| Oracle® Retail Merchandise Financial Planning Retail Cloud Service User Guide Release 19.0 F24873-03 |
|

 Previous |
 Next |
| Oracle® Retail Merchandise Financial Planning Retail Cloud Service User Guide Release 19.0 F24873-03 |
|
Previous |
Next |
MFP Setup is part of the MFP Maintenance Activity. In MFP Setup, the administrator will maintain basic application settings related to the planning calendar, local currency, and VAT.
The steps within the MFP Setup Task:
The History Mapping step is used by the administrator to map the weeks for last year and last last year (two years ago).
The History Mappings step contains one view, History Mapping.
When a new calendar year is loaded, these values are automatically populated for the new year by the weekly batch. Use this view to make any updates needed in week mapping to most accurately account for moving holidays, promotions, and also to set up 52 to 53 week mappings.
The last year's (Ly) mapping is used to identify which week to map to in order to Seed from Ly, and review Ly values in a workspace.
The last last year (Lly) is used to identify which week to map to for reviewing history from two years prior in a workspace.
|
Note: A week can be mapped to more than one Ly or Lly week to account for 53 week years. Separate weeks with a comma. If more than one week needs to be assigned, then those week positions should be separated with a space. Those week positions data will then be aggregated. |
Table 4-1 History Mapping View Measures
| Measure | Description |
|---|---|
|
Lag Ly |
Identifies the week used for mapping as adjusted last year. |
|
Lag Lly |
Identifies the week that is being used for mapping as last last year (two years ago). |
|
Week ID |
Identifies the internal week position for the current week for reference. This is useful for copying week positions when manually setting Lag Ly and Lag Lly. |
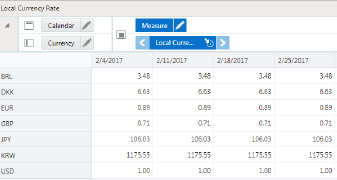
The Local Currency step provides support for administering the local currency configuration. This view is only available when the provision option with local currency is implemented.
The Local Currency step contains two views:
Within this view, you set the local currency conversion rate for each Channel by Week. The conversion rate is set in relation to the sales currency, often the corporate currency.
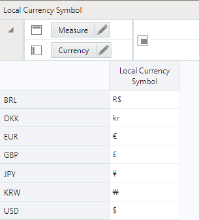
Within this view, the planning administrator sets the local currency symbol for each channel. This currency symbol can be included as the Location attribute in all Local Currency views.
For example, in Figure 4-3 the BRA Brick & Mortar channel has R$ as its local currency symbol, which indicates that local currency values for this channel are in Brazilian Real. All local currency BRA Brick & Mortar monetary values are displayed with R$.
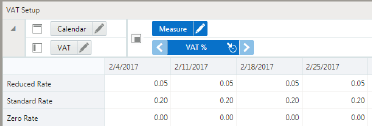
The VAT Setup step allows a planning administrator to enter the Value Added Tax (VAT) rate for each subclass by week.
The VAT Setup step contains a single view, VAT Setup.
In this view, the planning administrator inputs the VAT% (sales) and VAT C % (cost rate).
When planning sales retail, the VAT% rate is applied to gross sales and then returns are subtracted to calculate net sales. If no VAT% rate is planned, then net sales are simply determined as gross sales less returns.
VAT Rate% is stored at Week/Subclass/Channel.
Table 4-4 VAT Setup View Measures
| Measure | Description |
|---|---|
|
VAT% |
The default Value Added Tax (VAT) rate percentage applied to sales. This value should be set if there are taxes that are applied to the sale of goods. |
|
VAT C % |
The Value Added Tax rate percentage for the cost of goods. This value should be set if there are taxes that are applied on the purchase of goods. |
The Manage Batch step provides the ability to control the integration source for merchandise foundation data, as well as which periods and positions are included when plans are exported. The values set in this step are employed in batch (along with corresponding Approved/Submitted/Seeded Info measures) to set export flags for all the plan versions that are exportable from MFP Retail Cloud Service:
Merch Plan Current Plan (MP Cp)
Merch Plan Original Plan (MP Op)
Merch Plan Waiting for Approval Plan (MP Wa)
Merch Plan Working Plan (MP Wp)
Location Plan Current Plan (LP Cp)
Location Plan Original Plan (LP Op)
Location Plan Working Plan (LP Wp)
Merch Targets Target (MT Tgt)
Merch Targets Working Plan (MT Wp)
Location Targets Target (LT Tgt)
Location Targets Working Plan (LT Wp)
The planner or administrator indicates whether elapsed periods should be included and which positions should be exported in the following two views:
Within this view, the business system administrator or system administrator designates whether or not elapsed periods should be included when exporting plan data. The system administrator will also designate whether or not Oracle Retail Merchandising Foundation Cloud Service is integrated with MFP CS.
Table 4-5 Manage Batch View Measures
| Measure | Description |
|---|---|
|
Enable RMF CS Integration |
This flag controls whether or not additional batch processes run to format RMF CS data into load-ready format. Set this value to True when integrating with RMF CS. |
|
Export Elapsed Periods |
When selected, this flag indicates that data for the elapsed periods must be exported. By default, this value is unchecked, meaning that only data for unelapsed periods will be included in the exported plan data. |
|
Batch Uses BDI |
This setting is enabled if batch is configured to use Bulk Data Integration. |
|
Batch Uses PDS |
This flag is informational. It is set automatically in batch if batch is configured to read/write to the Planning Data Store (PDS). |
|
Enable Daily Exports |
If you have extended the MFP solution, this flag enables you to turn off the standard daily exports in favor of your solution-specific configured exports. |
|
Enable Weekly Exports |
If you have extended the MFP solution, this flag enables you to turn off the standard weekly exports in favor of your solution-specific configured exports. |
Within this view, the planning administrator selects the positions that will be included when exporting plan data for all versions.
Table 4-6 Manage Export View Measure
| Measure | Description |
|---|---|
|
Export Mask |
Allows the user to control which positions are exported for all plan versions. When selected, the Department/Channel/Half is included when exporting plan data. By default, this Boolean is checked for all positions. If the user wants to exclude any Department/Channel/Half from exporting, the user must un-check this Boolean. |
The export flags are set based on Export Mask and Approved or Submitted Info for Approved or Submitted Plans and Seeded Info for Working Plans.
The Forecast Setup step is used by the administrator to map the type of forecast for Pre-season and In-season.
The Forecast Setup step contains one view, Forecast Setup View.
In this view the planning administrator selects the type of forecast for Pre-season method and In-season method at department or channel level.
Administrators can select any of the following forecast options for the Pre-season forecast method:
Auto ES
Simple
Holt
Winters
Average
No Forecast
Croston
M Winters
A Winters
Simple Croston
For the In-Season forecast, the previous forecast methods plus the Bayesian method are available.
By default the Pre-season method is set using the Auto-ES forecast method and the In-season method is set using the Bayesian forecast method.