| Oracle® Retail Merchandise Financial Planning Cloud Service and Oracle® Retail Merchandise Financial Planning Enterprise Edition Cloud Service Administration Guide Release 18.0 F10753-05 |
|

 Previous |
| Oracle® Retail Merchandise Financial Planning Cloud Service and Oracle® Retail Merchandise Financial Planning Enterprise Edition Cloud Service Administration Guide Release 18.0 F10753-05 |
|
Previous |
This appendix describes the process for managing users and roles with Oracle Identity Management (OIM). The Administrator can create users and assign the level of access as needed. This appendix describes how to create/modify/delete a user and assign roles to a user.
If your Merchandise Financial Planning Cloud Service is configured with Oracle Identity Management (OIM) for managing users and access, follow the instructions in this appendix.
In order to provide application access to end users, the Cloud Service Administrator needs to create the user's account from OIM. Follow the steps in "OIM User Creation."
To complete the user provisioning activity, the same user name must be added in the Merchandise Financial Planning Cloud Service application and assigned to a necessary group.
MFP Cloud Service is built with role-based access. Permissions are associated with roles. Table 3-1 lists the available roles.
The Administrator can assign the above role or roles to the user. Follow the steps in "Assigning Members to a Role."
For detailed information on the tasks related to user and role, see the following sections:
This section describes how to maintain users through OIM.
Before users can access the Oracle Retail Merchandise Financial Planning Cloud Service, it is necessary to provision access to the system for each user and to assign roles to each user to control what functionality will be available to the user. The access provisioning is done using OIM. Once user creation is done in OIM, the same user needs to be added in the Merchandise Financial Planning Cloud Service.
|
Note: The OIM Application URL and the login with the required administrator access are needed to perform the following steps. The welcome email sent by Oracle includes the URL. |
The following steps explain how to define users, assign roles, and revoke access for users:
Log in to the OIM application.
Click Manage Administration.
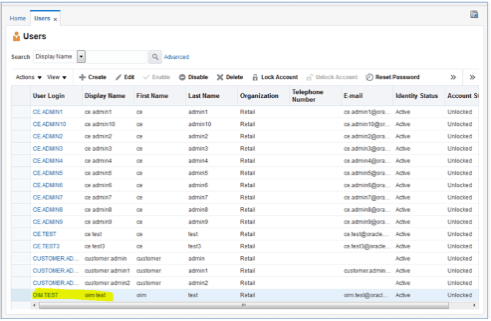
Click Users.
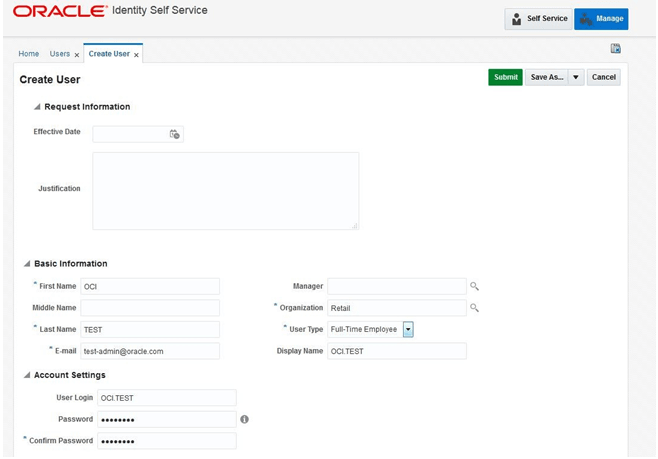
Under Actions, click Create. The Create User screen appears.
Under Basic Information, enter the following:
First Name
Last Name
For Organization, enter Retail
For User, enter Full Time Employee
E-mail: E-mail address of employee
Under Account Settings, enter:
User Login: <firstname>.<lastname>
|
Note: Oracle recommends that the User Login be entered in upper case. |
Password
Confirm Password
|
Note: If two employees have the same first name and last name or if you want to reuse the user login of a user that was deleted earlier, use the middle name initial in between the user login. For example: <firstname>.x.<lastname> |
Click Submit.
|
Note: The new user will not be able to log in to the application after Step 7. To fully complete the user creation, the same user needs to be added in the Merchandise Financial Planning Cloud Service as well. See Step 8. |
To complete the user creation, follow the steps for adding a user in the User Maintenance chapter of the Oracle Retail Predictive Application Server Cloud Edition Administration Guide.
|
Note: The user name created in RPAS must exactly match the original case of the User Login entered in Step 6. |
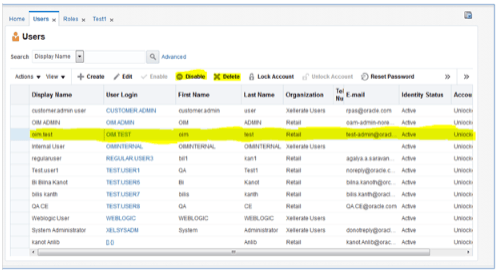
OIM provides the Administrator a choice to delete or disable a non-active user. Delete will permanently delete all the details of the user, while disable will keep the entry of the user available, only barring its access rights.
To delete or disable a user:
Log in to the OIM application.
Under Administration, click Users.
Select the user and click Disable or Delete as necessary.
Locking or unlocking a particular user can also be done from this same screen if needed.
The same user also needs to be deleted from the MFP CS application. This will keep OIM and the application synchronized. Complete the user deletion by following the steps for deleting a user in the User Maintenance chapter of the Oracle Retail Predictive Application Server Cloud Edition Administration Guide.
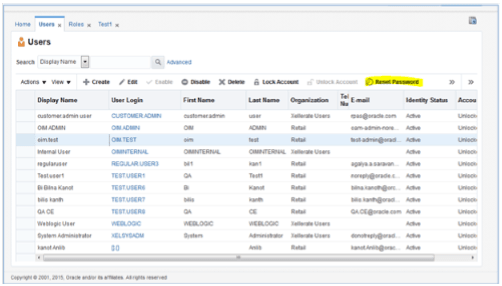
To reset the password of a user:
Log in to the OIM application.
Under Administration, click Users.
Click the Search tab and then select the user for which you want to reset the password.
Click Reset Password.
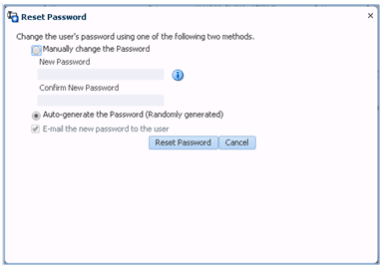
In the Reset Password screen, make sure Auto-generate the Password is selected and click Reset Password. The system auto-generates the password and sends an email to the user.
If you want to set the password manually, click Manually Change the Password, update the new password, and then click Reset Password.
To complete the password reset, follow the steps for editing a user in the User Maintenance chapter of the Oracle Retail Predictive Application Server Cloud Edition Administration Guide. This will keep OIM and the application synchronized.
This section describes how to maintain roles through OIM.
To assign members to a role:
Log in to the OIM application.
Click Users.
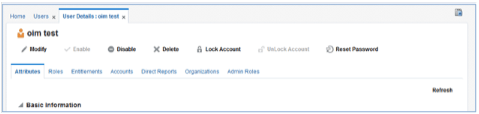
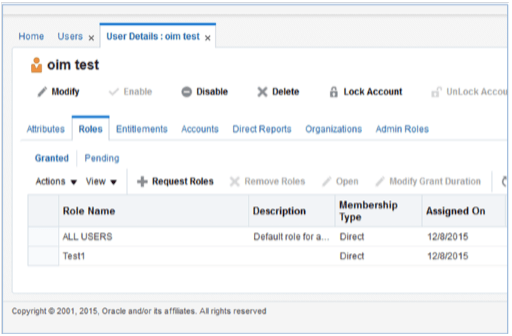
Click the user you want to select. In this example, oim.test is used.
The User Details screen appears. Click the Roles tab.
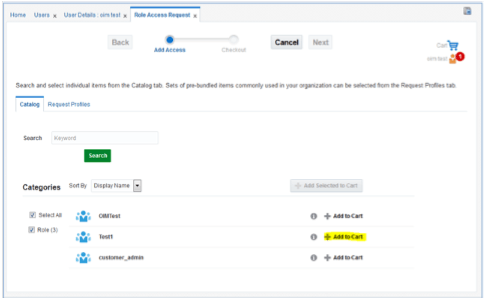
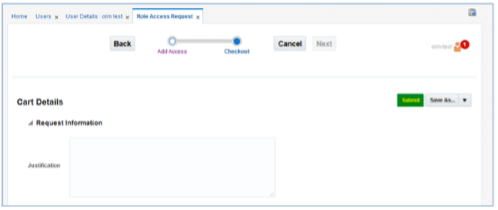
Click Request Roles.
Figure A-10 Roles Screen Request Roles List
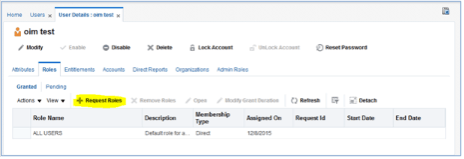
Click Add to Cart next to the role to assign.
Click Next.
Click Submit.
The role is assigned to the user.
On the User Details screen, click Refresh.
The assigned role is displayed.
|
Note: The Administrator needs to assign a similar User Group to the specific user in the MFP CS application domain as well to complete the role assignment.For more information on User and User Group, see the information on adding a user and adding a user group in the User Maintenance chapter of the Oracle Retail Predictive Application Server Cloud Edition Administration Guide. |
To revoke the membership of a member in a role:
Log in to the OIM application.
Click Users.
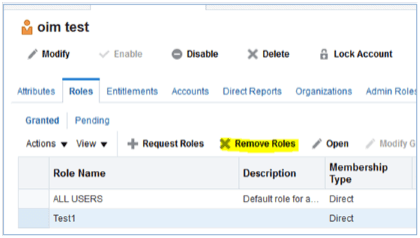
Click the user you want to select. In this example, oim.test is used.
The User Details screen appears. Click the Roles tab.
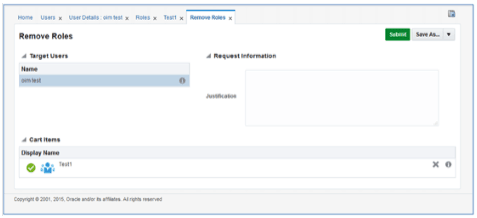
Select the role you want to revoke and click Remove Roles.
In the next section, click Submit.
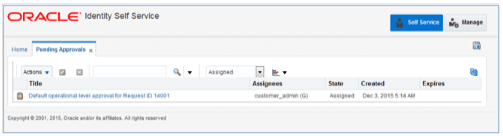
Users can also request roles that are available for the users to access the MFP Service (or ask to revoke them). To approve the request from a user:
Log in to the OIM application.
Click Pending Approvals.
Figure A-19 Identity Self Service Screen with Pending Approvals
Click the action assigned to you.
Click Claim.
Figure A-21 Pending Claim Summary Information
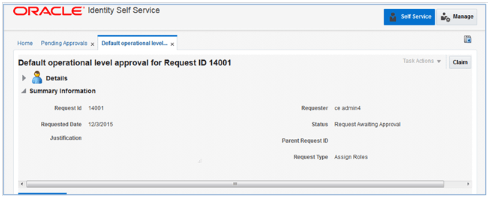
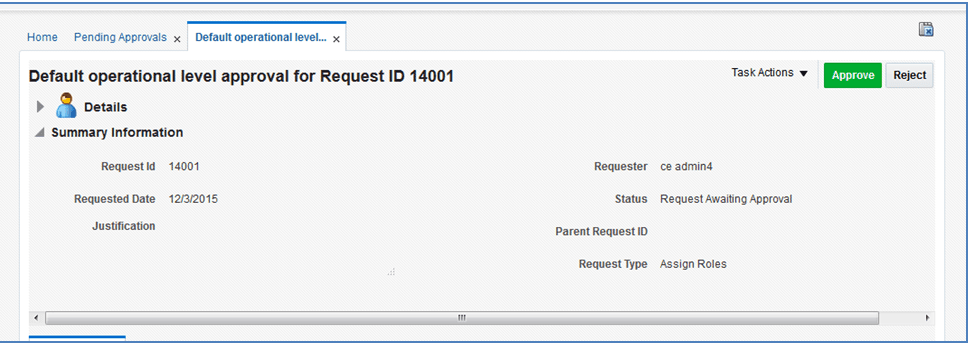
Click Approve or Reject. The request completes.
Figure A-22 Pending Approval Summary Information
Users can also request multiple roles that are available for the users to access the MFP Service (or ask to revoke them). To approve the request from a user:
Log in to the OIM application.
Click Pending Approvals.
Figure A-23 Identity Self Service Screen with Pending Approvals
Click the action assigned to you.
Click Claim.
Figure A-25 Pending Claim Summary Information
Click Approve or Reject.
Figure A-26 Pending Approval Summary Information
Once done, if approved, the request is split into multiple requests, one for each role for each user. Approve all of them by following Steps 3 to 5.
Once all the requests are approved, all the roles are assigned to the users.
|
Note: The Administrator can request multiple roles for multiple users. Once the request is made, the Administrator is required to approve the request using the Approve Requests from User for Multiple Roles process. |
This section describes how to maintain users through Oracle Support.
If a large number of users must be created, the Oracle team can bulk load the users into the OIM application. When users are bulk loaded, each initial password is set to the current password of a template user. The new users are required to change the password on their first login.
To request the creation of accounts by bulk loading:
Create a CSV file listing all users to create. Following is an example of this file.
##################
 filename.csv
###################
##########################################
USR_LOGIN,USR_FIRST_NAME,USR_LAST_NAME,USR_EMAIL,ORG_NAME
ce.admin1,ce,admin1,ce.admin1@oracle.com,Retail
ce.admin2,ce,admin2,ce.admin2@oracle.com,Retail
ce.admin3,ce,admin3,ce.admin3@oracle.com,Retail
ce.admin4,ce,admin4,ce.admin4@oracle.com,Retail
ce.admin5,ce,admin5,ce.admin5@oracle.com,Retail
ce.admin6,ce,admin6,ce.admin6@oracle.com,Retail
ce.admin7,ce,admin7,ce.admin7@oracle.com,Retail
ce.admin8,ce,admin8,ce.admin8@oracle.com,Retail
ce.admin9,ce,admin9,ce.admin9@oracle.com,Retail
ce.admin10,ce,admin10,ce.admin10@oracle.com,Retail
##########################################
Create or identify a user whose password will be used as the initial password for all the created users.
Open an SR with Oracle Support and provide the CSV file and user from Steps 1 and 2. For more information, see "Oracle Support."
|
Note: The new user will not be able to log in to the application after Step 3. To fully complete the user creation, the same user needs to be added in the MFP CS application as well. To complete the user creation, see Step 4. |
To complete the user creation, follow the steps for adding a user in the User Maintenance chapter of the Oracle Retail Predictive Application Server Cloud Edition Administration Guide.
|
Note: The user name created in RPAS must exactly match the original case of the User Login entered in Step 1. |
This section describes how to maintain roles through Oracle Support.
If a considerable number of users need to have roles to be assigned, the Oracle team can bulk update the role membership into the OIM application. However, Oracle recommends that a customer administrator use the Identity Management application to do these assignments.
To update the membership by bulk update:
Create a CSV file with the user role mapping. Note that the user name must be in upper case. See the following example:
##################
 role.csv
###################
##########################################
UGP_NAME,USR_LOGIN
Role1,CE.ADMIN1
Role1,CE.ADMIN2
Role3,CE.ADMIN3
Role4,CE.ADMIN4
Role5,CE.ADMIN5
Role6,CE.ADMIN6
Role7,CE.ADMIN7
Role8,CE.ADMIN8
Role2,CE.ADMIN8
Role2,CE.ADMIN9
##########################################
Open an SR with Oracle Support and provide the CSV file and user name from Step 1.
|
Note: If more than one role is to be attached to a particular user, add one more row with the role that the user is to have and the user name. Refer to the CE.ADMIN8 in the above example. The CE.ADMIN8 has both Role 8 and Role 2. |