3 Oracle OpenScript Tutorial
This tutorial walks you through the main features of Oracle OpenScript. The tutorial consists of the following examples:
-
Starting the Avitek Medical Records Sample Application - explains how to start the sample Avitek Medical Records Server for use with this tutorial.
-
Starting Oracle OpenScript - describes how to start OpenScript.
-
Creating a Web Functional Test Script - describes how to create a Web Functional test script project and record a script.
-
Working with Scripts - explains the features of the OpenScript script tree and how to examine the structure and content of a recorded script.
-
Playing Back a Web Functional Test Script - explains the procedure for playing back Web Functional Test scripts that you have recorded and viewing the results.
-
Adding Tests to the Script - explains how to add tests to your OpenScript scripts.
-
Creating an HTTP Test Script - describe how to create an HTTP protocol load test script project and record a load test script.
-
Creating an HTTP Test Script with Databanks - describe how to create an HTTP protocol load test script project and explains how to configure and use Databanks to run iterative tests on a login form using data from an external file.
-
Stopping the Avitek Medical Records Server - explains how to stop the sample Avitek Medical Records Server used with this tutorial.
The tutorial is designed to be followed sequentially from beginning to end. Many of the examples are interrelated and build upon the steps in previous examples.
3.1 Starting the Avitek Medical Records Sample Application
The tutorial uses the Avitek Medical Records Sample Application to record and playback OpenScript scripts. The WebLogic server and Avitek Medical Records Sample Application need to be started on the system before creating OpenScript script projects and recording scripts.
To start the Weblogic Server and Avitek Medical Records Sample Application:
-
Select Programs from the Start menu and then select Sample from the Oracle Application Testing Suite menu.
-
Select Start MedRec Application.
-
Wait until the Avitek Medical Records Sample Application starts in the Weblogic server.
-
Close the browser window after the server and sample application are started. When recording OpenScript scripts, the browser window will automatically open again to specify the Web address to record.
3.2 Starting Oracle OpenScript
To start OpenScript:
-
Select Programs from the Start menu, then select OpenScript from the Oracle Application Testing Suite Start menu.
3.3 Example 1: Creating a Web Functional Test Script
This example illustrates the creation of an OpenScript Web Functional test script project and recording a script. A script project creates the basic structure of an OpenScript script. Initially, the script project includes only the Initialize, Run, and Finish script nodes with the underlying Java code. You use the recording capabilities of OpenScript to record page navigations and generate the Java code for the script.
3.3.1 Creating a Web Functional Test Script Project
To create a Web Functional Test Script Project:
-
Select New from the File menu.
-
Select Web under the Functional Testing (Browser/GUI Automation) folder.
-
Click Next.
-
Make sure the Repository is set to Default.
-
Enter WebTutor as the script name.
-
Click Finish. OpenScript creates the script project and shows the Initialize, Run, and Finish nodes in the Script View as follows:
Figure 3-1 OpenScript Script Project Tree

Description of "Figure 3-1 OpenScript Script Project Tree"
3.3.2 Recording a Web Functional Test Script
Recording scripts captures the page navigations and generates the Java code that will be used to drive script playback for testing purposes. Web Functional test scripts record and playback actions performed on browser objects.
In this example, we will open the Avitek Medical Records sample application and log in as a patient. During recording, we will add a Text Matching test to verify that the log in was successful.
To record a Web Functional Test Script:
-
Select Record from the Script menu or click the Record toolbar button. OpenScript opens a browser window and the OpenScript toolbar window.
-
Enter
http://<machineName>:7011/medrec/into the browser Address line and press Enter. -
When the application loads, click Start using MedRec!. A second browser window opens with Avitek Medical Records Sample Application.
-
Click Login under the Patient section.
-
Enter
fred@golf.comas the Email address. -
Enter
weblogicas the password. -
Click Submit.
-
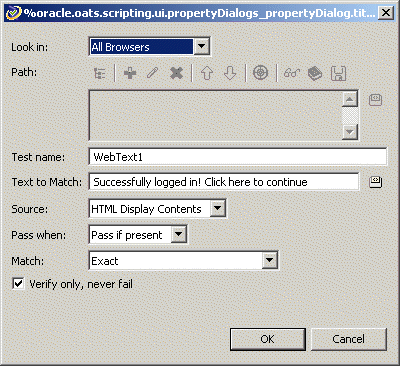
Click the Text Matching Test button on the OpenScript floating toolbar.
-
Enter
WebText1as the Test name. -
Enter
Successfully logged in! Click here to continueas the Text to Match. -
Make sure Source is set to HTML Display Contents.
-
Make sure Pass when is set to Pass if present.
-
Make sure Match is set to Exact.
-
Make sure Verify only, never fail is selected.
-
Click OK.
-
Click Successfully logged in! Click here to continue.
-
Click Logout in the Avitek Medical Records application.
-
Close the Avitek Medical Records application browser window.
-
Close the Weblogic Server Avitek Medical Records Sample Application browser window.
Recording automatically stops when you close the second browser window. The script tree view includes plus icons to indicate additional nodes have been added to the script as follows:
Figure 3-2 OpenScript Script Tree After Recording

Description of "Figure 3-2 OpenScript Script Tree After Recording"
-
Save the script.
3.4 Example 2: Working with Scripts
This example explains the features of the OpenScript Script tree and how to examine the structure and content of a recorded script.
After recording a script, you can expand the Tree View to view the page navigations, actions, and parameters recorded to the script. Before starting this example, make sure the script that you recorded in Example 1 is still displayed.
3.4.1 Viewing Information About Script Items
To view information about script items:
-
Expand the Initialize section to expand the tree as follows:
Figure 3-3 Script Tree with Expanded Initialize Section

Description of "Figure 3-3 Script Tree with Expanded Initialize Section"
The Initialize section executes commands that will be run only once at the beginning of script playback. In our recorded script, Launch Browser is the only action in the Initialize section.
-
Expand the Run section to expand the tree as follows:
Figure 3-4 Script Tree with Expanded Run Section

Description of "Figure 3-4 Script Tree with Expanded Run Section"
The Run node contains the navigations recorded to the script as Step Groups. By default, OpenScript Web Functional test scripts create Step Group nodes based on web page navigations. Step Group preferences can be changed in the OpenScript Preferences.
-
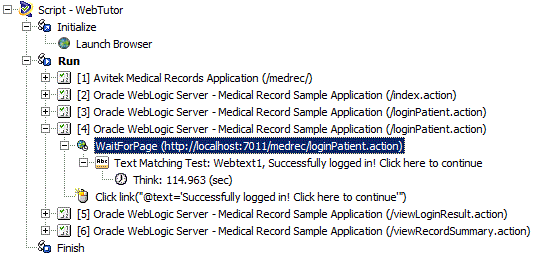
Expand the [4] (/loginPatient.action) Step Group and select the WaitForPage (http://systemName:7011/medrec/loginPatient.action) node as follows:
Figure 3-5 Script Tree with Expanded Step Group Node
Description of "Figure 3-5 Script Tree with Expanded Step Group Node"
The Step Group node shows the actions and parameters recorded for specific navigations and actions on a Web page.
The Details View tabs show the details for a specific navigation including a screen shot of the recorded page, the HTML source, and the browser rendering of the page.
-
Click the Screenshot, HTML, and Browser tabs to view the script details.
-
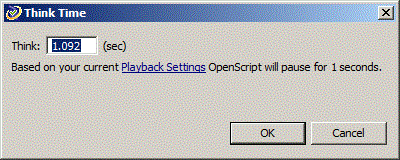
Expand the WaitForPage (http://systemName:7011/medrec/loginPatient.action) node. The script records Think time nodes to include the amount of user delay that occurred during recording as follows:
-
Select the Think node, click the right mouse button and select Properties. The Think time properties lets you edit the delay recorded to a script as follows:
-
Change the Think time value and click OK. This is useful if you want to reduce long a delay time that may have occurred during recording of script.
-
Right-click the Text Matching Test: Web Text node and select Properties. You can view or change the Text Matching test properties as follows:
-
Click Cancel to leave the Text Matching test properties unchanged.
-
Open and view the properties of other script nodes.
3.4.2 Using the Java Code View
When you create a script project and record a script, the Java code is automatically generated. The Java Code view shows the script navigations and data as Java programming code. The Java Code view corresponds to the Tree View. Any changes in the Code View will be automatically updated in the Tree View. The Java Code view has the following standard procedures:
-
initialize()- corresponds to the Initialize node of the Tree View and executes any custom code added once at the beginning of script playback. -
run()- corresponds to the Run node of the Tree View and executes recorded and custom code one or more times during script playback depending upon databanks or other custom programming. -
finish()- corresponds to the Finish node of the Tree View and executes any custom code added once at the end of script playback.
Use Ctrl-space to open an Intellisense window listing available procedures. See the API Reference in the OpenScript Platform Reference help for additional programming information.
3.5 Example 3: Playing Back a Web Functional Test Script
This example explains the procedure for playing back Web Functional Test scripts that you have recorded. It also shows the results log. Web Functional Test scripts perform actions on browser objects. During playback, the browser will open and you will be able to watch as script actions occur.
To play back an OpenScript script:
-
Select Playback from the Script menu or click the Playback toolbar button to play back the recorded script. The navigations and actions in the script Step Groups will be played back in the order recorded. The Browser navigates to each page, executes the any tests for each page, and shows the results in the Result view.
-
When playback finishes, expand the Results tree to view the results for each Step Group as follows:
Figure 3-9 Script Playback Results in the Results View

Description of "Figure 3-9 Script Playback Results in the Results View"
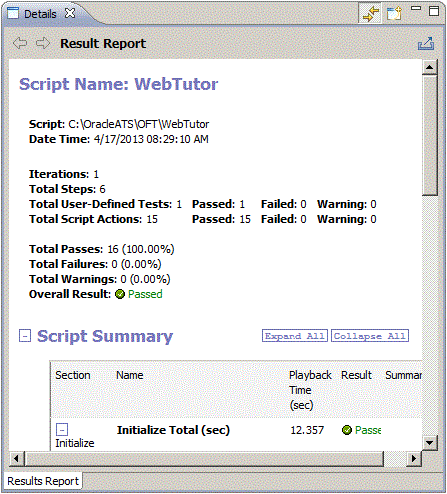
The "passed" results indicate that all referenced resources are available. Oracle OpenScript automatically generates a results report and opens the report in the Details view.
-
Select the top-level Result node or the script name in the Results view to view the results report in the Details view as follows:
Figure 3-10 Results Report in the Details View
Description of "Figure 3-10 Results Report in the Details View"
Notice that all tests passed. This is because you played back the script using the same version of the Web pages that was used to record the script. This establishes a baseline of tests for the Web application or Web site's content and structure.
-
Expand the Run node in the Results view then expand the results for Step Group [4] (/loginPatient.action).
-
Select the WaitForPage node under [4] (/loginPatient.action). The Details view shows the results for the specific Step Group.
-
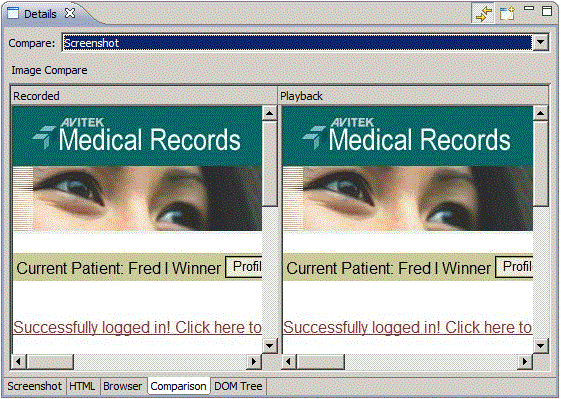
Click the Comparison tab in the Details view. The Comparison tab lets you compare the recorded HTML content, screenshots, and browser renderings of page navigations to the play back values as follows:
Figure 3-11 Details View Showing the Web Functional Test Comparison Tab
Description of "Figure 3-11 Details View Showing the Web Functional Test Comparison Tab"
-
Select the Content and Browser options in the Compare list to compare the recorded and playback HTML source and browser renderings of the page.
3.6 Example 4: Adding Tests to the Script
This example explains how to add tests to your OpenScript scripts. Make sure the script you recorded in the previous example is open in OpenScript.
OpenScript provides the ability to add the following test types to the pages in your Web Functional test script:
-
Text Matching Test
-
Server Response Test
-
Object Test
-
Table Test
Other OpenScript test modules provide test types specific to the type of module.
3.6.1 Inserting a Server Response Test Case
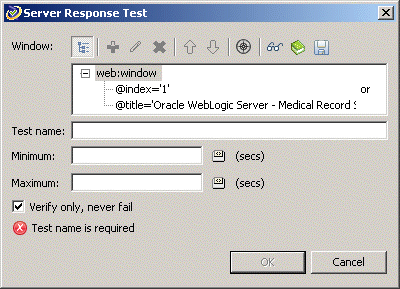
Server Response test cases measure the response time of a server access for a page in the script.
To add a Server Response test:
-
Expand the [2] (/medrec/) Step Group in the script tree.
-
Select the WaitForPage (http://systemName:7011/medrec/index.action) node.
-
Select Add from the Script menu, then select Other.
-
Expand the Web Tests folder, select Server Response Test, and click OK. OpenScript opens the Server Response Test properties dialog box as follows:
Figure 3-12 Server Response Test Properties Dialog Box
Description of "Figure 3-12 Server Response Test Properties Dialog Box"
-
Type WebTimer1 as the test case name.
-
Click OK and view the test in the script. OpenScript adds the test to the Step Group as follows:
Figure 3-13 Server Response Test Added to the Script Tree

Description of "Figure 3-13 Server Response Test Added to the Script Tree"
3.6.2 Inserting a Table Test
Table test cases let you define a custom test on a Web page table object. The Table Test properties lets you select the table object directly from the Web page by highlighting it with the mouse. The properties also let you specify the table object property to test and the type of test to perform.
To add a Table test:
-
Expand the [5] (/viewLoginResult.action) Step Group in the script tree.
-
Select the WaitForPage (http://systemName:7011/medrec/patient/viewLoginResult.action) node.
-
Select Add from the Script menu, then select Other.
-
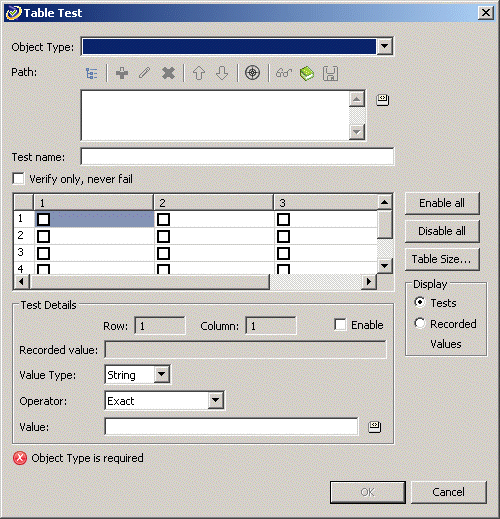
Expand the Web Tests folder, select Table Test, and click OK. OpenScript opens the Table Test properties dialog box as follows:
Figure 3-14 Table Test Properties Dialog Box
Description of "Figure 3-14 Table Test Properties Dialog Box"
-
Click the select Capture object in browser button next to the Path field and select Capture Object from the menu. The capture mode starts.
-
Open the Medical Records Sample Application (http://systemName:7011/medrec/) in the browser window (which should still be open from the previous example).
-
Click Start using MedRec! to navigate to the page with the table data.
-
Click Login under the Patient section.
-
Enter
fred@golf.comas the Email address. -
Enter
weblogicas the password. -
Click Submit.
-
Click Successfully logged in! Click here to continue.
-
Move the mouse over the Prescriptions table so that the table is highlighted.
-
Press F10 to capture the object path in the Select Object dialog box.
-
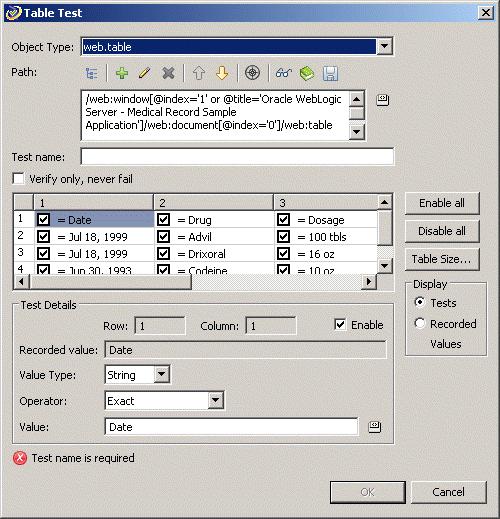
Click OK. The object path for the Medical Records Sample Application web page table is added to the Table Test properties as follows:
Figure 3-15 Table Test Properties Dialog Box with Captured Data
Description of "Figure 3-15 Table Test Properties Dialog Box with Captured Data"
The Table Test properties lets you enable or disable testing for each table cell individually. The Test Details section shows the details for the currently selected table cell.
-
Clear the check boxes for all of the data items in rows 2, 3, and 4 (scroll the table as necessary). This will perform the testing on heading rows but not the data rows.
-
Enter WebTable as the Test name.
-
Click OK and view the test in the script. OpenScript adds the test to the script [6] (/viewLoginResult.action) Step Group as follows:
Figure 3-16 Table Test Added to the Script Tree

Description of "Figure 3-16 Table Test Added to the Script Tree"
-
Save the script.
-
Close the Medical Records Sample Application browser windows.
-
Playback the script and verify that all tests pass.
-
Close the WebTutor script when finished.
3.7 Example 5: Creating an HTTP Test Script
This example explains how to create an HTTP test script project to use for load testing an application. HTTP test scripts record and playback navigations performed using the HTTP protocol. HTTP scripts are typically used for performing load tests on an application using the Oracle Load Testing application.
3.7.1 Creating an HTTP Script Project
To create an HTTP script project:
-
Select New from the File menu.
-
Select Web/HTTP under the Load Testing (Protocol Automation) folder.
-
Click Next.
-
Make sure the Repository is set to Default.
-
Enter HTTPTutor1 as the script name.
-
Click Finish. OpenScript creates the script project and shows the Initialize, Run, and Finish nodes in the Script view.
3.7.2 Recording an HTTP Script
To record an HTTP script:
-
Select Record from the Script menu or click the Record toolbar button. OpenScript opens a browser window and the OpenScript toolbar window.
-
If asked if you want to clear the cache, click Yes.
-
Enter
http://<machineName>:7011/medrec/into the browser Address line and press Enter. -
When the application loads, click Start using MedRec!. A second browser window opens with Avitek Medical Records Sample Application.
-
Click Login under the Administrator section.
-
Enter
admin@avitek.comas the Email address. -
Enter
weblogicas the password. -
Click Submit.
-
Click View Pending Requests.
-
Click Logout in the Avitek Medical Records application.
-
Close the Avitek Medical Records application browser window.
-
Close the Weblogic Server Avitek Medical Records Sample Application browser window. Recording automatically stops.
-
Save the script.
-
Playback the script and verify there are no errors.
3.8 Example 6: Creating an HTTP Test Script with Databanks
This example explains how to create an HTTP test script and use a databank to drive testing. This example also explains one way to use the Databanks with the Text Matching test case to verify Login results pages. The Databanks provides the capability to run iterative tests using data from a Databank file.
3.8.1 Creating an HTTP Script Project
To create an HTTP script project:
-
Select New from the File menu.
-
Select Web/HTTP under the Load Testing (Protocol Automation) folder.
-
Click Next.
-
Make sure the Repository is set to Default.
-
Enter HTTPTutor2 as the script name.
-
Click Finish. OpenScript creates the script project and shows the Initialize, Run, and Finish nodes in the Script view.
3.8.2 Recording an HTTP Script
To record an HTTP script:
-
Select Record from the Script menu or click the Record toolbar button. OpenScript opens a browser window and the OpenScript toolbar window.
-
Reload the Medical Records Sample Application (http://systemName:7011/medrec/) in the browser window.
-
When the application loads, click Start using MedRec!. A second browser window opens with Avitek Medical Records Sample Application.
-
Click Login under the Patient section.
-
Enter
fred@golf.comas the Email address. -
Enter
weblogicas the password. -
Click Submit.
-
Click Successfully logged in! Click here to continue.
-
Click Logout in the Avitek Medical Records application.
-
Close the Avitek Medical Records application browser window.
-
Close the Weblogic Server Avitek Medical Records Sample Application browser window. Recording automatically stops.
3.8.3 Viewing the Parameters in the Script
To view the script parameters:
-
Expand the [4] Oracle WebLogic Server - Medical Record Sample Application Step Group in the script tree. Notice the parameters under the Post Data node of the tree as follows:
Figure 3-17 Script Parameter Values for HTTP Post Data

Description of "Figure 3-17 Script Parameter Values for HTTP Post Data"
The usernameInput and passwordInput parameters can be mapped to a databank file to pass data from an external file.
3.8.4 Configuring Databanks with OpenScript Scripts
Before you can map parameters to databank, you must configure the script with the databank file.
To configure a databank in OpenScript scripts:
-
Open or create a Script project.
-
Select the Assets tab.
-
Select Databanks.
-
Click Add.
-
Select CSV file.
-
Select the Default Repository from the My Repositories tree.
Note:
If necessary, copy the sample databank files from C:\<installdir>\openScript\SampleFiles\DataBank to the default repository (C:\<installdir>\OFT). -
Select the
avitek.csvdatabank file from the DataBank repository folder. -
Enter an alias name to use for the Databank or leave the default alias name. The default alias name is the name of the .CSV Databank file.
-
Click OK to add the Databank file.
-
Click the Tree View tab.
Databank files are comma-separated value files. The field names are on the first line of the file separated by commas (no spaces). The field data is on subsequent lines separated by commas (different line for each record, no spaces around commas). The following shows an example:
FirstName,LastName,Mail,Phone
John,Smith,JohnS@company.com,x993
Mary,Ellen,MaryE@company.com,x742
If a data value contains a comma, place quotation marks around the value, as follows:
John,Smith,"Anytown, MA","(603) 993-0000"
3.8.5 Getting Databank Records
To get Databank records to use with a script:
-
Open or create a script project.
-
Configure the Databank to use with a script in the Assets tab.
-
Select the Initialize node.
-
Select the Script menu and then select Other from the Add sub menu.
-
Expand the General node and select Get Next Databank Record.
-
Click OK.
-
Select the Databank
avitekalias to specify the Databank file to get the record from. -
Click OK. A GetNextDatabankRecord: databank alias node will be added to the script.
In the Java Code view, the
getDatabank("databank alias").getNextDataBankRecord()method will be added to the script code:getDatabank("avitek").getNextDatabankRecord();
3.8.6 Mapping Script Parameters to Databank Fields
After configuring a databank in a script, you can map the databank fields to specific script parameters.
To map databank fields to script parameters:
-
Expand the [4] Oracle WebLogic Server - Medical Record Sample Application script tree node.
-
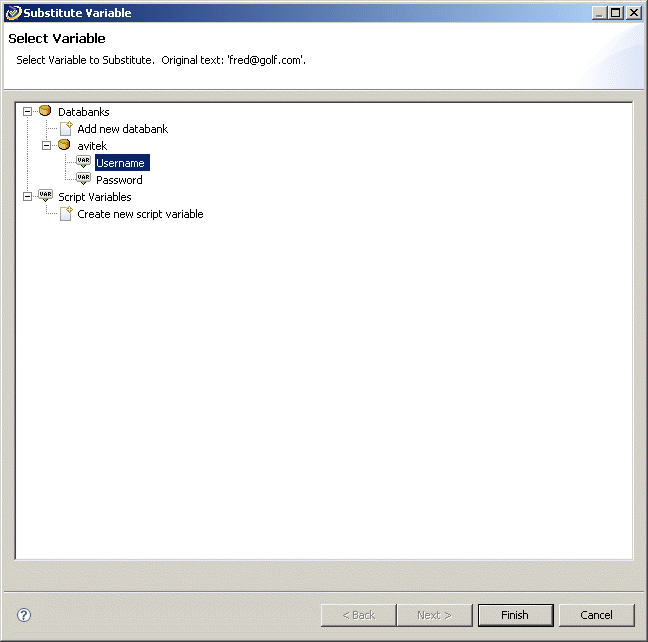
Right-click the
usernameInputparameter and select Substitute Variable. The Substitute Variable window opens with the databank field names listed as follows: -
Select the Username field and click Finish. The parameter value changes to a databank variable in double braces{{db.avitek.Username,fred#@golf.com}} as follows:
Figure 3-19 Script Parameter with a Mapped Databank Variable

Description of "Figure 3-19 Script Parameter with a Mapped Databank Variable"
-
Right-click the
passwordInputparameter and select Substitute Variable. The Substitute Variable window opens with the databank field names listed. -
Select the Password field and click Finish. The parameter value changes to a databank variable in double braces{{db.avitek.Password,weblogic}} as follows:
Figure 3-20 Script Parameters with Multiple Mapped Databank Variables

Description of "Figure 3-20 Script Parameters with Multiple Mapped Databank Variables"
-
Save the script.
3.8.7 Inserting a Text Matching Test
Now we want to insert a Text Matching text case that verifies that the login results were successful.
-
Select the Submit form ("@id='j_id_id3") node under the [4] Oracle WebLogic Server - Medical Record Sample Application script tree node. The page appears in the Details view.
-
Select Add from the Script menu then select Other.
-
Select Text Matching Test in the HTTP Tests folder and click OK.
-
Enter HTTPMatch as the test name.
-
Enter
Successfully logged in! Click here to continueas the Text to Match. -
Make sure the Source options is HTML Display Contents.
-
Make sure the Pass When option is Pass if Present.
-
Make sure the Match option is Exact.
-
Click OK. The Text Matching test node appears in the script tree at the end of the Step Group as follows:
Figure 3-21 Script Tree with a Text Matching Test Node

Description of "Figure 3-21 Script Tree with a Text Matching Test Node"
-
Save the script.
3.8.8 Playing Back the Script with Iterations
Now that the script has a databank mapped to the Post Data parameters, we can play back the script with multiple iterations to use all of the values in the databank file.
To play back the script with iterations:
-
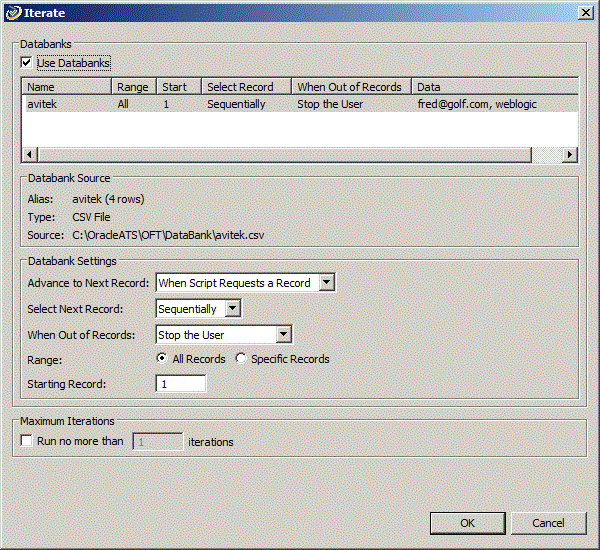
Select Iterate from the Script menu. The Iterations dialog box opens as follows:
-
Make sure Range is set to All Records.
-
Make sure the Starting Record is set to 1.
-
Make sure the Run no more than [] iterations is selected and set to 1.
-
Click the OK button to playback the script with multiple iterations.
-
Watch the Details view as the script plays back the script several times using a different data value for the login each time.
-
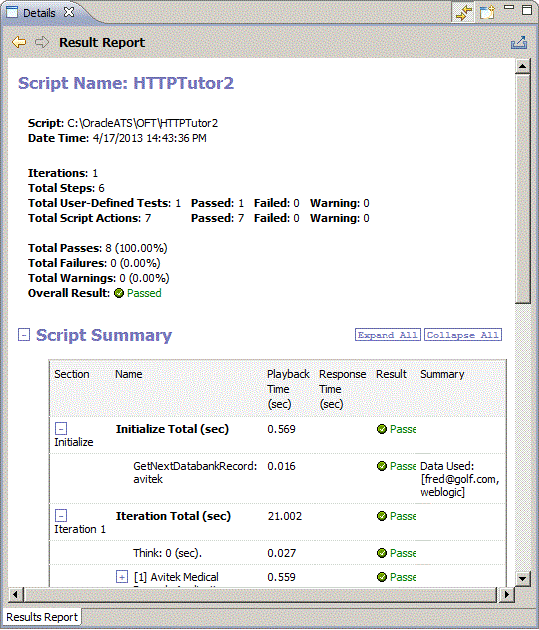
View the playback results in the Results view. At the end of playback the Details view shows the results report similar to the following:
Figure 3-23 Results Report for Multiple Iterations
Description of "Figure 3-23 Results Report for Multiple Iterations"
-
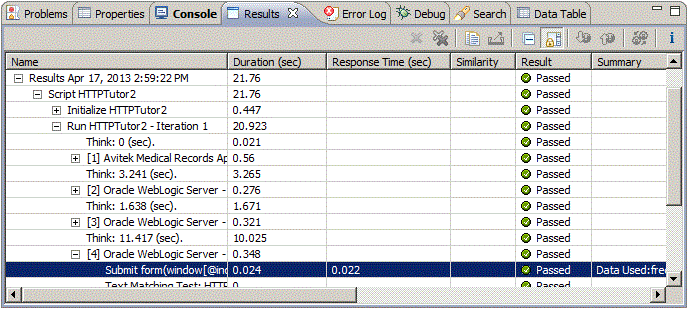
Scroll the Results view and select one of the HTTP navigation nodes such as Submit form(window[@index='1']//form[((@id='j_id_id3' and @name='j_id_id3')[...].
Figure 3-24 Results View with Navigation Node Selected
Description of "Figure 3-24 Results View with Navigation Node Selected"
-
Click the tabs in the Details view. The Comparison tab for HTTP scripts lets you compare the recorded HTML content, Request Headers, Response Headers, and Cookies to the playback values as follows:
Figure 3-25 Details View Showing the HTTP Test Comparison Tab
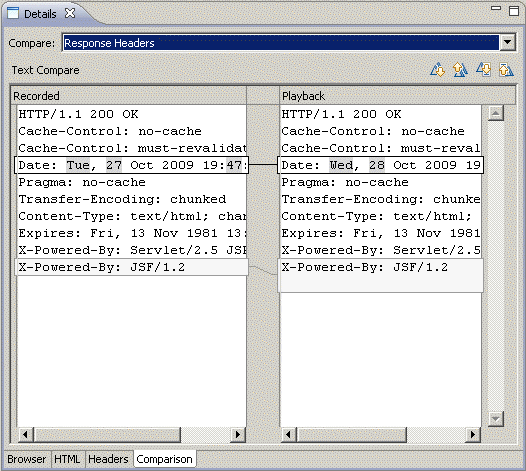
Description of "Figure 3-25 Details View Showing the HTTP Test Comparison Tab"
-
This completes the OpenScript tutorial. Save the script and close the OpenScript application.
3.9 Stopping the Avitek Medical Records Server
When finished with the tutorial be sure to stop the sample Medical Records Server. If you want to try using scripts recorded against the sample Medical Records Server application in Oracle Load Testing or Oracle Test Manager tutorials, leave the Avitek Medical Records Server running until after completing those trials.
To stop the Weblogic Server and Avitek Medical Records Server:
-
Select Programs from the Start menu and then select Sample from the Oracle Application Testing Suite menu.
-
Select Stop MedRec Application.
-
Wait until the Weblogic server stops.
-
Close the command windows after the server stops.
