| Oracle® Retail Assortment & Item Planning for Fashion/Softlines Cloud Service User Guide Release 19.0 F24864-08 |
|

 Previous |
 Next |
| Oracle® Retail Assortment & Item Planning for Fashion/Softlines Cloud Service User Guide Release 19.0 F24864-08 |
|
Previous |
Next |
The Assortment Period Maintenance task is used to assign weeks to Assortment Periods and assign location clusters to Assortment Periods, assigning the flows, mapping the last assortment weeks, as well as analyzing the locations by clusters, and viewing the assortment periods by calendar.
The typical user of the Assortment Maintenance task is an assortment planner who has business knowledge of which location clusters should be assigned to which Assortment Periods and which weeks should be assigned to each Assortment Period.Users can define how many flows should be present in each of these assortment periods in order to plan a fresh set of merchandise to go on the floor every few weeks to keep the collections fresh and interesting for the consumers.
Approved location clusters
The high-level steps to complete this process:
Assign weeks to Assortment Periods.
Assign a maximum initial receipt lead time.
Assign a cluster version to an Assortment Period.
Define flows.
Map last assortment weeks.
View Assortment Periods by calendar.
View clusters by location.
To create the Assortment Maintenance segment:
Click Assortment Services in the Task menu. Then, click the Planning Administration activity and then the Assortment Period Maintenance task.
The dialog to create New Plan opens. Click Create New Plan.
Enter the Plan Label in the text field. Click Ok.
In Select Product, select one or multiple departments and click Finish.
The Assortment Maintenance segment is built.
The first and only step in the Assortment Maintenance process is to assign weeks to a cluster, assign a cluster version to an Assortment Period, and assign the maximum receipt lead time. The planner can also view assortment periods by calendar and location clusters by calendar.It is advisable that multiple departments planned together should have the same assortment period and flows defined for accurate planning.
The steps to complete this process:
Assign a cluster version to an Assortment Period.
View an Assortment Period and its associated quarter.
View a cluster version and its associated quarter.
Prior to Starting this Step:
Location clusters should be approved.
The planner should know which location cluster version should be assigned to which Assortment Period.
The planner should know which weeks belong to each Assortment Period.
The planner should have information for defining the flows for each Sub-class.
After Completing this Step:
Complete other steps of Placeholder Maintenance as necessary.
Tab and Views in this Step:
Assortment Period Maintenance Tab:
3. Define Last Assortment Mapping View
This tab is used to define assortment periods and flows and review the assortment periods by calendar and location.
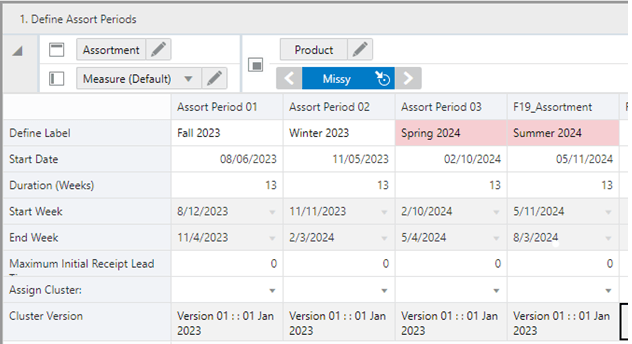
The Define Assort Periods view is used to assign weeks to an Assortment Period and to assign a cluster version to an Assortment Period.
The steps to complete this process:
In the Define Label measure field, input a name for the Assortment Period that makes business sense to identify the Assortment Period.
This label will be shown in the Assortment Services wizards when selecting Assortment Periods.
In the Start Date measure, enter or select the first week of the Assortment Period.
The Start Week measure will populate.
In the Duration (Weeks) measure, enter the number of weeks of the Assortment Period.
The End Week measure will populate.
In the Maximum Initial Receipt Lead Time measure, enter the maximum number of weeks that receipts can be received before the start of the Assortment Period.
Within the Item Planning segment, the planner will be able to choose which week the receipts should arrive before the start week of the assortment period, up to the maximum that is set here.
In the Assign Cluster measure picklist, select the appropriate cluster version and assign it to the Assortment Period.
Run the Assign Cluster Application Action.
Run the Approve Application Action.
Note that weeks may not overlap between Assortment Periods, and a real-time alert will appear if they do. You must resolve the alert before data will be committed to the database.
Measure Table
Table 8-1 1. Define Assort Periods View Measures
| Label | Definition |
|---|---|
|
Define Label |
A user-entered label for an Assortment Period. The label will be visible in the Item Planning wizard when selecting Assortment Periods to help the planner identify the correct Assortment Period to plan. |
|
Start Date |
The first date of the Assortment Period. |
|
Duration (Weeks) |
The number of weeks in the Assortment Period. |
|
Start Week |
The first week of the Assortment Period, calculated from the Start Date and the Duration entered. |
|
End Week |
The last week of the Assortment Period, calculated from the Start Date and the Duration entered. |
|
Maximum Initial Receipt Lead Time |
The maximum number of weeks for initial receipt lead time (before the Start Week that the initial receipts arrive). |
|
Assign Cluster |
A picklist measure populated with approved cluster versions. It is used to select the appropriate version to assign to an Assortment Period. |
|
Cluster Version |
Reference measure that is populated after running the Assign Cluster Application Action with the cluster version assigned to an Assortment Period. |
Application Actions
Assign Cluster
The Assign Cluster Application Action copies the selected cluster version to the assortment period selected, populating the Cluster Version measure with the cluster version name for reference.
Approve
The Approve Application Action commits data to the database, first checking that there are no real-time alerts that are unresolved.
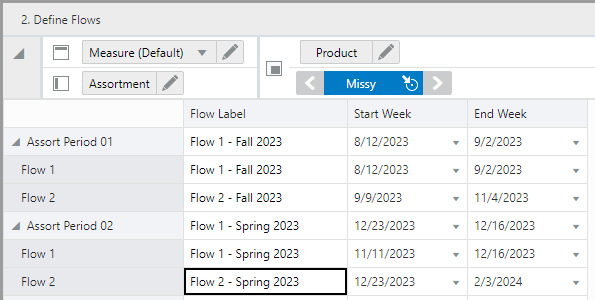
The Define Flows view is used for mapping and creating the flows for the assortment period at category level. The planner can create as many flows as needed by using Placeholder Maintenance. The flows should be within the assortment period starting and ending weeks.
The step to complete this process:
Create the flows as needed for the assortment period at category level.
Measure Table
Table 8-2 2. Define Flows View Measures
| Label | Definition |
|---|---|
|
Flow Label |
User-defined label for the flow for identification while assigning during build wedge process. |
|
Start Week |
Start week of the flow (Should be with in Assortment period range). |
|
End Week |
End week of the flow (Should be with in Assortment period range). |
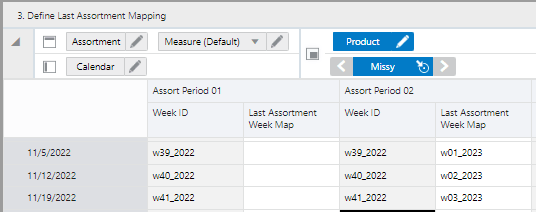
The Define Last Assortment Mapping view is used to map a week in the current assortment to a week in the last assortment. It provides visibility to how the Assortment Periods line up to the dates in the calendar.
The step to complete this process:
Enter this assortment's week that should map back to last assortment period by category.
For example, in the following figure, w40_2022 is mapped to the last assortment start week which is w02_2023.
Measure Table
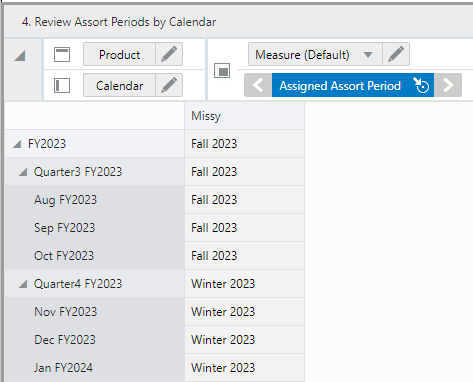
The Assort Periods by Calendar view is used for reference purposes only, to allow the planner to view the assortment periods by different levels of the calendar hierarchy (week, month, quarter, half, year). It provides visibility to how the Assortment Periods line up to the dates in the calendar.
The step to complete this process:
View Assortment Periods by category, week, month, quarter, half, or year, as desired.
Measure Table
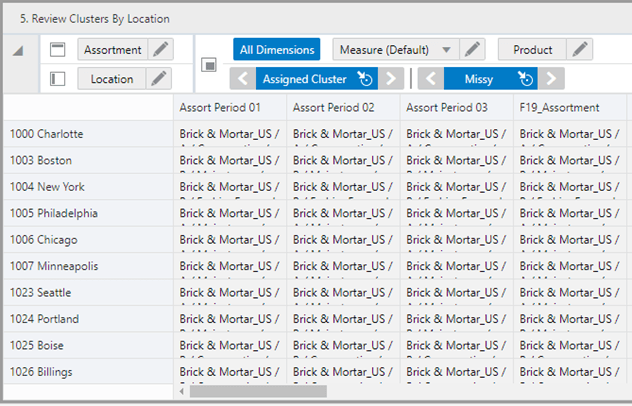
The Clusters by Location view is used for reference purposes only, to allow the planner to view how locations are assigned to different clusters during different Assortment Periods.
The steps to complete this process:
Using the Assigned Cluster measure, view each location's cluster assignments by department and Assortment Period, as desired.
Using the Store to Cluster Prerange by Period measure, view each location's assignment to an Assortment Period, as desired.
Note that if a Location appears as Unassigned, it will not be available for selection in Assortment & Item Planning, as it means the location does not belong to a cluster.
Measure Table