| Oracle® Retail Invoice Matching User Guide Release 15.0 E68580-01 |
|


 Previous |
 Next |
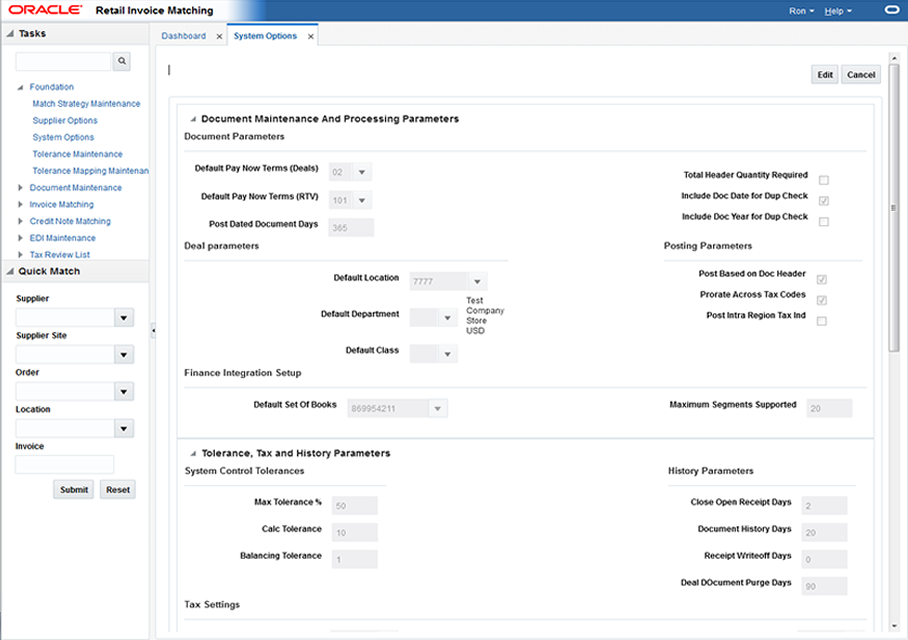
In the System Options window, you can define system-wide parameters that affect the functions of Oracle Retail Invoice Matching. You indicate how long the system maintains various documents, and you can enter the unique codes that ReIM uses to identify document types.
Updated settings are available for all users who log on after the changes are made. To see the changes reflected in Oracle Retail Invoice Matching, you must log out and log in again.
This section includes the following system options instructions:
Navigate: From the Tasks menu, select Foundation > System Options. The System Options window opens.
Perform the following procedure to make changes to the ReIM system parameters
On the upper part of the screen, click Edit to enable the editable fields.
Once you have completed your system options updates, click Save and Close. If you want to save changes but continue to make additional changes, click Save.
|
Note: Changes are available to users who log in after you have completed the changes. To see the changes reflected, you must log out and log in again. |
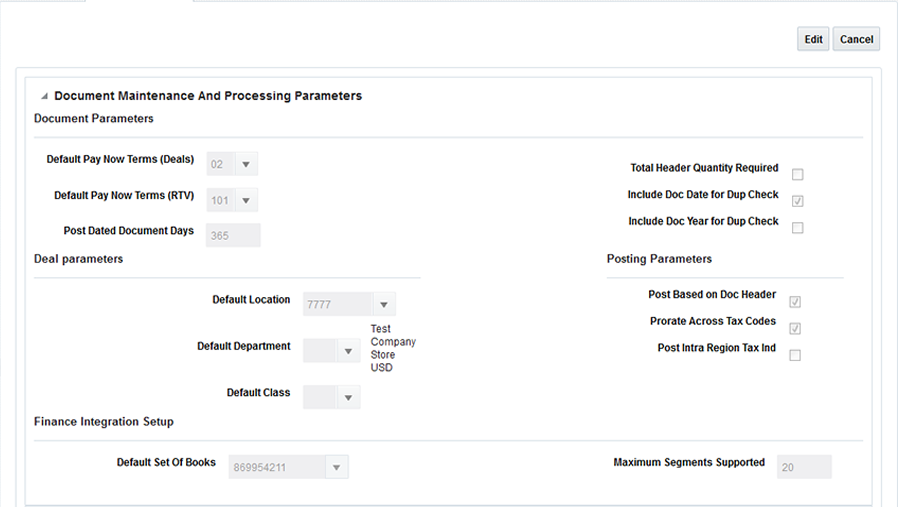
Table 6-1 Document Maintenance And Processing Parameters System Options
| Field | Description |
|---|---|
|
Default Pay Now Terms (Deals) |
This column holds the term id that is defaulted on deal documents. In the document creation dialog, this term, its discount percentage, and due days are defaulted onto new deal documents. |
|
Default Pay Now Terms (RTV) |
This column holds the term id that is defaulted on RTVs and resulting documents. In the document creation dialog, this term, and its discount percentage and due days are defaulted onto RTVs and resolution documents. |
|
Post Dated Document Days |
How many days old a document can be when entered into the system. For example, if set to 180 then a document older than six months cannot be entered via EDI or online entry. |
|
Total Header Quantity Required |
Is header quantity required when creating a merchandise invoice. |
|
Include Doc Date for Dup Check |
Indicates whether the document date should be included in the uniqueness check. If this setting is checked, 'Include Doc Year for Dup Check' must be unchecked. |
|
Include Doc Year for Dup Check |
Indicates whether the document year should be included in the uniqueness check. If this setting is checked, 'Include Doc Date for Dup Check' must be unchecked |
|
Default Location |
Default system location, used by non merch document injection. |
|
Default Department |
Default system department, used by deal processing. |
|
Default Class |
Default system class, used by deal processing. |
|
Post Based on Doc Header |
Should posting be done based on the document header rather a than the accumulated total of the details. |
|
Prorate Across Tax Codes |
Should tax posting entries be prorated across tax codes. |
|
Post Intra Region Tax Ind |
This Indicator is applicable on documents where supplier's and location's vat region are different. When set to ON, posting will post the taxes applicable on the item on location's VAT region as it would if supplier's and locations VAT region were the same. When set to OFF, posting would post the Zero taxes on the document (as is functionality). |
|
Default Set Of Books |
Default set of books. |
|
Maximum Segments Supported |
Maximum number of supported G/L accounting segments. |
Table 6-2 Tolerance, Tax and History Parameters System Options
| Field | Description |
|---|---|
|
Max Tolerance % |
Defines the largest percent tolerance that can be used within the system |
|
Calc Tolerance |
Calculation tolerance value. This is used to allow documents to be loaded to the system even if they have small rounding differences between the accumulated details and the document header. It is also used to allow for small rounding differences for taxes. |
|
Balancing Tolerance |
Tolerance setting for adjusting detail lines to align vat amount for balancing posting entries. |
|
Close Open Receipt Days |
This column holds the number of days that a shipment can remain in ready formatch status before it is automatically closed by ReIM. |
|
Document History Days |
Defines the number of days document history will be held before purging (for documents that have been fully processed) |
|
Receipt Writeoff Days |
Number of days to keep receipts before purging. |
|
Deal Document Purge Days |
Number of days to keep posted deals |
|
Number of Taxes Allowed |
Number of supported taxes per item. Valid values include 'Single Tax', or 'No Tax'. |
|
Tax Document Creation Level |
Tax document creation level; used to define of level at which rejection due to incorrect tax. Valid values include 'Item' or 'Full Invoice'. |
|
Tax Validation Type |
Type of tax validation. Valid values include 'Reconcile', 'Retailer', or 'Vendor'. |
|
Default Header Tax |
Should header taxes be defaulted from detail taxes |
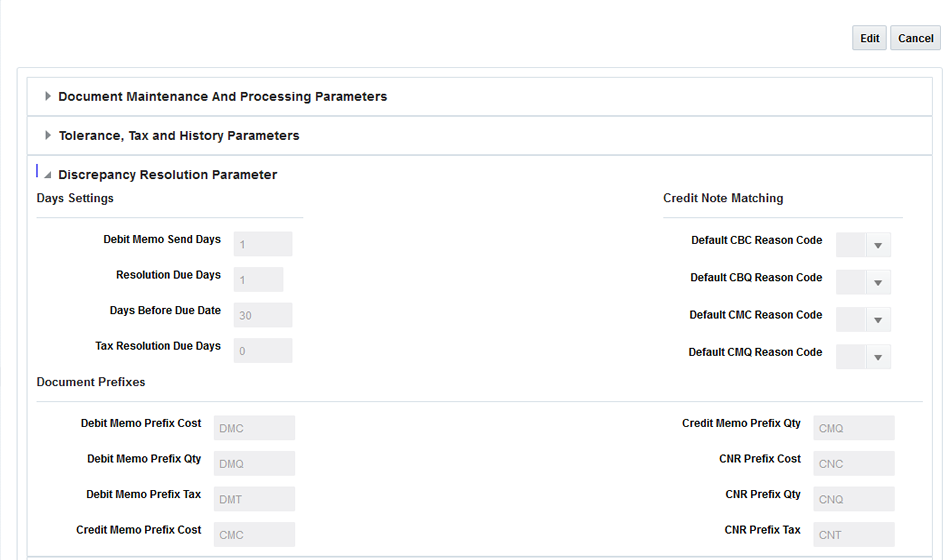
Table 6-3 Discrepancy Resolution Parameter System Options
| Field | Description |
|---|---|
|
Debit Memo Send Days |
Describes number of days prior to the due date of an invoice that a debit memo should be sent if the credit note is late. |
|
Resolution Due Days |
Cost and Quantity discrepancy resolution due days. Used in calculation of resolve by date. This column holds the number of days that a cost resolution can stay outstanding from when it was routed for review to when it should be resolved. |
|
Days Before Due Date |
This parameter will indicate the maximum number of days before the invoice due date that any discrepancies for that invoice should be routed. |
|
Tax Resolution Due Days |
Tax discrepancy resolution due days. Used in calculation of tax discrepancy resolve by date. This column holds the number of days that a tax resolution can stay outstanding from when it was routed for review to when it should be resolved. |
|
Default Overbill Reason Code |
Default reason code for overbill cost. |
|
Default Overbill Reason Code |
Default reason code for overbill quantity. |
|
Default Underbill Reason Code |
Default reason code for underbill cost. |
|
Default Underbill Reason Code |
Default reason code for underbill quantity. |
|
Debit Memo Prefix Cost |
Document prefix for generated Debit memo cost |
|
Debit Memo Prefix Qty |
Document prefix for generated Debit memo qty |
|
Debit Memo Prefix Tax |
Document prefix for generated Debit memo tax |
|
Credit Memo Prefix Cost |
Document prefix for generated Credit memo cost |
|
Credit Memo Prefix Qty |
Document prefix for generated Credit memo qty |
|
CNR Prefix Cost |
Document prefix for generated Credit note cost |
|
CNR Prefix Qty |
Document prefix for generated Credit note qty |
|
CNR Prefix Tax |
Document prefix for generated Credit note tax |
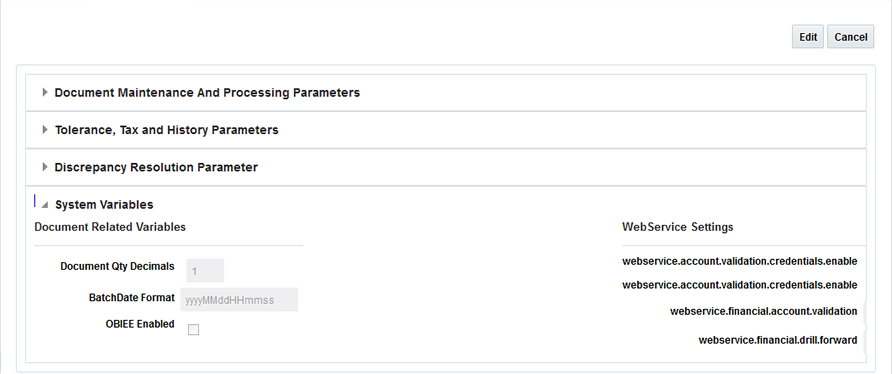
Table 6-4 System Variables System Options
| Field | Description |
|---|---|
|
Document Qty Decimals |
Max number of digits allowed for quantity. Both display as well as accepting data |
|
BatchDate Format |
Expected data format for Injector batch |
|
OBIEE Enabled |
|
|
webservice.account.validation.credentials.enable |
provider URL for account validation |
|
webservice.account.validation.credentials.enable |
Enable validation of webservice account credentials. Should be secure |
|
webservice.financial.account.validation |
provider URL for drill forward |
|
webservice.financial.drill.forward |
Enable validation of webservice account credentials. Should be secure |
Tolerance settings in ReIM are entities with an ID and a description. These entities are mapped to supplier sites, suppliers, supplier groups, or departments. One of the tolerance entities is also defined as the system default. The match engine looks at the documents in the match and determines the appropriate level to search for a tolerance to be applied.
The Tolerance Search window provides a way in which to search for already defined tolerances.
Navigate: From the Tasks menu, select Foundation > Tolerance Maintenance. The Tolerance Search window opens.
From the Tolerance Search window, use the following criteria to search for existing tolerances:
Table 6-5 Tolerance Search Fields
| Field | Description |
|---|---|
|
Tolerance ID |
This field allows the user to enter a tolerance ID to be used in search criteria. |
|
Description |
This field allows the user to enter the description to be used in search criteria. |
|
System Default |
The system requires one (and only one) tolerance to be flagged as the system default tolerance. This field allows searching based on this indicator. Available values include:
|
|
Currency Code |
This field allows the user to enter a currency to be used in search criteria. |
After you have entered the desired search criteria, click Search.
|
Note: If you would like to save your search criteria to use at a later date, click Save. |
Your search results are displayed in the Search Results pane of the Tolerance Search window.
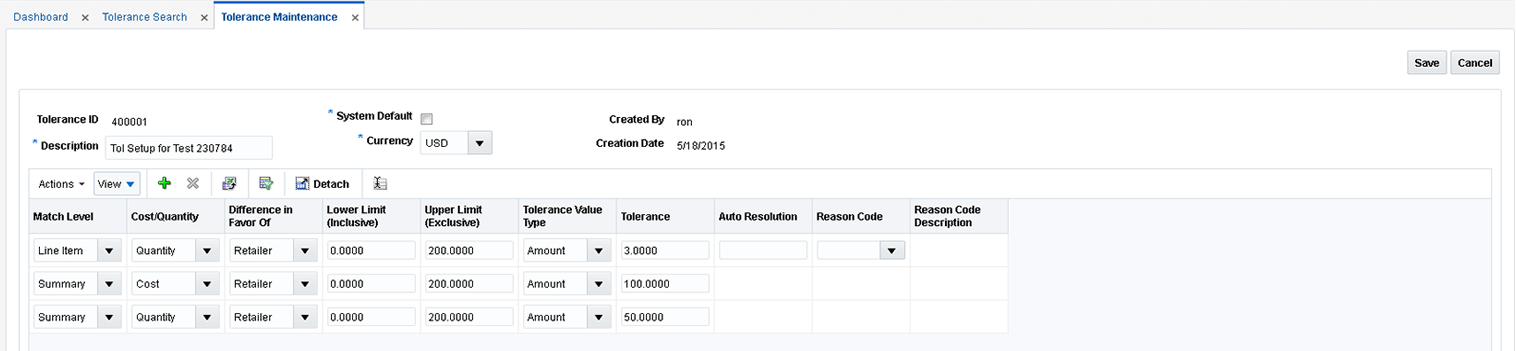
The Tolerance Maintenance window is called from the Tolerance Search window. The Tolerance Maintenance window allows the user to edit, view, or delete an existing tolerance setting. One tolerance setting must be flagged as the system default. The other settings are mapped to tolerance levels such as Department, Supplier Group, Supplier, or Supplier Site.
Navigate: From the Tasks menu, select Foundation > Tolerance Maintenance. The Tolerance Search window opens.
From the Tolerance Search window, perform a search for existing tolerances. See Tolerance Search for additional information.
From the Search Results pane, select the tolerance you want to edit.
With the tolerance selected, select Edit from the Action menu. The Tolerance Maintenance window is displayed.
From the Tolerance Maintenance window, you can perform the following:
Edit All – Allows you to edit all lines in the tolerance.
Click to Edit – Allows you to edit a single line of the tolerance.
Add – Allows you to add a new line to the tolerance.
Delete – Allows you to delete a selected line from the tolerance
|
Note: In Edit mode, the Tolerance ID field is display only and cannot be changed. |
Perform your updates to the tolerance.
Click Save to save the updated tolerance.
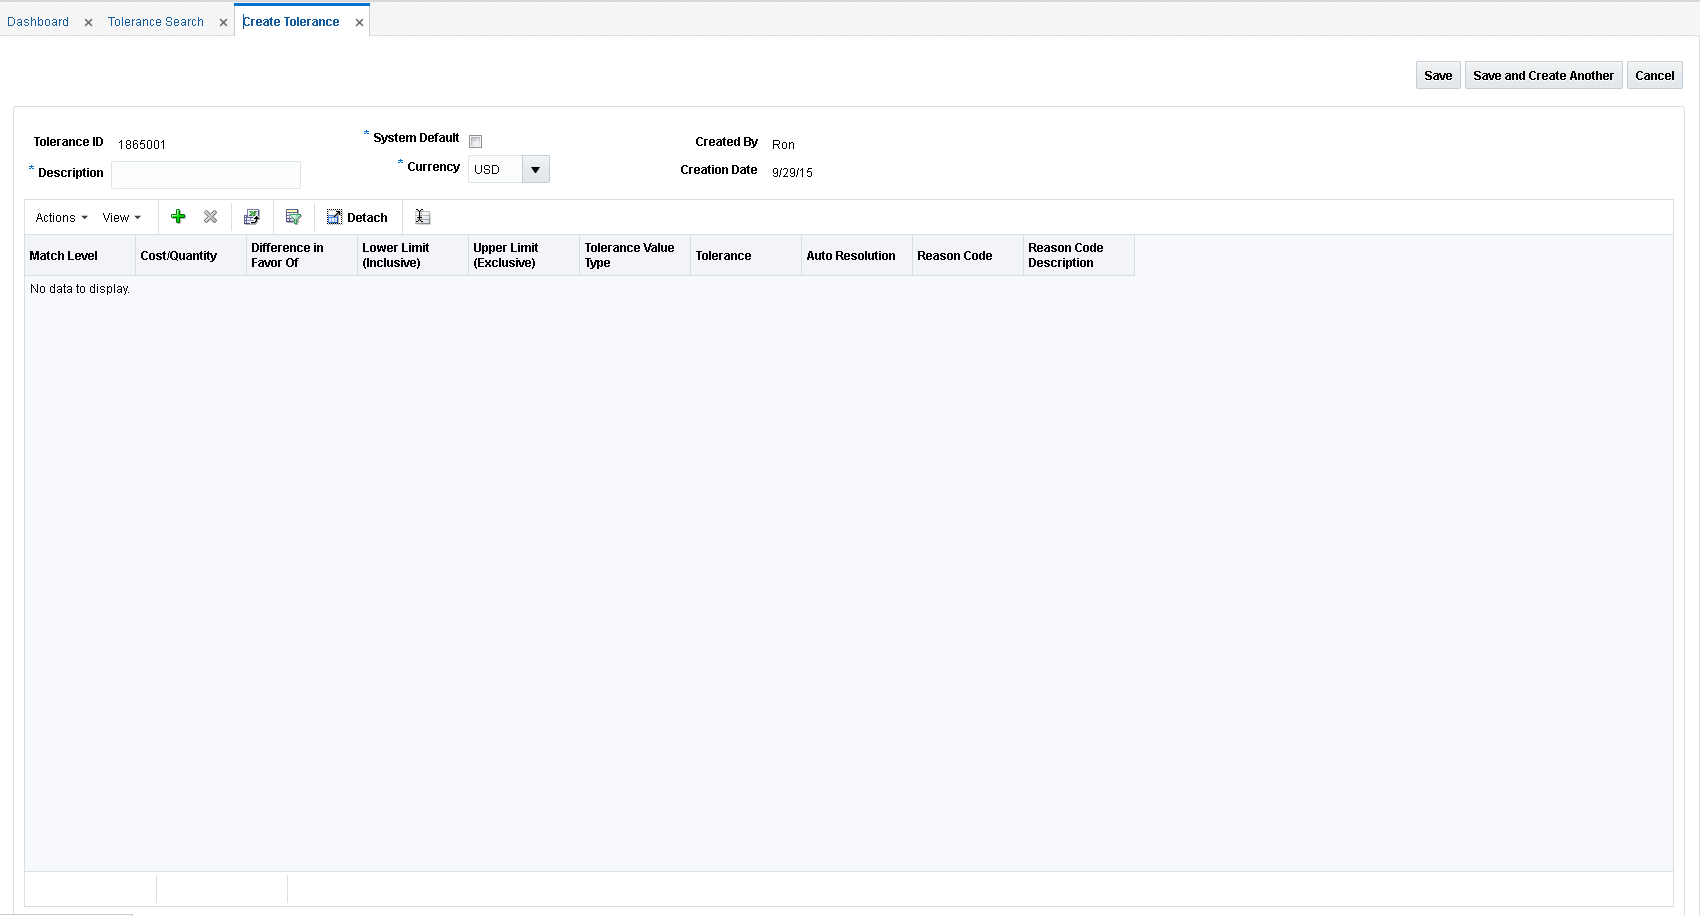
The Create tolerance action is available in the Search Results pane at all times regardless of whether a tolerance search has been performed.
Navigate: From the Tasks menu, select Foundation > Tolerance Maintenance. The Tolerance Search window opens.
From the Search Results pane of the Tolerance Search window, select Create from the Action menu. The Create Tolerance window is displayed.
Enter a Description and select the Currency for the new tolerance. If the tolerance will be used as the default tolerance, select the Default Tolerance check box.
From the Create Tolerance window, select Add from the Action menu. An empty tolerance is added to the tolerance table.
|
Note: When in create mode, the Tolerance ID is automatically assigned and cannot be changed. |
Enter the following information for your new tolerance:
Match Level – Select the match level for which the tolerance settings apply.
Summary is used for matching at the summary level. Summary level matches the accumulated total of the invoice detail lines, if they are present, to the accumulated total of the detail lines on the receipt. For Header-Only invoices, it matches the merchandise amount from the invoice header with the accumulated total of the receipt lines.
Line Item is used for matching at the item level.
Cost/Quantity – Select whether the tolerance settings specified are for cost or quantity matching.
Difference in Favor Of – Select whether the tolerance settings specified are for when the discrepancy is in favor of the Supplier or the Retailer. A difference in Favor of the Supplier indicates that the invoice (or item) is an overbill (the invoice is more than the receipt). A difference in Favor of the Retailer indicates the invoice (or item) is an underbill (the invoice is less than the receipt).
Lower Limit (Inclusive) – Specify the lower limit for which this tolerance applies.
This field is used in conjunction with the Upper Limit field to allow the user to specify different tolerance levels for different values of invoices. For example, a retailer might want to specify that low value documents (those less than $100.00) might be considered within tolerance if they have a variance of 10% or less, however, high value documents (those with document values greater than $100) might need to be within only 5% variance for them to match within tolerance.
|
Note: The value must be greater than or equal to zero and must be less than the Upper Limit on the same row. |
Upper Limit (Exclusive) – Specify the upper limit for which this tolerance applies.
This field is used in conjunction with the Lower Limit field to allow the user to specify different tolerance levels for different values of invoices.
|
Note: The value must be greater than zero and must be greater than the Lower Limit on the same row. |
Tolerance Value Type – Specify whether the Tolerance setting and the chargeback tolerance setting are percent or amount values.
Tolerance – The Tolerance value is the amount by which the invoice (or invoice item) amount can vary from the receipt (or receipt item) amount yet still be considered valid for matching. Matches which are not perfect but have a variance within the tolerance setting are considered Matched within Tolerance.
Auto Resolution – The Auto Resolution value is used to determine the variance level at which the system automatically generates a resolution action to resolve the discrepancy. It is only used at the line level. If the variance between the invoice item and receipt item is greater than the Tolerance setting, but is less than or equal to the Auto Resolution setting, then the system automatically generates a resolution action with the use of a reason code.
Reason Code – The Reason Code is used to automatically resolve discrepancies which fall within the Auto Resolution tolerance level.
Only Reason Codes with the following types or Resolution Actions are allowed:
Debit Memo Cost (if this row has Cost selected for the Cost/Quantity setting).
Debit Memo Quantity (if this row has Quantity selected for the Cost/Quantity setting).
Credit Memo Cost (if this row as Cost selected for the Cost/Quantity setting)
Credit Memo Quantity (if this row has Quantity selected for the Cost/Quantity setting)
Discrepancy Write Off (DWO)
Receiver Cost Adjustment (if this row has Cost selected for the Cost/Quantity setting)
Receiver Unit Adjustment (if this row has Quantity selected for the Cost/Quantity setting)
Click Save to save the new tolerance.
If you want to create an additional tolerance, click Save and Create Another.
Tolerance Mapping Maintenance allows users to create a mapping between an entity of a Tolerance Level with a Tolerance ID. For example, it allows a tolerance ID to be mapped to a particular supplier.
The Tolerance Mapping Search window provides a way in which to search for already defined tolerance mappings.
Navigate: From the Tasks menu, select Foundation > Tolerance Mapping Maintenance. The Tolerance Mapping Search window opens.
From the Tolerance Mapping Search window, use the following criteria to search for existing tolerance mappings:
Table 6-6 Tolerance Mapping Search Fields
| Field | Description |
|---|---|
|
Tolerance Level |
When a tolerance level is selected, the value field LOV and validation is based on the tolerance level. Valid values are:
|
|
Department |
This field allows the user to enter a department to be used in search criteria. |
|
Supplier Group |
This field allows the user to enter a supplier group to be used in search criteria. |
|
Supplier |
This field allows the user to enter a supplier to be used in search criteria. |
|
Supplier Site |
This field allows the user to enter a supplier site to be used in search criteria. |
|
Tolerance ID |
This field allows the user to enter a tolerance ID to be used in search criteria. |
After you have entered the desired search criteria, click Search.
|
Note: If you would like to save your search criteria to use at a later date, click Save. |
Your search results are displayed in the Search Results pane of the Tolerance Mapping Search window.
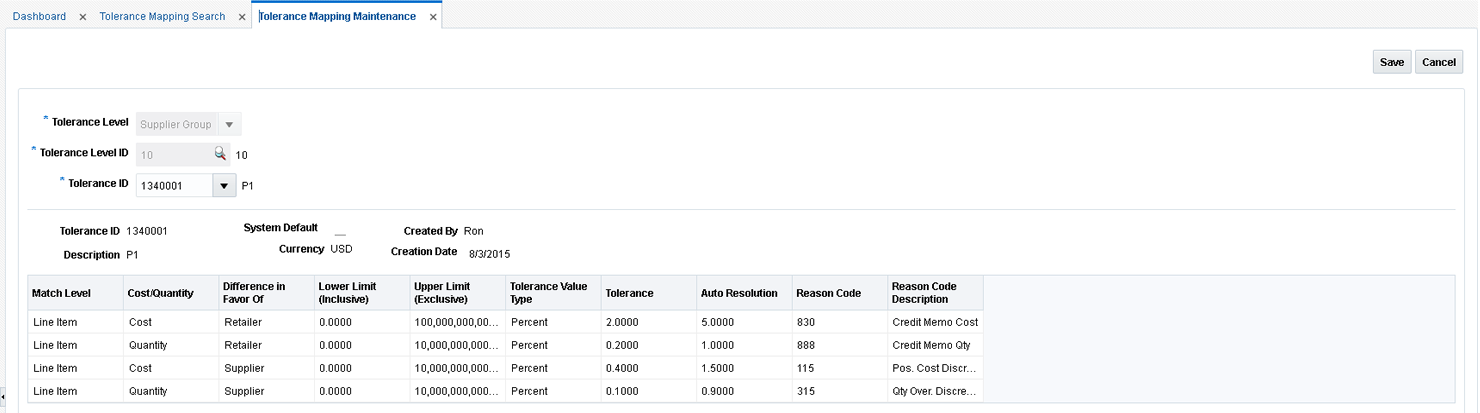
The Tolerance Mapping Maintenance window is called from the Tolerance Mapping Search window. The Tolerance Mapping Maintenance window allows the user to edit, view, or delete an existing tolerance mapping. Tolerance mappings are mapped to tolerance levels such as Department, Supplier Group, Supplier, or Supplier Site.
Navigate: From the Tasks menu, select Foundation > Tolerance Mapping Maintenance. The Tolerance Mapping Search window opens.
From the Tolerance Mapping Search window, perform a search for existing tolerance mappings. See Tolerance Mapping Search for additional information.
From the Search Results pane, select the tolerance mapping you want to edit.
With the tolerance mapping selected, select Edit from the Action menu. The Tolerance Mapping Maintenance window is displayed.
From the Tolerance Mapping Maintenance window, you can edit the Tolerance ID that is associated with the tolerance mapping.
Click Save to save the updated tolerance mapping.
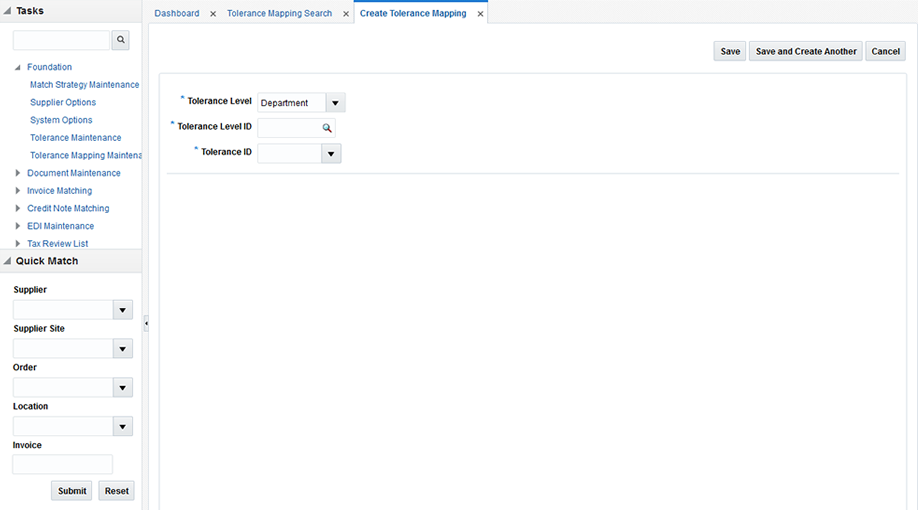
The Create tolerance mapping action is available in the Search Results pane at all times regardless of whether a tolerance mapping search has been performed.
Navigate: From the Tasks menu, select Foundation > Tolerance Mapping Maintenance. The Tolerance Mapping Search window opens.
From the Search Results pane of the Tolerance Mapping Search window, select Create from the Action menu. The Create Tolerance Mapping window is displayed.
Enter the following information for your new tolerance mapping:
Tolerance Level – Valid values are:
Department
Supplier Group
Supplier
Supplier Site
When a tolerance level is selected, the value field LOV and validation will be based on the tolerance level.
Tolerance Level ID – Enter the ID for the entity selected as the tolerance level. For example, if the tolerance level selected was Supplier Site, you would enter a supplier site ID for this field.
Tolerance ID – Enter the tolerance ID to be mapped to the selected entry.
Click Save to save the new tolerance mapping.
If you want to create an additional tolerance mapping, click Save and Create Another.
The batch auto-match program performs several types of match attempts in an effort to match invoices to receipts. The Match Strategy rules feature allows retailers to build and maintain match strategies which specifically define the types of matches which should be attempted and the order in which they should be tried during the auto-match process. The match strategies can be defined at the system, supplier group, or supplier level.
The Match Strategy Search window provides a way in which to search for already defined match strategies.
Navigate: From the Tasks menu, select Foundation > Match Strategy Maintenance. The Match Strategy Search window opens.
From the Match Strategy Search window, use the following criteria to search for existing strategies:
Table 6-7 Match Strategy Search Fields
| Field | Description |
|---|---|
|
Match Strategy ID |
This field allows the user to enter a match strategy ID to be used in search criteria |
|
Description |
This field allows the user to enter a match strategy Description to be used in search criteria |
|
System Default |
The system requires one (and only one) match strategy to be flagged as the 'system' default strategy. This field allows searching based on this indicator. |
After you have entered the desired search criteria, click Search.
|
Note: If you would like to save your search criteria to use at a later date, click Save. |
Your search results are displayed in the Search Results pane of the Match Strategy Search window.
Navigate: From the Tasks menu, select Foundation > Match Strategy Maintenance. The Match Strategy Search window opens.
From the Match Strategy Search window, perform a search for existing match strategies. See Match Strategy Search for additional information.
From the Search Results pane, select the match strategy you want to edit.
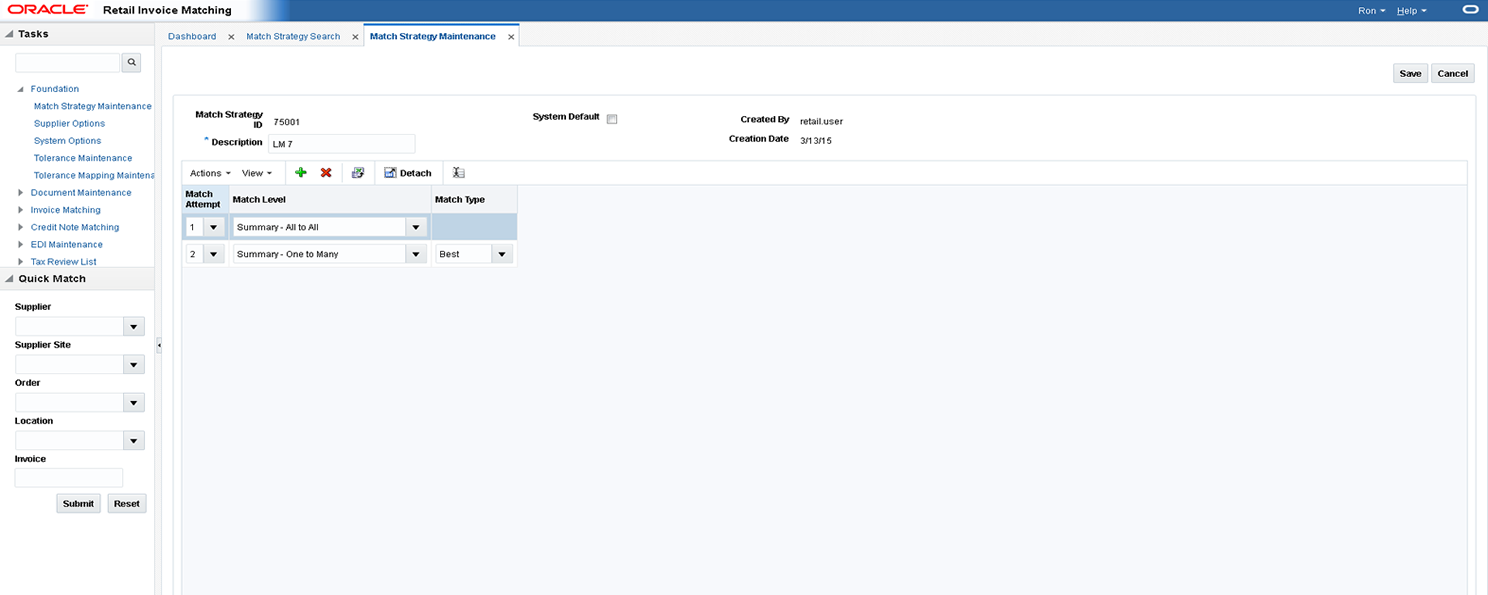
With the match strategy selected, select Edit from the Action menu. The Match Strategy Maintenance window is displayed.
From the Match Strategy Maintenance window, you can edit the following:
Match Attempt – Specifies the order in which the match is attempted.
Match Level – Specifies the match level for this match attempt. Valid values include: Summary All-to-All, Summary One to Many, and Detail.
Match Type – Match Type is only applicable for Detail Matches or for Summary One-to-Many matches. Valid values include Best or Regular.
Click Save to save the updated match strategy.
The Create match strategy action is available in the Search Results pane at all times regardless of whether a match strategy search has been performed.
Navigate: From the Tasks menu, select Foundation > Match Strategy Maintenance. The Match Strategy Search window opens.
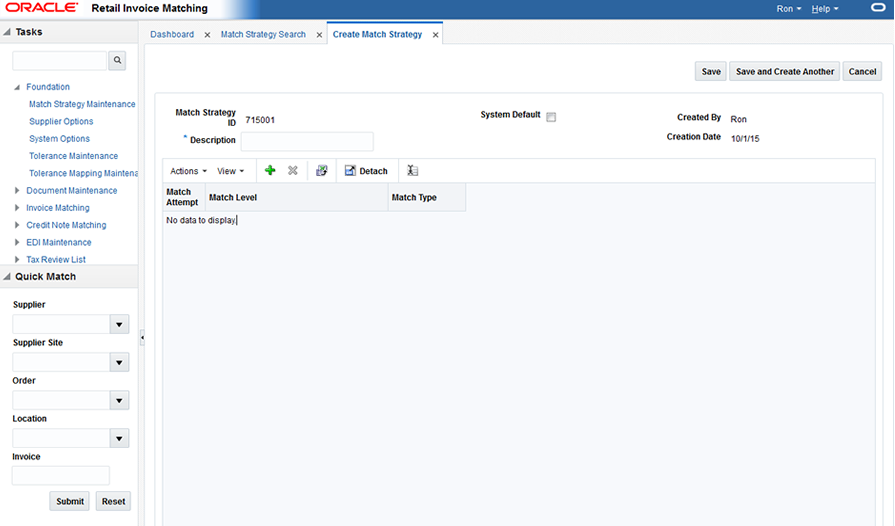
From the Search Results pane of the Match Strategy Search window, select Create from the Action menu. The Create Match Strategy window is displayed.
Enter a Description for the new match strategy. If the match strategy will be used as the system default, select the System Default check box.
From the Create Match Strategy window, select Add from the Action menu. An empty match strategy is added to the Match Strategy table.
|
Note: When in create mode, the Match Strategy ID is automatically assigned and cannot be changed. |
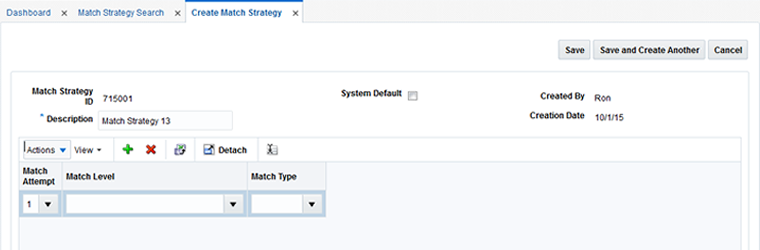
Enter the following information for your new match strategy:
Match Attempt – Select the order in which the strategy is attempted.
Match Level – Select the match level for this match attempt. Valid values include: Summary All to All, Summary One to Many, and Detail.
Match Type – Match Type is only applicable for Detail Matches or for Summary One to Many matches.
Click Save to save the new match strategy.
If you want to create an additional match strategy, click Save and Create Another.
General Ledger Cross reference, Dynamic Segments, GL Options, and Reason codes need to be set up. Check with your system administrator on how to build this required information.
In the Supplier Options window, you can indicate how invoices from each supplier should be matched. You can associate a specific accounts payable reviewer to a supplier, and you can create Supplier Groups.
The Supplier Options window provides a way in which to search for already defined suppliers, supplier sites, or supplier groups.
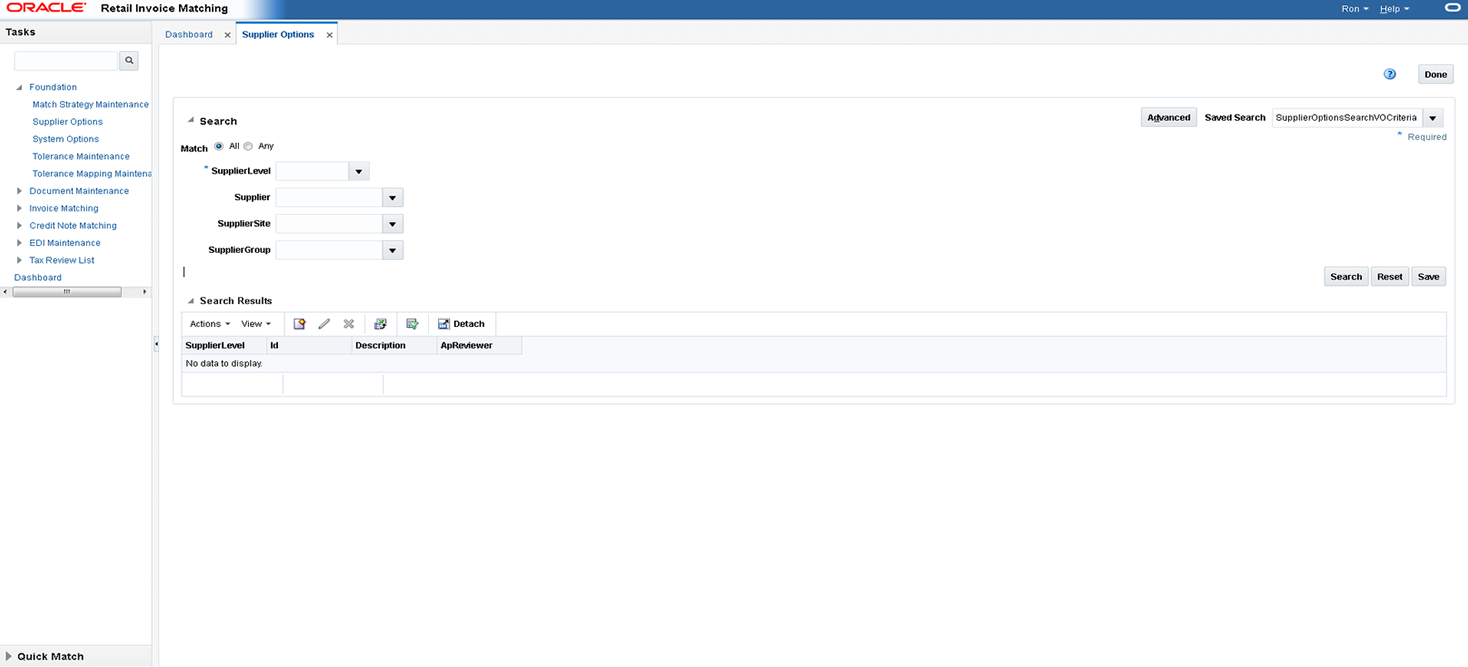
Navigate: From the Tasks menu, select Foundation > Supplier Options. The Supplier Options window opens.
From the Supplier Options window, use the following criteria to search for existing suppliers, supplier sites, or supplier groups:
Table 6-8 Supplier Options Search Fields
| Field | Description |
|---|---|
|
Supplier Level |
This field allows selection of a Supplier Level as a filter criterion to filter the Supplier Options records. Available options are:
|
|
Supplier |
This field allows selection of a Supplier as a filter criterion to filter the Supplier Options records. |
|
Supplier Site |
This field allows filtering of Supplier Options records based on the Supplier site ID specified. |
|
Supplier Group |
This field allows filtering of Supplier Options records based on the Supplier Group ID specified. |
After you have entered the desired search criteria, click Search.
|
Note: If you would like to save your search criteria to use at a later date, click Save. |
Your search results are displayed in the Search Results pane of the Supplier Options window.
Navigate: From the Tasks menu, select Foundation > Supplier Options. The Supplier Options window opens.
In the Supplier Level field, select Supplier, Supplier Site, or Supplier Group or click the LOV buttons to select a specific Supplier, Supplier Site, or Supplier Group.
|
Note: Differences exist between editing a supplier group, a supplier, and a supplier site. For example, when editing a Supplier Group the UI displays Suppliers associated with the Group. In addition, supplier groups have fewer possible fields. Default Match Key is not allowed on the supplier site level. |
Click Search. The supplier details are displayed.
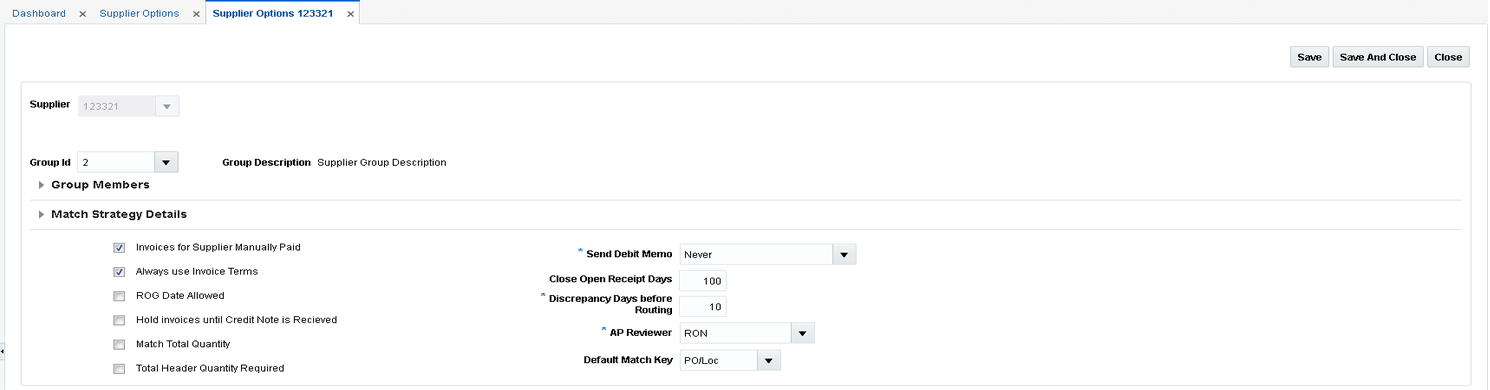
In the AP Reviewer field, enter the ID of an accounts payable reviewer, or click the LOV button to select the reviewer that you want to associate with the supplier, supplier site, or supplier group.
Edit the enabled fields as necessary:
Invoices for Supplier Manually Paid: Select the check box to indicate that invoices from this supplier should be paid manually.
Match Invoices to Receipts from Other Suppliers: Select the check box to indicate that the retailer can pay suppliers other than the one listed for the invoice.
Always Use Invoice Terms: Select the check box to indicate that the terms date on the invoice is always used to pay an invoice.
ROG Date Allowed: Select the check box to use the receipt of goods date to determine the due date of an invoice.
Send Debit Memo: Select the frequency to indicate when to send a debit memo.
Possible values are:
Always - Indicates Debit Memo will be sent.
Never - Indicates a Credit Note Request will be sent.
Only when Credit Note is late - Indicates a Credit Note Request will be sent, but later if the Credit Note does not come in on time, a Debit Memo is then generated.
When this setting is either Never or Only when the Credit Note is Late, an additional option called Hold Invoice is allowed. You can check or uncheck it.
|
Note: If Hold Invoice is checked, matched invoices will not post to the Financial System until all Credit Note Requests associated with the invoice are matched to Credit Notes. |
Close Open Receipt Days: Enter the number of days that a receipt remains in the system without an invoice. After the number of days has passed, the receipt is posted for payment.
Discrepancy Days Before Routing: Enter the number of days that quantity discrepancies should be held before routing for resolution.
Click Save to save your changes or Save and Close to save your changes and close the window.
The Create supplier action is available in the Search Results pane at all times regardless of whether a supplier search has been performed.
Navigate: From the Tasks menu, select Foundation > Supplier Options. The Supplier Options window opens.
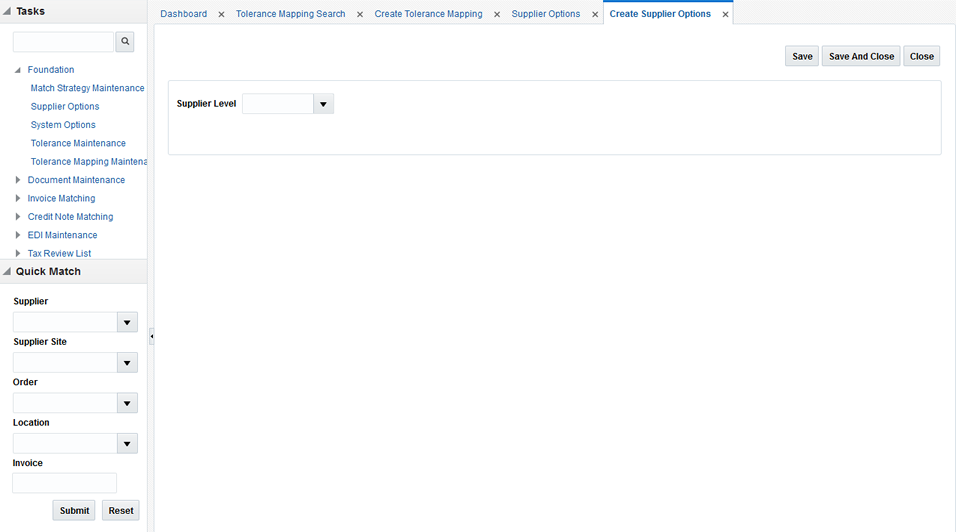
From the Search Results pane of the Supplier Options window, select Create from the Action menu. The Create Supplier Options window is displayed.
From the Create Supplier Options window, you can perform the following actions:
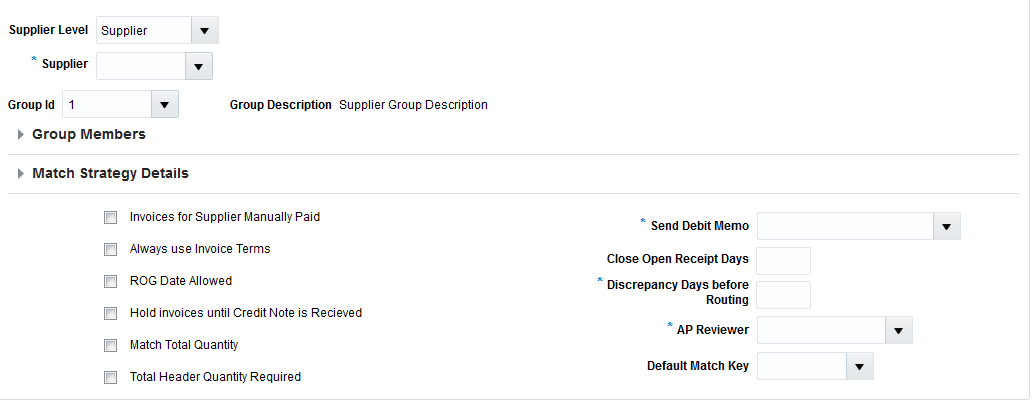
From the Create Supplier Options window, select Supplier in the Supplier Level field.
In the Supplier field, select the supplier against which the new Supplier Options record is to be created. The supplier must be a valid supplier already setup in RMS.
If this supplier will be matching invoices to other suppliers with a supplier group, then enter the supplier group ID.
If the supplier is not part of a supplier group, and they do not want to use the system default match strategy, then enter the match strategy.
Enter values in the enabled fields as necessary:
Invoices for Supplier Manually Paid: Select the check box to indicate that invoices from this supplier should be paid manually.
Always Use Invoice Terms: Select the check box to indicate that the invoice terms should always be used as the best terms.
ROG Date Allowed: Select the check box to use the receipt of goods date to determine the due date of an invoice.
Hold invoices until Credit Note is Received: If checked, matched invoices will not post to the Financial System until all Credit Note Requests associated with the invoice are matched to Credit Notes.
Match Total Quantity: Determines if Matching of Total Quantity is required for Invoices at this Supplier Level.
Total Header Quantity Required: Determines if Total Header Quantity is required to be specified for Invoices at this Supplier Level.
Send Debit Memo: Select the frequency to indicate when to send a debit memo.
Possible values are:
Always - Indicates Debit Memo will be sent.
Never - Indicates a Credit Note Request will be sent.
Only when Credit Note is late - Indicates a Credit Note Request will be sent, but later if the Credit Note does not come in on time, a Debit Memo is then generated.
When this setting is either Never or Only when the Credit Note is Late, an additional option called Hold Invoice is allowed. You can check or uncheck it.
Close Open Receipt Days: Enter the number of days that a receipt remains in the system without an invoice. After the number of days has passed, the receipt is posted for payment.
Discrepancy Days Before Routing: Enter the number of days that quantity discrepancies should be held before routing for resolution.
AP Reviewer: This field specifies which accounts payable employee will be the default reviewer for invoice at this Supplier Levels.
Default Match Key: Indicates the Default Match key applicable for the Supplier Group for the Auto match process.
Click Save to save your changes or Save and Close to save your changes and close the window.
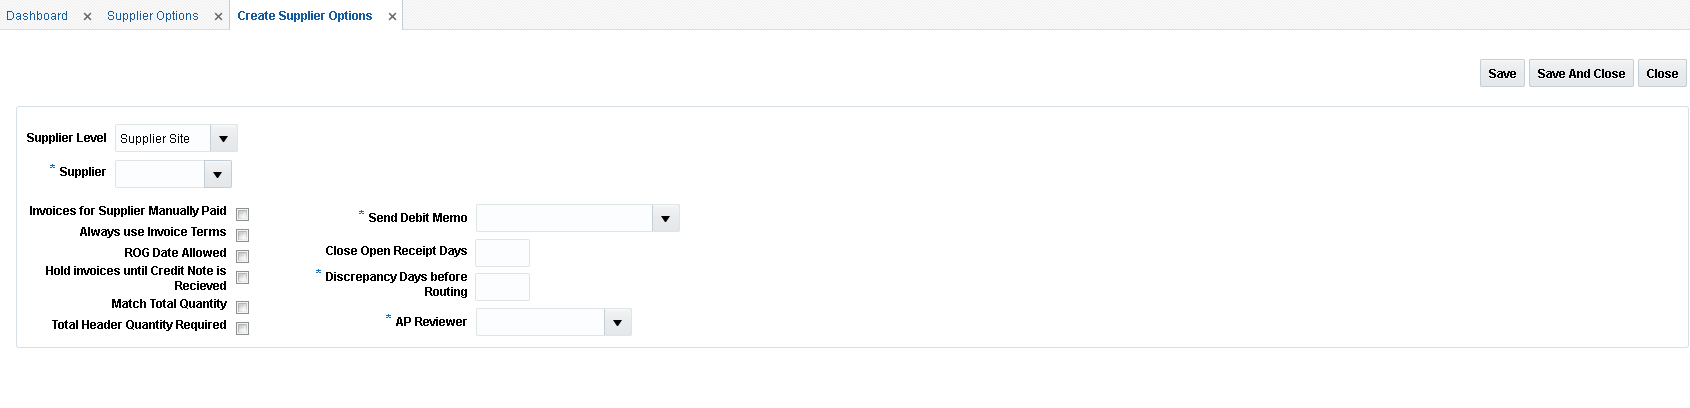
From the Create Supplier Options window, select Supplier Site in the Supplier Level field.
In the Supplier Site field, select the supplier site against which the new Supplier Options record is to be created.
Enter values in the enabled fields as necessary:
Invoices for Supplier Manually Paid: Select the check box to indicate that invoices from this supplier should be paid manually.
Always Use Invoice Terms: Select the check box to indicate that the invoice terms should always be used as the best terms.
ROG Date Allowed: Select the check box to use the receipt of goods date to determine the due date of an invoice.
Hold invoices until Credit Note is Received: If checked, matched invoices will not post to the Financial System until all Credit Note Requests associated with the invoice are matched to Credit Notes.
Match Total Quantity: Determines if Matching of Total Quantity is required for Invoices at this Supplier Level.
Total Header Quantity Required: Determines if Total Header Quantity is required to be specified for Invoices at this Supplier Level.
Send Debit Memo: Select the frequency to indicate when to send a debit memo.
Possible values are:
Always - Indicates Debit Memo will be sent.
Never - Indicates a Credit Note Request will be sent.
Only when Credit Note is late - Indicates a Credit Note Request will be sent, but later if the Credit Note does not come in on time, a Debit Memo is then generated.
When this setting is either Never or Only when the Credit Note is Late, an additional option called Hold Invoice is allowed. You can check or uncheck it.
Close Open Receipt Days: Enter the number of days that a receipt remains in the system without an invoice. After the number of days has passed, the receipt is posted for payment.
Discrepancy Days Before Routing: Enter the number of days that quantity discrepancies should be held before routing for resolution.
AP Reviewer: This field specifies which accounts payable employee will be the default reviewer for invoices at this Supplier Levels.
Click Save to save your changes or Save and Close to save your changes and close the window.
From the Create Supplier Options window, select Supplier Group in the Supplier Level field.
In the Group Description field, enter a description for the group being created.
If you do not want to use the system default match strategy, then enter the match strategy.
Enter values in the enabled fields as necessary:
Match Total Quantity: Determines if Matching of Total Quantity is required for Invoices at this Supplier Level.
Total Header Quantity Required: Determines if Total Header Quantity is required to be specified for Invoices at this Supplier Level.
Default Match Key: Indicates the Default Match key applicable for the Supplier Group for the Auto match process.
AP Reviewer: This field specifies which accounts payable employee will be the default reviewer for invoice at this Supplier Levels.
Discrepancy Days Before Routing: Enter the number of days that quantity discrepancies should be held before routing for resolution.
Click Save to save your changes or Save and Close to save your changes and close the window.