| Oracle® Invoice Matching Operations Guide Release 16.0.2 F10135-02 |
|

 Previous |
 Next |
This chapter discusses supported steps for customizing Retail applications.
Retailers must understand the following concepts before performing any of the supported customization scenarios discussed in this chapter.
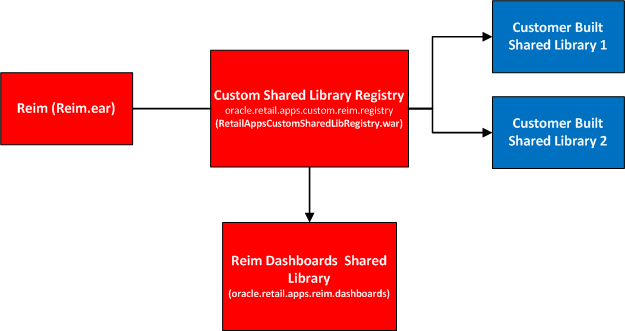
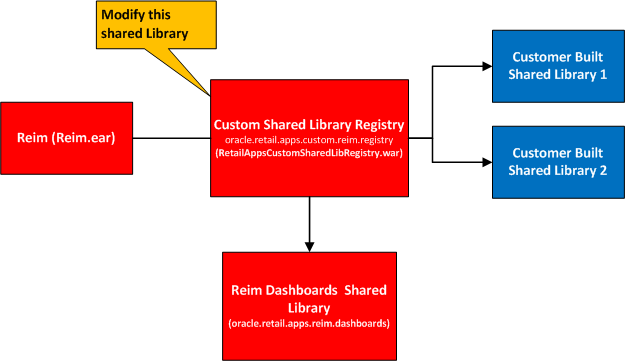
In order to customize the Retail Application, retailers must understand the deployment of the Retail Application.
A Retail Application can install one or more application artifacts into a WebLogic server instance. The diagram below shows a typical installation of a Retail Application:
The Retail Application is deployed as a standalone application and deployed using an EAR file.
Two shared libraries are typically installed along with the application EAR:
The Included Dashboards Shared Library
The Custom Shared Library Registry
The Included Dashboards Shared Library contains the Retail Application-built dashboards. These dashboards can be customized. Further discussion on Retail Application Included Dashboards can be found in the section, Understanding Dashboards in Retail Applications.
A Retail Application that allows for customization will have as part of its installation an intermediary shared library that will serve as a registry to reference the actual retailer-built shared libraries. This is called the Custom Shared Library Registry.
When retailers need to add their own content into the application, metadata to register their content into the application's UI including the binaries for the content itself (e.g. task flows and pages) are expected to be packaged into a Web Archive (WAR) file and deployed as a shared library in the same managed server as the application itself.
Then, the names of these shared libraries have to be referenced in the Custom Shared Library Registry.
Retail Applications allow retailers to add and display custom content such as new workflows and dashboards. These custom contents can be accessed from the Retail Application's user interface (UI).
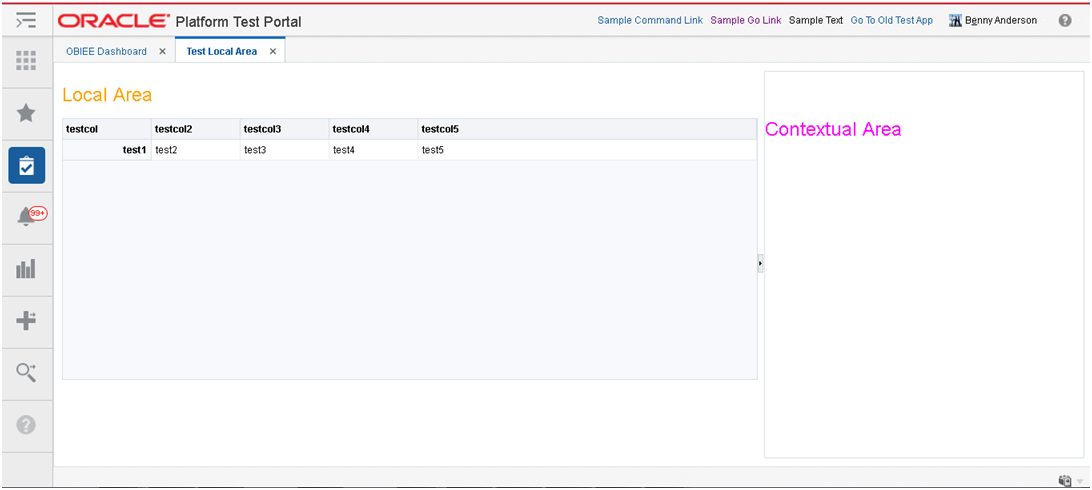
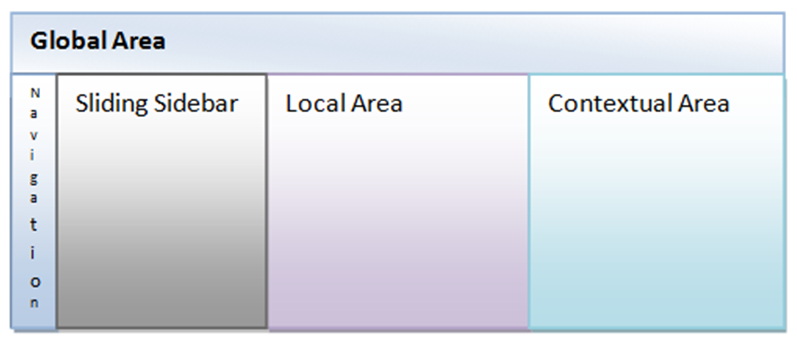
The Retail Application user interface organizes the contents into visual containers that fulfill common layout and navigational requirements in a structured, consistent manner.
The high-level containers or areas in the UI are highlighted below:
Global Area
Navigation Pane and Sliding Sidebar Menu
Local Area
Contextual Area
The Local Area is the main content area of the application. Workflows that allow users to get tasks done in the application are presented in this area. The workflows are launched into this area as a result of actions the user take in the navigation pane, sliding sidebar panel and global area.
The Navigation Pane organizes the different actions a user can take on the application as iconic menu items. The options or actions available to the users for each menu item is presented in the Sliding Sidebar panel next to the Navigation Pane. There are five (5) standard Navigation Pane menus that are available to users:
Application Navigator/Switcher – This menu allows users to switch between Retail Applications.
Favorites – This menu allows users to access their own favorite list of actions or tasks within the application.
Tasks – This menu presents a hierarchy of tasks or actions the user can access in the application.
Reports – This menu presents a hierarchy of links to the application reports and dashboards.
Notification – This menu allows users to access unread and past notifications around business processes that are happening in the application.
The Global Area of the application contains branding information on the left hand side and application wide menu options on the right hand side. Application wide menu options include access to application preferences, login and logout, application help and application information.
The Contextual Area is a collapsible area on the right of the page, which provides space to present information that can assist users in completing their tasks. The Contextual Area is presented per Local Area tab. Each task flow is presented in the local area can have a contextual area.
When retailers want to add new content such as new pages, business components, or even Java code into a Retail Application, retailers will need to create a custom shared library, deploy that into the same managed server as the Retail Application, and register that library into the Retail Application.
As discussed in the section, Understanding the Deployment of Retail Applications, a Retail Application that allows for customization will have as part of its installation an intermediary shared library that will serve as a registry to reference the actual retailer-built shared libraries. This is called the Custom Shared Library Registry.
This section contains steps retailers can follow to create a custom shared library that will contain new custom made content, reference that shared library from the registry, and deploy it to the server.
To create the custom shared library, it is recommended that retailers download and install JDeveloper version 12.2.1 by following the link below:
http://www.oracle.com/technetwork/developer-tools/jdev/downloads/index.html
This section describes the steps to create and configure the Custom Shared Library Workspace in JDeveloper, which will house the code for any custom content the retailer wants to add into the Retail Application. Through JDeveloper, a shared library web application archive file (.WAR) can be generated which can be deployed in the same managed server as the Retail Application.
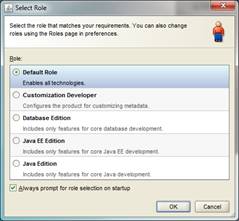
Open JDeveloper and choose Developer Role when prompted.
Create a new Fusion Web Application JDeveloper workspace.
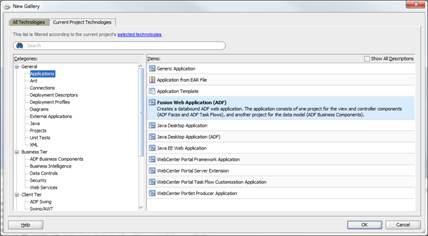
Go to File > New to invoke the New Gallery dialog. Choose Fusion Web Application (ADF) as the type of application to create and click OK.
Provide a meaningful application name, a directory path to the workspace, and an application (Java) package prefix. Click Finish.

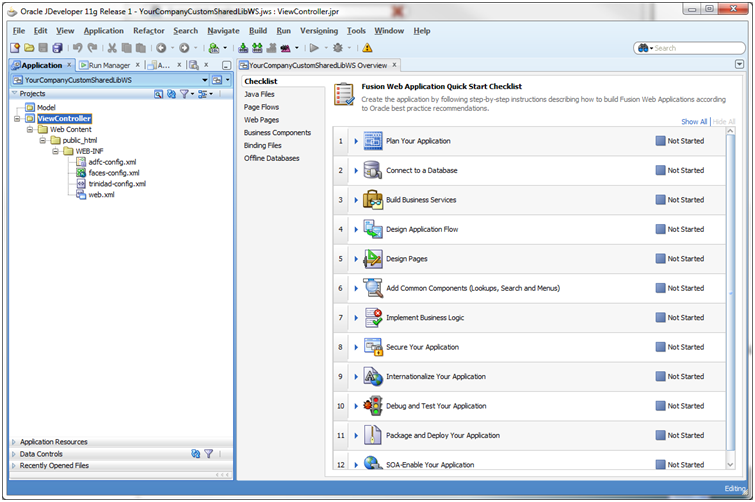
JDeveloper will generate a new workspace with two projects: Model and View-Controller.
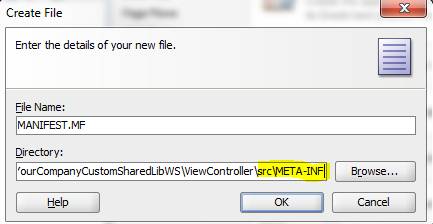
Add a Manifest file containing the name of the shared library.
Right-click on the View-Controller project and choose New from the Context menu.

The New Gallery dialog appears. Choose the option, File (General), in the All Technologies section of the dialog. Click OK.
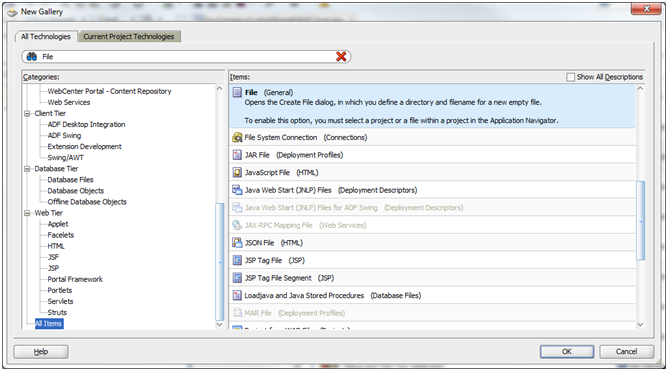
The Create File dialog opens. For the File Name, specify MANIFEST.MF. For the Directory, the new file must be added under the src/META-INF sub-directory under the View-Controller project's directory.
Edit the new MANIFEST.MF file and add the following entries:
Manifest-Version: 1.0
Implementation-Vendor: companyName
Implementation-Title: Custom Shared Library for companyName
Implementation-Version: 1.0
Extension-Name: companyname.custom.shared.lib
Specification-Version: 1.0
Created-By: companyName
Modify the contents such that meaningful and unique values are used for Implementation-Vendor, Implementation-Title, Extension-Name, and Created-By. Example:
Manifest-Version: 1.0
Implementation-Vendor: Acme Retail
Implementation-Title: Custom Shared Library for Acme Retail
Implementation-Version: 1.0
Extension-Name: acmeretail.custom.shared.lib.procurement
Specification-Version: 1.0
Created-By: AcmeRetail
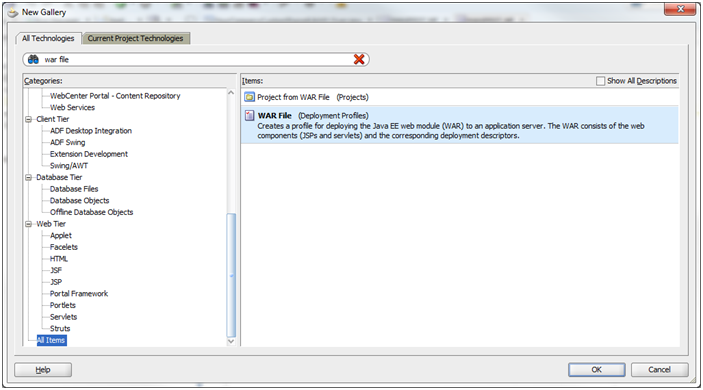
Create a deployment profile for the shared library.
Right-click on the View-Controller project and choose New from the Context menu.
The New Gallery dialog appears. Choose the option, WARFile (Deployment Profiles), in the All Technologies section of the dialog. Click OK.
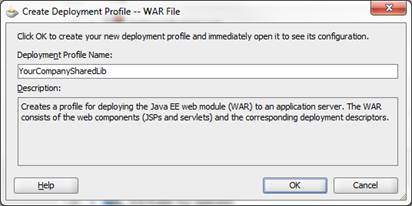
Provide a unique and meaningful name for the Deployment Profile and click OK.
The Edit WAR Deployment Profile Properties dialog is shown.
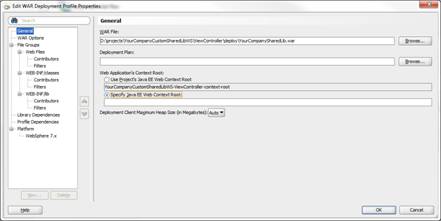
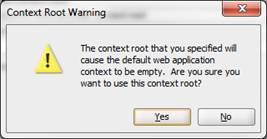
Under the General section, make sure that the Specify Java EE Web Context Root is selected without any value.
When you navigate away from this section, you will be prompted to confirm that you really want a blank context root. Click Yes to the confirmation dialog.
Under the WAR Options section, enable the Include Manifest File option and Add the MANIFEST.MF file you created under …/View-Controller/src/META-INF.
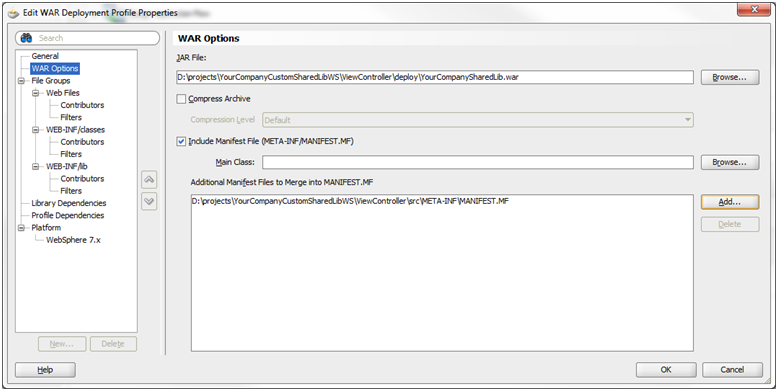
Click OK.
This section describes the steps on how to generate and deploy the Custom Shared Library WAR file:
Generate the share library WAR file through JDeveloper.
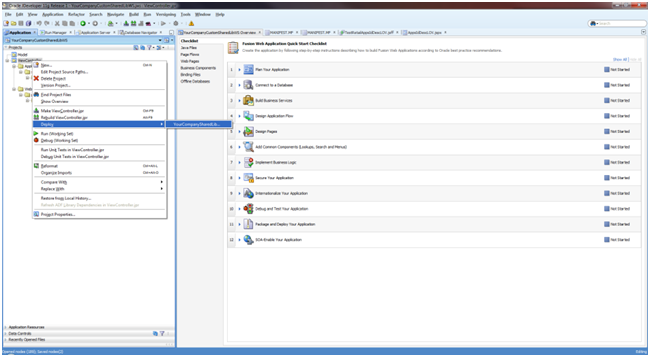
Open the Custom Shared Library workspace.
Right-click on the View-Controller project and choose the shared library WAR deployment profile created previously under the Deploy option.
The Deploy dialog opens. Select Deploy to WAR and click Finish.
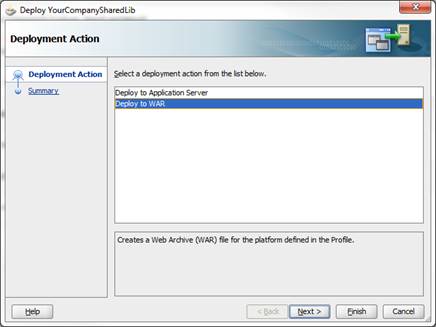
JDeveloper generates the WAR file into the View-Controller project folder sub-directory, deploy.

Deploy the generated WAR file to the same managed server as the Retail Application as a shared library. Refer to section 6 of the Deploying Applications to Oracle WebLogic Server documentation (http://docs.oracle.com/cd/E23943_01/web.1111/e13702/deploy.htm). This task has to be done using the WebLogic Administration Console or Enterprise Manager Fusion Middleware Control with a user having WebLogic administrator permissions.
Once the retailer has created and deployed its own custom shared library, the retailer needs to modify the configuration of the Custom Shared Library Registry to add references to the retailer's shared library.
oracle.retail.apps.custom.reim.registry
To do this:
Log into the WebLogic Administration Console as a user with administrative permissions.
If the Administration Console was configured with domain configuration locking, go ahead and click Lock & Edit to ensure that other administrators can be prevented from making changes during your edit session.
Navigate to the Deployments section.
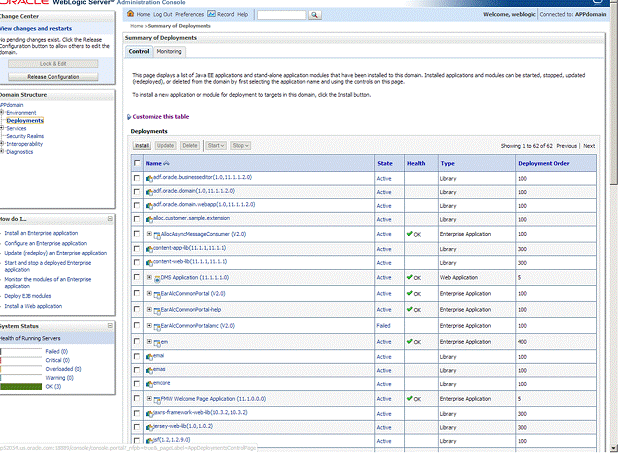
Look for the Retail Application deployment and shut it down. Choose Force Stop Now when appropriate. Wait for the shutdown process to complete.
Get the deployment location of the Retail Application's custom shared library registry. Under the deployments list, click on the link for the library named oracle.retail.apps.alc.portal.extensions. The Settings page for the library appears.
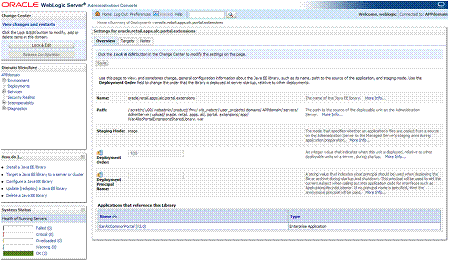
The Settings page will show the file location of the registry's WAR file under the Path entry.
Make a note of this file location.
Using the operating system's file manager application, go to the location of the WAR file. You need read and write permissions to the file system where the WAR file is located.
Make a copy of the WAR file as back-up.
Open the original WAR file using an archive file manager and update the /WEB-INF/weblogic.xml by adding a new <library-ref> entry pointing to your custom shared library.
<library-ref>
<library-name>companyname.custom.shared.lib</library-name>
</library-ref>
|
Note: The library-name has to match the Extension-Name you provided in your custom shared library's MANIFEST.MF file. |
Once this change is done, you have now linked your custom shared library to the Retail application.
Return to the WebLogic Administration Console. Navigate to Environments' Servers section. Under the Control tab, select the managed server where the Retail Application is deployed to. Shut it down and start it back up again.
Custom ADF and Java based components can be coded into the Custom Shared Library workspace. Typically, retailers can include task flows that add new UI workflows into the Retail Application UI. These task flows may implement:
A new workflow to maintain the Retail Application's data.
A dashboard page to highlight key performance indicators and important metrics based on the Retail Application's data.
This section contains important points that developers must consider when building new custom ADF-based contents for Retail Applications.
Custom ADF content must be implemented within the custom shared library workspace. Retailers must create a new custom shared library workspace if none exists.
The WAR artifact for the custom shared library must be regenerated and redeployed. See Adding a Custom Shared Library for additional information.
Since Retail Applications are secured web applications, the addition of new ADF UI pages and task flows will need to be secured using the application roles and policies that are recognized by the Retail Application. The provisioning process is done using the Oracle Enterprise Manager Fusion Middleware Control console.
Developers will be building components in both Model and View-Controller layers using the tools and standards available for Oracle ADF. New ADF screens will have their own business components, task flows, pages, and bindings. These components must comply to published best practices and standards for that technology.
Refer to the Oracle JDeveloper and Oracle ADF Technical Resources web site (http://www.oracle.com/technetwork/developer-tools/jdev/learnmore/index.html) . Of particular interests are coding guidelines published under the ADF Architecture Square section of the site (http://www.oracle.com/technetwork/developer-tools/adf/learnmore/adfarchitect-1639592.html).
Task flows must be built as bounded task flows using JSF page fragments.
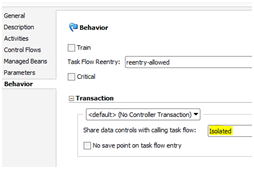
The task flow must have an isolated data control scope. This is configured in JDeveloper's task flow designer by going to the Behavior tab and setting data control share option as "Isolated".
New application modules must be configured to use Data Sources and not JDBC URLs when accessing the database layer. This can be configured in JDeveloper's application module designer.
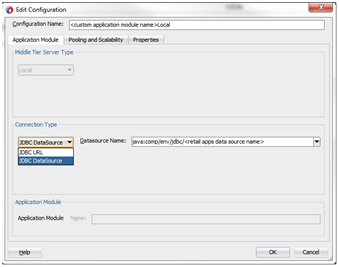
The data source name must be the same as the Retail Application's primary data source name.
jdbc/AllocationApplicationDBDS
To add new contents in the Retail Application's Reports Menu, the retailer must override the reports menu model.
All items seen by the user in the Reports Menu are registered in an XML file called the Reports Menu Model.
This file is kept in the application's EAR file but can be extracted, copied and modified so retailers can add references to their own dashboards or reports.
To add or modify an item in the Reports Menu, follow the steps below:
Add a custom shared library. See Adding a Custom Shared Library for additional information.
Using JDeveloper, open the Custom Shared Library workspace in Developer Role.
Add new custom reports as required.
Regenerate the shared library WAR file from the workspace and redeploy the shared library. Shutdown and restart of the Retail Application and its shared library registry is required.
Changes Required in Shared Library Registry for Custom Reports Menu Model:
Obtain the application's Reports menu model XML file.
Reports Menu Model XML – Reim.ear\ReimViewController.war\WEB-INF\classes\oracle\retail\apps\framework\uishell\config\custom\HomeReportsMenuModel.xml
Please refer the Section Reference the Custom Shared Library from the Retail Application., to register custom reports menu model shared library within the Retail Application.
Open the original WAR file using an archive file manager and copy the above Reports menu model xml file in View-Controller project src directory, preferably under a subdirectory called custom.
Add a new or modify existing file called PageTemplateOverrideModel.properties under the View-Controller/src directory.
Modify this file and add the following entry:
Home.reportsMenuModelXml=<path to sidebar model xml within view-controller/src>
Example:
Home.reportsMenuModelXml=/custom/HomeReportsMenuModel.xml
Modify the copy of the model. Add new items , which are created in the shared library project. Refer to the section, Reports Menu Model XML Items.
Test the Retail Application.
The Reports menu model is composed of Item elements. An item renders as either a launchable link or a submenu in the Reports menu of the Retail Application. Below is an example of what a Reports Menu Model XML might look like:
<?xml version="1.0" encoding="UTF-8" standalone="yes"?>
<NavigationDefinition … >
    <Items>
       <Item id="myFolder" title="My Folder"  type="folder">
           <Items>

                <Item id="myContent" type="taskflow"
                      title="My Content">
                    <url>
                       /WEB-INF/mycompany/CustomDashboardTaskFlow.xml#CustomDashboardTaskFlow
                    </url>
                    <Parameters>
                        <Parameter id="productName">"Acme"</Parameter>
                    </Parameters>
                </Item>
           </Items>
       </Item>
    </Items>
</NavigationDefinition>
Item Attributes
| Attribute | Description |
|---|---|
|
visible |
Indicates if the item should be rendered (visible) or not. It can be an EL Expression that evaluates to true or false. Or it can be a plain string value equal to "true" or "false". Defaults to "true". |
|
type |
Indicates the type of the item. The main values are "folder","taskflow","link". The type "folder" indicates that the item contains additional sub-navigation items. The type "taskflow" indicates it is a task flow, and the type "link" is used for URLs. |
|
title |
The attribute title is used to provide the title of the sidebar item. This attribute is a required attribute. |
|
targetTitle |
The attribute targetTitle is used to provide the title of the tab in the content area. This attribute is an optional attribute. If not provided, the value of the title attribute will be used as the title of the tab in the content area. |
|
accessKey |
The attribute accessKey is used to specify the keyboard keystroke or a group of keystrokes that are used to access the navigation item using the keyboard. |
|
shortDesc |
The attribute shortDesc is used to provide the description of the navigation item which will be displayed when the user hovers over a menu item. |
|
showCloseIcon |
Mainly used when the content is being rendered in a popup, and indicates if the 'x' icon should show or not on the top right corner of the popup to facilitate manual closing of the popup. Takes the values "true" or "false". Defaults to "false". |
|
defaultContent |
Indicates whether the corresponding items from the model show up by default in tabs in the content area when the page template loads. Takes values "true" or "false", or may even take an EL Expression evaluating to "true" or "false". |
|
reuseInstance |
The attribute reuseInstance is used to specify whether the navigation items with the same title and url will use the same tab or not. When this attribute is set to false, the request to open the content for that navigation item will always use a new tab. When the attribute is true, the navigation items with the same title and url will share the same tab in the content area. It defaults to true. |
|
keysList |
Takes name value pairs separated by a semicolon. The attribute keysList provides a way to differentiate two navigation items with the same title and url. If keysList is not provided, then the two navigation items with the same title and url will always use the same tab. When the keysList is provided, it provides uniqueness to the navigation items with the same title and url enabling them to use different tabs. ExamplekeysList="key1=value1;key2=value2" |
|
urlRendererHeight, |
Example values are shown below. These used in the case of a popup and indicate the height and width of the popup. |
|
urlRendererHeight, urlRendererWidth |
Example values are shown below. These used in the case of a popup and indicate the height and width of the popup. urlRendererHeight="200px" urlRendererWidth="200px" |
|
reloadTab |
When this attribute is set to true, an already opened tab will be reloaded with the new input parameters for the taskflow. When it is set to false, a previously opened tab will only be re-focused, but not reloaded with new input parameters for the taskflow. The reload tab functionality has some limitations. Please see section 'Error! Reference source not found. |
|
refreshOnDisclosure |
When the navigation item has refreshOnDisclosure attribute set to true then the tab displaying that item in the Content Area will be refreshed every time it's disclosed. The attribute can take either of the two values true or false. Default is false. The attribute is useful in the scenarios where we want to display to the user the latest information from the database every time he/she comes back to the tab. The attribute should be used with caution because if the data in that tab is not committed before leaving the tab then the uncommitted data will be lost upon coming back to the tab. |
|
dynamicTabFocus |
When a navigation item is invoked, the tab displaying that item will have its text focused. To override this behavior, set dynamicTabFocus to "false". This attribute defaults to "true". |
|
popupId |
Applicable only when target="_popup". Must be a number between 1 and 15. This attribute allows consuming applications to target a specific popup within the UI Shell. The framework provides 15 popups that consuming applications can take advantage of. In case this attribute has not been specified, a default popup will be used by the framework. This default popup will not store its dimensions in MDS. |
|
popupContentHeight |
Applicable only when target="_popup". This attribute is used to provide the height in pixels of the resulting popup dialog window. |
|
popupContentWidth |
Applicable only when target="_popup". This attribute is used to provide the width in pixels for the resulting popup dialog window. |
|
popupStretchChildren |
Applicable only when target="_popup". This attribute is used to indicate the stretching behavior for the contents of the resulting popup window. The contents are referred to as child components. Valid values are:
|
|
popupResize |
Applicable only when target="_popup". This attribute is used to indicate the resulting popup window's resizing behavior. Valid values are:
|
|
popupHelpTopicId |
Applicable only when target="_popup". This attribute is used to look up a topic in a helpProvider for the resulting popup window. |
|
popupShortDesc |
Applicable only when target="_popup". This attribute is used to provide short description of the resulting popup window. |
|
contentListener |
Specifies the fully qualified name of the class implementing the ContentListener interface. This allows applications to have the ability to inject any session or request values before opening tabs. |
|
tabShortDesc |
Specifies the text to be shown when the user hovers over the application tab. Using this attribute application team can keep the title short and the tabShortDesc as fully qualified tab name which can be shown as the tooltip of the tab. This attribute will be displayed as tab title in screen reader mode. |
Item Sub-elements
| Sub-element | Description |
|---|---|
|
url |
The location of the item being launched. If the type is "taskflow" - then the URL element must contain the path to the task flow XML. If the type is "link" - then the URL of the external system must be indicated in this subelement. The entire URL must be marked as character data (e.g. enclosed in CDATA) |
|
Parameter |
The <Parameters> sub-element within <Item> should list all the parameters to the dashboard page if there are any. Each parameter is represented as a <Parameter> element inside <Parameters>. The <Parameter> id should be the actual parameter reference name recognized by the dashboard URL. The value of each <Parameter> is a string value. This is the only supported data type. |
Securing Access to Items
To restrict access to report items to specific security roles, set the visible property on the <Item> element for the dashboard URL to an Expression Language (EL) expression that calls ADF's securityContext API's isUserInRole method. Example:
                <Item id="myDashboard1"
                      type="link"
                      title="Profitability Dashboard"
                      visible="#{securityContext.isUserInRole['BUYER_JOB']}" >
The parameter to the securiytContext.isUserInRole method is a logical security role that is configured for the Retail Application. The API returns true if the user is included in the specified security role. If the user is not authenticated or is not found in the role, the API returns false.
To add new contents in the Retail Application's Tasks Menu, the retailer must override the tasks menu model.
All items seen by the user in the Tasks Menu are registered in an XML file called the Tasks Menu Model.
This file is kept in the application's EAR file but can be extracted, copied and modified so retailers can add references to their own workflows.
To add or modify an item in the Tasks Menu, follow the steps below:
Add a custom shared library. Refer to the section, Adding a Custom Shared Library for details.
Using JDeveloper, open the Custom Shared Library workspace in Developer Role.
Add all the custom task menu items as required.
Regenerate the shared library registry WAR file from the workspace and redeploy the shared library. Shutdown and restart of the Retail Application and its shared library registry is required.
Changes Required in Shared Library Registry for Custom Task Menu Model
Obtain the application's Tasks menu model XML file.
Tasks Menu Model XML – /oracle/retail/apps/framework/uishell/config/custom/HomeTaskMenuModel.xml
Please refer the section Reference the Custom Shared Library from the Retail Application, to register custom task menu model shared library with in the Retail Applications.
Open the original WAR File using an archive file manager and copy the above TaskMenuModel xml file in the View-Controller project src directory, preferably under a subdirectory called custom.
Add a new file called PageTemplateOverrideModel.properties under the View-Controller/src directory. Modify this file and add the following entry:
Home.taskMenuModelXml=<path to sidebar model xml within view-controller/src>
Example:
Home.taskMenuModelXml=/custom/HomeTaskMenuModel.xml
Modify the copy of the model. Add new itemsdefined in the custom shared library above. The format of the tasks menu model is similar to the format of the reports menu model. Refer to the section, Reports Menu Model XML Items.
Test the Retail Application.
A dashboard is a page within a Retail Application that displays the status of metrics and key performance indicators relevant to the Retail Application. They are typically tailored for specific roles and they allow users to easily monitor the status of the current data within the application.
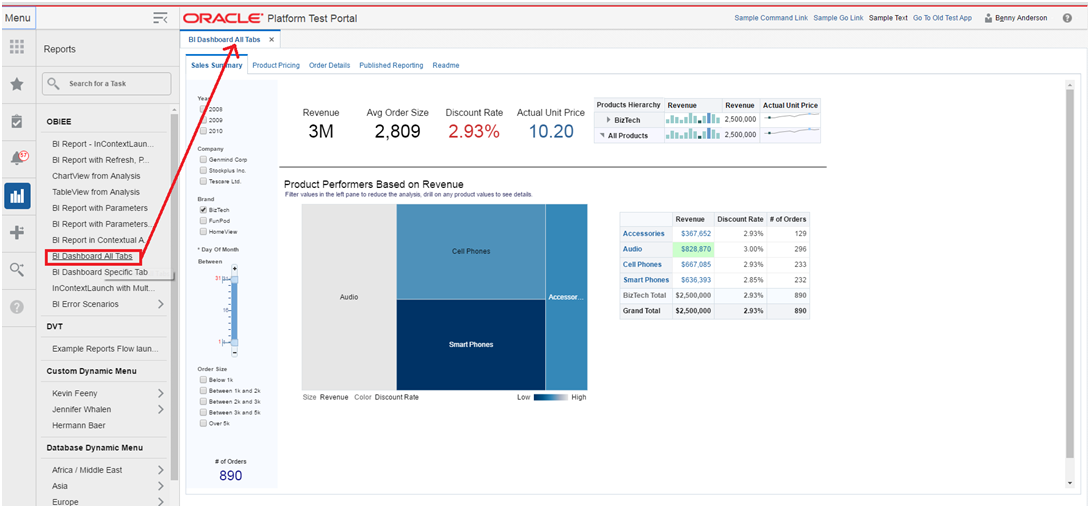
Users can access dashboards from the application's Reports menu.
The example below shows the dashboard page as rendered in the local area of a Retail Application's UI.
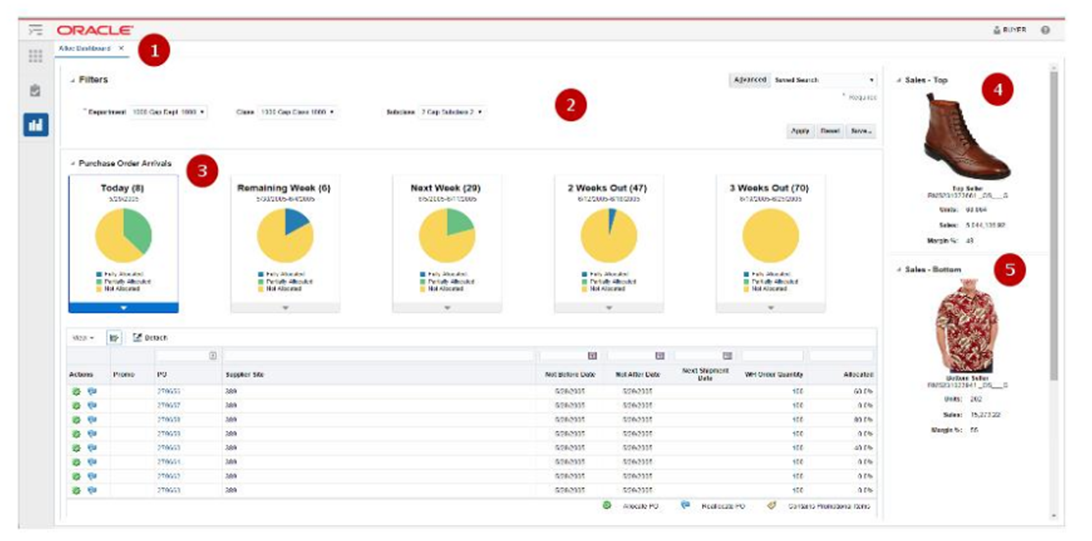
Anatomy of a Dashboard
Depicted below is an example of a dashboard that might appear in a Retail Application:
|
1 |
Dashboard Page |
A page rendering a dashboard. A dashboard is composed of 1 or more reports. The dashboard page is launched as a tab within the Retail Application |
|
2 |
Prompt Region |
The prompt region contains a set of editable input components that allow users to modify the parameters of the various reports in the dashboard. This allows users to see different sets of data for the same set of reports. This is optional on a dashboard page. There can be multiple prompt regions in a dashboard affecting different sets of reports on a dashboard. |
|
3, 4, 5 |
Report Regions |
A report region shows a graphical view of the application's business data. |
Supported Implementation of Dashboards
Retail Applications support the following implementation of dashboards:
Dashboards built using Oracle ADF.
Dashboards built in external BI reporting tools and accessible via a web browser URL.
Dashboards built using Oracle ADF is the recommended implementation of dashboards as they have seamless integration with the rest of the Retail Application.
Dashboards built in external BI reporting tools are supported as long as the dashboards can be accessed in a web browser via a URL. Oracle Retail recommends using Oracle Business Intelligence Enterprise Edition (OBIEE) for URL based dashboards.
Dashboards developed externally doesn't support Contextual links to Allocation Application, that means report can not access the App using contextual links.
Retail Application Included Dashboards
As mentioned in the section, Understanding the Deployment of Retail Applications, a Retail Application is installed with a shared library containing included dashboards that are rendered by default within the application.
These dashboards have the following characteristics:
The dashboards are implemented in Oracle ADF for seamless integration with the rest of the application workflows.
The dashboards are implemented using a common framework called ADF Dashboard Prompts to allow for a standard way of customizing them.
Retailers can customize included dashboards. Please refer to the section, Dashboard Customization Scenarios for details on the types of customization retailers can perform on included dashboards.
This section describes the steps for adding ADF based dashboard reports into the Retail Application's UI Sidebar. ADF-based reports can be integrated into the Retail Application by adding the dashboard report's task flow URL in the application's reports menu model XML file:
Add a new custom shared library. Refer to the section, Adding a Custom Shared Library.
Implement the dashboard page components in the custom shared library workspace. Dashboard page components are built as Oracle ADF bounded task flows. Refer to the section, Creating New ADF Contents, for important considerations when building custom ADF content.
Note the task flow URL and the parameters of the dashboard task flow.
Register the task flow URL and parameters into the application's Reports Menu Model. Refer to section, Adding or Modifying an Item in the Reports Menu.
Re-generate the Custom Shared Library WAR file from the Custom Shared Library workspace. Shutdown the Retail Application and its Custom Shared Library Registry, redeploy the Custom Shared Library WAR file, and restart the Retail Application components.
Grant security permissions to dashboard page components. Refer to the section, Creating New ADF Contents.
Test the Retail Application. Log-in and verify the newly added content.
This section describes the steps for adding external dashboard reports into the Retail Application's UI Sidebar. The reports such as OBIEE, BI Publisher or Microstrategy can be integrated into the Retail Application by adding the web URL of the dashboard report in the application's reports menu model XML file:
Create the dashboard report in the reporting server instance.
Obtain the URL to the dashboard report along with any parameters needed to render it.
Add a New Custom Shared Library. Refer to the section, Adding a Custom Shared Library.
Open the Custom Shared Library workspace in JDeveloper.
Add a new item in the reports menu for the URL and parameters of the dashboard report. Refer to the section, Adding or Modifying an Item in the Reports Menu.
Re-generate the Custom Shared Library WAR file from the Custom Shared Library workspace. Shutdown the Retail Application and its Custom Shared Library Registry, redeploy the Custom Shared Library WAR file, and restart the Retail Application components.
Test the Retail Application. Log-in and verify that a link to the BI dashboard appears in the UI's sidebar task tree under a folder "My Custom Dashboards".
This section contains supported customization use cases for out-of-the-box dashboards included in the Retail Application installation.
Understanding Design Pattern of Included Dashboards
As mentioned in the section, Anatomy of a Dashboard, dashboards are composed of prompt regions and report regions.
The representation of those parts at runtime are depicted in the diagram below:
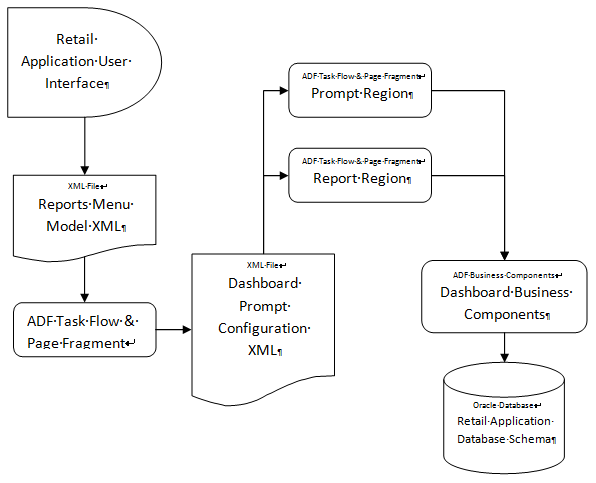
The dashboard page, prompts and reports are implemented as ADF bounded task Flows and page fragments. The prompts and regions are configured in an XML file called a Dashboard Prompt Configuration XML. The dashboard prompt XML arranges visually the prompts and regions on the dashboard page.
The dashboard task flow is launchable from the Retail Application User Interface's Reports Menu. In order to make the report launchable, the dashboard task flow is registered in the application's reports menu model XML.
A set of ADF business components enable data from the Retail Application schema to be rendered in the report regions.
The figure below shows a rendering of a dashboard (called Alloc Dashboard) in a Retail Application:

The different parts of this example dashboard are described below:
|
1 |
Dashboard Page |
For this example - this called the Allocations Dashboard or Alloc Dashboard. It contains 1 prompt and 3 reports. It is implemented as an ADF bounded task flow called AllocDashboardFlow. |
|
2 |
Prompt Region |
This is the prompt region that users modify to change the view of the various reports in this dashboard. It is implemented as an ADF bounded task flow called DashboardFilterFlow. |
|
3 |
Order Status Report |
A report region showing a row of information tiles and a detail table. It is implemented as an ADF bounded task flow called OrderStatusFlow. |
|
4 |
Top Seller Report |
A report region showing the top selling item. It is implemented as an ADF bounded task flow called TopSellerFlow |
|
5 |
Bottom Seller Report |
A report region showing the bottom selling item. It is implemented as an ADF bounded task flow called BottomSellerFlow |
The dashboard is launched from the application's reports menu. The reports menu model XML file (as shown below) contains an item called allocDashboard registering the task flow, AllocDashboardFlow, into the reports menu. Note that the dashboard task flow includes a parameter called dashboardConfigXML which references the location of the Dashboard Prompt Configuration XML file.
<?xml version="1.0" encoding="UTF-8" standalone="yes"?>
<NavigationDefinition id="Folder_1"
    xmlns:xsi="http://www.w3.org/2001/XMLSchema-instance"
    xmlns="urn:www.oracle.com:oracle.retail.apps.framework.navigation"
    xsi:schemaLocation="urn:www.oracle.com:oracle.retail.apps.framework.navigation classpath:oracle/retail/apps/framework/uishell/navigation/model/schema/NavigationModel.xsd">
    <Items>
        <Item id="allocDashboard" title="Alloc Dashboard"
              shortDesc="Alloc Dashboard"
              type="taskflow">
            <url>/WEB-INF/AllocDashboardFlow.xml#AllocDashboardFlow</url>
            <Parameters>
                <Parameter id="dashboardConfigXML">"/oracle/AllocDashboardPrompt.xml"</Parameter>
            <Parameters>
        </Item>
    </Items>
</NavigationDefinition>
The Dashboard Prompt Configuration XML file for this example is called the AllocDashboardPrompt.xml and it contains the following entries:
<?xml version="1.0" encoding="UTF-8" ?>
<Dashboard layout="column" xmlns="urn:www.oracle.com:oracle.retail.apps.framework.dashboard"
           xmlns:xsi="http://www.w3.org/2001/XMLSchema-instance"
           xsi:schemaLocation="urn:www.oracle.com:oracle.retail.apps.framework.dashboard classpath:oracle/retail/apps/framework/dashboard/model/schema/dashboardSchema.xsd">
    <Vectors>
        <Vector>
            <Items>
                <Item id="filter" type="prompt">
                    <url>/WEB-INF/DashboardFilterFlow.xml#DashboardFilterFlow</url>
                </Item>
                <Item id="orderStatus" type="report">
                    <url>/WEB-INF/oracle/retail/apps/framework/dvtcontextawarereport/publicui/flow/DVTContextAwareReportFlow.xml#DVTContextAwareReportFlow</url>
                    <Parameters>
                        <Parameter id="taskflowURL">/WEB-INF/OrderStatusFlow.xml#OrderStatusFlow</Parameter>
                        <Parameter id="parameterName1">departmentIds</Parameter>
                        <Parameter id="payloadKeyName1">DepartmentId</Parameter>
                        <Parameter id="parameterName2">classIds</Parameter>
                        <Parameter id="payloadKeyName2">ClassId</Parameter>
                        <Parameter id="parameterName3">subclassIds</Parameter>
                        <Parameter id="payloadKeyName3">SubclassId</Parameter>
                    </Parameters>
                </Item>
            </Items>
        </Vector>
        <Vector width="300px">
            <Items>
                <Item id="topSeller" type="report">
                    <url>/WEB-INF/oracle/retail/apps/framework/dvtcontextawarereport/publicui/flow/DVTContextAwareReportFlow.xml#DVTContextAwareReportFlow</url>
                    <Parameters>
                        <Parameter id="taskflowURL">/WEB-INF/oracle/retail/apps/flow/TopSellerFlow.xml#TopSellerFlow</Parameter>
                        <Parameter id="parameterName1">departmentIds</Parameter>
                        <Parameter id="payloadKeyName1">DepartmentId</Parameter>
                        <Parameter id="parameterName2">classIds</Parameter>
                        <Parameter id="payloadKeyName2">ClassId</Parameter>
                        <Parameter id="parameterName3">subclassIds</Parameter>
                        <Parameter id="payloadKeyName3">SubclassId</Parameter>
                    </Parameters>
                </Item>
                <Item id="bottomSeller" type="report">
                    <url>/WEB-INF/oracle/retail/apps/framework/dvtcontextawarereport/publicui/flow/DVTContextAwareReportFlow.xml#DVTContextAwareReportFlow</url>
                    <Parameters>
                        <Parameter id="taskflowURL">/WEB-INF/oracle/retail/apps/flow/BottomSellerFlow.xml#BottomSellerFlow</Parameter>
                        <Parameter id="parameterName1">departmentIds</Parameter>
                        <Parameter id="payloadKeyName1">DepartmentId</Parameter>
                        <Parameter id="parameterName2">classIds</Parameter>
                        <Parameter id="payloadKeyName2">ClassId</Parameter>
                        <Parameter id="parameterName3">subclassIds</Parameter>
                        <Parameter id="payloadKeyName3">SubclassId</Parameter>
                    </Parameters>
                </Item>
            </Items>
        </Vector>
    </Vectors>
</Dashboard>
The file registers the prompts and regions into a hierarchy of vectors and items. The structure of the dashboard prompt configuration XML file is explained in the following section.
The Dashboard Prompt Configuration XML File
The root element of the model is the "Dashboard" element. Other than schema and namespace information, the "Dashboard" element has a "layout" attribute that must be provided, and must contain a value of either "row" or "column". This attribute arranges the regions of the dashboard in rows or columns.
Inside the "Dashboard" element is a "Vectors" element, which contains a list of "Vector" elements. If the dashboard layout="row", then each "Vector" corresponds to a single row in the dashboard. Conversely, if layout="column", then each "Vector" corresponds to a column. To add a new row or column, simply add another "Vector" element inside the "Vectors" element.
Up to 12 rows and 6 columns can be displayed in a dashboard, not including separate header and footer regions. Any items beyond 12 rows or 6 columns will not appear on the dashboard.
Rows in the dashboard display from top to bottom. If layout="row", the first "Vector" will appear toward the top of the page. Columns appear from left to right, so if layout="column", the first "Vector" will appear toward the left of the page.
Each "Vector" element contains an "Items" element, which contains a list of "Item" elements. The xml structure for "Item" elements is very similar to the tasks or reports sidebar menu models.
The following attributes are supported on dashboard items:
| Name | Description | Required? |
|---|---|---|
|
id |
A unique id for this region |
Yes |
|
type |
The type of content contained in this region. Valid values: prompt, report |
Yes |
|
width |
The width of this region. See below for more details. |
No |
|
height |
The height of a region. See below for more details. |
No |
|
url |
The task flow url to open in this region |
Yes |
|
Parameters |
Parameters to be sent to the URL |
No |
In addition to the items arranged in rows or columns, you can add a header and footer region to the dashboard. Both horizontally span the full width of the dashboard, with the header appearing at the top and the footer appearing at the bottom. These can be added in the model by specifying a "HeaderItem" or "FooterItem" child of the root "Dashboard" element. These regions support all the same properties as other items in the dashboard.
Vectors and items expose width and height attributes to enable applications to resize elements to best fit on the dashboard. Certain rules and best practices apply when using these attributes.
First, if the dashboard is in row layout, then all items in a row must have the same height. The height attribute from the vector is used to specify the height of every item in that row. Since rows are assumed to span the full width, the vector width is ignored in this layout.
In the same way, when the dashboard is arranged in column layout, all items in a column must have the same width. The vector width is used to specify the width of every item in that column. Columns should expand vertically to accommodate all content, allowing a scrollbar if necessary. Therefore, vector height is ignored in this layout.
In addition to the width and height attributes, a vector also provides a dimensionsFrom attribute. The valid values of the dimensionsFrom attribute can be auto, child or parent. The dimensionsFrom attribute is used to specify whether the Items in the vector inherit their dimensions from the parent decorative box or not. When the dimensionsFrom attribute is parent, the Items in the vector will be stretched to fill any available space in the vector. When the dimensionsFrom attribute is child, the Items in the vector won't stretch but will display scroll bars if they cannot be accommodated in the available space in the decorative box. The default value of the dimensionsFrom attribute is 'auto' which gives preference to the child dimensions.
The following table indicates which attributes are used, based on which dashboard layout has been selected.
| Row layout | Column layout | |
|---|---|---|
|
Vector width |
ignored |
valid |
|
Vector height |
valid |
ignored |
|
Item height |
ignored |
valid |
|
Item width |
valid |
ignored |
In column layout, either every vector width should be provided, or every width should be omitted. If all widths are omitted, columns default to divide the total width evenly. When the widths are omitted, the dimensionsFrom attribute of the vector can be set to parent if stretching of the Items is desired. If widths are provided, they should be specified as a percentage, and the sum of all widths should equal 100%.
In row layout, heights may be specified or omitted as desired. If a row's height is omitted, it will default to get the dimension from the content inside the regions. When the row's height is omitted, the dimensionsFrom attribute of the vector can be set to parent if stretching of the Items is desired. Heights should be specified using an exact unit such as px or em. Percentages should not be used.
If these rules and best practices are ignored, results may be inconsistent or undesirable. Items may not size as intended, and horizontal scrollbars or nested vertical scrollbars may appear.
In addition to resizing entire rows or columns, individual items inside the row or column can also be resized. As mentioned above, items in a row should all have the same height, so in row layout, item height is ignored and only item width is valid. And items in a column should have the same width, so item width is ignored and only item height is valid. See the table above for details.
The same rules and best practices that apply to vector height and width also apply to setting item height and width.
Refreshing Reports on Prompt Changes
When the user changes a value on the dashboard prompt, that value translates as a parameter change on the different reports on the dashboard.
This is accomplished through a feature in ADF called Contextual Events. To put simply, contextual events are signals that a page in a task flow can generate for which pages in other task flows can listen and react to. For the included dashboards, prompt regions generate a contextual event whenever the user changes a prompt field value. When a report "hears" an event, it will process the contextual event information (called a payload) to extract the changed prompt value, use that value as a parameter to the report query and refresh the report region.
In the example depicted in the previous section, the dashboard prompt configuration XML file shows all three reports registered under a wrapper task flow called the DVTContextAwareReportFlow.
                <Item id="bottomSeller" type="report">
                    <url>/WEB-INF/oracle/retail/apps/framework/dvtcontextawarereport/publicui/flow/DVTContextAwareReportFlow.xml#DVTContextAwareReportFlow</url>
                    <Parameters>
                        <Parameter id="taskflowURL">/WEB-INF/oracle/retail/apps/flow/BottomSellerFlow.xml#BottomSellerFlow</Parameter>
                        <Parameter id="parameterName1">departmentIds</Parameter>
                        <Parameter id="payloadKeyName1">DepartmentId</Parameter>
                        <Parameter id="parameterName2">classIds</Parameter>
                        <Parameter id="payloadKeyName2">ClassId</Parameter>
                        <Parameter id="parameterName3">subclassIds</Parameter>
                        <Parameter id="payloadKeyName3">SubclassId</Parameter>
                    </Parameters>
                </Item>
The DVTContextAwareReportFlow wrapper task flow enables a report to listen to contextual events generated by prompt regions.
Note the pairs of parameterNameN and payloadKeyNameN registered in the <Parameters> section for the report task flow BottomSellerFlow. A pair of parameter name and payload key name tells the framework what prompt value is mapped to a specific report parameter. From the example above, parameterName1 is specified as "departmentIds" and payloadKeyName1 as "departmentIds". This means the following:
There is a task flow parameter for the BottomSellerFlow called "departmentIds"
When the user changes the value of the department ID in the prompt region, the system will generate a contextual event with the new department value stored as reference "DepartmentId".
The report is context aware (as indicated by the wrapper task flow - DVTContextAwareReportFlow). When the report detects the contextual event, the framework will get the new department ID value from the payload by using the key "DepartmentId", use it to update the BottomSellerFlow task flow's "departmentId" parameter, and refresh the report region.
For more details on the DVTContextAwareReportFlow, refer to the section Adding a DVT Taskflow-based Contextual Report.
List of Retail Application Included Dashboards
This section contains a listing of all dashboard reports included in the Retail Application.
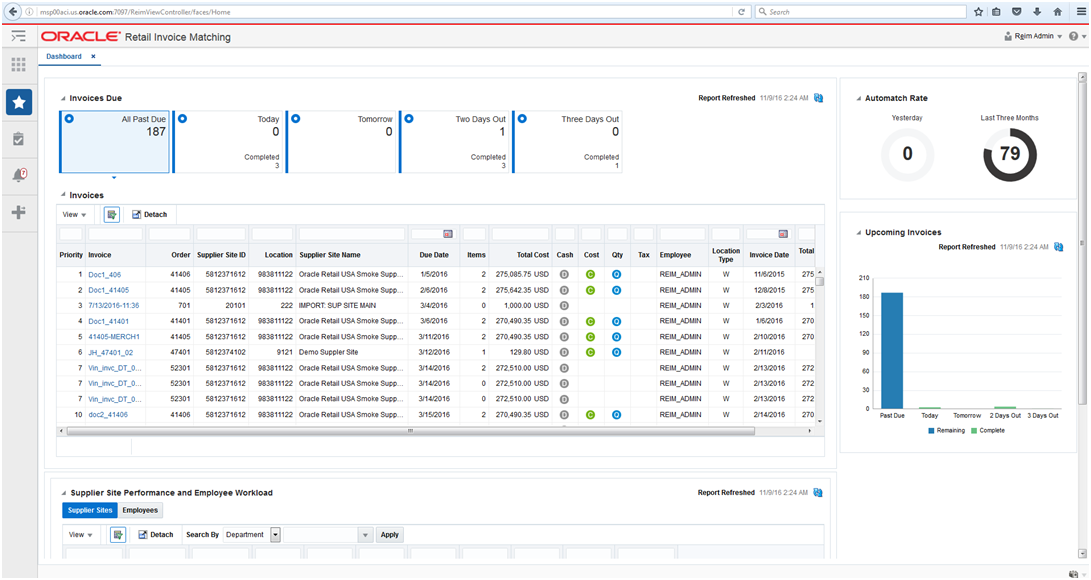
Accounts Payable Summary View

The dashboard surfaces information in a manner that will help users (Accounts Payable specialist) understand invoice match workload and provide quick visibility into cost, quantity and tax discrepancies. There are 3 main sections of the Accounts Payable dashboard: Upcoming Invoices, Auto Match Rate, and Invoice list. This view will show details for only the invoices that this role is responsible for managing and manually matching.
The dashboard can be accessed by the following job roles:
Accounts Payable Specialist
The following reports will be displayed on the dashboard:
Upcoming Invoices
Auto Match Rate
Invoice list
Task Flow Urls:
/WEB-INF/oracle/retail/apps/reim/dashboards/view/reimdashboard/flow/ReimDashboardFlow.xml
/WEB-INF/oracle/retail/apps/reim/dashboards/view/reimdashboard/flow/UpcomingInvoicesReportFlow.xml
/WEB-INF/oracle/retail/apps/reim/dashboards/view/reimdashboard/flow/AutomatchRateReportFlow.xml
/WEB-INF/oracle/retail/apps/reim/dashboards/view/reimdashboard/flow/InvoiceReportFlow.xml
Parameters to the dashboard task flow:
| Parameter | Sample Value |
|---|---|
|
dashboardXml |
/oracle/retail/apps/reim/dashboards/view/reimdashboard/ReimDashboard.xml |
There are no dashboard prompts for this dashboard
Finance Manager Supplier View
The dashboard surfaces information in a manner that will help users (Finance Manager) understand invoice match workload, view supplier performance, manage employee workload and provide quick visibility into cost, quantity and tax discrepancies. There are 4 main sections for the Finance Manager view; Upcoming Invoices, Auto Match Rate, Suppliers and Invoices. Finance Manager will see the detail for all of his/her employees that he/she manages.
The dashboard can be accessed by the following job roles:
Finance Manager - A Finance Manager is responsible for the financial accounting of a region.
The following reports will be displayed on the dashboard:
Upcoming Invoices
Auto Match Rate
Supplier Performance and Employee Workload
Invoices
Task Flow Urls:
/WEB-INF/oracle/retail/apps/reim/dashboards/view/reimdashboard/flow/ReimDashboardFlow.xml
/WEB-INF/oracle/retail/apps/reim/dashboards/view/reimdashboard/flow/UpcomingInvoicesReportFlow.xml
/WEB-INF/oracle/retail/apps/reim/dashboards/view/reimdashboard/flow/AutomatchRateReportFlow.xml
/WEB-INF/oracle/retail/apps/reim/dashboards/view/reimdashboard/flow/SupplierSitePerformanceReportFlow.xml
/WEB-INF/oracle/retail/apps/reim/dashboards/view/reimdashboard/flow/EmployeeWorkloadReportFlow.xml
/WEB-INF/oracle/retail/apps/reim/dashboards/view/reimdashboard/flow/InvoiceReportFlow.xml
Adding or Replacing A Report In An Included Dashboard
This section discusses the steps needed to add or replace a report on an included dashboard.
Add a custom shared library. Refer to the section, Adding a Custom Shared Library. An existing custom shared library can be reused.
Identify the dashboard to be modified. Refer to the section, List of Retail Application Included Dashboards.
If needed, open the custom shared library workspace in JDeveloper and build your own custom report as an ADF bounded task flow. Refer to the section, Creating New ADF Contents.
If the report has to refresh when a prompt on the dashboard is changed by the user, make sure that task flow parameters are present for the prompt values your report will need to react to. Refer to the section, List of Retail Application Included Dashboards, for a list of prompt payload values that can be generated for the dashboard.
Note the new report's task flow URL and parameters.
Obtain a copy of the dashboard prompt configuration XML file for the dashboard to be modified. Refer to the section, List of Retail Application Included Dashboards.
Modify the copy of the dashboard prompt configuration XML file to add an item or replace an existing item for the new report. Refer to the section, The Dashboard Prompt Configuration XML File for details on properly creating a new item entry in the configuration file.
If the report has to refresh when a prompt on the dashboard is changed by the user, make sure that report task flow is wrapped in a DVTContextAwareTaskFlow for its item entry in the dashboard prompt configuration XML file. Use the example in the section, Understanding Design Pattern of Included Dashboards, as reference. Refer to the section, Adding a DVT Taskflow-based Contextual Report for usage of the DVTContextAwareTaskFlow framework.
Modify the included dashboard's entry in the application's Reports Menu to reference the location of your copy of the dashboard prompt configuration XML file. Refer to the section, Adding or Modifying an Item in the Reports Menu.
Re-generate the Custom Shared Library WAR file from the Custom Shared Library workspace. Shutdown the Retail Application and its Custom Shared Library Registry, redeploy the Custom Shared Library WAR file, and restart the Retail Application components.
Test the Retail Application.
Removing a Report From An Included Dashboard
This section discusses the steps needed to remove a report from an included dashboard.
Add a custom shared library. Refer to the section, Adding a Custom Shared Library. An existing custom shared library can be reused.
Identify the dashboard to be modified. Refer to the section, List of Retail Application Included Dashboards.
Obtain a copy of the dashboard prompt configuration XML file for the dashboard to be modified. Refer to the section, List of Retail Application Included Dashboards.
Modify the copy of the dashboard prompt configuration XML file and remove the report. You may need to readjust the position of the other reports. Refer to the section, The The Dashboard Prompt Configuration XML File for details on the configuration XML attributes that control the rendering of the dashboard.
Modify the included dashboard's entry in the application's Reports Menu to reference the location of your copy of the dashboard prompt configuration XML file. Refer to the section, Adding or Modifying an Item in the Reports Menu.
Re-generate the Custom Shared Library WAR file from the Custom Shared Library workspace. Shutdown the Retail Application and its Custom Shared Library Registry, redeploy the Custom Shared Library WAR file, and restart the Retail Application components.
Test the Retail Application.
Change the Layout Of An Included Dashboard
This section discusses the steps needed to change the layout of the reports in included dashboards.
Add a custom shared library. Refer to the section, Adding a Custom Shared Library. An existing custom shared library can be reused.
Identify the dashboard to be modified. Refer to the section, List of Retail Application Included Dashboards.
Obtain a copy of the dashboard prompt configuration XML file for the dashboard to be modified. Refer to the section, List of Retail Application Included Dashboards.
Modify the copy of the dashboard prompt configuration XML file and rearrange the position of the item entries. Refer to the section, The Dashboard Prompt Configuration XML File for details on the attributes to control the layout of dashboard.
Modify the included dashboard's entry in the application's Reports Menu to reference the location of your copy of the dashboard prompt configuration XML file. Refer to the section, Adding or Modifying an Item in the Reports Menu.
Re-generate the Custom Shared Library WAR file from the Custom Shared Library workspace. Shutdown the Retail Application and its Custom Shared Library Registry, redeploy the Custom Shared Library WAR file, and restart the Retail Application components.
Test the Retail Application.
Contextual Reports are reports that appear in a task flow's contextual area section. As discussed in the section, Understanding the Retail Application User Interface, the Contextual Area is a collapsible section to the right of the local area that provides a space to present information that can assist users in completing their tasks.
Since information presented in a contextual area is presented depending on the task or workflow the user is on, contextual areas are associated to task flows and there can be at most one contextual area per task flow.
Within a contextual area - multiple contextual reports can be configured.
Each contextual report can change its contents depending on the action being performed in the user's current workflow.
For example, in the screenshot below, as the user selects the line of business from the table, the line chart will show the annual trade for the selected line of business.

Each task flow publishes contextual business events on key activities happening in the screen. Contextual reports can listen to those events and change its content depending on the payload information associated with the event.
Contextual reports can either be ADF based DVT reports or can be maintained in a separate BI reporting tool. The ADF based DVT reports are ADF taskflows, which are built using the ADF Data Visualization components. The reports maintained in an external reporting tool are URLs accessible in a web browser via a URL. Oracle Retail recommends using Oracle Business Intelligence Enterprise Edition (Oracle BI EE) for an external reporting tool.
The contextual reports are added into a Retail Application by adding and configuring the task flow's contextual area model XML file into the Custom Shared Library.
Retail Applications may provide retailers with a list of possible contextual business events each flow generates. Retailers can configure their contextual reports to react to these events. Each event will also include information about the event's payload information (example: the item ID of the item being selected in an Allocation Maintenance screen).
| Event Name | Task Flow | Contextual Area Name | Contextual Area Model XML Location | Generated when… | Payload Values |
|---|---|---|---|---|---|
|
DetailToleranceRange |
ToleranceRangeDetailFlow |
ToleranceRangeDetail |
ReimViewController.EAR ' ReimDashboardSharedLib.war ' /oracle/retail/apps/reim/dashboards/view/uishell/config/custom/contextualarea/ContextualAreaModelDetailMatchFlow.xml |
The user enters the Detail Match screen or clicks on an item from the table |
|
|
qtyComparison |
QuantityComparisonFlow |
QuantityComparison |
ReimViewController.EAR ' ReimDashboardSharedLib.war ' /oracle/retail/apps/reim/dashboards/view/uishell/config/custom/contextualarea/ContextualAreaModelDetailMatchFlow.xml |
The user enters the Detail Match screen or clicks on an item from the table |
|
|
costComparison |
CostEventFlow |
CostEvent |
ReimViewController.EAR ' ReimDashboardSharedLib.war ' /oracle/retail/apps/reim/dashboards/view/uishell/config/custom/contextualarea/ContextualAreaModelDetailMatchFlow.xml |
The user enters the Detail Match screen or clicks on an item from the table |
|
|
suppSiteEventBinding |
SupplierSiteFlow |
SupplierSite |
ReimViewController.EAR ' ReimDashboardSharedLib.war ' /oracle/retail/apps/reim/dashboards/view/uishell/config/custom/contextualarea/ContextualAreaModelDiscrepancyListFlow.xml |
The user searches from the Discrepancy List screen or clicks on an item from the table |
siteId - the supplier site id |
|
qtyEventBinding |
QuantityComparisonFlow |
QuantityComparison |
ReimViewController.EAR ' ReimDashboardSharedLib.war ' /oracle/retail/apps/reim/dashboards/view/uishell/config/custom/contextualarea/ContextualAreaModelDiscrepancyListFlow.xml |
The user searches from the Discrepancy List screen or clicks on an item from the table |
|
|
costEventBinding |
CostEventFlow |
CostEvent |
ReimViewController.EAR ' ReimDashboardSharedLib.war ' /oracle/retail/apps/reim/dashboards/view/uishell/config/custom/contextualarea/ContextualAreaModelDiscrepancyListFlow.xml |
The user searches from the Discrepancy List screen or clicks on an item from the table |
|
|
SummaryToleranceRange |
ToleranceRangeSummaryFlow |
ToleranceRangeSummary |
ReimViewController.EAR ' ReimDashboardSharedLib.war ' /oracle/retail/apps/reim/dashboards/view/uishell/config/custom/contextualarea/ContextualAreaModelSummaryMatchFlow.xml |
The user enters the Summary Match screen or clicks on an item from the table |
|
|
supplierSiteEvent |
SupplierSiteFlow |
SupplierSite |
ReimViewController.EAR ' ReimDashboardSharedLib.war ' /oracle/retail/apps/reim/dashboards/view/uishell/config/custom/contextualarea/ContextualAreaModelSummaryMatchFlow.xml |
The user enters the Summary Match screen or clicks on an item from the table |
|
This section describes how to prepare the Custom Shared Library so retailers will be able to add contextual reports in Retail Application task flows.
Perform the steps described in the section Adding a Custom Shared Library to create a Custom Shared Library workspace, generate a shared library WAR out of it, deploying the WAR, and associating the library to the Retail Application.
Using JDeveloper, open the Custom Shared Library workspace in Developer Role.
Add new contents as required.
Regenerate the shared library WAR file from the workspace and redeploy the shared library. Shutdown and restart of the Retail Application and its shared library registry is required.
Changes required in Shared Libarary Registry for Custom Contextual Reports
Obtain a copy of the task flow contextual area model XML files where contextual reports will be added. Refer to section, List of Contextual Business Events and Payloads.
Example: If the contextual area model XML for the task flow AllocMaintFlow is called AllocMaintFlowContextualAreaModel.xml - then that file's path must be View -Controller/src/custom/AllocMaintFlowContextualAreModel.xml.
Please refer the section Referencing the Custom Shared Library from the Retail Application to register custom contextual reports shared library with in the Retail Applications.
Open the original WAR file using an archive file manager and copy the contextual area model XML file in the View-Controller project src directory, preferably under a subdirectory called custom.
Add a new or open the existing file called PageTemplateOverrideModel.properties under the View-Controller/src directory. Modify this file and add the following entry:
<ContextualAreaName>.contextualAreaModel=<path to the contextual area model for the flow>
Example:
AllocMaintFlow.sidebarModel=/custom/AllocMaintFlowContextualAreaModel.xml
Test the Retail Application. Navigate to the flow and make sure the flow is functional.
Adding a contextual report to a task flow entails the modification of the task flow's Contextual Area Model XML file. Multiple reports can be added to the model. Each report is rendered in a collapsible panel box.
Before adding a URL based contextual report, the retailer must have:
Built, prepared, deployed, and tested the Custom Shared Library as described in the section, section Preparing the Custom Shared Library for Adding Contextual Reports.
Obtained information about the Retail Application's list of contextual business events that can be broadcast from various workflows.
Created one or more contextual BI reports in the BI reporting tool (e.g. Oracle BI EE).
The web URL for each report must be available in order to proceed with the steps in this section.
Any parameters to configure the content of the report must be known and should be accessible as parameters to the dashboard's URL.
Once the above pre-requisites have been satisfied, proceed with the following steps:
Assume the following example scenario when following the steps:
A contextual report called "Item Metrics" showing information about an item is to be added to the Allocation Maintenance Flow's main page. When the user selects an item on the page, the report will show information for the selected item.
Retail Application has provided the following information about the contextual business event:
| Event Name | Task Flow | Page | Contextual Area Model XML Location | Generated when… | Payload Values |
|---|---|---|---|---|---|
|
AllocMaintItem SelectedEvent |
AllocMaintFlow |
AllocMaintPage |
EAR name -> war name-> jar name -> /oracle/retail/apps/xyz/AllocMaintFlowContextualAreaModel.xml |
The user selects an item on the Allocation Maintenance Flow's main screen. |
|
The Item Metrics report was built in the retailer's BI reporting tool (e.g. Oracle BI EE). It was built considering the payload values the contextual business event will generate.
Open the Custom Shared Library workspace in JDeveloper.
Open the task flow contextual area model XML file (ex. ViewController/src/custom/AllocMaintFlowContextualAreaModel.xml).
Add an <Item> element within the topmost <Items> element that references the task flow called ViewContextAwareReportFlow. The ViewContextAwareReportFlow is a framework for rendering URL based reports that will be aware of contextual business events emanating from the Retail Application task flows.
Example:
<?xml version="1.0" encoding="UTF-8" standalone="yes"?>
<NavigationDefinition … >
    <Items>
        ...
        ...

        <Item id="showItemMetric"
              type="taskflow"
              title="Item Metric">
            <url>
/WEB-INF/oracle/retail/apps/framework/contextawarereport/publicui/flow/ViewContextAwareReportFlow.xml#ViewContextAwareReportFlow
            </url>
         </Item>

    </Items>
</NavigationDefinition>
Note the following:
Make sure that the <Item> id is unique.
Make sure the <Item> type is "taskflow"
Provide a meaningful title.
Populate the parameters to the ViewContextAwareReportFlow by adding the following <Parameter>/<Parameters> elements.
<?xml version="1.0" encoding="UTF-8" standalone="yes"?>
<NavigationDefinition … >
<Items>
<Item id="showCustomerMetric"
type="taskflow"
title="Customer Metric">
<url>
/WEB-INF/oracle/retail/apps/framework/contextawarereport/publicui/flow/ViewContextAwareReportFlow.xml#ViewContextAwareReportFlow
</url>
<Parameters>
<Parameter id="reportDescription">Item Metric</Parameter>
<Parameter id="actionType">AllocMaintItemSelectedEvent</Parameter>
<Parameter id="primaryUrl">
<![CDATA[/faces/oracle/retail/apps/framework/contextawarereport/publicui/page/ViewContextAwareReportTestPage.jspx?paramItemId=<selectedItemId>¶mItemType=<selectedItemType:token01>¶mLanguage=<language>]]>
</Parameter>
<Parameter id="token01">regular</Parameter>
</Parameters>
</Item>
</Items>
</NavigationDefinition>
Note the following:
The <Parameter id="reportDescription"> element is the title of the contextual area report. Set this to a meaningful value.
The <Parameter id="actionType"> element indicates the contextual business event name the report will listen to.
The <Parameter id="primaryUrl"> element indicates the URL to the contextual area report in the BI server. The entire URL must be marked as character data (e.g. enclosed in CDATA). Note that the parameters to the URL are tokenized. The example above uses a test page called ViewContextAwareReportTestPage.jspx which can be replaced with the actual report URL.
The "?paramItemId=<selectedItemId>" portion of the URL instructs the system to pass the contextual business event payload value called selectedItemId into the URL parameter paramItemId when rendering the contextual report.
The "?paramItemType=<selectedItemType:token01>" portion of the URL instructs the system to pass the contextual business event payload value called selectedItemType into the URL parameter paramItemType when rendering the contextual report. If that payload value is empty or null at runtime, then a default value of regular is used as referenced in a <Parameter id="token01"> entry. The colon symbol separates the payload value from the default value if the payload value is null.
The "?paramLanguage=<language>" portion of the URL instructs the system about the current locale of the user. The "language" identifier is a reference to a value in the contextual event payload. This is a built-in value that all Retail Application contextual business event payloads will have.
The <Parameter id="token01"> element holds the default value for the URL parameter selectedItemType. Token parameters hold default values and you can define up to 20 default value tokens.
Re-generate the Custom Shared Library WAR file from the Custom Shared Library workspace. Shutdown the Retail Application and its Custom Shared Library Registry, redeploy the Custom Shared Library WAR file, and restart the Retail Application components.
Test the Retail Application. Go to the flow where the report was added and verify that the report is rendered correctly.
Before adding a DVT taskflow based contextual report, the retailer must have:
Built, prepared, deployed, and tested the Custom Shared Library as described in the section Preparing the Custom Shared Library for Adding Contextual Reports.
Obtained information about the Retail Application's list of contextual business events that can be broadcast from various workflows.
Created one or more taskflows using the ADF DVT components.
Any parameters to configure the content of the report must be known and should be accessible as taskflow parameters.
Once the above pre-requisites have been satisfied, proceed with the following steps:
Assume the following example scenario when following the steps:
A contextual report called "Item Metrics" showing information about an item is to be added to the Allocation Maintenance Flow's main page. When the user selects an item on the page, the report will show information for the selected item.
Retail Application has provided the following information about the contextual business event:
| Event Name | Task Flow | Page | Contextual Area Model XML Location | Generated when… | Payload Values |
|---|---|---|---|---|---|
|
AllocMaintItem SelectedEvent |
AllocMaintFlow |
AllocMaintPage |
EAR name -> war name-> jar name -> /oracle/retail/apps/xyz/AllocMaintFlowContextualAreaModel.xml |
The user selects an item on the Allocation Maintenance Flow's main screen. |
|
The Item Metrics report was built in ADF. It was built considering the payload values the contextual business event will generate.
Re-generate the Custom Shared Library WAR file from the Custom Shared Library workspace. Shutdown the Retail Application and its Custom Shared Library Registry, redeploy the Custom Shared Library WAR file, and restart the Retail Application components.
Changes Required in Shared Library Registry for Custom DVT Taskflow based Contextual Report
Obtain the task flow contextual area model XML file (ex. ViewController/src/custom/AllocMaintFlowContextualAreaModel.xml).
Add an <Item> element within the topmost <Items> element that references the task flow called DVTContextAwareReportFlow. The DVTContextAwareReportFlow is a framework for rendering ADF DVT based reports that will be aware of contextual business events emanating from the Retail Application task flows.
Example:
<?xml version="1.0" encoding="UTF-8" standalone="yes"?>
<NavigationDefinition … >
                 <Items>
                        ...
                        ...

                        <Item id="showItemMetric"
                 type="taskflow"
                 title="Item Metric">
                        <url>
/WEB-INF/oracle/retail/apps/framework/dvtcontextawarereport/publicui/flow/DVTContextAwareReportFlow.xml#DVTContextAwareReportFlow
                         </url>
                        </Item>

                 </Items>
</NavigationDefinition>
Note the following:
- Make sure that the <Item> id is unique.
- Make sure the <Item> type is "taskflow"
- Provide a meaningful title.
Populate the parameters to the DVTContextAwareReportFlow by adding the following <Parameter>/<Parameters> elements.
<?xml version="1.0" encoding="UTF-8" standalone="yes"?>
<NavigationDefinition … >
    <Items>

        <Item id="showCustomerMetric"
              type="taskflow"
              title="Customer Metric">
            <url>
/WEB-INF/oracle/retail/apps/framework/dvtcontextawarereport/publicui/flow/DVTContextAwareReportFlow.xml#DVTContextAwareReportFlow
            </url>
            <Parameters>
                <Parameter id="taskflowURL">/WEB-INF/oracle/retail/apps/framework/uishell/navigation/contextualarea/flow/ItemMetricFlow.xml#ItemMetricFlow</Parameter>
                <Parameter id="parameterName1">itemId</Parameter>
                <Parameter id="payloadKeyName1">ItemId</Parameter>
                <Parameter id="parameterValue1">#{payload.valueMap['ItemId']}</Parameter>
                <Parameter id="refreshOnDisclosure">#{true}</Parameter>
            </Parameters>
         </Item>

    </Items>
</NavigationDefinition>
Note the following:
- The <Parameter id="taskflowURL"> element is the URL of the DVT taskflow that will be displayed in the contextual area.
- The <Parameter id="parameterName1"> element indicates a parameter for the DVT taskflow. A maximum of 15 parameters can be specified.
- The <Parameter id="payloadKeyName1"> element indicates the name of the payload key that maps to the taskflow parameter parameterName1. A maximum of 15 payload keys can be specified. The value of the payload key in the event payload will be used for the parameter in the DVT taskflow.
- The <Parameter id="parameterValue1"> element holds the default value of the DVT taskflow. A maximum of 15 parameter values can be specified.
- The <Parameter id="refreshOnDisclosure"> element is used to refresh the DVT taskflow on the disclosure of the tab.
Test the Retail Application. Go to the flow where the report was added and verify that the report is rendered correctly.
The Retail Application provides the capability to display both static and dynamic tasks in the task list. The static tasks are based off an xml model file, for example, HomeTaskMenuModel.xml, HomeReportsMenuModel.xml. These tasks should be predefined in the tasks or reports menu model file.
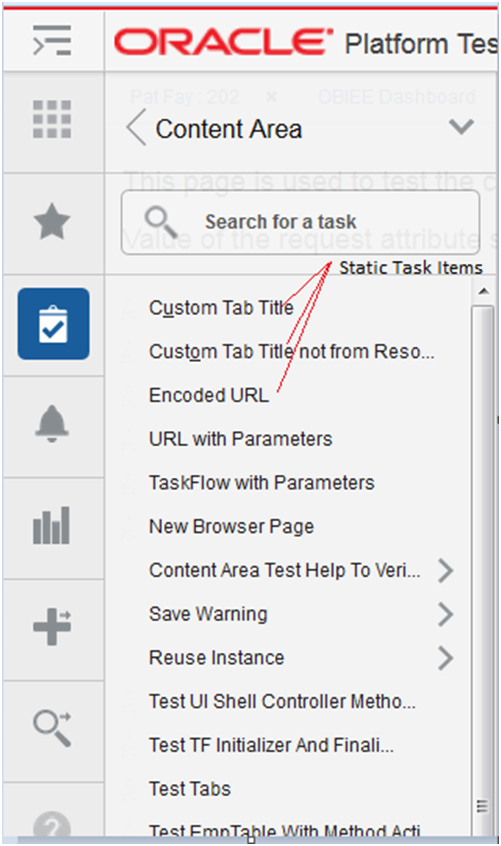
The dynamic tasks can be sourced from any data source like OBIEE, BIPublisher, database tables, Web Services etc. The complete hierarchy of task items including the folders and actions can be generated dynamically at runtime.
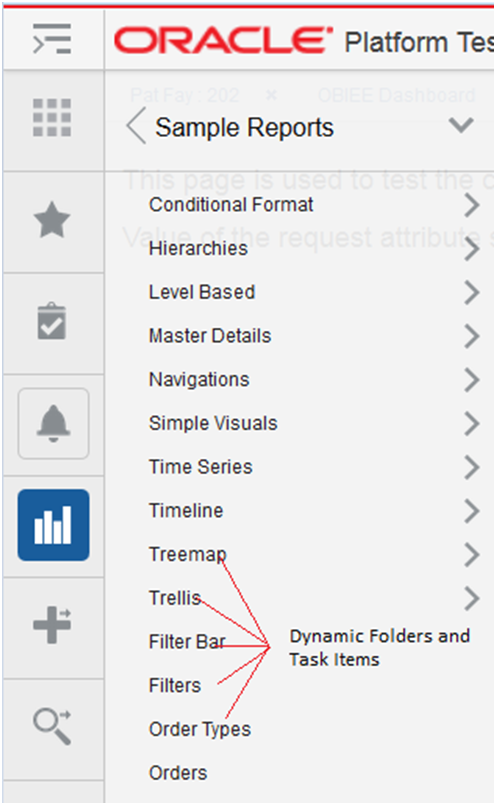
From the user's perspective, there is no difference between the static versus the dynamic task items. They look and behave the same.
The Retail Application provides an interface called DynamicContentHandler that can be implemented to add dynamic tasks in the task menu. The interface is as follows
package oracle.retail.apps.framework.uishell.taskmenu.dynamiccontent.handler;

import java.util.List;

import oracle.retail.apps.framework.uishell.taskmenu.dynamiccontent.dataobject.TaskMenuItem;
import oracle.retail.apps.framework.uishell.util.RetailUiShellHttpSessionListeners;

public interface DynamicContentHandler extends RetailUiShellHttpSessionListeners.RemovalListener {
    public List<TaskMenuItem> getChildren(TaskMenuItem taskMenuItem) throws Exception;

    public List<TaskMenuItem> getDefaultTaskMenuItems() throws Exception;

    public TaskMenuItem getInContextTaskMenuItem(String taskMenuItemId) throws Exception;
}
The interface extends another interface called RetailUiShellHttpSessionListeners.RemovalListener. The RemovalListener interface provides the following method.
    public static interface RemovalListener extends Serializable  {
        public void onSessionRemove();
    }
The below table explains the use of these methods.
|
getChildren(TaskMenuItem taskMenuItem) |
This method provides the child task items for a given task menu item. |
|
getDefaultTaskMenuItems() |
This method provides the task items that will be loaded as the default content in the Retail Application. |
|
getInContextTaskMenuItem(String taskMenuItemId) |
This method provides the task item based on a given task menu id for In-Context launching. |
|
onSessionRemove() |
This method will be called by the Retail Application when the user logs out of the application. The method can be used to do any resource cleanup or can be used to logout from the external data source. |
The Item element of the menu model file supports a type called 'dynamicContent' along with the type's taskflow and link. When the Retail Application encounters the type as dynamicContent, it looks for the attribute called dynamicContentHandler. The dynamicContentHandler attribute will tell the Retail Application the name of the implementation class which will be used to provide the dynamic task items. The class should implement the DynamicContentHandler interface.
<Item id="customDynamicMenuFolder" visible="#{true}" title="Custom Dynamic Menu"
              type="folder">
            <Items>
                <Item id="customTreeModelDynamicContent" title="Custom Dynamic Menu"
                      type="dynamicContent"
                      dynamicContentHandler="oracle.retail.apps.framework.uishell.taskmenu.handler.custom.CustomTreeModelDynamicContentHandler"
                      visible="#{securityContext.authenticated}"/>
            </Items>
        </Item>
The Item element with the type attribute as dynamicContent can be placed anywhere in the hierarchy of the static task items in the tasks or reports menu model file. The dynamic task items will begin exactly from the location where the dynamicContent Item is defined.
The menu model file can be customized to add an entry for the dynamic content as shown above. Please refer to the section Adding or Modifying an Item in the Tasks Menu for more details.
We will start with a simple example to show how to display the dynamic task items in the task menu. The example uses the org.apache.myfaces.trinidad.model.TreeModel implementation called org.apache.myfaces.trinidad.model.RowKeyPropertyTreeModel to pull and display data in the task menu hierarchy. The class org.apache.myfaces.trinidad.model.RowKeyPropertyTreeModel is a subclass of org.apache.myfaces.trinidad.model. ChildPropertyTreeModel. The class ChildPropertyTreeModel creates a TreeModel from a list of beans and the class RowKeyPropertyTreeModel adds the support of row keys to the TreeModel. Let's assume that we have a TreeModel object created for a hierarchy of Employee objects. We want to display the names of the employees as tasks in the task list. The managers will be displayed as folders. The action on the manager's name will open the list of directs for the manager. The action on the leaf employee names will open the employee details screen for the selected employee.
The implementation class for the DynamicContentHandler interface is named as CustomTreeModelDynamicContentHandler. It has a method that builds the TreeModel from the list of Employee objects.
    /**
     * Build a custom tree model.
     * @return
     */
    private TreeModel buildTreeModel() {
        List<Employee> allEmployees = new ArrayList<Employee>();

        Employee manager1 = new Employee(197, "Kevin Feeny");
        Employee emp = new Employee(198, "Donald OConnel");
        manager1.addDirect(emp);
        emp = new Employee(199, "Douglas Grant");
        manager1.addDirect(emp);

        Employee manager2 = new Employee(200, "Jennifer Whalen");
        emp = new Employee(201, "Michael Harstein");
        manager2.addDirect(emp);
        Employee manager3 = new Employee(203, "Susan Marvis");
        emp = new Employee(202, "Pat Fay");
        manager3.addDirect(emp);
        manager2.addDirect(manager3);

        emp = new Employee(204, "Hermann Baer");

        allEmployees.add(manager1);
        allEmployees.add(manager2);
        allEmployees.add(emp);

        //create a RowKeyPropertyTreeModel with employeeId as a row key and directs as child property
        return new RowKeyPropertyTreeModel(allEmployees, "directs", "employeeId");
    }
The TreeModel is initialized on the initialization of the class CustomTreeModelDynamicContentHandler.
    public class CustomTreeModelDynamicContentHandler implements DynamicContentHandler {

    private static final ADFLogger LOG =
        ADFLogger.createADFLogger(CustomTreeModelDynamicContentHandler.class);
    private TreeModel treeModel;
    private static final String TASKMENU_ITEM_ID_SEPARATOR = "_";

    public CustomTreeModelDynamicContentHandler() {
        super();
        this.treeModel = buildTreeModel();
    }
We will implement the getChildren method of the DynamicContentHandler interface.
    /**
     * This method is called by the Retail Application to get the dynamic task items.
     * @param taskMenuItem
     * @return
     */
    public List<TaskMenuItem> getChildren(TaskMenuItem taskMenuItem) {
        //if taskMenuItem is null then framework is trying to load the root objects,
        //otherwise the framework has already navigated the tree
        if (taskMenuItem != null) {
            this.treeModel.setRowKey(taskMenuItem.getPath());
            this.treeModel.enterContainer();
            this.treeModel.setRowIndex(0);
        } else {
            this.treeModel.setRowKey(null); //move to root
        }
        return getChildrenForCurrentRowKey();
    }

    /**
     * This method returns the children for the current row key in the tree model.
     * @param model
     * @return
     */
    private List<TaskMenuItem> getChildrenForCurrentRowKey() {
        List<TaskMenuItem> childTaskMenuItemList = new ArrayList<TaskMenuItem>();
        int rowCount = this.treeModel.getRowCount();
        for (int i = 0; i < rowCount; i++) {
            this.treeModel.setRowIndex(i);
            TaskMenuItem childTaskMenuItem = buildTaskMenuItem();
            if (childTaskMenuItem != null)
                childTaskMenuItemList.add(childTaskMenuItem);
        }
        return childTaskMenuItemList;
    }
The Retail Application will instantiate the class oracle.retail.apps.framework.uishell.taskmenu.handler.custom.CustomTreeModelDynamicContentHandler. It will cache the class for subsequent requests after instantiating it once.
On the initial load of the page, the Retail Application will call getChildern on the dynamicContentHandler implementation class by passing it a null value of the TaskMenuItem object.
When the argument is null, the method getChildern should return the root dynamic task items. The Retail Application will display the root items on the initial load of the page. In the example above, the employees Kevin, Jennifer and Hermann are the root items of the TreeModel so they will be loaded by the Retail Application and displayed as the initial dynamic task items for the CustomTreeModelDynamicContentHandler.
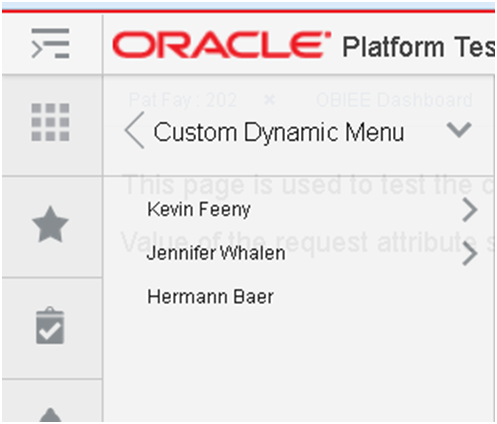
When the user clicks on a Folder, the Retail Application will send the current selected TaskMenuItem object to the getChildern method to load the children of the current selected task item. When the argument of the getChildren method is a valid TaskMenuItem object, the getChildren method should return the children of the TaskMenuItem object.
The Retail Application always lazy loads the dynamic items. This means that the children of a dynamic Folder will only be loaded when the user clicks on the Folder. Once the children are loaded they are cached by the Retail Application. In the above example, even though the Retail Application lazy loads the dynamic items, the TreeModel pre-loads all the employees.
The TaskMenuItem class is an abstraction of a dynamic task in the task menu. It is an equivalent of the 'Item' element in the task menu model file. The TaskMenuItem class can be used to add dynamic links, taskflows and folders in the task menu. The class has the following attributes.
    private Object path;
    private String id;
    private String title;
    private String url;
    private String shortDesc;
    private boolean visible = true;
    private TaskMenuItemType type = TaskMenuItemType.LINK;
    private TaskMenuTarget target;
    private List<Parameter> parameters;
    private List<Attribute> attributes;
    private String accessKey;
    private boolean disabled;
Following is a java doc screenshot of the TaskMenuItem class.
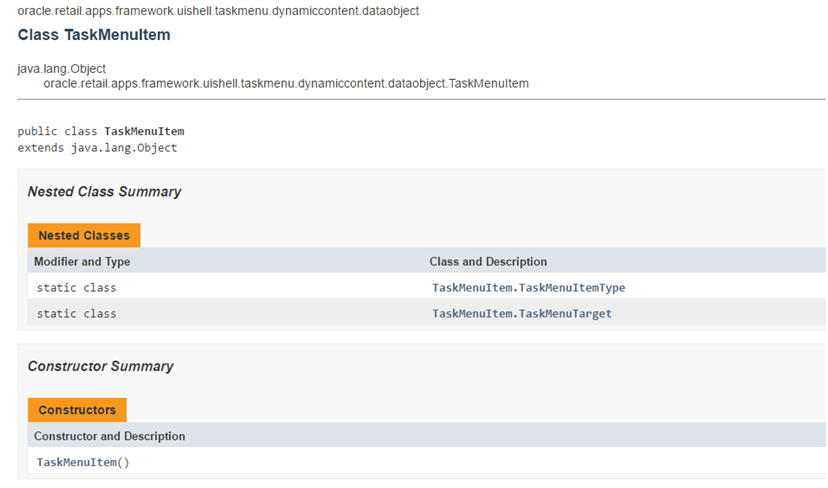
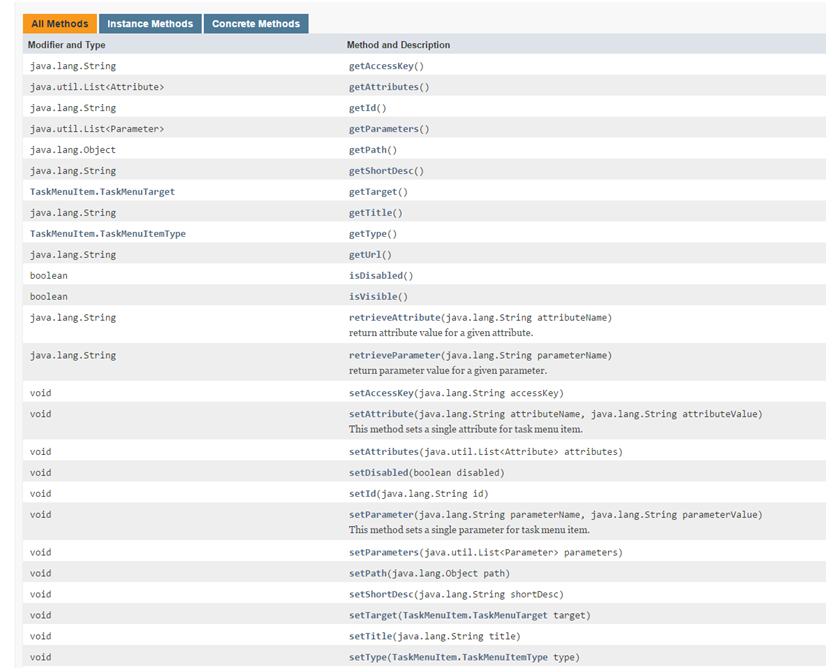
The attribute 'path' can be used to store the information of the current node. The 'path' attribute is of type 'Object' so it can store any object which can be used to identify the current node in the external hierarchy. In the example above, the path stores the row key of the TreeModel which is an ArrayList of employeeId's starting from the root to the current selected node. The path can vary based on the implementation of the DynamicContentHandler interface. For example, if the DynamicContentHandler implementation reads the database tables to display a dynamic menu then the path can be an ArrayList of the primary keys of the database tables, if the DynamicContentHandler implementation calls an external web service to generate a dynamic menu then the path can be a String object which identifies a node in the external system.
The following code snippet shows how a TaskMenuItem can be built in the DynamicContentHandler implementation class.
    /**
     * build a task menu item from the custom object.
     * @param rowKey
     * @param employee
     * @return
     */
    private TaskMenuItem buildTaskMenuItem() {

        List<Object> rowKey = (List<Object>)this.treeModel.getRowKey();
        Employee employee = (Employee)this.treeModel.getRowData();

        if (this.treeModel.isContainer()) {
            return buildContainerTaskMenuItem(rowKey, employee);
        } else {
            return buildLeafTaskMenuItem(rowKey, employee);
        }
    }

    /**build container taskmenu item.
     * @param rowKey
     * @param employee
     * @return
     */
    private TaskMenuItem buildContainerTaskMenuItem(List<Object> rowKey, Employee employee) {
        TaskMenuItem taskMenuItem = new TaskMenuItem();
        taskMenuItem.setPath(rowKey);
        taskMenuItem.setId(generateUniqueId(rowKey));
        taskMenuItem.setTitle(employee.getName());
        taskMenuItem.setShortDesc(employee.getName() + " : " + employee.getEmployeeId());
        taskMenuItem.setType(TaskMenuItem.TaskMenuItemType.FOLDER);
        return taskMenuItem;
    }

    /**build leaf task menu item.
     * @param rowKey
     * @param employee
     * @return
     */
    private TaskMenuItem buildLeafTaskMenuItem(List<Object> rowKey, Employee employee) {
        TaskMenuItem taskMenuItem = new TaskMenuItem();
        taskMenuItem.setPath(rowKey);
        taskMenuItem.setId(generateUniqueId(rowKey));
        taskMenuItem.setTitle(employee.getName());
        taskMenuItem.setShortDesc(employee.getName() + " : " + employee.getEmployeeId());
        taskMenuItem.setType(TaskMenuItem.TaskMenuItemType.TASKFLOW);
        taskMenuItem.setUrl("/WEB-INF/oracle/retail/apps/framework/uishell/navigation/contentarea/flow/TestOverrideCloseTabFlow.xml#TestOverrideCloseTabFlow");

        //set attributes on taskMenuItem
        taskMenuItem.setAttribute("TabTitle",
                                  employee.getName() + " : " + employee.getEmployeeId());
        taskMenuItem.setAttribute("tabShortDesc",
                                  "Employee " + employee.getName() + " has emplyee Id " +
                                  employee.getEmployeeId() + ".");

        //set parameters on taskMenuItem
        taskMenuItem.setParameter("EmployeeId", String.valueOf(employee.getEmployeeId()));
        return taskMenuItem;
    }

    /**This method generages a unique id for the taskmenu item.
     * @param rowKey
     * @return
     */
    private String generateUniqueId(List<Object> rowKey) {
        return rowKey.stream().map(c -> c.toString()).collect(Collectors.joining(TASKMENU_ITEM_ID_SEPARATOR));
    }
When a user logs in the Retail Application, the user sees the default content that has been configured in the Retail Application. The default content opens up directly in a Retail UIShell tab without the user having to launch it from the task menu. The dynamic task items can also be configured as the default content in the application. The DynamicContentHandler interface provides a method called getDefaultTaskMenuItems which returns a List of TaskMenuItem objects. The items returned from this method will be launched automatically after the user logs in.
The following is a sample implementation of the getDefaultTaskMenuItems method.
    /**Get the default task menu items. These will be automatically loaded on initial load of the home page.
     * @return
     */
    @Override
    public List<TaskMenuItem> getDefaultTaskMenuItems() {
        List<Object> rowKey = new ArrayList<Object>();
        rowKey.add(200); //"Jennifer Whalen"
        rowKey.add(203); //"Susan Marvis"
        rowKey.add(202); //"Pat Fay"
        Employee employee = (Employee)this.treeModel.getRowData(rowKey); //get Pat Fay

        TaskMenuItem taskMenuItem = buildLeafTaskMenuItem(rowKey, employee);
        List<TaskMenuItem> defaultTaskMenuItems = new ArrayList<TaskMenuItem>();
        defaultTaskMenuItems.add(taskMenuItem);
        return defaultTaskMenuItems;
    }
The Retail Application provides a way to launch links and taskflows directly using a browser URL. The content is launched in the context of the external application by passing parameters in the URL.
The Retail Application requires a navModelItemId parameter in the request to identify the content that needs to be launched. The Retail Application checks the static task menu model files to see if an Item exists with that id in the model file. If the Retail Application does not find a static item, it consults the list of dynamic content handlers configured with the application to look for the item. If the dynamic content handler returns a TaskMenuItem for the given id, it will be launched in the Retail Application. The dynamic content handler should implement a method called getInContextTaskMenuItem(String taskMenuItemId) which will return the TaskMenuItem object for the taskMenuItemId received. The getInContextTaskMenuItem should be able to find the Item using the taskMenuItemId.
The following is a sample implementation of the getInContextTaskMenuItem(String taskMenuItemId) method.
    /**This method returns an in-context item.
     * @param taskMenuItemId
     * @return
     */
    @Override
    public TaskMenuItem getInContextTaskMenuItem(String taskMenuItemId) {
        TaskMenuItem inContextTaskMenuItem = null;
        Employee employee = null;
        List<Object> rowKey = null;
        if (taskMenuItemId != null) {
            try {
                rowKey =
                    Arrays.stream(taskMenuItemId.split(TASKMENU_ITEM_ID_SEPARATOR)).map(c -> Integer.valueOf(c)).collect(Collectors.toList());
                employee = (Employee)this.treeModel.getRowData(rowKey);

                if ((employee != null) && (employee.getDirects().isEmpty())) {
                    inContextTaskMenuItem = buildLeafTaskMenuItem(rowKey, employee);
                }
            } catch (Exception e) {
                if (LOG.isWarning()) {
                    LOG.warning("Error occurred looking for dynamic In-Context Item with id " +
                                taskMenuItemId, e);
                }
            }
        }
        return inContextTaskMenuItem;
    }
The custom dynamic content handler can be added to the classpath of the Retail Application by deploying it as a shared library. Please refer to the section Adding a Custom Shared Library for details on how to deploy a shared library.
The DynamicContentHandler interface can be used to add dynamic task items in the task menu from a variety of data sources including OBIEE, BIPublisher, database tables, and custom Web Services etc. The Retail Application provides the default implementation of the DynamicContentHandler interface for OBIEE and BIPublisher. These implementations are called Report Adapters. The Report Adapters can display the user's reports from OBIEE and BIPublisher as tasks in the task list. The user can click on the tasks to display individual reports and dashboards.
|
Note: The connection to both the OBIEE and BIPublisher should be secured using TLS protocol. Please ensure that the Report Adapter integration is done using secured protocol in the production environments. |
OBIEE Report Adapter
The RetailAppsObieeAdapter relies on a properties file called RetailAppsObieeAdapter.properties for the OBIEE configuration. Create RetailAppsObieeAdapter.properties in any location on the file system. Modify the setDomainEnv.cmd for the Windows environment or setDomainEnv.sh file for the Unix environment to add the RetailAppsObieeAdapter.properties as a Java system property specifying the location in the file system where the RetailAppsObieeAdapter.properties file resides.
For example for windows environment
set EXTRA_JAVA_PROPERTIES=-DRetailAppsObieeAdapter.properties=D:\Work\RetailAppsFramework\RetailAppsObieeAdapter.properties %EXTRA_JAVA_PROPERTIES%
For Unix environment
EXTRA_JAVA_PROPERTIES="-DRetailAppsObieeAdapter.properties =/scratch/u00/product/Oracle/Middleware/user_projects/domains/RAFDomain/custom_properties/RetailAppsObieeAdapter.properties ${EXTRA_JAVA_PROPERTIES}"export EXTRA_JAVA_PROPERTIES
The RetailAppsObieeAdapter.properties can be used to specify the following properties for the OBIEE Report Adapter configuration.
| Property | Required? | Description |
|---|---|---|
|
bi.connection.name |
Yes |
This property is used to specify the name of the BISoapConnection used to display the OBIEE reports. The connection should be created using the Enterprise Manager. Please refer to the section Creating the BIConnection for more details. |
|
bi.bipublisher.context.path |
No |
If the OBIEE installation includes both the OBIEE analytics and BIPublisher then the BIPublisher reports can also be displayed using the RetailAppsObieeAdapter. The bi.bipublisher.context.path is used to specify the context root of the BIPublisher installation. The default value is xmlpserver. |
|
bi.external.integration |
No |
This property can be used to disable the RetailAppsObieeAdapter integration. Setting this to false will disable the RetailAppsObieeAdapter integratioin. The default value is true. |
|
bi.report.new.browser.tab |
No |
This property can be used to display the OBIEE reports in a new browser tab on in a new Retail UI Shell tab. The default behavior of the RetailAppsObieeAdapter is to open the OBIEE reports in a new browser tab. Setting this property to false opens the reports in a new UI Shell tab. The default value is true. |
Creating the BIConnection
Please follow the following steps to create the BIConnection for the RetailAppsObieeAdapter configuration.
Login to the Enterprise Manager of the environment where the Retail Application is deployed and go to 'System MBean Browser' as shown below.
Go to 'Application Defined MBeans' and its sub folder 'oracle.adf.share.connections'
Expand 'Application: <AppName>' and select 'ADFConnections'. The following example uses RetailAppsFrameworkTest as the AppName.
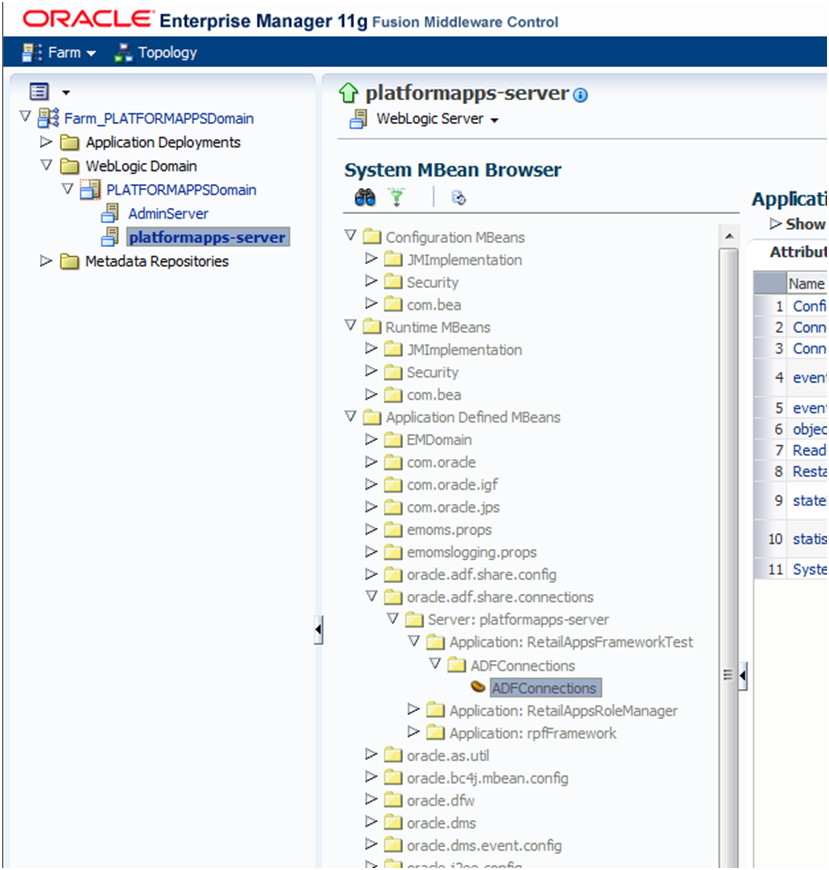
Go to the 'Operations' tab and click 'createConnection'.
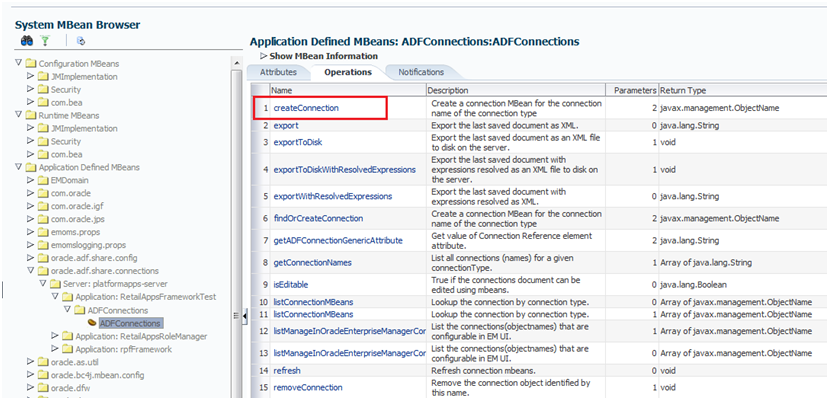
Enter Connection Type as BISoapConnection and Connection Name as BIConnection. Click Invoke on top right.
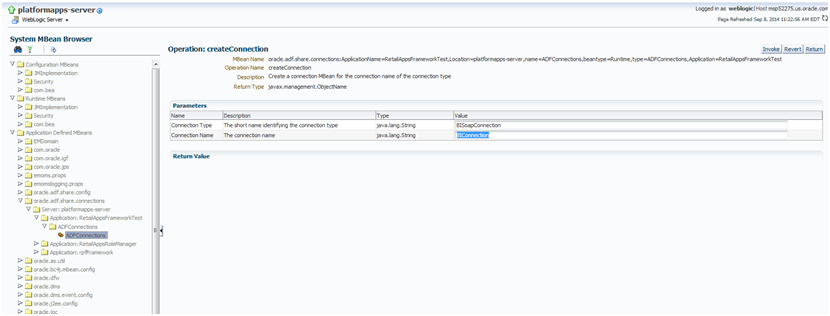
Refresh the tree using the button 'Refresh cached tree data'.
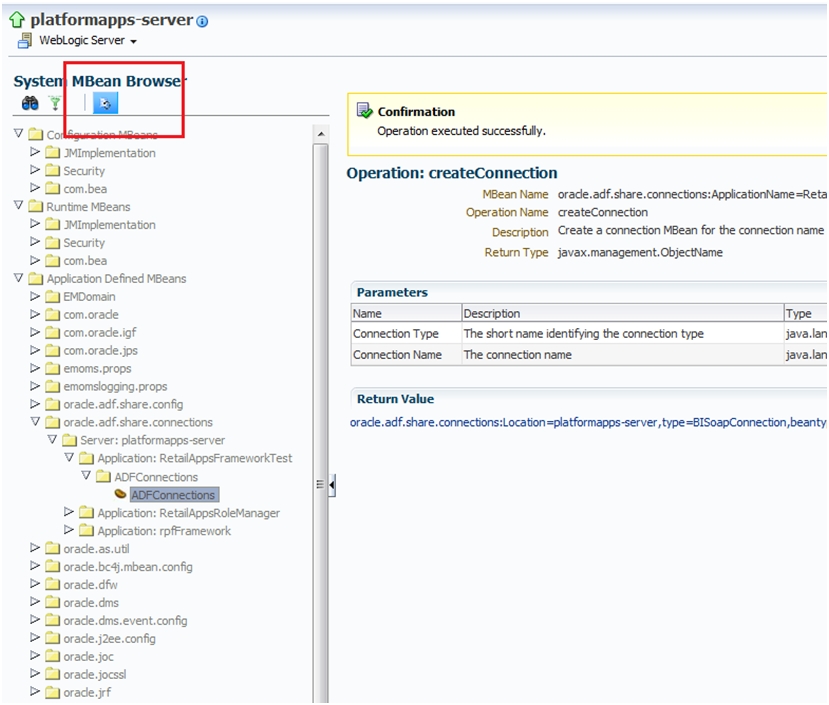
Once the tree is refreshed, you will notice that 'ADFConnections' becomes a folder and it has a new connection 'BIConnection'. Click on the BIConnection to open its properties in the right pane.

Enter the values shown in the table below. Once done click Apply on the top right.
|
Context |
The context root of the Oracle BI EE installation. Example: analytics |
|
Host |
The host of the Oracle BI EE installation. |
|
IsStaticResourcesLocationAutomatic |
The IsStaticResourcesLocationAutomatic attribute can be either true or false. When this attribute is true, the BI Presentation Server will be used to specify the location of the static resources. When this attribute is false, the attribute 'StaticResourcesLocation' should be provided. The attribute StaticResourcesLocation will be used to find the static resources when the attribute IsStaticResourcesLocationAutomatic is false. |
|
Password |
The password for the BIImpersonateUser. |
|
Port |
The port of the Oracle BI managed server. Example 9704 |
|
Protocol |
http or https For production environments, use https. |
|
ShouldPerformImpersonation |
true (keep it true, default is true) |
|
StaticResourcesLocation |
The path of the location where the static resources are available. If the IsStaticResourcesLocationAutomatic attribute is true then use the following URL for the StaticResourcesLocation attribute.
If the IsStaticResourcesLocationAutomatic attribute is false, then use the following URL for the StaticResourcesLocation attribute.
The Oracle BI EE static resources, namely the 'res' and 'analyticsRes' directories should be available from the Oracle Web Tier's htdocs directory when the IsStaticResourcesLocationAutomatic attribute is false. |
|
Username |
The username that has been configured on the Oracle BI EE with the impersonate permissions. Example: BIImpersonateUser |
|
WSDLContext |
analytics-ws |
Go to 'ADFConections' to save the changes. Click on 'save' operation in the Operations tab.
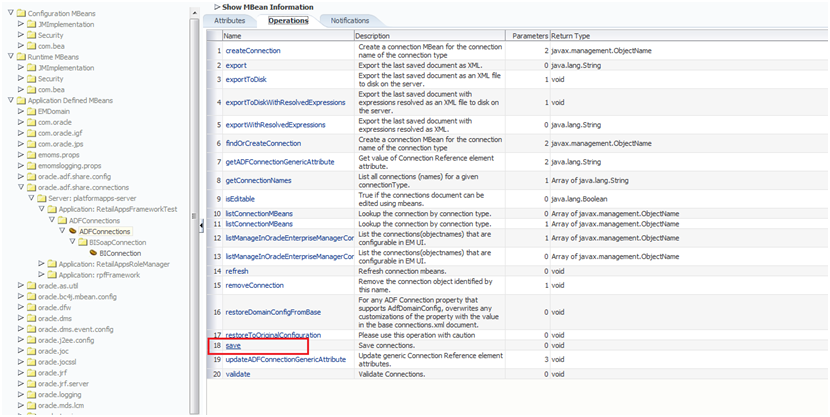
Click on 'Invoke' on the top right to save the changes.

Once the connection is created successfully, modify the RetailAppsObieeAdapter.properties to add the bi.connection.name as BIConnection.
Configuring the Reports Menu
Once we have configured the RetailAppsObieeAdapter.properties and created a BIConnection, we can add an Item of type="dynamicContent" in the HomeReportsMenuModel.xml file to display the OBIEE Reports in the Reports menu. The implementation of the DynamicContentHandler interface for OBIEE is called oracle.retail.apps.framework.report.obiee.handler.ObieeDynamicContentHandler.
        <Item id="obieeFolder" visible="#{true}" title="OBIEE" type="folder">
            <Items>
                <Item id="obieeDynamicContent" title="OBIEE Dynamic Menu" type="dynamicContent"
                      dynamicContentHandler="oracle.retail.apps.framework.report.obiee.handler.ObieeDynamicContentHandler"
                      visible="#{securityContext.authenticated}"/>
            </Items>
        </Item>
The reports menu model can be customized to add an entry for the dynamic content as shown above. Please refer to the section Adding or Modifying an Item in the Reports Menu for more details.
BIPublisher Report Adapter
The RetailAppsBiPublisherAdapter relies on a properties file called RetailAppsBiPublisherAdapter.properties for the BIPublisher configuration. Create RetailAppsBiPublisherAdapter.properties in any location on the file system. Modify the setDomainEnv.cmd for the Windows environment or setDomainEnv.sh file for the Unix environment to add the RetailAppsBiPublisherAdapter.properties as a Java system property specifying the location in the file system where the RetailAppsBiPublisherAdapter.properties file resides.
For example for windows environment:
set EXTRA_JAVA_PROPERTIES=-DRetailAppsBiPublisherAdapter.properties=D:\Work\RetailAppsFramework\RetailAppsBiPublisherAdapter.properties %EXTRA_JAVA_PROPERTIES%
For Unix environment:
EXTRA_JAVA_PROPERTIES="-DRetailAppsBiPublisherAdapter.properties=/scratch/u00/product/Oracle/Middleware/user_projects/domains/RAFDomain/custom_properties/RetailAppsBiPublisherAdapter.properties ${EXTRA_JAVA_PROPERTIES}"export EXTRA_JAVA_PROPERTIES
The RetailAppsBiPublisherAdapter.properties can be used to specify the following properties for the BIPublisher Report Adapter configuration.
| Property | Required? | Description |
|---|---|---|
|
bipublisher.wsdl.location |
Yes |
This property is used to specify the WSDL URL of the BIPublisher PublicReportService. For example: https://bipublisher_host:bipublisher_port/xmlpserver/services/PublicReportService?wsdl |
|
bipublisher.external.integration |
No |
This property can be used to disable the RetailAppsBiPublisherAdapter integration. Setting this to false will disable the RetailAppsBiPublisherAdapter integratioin. The default value is true. |
|
bipublisher.report.new.browser.tab |
No |
This property can be used to display the BIPublisher reports in a new browser tab on in a new Retail UI Shell tab. The default behavior of the RetailAppsBiPublisherAdapter is to open the BIPublisher reports in a new browser tab. Setting this property to false opens the reports in a new UI Shell tab. The default value is true. |
Store the BIPublisher Admin Credentials
The RetailAppsBiPublisherAdapter requires the admin credentials of the BIPublisher to be stored in the WebLogic domain credential store where the Retail Application is deployed. The admin credentials are used by the RetailAppsBiPublisherAdapter to connect to the BIPublisher.
The admin credentials can be stored the in domain credential store by using WebLogic Scripting tool or the Enterprise Manager.
WebLogic Scripting Tool
After running the wlst script, connect to the WebLogic Domain using the connect() command and run the following createCred() command. Replace the <bip_admin_user> and <bip_admin_password> with the BIPublisher admin user and password.
createCred(map="oracle.retail.apps.framework.report.bipublisher", key="bipadmin", user="<bip_admin_user>", password="<bip_admin_password>", desc="BIPublisher admin user credentials")
If the credentials already exist for the map 'oracle.retail.apps.framework.report.bipublisher' and key 'bipadmin', update them using the following command
updateCred(map="oracle.retail.apps.framework.report.bipublisher", key="bipadmin", user="<bip_admin_user>", password="<bip_admin_password>")
Enterprise Manager
Navigate to Security/Credentials.
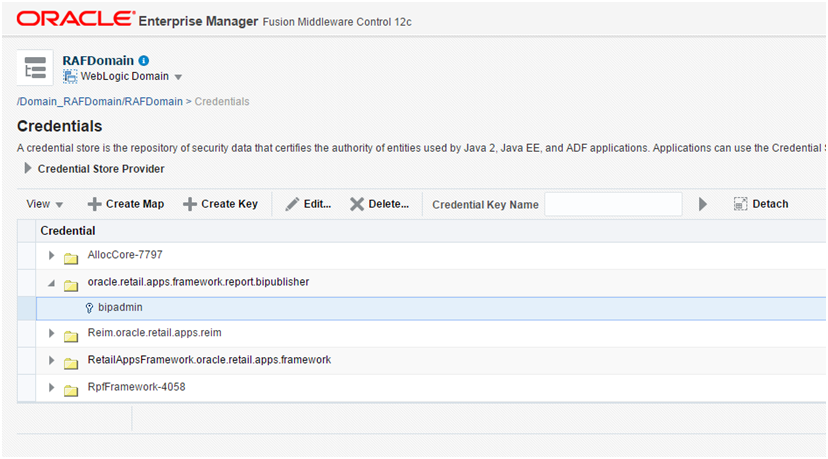
Create a new map called 'oracle.retail.apps.framework.report.bipublisher'. Inside this map create a new key called 'bipadmin' and enter the BIPublisher admin credentials.
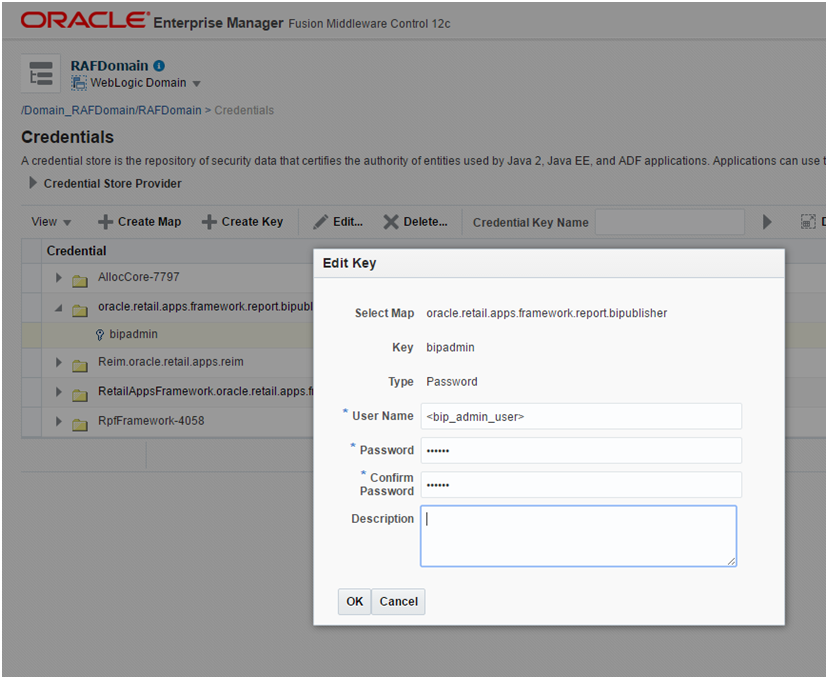
Configuring the Reports Menu
Once we have configured the RetailAppsBiPublisherAdapter.properties and have added the BIPublisher WSDL URL property in the properties file, we can add an Item of type="dynamicContent" in the HomeReportsMenuModel.xml file to display the BIPublilsher Reports in the Reports menu. The implementation of the DynamicContentHandler interface for the BIPublisher is called oracle.retail.apps.framework.report.bipublisher.handler.BiPublisherDynamicContentHandler.
                <Item id="bipublisherFolder" visible="#{true}" title="BiPublisher" type="folder">
            <Items>
                <Item id="bipublisherDynamicContent" title="BIPublisher Dynamic Menu"
                      type="dynamicContent"
                      dynamicContentHandler="oracle.retail.apps.framework.report.bipublisher.handler.BiPublisherDynamicContentHandler"
                      visible="#{securityContext.authenticated}"/>
            </Items>
        </Item>
The reports menu model can be customized to add an entry for the dynamic content as shown above. Please refer to the section Adding or Modifying an Item in the Reports Menu for more details.