| Oracle® Invoice Matching Operations Guide Release 16.0.2.1 F13389-02 |
|

 Previous |
 Next |
This chapter of the operations guide is intended for administrators who provide support and monitor the running system.
The content in this chapter is not procedural, but is meant to provide descriptive overviews of the key system parameters that establish the ReIM environment.
See the Oracle Retail Invoice Matching Installation Guide for hardware and software requirements. Also see Oracle Retail application software compatibility information.
Unit of Measure
For invoices sent from RMS with quantities representing weight rather than number of eaches, ReIM converts the unit of measure (UOM) on the receipt to the UOM on the invoice.
ReIM uses non-merchandise codes defined on the RMS table NON_MERCH_CODE_HEAD. The form that allows users to enter non-merchandise codes in RMS is not available when the RMS invoice match indicator (SYSTEM_OPTIONS.REIM_IND) is set to no. Instead, non-merchandise codes should be added to the NON_MERCH_CODE_HEAD table using the database.
Supplier options
All suppliers must have options defined for their invoices to be processed by the system, and the terms defined for those suppliers must be completely updated in RMS. To support the use of suppliers in ReIM, terms must have the following properties on the TERMS_DETAIL table:
ENABLED_FLAG is set to Y.
START_DATE_ACTIVE must be defined.
END_DATE_ACTIVE must be defined.
GL account maintenance
All reason codes, non-merchandise codes, and basic transactions must be mapped through GL account maintenance to support posting to the retailer's financial solution. Transactions are posted to a staging table in ReIM, the extract to update the accounts payable/financial solution is the retailer's responsibility.
TAX
If TAX is turned on, the retailer must have TAX regions, TAX items, and TAX codes set up in the merchandising system (such as RMS) to support validation of invoiced TAX charges. Verify the following values on the IM_SYSTEM_OPTIONS table:
|
Note: The values below should not be changed after initial setup. Changing them can cause errors in the system. |
NUM_TAX_ALLOW is set to S (single) TAX, N (no) TAX.
TAX_VALIDATION_TYPE is set to RECON (Reconcile TAX), VENDR (Always Use Vendor TAX), or RETLR (Always use Retail TAX).
The DEFAULT_TAX_HEADER is set to Y or N.
TAX_DOCUMENT_CREATION_LVL is set to ITEM or FULL_INVOICE.
The property file has only technical configurations that are specific to the particular deployment. All the business related configurations are located within the system option scope.
The following properties are configurable
#help settings
help.server.url - Help server URL
reim.help.library - path to the ReIM specific help deck
reim.release.version - help version
reim.help.url.suffix -help URL suffix identifying specific document within the library
reim.help.default.url.suffix -default page within the document
#JMS settings
reim.jms.connection.factory.name -name of the JMS factory within JNDI tree on WL used for spreadsheet induction
reim.jms.queue.doc.induction.name - name of the JMS queue within JNDI tree on WL used for spreadsheet induction
reim.jms.application.code- Application code identifier used for JMS publishing
#Notification settings
reim.jdbc.raf.async.task- name of the data source within JNDI tree on WL used for async publishing
Oracle Retail Invoice Matching utilizes the industry-standard Apache Log4j logging framework to log system messages and exceptions. This framework is embedded in the application code to allow for configurable logging to suit the needs of the retailer.
Please note that Log4j is used for batch clients only. Server logging is done using standard WbLogic logging infrostracture.
The Log4j API system utilizes three main configurable entities:
Loggers
Appenders
Layouts
Loggers are responsible for defining exactly what gets logged. Typically, loggers define a specific level of detail (the log level) for a specific java package name as well as an appender the logger is assigned to. These criteria are then delegated to the appropriate appender for the specific logger. A single logger can be assigned to multiple appenders.
Appenders are used to dictate where logged content is directed to for a given logger. For example, the retailer may wish to configure a log appender to publish a log to a database table, a flat file, or an e-mail address. For each of these options, a separate appender would be defined and assigned to a specific logger.
Layouts are leveraged by the appender to dictate the exact content of the log message. Relevant information may include: date, time, and origin of the error message. These values can all be configured through the log layout.
The log4j.properties file holds all of the information relevant to logging for batch clients.
Table 3-1 Log4J Parameters
| Parameter | Description |
|---|---|
|
log4j.appender.BATCHFILE |
Type of file appender. |
|
log4j.appender.BATCHFILE.File |
Path to the log file where batches will write log entries. |
|
log4j.appender.BATCHFILE.DatePattern |
Date pattern for log file. |
|
log4j.appender.BATCHFILE.Append |
Indicator if the log should append entries to the existing file. |
|
log4j.appender.BATCHFILE.Threshold |
Logging threshold level. |
|
log4j.appender.BATCHFILE.layout |
Pattern layout for log entry. |
|
log4j.appender.BATCHFILE.layout.ConversionPattern |
Pattern for log entry. |
Internationalization is the process of creating software that is able to be translated more easily. Changes to the code are not specific to any particular market. ReIM has been internationalized to support multiple languages.
This section describes configuration settings and features of the software that ensure that the base application can handle multiple languages.
Translation is the process of interpreting and adapting text from one language into another. Although the code itself is not translated, components of the application that are translated may include the following:
Graphical user interface (GUI)
Error messages
The following components are not translated:
Documentation (online help, release notes, installation guide, user guide, operations guide)
Batch programs and messages
Log files
Configuration tools
Reports
Demonstration data
Training materials
The user interface for ReIM has been translated into:
Arabic
Chinese (simplified)
Chinese (traditional)
Croatian
Dutch
French
German
Greek
Hungarian
Italian
Japanese
Korean
Polish
Portuguese (Brazilian)
Russian
Spanish
Swedish
Turkish
To set the language ReIM displays in, set the user language. Choose Preferences from the drop-down menu under the user name, then choose Language in the taskbar. There are two language settings you can choose:
Default: This will permanently change the language for this user. All subsequent sessions will be in this language.
Current Session: This will change the language only for this session. It will revert back to the Default the next time this user logs in.
When finished making your selections, click the Save button.
ReIM allows the user to see dates and times in a format appropriate for their own locale, regardless what the data is stored in. Set the language ReIM displays in, set the user language. Choose Preferences from the drop-down menu under the user name, then choose Regional in the taskbar. There are multiple settings you can choose:
Territory: Choose a territory from this list. ReIM will automatically pick Date, Time, and Number formats appropriate for that territory.
Date Format: Choose an option from this menu to select a date format that is different from the default for the selected Territory.
Time Format: Choose an option from this menu to select a time format that is different from the default for the selected Territory.
Number Format: Choose an option from this menu to select a number format that is different from the default for the selected Territory.
Time Zone: Choose an option from this menu to select your time zone.
When finished making your selections, click the Save button.
Most user interface and message translations are stored in xlf files. When you select a different language from the Preferences screen, ReIM will choose the correct xlf file for that language.
Some translations for some drop-down menus are stored on four database tables. The tables are RTC_LOOKUP_VALUES_TL, RTC_LOOKUP_TYPES_TL, RAF_FACET_ATTRIBUTE_CFG_TL, and RAF_NOTIFICATION_TYPE_TL. These tables are multilingual; all languages of these strings (English as well as all translations) are stored in the same place.
This file contains a key value pair for some of the labels visible through the GUI at run time. Text labels and error messages have been identified, separated from the core source code, and placed into the properties file. The contents of the file can be used for retailer-specific configuration purposes (such as for the creation of custom labels or error messages). Some other sources of translatable data is used within the system such as XLIF files and database tables.
Applications may need to execute operations that can take significant time to complete.
Executing these operations in the application's own thread will cause the application to block other operations until those long-running operations finish.
In contrast, being able to assign the long-running operations to background threads allows the foreground thread to remain active and service further user requests. This is also described as launching those operations asynchronously.
For example, in the Retail Reim application, when an invoice induction request is submitted for approval, the system needs to perform comprehensive validation to ensure that the request is valid. The validation should be performed asynchronously. The user can proceed with performing other operations within the system. Once the background validation is complete, the user is notified.
Retail Applications achieve asynchronous processing using Java Messaging Service (JMS). When a user, for instance, through the application UI screen, submits a business entity for processing asynchronously, the application goes through a process depicted in the diagram below:
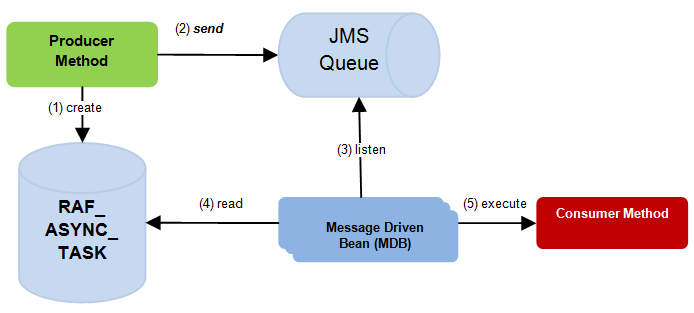
The Retail Application's producer process executes to collect the user request for asynchronous processing and stores that information into a database table called RAF_ASYNC_TASK. This table serves as a log of asynchronous processing requests as well as storage for any kind of context information in order to complete the processing. Example: The unique identifier of the business object for each invoice induction request.
The producer method creates a queue message and sends it to a JMS Queue.
One or more instances of Message Driven Beans (MDB) are configured to listen to the JMS Queue.
When messages are detected on the queue, the MDBs are dispatched to execute a task asynchronously. The MDB will read context information about the task from the task table.
The MDB will execute the required processing for the task.
The following resources in the WebLogic Administrator Console application should be configured in order to allow asynchronous processing to function in a Retail Application:
| WebLogic Server Resource | Required Names/References | Configuration Notes |
|---|---|---|
|
JMS Server |
Any name can be used. |
None. Defaults provided by WebLogic acceptable. |
|
JMS Module |
Any name can be used. |
None. Defaults provided by WebLogic acceptable. |
|
JMS Queue |
Name: InvoiceInductionQueue JNDI: jndi/InvoiceInductionQueue |
|
|
JMS Queue Connection Factory |
Name: InvoiceInductionCF JNDI: jndi/InvoiceInductionCF |
|
Please refer to WebLogic documentation found in http://www.oracle.com/technetwork/middleware/weblogic/documentation/index.html for detailed information about how to configure the above resources.
The RAF_ASYNC_TASK table can be used to view error codes for failures, and to monitor any failures requiring triage from production support team. As described in the section, Overview of Asynchronous Processes in Retail Applications, each asynchronous processing request is logged as a row in the RAF_ASYNC_TASKS table. As the task is sent to the queue, picked up and completed by the consuming message driven bean, the row in this table is updated with status information.
| RAF_ASYNC_TASK Column | Description |
|---|---|
|
ASYNC_TASK_ID |
A unique identifier for each row in this table. Each asynchronous task is given a unique ASYNC_TASK_ID. |
|
APPLICATION_CODE |
A code representing the Retail Application that generated the asynchronous task. |
|
TASK_DESC |
A short description of the asynchronous task. |
|
TASK_CONTEXT |
A string containing information needed to process the asynchronous task. Usually indicates the ID of the business entity to be processed (example: the ID of the request to be processed) |
|
STATUS |
The status of the asynchronous task.
|
|
TASK_COMMAND_CLASS_NAME |
A fully-qualified Java class name that contains the business logic for completing the task. |
|
PUBLISH_TIMESTAMP |
The time and date when the asynchronous task was published. That is, when the status was changed to NEW. |
|
PROCESS_START_TIMESTAMP |
The time and date when processing of the asynchronous task started. That is, when the status was changed to IN-PROGRESS. |
|
PROCESS_END_TIMESTAMP |
The time and date when the processing of the asynchronous task ended with either a SUCCESS or FAILED status. |
|
PROCESS_ERROR_TXT |
When the status is FAILED, this column would contain information about the failure. The server logs may need to be inspected for more detailed information about the cause of the processing failure. |
|
CREATED_BY |
Audit field pertaining to the logged in application user that requested the task. |
|
CREATE_DATE |
Audit field pertaining to when the row was created. |
|
LAST_UPDATED_BY |
Audit field pertaining to the user that last updated the row. |
|
LAST_UPDATE_DATE |
Audit field pertaining to the last date/time when the row was updated. |
As previously mentioned, each asynchronous task is logged as a row in the RAF_ASYNC_TASK table. Overtime, this table can grow significantly, which can degrade performance of the asynchronous task mechanism.
It is recommended that retailers periodically purge this table.
Retail Applications provide a simple PL/SQL function to purge contents of the RAF_ASYNC_TASK table based on retention period (in days).
declare
   retval number(10);
begin
   -- remove rows older than 5 days
   retval := raf_async_task_pkg.delete_async_task(5);
end;
/
This section covers the following topics:
Retail Applications provide the ability to notify authenticated users in the application when business events occur. An example of a business event is when a background asynchronous task such as an approval of an allocation or a validation of a price change has completed. Typically, the user is expected to take action on these notifications.
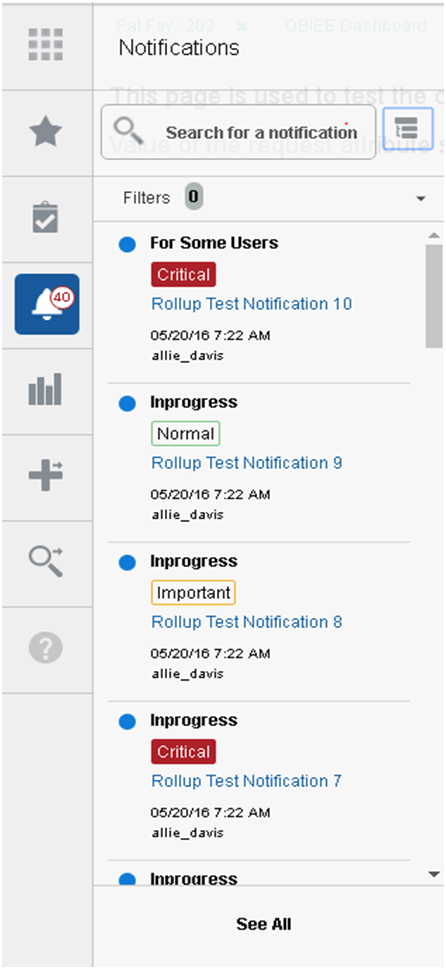
The notification icon on the Retail Application's navigation pane displays the count of unread notifications for the user. When a notification is generated, this count is incremented immediately and thereafter refreshed at regular configurable intervals.
The sliding sidebar menu expands when the user clicks on the notification icon. The expanded sidebar menu will show the latest notifications. Clicking on "See All" will show all the notifications in a new tab.
Clicking on the link for each launchable notification opens the specific UI flow that will allow the user to address any pending action for the notification.
Notifications are represented as rows in the table RAF_NOTIFICATION. Over a period of time, depending on how notifications are being generated by the application, the size of this table can grow continually, potentially degrading performance of the notifications feature.
It is recommended that retailers purge this table periodically. You can do this via the Purge feature available in the Retail Application Administration Console (RAAC). For more details on the Manage Notifications feature in RAAC, please refer to the Oracle Retail Application Administration Console User Guide.
You could also setup a batch job that runs periodically, that invokes the pl-sql as shown below:
declare
   retval number(10);
begin
   -- remove Notifications from the Reim application that have exceeded       .  -- their retention duration.
   retval := raf_notification_task_pkg. DEL_NOTIF_PAST_RETENTION('REIM');
end;
ReST Endpoints have been exposed by the Notifications framework to ease the integration concerns with disparate applications.
Users of the mobile version of the Retail Application can receive notifications in their mobile devices using push notifications.
Push notifications for Mobile Retail Applications need to be enabled by the Retailer. This section describes the specific steps to enable this feature.
Note that push notification is a native feature in modern mobile devices so the steps to enable this service on different platforms will be different.
Using push notifications on Android requires retailers to register the mobile Retail Application with Google Cloud Messaging (GCM). An API key and sender ID will be generated from the account created during registration. Refer to Google's developer site for instructions on how to create an account and generate these credentials.
Once credentials to the specific platforms are available, retailers need to add these to the server.
For Apple Push Notifications, retailers must import the key and certificate from Apple into weblogic. In order to do this, a keystore (JKS) file must be created using the Java keystore utility. The key and certificate can then be imported into the created keystore file. Retailers can refer to Oracle Java SE documentation for details on the keystore utility.
Once created, the keystore can be uploaded into the weblogic system app stripe. Retailers can use the weblogic scripting tool to run a Python script similar to the one shown below. The example shows that the keystore is named RetailAppsPushServices.
user = "admin username"
password = "admin password"
url = "[weblogic server]:[port]"
keypass = "keystore password"
keypath = "keystore filepath"
apnsAlias = "key alias"
apnsPass = "key password"
connect(user, password, url)
svc = getOpssService(name='KeyStoreService')
svc.importKeyStore(appStripe='system', name='RetailAppsPushServices', type='JKS', filepath=keypath, password=keypass, permission=true, aliases=apnsAlias, keypasswords=apnsPass)
exit('y')
For more details on how to import the created java keystores into weblogic, refer to Oracle WebLogic Server and Oracle Fusion Middleware documentation.
For Android notifications, retailers will need to set up the acquired API key as a generic credential in WebLogic. The GCM API key must be set in a map named "RetailAppsPushServices" under the key "gcmApiKey". Refer to Oracle WebLogic Server and Oracle Fusion Middleware documentation for instructions on creating and setting generic credentials
Lastly, if the server environment has proxy settings, the RetailAppsPushServices deployed on the weblogic server has to be modified. Retrieve the RetailAppsPushServices application enterprise archive (EAR) from the server, and modify the proxy.properties within. Once completed, the modified EAR file has to be redployed to the server.
Retail Applications provide an ability to switch between applications using the Application Navigator facility. These applications are configured using the Manage Application Navigator screens on Retail Application Administration Console (RAAC). For more details on Application Navigator in RAAC, please refer to the Oracle Retail Merchandising Implementation Guide.
This section discusses the functional security for Retail applications and the components used to implement it. Functional security is based on OPSS. For more information on OPSS, refer to the Oracle Fusion Middleware Application Security Guide.
This section covers the following topics:
Users are not assigned to permissions directly; rather access is assigned to roles. Roles group particular permissions required to accomplish a task; instead of assigning individual permissions, roles match users with the permissions required to complete their particular task.
There are two main types of roles, enterprise and application.
The Identity Store contains enterprise roles that are available across applications. These are created as groups in LDAP, making them available across applications.
Applicable Retail Applications security provides four types of roles: abstract, job, duty, and privilege.
Applicable Retail Applications will record job, abstract roles as enterprise roles and duty, privilege roles as application roles.
Application roles are stored in the application-specific policy store. These roles and role mappings are described in the jazn-data.xml file under the policy stripe [Reim].
Abstract roles are associated with a user, irrespective of their job or job function. These roles are not associated with a job or duty. These roles are normally assigned by the system (based on user attributes), but can be provisioned to a user on request.
Naming Convention: All the Retail Abstract role names end with' _ABSTRACT'
Example: APPLICATION_ADMIN_ABSTRACT
Job roles are associated with the job of a user. A user with this job can have many job functions or job duties.
|
Note: These roles are called Job roles as the role names closely map to the jobs commonly found in most organizations. |
Naming Convention: All the Retail Job role names end with' _JOB'
Example: REIM_APPLICATION_ADMINISTRATOR_JOB.
Job duties are tasks one must do on a job. A person is hired into a job role. These are the responsibilities one has for a job.
Duty roles are roles that are associated with a specific duty or a logical grouping of tasks. Generally, the list of duties for a job is a good indicator of what duty roles should be defined.
Duty roles should:
Read as a job description at a job posting site.
Duties that we create should be self-contained and pluggable into any existing or new job or abstract role.
Naming Convention: All the Retail duty role names end with' _DUTY'
Example: SUPPLIER_OPTIONS_MAINTENANCE_DUTY
Privilege is the logical collection of permissions. A privilege can be associated with any number of User Interface components. Privileges are expressed as application roles.
Naming Convention: All the Retail Privilege role names end with' _PRIV'
Example: SEARCH_SUPPLIER_OPTIONS_PRIV
Privilege roles carry security grants.
Example:
<grant>
   <grantee>
      <principals>
            <principal>
                                <class>oracle.security.jps.service.policystore.
                                                                                ApplicationRole</class>
               <name>MAINTAIN_DOCUMENTS_PRIV</name>
            </principal>
       </principals>
     </grantee>
  <permissions>
   <permission>
                                <class>oracle.adf.controller.security.TaskFlowPermission</class>
                                <name>/oracle/retail/apps/reim/view/documentmaintenance/flow/DocumentMaintenanceFlow.xml#DocumentMaintenanceFlow</name>
                                <actions>view</actions>
                            </permission>
 </permissions>
</grant>
Retail role hierarchies are structured to reflect the Retail business process model.
Job roles inherit duty roles. For example, the ReIM application administrator Job role inherits the SYSTEM_OPTIONS_MAINTENANCE_DUTY roles.
<app-role> <name> SYSTEM_OPTIONS_MAINTENANCE_DUTY </name> <class>oracle.security.jps.service.policystore.ApplicationRole</class> <members> <member> <class>oracle.security.jps.internal.core.principals. JpsXmlEnterpriseRoleImpl</class> <name> REIM_APPLICATION_ADMINISTRATOR_JOB </name> </member> </members></app-role>
Duty roles inherit Privilege roles. Duty roles can inherit one or more other Duty roles.
Example: DOCUMENT_MANAGEMENT_DUTY inherits DOCUMENT_INQUIRY_DUTY role.
<app-role>
     <name>DOCUMENT_INQUIRY_DUTY</name>
     <class>oracle.security.jps.service.policystore.ApplicationRole</class>
     <members>
         <member>
             <class>oracle.security.jps.service.policystore.ApplicationRole</class>
             <name>DOCUMENT_MANAGEMENT_DUTY</name>
         </member>
         <member>
             <class>oracle.security.jps.internal.core.principals.JpsXmlEnterpriseRoleImpl</class>
             <name>REIM_APPLICATION_ADMINISTRATOR_JOB</name>
         </member>
     </members>
 </app-role>
Example: DOCUMENT_INQUIRY_DUTY role inherits the SEARCH_DOCUMENTS_PRIV role
<app-role> <name>SEARCH_DOCUMENTS_PRIV</name> <class>oracle.security.jps.service.policystore.ApplicationRole</class> <members> <member> <class>oracle.security.jps.service.policystore.ApplicationRole</class> <name>DOCUMENT_INQUIRY_DUTY</name> </member> <member> <class>oracle.security.jps.internal.core.principals.JpsXmlEnterpriseRoleImpl</class> <name>REIM_APPLICATION_ADMINISTRATOR_JOB</name> </member> </members> </app-role>
Retail applications ship with default security reference implementations. The source of truth for default reference implementation is the jazn-data.xml file.
Table 3-5 Privileges
| Name | Description |
|---|---|
|
Search Documents Priv |
A privilege for searching for documents |
|
Maintain Documents Priv |
A privilege for creating and editing documents. |
|
Delete Documents Priv |
A privilege for deleting documents. |
|
View Documents Priv |
A privilege for viewing documents, |
|
Pay Invoice Manually Priv |
A privilege to allow user to pay an invoice before matching the invoice. |
|
EDI Maintenance Priv |
A privilege for allowing a user to fix EDI errors. |
|
Reverse Debit Memo Priv |
A privilege for allowing a user to reverse a Debit Memo |
|
Create Credit Note from CNR Priv |
A privilege for allowing a user to create a credit note from a credit note request |
|
Void Credit Note Priv |
A privilege for allowing a user to void a credit note. |
|
Unmatch Priv |
A privilege for allowing a user to unmatch a merchandise invoice. |
|
Upload_Documents_Priv |
A privilege for allowing a user to upload documents. |
|
Search Financal Posting Error Priv |
A privilege for searching for financial posting errors. |
|
Maintain Financial Posting Error Priv |
A privilege for editing financial posting errors. |
|
View Financial Posting Error Priv |
A privilege for viewing financial posting errors. . |
|
Search Tolerance Priv |
A privilege for searching for tolerance settings. |
|
Maintain Tolerance Priv |
A privilege for creating and editing tolerance settings. |
|
Delete Tolerance Priv |
A privilege for deleting a tolerance setting |
|
View Tolerance Priv |
A privilege for viewing for tolerance settings. |
|
Search Tolerance Mapping Priv |
A privilege for searching for tolerance mapping settings. |
|
Maintain Tolerance Mapping Priv |
A privilege for creating and editing tolerance mapping settings. |
|
Delete Tolerance Mapping Priv |
A privilege for deleting a tolerance mapping setting |
|
View Tolerance Mapping Priv |
A privilege for viewing for tolerance mapping settings. |
|
Search Match Strategy Priv |
A privilege for searching for Match Strategy settings. |
|
Maintain Match Strategy Priv |
A privilege for creating and editing Match Strategy settings. |
|
Delete Match Strategy Priv |
A privilege for deleting a Match Strategy setting |
|
View Match Strategy Priv |
A privilege for viewing for Match Strategy settings. |
|
Search Match Strategy Mapping Priv |
A privilege for searching for Match Strategy mapping settings. |
|
Maintain Match Strategy Mapping Priv |
A privilege for creating and editing Match Strategy mapping settings. |
|
Delete Match Strategy Mapping Priv |
A privilege for deleting a Match Strategy mapping setting |
|
View Match Strategy Mapping Priv |
A privilege for viewing for Match Strategy mapping settings. |
|
Search G/L Cross Reference Priv |
A privilege for searching for G/L Cross Reference settings. |
|
Maintain G/L Cross Reference Priv |
A privilege for creating and editing t G/L Cross Reference settings. |
|
Delete G/L Cross Reference Priv |
A privilege for deleting a G/L Cross Reference setting |
|
View G/L Cross Reference Priv |
A privilege for viewing for G/L Cross Reference settings. |
|
Search Reason Code Priv |
A privilege for searching for Reason Code settings. |
|
Maintain Reason Code Priv |
A privilege for creating and editing Reason Code settings. |
|
Delete Reason Code Priv |
A privilege for deleting a Reason Code setting |
|
View Reason Code Priv |
A privilege for viewing for Reason Code settings. |
|
Search G/L Options Priv |
A privilege for searching for G/L Options settings. |
|
Maintain G/L Options Priv |
A privilege for creating and editing G/L Options settings. |
|
Delete G/L Options Priv |
A privilege for deleting a G/L Options setting |
|
View G/L Options Priv |
A privilege for viewing for G/L Options settings. |
|
Maintain System Options Priv |
A privilege for creating and editing System Options settings. |
|
Delete System Options Priv |
A privilege for deleting a System Options setting |
|
View System Options Priv |
A privilege for viewing for System Options settings. |
|
Search Supplier Options Priv |
A privilege for searching for Supplier Options settings. |
|
Maintain Supplier Options Priv |
A privilege for creating and editing Supplier Options settings. |
|
Delete Supplier Options Priv |
A privilege for deleting a Supplier Options setting |
|
View Supplier Options Priv |
A privilege for viewing for Supplier Options settings. |
|
Search Location Dynamic Mapping Priv |
A privilege for searching for Location Dynamic Mapping settings. |
|
Maintain Location Dynamic Mapping Priv |
A privilege for creating and editing Location Dynamic Mapping settings. |
|
Delete Location Dynamic Mapping Priv |
A privilege for deleting a Location Dynamic Mapping setting |
|
View Location Dynamic Mapping Priv |
A privilege for viewing for Location Dynamic Mapping settings. |
|
Search Dept Class Dynamic Mapping Priv |
A privilege for searching for Dept Class Dynamic Mapping settings. |
|
Maintain Dept Class Dynamic Mapping Priv |
A privilege for creating and editing Dept Class Dynamic Mapping settings. |
|
Delete Dept Class Dynamic Mapping Priv |
A privilege for deleting a Dept Class Dynamic Mapping setting |
|
View Dept Class Dynamic Mapping Priv |
A privilege for viewing for Dept Class Dynamic Mapping settings. |
|
Search Manual Match Priv |
A privilege to allow a user search for invoices and receipts to be manually matched |
|
Manual Match Priv |
A privilege to allow a user to match an invoice manually through the UI. |
|
Search Credit Note Match Priv |
A privilege to allow a user to search for Credit Notes to Credit Note Requests to be matched,. |
|
Credit Note Match Priv |
A privilege to match Credit Notes to Credit Note Requests. |
|
Search Discrepancy List Priv |
A privilege to search for Discrepancies. |
|
Cost Resolution Priv |
A privilege to allow a cost discrepancy to be resolved. |
|
Quantity Resolution Priv |
A privilege to allow a quantity discrepancy to be resolved |
|
Search Tax Discrepancy List Priv |
A privilege to search for Tax Discrepancies |
|
Tax Discrepancy Resolution Priv |
A privilege to allow a tax discrepancy to be resolved. |
Table 3-6 Duties
| Name | Description | List of Privileges |
|---|---|---|
|
Document Management Duty |
A Duty for managing documents. This duty is an extension of the Document Inquiry Duty |
|
|
Document Inquiry Duty |
A duty for viewing documents |
- View Documents Priv- Search Documents Priv |
|
Pay Invoice Duty |
A duty for paying an invoice manually |
- Pay Invoice Manually Priv |
|
EDI Maintenance Duty |
A duty for fixing EDI Errors. |
- EDI Maintenance Priv |
|
Reverse Debit Memo Duty |
A duty to allow user to reverse a Credit Note |
- Reverse Debit Memo Priv |
|
Create Credit Note from CNR Duty |
A duty to allow user to create a Credit Note from a Credit Note Request |
- Create Credit Note from CNR Priv |
|
Void Credit Note Duty |
A duty for voiding a Credit Note. |
- Void Credit Note Priv |
|
Unmatch Duty |
A duty for unmatching a merchandise invoice |
Unmatch Priv |
|
Upload Duty |
A duty for uploading documents |
Unload Documents Priv |
|
Financial Posting Error Duty |
A Duty for managing Financial Posting Errors. This duty is an extension of the Financial Posting Errors Inquiry Duty |
- All privileges found in the Financial Posting Error Inquiry Duty. - Maintain Financial Posting Error Priv |
|
Financial Posting Error Inquiry Duty |
A duty for viewing Financial Posting Errors |
- View Financial Posting Error Priv- Search Financial Posting Error Priv |
|
Tolerance Maintenance Duty |
A Duty for managing Tolerance settings. This duty is an extension of the Tolerance Inquiry Duty |
- All privileges found in the Tolerance Inquiry Duty. - Maintain Tolerance Priv - Delete Tolerance Priv - Maintain Tolerance Mapping Priv - Delete Tolerance Mapping Priv |
|
Tolerance Inquiry Duty |
A duty for viewing Tolerance settings |
- View Tolerance Priv - View Tolerance Mapping Priv - Search Tolerance Priv - Search Tolerance Mapping Priv |
|
Match Strategy Maintenance Duty |
A Duty for managing Match Strategy settings. This duty is an extension of the Match Strategy Inquiry Duty |
- All privileges found in the Match Strategy Inquiry Duty. - Maintain Match Strategy Priv - Delete Match Strategy Priv - Maintain Match Strategy Mapping Priv - Delete Match Strategy Mapping Priv |
|
Match Strategy Inquiry Duty |
A duty for viewing Match Strategy settings |
- View Match Strategy Priv - View Match Strategy Mapping Priv - Search Match Strategy Priv - Search Match Strategy Mapping Priv |
|
G/L Cross Reference Maintenance Duty |
A Duty for managing G/L Cross Reference settings. This duty is an extension of the G/L Cross Reference Inquiry Duty |
- All privileges found in the G/L Cross Reference Inquiry Duty. - Maintain G/L Cross Reference Priv - Delete G/L Cross Reference Priv |
|
G/L Cross Reference Inquiry Duty |
A duty for viewing G/L Cross Reference settings |
- View G/L Cross Reference Priv- Search G/L Cross Reference Priv |
|
Reason Code Maintenance Duty |
A Duty for managing Reason Code settings. This duty is an extension of the Reason Code Inquiry Duty |
- All privileges found in the Reason Code Inquiry Duty. - Maintain Reason Code Priv - Delete Reason Code Priv |
|
Reason Code Inquiry Duty |
A duty for viewing Reason Code settings |
- View Reason Code Priv- Search Reason Code Priv |
|
G/L Options Maintenance Duty |
A Duty for managing G/L Options settings. This duty is an extension of the G/L Options Inquiry Duty |
- All privileges found in the G/L Options Inquiry Duty. - Maintain G/L Options Priv - Delete G/L Options Priv |
|
G/L Options Inquiry Duty |
A duty for viewing G/L Options settings |
- View G/L Options Priv- Search G/L Options Priv |
|
System Options Maintenance Duty |
A Duty for managing System Options settings. This duty is an extension of the System Options Inquiry Duty |
- All privileges found in the System Options Inquiry Duty. - Maintain System Options Priv - Delete System Options Priv |
|
System Options Inquiry Duty |
A duty for viewing System Options settings |
- View System Options Priv |
|
Supplier Options Maintenance Duty |
A Duty for managing Supplier Options settings. This duty is an extension of the Supplier Options Inquiry Duty |
- All privileges found in the Supplier Options Inquiry Duty. - Maintain Supplier Options Priv - Delete Supplier Options Priv |
|
Supplier Options Inquiry Duty |
A duty for viewing Supplier Options settings |
- View Supplier Options Priv- Search Supplier Options Priv |
|
Location Dynamic Mapping Maintenance Duty |
A Duty for managing Location Dynamic Mapping settings. This duty is an extension of the Location Dynamic Mapping Inquiry Duty |
- All privileges found in the Location Dynamic Mapping Inquiry Duty. - Maintain Location Dynamic Mapping Priv - Delete Location Dynamic Mapping Priv |
|
Location Dynamic Mapping Inquiry Duty |
A duty for viewing Location Dynamic Mapping settings |
- View Location Dynamic Mapping Priv- Search Location Dynamic Mapping Priv |
|
Dept Class Dynamic Mapping Maintenance Duty |
A Duty for managing Dept Class Dynamic Mapping settings. This duty is an extension of the Dept Class Dynamic Mapping Inquiry Duty |
- All privileges found in the Dept Class Dynamic Mapping Inquiry Duty. - Maintain Dept Class Dynamic Mapping Priv - Delete Dept Class Dynamic Mapping Priv |
|
Dept Class Dynamic Mapping Inquiry Duty |
A duty for viewing Dept Class Dynamic Mapping settings |
- View Dept Class Dynamic Mapping Priv - Search Dept Class Dynamic Mapping Priv |
|
Invoice Matching Duty |
A duty for manually matching invoices |
- Manually Match Priv- Search Manual Match Priv |
|
Resolve Cost Discrepancies Duty |
A duty for resolving cost discrepancies |
- Cost Discrepancy Priv - Search Discrepancy List Priv |
|
Resolve Quantity Discrepancies Duty |
A duty for resolving quantity discrepancies |
- Quantity Discrepancy Priv- Search Discrepancy List Priv |
|
Resolve Discrepancies Duty |
A duty for resolving either cost or quantity discrepancies |
- Cost Discrepancy Priv - Quantity Discrepancy Priv - Search Discrepancy List Priv |
|
Credit Note Matching Duty |
A duty for matching Credit Notes |
- Credit Note Match Priv - Search Credit Note Match Priv- |
|
Resolve Tax Discrepancy Duty |
A duty for resolving tax discrepancies |
- Tax Discrepancy Resolution Priv- Search Tax Discrepancy List Priv- |
Table 3-7 Role Mapping
| Role | Duty | Privileges |
|---|---|---|
|
Accounts Payable Specialist |
Document Management DutyPay Invoice DutyEDI Maintenance DutyReverse Debit Memo DutyCreate Credit Note from CNR DutyVoid Credit Note DutyTolerance Inquiry DutyMatch Strategy Inquiry DutyG/L Cross Reference Inquiry DutyReason Code Inquiry DutyG/L Options Inquiry DutySystem Options Inquiry DutySupplier Options Inquiry DutyLocation Dynamic Mapping Inquiry DutyDept Class Dynamic Mapping Inquiry DutyInvoice Matching DutyCredit Note Matching DutyDiscrepancy Resolution DutyOverride Department Security DutyResolve Tax Discrepancy Duty |
- All privileges found in the Document Inquiry Duty. - Maintain Documents Priv - Delete Documents Priv - Pay Invoice Manually Priv - EDI Maintenance Priv - Reverse Debit Memo Priv - Create Credit Note from CNR Priv - Void Credit Note Priv - View Tolerance Priv - View Tolerance Mapping Priv - Search Tolerance Priv - Search Tolerance Mapping Priv - View Match Strategy Priv - View Match Strategy Mapping Priv - Search Match Strategy Priv - Search Match Strategy Mapping Priv - View G/L Cross Reference Priv - Search G/L Cross Reference Priv - View Reason Code Priv - Search Reason Code Priv - View G/L Options Priv - Search G/L OptionsPriv - View System Options Priv - Search System Options Priv - View Supplier Options Priv - Search Supplier Options Priv - View Location Dynamic Mapping Priv - Search Location Dynamic Mapping Priv - View Dept Class Dynamic Mapping Priv - Search Dept Class Dynamic Mapping Priv - Manually Matching Priv - Cost Discrepancy Priv - Quantity Discrepancy Priv - Override Department Security Priv - Credit Note Matching Priv- |
|
Finance Manager |
Document Management Duty Pay Invoice Duty EDI Maintenance Duty Reverse Debit Memo Duty Create Credit Note from CNR Duty Void Credit Note Duty Tolerance Maintenance Duty Match Strategy Maintenance Duty G/L Cross Reference Maintenance Duty Reason Code Maintenance Duty G/L Options Maintenance Duty System Options Inquiry Duty Supplier Options Maintenance Duty Location Dynamic Mapping Maintenance Duty Dept Class Dynamic Mapping Maintenance Duty Invoice Matching Duty Credit Note Matching Duty Discrepancy Resolution Duty Override Department Security Duty Resolve Tax Discrepancy Duty |
- All privileges found in the Document Inquiry Duty. - Maintain Documents Priv - Delete Documents Priv - Pay Invoice Manually Priv - EDI Maintenance Priv - Reverse Debit Memo Priv - Create Credit Note from CNR Priv - Void Credit Note Priv - All privileges found in the Tolerance Inquiry Duty. - Maintain Tolerance Priv - Delete Tolerance Priv - Maintain Tolerance Mapping Priv - Delete Tolerance Mapping Priv - All privileges found in the Match Strategy Inquiry Duty. - Maintain Match Strategy Priv - Delete Match Strategy Priv - Maintain Match Strategy Mapping Priv - Delete Match Strategy Mapping Priv - All privileges found in the G/L Cross Reference Inquiry Duty. - Maintain G/L Cross Reference Priv - Delete G/L Cross Reference Priv - All privileges found in the Reason Code Inquiry Duty. - Maintain Reason Code Priv - Delete Reason Code Priv - All privileges found in the G/L Options Inquiry Duty. - Maintain G/L Options Priv - Delete G/L Options Priv - All privileges found in the System Options Inquiry Duty. - All privileges found in the Supplier Options Inquiry Duty. - Maintain Supplier Options Priv - Delete Supplier Options Priv - All privileges found in the Location Dynamic Mapping Inquiry Duty. - Maintain Location Dynamic Mapping Priv - Delete Location Dynamic Mapping Priv - All privileges found in the Dept Class Dynamic Mapping Inquiry Duty. - Maintain Dept Class Dynamic Mapping Priv - Delete Dept Class Dynamic Mapping Priv |
|
- Manually Match Priv - Search Manual Match Priv - Credit Note Match Priv - Search Credit Note Match Priv - Cost Discrepancy Priv - Quantity Discrepancy Priv - Search Discrepancy List Priv - Override Department Security Priv - Tax Discrepancy Resolution Priv - Search Tax Discrepancy List Priv |
||
|
Buyer |
Override Department Security Duty Resolve Cost Discrepancies Duty |
- Cost Discrepancy Priv - Search Discrepancy List Priv - Override Department Security Priv |
|
Corporate Inventory Control Analyst |
Resolve Quantity Discrepancies Duty |
- Quantity Discrepancy Priv- Search Discrepancy List Priv |
|
ReIM Application Administrator |
All duties. |
- All privileges |
|
Financial Analyst |
Document Inquiry Duty Pay Invoice Duty Tolerance Inquiry Duty Match Strategy Inquiry Duty G/L Cross Reference Inquiry Duty Reason Code Inquiry Duty G/L Options Inquiry Duty System Options Inquiry Duty Supplier Options Inquiry Duty Location Dynamic Mapping Inquiry Duty Dept Class Dynamic Mapping Inquiry Duty Financial Posting Error Inquiry Duty |
- All privileges in - Document Inquiry Duty. - All privileges in - Tolerance Inquiry Duty. - All privileges found in the Match Strategy Inquiry Duty. - All privileges found in the G/L Cross Reference Inquiry Duty. - All privileges found in the Reason Code Inquiry Duty. - All privileges found in the G/L Options Inquiry Duty. - All privileges found in the System Options Inquiry Duty. - All privileges found in the Supplier Options Inquiry Duty. - All privileges found in the Location Dynamic Mapping Inquiry Duty. - All privileges found in the Dept Class Dynamic Mapping Inquiry Duty. - All privileges found In the Financial Posting Error Inquiry Duty - |
|
Accounts Payable Manager |
Document Management Duty Pay Invoice Duty EDI Maintenance Duty Reverse Debit Memo Duty Create Credit Note from CNR Duty Void Credit Note Duty Tolerance Maintenance Duty Match Strategy Maintenance Duty G/L Cross Reference Maintenance Duty Reason Code Maintenance Duty G/L Options Maintenance Duty System Options Inquiry Duty Supplier Options Maintenance Duty Location Dynamic Mapping Maintenance Duty Dept Class Dynamic Mapping Maintenance Duty Invoice Matching Duty Credit Note Matching Duty Discrepancy Resolution Duty Resolve Tax Discrepancy Duty Unmatch Duty Upload Documents Duty Financial Posting Error Duty |
- EDI Maintenance Priv- Reverse Debit Memo Priv- Create Credit Note from CNR Priv - Void Credit Note Priv- All privileges found in the Tolerance Inquiry Duty.- Maintain Tolerance Priv- Delete Tolerance Priv- Maintain Tolerance Mapping Priv- Delete Tolerance Mapping Priv- All privileges found in the Match Strategy Inquiry Duty.- Maintain Match Strategy Priv- Delete Match Strategy Priv- Maintain Match Strategy Mapping Priv- Delete Match Strategy Mapping Priv- All privileges found in the G/L Cross Reference Inquiry Duty.- Maintain G/L Cross Reference Priv- Delete G/L Cross Reference Priv- All privileges found in the Reason Code Inquiry Duty.- Maintain Reason Code Priv- Delete Reason Code Priv- All privileges found in the G/L Options Inquiry Duty.- Maintain G/L Options Priv- Delete G/L Options Priv- All privileges found in the System Options Inquiry Duty.- All privileges found in the Supplier Options Inquiry Duty.- Maintain Supplier Options Priv- Delete Supplier Options Priv- All privileges found in the Location Dynamic Mapping Inquiry Duty.- Maintain Location Dynamic Mapping Priv- Delete Location Dynamic Mapping Priv- All privileges found in the Dept Class Dynamic Mapping Inquiry Duty.- Maintain Dept Class Dynamic Mapping Priv- Delete Dept Class Dynamic Mapping Priv |
|
- Manually Match Priv - Search Manual Match Priv - Credit Note Match Priv - Search Credit Note Match Priv - Cost Discrepancy Priv - Quantity Discrepancy Priv - Search Discrepancy List Priv - Tax Discrepancy Resolution Priv - Search Tax Discrepancy List Priv - Unmatch Priv - Upload documents Priv - All privileges found In the Financial Posting Error Inquiry Duty - Financial Posting Error Priv |
||
|
Data Steward |
Document Management Inquiry Duty EDI Maintenance Duty Tolerance Maintenance Duty Match Strategy Maintenance Duty G/L Cross Reference Maintenance Duty Reason Code Maintenance Duty G/L Options Maintenance Duty System Options Maintenance Duty Supplier Options Maintenance Duty Location Dynamic Mapping Maintenance Duty Dept Class Dynamic Mapping Maintenance Duty Upload Documents Duty Financial Posting Error Duty |
- All privileges found in the Document Inquiry Duty. - EDI Maintenance Priv - All privileges found in the Tolerance Inquiry Duty. - Maintain Tolerance Priv - Delete Tolerance Priv - Maintain Tolerance Mapping Priv - Delete Tolerance Mapping Priv - All privileges found in the Match Strategy Inquiry Duty. - Maintain Match Strategy Priv - Delete Match Strategy Priv - Maintain Match Strategy Mapping Priv - Delete Match Strategy Mapping Priv - All privileges found in the G/L Cross Reference Inquiry Duty. - Maintain G/L Cross Reference Priv - Delete G/L Cross Reference Priv - All privileges found in the Reason Code Inquiry Duty. - Maintain Reason Code Priv - Delete Reason Code Priv - All privileges found in the G/L Options Inquiry Duty. - Maintain G/L Options Priv - Delete G/L Options Priv - All privileges found in the System Options Inquiry Duty. - Maintain System Options Priv - All privileges found in the Supplier Options Inquiry Duty. - Maintain Supplier Options Priv - Delete Supplier Options Priv - All privileges found in the Location Dynamic Mapping Inquiry Duty. |
|
- Maintain Location Dynamic Mapping Priv - Delete Location Dynamic Mapping Priv - All privileges found in the Dept Class Dynamic Mapping Inquiry Duty. - Maintain Dept Class Dynamic Mapping Priv - Delete Dept Class Dynamic Mapping Priv - Upload documents Priv - All privileges found In the Financial Posting Error Inquiry Duty - Financial Posting Error Priv |
|
Note: Make sure that the policy store is loaded with the default security configuration. For more information, see the Post Installation steps in the Oracle Retail Invoice Matching Installation Guide. |
The common decisions made to match your enterprise to the default security reference implementation include the following:
Do the default job roles match the equivalent job roles in your enterprise?
Do the jobs in your enterprise exist in the security reference implementation?
Do the duties performed by the jobs in your enterprise match the duties in the security reference implementation?
|
Important: It is important when constructing a role hierarchy that circular dependencies are not introduced. The best practice is to leave the default security configuration in place and first incorporate your customized application roles in a test environment. |
Retail applications provide a way in which retailers can modify the default roles to map to their security groups through the Retail Application Administration Console (RAAC).
RAAC is installed along with the Retail Application. Users with proper security privileges to access RAAC can launch RAAC by clicking on a link from the Retail Application's global menu.
For more information about using RAAC, refer to the Oracle Retail Application Administration Console chapter of the Oracle Retail Merchandising Implementation Guide.
There are situations where administrators need to disable certain links or the default content such as Dashboards due to unavailability or other reasons. Retail Applications provide the flexibility to disable such content so that the application remains largely unaffected.
Applications can choose to serve certain content such as dashboards to users upon launching the application. This is referred to as "Default Content". However sometimes this default content may cause delays in application launch after logging-in or worse it may render the application unusable.
To handle such scenarios Retail Applications provide a feature for Administrators called "Safe Mode" which. allows the user to log in without serving up any default content. Once this mode is turned on, no default content is shown to any user when the application is launched.
To turn on this mode the property "uishell.load.safe.mode" must be set to true in the RetailAppsViewController.properties file.
Administrators may occasionally need to disable content launchable from links in the sidebar menu. Retail Applications provide the ability to disable such links.
To disable a link the Administrator must first find the "id" of that link as specified in the SidebarNavigationModel.xml file. This value must then be provided to the property "uishell.sidebar.invalid.item.ids" within the RetailAppsViewController.properties file. To disable more than one link, pass in multiple ids separated by a comma.
Retail Applications are built using ADF and one of the features within ADF is the Oracle Metadata Services (MDS) framework which provides a facility for retailers to customize the applications.
Refer to the document, Oracle® Fusion Middleware Developing Fusion Web Applications with Oracle Application Development Framework ( https://docs.oracle.com/middleware/1221/adf/develop/GUID-33CB77F6-6ECD-4B5D-9B95-5874AEDA1A78.htm#ADFFD2077), for more information about MDS.
Oracle Metadata Services (MDS) is a key infrastructure component in Oracle Fusion Middleware. It is the layer through which metadata is loaded, saved, cached, stored, managed, and customized both by various middleware components and by the applications built on Fusion Middleware.
The use of MDS in ADF applications, for example, can allow applications to remember how users like to work, and therefore not require them to set up the application for every session. This may include, for example, saving of common searches and screen layouts for every user. This allows making use of the application easier and more intuitive for the users. MDS provides a foundation that can be leveraged by Oracle Application Development Framework (ADF) applications to provide such persistent personalization.
Oracle Metadata Services (MDS) makes use of metadata repositories or partitions. A Metadata repository or partition contains metadata for Oracle Fusion Middleware components. It can also contain metadata about the configuration of Oracle Fusion Middleware and metadata for applications. Oracle Metadata Services (MDS) stores the customizations in a metadata repository and retrieves them at runtime to merge the customizations with the base metadata to reveal the customized application.
A common problem when a patch is installed for a Retail Application is that certain screens would fail to load or UI elements fail to display data properly.
The cause of this issue is commonly attributed to user personalization on screen elements that are now removed in the patch.
For example, prior to patching the application, users may have saved search criterias on certain screens as a way to conveniently recall their desired search results whenever they use the application. Those saved search criterias are persisted by ADF in the MDS repository. If the patch involves the removal of one of the attributes used in the search criterias, applying the patch will cause the screens that have those search criterias fail to load.
The MDS repository is configured in the WebLogic server where the Retail Application is deployed. The repository is database-based and it is organized or subdivided into partitions. Retail Applications are deployed with their own partition within the server's MDS repository.
It is recommended to not delete the MDS partition during the upgrade of the Retail Application, instead use the functions described in this document to resolve any issues related to MDS.
For managing MDS Customizations in Retail Fusion Applications, use the Oracle Enterprise Manager to perform common metadata service tasks such as exporting, deleting, and importing of MDS Customizations. This can be done in the Oracle Enterprise Manager using the System MBean Browser and the MDSAppRuntime MBean.
Perform the following steps to access the MDSAppRuntime MBean.
Login to the Oracle Enterprise Manager by navigating to the URL in the following format:
http://<host>:<port>/em/
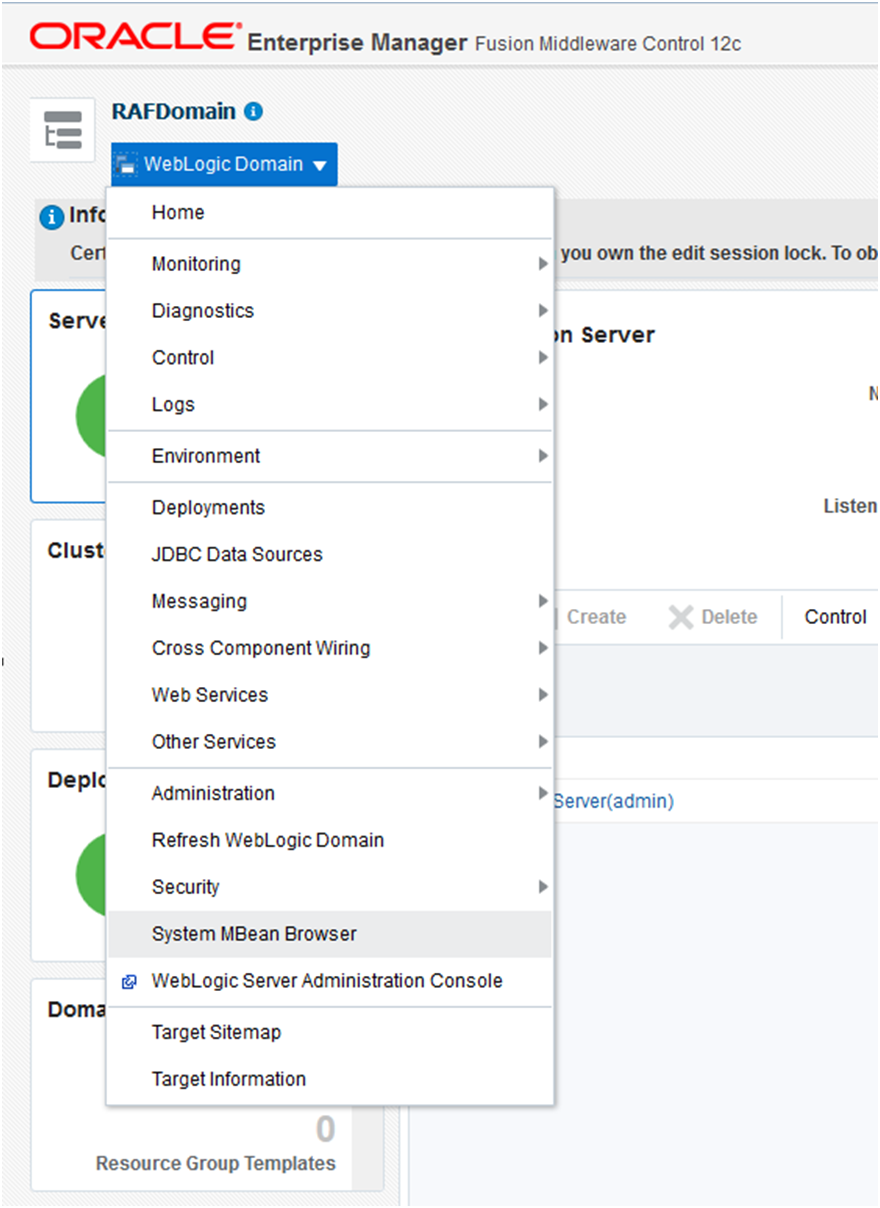
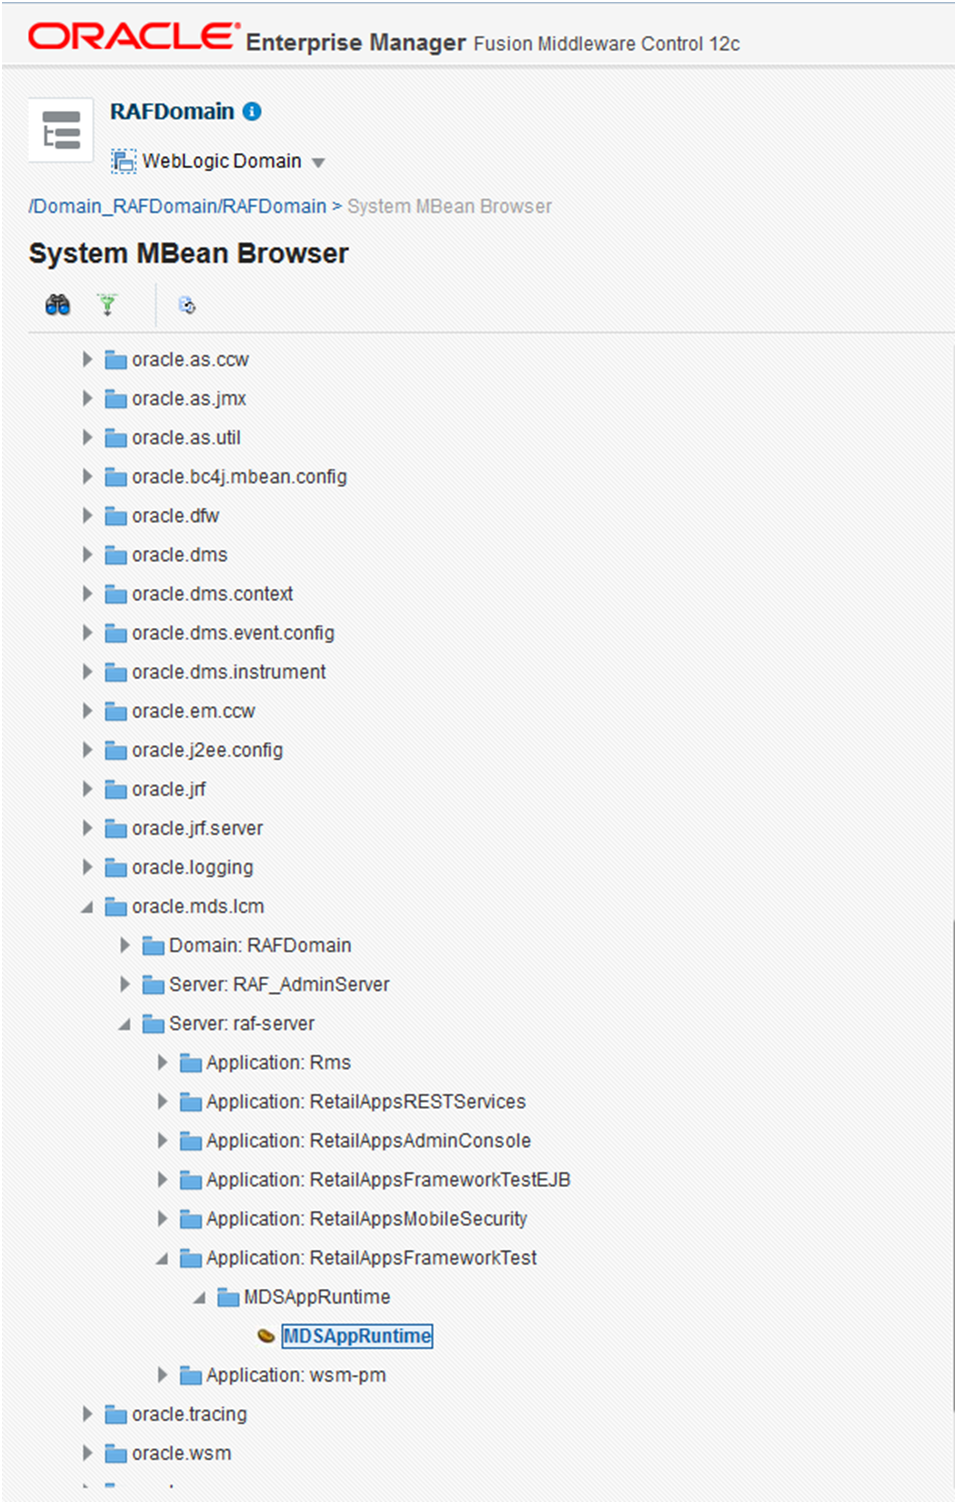
Click on the WebLogic Domain dropdown under the domain name. Navigate to System MBean Browser menu item and click on System MBean Browser. The screenshot below shows the RAFDomain as the domain name.
Under Application Defined MBeans, locate MDSAppRuntime which can be found under the following folder structure:
> oracle.mds.lcm > Server: AppServer > Application: Application Name > MDSAppRuntime
Choose the correct server and the Retail Application name based on your installation. The screenshot below displays RAFServer and RetailAppsFrameworkTest application.
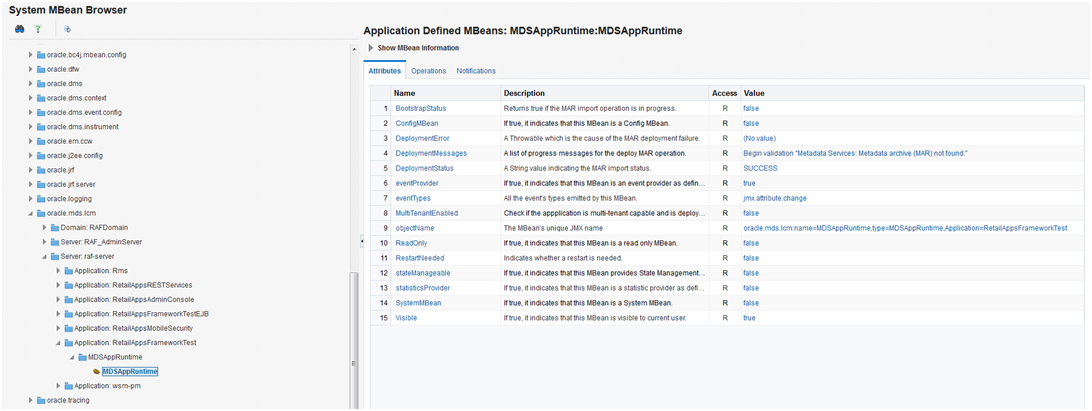
Click MDSAppRuntime management bean (MBean).
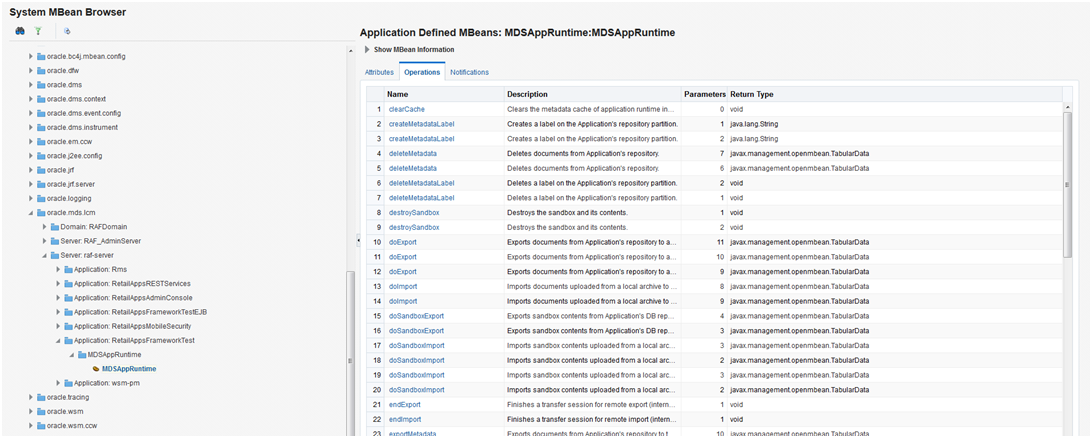
Select the Operations tab to view the operations available for the MDSAppRuntime MBean.
These are the operations which can be used in managing MDS Customizations. The exportMetadata, deleteMetadata, importMetadata, createMetadataLabel, listMetadataLabels, deleteMetadataLabel, and promoteMetadataLabel; will be briefly discussed in the following sections.
Navigate to the MDSAppRuntime management bean (MBean), as described in the section Using the System MBean Browser and the MDSAppRuntime MBean.
Export metadata by selecting the exportMetadata operation available from the Operations tab.
For toLocation, provide a valid absolute path to a directory or archive in the file system to which the selected documents will be exported. This location must be accessible from the machine where the application is running. If it does not exist, a directory will be created except that when the name ends with ".jar", ".JAR", ".zip", or ".ZIP", an archive will be created. Exporting metadata to an existing archive will overwrite the existing file.
Example: /tempDir/downloads/mdsExport/RetailAppsFrameworkTestMDS.zip
Click Invoke (located at the upper-right corner of the page) to proceed with the export operation.
Click Return to return to the list of operations.
Navigate to the MDSAppRuntime management bean (MBean), as described in the section Using the System MBean Browser and the MDSAppRuntime MBean.
Export metadata by selecting the exportMetadata operation available from the Operations tab.
For toLocation, provide a valid absolute path to a directory or archive in the file system to which the selected documents will be exported. This location must be accessible from the machine where the application is running. If it does not exist, a directory will be created except that when the name ends with ".jar", ".JAR", ".zip", or ".ZIP", an archive will be created. Exporting metadata to an existing archive will overwrite the existing file.
Example: /tempDir/downloads/mdsExport/RetailAppsFrameworkTestMDS.zip
For docs, click the pencil icon. On the Edit Parameter popup, click Add, and in the Element box, enter a list of comma-separated, fully qualified document names or document name patterns to export.
To export customizations for a specific page, simply enter the fully qualified base document name in the Element box.
Example:
/oracle/retail/apps/framework/uishell/skin/page/TestTablesAndTrees.jsff
You can provide the path to multiple documents to export, by clicking the Add button. Do not provide any docs in case you want to export all customizations for the user.
For restrictCustTo, click the pencil icon. On the Edit Parameter popup, click Add, and in the Element box, enter the list of customization layer names. This can be a list of comma-separated customization layer names used to restrict the operation to only customization documents that match the specified customization layers.
Each customization layer name can contain, within a pair of brackets, optional customization layer values and value patterns separated by commas. Wildcards (%) may also be used for restricting the operation.
For example:
Table 3-8 Customization Values
| Value | Description |
|---|---|
|
user[buyer] |
Restricts operation to the user 'buyer' |
|
user[buyer, betty_buyer] |
Restricts operation to the users 'buyer' and 'betty_buyer' |
|
user[bu%] |
Restricts operation to user names that start with 'bu' (for example, buyer) |
|
user[be%] |
Restricts operation to user names that start with 'be' (for example, betty_buyer) |
|
user[%bu%] |
Restricts operation to users with 'bu' in the name (for example, buyer and betty_buyer) |
Click Invoke, located at the upper-right corner of the page, to proceed with the export operation.
A confirmation message will display in the page. Click Return to return to the list of operations.
Navigate to the MDSAppRuntime management bean (MBean), as described in the section Using the System MBean Browser and the MDSAppRuntime MBean.
Delete metadata by selecting the deleteMetadata operation available from the Operations tab.
For docs, click the pencil icon. On the Edit Parameter popup, click Add, and in the Element box, enter a list of comma-separated, fully qualified document names or document name patterns.
To delete all customizations for a user, enter "/**" (without the quotes).
This will recursively delete all customizations under "/" including any other customizations located in the folder(s) under it. Click OK.
For restrictCustTo, click the pencil icon. On the Edit Parameter popup, click Add, and in the Element box, enter the list of customization layer names. This can be used to restrict the operation to only customization documents that match the specified customization layers.
Each customization layer name can contain, within a pair of brackets, optional customization layer values and value patterns separated by commas. Wildcards (%) may also be used for restricting the operation.
For example:
Table 3-9 Customization Values
| Value | Description |
|---|---|
|
user[buyer] |
Restricts operation to the user 'buyer' |
|
user[buyer, betty_buyer] |
Restricts operation to the users 'buyer' and 'betty_buyer' |
|
user[bu%] |
Restricts operation to user names that start with 'bu' (for example, buyer) |
|
user[be%] |
Restricts operation to user names that start with 'be' (for example, betty_buyer) |
|
user[%bu%] |
Restricts operation to users with 'bu' in the name (for example, buyer and betty_buyer) |
Click Invoke, located at the upper-right corner of the page, to proceed with the delete operation.
A confirmation message will display in the page. Click Return to return to the list of operations.
Navigate to the MDSAppRuntime management bean (MBean), as described in the section Using the System MBean Browser and the MDSAppRuntime MBean.
Delete metadata by selecting the deleteMetadata operation available from the Operations tab.
For excludeBaseDocs, select true. This is a Boolean value indicating whether to exclude base metadata documents from being deleted.
For docs, click the pencil icon. On the Edit Parameter popup, click Add, and in the Element box, enter a list of comma-separated, fully qualified document names or document name patterns.
To delete all customizations for a user, enter "/**" (without the quotes).
This will recursively delete all customizations under "/" including any other customizations located in the folder(s) under it. Click OK.
For restrictCustTo, click the pencil icon. On the Edit Parameter popup, click Add, and in the Element box, enter the list of customization layer names. This can be used to restrict the operation to only customization documents that match the specified customization layers.
Each customization layer name can contain, within a pair of brackets, optional customization layer values and value patterns separated by commas. Wildcards (%) may also be used for restricting the operation.
For example:
Table 3-10 Customization Values
| Value | Description |
|---|---|
|
user[buyer] |
Restricts operation to the user 'buyer' |
|
user[buyer, betty_buyer] |
Restricts operation to the users 'buyer' and 'betty_buyer' |
|
user[bu%] |
Restricts operation to user names that start with 'bu' (for example, buyer) |
|
user[be%] |
Restricts operation to user names that start with 'be' (for example, betty_buyer) |
|
user[%bu%] |
Restricts operation to users with 'bu' in the name (for example, buyer and betty_buyer) |
Click Invoke, located at the upper-right corner of the page, to proceed with the delete operation.
A confirmation message will display in the page. Click Return to return to the list of operations.
Navigate to the MDSAppRuntime management bean (MBean), as described in the section Using the System MBean Browser and the MDSAppRuntime MBean.
Delete metadata by selecting the deleteMetadata operation available from the Operations tab.
For excludeBaseDocs, select true. This is a Boolean value indicating whether to exclude base metadata documents from being deleted.
For docs, click the pencil icon. On the Edit Parameter popup, click Add, and in the Element box, enter a list of comma-separated, fully qualified document names or document name patterns.
To delete all customizations for a user, enter "/**" (without the quotes).
This will recursively delete all customizations under "/" including any other customizations located in the folder(s) under it. Click OK.
For restrictCustTo, click the pencil icon. On the Edit Parameter popup, click Add, and in the Element box, enter the list of customization layer names. This can be used to restrict the operation to only customization documents that match the specified customization layers.
Each customization layer name can contain, within a pair of brackets, optional customization layer values and value patterns separated by commas. Wildcards (%) may also be used for restricting the operation.
For example:
Table 3-11 Customization Values
| Value | Description |
|---|---|
|
user[buyer] |
Restricts operation to the user 'buyer' |
|
user[buyer, betty_buyer] |
Restricts operation to the users 'buyer' and 'betty_buyer' |
|
user[bu%] |
Restricts operation to user names that start with 'bu' (for example, buyer) |
|
user[be%] |
Restricts operation to user names that start with 'be' (for example, betty_buyer) |
|
user[%bu%] |
Restricts operation to users with 'bu' in the name (for example, buyer and betty_buyer) |
Click Invoke, located at the upper-right corner of the page, to proceed with the delete operation.
A confirmation message will display in the page. Click Return to return to the list of operations.
Navigate to the MDSAppRuntime management bean (MBean), as described in the section Using the System MBean Browser and the MDSAppRuntime MBean.
Import metadata by selecting the importMetadata operation available from the Operations tab.
For fromLocation, enter the path of the directory or archive from which the documents will be imported.
Example: /tempDir/downloads/mdsExport/RetailAppsFrameworkTestMDS.zip
Click Invoke, located at the upper-right corner of the page, to proceed with the import operation.
A confirmation message will display in the page. Click Return to return to the list of operations.
Navigate to the MDSAppRuntime management bean (MBean), as described in the section Using the System MBean Browser and the MDSAppRuntime MBean.
Import metadata by selecting the importMetadata operation available from the Operations tab.
For fromLocation, enter the path of the directory or archive from which the documents will be imported.
Example: /tempDir/downloads/mdsExport/RetailAppsFrameworkTestMDS.zip
For excludeBaseDocs, select true. A Boolean value indicating whether to exclude base metadata documents from being imported.
For docs, click the pencil icon. On the Edit Parameter popup, click Add, and in the Element box, enter a list of comma-separated, fully qualified document names or document name patterns.
To import customizations for a specific page, simply enter the fully qualified base document name in the Element box.
For example: /oracle/retail/apps/framework/uishell/skin/page/TestTablesAndTrees.jsff
You can provide the path to multiple documents to be imported, by clicking the Add. When done, click OK
For restrictCustTo, click the pencil icon. On the Edit Parameter popup, click Add, and in the Element box, enter the list of customization layer names. This can be used to restrict the operation to only customization documents that match the specified customization layers.
Each customization layer name can contain, within a pair of brackets, optional customization layer values and value patterns separated by commas. Wildcards (%) may also be used for restricting the operation.
For example:
Table 3-12 Customization Values
| Value | Description |
|---|---|
|
user[buyer] |
Restricts operation to the user 'buyer' |
|
user[buyer, betty_buyer] |
Restricts operation to the users 'buyer' and 'betty_buyer' |
|
user[bu%] |
Restricts operation to user names that start with 'bu' (for example, buyer) |
|
user[be%] |
Restricts operation to user names that start with 'be' (for example, betty_buyer) |
|
user[%bu%] |
Restricts operation to users with 'bu' in the name (for example, buyer and betty_buyer) |
Click Invoke, located at the upper-right corner of the page, to proceed with the import operation.
A confirmation message will display in the page. Click Return to return to the list of operations.
Navigate to the MDSAppRuntime management bean (MBean), as described in the section Using the System MBean Browser and the MDSAppRuntime MBean.
Create metadata label by selecting the createMetadataLabel operation available from the Operations tab.
For label, enter a valid name of the new metadata label to be created.
Click Invoke, located at the upper-right corner of the page, to proceed with the operation.
A confirmation message will display in the page. Click Return to return to the list of operations.
Navigate to the MDSAppRuntime management bean (MBean), as described in the section Using the System MBean Browser and the MDSAppRuntime MBean.
Create metadata label by selecting the promoteMetadataLabel operation available from the Operations tab.
For label, enter a valid name of the new metadata label to be promoted. Promoting metadata labels can be used to roll back to an earlier version of the document, as captured by the label.
Click Invoke, located at the upper-right corner of the page, to proceed with the operation.
A confirmation message will display in the page. Click Return to return to the list of operations.
Navigate to the MDSAppRuntime management bean (MBean), as described in the section Using the System MBean Browser and the MDSAppRuntime MBean.
List all metadata labels by selecting the listMetadataLabels operation available from the Operations tab.
Click Invoke, located at the upper-right corner of the page, to proceed with the operation.
This will list all the available metadata labels previously created. You can use this, for example, to get the latest metadata label that you want to promote.
Click Return to return to the list of operations.
Navigate to the MDSAppRuntime management bean (MBean), as described in the section Using the System MBean Browser and the MDSAppRuntime MBean.
Delete metadata label by selecting the deleteMetadataLabel operation available from the Operations tab.
For label, enter a valid name of the metadata label to be deleted.
Click Invoke, located at the upper-right corner of the page, to proceed with the operation.
A confirmation message will display in the page. Click Return to return to the list of operations.