| Oracle® Retail Advanced Science Engine Security Guide Release 14.1 E59123-01 |
|

 Previous |
 Next |
The application supports the use of Oracle WebLogic Server 12c Release 3 (12.1.3), extended to use Oracle Application Development Runtime Release 12.1.3. The WebLogic server must be secured using the security recommendations provided in the Oracle Fusion Middleware Information Roadmap for Oracle WebLogic Server (http://docs.oracle.com/middleware/1213/wls/LOCKD/intro.htm#LOCKD107).
|
Note: Ater SSL is configured, RSE_CONFIG ASO_helpInfo and CDM_helpInfo parameters (PARAM_NAME/PARAM_VALUE columns) must be configured with a full URL (for example, https://host:port/full/path/to/help). |
This chapter provides additional specific guidance for securing the WebLogic server for use with the application. It includes the following sections:
Before you start setting up the database, ensure that you have installed all the critical patch updates (CPU) and patches for the WebLogic server. Critical patch updates and patch sets for Oracle products are made available on the My Oracle Support Web site along with documentation or instructions on how you can install them.
When setting up the WebLogic domain, set up the following configuration parameters to ensure a secured configuration:
In a secured configuration, the WebLogic server administrative user names and passwords must not use any default or predictable values, such as weblogic1, welcome1, weblogic, and so on. When setting up the WebLogic domain, ensure that you use non-standard user names and passwords.
When the WebLogic server and domains are installed and set up, ensure that they are not running under the root operating system user account. You can check for this by reviewing the permissions on the WebLogic server files and folders. None of these objects should be owned by the root operating system user.
Once the WebLogic domain for the application is created, ensure that you manually disable the HTTP port and enable the HTTPS port. This ensures that only a secure channel is used for accessing the application. This should be done for two reasons:
User credentials over HTTP are sent in clear-text and anyone listening in on the network will see the user names and passwords.
Disabling the HTTP protocol ensures the application is only accessed via HTTPS for all URLs.
You must also ensure that the secure HTTPS port number is changed to a non-default value. This value must be environment-specific, non-standard, and not easily predictable.
For more information on configuring the listen ports, refer to the Oracle Fusion Middleware Administrator's Guide.
A Java keystore (JKS) is a secured database that stores keys and certificates for an organization. It is used to achieve authentication, integrity, and privacy within in a network. The WebLogic server uses JKS keystores for applications deployed in the WebLogic server.
By default, the WebLogic server is configured with a demo identity keystore and trust keystore. These keystores must not be used in a production environment. You must create your own keystores in the production environment and set up the WebLogic server to use them.
This section describes how you can create your own keystore and trust store. It also describes the necessary configuration steps to set up the WebLogic server with your JKS keystore. It includes the following sections:
To set up your own keystore and trust store: <change commands>
Create a new directory called keystores in your application deployment and navigate to this directory.
Run the following command to create your keystore and certificate:
keytool -genkey -keyalg RSA -alias RASEselfsigned -keystore RASEkeystore.jks -storepass password -validity 360 -keysize 2048
Run the following command to export your certificate from the keystore:
keytool -export -alias RASEselfsigned -keystore RASEkeystore.jks -rfc -file RASEselfsigned.cer
Run the following command to create a trust store and add your certificate to the list of trusted certificates:
keytool -import -alias RASEselfsigned -file RASEselfsigned.cer -keystore RASEtrust.ts -storepass password
Once you are done, there will be three files in the keystores folder—the keystore, the trust store, and the certificate.
|
Note: In the code snippets above, the alias name (RASEselfsigned), keystore name (RASEkeystore), and trust store (RASEtrust) are used for illustration purposes in this document. You may choose to set up names you want. |
To associate the keystore and trust store with the WebLogic server instance:
Log on to the WebLogic Server Administration Console.
From the Domain Configurations section, click Servers, under the Environment category. The Summary of Servers page appears.
On the Summary of Servers page, under the Configuration tab, click the relevant server used for ORASE. The Settings page for the server appears.
On the Settings page, in the Configuration tab, click the Keystores tab.
In the Keystores tab, click the Change button next to the Keystores field.
|
Note: You may need to lock the configuration for editing. |
From the drop-down list, select Custom Identity and Custom Trust.
Click Save.
Enter relevant information in the following fields:
Custom Identity Keystore – Specify the location of the keystore file (.jks). For example, /u00/oracle/rase141/keystore/RASEkeystore.jks.
Custom Identity Keystore Type – Specify the type of the keystore. Enter the text jks.
Custom Identity Keystore Passphrase – Specify the password associated with the keystore (set up when you created the keystore).
Confirm Custom Identity Keystore Passphrase – Specify the same password again to confirm.
Custom Trust Keystore – Specify the location of the trust store file (.ts). For example, /u00/oracle/rase141/keystore/RASEtrust.ts.
Custom Trust Keystore Type – Specify the type of the trust store. Enter the text jks.
Custom Trust Keystore Passphrase – Specify the password associated with the trust store (set up when you created the trust store).
Confirm Custom Trust Keystore Passphrase – Specify the same password again to confirm.
Click Save to save the entries on the Keystores tab.
Click the SSL tab and enter the relevant values in the following fields:
Private Key Alias – Specify the name of the keystore self-signed certificate. For example, RASEselfsigned.
Private Key Passphrase – Specify the private key password associated with the certificate (set up when you created the certificate).
Confirm Private Key Passphrase – Specify the password again to confirm.
Click Save and activate your configuration changes.
Restart the WebLogic server for the changes to take effect.
To see the changes to the keystores, ensure that the SSL is already enabled.
Perform the following steps to configure the WebLogic scripts in order to secure the Administration Server:
Update the WebLogic startup/shutdown scripts with secured port and protocol to start/stop services.
Back up and update the following files in <DOMAIN_HOME>/bin with the correct administration server urls:
startManagedWebLogic.sh: echo "$1 managedserver1 http://apphost1:7001"
stopManagedWebLogic.sh: echo "ADMIN_URL defaults to t3://apphost1:7001 if not set as an environment variable or the second command-line parameter."
stopManagedWebLogic.sh: echo "$1 managedserver1 t3://apphost1:7001 WebLogic WebLogic"
stopManagedWebLogic.sh: ADMIN_URL="t3://apphost1:7001"
stopWebLogic.sh: ADMIN_URL="t3://apphost1:7001"
Change the URLs as follows:
Certificate was added to keystore
t3s://apphost1:7002
https://apphost1:7002
You will need the Retail Application installer to run Java. If the Administration Server is secured using signed certificate, the Java keystore used to launch the installer must have the certificate installed.
If the installer is being run using JDK deployed at location /u00/webadmin/product/jdk, complete the following:
apphost1:[12.1.3_apps] /u00/webadmin/ssl> keytool -import -trustcacerts -alias apphost1 -file /u00/webadmin/ssl/apphost1.cer -keystore /u00/webadmin/product/jdk/jre/lib/security/cacerts
Enter keystore password:
Certificate was added to keystore
apphost1:[12.1.3_apps] /u00/webadmin/ssl>
It is recommended that you use a stronger encryption protocol in your production environment.
The following sections describe how to enable the latest SSL and cipher suites.
In a production environment, Oracle recommends Transport Layer Security (TLS) Version 1.1 or higher for sending and receiving messages in an SSL connection.
To control the minimum versions of SSL Version 3.0 and TLS Version 1 that are enabled for SSL connections, do the following:
Set the WebLogic.security.SSL.minimumProtocolVersion=protocol system property as an option in the command line that starts WebLogic Server.
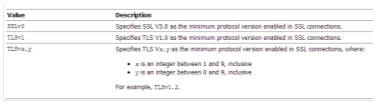
This system property accepts one of the following values for protocol:
Set the following property in startup parameters in WebLogic Managed server for enabling the higher protocol:
DWebLogic.security.SSL.minimumProtocolVersion=TLSv1.1
|
Note: If the protocol is set for Managed servers, it should be set for the Administration server. Ensure that all the managed servers are down when making changes to the Administration server for setting up the protocol. It is recommended to set the properties in Administration server and then the Managed server. |
You must install the unlimited encryption Java Cryptography Extension (JCE) policy if you want to use the strongest Cipher suite (256 bit encryption) AES_256 (TLS_RSA_WITH_AES_256_CBC_SHA). It is dependent on the Java Development Kit (JDK) version.
Using the following URL, download and install the JCE Unlimited Strength Jurisdiction Policy Files that correspond to the version of your JDK:
http://www.oracle.com/technetwork/java/javase/downloads/index.html
For JDK 7, download from the following URL:
http://www.oracle.com/technetwork/java/javase/downloads/jce-7-download-432124.html and replace the files in JDK/jre/lib/security directory
|
Note: Restart the entire WebLogic instance using the JDK to enable changes to take effect once the JCE has been installed. |
Configure the <ciphersuite> element in the <ssl> element in the <DOMAIN_HOME>\server\config\config.xml file in order to enable the specific Cipher Suite to use as follows:
|
Note: You must ensure that the tag <ciphersuite> is added immediately after the tag <enabled>. |
<ssl>
<name>examplesServer</name>
<enabled>true</enabled>
<ciphersuite>TLS_RSA_WITH_AES_256_CBC_SHA</ciphersuite>
<-port>17002</-port>
...
</ssl>
|
Note: The above can be done using wlst script. For more information, go to http://docs.oracle.com/middleware/1213/wls/SECMG/ssl_jsse_impl.htm#SECMG502. It is advisable to bring down the managed server prior to making the changes. |
Complete the following steps to secure the Nodemanager with SSL certificates:
Navigate to <BEA_HOME>/wlserver_10.3/common/nodemanager and back up nodemanager.properties.
Add the following similar entries to nodemanager.properties:
KeyStores=CustomIdentityAndCustomTrust
CustomIdentityKeyStoreFileName=/u00/webadmin/ssl/hostname.keystore
CustomIdentityKeyStorePassPhrase=[password to keystore, this will get encrypted]
CusCustomIdentityPrivateKeyPassPhrase=[password to keystore, this will get encrypted]tomIdentityAlias=hostname
CustomTrustKeyStoreFileName=/u00/webadmin/ssl/hostname.keystore SecureListener=true
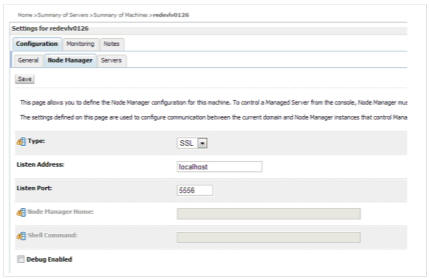
Log in to WebLogic console, navigate to Environment, and then Machines.
Select the nodemanager created already and navigate to Node Manager tab.
In the Change Center, click Lock & Edit.
In the Type field, select SSL from the list.
Click Save and Activate.
You must bounce the entire WebLogic Domain for changes to take effect after activating the changes.
You must verify that the nodemanager is reachable in the Monitoring tab after restart.