| Oracle® Retail Advanced Science Engine Security Guide Release 14.1 E59123-01 |
|

 Previous |
 Next |
This chapter covers common errors and issues and how to troubleshoot them. It contains the following sections:
Java Version 7 SSL Handshake Issue While Using Self-Signed Certificates
HTTPS Service Encountering a Redirect Loop After Applying Policy A
Java Version 7 may have issues using self signed certificates. The self-signed root certificate may not be recognized by Java Version 1.7 and a certificate validation exception might be thrown during the SSL handshake. You need to create the private key with Subject Key Identifier to fix this problem. You need to include an option "-addext_ski" when the orapki utility is used to create the private key in the root wallet.
If customers are using certificates other than those provided by standard certificate authorities in a custom CA implementation, then the JRE used for launching the applications from local machines like laptops or desktops might display a different error messages.
The most probable cause of this issue is the unavailability of root certificates of the CA within the local JRE being used.
Perform the following steps to import the root certificates:
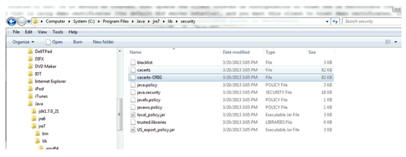
Back up cacert at <JRE_HOME>/lib/security/cacert.
Import the certificate using keytool utility as shown in the following example:
C:\Program Files\Java\jre7\lib\security>..\..\bin\keytool.exe -import -trustcacerts -file D:\ADMINISTRATION\SSL\apphost2\Selfsigned\apphost2.root.cer -alias apphost2 -keystore "C:\Program Files\Java\jre7\lib\security\cacerts"
Enter keystore password: [default is changeit]
Owner: CN=apphost2, OU=<department>, O=<company>,L=<city>,ST=<state or province>, C=<country>",
Issuer: CN=apphost2, OU=<department>, O=<company>,L=<city>,ST=<state or province>, C=<country>"
Serial number: 515d4bfb
Valid from: Thu Apr 04 15:16:35 IST 2013 until: Fri Apr 04 15:16:35 IST 2014
Certificate fingerprints:
MD5: AB:FA:18:2B:BC:FF:1B:67:E7:69:07:2B:DB:E4:C6:D9
SHA1: 2E:98:D4:4B:E0:E7:B6:73:55:4E:5A:BE:C1:9F:EA:9B:71:18:60:BB
SHA256: F3:54:FB:67:80:10:BA:9C:3F:AB:48:0B:27:83:58:BB:3D:22:C5:27:7D:
F4:D1:85:C4:4E:87:57:72:2B:6F:27
Signature algorithm name: SHA1withRSA
Version: 3
Trust this certificate? [no]: (yes)
Certificate was added to keystore
C:\Program Files\Java\jre7\lib\security>
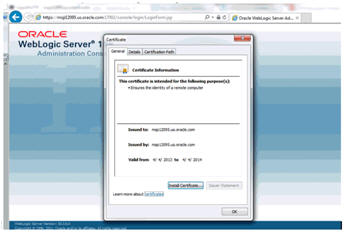
You must add the signed WebLogic server certificate in the browser to avoid a certificate verification error if the Root Certificate is not in the list of trusted CAs.
Complete the following steps to import the Root Certificate through Internet Explorer:
Copy the Root Certificate file to the workstation.
Rename the file to fa_root_cert.cer (this is a quick way to associate the file with the Windows certificate import utility).
Select the file.
Click Install Certificate and click Next.
Select Place all certificates in the following store and click Browse.
Select trusted Root Certification Authorities and click OK.
Click Next.
Click Finish and then Yes at the Security Warning prompt.
Click OK to close the remaining open dialog boxes.
Complete the following steps to import the Root Certificate through Mozilla Firefox:
Start Mozilla Firefox.
Select Tools > Options from the main menu.
Click Advanced >Encryption tab >View Certificates.
In Certificate Manager, click the Authorities tab and then the Import button.
In the Downloading Certificate dialog, choose Trust this CA to identify websites and click OK.
Click OK in Certificate Manager.
Open a browser and test the URL using the SSL port.
The hostname verification ensures that the hostname in the URL to which the client connects matches the hostname in the digital certificate that the server sends back as part of the SSL connection. However, in case SSL handshake is failing due to inability to verify hostname this workaround can be used.
|
Note: Disabling hostname verification is not recommended on production environments. It is only recommended for testing purposes. Hostname verification helps to prevent man-in-the-middle attacks. |
Complete the following steps to disable the hostname verification for testing purposes:
Go to Environment > Domain > Servers > AdminServer.
Click the SSL tab.
Click Advanced.
On Hostname Verification, select NONE.
Save and activate changes.
On the Node Manager startup script, look for JAVA. Add the following line:
Dweblogic.nodemanager.sslHostNameVerificationEnabled=false
After this change, the script should look as follows:
JAVA_OPTIONS="-Dweblogic.nodemanager.sslHostNameVerificationEnabled=false ${JAVA_OPTIONS}"
cd "${NODEMGR_HOME}"
set -x
if [ "$LISTEN_PORT" != "" ]
 then   if [ "$LISTEN_ADDRESS" != "" ]
Restart Node manager.
In situations where a certificate expires or belongs to a different host, the certificate become unusable. You can use the keytool utility to determine the details of the certificate. The certificate should be renewed or a new certificate should be obtained from the appropriate certificate authorities, if the certificate expire.
Example:
apphost1:[12.1.3_apps] /u00/webadmin/ssl> keytool -printcert -file cert.cer
Certificate[1]:
Owner: CN=apphost1, OU=<department>, O=<company>,L=<city>,ST=<state or province>, C=<country>"
Issuer: CN=Oracle SSL CA, OU=Class 3 MPKI Secure Server CA, OU=VeriSign Trust Network, O=Oracle Corporation, C=US
Serial number: 0078dab9f1a5b56e2cd6g92a3987296
Valid from: Thu Oct 11 20:00:00 EDT 2012 until: Sat Oct 12 19:59:59 EDT 2013
Certificate fingerprints:
MD5: 2B:71:89:11:01:40:43:FC:6F:D7:FB:24:EB:11:A5:1C
SHA1:
DA:EF:EC:1F:85:A9:DA:0E:E1:1B:50:A6:8B:A8:8A:BA:62:69:35:C1
SHA256: C6:6F:6B:A7:C5:2C:9C:3C:40:E3:40:9A:67:18:B9:DC:8A:97:52:DB:FD:AB:4B:E5:B2:56:47:EC:A7:16:DF:B6
Signature algorithm name: SHA1withRSA
Version: 3
Extensions:
Keystores are repository of the certificates. When issues related to SSL Certificates exist, you should check the certificates that are available in the keystore. If the certificates are not missing, they should be imported. The keytool command provides the list of the certificates available.
Example:
$ keytool -v -list -keystore /u00/webadmin/product/jdk/jre/lib/security/cacerts
$ keytool -v -list -keystore /u00/webadmin/product/10.3.X_APPS/WLS/wlserver_12.1.3/server/lib/apphost1.keystore
The proxy server access enters into a redirect loop if the services are secured with policy A (user name token over SSL), and the deployment is in a cluster. The access to such services does not work.
Complete the following workaround through SB Console for services that are secured with HTTPS:
Click Resource Browser.
Click Proxy Services under Resource Browser.
Click Create under Change Center to start a session
For each of the SSL secured proxy services, perform the following steps:
Click the proxy service you want to change.
Click Edit next to HTTP Transport Configuration.
Uncheck HTTPS Required check box.
Click Last>>.
Click Save.
Click Activate and then Submit.