| Oracle® Retail Merchandising Security Guide Release 15.0 E65442-01 |
|

 Previous |
 Next |
This chapter covers the administration tasks performed during post installation of RMS application. The section covers the roles and permissions granted for Oracle Advanced Queuing, setting up table level auditing through the application UI, Security Policies around views, formweb.cfg, and the steps to secure the Webservice calls.
This chapter covers the following topics:
Some online processes are moved to asynchronous processing in RMS UI. Some processes that take a longer time have been moved to background asynchronous processing. This is done by using Oracle's Advanced Queuing (AQ) to push long-running processes of a workflow into a separate and asynchronous transaction. One feature of the async processing is the Async Notification message. This mechanism informs the user when the async processing has been completed. This notification message is displayed to the user in RMS UI in near real time.
The following new AQ objects are introduced to implement the roles and permissions:
New User RMS_ASYNC_USER is created with _ADMINISTRATOR_ROLE, DBMS_AQ (execute) and DBMS_AQADM (execute) permissions only
This new user is a dedicated user added to the RMS install. The RMS_NOTIFICATION_QUEUE queue is also created in this user instead of the owning schema
In RMS application as part of security, all search screens and LOVs (List of Values) access the views. Those users who have privileges will only be able to see the data from these views.
These views are implemented by the following scripts:
add_filter_policy.sql
This script adds filter policy to four main categories of data in RMS
Organizational Hierarchy Filtering Policies: Views under this category are V_CHAIN, V_AREA, V_REGION, V_DISTRICT, V_STORE, V_WH, V_EXTERNAL_FINISHER, V_INTERNAL_FINISHER and V_TSF_ENTITY
Merchandise Hierarchy Filtering Policies: V_DIVISION, V_GROUPS, V_DEPS, V_CLASS, V_SUBCLASS and V_ITEM_MASTER
Data Element Filtering Policies: V_DIFF_GROUP_HEAD, V_LOC_LIST_HEAD, V_LOC_TRAITS, V_SEASONS, V_SKULIST_HEAD, V_TICKET_TYPE_HEAD, V_UDA and V_SUPS
Product Location Security Policies: V_TRANSFER_FROM_STORE, V_TRANSFER_FROM_WH, V_TRANSFER_TO_STORE and V_TRANSFER_TO_WH
This section covers the common Application Administration.
For file permission, the following permissions should be given to users to access files once the installation is complete:
All configuration files should at most have 660 permission
All static data (flat files) should at most have 640 permission
Based on the permissions above, besides the owner (the installer user), the group member can also view, read, modify the configuration files, and read the static file. A user out of the group cannot perform any action on the ReSA files. Explicit permissions need to be given by the Administrator to users outside of the group.
Data Access Schema (DAS) is an extension of RMS database used by external applications requiring RMS data. The external applications extracting data from RMS increases the server load on the main RMS schema which impacts the performance of core RMS functionality. The data in the DAS schema is replicated real time from the main RMS schema allowing the server load of the extract job to be restricted to this separate database.
The core RMS tables are replicated to the DAS schema in near real time. On top of these replicated tables, there is a layer of data base views which structures the data and exposes them as business data. An external application that is not aware of the RMS data structure can read the business data exposed.
For a new external application required data extract from RMS, the client should check if the existing tables and views in the DAS schema is sufficient. If not, the RMS table should be included in the list of replicated tables. The client should also build additional views on top of the table or views to structure the data in way it is useful to the requesting application while also considering the reuse for the view for any future use.
The DAS schema is exposed to the external application as a read only schema and external applications should not write into this schema:
Database tables which are replicated from main RMS schema should not be accessed directly from external application. The external application should always access the data using the views only. This will avoid changes to the external application when there is a change in RMS table structure. Any change in RMS data structure should be transparent to the external application just by changing the view built on these tables.
The external application should not be granted permission on the database views. The access to the views should be restricted based on the functional data requirement for a specific application.
Following is the application specific feature administration:
The user can try logging into the application for a specific number of attempts. After ’X' times of continuous failure, the user cannot log in to the application as the account will get locked. For more information, see Configuring the Database Password Policies section.
Application server session time-out. For more information, see RMS - Forms Timeout Setting - Optional section.
When the RMS application is accessed without any config parameters and other parameters, default config section should be modified to throw an error message or a blank form. To enforce this security, add the parameter restrictedURLchars=userid to formsweb.cfg.
Example 11-1 formsweb.cfg entry for restricted URL
<MW_HOME>/user_projects/domains/ClassicDomain/config/fmwconfig/servers/WLS_FORMS/applications/formsapp_11.1.2/config/formsweb.cfg

[rmsFqa3]
envfile=./develop/rmsFqa3.env
restrictedURLchars=userid
width=950
height=685
separateFrame=true
form=rtkstrt.fmx
lookAndFeel=Oracle
colorScheme=swan
archive=frmall.jar,icons.jar
imageBase=codebase
heartbeat=12
|
Note: There are reports generated by Allocation that include in-context launch into RMS screens to display a specific order or shipment. This feature allows you to gain access data which may be restricted by the RMS permissions it is granted with. It is therefore necessary that access to this feature will also have a proper role in RMS to access these screens. |
Audit Trails - The AUDIT_FLD and AUDIT_TBL tables in RMS hold the master table (RMS table names) and field names that are to be audited.
The following are the details for RMS application audit logs:
The batch auditsys.pc adds audit logic to the tables present in AUDIT_TBL table.
A table that has an audit requested raised against it has an audit table created to hold all the inserts/updates/deletes of data.
When this batch program is run, it creates a trigger RMS_tablename_AU which needs to be applied to the master table (tablename). This batch also creates a table tablename_AU.
This audit table (named [RMS_table]_AU) holds the key values of the master table and the username and date of the audited transaction.
Additional fields to be audited may be added or removed at the user's request prior to running auditsys.pc program.
You need to run the auditprg.pc program once the audit table is created to remove the audit table and then add to the RMS audit trail again for any changes to the columns being tracked.
The audit table and the database trigger are automatically promoted to the database.
A user that is granted the following special privileges or a user that has database administrator (DBA) privileges must execute this program:
Create any table
Create any trigger
See the following example:
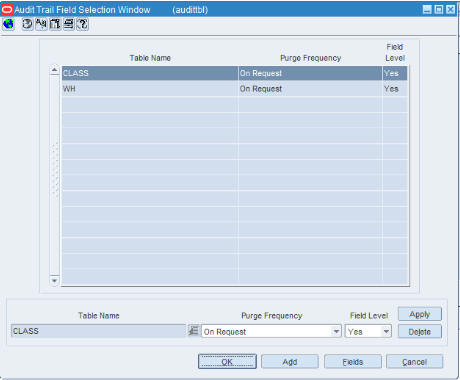
You need to make an entry in AUDIT_TBL and AUDIT_FLD tables to enable audit on WH table.
Navigate to Control > System >Audit Trail.
Fields of WH table to be audited are entered in AUDIT_FLD table. When auditsys.pc program runs, WH_AU table with the columns mentioned in AUDIT_FLD table is created. For each field mentioned in AUDIT_FLD table, OLD_ and NEW_ columns are created by auditsys.pc program. A corresponding trigger is created for the table to capture the audit (old and new changes). In the above example, trigger RMS_WH_AU is created to capture the changes of the mentioned fields.
You need to configure the user credentials and other security related information at the service consumer and the app service provider layers, in order to provide end to end security between web service consumer and the provider.
|
Note:
|
Applying policy A involves the following:
Enabling the HTTPS servers
Creating the Webservice users
Securing services
Updating the Webservice deployment
Webservice Clock Skew setting
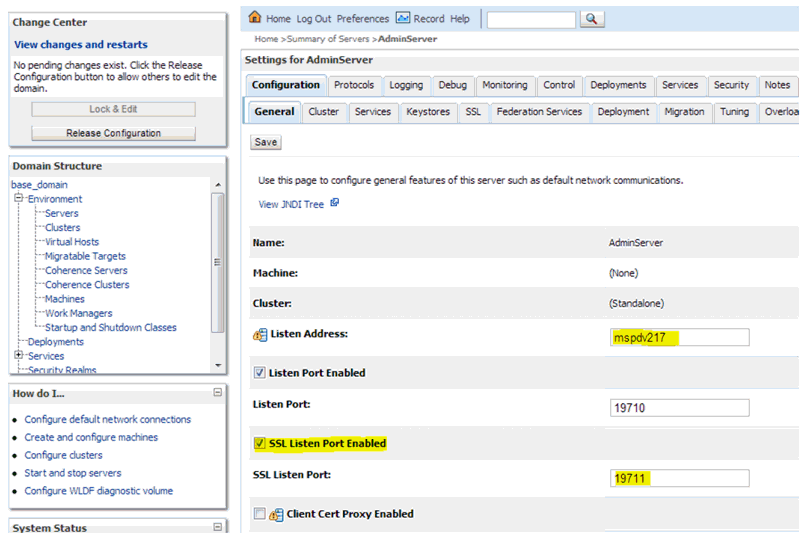
Perform the following steps to enable HTTPS servers:
In WebLogic Admin Console, click Environment > Servers.
Click the server where the web service has been deployed.
Click the General tab.
Check the SSL Listen Port Enabled check box.
Enter a port number for the SSL Listen Port. This is the port number for service end point.
Enter the hostname in Listen Address field.
Click Save.
Perform the following steps to create roles and users who can access the Web services:
In WebLogic Admin Console, click the Domain Structure window, and click the Security Realms link.
The default realm appears.
Click the link on the realm.
Click the Users and Groups tab.
Click New.
Enter the user name and password details on the next screen.
Leave the default value for Provider.
Click OK to save the changes.
The new user is shown in the list of users.
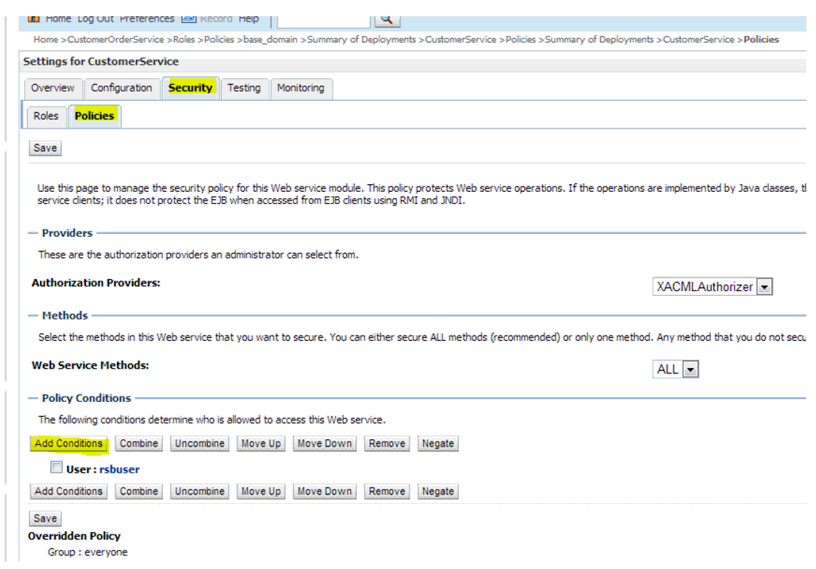
Perform the following steps in WebLogic Admin Console for each of the services to be secured:
Attach the user created in previous step to the service.
Click Deployments.
Click the service you want to secure.
Click Securities and then Policies.
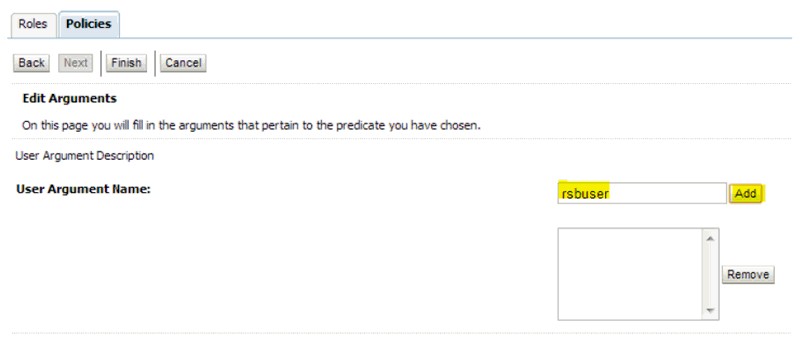
Click Add Conditions > Predict List: Pick User from dropdown > Next > User Argument Name: > Type username you created > Add > Finish > Save.
Attach policy to the service.
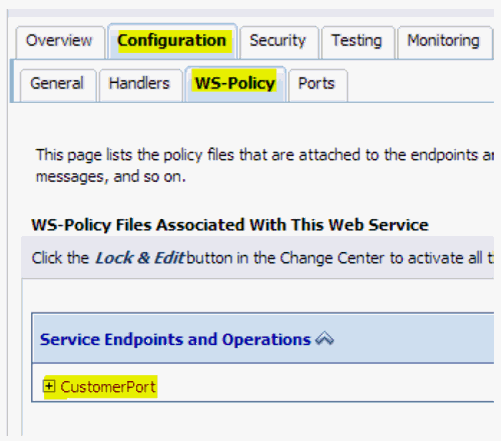
Navigate to Configuration tab.
Click WSB Policy tab and select the service port.
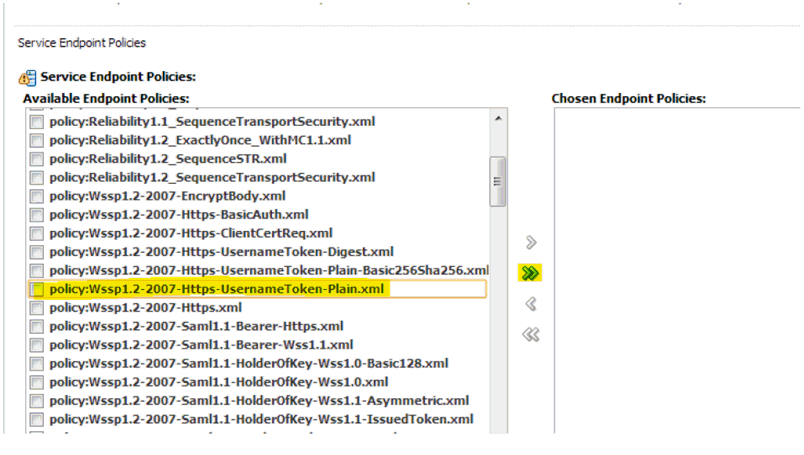
Pick WebLogic > Next > Service Endpoint Policies: select policy:Wssp1.22007HttpsUsernameTokenPlain.xml > Finish
Click OK if WebLogic prompts you to save Plan.xml.
Perform the following steps to update the Webservice deployment:
In WebLogic Admin Console, click Deployments.
Click Lock & Edit and select the deployed application which has the Webservices to be secured.
Click Update and select the deployment ear along with the Plan.xml if saved in the previous steps.
Click Finish.
Click Activate Changes to reflect the changes.
Verify the configuration by checking the WSDL of the service.
The WSDL must have the policy information in it.
Webservices when secured need to be time synched with providers and consumers. However, due to various reasons the providers and consumers can have different time gap.
Weblogic can be configured to different tolerance level for webservices to work.
Perform the following steps to set the tolerance level of time different:
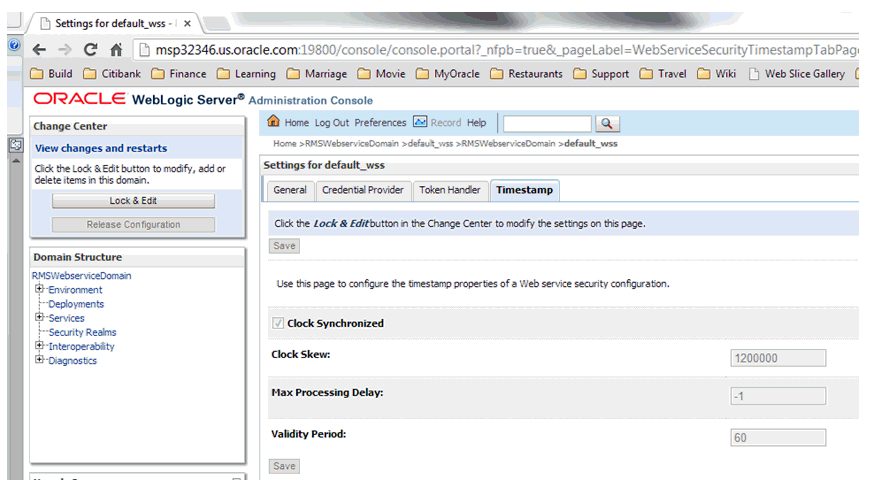
Navigate to WLS Console > Domain > Web Service Security > default_wss > Timestamp.
Click Lock and Edit and update the Clock Skew with tolerance limit (in milliseconds).
Click Activate Changes.
Bounce the managed server hosting Webservice once the changes are implemented.
Applying policy B involves the following:
Creating the Webservice users
Securing services
Updating the Webservice deployment
Perform the following steps to create roles and users who can access the Web services:
In WebLogic Admin Console, click the Domain Structure window, and click the Security Realms link.
The default realm appears.
Click the link on the realm.
Click the Users and Groups tab.
Click New.
Enter the user name and password details on the next screen.
Leave the default value for Provider.
Click OK to save the changes.
The new user is shown in the list of users.
Perform the following steps in WebLogic Admin Console for each of the services to be secured:
Attach the user created in previous step to the service.
Click Deployments.
Click the service you want to secure.
Click Securities and then Policies.
Click Add Conditions > Predict List: Pick User from dropdown > Next > User Argument Name: > Type username you created > Add > Finish > Save.
Attach policy to the service.
Navigate to Configuration tab.
Click WSB Policy tab and select the service port.
Pick WebLogic > Next > Service Endpoint Policies: select policy:Wssp1.22007HttpsUsernameTokenPlain.xml > Finish
Click OK if WebLogic prompts you to save Plan.xml.
Perform the following steps to update the Webservice deployment:
In WebLogic Admin Console, click Deployments.
Click Lock & Edit and select the deployed application which has the Webservices to be secured.
Click Update and select the deployment ear along with the Plan.xml if saved in the previous steps.
Click Finish.
Click Activate Changes to reflect the changes.
Verify the configuration by checking the WSDL of the service.
The WSDL must have the policy information in it.