| Oracle® Retail Allocation Operations Guide Release 15.0 E65743-01 |
|


 Previous |
 Next |
This chapter is intended for administrators who support and monitor the running system.
The content in this chapter is not procedural, but is meant to provide descriptive overviews of the key system parameters.
This section covers the following topics:
Applications may need to execute operations that can take significant time to complete.
Executing these operations in the application's own thread will cause the application to block other operations until those long-running operations finish.
In contrast, being able to assign the long-running operations to background threads allows the foreground thread to remain active and service further user requests. This is also described as launching those operations asynchronously.
For example, in the Allocation application, when an allocation request is submitted for approval, the system needs to perform a comprehensive validation to ensure that the allocation is valid. The validation should be performed asynchronously. You can proceed with performing other operations within the system. Once the background validation is complete, you are notified.
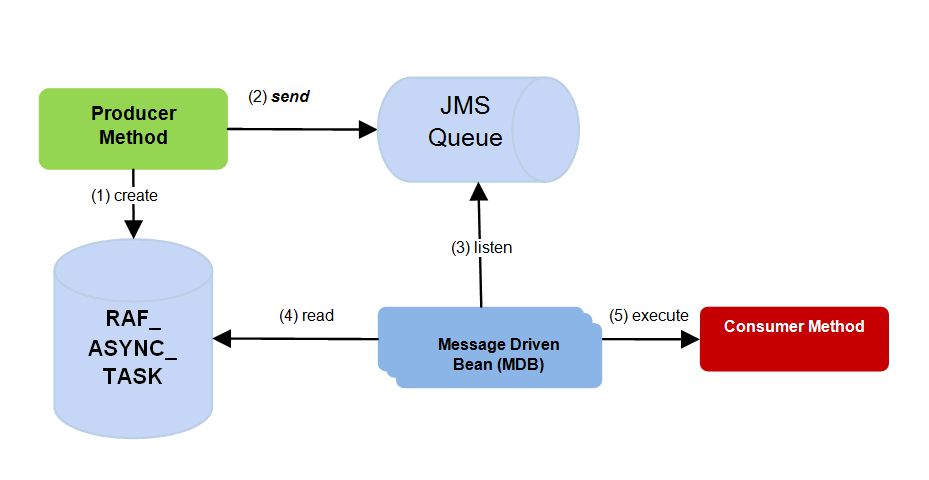
Retail Applications achieve asynchronous processing using Java Messaging Service (JMS). When a user, for instance, through the application UI screen, submits a business entity for processing asynchronously, the application goes through a process depicted in the diagram below:
The Retail application's producer process executes to collect the user request for asynchronous processing and stores that information into a database table called RAF_ASYNC_TASK. This table serves as a log of asynchronous processing requests as well as storage for any kind of context information in order to complete the processing. For example, the unique identifier of the business object such as an allocation being submitted for asynchronous calculation.
The producer method creates a queue message and sends it to a JMS Queue.
One or more instances of Message Driven Beans (MDB) are configured to listen to the JMS Queue.
When messages are detected on the queue, the MDBs are dispatched to execute a task asynchronously. The MDB reads the context information about the task from the TASK table.
The MDB executes the required processing for the task.
The following resources in the WebLogic Administrator Console application should be configured in order to allow asynchronous processing to function in a Retail application:
Table 3-1 WebLogic Administrator Console Resources
| WebLogic Server Resource | Required Names/References | Configuration Notes |
|---|---|---|
|
JMS Server |
Any name can be used. |
None. Defaults provided by WebLogic acceptable. |
|
JMS Module |
Any name can be used. |
None. Defaults provided by WebLogic acceptable. |
|
JMS Queue |
Name: calcQueue JNDI: oracle.retail.apps.alc.async.AllocCalcQueue |
|
|
JMS Queue Connection Factory |
Name: allocCalcQueueCF JNDI: oracle.retail.apps.alc.async.AllocCalcQueueCF |
|
|
Work Manager |
Name: AllocWorkManager |
|
Refer to WebLogic documentation found in http://www.oracle.com/technetwork/middleware/weblogic/documentation/index.html.
for detailed information about how to configure the above resources.
The RAF_ASYNC_TASK table can be used to view error codes for failures, and to monitor for any failures requiring triage from production support team. As described in the section, Overview of Asynchronous Processes in Retail Applications, each asynchronous processing request is logged as a row in the RAF_ASYNC_TASKS table. As the task is sent to the queue, picked up and completed by the consuming message driven bean, the rows in this table are updated with status information.
Table 3-2 RAF_ASYNC_TASK Table Details
| RAF_ASYNC_TASK Column | Description |
|---|---|
|
ASYNC_TASK_ID |
A unique identifier for each row in this table. Each asynchronous task is given a unique ASYNC_TASK_ID. |
|
APPLICATION_CODE |
A code representing the Retail Application that generated the asynchronous task. |
|
TASK_DESC |
A short description of the asynchronous task. |
|
TASK_CONTEXT |
A string containing information needed to process the asynchronous task. Usually indicates the ID of the business entity to be processed (example: the ID of the allocation request to be approved) |
|
STATUS |
The status of the asynchronous task.
|
|
TASK_COMMAND_CLASS_NAME |
A fully-qualified Java class name that contains the business logic for completing the task. |
|
PUBLISH_TIMESTAMP |
The time and date when the asynchronous task was published. That is, when the status was changed to NEW. |
|
PROCESS_START_TIMESTAMP |
The time and date when processing of the asynchronous task started. That is, when the status was changed to IN-PROGRESS. |
|
PROCESS_END_TIMESTAMP |
The time and date when the processing of the asynchronous task ended with either a SUCCESS or FAILED status. |
|
PROCESS_ERROR_TXT |
When the status is FAILED, this column would contain information about the failure. The server logs may need to be inspected for more detailed information about the cause of the processing failure.
|
|
CREATED_BY |
Audit field pertaining to the logged in application user that requested the task. |
|
CREATE_DATE |
Audit field pertaining to when the row was created. |
|
LAST_UPDATED_BY |
Audit field pertaining to the user that last updated the row. |
|
LAST_UPDATE_DATE |
Audit field pertaining to the last date/time when the row was updated. |
As previously mentioned, each asynchronous task is logged as a row in the RAF_ASYNC_TASK table. Over time, this table can grow significantly which can degrade performance of the asynchronous task mechanism.
It is recommended that retailers periodically purge this table.
Retail applications provide a simple PL/SQL function to purge contents of the RAF_ASYNC_TASK table based on retention time period (in days).
declare
 retval number(10);begin -- remove rows older than 5 days retval := raf_async_task_pkg.delete_async_task(5);end;/
This section covers the following topics:
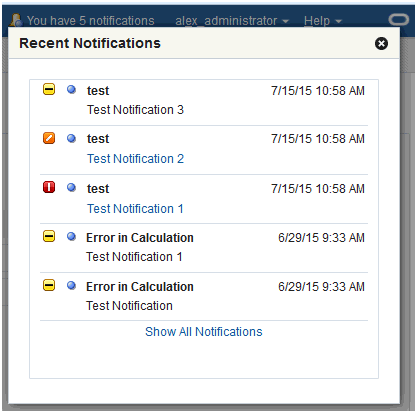
Retail applications provide the ability to notify authenticated users in the application when business events occur. An example of a business event is when a background asynchronous task such as an approval of an allocation or a validation of a price change has completed. Typically, you are expected to take action on these notifications.
When a notification is generated for the user, the notification icon on the Retail Application's global area appears along with a count of the number of pending notifications for the user.
A popup is presented to the user when he/she clicks on the notification icon. The popup will show five latest notifications. Clicking on "Show All Notifications" will show all notifications in a new tab.
Clicking the link for each notification opens the specific UI flow that will allow the user to address any pending action for the notification.
Notifications are represented as rows in the RAF_NOTIFICATION table. Over a period of time, depending on how notifications are being generated by the application, the size of this table can grow continually, potentially degrading performance of the notifications feature.
It is recommended that retailers purge this table periodically. You can do this via the Purge feature available in the Retail Application Administration Console (RAAC). For more details on the Manage Notifications feature in RAAC, refer to the Oracle Retail Application Administration Console chapter of the Oracle Retail Merchandising Implementation Guide.
You could also setup a batch job that runs periodically, that invokes the pl-sql as shown below:
declare retval number(10);begin -- remove Notifications from the Allocation application that have exceeded . -- their retention duration. retval := raf_notification_task_pkg. DEL_NOTIF_PAST_RETENTION('ALC');end;
ReST Endpoints have been exposed by the Notifications framework to ease the integration concerns with disparate applications. Refer to section "Notification ReSTful Web Services" in the Allocation ReSTful Web Services Implementation chapter for details on service endpoints.
Retail Applications provide an ability to switch between applications using the Application Navigator facility. These applications are configured using the Manage Application Navigator screens on Retail Application Administration Console (RAAC). For more details on Application Navigator in RAAC, refer to the Oracle Retail Application Administration Console chapter of the Oracle Retail Merchandising Implementation Guide.
This section discusses the functional security for Retail applications and the components used to implement it. Functional security is based on OPSS. For more information on OPSS, refer to the Oracle Fusion Middleware Application Security Guide.
This section covers the following topics:
Users are not assigned to permissions directly; rather access is assigned to roles. Roles group particular permissions required to accomplish a task; instead of assigning individual permissions, roles match users with the permissions required to complete their particular task.
There are two main types of roles, enterprise and application.
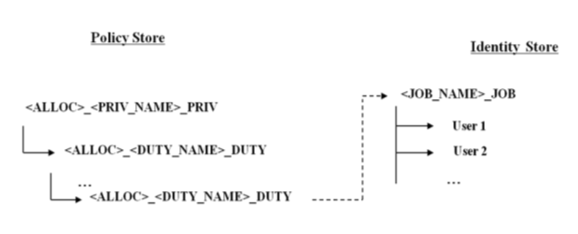
The Identity Store contains enterprise roles that are available across applications. These are created as groups in LDAP, making them available across applications.
Applicable Retail Applications security provides four types of roles: abstract, job, duty, and privilege.
Applicable Retail Applications record job, abstract roles as enterprise roles and duty, privilege roles as application roles.
Application roles are stored in the application-specific policy store. These roles are normally assigned by the system (based on user attributes), but can be provisioned to a user on request.
Abstract roles are associated with a user, irrespective of their job or job function. These are also roles that are not associated with a job or duty. These roles are normally assigned by the system (based on user attributes), but can be provisioned to a user on request.
Naming Convention: All the Retail Abstract role names end with' _ABSTRACT'
Example: APPLICATION_ADMIN_ABSTRACT
JJob roles are associated with the job of a user. A user with this job can have many job functions or job duties.
|
Note: These roles are called Job roles as the role names closely map to the jobs commonly found in most organizations. |
Naming Convention: All the Retail Job role names end with' _JOB'
Example: ALLOCATOR_JOB.
Job duties are tasks one must do on a job. A person is hired into a job role. These are the responsibilities one has for a job.
Duty roles are roles that are associated with a specific duty or a logical grouping of tasks. Generally, the list of duties for a job is a good indicator of what duty roles should be defined.
Duty roles should:
Read as a job description at a job posting site.
Duties that we create should be self-contained and pluggable into any existing or new job or abstract role.
Naming Convention: All the Retail duty role names end with' _DUTY'
Example: ALC_ALLOC_POLICY_MAINTENANCE_MANAGEMENT_DUTY
Privilege is the logical collection of permissions. A privilege can be associated with any number of User Interface components. Privileges are expressed as application roles.
Naming Convention: All the Retail Privilege role names end with' _PRIV'
Example: ALC_ALLOC_SEARCH_PRIV
Privilege roles carry security grants.
Example:
<grant>
   <grantee>
      <principals>
            <principal>
                                <class>oracle.security.jps.service.policystore.
                                                                                ApplicationRole</class>
               <name>ALC_ALLOC_SEARCH_PRIV</name>
            </principal>
       </principals>
     </grantee>
  <permissions>
   <permission>
 <class>oracle.adf.controller.security.TaskFlowPermission</class>
 <name>/oracle/retail/apps/alc/allocsummary/publicUi
                        /flow/AllocationSummaryFlow.xml#AllocationSummaryFlow</name>
    <actions>view</actions>
  </permission>
 </permissions>
</grant>
Retail role hierarchies are structured to reflect the Retail business process model.
Job roles inherit duty roles. For example, the Allocator Job role inherits the ALC_ALLOC_SYSTEM_OPTIONS_INQUIRY_DUTY roles.
<app-role>
  <name>ALC_ALLOC_SYSTEM_OPTIONS_INQUIRY_DUTY</name>
  <class>oracle.security.jps.service.policystore.ApplicationRole</class>
  <members>
   <member>
     <class>oracle.security.jps.internal.core.principals.
                JpsXmlEnterpriseRoleImpl</class>
     <name>ALLOCATOR_JOB</name>
  </member>
 </members>
</app-role>
Duty roles inherit Privilege roles. Duty roles can inherit one or more other Duty roles.
Example: ALC_ALLOC_SIZE_PROFILE_MANAGEMENT_DUTY inherits ALC_ALLOC_SIZE_PROFILE_INQUIRY_DUTY role.
<app-role>
  <name>ALC_ALLOC_SIZE_PROFILE_INQUIRY_DUTY</name>
  <class>oracle.security.jps.service.policystore.ApplicationRole</class>
  <members>
    <member>
     <class>oracle.security.jps.internal.core.principals.
                            JpsXmlEnterpriseRoleImpl</class>
     <name>BUYER_JOB</name>
    </member>
    <member>
     <class>oracle.security.jps.service.policystore.ApplicationRole</class>
     <name>ALC_ALLOC_SIZE_PROFILE_MANAGEMENT_DUTY</name>
    </member>
  </members>
</app-role>
Example: ALC_ALLOC_SIZE_PROFILE_INQUIRY_DUTY role inherits the ALC_ALLOC_SIZE_PROFILE_VIEW_PRIV role
<app-role>
 <name>ALC_ALLOC_SIZE_PROFILE_VIEW_PRIV</name>
 <class>oracle.security.jps.service.policystore.ApplicationRole</class>
 <members>
  <member>
   <class>oracle.security.jps.service.policystore.ApplicationRole</class>
   <name>ALC_ALLOC_SIZE_PROFILE_INQUIRY_DUTY</name>
  </member>
 </members>
</app-role>
Retail applications ship with default security reference implementations. The source of truth for default reference implementation is the jazn-data.xml file.
|
Note: Make sure that the policy store is loaded with the default security configuration. For more information, see the Post Installation steps in the Oracle Retail Allocation Installation Guide. |
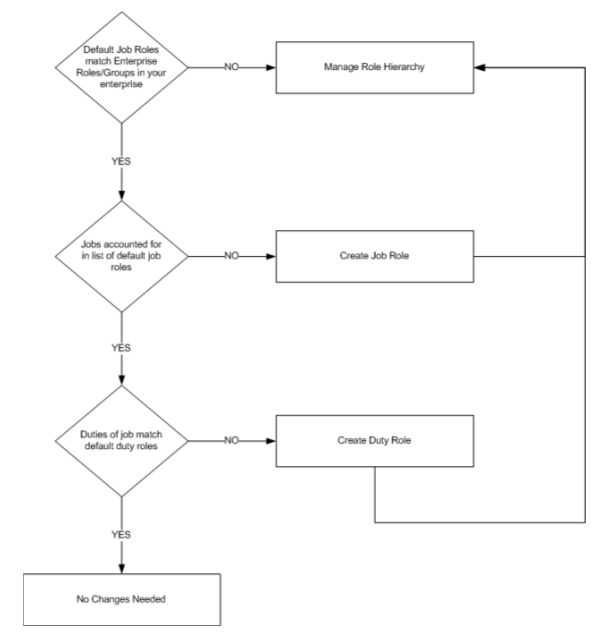
The common decisions made to match your enterprise to the default security reference implementation include the following:
Do the default job roles match the equivalent job roles in your enterprise?
Do the jobs in your enterprise exist in the security reference implementation?
Do the duties performed by the jobs in your enterprise match the duties in the security reference implementation?
|
Important: It is important when constructing a role hierarchy that circular dependencies are not introduced. The best practice is to leave the default security configuration in place and first incorporate your customized application roles in a test environment. |
Retail applications provide a way in which retailers can modify the default roles to map to their security groups through the Retail Application Administration Console (RAAC).
RAAC is installed along with the Retail Application. Users with proper security privileges to access RAAC can launch RAAC by clicking on a link from the Retail Application's global menu.
For more information about using RAAC, refer to the Oracle Retail Application Administration Console chapter of the Oracle Retail Merchandising Implementation Guide.
There are situations where administrators need to disable certain links or the default content such as Dashboards due to unavailability or other reasons. Retail Applications provide the flexibility to disable such content so that the application remains largely unaffected.
Applications can choose to serve certain content such as dashboards to users upon launching the application. This is referred to as "Default Content". However sometimes this default content may cause delays in application launch after logging-in or worse it may render the application unusable.
To handle such scenarios Retail Applications provide a feature for Administrators called "Safe Mode" which. allows the user to log in without serving up any default content. Once this mode is turned on, no default content is shown to any user when the application is launched.
To turn on this mode the property "uishell.load.safe.mode" must be set to true in the RetailAppsViewController.properties file.
Administrators may occasionally need to disable content launchable from links in the sidebar navigation tree. Retail applications provide the ability to disable such links.
To disable a link the Administrator must first find the "id" of that link as specified in the SidebarNavigationModel.xml file. This value must then be provided to the property "uishell.sidebar.invalid.item.ids" within the RetailAppsViewController.properties file. To disable more than one link, pass in multiple ids separated by a comma.
Retail Applications are built using ADF and one of the features within ADF is the Oracle Metadata Services (MDS) framework which provides a facility for retailers to customize the applications.
Refer to the document, Oracle Fusion Middleware Fusion Developer's Guide for Oracle Application Development Framework (https://docs.oracle.com/middleware/1213/adf/develop/adf-web-customizing-apps.htm#ADFFD2077), for more information about MDS.
Oracle Metadata Services (MDS) is a key infrastructure component in Oracle Fusion Middleware. It is the layer through which metadata is loaded, saved, cached, stored, managed, and customized both by various middleware components and by the applications built on Fusion Middleware.
The use of MDS in ADF applications, for example, can allow applications to remember how users like to work, and therefore not require them to set up the application for every session. This may include, for example, saving of common searches and screen layouts for every user. This allows making use of the application easier and more intuitive for the users. MDS provides a foundation that can be leveraged by Oracle Application Development Framework (ADF) applications to provide such persistent personalization.
Oracle Metadata Services (MDS) makes use of metadata repositories or partitions. A Metadata repository or partition contains metadata for Oracle Fusion Middleware components. It can also contain metadata about the configuration of Oracle Fusion Middleware and metadata for applications. Oracle Metadata Services (MDS) stores the customizations in a metadata repository and retrieves them at runtime to merge the customizations with the base metadata to reveal the customized application.
A common problem when a patch is installed for a Retail Application is that certain screens would fail to load or UI elements fail to display data properly.
The cause of this issue is commonly attributed to user personalization on screen elements that are now removed in the patch.
For example, prior to patching the application, users may have saved search criterias on certain screens as a way to conveniently recall their desired search results whenever they use the application. Those saved search criterias are persisted by ADF in the MDS repository. If the patch involves the removal of one of the attributes used in the search criterias, applying the patch will cause the screens that have those search criterias fail to load.
The MDS repository is configured in the WebLogic server where the Retail Application is deployed. The repository is database-based and it is organized or subdivided into partitions. Retail Applications are deployed with their own partition within the server's MDS repository.
It is recommended to not delete the MDS partition during the upgrade of the Retail application, instead use the functions described in this document to resolve any issues related to MDS.
For managing MDS Customizations in Retail Fusion Applications, use the Oracle Enterprise Manager to perform common metadata service tasks such as exporting, deleting, and importing of MDS Customizations. This can be done in the Oracle Enterprise Manager using the System MBean Browser and the MDSAppRuntime MBean.
Perform the following steps to access the MDSAppRuntime MBean.
Login to the Oracle Enterprise Manager by navigating to the URL in the following format:
http://<host>:<port>/em/
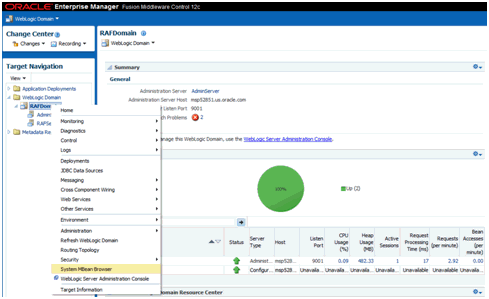
From the Navigation menu, under WebLogic Domain, right-click on the application domain and navigate to System MBean Browser from the context menu.
Choose the correct domain based on your installation. The figure below displays RAFDomain.
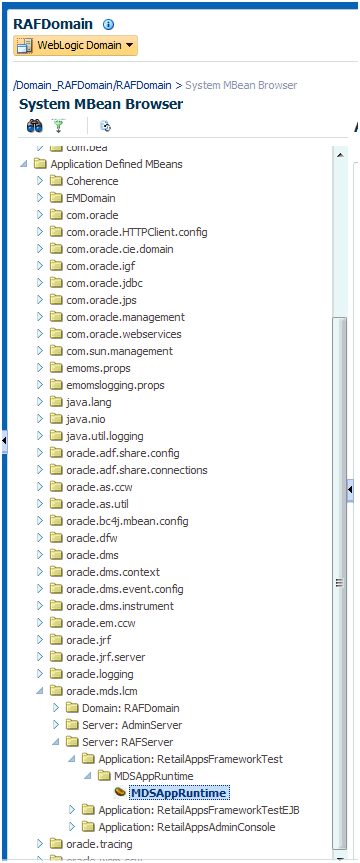
Under Application Defined MBeans, locate MDSAppRuntime which can be found under the following folder structure:
> oracle.mds.lcm > Server: AppServer > Application: Application Name > MDSAppRuntime
Choose the correct server and the Retail Application name based on your installation. The figure below displays RAFServer and RetailAppsFrameworkTest application.
Click MDSAppRuntime management bean (MBean).
Select the Operations tab to view the operations available for the MDSAppRuntime MBean.
These are the operations which can be used in managing MDS Customizations. The exportMetadata, deleteMetadata, importMetadata, createMetadataLabel, listMetadataLabels, deleteMetadataLabel, and promoteMetadataLabel; will be briefly discussed in the following sections.
Navigate to the MDSAppRuntime management bean (MBean), as described in the section "Using the System MBean Browser and the MDSAppRuntime MBean".
Export metadata by selecting the exportMetadata operation available from the Operations tab.
For toLocation, provide a valid absolute path to a directory or archive in the file system to which the selected documents will be exported. This location must be accessible from the machine where the application is running. If it does not exist, a directory will be created except that when the name ends with ".jar", ".JAR", ".zip", or ".ZIP", an archive will be created. Exporting metadata to an existing archive will overwrite the existing file.
Example: /tempDir/downloads/mdsExport/RetailAppsFrameworkTestMDS.zip
Click Invoke (located at the upper-right corner of the page) to proceed with the export operation.
Click Return to return to the list of operations.
Navigate to the MDSAppRuntime management bean (MBean), as described in the section "Using the System MBean Browser and the MDSAppRuntime MBean".
Export metadata by selecting the exportMetadata operation available from the Operations tab.
For toLocation, provide a valid absolute path to a directory or archive in the file system to which the selected documents will be exported. This location must be accessible from the machine where the application is running. If it does not exist, a directory will be created except that when the name ends with ".jar", ".JAR", ".zip", or ".ZIP", an archive will be created. Exporting metadata to an existing archive will overwrite the existing file.
Example: /tempDir/downloads/mdsExport/RetailAppsFrameworkTestMDS.zip
For docs, click the pencil icon. On the Edit Parameter popup, click Add, and in the Element box, enter a list of comma-separated, fully qualified document names or document name patterns to export.
To export customizations for a specific page, simply enter the fully qualified base document name in the Element box.
Example:
/oracle/retail/apps/framework/uishell/skin/page/TestTablesAndTrees.jsff
You can provide the path to multiple documents to export, by clicking the Add button. Do not provide any docs in case you want to export all customizations for the user.
For restrictCustTo, click the pencil icon. On the Edit Parameter popup, click Add, and in the Element box, enter the list of customization layer names. This can be a list of comma-separated customization layer names used to restrict the operation to only customization documents that match the specified customization layers.
Each customization layer name can contain, within a pair of brackets, optional customization layer values and value patterns separated by commas. Wildcards (%) may also be used for restricting the operation.
For example:
Table 3-6 Customization Values
| Value | Description |
|---|---|
|
user[buyer] |
Restricts operation to the user 'buyer' |
|
user[buyer, better_buyer] |
Restricts operation to the users 'buyer' and 'better_buyer' |
|
user[bu%] |
Restricts operation to user names that start with 'bu' (for example, buyer) |
|
user[be%] |
Restricts operation to user names that start with 'be' (for example, betty_buyer) |
|
user[%bu%] |
Restricts operation to users with 'bu' in the name (for example, buyer and betty_buyer) |
Click Invoke, located at the upper-right corner of the page, to proceed with the export operation.
A confirmation message will display in the page. Click Return to return to the list of operations.
Navigate to the MDSAppRuntime management bean (MBean), as described in the section "Using the System MBean Browser and the MDSAppRuntime MBean".
Delete metadata by selecting the deleteMetadata operation available from the Operations tab.
For docs, click the pencil icon. On the Edit Parameter popup, click Add, and in the Element box, enter a list of comma-separated, fully qualified document names or document name patterns.
To delete all customizations for a user, enter "/**" (without the quotes).
This will recursively delete all customizations under "/" including any other customizations located in the folder(s) under it. Click OK.
For restrictCustTo, click the pencil icon. On the Edit Parameter popup, click Add, and in the Element box, enter the list of customization layer names. This can be used to restrict the operation to only customization documents that match the specified customization layers.
Each customization layer name can contain, within a pair of brackets, optional customization layer values and value patterns separated by commas. Wildcards (%) may also be used for restricting the operation.
For example:
Table 3-7 Customization Values
| Value | Description |
|---|---|
|
user[buyer] |
Restricts operation to the user 'buyer' |
|
user[buyer, better_buyer] |
Restricts operation to the users 'buyer' and 'better_buyer' |
|
user[bu%] |
Restricts operation to user names that start with 'bu' (for example, buyer) |
|
user[be%] |
Restricts operation to user names that start with 'be' (for example, betty_buyer) |
|
user[%bu%] |
Restricts operation to users with 'bu' in the name (for example, buyer and betty_buyer) |
Click Invoke, located at the upper-right corner of the page, to proceed with the delete operation.
A confirmation message will display in the page. Click Return to return to the list of operations.
Navigate to the MDSAppRuntime management bean (MBean), as described in the section "Using the System MBean Browser and the MDSAppRuntime MBean".
Delete metadata by selecting the deleteMetadata operation available from the Operations tab.
For excludeBaseDocs, select true. This is a Boolean value indicating whether to exclude base metadata documents from being deleted.
For docs, click the pencil icon. On the Edit Parameter popup, click Add, and in the Element box, enter a list of comma-separated, fully qualified document names or document name patterns.
To delete all customizations for a user, enter "/**" (without the quotes).
This will recursively delete all customizations under "/" including any other customizations located in the folder(s) under it. Click OK.
For restrictCustTo, click the pencil icon. On the Edit Parameter popup, click Add, and in the Element box, enter the list of customization layer names. This can be used to restrict the operation to only customization documents that match the specified customization layers.
Each customization layer name can contain, within a pair of brackets, optional customization layer values and value patterns separated by commas. Wildcards (%) may also be used for restricting the operation.
For example:
Table 3-8 Customization Values
| Value | Description |
|---|---|
|
user[buyer] |
Restricts operation to the user 'buyer' |
|
user[buyer, better_buyer] |
Restricts operation to the users 'buyer' and 'better_buyer' |
|
user[bu%] |
Restricts operation to user names that start with 'bu' (for example, buyer) |
|
user[be%] |
Restricts operation to user names that start with 'be' (for example, betty_buyer) |
|
user[%bu%] |
Restricts operation to users with 'bu' in the name (for example, buyer and betty_buyer) |
Click Invoke, located at the upper-right corner of the page, to proceed with the delete operation.
A confirmation message will display in the page. Click Return to return to the list of operations.
Navigate to the MDSAppRuntime management bean (MBean), as described in the section "Using the System MBean Browser and the MDSAppRuntime MBean".
Delete metadata by selecting the deleteMetadata operation available from the Operations tab.
For excludeBaseDocs, select true. This is a Boolean value indicating whether to exclude base metadata documents from being deleted.
For docs, click the pencil icon. On the Edit Parameter popup, click Add, and in the Element box, enter a list of comma-separated, fully qualified document names or document name patterns.
To delete all customizations for a user, enter "/**" (without the quotes).
This will recursively delete all customizations under "/" including any other customizations located in the folder(s) under it. Click OK.
For restrictCustTo, click the pencil icon. On the Edit Parameter popup, click Add, and in the Element box, enter the list of customization layer names. This can be used to restrict the operation to only customization documents that match the specified customization layers.
Each customization layer name can contain, within a pair of brackets, optional customization layer values and value patterns separated by commas. Wildcards (%) may also be used for restricting the operation.
For example:
Table 3-9 Customization Values
| Value | Description |
|---|---|
|
user[buyer] |
Restricts operation to the user 'buyer' |
|
user[buyer, better_buyer] |
Restricts operation to the users 'buyer' and 'better_buyer' |
|
user[bu%] |
Restricts operation to user names that start with 'bu' (for example, buyer) |
|
user[be%] |
Restricts operation to user names that start with 'be' (for example, betty_buyer) |
|
user[%bu%] |
Restricts operation to users with 'bu' in the name (for example, buyer and betty_buyer) |
Click Invoke, located at the upper-right corner of the page, to proceed with the delete operation.
A confirmation message will display in the page. Click Return to return to the list of operations.
Navigate to the MDSAppRuntime management bean (MBean), as described in the section "Using the System MBean Browser and the MDSAppRuntime MBean".
Import metadata by selecting the importMetadata operation available from the Operations tab.
For fromLocation, enter the path of the directory or archive from which the documents will be imported.
Example: /tempDir/downloads/mdsExport/RetailAppsFrameworkTestMDS.zip
Click Invoke, located at the upper-right corner of the page, to proceed with the import operation.
A confirmation message will display in the page. Click Return to return to the list of operations.
Navigate to the MDSAppRuntime management bean (MBean), as described in the section "Using the System MBean Browser and the MDSAppRuntime MBean".
Import metadata by selecting the importMetadata operation available from the Operations tab.
For fromLocation, enter the path of the directory or archive from which the documents will be imported.
Example: /tempDir/downloads/mdsExport/RetailAppsFrameworkTestMDS.zip
For excludeBaseDocs, select true. A Boolean value indicating whether to exclude base metadata documents from being imported.
For docs, click the pencil icon. On the Edit Parameter popup, click Add, and in the Element box, enter a list of comma-separated, fully qualified document names or document name patterns.
To import customizations for a specific page, simply enter the fully qualified base document name in the Element box.
For example: /oracle/retail/apps/framework/uishell/skin/page/TestTablesAndTrees.jsff
You can provide the path to multiple documents to be imported, by clicking the Add. When done, click OK
For restrictCustTo, click the pencil icon. On the Edit Parameter popup, click Add, and in the Element box, enter the list of customization layer names. This can be used to restrict the operation to only customization documents that match the specified customization layers.
Each customization layer name can contain, within a pair of brackets, optional customization layer values and value patterns separated by commas. Wildcards (%) may also be used for restricting the operation.
For example:
Table 3-10 Customization Values
| Value | Description |
|---|---|
|
user[buyer] |
Restricts operation to the user 'buyer' |
|
user[buyer, better_buyer] |
Restricts operation to the users 'buyer' and 'better_buyer' |
|
user[bu%] |
Restricts operation to user names that start with 'bu' (for example, buyer) |
|
user[be%] |
Restricts operation to user names that start with 'be' (for example, betty_buyer) |
|
user[%bu%] |
Restricts operation to users with 'bu' in the name (for example, buyer and betty_buyer) |
Click Invoke, located at the upper-right corner of the page, to proceed with the import operation.
A confirmation message will display in the page. Click Return to return to the list of operations.
Navigate to the MDSAppRuntime management bean (MBean), as described in the section "Using the System MBean Browser and the MDSAppRuntime MBean".
Create metadata label by selecting the createMetadataLabel operation available from the Operations tab.
For label, enter a valid name of the new metadata label to be created.
Click Invoke, located at the upper-right corner of the page, to proceed with the operation.
A confirmation message will display in the page. Click Return to return to the list of operations.
Navigate to the MDSAppRuntime management bean (MBean), as described in the section "Using the System MBean Browser and the MDSAppRuntime MBean".
Create metadata label by selecting the promoteMetadataLabel operation available from the Operations tab.
For label, enter a valid name of the new metadata label to be promoted. Promoting metadata labels can be used to roll back to an earlier version of the document, as captured by the label.
Click Invoke, located at the upper-right corner of the page, to proceed with the operation.
A confirmation message will display in the page. Click Return to return to the list of operations.
Navigate to the MDSAppRuntime management bean (MBean), as described in the section "Using the System MBean Browser and the MDSAppRuntime MBean".
2. List all metadata labels by selecting the listMetadataLabels operation available from the Operations tab.
Click Invoke, located at the upper-right corner of the page, to proceed with the operation.
This will list all the available metadata labels previously created. You can use this, for example, to get the latest metadata label that you want to promote.
Click Return to return to the list of operations.
Navigate to the MDSAppRuntime management bean (MBean), as described in the section "Using the System MBean Browser and the MDSAppRuntime MBean".
Delete metadata label by selecting the deleteMetadataLabel operation available from the Operations tab.
For label, enter a valid name of the metadata label to be deleted.
Click Invoke, located at the upper-right corner of the page, to proceed with the operation.
A confirmation message will display in the page. Click Return to return to the list of operations.