| Oracle® Retail Allocation Operations Guide Release 15.0 E65743-01 |
|


 Previous |
 Next |
This chapter discusses supported steps for customizing Retail applications.
When retailers want to add new content such as new pages, business components, or even Java code into a Retail Application, retailers will need to create a custom shared library, deploy that into the same managed server as the Retail Application, and register that library into the Retail Application.
Refer to the WebLogic documentation, Developing Applications with WebLogic Server, to learn more about developing and deploying shared libraries in WebLogic.
A Retail application that allows for customization will have as part of its installation an intermediary shared library that will serve as a registry to reference the actual customer-built shared libraries. The diagram below shows the deployment of a Retail Application with the Custom Shared Library Registry.
When retailers need to add their own content into the application, metadata to register their content into the application's UI including the binaries for the content itself (for example, task flows and pages) are expected to be packaged into a Web Archive (WAR) file and deployed as a shared library in the same managed server as the application itself.
Then, the names of these shared libraries have to be referenced in the Custom Shared Library Registry.
This section contains instructions on how retailers can create their own shared library that will contain custom content they want to include in the Retail Application UI.
The steps in this section are required before a retailer can customize a Retail Application.
To create the custom shared library, it is recommended that you download and install JDeveloper version 12.1.3 by using the following link:
http://www.oracle.com/technetwork/developer-tools/jdev/downloads/index.html
This section describes the steps to create and configure the Custom Shared Library Workspace in JDeveloper, which will house the code for any custom content the retailer wants to add into the Retail Application. Through JDeveloper, a shared library web application archive file (.WAR) can be generated which can be deployed in the same managed server as the Retail Application.
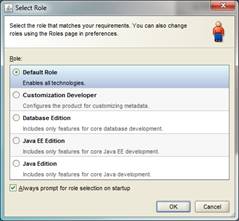
Open JDeveloper and choose Developer Role when prompted.
Create a new Fusion Web Application JDeveloper workspace.
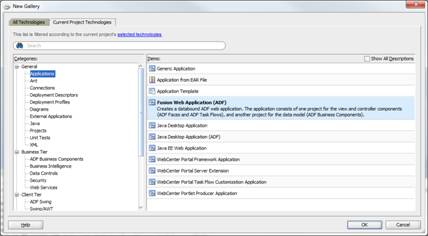
Go to File > New to invoke the New Gallery dialog. Choose Fusion Web Application (ADF) as the type of application to create and click OK.
Provide a meaningful application name, a directory path to the workspace, and an application (Java) package prefix. Click Finish.
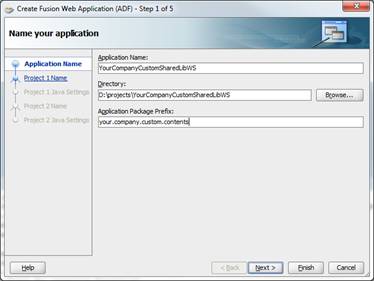
JDeveloper will generate a new workspace with two projects: Model and View-Controller.
Add a Manifest file containing the name of the shared library.
Right-click on the View-Controller project and choose New from the Context menu.
The New Gallery dialog appears. Choose the option, File (General), in the All Technologies section of the dialog. Click OK.
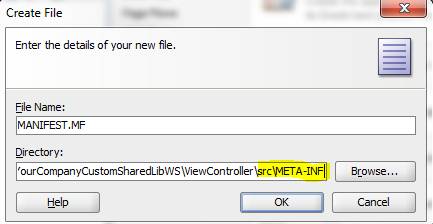
The Create File dialog opens. For the File Name, specify MANIFEST.MF. For the Directory, the new file must be added under the src/META-INF sub-directory under the View-Controller project's directory.
Edit the new MANIFEST.MF file and add the following entries:
Manifest-Version: 1.0
Implementation-Vendor: companyName
Implementation-Title: Custom Shared Library for companyName
Implementation-Version: 1.0
Extension-Name: companyname.custom.shared.lib
Specification-Version: 1.0
Created-By: companyName
Modify the contents such that meaningful and unique values are used for Implementation-Vendor, Implementation-Title, Extension-Name, and Created-By. Example:
Manifest-Version: 1.0
Implementation-Vendor: Acme Retail
Implementation-Title: Custom Shared Library for Acme Retail
Implementation-Version: 1.0
Extension-Name: acmeretail.custom.shared.lib.procurement
Specification-Version: 1.0
Created-By: AcmeRetail
Create a deployment profile for the shared library.
Right-click on the View-Controller project and choose New from the Context menu.
The New Gallery dialog appears. Choose the option, WARFile (Deployment Profiles), in the All Technologies section of the dialog. Click OK.
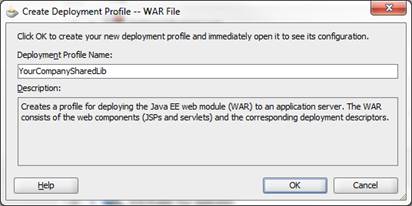
Provide a unique and meaningful name for the Deployment Profile and click OK.
The Edit WAR Deployment Profile Properties dialog is shown.
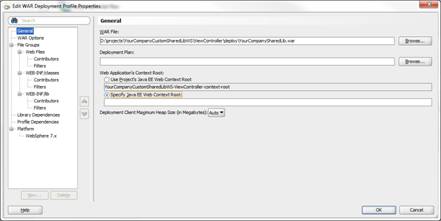
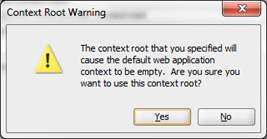
Under the General section, make sure that the Specify Java EE Web Context Root is selected without any value.
When you navigate away from this section, you will be prompted to confirm that you really want a blank context root. Click Yes to the confirmation dialog.
Under the WAR Options section, enable the Include Manifest File option and Add the MANIFEST.MF file you created under …/View-Controller/src/META-INF.
Click OK.
This section describes the steps on how to generate and deploy the Custom Shared Library WAR file:
Generate the share library WAR file through JDeveloper.
Open the Custom Shared Library workspace.
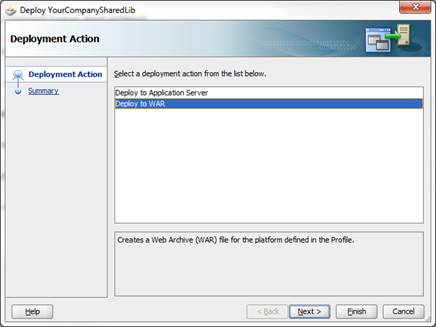
Right-click on the View-Controller project and choose the shared library WAR deployment profile created previously under the Deploy option.
The Deploy dialog opens. Select Deploy to WAR and click Finish.
JDeveloper generates the WAR file into the View-Controller project folder sub-directory, deploy.

Deploy the generated WAR file to the same managed server as the Retail Application as a shared library. Refer to section 6 of the Deploying Applications to Oracle WebLogic Server documentation (http://docs.oracle.com/cd/E23943_01/web.1111/e13702/deploy.htm). This task has to be done using the WebLogic Administration Console or Enterprise Manager Fusion Middleware Control with a user having WebLogic administrator permissions.
As discussed in the section "Using Custom Shared Library for Adding Custom Content", a customizable Retail Application will include in its deployment an intermediary shared library that will serve as a registry for any other shared libraries the retailer wants to include during runtime of the Retail Application.
Once the retailer has created and deployed its own custom shared library by following the steps in the section "Creating and Deploying a Custom Shared Library", the retailer needs to modify the configuration of the Custom Shared Library Registry to add references to the retailer's shared library.
To do this:
Log in to the WebLogic Administration Console as a user with administrative permissions.
If the Administration Console was configured with domain configuration locking, go ahead and click Lock & Edit to ensure that other administrators can be prevented from making changes during your edit session.
Navigate to the Deployments section.
Look for the Retail Application deployment and shut it down. Choose Force Stop Now when appropriate. Wait for the shutdown process to complete.
Get the deployment location of the Retail Application's custom shared library registry. Under the deployments list, click on the link for the library named oracle.retail.apps.alc.portal.extensions. The Settings page for the library appears.
The Settings page will show the file location of the registry's WAR file under the Path entry.
Make a note of this file location.
Using the operating system's file manager application, go to the location of the WAR file. You need read and write permissions to the file system where the WAR file is located.
Make a copy of the WAR file as back-up.
Open the original WAR file using an archive file manager and update the /WEB-INF/weblogic.xml by adding a new <library-ref> entry pointing to your custom shared library.
<library-ref>
<library-name>companyname.custom.shared.lib</library-name>
</library-ref>
|
Note: The library-name has to match the Extension-Name you provided in your custom shared library's MANIFEST.MF file. |
Once this change is done, you have now linked your custom shared library to the Retail application.
Return to the WebLogic Administration Console. Navigate to Environments' Servers section. Under the Control tab, select the managed server where the Retail Application is deployed to. Shut it down and start it back up again.
The Custom ADF and Java based components that add new content or functionality into the Retail Application can be coded or built into the Custom Shared Library workspace. Typically, retailers can include task flows that add new UI workflows into the Retail Application UI.
The WAR for the Custom Shared Library needs to be regenerated when new content is added.
To re-deploy the Custom Shared Library WAR, the Retail Application and its Custom Shared Library Registry must both be shutdown first.
Since Retail Applications are secured web applications, the addition of new ADF UI pages and task flows will need to be secured using the application roles and policies that are recognized by the Retail Application. The provisioning process is done using the Oracle Enterprise Manager Fusion Middleware Control Console.
Refer to section 9, Managing the Policy Store, of the Oracle Fusion Middleware Application Security Guide for details. (http://docs.oracle.com/cd/E23943_01/core.1111/e10043.pdf).
Retail Applications allow retailers to add and display custom content such as ADF task flows and URL to BI reports in the deployed application. These custom contents can be accessed from the Retail Application's user interface (UI).
The Retail Application user interface organizes the contents into visual containers that fulfill common layout and navigational requirements in a structured, consistent manner.
The high level containers or areas in the UI are highlighted in the diagram below:
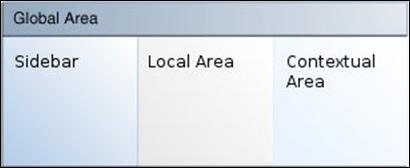
The Global Area presents branding, logged-in user information as well as menus that allow users to switch to other areas of the application. Notifications are also visually represented as an icon in this area.
The Sidebar Area is a collapsible area on the left of the page. A typical content of the sidebar area is the task navigation tree. Each node on the tree presents a business process or task that opens UI workflow screens in the Local Area.
The Local Area is the main content area for the application. The contents change as a result of actions selected in the Sidebar or Global Area. Typically, task flows are opened as tabs within the Local Area.
The Contextual Area is a collapsible area on the right of the page, which provides space to present information that can assist users in completing their tasks. The Contextual Area is presented per Local Area tab. Each task flow in presented in the local area can have their own contextual area.
A dashboard is a page within a Retail Application that displays the current status of metrics and key performance indicators relevant to the Retail Application. They are typically tailored for specific roles and they allow you to easily monitor the status of the current data within the application.
For Retail Applications, dashboards are typically built and maintained in a separate BI reporting tool. Oracle Retail recommends using Oracle Business Intelligence Enterprise Edition (OBIEE). Whatever the tool you use, the resulting dashboards must be accessible in a Web browser via a URL.
The dashboards can be added into a Retail Application which a user can launch from the application UI's sidebar task tree.
The dashboard pages are added into a Retail Application by adding and configuring the application's Sidebar Navigation Model XML file into the Custom Shared Library.
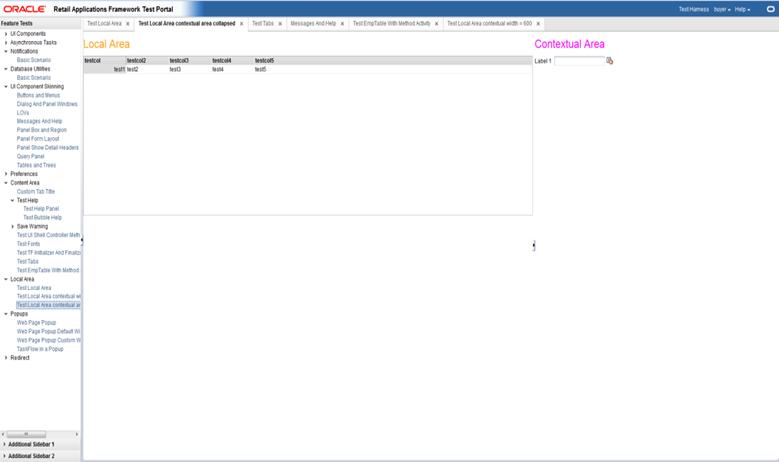
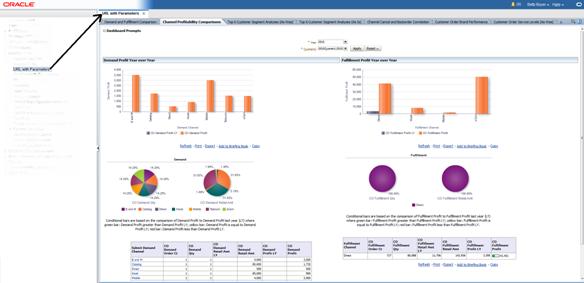
The example below shows the dashboard page as rendered in the local area of a Retail Application's UI.
This section describes how to prepare the Custom Shared Library so retailers will be able to add dashboard pages into the Retail Application.
Perform the steps described in the section "Creating and Deploying a Custom Shared Library" to create a Custom Shared Library workspace, generate a shared library WAR out of it, deploying the WAR, and associating the library to the Retail Application.
Obtain a copy of the application's sidebar navigation model XML file.
EarAllocCore.ear\AlcPublicUIViewController.war\WEB-INF\classes\oracle\retail\apps\framework\uishell\config\custom\HomeSidebarNavigationModel.xml
Using JDeveloper, open the Custom Shared Library workspace in Developer Role.
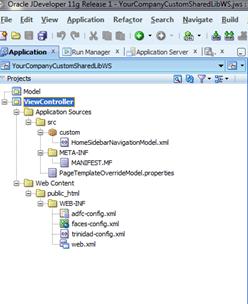
Add the sidebar model XML file in the View-Controller project src directory, preferably under a subdirectory called Custom.
Example:
If the sidebar navigation model is named HomeSidebarNavigationModel.xml,then that file's path must be View-Controller/src/custom/HomeSidebarNavigationModel.xml.
Add a new file called PageTemplateOverrideModel.properties under the View-Controller/src directory. Modify this file and add the following entry:
Home.sidebarModel=<path to sidebar model xml within view-controller/src>
Example:
Home.sidebarModel=/custom/HomeSidebarNavigationModel.xml
Verify the location of the files in the workspace.
Regenerate the shared library WAR file from the workspace and redeploy the shared library. Shutdown and restart of the Retail Application and its shared library registry is required.
Test the Retail Application. The original sidebar contents of the Retail Applications should be accessible.
The succeeding sections describe the steps to modify the model in order to add dashboard pages into the Retail Application.
Adding a dashboard page to be accessible from the sidebar area of the Retail Application's UI entails the modification of the Sidebar Navigation Model XML file. The sidebar area renders a collection of links organized or grouped into folders. Each link represents a content that launches into a tab in the UI's local content area. A content is typically a workflow that allows users to accomplish specific tasks in the application. A content can be a dashboard page.
This section describes the steps for adding an Oracle BI EE based Dashboard into the UI Sidebar. Refer to the section, "Oracle Business Intelligence Enterprise Edition Integration in Retail Application" in the Oracle Business Intelligence Enterprise Edition Integration in Retail Applications chapter for more information about Oracle BI EE integration with Retail Applications.
Before adding a dashboard into the UI Sidebar, you must have:
Built, prepared, deployed, and tested the Custom Shared Library as described in the section "Preparing the Custom Shared Library for Adding Dashboards".
Created one or more dashboard pages in their BI reporting tool (for example, OBIEE).
The Web URL for the dashboard pages must be available in order to proceed with the steps in this section.
Any parameters to modify the content of the dashboard must be known and should be accessible as parameters to the dashboard's URL.
Once the above pre-requisites have been satisfied, take the following steps:
Obtain the Oracle BI EE connection name from the Retail Application configured to point at the retailer's Oracle BI EE instance. The configuration of this Oracle BI EE connection is performed during the Retail Application installation.
BI Connection Server name = BIConnection
Create dashboard reports in the Oracle BI EE.
Build, prepare, deploy, and test the Custom Shared Library as described in the section "Preparing the Custom Shared Library for Adding Dashboards".
Open the Custom Shared Library workspace in JDeveloper.
Open the application's Sidebar Navigation Model XML file (for example, View-Controller/src/custom/HomeSidebarNavigationModel.xml).
Go to the bottom of the file and add a new folder into the list. A folder is represented by an <Item>/<Items> pair of XML elements of type "folder". These have to be added within the top most <Items> tag.
<?xml version="1.0" encoding="UTF-8" standalone="yes"?>
<NavigationDefinition … >
<Items>
... (existing contents)
<!-- Add this paragraph -->
<Item id="myCustomDashboardFolder" title="My Custom Dashboards" type="folder">
<Items>
<!-- add more items here -->
</Items>
</Item>
</Items>
</NavigationDefinition>
Provide a unique identifier to the Item and meaningful values for the title attributes of the Item tag. For this example, we will assume that the folder title is "My Custom Dashboards".
Add an <Item> element within the folder that references the dashboard page URL as well as the parameters to control the view of the dashboard if available.
The example below will filter the 'Demand Profit' analysis using the fiscal year as 2012 and fiscal quarters as 2012Quarter1, 2012Quarter2, 2012Quarter3 and 2012Quarter4. The analysis should have prompted filters added for the columns "Business Calendar"."Fiscal Year" and "Business Calendar"."Fiscal Quarter":.
<?xml version="1.0" encoding="UTF-8" standalone="yes"?>
<NavigationDefinition … >
<Items>
... (existing contents)
<Item id="myCustomDashboardsFolder" title="My Custom Dashboards" type="folder">
<Items>
<Item id="myDashboard1"
type="link"
title="Profitability Dashboard">
<url> <![CDATA[http://mspdv171.us.oracle.com:9704/analytics/saw.dll?SyndicatePages&syndicate=portal&PortalPath=/shared/Customer Order/_portal/Customer Order&Page=Channel Profitability Comparisons&Action=Navigate]]>
</url>
<Parameters>
<Parameter id="col1">"Business Calendar"."Fiscal Year"</Parameter>
<Parameter id="val1">"2010"</Parameter>
<Parameter id="psa1">"Retail Merchandising Analytics As-Was"</Parameter>
<Parameter id="col2">"Business Calendar"."Fiscal Quarter"</Parameter>
<Parameter id="val2">"2010Quarter1" "2010Quarter2" "2010Quarter3"</Parameter>
<Parameter id="psa2">"Retail Merchandising Analytics As-Was"</Parameter>
</Parameters>
</Item>
</Items>
</Item>
</Items>
</NavigationDefinition>
To create this element, note the following attributes and sub-elements:
The <Item> type must be set as "taskflow".
The <Item> title must be meaningful.
The <Item> id attribute must be unique across all the other items in the XML file.
The <url> sub-element within <Item> indicates thea URL to the dashboard page built in the BI tool. The entire URL must be marked as character data (for example, enclosed in CDATA) to the Retail Applications task flow "BIReportFlow" which allows the integration of the Oracle BI EE dashboard into the Retail Application UI.
The <Parameters> sub-element within <Item> should list all the parameters to the BIReportFlow task flow including functional parameters to the dashboard being rendered. Each parameter is represented as a <Parameter> element inside <Parameters>.
The <Parameter> id should be the actual parameter reference name recognized by the dashboard URL.
The value of each <Parameter> is a string value. This is the only supported data type.
The parameter connectionId refers to the name of the connection configured within the Retail Application to connect to a BI server instance. This is a required parameter of the BIReportFlow task flow.
The parameter biCatalogPath refers to the path of the BI dashboard within the BI server. This is a required parameter of the BIReportFlow task flow.
The parameter obipsType specifies if the Oracle BI EE content is an analysis or a dashboard. A value of biDashboardContent is required for dashboard objects.
The parameter pair parameterNameN and parameterValueN specifies the name and value of the prompt to the report.
More information about the BIReportFlow task flow can be found in the section "Showing Oracle Business Intelligence Enterprise Edition Reports and Dashboards in the Retail Application" in the Oracle Business Intelligence Enterprise Edition Integration in Retail Applications chapter.
Re-generate the Custom Shared Library WAR file from the Custom Shared Library workspace. Shutdown the Retail aApplication and its Custom Shared Library Registry, redeploy the Custom Shared Library WAR file, and restart the Retail application components.
Test the Retail Application. Log in and verify that a link to the BI dashboard appears in the UI sidebar task tree under a folder "My Custom Dashboards".
This section describes the steps for adding non-Oracle BI EE based dashboards into the Retail Application's UI Sidebar. Non-Oracle BI EE based reports such as BI Publisher or Microstrategy can be integrated into the Retail Application by adding the web URL of the dashboard report in the application's sidebar navigation model XML file:
Create the dashboard report in the reporting server instance.
Obtain the URL to the dashboard report along with any parameters needed to render it.
Build, prepare, deploy, and test the Custom Shared Library as described in the section "Preparing the Custom Shared Library for Adding Dashboards".
Open the Custom Shared Library workspace in JDeveloper.
Open the application's sidebar navigation model XML file (for example, View-Controller/src/custom/HomeSidebarNavigationModel.xml).
Go to the bottom of the file and add a new folder into the list. A folder is represented by an <Item>/<Items> pair of XML elements of type "folder". These have to be added within the topmost <Items> tag.
<?xml version="1.0" encoding="UTF-8" standalone="yes"?>
<NavigationDefinition … >
  <Items>
    ... (existing contents)
<!-- Add this paragraph -->
<Item id="myCustomDashboardFolder" title="My Custom Dashboards" type="folder">
     <Items>
       <!-- add more items here -->
     </Items>
   </Item>
          </Items>
</NavigationDefinition>
Provide unique id to the Item and meaningful values for the title attributes of the Item tag. For this example, we will assume that the folder title is "My Custom Dashboards".
Add an <Item> element within the folder that references the dashboard page URL as well as parameters to control the view of the dashboard if available.
The example below shows an <Item> element that links to a BI dashboard URL with 6 parameters.
<?xml version="1.0" encoding="UTF-8" standalone="yes"?>
<NavigationDefinition … >
  <Items>
    ... (existing contents)
    <Item id="myCustomDashboardsFolder" title="My Custom Dashboards" type="folder">
     <Items>
         <Item id="myDashboard1"
            type="link"
           title="Profitability Dashboard">
          <url>
            <![CDATA[http://mspdv171.us.oracle.com:9704/analytics/saw.dll?SyndicatePages&syndicate=portal&PortalPath=/shared/Customer Order/_portal/Customer Order&Page=Channel Profitability Comparisons&Action=Navigate]]>
          </url>
          <Parameters>
            <Parameter id="col1">"Business Calendar"."Fiscal Year"</Parameter>
            <Parameter id="val1">"2010"</Parameter>
            <Parameter id="psa1">"Retail Merchandising Analytics As-Was"</Parameter>
            <Parameter id="col2">"Business Calendar"."Fiscal Quarter"</Parameter>
            <Parameter id="val2">"2010Quarter1" "2010Quarter2" "2010Quarter3"</Parameter>
            <Parameter id="psa2">"Retail Merchandising Analytics As-Was"</Parameter>
          </Parameters>
        </Item>
                     </Items>
   </Item>
   </Items>
</NavigationDefinition>
To create this element, note the following attributes and sub-elements:
The <Item> type must be set as "link".
The <Item> title must be meaningful.
The <Item> id attribute must be unique across all the other items in the XML file.
The <url> sub-element within <Item> indicates the URL to the dashboard page built in the BI tool. The entire URL must be marked as character data (for example, enclosed in CDATA).
The <Parameters> sub-element within <Item> should list all the parameters to the dashboard page if there are any. Each parameter is represented as a <Parameter> element inside <Parameters>.
The <Parameter> id should be the actual parameter reference name recognized by the dashboard URL.
The value of each <Parameter> is a string value. This is the only supported data type.
Re-generate the Custom Shared Library WAR file from the Custom Shared Library workspace. Shutdown the Retail Application and its Custom Shared Library Registry, redeploy the Custom Shared Library WAR file, and restart the Retail Application components.
Test the Retail Application. Log-in and verify that a link to the BI dashboard appears in the UI's sidebar task tree under a folder "My Custom Dashboards".
To restrict access to the dashboard added on the sidebar to specific security roles, set the visible property on the <Item> element for the dashboard URL to an Expression Language (EL) expression that calls ADF's securityContext API's isUserInRole method. Example:
<Item id="myDashboard1"
type="link"
title="Profitability Dashboard"
visible="#{securityContext.isUserInRole['BUYER_JOB']}" >
The parameter to the securityContext.isUserInRole method is a logical security role that is configured for the Retail Application. The API returns true if the user is included in the specified security role. If the user is not authenticated or is not found in the role, the API returns false.
Contextual Reports are reports that appear in a task flow's contextual area section. As discussed in the section, "Overview of a Retail Application User Interface", the Contextual Area is a collapsible section to the right of the local area that provides a space to present information that can assist users in completing their tasks.
Since information presented in a contextual area is presented depending on the task or workflow the user is on, contextual areas are associated with task flows and there can be at most one contextual area per task flow.
Within a contextual area, multiple contextual reports can be configured.
Each contextual report can change its contents depending on the action being performed in the user's current workflow.
For example, Metrics pertaining to an item included in an allocation being maintained by a user can be displayed in the Allocation Maintenance Flow. As the user clicks through the list of items, the corresponding metrics on contextual area change.
Each task flow publishes the contextual business events on key activities taking place in the screen. Contextual reports can listen to those events and change its contents depending on the payload information associated with the event.
Contextual reports are typically built and maintained in a separate BI reporting tool. Oracle Retail recommends using Oracle Business Intelligence Enterprise Edition (OBIEE). Whatever the tool the retailer users, the resulting reports must be accessible in a web browser via a URL.
The contextual reports are added in a Retail Application by adding and configuring the task flow's contextual area model XML file into the Custom Shared Library.
Retail Applications can also provide you with the list of possible contextual business events each flow generates. Retailers can configure their contextual reports to react to these events. Each event includes information about the event's payload information (for example, the item ID of the item being selected in an Allocation Maintenance screen).
The following table lists the contextual business events and the payloads:
| Event Name | Task Flow | Page | Contextual Area Model XML Location | Generated when… | Payload Values |
|---|---|---|---|---|---|
| UpdateContextAwareReportEvent | AllocationMaintenanceFlow | Alloc Maintenance Page | EAR name à war nameà jar name à oracle\retail\apps\framework\uishell\config\custom\contextualarea | Allocation Maintenance, Item Review row change |
|
| itemSourceLocEventBinding | AllocResultsFlow | Alloc Maintenance Page | EAR name à war nameà jar name à oracle\retail\apps\framework\uishell\config\custom\contextualarea | Alloc Maintenance, Item Result row change |
|
| itemforcastEventBinding | AllocResultsFlow | Alloc Maintenance Page | EAR name à war nameà jar name à oracle\retail\apps\framework\uishell\config\custom\contextualarea | Alloc Maintenance, Item Result row change |
|
This section describes how to prepare the Custom Shared Library so retailers will be able to add contextual reports in Retail Application task flows.
Perform the steps described in the section "Creating and Deploying a Custom Shared Library" to create a Custom Shared Library workspace, generate a shared library WAR out of it, deploying the WAR, and associating the library to the Retail Application.
Obtain a copy of the task flow contextual area model XML files where the contextual reports will be added. Refer to section, "List of Contextual Business Events and Payloads".
Using JDeveloper, open the Custom Shared Library workspace in a Developer Role.
Add the contextual area model XML file in the View-Controller project src directory, preferably under a sub-directory called Custom.
Example:
If the contextual area model XML for the task flow AllocMaintFlow is called AllocMaintFlowContextualAreaModel.xml, then that file's path must be View-Controller/src/custom/AllocMaintFlowContextualAreModel.xml.
Add a new or open the existing file called PageTemplateOverrideModel.properties under the View-Controller/src directory. Modify this file and add the following entry:
Home.sidebarModel=<path to sidebar model xml within view-controller/src>
<FlowName>.contextualAreaModel=<path to the contextual area model for the flow>
For example:
AllocMaintFlow.sidebarModel=/custom/AllocMaintFlowContextualAreaModel.xml
Regenerate the shared library WAR file from the workspace and redeploy the shared library. Shutdown and restart of the Retail Application and its shared library registry is required.
Test the Retail application. Navigate to the flow and make sure the flow is functional.
Adding a contextual report to a task flow primary entails the modification of the task flow's Contextual Area Model XML file. Each report is rendered in a collapsible panel box.
Before adding a dashboard into the UI Sidebar, the retailer must have:
Built, prepared, deployed, and tested the Custom Shared Library as described in the section "Preparing the Custom Shared Library for Adding Contextual Reports".
Obtained information about the Retail Application's list of contextual business events that can be broadcast from various workflows.
Created one or more contextual BI reports in the BI reporting tool (for example, OBIEE).
The web URL for each report must be available in order to proceed with the steps in this section.
Any parameters to configure the content of the report must be known and should be accessible as parameters to the dashboard's URL.
Once the above pre-requisites have been satisfied, proceed with the following steps:
Assume the following example scenario when following the steps:
A contextual report called "Item Metrics" showing information about an item is to be added to the Allocation Maintenance Flow's main page. When the user selects an item on the page, the report displays information for the selected item.
The Retail Application has provided the following information about the contextual business event:
| Event Name | Task Flow | Page | Contextual Area Model XML Location | Generated when… | Payload Values |
|---|---|---|---|---|---|
| AlcAllocMaintenanceItemReviewSelectedEvent | AllocationMaintenanceFlow | AllocMaintenancePage | Allocation Maintenance, Item Review row change |
|
The Item Metrics report was built in the retailer's BI reporting tool (for example, OBIEE). It was built considering the payload values the contextual business event will generate.
Open the Custom Shared Library workspace in JDeveloper.
Open the task flow contextual area model XML file (for example, ViewController/src/custom/AllocMaintFlowContextualAreaModel.xml).
Add an <Item> element within the topmost <Items> element that reference the task flow called ViewContextAwareReportFlow. The ViewContextAwareReportFlow is a framework for rendering URL based reports that will be aware of contextual business events emanating from the Retail aplication task flows.
Example:
<?xml version="1.0" encoding="UTF-8" standalone="yes"?>
<NavigationDefinition … >
<Items>
...
...
<Item id="showItemMetric"
type="taskflow"
title="Item Metric">
<url>
/WEB-INF/oracle/retail/apps/framework/contextawarereport/publicui/flow/ViewContextAwareReportFlow.xml#ViewContextAwareReportFlow
</url>
</Item>
</Items>
</NavigationDefinition>
|
Note:
|
Populate the parameters to the ViewContextAwareReportFlow by adding the following <Parameter>/<Parameters> elements:
<?xml version="1.0" encoding="UTF-8" standalone="yes"?> <NavigationDefinition … > <Items> <Item id="showCustomerMetric" type="taskflow" title="Customer Metric"> <url> /WEB-INF/oracle/retail/apps/framework/contextawarereport/publicui/flow/ViewContextAwareReportFlow.xml#ViewContextAwareReportFlow </url> <Parameters> <Parameter id="reportDescription">Item Metric</Parameter> <Parameter id="actionType">AllocMaintItemSelectedEvent</Parameter> <Parameter id="primaryUrl"> <![CDATA[http://companyobiee.com:9704/report/shared/itemMetric¶mItemId=<selectedItemId>¶mItemType=<selectedItemType:token01>¶mLanguage=<language>]]> </Parameter> <Parameter id="token01">regular</Parameter> </Parameters> </Item> </Items> </NavigationDefinition>
|
Note:
|
Re-generate the Custom Shared Library WAR file from the Custom Shared Library workspace. Shutdown the Retail Application and its Custom Shared Library Registry, redeploy the Custom Shared Library WAR file, and restart the Retail Application components.
Test the Retail Application. Go to the flow where the report was added and verify that the report is rendered correctly.
