| Oracle® Retail Allocation Oracle® Retail Allocation User Guide Release 15.0 E65397-01 |
|


 Previous |
 Next |
| Oracle® Retail Allocation Oracle® Retail Allocation User Guide Release 15.0 E65397-01 |
|
Previous |
Next |
Oracle Retail Allocation allows to create simulated allocation scenarios prior to generating an actual allocation. For operational efficiencies, allocation results from a What If allocation can be used to generate various types of RMS Purchase Orders. This chapter describes the different steps involved in creating a What If allocation. To create a What If allocation, select and review the items, add locations, and assign policies.
The What If Summary window displays the results of a What If allocation. From the What If Summary window you can create a purchase order, making the hypothetical allocation a reality. This chapter contains the following topics:
You can search for items to allocate using the Create What If Allocation window. The Create What If Allocation window allows you to:
Search for items – After the sources are selected, you can search for items to allocate using Basic or Advanced search options or by applying a Saved Search.
View search results – After searching for items, you can view the search results in this section and select the items the you want to allocate.
Create Worksheet – You can create a Worksheet with the selected items for further processing of allocations.
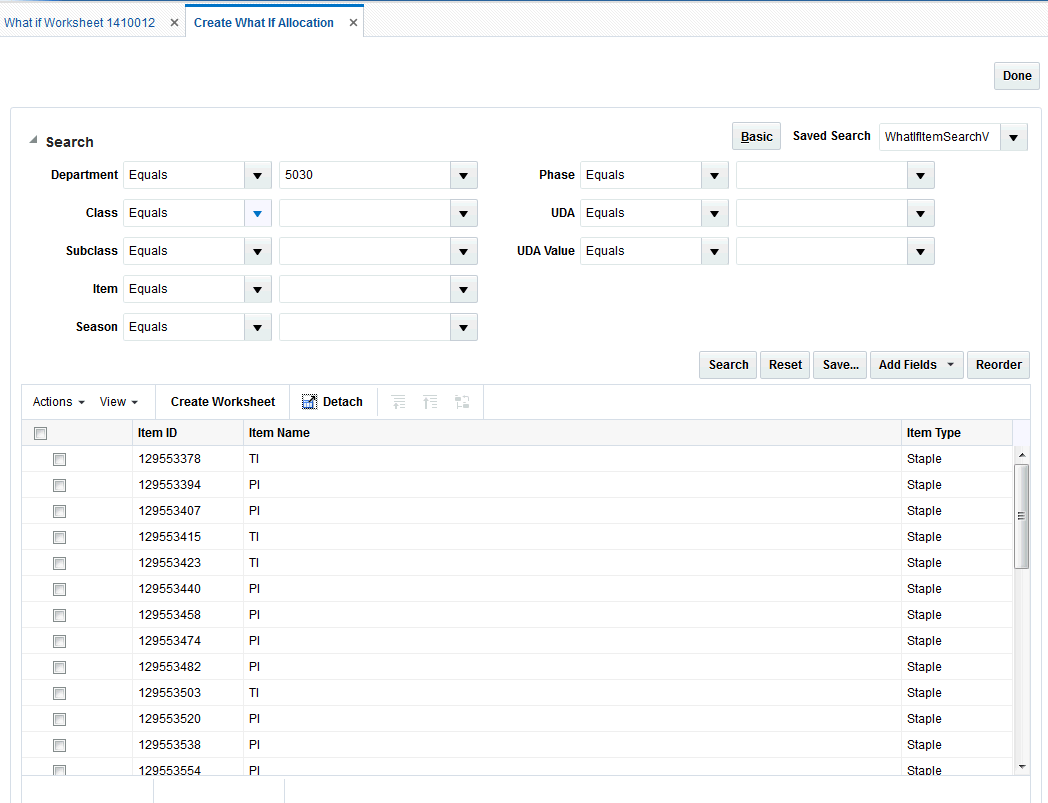
To search for items to allocate:
From the Tasks menu, select Create What If Allocation. The Create What If Allocation window appears.
To use a saved search, select the search template in the Saved Search field.
Optionally, click Advanced to see the advanced search options.
Refine your search by entering information in the available fields. The fields available for search are:
Department
Class
Subclass
Item
Click Search to view items that match the criteria.
The Worksheet window allows you to view items that are selected for allocation, the quantity available, the item type, and source information. You can add or delete items from the worksheet.You can review the items selected for the allocation in the Worksheet window. To create a worksheet:
From the Tasks menu, select Create What If Allocation. The Create What If Allocation window appears.
Search for the items that you want to add to the worksheet.
Select the required items from the search results. The Create Worksheet button is activated.
Click Create Worksheet. The What If - Worksheet window appears with the selected items listed.
To add items to the worksheet:
On the What If - Worksheet window, select Quick Item Add from the Actions menu. The item search fields are displayed in a pop-up window.
Search and retrieve the items that you want to add.
Select the items and click Add Worksheet. The items are added to the current worksheet.
To create an allocation from the Worksheet window:
On the Worksheet window, select the items that you want to allocate. The Create Allocation button is enabled.
|
Note:
|
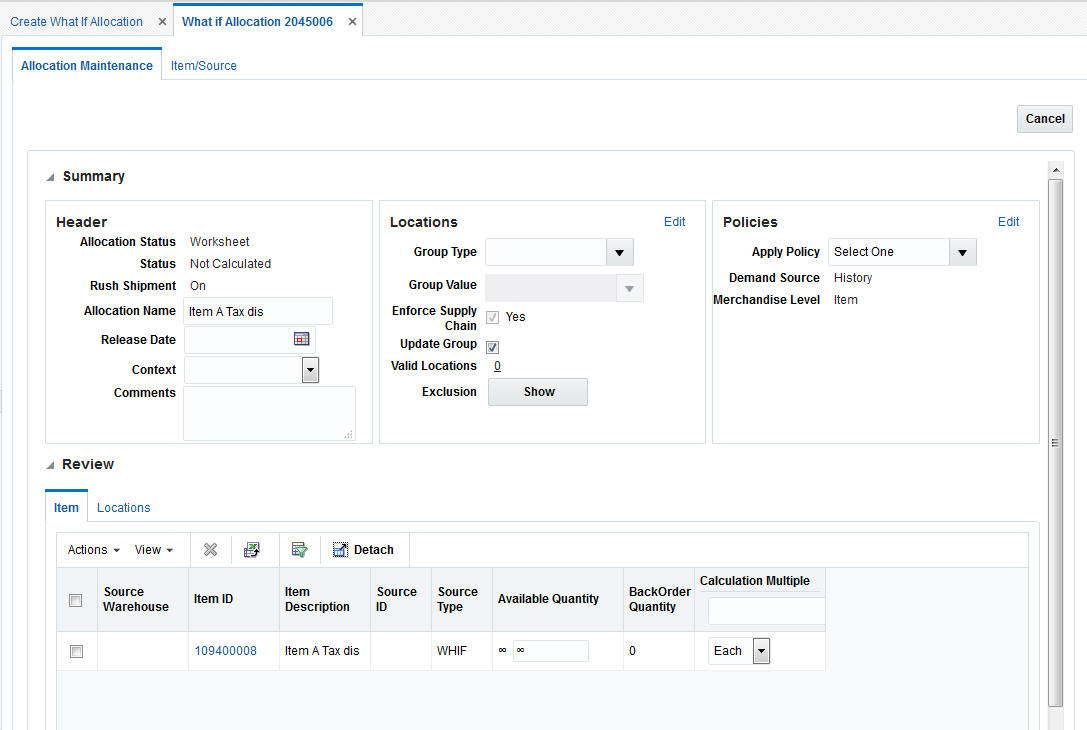
Click Create Allocation. The Allocation Maintenance window appears. You can proceed to select locations and policies for the allocation.
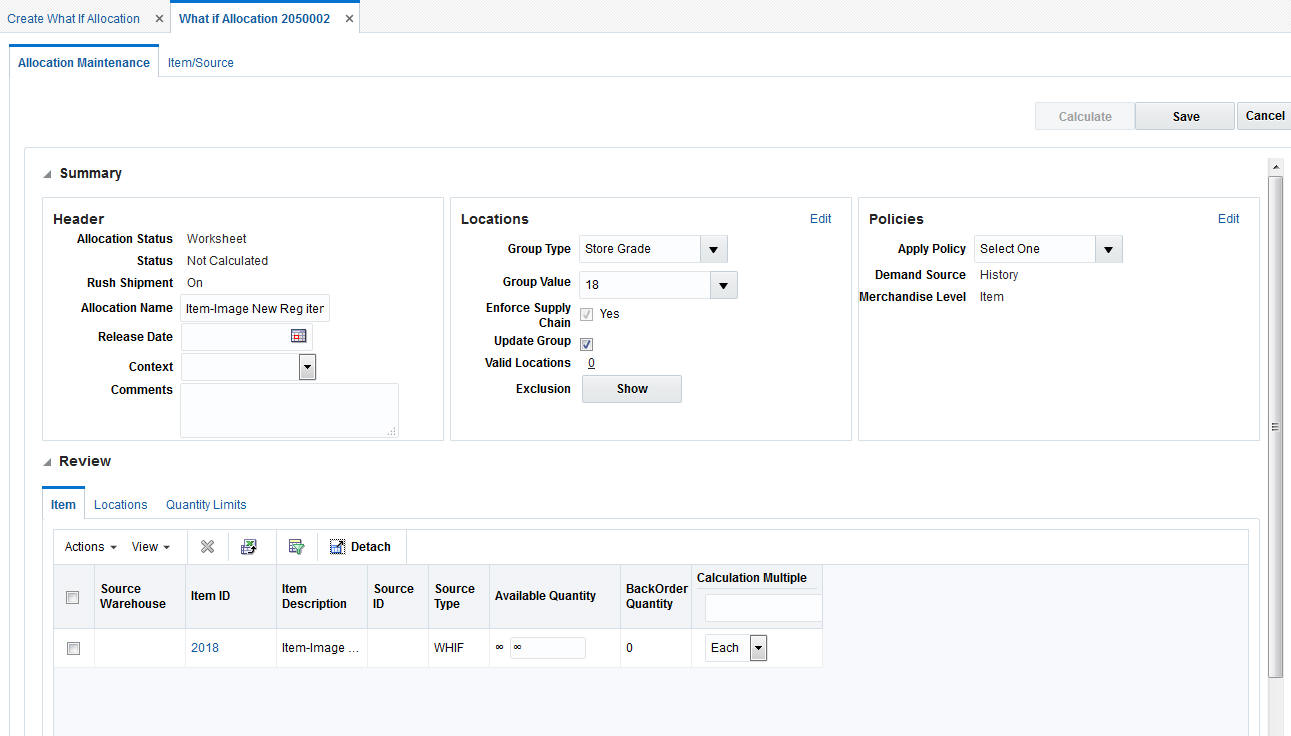
The Review section of the Allocation Maintenance window allows you to view items that were selected for allocation, the quantity available, the calculation multiple, and source information.
To review item information:
On the What-If Worksheet window, click Create Allocation. The Allocation Maintenance window appears.
In the Context field, select a reason why the allocation is being created (optional).
If you select Promotion in the Context field, select a promotion in the Promotion field.
In the Comments field, enter comments or notes as necessary.
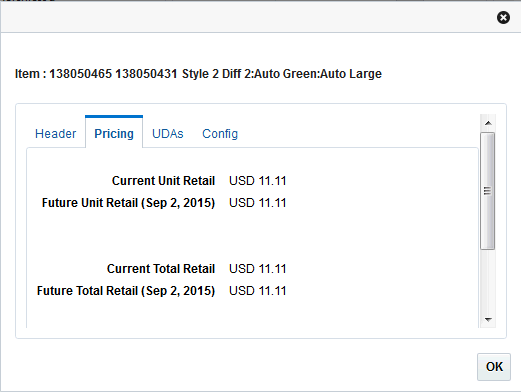
You can view the item details by clicking the Item ID link in the Worksheet or the Allocation Maintenance window. It has the following tabs:
Header – This provides the complete item description along with the Merchandise Hierarchy, Differentiators and Supplier details
Pricing – The Current Retail and Future Retail (based on the Release Date) values are displayed here at the unit level as well as the total number of allocated units
UDAs – This displays any user defined attributes linked with the item in RMS
Config – Packaging details linked with the item such as the inner, case and pallet values are displayed here.
This pop up also displays an image of the item retrieved from the ITEM_IMAGE table in RMS.
Select the calculation multiple from the Calculation Multiple column. Click Set All to apply the multiple to all items in the allocation. The options available are:
Each
Inner
Case
Pallet
|
Note: The Inner option is not advised if you are creating a What If allocation as Inner is not a valid order rounding multiple within RMS. If you choose this option, you have to do the rounding manually before creating the order. |
To specify the calculation multiple of individual items, select the multiple from the Calculation Multiple field next to the item.
The Add Locations window allows you to search and select stores and warehouses for the allocation. You can add locations or groups of locations to an allocation. Various types of groups such as, RMS Location Lists & Traits and Allocation Groups can be used as a mechanism to select multiple locations.You can create the following complex groups:
A union, which includes all locations in the groups selected.
An intersection, which includes all locations that are duplicated in the groups selected.
An exclude, which excludes the locations in the groups selected.
An exclude intersection, which includes all locations that are not duplicated in the groups selected.
Templates are created to apply the same location combination for multiple allocations.
You can add locations using the Group Type field on the Allocation Maintenance window which is used for quick Add location, or if you want to select multiple groups or create a complex group then you can click the Edit Location button to access the Add Locations window.
|
Note: You can select franchise locations to create an allocation for franchise stores. Allocations can be for only franchise stores or for a combination of franchise and company stores. When an allocation created for one or more franchise stores is approved, a franchise order is created. |
To use quick add locations:
On the Allocation Maintenance window, from the Locations section, select the type of group in the Group Type field. Locations brought in from the selected group are listed in the Group Value list.
Select the group in the Group Value field.
The Enforce Supply Chain is checked and disabled in a What if allocation.
Select the Update Group option to specify that location groups in this allocation should be updated when the Oracle Retail Merchandising System (RMS) location groups (or the Allocation Group) change.
Click Show next to the Exclusions field to view the item location exceptions. The Item Location Exceptions window appears listing the invalid item-location combinations.
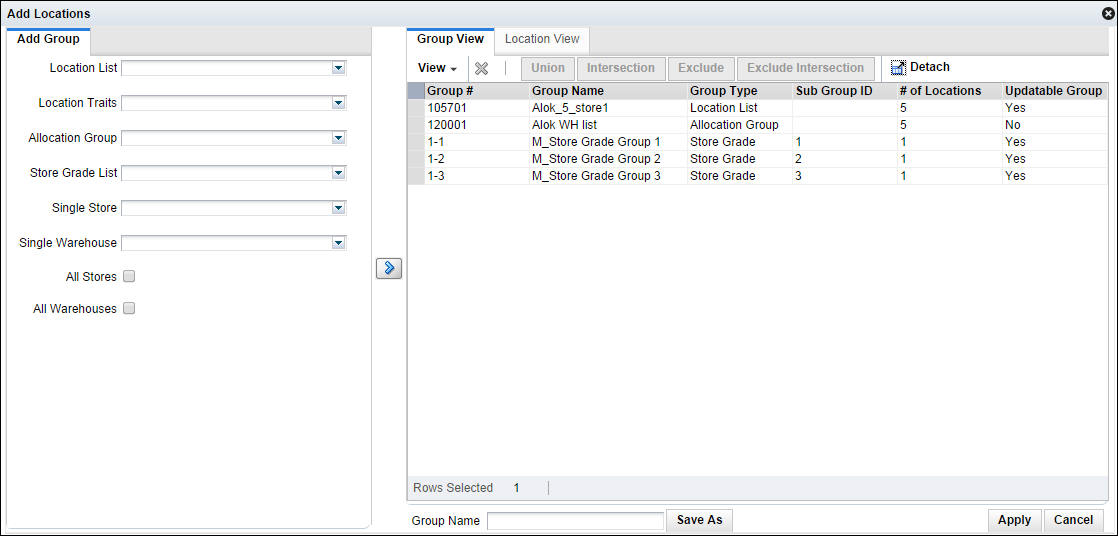
To add locations using the Add Location window:
On the Allocation Maintenance window, click Edit in the Locations section. The Add Locations window appears.
Select the location group using the following lists:
Location List
Location Trait
Allocation Group
Store Grade List
Single Store
Single Warehouse
You can also select the All Stores and All Warehouses option.
Click the ![]() icon. The location groups matching the search criteria are displayed in the Group View tab.
icon. The location groups matching the search criteria are displayed in the Group View tab.
If you want to delete any stores or warehouses before creating the location group, do the following:
Select the Location View tab. The stores and warehouses available in the selected location groups are displayed.
Select the locations you want to delete.
Click the delete icon.
Select the groups you want to combine to form a new location group.
Click the Union, Intersection, Exclude, or Exclude Intersection button to form the desired combination.
Optionally, enter a name in the Group Name field and click Save As to save the new location group.
Click Apply. The new location group is applied to the Allocation. You can review the selected locations in the Review section of the Allocation Maintenance window.
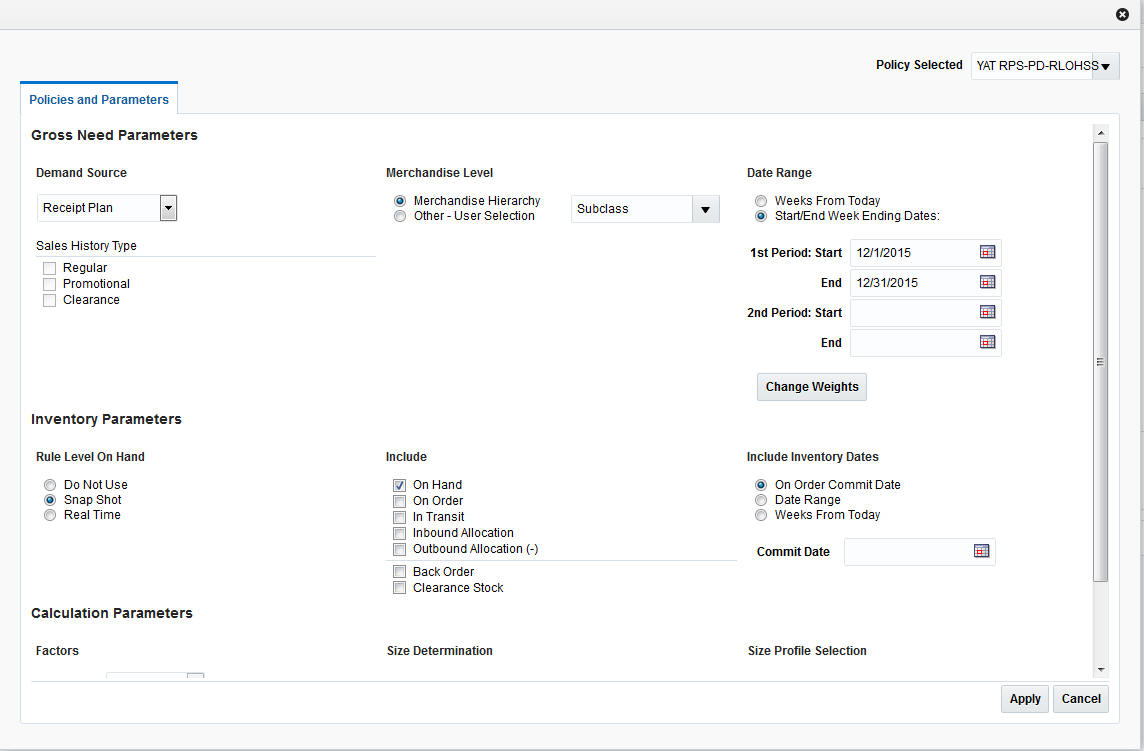
An allocation determines need by using a policy. You determine how the policy gathers information by selecting Level, Calculation Type, Date Range, and Sales History Type.You can customize the level a policy is applied to by using the User Selection window. Use the window to set the percentage of policies to apply to hierarchies and the time periods to constrain the policies.
To select a policy:
From the What If - Worksheet, select the items to allocate.
Click Create Allocation. The Allocation Maintenance window appears.
In the Policies section, you can select a predefined policy from the Apply Policy list.
Click Edit. The Policies window appears.
In the Demand Source field, select the source of demand from the list of values:
Table 4-1 Select Demand Source Options
| Source | Description |
|---|---|
|
History |
Use the item's historical sales for the date range selected to determine the gross need of item on the allocation. |
|
Corporate Rules |
Use custom pre-defined rules to determine the gross need of the item on the allocation. |
|
History and Plan |
Use both the item's sales history and plan for the date range selected to determine the gross need of the item on the allocation. |
|
Forecast |
Use the item's forecast for the date range selected to determine the gross need of item on the allocation. |
|
Plan |
Use the item's plan for the date range selected to determine the gross need of the item on the allocation. |
|
Receipt Plan |
Use the item's receipt plan to determine the gross need of the item in the Allocation system in order to create pre-allocations. |
|
Plan Re-project |
Use to compare the item's actual sales to the plan, re-forecast the plan based on performance for the date range selected, and use the re-projected plan to determine the gross need of the item on the allocation. |
In the Sales History Type section, select the check boxes for the type of history to include.
The store demand is derived from the level of product hierarchy selected. On the Policies window, you can select to allocate items using hierarchy or user selection.
To allocate using hierarchy:
In the Level section, select Hierarchy.
Select the hierarchy level to allocate by from the list.
|
Note: Item need for an allocation is determined by calculating the need for each item on the allocation from the selected rule for the organizational hierarchy level selected. |
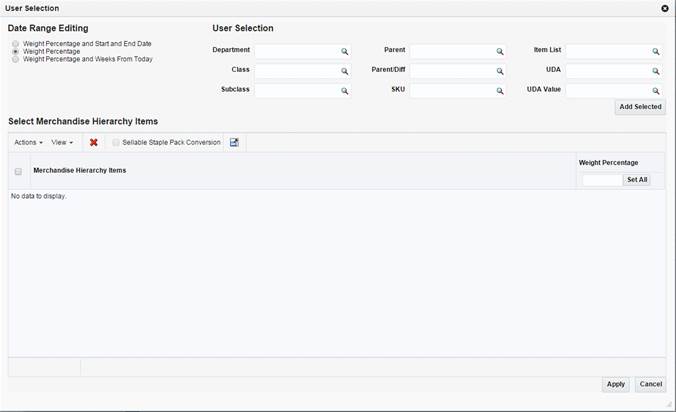
To allocate using user selection:
In the Level section, select Other - User Selection.
Click Edit. The User Selection window appears.
In the Date Range Editing section select an option:
Weight Percentage
Weight Percentage and Start and End Date
Weight Percentage and Weeks from Today
In the User Selection section enter an ID in the appropriate field to select a merchandise hierarchy level.
Click Add. The merchandise hierarchy is added to the Select Merchandise Hierarchy Items section.
Enter the weight or percentage to adjust the need calculated for the user selection in the Weight column.
Enter the start and end date in the Start Date and End Date column.
|
Note:
|
Enter a number in the Weeks From Today column. This value specifies the number of weeks all approved allocations, direct to store orders, and transfers as stock on hand and future fulfillment, are included at the store or warehouse in the need calculation. The value can range between 1 and 52 only.
|
Note:
|
The inventory parameters comprise of Rule Level On Hand, Include In Inventory, and Remove Future Fulfilment.
To set Rule Level On Hand:
Select one of the following options available in the Rule Level On Hand section:
Do Not Use
Snap Shot
Real Time
|
Note:
|
Currently, when allocating the net need using either Stock on Hand (SOH) or Rule Level On Hand (RLOH), the values for on-hand is derived from using the summation of four RMS Inventory buckets. You can select to include or exclude one or more of these buckets.
To include inventory details:
In the Include Inventory Dates section, when you enter a date in the On Order Commit Date field, all approved allocations, direct to store orders, and transfers dated on or before the date are included in the calculation of on-hand quantity.
When you enter the number of weeks, it is used to determine how many weeks into the future should be used to pull approved allocations, direct to store orders, and transfers into the calculation for on-hand quantity.
On the Policies window, you can select the date range.
Start/End Week Ending Dates
Enter the start date in the 1st Period Start field.
Enter the end date in the 1st Period End field.
|
Note: You may select a second time period by entering dates in the 2nd period Start and End fields. |
Weeks From Today
Enter the number of weeks to search back or forward, depending on the rule type selected. The system starts searching with the last completed week.
Change Weights
Click Change Weights. The Change Weights window appears.
|
Note: The date displayed is the end of the week selected as defined in the allocation configuration files. |
Enter the new weights as appropriate.
Click OK to save changes.
The Type section Need Is field is defaulted to Exact and it is not editable for an allocation with infinite availability.
In the Mode field, select the type of algorithm calculation. The mode available is Simple.
|
Note: Simple mode is applicable for both staple and fashion items. |
In the Allocate To field, select the need type for calculation, values available are Net Need and Gross Need.
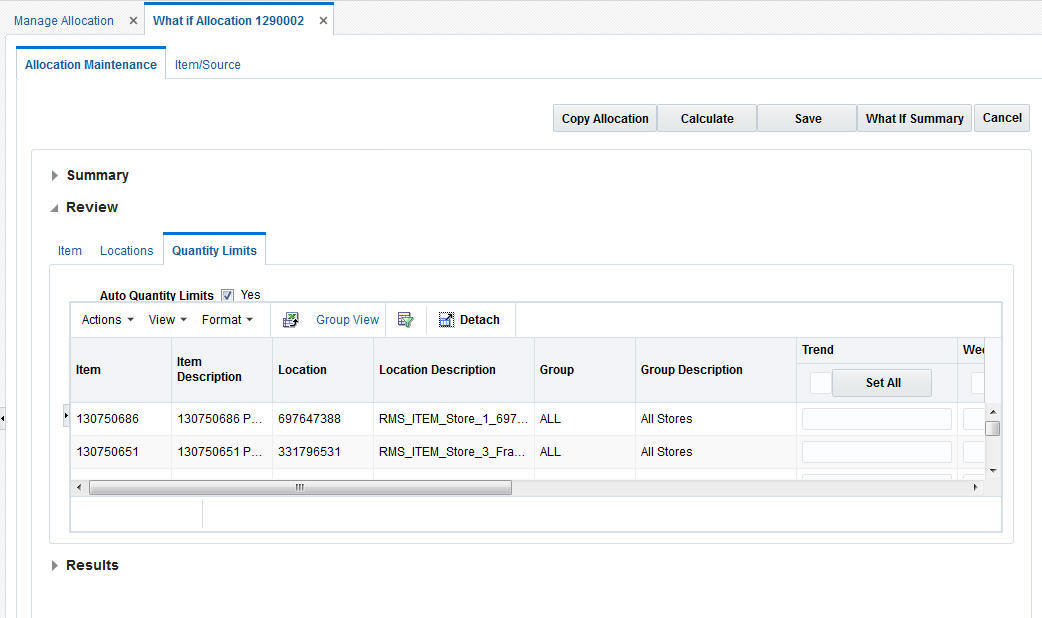
The quantity limits section allows you to set parameters for the allocation at the item/store level. The section allows you to set the parameters for different stages of the allocation.
To set quantity limits:
On the Allocation Maintenance window, select the Quantity Limits tab from the Review section. The Quantity Limits window appears.
In the By Location Aggregate field, the location level is set to Store for Simple mode.
Select Include Inventory Minimum or Include Inventory Maximum to include stock on hand of the item at the location to calculate the net need.
|
Note: The Include Inventory Minimum and Include Inventory Maximum check boxes are selected by default. |
Enter the quantity limits at the appropriate intersection for item/location and limiter.
You can work at the group level using the Group view.
To use the group view:
On the Quantity Limits window, click the Group View link. The Group view window appears.
Select an option in the Set All to field. The options available are:
Copy: Use this option to copy the entered quantity to all the stores in the group.
Spread: Use this option to spread the entered quantity equally to all the stores in the group.
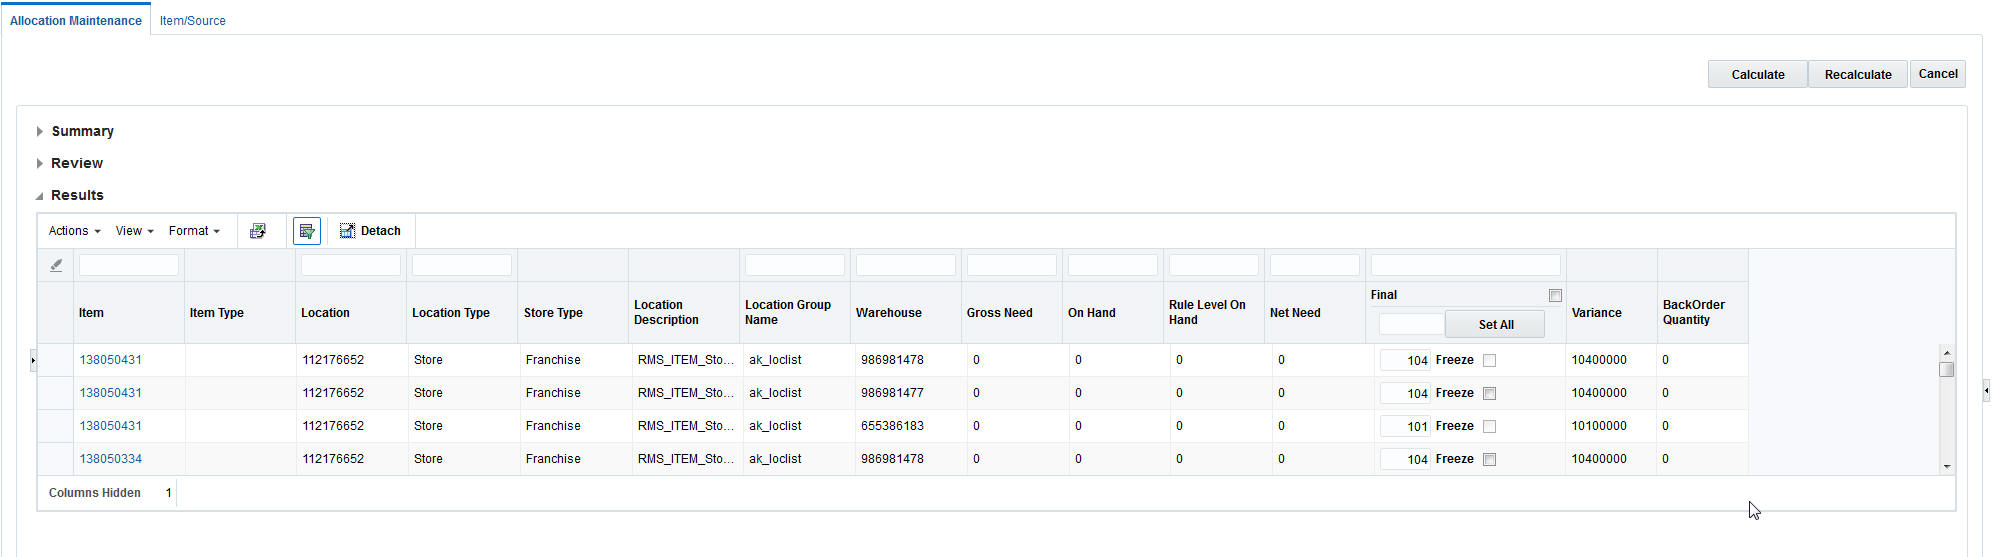
After you allocate items, add locations, and assign policies, you can calculate the allocation. To calculate an allocation:
On the Allocation Maintenance window, click Calculate. The calculation of the Allocation starts. The Allocation Maintenance window is closed.
The calculation will process in the calculation queue. Once complete you are notified through the notifications icon. When the calculation is complete, the notification icon  on the Allocation task bar increments in number.
|
Note: Notifications is an optional for the application. See "Notifications" in the Appendix for more information. |
Click the notification icon to display the recent notifications list.
Click the link for the allocation you want to view. The calculation results are displayed.
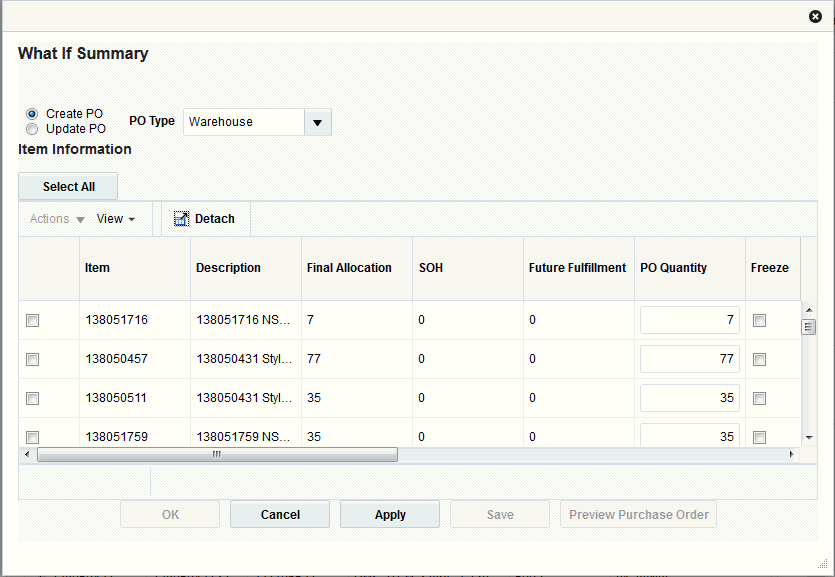
To generate a purchase order:
Click What If Summary. The What If Summary window appears.
Select the check box next to the items you wish to place on the purchase order.
In the PO type field, select the type of PO you want to generate.
Bulk: A purchase order is generated to a redistribution warehouse and no allocation is attached to the PO. This type of PO is created during the initial planning phase when there is no information about the different warehouses which are required to receive the items. You can then have the letter of credit ready and approved before the actual order is sent.
Cross Dock: A purchase order is generated with a line item for each warehouse. The goods are directed from the supplier to a warehouse where it is immediately shipped out to the proper store.
|
Note: In a typical Cross dock scenario, if the default warehouse for a store is also present as a destination warehouse on the What If allocation, the user will receive a pop-up while trying to raise the PO that the same warehouse cannot be specified as a source and a destination warehouse in the same allocation and hence such a cross dock Allocation cannot be created. The PO creation will be carried out. The user will then need to manually create an allocation using this PO as its source. |
|
Note: The purchase order must be approved within the merchandising system before accessing the allocation. |
Warehouse: One purchase order is generated with multiple warehouses and quantities and no allocation is attached to the PO. The items are shipped to the warehouses which are the default sourcing locations of the destination stores in the allocation.
Direct to Location: A purchase order is generated created directly against the destination store or warehouse present in the What-if allocation.
|
Note: Allocation produces a suggested purchase order quantity, once sent to RMS for approval, RMS item/supplier constraints are applied to determine the actual PO quantity. |
Click Apply.
Click Preview Purchase Order. The Purchase Order Preview window appears.
Click Create PO. The item information is sent to the merchandising system, and the PO is generated in the Worksheet status.
|
Note: As the order approval takes place in RMS, credit check is not required here even if the allocation contains franchise stores. |