| Oracle® Retail Allocation User Guide Release 16.0.024 E92933-01 |
|


 Previous |
 Next |
This chapter explains how to manage foundation data in Oracle Retail Allocation. This chapter contains the following topics:
You can manage policy templates using the following procedures.
To create a policy template:
From the Tasks menu, select Allocation Foundation > Manage Policy Templates. The Manage Policy Template window appears.
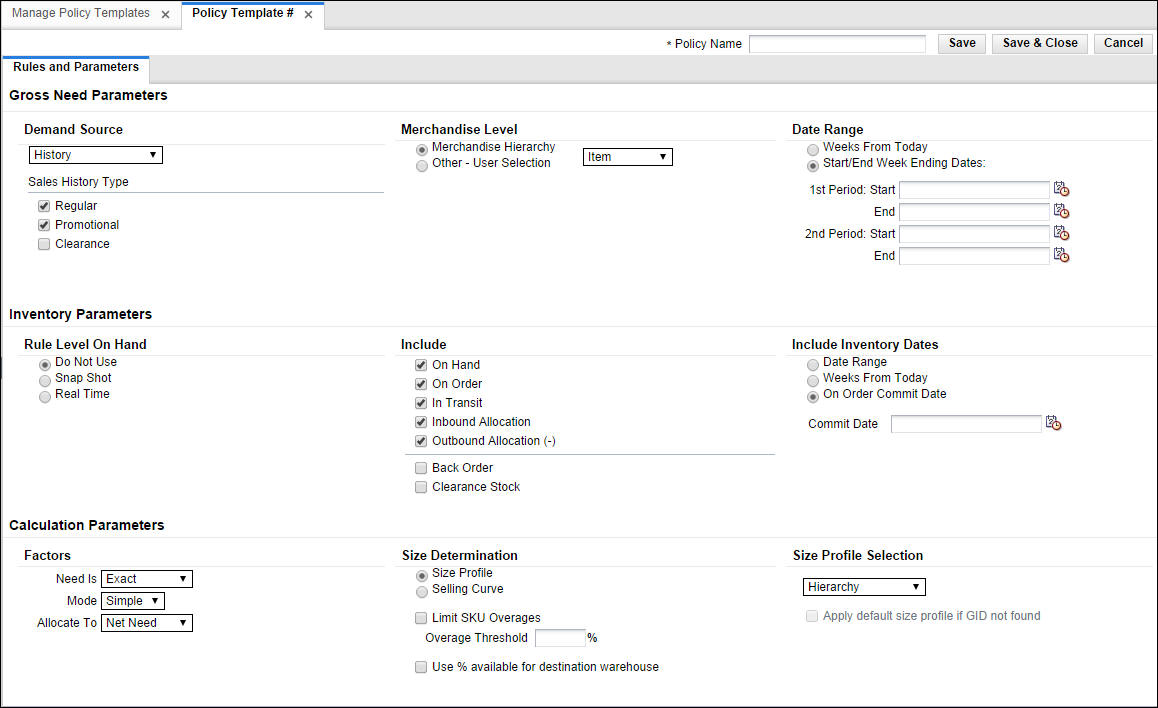
From the Actions menu, select Create. The Policy Template window appears.
Enter a name in the Policy Name field.
Update as necessary and click Save. The policy template is saved.
To select a demand source:
In the Demand Source field, select the source of demand from the list of values:
Table 7-1 Select Demand Source Options
| Source | Description |
|---|---|
|
History |
Use the item's historical sales for the date range selected to determine the gross need of item on the allocation. |
|
Corporate Rules |
Use custom pre-defined rules to determine the need of the item on the allocation. |
|
History and Plan |
Use both the item's sales history and plan for the date range selected to determine the gross need of the item on the allocation. |
|
Forecast |
Use the item's forecast for the date range selected to determine the gross need of item on the allocation. |
|
Plan |
Use the item's plan for the date range selected to determine the gross need of the item on the allocation. |
|
Receipt Plan |
Use the item's receipt plan to determine the gross need of the item in the Allocation system in order to create pre-allocations. |
|
Plan Re-project |
Use to compare the item's actual sales to the plan, re-forecast the plan based on performance for the date range selected, and use the re-projected plan to determine the gross need of the item on the allocation. |
In the Sales History Type section, select the check boxes for the type of history to include.
The demand is derived from the level of product hierarchy selected. On the Policies window, you can select to allocate items using hierarchy or user selection.
To allocate items using hierarchy:
In the Level section, select Merchandise Hierarchy.
|
Note:
|
Select the hierarchy level to allocate by from the list.
|
Note: Item need for an allocation is determined by calculating the need for each item on the allocation from the selected policy for the organizational hierarchy level selected. |
To allocate items using user selection:
In the Level section, select Other - User Selection.
Click Edit. The User Selection window appears.
In the Date Range Editing section select an option:
Weight Percentage
Weight Percentage and Start and End Date
Weight Percentage and Weeks from Today
In the User Selection section enter an ID in the appropriate field to select a merchandise hierarchy level.
Click Add. The merchandise hierarchy is added to the Select Merchandise Hierarchy Items section.
Enter the weight or percentage to adjust the need calculated for the user selection in the Weight column.
Enter the start and end date in the Start Date and End Date column.
|
Note:
|
Enter a number in the Weeks From Today column. This value specifies the number of weeks all approved allocations, direct to store orders, and transfers as stock on hand and future fulfillment, are included at the store in the need calculation. The value can range between 1 and 52 only.
|
Note:
|
Enter the number of weeks to search back or forward, depending on the rule type selected. The system starts searching with the last completed week.
Change Weights
Click Change Weights. The Change Weights window appears.
|
Note: The date displayed is based on the end of week day selected as defined in the allocation system options. |
Enter the new weights as appropriate.
Click OK to save changes.
The inventory parameters comprise of Rule Level On Hand, Include In Inventory, and Remove Future Fulfilment.
To set Rule Level On Hand:
Select one of the following options available in the Rule Level On Hand section:
Do Not Use
Snap Shot
Real Time
|
Note:
|
Currently, when allocating the net need using either Stock on Hand (SOH) or Rule Level On Hand (RLOH), the values for on-hand is derived from using the summation of five RMS Inventory buckets. You can select to include or exclude one or more of these buckets.
To include inventory details:
In the Include Inventory Dates section, when you enter a date in the On Order Commit Date field, all approved allocations, direct to store orders, and transfers dated on or before the date are included in the calculation of on-hand quantity.
When you enter the number of weeks, it is used to determine how many weeks into the future should be used to pull approved allocations, direct to store orders, and transfers into the calculation for on-hand quantity.
To select factors:
In the Factors section Need Is field, select how the Allocation should determine the quantity of items sent to a location.
In the Mode field, select the type of algorithm calculation. The modes available are Simple, Spread Demand, and Pack Distribution.
|
Note:
|
In the Allocate To field, select the need type for calculation, values available are Net and Gross.
To set the method used to determine what to allocate:
Select one of the following options in the Size Determination section:
Size Profile to use the store size profile ratio as a guide to determine what to allocate. This option is the default selection.
Selling Curve to use the selling curve derived from the policies (the demand source and hierarchy level) selected within the allocation as a guide to determine what to allocate.
|
Note: Selling Curve option can be used only when the level is Parent, Parent/diff, or Item. |
Select Limit SKU Overages to limit the SKU overages.
Enter the acceptable overage percentage in the Overage Threshold field.
You can manage location groups using the following procedures.
To search for location groups:
From the Tasks menu, select Location Group Search. The Location Group Search window appears.
Enter information in one or more fields for the search.
Click the Search button. The location groups matching the criteria are displayed in the Search Results pane.
You can create complex location groups using the Add Location window. To create location groups:
From the Tasks menu, select Allocation Foundation > Manage Location Groups. The Manage Location Groups window appears.
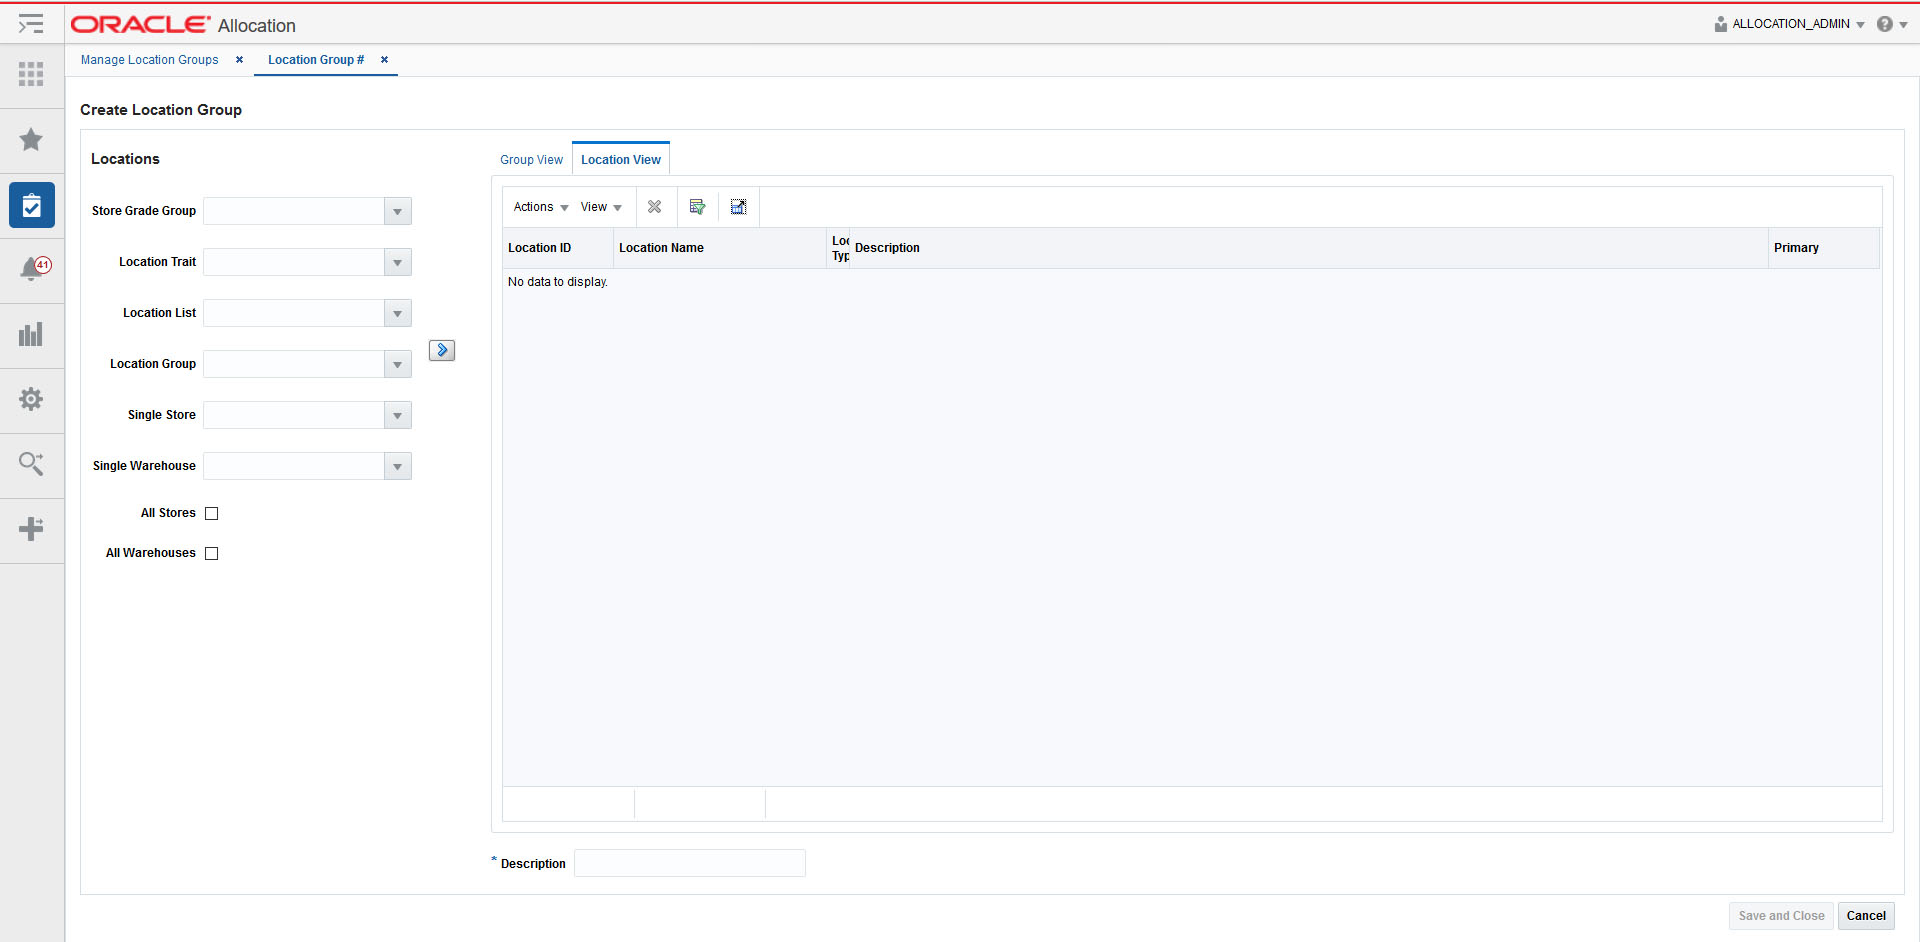
From the Actions menu, select Create. The Create Location Group window appears.
Select the location criteria using the following lists:
Store Grade Group
Location Trait
Location List
Location Group
Single Store
Single Warehouse
All Stores
All Warehouses
Click the ![]() icon. The location groups matching the search criteria are displayed in the Group View tab.
icon. The location groups matching the search criteria are displayed in the Group View tab.
Select the groups you want to combine to form a new location group.
If you want to delete any locations before creating the location group, do the following:
Select the Location View tab. The locations available in the selected groups are displayed.
Select the locations you want to delete.
Click the delete icon.
Click the Union, Intersection, Exclude, or Exclude Intersection button to form the desired combination.
Enter a name for the location group in the Location Group Name field.
Click Save and Close to save the location group.
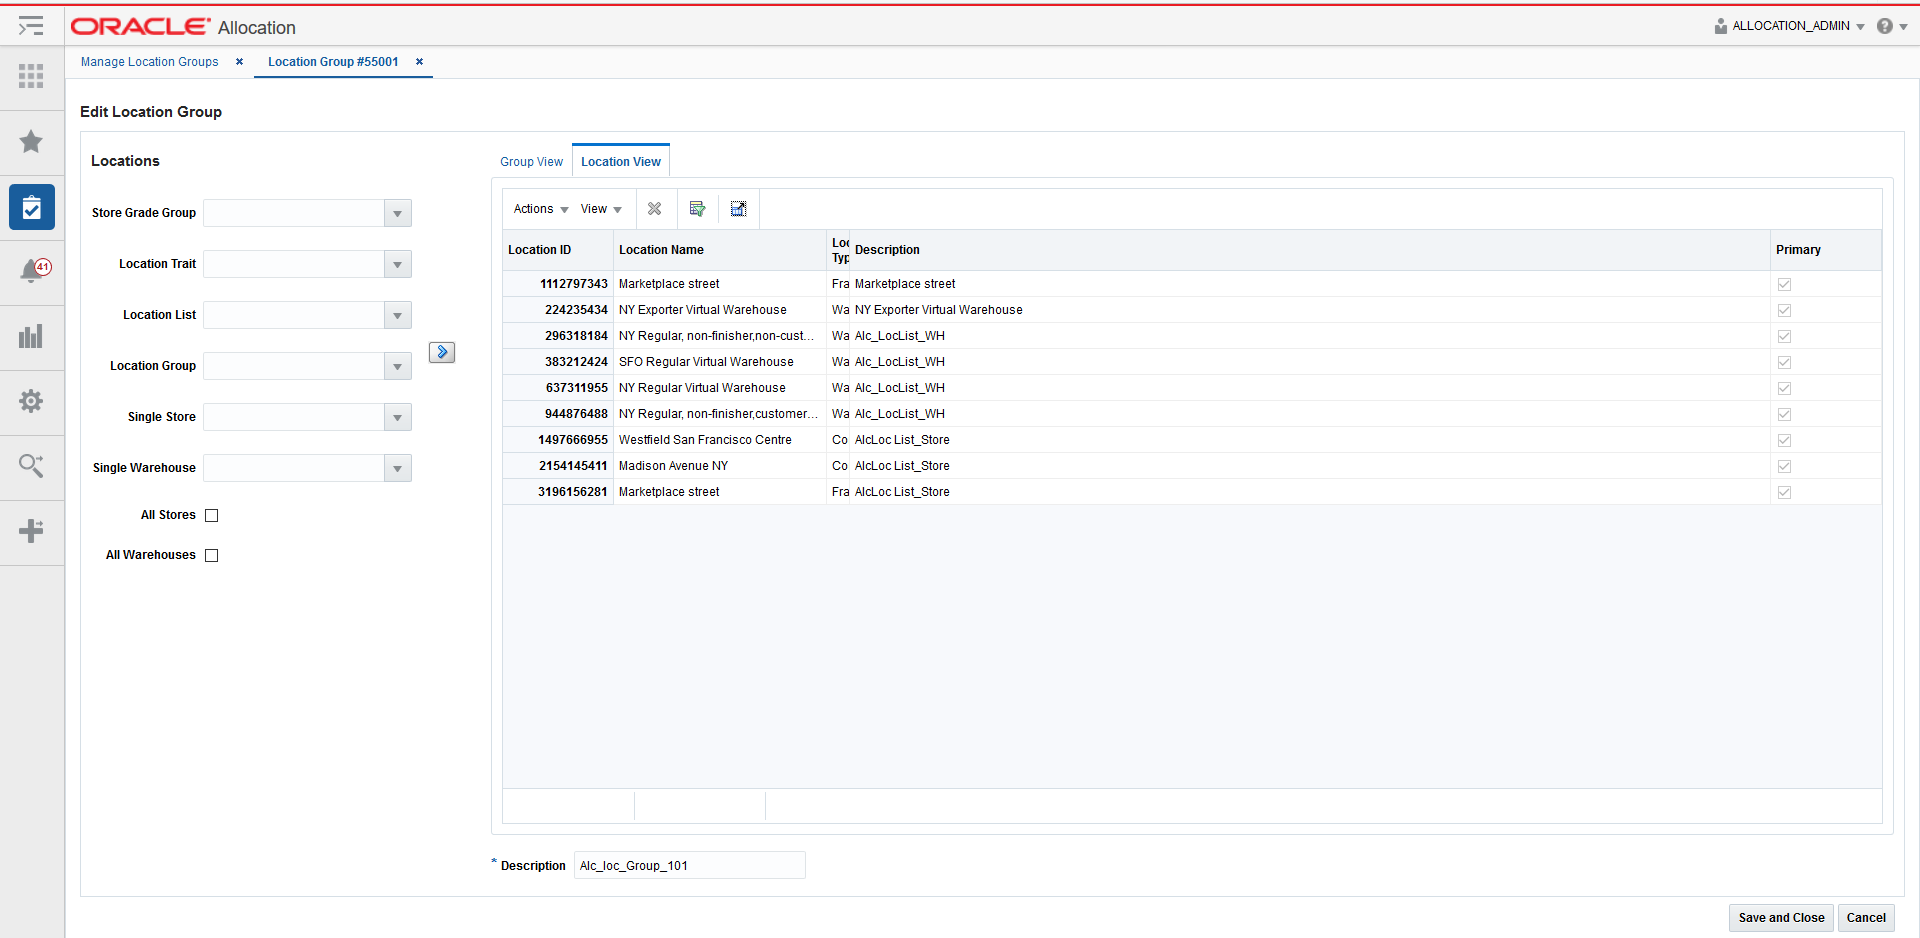
You can edit a location group using the Edit Location window. To edit a location group:
From the Tasks menu, select Allocation Foundation > Manage Location Groups. The Manage Location Groups window appears.
Search for an existing location group. See Searching for Location Groups for additional information.
From the Search Results pane, select the location group you want to edit and select Edit from the Action menu. the Edit Location Group window appears.
Make your changes to the location group and click Save and Close to return to the Manage Location Groups window.
Size Profile refers to the ratio derived out of historical sales figures to give an accurate estimate of the number of items of different sizes or colors that must be allocated to the destination store and applies only to fashion items within Allocation.
One of the sources of this data is the Oracle Retail Size Profile Optimization (SPO) system which resides on RPAS and creates optimal profiles of size distribution both by merchandise category and store. In the Store Size Profile Optimization product, you can now create seasonal store size profiles. These multiple store size profiles created in SPO are assigned Generation ID's (GIDs).
A combination of a merchandise hierarchy and store may have multiple size profiles specific to different seasons. These multiple profiles or GIDs are displayed as an option in the Policy Maintenance window and they can be used while performing a fashion allocation depending on the items being allocated and their expected date of arrival at the stores. A fashion item may have different summer and fall profiles defined and you can select the appropriate profile based on the time period of the year when the item is being allocated.
The following options are available for warehouse size profiles:
% to Total
When this option is selected, the system allocates based on the percentage of each size to the total available quantity. This is determined using the following steps -.
Step 1: Determine the percentage availability of each size to the total available quantity to allocate at the source location. Refer to the following table for this calculation:
| Style-Color | Red Navy Shirt | Available Quantity | % to Total |
|---|---|---|---|
| SKU | SM Red Navy Shirt | 250 | 21 |
| SKU | MD Red Navy Shirt | 300 | 26 |
| SKU | LG Red Navy Shirt | 450 | 38 |
| SKU | XL Red Navy Shirt | 175 | 15 |
Step 2: To allocate 200 units to the destination warehouse based on its need value.
Step 3: Apply the % to Total values obtained in Step 1 against the allocated quantity of 200 units going out to the destination warehouse. The results would be as follows:
| Style-Color | Red Navy Shirt | 200 | |
|---|---|---|---|
| SKU | SM Red Navy Shirt | 43 | 200*21 |
| SKU | MD Red Navy Shirt | 51 | 200*26 |
| SKU | LG Red Navy Shirt | 77 | 200*38 |
| SKU | XL Red Navy Shirt | 30 | 200*15 |
Size SM = 21% of the total available quantity, 200*21% = 43 units
Size MD = 26% of the total available quantity, 200*26% = 51 units
Size LG = 38% of the total available quantity, 200*38% = 77 units
Size XL = 15% of the total available quantity, 200*15% = 30 units
Total allocated by size to warehouse = 200 units
|
Note: The total available quantity refers to the total number of units present in the set of sources selected for an item linked to the specific warehouse within an allocation. |
Consider the following example:
PO1 for WH1 = 100 units
PO2 for WH2 = 175 units
SOH at WH1 = 55 units
SOH at WH2 = 45 units
If both PO1 and SOH are selected as sources for WH1, then the total available quantity for allocations sourced out of WH1 = 100 + 55 = 155 units
For WH2, if only SOH is selected as the source, then the total available quantity for allocation sourced out of WH2 = 45 units (ignoring the 175 units present in PO2).
So, based on the source(s) selected within an allocation for a fashion item, the total available quantity is subject to change.
|
Note: This method does not apply to What-if allocations which will completely rely on records in the database table ALC_SIZE_PROFILE. An exception is thrown if there are no records in this table just like it works for store locations for this type of an allocation.Any holdback quantity specified in the source warehouse is not considered while determining the warehouse availability. |
WH Sales Curve
This option is valid only for the Demand Source = History. An error pop-up is encountered if you try to apply this option for other demand sources.
When applied, this will apply a curve using a weighted average logic from all the data present in the Issues column from the existing RMS owned ITEM_LOC_HIST table for the warehouse locations. For any store locations, the check-boxes linked with the sales type that are checked will act as an additional filter.
For example, if Regular and Promotional are selected in the Policy window, both these types of sales issues in the ITEM_LOC_HIST table will be considered.
In case of no records present for the warehouse in the table, the allocation will be moved to the Calculation Error state.
The Manage Location Size Profiles window allows you to view, edit, and create size profiles, or size curves, at any merchandise hierarchy level including department, class, subclass, parent, diff. Allocation allows you to load size profiles (curves) from Oracle Retail Curve, a module of Oracle Retail Demand Forecasting.
Following are the fields available on the Size Profile window:
Generation ID
Indicates the generation IDs (GIDs) sent from Oracle Retail Size Profile Optimization (SPO). GIDs are seasonal store size profiles.
Size Profile Level
Indicates the merchandise hierarchy level for which the size profile records are retrieved. This list contains the following values:
Department
Class
Subclass
Parent
Parent/Diff
Department
Indicates the Department ID that the size profile is associated with.
Class
Indicates the Class ID that the size profile is associated with.
Subclass
Indicates the Subclass ID that the size profile is associated with.
Parent
Indicates the Parent ID that the size profile is associated with.
Parent/Diff
Indicates the Parent/Diff ID that the size profile is associated with.
Single Store
Indicates the Store ID used for the size profile search.
Single Warehouse
Indicates the Warehouse ID used for the size profile search.
Location Group (Advanced search option)
Following are the options available:
Store Grade Group
Indicates the Store Grade Group ID the size profile is associated with.
Store Grade
Indicates the Store Grade ID the size profile is associated with.
Location List
Indicates the Location List ID the size profile is associated with.
Location Trait
Indicates the Location Trait ID the size profile is associated with.
All Stores (Advanced search option)
Indicates that the size profile details for the items in the allocation for all the valid stores for which the item range exists is displayed.
All Warehouses (Advanced search option)
Indicates that the size profile details for the items in the allocation for all the valid warehouses for which the item range exists is displayed.
Size Group
Indicates the size group linked to the size profile. Displays a list of non-aggregated size groups for the selected merchandise hierarchy and it is applicable to the levels: Department, Class, and Subclass.
Generation IDs are sets of store size profile data created and maintained in Oracle's Size Profile Optimization (SPO) product. SPO to Allocation is required in order to search and select GIDs.
You can search for a size profile in three different combinations.
GID only search – Displays all the records that correspond to the selected GID. The records displayed may be at the same merchandise hierarchy level or different ones.
GID and Merchandise Hierarchy combined search – Displays records, common to the selected GID and merchandise hierarchy.
Merchandise Hierarchy only – Displays records that correspond to the selected merchandise hierarchy. There may be more than one GID record (Summer Profile, Spring Profile, Winter Profile) but there is always only one set of non-GID records at a given level.
To search for a size profile:
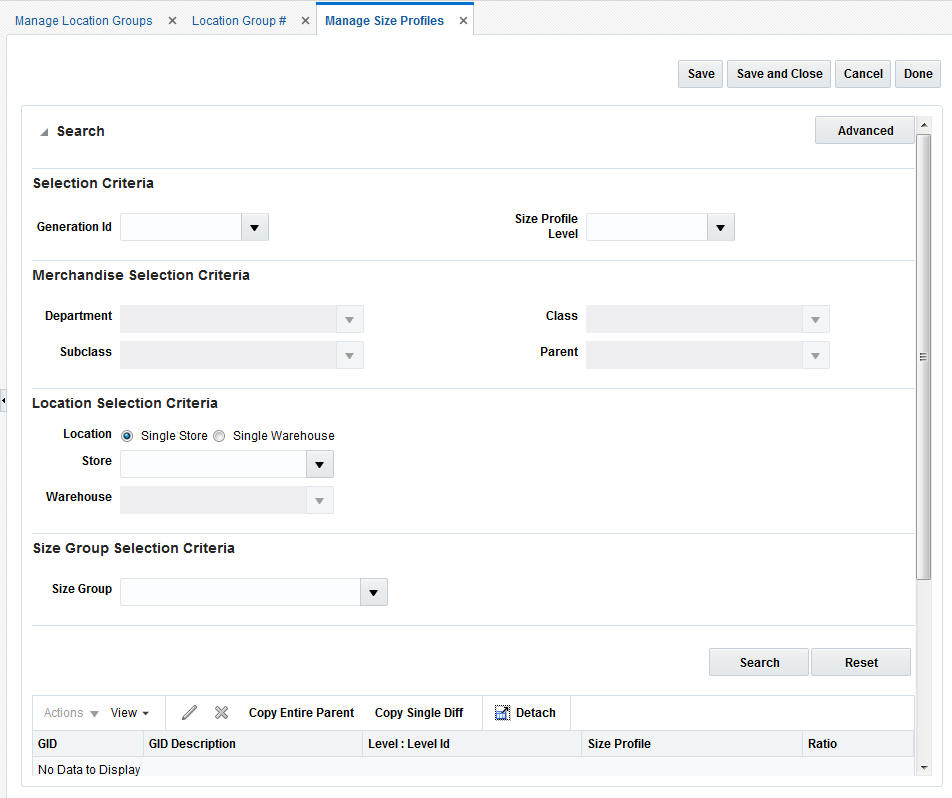
From the Tasks menu, select Manage Location Size Profiles. The Manage Location Size Profiles window appears.
In the Generation ID field, select an ID for a GID search or a GID merchandise combined search.
In the Size Profile Level field, select a level.
In the Department field, select the department.
If necessary based on the size profile level you selected in step 3, select the class, subclass, parent, or parent/diff.
In Location Selection Criteria, select the location for which the size profile must apply. You must select at least one location.
In Size Group Selection Criteria, select the size group for the size profile.
Click Search. The list of size profiles matching the criteria is displayed.
You can edit an existing size profile or create a size profile based on the criteria defined here:
GID based size profile
If the current allocation is using a GID based profile, you can only edit or delete the size profile.
If there is no data present in the database corresponding to the selected GID, then you must either select a different GID or a non-GID based profile. Data addition is not possible for a GID based size profile.
Non-GID based size profile
If the current allocation is using a non-GID based profile, you can create, edit, or delete the size profile details.
If there is no data present in the database corresponding to the item/location combination, you can add the size profile details through the system UI.
To create or edit size profiles:
From the Tasks menu, select Manage Size Profiles. The Manage Size Profiles window appears.
Search and select the size profile that you want to edit.
Click the edit icon. The size profile is enabled for editing.
Enter a ratio in the Ratio column for each of the items.
Click Save to save the size profile.
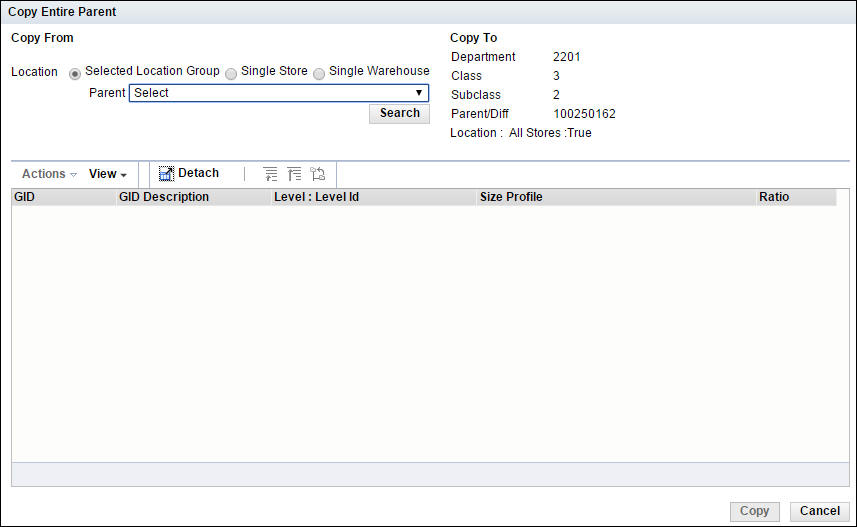
To copy a parent:
From the Tasks menu, select Manage Size Profiles. The Manage Size Profiles window appears.
Search and select the size profile that you want to copy to.
Click Copy Entire Parent. The Copy Entire Parent window appears.
In the Copy From field, select the parent. The size profile details appear.
|
Note: The parent to copy from must have the same sizes and diffs as the parent being copied to. |
Select the size profile. The Copy button is activated.
Click Copy. The size profile is copied and the Size Profile window appears.
If required, you can edit the ratio in the Ratio column.
Click Save to save the size profile.
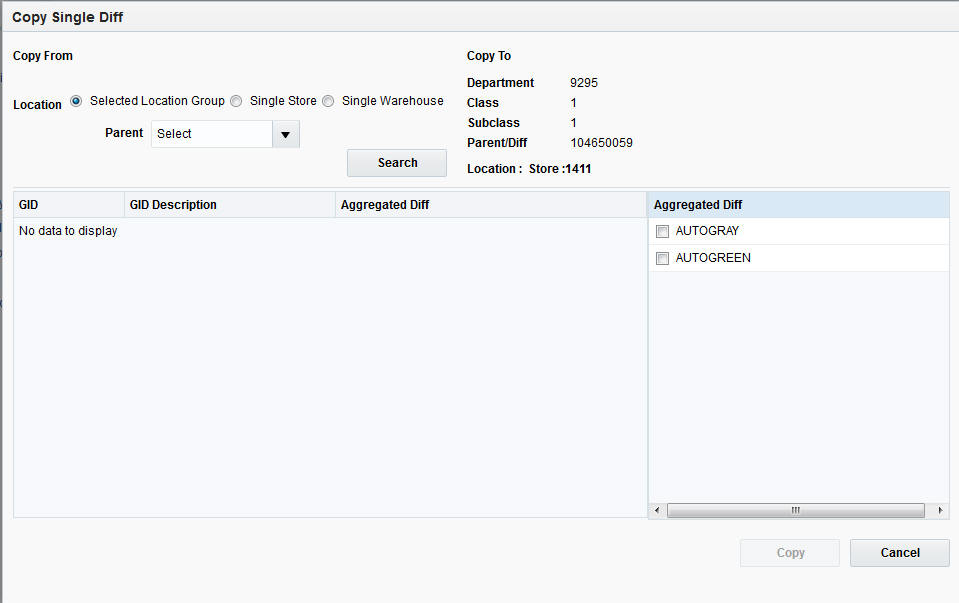
You can copy size profile ratios from single diff of the selected parent to one or more diffs of the current parent.
To copy a single diff:
From the Tasks menu, select Manage Size Profile. The Manage Size Profiles window appears.
Search and select the size profile that you want to copy.
Click Copy Single diff. The Copy Single diff window appears.
In the Copy From field, select the parent. The size profile details appear.
Click the Expand icon to view the aggregated diffs available in the size profile.
Select the diff from which you wish to copy. The Copy button is activated.
Click Copy. The single diff is copied and the Manage Size Profile window appears.
If required, you can edit the ratio in the Ratio column.
Click Save to save the size profile.
You must have System Administrator or Allocation Manager access to the Allocation system in order to edit system options. The properties available on the System Options window can be classified into two types, System Properties and User Group Properties. The System Administrator has the authority to edit both System Properties as well as User Group Properties whereas the Allocation Manager can only edit the User Group Properties. The other user types Allocator and Buyer have only view rights for System Options.
The System Options screen is divided into the following collapsible containers:
Figure 7-9 Foundation Section

Table 7-2 Foundation Fields
| Field | Description |
|---|---|
|
End of Week Day |
Indicates the day to be treated as the end of the week. (Required) |
|
Display Item Location Warning |
Indicates whether a warning message needs to be displayed to the user in case of selection of an invalid item/location combination. |
|
Auto Update Location Group |
Indicates whether the location groups need to get updated for worksheet allocations. |
|
Size Profile Validation Levels |
Indicates the levels at which the validation should be done. The valid values are - STYLE,STYLE/COLOR,SUBCLASS,CLASS,DEPT. If you want to specify more than one value, then use the comma as a delimiter. |
|
Use Sister Store Demand |
Indicates whether the need of a like store can be used during allocation calculation. If this is set to True, the system will use the sister store's need when the records don't exist for a store. If this is set to False, the system will use the sister store's need when the records don't exist for a store or when there are existing records but with zero need. |
|
Consider On Order in Stock Calculation |
Indicates whether the 'On Order' quantities against open purchase orders need to be considered while calculating item stock on hand. |
|
Location Statuses to Exclude |
The Location Statuses to Exclude. |
Table 7-3 Pricing Foundation Fields
| Field | Description |
|---|---|
|
Link Promotions |
Indicates whether or not the system should allow the user to link promotions with an allocation during the creation process. |
|
Display Future Retail |
Indicates if the user will be allowed to view the future unit retail for items present in an allocation. |
Table 7-4 What If Fields
| Field | Description |
|---|---|
|
What If Summary Default Action |
Indicates the Default Action on the What If Summary UI: Create or Update PO. |
|
Location Statuses to Exclude |
The Location Statuses to Exclude. |
|
Default Import Warehouse |
Indicates the default warehouse for import based purchase orders from "What If" allocations. |
|
Import Warehouses |
Indicates the set of warehouses to be used for import based purchase orders. If there is more than one 'what if' import warehouse, you must separate multiple warehouse ids by comma. |
|
Default Warehouse for Bulk Orders |
Indicates the Non-finisher virtual bulk warehouse id for PO creation for 'What If' allocations. |
|
Item Source Query Level |
Indicates the item source tier query level in case of a what if allocation. This is related to the merchandise hierarchy of the setup of the retailer. Valid values are: D=Department, C=Class, S=Subclass or I=Item. |
|
Consider Future Available |
Indicates whether or not to consider Future Available inventory for What If Allocations. True - Use the future SOH, False - Use the current SOH only. |
Table 7-5 Threshold Fields
| Field | Description |
|---|---|
|
Location List Threshold |
Indicates the threshold value to be used in SQL IN while fetching the location list. |
|
Item Search Maximum Row Count |
Limits the number of rows that will be returned by the item search. |
|
Allocation Retention |
The number of days to keep allocations not linked to RMS allocations in the system. |
|
Worksheet Retention |
The number of days to keep worksheets not linked to allocations in the system. |
|
Batch Provider Path |
A valid batch provider URL. |
|
Calculation Log Path |
The directory path to hold calculation dat files. |
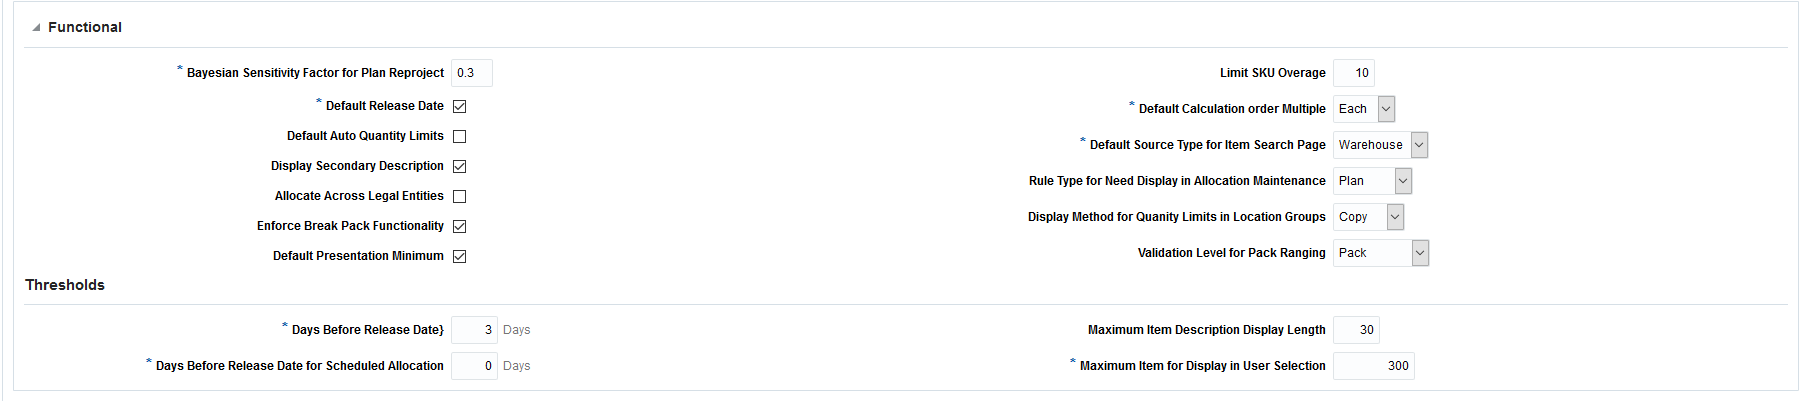
Table 7-6 Functional Fields
| Field | Description |
|---|---|
|
Bayesian Sensitivity Factor for Plan Reproject |
Indicates the plan sensitivity value to be used while using the Plan Reproject policy. |
|
Default Release Date |
Indicates whether or not to use Default Release Date. 'YES' indicates Allocations will have a default release Date and 'NO' indicates Allocation will not have a default release date. |
|
Default Auto Quantity Limits |
Indicates whether or not to use Default Auto Quantity Limits. 'YES' indicates Allocations will have Default Auto Quantity Limits and 'NO' indicates Allocation will not have Default Auto Quantity Limits. |
|
Display Secondary Description |
Secondary Indicator |
|
Allocate Across Legal Entities |
Indicates whether or not the user can cross legal entities.'YES' indicates Allocations cannot cross legal entities and 'NO' indicates Allocation can cross legal entities. |
|
Enforce Break Pack Functionality |
Indicates whether the break pack functionality is enabled or not. |
|
Default Presentation Minimum |
Indicates if presentation minimums are to be initially defaulted into the quantity limits UI. |
|
Limit SKU Overage |
Indicates the Limit SKU Overages value. |
|
Default Calculation order Multiple |
Indicates the default calculation multiple. Possible Values are ’EA'(Each), 'IN'(Inner),'CA'(Case) and 'PA'(Pallet). |
|
Default Source Type for Item Search Page |
Indicates the Item Source that will be checked by default when entering the Item Search page. Please note that the system will allow for only one default to be set.A=Allocation, B = Bill of Lading, P = Purchase order, S = Advanced Shipping Notification, T = Transfer, W = Warehouse. |
|
Rule Type for Need Display in Allocation Maintenance |
Indicates the rule type for which the need value would be displayed in the Allocation Maintenance UI. |
|
Display Method for Quantity Limits in Location Groups |
Indicates the method of splitting quantity limits across individual stores in a location group. |
|
Validation Level for Pack Ranging |
Indicates the level at which exclusion takes place for a Pack. Allowed values are P=Pack, C=Component |
Table 7-7 Functional Threshold Fields
| Field | Description |
|---|---|
|
Days Before Release Date |
The number of days before the release date of the allocation. |
|
Days Before Release Date for Scheduled Allocation |
The number of days beyond the release date of a schedule allocation. Note: Batch process uses the system date to derive the release date. |
|
Maximum Item Description Display Length |
Indicates the maximum length to be used for display of Item descriptions in the UI. |
|
Maximum Item for Display in User Selection |
Maximum number of items per alternate hierarchy selection. |
Table 7-8 Operational Insights Fields
| Field | Description |
|---|---|
|
Order Allocation Time Threshold |
The number of days before the not after date of the purchase order. |
|
Order Threshold |
The percentage of the warehouse order quantity. |
|
Need Calculation Type |
Indicates Need type that the OI Reports are sourced from. P=plan , F=forecast. (Required). |
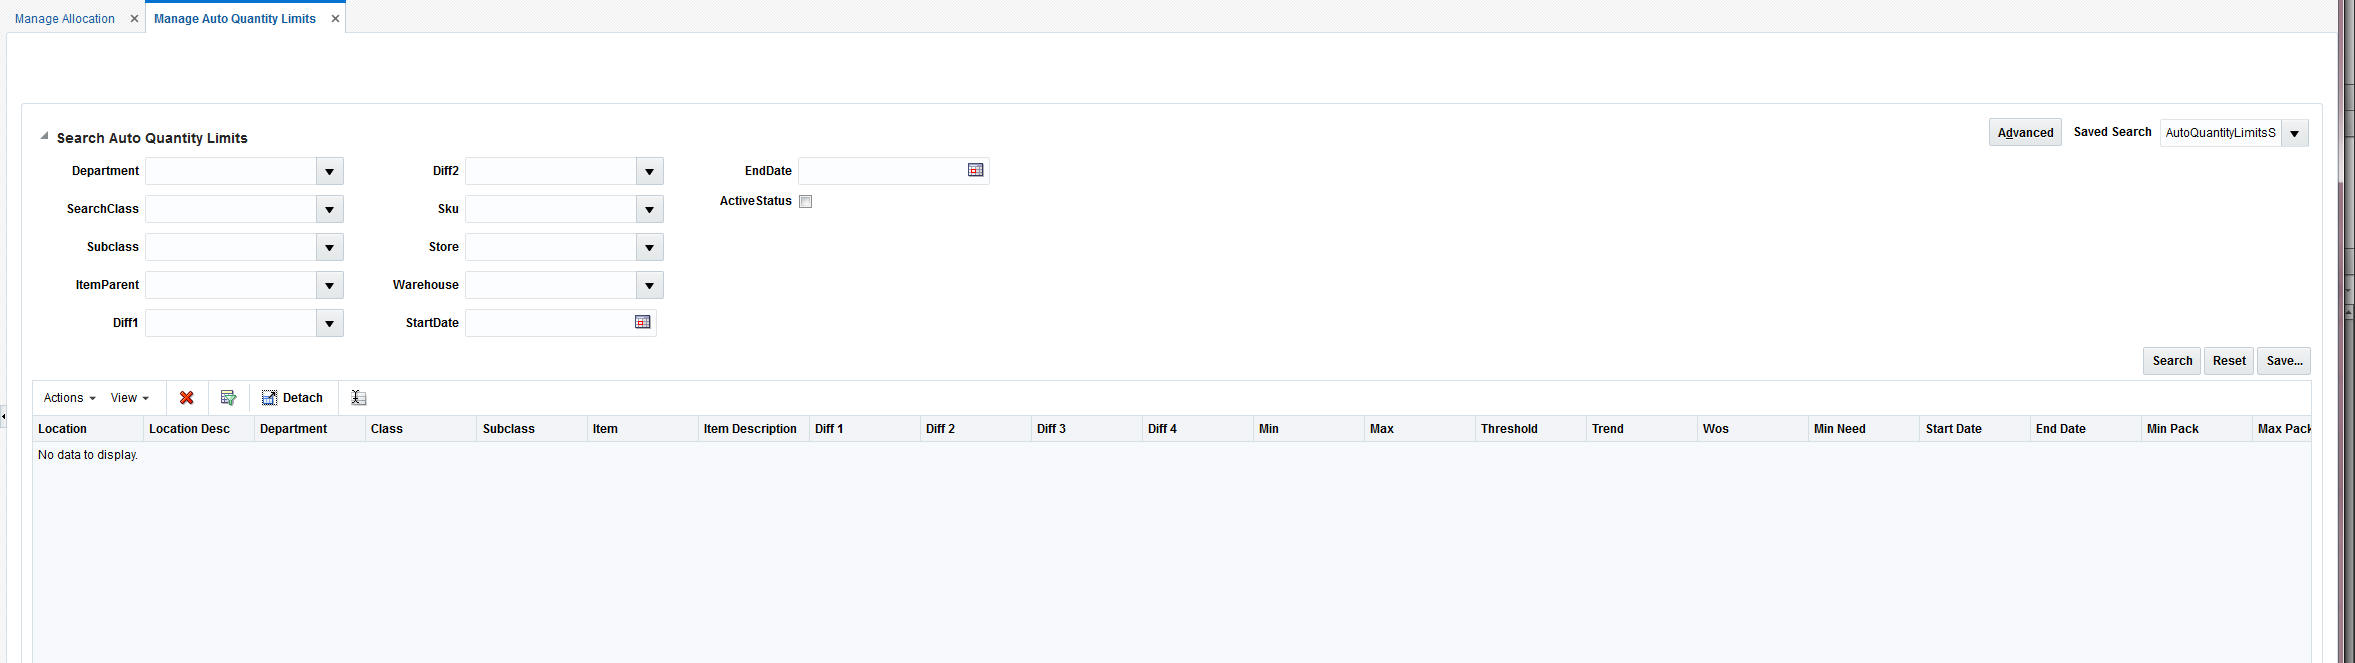
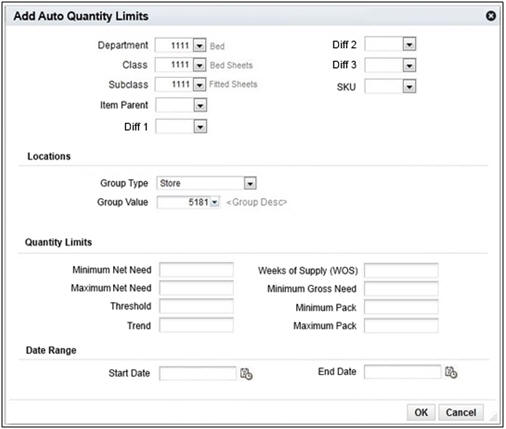
You can store a default set of quantity limits for the desired merchandise hierarchy and location groups. The auto quantity limits section allows you to set parameters for the allocation at the item/warehouse level demand constraints.
To manage auto quantity limits:
From the Tasks menu, select Allocation Foundation > Manage Auto Quantity Limits. The Manage Auto Quantity Limits window appears.
Select Create from the Actions drop down list. The Add Auto Quantity Limits window appears.
Enter a Department, or select a value from the LOV.
Enter a Class, or select a value from the LOV.
Enter a Subclass, or select a value from the LOV.
Enter an Item Parent, or select a value from the LOV.
Enter a Diff, or select a value from the LOV.
Enter a SKU, or select a value from the LOV.
From the Locations area, enter the Group Type, or select a value from the LOV.
Enter the Group Value, or select a value from the LOV.
From the Quantity Limits area, enter the Minimum Net Need.
Enter the Maximum Net Need.
Enter the Threshold.
Enter the Trend.
Enter the Weeks of Supply (WOS).
Enter the Minimum Gross Need.
Enter the Minimum and Maximum Pack. The minimum pack quantity limit ensures that the destination location receives at least this number of packs irrespective of the calculated demand. The maximum pack quantity limit ensures that the store does not receive more than this number of units of the pack item.
|
Note: The pack quantity limits can be applied only in cases where the allocation contains only pack items that have been selected to be allocated as a single entity.Note: The available packs is a sum of all the item sources linked with the pack selected by the user in the current allocation. |
From the Date Range area, enter the Start Date, or select a value by clicking the calendar icon.
Enter the End Date, or select a value by clicking the calendar icon.
Click OK to save the information and return to the Manage Auto Quantity Limits window. You can now use the Auto Quantity Limits checkbox to load the default quantity limits for creating an allocation for all work flows.