| Oracle® Retail Advanced Inventory Planning Data Management User Guide Release 14.1.2 |
|

 Previous |
 Next |
| Oracle® Retail Advanced Inventory Planning Data Management User Guide Release 14.1.2 |
|
Previous |
Next |
This chapter provides information about using Data Management for stores.
This section provides information on how to:
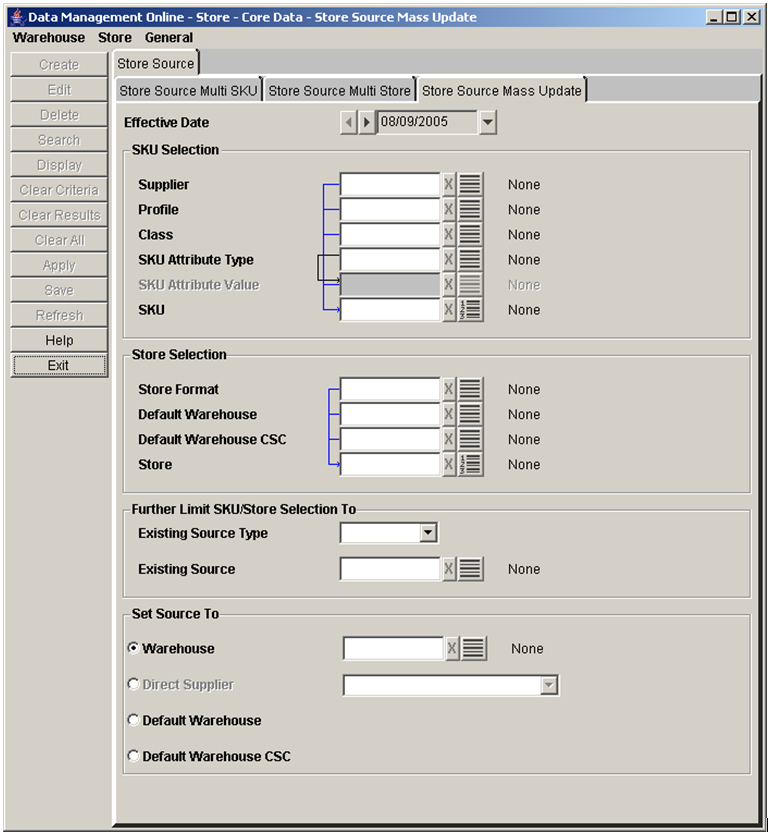
The Store Source Mass Update window allows you to create or change the store source for multiple SKUs at multiple stores. You can limit the SKUs and stores created or updated by specifying SKU characteristic, store characteristic, and additional SKU/location attributes.
Navigate: Log into Data Management. From the Store menu, select Core Data. On the Store Source primary tab, select the Store Source Mass Update tab.
In the Effective Date field, enter the date when the change occurs.
In the SKU Selection area, enter the criteria to be used to search for the SKUs you want to update.
In the Store Selection area, select the store criteria to be used to search for stores that receive the SKUs from the new source.
In the Further Limit SKU Store Selection area, select the source type as necessary.
In the Set Source To area, select the new source for the SKUs and stores combination.
Click Save. You are prompted to confirm your decision.
Click OK.
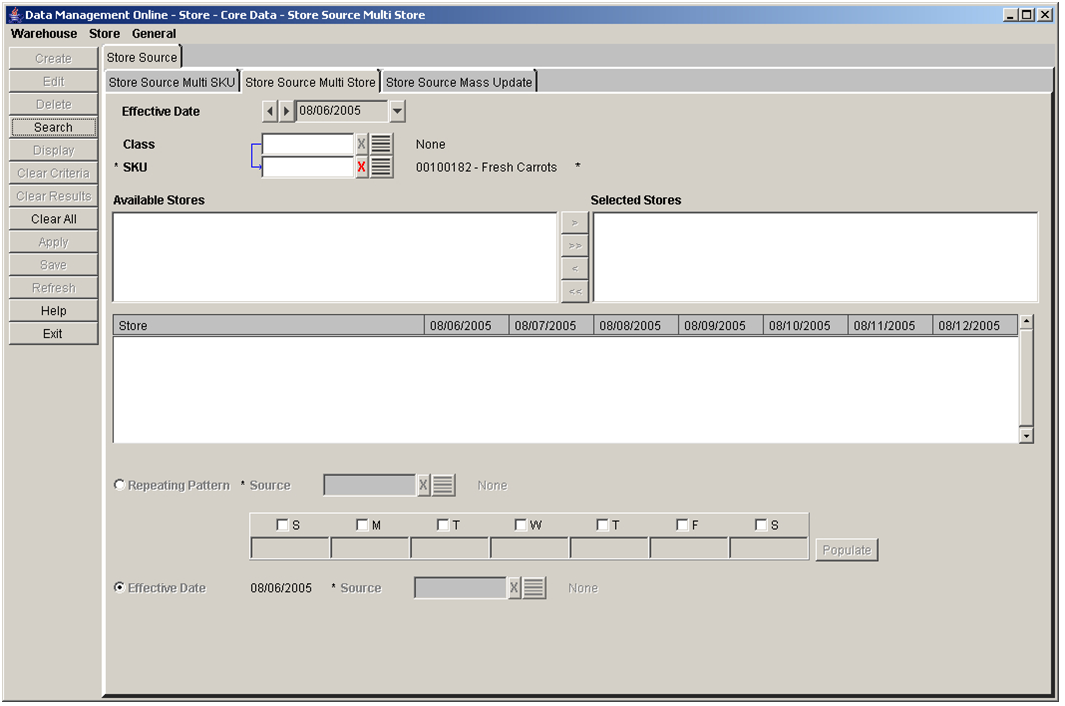
The Store Source tabs allow you to view the store source for warehouse and direct supplied SKUs. The store source indicates the single supplier or warehouse that supplies the SKUs to the store. The Store Source Multi Store tab allows you to select one SKU and view all stores - at which the SKU is on-supply for the selected effective date - and the associated sources of any particular store displayed. You can change a source for a specific store with a repeating pattern or with a specific source going forward from the effective date chosen.
Provides the ability to define different sources, either suppliers or warehouses, that supply a store on various days of the week. When you create a pattern for a week, the pattern repeats indefinitely, or until you create a new pattern.
When you select the Effective Date option, you are creating a single source, either a supplier or warehouse, for a store. When you set the effective date, the source supplies the store indefinitely.
Navigate: Log into Data Management. From the Store menu, select Core Data. On the Store Source primary tab, select the Store Source Multi Store secondary tab.
In the Effective Date field, select an effective date using the calendar button.
In the Class field, enter the class ID, or click the LOV button and select a class.
In the SKU field, enter the SKU ID or click the LOV button and select a SKU.
Click Search.
Move the stores that you want to edit to the Selected area.
|
Note: Any changes saved only apply to stores in the Selected area. |
In the Selected area, select a store.
Click Display. The source ID for the SKU/store is displayed.
Navigate: Log into Data Management. From the Store menu, select Core Data. On the Store Source primary tab, select the Store Source Multi Store secondary tab.
Search for store source by SKU.
Select the Repeating Pattern option.
In the Source field, click the LOV button to select the source that supplies the selected store.
Select the check box associated with each day for which you wish to create a repeating source pattern. The pattern is created using the source from the Source LOV button.
Click Populate to create the source pattern.
|
Note: You can select a different source for each day. This allows you to set up a repeating pattern that uses different source values across the days of the week. |
Clear the check boxes and repeat steps 3 - 5 until each day in the week has a source value populated in it.
Click Save. You are prompted to confirm your decision.
Click OK.
Navigate: Log into Data Management. From the Store menu, select Core Data. On the Store Source primary tab, select the Store Source Multi Store secondary tab.
Search for store source by SKU.
Select the Effective Date option.
In the Source field, click the LOV button to select the source that supplies the selected store.
|
Note: The effective date is the date you select when searching for the store source by SKU. |
Click Save. You are prompted to confirm your decision.
Click OK.
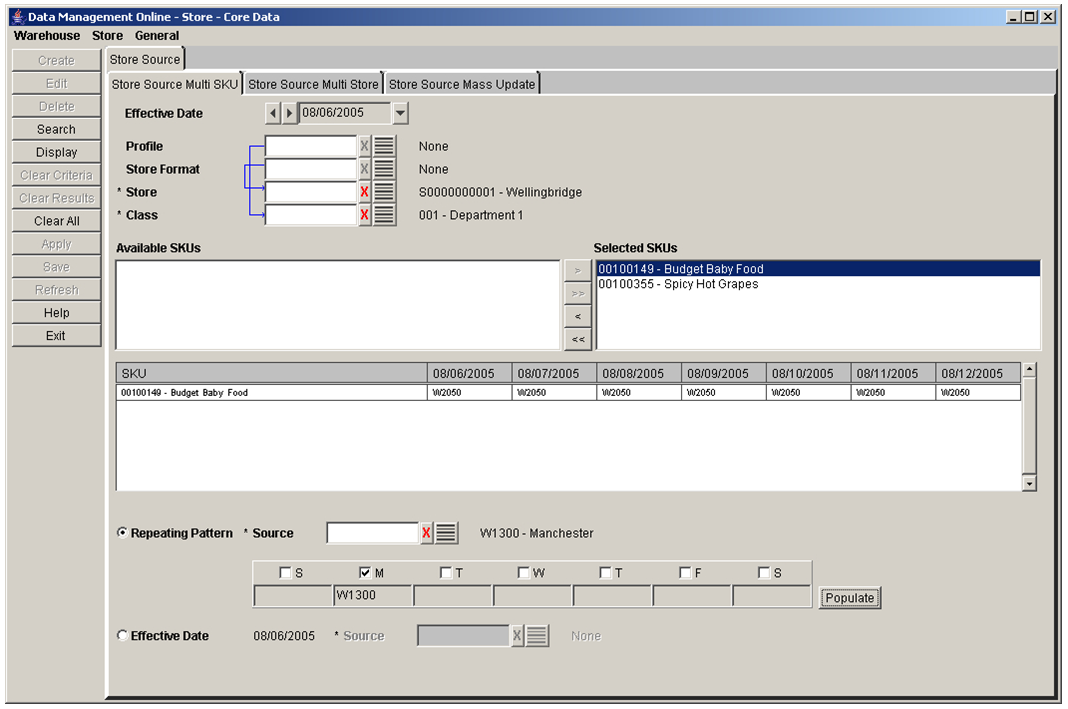
The Store Source tabs allow you to view and maintain the store source for warehouse and direct-supplied SKUs. The store source indicates the supplier or warehouse that supplies the SKUs to the store. The Store Source Multi SKU tab allows you to select one store and view all SKUs, which are on-supply at the store on the selected effective date, and the associated sources for any SKUs displayed. You can change a source for a specific SKU with a repeating pattern or with a specific source going forward from the effective date chosen.
Allow you to define multiple sources, either suppliers or warehouses, that supply a store on various days of the week. When you create a pattern for a week, the pattern repeats indefinitely, or until you create a new pattern.
When you select the Effective Date option, you are creating a single source, either a supplier or warehouse, for a store. When you set the effective date, the source supplies the store indefinitely.
Navigate: Log into Data Management. From the Store menu, select Core Data. On the Store Source primary tab, select the Store Source Multi SKU secondary tab.
In the Effective Date field, select an effective date using the calendar button.
In the Profile field, enter the profile ID, or click the LOV button and select a profile.
In the Store Format field, enter the store format ID, or click the LOV button and select a store format.
In the Store field, enter the store ID, or click the LOV button and select a store.
In the Class field, enter the class ID, or click the LOV button and select a class.
Click Search.
Move the SKUs that you want to edit to the Selected area.
|
Note: Any changes saved only apply to SKUs in the Selected SKUs area. |
In the Selected area, select a SKU.
Click Display. The source ID for the SKU/store is displayed.
Navigate: Log into Data Management. From the Store menu, select Core Data. On the Store Source primary tab, select the Store Source Multi SKU secondary tab.
Search for store source by store.
Select the Repeating Pattern option.
In the Source field, click the LOV button to select the source that supplies the selected store.
Select the check box associated with each day for which you wish to create a repeating source pattern. The pattern is created using the source from the Source LOV button.
Click Populate to create the source pattern.
|
Note: You can select a different source for each day. This allows you to set up a repeating pattern that uses different source values across the days of the week. |
Clear the check boxes and repeat Steps 3 - 5 until each day in the week has a source value populated in it.
Click Save. You are prompted to confirm your decision.
Click OK.
Navigate: Log into Data Management. From the Store menu, select Core Data. On the Store Source primary tab, select the Store Source Multi SKU secondary tab.
Search for store source by store.
Select the Effective Date option.
In the Source field, click the LOV button to select the source that supplies the selected store.
|
Note: The effective date is the date you select when searching for the store source by SKU. |
Click Save. You are prompted to confirm your decision.
Click OK.
This section provides information on:
This section provides information on how to:
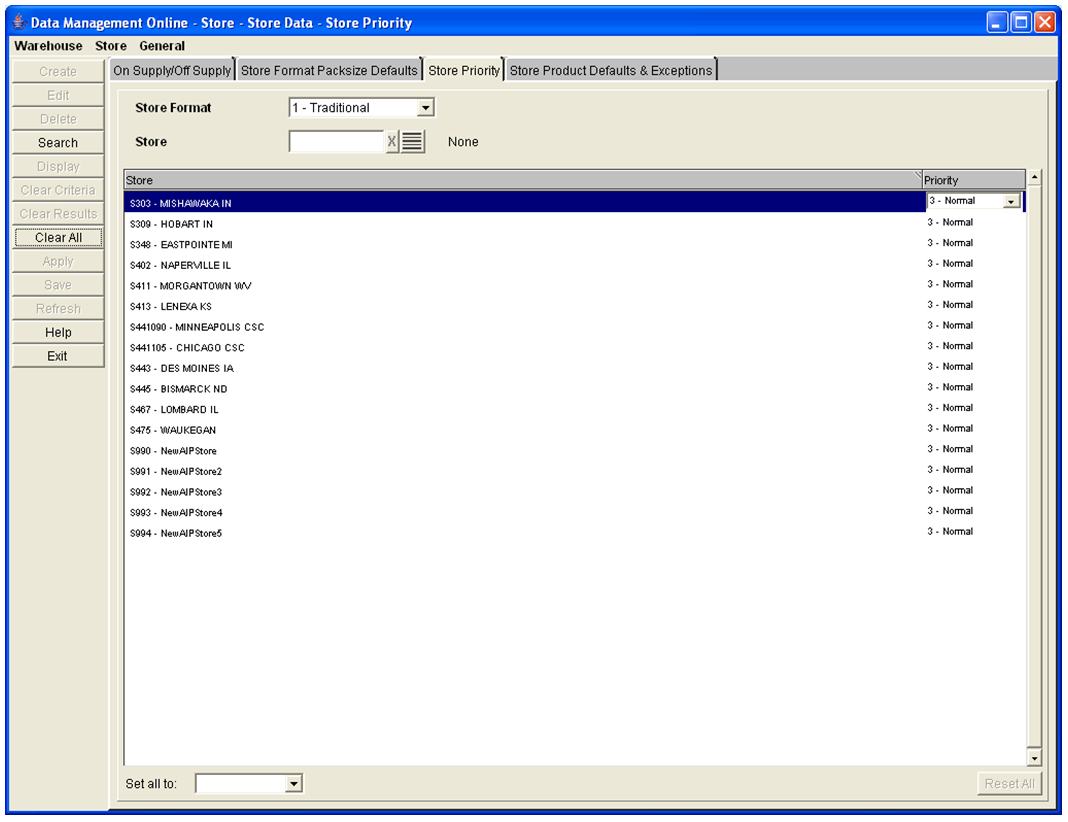
Store priorities are used to determine how the replenishment needs of a store are met in times of warehouse shortage and surplus. Until you assign a store priority, the default priority for the store is 1 - Super High.
Navigate: Log into Data Management. From the Store menu, select Store Data. Select the Store Priority tab.
In the Store Format field, select a format.
In the Store field, enter a store ID, or click the LOV button and select a store.
Click Search.
In the Priority column, click on the store priority to enable the field.
Select the appropriate store priority.
Click Save. You are prompted to confirm your decision.
Click OK.
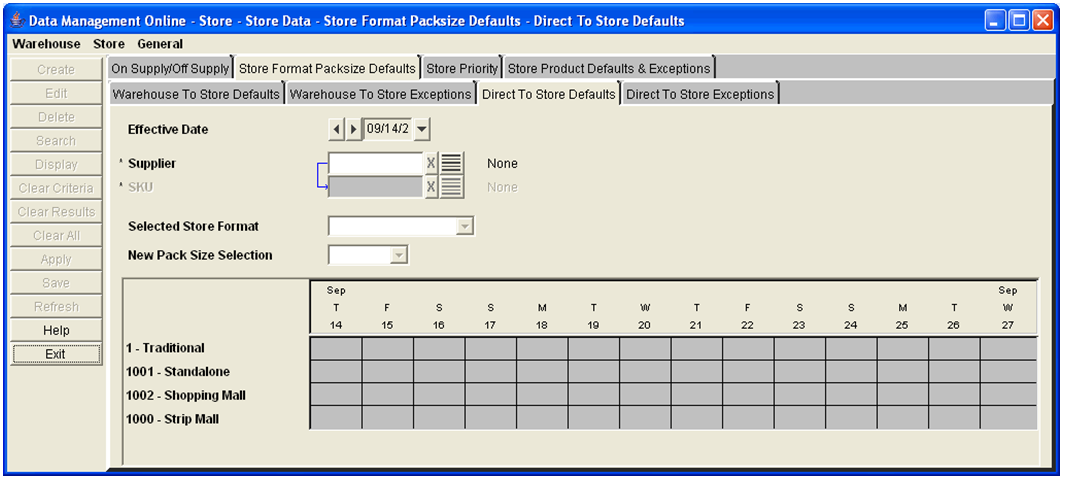
The store format pack assigns the default ordering pack-sizes to a store, by store format. First you select the store format and assign the default pack-size for the stores that meet the format criteria, then you create exceptions for stores within the format to order alternate pack-sizes. You can define store/pack-sizes from the supplier or the warehouse.
Navigate: Log into Data Management. From the Store menu, select Store Data. On the Store Format Pack-size Defaults primary tab, select the Direct To Store Defaults secondary tab.
In the Effective Date field, select an effective date using the calendar button.
In the Supplier field, enter the supplier ID, or click the LOV button and select a supplier.
|
Note: The list of suppliers is limited to suppliers associated with a supplier profile. |
In the SKU field, enter the SKU ID, or click the LOV button and select a SKU.
Click Display. Existing data for the formats, supplier, and SKU for a period of 14 days are displayed, beginning with the effective date.
In the Selected Store Format field, select the store format that you want to apply the changes to.
In New Pack-size Selection field, select a SKU pack-size.
|
Note: The SKU-pack-sizes displayed are limited to the pack-sizes of the SKU available from the supplier. |
Click Save. You are prompted to confirm your decision.
Click OK.
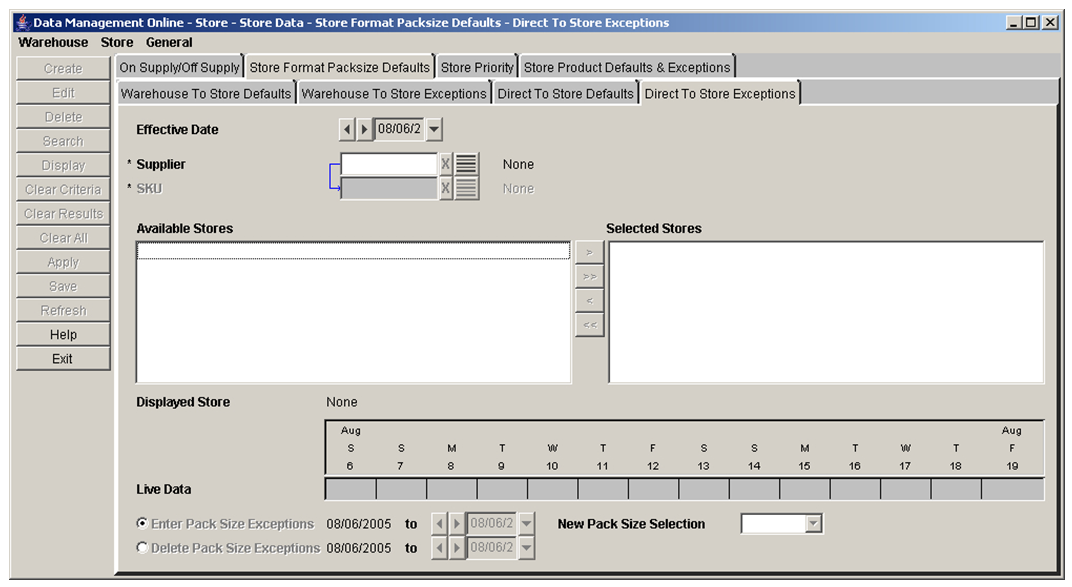
Navigate: Log into Data Management. From the Store menu, select Store Data. On the Store Format Pack-size Defaults primary tab, select the Direct To Store Exceptions secondary tab.
In the Effective Date field, select an effective date using the calendar button.
In the Supplier field, enter the supplier ID, or click the LOV button and select a supplier.
|
Note: The list of suppliers is limited to suppliers associated with a supplier profile. |
In the SKU field, enter the SKU ID, or click the LOV button and select a SKU.
Click Search.
Move the stores that you want to edit to the Selected Stores area.
|
Note: Any changes saved only apply to stores in the Selected Stores area. |
In the Selected Stores area, select a store.
Click Display. The pack-size default for the store is displayed.
To create a pack-size exception:
Select the Enter Pack-size Exceptions option button.
In the To date field, select the last date the exception is effective.
In the New Pack-size Selection field, select the SKU-pack-size that you want to replace the default pack-size.
|
Note: Pack Change Events cannot be overridden in this window. Stores should be added to the excluded destinations list to manually change a pack size that is part of an Event. |
To delete a pack-size exception:
Select the Delete Pack-size Exceptions option.
In the To date field, select the last date the exception is effective.
Click Save. You are prompted to confirm your decision.
Click OK.
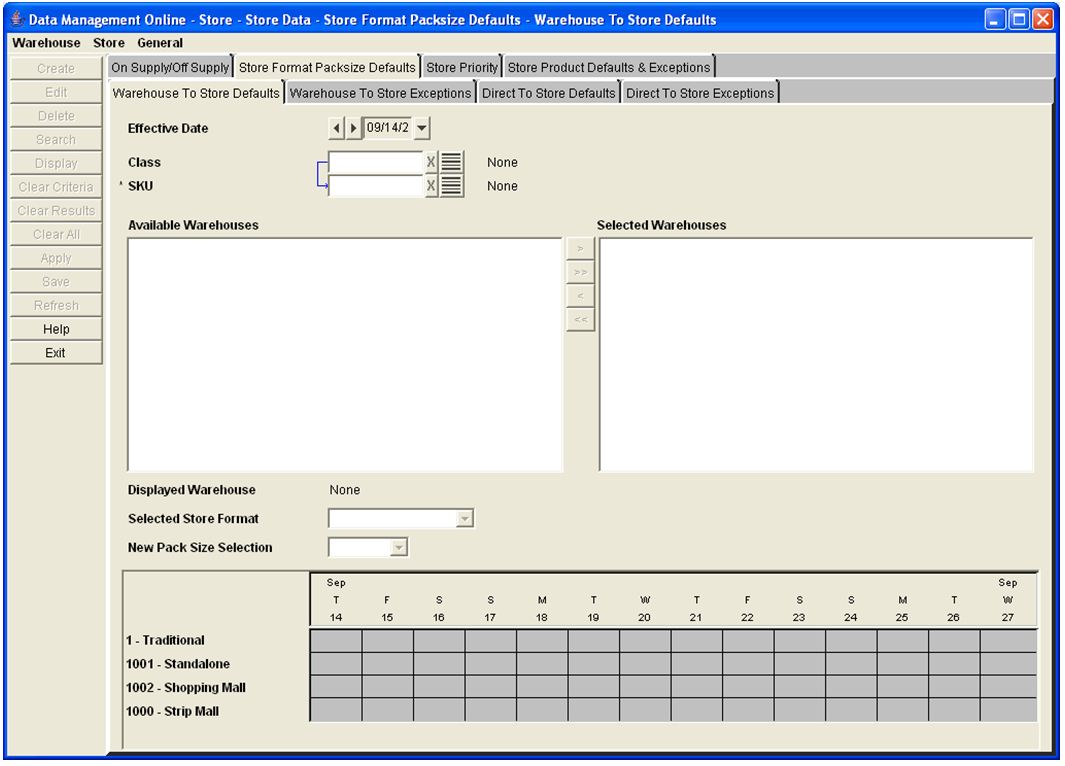
Navigate: Log into Data Management. From the Store menu, select Store Data. On the Store Format Pack-size Defaults primary tab, select the Warehouse to Store Defaults secondary tab.
In the Effective Date field, select an effective date using the calendar button.
In the Class field, enter the class ID, or click the LOV button and select a class.
In the SKU field, enter the SKU ID, or click the LOV button and select a SKU.
Click Search.
Move the warehouses that you want to edit to the Selected Warehouses area.
|
Note: Any changes saved only apply to warehouses in the Selected Warehouses area. |
In the Selected Warehouses area, select a warehouse.
Click Display. The pack-size default for the store format is displayed.
In the Store Format field, select the store format that you want to apply the changes.
In New Pack-size Selection field, select a SKU pack-size.
|
Note: The SKU-pack-sizes displayed are limited to the pack-sizes of the SKU available from the supplier. |
Click Save. You are prompted to confirm your decision.
Click OK.
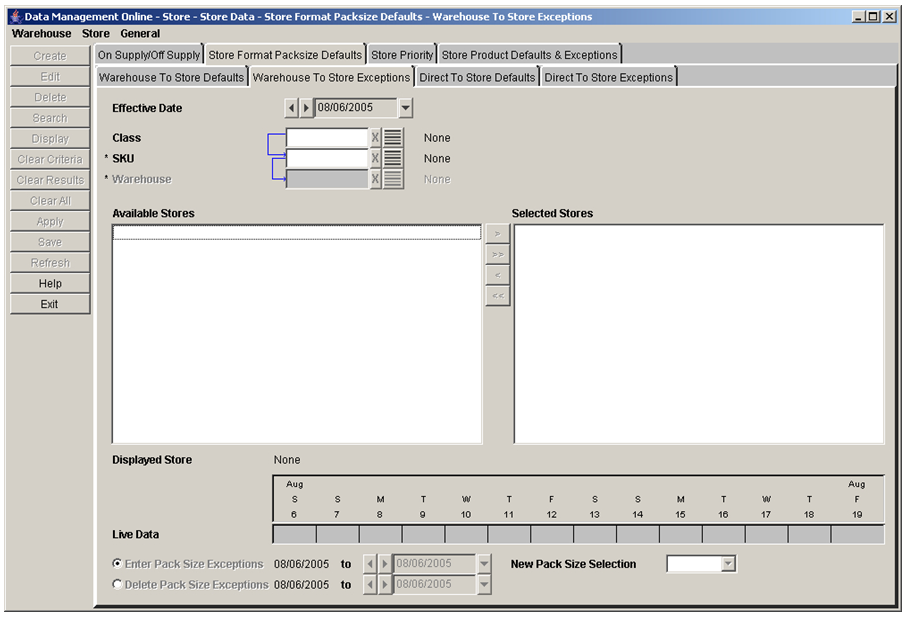
Navigate: Log into Data Management. From the Store menu, select Store Data. On the Store Format Pack-size Defaults primary tab, select the Warehouse to Store Exceptions secondary tab.
In the Effective Date field, select an effective date using the calendar button.
In the Class field, enter the class ID, or click the LOV button and select a class.
In the SKU field, enter the SKU ID or click the LOV button and select a SKU.
In the Warehouse field, enter the warehouse ID, or click the LOV button and select a warehouse.
|
Note: The list of suppliers is limited to suppliers associated with a supplier profile. |
In the SKU field, enter the SKU ID or click the LOV button and select a SKU.
Click Search.
Move the stores that you want to edit to the Selected Stores area.
|
Note: Any changes saved only apply to stores in the Selected Stores area. |
In the Selected Stores area, select a store.
Click Display. The pack-size default or exception for the store is displayed.
To create a pack-size exception:
Select the Enter Pack-size Exceptions option.
In the To date field, select the last date the exception is effective.
In the New Pack-size Selection field, select the SKU-pack-size that you want to replace the default pack-size.
|
Note: Pack Change Events cannot be overridden in this window. Stores should be added to the excluded destinations list to manually change a pack size that is part of an Event. |
To delete a pack-size exception:
Select the Delete Pack-size Exceptions option.
In the To date field, select the last date the exception is effective.
Click Save. You are prompted to confirm your decision.
Click OK.
On supply and off supply dates drive the replenishment process for Oracle Retail store replenishment batch process. They indicate the period of time over which a SKU at a store needs to be replenished. The on sale and off sale dates are the dates when the product goes on sale or off sale in the store. Typically, a SKU is assigned an on-supply date prior to the on sale date so that inventory is available in the store on the on sale date. Similarly, a SKU is assigned an off supply date prior to the off sale date so that inventory is depleted when the off sale date is reached.
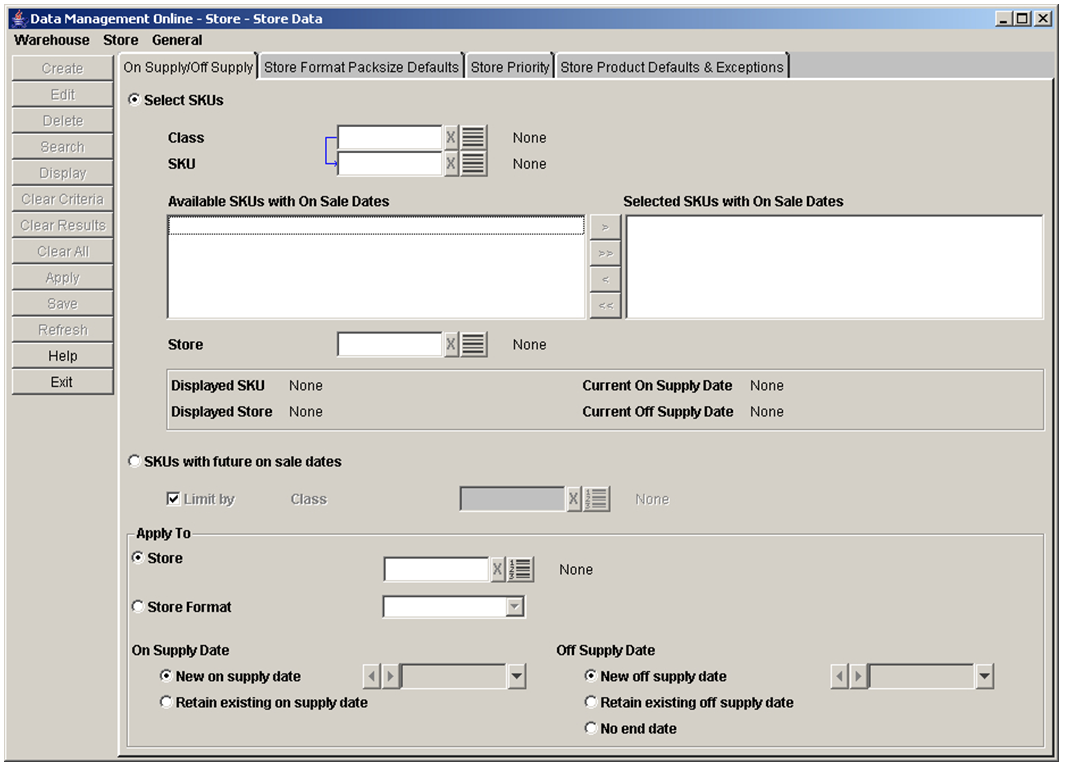
The On Supply/Off Supply tab allows you to modify the on supply/off supply dates which are initially generated in a nightly-batch process. This window also allows you to view a store's current on supply and off supply dates.
The On Supply/Off Supply tab allows you to update on supply and off supply dates for an individual SKU and store combination or for large numbers of SKUs and stores.
Navigate: Log into Data Management. From the Store menu, select Store Data. Select the On Supply/Off Supply tab.
Select the Select SKUs option.
In the Class field, enter the class that contains the SKU you are searching for, or click the LOV button and select the class.
In the SKU field, enter a SKU or click the LOV button and select a SKU.
Click Search. Results that match are displayed in the Available SKUs with On Sale Dates area.
Move the SKUs you want to view or change to the Selected SKUs with On Sale Dates area.
In the Store field, enter the store for which you want to view on supply/off supply information for the selected SKU, or click the LOV button and select a store.
|
Note: You can only view On Supply and Off Supply date for one SKU/store at a time. |
Click Display.
Navigate: Log into Data Management. From the Store menu select Store Data. Select the On Supply/Off Supply tab.
Select the SKUs with future on sale dates option.
In the Class field, enter the class that contains the SKUs you are searching for, or click the LOV button and select the class.
Navigate: Log into Data Management. From the Store menu select Store Data. Select the On Supply/Off Supply tab.
Search for and retrieve supply dates for a store:
Search for SKUs with on sale dates.
Search for SKUs with future on sale dates.
When the Select SKUs option is selected, move the appropriate SKUs to the Selected SKUs with On Sale Dates area.
Select the store you want to apply the changes to.
In the Apply to area, select the Store option.
In the field to the right, enter a store ID, or click the LOV button and select a store you want to apply the changes to.
or
In the Apply area, select the Store Format field.
In the field to the right, select the store format you want the changes applied to.
Specify on-supply and off-supply dates for the locations you selected.
In the On Supply Date area, select:
- New On Supply Date: Allows you to pick a new date for the selected locations that should be supplied with the selected SKUs.
- Retain Existing On Supply Date: Allows you to use the currently defined on supply date for the item.
In the Off Supply Date area, select:
New Off Supply Date: Allows you to pick a new date for the selected locations that should no longer be supplied with the selected SKUs.
Retain Existing Off Supply Date: Allows you to use the currently defined off supply date for the item.
No Date: Allows you to indicate that the SKUs selected for the location are always supplied.
Click Save.
This section provides information on:
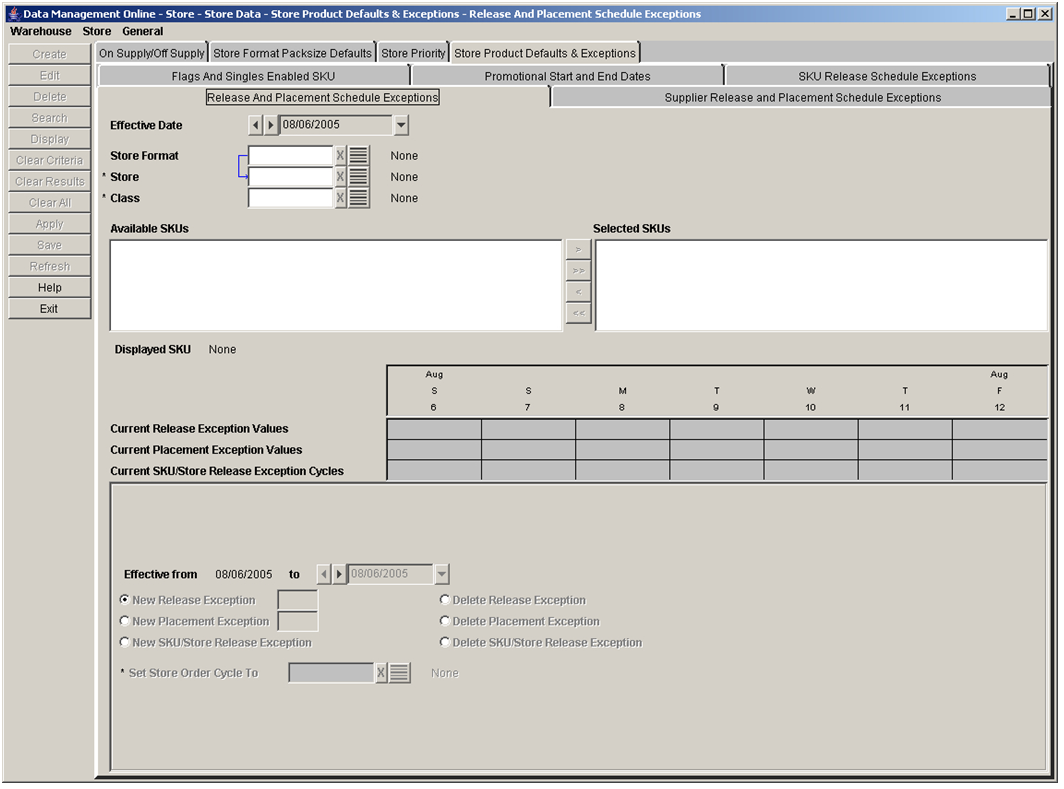
The Release and Placement Schedule Exception window allows you to set new SKU/store release and placement schedule exceptions in two ways. The first is by entering an integer value that represents either the release lead time or the placement lead time. The second is by selecting an alternate order cycle to be used in place of the default. You can also use this screen to delete existing exceptions.
Navigate: Log into Data Management. From the Store menu, select Store Data. On the Store Product Defaults & Exceptions primary tab, select the Release and Placement Schedule Exceptions secondary tab.
Select an effective date using the standard date selection control.
Enter search criteria to retrieve existing exceptions.
| To Select a... | Then in the... |
|---|---|
| Store format | Warehouse field, enter the warehouse ID or click the LOV button and select a store format. |
| Store | Store field, enter the store format ID or click the LOV button and select a store. |
| Class | Class field, enter the class ID or click the LOV button and select a class |
Click Search to retrieve available SKUs.
Move a SKU from the Available SKU area to the Selected SKUs area.
Select a SKU.
Click Display.
Perform the following steps to create a Release Exception:
In the To date field, enter the last day the exception is enabled in the system.
Select New Release Exception.
In the next field enter the new lead time.
|
Note: This field is a value, in days, between 0 and 366, inclusive. |
Click Save. You are prompted to confirm your decision.
Click OK.
Perform the following steps to delete a Release Exception:
In the To date field, enter the last day the exception is enabled in the system.
Select Delete Release Exception.
Click Save. You are prompted to confirm your decision.
Click OK.
Perform the following steps to create a Placement Exception:
In the To date field, enter the last day the exception is enabled in the system.
Select New Placement Exception.
In the next field enter the new lead time.
|
Note: This field is a value, in days, between 0 and 366, inclusive. |
Click Save. You are prompted to confirm your decision.
Click OK.
Perform the following steps to delete a Placement Exception:
In the To date field, enter the last day the exception is enabled in the system.
Select Delete Placement Exception.
Click Save. You are prompted to confirm your decision.
Click OK.
Perform the following steps to create a SKU/Store Release Exception:
In the To date field, enter the last day the exception is enabled in the system.
Select New SKU/Store Release Exception.
In the Set Store Order Cycle To field, select the new store order cycle using the LOV button.
Click Save. You are prompted to confirm your decision.
Click OK.
The SKU Release Schedule Exceptions window allows you to set exception to the SKU release and placement schedule at the SKU/day level. The exception is a new store order cycle that overlays the default order cycle.
The SKU release and placement schedule exception is set up when you select a store order cycle that is different than the profile's default order cycle.
Navigate: Log into Data Management. From the Store menu select Store Data. On the Store Product Defaults & Exceptions primary tab, select the SKU Release Schedule Exceptions secondary tab.
Select an effective date using the standard date selection control.
Enter search criteria to retrieve existing exceptions.
In the Class field, enter the class ID or click the LOV button and select a class.
In the SKU field, enter the SKU ID or click the LOV button and select a SKU.
Click Display.
Navigate: Log into Data Management. From the Store menu select Store Data. On the Store Product Defaults & Exceptions primary tab, select the SKU Release Schedule Exceptions secondary tab.
Search for and retrieve exceptions to a SKU release schedule.
In the To date field, select the last date the SKU in enabled in the system.
Select Set New SKU Exceptions.
In the Set Store Order Cycle To field, select a store order cycle using the LOV button.
Click Save. You are prompted to confirm your decision.
Click OK.
Navigate: Log into Data Management. From the Store menu select Store Data. On the Store Product Defaults & Exceptions primary tab, select the SKU Release Schedule Exceptions secondary tab.
Select Delete Any SKU Exceptions.
Click Save. You are prompted to confirm your decision.
Click OK.
This section provides information on:
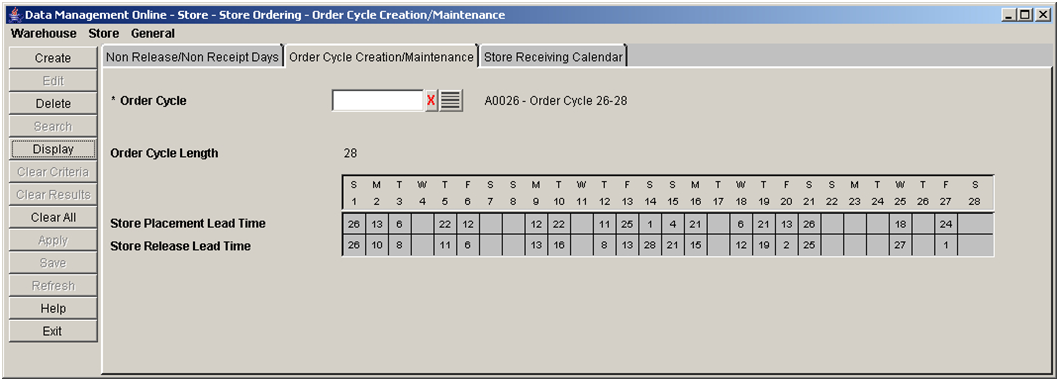
A store order cycle indicates when a supplier or warehouse can deliver to a store. Order cycles are composed of lead times. A lead time indicates which days of the week are acceptable delivery days and the number of days beforehand the source must receive the order in order to deliver on a selected day. A zero lead time represents same day continuous replenishment. You may leave a lead time blank, which indicates that orders are not received at the store on that day.
You can only create and delete store order cycles. When you create order cycles, the order cycle code must consist of five alphanumeric characters and be unique.
There are two types of lead times: store placement lead time and store release lead time. The store order cycle encompasses both the release lead time and the placement lead time. Typically, the lead times are the same, but for business reasons, you may choose to make the placement lead time longer than the release lead time. One possible reason to set a different placement lead time is to fix the store order quantity so that orders into the store's source warehouse can be executed with the confidence that the orders are sufficient to meet demand.
Navigate: Log into Data Management. From the Store menu, select Store Ordering. Select the Order Cycle Creation/Maintenance tab.
In the Order Cycle field, select the order cycle you wish to view from the Order Cycle LOV button.
Click Display.
Navigate: Log into Data Management. From the Store menu, select Store Ordering. Select the Order Cycle Creation/Maintenance tab.
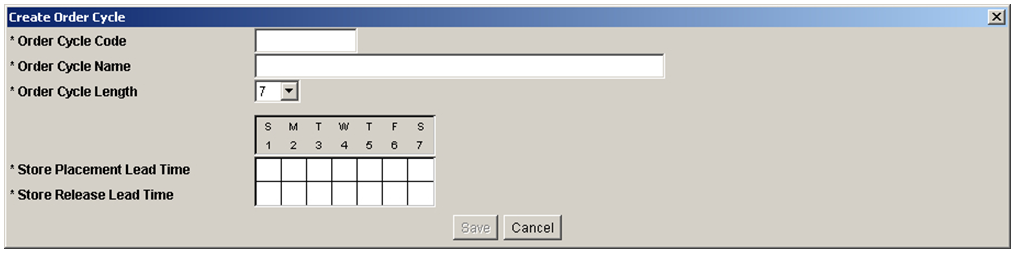
Click Create. The Create Order Cycle Window opens.
In the Order Cycle Code field, enter a code for the order cycle.
In the Order Cycle Name field, enter a name for the order cycle.
In the Order Cycle Length field, select the length of the order cycle.
Enter placement lead times:
Double-click a cell in the Store Placement Lead Time row of the grid.
Enter a whole number for the lead time in the cell.
- You must enter a store placement lead time for at least one day in the cycle.
- If you enter a store placement lead time for a given day in the cycle, you must enter a store release lead time for the same day.
- The store placement lead time must be greater than or equal to the store release lead time for any given day.
Press Enter or click away from the cell.
Enter store release lead times:
Double-click a cell in the Store Release Lead Time row of the grid.
Type an integer value for the desired lead time in the cell.
- You must enter a store release lead time for at least one day in the cycle.
- When you enter a store release lead time for a given day in the cycle, you also need to enter a store placement lead time for the same day.
- The store release lead time must be less than or equal to the store placement lead time for any given day.
|
Note: Once you save an order cycle, it can no longer be updated. |
Press Enter or click away from the cell.
Click Save. You are prompted to confirm your decision.
Click OK.
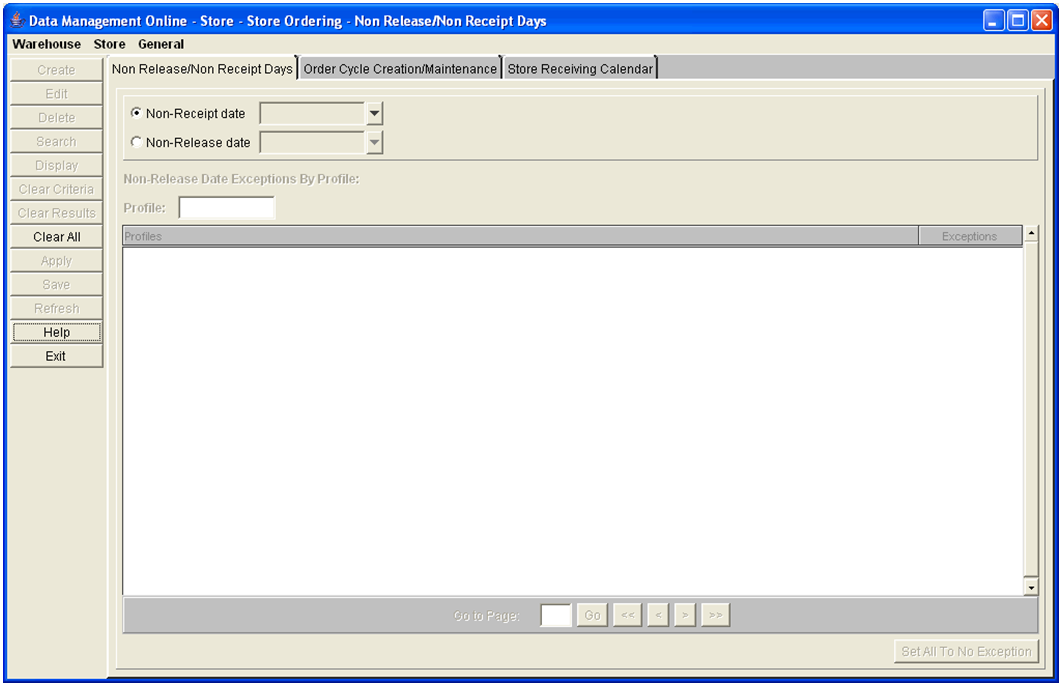
The Non Release/Non Receipt Days window allows you to maintain non-receipt and non-release dates for the entire company. You create a non-receipt day to indicate that for that particular day, no product is received from a source. You create a non-release day to indicate that for that particular day, no product is ordered from the source.
Navigate: Log into Data Management. From the Store menu, select Store Ordering. Select the Non Release/Non Receipt Days tab.
Select the type of date you want to search for.
Click the calendar button and select the date you want to view. The existing Non Release Dates and Non Receipt Days appear in bold in their respective calendar.
To limit searches for non-release dates by profile, enter the profile ID in the Non-Release Date Exceptions By Profile field.
Click Search.
Navigate: Log into Data Management. From the Store menu, select Store Ordering. Select the Non Release/Non Receipt Days tab.
Select Non-Receipt Date.
Click the calendar button to select a non-receipt date.
|
Note: Dates in gray indicate that those dates are eligible to be created as a non-receipt day. |
Click Create. You are prompted to confirm your decision.
Click OK.
Navigate: Log into Data Management. From the Store menu, select Store Ordering. Select the Non Release/Non Receipt Days tab.
Search for existing non-release/non-receipt days.
|
Note: Dates in bold black indicate that those dates are eligible to be deleted as a non-receipt day. |
Click Delete. You are prompted to confirm your decision.
Click OK.
Navigate: Log into Data Management. From the Store menu, select Store Ordering. Select the Non Release/Non Receipt Days tab.
Select Non-Release Date.
Click the calendar button to select a non-release date.
|
Note: Dates in gray indicate that those dates are eligible to be a non-release day. |
Click Create. You are prompted to confirm your decision.
Click OK.
Navigate: Log into Data Management. From the Store menu, select Store Ordering. Select the Non Release/Non Receipt Days tab.
Search for existing non-release/non-receipt days.
In the Profile field, enter the beginning of the profile ID and press Enter.
In the Exceptions field, select Y to indicate that exceptions exist.
Select the check box for the profiles you want to create an exception for.
Click Save. You are prompted to confirm your decision.
Click OK.
Navigate: Log into Data Management. From the Store menu, select Store Ordering. Select the Non Release/Non Receipt Days tab.
Search for existing non-release/non-receipt days.
|
Note: Dates in bold black indicate that those dates are eligible to be deleted as a non-receipt day. |
Click Delete. You are prompted to confirm your decision.
Click OK.
Navigate: Log into Data Management. From the Store menu, select Store Ordering. Select the Non Release/Non Receipt Days tab.
Search for existing non-release/non-receipt days.
In the Exceptions field,
Enter Y to indicate that exceptions exist.
Enter N to indicate that no exceptions exist.
or
Click Set All To No exception to clear all exceptions.
Click Save. You are prompted to confirm your decision.
Click OK.