| Oracle® Retail Advanced Inventory Planning Implementation Guide Release 14.1.2 E71752-02 |
|

 Previous |
 Next |
| Oracle® Retail Advanced Inventory Planning Implementation Guide Release 14.1.2 E71752-02 |
|
Previous |
Next |
During the installation of the AIP-RPAS batch code (as detailed in the Oracle Retail Advanced Inventory Planning Installation Guide), the installer has the option of creating an AIP-RPAS domain using the sample hierarchy data provided with the AIP package. This domain is not suitable for production use.
This chapter provides details on the process for creating an AIP-RPAS domain with production-quality data. This process can be run whether or not you have already run the AIP-RPAS Installer.
This section provides information about the AIP Installer.
About Notations
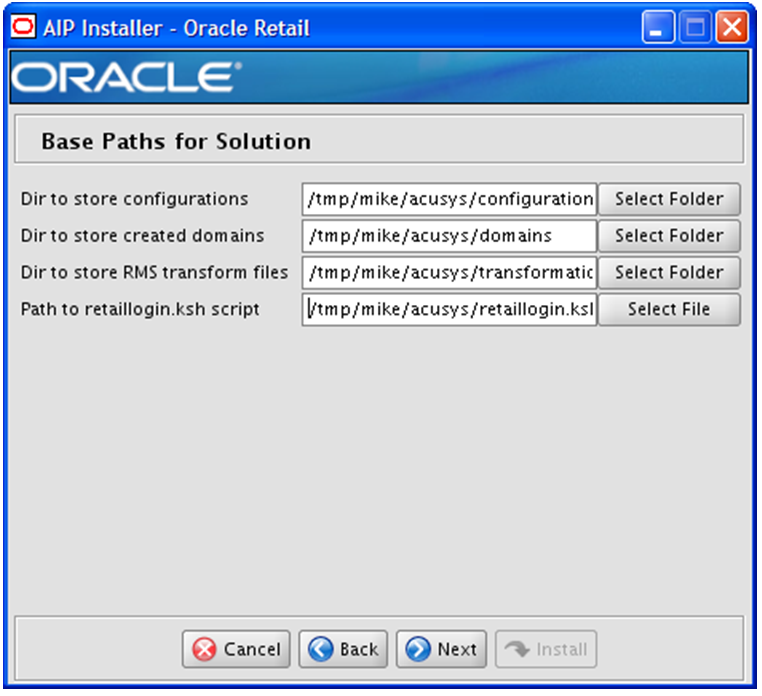
For reference purposes, this chapter uses the notation <AIP Installer> to refer to the UNIX directory where the AIP-rpas-installer.zip archive has been unpacked. The UNIX environment variable $AIP_INSTALL refers to the directory location specified during the execution of the AIP-RPAS Installer for Dir to store configurations, as shown in Figure 3-1.
In Figure 3-1,/tmp/mike/acusys/configurations/aip was entered as the directory to store the configurations. For purposes of this document, $AIP_INSTALL refers to /tmp/mike/acusys.
Base Paths for Solution
Table 3-1 provides information about the directories inside the $AIP_INSTALL directory. These directories are populated by the AIP-RPAS Installer once it is run.
Table 3-1 $AIP_INSTALL Directory
| Directory | Contents |
|---|---|
|
|
AIP base XML files generated by and that are customizable by using the RPAS Configuration Tools. |
|
|
AIP default XML files used by the RPAS domain build process. |
|
|
Directories and files copied into the RPAS domain during domain build process. These files are used by the interface between AIP Oracle and external systems (such as RMS and RDF). |
|
|
AIP default/sample hierarchy data files and message strings loaded into the RPAS domain build during domain build process. |
The $AIP_INSTALL/input directory contains a set of hierarchy data files that are provided as a sample for load during the AIP-RPAS domain build during the execution of the AIP-RPAS Installer. These hierarchy data files contain positions along each dimension in each hierarchy. These hierarchy data files are listed in Table 3-2.
Table 3-2 Hierarchy Data Overview
| Hierarchy Data File | Description |
|---|---|
|
bcsk.dat |
Baseline/Contingency Stock |
|
clnd.dat |
Calendar |
|
dsp.dat |
Destination Stocking Point |
|
had.dat |
Advertising |
|
hevt.dat |
Event |
|
hseq.dat |
Sequence Number |
|
hsku.dat |
Substitute SKU |
|
hspl.dat |
Supplier |
|
husa.dat |
User-specified Allocation |
|
intv.dat |
Interval |
|
loc.dat |
Location |
|
ntwg.dat |
Network Group |
|
oltc.dat |
Order Lead Time |
|
ordg.dat |
Order Group |
|
proc.dat |
Profile Order Cycle |
|
prod.dat |
Product |
|
prof.dat |
Profile |
|
ssp.dat |
Source Stocking Point |
|
whse.dat |
Warehouse |
Some of the data provided in the AIP package is of no use to the client running AIP in a production environment. This is because the positions are sample positions only, and other hierarchy data contains generic positions that do not need to be customized (for example, hseq, intv). Therefore a domain built on this data is suitable only for proof of installation correctness, including viewing with the RPAS Client, but not suitable for production.
|
Note: The client must build the domain with the BCSK hierarchy even if this functionality in not used. A core dump occurs during AIP-RPAS batch processes if there is a lack of BCSK hierarchy positions in the hierarchy maintenance database (hmaint). |
|
Note: In previous versions of AIP, the calendar hierarchy could be generated at domain build time using RPAS functionality. In this version of AIP, the calendar hierarchy must be loaded as a flat file alongside the other hierarchy files. There is no calendar generator provided with the version of RPAS compatible with this version of AIP. See Chapter 7, "AIP Calendar Hierarchy" for detailed information on file format of calendar hierarchy. |
In addition to the hierarchy data listed in Table 3-2, there are two additional files contained in the $AIP_INSTALL/input directory. These are non-optional, non-sample, base code files containing message strings, which must co-exist with the hierarchy data. These must be left intact and must not be replaced. During domain creation, these files are loaded into the domain. These message string data files are described in the following table.
| Message Strings File | Description |
|---|---|
| msgs.dat.aip | Message Hierarchy Positions |
| r_msglabel.ovr.aip.english | Message String Data Overlay |
This section describes the procedure by which the AIP installation files can be used as a starting point for creating an AIP-RPAS domain that contains production data. The process consists of some manual intervention during certain points of the installation to most efficiently and expediently create a usable AIP-RPAS domain built on customer hierarchy data. The intervention entails a combination of manipulating of the packaged files, running the AIP-RPAS Installer, and running some AIP-RPAS batch scripts.
These instructions are organized into the following sections:
The following procedure details part one of how to manipulate the hierarchy data:
Locate and extract AIP-rpas-installer.zip into a newly created staging directory, referred to as <AIP Installer>. Note that <AIP Installer> is not the same as the environment variable, $AIP_INSTALL, used later.
For more information about the AIP Installer, refer to the Oracle Retail Advanced Inventory Planning Installation Guide, chapter ”Installing AIP-RPAS- Full Version.”
AIP-rpas-installer.zip file contains the following:
<AIP Installer>/aip/aip/aip_install/aip.tar.zip
This aip.tar.zip archive must be unpacked and manipulated as detailed in the following steps.
Change directories to the <AIP_Installer>/aip/aip/aip_install/ directory where aip.tar.zip is located and unpack the aip.tar.zip archive using the following commands:
cd <AIP_Installer>/aip/aip/aip_install
cp aip.tar.zip aip.tar.zip.orig
unzip -p aip.tar.zip | tar -xf -
This results in the creation of several subdirectories, including an
<AIP_Installer>/aip/aip/aip_install/input subdirectory.
Replace the <AIP_Installer>/aip/aip/aip_install/input/clnd.dat file with a clnd.dat file created by the RMS to AIP transform script or by the customer. The clnd.dat must be replaced with a clnd.dat file created by customer or a clnd.csv.dat file created by RMS-AIP transform script or by the customer.
The details for creating a clnd.csv.dat file from RMS to AIP transformation can be found in the Oracle Retail Advanced Inventory Planning Operations Guide.
The clnd.csv.dat file contains the calendar hierarchy information. The details on the file format of this file for manual file creation (non-RMS) can be found in Chapter 7, "AIP Calendar Hierarchy". This file must be customized to contain the customer's desired calendar, including the start and end days required by the business. Note that the calendar must begin with a Sunday.
Replace each of the following .dat files in <AIP_Installer>/aip/aip/aip_install/input with a 0-byte file:
had.dat
oltc.dat
ordg.dat
proc.dat
Use the UNIX built-in shell commands, rm and touch, to accomplish this task:
cd <AIP_Installer>/aip/aip/aip_install/input
rm had.dat oltc.dat ordg.dat proc.dat
touch had.dat oltc.dat ordg.dat proc.dat
cd <AIP_Installer>/aip/aip/aip_install
|
Note: The oltc (Order Lead Time Cycle hierarchy), ordg (Order Group hierarchy), and proc (Profile Order Cycle hierarchy) data files will be supplied by AIP Oracle table exports, and the had (Advertising hierarchy) file will be supplied by the customer's external system, so sample positions must not be loaded into these hierarchies. (Note that they are zeroed out.) |
|
Note: AIP Oracle will also supply the ntwg (Network Group hierarchy) data file, but this hierarchy must have positions in it for the domain build process to succeed. The sample data for ntwg will be removed at the end of this process. |
At this point there is no further hierarchy manipulation that can be done to replace sample hierarchy data files with non-sample hierarchy data files without running part of AIP-RPAS batch. Therefore, the <AIP_Installer>/aip/aip/aip_install/aip.tar.zip file must be repacked so it can be used by the AIP-RPAS Installer.
Repack the aip.tar.zip archive using the following commands:
tar -cf aip.tar input configuration domain_build
zip aip.tar.zip aip.tar
The goal of this step is to not only install the AIP binary code, but to also build a temporary AIP-RPAS domain that will be used for running a subset of AIP-RPAS batch processes to create RPAS-loadable, customer-sourced, hierarchy data.
With the repacked aip.tar.zip file, the installation instructions in the ”Installing AIP-RPAS- Full Version” chapter of the Oracle Retail Advanced Inventory Planning Installation Guide must be followed in their entirety, except that the AIP-RPAS Installer does not need to be unpacked again. When prompted to build an AIP domain, make note of the location of the domain (AIP path prompt on Domain installation paths window), as this is required as an environment variable, $TEST_AIPDOMAIN. Also, be sure to request the creation of the domain at the Create AIP Domain prompt.
The AIP-RPAS Installer installs all the AIP binary code and creates an AIP-RPAS domain that contains the customer's Calendar hierarchy and the following empty hierarchies:
Advertising
Order Lead Time Cycle
Order Group
Profile Order Cycle
The remaining hierarchies in this temporary domain contain sample data.
Using this hybrid sample-customer hierarchy domain, you can execute a subset of the RMS-AIP Transformation scripts and an abbreviated AIP-RPAS batch, according to the instructions in the next section, to create the remaining AIP-RPAS hierarchies. These hierarchies will then be used to create a final domain that is built with customer hierarchy data.
During the RPAS Installer execution, you were prompted to enter the path to store a newly created retaillogin.ksh script. During the AIP-RPAS Installer execution, an $AIP_INSTALL/aiplogin.ksh script was created, which is called by retaillogin.ksh. This retaillogin.ksh script must be run prior to running the AIP-RPAS batch processes because it sets some environment variables, including AIP-specific variables set by aiplogin.ksh, that are needed for the next steps.
At this point you should source the retaillogin.ksh script to set your environment for the remaining steps. It will call aiplogin.ksh, which was created by the AIP-RPAS Installer, that sets the $AIP_INSTALL and $TEST_AIPDOMAIN environment variables.
cd <Path to retaillogin.ksh script>
. ./retaillogin.ksh
You must make any optional customizations to the AIP configuration prior to building the production domain. Configure the AIP solution using RPAS Configuration Tools.
|
Note: This section requires that the RPAS Configuration Tools are installed and working properly on your Windows workstation. For information on installing and troubleshooting RPAS Configuration Tools, refer to the Oracle Retail Predictive Application Server Installation Guide. |
AIP is packaged with a base configuration that all implementations must use as a starting point for any customization. This base configuration is stored within various files and directories, which are unpacked during installation. In order to modify this configuration, the configuration files must be loaded onto a Windows workstation in order to load them into the RPAS Configuration Tools.
|
Note: This release of the AIP-RPAS configuration is enabled for multi-language capability as a default. This means that the domain build will set up positions in the database arrays into which translated strings can be optionally loaded by the domain administrator. See the Oracle Retail Predictive Application Server Administration Guide for the RPAS Classic Client or the Oracle Retail Predictive Application Server Administration Guide for the RPAS Fusion Client for details. It is strongly recommended that the multi-language setting remain at True. RPAS does not support upgrading a domain single-language configuration to a mutli-language configuration. |
Because the RPAS Configuration Tools must run on a Windows workstation, in order to customize the configuration, the $AIP_INSTALL/configuration/AIP directory must be accessible from or copied to a Windows PC on a local or network drive.
The AIP solution is configurable to a limited degree. The following table describes what you can and cannot customize with respect to maintaining the integrity of this release.
| Rule | Description |
|---|---|
| Clients cannot change existing measures or rules or add rules to existing rule groups. | Doing so results in a non-supported AIP configuration, which yields unpredictable results during the operation of AIP. |
| Clients can add additional measures, rule groups, and workbooks. | These must not be modified or otherwise touched during the patch installation. |
| Clients can customize the domain Hierarchy contained in hierarchy.xml. | In order to insert a customized hierarchy.xml into the configuration, the modified (using the RPAS Configuration Tools) hierarchy.xml must be copied to:
This is where the domain build will be looking for the hierarchy. |
| The AIP-RPAS domain must be partitioned along the product hierarchy at the subclass (SCLS) dimension. | This is not configurable. |
Basic instructions for running the RPAS Configuration Tools are as follows:
Double-click the ConfigTools.exe file in your RPAS Configuration Tools installation directory to launch the RPAS Configuration Tools.
The AIP solution consists of one domain structure, named AIP.
From the File menu, select Open and navigate to the configuration directory on your local or network drive.
Navigate to the configuratioNAIP directory and select the AIP.xml file to open the AIP domain configuration.
Perform any configuration tasks that are necessary, save, and then close the AIP configuration.
Once you are satisfied with the configuration, copy the configuration directory back to $AIP_INSTALL before proceeding.
External system hierarchy and measure data must be introduced into the AIP-RPAS domain in order for the AIP-RPAS batch processes to execute and create the remaining AIP-RPAS-loadable hierarchies.
To run a partial batch that results in loadable hierarchy data, those external system files required by AIP-RPAS batch must be placed into the AIP-RPAS domain.
Even though only the hierarchy data files are used for creating the RPAS loadable hierarchy files, the required measure data files must also be present for the batch processes to complete without error. The batch processes checks for the existence of all required files in the early batch of external files. For reference, these early files are listed with their options (Required or Optional) in:
$AIPDOMAIN/interface/config/external/earlyfiles.config
Follow these steps to prepare and properly place the required external system data files into the AIP-RPAS domain:
The following hierarchy data files must be prepared according to the file formats defined in this guide and copied to the $AIPDOMAIN/interface/rms/input directory:
item.txt
loc.txt
splr.txt
whse.txt
RMS customers can:
copy splr.txt from the RMS RETL Extracts
generate item.txt, loc.txt, and whse.txt
For RMS customers to generate item.txt, loc.txt, and whse.txt, follow the instructions in this step, or continue to Step 3.
RMS customers can run a subset of the RMS-AIP Transformation scripts against the hybrid sample-customer hierarchy domain to generate item.txt, loc.txt, and whse.txt. See Table 9-48, "RMS 13.0/13.1 RETL Extracts" for the required RMS RETL Extract inputs to the following RMS-AIP Transformation scripts:
|
Note: The instructions detailed in this step reference the RMS 13.0/13.1 - AIP Transformation scripts; users of other versions of RMS must substitute for these the appropriate scripts that match their version of RMS. |
|
Note: These steps will generate additional files in $AIPDOMAIN/interface/rms/input that are not needed at this time. |
Ensure $RPAS_TODAY is defined to satisfy the batch scripting architecture requirements. (The actual value is not important for this step.)
Ensure RETL is installed and that the retl executable is in the $PATH.
Copy all required RMS RETL extracts needed to generate item.txt, loc.txt, and whse.txt to the directory $RAW_RMS_DATA_DIR, defined in$RPAS_HOME/bin/aip_env_rpas.sh.
Copy the RMS schema from the RMS package into $RMS_SCHEMA_DIR, which is also defined in aip_env_rpas.sh.
Copy the AIP schema from the AIP package (installed to the aip_schema_dir subdirectory of the path specified by Dir to store RMS transform files during the AIP Installer execution) into $AIP_SCHEMA_DIR, which is also defined in aip_env_rpas.sh.
Run aipt_item_rms13.ksh to generate $AIPDOMAIN/interface/rms/input/item.txt.
Run aipt_orghier_rms13.ksh to generate $AIPDOMAIN/interface/rms/input/loc.txt.
Run aipt_rename.ksh and aipt_move.ksh to generate $AIPDOMAIN/interface/rms/input/whse.txt.
For RMS customers to generate clnd.csv.dat, they must follow the instuctions in this step, or continue to Step 4.
To replace the sample calendar hierarchy provided with the AIP package, run the following calendar transformation script to generate clnd.csv.dat from the RMS RETL Extracts:
Copy the required RMS RETL extracts needed to generate clnd.csv.dat to $RAW_RMS_DATA_DIR.
Run aipt_clnd.ksh to generate $AIPDOMAIN/interface/rms/input/clnd.csv.dat.
|
Note: The AIP-RPAS batch process checks for existence of all required files and halts the process if any required files are missing. Therefore, to complete the batch processes without error, some measure data files must also be present in the$AIPDOMAIN/interface/rms/input directory. However, they only need to exist to pass the existence check. They do not need to be populated with data. |
Use the UNIX command, touch, to create 0-byte data files for the required measures. The optional data files do not need to be created.
dm0_ofseffdt_.txt
dm0_onseffdt_.txt
dmx_prdspllks.txt
dmx_dirspl.txt
|
Note: The goal of this preparation step is to provide files needed to create RPAS-loadable hierarchy files, which can be used to build a domain based on customer hierarchy data. As a result, only the first few steps of AIP-RPAS batch will be run as described in the next section. It follows then that the inventory and forecast data files are not required even in 0-byte stub form, because the AIP-RPAS batch processes that process those files will not be run. |
A subset of the first-day AIP-RPAS batch processes can now be run against the AIP-RPAS domain created in the previous sections. The batch steps run will create hierarchy data files that can then be used to create a domain using customer hierarchy data positions (for example, customer SKUs and stores).
|
Note: During the RPAS Installer execution, you were prompted to enter the path to store a newly created retaillogin.ksh script. During the AIP-RPAS Installer execution, an$AIP_INSTALL/aiplogin.ksh script was created, which is called by retaillogin.ksh. This retaillogin.ksh script must be run prior to running the AIP-RPAS batch processes because it sets some environment variables, including AIP-specific variables set by aiplogin.ksh, which are needed for the next steps. |
The master AIP-RPAS batch script aip_batch.sh reads from aip_env_rpas.sh to find the locations of the domain and log path. The domain and log path variables (AIPDOMAIN and RPAS_INTEGRATION_HOME) default to the $TEST_AIPDOMAIN and TEST_RPAS_INTEGRATION_HOME variables. Therefore, add a definition of TEST_RPAS_INTEGRATION_HOME to $AIP_INSTALL/aiplogin.ksh or redefine the RPAS_INTEGRATION_HOME variable inside $RPAS_HOME/biNAip_env_rpas.sh. This is the location where the logs will be written.
Ensure RPAS_TODAY is set before running the aip_batch.sh as shown in Step 3.
For example, run export RPAS_TODAY=20060510 at the command line before run aip_batch.sh.
Execute the following command:
aip_batch.sh -f -s set_implementation_parameters -e convert_hierarchies_for_loading
This command instructs the AIP-RPAS batch to run all first-day steps as scheduled in the $RPAS_HOME/bin/aip_batch.sh script from the set_implementation_parameters step through the convert_hierarchies_for_loading step.
These steps accomplish the task of creating RPAS loadable hierarchy files for the following:
product (prod.dat)
warehouse (whse.dat)
supplier (hspl.dat)
location (loc.dat)
profile (prof.dat)
source stocking point (ssp.dat)
destination stocking point (dsp.dat)
These hierarchy data files are now located in $AIPDOMAIN/input directory.
If there are any errors resulting from these batch processes, see the log files written to $TEST_RPAS_INTEGRATION_HOME to determine the error. If the logs indicate that any measure data files are missing, ensure that 0-byte versions of these files are located in the $AIPDOMAIN/interface/rms/input directory and rerun the above aip_batch.sh command.
Some previous versions of AIP allowed for two kinds of RPAS domains. The first was an RPAS simple domain, where all the hierarchy and measure data were contained in one set of databases. The second was an RPAS global domain, where the hierarchy and measure data were partitioned across several sets of databases. In a global domain set, there was one master domain and one or more local domains (or subdomains).
This version of AIP supports only RPAS global domains.
The $AIP_INSTALL/domain_build directory contains files necessary to instruct the build programs how and where to build domains as well as partitioning information for global domains. Within $AIP_INSTALL/domain_build, there is one directory, AIP, corresponding to the build instructions for the AIP domain. Within the AIP directory is a config directory, which contains files that must be edited during installation.
The directory $AIP_INSTALL/domain_build/AIP/config contains one file:
globaldomainconfig.xml
Inside the globaldomainconfig.xml file are XML tags read by the RPAS domain build program that specify the name, location, and partitioning information for each domain in a global domain structure.
The settings provided with this installation specify a global domain set with one master domain and two local domains. The default partitioning dimension is subclass (SCLS) and the default partitioning dimensions are set to match the subclasses contained in the sample data files provided in the input.tar file. The partitioning dimension is not customizable and must remain at subclass (SCLS). However, the subclasses in each local domain and the number of local domains must be determined according to the business needs.
The default globaldomainconfig.xml for AIP is similar to the following example.
Example:
<?xml version="1.0" encoding="UTF-8" standalone="yes" ?><rpas>    <globaldomain>        <path>DOMAIN_PATH</path>        <partitiondim>SCLS</partitiondim>        <subdomain>            <subpath>DOMAIN_PATH/ldom0</subpath>
            <subpositions>1414_1000_1000,25_110_1204,25_116_438,25_116_439,
             25_116_440,25_116_442,25_119_692,3_564_984,43_813_1458,43_813_516,
             44_602_1212,44_602_1214,44_602_1215,48_264_683,
              48_906_803</subpositions>        </subdomain>        <subdomain>            <subpath>DOMAIN_PATH/ldom1</subpath>
            <subpositions>48_906_804,48_906_805,5_503_1401,5_503_1503,5_503_
             1504,5_530_246,5_531_658,5_699_817,66_213_482,66_214_553,66_223_
             394,66_224_1117,71_710_112,71_710_113,71_710_1497,7_562_1108
             </subpositions>        </subdomain>    </globaldomain></rpas>
If the desired global domain solution for the AIP module contains more than two local domains, copy the <subdomain> … </subdomain> tag-set as many times as needed and then customize each new copy of the tag-set.
|
Tip: Each sub-domain (such as the local domain) must contain at least one position along the partitioning dimension (for example, SCLS) in the production hierarchy data set, namely, prod.dat. In addition, all the positions along the partitioning dimension in the data set (prod.dat) must be listed in one of the local domains. Otherwise, the domain creation will fail. An error will be reported in the build log. |
The <path> … </path> and <subpath> … </subpath> tags in the globaldomainconfig.xml files must be modified since they specify the absolute path to each component of each global domain. This XML file currently contains DOMAINPATH as a placeholder, which you must replace with the actual domain path components.
|
Tip: If the globaldomainconfig.xml file refers to domain directories that already exist, the domain build process in the following example will not overwrite these domains. Rather, they will be skipped. It is essential that the<path> and <subpath> tags contain paths that do not exist. |
Example:
<path>/u01/acusys/rpas/Domains/aip</path>
<subpath>/u01/acusys/rpas/Domains/aip/ldom0</subpath>
<subpath>/u01/acusys/rpas/Domains/aip/ldom1</subpath>
where /u01/acusys/rpas/Domains/aip does NOT currently exist.
|
Note: Before invoking the utility (described in Manipulate the Hierarchy Data, Part Two) to create the AIP domain, there is one system environment variable clients might want to consider. This environment variable can be configured to control certain behaviors of the RPAS Configuration Tools utility,rpasInstall, which does the majority of the work to build a domain. The variable name is RIDE_OPTIONS. Consult the RPAS documentation for more information about various options that can be configured by customizing the RIDE_OPTIONS variable. |
The AIP Package files must be updated with the newly created required hierarchy and configuration XML files as follows:
Repackage the <AIP_Installer>/aip/aip/aip_install/aip.tar.zip file with the following newly created files from the $AIPDOMAIN/input directory:
prod.dat
whse.dat
hspl.dat
loc.dat
prof.dat
dsp.dat
ssp.dat
Repackage the <AIP_Installer>/aip/aip/aip_install/aip.tar.zip file using the following commands:
cd <AIP_Installer>/aip/aip/aip_install/input
cp $TEST_AIPDOMAIN/input/prod.dat .
cp $TEST_AIPDOMAIN/input/whse.dat .
cp $TEST_AIPDOMAIN/input/hspl.dat .
cp $TEST_AIPDOMAIN/input/loc.dat .
cp $TEST_AIPDOMAIN/input/prof.dat .
cp $TEST_AIPDOMAIN/input/ssp.dat .
cp $TEST_AIPDOMAIN/input/dsp.dat .
cd <AIP_Installer>/aip/aip/aip_install
tar -cf aip.tar input configuration domain_build
zip aip.tar.zip aip.tar
It is important for the domain build process, described in the next section, to find the customer hierarchy data in the <AIP_Installer>/aip/aip/aip_install/input directory and the globaldomainconfig.xml file in the <AIP_Installer>/aip/aip/aip_install/domain_build/AIP/config directory.
|
Note: Theaip.tar.zip file does not have to be repackaged in order to run the domain build independently. Nevertheless, it is suggested that the aip.tar.zip file be repackaged so that the entire AIP-RPAS installer can be run again in the future with the end result of an AIP-RPAS domain that contains customer data. |
Once the various configuration files and hierarchy files are customized, the temporary AIP-RPAS domain can be deleted and the final AIP-RPAS domain can be built. Invoke the build_aip_domains.ksh script to initiate the AIP domain build process manually. There is no need to go through the Installer to build the domain. This script is located in the $RPAS_HOME/bin directory. Make sure that this directory is in the $PATH environment variable of the UNIX account running the batch. If you have run retaillogin.ksh previously, then $RPAS_HOME/bin should be in your $PATH.
The build_aip_domains.ksh requires several command line options listed in the following table:
| Option | Option Description | Argument Value |
|---|---|---|
| -d | Domain source | $AIP_INSTALL/domain_build |
| -c | Configuration | $AIP_INSTALL/configuration |
| -i | Input | $AIP_INSTALL/input |
| -l | Log file | < any path and filename to an output log file > |
Example execution command:
build_aip_domains.ksh -d $AIP_INSTALL/domain_build -c $AIP_INSTALL/configuration -i $AIP_INSTALL/input -l $AIP_INSTALL/aip_build.log
This build script internally calls the appropriate RPAS installation programs to perform the following:
Create an RPAS global domain in the paths/locations specified by the configuration files. If domain components already exist in the specified locations, they will not be overwritten.
Register all measures, templates, and rules that were created using the RPAS Configuration Tools in the domain.
Establish the partitioning mapping according to the partitioning information specified in the globaldomainconfig.xml file.
Verify the domain build process for errors after the installation programs are complete. In the event that errors occurred in the domain build, you will be alerted and should check the log file to determine the source of the error.
The log file can be scanned for errors by using any text editor or UNIX text search commands. If an error occurs, it will most likely contain the word error, so the following command might be useful for detecting if any build errors occurred:
grep -i error $AIP_INSTALL/build_logs/*.log
Other keywords to search for are:
<E
not found
exception
|
Note: When viewing or searching through the build log, consult the Oracle Retail Advanced Inventory Planning Release Notes. The Release Notes contain all known issues associated with this release. |
|
Note: Once the domain build has successfully completed, you must preserve the$AIP_INSTALL directory. The domain configuration files are automatically copied inside the domain after a successful build. However, the $AIP_INSTALL directory is used for AIP patches. |
Once the domain build is completed, the sample positions from the Network Group hierarchy should be removed. This is done in order that there will be no sample positions in this hierarchy once the AIP Oracle export provides new hierarchy positions during daily AIP-RPAS batch.
Remove the Network Group hierarchy positions using the following commands:
touch $TEST_AIPDOMAIN/input/ntwg.dat
loadHier -d $TEST_AIPDOMAIN -load ntwg -checkParents -purgeAge 0
The -purgeAge option indicates that all positions in the hierarchy older than the number specified (in days) should be removed from the hierarchy. Using 0 ensures all positions are removed, and since there are no positions in the ntwg.dat file to be loaded, the hierarchy is effectively cleared.
The end result after executing the steps in the previous sections is an AIP-RPAS domain with the customer-specified arrangement of product subclasses per local domain, together with the following arrangement of hierarchies:
Table 3-3 Customer Data Hierarchies
|
Calendar |
Supplier |
Source Stocking Point |
|
Product |
Location |
Destination Stocking Point |
|
Warehouse |
Profile |
Advertising |
Table 3-5 Default / Sample Hierarchies
|
Baseline/Contingency Stock |
User Specified Allocation |
|
Sequence Number |
Interval |
|
Note: The empty hierarchies will be populated during a full AIP-RPAS batch run. The data for these hierarchies will be supplied by the AIP Oracle export that will be loaded into the AIP-RPAS domain. |
RPAS global domains contain internal pointers that specify the disk location of the master and local domains. The master domain must know where the local domains exist on disk, and the local domains must each know where the master domain exists.
After the AIP domain is created, you can move it to a different location. However, the following process must be followed to copy or move the domain components in order to update the newly copied/moved domain component directories.
If the local domain directories are subdirectories of the master domain directory, or if you want your local domains to be moved inside the master domain, perform the following:
Use the RPAS copyDomain utility. Refer to the Oracle Retail Predictive Application Server Administration Guide for the RPAS Classic Client or the Oracle Retail Predictive Application Server Administration Guide for the RPAS Fusion Client for details about this utility. This utility updates the internal pointers between master and sub-domains. It converts the pointers between master and local domains from absolute UNIX paths to relative paths. The master domain refers to local domains by directory name only (for example, ldom0), and the local domains refer to the master domain by ”..”.
If the sub-domain directories are not subdirectories of the master domain, and you wish to preserve this spread-out global domain set, but at the same time you wish to move a local domain or the master domain, use the RPAS moveDomain utility. This utility will move some or all parts of an RPAS domain by specifying the new paths in an XML file. Refer to the Oracle Retail Predictive Application Server Administration Guide for the RPAS Classic Client or the Oracle Retail Predictive Application Server Administration Guide for the RPAS Fusion Client for details about this utility.
|
Note: Previous versions of AIP contained anupdateGlobalPointers utility. This utility is deprecated in AIP due to increased functionality in the copyDomain and moveDomain RPAS utilities. |
The RPAS server installation package includes the following RPAS clients:
| RPAS Client | Description |
|---|---|
| RPAS Classic Client | A Windows-based client interface for end users and system administrators of an RPAS domain. |
| RPAS Fusion Client | A Web-based client developed using Oracle Application Development Framework (ADF). It includes the features available in the RPAS Windows-based client and meets the scalability requirements set for the RPAS platform. |
Each RPAS client installation package includes a separate installer to help you install the client. For more information on installing the RPAS clients, refer to the Oracle Retail Predictive Application Server Installation Guide.
RPAS Classic Client
The RPAS Classic Client must be configured to point to one of the newly created domains. Refer to the Oracle Retail Predictive Application Server Installation Guide for instructions on how to attach the domains to the client. Double-click the EConfigure.exe file to define the RPAS Client configuration.
RPAS Fusion Client
The AIP installation software enables you to install the taskflow and online help files for the RPAS Fusion Client. In order to install the taskflow files, the RPAS Fusion Client must already be installed. For more information on installing the RPAS Fusion Client, see the Oracle Retail Predictive Application Server Installation Guide.
Each RPAS client installation package includes a separate installer to help you install the client. For more information on installing the RPAS clients, refer to the Oracle Retail Predictive Application Server Installation Guide.
During the RPAS Fusion Client installation, the installer automatically sets up the RPAS domain connection configurations in the ProfileList.xml file. If you choose to set up the domain connection after the installation or set up an additional domain, you must manually set up the connection. For more information, see the Oracle Retail Predictive Application Server Administration Guide for the RPAS Fusion Client.
Refer to other chapters in this Oracle Retail Advanced Inventory Planning Implementation Guide and the Oracle Retail Advanced Inventory Planning Operations Guide for information on loading data into the domains and for practical use of the AIP batch domains.
The AIP-RPAS domain does not contain any accounts. The domain build process for previous versions of AIP and RPAS created the default accounts of adm and usr during the domain build. These accounts are not created in the domain build process for this release.
For details and instructions on how to create admin and user accounts for the AIP-RPAS domain, refer to the:
Oracle Retail Predictive Application Server Release Notes.
Oracle Retail Predictive Application Server Administration Guide for the RPAS Classic Client or the Oracle Retail Predictive Application Server Administration Guide for the RPAS Fusion Client for the description of the usermgr utility in the ”Operational Utilities” chapter.
Oracle Retail Predictive Application Server Administration Guide for the RPAS Classic Client or the Oracle Retail Predictive Application Server Administration Guide for the RPAS Fusion Client chapters on ”User Maintenance” and ”System Administration”.