| Oracle® Retail Merchandising System User Guide 14.1 E55773-01 |
|

 Previous |
 Next |
Inventory Control is one of the foremost functions of RMS. Proper inventory control allows the retailer to have optimum and accurate inventory at various entities of business like stores and warehouses. Span of inventory control ranges from receiving merchandise from suppliers and managing during the time it is on retailer's premises to supplying to franchise partners and returning to vendor.
RMS facilitates end to end management of inventory including receiving, transfer, adjustments, reconciliation, mass return transfers, return to vendor, franchise order management, stock counts, item transformation, and work order maintenance.
This chapter contains the following topics to help understand and manage inventory control in RMS:
You can view and maintain shipments by shipment number. You can also view outstanding shipments for a purchase order.
Shipments originate from a variety of sources:
ASN shipments: Shipments are created automatically from advance shipping notices (ASN) that are received from suppliers through electronic data interface (EDI).
System: Shipments are transmitted by an external system, such as a warehouse management system.
System ASN: Shipments are created automatically when a shipment is received before the ASN is received through EDI or from an external system. Items may be received online against shipments that are created by system ASN.
System UCC-128: Shipments for cartons are transmitted by an external system. Cartons and their associated items may be received online against shipments created by UCC-128.
ASN UCC-128: Shipments are created automatically from carton-level ASNs that are received from suppliers through EDI.
In a multi-channel environment, suppliers and external systems are aware of warehouses at the physical warehouse level. Within RMS, shipments to warehouses are maintained at the virtual warehouse level. When quantities are unspecified at the virtual warehouse level, the quantities are distributed among the virtual warehouses based on the default distribution rule.
See "View appointment/location details" in the Purchasing chapter
See "View outstanding shipments for a purchase order" in the Purchasing chapter
Two types of calendars are supported by the system:
Normal (Julian) calendar: Results in uneven yearly, quarterly, and monthly comparisons since calendar dates generally fall on different days from one year to the next. The number of weekdays differs from one year to the next. For example: There may be four Saturdays in a month one year, but five Saturdays the next year. A month may have between 28 and 31 days. Once every four years, an extra day is added to compensate for leap year.
Retail (4-5-4) calendar: Each quarter contains 13 full weeks divided into a 4-5-4 format. That is, the first month of the quarter has four weeks, the second month has five weeks, and the third month has four weeks. The number of days in the retail year, except leap year, equals only 364 days. To compensate for the missing day in non-leap years, an extra week is added to the calendar once every seven years. The retail calendar provides consistent inclusion of weekends for yearly comparisons by month and a consistent day for month-end processing.
Sales history is always based on the retail calendar. The calendar begins at least 18 months prior to the earliest stock ledger and sales history data. The calendar also contains dates at least three years into the future.
The calendar is set up by the system administrator. You can identify the half-year periods used in the system. Half-year periods are entered in the format YYYYn, where YYYY is the four-digit year and n is the period. The period may be 1 or 2. For example: The first half of 2002 is entered as 20021.
See "Edit Halves" in the System Administration chapter
See "View Halves" in the System Administration chapter
Navigate: From the main menu, select Inventory > Stock Count. The Stock Count Search window opens. Search for and retrieve a stock count by selecting Unit Variance and Adjustment in the Action field. The Stock Count Variance window opens.
In the Group Type field, select the type of location or locations.
In the Value field, enter the ID of the location, or click the LOV button and select the location.
|
Note: The Value field is enabled if you select Store or Warehouse in the Group Type field. |
Click Apply. The location or locations are added to the table.
From the Options menu, select Create Trial Variance Report.
When prompted to wait for the report, click Yes.
Print the report.
Click OK to save your changes and close the window.
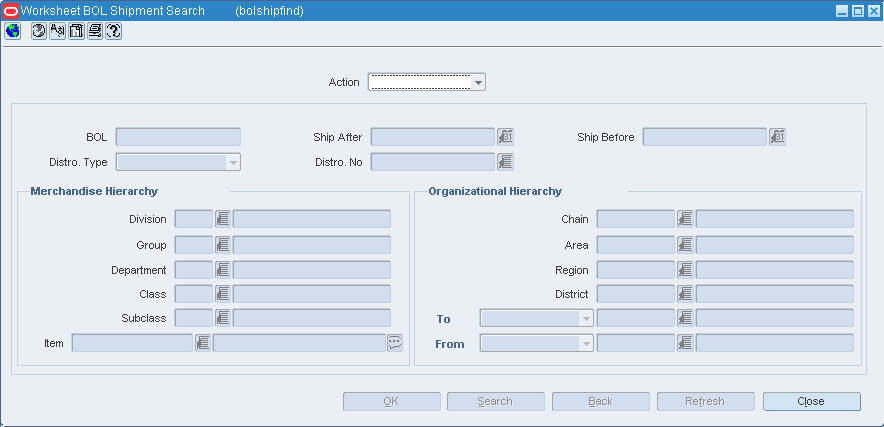
The Worksheet BOL Shipment window allows multiple distributions (transfers and allocations) to be included in a single BOL shipment. This form allows the user to search for a BOL shipment.
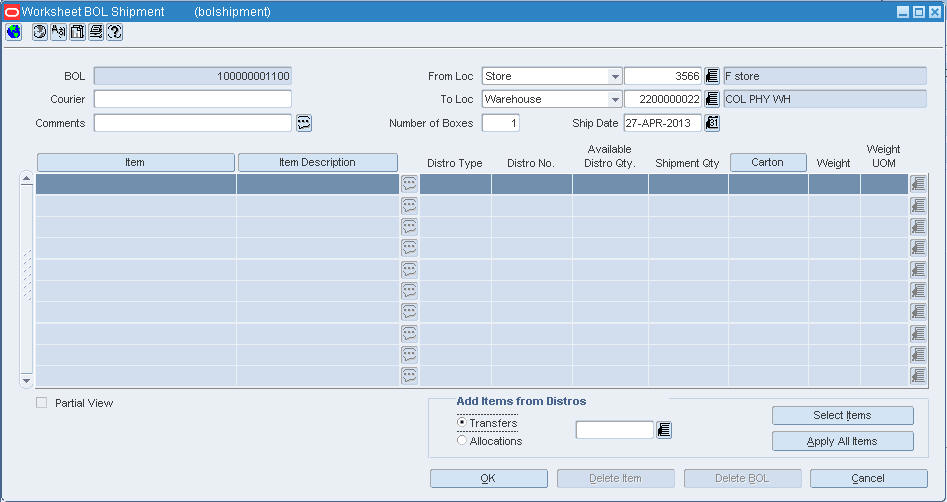
The Worksheet BOL Shipment window allows multiple distributions (transfers and allocations) to be included in a single BOL shipment. This form allows the user to build a BOL shipment over time and ship it once complete.
Navigate: Main menu > Inventory > Shipping > Worksheet BOL Shipment. The Worksheet BOL Shipment Search window opens.
To create a worksheet:
In the Action field, select New.
Click OK. The Worksheet BOL Shipment window opens.
In the From Loc, select either the Store or Warehouse from the list.
Enter the store ID or select from the list.
Enter the store or warehouse, or select it from the LOV.
In the To Loc, select either the Store or Warehouse from the list.
Enter the store or warehouse, or select it from the LOV.
In the Courier field, enter the courier name, if applicable.
In the Comments field, enter comments, if any.
In the Number of Boxes field, enter the number of boxes that are in the shipment.
In the Ship Date field, select the date from the list.
In the Add Items from Distros, select either the Transfers or Allocations option.
Enter the Transfers or Allocations, or select it from the list.
Click Select Items. The Add Items from Distro window opens.
Select the items.
Click OK. The Worksheet BOL Shipment window opens.
Click Apply All Items.
Click OK to save and close the window.
A stop shipment list is used to designate a date range when stores can receive allocated shipments. Stop shipment date ranges may be for individual stores or for entire location lists of stores.
Navigate: From the main menu, select Control > Setup >Stop Shipment Lists > Edit. The Stop Shipment window opens.
Click Add.
Select a location type of Store or Location List.
Enter a store/location list ID, or click the LOV button and select a store/location list.
|
Note: If you select a location list that contains a warehouse, a message will be displayed stating that the location list cannot be used to create a stop shipment list. |
Enter a Department ID, or click the LOV button and select a department.
Enter a Class ID, or click the LOV button and select a class.
Enter a Subclass ID, or click the LOV button and select a subclass.
Enter an Item ID, or click the LOV button and select an item.
Enter a Start date, or click the calendar button and select the start date.
Enter an End date, or click the calendar button and select the end date.
Click Apply to add the new record.
|
Note: If any required fields in the apply block are empty, an error is flagged. |
Navigate: From the main menu, select Control > Setup >top Shipment Lists > Edit. The Stop Shipment window opens.
The Scheduled Item Maintenance window is used to view or edit lists of item list/location list links. After linking an item list with a location list, you may specify a date to use the item/location list as part of a scheduled item maintenance update.
You may link an item list to multiple location lists. If the location lists contain identical locations, a message opens which states that you are creating duplicate links. You may click Yes to create the link, or No to cancel the link.
See "Add an item list/location list link" in Foundation Data chapter
See "Edit an Item List/Location List Link" in the Item Maintenance chapter
See "Delete an item list/location list link" in Foundation Data chapter
See "View an item list/location list link" in Foundation Data chapter
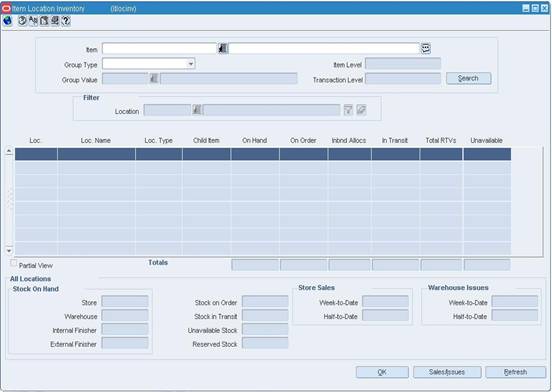
The Store Sales/Warehouse Issues window allows you to view weekly sales history or warehouse issues for an item at one or multiple stockholding locations. The monetary amounts appear in the primary currency of the company. The quantities appear in the standard unit of measure. All details appear at the transaction level. If you search for an item that is above the transaction level, the details are summarized at the transaction level.
Navigate: From the main menu, select Inventory > Item Sales/Issues by Location. The Store Sales/Warehouse Issues window opens.
|
Note: You can also access this window from the Item Master window, Item Children window, Item Location window, and Item Location Inventory window. Some search criteria are automatically filled in depending on how you access the Store Sales/Warehouse Issues window. |
In the Item field, enter the item number of the item, or click the LOV button and select the item.
In the Group Type field, select a grouping mechanism.
In the Group Value field, enter the ID of the specific location or group, or click the LOV button and select the group.
In the Sales Type area, select the type of sales to be included in the results.
|
Note: The Sales Type area is enabled if you select a group type that pertains to stores. |
In the Date Range area, enter the range of dates to be included in the results, or click the calendar buttons and select the dates.
Click Search. The sales history or warehouse issues appear depending on what you selected in the Group Type field.
To filter the results by location:
In the Location field of the Filter area, enter the ID of the location, or click the LOV button and select the location.
Click the filter button. The sales history or warehouse issues for the selected location appear.
Click the clear filter button to redisplay the previous sales history or warehouse issues.
To view details for additional weeks, drag the horizontal scroll bar to the right.
Click OK to save your changes and close the window.
Click Refresh to view sales history or warehouse issues for another item, or click OK to exit.
The Reclassification View/Maintain window allows you to view and delete the items that are to be affected by the current reclassification event.
View "Delete an item from a reclassification event" in the Item Maintenance chapter
View items affected by a reclassification event
The Reclassification View window allows you to edit, view, or delete the reclassification events that have not been processed yet.
Delete a reclassification event
View reclassification events
The Region Maintenance window allows you to create, edit, view, and delete a region in the organizational hierarchy. A region is below the area and above the district in the organizational hierarchy. Typically, the region is used to define a geographical grouping within the organization. A region can belong to only one area within the organizational hierarchy.
You can associate location traits with a region. Location traits that are applied to a region are applied automatically to the districts and stores within the region.
Maintain a region
View regions
After entering user and group information, you may use RMS to create, maintain, and view Regionality relationships. The Regionality form is used to associate corporate users or groups of users with any of the following:
Locations
Groups of locations
Suppliers
Departments
Regionality uses the relationships that are created using the Regionality window to create combinations of Groups, Locations, Supplier and Departments at a detailed level.
The groups used for Regionality maintenance can be the same existing groups that were set up for RMS security. Different groups can be set up and used by Security or Regionality; however, since Regionality is designed to provide a list of people responsible for an area, the two should be closely related. Once groups are set up, users must be assigned to the groups.
A business role can be associated with a specific group, or the Business Role field can be left blank. A group can have only 1 business role, but a business role can be associated with an unlimited number of groups.
Once groups and user/group relationships exist, you can create regionality relationships. The first and most fundamental relationship is the relationship between groups and locations. A group must be set-up to have access to different locations by using the levels of the organizational hierarchy. These different levels include: company, chain, area, region, district, store and warehouse. If there are any changes made to the organizational hierarchy (for example, moving a district to a new region), or if new stores or warehouses are added to the system, these changes will automatically affect regionality.
Once group/location relationships are established, there are a number of other relationships that can be set-up for these groups and locations. These relationships are:
Suppliers: A group or location is responsible for a supplier (without regard to departments).
Supplier/departments: A group/location is responsible for a particular supplier and department combination.
Departments: A group/location is responsible for an entire department (without regard to suppliers).
The three relationships can overlap. For example, you could set up a supplier relationship for supplier A and then set-up a supplier/department relationship for supplier A/department 1000.
The top portion of the window is used to enter search criteria. You can search based on a group or a business role, locations (any level of the organizational hierarchy as well as warehouse), a supplier number, and/or a department.
The following paragraphs offer a general overview of functionality for the Regionality Maintenance form. For more detailed information, click one of the links below:
Group versus Business Role When searching on a business role, all groups that have that particular role will be displayed in the results. You can search based on a group or a business role, but not both. Once one field is entered with information, the other will be disabled. You may delete the information in either field to enable the other.
Entering Data To start entering data, you must first enter group/organizational hierarchy relationships. Once at least one group/organizational hierarchy has been entered, the additional relationships (supplier, supplier/department, department) may be entered as well
Searching When a search is executed, all of the different blocks of data will be queried (for example, group/locations, supplier, supplier/departments, and departments). Each time you choose a different group/location relationship, the supplier, supplier/department, and department blocks will be updated to display data for that group and location.
Editing Within each block of data (group/organizational hierarchy, supplier, supplier/department, and department), you may add and delete records by using the Add and Delete
Add a regionality relationship
Edit a regionality relationship
View a regionality relationship
Navigate: From the Main Menu, select Control > System > Regionality > Regionality Matrix > View. The Regionality Maintenance window opens.
Enter the appropriate search criteria. Click Query to view the group/location records that match your criteria.
|
Note: You can query by either Group ID or Business Role. Selecting one disables the other. |
Click OK to close the window.
The Missing Documents window allows you to edit and view the documents that are required by the Customs agency for each order and item combination. These documents are accumulated along the supply chain. You can track missing documents in both the Transportation module and the Customs Entry module.
Add a missing document to a customs entry
Add a missing document to a transportation record
Maintain missing documents for a customs entry
Maintain missing documents for a transportation record
View missing documents for a customs entry
View missing documents for a transportation record
Navigate: Main menu > Inventory > Shipping > Order Shipment. The Purchase Order Shipment window opens.
To create a purchase order shipment:
In the Order field, enter an order or select an order from the list.
In the Ship Date field, enter a date.
In the ASN field, enter an ASN number.
In the Location Type field, select a location type.
|
Note: When creating an import order, make sure that the import country and the import location are the same. |
In the Location field, enter a location or select a location from the list.
In the Number of Boxes filed, enter the number of boxes.
Click Select Items to Ship. A list of items appear in the item list.
Click OK to save the item and close the window.
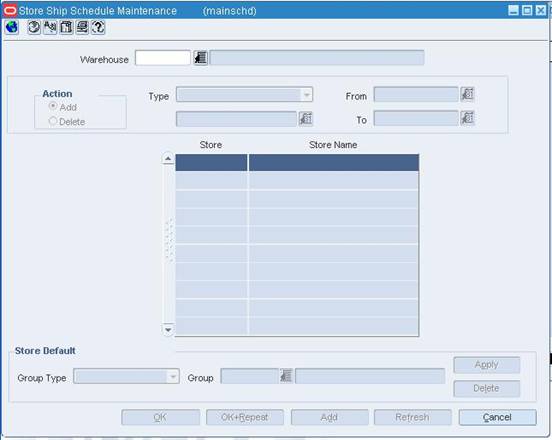
Navigate: From the main menu, select Control > Setup > Store Ship Schedule > Store Ship Schedule. The Store Ship Schedule Maintenance window opens.
In the Warehouse field, enter the ID of a physical warehouse, or click the LOV button and select the warehouse.
In the Action area, select a task:
To add stores to the schedule, select the Add option.
To delete stores from the schedule, select the Delete option.
Select the ship dates:
To schedule shipments for a specific date, select Specific Date in the Type field. Then enter the date in the Value field, or click the calendar button and select the date.
To schedule shipments for a specific day at regular intervals, select Every, Every Second, Every Third, or Every Fourth in the Type field. In the Value field, select the day. Then enter the start and end dates in the From and To fields, or click the calendar buttons and select the dates.
To schedule daily shipments for a range of dates, select All Dates in Range in the Type field. Then enter the start and end dates in the From and To fields, or click the calendar buttons and select the dates.
Select the stores:
Click Add. The Apply area becomes enabled.
In the Group Type field, select the grouping mechanism.
In the Value field, enter the ID of the store or group, or click the LOV button and select the location or group.
Click Apply. The stores are added to the table.
Click OK to save your changes and close the window.
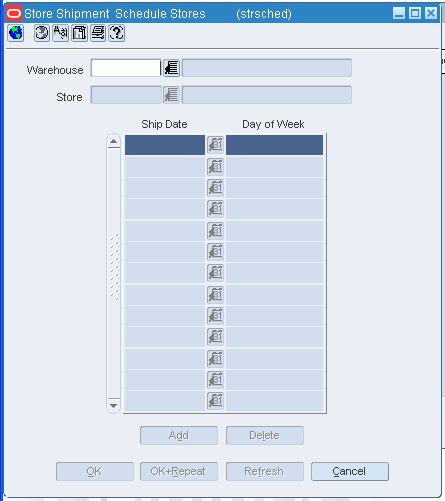
Navigate: From the main menu, select Control > Setup > Store Ship Schedule > Ship Schedule by Store > Edit. The Store Shipment Schedule Stores window opens.
In the Warehouse field, enter the ID of the physical warehouse, or click the LOV button and select the warehouse.
In the Store field, enter the ID of the stockholding store, or click the LOV button and select the store. The ship dates on the schedule appear.
To add a ship date to the schedule:
Click Add. The next available line is enabled.
In the Ship Date field, enter the date, or click the calendar button and select the date.
To delete a ship date from the schedule:
Select a ship date and click Delete.
When prompted to delete the record, click Yes.
Click OK to save your changes and close the window.
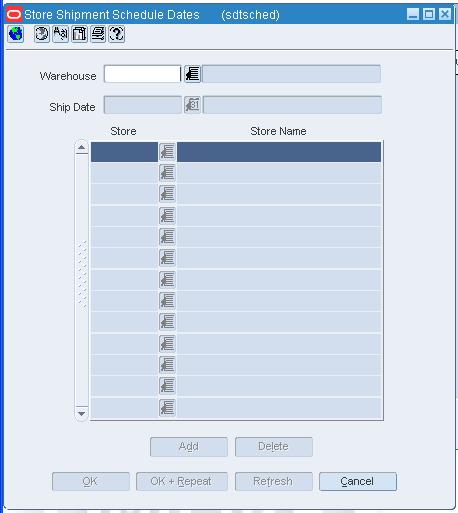
Navigate: From the main menu, select Control > Setup > Store Ship Schedule > Ship Schedule by Ship Date > View. The Store Shipment Schedule Dates window opens.
In the Warehouse field, enter the ID of the warehouse, or click the LOV button and select the warehouse.
In the Ship Date field, enter the date, or click the calendar button and select the date. The stores on the schedule appear.
Click OK to close the window.
Navigate: From the main menu, select Control > Setup > Store Ship Schedule > Ship Schedule by Store > View. The Store Shipment Schedule Stores window opens.
In the Warehouse field, enter the ID of the warehouse, or click the LOV button and select the warehouse.
In the Store field, enter the ID of the store, or click the LOV button and select the store. The ship dates on the schedule appear.
Click OK to close the window.
Navigate: From the main menu, select Ordering > Orders. The Order Search window is displayed.
Search for and retrieve a purchase order in View mode. The PO Header Maintenance window opens.
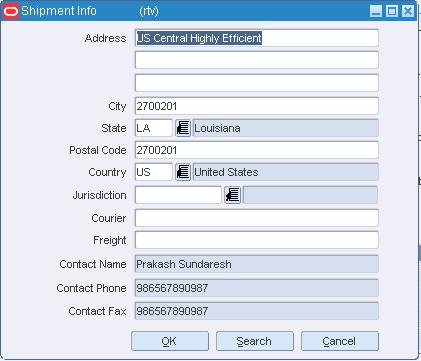
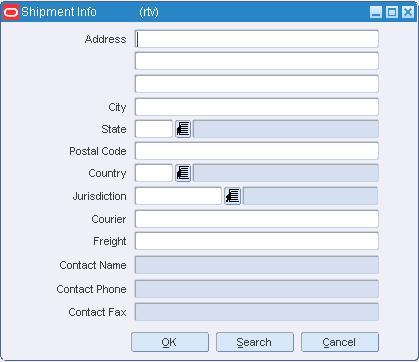
From the options menu, select Shipping. The Order Shipping Information window opens.
Click OK to close the window.
Navigate: From the main menu, select Action > Organizational Hierarchy. The Organization Hierarchy Main Form window opens. Search for and retrieve a store in View mode. The Store Maintenance window opens. From the Options menu, select Delivery Schedule. The Delivery Schedule window opens.
or
From the main menu, select Action > Organizational Hierarchy. The Organization Hierarchy Main Form window opens. Search for and retrieve a Warehouse in View mode. The Warehouse Maintenance window opens. From the Options menu, select Delivery Schedule. The Delivery Schedule window opens.
In the Source Type field, select the type of source for the delivery schedule.
In the Source field, enter the ID of the supplier or warehouse, or click the LOV button and select the supplier or warehouse.
To view exceptions for a delivery schedule, click Exceptions. The Exceptions window opens.
Click OK to close the window.
Navigate: From the main menu, select Control > Setup > Store Ship Schedule > Ship Schedule by Ship Date > Edit. The Store Shipment Schedule Dates window opens.
In the Warehouse field, enter the ID of the physical warehouse, or click the LOV button and select the warehouse.
In the Ship Date field, enter the date, or click the calendar button and select the date. The stores on the schedule appear.
To add a stockholding store to the schedule:
Click Add. The next available line is enabled.
In the Store field, enter the ID of the store, or click the LOV button and select the store.
To delete a store from the schedule:
Select a store and click Delete.
When prompted to delete the record, click Yes.
Click OK to save your changes and close the window.
The Shipment window allows you to view the details of a shipment. You can access additional windows in order to view details regarding a selected item and details regarding the purchase order, appointment, receipt details, or transfer associated with shipment.
Navigate: From the main menu, select Inventory > Shipping > Shipments. The Shipment Search window opens.
Search for and retrieve a shipment in View mode. The shipment opens in the Shipment window.
To view additional details about the shipment, select from the following options:
Click Appointments to view appointment information. The details appear in the Appointments window.
Click Receipt Detail to view updates that have occurred for the receipt. The details appear in the Receipt Detail window.
Click Item Detail to view item information. The details appear in the Item Maintenance window.
Click View Transfer to view transfer information. The details appear in the Transfer Maintenance window.
Click View Order to view purchase order information. The details appear in the PO Header Maintenance window.
Click OK to close the window.
The Purchase Order Shipment window allows the creation of shipment records for purchase orders.
The Store Shipment Schedule Dates window allows you to view and maintain the destination stores on a shipping schedule for a warehouse. The stockholding stores are maintained by ship date.
In a multi-channel environment, you can maintain shipping schedules at the physical warehouse level. The changes are automatically applied to all virtual warehouses within the physical warehouse.
The Store Shipment Schedule Stores window allows you to view and maintain the ship dates on a shipping schedule for a warehouse. The ship dates are maintained by stockholding store.
In a multi-channel environment, you maintain shipping schedules at the physical warehouse level. The changes are automatically applied to all virtual warehouses within the physical warehouse.
The Store Ship Schedule Maintenance window allows you maintain a shipping schedule for a warehouse. The shipping schedule can refer to one or more stockholding stores for one date or a range of dates.
In a multi-channel environment, you maintain shipping schedules at the physical warehouse level. Any changes are automatically applied to all virtual warehouses within the physical warehouse.
The Shipment Search window allows you to enter criteria in order to search for shipments and view the results of the search.
Navigate: From the main menu, select Inventory > Shipping > Shipments. The Shipment Search window opens.
Enter search criteria as desired and click Search, or click All Shipments to view all shipments. The Shipment Search window displays the shipments that match the search criteria.
Select a task:
To perform another search, click Refresh.
To display the details of a shipment, select a record and click OK. The details appear in the Shipment window.
Click Close to close the window.
Navigate: From the main menu, select Inventory > Receiving > Receiving Unit Adjustment. The Receiver Unit Adjustment window opens.
To search for a shipment, enter a number in the Shipment, or Order fields. The items associated with the shipment/order appear.
|
Note: The Physical Shipment field is enabled in a multi-channel environment. If you first enter a purchase order number in the Order field, you can restrict the number of shipments from which to choose. |
To search for a specific item on the shipment/order:
In the Item Type area, select the type of item number you want to search by.
In the Find area, enter the item number in the Item field, or click the LOV button and select the item. The appropriate item is highlighted.
In the Corrected field next to each item, enter the revised number of units received.
To view the total updates to the quantity received
Click Receipt Detail. The Receipt Detail window opens.
Receipt Detail Window
Click OK to close the window.
Click OK to save any changes and close the window.
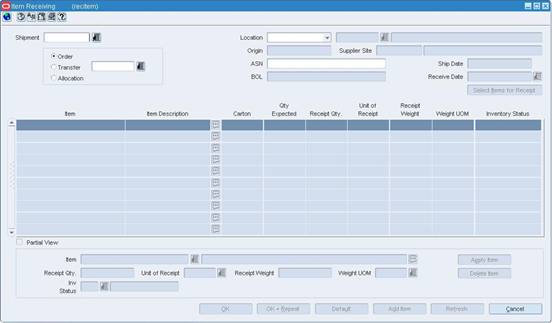
Navigate: Main menu > Inventory > Receiving > Item Receiving. The Item Receiving window opens.
To receive an item:
In the Shipment field, enter a shipment number, or click the LOV button and select the shipment.
In the Receive Date field, enter a date, or click the calendar button and select the date.
Click Select Items for Receipt. The list box populates with items that match the criteria.
In the Receipt Qty field, enter the quantity.
In the Unit of Receipt field, select the units, or click the LOV button and select the units.
Click Apply Item. The changes are saved to the shipment.
Click OK to save the information and close the window.
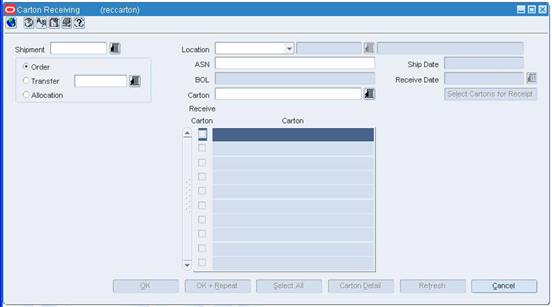
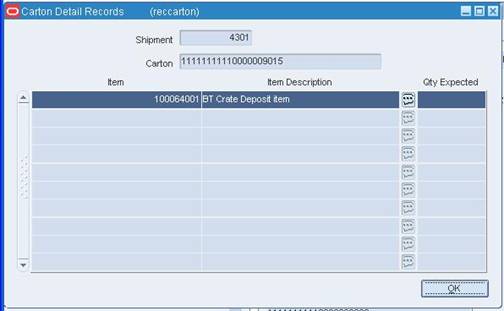
This window is used to receive shipments on carton-by-carton basis within a given shipment.
Navigate: Main menu > Inventory > Receiving > Carton Receiving. The Carton Receiving window opens.
To receive a carton:
In the Shipment field, enter the shipment number, or click the LOV button and select the number from the list.
In the Receive Date field, enter the date, or click the Calendar button and select a date.
Click Select Cartons for Receipt.
In the Receive Carton area, select the cartons to receive.
Click Carton Detail. The Carton Detail Records window opens.
Click OK. The Carton Detail Records window closes.
Click OK to save your data and close the window.
The Receipt Detail window allows you to view the updates made to the receipts for a shipment. The updates made to a receipt may occur before or after a receipt has been matched. There are two receipt types:
Receipt: The original document received at the warehouse indicating what merchandise has been received. Any changes made to the quantity before matching has occurred is changed on the receipt.
Adjustment: The addendum document created for any changes that occur after the receipt has been matched.
The Receiver Cost Adjustment window allows you to adjust the unit cost of an item by purchase order and location after it has been received. In a multi-channel environment, a cost change made for a virtual warehouse is automatically applied to all virtual warehouses within the same physical warehouse. You may be prompted to enter a new average cost for an item that does not have an old average cost.
You may want to adjust the average cost if any stock ledger transactions have occurred since the initial receipt of items on the current purchase order. To verify whether such transactions occurred, you can access the Transaction Data window. To adjust the average cost, you can access the Average Cost Adjustment window. The average cost for a pack item is calculated at the component item level.
Supplier-level history, the stock ledger, and open to buy receipts are adjusted automatically as a result of the cost change. If you are using Trade Management to import costs, it is assumed that all locations have the same cost value for an item. However, if the cost of items that are being imported DO vary by location, Trade Management will convert the cost values to an identical weighted average cost.
The Receiver Unit Adjustment window allows you to adjust the number of units already received by shipment/order. The stock ledger, supplier history, open-to-buy amounts, and average costs are automatically adjusted.
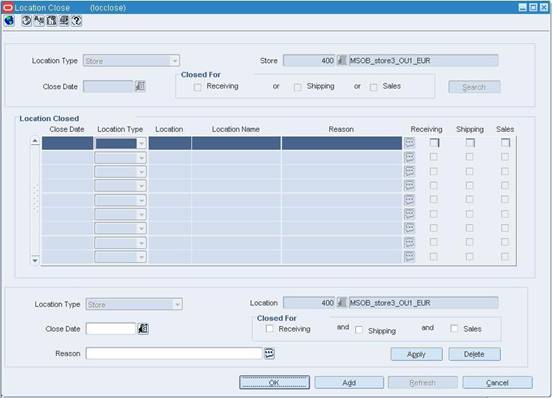
Activity schedules allow you to add, edit, and view dates on which a location is closed. You indicate that a group of locations or a single location is closed on a particular date. You can also specify what operations the locations can perform on that date. For example, you can specify that a store cannot perform sales on that date; that is, the store is closed for sales that day, but it can receive and ship shipments. When you view close dates for a group of locations, the locations are listed by date, and only the locations in the group with close dates are displayed. Non-stockholding stores can remain open or closed for sales only. By their nature, they cannot ship or receive items. In a multi-channel environment, changes made to a physical warehouse are applied to the virtual warehouses within the physical warehouse.
When the Use Location Activity Schedule system parameter is selected, the replenishment feature uses the location close schedule to dynamically calculate lead times for the items at the location. When a purchase order cannot be delivered to a location because it is closed, the lead time is calculated by taking the minimum lead time and adding additional days to reach the next valid delivery day. In effect, the lead time is extended until the next delivery day for the location.
Navigate: From the main menu, select Action > Organizational Hierarchy. The Organization Hierarchy Main Form window opens.
Select Store on the tree structure. The stores appear on the table.
Select a store and click View. The Store Maintenance window opens.
From the Options menu, select Activity Schedule. The Location Close window opens.
Click OK to close the window.
Navigate: From the main menu, select Action > Organizational Hierarchy. The Organization Hierarchy Main Form window opens.
Select Warehouse on the tree structure. The warehouses appear on the table.
Select a warehouse and click View. The Warehouse Maintenance window opens.
From the Options menu, select Activity Schedule. The Location Close window opens.
Click OK to close the window.
Navigate: From the main menu, select Action > Organizational Hierarchy. The Organization Hierarchy Main Form window opens. Select Store on the tree structure. The stores appear on the table. Select a store and click Edit. The Store Maintenance window opens. From the Options menu, select Activity Schedule. The Location Close window opens.
Select a record. The details appear in the Apply area.
Edit the activities and reason as necessary.
Click the Apply. The details are updated in the table.
Click OK to save your changes and close the window.
Click Add. The fields in the Apply area are cleared.
In the Close Date field, enter the date, or click the calendar button and select the date.
In the Closed For area, select the check box next to each activity for which the locations are closed.
In the Reason field, enter the reason why the location is closed.
Click Apply. The closing date is added to the table.
Click OK to save your changes and close the window.
Navigate: From the main menu, select Control > Setup > Location Activity Schedule > Location Closings > View. The Location Close window opens.
To view activity schedules for a subset of locations, enter filter criteria in the Search area.
|
Note: To display activity schedules for all locations, do not enter any search criteria. |
Click Search. The locations that match the criteria appear.
Click OK to close the window.
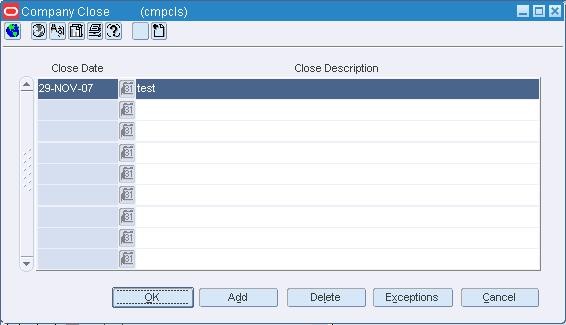
Navigate: From the main menu, select Control > Setup > Location Activity Schedule > Company Closings > View. The Company Close window opens.
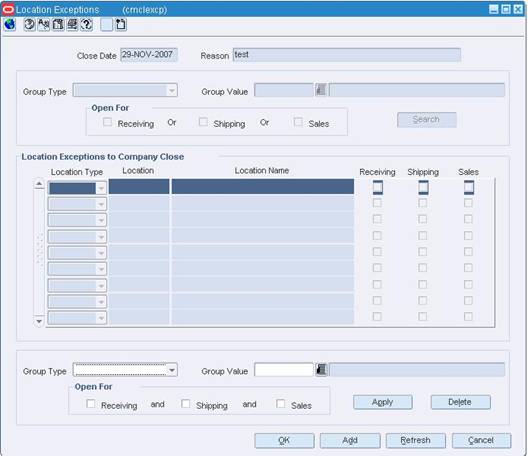
To view which locations are open when the company is closed, select a date and click Exceptions. The exceptions appear in the Location Exceptions window.
To view a subset of the exceptions:
Click Refresh. The fields in the Search area are enabled.
Enter the filter criteria in the enabled fields as necessary.
Click Search.
Click OK to close the windows.
Navigate: From the main menu, select Action > Organizational Hierarchy. The Organization Hierarchy Main Form window opens.
Select Warehouse on the tree structure. The warehouses appear in the table.
Select a warehouse and click View. The Warehouse Maintenance window opens.
To view the address:
Click Address. The Address window opens.
Click OK to close the Address window.
Click OK to close the window.
Navigate: From the main menu, select Actions > Organizational Hierarchy. The Organization Hierarchy Main Form window opens.
Select Warehouse on the tree structure. The warehouses appear in the table.
Select a warehouse and click Edit. The Warehouse Maintenance window opens.
From the Options menu, select Virtual Warehouse. The Virtual Warehouse Maintenance window opens.
From the Options menu, select Warehouse Department Parameters > View. The Warehouse Department Parameters window opens.
Click OK to close the window.
Navigate: From the main menu, select Action > Organizational Hierarchy. The Organization Hierarchy Main Form window opens.
Select Warehouse on the tree structure. The warehouses appear in the table.
Select a warehouse and click View. The Warehouse Maintenance window opens.
From the Options menu, select Virtual Warehouses. The Virtual Warehouse Maintenance window opens.
Click OK to close the window.
Navigate: From the main menu, select Control > Setup > Warehouse/Store Assignment > Create Assignments > View. The current assignments appear in the Warehouse Store Assignment window.
To view a subset of the assignments:
In the Warehouse field in the Filter area, enter the ID of a warehouse as necessary.
In the Assignment Date field, enter a date, or click the calendar button and select the date as necessary. Select an operator in the field just before the date field.
Click the filter button. The assignments that match the criteria appear.
To display all the assignments, click the clear button, then click the filter button.
Click OK to close the window.
Navigate: From the main menu, select Action > Organizational Hierarchy. The Organization Hierarchy Main Form window opens. Select Warehouse on the tree structure. The warehouses appear on the table. Select a warehouse and click Edit. The Warehouse Maintenance window opens. From the Options menu, select Activity Schedule. The Location Close window opens.
Select a record. The details appear in the Apply area.
Edit the activities and reason as necessary.
Click Apply. The details are updated in the table.
Click OK to save your changes and close the window.
Click Add. The fields in the Apply area are cleared.
Click Add. The fields in the Apply area are cleared.
In the Location Type field of the Apply area, select a grouping mechanism.
In the Location field, enter the ID of the group or location, or click the LOV button and select the group.
In the Close Date field, enter the date, or click the calendar button and select the date.
In the Closed For area, select the check box next to each activity for which the locations are closed.
In the Reason field, enter the reason why the location is closed.
Click Apply. The closing date is added to the table.
Click OK to save your changes and close the window.
Navigate: From the main menu, select Control > Setup > Location Activity Schedule > Location Closings > Edit. The Location Close window opens.
In the Search area, enter location, date, or activity criteria to restrict the search.
Click Search. The locations that match the criteria appear.
Select a record. The details appear in the Apply area.
Edit the activities and reason as necessary.
Click Apply. The details are updated on the table.
Click OK to save your changes and close the window.
Click Add. The fields in the Apply area are cleared.
In the Location Type field, select a grouping mechanism.
In the Location field, enter the ID of the specific group or location, or click the LOV button and select the group or location.
In the Close Date field, enter the date, or click the calendar button and select the date.
In the Closed For area, select the check box next to each activity for which the locations are closed.
In the Reason field, enter the reason why the locations are closed.
Click Apply. The selected locations are added to the table.
Click OK to save your changes and close the window.
Navigate: From the main menu, select Control > Setup > Location Activity Schedule > Company Closings > Edit. The Company Close window opens.
Click Add. The next available line is enabled.
In the Close Date field, enter the date, or click the calendar button and select the date.
In the Close Description field, enter the reason why the company is closed.
Select a date and click Delete.
When prompted to delete the record, click Yes.
To indicate which locations remain open when the company is closed, select a date and click Exceptions. The Location Exceptions window opens.
Click Add. The fields in the Apply area are enabled.
In the Group Type field of the Apply area, select a grouping mechanism.
In the Group Value field, enter the ID of the group or location, or click the LOV button and select the group.
In the Open For area, select the check box next to each activity for which the locations are open.
Click Apply. The locations are added to the table.
Click OK to save your changes and close the window.
Navigate: From the main menu, select Inventory > Stock Count. The Stock Count Search window opens.
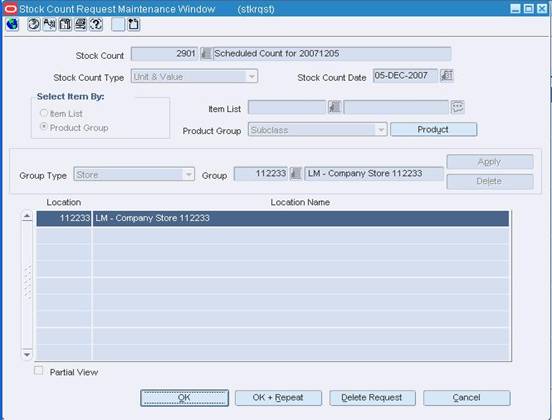
Search for and retrieve a stock count in View mode and with an Action Type of Request. The Stock Count Request Maintenance window opens.
To view the merchandise levels in a Unit and Value type of request:
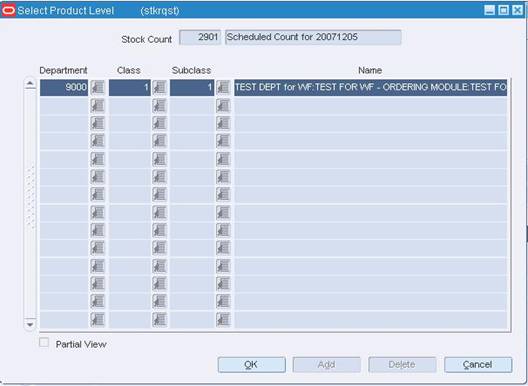
Click Product. The details appear in the Select Product Level window.
Click OK to exit the Select Product Level window.
Click OK to close the window.
Navigate: From the main menu, select Inventory > Stock Count. The Stock Count Search window opens. Search for and retrieve a stock count in Edit mode and with an Action Type of Request. The Stock Count Request Maintenance window opens.
In the Stock Count Date field, edit the scheduled date for the stock count as necessary.
Select a product.
Select product level.
Click OK. The Select Product Level window opens.
To add a merchandise level, click Add and enter the details on the next available line.
To delete a merchandise level, select a record and click Delete. When prompted to delete the record, click Yes.
Click OK to save your changes and close the window.
In the Group Type field, select a grouping mechanism.
In the Group field, enter the ID of the specific location or group, or click the LOV button and select the location or group.
Click Apply. The locations are added to the table.
Click OK to save your changes and close the window.
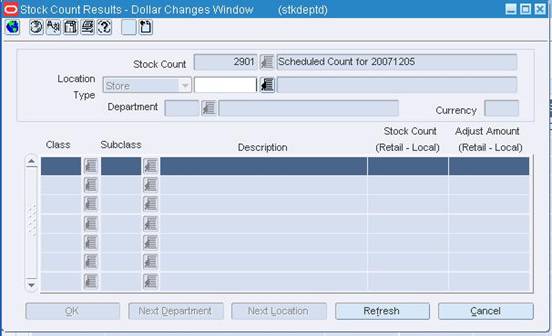
Navigate: From the main menu, select Inventory > Stock Count. The Stock Count Search window opens. Search for and retrieve a stock count by selecting Dollars Change/Ledger Adjust in the Action field. The Stock Count Results Dollar Changes window opens.
In the Location Type field, select the type of location.
In the Location field, enter the ID of the location, or click the LOV button and select the location.
In the Department field, enter the ID of the department, or click the LOV button and select the department.
To force the system to update the stock ledger, select Create Adjustments from the Options menu.
|
Note: The stock ledger is updated by a regularly scheduled batch program. |
In the Class field, enter the ID of the class, or click the LOV button and select the class.
In the Subclass field, enter the ID of the subclass, or click the LOV button and select the subclass.
In the Adjust Amount field, enter a positive number to increase the value, or a negative amount to decrease the value.
|
Note: Depending on system options, the monetary value may be either retail or cost. |
Click OK to save your changes and close the window.
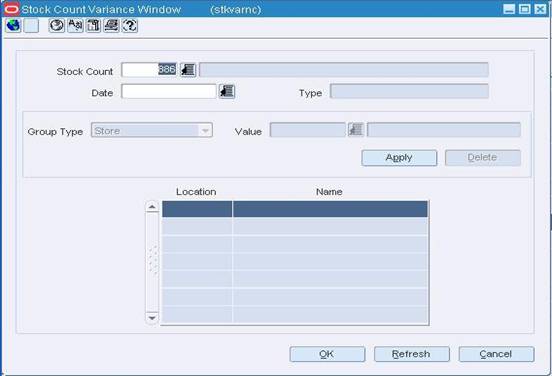
Navigate: From the main menu, select Inventory > Stock Count. The Stock Count Search window opens. Search for and retrieve a stock count by selecting Unit Variance and Adjustment in the Action field. The Stock Count Variance window opens.
In the Group Type field, select the type of location or locations.
In the Value field, enter the ID of the location, or click the LOV button and select the location.
|
Note: The Value field is enabled if you select Store or Warehouse in the Group Type field. |
Click Apply. The location or locations are added to the table.
From the Options menu, select Create Stock Adjustments.
When prompted to continue, click Yes.
|
Note: The adjustments are made by a regularly scheduled batch program. |
Click OK to save your changes and close the window.
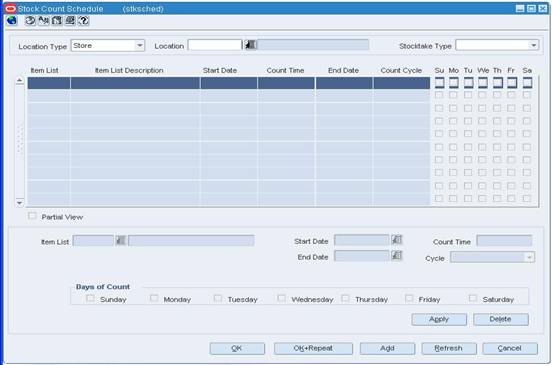
Navigate: From the main menu, select Inventory > Stock Count Schedule > View. The Stock Count Schedule opens.
In the Location Type field, select the type of location.
In the Location field, enter the ID of the location or the location list, or click the LOV button and select a location or location list.
In the Stocktake Type field, select how the stock count is counted. The stock counts that match the criteria appear.
Click OK to save your changes and close the window.
Navigate: From the main menu, Inventory > Stock Count Schedule > Edit. The Stock Count Schedule opens.
In the Location Type field, select the type of location.
In the Location field, enter the ID of the location or the location list, or click the LOV button and select a location or location list.
In the Stocktake field, select how the stock count is counted. The schedules for the current location appear.
Select a stock count schedule. The details appear in the Apply area.
In the Apply area, edit the enabled fields.
Click Apply.
Click OK to save your changes and close the window.
Navigate: From the main menu, select Inventory > Stock Count. The Stock Count Search window opens.
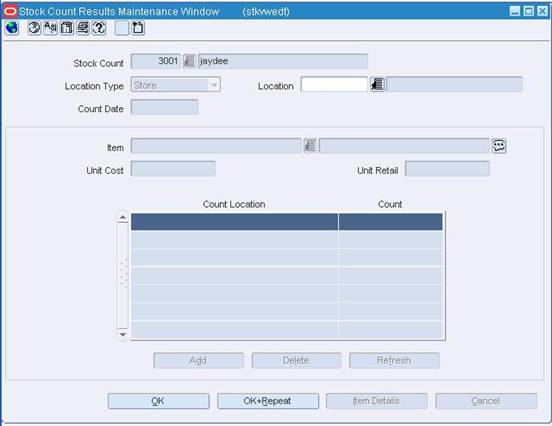
Search for and retrieve a stock count in View mode and with an Action Type of Count Quantity. The Stock Count Results Maintenance window opens.
In the Stock Count field, enter the ID of the unprocessed stock count, or click the LOV button and select the stock count.
In the Location Type field, select the type of location.
In the Location field, enter the ID of the specific location, or click the LOV button and select the location.
In the Item field, enter the item number of the item, or click the LOV button and select the item. The details of the stock count appear.
Click OK to save your changes and close the window.
Navigate: From the main menu, select Inventory > Stock Count. The Stock Count Search window opens. Search for and retrieve a stock count in Edit mode and with an Action Type of Count Quantity. The Stock Count Results Maintenance window opens.
In the Stock Count field, enter the ID of the unprocessed stock count, or click the LOV button and select the stock count.
In the Location Type field, select the type of location.
In the Location field, enter the ID of the specific location, or click the LOV button and select the location.
In the Item field, enter the item number of the item, or click the LOV button and select the item. The details of the stock count appear.
Edit the quantities in the Count field as necessary.
To delete a result from the stock count, select a record, and click Delete.
Click OK to save your changes and close the window.
Navigate: From the main menu, select Inventory > Stock Count. The Stock Count Search window opens. Search for and retrieve a stock count in New mode and with an Action Type of Count Quantity. The Stock Count Results Maintenance window opens.
In the Stock Count field, enter the ID of the unprocessed stock count, or click the LOV button and select the stock count.
In the Location Type field, select the type of location.
In the Location field, enter the ID of the specific location, or click the LOV button and select the location.
In the Item field, enter the item number of the item, or click the LOV button and select the item. The Count Location and Count fields are enabled.
In the Count Location field, enter the name of the storage area.
In the Count field, enter the number of units found in the storage area.
To add another storage area and quantity, click Add. Enter the details on the next available line is enabled.
Click OK to save your changes and close the window.
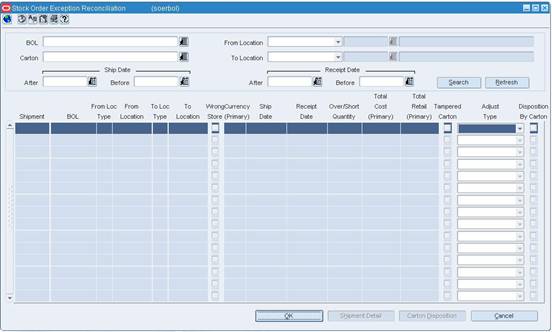
The Stock Order Exceptions Reconciliation window allows you to edit and view receipts where the item quantity does not match the actual quantity received. All open stock orders where the shipped quantity could not be reconciled to the received quantity appear in the results. Once you have searched for receipts you can create adjustments to account for the differences.
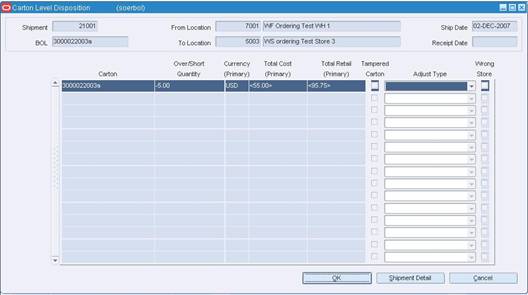
The Stock Order Exceptions Reconciliation by Carton window allows you to view carton level details for a stock order
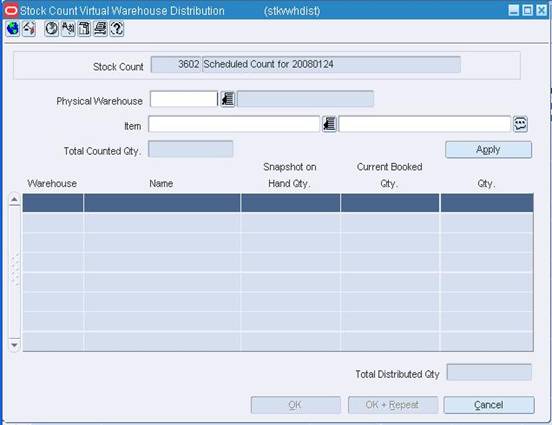
Navigate: From the main menu, select Inventory > Stock Count. The Stock Count Search window opens. Search for and retrieve a stock count by selecting Virtual Warehouse Distribution in the Action field. The Stock Count Virtual Warehouse Distribution window opens. Select Stock Count VWH Distribution from the Options menu. The Stock Count Virtual Warehouse Distribution window opens.
|
Note: You can also access the Stock Count Virtual Warehouse Distribution window from the Stock Count Results Maintenance window. |
In the Physical Warehouse field, enter the ID of the physical warehouse, or click the LOV button and select the physical warehouse.
In the Item field, enter the ID of the item, or click the LOV button and select the item.
Click Apply. The virtual warehouses associated with the current physical warehouse appear.
Edit the quantities for the virtual warehouses as necessary.
Click OK to save your changes and close the window.
Navigate: From the main menu, select Inventory > Stock Order Exception Reconciliation. The Stock Order Exception Reconciliation window opens.
In the filter area, enter the search criteria as necessary, or click the LOV button or calendar button and select the appropriate information.
Click the filter button. The items that match the criteria appear in the details frame.
In the Adjust Type field, select the method you want to use to reconcile the difference between the stock order and the receipt.
|
Note: To view details of a shipment, click Shipment Detail. The Shipment window opens. |
Click OK to save any changes and close the window.
Select a record that has cartons.
Click Carton Disposition. The Carton Level Disposition window opens.
In the Adjust Type field, select the method you want to use to reconcile the difference between the carton and the receipt.
To view the details of a shipment, click Shipment Detail. The Shipment window opens.
Click OK to close the window.
Click OK to save any changes and close the window.
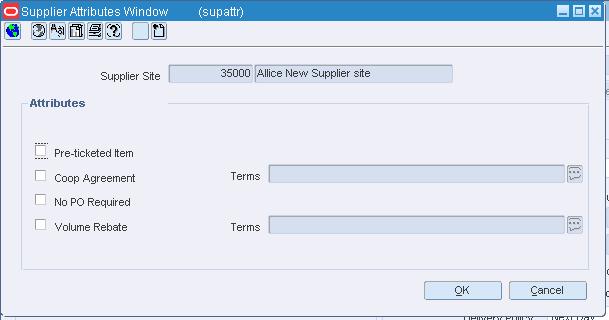
Navigate: From the main menu, select Control > Supplier > Maintenance. The Supplier Search window opens. Search for and retrieve a supplier site in Edit mode. The Supplier Maintenance window opens.
From the Options menu, select Attributes. The Supplier Attributes window opens.
Enter or select the attributes that apply to the current supplier.
Click OK to save your changes and close the window.
The Customs Entry Header window allows you to create, edit, and view a customs entry. From this window, you can access forms, protests, timelines, and shipments.
Generally, the initial information is pulled in from finalized transportation records. After the customs entries are created, you can maintain them as the information changes. The customs entry information is shared with trading partners, typically customs brokers, by means of a regularly scheduled batch program.
The Customs Entry Items window allows you to edit and view the items on a customs entry by shipment.
The Customs Entry Items/BL/Container window allows you to view bills of lading, or air waybills, and container information for an item that has multiple bills of lading or air waybills.
The Customs Entry Search window allows you to enter criteria in order to search for customs entries and view the results of the search.
The default view for the Customs Entry Search window opens when you open the window for the first time. You can also create a custom view.
The Customs Entry Forms window allows you to edit and view the requests by other government agencies for additional information about the entry.
The Customs Entry Shipment window allows you to edit and view the shipments that are included on a customs entry.
The Customs Entry Charges window allows you to edit and view the charges for an item on a customs entry. The charges may include duty components, total duty, taxes, fees, harbor maintenance fees, merchandise processing fees, and the components that make up the value for duty (VFD). An HTS classification is required for all assessments.
To display monetary amounts in the primary currency of the company or the local currency of the Customs agency, select the appropriate option from Options > Currency.
The Transportation License/Visa window allows you to edit and view the licenses and visas that are associated with a transportation record.
The Customs Entry License/Visa window allows you to edit and view the licenses and visas for an item on a customs entry.
The Customs Entry Protest window allows you to edit and view the protests that are filed with a Customs agency against a customs entry.
The Transportation window allows you create, edit, and view a transportation record. Transportation records are unique by shipment, purchase order, and item. Unique shipments are designated by vessel, voyage or flight number, and estimated departure date.
The Transportation Item window allows you to edit and view the component items for an item parent.
The Transportation Claims window allows you to edit and view the claims against a partner. Claims can be made for damaged merchandise and inadequate quantities. A single claim can span multiple cartons.
The PO-Level Transportation window allows you to enter items and related shipments for a specific purchase order.
The Transportation Packing window allows you to edit and view packing information at the container level.
To display the shipped quantities and received quantities for the packing records, select the appropriate option from the View menu.
The Transportation Delivery window allows you to edit and view delivery information at the final destination level. You can indicate how many units and cartons of an item were delivered and to which locations.
The Transportation Selection window allows you to enter criteria in order to search for transportation records and view the results of the search.
The default view for the Transportation Selection window opens when you open the window for the first time. You can also create a custom view.
The Commercial Invoice window allows you to edit and view basic information from the commercial invoice.
The Transportation Dates window allows you to edit and view the estimated and actual departure dates, the estimated and actual arrival dates, and the actual delivery date of an item.
The Freight window allows you to edit and view freight information, including inland movement for the shipment. Inland shipments move goods from the discharge port to the final destination such as the distribution center.
The Transportation Totals window allows you to view the total units, weight, dimension, and value of an order and item combination at several levels. You can convert a measurement by changing the unit of measure for a field. Conversions are not saved when you close the window.
The Transportation Finalize window allows you to create customs entries from completed transportation records. Before transportation records can be finalized, you must first mark them as candidates for finalization. To do this, search for and retrieve a transportation record. On the Transportation window, select the Candidate Ind check box.
The Transportation Finalize window lets you enter the entry number, import country, broker, and currency code to apply to the finalized transportation records. When entering information on this window, information is added to all records that match the vessel, voyage, and estimated departure date criteria.
If you do not enter any search criteria, all transportation records that are marked as candidates are finalized and you do not have the opportunity to apply an entry number, import country, broker, or currency information.
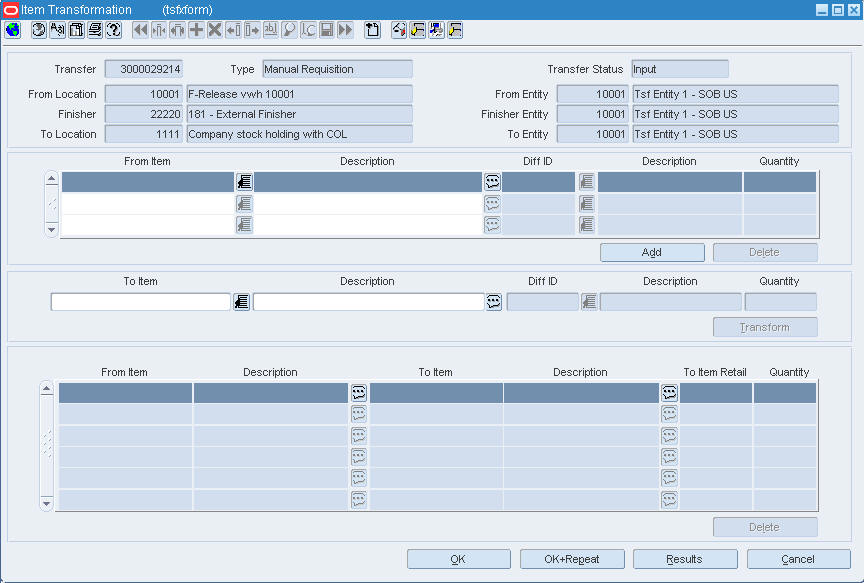
The Item Transformation window allows you to convert one item to another item at a finishers. You may change one item to a second item or you may consolidate multiple items into one item. Items are transformed at a finishing location.
There are certain conditions that must be met before you complete and item transformation. When you transform the first item into a second item, the second item must exist in approved status in the merchandising system before you can complete the transformation. The entire quantity of item on a transfer must be transformed to the same item.
There are two types of item transformation that can occur:
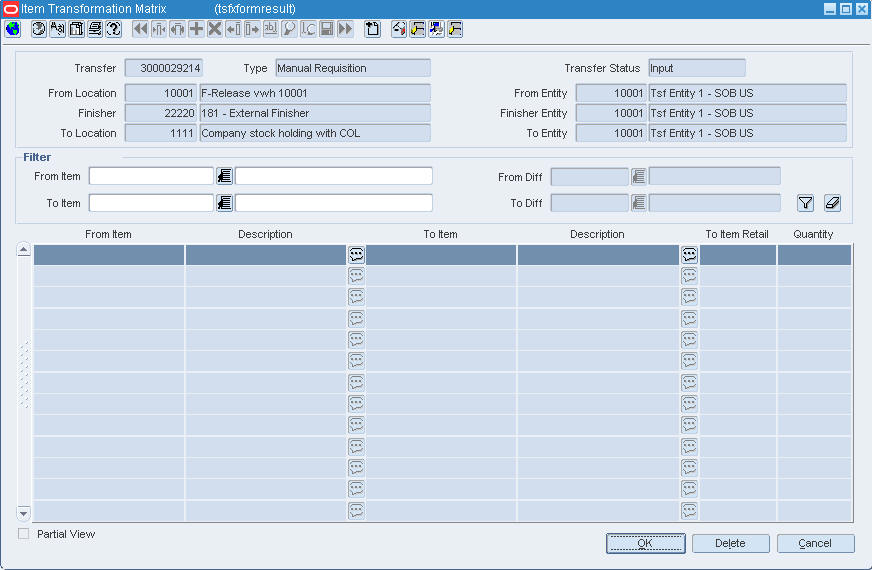
The Item Transformation Matrix window allows you to view a summary of the items that have been transformed. You can filter the items on the transfer in order to view a subset of the transformed items by item or diff.
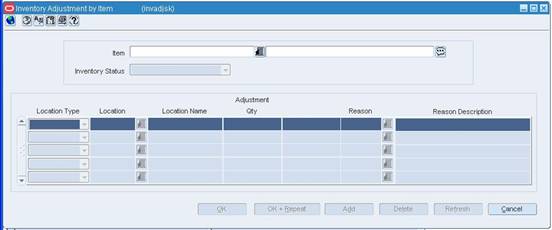
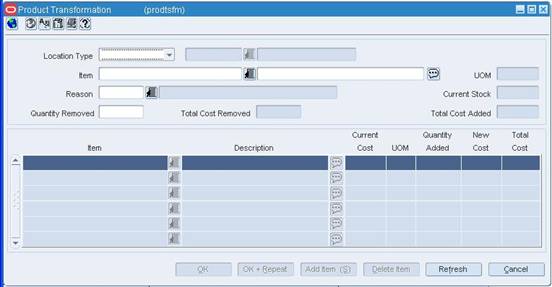
The Product Transformation window allows you to manually adjust the inventory of a transformed item and the items derived from the transformed item.
For example, a grocer might buy and place into inventory a side of beef. The butcher may prepare steaks and ground beef from the side of beef. In this example, the grocer reduces inventory by one side of beef and increases inventory by the number of steaks and packages of ground beef. In addition to adjusting the quantities, you can adjust the cost of the items derived from the transformed item. The overall cost of the transaction, however, must remain the same.
Both the quantities and values of the stock on hand are adjusted in the stock ledger.
Inventory adjustments may also be initiated by an external system, such as a warehouse management system.
The Transformation Maintenance window allows you to indicate how an orderable item is divided into sellable pieces. A transformable item can be either sellable or orderable.
Transformed Orderable: The item is ordered from the supplier in one form, but changed by the retailer and sold to the customer in a different form.
Transformed Sellable: The item that is sold to the customer. A transformed sellable item is ordered from the supplier in a different form than it is sold.
When setting up the transformable items, first create the sellable items. Next, create the orderable item and associate the sellable items to the orderable item.
See "Create a Transformable Item" in the Item Maintenance chapter
See "Maintain an Item" in the Item Maintenance chapter
See "View an Item" in the Foundation Data chapter
The Transformation Yield Maintenance window allows you to distribute the sellable item across multiple orderable items. In order to access this window, a transform sellable item must be associated to more than one transform orderable items.
See "Define Yield Details for a Sellable Item" in the Item Maintenance chapter
Transfers zones are grouping of locations within an area. Transfer zones are set up to restrict the transfer of items to locations within the transfer zone. You can assign a store to a transfer zone when you create or edit the store.
Transfer entities define which locations in an organization are grouped together due to legal requirements. Transfer entities can be defined by brand, geography, country or other grouping defined by your company. Moving items between transfer entities is treated as a sale from the sourcing location and purchase by the receiving location. Items that have been transferred between entities and may require a change in cost and retail pricing as well as ownership.
Finally, you may set up the additional information required to complete a transfer that has finishing. You need to create activities that are used on the work orders. If there are certain activities that you regularly assign, you can create a work order template that will allow you to apply the set of activities to a work order on a transfer.
See "Add a Work Order Template" in the Purchasing chapter
See "Edit a Work Order Template" in the Purchasing chapter
See "View a Work Order Template" in the Purchasing chapter
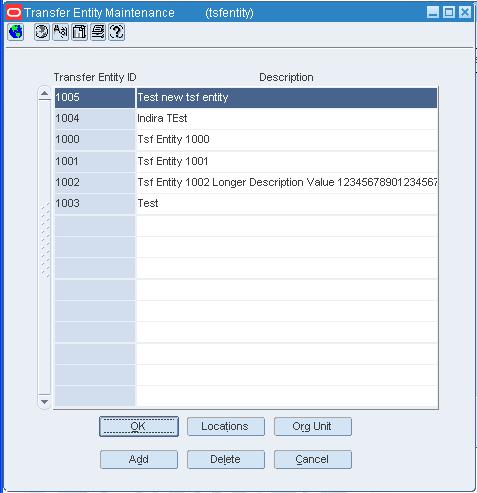
Navigate: From the main menu, select Control > Setup > Transfer Entities > Edit. Transfer Entity Maintenance window opens.
Click Add. The next line on the table is enabled.
In the Transfer Entity ID field, enter a unique ID.
In the Description field, enter a description of the transfer entity.
Click OK to save any changes and close the window.
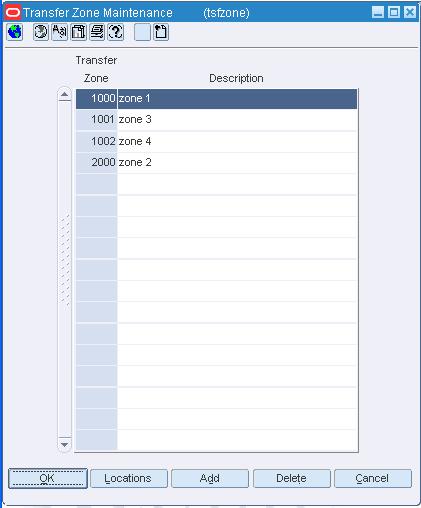
Navigate: From the main menu, select Control > Setup > Transfer Zone > View. The Transfer Zone Maintenance window opens.
To view the locations that are associated with a transfer zone:
Select a transfer zone and click Locations. The locations appear in the Locations Within Transfer Zone Maintenance window.
Click OK to close the window.
Click OK to close the window.
Navigate: From the main menu, select Control > Setup > Transfer Zone > Edit. The Transfer Zone Maintenance window opens.
Edit the descriptions as necessary.
Navigate: From the main menu, select Control > Setup > Transfer Work Order Activity > Edit. The Transfer Work Order - Activity Set Up window opens.
Click Add. The next line on the table is enabled.
In the Activity ID field, enter the ID of the activity.
In the Activity Description field, enter a description of the activity.
In the Unit Cost field, enter the amount per unit that it will cost to add finishing to the transfer.
In the Cost Type field, select the method used to distribute the cost of finishing.
Click OK to save any changes and close the window.
The Transfer Entity Window allows you to create and maintain the transfer entities. Transfer entities define which locations in an organization are grouped together due to legal requirements. Transfer entities can be defined by brand, geography, country or other grouping defined by your company. Moving items between transfer entities is treated as a sale from the sourcing location and purchase by the receiving location. Items that have been transferred between entities and may require a change in cost and retail pricing as well as ownership.
After a transfer entity is created, you associate a store or warehouse with a transfer entity during the set up of a location.
Navigate: From the main menu, select Inventory > Transfer. The Transfer Search window opens.
Search for and retrieve a transfer in View mode. The Transfer Maintenance window opens.
Click Items. The details are displayed in the Transfer Detail window.
Select the appropriate option from the Options > Currency menu.
On the Transfer Detail window, select the item. From the Options menu, select Transfer Up Charges. The details appear in the Transfer Up Charges window.
Click OK to close the window.
Navigate: From the main menu, select Control > Setup > Transfer Entities > View. The Transfer Entity Maintenance window opens.
To view the locations associated with the Transfer Entity, click Locations. The Transfer Entity Locations window opens.
Click OK to close the windows.
Navigate: From the main menu, select Control > Setup > Transfer Work Order Activity > View. The Transfer Work Order - Activity Set Up window opens.
Click OK to save any changes and close the window.
Navigate: From the main menu, select Inventory > Transfer. The Transfer Search window opens.
In the Action field, select New.
In the Type field select the type of transfer that you want to create.
Click OK. The Transfer Maintenance window opens.
In the Delivery Date, enter the earliest date that the transfer can be delivered to the store.
If you are creating an reallocation or return to vendor transfer, in the Transfer Entity Type field, select intercompany or intracompany to indicate which type of transfer is created.
Enter information in the enabled fields as necessary.
In the From area:
In the From Entity, enter the ID of the sourcing entity, or select from the list.
In the Location Type, select the type of location the transfer originates from.
In the Location, enter the location ID or click the LOV button and select a location.
Select the Freight Type and Carrier.
In the Finisher area:
|
Note: Finishers are required for transfer that will have work orders, transformations, or packing instructions. |
In the Finisher Entity, enter or select the finisher from the list.
Select the Finisher Type from the list.
Enter the Finisher or select from the list.
Select the Freight Type and Carrier.
In the To area:
In the To Entity, enter the ID of the destination entity, or select from the list.
|
Note: If you select Intercompany Transfer as the Transfer Type, the To Entity must be different than the From Entity that you entered in the From area. |
In the Location Type, select the type of location the transfer is going to.
In the Location, enter the location ID or select from the list.
On the Transfer Maintenance window click Items. The Transfer Detail window opens.
The transfer and the transfer status details will be displayed.
Table 9-2 Transfer Detail Field and Description
| Field | Description |
|---|---|
|
Item Type |
Select the Item Type from the list. You can also enter the item ID or select from the LOV. |
|
Diff ID |
In the Diff ID field, enter or select the diff ID from the list. |
|
Inv Status |
In the Inv Status field, enter the inventory status type, or select the inventory status type from the list. Note: You can only enter a value in the Inv Status field if you select Unavailable in the Inventory Status field in Transfer Maintenance window. |
|
Qty Type |
Select the quantity type from the list. The two quantity types are:
|
|
Transfer Price Adjustment Type |
In the Transfer Price Adjustment Type field, select the type of transfer price adjustment you want to make. |
|
Adjustment Value |
In the Adjustment Value field, enter the price or percent that you are adjusting by. |
|
Backorder Qty |
This field cannot be edited. This field displays the customer back-orders for an item based on stock on hand availability. |
|
From Loc Cost |
This field cannot be edited. This field displays the cost for transferring an item from the location. |
|
Transfer Cost |
This field cannot be edited. This field displays the transfer cost and the cost varies based on the selected Transfer Cost Adjustment Type and the Adjustment Value. |
|
Apply |
Click Apply, to add the details to the table grid. |
|
Add |
Click Add, to add new Item Type information. |
|
Delete |
Click Delete, to clear and reenter the Item Type information. |
Click OK to save your changes and close the window.
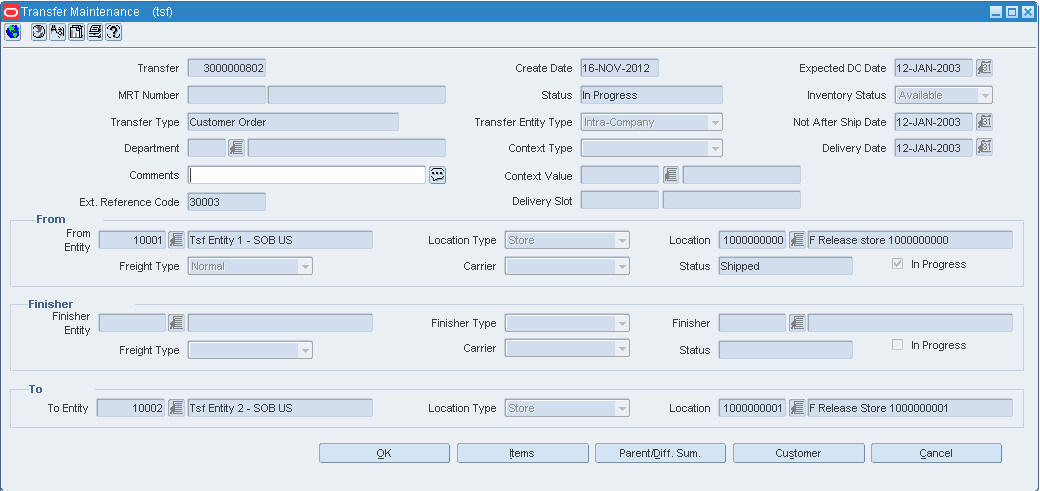
The Transfer Maintenance window allows you to create and maintain a transfer. Store requisition, cross-dock PO, PO-linked, combined, and MRT-based return to vendor transfers are created automatically. You can create any other type of transfer, such as customer order, return to vendor, confirmation, non-salable merchandise, administrative, and manual requisition. In a multi-channel environment, you can create book transfers and non-salable book transfers.
From the Transfer Maintenance window, you can access details about the items to be transferred, the customer for a customer order, and a summary by diff for an item parent. In addition, you can receive a shipped transfer.
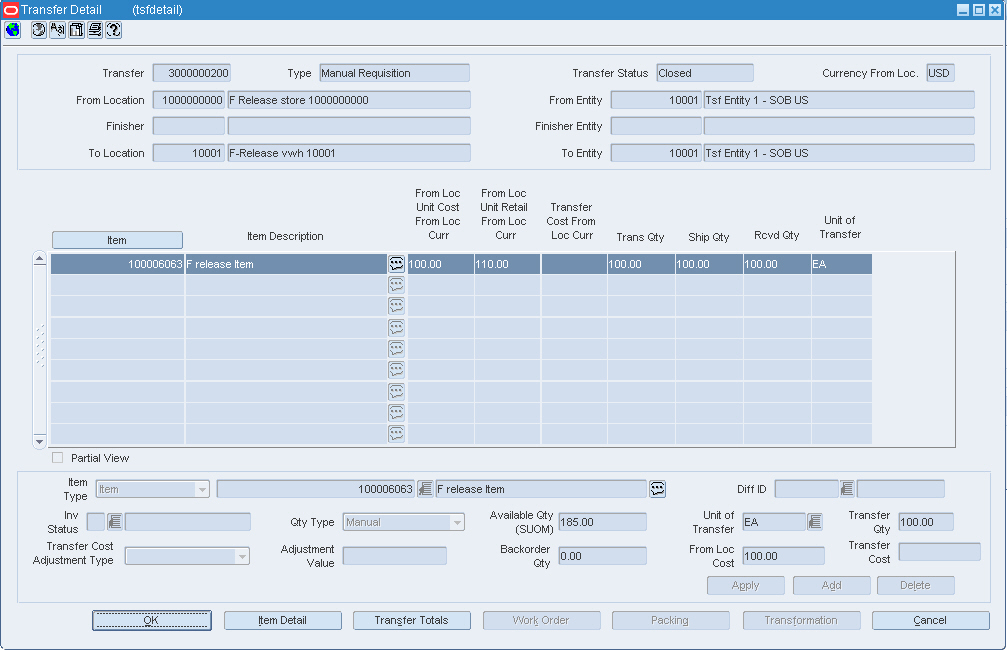
The Transfer Detail window allows you view and maintain the list of items on a transfer. You can edit the number of units transferred and the number of units shipped. To view additional details about the transfer, select the appropriate option from the View menu.
To view monetary amounts in the primary currency of the company or in the local currency of either the origin location or destination location, select the currency from the Options > Currency menu.
To view the localization flexible attributes, select Utilization from the Options menu.
Navigate: From the main menu, select Inventory > Transfer. The Transfer Search window opens.
Search for and retrieve a transfer in View mode. The Transfer Maintenance window opens.
Click Items. The Transfer Detail window opens.
Click Work Order. The Transfer Work Order Maintenance window opens.
Filter for item / activities.
Click OK to close the window.
Navigate: From the main menu, select Inventory > Transfer. The Transfer Search window opens. Search for and retrieve a transfer in Edit mode. Restrict the search to transfers in Input or Approved status. The Transfer Maintenance window opens.
Edit the enabled fields as necessary.
Click Items. The details appear in the Transfer Detail window.
Select the item to be edited. The details appear in the Apply area.
Edit the enabled fields as necessary.
Click Apply. The updated details are added to the table.
Click OK to save your changes and close the windows.
Navigate: From the main menu, select Control > Setup > Transfer Entities > Edit. The Transfer Entity Maintenance window opens.
Select a transfer entity.
In the Description field, edit the description of the transfer entity.
Click OK to save any changes and close the window.
Navigate: From the main menu, select Control > Setup > Transfer Work Order Activity > Edit.
The Transfer Work Order - Activity Set Up window opens.
Edit the enabled fields as necessary.
|
Note: If you need to change the cost type of an activity, you must delete the activity and add a new activity. |
Click OK to save any changes and close the window.
Navigate: From the main menu, select Inventory > Transfer. The Transfer Search window opens. Search for and retrieve a transfer in Edit mode. Restrict the search to transfers in Input or Approved status. The Transfer Maintenance window opens. Click Items. The Transfer Detail window opens.
Click Work Order. The Transfer Work Order Maintenance window opens.
Select an item / activity on the table.
Edit the Activity cost as necessary.
Edit or add comments as necessary.
Click Apply. The item / activity is added to the table.
To delete an activity from an item:
Select an item / activity on the table.
Click Delete. You are prompted to confirm the deletion.
Click OK. The activity is deleted from the item.
Click OK to save any changes and close the window.
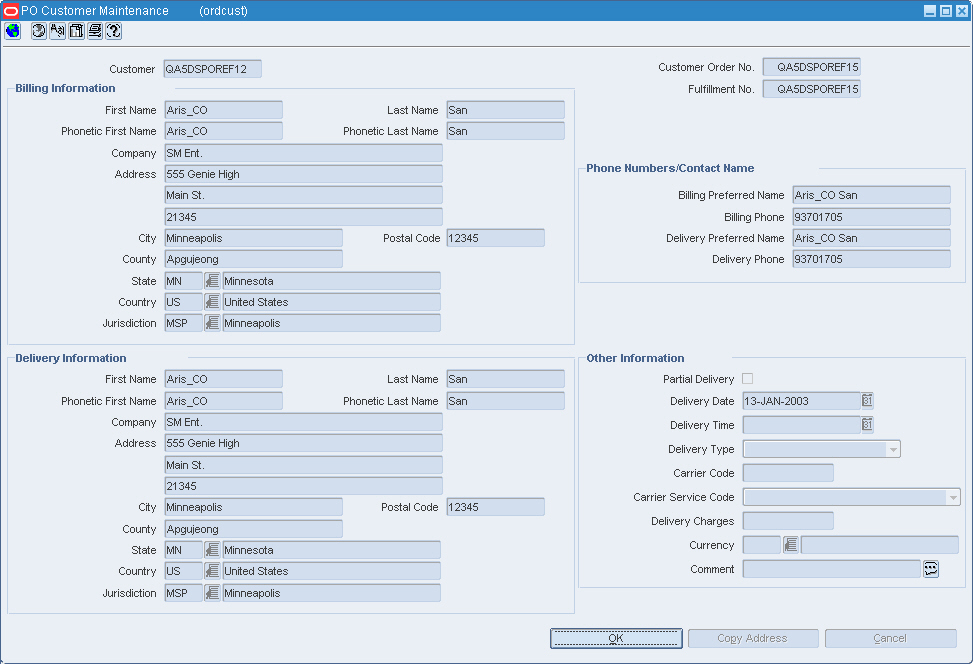
Navigate: From the main menu, select Inventory > Transfer. The Transfer Search window opens. Search for and retrieve a transfer in Edit mode. Restrict the search to a Customer Order type. The Transfer Maintenance window opens.
Click Customer. The PO Customer Maintenance window opens.
Edit the enabled fields as necessary.
Click OK to save your changes and close the window
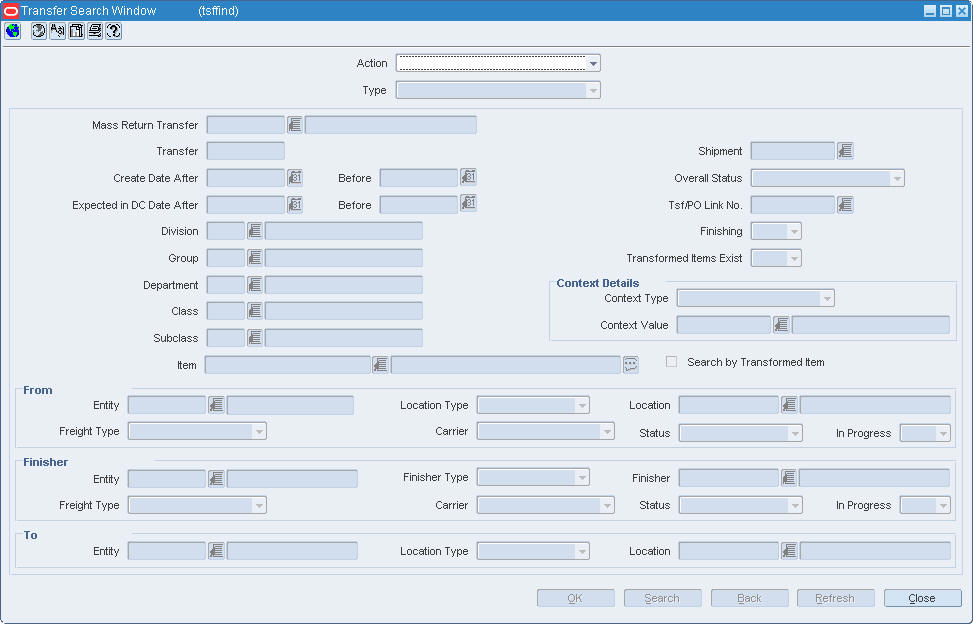
The Transfer Search window allows you to enter criteria in order to search for transfers and view the results of the search.
The default view for the Transfer Search window opens when you open the window for the first time. You can also create a custom view.
Navigate: From the main menu, select Inventory > Transfer. The Transfer Search window opens.
In the Action field, select either Edit or View.
Enter additional criteria as desired to make the search more restrictive.
Click Search. The Transfer Search window displays the transfers that match the search criteria.
Select a task:
To perform another search, click Refresh.
To display the details of a transfer, select a record and click OK. The details appear in the Transfer Maintenance window.
Click Close to exit.
Navigate: From the main menu, select Control > Setup > Transfer Entities > Edit. The Transfer Entity Maintenance window opens.
Select a transfer entity.
Click Delete. You are prompted to confirm the deletion.
Click Yes. The transfer entity is deleted.
|
Note: You cannot delete a transfer entity that is associated with a location. Associate the locations with other entities and then delete the original location. |
Click OK to save any changes and close the window.
Navigate: From the main menu, select Inventory > Transfer. The Transfer Search window opens. Search for and retrieve a transfer in New from Existing mode. The Transfer Maintenance window opens.
Edit the enabled fields as necessary.
Click Items. The Transfer Detail window opens.
In the Apply area, select a grouping mechanism in the Item Type field.
In the Item field, enter the ID of the item or item list, or click the LOV button and select the item or item list.
Enter any additional details in the enabled fields.
Click Apply. The details are added to the table.
Click OK to save your changes and close the window.
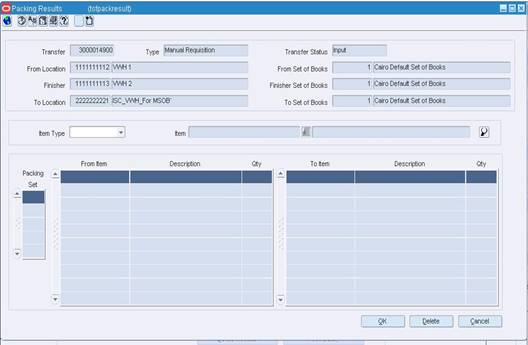
The Packing Results window allows you to view the packaging instructions that are being sent for this transfer. From this window you can delete a set of instructions.
The Transfer Entity Locations Window allows you to view all locations that have been associated to a transfer entity.
Use The Transfer Up Charges window to view the up charge groups that are associated with a specific transfer/item/from location/to location combination. Up charge groups are a combination of up charge components. Up charge components are charges that are incurred when transferring from a store or warehouse to another store or warehouse.
To view the monetary amounts in the currency of the source location (From Loc), the destination location (To Loc), or the primary currency of the company (Primary), select the appropriate option from the Options > Currency menu.
See "View an Up Charge Group" in the Foundation Data chapter
Navigate: From the main menu, select Inventory > Transfer. The Transfer Search Window opens. Search for and retrieve a transfer in edit mode. The Transfer Maintenance window opens. From the Options menu, select Delete Up charge.
You will be prompted to permanently delete all up charges associated with the transfer.
Click Yes.
Click OK to save your changes and close the window.
The Transfer Parent/Diff Summary window allows you to view the number of units transferred, shipped, and received by item parent/diff. You can view the item parent with any diff value that is assigned to that item.
Navigate: From the main menu, select Inventory > Transfer. The Transfer Search window opens. Search for and retrieve a transfer in Edit mode. The Transfer Maintenance window opens.
From the Options menu, select Print. The Report Parameters page opens.
In the Destination field, select the destination for the report.
In the Destination Printer field, the default printer name is filled in automatically.
|
Note: Default printers are assigned by user name. If the field is empty, enter the ID of a printer. |
In the Transfer Number field, the current transfer number is filled in automatically. To print a different transfer, edit the transfer number.
Click Submit Query. The report is sent to the destination selected in the Destination field.
The Transfer Work Order Maintenance Window allows you to define activities that are complete by the finisher before the transfer is completed. You must select a finisher when creating the transfer in order to access the window.
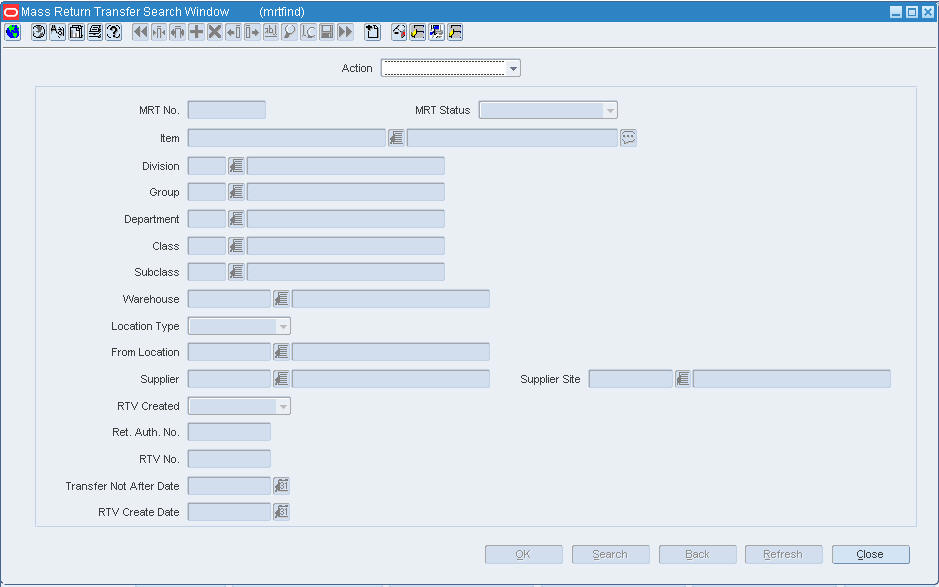
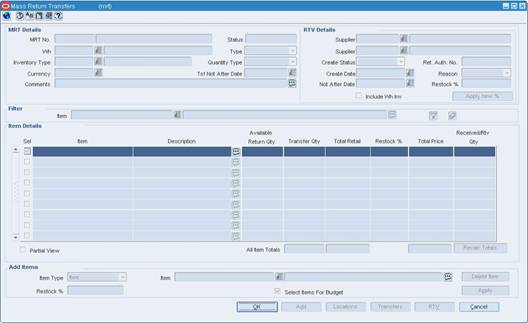
Navigate: From the main menu, select Inventory > Mass Return Transfers. The Mass Return Transfer Search window opens.
In the Action field, select New.
Click OK. The Mass Return Transfers window opens.
In the MRT Details area:
In the MRT No. field, enter the MRT description.
In the Warehouse field, enter the ID of the warehouse that the items are being returned to, or click the LOV and select a warehouse.
|
Note: You cannot select a finisher or a physical warehouse in a multi-channel environment. |
In the Type field, select the type of MRT you are creating:
Inter-company: The transfer can occur between locations in different transfer entities.
Intra-company: The transfer can occur between locations in the same transfer entity.
|
Note: If your system settings do not allow inter-company transfers, this field will default to intra-company. |
In the Inventory Type field, enter the ID of the type of merchandise you want to transfer, or click the LOV button and select a merchandise type.
In the Quantity Type field, select the how you will determine the number of items to transfer.
Manual: After selecting the item, you must enter the number of items to transfer. The quantity will default to the stock on hand (SOH), but if the SOH falls below the defined transfer quantity, the transfer will be created in input status.
All Inventory: Transfers are created for all stock on hand and the user can not specify how much to transfer,
In the Tsf Not After Date field, enter the last date the transfer can occur, or click the calendar button and select a date.
In the RTV Details area:
In the Supplier field, enter the ID of the supplier you are returning the merchandise to, or click the LOV button and select the supplier.
In the Create Status field, select the status the RTV will be created in.
In the Ret. Aut. No. enter the return authorization number for the supplier.
In the Create Date field, enter the date the RTV is created.
|
Note: If you do not enter a date, you must create the RTV manually. |
In the Reason field, select the reason you are creating the RTV.
In the Not After Date field, enter the last date the RTV can occur, or click the calendar button and select a date.
In the Restock % field, enter the percentage that is applied for restocking fees.
Select the Include Wh Inv check box, to indicate warehouse inventory is included in the creation of the RTVs.
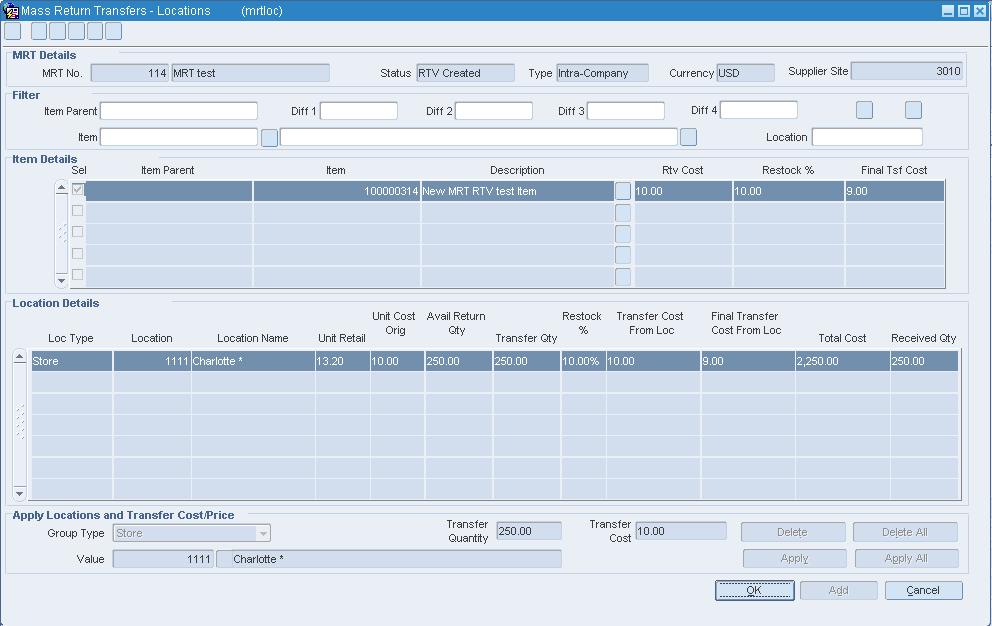
Add items to a mass return transfer.
Add locations to a mass return transfer.
If you do not enter a date, you must create the RTV manually.
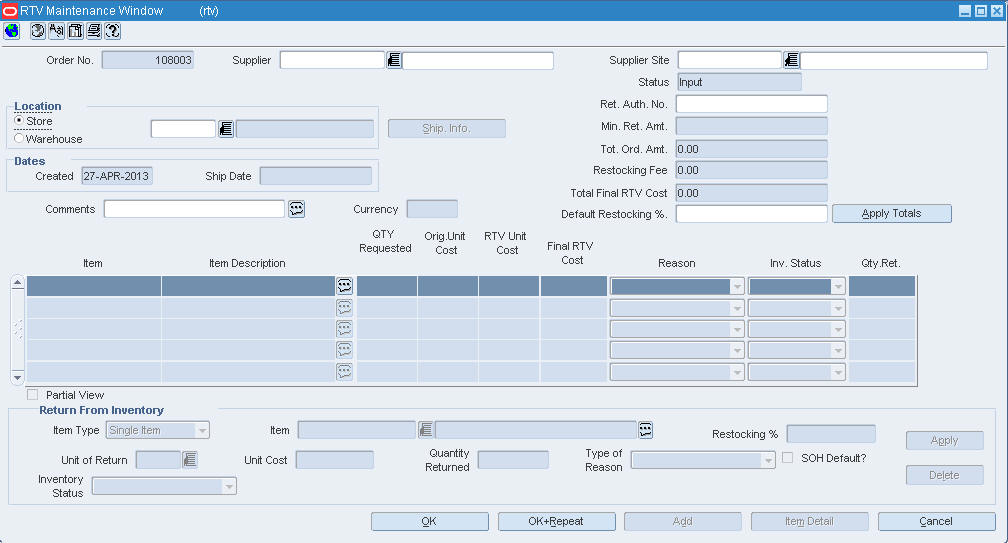
On the Mass Returns Transfer window, click RTV. The RTV window opens.
Create an RTV order.
Approve the RTV order.
Click OK to save any changes and close the window.
Click OK to save any changes and close the window. If you created the MRT to automatically create the RTV, the RTV will be created on the date entered in the create date field.
The Transfer Zone Maintenance window allows you to maintain a list of transfer zones. You can assign a transfer zone to a store when you create or edit the store. Transfer zones are used to restrict transfers to stores within the same transfer zone.
The Locations within Transfer Zone Maintenance window allows you to view a list of the stores that are members of the selected transfer zone. While you cannot assign a store to a transfer zone in this window, you can do so when you create or edit a store.
Transfers with finishing require that the items on the transfer are worked on before they arrive to a final location. Work on items are complete at a finishers. Finishers can be internal or external. Internal finishers are part of the company, and are typically located in an area of the warehouse. External finishers are set up as a partner to the company, and may be located off site.
You can set up the activities that are required for an item before the transfer is complete. The following are the activities that require finisher be identified for a transfer.
Work order: Work orders are a request that work be done to an item before it arrives at the final location. You assign specific activities that need to be completed by the finisher.
Transformation: Transformation is a request that one item is converted to a second item before it arrives to the final location.
Packing: Packing request are completed at the finishers when the request accompanies a transfer the items are packaged in certain groupings before the transfer is sent to the final location.
Navigate: From the main menu, select Inventory > Transfer. The Transfer Search window opens.
Create a transfer with finishing.
On the Transfer Detail window, click Work Order. The Transfer Work Order Maintenance window opens.
Select the item you want to add an activity to.
To add a single activity to an item:
In the Activity Type field, select Activity.
In the Activity field, enter the ID of the activity you want to use, or click the LOV button and select an activity.
Edit the Activity Cost as necessary. The activity cost is defaulted from the activity cost entered when the activity was set up.
Add additional comments as necessary.
Click Apply. The details appear on the table.
To add multiple activities to an item.
In the Activity Type field, select Template to add multiple activities as indicated on the template.
In the Template field, enter the ID of the template you want to use, or click the LOV button and select an template.
Click Apply. The details appear on the table.
Click OK to save any changes and close the window.
Navigate: From the main menu, select Inventory > Transfer. The Transfer Search window opens.
Create a transfer.
Add a transfer work order activity
On the Transfer Detail window, click Packing. The Item Packing window opens.
In the Item field, select a pack item that is on the transfer.
Click Explode Pack. The component items appear in the Results area.
In the Item field, select a pack item that is on the transfer.
|
Note: You may need to transform the items on a transfer before they can be packed. |
In the Pack No. field, enter the ID of the new pack.
Click Build Pack. The new pack is created and displayed in the Results area.
In the Item field, select bulk items on that are on the transfer.
In the Pack No. field, enter the ID of the new pack.
Click Build Pack. The new pack is created and displayed in the Results area.
Navigate: From the main menu, select Inventory > Transfer. The Transfer Search window opens.
Create a transfer.
Add a transfer work order activity
On the Transfer Detail window, click Transformation. The Item Transformation window opens.
In the From Item area:
In the From Item field, enter the item ID of the item or parent item you want to convert, or click the LOV button and select an item.
If the parent item has diffs, in the Diff ID field, enter the diff ID of the item that you want to convert, or click the LOV button and select a diff.
In the To Item area:
In the To Item field, enter the ID of the item or parent item that you want the From Item to become, or click the LOV button and select an item.
|
Note: The To Item you select must be an approved item in the merchandising system. |
If the item selected in the To Item field is a parent item, In the Diff ID field, enter the diff ID of the item that you want the From item to become, or click the LOV button and select a diff. If you want the diffs of the From Items to become one item with no diffs, leave the Diff ID field blank.
Click Transform. The transformed items are displayed in the Transformation area.
To view the results of all the items that have been transformed for the transfer, click Results. The Item Transformation Matrix window opens.
In the Filter area, enter the search criteria as necessary, or click the LOV button and select the appropriate information.
Click the filter button. The items that match the criteria appear in the results area.
To clear search criteria, click the clear filter button. Data in all fields is cleared.
Click Delete to remove a transformed item from the results area. You are prompted to confirm the deletion.
Click OK.
Click OK to save any changes and close the windows.
When a transfer is added to the system, it must go through a series of checks before it is accessible in the system. Depending on your user role, you may not be able to move the transfer to the next status. A transfer may be in any of the following statuses:
Table 9-3 Transfer Statuses
| Status | Definition |
|---|---|
|
Input |
The transfer has been started, but not completed. |
|
Submitted |
The transfer has been completed and is pending review. |
|
Approved |
The transfer has been reviewed and has been approved. |
|
Picked |
Items on the transfer have been selected for shipping to the next receiver. |
|
In Progress |
The transfer has been shipped to the next receiver in the transfer. |
|
Deleted |
The transfer is marked for deletion. It will be deleted by a regularly scheduled batch program. |
|
Closed |
The transfer has been received at the final location and is complete. |
Navigate: From the main menu, select Inventory > Transfer. The Transfer Search window opens. Search for and retrieve a transfer in Edit mode. Restrict the search to transfers in Input status. The Transfer Maintenance window opens.
From the Options menu, select Submit. The status of the transfer changes to Submitted.
Click OK to save your changes and close the window.
Navigate: From the main menu, select Inventory > Transfer. The Transfer Search window opens. Search for and retrieve a transfer in Edit mode. Restrict the search to transfers in Input status. The Transfer Maintenance window opens.
From the Options menu, select Approve. The status of the transfer changes to Approved.
Click OK to save your changes and close the window.
Navigate: From the main menu, select Inventory > Transfer. The Transfer Search window opens. Search for and retrieve a transfer in Edit mode. Restrict the search to transfers in Input or Approved status. The Transfer Maintenance window opens.
From the Options menu, select Delete. When prompted to delete the record, click Yes. You are returned to the Transfer Search window.
Click Close to exit.
Navigate: From the main menu, select Inventory > Transfer. The Transfer Search window opens. Search for and retrieve a transfer in Edit mode. Restrict the search to transfers in Shipped status. The Transfer Maintenance window opens.
From the Options menu, select Close. The status of the transfer is changed to Closed.
|
Note: If there are any open appointments assigned to this transfer, that message displays stating that the transfer cannot be closed. |
Click OK to save your changes and close the window.
Mass return transfers (MRTs) allow you to create transfers from multiple locations to a single warehouse. There are two types of MRTs that you can create.
Mass returns: Items are transferred from multiple locations to a consolidation location in order to redistribute them to other stores. A transfer is created with a transfer type of reallocation
Return To Vendors (RTV): Items are transferred from multiple location to a consolidation location and then returned to the vendor. If you set up the RTV to create automatically, the RTV is created on the date you enter. Alternatively, you can manually create the RTV.
When you create the MRT, you select a warehouse that is the receiving locations for the transfers. This warehouse will also be the sending location for the RTV. If the MRT will result in an RTV, you must also identify which supplier will receive the items and whether or not to include the warehouse stock in the RTV.
Next you must identify which items are included on the MRT. You can indicate the amount that will be charged to restock the item as well as select the item for the budget.
Finally you must indicate which locations are consolidating to the warehouse. You can indicate the number of items you want to transfer as well as the cost of the item for that item/location.
The Mass Return Transfer window allows you to create a transfer from stores to warehouses. You can combine multiple item/locations on one mass return transfer and send the merchandise to a consolidation location, such as a warehouse. Once the Mass Return Transfer is created, you can transfer the items to new locations or you can return the items to the vendor.
The default view for the Mass Return Transfers window opens when you open the window for the first time. You can also create a custom view.
Navigate: From the main menu, select Inventory > Mass Return Transfers. The Mass Return Transfer Search window opens.
In the Action field, select New.
Click OK. The Mass Return Transfers window opens.
In the MRT Details area:
In the MRT No. field, enter the MRT description.
In the Wh field, enter the ID of the warehouse that the items are being returned to, or click the LOV and select a warehouse.
|
Note: You cannot select a finisher or, in a multi-channel environment, a physical warehouse. |
In the Type field, select the type of MRT you are creating.
Inter-company: The transfer can occur between locations in different transfer entities.
Intra-company: The transfer can occur between locations in the same transfer entity.
|
Note: If your system settings do not allow inter-company transfers, this field will default to intra-company. |
In the Inventory Type field, enter the ID of the type of merchandise you want to transfer, or click the LOV button and select a merchandise type.
In the Quantity Type field, select how you will determine the number of items to transfer.
Manual: After selecting the item, you must enter the number of items to transfer. The quantity will default to the stock on hand (SOH), but if the SOH falls below the defined transfer quantity, the transfer will be created in input status.
All Inventory: Transfers are created for all stock on hand and the user can not specify how much to transfer,
In the Tsf Not After Date field, enter the last date the transfer can occur, or click the calendar button and select a date.
Add items to a mass return transfer.
Add locations to a mass return transfer
Navigate: From the main menu, select Inventory > Mass Return Transfers. The Mass Return Transfer Search window opens. Search for and retrieve a transfer in Edit mode. Restrict the search to transfers in Input status. The Mass Return Transfers window opens.
In the MRT Details area, update the enabled fields as necessary.
Filter the mass return transfer as necessary.
Edit the enabled fields.
Click Apply.
Click Add. The Add Items area is enabled.
In the Item Type field, select the type of item you want to add to the transfer.
In the Item field, enter the item ID or click the LOV button and select an item.
In the Restock % field, enter the percentage that is applied as a restocking fee to the item.
|
Note: This field is available only for RTV MRTs. |
Click Apply. The Items are added to the table.
Click Locations. The Mass Return Transfers - Location window opens.
Filter the mass return transfer as necessary.
Edit the enabled fields.
Click Apply.
In the Group Type field, select the type of locations you want to add.
In the Value field, enter the ID of the location or the location group or click the LOV button and select a location.
In the Transfer Quantity field, enter the number of items you want to transfer.
|
Note: If you select All Inventory in the Quantity Type field, on the Mass Return Transfers window, this field will not be greyed out. |
In the Transfer Price field, enter the total amount of the item, including the cost of the item.
Apply the locations and costs to the transfer.
Click Apply to associate the costs and locations to the selected item on the transfer.
Click Apply All to associate the locations and items on the transfer.
Select the option that identifies how you want the location and items associated.
Click OK to save any changes and close the window.
Click OK to save any changes and close the window.
Select an item in the Locations Details area.
Delete the location and cost from the transfer.
Click Apply to associate the costs and locations to the selected item on the transfer
Click Apply All to associate the locations and items on the transfer.
Select the option that identifies how you want the location and items associated.
Click OK to save any changes and close the window.
Click OK to save any changes and close the window.
Navigate: From the main menu, select Inventory > Mass Return Transfers. The Mass Return Transfer Search window opens. Search for and retrieve a transfer in Edit mode. Restrict the search to transfers in Worksheet status. The Mass Return Transfers window opens.
In the Filter area, enter an item ID, or click the LOV button and select an item.
Click the filter button. Matching results appear in the Item Details area.
Click the clear filter button to display all item on the mass return transfer.
On the Mass Returns Transfer window, click Locations. The Mass Return Transfers - Locations window opens.
In the Filter area, enter the ID of the criteria you want to limit your search by in the appropriate field.
Click the filter button. Matching results appear in the Item Details area.
Click the clear filter button to display all item on the mass return transfer.
Navigate: From the main menu, select Inventory > Mass Return Transfers. The Mass Return Transfers Search window opens.
In the Action field, select either Edit or View.
Enter additional criteria as desired to make the search more restrictive.
Click Search. The Mass Return Transfer Search window displays the transfers that match the search criteria.
Select a task:
To perform another search, click Refresh.
To display the details of a transfer, select a record and click OK. The details appear in the Mass Return Transfers window.
Click Close to exit.
Navigate: From the main menu, select Inventory > Mass Return Transfers. The Mass Return Transfer Search window opens. Search for and retrieve a transfer in Edit mode. Restrict the search to transfers in Worksheet status. The Mass Return Transfers window opens.
In the Add Items area, click Add.
In the Item Type field, select the type of item you want to add to the transfer.
In the Item field, enter the item ID or click the LOV button and select an item.
In the Restock % field, enter the percentage that is applied as a restocking fee to the item.
|
Note: This field is available only for RTV MRTs. |
Click Apply. The Items are added to the table.
The Mass Return Transfer Search window allows you to enter criteria in order to search for mass return transfers and view the results of the search.
The default view for the Mass Return Transfer Search window opens when you open the window for the first time. You can also create a custom view.
The Mass Return Transfers - Locations window allows you to identify which locations are sending the merchandise to the consolidation location and the quantities the location will send.
A return to vendor (RTV) order is used to send merchandise back to the supplier. RTV orders may be received from an external system, such as a warehouse management system. The items on these RTV orders are already shipped, so their status in RMS is Shipped.
One or more items may be included on the RTV order, but only one supplier and location can be entered.
If the RTV was created as the result of an mass return transfer (MRT), the MRT number will be displayed on the RTV. You can view the details of the MRT by searching for the MRT.
Navigate: From the main menu, select Inventory > Return to Vendor. The RTV Search window opens.
Search for and retrieve an RTV order in View mode. The RTV Maintenance window opens.
To view the supplier's return address and courier information:
Click Ship Info. The details appear in the Shipment Info window.
Click OK to close the Shipment Info window.
Click OK to close the window.
Navigate: From the main menu, select Inventory > Mass Return Transfers. The Mass Return Transfer Search window opens.
Search for and retrieve a transfer in View mode. The Mass Return Transfers window opens.
Click Locations to view locations associated with the items. The Mass Return Transfer - Locations window opens.
Click Transfers to search for and view transfers associated with the MRT. The Transfer Find window opens.
Click RTV to search for and view RTVs associated with the MRT. The RTV find window opens.
Click OK to close the windows.
Navigate: From the main menu, select Inventory > Return to Vendor. The RTV Search window opens.
In the Action field, select New. Click OK. The RTV Maintenance window opens.
|
Note: You can also access the RTV Maintenance window directly from the Quality Control window. |
In the Supplier field, enter the ID of the supplier, or click the LOV button and select the supplier.
In the Location area
Select the type of location.
Enter the ID of the location that is returning the item, or click the LOV button and select the location.
In the Ret Auth No field, enter the supplier's return authorization number as necessary.
In the Comments field, enter any comments as necessary.
In the Default Restocking % field, enter what percentage, if any, the supplier charges for returns.
Make adjustments to the Unit of Return or Unit Cost, if necessary.
To edit the supplier's return address and courier information:
Click Ship Info. The Shipment Info window opens.
Click Search and select an alternative return address as necessary. Otherwise, enter or edit the default information.
Click OK to save any changes and close the window.
Click Add. The fields in the Apply area are cleared.
In the Item Type field, select how you want to add items to the RTV order.
In the Item field, enter the item ID or click the LOV button and select the item.
Select the quantity you want to return.
To return all items at the location, select the SOH Default check box.
To return a set quantity, in the Quantity Returned field, enter the appropriate number.
In the Unit Cost field, adjust the amount of the cost of the item as necessary.
|
Note: The unit cost defaults to the last receipt cost at the origin location for the supplier, if the receipt still exists in RMS. |
In the Type of Reason field, select the appropriate option.
The Restocking % field is defaulted from the Default Restocking % field in the header area. Update the Restocking % field as necessary for the item.
Click Apply. The item or items are added to the RTV order.
Click OK to save any changes and close the window.
Navigate: From the main menu, select Inventory > Return to Vendor. The RTV Search window opens. Search for and retrieve an RTV order in Edit mode. Restrict the search to RTV orders in Input status. The RTV Maintenance window opens.
From the Options menu, select Approve.
When prompted to approve the RTV order, click Yes. The status of the RTV order is changed to Approved.
Click OK to save your changes and close the window.
The RTV Maintenance window allows you to maintain return to vendor (RTV) orders. You specify the supplier to which the items are returned and the stockholding location from which the items are returned. You can return items from inventory or items that failed quality control.
When you return items from inventory, you can select an item or use an item list. In addition to entering the number of units to return, you must select the reason for the return. If the reason is unavailable inventory, you also select the status of the inventory.
When you return items that failed quality control, you must identify the shipment, the item, and the number of units to return.
The status of the RTV order changes as it passes through the approval process and is shipped. Depending on your user role, you can manually change the status of the RTV order.
If you use an item list on the RTV order, you may want to rebuild the list. To rebuild an item list, select Options > Rebuild Item List.
Navigate: From the main menu, select Inventory > Return to Vendor. The RTV Search window opens. Search for and retrieve an RTV order in Edit mode. Restrict the search to RTV orders in Input status. The details of the RTV order appear in the RTV Maintenance window.
Edit the Ret Auth No, Handling Pct, and Comments fields as necessary.
Click Ship Info. The Shipment Info window opens.
Click Search and select an alternative return address as necessary. Otherwise, enter or edit the default information.
Click OK to save your changes and close the window.
Navigate: From the main menu, select Inventory > Mass Return Transfers. The Mass Return Transfer Search window opens. Search for and retrieve a transfer in Edit mode. Restrict the search to transfers in Worksheet status. The Mass Return Transfers window opens.
Click Locations. The Mass Return Transfers - Location window opens.
In the Group Type field, select the type of locations you want to add.
In the Value field, enter the ID of the location or the location group or click the LOV button and select a location.
In the Transfer Quantity field, enter the number of items you want to transfer.
|
Note: If you selected All Inventory in the Quantity Type field, on the Mass Return Transfers window, this field is disabled. If you selected Manual in the Quantity Type field, on the Mass Return Transfers window, leave the field blank to include all stock on hand at the location. |
In the Transfer Price field, the transfer price of the items:
For intercompany transfers, enter the sales price of the item.
For intracompany enter the transfer cost.
Apply the locations to the transfer:
Click Apply to associate the locations to the selected item on the transfer.
Click Apply All to associate the locations and items on the transfer.
Select the option that identifies how you want the location and items associated.
Click OK to save any changes and close the window.
Click OK to save any changes and close the window.
The RTV Search window allows you to enter criteria in order to search for return to vendor (RTV) orders and view the results of the search.
The default view for the RTV Search window opens when you open the window for the first time. You can also create a custom view.
Navigate: From the main menu, select Inventory > Return to Vendor. The RTV Search window opens.
In the Action field, select either Edit or View.
Enter additional criteria as desired to make the search more restrictive.
Click Search. The RTV Search window displays the RTV orders that match the search criteria.
Select a task:
To perform another search, click Refresh.
To display the details of an RTV order, select a record and click OK. The details appear in the RTV Maintenance window.
Click Close to exit.
Navigate: From the main menu, select Inventory > Return to Vendor. The RTV Search window opens. Search for and retrieve an RTV order in Edit mode. Restrict the search to RTV orders in Input status. The RTV Maintenance window opens.
From the Options menu, select Cancel.
When prompted to cancel the RTV order, click Yes. The status of the RTV order is changed to Cancelled.
Click OK to save your changes and close the window.
The Shipment Info window allows you to edit the supplier's return address and courier information for the current RTV order. The default address is filled in automatically. You can edit the current address, or search for and select a different address.
Navigate: From the main menu, select Inventory > Return to Vendor. The RTV Search window opens. Search for and retrieve an RTV order in Edit mode. Restrict the search to RTV orders in Approved status. The RTV Maintenance window opens.
From the Options menu, select Unapprove.
When prompted to unapprove the RTV order, click Yes. The status of the RTV order is changed to Input.
Click OK to save your changes and close the window.
When a mass return transfer is added to the system, it must go through a series of checks before it is accessible in the system. Depending on your user role, you may not be able to move the mass return transfer to the next status. A mass return transfer may be in any of the following statuses:
Table 9-4 Mass Return Transfer Statuses
| Status | Definition |
|---|---|
|
Input |
The mass return transfer has been started, but not completed. |
|
Submitted |
The mass return transfer has been completed and is pending review. |
|
Approved |
The mass return transfer has been reviewed and has been approved. |
|
Rejected |
The mass return transfer has been submitted, reviewed, and has been rejected. |
|
Closed |
The mass return transfer is complete. |
|
Canceled, Cancel |
The mass return transfer has been manually closed and is no longer valid. |
|
RTV Created |
The mass return transfer has an associated RTV order for the MRT has been created |
Navigate: From the main menu, select Inventory > Mass Return Transfers. The Mass Return Transfer Search window opens. Search for and retrieve a transfer in Edit mode. Restrict the search to transfers in Input status. The Mass Return Transfers window opens.
From the Options menu, select Submit. The status of the transfer changes to Submitted.
Click OK to save any changes and close the window.
Navigate: From the main menu, select Inventory > Mass Return Transfers. The Mass Return Transfer Search window opens. Search for and retrieve a transfer in Edit mode. Restrict the search to transfers in Submitted status. The Mass Return Transfers window opens.
From the Options menu, select Approve. The status of the transfer changes to Approved.
Click OK to save any changes and close the window.
Navigate: From the main menu, select Inventory > Mass Return Transfers. The Mass Return Transfer Search window opens. Search for and retrieve a transfer in Edit mode. Restrict the search to transfers in Worksheet status. The Mass Return Transfers window opens.
From the Options menu, select Reject. The status of the transfer changes to Rejected.
Click OK to save any changes and close the window.
Navigate: From the main menu, select Inventory > Mass Return Transfers. The Mass Return Transfer Search window opens. Search for and retrieve a transfer in Edit mode. The Mass Return Transfers window opens.
From the Options menu, select Close. The status of the transfer changes to Closed.
Click OK to save any changes and close the window.
Inventory adjustments can be made online or they can be received from an external system, such as a warehouse management system. There are two types of adjustments that can be made to inventory:
Stock on hand: The quantity of stock on hand, or salable stock, is increased or decreased. Both the quantity and value of the stock on hand are adjusted in the stock ledger.
Unavailable inventory: The quantity of stock on hand does not change, but the quantity of unavailable stock, or non-salable stock, is increased or decreased. In the stock ledger, the adjustment is recorded as a transfer between stock on hand and unavailable inventory. No adjustment is made to the stock value.
Prior to using the inventory adjustment functionality, status types and reasons for adjustments must be set up in the system. The Total Stock on Hand status type is reserved for adjustments made to salable goods. Any additional status types are user-defined and are reserved for adjustments made to non-salable goods. The user-defined status types indicate why the goods are non-salable. When adjusting total stock on hand, you must select a reason for the adjustment. The reason indicates why the total stock on hand must be adjusted.
See "Edit an Inventory Status Type" in the System Administration chapter
Navigate: From the main menu, select Control > Setup > Inventory Status Types > View. The window opens.
Click OK to close the window.
Navigate: From the main menu, select Control > Setup > Inventory Adjustment Reason > View. The Inventory Adjustment Reason Code Maintenance window opens.
Click OK to close the window.
Navigate: From the main menu, select Control > Setup > Inventory Adjustment Reason > Edit. The Inventory Adjustment Reason Code Maintenance window opens.
Click Add. The next available line is enabled.
In the Reason field, enter a unique ID for the reason.
In the Description field, enter the description of the reason.
In the Cost of Good Sold field, select the check box to indicate that associating this reason with an inventory adjustment will affect the cost of goods sold.
Click OK to save your changes and close the window.
Navigate: From the main menu, select Control > Setup > Inventory Status Types > Edit. The Inventory Status Types window opens.
Click Add. The next available line is enabled.
In the Status field, enter a unique ID for the status type.
In the Description field, enter the description of the status type.
Click OK to save your changes and close the window.
Inventory adjustments can be made online or they can be received from an external system, such as a warehouse management system. There are two types of adjustments that can be made to inventory:
Stock on hand: The quantity of stock on hand, or salable stock, is increased or decreased. Both the quantity and value of the stock on hand are adjusted in the stock ledger.
Unavailable inventory: The quantity of stock on hand does not change, but the quantity of unavailable stock, or non-salable stock, is increased or decreased. In the stock ledger, the adjustment is recorded as a transfer between stock on hand and unavailable inventory. No adjustment is made to the stock value.
You can choose to adjust the inventory of one item at multiple locations, multiple items at one location, or a transformed item at one location. An example of a transformed item might be a watermelon that is sliced into smaller chunks for sale. You reduce the stock on hand for whole watermelons and increase the stock on hand for sliced pieces of watermelon.
When you edit or view an item, you can choose to view the quantity of unavailable, or non-salable, stock on hand. You can restrict the view to one or all inventory status types at one or all locations.
See "View Unavailable Inventory" in the Item Maintenance chapter
Navigate: From the main menu, select Inventory > Inventory Adjustments > By Item. The Inventory Adjustment by Item window opens.
In the Item field, enter the item number of the item, or click the LOV button and select the item.
In the Inventory Status field, select the status that you want to apply to the item.
In the Reason field, enter the ID of the reason for the adjustment, or click the LOV button and select the reason.
|
Note: A reason is required if you select Total Stock on Hand in the Inventory Status field. |
In the Location Type field, select the type of location where the adjustment is needed.
|
Note: Pack items can be adjusted only at warehouses. |
In the Location field enter the ID of the location, or click the LOV button and select the location.
In the Adjustment Qty field enter the number of units that you want to add or subtract. Use a negative number to subtract from the total.
Click OK to save your changes and close the window.
The Inventory Adjustment by Location window allows you to manually adjust the inventory of one or more items at a location. Adjustments for pack items can be made only at a warehouse.
You can choose from two types of adjustments:
Stock on hand: The quantity of stock on hand, or salable stock, is increased or decreased. Both the quantity and value of the stock on hand are adjusted in the stock ledger.
Unavailable inventory: The quantity of stock on hand does not change, but the quantity of unavailable stock, or non-salable stock, is increased or decreased. In the stock ledger, the adjustment is recorded as a transfer between stock on hand and unavailable inventory. No adjustment is made to the stock value.
Inventory adjustments may also be initiated by an external system, such as a warehouse management system.
Adjust Inventory By Location
Navigate: From the main menu, select Inventory > Inventory Adjustments > By Store/Warehouse. The Inventory Adjustment by Location window opens.
In the Location Type field, select the type of location where the adjustment must be made.
In the Location field, enter the ID of the location, or click the LOV button and select the location.
In the Inventory Status field, select the status that you want to apply to the items at the selected location.
In the Reason field, enter the ID of the reason for the adjustment, or click the LOV button and select the reason.
|
Note: A reason is required if you select Total Stock on Hand in the Inventory Status field. |
In the Item field, enter the item number of the item, or click the LOV button and select the item.
In the Adjustment Qty field enter the number of units that you want to add or subtract. Use a negative number to subtract from the total.
Click OK to save your changes and close the window.
Navigate: From the main menu, select Inventory > Inventory Adjustments > Product Transformation. The Product Transformation window opens.
In the Location Type field, select the type of location where the adjustment must be made.
In the Location field, enter the ID of the location, or click the LOV button and select the location.
In the Item field, enter the item number of the item to be transformed, or click the LOV button and select the item.
In the Reason field, enter the ID of the reason for the adjustment, or click the LOV button and select the reason.
In the Quantity Removed field, enter the number of units subtracted from stock on hand.
In the Item field, enter the item number of the item derived from the transformed item, or click the LOV button and select the item.
In the Quantity Added field, enter the number of units added to the stock on hand.
In the New Cost field, edit the default cost per unit as necessary.
Add any additional items that are derived from the transformed item.
Click OK to save your changes and close the window.
Navigate: From the main menu, select Control > Setup > Inventory Adjustment Reason > Edit.
The Inventory Adjustment Reason Code Maintenance window opens.
In the Description field, edit the description as necessary.
If there are no inventory adjustments associate with the reason, you can select or clear the Cost of Goods Sold Check box.
Click OK to save any changes and close the window
The Inventory Adjustment by Item window allows you to manually adjust the inventory of an item at one or more locations. Adjustments for pack items can be made only at warehouses.
You can choose from two types of adjustments:
Stock on hand: The quantity of stock on hand, or salable stock, is increased or decreased. Both the quantity and value of the stock on hand are adjusted in the stock ledger.
Unavailable inventory: The quantity of stock on hand does not change, but the quantity of unavailable stock, or non-salable stock, is increased or decreased. In the stock ledger, the adjustment is recorded as a transfer between stock on hand and unavailable inventory. No adjustment is made to the stock value.
Inventory adjustments may also be initiated by an external system, such as a warehouse management system.
The Inventory Status Types window allows you to maintain a list of status types. You use a status type to indicate why one or more units of stock on hand are made unavailable for sale. For example, the item may be damaged or under repair.
Add an Inventory Status Type
View Inventory Status Types
Navigate: From the main menu, select Inventory > Item Inventory by Location.
The Item Location Inventory window opens.
|
Note: You can also access this window from the Item Master window, Item Children window, Item Location window, and Store Sales/Warehouse Issues window. Some search criteria are automatically filled in depending on how you access the Item Location Inventory window. |
In the Item field, enter the item number of the item, or click the LOV button and select the item.
In the Group Type field, select a grouping mechanism.
In the Group Value field, enter the ID of the specific location or group, or click the LOV button and select the location or group.
Click Search. The inventory details appear in the table. Corporate totals are displayed in the All Locations area.
To filter the results by location:
In the Location field of the Filter area, enter the ID of the location, or click the LOV button and select the location.
Click the filter button. The inventory details for the selected location appear.
|
Note: The corporate totals in the All Locations area do not change. |
Click the clear filter button to redisplay the previous inventory details.
To view the results in a partial view, select the Partial View checkbox.
To view the monetary amounts in the primary currency of the company or the local currency of the location, select the appropriate option from the Options > Currency menu.
To view additional inventory details, select the appropriate option from the View menu.
Click OK to save your changes and close the window.
Stock counts can be requested and processed in one of two ways:
By unit and value: Requests are made at product level. The results of a physical stock count are used to adjust the quantity of the stock on hand and the monetary value of the stock in the stock ledger.
By unit: Requests are made for multiple items using an item list. The results of the physical stock count are used to adjust the quantity of the stock on hand. The stock ledger is not adjusted.
You can request a stock count as needed or create a schedule of stock counts. If you have access to Oracle Retail Analytics (ORA), you can create item lists based on ABC classifications. The item lists can be used in requests for stock counts by unit.
Immediately prior to the scheduled date of the physical stock count, a snapshot is taken of the stock on hand, stock in transit, retail value, and weighted average cost. If the stock on hand has not yet been adjusted as a result of the physical count, the snapshot continues to be adjusted automatically as late transactions are received from the point of sale and the warehouse management system.
The results of a physical stock count may be received from an external system or entered manually. You can print a variance report which allows you to review any variances between the book count and physical count. After reviewing the report, you can edit the quantities for stock counts by unit or by unit and value as necessary. For stock counts by unit and value, you can also edit the monetary value of the stock as necessary. After editing quantities and monetary values, you can force the system to adjust the stock on hand and post the updated monetary values to the stock ledger.
In a multi-channel environment, you may request a stock count at a physical warehouse. The system automatically distributes the results among the virtual, or stockholding, warehouses based on the default distribution method. You can edit the results at the virtual warehouse level.
The Stock Count Schedule window allows you to maintain schedules for stock counts. You can schedule stock counts for a stockholding store, a warehouse, or all locations on a location list. The stock can be counted in units or in units and monetary value. Depending on system options, the monetary value may be either retail or cost. You can schedule stock counts for every day, every week, or every two or more weeks. You can also designate the dates on which a schedule becomes effective and expires.
In a multi-channel environment, stock counts for warehouses are scheduled at the physical warehouse level.
See "Edit Stock Count Schedules" in the Inventory Control chapter
See "View Stock Count Schedules" in the Inventory Control chapter
Navigate: From the main menu, select Inventory > Stock Count Schedule > Edit. The Stock Count Schedule opens.
In the Location Type field, select the type of location.
In the Location field, enter the ID of the location or the location list, or click the LOV button and select the location or location list.
In the Stocktake Type field, select type of count. If a stock count schedule already exists for the selected location, it opens in the table.
Click Add. The fields in the Apply area are cleared.
Depending on the type of stock count, enter either of the following details:
Units: In the Item List field, enter the ID of the item list, or click the LOV button and select the item list.
Units & Value: In the Department field, enter the ID of the department, or click the LOV button and select the department. Enter the class and subclass in their respective fields as necessary.
In the Start Date and End Date fields, enter the dates on which the schedule becomes effective and expires.
In the Count Time field, enter the time of day at which the stock count begins. Use international standard time (24-hour clock).
In the Cycle field, select the frequency of the stock counts.
In the Days of Count field, select the day of the week for the stock count.
|
Note: If the cycle is every day, all of the days are automatically selected. If the frequency is every week, you can select more than one day. |
Click Apply. The schedule is added to the table.
Click OK to save your changes and close the window.
Navigate: From the main menu, Inventory > Stock Count Schedule > Edit. The Stock Count Schedule opens.
In the Location Type field, select the type of location.
In the Location field, enter the ID of the location or the location list, or click the LOV button and select a location or location list.
In the Stocktake field, select how the stock count is counted. The schedules for the current location appear.
Select a schedule and click Delete.
Click OK to save your changes and close the window.
The Stock Count Search window allows you to enter criteria in order to search for stock counts and view the results of the search. You can perform the following tasks:
Enter a request for a stock count by unit or by unit and value.
Enter the results of a stock count manually. Generally, the results are transmitted to RMS from an outside source.
Review and adjust variances between the book stock and the physical count. The stock on hand and stock ledger are updated by a regularly scheduled batch program.
Review the results of a unit and value stock count at the subclass level.
Review and adjust the retail value and cost value of the stock on hand. The stock ledger is updated by a regularly scheduled batch program.
In a multi-channel environment, redistribute losses and gains that result from a stock count in a physical warehouse among its virtual warehouses. The stock on hand and stock ledger are updated by a regularly scheduled batch program.
The default view for the Stock Count Search window opens when you open the window for the first time. You can also create a custom view.
Navigate: From the main menu, select Inventory > Stock Count. The Stock Count Search window appears.
In the Action field, select any action except New.
If you select Edit or View in the Action field, select either Request or Count Quantity in the Action Type field.
Enter additional criteria as desired to make the search more restrictive.
Click Search. The Stock Count Search window displays the stock counts or requests that match the search criteria.
Select a task:
To perform another search, click Refresh.
To display the details of a stock count, select a record and click OK. The details appear in the appropriate maintenance window.
Click Close to exit.
The Stock Count Request Maintenance window allows you to request a stock count. You can also edit a request until the lockout period. The lockout period is a system parameter. It may be set for one or more days before the scheduled date of the stock count. You can delete a request at any time if the stock count has not yet been processed for any location entered on the request.
If you use either an item list or a location list in building a request, you may want to force the system to rebuild the lists so they are current.
Location list: Select Rebuild Location List from the Options menu.
Item list: Select Rebuild Item List from the Options menu.
To view more information on these topics, see also:
See "Edit a Request for a Stock Count" in the Inventory Control chapter
See "View a Request for a Stock Count" in the Inventory Control chapter
Navigate: From the main menu, select Inventory > Stock Count. The Stock Count Search window opens. Search for and retrieve a stock count in New mode and with an Action Type of Request. The Stock Count Request Maintenance window opens.
In the Stock Count field, enter a description for the stock count.
In the Stock Count Type field, select the type of count.
In the Stock Count Date field, enter the scheduled date for the stock count, or click the calendar button and select the date.
Depending on which option you selected in the Stock Count Type field, enter one of the following details:
Unit: In the Select Items By area, select Item List or Product Group.
If you select Item List, in the Item List field, enter the ID of the item list, or click the LOV button and select the item list.
If you select Product Group, in the Product Group field, select the merchandise level. Next, click Product. On the Select Product Level window, select the departments, classes, and subclasses that you want to include in the request. Click OK to exit the Select Product Level window.
Unit & Value: In the Product Group field, select the merchandise level. Next, click Product. On the Select Product Level window, select the departments, classes, and subclasses that you want to include in the request. Click OK to exit the Select Product Level window.
In the Group Type field, select a grouping mechanism.
In the Group field, enter the ID of the specific location or group, or click the LOV button and select the location or group.
Click Apply. The locations are added to the table.
To delete a location from the table:
Select a location and click Delete.
When prompted to delete the record, click Yes.
Click OK to save your changes and close the window.
Navigate: From the main menu, select Inventory > Stock Count. The Stock Count Search window opens. Search for and retrieve a stock count in Edit mode and with an Action Type of Request. The Stock Count Request Maintenance window opens.
Click Delete Request.
When prompted to delete the request, click Yes. You are returned to the Stock Count Search window. The request is deleted by a regularly scheduled batch program.
The Stock Count Results - Dollar Changes window allows you to review and edit the monetary value of the stock on hand at a location. This step is necessary after a unit and value type of stock count has been performed at a location.
To display monetary amounts in the primary currency of the company or the local currency of the location, select the appropriate option from the Options > Currency menu.
To force the system to adjust amounts in the stock ledger, select Create Adjustments from the Options menu. The stock ledger is adjusted by a regularly scheduled batch program. At this point, the unit and value type of stock count is considered complete.
See "Adjust the Stock Ledger After a Stock Count" in the Inventory Control chapter
The Stock Count Variance window allows you to create a trial variance report and adjust stock counts for one or multiple locations.
Variances between book stock and the physical count can be corrected in the Stock Count Results Maintenance window. However, to force the system to actually adjust the quantities, you must return to the Stock Count Variance window and select Create Stock Adjustments from the Options menu. The stock on hand is adjusted by a regularly scheduled batch program. At this point, the unit type of stock count is considered complete.
See "Create a Trial Variance Report" in the Inventory Control chapter
See "Adjust the Stock on Hand after a Stock Count" in the Inventory Control chapter
The Stock Count Results Maintenance window allows you to manually enter the results of a stock count. You can also view and edit unprocessed stock counts at a location.
Variances between book stock and the physical count can be corrected in the Stock Count Results Maintenance window. However, to force the system to actually adjust the quantities, you must go to the Stock Count Variance window and select Create Stock Adjustments from the Options menu. The stock on hand is adjusted by a regularly scheduled batch program. At that point, the unit type of stock count is considered complete.
In a multi-channel environment, you can access the Stock Count Virtual Warehouse Distribution window in order to redistribute stock among the virtual warehouses that are associated with a physical warehouse.
See "Edit the Results of a Stock Count" in the Inventory Control chapter
See "View the Results of a Stock Count" in the Inventory Control chapter
In a multi-channel environment, the Stock Count Virtual Warehouse Distribution window allows you to review the stock count at a physical warehouse. You can then redistribute any shrinkage or gain among the virtual warehouses within the physical warehouse.
See "Redistribute Stock Within a Physical Warehouse" in the Inventory Control chapter
The Stock Count Results Dollar View window allows you to view the monetary value of stock on hand after a stock count is performed at a location. The amounts are calculated at the department/class/subclass level.
To display monetary amounts in the primary currency of the company or the local currency of the location, select the appropriate option from the Options > Currency menu.
The Select Product Level window allows you to view and maintain the departments, classes, and subclasses that are included in a request for a stock count. This task is necessary when you request a unit and value type of stock count.
See "Edit a Request for a Stock Count" in the Inventory Control chapter
See "View the Request for a Stock Count" in the Inventory Control chapter
Navigate: From the main menu, select Inventory > Stock Count. The Stock Count Search window opens.
Search for and retrieve a stock count by selecting Dollars View in the Action field. The Stock Count Results Dollar View window opens.
In the Location Type field, select the type of location.
In the Location field, enter the ID of the location, or click the LOV button and select the location. The details of the stock count appear.
To view the monetary amounts in the primary currency of the company or the local currency of the location, select the appropriate option from the Options > Currency menu.
Click OK to close the window.