| Oracle® Retail Merchandising System User Guide 14.1 E55773-01 |
|

 Previous |
 Next |
This chapter discusses the Purchase Ordering function that controls procurement of stock for retail. Setup of buyers and Open to Buy limits are discussed as a precursor to order creation. Purchase Orders can be raised in RMS through various automated as well as manual means. Manual Orders may be raised for adhoc purchases, against contracts and from replenishment generated Buyer worksheets. Automated orders are largely generated by the replenishment batches. Purchase orders in RMS provide support for capture and view of several ordering related attributes such as shipping information, import attributes, Harmonized Tariff Schedule (HTS), expenses, letter of credit information, and partner information. Inventory Management parameters such as scaling, truck splitting, and supplier minimum, rounding percentages may also be defined and enforced at the order level. The ordering screens also provide usability enhancers such as diff distribution and pack templates to ease the process of order creation.
Screen details and specific navigation to achieve these functions is elaborated in this following sections of this chapter.
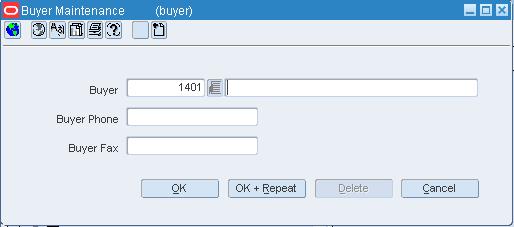
The buyer functions allow you to create, edit, view, and delete buyers. You can record the name, phone number, and fax number for each buyer.
Buyers are responsible for maintaining store stock levels with merchandise that matches consumer demand.
Because there can be many buyers and merchandisers at the division or group level, you may prefer to record the GMM (general merchandise manager) or DMM (division merchandise manager) at these levels.
See "Maintain a Buyer" in the System Administration chapter
Navigate: From the main menu, select Control > Buyer > New. The Buyer Maintenance window opens.
In the Buyer field, the ID is filled in automatically. Enter the buyer's name in the field to the right of the ID.
In the Buyer Phone field, enter the buyer's telephone number.
In the Buyer Fax field, enter the buyer's fax number.
Click OK to save your changes and close the window.
Navigate: From the main menu, select Control > Buyer > View. The Buyer Maintenance window opens.
In the Buyer field, enter the buyer's ID, or click the LOV button and select the buyer.
Click OK close the window.
Navigate: From the main menu, select Ordering > Orders. The Order Search window is displayed.
Search for and retrieve a purchase order in View mode. The PO Header Maintenance window opens.
From the options menu, select Buyer. The Order Buyer Information window opens.
Click OK to close the window.
Navigate: From the main menu, select Ordering > Buyer worksheet > View. The Buyer Worksheet opens.
Search for and retrieve items in the Buyer Worksheet.
Click OK to close the window.
Open to buy (OTB) budgets are usually maintained by an external planning system. OTB, purchase order, and stock ledger data are extracted from RMS. In return, the planning system provides up-to-date budget and forward limit data. OTB functionality operates on the retail (4-5-4) calendar.
OTB records are maintained at the subclass/week level. OTB is allotted to three purchasing categories:
Order of non-basic goods (N/B)
Buyer replenishment of basic goods (BRB)
Automatic replenishment of basic goods (ARB)
Within each category, monetary amounts are segregated by status. The statuses are Approved, Received, and Budgeted. Cancelled amounts are maintained outside of any category. Whether the amounts reflect cost value or retail value depends on the type of OTB calculation selected for each department.
As you create and edit departments in RMS, you must indicate whether direct cost or retail inventory amounts are used to calculate OTB.
When you create a purchase order, the OTB module monitors the available OTB. You, as the buyer, are warned if an order that you want to approve exceeds the amount budgeted for the OTB end-of-week date entered on the order. If you have sufficient authority, you may force the system to approve the order despite the warning.
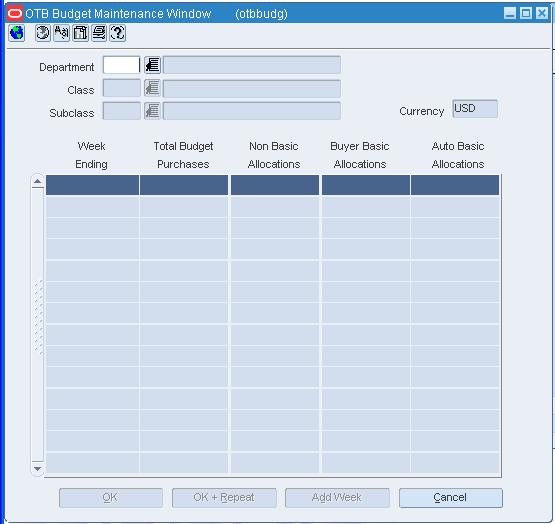
Although purchasing budgets may be received from an external planning system, you can maintain the purchasing budgets online by subclass and purchasing category.
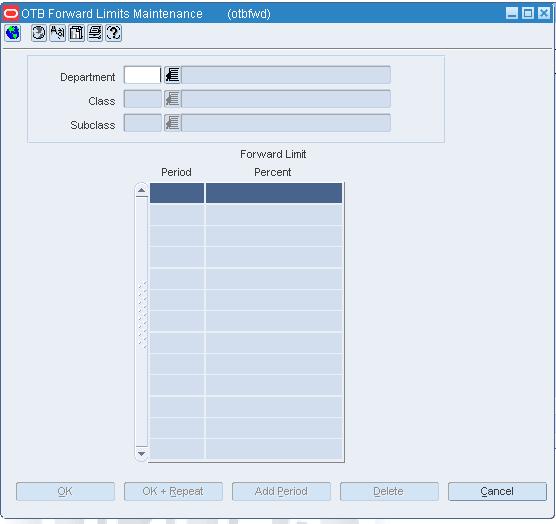
Forward limits may also be maintained online. A manager may limit how much of the OTB budget for a particular subclass and week may be used by the buyer. The manager may prevent buyers from committing too much of the available funds too early in the season, leaving no flexibility should conditions change or profitable opportunities arise unexpectedly.
Navigate: From the main menu, select Finance > OTB > Forward Limits. The OTB Forward Limits Maintenance window opens.
In the Department, Class, and Subclass fields, enter the ID of each, or click the LOV button and select the department, class, and subclass. Any existing forward limits appear.
Edit the percentages as necessary.
To add a forward limit:
Click Add Period. The next available line is enabled.
In the Period field, enter the number of weeks ahead of the current week for which you want to set a limit.
In the Forward Limit Percent field, enter the percentage of the OTB that the buyer may use from the period.
To delete a forward limit, select a forward limit and click Delete. The selected record is deleted.
Click OK to save your changes and close the window
Navigate: From the main menu, select Finance > OTB > Budgets. The OTB Budget Maintenance window opens.
In the Department, Class, and Subclass fields, enter the ID of each, or click the LOV button and select the department, class, and subclass. Any existing weekly budget records appear.
To add the next weekly period, click Add Week. Repeat as necessary.
In the Non Basic Allocations, Buyer Basic Allocations, and Auto Basic Allocations fields next to each weekly period, enter or edit the monetary amount to be budgeted for each type of purchase.
Click OK to save your changes and close the window.
Purchase orders may be automatically generated through several ways:
Replenishment: When inventory levels reach a point determined by the replenishment method assigned to an item, a purchase order can be created in Worksheet or Approved status.
Investment Buying: When the investment buy calculations indicate a benefit to the company by purchasing additional inventory, a purchase order can be created in Worksheet or Approved status.
Vendor managed inventory (VMI): If your supplier uses a VMI system, the supplier can create purchase orders in Worksheet or Approved status.
Truck splitting: When a purchase order is split into two purchase orders to accommodate truck splitting, a purchase order can be created in Worksheet status.
Warehouse Stocked/Cross Dock Docked Stock: Accumulates store need at the item/location level. If the need cannot be fulfilled by the warehouse, a worksheet PO is created.
More information can be found in these related topics:
Accept a Revision or Version of a Purchase Order
Delete Pre-Issued Order Number Requests
Navigate: From the main menu, select Action > View Reports. The Oracle Retail Printing window opens.
In the Module field, click the LOV button and select Orders.
In the Report field, click the LOV button and select the Purchase Order Revisions Summary.
Click Print. The Report Parameters Web page opens.
In the Destination field, select where you want the finished report to be sent. Select Cache to view the report online.
To restrict the report to a range of revision dates, enter the first and last date of the range in the Minimum Date and Maximum Date fields.
Click Submit Report. The report is generated and sent to the destination that you selected.
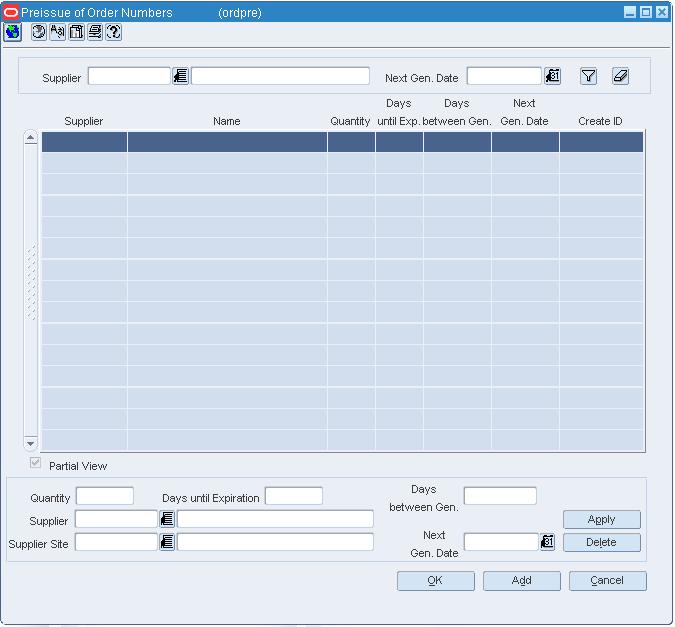
Navigate: From the main menu, select Ordering > Pre-Issue Order Numbers > Edit. The Pre-Issue of Order Numbers window opens.
Click Add.
In the Quantity of Order Numbers field, enter the quantity of purchase order numbers you want to issue.
In the Days until Expiration field, enter the number of days that should elapse between the date each set of purchase orders is created and when the purchase order numbers expire.
|
Note: Do not enter a value in the Days Between Gen. field as this is only used when recurring reports (batch) are needed. |
Enter the ID of the supplier that will receive the PO numbers, or click the LOV button and select a supplier.
In the Next Gen Date field, enter the next date that this group of POs should be created, or click the calendar button to select a specific date.
Click Apply. The new pre-issue order of numbers record is added to the table.
The Pre-Issued Order Number Report page opens.
In the Destination field, select where you want the finished report to be sent. Select Cache to view the report online.
Click Submit Query. The report is generated and sent to the destination that you selected.
Navigate: From the main menu, select Ordering > Pre-Issue Order Numbers > Edit. The Pre-Issue of Order Numbers window opens.
In the filter area, enter a supplier ID in the Supplier field, or enter a partial description and click the LOV button to select a supplier.
Click the filter button. The results appear on the table.
If there are order request for this supplier, you may edit information in the apply block.
If there are no order requests for this supplier, click Add.
In the Quantity field, enter the quantity of orders to be created.
In the Days Until Expiration field, enter the number of days between order number creation date the numbers will expire.
|
Note: Do not enter a value in the Days Between Gen. field as this is only used when recurring reports (batch) are needed. |
In the Supplier field, enter the supplier who will use the order numbers.
Enter the Next Gen Date. It defaults to today's date. This field can be modified.
Click Apply to add the record to the table.
Order numbers will be created for supplier records with a Next Generation Date equal to today.
After the first report is created, the supplier records that were processed will have the Next Gen Day incremented by the number displayed in the Days Between Generation field.
Navigate: From the main menu, select Ordering > Orders. The Order Search window is displayed.
Search for and retrieve a purchase order in View mode. The PO Header Maintenance window opens.
To view the items on the purchase order:
Click Items. The PO Item Maintenance window opens.
Click OK to exit the PO Item Maintenance window.
Click OK to close the window.
Navigate: From the main menu, select Ordering > Orders. The Order Search window is displayed.
Search for and retrieve a purchase order in View mode. Restrict the search to purchase orders in Approved or Closed status. The PO Header Maintenance window opens.
From the options menu, select Order Revisions. The PO Revisions window opens.
In the Type field, select Revision to review supplier changes or Version to review buyer changes.
In the Revision or Version field, enter the number of the revision or version, or click the LOV button and select the revision or version. The details of the revision or version appear in the table.
|
Note: If you don't know which revision or version number you want, you can select it by date. In the Date field, enter the date, or click the LOV button and select the date. |
Click OK to close the window.
Navigate: From the main menu, select Ordering > Orders. The Order Search window is displayed.
Search for and retrieve a purchase order in Edit mode. The PO Header Maintenance window opens.
Click Items and select an item. The PO Item Maintenance window opens.
Click Locations. The PO/Item Location window opens.
In the Order Details table, select an item.
From the options menu, select Expenses.
Click OK to close the window.
Navigate: From the main menu, select Ordering > Orders. The Order Search window is displayed.
Search for and retrieve a purchase order in View mode. The PO Header Maintenance window opens.
Click Summary. The PO Summary By Items window opens.
To view the locations for an item, select the item. The locations appear in the Location table.
To view a summary of the purchase order by location:
Click View Location. The PO Summary By Locations window opens.
Click View Items to return to the PO Summary By Items window.
Click OK to close the window.
Navigate: From the main menu, select Ordering > Orders. The Order Search window is displayed.
Search for and retrieve a purchase order in View mode. The PO Header Maintenance window opens.
Click Items. The PO Item Maintenance window opens.
|
Note: Only item parents can be summarized by diff. |
Click Item Parent/Diff Sum. The Order Item Parent/Diff Summary window opens.
To include the component items of packs in the summary, select the Include Pack Components check box as necessary.
Click OK to close the window.
Navigate: From the main menu, select Ordering > Orders. The Order Search window is displayed.
Search for and retrieve a purchase order in View mode. The PO Header Maintenance window opens.
Click Summary. The PO Summary By Items window opens.
Click View Location. The PO Summary By Locations window opens.
To view the items that are allocated to a location, select the location. The items appear in the Items table.
Click View Items to return to the PO Summary By Items window.
Click OK to close the window.
Navigate: From the main menu, select Inventory > Transfer. The Transfer Search window opens.
Search for and retrieve a transfer in View mode. Restrict the search to a Customer Order type. The Transfer Maintenance window opens.
Click Customer. The PO Customer Maintenance window opens.
Click OK to close the window.
Navigate: From the main menu, select Ordering > Orders. The Order Search window is displayed.
Search for and retrieve a purchase order in View mode. To determine if the PO is a Customer Order, the order type should be 'Customer Order'.
From the options menu, select Customer. The PO Customer Maintenance window opens.
Click OK to close the window.
Navigate: The Appointments window can be accessed any of the following ways:
From the main menu select Ordering > Appointments.
From the main menu select Inventory > Appointments.
From Options > Appointments on the PO Header Maintenance window, the PO Item Maintenance window, the Transfer Maintenance window, the Transfer Detail window.
From the main menu select Inventory > Shipment. Click Appointments on the Shipment window.
In the Search fields, enter or select search criteria.
|
Note: If there are no appointments associated with the purchase order, transfer, or shipment displayed on the previous window, fields on the Appointment window are disabled. |
Click Search. The appointments matching your search criteria appear.
To view appointment details, select a record in the Appointment table. The details for that appointment appear in the Appointment Details table.
Click Refresh to clear existing search results and conduct a new search.
Click OK to close the window.
Navigate: From the main menu, select Ordering > Orders. The Order Search window opens.
Search for and retrieve a purchase order in View mode. The PO Header Maintenance window opens.
Click Item. The PO Item Maintenance window opens.
Navigate: From the main menu, select Ordering > Orders. The Order Search window is displayed.
Search for and retrieve a purchase order in View mode. The PO Header Maintenance window opens.
From the options menu. select Order Dates. The Order Dates window opens.
Click OK to close the window.
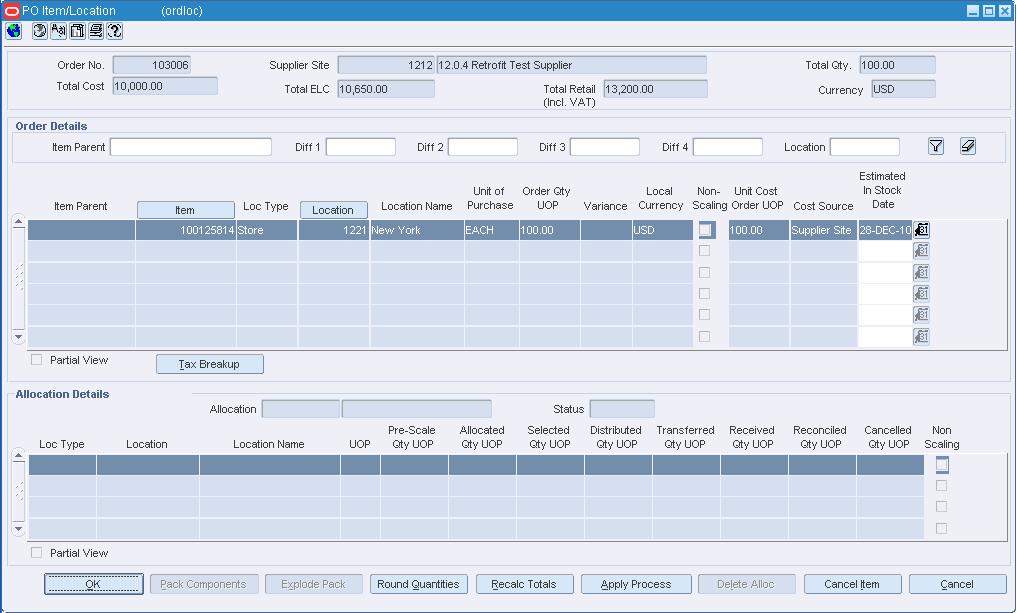
Navigate: From the main menu, select Ordering > Orders. The Order Search window is displayed.
Search for and retrieve a purchase order in Edit mode. The PO Header Maintenance window opens.
Click Items. The PO Item Maintenance window opens.
Select an item.
Click Locations. The PO/Item Location window opens.
Enter search criteria in the Order Details filter fields.
Click Filter. Information matching your criteria opens in the Order Details table.
|
Note: Allocation details will be displayed for the highlighted row in the Order Details table. |
Click OK to close the window.
Navigate: From the Main Menu, select Items > Items. The Item Search window opens.
Search for and retrieve an item in View mode. The Item Maintenance window opens.
|
Note: To view the order details for a level 2 item, from the Options menu, select List Children. The Item Children window opens. |
From the Options menu, select Order Detail. The Item Orders window opens.
To view the details of a purchase order:
Select a purchase order and click Order Detail. The PO Header Maintenance window opens.
Click OK to close the PO Header Maintenance window.
Click OK to close the window.
Navigate: From the main menu, select Ordering > Orders. The Order Selection window opens.
Search for and retrieve a purchase order in View mode. The PO Header Maintenance window opens.
From the Options menu, select Shipments. The outstanding shipments appear in the Shipments for PO window.
To view the details of a shipment:
Select a shipment and click Detail. The Shipment Header Maintenance window opens.
Click OK to exit the Shipment Header Maintenance window.
Click OK to close the window.
Navigate: From the main menu, select Ordering > Orders. The Order Search window is displayed.
Search for and retrieve a purchase order in Edit mode. Restrict the search to purchase orders in Worksheet status. The PO Header Maintenance window opens.
From the options menu, select Reject Reason. The Reject Reason window opens.
|
Note: The Reject Reason option is available only if the purchase order was generated automatically by the replenishment system and was in fact rejected. |
Click OK to close the window.
Navigate: From the main menu, select Ordering > Orders. The Order Search window is displayed.
Search for and retrieve a purchase order in View mode. The PO Header Maintenance window opens.
From the options menu, select Supplier Details. The Order Supplier Address window opens.
Click OK to close the window.
Navigate: From the main menu, select Ordering > Orders. The Order Search window opens.
Search for and retrieve a purchase order in Edit mode. Restrict the search to purchase orders in Approved status. The PO Header Maintenance window opens.
From the Options menu, select Order Revisions. The PO Revisions window opens.
In the Type area, select Revision or Version.
In the Type field, select Revision to review supplier changes, or Version to review buyer changes.
In the Revision or Version field, enter the number of the revision or version, or click the LOV button and select the revision or version. The details of the revision or version appear in the table.
|
Note: If you don't know which revision or version number you want, you can select it by date. In the Date field, enter the date, or click the LOV button and select the date. |
Select the Accept check box next to each detail that you want to accept. If you want to accept all of the details, click Accept All.
Click OK to save your changes and close the window.
The Work Order window allows you to create, edit, or view one or more work orders for the items on a purchase order. You can edit the default quantity to be worked on for each item and location. Next you assign work in progress codes (WIP) and indicate in which sequence the tasks must be completed.
Navigate: From the main menu, select Ordering > Orders. The Order Search window is displayed.
Search for and retrieve a purchase order in Edit or View mode. The PO Header Maintenance window opens.
From the Options menu, select Work Orders > View. The items and locations appear on the Work Order window.
To view the tasks assigned to an item and location, select an item and location record. The tasks are displayed in the WIP table.
To view another work order for the same purchase order, click either Prev or Next.
Click OK to close the window.
Navigate: From the main menu, select Inventory > Work Order Template > View. The Work Order Template window opens.
In the Work Order Template field, enter the template ID, or click the LOV button and select the template.
Click OK to close the window.
Navigate: From the main menu, select Ordering > Orders. The Order Search window opens.
Search for and retrieve a purchase order in Edit mode. The PO Header Maintenance window opens.
From the Options menu, select Work Orders > New. The Order Distribution Worksheet window opens.
Click Work Order. The Work Order window opens.
Click Add WIP. The next available line in the WIP table is enabled.
In the WIP code field, enter the WIP code for the task to be performed, or click the LOV button and select the WIP code.
In the WIP Seq No field, enter the sequence in which the task must be performed.
Select an item and location combination and click Delete Item/Loc.
When prompted to delete the record, click Yes.
In the Quantity field next to each item and location combination, edit the number of units affected by the work order as necessary.
Click OK to save your changes and close the window.
Navigate: From the main menu, select Ordering > Orders. The Order Search window is displayed.
Search for and retrieve a purchase order in Edit mode. The PO Header Maintenance window opens.
From the Options menu, select Work Orders > Edit. The Work Order window opens.
|
Note: If there is more than one work order, you may need to click Next in order to access the desired work order. |
In the Quantity field next to each item and location record, edit the number of units as necessary.
Select an item and location record and click Delete Item/Loc.
When prompted to delete the record, click Yes.
Click OK to save your changes and close the window.
Select an item and location record. The tasks appear in the WIP table.
Click Add WIP. The next available line in the WIP table is enabled.
In the WIP code field, enter the WIP code for the task, or click the LOV button and select the WIP code.
In the WIP Seq No field, enter the sequence in which the task must be performed.
Navigate: From the main menu, select Ordering > Orders. The Order Search window is displayed.
Search for and retrieve a purchase order in Edit mode. The PO Header Maintenance window opens.
From the Options menu, select Work Orders > Edit. The Work Order window opens.
|
Note: If there is more than one work order, click Next in order to access the desired work order. |
Click Delete WO.
When prompted to delete the record, click Yes. If there are no more work orders, you are returned to the PO Header Maintenance window.
Click OK to save your changes and close the window.
The Work Order Template window allows to group common activities together on a template. Once you have created the template, you can apply it to a work order when creating a transfer.
Navigate: From the main menu, select Inventory > Work Order Templates > New. The Work Order Template window opens.
In the Work Order Template field, enter a description of the template
In the Apply area, enter an Activity ID, or click the LOV button and select an activity.
If necessary, in the Activity Cost field, edit the amount it costs to complete the activity.
|
Note: The activity cost and cost type default from the information defined during activity set up. |
In the Comments field, enter comments as necessary.
Click Apply. The activity is added to the template.
Click OK to save any changes and close the window.
Navigate: From the main menu, select Inventory > Work Order Template > Edit. The Work Order Template window opens.
In the Work Order Template field, enter the template ID, or click the LOV button and select the template.
Select the activity you want to edit.
In the Activity Cost field, edit the amount it costs to complete the activity.
In the Comments field, enter comments as necessary.
Click Apply. The activity is added to the template.
Click Add. The next line on the table is enabled.
Enter an Activity ID, or click the LOV button and select an activity.
If necessary, in the Activity Cost field, edit the amount it costs to complete the activity.
|
Note: The activity cost and cost type default from the information defined during activity set up. |
In the Comments field, enter comments as necessary.
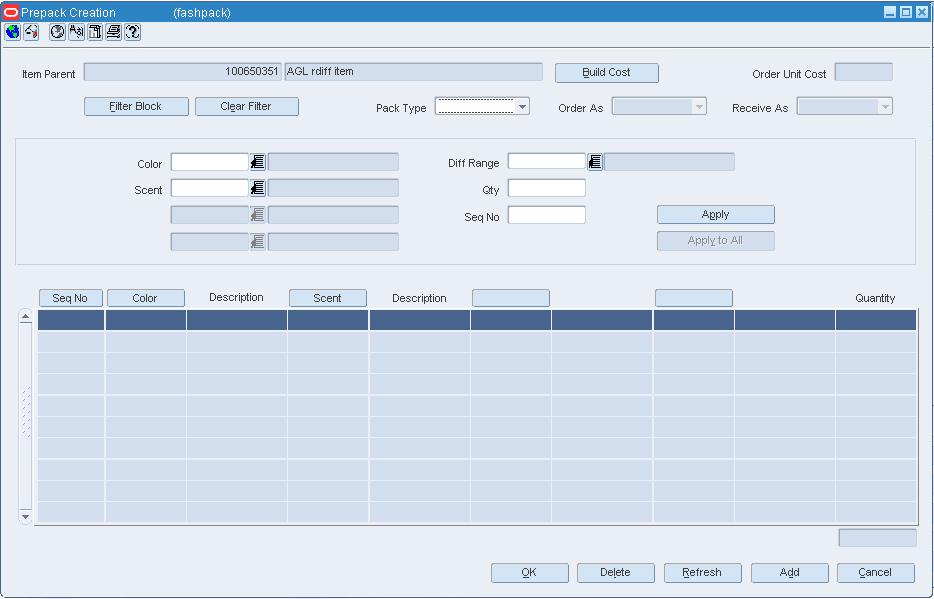
The Prepack Creation window allows you to create a pack for a purchase order. A prepack is a pack item that contains an assortment of diffs. You can add a diff, diff range, or diff template. You also enter a sequence number (for buyer packs) and the quantity that is to be distributed among the diff combinations. The sequence number is a grouping mechanism. All diff records with the same sequence number are grouped under the same diff pack template. This allows you to create multiple packs for the current purchase order.
You can create buyer packs or vendor packs. If you select buyer pack, you must indicate whether the pack is ordered and received as a pack or as eaches. If you select vendor pack, you must enter a unit cost for the pack. The unit cost for buyer packs is derived from the component items of the pack. The pack templates that you create here cannot be re-used for another purchase order.
To display the monetary amount in the primary currency of the company, the local currency of the supplier, or the currency of the order, select the appropriate option from the Options > Currency menu.
Create a Purchase Order for a Pack Item
Navigate: From the main menu, select Ordering > Orders. The Order Search window is displayed.
Search for and retrieve a purchase order in View mode. The PO Header Maintenance window opens.
Click Item. The PO Item Maintenance window opens.
Click Prepack. The Prepack Creation window opens.
|
Note: If the Prepack check box is not selected on the PO Header Maintenance window, there is no pack assortment. |
To filter the assortment:
Click Filter Block. The Prepack Filter window opens.
Enter or select the criteria by which you want to filter.
Click Apply Criteria. The filter criteria are added to the Filter Criteria table.
Click OK to close the Prepack Filter window. You are returned to the Prepack Creation window where you can view the results of the filter.
To clear the filter, click Clear Filter. All the records appear.
Click OK to close the window.
Navigate: From the main menu, select Items > Items. The Item Search window opens.
Search for and retrieve an item in View mode. Search for the component item of the simple packs. The Item Maintenance window opens.
Click on the Simple Pack View option. The Simple Pack Setup window opens.
Select a simple pack.
Click Pack Detail. The Item Maintenance window opens with the details of the simple pack.
To view additional details for the selected simple pack, click on the appropriate option in the Options list.
Click OK to close the window.
Navigate: From the main menu, select Items > Items. The Item Search window opens.
Search for and retrieve a pack item in View mode. To restrict the search to pack items, select the Pack Item check box. The Item Maintenance window opens.
To view the component items:
Click Pack Details. The Pack Item Detail Maintenance window opens with the items that make up the pack item.
Click OK to close the Pack Item Detail Maintenance window.
To view the details for the pack item, click on the appropriate options on the Options list of the Item Maintenance window.
Click OK to close the window.
Navigate: From the main menu, select Items > Diffs > Pack Templates> View. The Pack Template Maintenance window opens.
In the Pack Template ID field, enter the ID of the pack template, or click the LOV button and select the template.
Navigate: From the main menu, select Ordering > Orders. The Order Search window is displayed.
Search for and retrieve a purchase order in Edit mode. The PO Header Maintenance window opens.
Click Items and select an item. The PO Item Maintenance window opens.
Click Locations. The PO/Item Location window opens.
Click Pack Components. The PO Item Pack Component window opens.
Click Item Detail to view additional information about the individual items in the pack. The Item Maintenance window opens.
Click OK to close all windows.
Navigate: From the main menu, select Inventory > Pack Items > Build Sellable Pack. The Sellable Pack Build window opens.
In the Pack No field, enter a pack number, or enter a partial description and click the LOV button to select a sellable pack.
In the Location Type field, select Store or Warehouse.
Enter a valid store or warehouse number, or enter a partial description and click the LOV button to select a store or warehouse.
Select to view the Item Type by Item or VPN.
Click Refresh to clear the displayed information and enter new search criteria.
Click OK to close the window.
Navigate: From the main menu. select Ordering > Orders. The Order Search window opens.
In the Action field, select New Order and click OK. The PO Header Maintenance window opens.
The Order No is generated automatically.
Select the Order Type from the list.
In the Import Country field, enter the code for the import country, or click the LOV button and select the import country.
|
Note: When creating an import order, make sure that the import country and the import location are the same. |
In the Supplier field, enter the ID of the supplier, or click the LOV button and select the supplier. The supplier defaults for other fields are filled in automatically.
In the Department field, enter the ID of the department, or click the LOV button and select the department.
|
Note: The department may be required depending on how the system was set up. |
In the Not Before Date and Not After Date fields, enter the dates, or click the calendar button and select the dates.
Select the Prepack check box.
Enter or edit the enabled fields, as necessary.
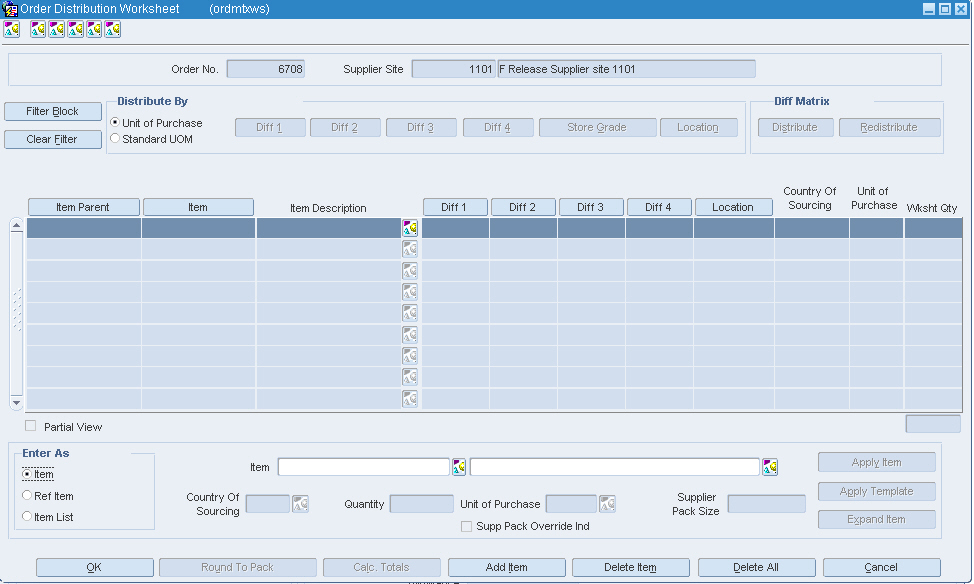
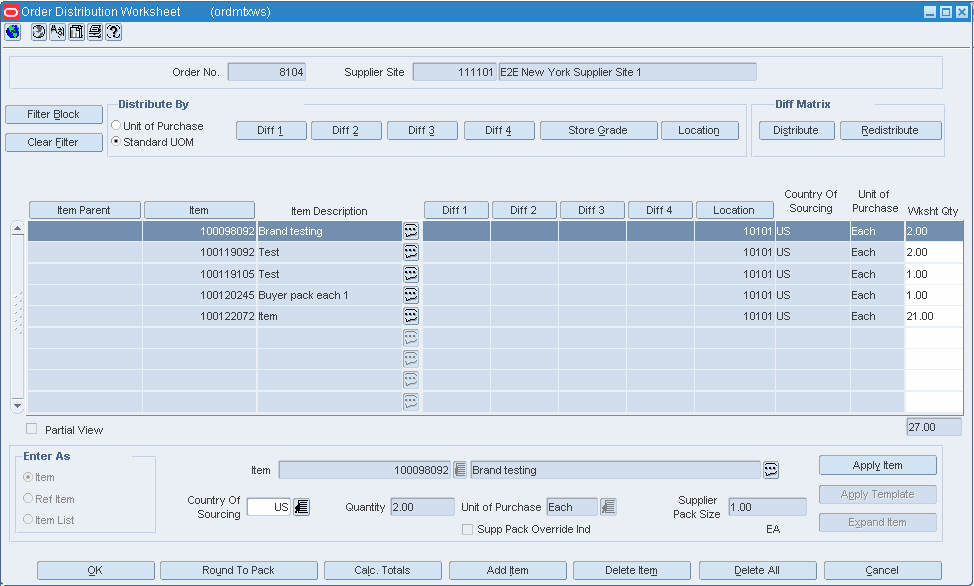
Click Items. The Order Distribution Worksheet window opens.
|
Note: Depending on the options you select on the PO Header Maintenance window, you may be prompted to provide additional information in other windows. |
Click Add Item.
In the Enter As field, select Item, Ref Item, or Item List.
Enter the information for the Item, Ref Item, or Item List in the apply block.
Click Apply Template. The Prepack Creation window opens.
In the Pack Type field, select Buyer or Vendor.
If you select Buyer in the Pack Type field, select an option in the Order As and Receive As fields.
If you select Vendor in the Pack Type field, enter the cost per component unit in the Unit Cost field.
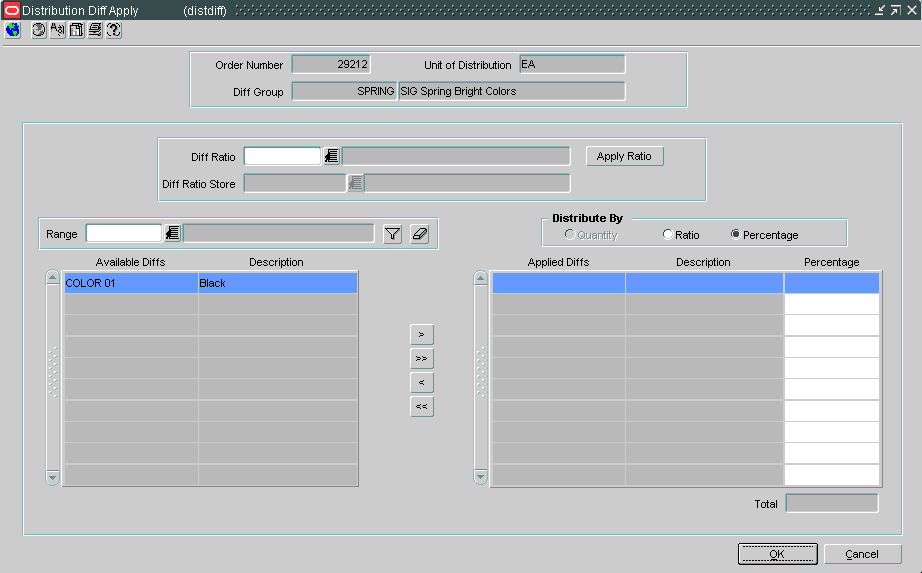
Click Add Diff.
In the Diff area, select either diff or diff Range.
Enter the diff ID or diff range, or click the LOV button and select a value.
Click Apply.
In the Diff fields, select Diff ID, Diff Range, or Diff Template.
Enter a description, or click the LOV button and select a value.
In the Quantity field, enter the quantity that you want to distribute among the diff combinations.
If you select Buyer in the Pack Type field, enter a sequence number in the Seq No field.
Click Apply to add the diffs to the selected record, or click Apply All to add the diffs to all records in the current range.
Click Build Cost to calculate the unit cost of the prepack.
Click OK to exit the Prepack window. The Order Distribution Worksheet window opens.
You may filter the items to apply a method of distribution to a specific set of items.
Select a distribution method and enter the appropriate information in the window that opens:
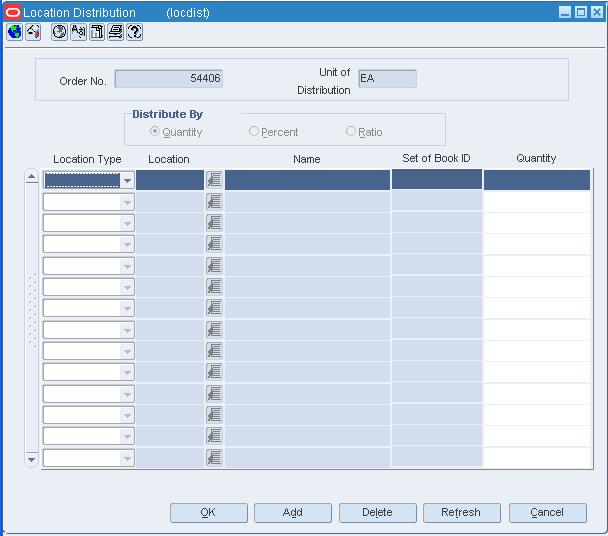
To distribute the items by location, click Location. The Location Distribution window opens.
To distribute the items by store grade, click Store Grade. The Store Grade Distribution window opens.
When you have finished distributing the items, click OK to exit the Order Distribution Worksheet window. The PO Item Maintenance window is displayed.
Navigate: From the main menu, select Ordering > Orders. The Order Search window is displayed.
Search for and retrieve a purchase order in Edit mode. Restrict the search to purchase orders in Worksheet status. The PO Header Maintenance window opens.
Click Item. The PO Item Maintenance window opens.
|
Note: If the Prepack check box is not selected on the PO Header Maintenance window, there is no pack assortment. |
Click Prepack. The Prepack Creation window opens.
To add diff values to the assortment:
Click Add Diff.
In the Diff area, select the Diff or Diff Range option.
In the next field, enter the ID of the diff or diff range, or click the LOV button and select the diff or diff range.
Click Apply. The diff or diffs are added to the table.
Filter the assortment to display only the new diffs before you add the sizes and quantities. Use the Blank Size and Blank Quantity criteria.
To add sizes and quantities to the assortment:
In the Size area, select the Size, Size Range, or Size Template option.
In the next field, enter the ID of the size, size range, or size template, or click the LOV button and select the size, size range, or size template.
In the Quantity field, enter the quantity that you want to distribute among the assortment.
Click Apply. The color or colors are added to the table.
Click Clear Filter to display all the records.
Click OK to save your changes and close the window.
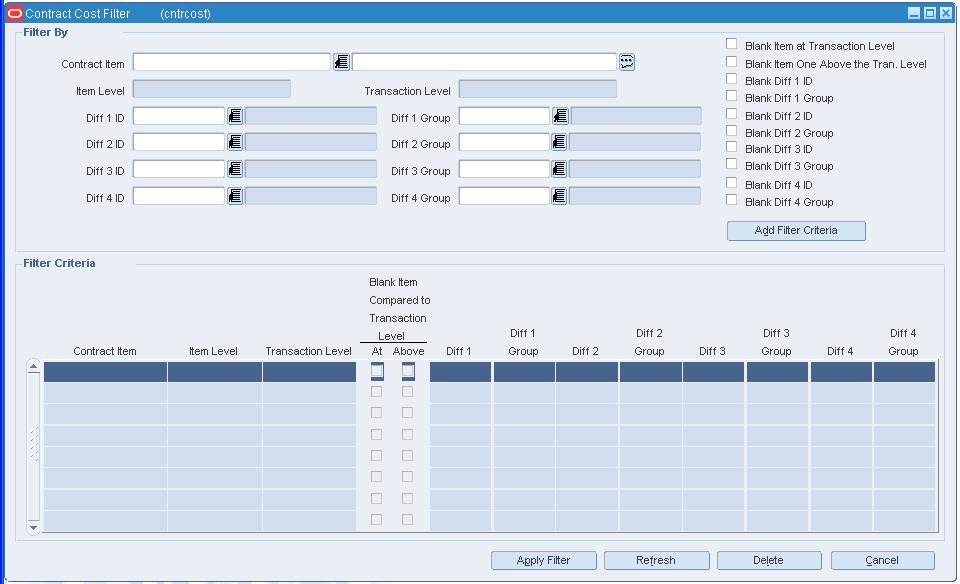
The Prepack Filter window allows you to filter the assortment that opens on the Prepack window. You can then view or edit the resulting subset of the assortment.
Navigate: From the main menu, select Ordering > Orders. The Order Search window is displayed.
Search for and retrieve a purchase order in Edit or View mode. The PO Header Maintenance window opens.
Click Item. The PO Item Maintenance window opens.
|
Note: If the Prepack check box is not selected on the PO Header Maintenance window, there is no pack assortment. |
Click Prepack. The Prepack Creation window opens.
Click Filter Block. The Prepack Filter window opens.
Enter or select the criteria by which you want to filter.
Click Apply Criteria. The filter criteria are added to the Filter Criteria table.
To delete a criterion from the Filter Criteria table:
Select the record and click Delete. You are prompted to delete the record.
Click Yes.
Click OK to close the Prepack Filter window. You are returned to the Prepack window where you can view or edit the results of the filter.
To clear the filter, click the Clear Filter button. All the records appear.
The PO Item Pack Component window allows you to view the component items for a pack item on a purchase order. This window only allows you to view the components of the pack, no changes can be made on this window.
The default view for the window opens when you open the window for the first time. You can also view the table with the ELC view or you can create a custom view.
You can create a purchase order manually. Many purchase orders are created through an auto generation process in RMS. Occasionally, you may need to write purchase order. After you create the purchase order header and add the appropriate details, you need to add items to a purchase order and distribute the items on the purchase order.
Create a Purchase Order for a Customer
Create a Purchase Order for a Pack Item
The PO Header Maintenance window allows you to create, edit, and view purchase orders. You can select special characteristics for a purchase order. Depending on which characteristics you select, you may be prompted to enter additional information.
Some of the special characteristics may be:
If you create an import order and pay by letter of credit, you must provide additional information for the letter of credit.
If you create an order for a prepack, you must provide the details for the prepack.
If you for a customer, you must provide customer details.
To display monetary amounts in the primary currency of the company or the currency of the order, select the appropriate option from Options > Currency.
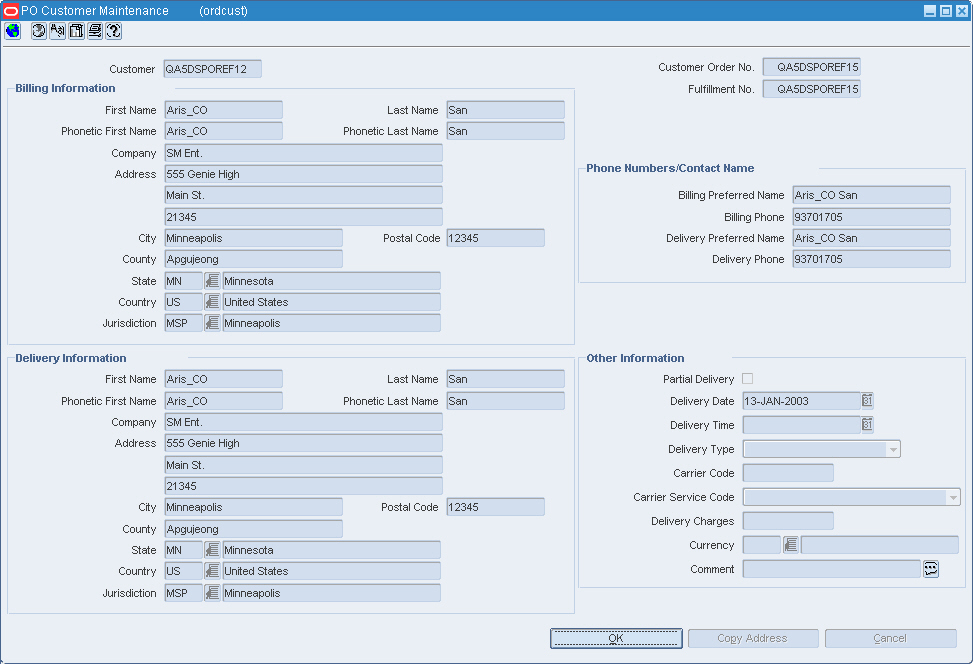
The PO Customer Maintenance window allows you to add and maintain customer contact information. Customer information can be maintained from within a purchase order or a transfer.
Create a Purchase Order for a Customer
Edit Customer Information for a Purchase Order
See "Edit Customer Information for a Transfer" in the Inventory Control chapter
The PO Item Level Deals window allows you to view deal components that apply to an item on a purchase order.
See "View Deals for an Item on a Purchase Order" in the Deals chapter
The Order Child Items window allows you to view the details of all the item parents on a purchase order, including item parents that are components of pack items. You can view the diffs, locations, quantities ordered, quantities received, costs, and retail values.
Navigate: From the main menu, select Ordering > Orders. The Order Search window is displayed.
Search for and retrieve a purchase order with diffs in View mode. The PO Header Maintenance window opens.
Click Items. The PO Item Maintenance Window opens.
Click Diff Detail. The Order Child Items window opens.
To filter the data in the table, enter values in the Item Parent, Diff, and Location fields, as necessary.
Click OK to close the window.
Navigate: From the main menu, select Ordering > Orders. The Order Search window opens.
In the Action field, select New Order and click OK. The PO Header Maintenance window opens.
The Order number is displayed.
Table 5-1 Purchase Order Header Maintenance fields and descriptions
| Field | Description |
|---|---|
|
Order No. |
The order number is displayed by default. |
|
Order Type |
In the Order Type field, select the order type. |
|
Status |
The order status is Worksheet. The status will be updated when the purchase order is submitted or approved. |
|
Supplier - Order |
Enter the order type or select the supplier - order from the list. |
|
Supplier Site - Order |
Enter the order type or select the supplier - order from the list. |
|
Location Type |
Select the location type from the list. |
|
Location |
Enter the purchase order location or select from the list. |
|
Invoice Loc Type |
This field is only enabled for Import POs. |
|
Invoice Loc |
This field is only enabled for Import POs. |
|
Routing Location |
This field is only enabled for Import POs. |
|
Terms |
Enter the term or select from the list. |
|
Pay Method |
Select the mode of payment from the list. |
|
PO Type |
Enter the purchase order type or select from the list. |
|
Department |
Enter the department or select from the list. |
|
Promotion |
If there are any promotions given on the item, then enter or select the promotion. |
|
Country of Sourcing |
Enter the sourcing country or select from the list. |
|
Order Currency |
Enter the order currency or select from the list. |
|
Order Exchange Rate |
Enter the order exchange rate or select from the list. |
|
Pickup Date |
Enter the date when the item will be picked up or click the Calendar button to select the date. |
|
Not Before Date |
Enter the date before which the item will be picked up by the customer or click the Calendar button to select the date. |
|
Not After Date |
Enter the date after which the item cannot be picked up by the customer or click the Calendar button to select the date. |
|
OTB End of Week Date |
Enter the open to buy date of the week date or click the Calendar button to select the date. |
|
Calculate Dates |
If you do not know the Pickup Date, Not Before Date, Not After Date, and OTB End of Week Date then click Calculate Dates. The dates will be calculated from the date of creating the purchase order. |
|
Note: You can either enter the dates manually or click the Calculate Dates button. When you click this button, the dates will be calculated automatically. |
To add the items to the purchase order, click Items on the PO Header Maintenance window.
Distribute the items on a purchase order by diff, location, or store grade.
Click OK to save your changes and close the window.
Navigate: From the main menu, select Ordering > Orders. The Order Search window is displayed.
Search for and retrieve a purchase order in Edit mode. The PO Header Maintenance window opens.
Edit the enabled fields as necessary.
To change the status of the purchase order, select the appropriate status from the Options menu.
Click Recalc Totals to update the monetary amounts.
Click OK to save your changes and close the window.
The Recalculation Options window allows you to change components of the current order that affect its price. These components include: the base cost of the items, scaling, replenishment, bracket costs, deals, and landed cost. The Recalculation Options window allows you to recalculate the total order cost. You can decide which component to choose when calculating the total cost of the order.
Navigate: From the main menu, select Ordering > Orders.
Search for and retrieve a purchase order in Edit mode. The PO Header Maintenance window opens.
Click Items. The PO Item Maintenance window opens.
Click Apply Process. The Recalculation Options window opens.
Select the check boxes for the options that you want to recalculate.
Click OK to recalculate the selected options and close the window.
The Order Search window allows you to enter criteria in order to search for purchase orders and view the results of the search.
After performing a search, you can view information regarding due orders and replenishment results. To view replenishment results for a selected order, select Options > Replenishment results. This option is enabled after you perform a search.
The default view for the Order Search window opens when you open the window for the first time. From the View menu, you can choose to view the Due Orders layout or you can create a custom view.
Navigate: From the main menu, select Ordering > Orders. The Order Search window opens.
In the Action field, select either Edit Order or View Order.
If you are searching for due orders, in the Buyer field, enter the ID of the buyer, or click the LOV button and select the buyer.
Enter additional criteria as desired to make the search more restrictive.
Click Search. The Order Selection window displays the purchase orders that match the search criteria.
Select a task:
To perform another search, click Refresh.
To display the details of the purchase order, select a record and click OK. The PO Header Maintenance window opens.
Click Close to exit.
Navigate: From the main menu, select Ordering > Orders. The Order Search window is displayed.
Search for and retrieve a purchase order in Edit mode. The PO Header Maintenance window opens.
Click Print. The Report Parameters Web page opens.
In the Destination field, select where you want the finished report to be sent.
|
Note: Select Cache to view the report online. |
Click Submit Query. The report is generated and sent to the selected destination.
First, create an item using Quick Item Entry (see "Create an Item Using Quick Item Entry" in the Item Maintenance chapter).
Navigate: From the main menu, select Ordering > Orders. The Order Search window is displayed. Create a New Order. Enter the necessary information.
Select Shipping from the Options menu. The Order - Shipping Information window opens.
In the Purchase Type field enter the type, or select the LOV button and select the type.
In the Shipping Method field select the method, or select the LOV button and select the method.
In the Freight Terms field select the terms, or select the LOV button and select the terms.
In the Freight Payment Method field select the method, or select the LOV button and select the method.
In the Transportation Responsibility field select the transportation responsibility, or select the LOV button and select the transportation responsibility.
In the Title Pass Location select the location, or select the LOV button and select the location.
In the Pickup Location field enter the location description.
In the Pickup No. field enter the field description.
Click OK to save your changes and close the window. The PO Header Maintenance window opens.
Navigate: From the main menu, select Ordering > Orders. The Order Search window is displayed.
Search for and retrieve a purchase order in Create Order from Existing mode. The PO Header Maintenance window opens.
Edit the enabled fields as necessary.
To edit the items and locations:
Click Items. The PO Header Maintenance window opens.
Edit as necessary.
Click Locations. The PO Item/Location window opens.
Edit as necessary.
Click OK to exit each window. The PO Header Maintenance window opens.
Click Recalc Totals to update the monetary amounts.
Click Apply Process.
Select the Apply Deals options to include any deals that pertain to the items. You are prompted to include the deals.
Click Yes to approve the inclusion of deals.
Click OK to save your changes and close the window.
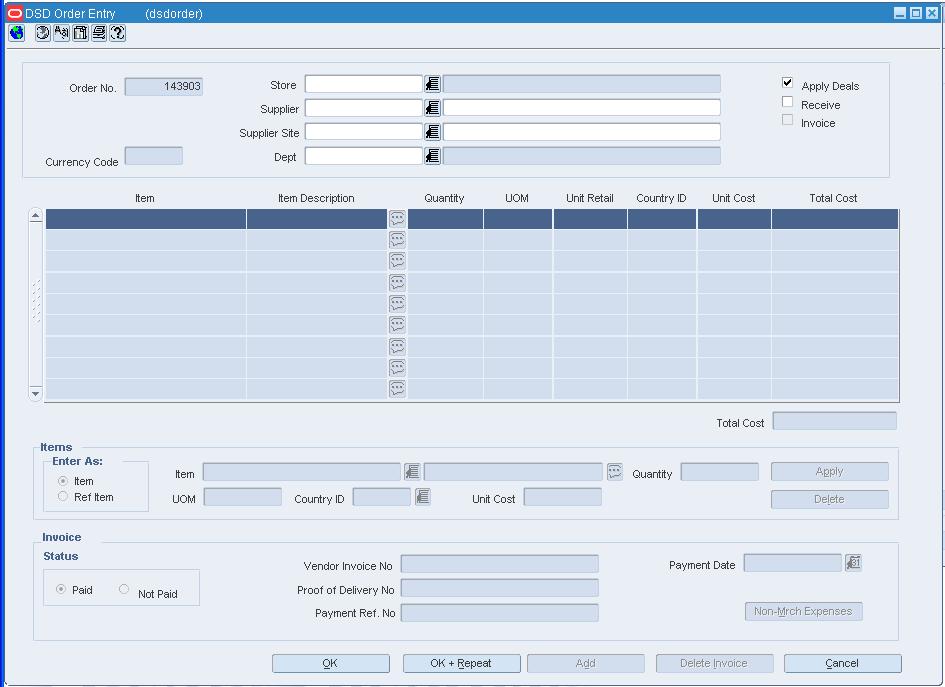
The Direct Store Delivery window allows you to create, edit and view direct store deliveries.
Some of the special characteristics may be:
If you create an import order and pay by letter of credit, you must provide additional information for the letter of credit.
If you create an order for a prepack, you must provide the details for the prepack.
If you create a purchase order for a customer, you must provide customer details.
To display Ordering > Orders:
The Order Search window opens.
Select DSD Order Entry from the Action drop down list.
Click OK.
The DSD Order Entry window opens.
More information can be found in these related topics:
Navigate: From the main menu, select Ordering > Orders. The Order Search window opens.
In the Action field, select DSD Order Entry and click OK. The Direct Store Delivery window opens.
In the Store field, enter the store code, or click the LOV button and select the store.
In the Supplier - Order field, enter the ID of the supplier, or click the LOV button and select the supplier. The supplier defaults for other fields are filled in automatically.
In the Supplier Site - Order field, enter the supplier site, or click the LOV button and select the supplier site. The Supplier Site defaults for other fields are filled in automatically.
Select Triangulation, if necessary.
In the Supplier - Delivery field, enter the ID of the supplier, or click the LOV button and select the supplier, if necessary. The supplier defaults for other fields are filled in automatically.
In the Supplier Site - Delivery field, enter the supplier site, or click the LOV button and select the, if necessary. The Supplier Site defaults for other fields are filled in automatically.
In the Department field, enter the ID of the department, or click the LOV button and select the department.
|
Note: The department may be required depending on how the system was set up. |
Select the Apply Deals, Receive, and/or Invoice checkboxes, as appropriate.
In the Item area, enter an item in the Item field, or click the LOV button and select an item.
In the Quantity field, enter the quantity.
Click Apply.
In the Invoice area, enter a number in the Vendor Invoice No field.
In the Proof of Delivery No field, enter a number.
In the Payment Ref. No field, enter a number.
In the Payment Date field, enter a date, or click the calendar button and select a date.
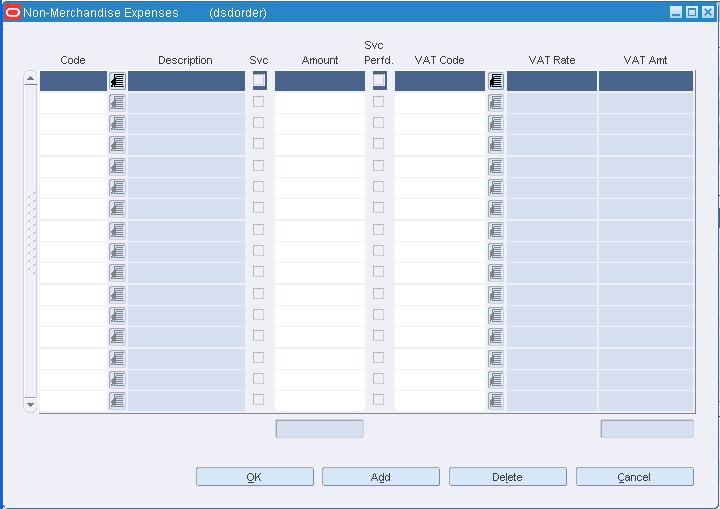
Click Non-Mrch. Expenses. The Non-Merchandise Expenses window opens.
In the Code field, enter a code, or click the LOV button and select a code.
In the Amount field, enter an amount.
In the VAT Code field, enter a code, or click the LOV button and select a code.
Click OK. The information is saved and the Non-Merchandise Expenses window closes.
Click OK to save your changes and close the window.
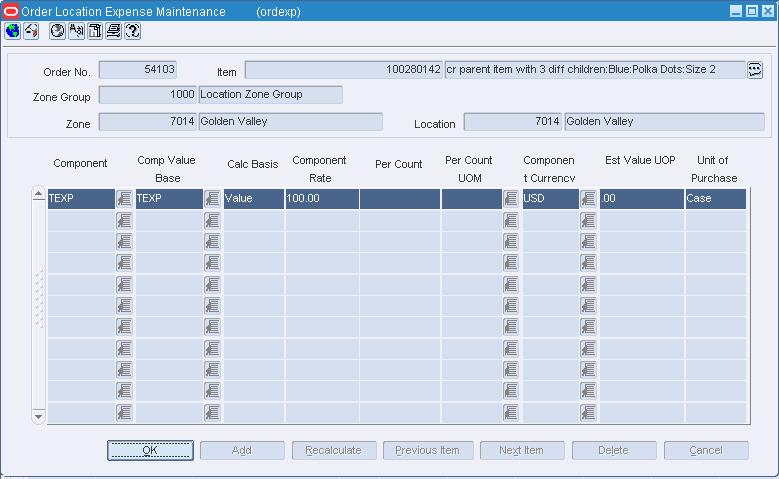
The Order Location Expense Maintenance window allows you to view the importing and exporting expenses associated with a purchase order.
This window may also be used to create and edit expense components for each order/item/location combination. Changes that are made at one location can be defaulted to all other locations within the same zone.
The default view for the Order Location Expense Maintenance window opens when you open the window for the first time. From the View menu, you can create a custom view.
Create Expense Components for an Order/Item/Location Combination
Edit Expense Components for Each Order/Item/Location Combination
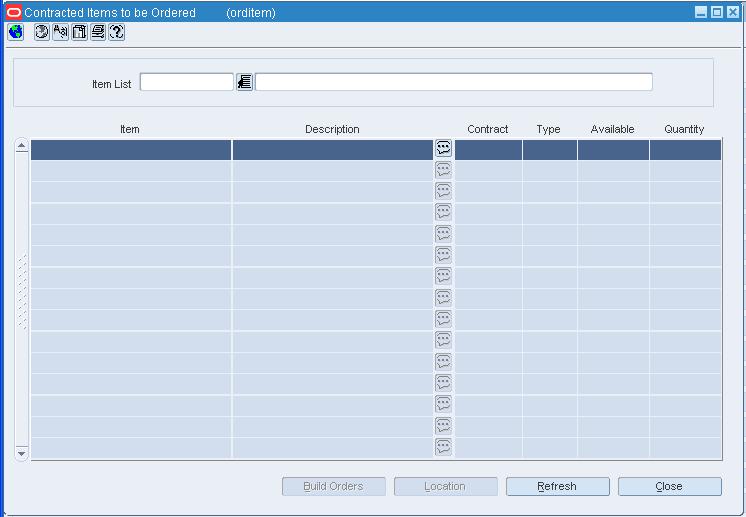
The Build Orders From Contracts window allows you to generate purchase orders from an item list that contains contracted items.
Navigate: From the main menu, select Ordering > Orders. The Order Selection window opens.
Search for and retrieve a purchase order in Edit mode. Retrieve purchase orders in Worksheet status only. The PO Header Maintenance window opens.
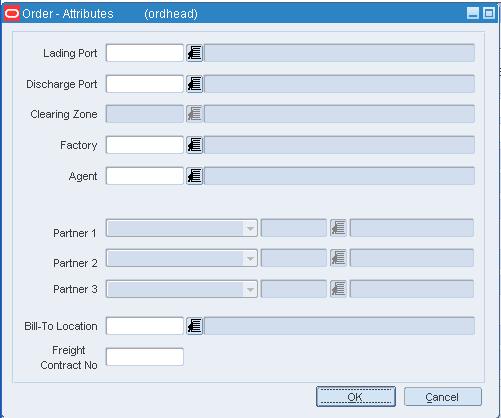
From the Options menu, select Attributes. The Order - Attributes window opens.
Enter or select the import attributes that apply to the current purchase order.
|
Note: When you are using Oracle Retail Trade Management (RTM) with RMS, the Bill-To Location field is required. |
Click OK to save your changes and close the window.
Appointments define the quantity of goods that are expected to ship from one location to another. The appointments are created in the warehouse management system and sent to RMS. When a shipment is received, the warehouse management system sends a message to RMS Receiving and completes the following actions:
The appointment status changes to Closed
Qty Received and Receipt No fields are updated
RMS attempts to close the document associated with the appointment (a purchase order, transfer, or allocation).
A purchase order, transfer, or allocation cannot be closed if an associated appointment does not have a status of Closed. Also, the line item order quantity (canceled quantity) cannot fall below the total expected quantity for all of the shipments and appointments that are attached to the order for that line item.
Navigate: From the Main menu, select Ordering > Orders. The Order Search window opens.
Search for and retrieve a purchase order in Edit mode. The PO Header Maintenance window opens.
Click Items and select an item. The PO Item Maintenance window opens.
Click Locations. The PO/Item Location window opens.
In the Order Details table, select an item. Select Options > Expenses. The Order Location Expense Maintenance window opens.
Click Add. The next available line in the table will be highlighted.
In the component field, click the LOV button and select the type of expense component for this order/item/location combination.
In the Comp Value Base (CVB) field, click the LOV button and select a CVB.
Click OK to save your changes and close the window. You will be asked to overwrite the cost components of all locations within the same zone for this order/item combination.
Click Yes.
|
Note: Click No if you only want to apply this expense component to the selected location. |
The window closes and the PO/Item Location window opens.
Navigate: From the main menu, select Ordering > Orders. The Order Search window opens.
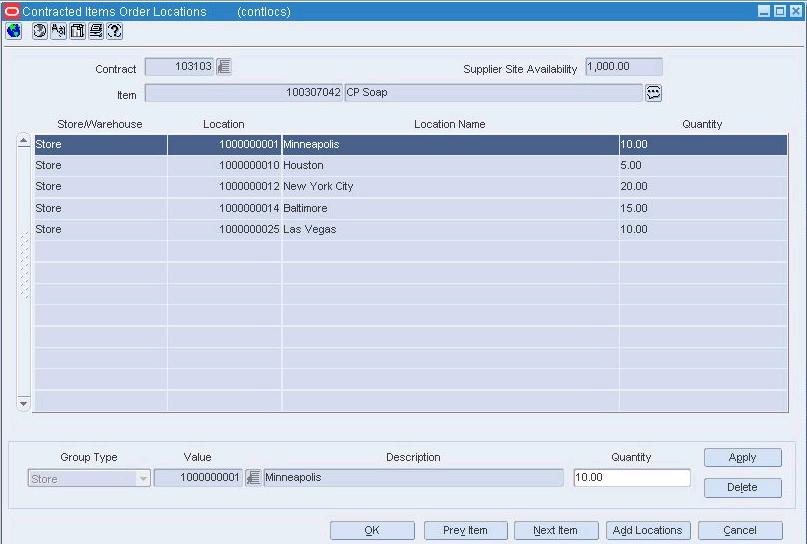
In the Action field, select New Order with Contract and click OK. The Contracted Items to be Ordered window opens.
In the Item List field, enter the ID of an item list, or click the LOV button and select the item list. The items on the item list appear.
Click Location. The Contracted Items Order Locations window opens.
In the Contract field, enter the ID of the contract, or click the LOV button and select the contract.
In the Group Type field, select the grouping mechanism for the destination locations.
In the Value field, enter the ID of the group, or click the LOV button and select the group.
In the Quantity field, enter the number of units to distribute to each location.
Click Apply. The locations and quantities are added to the table.
Click Next Item to select a contract for and distribute the next item on the item list.
After all the items are distributed, click OK to exit the Contracted Items Order Locations window.
Click Build Orders. The Build Orders from Contracts window opens.
In the Order Type field, select the type of order.
In the Not Before Date and Not After Date fields, enter the dates, or click the calendar buttons and select the dates.
In the Create Status field, select Generated for each record.
Click Create Orders.
When prompted to create the orders, click Yes.
Click OK to save your changes and close the window.
Navigate: From the main menu, select Ordering > Orders. The Order Search window opens.
In the Action field, select New Order and click OK. The PO Header Maintenance window opens.
In the Order Type field, select the order type.
|
Note: The Order Type value of Customer Order can only be selected when the OMS Indicator = N. Manual Customer Orders cannot otherwise be created on-line in RMS. |
In the Import Country field, enter the code for the import country, or click the LOV button and select the import country.
|
Note: When creating an import order, make sure that the import country and the import location are the same. |
In the Supplier field, enter the ID of the supplier, or click the LOV button and select the supplier. The supplier defaults for other fields are filled in automatically.
|
Note: If the PO is a multi-site Customer Order (location is a stockholding store), it is required for the supplier to support Direct to Store Delivery. |
Select a store in the Location field for a Customer Order PO.
In the Department field, enter the ID of the department, or click the LOV button and select the department.
|
Note: The department may be required depending on how the system was set up. |
In the Pickup Date field, enter a date, or click the calendar button and select a date.
In the Not Before Date and Not After Date fields, enter the dates, or click the calendar button and select the dates.
Enter or edit the enabled fields as necessary.
From the Options menu, select Customer. The PO Customer Maintenance window opens.
In the PO Customer Maintenance Window, the fields and descriptions are given below:
|
Note: The PO Customer Maintenance form is available for edit if the OMS indicator is No. The customer order number and fulfillment number fields are automatically generated (defaulted as the Order No) when OMS indicator is 'No'. |
Table 5-2 PO Customer Maintenance Fields and Description
| Field | Description |
|---|---|
|
Customer |
Enter the customer in this field. |
|
Customer Order No. |
This field will be set equal to the Purchase Order number for customer order POs entered in RMS. |
|
Fulfillment No. |
This field will be set equal to the Purchase Order number for customer order POs entered in RMS. |
|
Billing Information |
In this block, enter the following details for the Billing Information:
|
|
Delivery Information |
In this block, enter the following details for the Delivery Information:
|
|
Phone Numbers/Contact Name |
In this block, enter the following details for the Phone Numbers/Contact Name:
|
|
Other Information |
In this block, enter the following details for the other Information:
|
After completing the information, click OK to exit the PO Header Maintenance window.
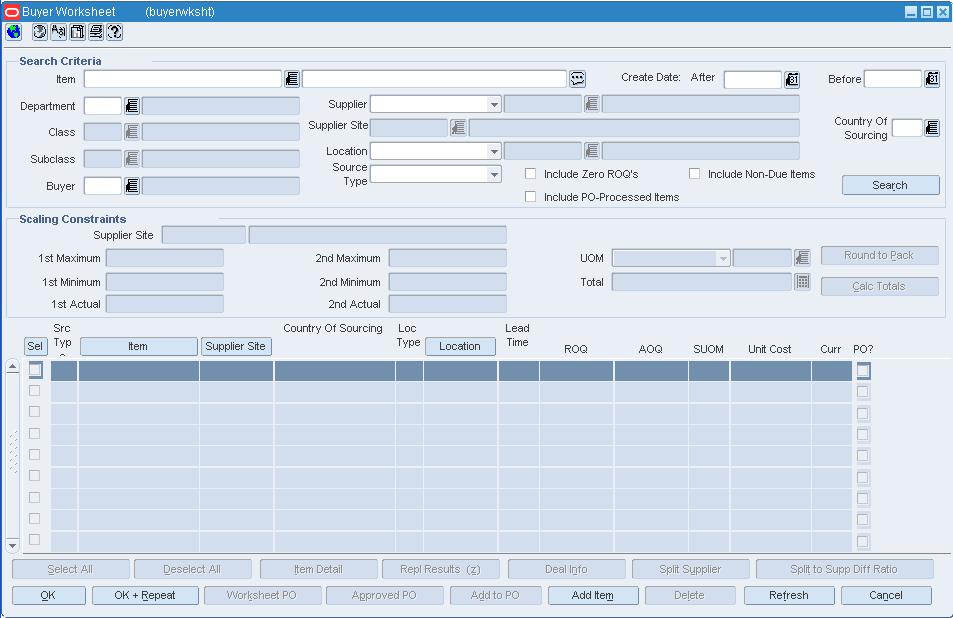
Navigate: From the main menu, select Ordering > Buyer worksheet > Edit. The Buyer Worksheet opens.
Search for and retrieve items in the Buyer Worksheet.
Select the check box to the left of the item you wish to delete.
Click Delete. You are prompted to delete the item.
Click Yes.
Click OK to save your changes and close the window.
Navigate: From the main menu, select Ordering > Pre-Issue Order Numbers. The Pre-Issue of Order Numbers window opens.
Select a record in the pre-issue table.
Click Delete. You are prompted to confirm the deletion of the pre issue order request record.
Click Yes.
Click OK to close the window and save your changes.
Navigate: From the main menu, select Ordering > Orders. The Order Search window is displayed.
|
Note: Editing the customer information for a PO is applicable only if the OMS indicator is 'No'. |
Search for and retrieve a purchase order in Edit mode. The PO Header Maintenance window opens.
From the Options menu, select Customer. The PO Customer Maintenance window opens.
|
Note: The order type should be 'Customer Order' to determine if it is a customer order PO. |
Edit the enabled fields as necessary.
Click OK to save your changes and close the window.
Navigate: From the main menu, select Ordering > Orders. The Order Search window opens.
Search for and retrieve a purchase order in Edit mode. The PO Header Maintenance window opens.
Click Items and select an item. The PO Item Maintenance window opens.
|
Note: The Item and supplier setup supports direct ship indicator = Y. |
Click Locations. The PO/Item Location window opens.
In the Order Details table, select an item. From the options menu, select Expenses. The Order Location Expense Maintenance window opens.
To delete an expense component, click on the component and click Delete. Click Yes, when prompted to confirm the deletion.
To update an expense component, make changes to any editable field.
Click Recalculate to recalculate the expense information.
Click OK to save your changes and close the window. If you made changes to a component, you will be asked to overwrite the cost components of all locations within the same zone for this order/item combination.
Click Yes.
|
Note: Click No if you only want to apply the changes to the selected location. |
The window closes and the PO/Item Location window opens.
Navigate: From the main menu, select Ordering > Orders. Search for and retrieve a purchase order in Edit mode. Restrict the search to purchase orders in Worksheet status. The PO Header Maintenance window opens. To apply inventory management details to the entire purchase order, from the Options menu, select Inventory Mgmt./Totals. The Order Inventory Maintenance Window opens.
or
To apply inventory management details to an item on the purchase order, click Items on the PO Header Maintenance window. The PO Item Maintenance window opens. Select an item on the table. From the Options menu, select Inventory Mgmt Info/Totals. The Order Inventory Maintenance Window opens.
or
To apply inventory management details to an item and location on the purchase order, click Locations on the PO Item Maintenance window. The PO Item/Location window opens. Select a location on the Order Detail table. From the Options menu, select Inventory Mgmt Info/Totals. The Order Inventory Maintenance window opens.
In the Scaling Constraints area, select the Scale to Order check box. The Scaling Constraints area is enabled.
In the Scaling Objective field, select whether purchase orders are scaled to the minimum or maximum values of the scaling constraints.
In the Scaling Level field, select the level at which the scaling is performed.
In the Maximum Iterations field, edit the maximum number of times that the scaling process is performed for the purchase order.
In the Scaling Constraints Primary column, edit the following fields:
Type: Select the primary type of constraint to use when scaling orders.
UOM/Currency: If you select, Mass or Volume as the primary type, edit the UOM code, or click the LOV button and select the UOM. If you select, Amount as the primary type, edit the currency code, or click the LOV button and select the currency code.
Max Value: Edit the maximum value of the constraint.
Max Value Tolerance: Edit the percentage tolerance for the maximum value of the constraint.
Min Value: Edit the minimum value of the constraint.
Min Value Tolerance: Edit the percentage tolerance for the minimum value of the constraint.
In the Scaling Constraints Secondary column, edit the following fields:
Type: Select the secondary type of constraint to use when scaling orders.
|
Note: The Secondary Type cannot be the same as the Primary Type. |
UOM/Currency: If you select, Mass or Volume as the secondary type, edit the UOM code, or click the LOV button and select the UOM. If you select, Amount as the secondary type, edit the currency code, or click the LOV button and select the currency code.
Max Value: Edit the maximum value of the constraint.
Max Value: Edit the maximum value of the constraint.
Max Value Tolerance: Edit the percentage tolerance for the maximum value of the constraint.
Min Value: Edit the minimum value of the constraint.
Min Value Tolerance: Edit the percentage tolerance for the minimum value of the constraint.
In the Level field, select the level at which the minimum order requirements of the supplier must be met.
In the Minimum 1 column, complete the following fields:
Type: Select how the first minimum order requirement is expressed.
UOM/Currency: If you select Mass or Volume as the primary type, edit the UOM code, or click the LOV button and select the UOM. If you select Amount as the primary type, edit the currency code, or click the LOV button and select the currency code.
Value: Edit the value of the first minimum order requirement of the supplier.
When you define two minimum order requirements, select the relationship between the requirements in the Conjunction field.
In the Minimum 2 column, complete the following fields:
Type: Select how the second minimum order requirement is expressed.
|
Note: The Minimum 2 Type cannot be the same as the Minimum 1 Type. |
UOM/Currency: If you select Mass or Volume as the secondary type, edit the UOM code, or click the LOV button and select the UOM code. If you select Amount as the secondary type, edit the currency code, or click the LOV button and select the currency code.
Value: Edit the value of the first minimum order requirement of the supplier.
In the Truck Splitting Constraints area, select the Split Order into Truckloads check box. The Truck Splitting Constraints area is enabled.
In the Constraint 1 column, complete the following fields:
Type: Select the primary type of constraint to use when splitting orders into truckloads.
UOM/Currency: If you select Mass or Volume as the primary type, edit the UOM code, or click the LOV button and select the UOM code. If you select Amount as the primary type, edit the currency code, or click the LOV button and select the currency code.
Value: Edit the value of the constraint.
Tolerance: Edit the percentage tolerance for the maximum value of the constraint.
In the Constraint 2 column, complete the following fields:
Type: select the primary type of constraint to use when splitting orders into truckloads.
|
Note: The Constraint 2 Type cannot be the same as the Constraint 1 Type. |
UOM/Currency: If you select Mass or Volume as the secondary type, edit the UOM code, or click the LOV button and select the UOM code. If you select Amount as the secondary type, edit the currency code, or click the LOV button and select the currency code.
Value: Edit the value of the constraint.
Tolerance: Edit the percentage tolerance for the maximum value of the constraint.
In the Supplier field, edit the supplier ID, or click the LOV button and select the supplier.
In the File ID field, edit the file ID, or click the LOV button and select the file ID.
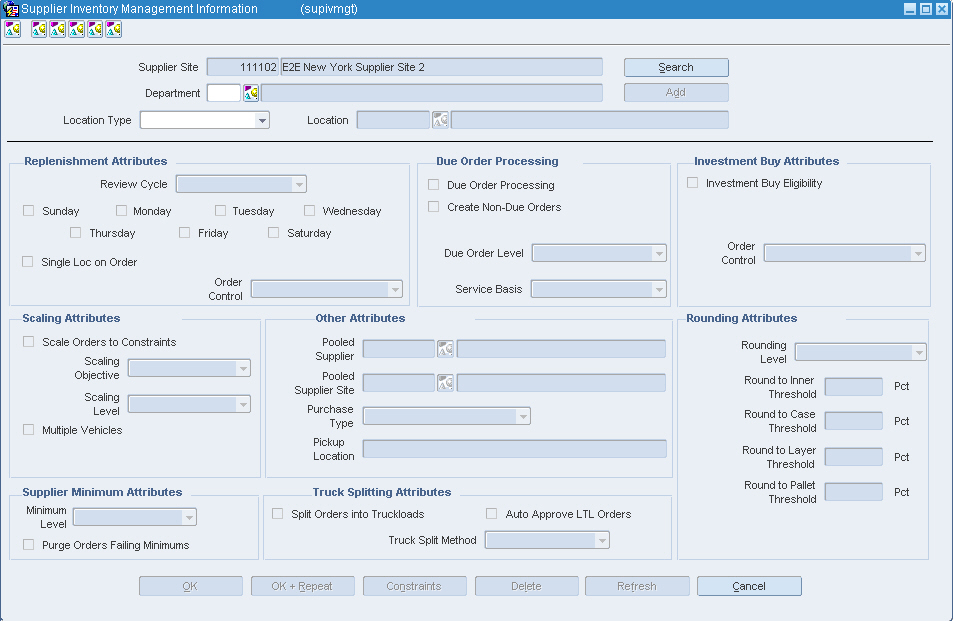
Navigate: From the main menu, select Control > Supplier. The Supplier Search window opens.
Search for and retrieve a supplier site in edit mode. The Supplier Maintenance window opens.
From the Options menu, select Inventory Management. The Supplier Inventory Management Information window opens.
To edit the inventory management level, enter the ID of the correct department, location, or department/location combination, or click the LOV button and select the appropriate information.
Click Search. The inventory management fields are automatically filled in.
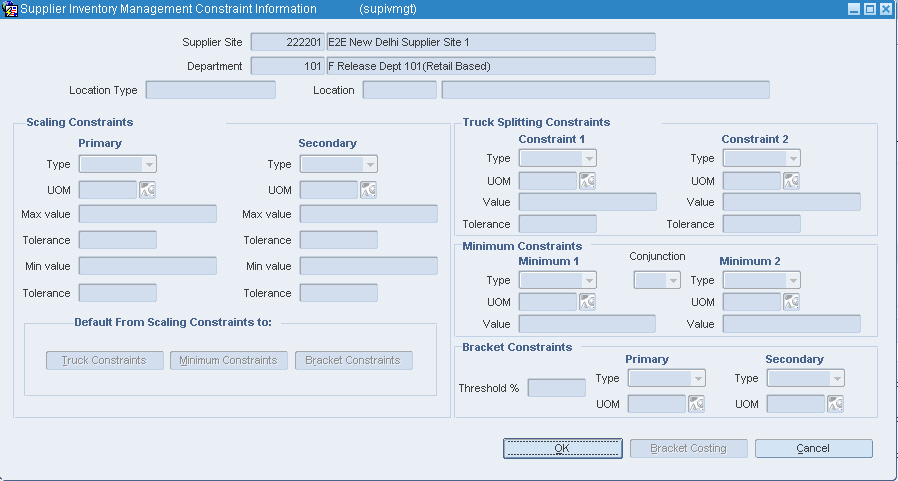
Click Constraints. The Supplier Inventory Management Constraint Information window opens.
Edit the enabled fields as necessary.
Click OK to save your changes and close the window.
Navigate: From the main menu, select Ordering > Buyer Worksheet > Edit. The Buyer Worksheet opens.
Search for and retrieve items on the Buyer Worksheet.
In the Sel field, select the check box to the left of the items you wish to review. To review the supplier constraints for multiple items, the items should have the same inventory management level.
Click Calc Totals. The supplier constraints for the line item or item are displayed.
|
Note: If the selected line items do not fulfill the criteria at a lower inventory management level, the next highest inventory management level information will be displayed. |
To round items to the required order quantity, click Round to Pack. The quantities are rounded based on the item's ordering restrictions from the supplier.
Once selected items meet the constraints, you may create a purchase order for the items.
Click OK to save your changes and close the window.
Navigate: From the main menu, select Control > Supplier > Maintenance. The Supplier Search window opens.
Search for and retrieve a Supplier Site in Edit mode. The Supplier Maintenance window opens.
From the Options menu, select Inventory Management. The Supplier Inventory Management Information window opens.
To edit the inventory management level, enter the ID of the correct department, location, or department/location combination, or click the LOV button and select the appropriate information.
Click Search.
Edit the enabled fields as necessary.
To delete the inventory management information:
Click Delete.
When prompted to delete the inventory management information, click Yes.
Click OK to save your changes and close the window.
Navigate: From the main menu, select Ordering > Proof of Performance Fulfillment> Edit. The POP Terms Fulfillment window opens.
In the Search By field, select the level at which you want to search for proof of performance definitions.
Enter or select the additional search criteria in the highlighted fields.
Click Search. Deals that match your search criteria appear in the Proof of Performance Definitions area.
In the Proof of Performance Fulfillment area, edit the enabled fields as necessary.
Click OK to save your changes and close the window.
Navigate: From the main menu, select Items > Item Lists. The Item List Search window opens.
Search for and retrieve an item list in Use mode. The Item List Header window opens.
From the Options menu, select Create Mass Item Change > User Defined Attributes. The Item UDA - Mass Change window opens.
Click Add.
In the Maintenance Type field, select the type of action.
In the User Defined Attribute field, enter the ID of the UDA, or click the LOV button and select the UDA.
If the Maintenance Type is Add, Change, or Create, enter the ID of the new value in the New UDA Value field, or click the LOV button, the calendar button, or the comments button and select the value.
|
Note: The type of button that opens depends on whether the UDA is a list of values, date, or free form text. |
If the Maintenance Type is Change or Delete, enter the ID of the current value in the Existing UDA Value field, or click the LOV button and select the value.
To delete a maintenance record:
Select the record and click Delete.
When prompted to delete the record, click Yes.
Click OK to save your changes and close the window.
Navigate: From the main menu, select Ordering > Orders. The Order Search window is displayed.
Search for and retrieve a purchase order in Edit mode. The PO Header Maintenance window opens.
From the Options menu, select Shipping. The Order Shipping Information window opens.
Edit the enabled fields as necessary.
Click OK to save your changes and close the window.
Navigate: From the main menu, select Ordering > Orders. The Order Search window is displayed.
Search for and retrieve a purchase order in Edit mode. The PO Header Maintenance window opens.
From the Options menu, select Buyer. The Order Buyer Information window opens.
To add a buyer, enter the ID of the buyer in the Buyer field, or click the LOV button and select the buyer.
To delete the buyer:
Click Remove.
When prompted to delete the record, click Yes.
Click OK to save your changes and close the window.
Navigate: From the main menu, select Ordering > Orders. The Order Search window is displayed.
Search for and retrieve a purchase order in Edit mode. The PO Header Maintenance window opens.
From the options menu, select Supplier Details. The Order Supplier Address window opens.
Click Search.
Select an order address from the list of values and click OK to exit.
Click OK to save your changes and close the window.
Navigate: From the main menu, select Control > Supplier > Maintenance. The Supplier Search window opens.
Search for and retrieve a supplier site. The Supplier Maintenance window opens.
|
Note: If the Financials module is installed, select Control > Supplier > Maintenance from the main menu. |
Click Org Unit. The Partner Org Unit window opens.
Make edits.
Select the check box next to the organizational unit that is the primary pay site.
Click Apply.
Click OK. The window closes.
Navigate: From the main menu, select Items > Items. The Item Search window opens.
Search for and retrieve an item in Edit mode. Restrict the search to items in Worksheet status. The Item Maintenance window opens.
Click on the Retail by Zone option on the Options list. The Item Retail Price by Zone window opens.
|
Note: You can edit the retail price for an sellable item. |
Edit the enabled fields on the table as necessary.
Enter the new retail price in the Selling Unit Retail field.
Enter the Selling UOM as necessary.
In the Markup% field, enter the percentage the price is marked up, based on the supplier's cost.
Update the appropriate multi-units field as necessary.
Click Apply.
Select the Overwrite All Lower Level Item Records check box if you want to apply the edits to the lower level items down to the transaction level.
Click OK to save your changes and close the window.
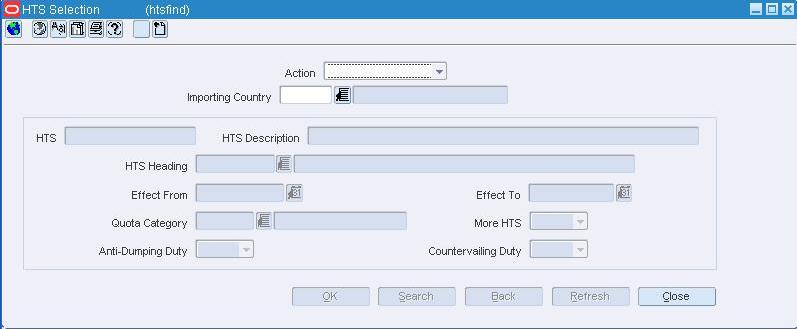
The HTS Details window allows you to view the details of an HTS classification that is associated with an item on a purchase order.
Navigate: From the main menu, select Ordering > Orders. The Order Selection window opens.
Search for and retrieve a purchase order in View mode. The purchase order must by an import type purchase order. The PO Header Maintenance window opens.
Click Items. The PO Header Maintenance window opens. Select an item.
From the Options menu, select HTS. The Order Item HTS Maintenance window opens.
To view the details of an HTS classification:
Select an HTS classification and click the HTS Details button. The HTS Details window opens.
Click Close to close the window.
Click OK to close the window.
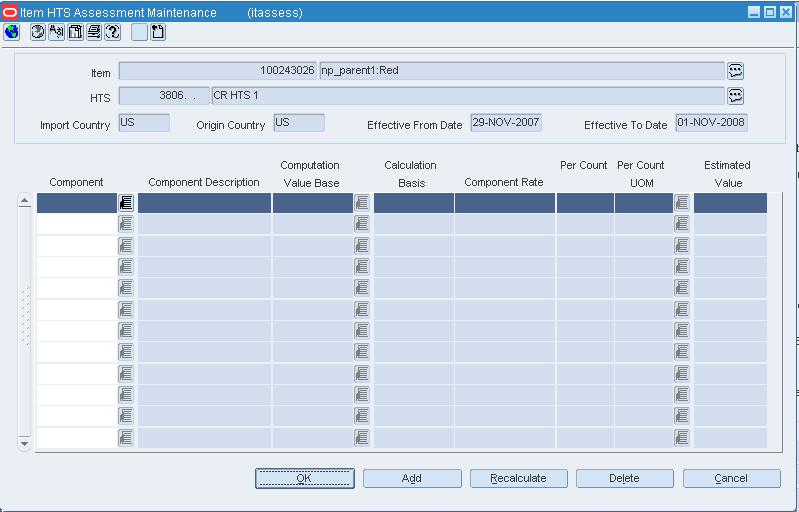
The Order Item HTS Maintenance window allows you to maintain the HTS classifications and assessments that are associated with an item on a purchase order.
The cost components track the pertinent assessments for an item by HTS classification. They may be included in duty, expense, and actual landed cost calculations. Assessments differ from expenses in that they are defined by a government agency. To display the status of the cost components for each calculation, select Nomination Flag from the View menu.
If you are using Trade Management to import costs, it is assumed that all locations have the same cost value for an item. However, if the cost of items that are being imported do vary by location, Trade Management will convert the cost values to an identical weighted average cost.
See "Approve an HTS Classification for an Item on a Purchase Order" in the Item Maintenance chapter
See "Edit an Assessment for an Item on a Purchase Order" in the Item Maintenance chapter
See "Edit an HTS Classification for an Item on a Purchase Order" in the Item Maintenance chapter
Navigate: From the main menu, select Ordering > Orders. The Order Selection window opens.
Search for and retrieve a purchase order in View mode. The PO Header Maintenance window opens.
Click Items. The PO Header Maintenance window opens. Select an item.
From the Options menu, select HTS. The Order Item HTS Maintenance window opens.
Select an HTS classification. The assessments appear in the Assessment Details table.
Click OK to close the window.
The New Parent Template window allows you to apply an Item Parent pack template to an Item Parent on a purchase order.
See "Add a Pack Template to a Purchase Order" in the Item Maintenance chapter
The Order - Attributes window allows you to record import information about a purchase order. Attributes can only be recorded for purchase orders in Worksheet status. In RMS, you can record the bill-to location and the freight contract number for the purchase order.
If Oracle Retail Trade Management is installed with RMS, you can also record the following information about the purchase order:
Lading port
Discharge port
Factory
Agent
Additional partner information
Because lading port, discharge port, agent, and factory affect HTS assessments and expenses, changing these attributes results in the recalculation of these assessments and expenses for the purchase order.
When you add a supplier to a purchase order, the partner and factory information defined for the supplier import attributes will default to the order attributes. Any documents association with the factory or partner will also be defaulted to the purchase order.
The Order - Buyer Information window allows edit and view the information about the buyer who is responsible for the purchase order.
The Order - Mass Item Cancel window allows to indicate the reason why you are canceling all the items on a purchase order. The status of the purchase order is changed to Closed. You can reverse the effect of canceling all the items on the purchase order by reinstating all the items. The status of the purchase order is changed to Worksheet.
The Order - Dates window allows you to edit and view the earliest and latest ship dates for an order. You can also view the dates on which the order was written, approved, and closed.
Navigate: From the main menu, select Ordering > Orders. The Order Search window is displayed.
Search for and retrieve a purchase order in Edit mode. Restrict the search to purchase orders in Worksheet status. The PO Header Maintenance window opens.
From the options menu, select Order Dates. The Order Dates window opens.
Enter the date in the enabled fields, or click the calendar button and select a date.
Click OK to save your changes and close the window.
If you edited the Estimated In Stock Date, you are prompted to apply the date to all items. Click Yes.
The Order - Supplier Address window allows you to edit and view the supplier's address, contact information, and currency. If the supplier has multiple order addresses, you can select one other than the default.
Navigate: From the main menu, select Ordering > Buyer worksheet > Edit. The Buyer Worksheet opens.
Search for and retrieve items in the Buyer Worksheet.
Select the item you want to split in the details frame. The line item must be a replenishment or manual line item. It cannot be generated from investment buy.
Click Split Supplier. The Split Supplier window opens. The primary supplier for the item opens in the detail area.
To add an additional supplier, click Add. The next row on the table is enabled.
To remove the supplier, click Delete to remove the primary supplier from the table.
In the Supplier field, enter the supplier ID or click the LOV button and select the supplier you wish to add to the item. The AOQ field is enabled.
In the Country of Sourcing field, enter the country of sourcing ID or click the LOV button and select an country of sourcing.
Enter the AOQ amount for this line item. The AOQ field in the header area is updated as each additional item/supplier quantity is entered.
Click OK to save your changes and close the window.
|
Note: If the ROQ does not equal the AOQ, a warning message appears. Click Yes to continue, or No to return to the Split Supplier window and correct the order quantity. |
Navigate: From the main menu, select Ordering > Buyer worksheet > Edit. The Buyer Worksheet opens.
Search for and retrieve items in the Buyer Worksheet.
Select the item you want to split in the details frame. The line item must be a replenishment or manual line item. It cannot be generated from investment buy.
Click Split to Supp Diff Ratio. The ROQ for the item/location will be split according to the contents of the table. The button will only be enabled if the source type is Replenishment and the supplier split ratio is defined for the item/location.
Click OK to save your changes and close the window.
The Order - Shipping Information window allows you to edit and view the shipping information for the items on a purchase order.
Edit Shipping Information for a Purchase Order
See "View Shipping Information for a Purchase Order" in the Inventory Control chapter
The Shipments for PO window allows you to view a list of the outstanding shipments for a purchase order. From the Shipments for PO window, you can access the details of a selected shipment.
The Order Inventory Maintenance window allows you to maintain and view inventory management information for purchase orders, for items on a purchase order, and for locations on a purchase order.
You can view the following inventory management information:
Purchase order quantities before and after scaling
Gross cost of the purchase order before and after scaling
Net cost of the purchase order before and after scaling
Due order processing parameters for replenishment orders
You can edit the following inventory management information:
Purchase order scaling
Minimum constraints
Truck splitting
Supplier Pooling
Order Quantities
The Order - Letter of Credit window allows you to maintain letter of credit information for a purchase order. You must enter letter of credit information when you select Letter of Credit as the method of payment on a purchase order.
See "Assign a Purchase Order to a Letter of Credit by Purchase Order" in the Letter of Credit chapter
The Order - Mass Item Cancel window allows you to indicate the reason why you are canceling all the items on the selected purchase order. The status of the purchase order is changed to Closed. You can reverse the effect of canceling all the items on the purchase order by reinstating all the items. The status of the reinstated purchase order is changed to Worksheet.
See "Edit the Status of a Purchase Order Raised Against a Contract" in the Contract chapter
The Order Parent/Diff Summary window allows you to view the details of an item parent on a purchase order by diffs. You can view the total cost, quantity ordered, quantity received, and quantity cancelled by diff.
The Order Transaction-Level Discounts window allows you to view deals with transaction level discounts that apply to a purchase order. You can view the amount of transaction level discount and the total of all transaction level discounts.
See "View Transaction Level Discounts for a Purchase Order" in the Oracle Retail Sales Audit User Guide
You can use the PO Diff Matrix Window to design a purchase order distribution based on three different diff group values.
The PO Item Maintenance window allows you to view and edit all the items on a purchase order.
Not all fields defined below appear on this window's default view. To view additional fields, select View > Custom and click the [+] on the custom toolbar. To display information specific to estimated landed cost, select View > ELC menu.
The PO Item/Location window allows you to edit and view all the item and location combinations on a purchase order.
To display information specific to replenishment allocations, pricing, quantities, order discounts, or estimated landed cost, select the appropriate option from the View menu. To search for a deal, select Options > Dealfind.
The order quantity/cancelled quantity cannot be changed to below the sum of the shipped or appointed quantity expected for all shipments/appointments attached to the order.
For cross-docked PO's, you cannot change the allocation quantity when the allocation is selected or distributed for shipping.
Only allocations created through replenishment may be modified.
If the replenishment allocation has not been received or is not being modified, the allocation detail can be deleted.
To view more information on the listed topics, see also:
View Order Details for Item and Location Combinations on a Purchase Order
The PO Revisions window allows you to indicate which changes to an approved purchase order you want to accept. Changes can be made by the buyer (version) or by the supplier (revision). The first version is the original purchase order. Changes are transmitted to and from the supplier through electronic data interchange (EDI). Revisions can occur when a buyer does not approve a purchase order, edits it, and re-approves it.
To view the monetary amounts in the primary currency of the company or the currency of the order, select the appropriate option from Options > Currency.
The PO Summary by items window allows you to view the locations on a purchase order by item. You can select an item in order to view the details of the locations to which the item is to be delivered.
To display information specific to estimated landed cost, select View > ELC.
The PO Summary By Locations window allows you to view a summary of the items on a purchase order by location. You can select a location in order to view the details of the items to be sent to the location.
The Pre Issue of Order Numbers window allows you to create purchase order numbers either manually or through a batch process. Pre-issued order numbers are used to provide a supplier with a valid order number, against which product may be delivered to a warehouse or store.
Order numbers are generated into a report. The report has space for the buyer to write notes regarding the date used, the supplier, the order value, and miscellaneous details. The buyer can make a commitment to a supplier on the supplier's premises or at a product fair, and enter the order upon returning to the office.
The automated process is designed to support the Vendor Managed Inventory (VMI) process, whereby the supplier is making the purchasing decisions, and needs a constant stream of orders numbers through which orders may be created.
Generate Pre-Issued Order Numbers (Manual)
Navigate: From the main menu, select Ordering > Orders. The Order Search window is displayed.
Search for and retrieve a purchase order in Edit mode. Restrict the search to purchase orders in Worksheet status. The PO Header Maintenance window displayed.
Click Items. The PO Item Maintenance window opens.
Click Filter Block. The Order Distribution Filter window opens.
Enter or select the criteria by which you want to filter in the Filter By area.
Click Add Filter Criteria. The filter criteria are added to the Filter Criteria table.
To delete a criterion from the Filter Criteria table:
Select the record and click Delete. You are prompted to delete the record.
Click Yes.
Click Apply Filter. The Order Distribution Worksheet window opens with the results of the filter.
Edit filter results as needed.
To clear the filter, click Clear Filter. All the items appear.
Click OK to save your changes and close the window.
Navigate: From the main menu, select Ordering > Contracts. The Contract Search window opens.
Search for and retrieve a contract in View mode. The Contract Header window opens.
Click Orders. The List of POs by Contract window opens.
Select a purchase order and click Items. The PO Item Maintenance window opens.
Click OK to close the windows.
Navigate: From the main menu, select Ordering > Contracts. The Contract Search window opens.
Search for and retrieve a contract in View mode. The Contract Header window opens
Edit the enabled fields as necessary.
To view the unit costs for all types of contracts:
Click Cost. The Contract Cost Maintenance window opens.
Click OK to exit the Contract Cost Maintenance window.
To view the quantities for Type A and Type B contracts, click Detail. The Contract Details Maintenance window opens.
To view monetary amounts in the currency of the contract or the primary currency of the company, select the appropriate option from the Options > Currency menu.
To view the audit trail for the contract, select Dates from the Options menu.
To view the purchase orders that are raised against the contract, click Orders. The List of POs by Contract window opens.
Click OK to close the window.
Navigate: From the main menu, select Ordering > Contracts. The Contract Search window opens.
Search for and retrieve a contract in View mode. The Contract Header window opens.
Click Cost or Detail. Either the Contract Cost Maintenance window or the Contract Details Maintenance window opens.
Click OK to close the window.
Navigate: From the main menu, select Ordering > Contracts. The Contract Search window opens.
Search for and retrieve a contract in View mode. The Contract Header window opens.
Click Detail. The Contract Details Maintenance window opens.
|
Note: Only item parents can be summarized by diff. You can view summaries by item parent/diff for Type A and Type B contracts. |
Click Item Parent/Diff Sum. The Contract Item Parent/Diff Summary window opens.
Click OK to close the window.
Navigate: From the main menu, select Ordering > Contract Cost History. The Contract Cost History window opens.
Enter search criteria in one or more of the enabled fields in order to restrict the search.
Click Search. The cost records that match the search criteria appear.
To view the details of a contract that is associated with a cost record:
Select a record and click Contract. The Contract Header window opens.
Click OK to exit the Contract Header window.
Click Refresh to clear all results and perform another search.
Click OK to close the window.
Navigate: From the main menu, select Ordering > Contracts. The Contract Search window opens.
Search for and retrieve a contract in Edit or View mode. The Contract Header window opens.
Click Cost. The Contract Cost Maintenance window opens.
|
Note: Use this procedure to filter cost records at the item level on a contract. You can then view or edit the subset of the items on the contract. |
Click the Filter button. The Contract Cost Filter window opens.
Enter or select the criteria by which you want to filter in the Filter By area.
Click Add Filter Criteria. The filter criteria are added to the Filter Criteria table.
To delete a criterion from the Filter Criteria table, select the record and click Delete.
Click Apply Filter. The Contract Cost Maintenance window opens with the filtered data.
To clear the filter, click Refresh. All the item cost records are again displayed.
Click OK to close the window.
The Reject Reason window allows you to view the reason why a purchase order that was generated automatically by the replenishment program was rejected. The reason for the rejection will be cleared after the order is reviewed and approved.
Items can be added to a purchase order (PO) one-by-one or by item list. You can choose to expand a buyer pack to its component items. You can choose to expand a level 1 or level 2 item to its component level 2 or level 3 items. You may also choose to apply an existing item pack template to a PO or create a temporary item pack template. Level 1 or level 2 items can be distributed on a PO by diffs. Quantities can be entered on a PO based on the unit of purchase or the standard unit of measure.
Add an Item to a Purchase Order
Navigate: From the main menu, select Ordering > Orders. The Order Search window is displayed.
Search for and retrieve a purchase order in Edit mode. Restrict the search to purchase orders in Worksheet status. The PO Header Maintenance window opens.
Click Items. The PO Item Maintenance window opens.
Click Add to Order. The Order Distribution Worksheet window opens.
Click Add Item.
In the Enter As area, select the Item, Ref Item, or Item List option.
In the Item field, enter the item number of the item or the ID of the item list, or click the LOV button and select the item or item list.
If required, enter the Country of Sourcing code for the country, or click the LOV button and select the country.
In the Quantity field, enter the number of units to be distributed of the item or among the components of an item list or item parent.
Enter or edit the Unit of Purchase and Supplier Pack Size fields as necessary.
Click the appropriate button to add the item or items to the table:
To add an item or the items on an item list, click Apply Item, Apply Ref Item, or Apply Item List.
To add the component items of an item parent or pack, click Expand Item.
To add a pack, click Apply Template. The Prepack window or the New Prepack Template window opens so that you may identify or create the template.
Filter and distribute the items as necessary.
Click OK to save your changes and close the window.
Navigate: From the main menu, select Ordering > Orders. The Order Search window is displayed.
Search for and retrieve a purchase order in Edit mode. Restrict the search to purchase orders in Worksheet status. The PO Header Maintenance window opens.
Click Item. The PO Item Maintenance window opens.
Edit the enabled fields as necessary.
Click OK to save your changes and close the window.
Navigate: From the main menu, select Ordering > Orders. The Order Search window opens.
Search for and retrieve a purchase order in Edit mode. The PO Header Maintenance window opens.
Click Items. The PO Item Maintenance window opens.
Click Redistribute. The Order Redistribution window opens.
Click Add Item.
In the Item Type field, select the type of item.
Enter the item number of the item in the Item field, or click the LOV button and select the item.
Click Apply. The item or items are added to the redistribution list. You are prompted to continue.
Click Yes. The Order Distribution Worksheet window opens.
From the Options > Redistribute menu, select the method by which you want to redistribute the items.
Distribute the items by store grade or location as necessary.
Click OK to save your changes and close the window.
You have several options for distributing items when a purchase order is created. Before distributing items, you can filter the items in order to display a subset of the items. Any distribution instructions that you enter are then applied only to the subset of items. The options for distribution may be:
Distribution by diff: Distribute items by any diff value associated with the purchase order.
Distribution by store grade: Select the final destinations by store grade group and store grade. Enter the distribution amounts by percentage or ratio.
Distribution by location: Select the final destinations one-by-one or by a list of values. Enter the distribution amounts by percentage or ratio.
More information can be found in these related topics:
Apply a Diff Ratio to a Diff Distribution
Redistribute Items on a Purchase Order
The Order Distribution Worksheet window allows you to add items to a purchase order. You can add items by item number, ref item number, or item list. You can choose to apply a template to an item parent or you can expand a buyer pack and item parent to their component items.
To display information specific to ref items or standard units of measure, select the appropriate option from the View menu.
Before exiting this window, you may distribute the items, or a subset of the items, by diff values, store grade, and location.
The Order Distribution Filter window allows you to filter the items that appear on the Order Distribution Worksheet window. You can then edit or distribute the resulting subset of items.
Navigate: From the main menu, select Ordering > Orders. The Order Search window is displayed.
Search for and retrieve an order in Edit mode. Restrict the search to orders in Worksheet status. The PO Header Maintenance window opens.
Click Items. The Order Distribution Worksheet window opens.
Click any of the Diff buttons to distribute by diff value. The Distribution Diff Apply window opens.
To limit the available diffs, in the range field, enter a diff range ID, or click the LOV button and select a diff range.
In the Available Diff area:
Select a diff and click the right arrow button. The diff is moved to the applied diff area.
Click the move all right arrow button. All diff are moved to the applied diff area.
If you select the following distribution method:
Quantity: Enter the number of items you want of each diff.
|
Note: You can distribute by quantity only if you did not enter a quantity on the Order Distribution Worksheet window. |
Distribution%: Enter the percentage of the items you want of each diff.
Ratio: Enter the proportion of items that you want of each diff.
|
Note: You can distribute the diffs and enter a quantity, distribution or ratio of zero (0). |
Click OK to save any changes and close the window.
Navigate: From the main menu, select Ordering > Orders. The Order Search window is displayed.
Search for and retrieve a purchase order in Edit mode. Restrict the search to purchase orders in Worksheet status. The PO Header Maintenance window opens.
Click Items. The PO Header Maintenance window opens.
Click Add to Order. The Order Distribution Worksheet window opens.
Distribute items on the purchase order.
Diff ratios can be applied to:
The X axis
The Y axis
The Z axis
The diff matrix table
The diff matrix table and the Z axis
The following rules apply:
If a ratio is applied to the diff matrix table, the matrix must be distributed by ratio.
If a ratio is applied to only the Z axis, the Z axis must be distributed by ratio.
If the ratio affects the matrix and the Z, both the matrix and the Z must be distributed by ratio.
If Ratio is selected in the Distribute Matrix By field, you can use an existing diff ratio to modify data in the diff matrix table.
To apply diff ratios to the diff matrix table, enter a diff ratio, or click the LOV button and select a ratio.
After a ratio is selected, you can view data for this item at a specific store. Enter a store ID, or click the LOV button and select an ID.
Click Apply Ratio.
Click OK to save your changes and close the window.
Navigate: From the main menu, select Ordering > Orders. The Order Search window is displayed.
Search for and retrieve a purchase order in Edit mode. Restrict the search to purchase orders in Worksheet status. The PO Header Maintenance window opens.
Click Items. The ordered items appear in the Order Distribution Worksheet window.
Filter the items as necessary.
Click Location. The Location Distribution window opens.
In the Distribute By area, select the method of distribution.
In the Location Type field, select the type of location.
In the Location field, enter the ID of the location, or click the LOV button and select the location.
If you select the following distribution method:
Quantity: Enter the number of items you want at each location, or the total items you want at each location.
|
Note: You can distribute by quantity only if you did not enter a quantity on the Order Distribution Worksheet window. |
Distribution%: Enter the percentage of the items you want at each location.
Ratio: Enter the proportion of items that you want at each location.
|
Note: You can distribute to a location and enter a quantity, distribution or ratio of zero (0). |
Click OK to save your changes and close the window.
Navigate: From the main menu, select Ordering > Contracts. The Contract Search window opens.
Search for and retrieve a contract in Edit mode. Restrict the search to contracts in Worksheet status. The Contract Header window opens.
Click Cost or Detail. The Contract Cost Maintenance window or the Contract Details Maintenance window opens.
Click Distribute. The Contract Distribution window opens.
In the Dist Qty field, edit the quantity as necessary.
Click Diff 1, Diff 2, Diff 3, Diff 4 Ready Date, or Location.
Enter distribution information in the Distribution window that opens.
Click OK to save your changes and close the window.
The Order Redistribution window allows you to select which items on a purchase order are candidates for redistribution.
Items on a purchase order are eligible for redistribution under the following conditions:
The purchase order has a status of Worksheet or Approved.
None of the items on the purchase order have been received.
The purchase order is not associated with a contract.
An advance shipping notice (ASN) has not been received.
Any item with an associated appointment or allocation cannot be redistributed.
If you are running Estimated Landed Cost (ELC), when you redistribute items, the default expenses and deals are reapplied. Any expenses that were added manually before the items are redistributed are lost. You also lose the ability to undo any previous scaling that was based on supplier constraints.
To determine which purchase orders should be redistributed, you may want to run the Order Redistribution report. The report displays all purchase orders in approved status that are currently distributed to a redistribution warehouse.
Navigate: From the main menu, select Ordering > Orders. The Order Search window is displayed.
Search for and retrieve a purchase order in Edit mode. Restrict the search to purchase orders in Worksheet status. The PO Header Maintenance window opens.
Click Items. The Order Distribution Worksheet window opens.
Filter the items as necessary.
Click Store Grade. The Store Grade Distribution window opens.
In the Buyer field, enter the ID of the buyer, or click the LOV button and select the buyer.
In the Store Grade Group field, enter the ID of the store grade group, or click the LOV button and select the store grade group. The store grades and number of stores in each store grade appear.
In the Distribute By area, select the method of distribution.
If you select the following distribution method:
Quantity: Enter the number of items you want at each store, or the total items you want for each store grade.
|
Note: You can distribute by quantity only if the quantity is not specified on the Order Distribution Worksheet window. |
Distribution%: Enter the percentage of the items you want at each store grade.
Ratio: Enter the proportion of items that you want at each store grade.
Click OK to save your changes and close the window.
Navigate: From the main menu, select Ordering > Orders. The Order Search window is displayed.
Search for and retrieve a purchase order in Edit mode. Restrict the search to purchase orders in Worksheet status. The PO Header Maintenance window opens.
Click Items. The ordered items appear in the Order Distribution Worksheet window.
In the Axes Diff Groups area, enter the ID of the diff group, or click the LOV button and select a diff group.
|
Note: The number of diff group fields that are enabled is based on the number of diff groups that were assigned to this item. All enabled diff group fields are required. |
In the Diff Range Limiting area, enter a diff range ID, or click the LOV button and select a diff range to limit the diff values displayed in the matrix table.
In the Distribute Matrix By area, select how quantities in the matrix appear for the X and Y axis.
In the Distribute Z Axis area, select how quantities in the matrix appear for the Z axis.
|
Note: Quantity is automatically selected if you do not enter the Worksheet quantity on the Order Distribution Worksheet window. |
Click Apply. The matrix table is updated to show the data matching your distribution parameters.
In the Distribute X By field, indicate that you want to enter values for the X axis in either quantities, ratios, or percentages. The fields above the matrix table are enabled.
In the Distribute Y By field, indicate that you want to enter values for the Y axis in either quantities, ratios, or percentages. The fields left of the matrix table are enabled.
|
Note: If a quantity was not entered on the Order Distribution Worksheet window, one of the values for the X-Y Distribution field must be quantity. |
In the X Distribution row, enter the values for the corresponding diff.
In the Y Distribution column, enter the values for the corresponding diff.
Click Apply Dist. A message opens notifying you that the current data will be overwritten.
Click Yes.
You can repeat these steps until you are satisfied with the data. The values in the table will be saved when you exit this window.
If Ratio is selected in the Distribute Matrix By field, you can use an existing diff ratio to modify data in the diff matrix table.
In the diff ration area, enter a diff ratio ID in the Diff Ratio field, or click the LOV button and select a ratio.
After a ratio is selected, you can view data for this item at a specific store. Enter a store ID, or click the LOV button and select an ID.
Click Apply Ratio.
Click OK+Repeat to save your changes and copy values from another diff group, or click OK to save your changes and close the window.
|
Note: After saving the distribution data in this window, you must distribute by diff 4 (if a fourth diff exists for this item) and by Location on the Order Distribution Matrix window. You cannot submit the order for approval until the item is completely distributed. |
If quantity was not entered on the Order Distribution Worksheet window, enter the value for the first diff in the Z distribution.
To use the existing X-Y distribution for all Z axis diffs, click Copy. The Z Axis Copy window opens.
In the Copy from Diff field, enter the ID of the Z diff that you want to copy from.
Click Get List. The diffs that are not yet associate to the X-Y distribution appear.
In the Copy field, select each diff group that should have the same value as the diff group selected in the Copy from Diff field.
Click OK to save any changes and close the window.
After entering data in the Z axis table, you can click Convert to Qty to change all percent and ration values on the matrix to quantity.
Click OK to save any changes and close the window.
When a purchase order is added to the system, it must go through a series of checks before it is accessible in the system. Depending on your user role, you may not be able to move the purchase order to the next status. A purchase order may be in any of the following statuses:
| Status | Definition |
|---|---|
| Worksheet | The purchase order has been started, but not completed. |
| Submitted | The purchase order has been completed and is pending review. |
| Approved | The purchase order has been reviewed and has been approved. |
| Delete | The purchase order is marked for deletion. It will be deleted by a regularly scheduled batch program. |
| Closed | The purchase order is complete. |
Navigate: From the main menu, select Ordering > Orders. The Order Search window is displayed.
Search for and retrieve a purchase order in Edit mode. Restrict the search to purchase orders in Worksheet status. The PO Header Maintenance window opens.
From the Options menu, select Submit. You are prompted to submit the purchase order.
Click Yes.
Click OK to save your changes and close the window.
Navigate: From the main menu, select Ordering > Orders. The Order Search window opens.
Search for and retrieve a purchase order in Edit mode. Restrict the search to purchase orders in Submitted status. The PO Header Maintenance window opens.
From the Options menu, select Approve. You are prompted to approve the purchase order.
Click Yes.
Click OK to save your changes and close the window.
Navigate: From the main menu, select Ordering > Orders. The Order Search window opens.
Search for and retrieve a purchase order in Edit mode. Restrict the search to purchase orders in Approved status. The PO Header Maintenance window opens.
From the Options menu, select Cancel All Items. You are prompted to cancel all the items on the purchase order.
Click Yes. The Order Mass Item Cancel window opens.
In the Cancel Reason field, select the reason for canceling the items on the purchase order.
Click OK. The status of the purchase order is changed to Closed.
Click OK to save your changes and close the window.
Navigate: From the main menu, select Ordering > Orders. The Order Search window is displayed.
Search for and retrieve a purchase order in Edit mode. Restrict the search to closed purchase orders that you know have been cancelled. The PO Header Maintenance window opens.
From the Options menu, select Reinstate All Items. You are prompted to reinstate all the items on the purchase order.
Click Yes. The status of the purchase order is changed to Worksheet.
Click OK to save your changes and close the window. You are prompted to approve the purchase order.
Click Yes or No.
|
Note: If you select No, the purchase order remains in Worksheet status. |
Navigate: From the main menu, select Ordering > Orders. The Order Search window is displayed.
Search for and retrieve a purchase order in Edit mode. Restrict the search to purchase orders in Worksheet or Submitted status. The PO Header Maintenance window opens.
From the Options menu, select Delete. You are prompted to delete the purchase order.
Click Yes.
Click OK to save your changes and close the window.
This window is used to display the tax breakup for a purchase order. The Calculate Tax button sends relevant transaction details (such as PO number, PO date, supplier, store/warehouse, item code, cost, utilization code, and quantity) and necessary calculations for tax.
Navigate: From the main menu, select Ordering > Orders. The Order Search window is displayed.
Search for and retrieve a purchase order in Edit mode. Restrict the search to purchase orders in Worksheet status. The PO Header Maintenance window opens.
From the options menu, select Tax Breakup. The Transaction Tax Breakup Details window opens.
View the information regarding the tax breakup.
Click OK to close the window or click Calculate Tax to calculate the total tax amounts in the window.
The harmonized tariff schedule for an import country can be stored and accessed online. It provides the tariff rates and statistical categories for imported merchandise. By means of an HTS batch program, the data can be updated as new tapes are released by the customs agencies. The data can also be maintained manually.
You can maintain the following information in the HTS module:
HTS headings
Heading restraints
Quota categories
HTS classifications
Generally, HTS classifications are updated from tapes received from the customs agency. These classifications can be updated manually.
You can associate the HTS classifications and assessments with items or items on purchase orders.
The HTS Details window allows you to view the details of an HTS classification that is associated with an item.
The HTS Heading Maintenance window allows you to edit and view the headings of a harmonized tariff schedule.
Navigate: From the main menu, select Control > Landed Cost > HTS Maintenance > HTS Heading Maintenance > Edit. The HTS Heading Maintenance window opens.
Edit the description as necessary.
To add an HTS heading:
Click Add. The next available line is enabled.
In the HTS Heading field, enter the number of the HTS heading.
In the Description field, enter the description of the HTS heading.
To enter additional comments, click the comments button.
To delete an HTS heading:
Select an HTS heading and click Delete.
When prompted to delete the record, click Yes.
Click OK to save your changes and close the window.
The Harmonized Tariff Schedule window allows you to create, edit, and view an HTS classification.
Navigate: From the main menu, select Control > Landed Cost > HTS Maintenance > HTS. The HTS Selection window opens.
Search for and retrieve an HTS classification in Edit mode. The details appear in the Harmonized Tariff Schedule window.
Click Delete.
When prompted to delete the record, click Yes.
Click OK to save your changes and close the window.
Navigate: From the main menu, select Control > Landed Cost > HTS Maintenance > HTS Heading Maintenance > Edit. The HTS Heading Maintenance window opens.
Select an HTS heading. From the Options menu, select HTS Heading Restraints. The HTS Heading Restraints window opens.
In the Importing Country field, enter the code for the import country, or click the LOV button and select the import country. The current restraints for the selected country appear.
Select a restraint.
In the Apply area, edit the enabled fields as necessary.
Click Apply to complete the edit.
To add a restraint:
Click Add. The fields in the Apply area are cleared.
Enter the details in the Apply area.
Click Apply. The restraint is added to the table.
To delete a restraint:
Select a restraint and click Delete.
When prompted to delete the record, click Yes.
Click OK to save your changes and close the window.
The HTS Anti-Dumping Duties window allows you to add and maintain the anti-dumping duties that are associated with an HTS classification.
The HTS Heading Restraints window allows you to edit and view the restraints applied at the heading level of the harmonized tariff schedule. The most common restraints are quota levels.
Navigate: From the main menu, select Items > Items. The Item Search window opens.
Search for and retrieve an item in View mode. The Item Maintenance window opens.
Click on the HTS option. The Item HTS Maintenance window opens.
To view the cost components for an HTS classification:
Select an HTS classification and click Assessments. The cost components appear in the Item HTS Assessment Maintenance window.
Click OK to close window.
To view the details of an HTS classification:
Select an HTS classification and click HTS Details. The details appear in the HTS Details window.
Click OK to close the window.
Click OK to close the window.
Navigate: From the main menu, select Control > Landed Cost > HTS Maintenance > HTS. The HTS Selection window opens.
Search for and retrieve an HTS classification in View mode. The Harmonized Tariff Schedule window opens.
Click OK to close the window.
Navigate: From the main menu, select Control > Landed Cost > HTS Maintenance > HTS Heading Maintenance > Edit. The HTS Heading Maintenance window opens.
Click OK to close the window.
Navigate: From the main menu, select Ordering > Orders. The Order Selection window opens.
Search for and retrieve a purchase order in View mode. The purchase order must by an import type purchase order. The PO Header Maintenance window opens.
Click Items. The PO Header Maintenance window opens. Select an item.
From the Options menu, select HTS. The Order Item HTS Maintenance window opens.
To view the details of an HTS classification:
Select an HTS classification and click the HTS Details button. The HTS Details window opens.
Click Close to close the window.
Click OK to close the window.
The HTS Countervailing Duties window allows you to add and maintain the countervailing duties that are associated with an HTS classification.
The HTS Fee window allows you to add and maintain the fees that are associated with an HTS classification.
The HTS Selection window allows you to enter criteria in order to search for harmonized tariff schedule (HTS) classifications and view the results of the search. It is also the starting point for creating, editing, or viewing an HTS classification.
The default view for the HTS Selection window opens when you open the window for the first time. You can also create a custom view.
The HTS Other Government Agencies window allows you to add and maintain the requirements from other government agencies that have jurisdiction over an HTS classification.
The HTS Reference window allows you to add and maintain user-defined references that are associated with an HTS classification.
The HTS Fee Zone Rates window allows the user to set up multiple duty rates by clearing zone for the HTS code.
Navigate: From the main menu, select Control > Landed Cost > HTS Maintenance > HTS. The HTS Selection window opens.
Search for and retrieve an HTS classification in Edit mode. The Harmonized Tariff Schedule window opens.
From the Option menu, select Fees. The HTS Fee window opens.
Select an item from the table.
Click Zone Rates. The HTS Fee Zone Rates window opens.
In the Clearing Zone column, enter a zone or click the LOV button to select a zone.
In the Specific Rate field, enter a rate.
In the AV Rate field, enter a rate.
Click Add. The zone rate is added.
Click OK to save your changes and close the window.
Navigate: From the main menu, select Control > Landed Cost > HTS Maintenance > HTS. The HTS Selection window opens.
Search for and retrieve an HTS classification in Edit mode. The Harmonized Tariff Schedule window opens.
From the Option menu, select Fees. The HTS Fee window opens.
Select an item from the table.
Click Zone Rates. The HTS Fee Zone Rates window opens.
In the Clearing Zone column, enter a zone or click the LOV button to select a zone.
In the Specific Rate field, enter a rate.
In the AV Rate field, enter a rate.
Click OK to save your changes and close the window.
Navigate: From the main menu, select Control > Landed Cost > HTS Maintenance > HTS. The HTS Selection window opens.
Search for and retrieve an HTS classification in Edit mode. The Harmonized Tariff Schedule window opens.
From the Option menu, select Fees. The HTS Fee window opens.
Select an item from the table.
Click Zone Rates. The HTS Fee Zone Rates window opens.
Select the Clearing Zone that you want to delete
Click Delete.
Click OK to save your changes and close the window.
The HTS Fee Zone Rates window allows the user to set up multiple duty rates by clearing zone for the HTS code.
Navigate: From the main menu, select Control > Landed Cost > HTS Maintenance > HTS. The HTS Selection window opens.
Search for and retrieve an HTS classification in Edit mode. The Harmonized Tariff Schedule window opens.
From the Option menu, select Taxes. The HTS Taxes window opens.
Select an item from the table.
Click Zone Rates. The HTS Taxes Zone Rates window opens.
In the Clearing Zone column, enter a zone or click the LOV button to select a zone.
In the Specific Rate field, enter a rate.
In the AV Rate field, enter a rate.
Click Add. The zone rate is added.
Click OK to save your changes and close the window.
Navigate: From the main menu, select Control > Landed Cost > HTS Maintenance > HTS. The HTS Selection window opens.
Search for and retrieve an HTS classification in Edit mode. The Harmonized Tariff Schedule window opens.
From the Option menu, select Taxes. The HTS Taxes window opens.
Select an item from the table.
Click Zone Rates. The HTS Taxes Zone Rates window opens.
In the Clearing Zone column, enter a zone or click the LOV button to select a zone.
In the Specific Rate field, enter a rate.
In the AV Rate field, enter a rate.
Click OK to save your changes and close the window.
Navigate: From the main menu, select Control > Landed Cost > HTS Maintenance > HTS. The HTS Selection window opens.
Search for and retrieve an HTS classification in Edit mode. The Harmonized Tariff Schedule window opens.
From the Option menu, select Taxes. The HTS Taxes window opens.
Select an item from the table.
Click Zone Rates. The HTS Taxes Zone Rates window opens.
Select the Clearing Zone to be deleted.
Click Delete. The zone rate is added.
Click OK to save your changes and close the window.
The HTS Fee Zone Rates window allows the user to set up multiple duty rates by clearing zone for the HTS code.
Navigate: From the main menu, select Control > Landed Cost > HTS Maintenance > HTS. The HTS Selection window opens.
Search for and retrieve an HTS classification in Edit mode. The Harmonized Tariff Schedule window opens.
From the Option menu, select Tariff Treatments. The HTS Tariff Treatment window opens.
Select an item from the table.
Click Zone Rates. The HTS Tariff Treatment Zone Rates window opens.
In the Clearing Zone column, enter a zone or click the LOV button to select a zone.
In the Specific Rate field, enter a rate.
In the AV Rate field, enter a rate.
In the Other Rate field, enter another rate.
Click Add. The zone rate is added.
Click OK to save your changes and close the window.
Navigate: From the main menu, select Control > Landed Cost > HTS Maintenance > HTS. The HTS Selection window opens.
Search for and retrieve an HTS classification in Edit mode. The Harmonized Tariff Schedule window opens.
From the Option menu, select Tariff Treatments. The HTS Tariff Treatment window opens.
Select an item from the table.
Click Zone Rates. The HTS Tariff Treatment Zone Rates window opens.
In the Clearing Zone column, select a zone to edit.
Make changes to the rate as necessary.
Click OK to save your changes and close the window.
Navigate: From the main menu, select Control > Landed Cost > HTS Maintenance > HTS. The HTS Selection window opens.
Search for and retrieve an HTS classification in Edit mode. The Harmonized Tariff Schedule window opens.
From the Option menu, select Tariff Treatments. The HTS Tariff Treatment window opens.
Select an item from the table.
Click Zone Rates. The HTS Tariff Treatment Zone Rates window opens.
In the Clearing Zone column, select a zone to be deleted.
Click Delete. The zone rate is added.
Click OK to save your changes and close the window.
The HTS Tariff Treatment window allows you to add and maintain the tariff treatments that are associated with an HTS classification. In addition to maintaining the tariff treatment, you can indicate which origin countries are excluded from the tariff treatment.
Navigate: From the main menu, select Control > Setup > Country > View. The Country Maintenance window opens. Select a country.
From the Options menu, select Tariff Treatments. The Country Tariff Treatment window opens.
Click OK to close the window.
Navigate: From the main menu, select Items > Items. The Item Search window opens.
Search for and retrieve an item in View mode. The Item Maintenance window opens.
Click on the Eligible Tariff Treatments option. The Item Eligible Tariff Treatment window opens.
Click OK to close the window.
Navigate: From the main menu, select Items > Items. The Item Search window is displayed.
Search for and retrieve an item in Edit mode. The Item Maintenance window opens.
Select the Eligible Tariff Treatments option. The current tariff treatments appear in the Item Eligible Tariff Treatment window.
Click Add. The next available line is enabled.
In the Tariff Treatment field, click the LOV button and select the appropriate tariff treatment.
Click OK to save your changes and close the window.
Navigate: From the main menu, select Control > Setup > Country > Edit. The Country Maintenance window opens. Select a country.
From the Options menu, select Tariff Treatments. The Country Tariff Treatment window opens.
Edit the Effective To Date field as necessary.
To add a tariff treatment:
Click Add. The next available line is enabled.
In the Tariff Treatment field, enter the code the tariff treatment, or click the LOV button and select the tariff.
In the Effective From Date field, enter the date on which the tariff treatment becomes effective, or click the calendar button and select the date.
In the Effective To Date field, enter the date on which the tariff treatment is no longer effective, or click the calendar button and select the date.
To delete a tariff treatment:
Select a tariff treatment and click Delete.
When prompted to delete the record, click Yes.
Click OK to save your changes and close the window.
Navigate: From the main menu, select Control > Landed Cost > HTS Maintenance > Quota Category > View. The Quota Categories window opens.
In the Importing Country field, enter the code for the import country, or click the LOV button and select the import country.
Click OK to close the window.
Navigate: From the main menu, select Control > Landed Cost > HTS Maintenance > HTS Heading Maintenance > Edit. The HTS Heading Maintenance window opens.
Select an HTS heading. From the Options menu, select HTS Heading Restraints. The HTS Heading Restraints window opens.
In the Importing Country field, enter the code for the import country, or click the LOV button and select the import country. The current restraints for the selected country appear.
Click OK to close the window.
The HTS Tax window allows you to add and maintain the taxes that are associated with an HTS classification.
The Item HTS Assessment Maintenance window allows you to maintain the assessments that are associated with an item. The assessments are calculated at the item, country of sourcing, import country level.
The cost components track the pertinent assessments for an item by HTS classification. They may be included in duty, expense, and actual landed cost calculations. Assessments differ from expenses in that they are defined by a government agency. To display the status of the cost components for each calculation, select Nomination Flags from the View menu.
Navigate: From the main menu, select Items> Items. The Item Search window opens.
Search for and retrieve an item in Edit mode. The Item Maintenance window opens.
Click the HTS option. The Item HTS Maintenance window opens.
Select an HTS classification and click Assessments. The Item HTS Assessment Maintenance window opens.
Edit the assessment details as necessary.
To add an assessment:
Click Add. The next available line is enabled.
In the Component field, enter the code for the cost component, or click the LOV button and select the cost component.
Enter additional information in the enabled fields.
From the View menu, select Nomination Flags. The Nomination Flags appear in the table.
In the Nomination Flag fields, select the status of the assessment in relation to the other components:
Select N/A if the assessment is not included in the calculation of total assessments and estimated landed costs.
Select + (plus sign) to add the assessment to the total.
Select - (minus sign) to subtract the assessment from the total.
Click Recalculate to update the estimated values.
To delete an assessment:
Select an assessment and click Delete.
When prompted to delete the record, click Yes.
Click OK to save your changes and close the window.
Navigate: From the main menu, select Ordering > Orders. The Order Selection window opens.
Search for and retrieve a purchase order in Edit mode. Restrict the search to import orders in Worksheet status. The PO Header Maintenance window opens.
Click Items. The PO Header Maintenance window opens. Select an item.
From the Options menu, select HTS. The Order Item HTS Maintenance window opens.
Select an HTS classification in the HTS Information table. The Assessment Details table opens.
Edit the assessments as necessary.
To add an assessment:
Select an HTS classification. The current assessments appear in the Assessment Details table.
Click Add Comp Details. The next available line is enabled.
In the Component field, enter the code for the cost component, or click the LOV button and select the cost component.
Enter additional information in the enabled fields.
From the View menu, select Nomination Flag. The Nomination Flag fields appear in the Assessment Details table.
In the Nomination Flag fields, select the status of the expense in relation to the other components.
Select N/A if the assessment is not included in the calculation of total assessments and estimated landed costs.
Select + (plus sign) to add the assessment to the total.
Select - (minus sign) to subtract the assessment from the total.
Click Recalculate in order to update the values.
To delete an assessment:
Select an HTS classification. The current assessments appear in the Assessment Details table.
Select an assessment and click Delete Comp Details.
When prompted to delete the record, click Yes.
Click OK to save your changes and close the window.
Navigate: From the main menu, select Items > Items. The Item Search window opens.
Search for and retrieve an item in View mode. The Item Maintenance window opens.
Click on the HTS option. The Item HTS Maintenance window opens.
Select an HTS classification and click Assessments. The Item HTS Assessment Maintenance window opens.
Click OK to close the window.
Navigate: From the main menu, select Ordering > Orders. The Order Selection window opens.
Search for and retrieve a purchase order in View mode. The PO Header Maintenance window opens.
Click Items. The PO Header Maintenance window opens. Select an item.
From the Options menu, select HTS. The Order Item HTS Maintenance window opens.Select an HTS classification. The assessments appear in the Assessment Details table.
Click OK to close the window.
The Quota Categories window allows you to edit and view quota categories by import country. Customs agencies group items with related characteristics into quota categories. Restrictions can then be placed on the category rather than on individual items.
Navigate: From the main menu, select Control > Landed Cost > HTS Maintenance > Quota Category > Edit. The Quota Categories window opens.
In the Importing Country field, enter the code for the import country, or click the LOV button and select the import country.
Click Add. The next available line becomes enabled.
In the Quota Category field, enter the ID of the quota category.
In the Description field, enter the description of the quota category.
Click OK to save your changes and close the window.
Navigate: From the main menu, select Control > Landed Cost > HTS Maintenance > Quota Category > Edit. The Quota Categories window opens.
In the Importing Country field, enter the code for the import country, or click the LOV button and select the import country.
Select a quota category and click Delete.
When prompted to delete the record, click Yes.
Click OK to save your changes and close the window.
Navigate: From the main menu, select Items > Items. The Item Search window is displayed.
Search for and retrieve an item in Edit mode. The Item Maintenance window opens.
Click on the Eligible Tariff Treatments option. The current tariff treatments appear in the Item Eligible Tariff Treatment window.
Select a tariff treatment and click Delete.
When prompted to delete the record, click Yes.
Click OK to save your changes and close the window.
Navigate: From the main menu, select Control > Landed Cost > HTS Maintenance > HTS Heading Maintenance > Edit. The HTS Heading Maintenance window opens.
Select an HTS heading.
From the Options menu, select HTS Heading Documents. The Required Documents window opens.
Select a document and click Delete.
When prompted to delete the document, click Yes.
Click OK to save your changes and close the window.
Navigate: From the main menu, select Control > Setup > Non-Merchandise Codes > View. The Non-Merchandise Codes Maintenance window opens.
View codes.
Click OK to close the window.
The harmonized tariff schedule for an import country can be stored and accessed online. It provides the tariff rates and statistical categories for imported merchandise. By means of an HTS batch program, the data can be updated as new tapes are released by the customs agencies. The data can also be maintained manually.
You can maintain the following information in the HTS module:
HTS headings
Heading restraints
Quota categories
HTS classifications
Generally, HTS classifications are updated from tapes received from the customs agency. These classifications can be updated manually.
Navigate: From the main menu, select Control > Landed Cost > HTS Maintenance > HTS. The HTS Selection window opens.
In the Action field, select New.
In the Importing Country field, enter the code for the import country, or click the LOV button and select the import country.
Click OK. The Harmonized Tariff Schedule window opens.
In the HTS field, enter the number of the classification.
In the HTS Description field, enter the description of the HTS classification. For extensive descriptions, click the comments button and enter the description.
In the Effect From and Effect To fields, enter the effective dates, or click the calendar buttons and select the dates.
In the Duty Comp Code field, enter the code for the duty calculation, or click the LOV button and select the duty calculation.
In the Units field, enter the number of units of measure that you want to define for the HTS classification.
In the Unit 1 UOM, Unit 2 UOM, and Unit 3 UOM fields, enter the codes for the applicable units of measure, or click the LOV buttons and select the units of measure.
Enter any additional information as necessary.
Click OK to save your changes and close the window.
Navigate: From the main menu, select Control > Landed Cost > HTS Maintenance > HTS. The HTS Selection window opens.
Search for and retrieve an HTS classification in Edit mode. The Harmonized Tariff Schedule window opens.
Edit the enabled fields as necessary.
To edit additional information for a classification, select the appropriate option from the Options menu.
Edit the enabled fields as necessary.
Click OK to save your changes and close the window.
Navigate: From the main menu, select Control > Landed Cost > HTS Maintenance > HTS. The HTS Selection window opens.
Search for and retrieve an HTS classification in Edit mode. The Harmonized Tariff Schedule window opens.
From the Options menu, select Countervailing Duties. The current countervailing duties appear in the HTS Countervailing Duties window.
Edit the enabled fields as necessary.
To add a countervailing duty:
Click Add.
Enter the details on the next available line.
To delete a countervailing duty:
Select a countervailing duty and click Delete.
When prompted to delete the record, click Yes.
Click OK to exit the HTS Countervailing Duties window.
From the Options menu, select Fees. The current fees appear in the HTS Fee window.
Edit the enabled fields as necessary.
To add a fee:
Click Add.
Enter the details on the next available line.
To delete a fee:
Select a fee and click Delete.
When prompted to delete the record, click Yes.
Click OK to exit the HTS Fee window.
From the Options menu, select References. The current references appear in the HTS Reference window.
Edit the Reference field as necessary.
To add a reference:
Click Add.
Enter the information on the next available line.
To delete a reference:
Select a reference and click Delete.
When prompted to delete the record, click Yes.
Click OK to exit the HTS Reference window.
From the Options menu, select Tariff Treatments. The current tariff treatments appear in the HTS Tariff Treatment window.
Edit the enabled fields as necessary.
To add a tariff treatment:
Click Add Treatment.
Enter the details on the next available line.
To exclude an country of sourcing from the tariff treatment:
Select a tariff treatment.
Click Add Exclusion.
In the Excluded Country field, enter the code for the country, or click the LOV button and select the country.
To delete an excluded country from the tariff treatment:
Select a tariff treatment.
Select an excluded country and click Delete Exclusion.
When prompted to delete the record, click Yes.
To delete a tariff treatment:
Select a tariff treatment and click Delete Treatment.
When prompted to delete the record, click Yes.
Click OK to save your changes and close the window.
From the Options menu, select Anti-Dumping Duties. The current anti-dumping duties appear in the HTS Anti-Dumping Duties window.
Edit the enabled fields as necessary.
To add an anti-dumping duty:
Click Add.
Enter the details on the next available line.
To delete an anti-dumping duty:
Select an anti-dumping duty and click Delete.
When prompted to delete the record, click Yes.
Click OK to save your changes and close the window.
From the Options menu, select Other Government Agencies. The current requirements appear in the HTS Other Government Agencies window.
Edit the enabled fields as necessary.
To add a requirement:
Click Add.
Enter the details on the next available line.
To delete a requirement:
Select a requirement and click Delete.
When prompted to delete the record, click Yes.
Click OK to save your changes and close the window.
From the Options menu, select Taxes. The current taxes appear in the HTS Tax window.
Edit the enabled fields as necessary.
To add a tax:
Click Add.
Enter the details on the next available line.
To delete a tax:
Select a tax and click Delete.
When prompted to delete the record, click Yes.
Click OK to save your changes and close the window.
Navigate: From the main menu, select Items > Items. The Item Search window opens.
Search for and retrieve an item in Edit mode. The Item Maintenance window opens.
Select the HTS option. The Item HTS Maintenance window opens.
Select an HTS classification and edit the status as necessary.
To add an HTS classification:
Click Add.
In the Import Country field, enter the code for the import country, or click the LOV button and select the import country.
In the Quota Category field, enter the ID of a quota category or click the LOV button and select the category. The quota category is optional.
In the HTS field, enter the HTS classification, or click the LOV button and select the HTS classification.
In the Country of Sourcing field, enter the code for the country of sourcing, or click the LOV button and select the country of sourcing.
In the Status field, select Approved, if applicable.
Click Apply. The HTS classification is added to the HTS table.
To delete an HTS classification:
Select an HTS classification and click Delete.
When prompted to delete the record, click Yes.
Click OK to save your changes and close the window.
Navigate: From the main menu, select Ordering > Orders. The Order Selection window opens.
Search for and retrieve a purchase order in Edit mode. Restrict the search to import orders in Worksheet status. The PO Header Maintenance window opens.
Click Items. The PO Header Maintenance window opens. Select an item.
From the Options menu, select HTS. The Order Item HTS Maintenance window opens.
Select an HTS classification and edit the status as necessary.
To add an HTS classification:
Click Add HTS. The fields in the Apply HTS area are cleared.
In the Quota Category field, enter the ID of a quota category or click the LOV button and select the quota category. The quota category is optional.
In the HTS field, enter the number of the HTS classification, or click the LOV button and select the HTS classification.
In the Status field, select Approved if applicable.
Click Apply HTS. The HTS classification is added to the HTS Information table.
To delete an HTS classification:
Select an HTS classification and click Delete HTS.
When prompted to delete the record, click Yes.
Click OK to save your changes and close the window.
Navigate: From the main menu, select Control > Landed Cost > HTS Maintenance > HTS. The HTS Selection window opens.
In the Action field, select either View or Edit.
In the Importing Country field, enter the code for the import country, or click the LOV button and select the import country.
Enter additional criteria as desired to make the search more restrictive.
Click Search. The HTS Selection window displays the HTS classifications that match the search criteria.
Select a task:
To perform another search, click Refresh.
To display the details of an HTS classification, select a record and click OK. The Harmonized Tariff Schedule window opens.
Click Close to close the window.
Navigate: From the main menu, select Items > Items. The Item Search window is displayed.
Search for and retrieve an item in Edit mode. The Item Maintenance window opens.
Select the HTS option. The Item HTS Maintenance window opens.
Select an HTS classification.
In the Status field of the Apply area, select Approved.
Click Apply.
Click OK to save your changes and close the window.
Navigate: From the main menu, select Ordering > Orders. The Order Selection window opens.
Search for and retrieve a purchase order in Edit mode. Restrict the search to import orders in Worksheet status. The PO Header Maintenance window opens.
Click Items. The PO Item Maintenance window opens. Select an item.
From the Options menu, select HTS. The Order Item HTS Maintenance window opens.
Select an HTS classification in the HTS Information table. The Assessment Details table opens.
Select an HTS classification. The details appear in the Apply HTS area.
In the Status field, select Approved.
Click Apply HTS.
Click OK to save your changes and close the window.