| Oracle® Retail Merchandising System Oracle Retail Merchandising System User Guide 16.0.22 E88086-01 |
|

 Previous |
 Next |
| Oracle® Retail Merchandising System Oracle Retail Merchandising System User Guide 16.0.22 E88086-01 |
|
Previous |
Next |
The RMS financial management module primarily aims to maintain an accurate stock ledger, export financial data to external financial system, and monitor a company's performance based on key performance indices. Financial management activities are comprised of, maintaining basic financial data such as cost, formulating financial budgets, general ledger relationship maintenance, stock counts, and stock ledger.
Basic financial data includes tax information, geocodes, financial sets of books, and so on. Cost maintenance deals with cost changes, Estimated landed cost (ELC), Actual landed cost (ALC), Computation value base (CVB), Obligations, and so on. Financial budgets are maintained in RMS, at monthly/financial half and location level for various measures including Open to buy (OTB). Stock counts in RMS can be scheduled or requested for each location in RMS either as unit and value count or unit count. The RMS stock ledger provides access to financial records based on a variety of merchandising transaction types. Some of the details are captured within RMS; other details are received from external systems. The remaining fields are calculated. The GL Cross Reference allows cross-referencing the merchandise hierarchy levels and transaction codes from RMS with the appropriate general ledger accounts within the external financial system.
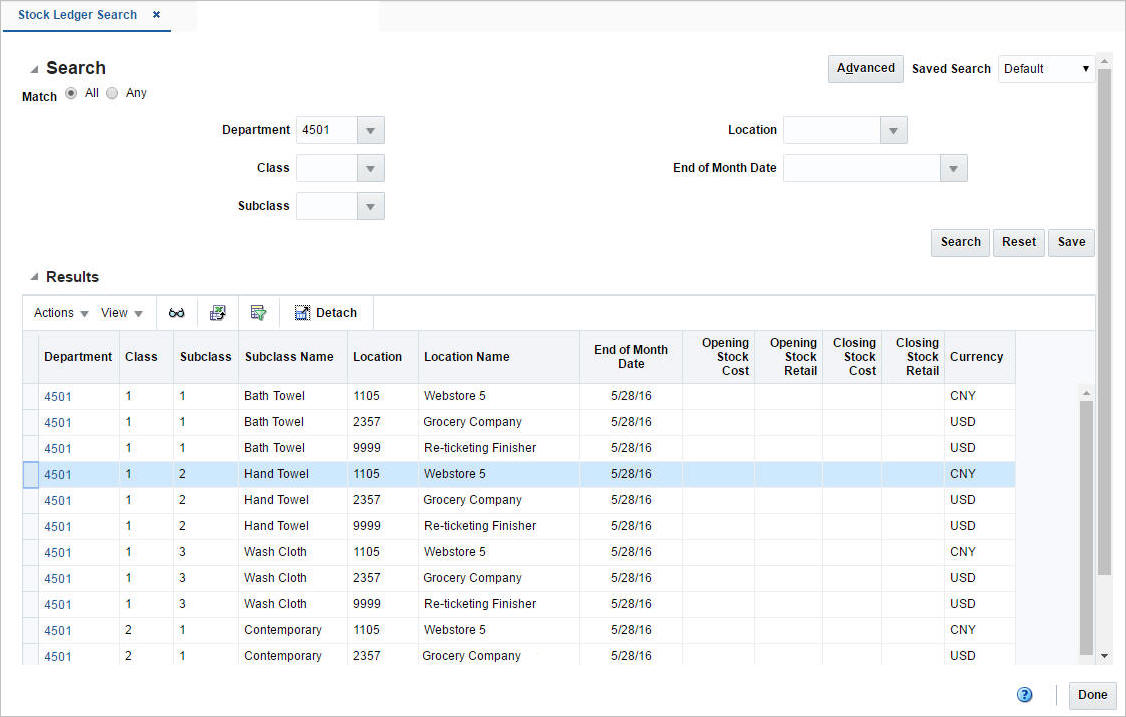
The Stock Ledger option opens the Stock Ledger Search window. The Stock Ledger Search window allows you to enter criteria in order to search for stock ledger records. Additionally you can perform the following functions in this window:
Search for stock ledger records by various search criteria
View the search results
View stock ledger records information
You can access the Stock Ledger Search window from the Task menu, select Finance > Stock Ledger. The Stock Ledger Search window appears.
The Stock Ledger Search window contains the following sections.
Search
For more information about the stock ledger search, see the Searching for Stock Ledger Records section.
To search for stock ledger records:
From the Task menu, select Finance > Stock Ledger. The Stock Ledger Search window appears.
You can search for a stock ledger record using basic or advanced search criteria, depending on the requirement. The basic mode is the default search mode.
Click Advanced to access the search section in advanced mode.
Click Basic to return to the basic mode.
To search for a stock ledger record using basic search criteria:
Enter, select or search for one or all of the following basic search criteria.
Table 12-1 Stock Ledger Search - Basic Search Criteria and Description
| Fields | Description |
|---|---|
|
Match option |
Check radio button All or Any. All - only stock ledger records matching all entered search criteria are shown, after the search is executed. Any - stock ledger records matching any of the entered search criteria are shown, after the search is executed. |
|
Department |
Enter, select or search for the department. |
|
Class |
Enter, select or search for the class. |
|
Subclass |
Enter, select or search for the subclass. |
|
Location |
Enter, select or search for the location. |
|
End of the Month Date |
Enter, select or search for the end of the month date. |
Click on the Saved Search list to select one of the saved search criteria. Selecting a saved search populates the search section with the saved search criteria. If the run automatically function is enabled for the search, the search is executed immediately, as you enter the search screen.
You can also personalize your saved searches by selecting Personalize. The Personalize Saved Searches window appears.
For more information about the Personalized Saved Search, see the Common User Interface Controls chapter, section "Personalize Saved Search".
Click Search. The stock ledger records that match the search criteria are displayed in the Results section.
Click Reset to clear the search section and results.
Click Save As... to save the current search criteria. The Create Saved Search window appears.
For more information about how to save your search criteria, see the Common User Interface Controls chapter, section "Create Saved Search".
Click Done to close the window.
To search for a stock ledger record using advanced search criteria:
To search using advanced search criteria, enter or select one or all of the advanced search criteria.
To narrow down the search, use the list next to the search fields. For example, determine if the entered value should equal or not equal the search result.
Click on the Saved Search list to select one of the saved search criteria. Selecting a saved search populates the search section with the saved search criteria. If the run automatically function is enabled for the search, the search is executed immediately.
You can also personalize your saved searches by selecting Personalize. The Personalize Saved Searches window appears.
For more information about the Personalized Saved Search, see the Common User Interface Controls chapter, section "Personalize Saved Search".
Click Search. The stock ledger records that match the search criteria are displayed in the Results section.
Click Reset to clear the search section and results.
Click Save As... to save the current search criteria. The Create Saved Search window appears.
For more information about how to save your search criteria, see the Common User Interface Controls chapter, section "Create Saved Search".
Click Add Fields to add more fields for the advanced search. To remove the field from the search, click the x right next to the field.
Click Reorder to change the order of the available search fields. The Reorder Search Fields window appears.
Select the desired search field and use the up and down arrows to rearrange the order of the fields.
Click OK to confirm the new order of the fields and close the window.
Click Cancel to reject any changes and close the window.
Click Done to close the window.
The Results section lists the retrieved stock ledger records.
Use the Actions Menu and icons to apply actions to the Results table. You can perform the actions listed below.
Table 12-2 Results - Actions Menu/Icons and Description
| Actions Menu/Icons | Description |
|---|---|
|
View and View icon |
To view a stock ledger record:
|
|
Export to Excel and Export to Excel icon |
You can export the records in the table to a Microsoft Excel spreadsheet by selecting Actions > Export to Excel or by using the Export to Excel icon |
You can customize the view of the table by using the options in the View Menu.
Table 12-3 Results - View Menu/Icons and Description
| View Menu/Icons | Description |
|---|---|
|
Columns |
You can manage which of the columns will be shown in the table by clicking the Show All and Manage Columns options. |
|
Detach and Detach icon |
You can view the table in the application in a separate window by clicking Detach or using the Detach icon |
|
Sort |
You can sort columns by the following options:
|
|
Reorder Columns |
You can reorder columns by clicking the Reorder Columns option. |
|
Query by Example and Query by Example icon |
You can filter the items by one or multiple column values by clicking Query by Example or using the Query by Example icon |
The toolbar contains the following icons and buttons.
The RMS Stock Ledger records and summarizes the financial results and records of merchandising processes such as buying, selling, price changes, stock adjustments, transfers, and so on. The individual transactions from the transaction data are aggregated at the subclass/location level for days, weeks, months, and financial half, based on the primary currency and calendar settings in the system.
The Stock Ledger window allows you to view stock ledger details by subclass/location/month. The details shown on the window may vary, based on the finance related setup for each department.
The Stock Ledger window contains the following sections:
Header
The Header section displays the department, class, subclass, location, end of month date, and the primary currency of the system.
Inventory at Retail
This section is only displayed for departments configured to use the retail method of accounting. This section summarizes the value of the opening and ending stock. It also shows the calculation used for determining the stock values by detailing the calculation of Inventory Additions and Inventory Reductions for the month or week. In addition this section shows other retail values such as VAT and Non-inventory sales.
Inventory at Cost
This section is only displayed for the departments that are configured to use the cost method of accounting. This section summarizes the value of the opening and ending stock. It also shows the calculations used for determining the stock values by detailing the calculation of Inventory Additions and Reductions for the month or week. In addition this section shows other values such as Workroom, Cash Discounts and Cost Variance.
Retail Calculations
This section is only displayed for departments that use the retail method of accounting.
This section holds information about cumulative markon and Gross Margin including the goods available to sell values in both cost and retail terms.
Retail and Margin Values
This section is only displayed for departments that use the cost method of accounting. It displays retail values such as net sales, franchise sales, outgoing intercompany transfers as well as net sales (non-inventory). Additionally the section displays margin values such as gross margin and intercompany margin.
The toolbar contains the following icons and buttons.
Table 12-5 Stock Ledger Toolbar - Icons/Buttons and Description
| Icons/Buttons | Description |
|---|---|
|
Help icon |
You can access the online help for a particular page by clicking the Help icon |
|
Expand and Collapse icons |
You can expand all the sections and collapse all the sections in the window by clicking the Expand and Collapse icons. |
|
Previous and Next Month icons |
Use the Previous and Next Month icons to view the stock ledger records of the previous or next month. |
|
Done |
Click Done to close the window. |
To view stock ledger records, follow the steps below.
From the Tasks menu, select Finance> Stock Ledger. The Stock Ledger Search window appears.
Enter or select search criteria as desired to make the search more restrictive.
Click Search. The stock ledger records that match the search criteria are displayed in the Results section.
In the Department column, click the department link, or mark a record and select Actions > View, use the View icon ![]() . The Stock Ledger window appears.
. The Stock Ledger window appears.
View the stock ledger records
Click Done to close the window.
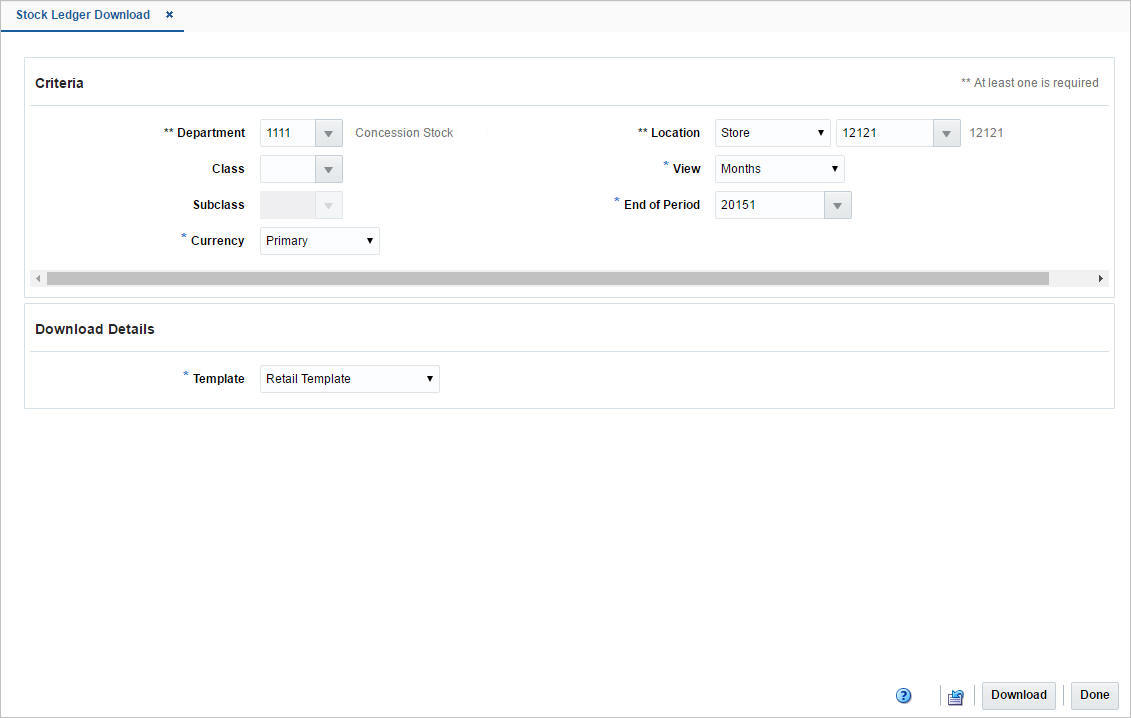
In the Stock Ledger Download window you can download stock ledger records from RMS to a spreadsheet.
The Stock Ledger Download window contains the following sections.
Criteria
Download Details
To download stock ledger records, follow the steps below.
From the Task menu, select Finance > Stock Ledger Download. The Stock Ledger Download window appears.
In the Criteria section, filter the data by the following criteria.
|
Note: You must enter the values in the View, Currency and End of Period field to carry out the search. Additionally you must enter either the department or the location to search for stock ledger records. |
Table 12-6 Stock Ledger Download - Filter Criteria
| Fields | Description |
|---|---|
|
Department |
Enter, select or search for the department. You must enter either the department or the location for the download. |
|
Class |
Enter, select or search for the class. |
|
Subclass |
Enter, select or search for the subclass. |
|
Currency |
Select if you want to download the data in the local or the retailer's primary currency. This field is a required field. |
|
Location |
Select the location type. Then enter, select or search for the location. You must enter either the location or the department for the download. |
|
View |
Select if you want to view the data by days, months, or weeks. This field is a required field. |
|
End of Period |
Enter, select or search for the end of period date. This field is a required field. |
In the Download Details section, select the template from the list. The Template field is a required field. The following templates are available.
Cost Template
This option will generate a file that contains only cost columns of the selected View.
Retail Template
This option will generate a file that contains only retail columns of the selected View.
Cost-Retail Template
This option will generate a file that contains both cost and retail columns of the selected View.
Click Download to download the spreadsheet with the selected stock ledger records on your desktop.
The toolbar contains the following icons and buttons.
Table 12-7 Stock Ledger Download Toolbar - Icons/Buttons and Description
| Icons/Buttons | Description |
|---|---|
|
Help icon |
You can access the online help for a particular page by clicking the Help icon |
|
Refresh icon |
You can refresh the window by clicking the Refresh icon. All fields will be cleared. |
|
Download |
Click Download to download the stock ledger records. |
|
Done |
Click Done to close the window. |
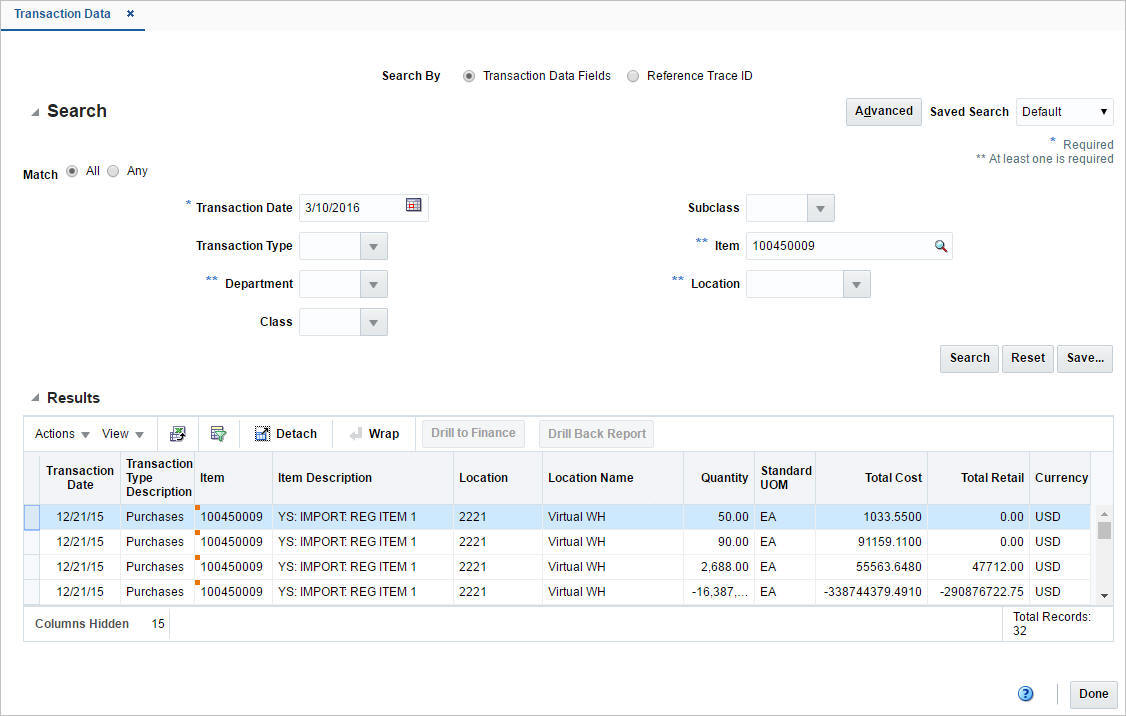
The Transaction Data window allows you to search for and view transactions on a specific date or range of dates for a specific department. Additionally you can perform the following functions:
Search for transactions by various search criteria
Search for transactions by reference trace ID
Make a web service to an external financial system via RFI
Open Drill Back to Report
You can access the Transaction Data window from the Task menu:
Select Finance > Transaction Data. The Transaction Data window appears.
Select Finance > Average Cost Adjustment. In the Average Cost Adjustment window, select Tran Data. The Transaction Data window appears.
Select Finance > Receipt Adjustment by Cost. In the Receipt Adjustment by Cost window, select Transaction Data. The Transaction Data window appears.
The Transaction Data window contains the following sections.
Search
For more information about how to search for a transaction, see the Searching for a Transaction section.
To search for a transaction:
From the Task menu, select Finance > Transaction Data. The Transaction Data Search window appears.
Select if you want to search for a transaction by:
Transaction Data Fields
Click Advanced to access the search section in advanced mode.
Click Basic to return to the basic mode.
Reference Trace ID
|
Note: In the search by transaction data fields, basic mode is the default search mode. |
To search for a transaction using basic search criteria:
Enter, select or search for one or all of the following basic search criteria.
|
Note: You must enter a transaction date to carry out the search. Additionally you must enter either the department, the item or the location to search for transaction data. |
Table 12-8 Transaction Data Search - Basic Search Criteria and Description
| Fields | Description |
|---|---|
|
Match option |
Check radio button All or Any. All - only transactions matching all entered search criteria are shown. Any - transactions matching any of the entered search criteria are shown. |
|
Transaction Date |
Enter the transaction date or use the Calendar icon to select a date. This field is a required field. |
|
Transaction Type |
Enter, select or search for the transaction type. |
|
Department |
Enter, select or search for the department. You need to enter either the department, the item or the location for the transaction search. |
|
Class |
Enter, select or search for the class. |
|
Subclass |
Enter, select or search for the subclass. |
|
Item |
Enter, or search for the item. You need to enter either the item, the location or the department for the transaction search. |
|
Location |
Enter, select or search for the location. You need to enter either the location, the department or the item for the transaction search. |
Click on the Saved Search list to select one of the saved search criteria. Selecting a saved search populates the search section with the saved search criteria. If the run automatically function is enabled for the search, the search is executed immediately.
You can also personalize your saved searches by selecting Personalize. The Personalize Saved Searches window appears.
For more information about the Personalized Saved Search, see the Common User Interface Controls chapter, section "Personalize Saved Search".
Click Search. The transactions that match the search criteria are displayed in the Results section.
Click Reset to clear the search section and results.
Click Save As... to save the current search criteria. The Create Saved Search window appears.
For more information about how to save your search criteria, see the Common User Interface Controls chapter, section "Create Saved Search".
Click Done to close the window.
To search for a transaction using advanced search criteria:
To search using advanced search criteria, enter or select one or all of the advanced search criteria.
To narrow down the search, use the list next to the search fields. For example, determine if the entered value should equal or not equal the search result.
Click on the Saved Search list to select one of the saved search criteria. Selecting a saved search populates the search section with the saved search criteria. If the run automatically function is enabled for the search, the search is executed immediately.
You can also personalize your saved searches by selecting Personalize. The Personalize Saved Searches window appears.
For more information about the Personalized Saved Search, see the Common User Interface Controls chapter, section "Personalize Saved Search".
Click Search. The transactions that match the search criteria are displayed in the Results section.
Click Reset to clear the search section and results.
Click Save As... to save the current search criteria. The Create Saved Search window appears.
For more information about how to save your search criteria, see the Common User Interface Controls chapter, section "Create Saved Search".
Click Add Fields to add more fields for the advanced search. To remove the field from the search, click the x right next to the field.
Click Reorder to change the order of the available search fields. The Reorder Search Fields window appears.
Select the desired search field and use the up and down arrows to rearrange the order of the fields.
Click OK to confirm the new order of the fields and close the window.
Click Cancel to reject any changes and close the window.
Click Done to close the window.
To search for a transaction by reference trace ID, follow the steps below.
In the Reference Trace ID field, enter, select or search for the reference trace ID.
Click Search. The transactions for the selected reference trace ID are displayed in the Results section.
Click Reset to clear the search section and results.
Click Done to close the window.
The Results section lists the retrieved transactions.
Use the Actions Menu and icons to apply actions to the Results table. You can perform the actions listed below.
Table 12-9 Results - Actions Menu/Icons and Description
| Actions Menu/Icons | Description |
|---|---|
|
Drill to Finance and Drill to Finance button |
Select Actions > Drill to Finance or use the Drill to Finance button to initiate a drill forward Web service call to an external finance system (Peoplesoft) to retrieve detailed information about the financial posting made for a source transaction. The details retrieved will be displayed in a separate window. |
|
Drill Back Report and Drill Back Report button |
You can open the Drill Back report in a new tab by selecting Actions > Drill Back Report or by using the Drill Back Report button. |
|
Export to Excel and Export to Excel icon |
You can export the records in the table to a Microsoft Excel spreadsheet by selecting Actions > Export to Excel or by using the Export to Excel icon |
|
Wrap icon |
You can wrap the values in the table column by first clicking the column on which you would like the text to wrap and then using the Wrap icon |
You can customize the view of the table by using the options in the View Menu.
Table 12-10 Results - View Menu/Icons and Description
| View Menu/Icons | Description |
|---|---|
|
Columns |
You can manage which of the columns will be shown in the table by clicking the Show All and Manage Columns options. |
|
Detach and Detach icon |
You can view the tables in the application in a separate window by clicking Detach or using the Detach icon |
|
Sort |
You can sort columns by the following options:
|
|
Reorder Columns |
You can reorder columns by clicking the Reorder Columns option. |
|
Query by Example and Query by Example icon |
You can filter the items by one or multiple column values by clicking Query by Example or using the Query by Example icon |
The toolbar contains the following icons and buttons.
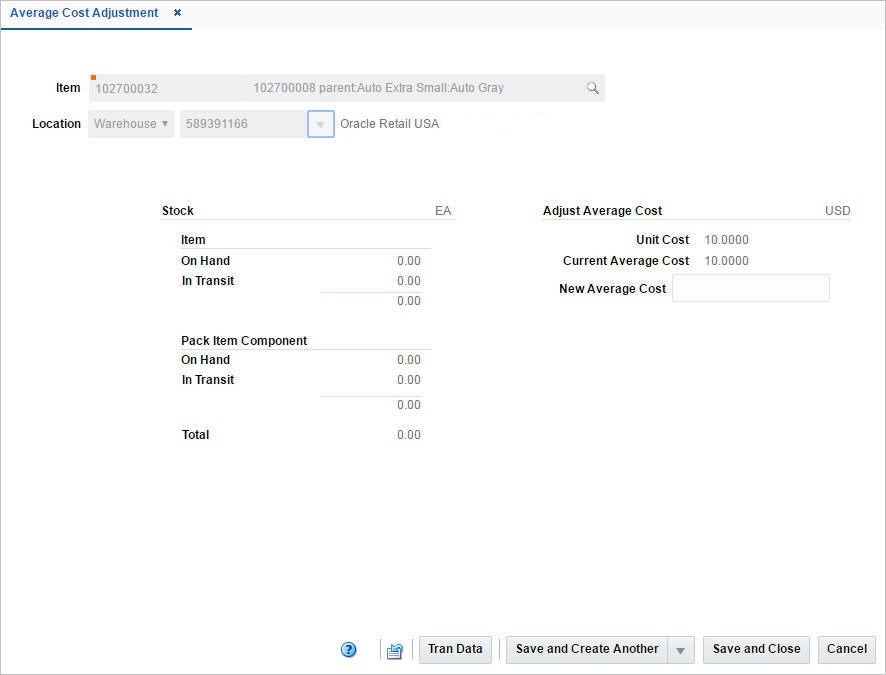
The Average Cost Adjustment window allows you to enter a new average cost for an item at a selected location.
In the Average Cost Adjustment Window displays the following fields.
Table 12-12 Average Cost Adjustment - Fields and Description
| Fields | Description |
|---|---|
|
Item |
Enter, or search for the item. |
|
Location |
Select the location type. Then enter, select or search for the location for which you want to adjust the average cost. |
|
Stock: |
This section allows you to view the item and pack item component quantities at a location. Right side of the section header displays the UOM (unit of measure) for the stock quantities shown. |
|
Item - On Hand |
Displays the stock on hand of the item at the selected location. |
|
Item - In Transit |
Displays the stock of the item in transit to the selected location. |
|
Pack Item Component - On Hand |
Displays the stock on hand of the pack item component at the selected location. |
|
Pack Item Component - In Transit |
Displays the stock of the pack item component in transit to the selected location. |
|
Total |
Displays the total quantity of the item at the selected location. |
|
Adjust Average Cost: |
This section allows you to view the current costs of an item at a location and allows you to change the average cost. Right side of the section header shows the location currency. |
|
Unit Cost |
Displays the unit cost of the item at the selected location. |
|
Current Average Cost |
Displays the current average cost of the item at the selected location. |
|
New Average Cost |
Enter the new average cost for the selected item/location. |
The toolbar contains the following icons and buttons.
Table 12-13 Average Cost Adjustment Toolbar - Icons/Buttons and Description
| Icons/Buttons | Description |
|---|---|
|
Help icon |
You can access the online help for a particular page by clicking the Help icon |
|
Refresh icon |
You can refresh the window by clicking the Refresh icon. All entries are reset and not saved. |
|
Tran Data button |
Opens the Transaction Data window. The item/location information is populated in the search criteria in the Search section. For more information about the Transaction Data window, see the Transaction Data section. |
|
Save and Close |
Click Save and Close to save the entered records and close the window. |
|
Save and Create Another |
Click Save and Create Another to save the entered records and create a new average cost adjustment. The menu contains the following options.
|
|
Cancel |
Click Cancel to reject all entries and close the window. |
To adjust the average cost for an item at a selected location, follow the steps below.
From the Tasks menu, select Finance > Average Cost Adjustment. The Average Cost Adjustment window appears.
In the Item field, enter, or search for the item.
In the Location field, select the location type from the list. Then enter, select or search for the location.
In the New Average Cost field, enter the new cost for the item at the selected location.
Then choose one of the saving options. For more information about the available options, see the Average Cost Adjustment Toolbar section.
The Receiver Adjustment by Cost window allows you to adjust the unit cost of an item by purchase order and location after it has been received.
Cost adjustment is performed at an item location level that exists in a purchase order.
The Receipt Adjustment by Cost Window contains the following sections.
In the header section you can choose a purchase order and an item on the order. The supplier site, invoice location, department and order status is displayed automatically.
The Locations section displays details such as received/matched/adjusted quantity, on hand/in transit inventory, order cost and average cost of the selected item in the chosen purchase order across all locations in the order. You can adjust the unit cost of an item in this section.
Use the Actions Menu and icons to apply actions to the table. You can perform the actions listed below.
Table 12-14 Locations - Actions Menu/Icons and Description
| Actions Menu/Icons | Description |
|---|---|
|
Edit and Edit icon |
Select Actions > Editor use the Edit icon For more information about how to edit the unit cost of a selected item, see the Adjusting the Unit Cost of an Item section. |
|
Export to Excel and Export to Excel icon |
You can export the records in the table to a Microsoft Excel spreadsheet by selecting Actions > Export to Excel or by using the Export to Excel icon |
You can customize the view of the table by using the options in the View Menu.
Table 12-15 Locations - View Menu/Icons and Description
| View Menu/Icons | Description |
|---|---|
|
Columns |
You can manage which of the columns will be shown in the table by clicking the Show All and Manage Columns options. |
|
Detach and Detach icon |
You can view the table in the application in a separate window by clicking Detach or by using the Detach icon |
|
Sort |
You can sort columns by the following options:
|
|
Reorder Columns |
You can reorder columns by clicking the Reorder Columns option. |
|
Query by Example and Query by Example icon |
You can filter the items by one or multiple column values by clicking the Query by Example option or by using the Query by Example icon |
The toolbar contains the following icons and buttons.
Table 12-16 Receipt Adjustment by Cost Toolbar - Icons/Buttons and Description
| Icons/Buttons | Description |
|---|---|
|
Help icon |
You can access the online help for a particular page by clicking the Help icon |
|
Refresh icon |
You can refresh the window by clicking the Refresh icon. All entries are reset and not saved. |
|
Transaction Data button |
Opens the Transaction Data window. The following fields are populated in the search criteria, when the transaction data window appears:
For more information about the Transaction Data window, see the Transaction Data section. |
|
Save |
Click Save to save the entered records. |
|
Save and Close |
Click Save and Close to save the entered records and close the window. |
|
Save and Create Another |
Click Save and Create Another to save the entered records and add additional entries. This option is only available, if you create a new expense profile. |
|
Cancel |
Click Cancel to reject all entries and close the window. |
To adjust the unit cost of an item by purchase order and location after it has been received, follow the steps below.
From the Tasks menu, select Finance > Receipt Adjustment by Cost. The Receipt Adjustment by Cost window appears.
In the Order No. field, enter, select or search for the purchase order.
In the Item field, enter, or search for the item.
The locations for the item are displayed in the Locations section.
Select a record in the table
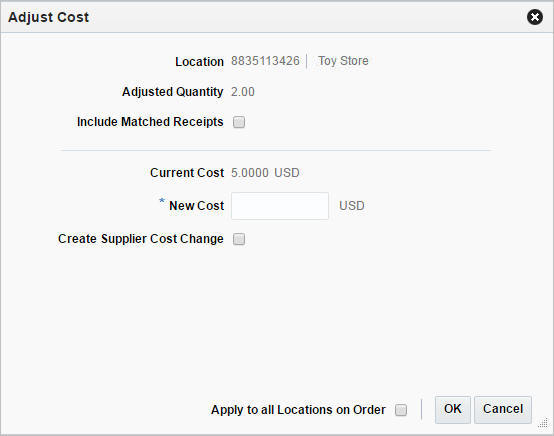
Then select Actions > Edit, or use the Edit icon ![]() . The Adjust Cost window appears. The location, the adjusted quantity and the current cost of the item at the location are displayed.
. The Adjust Cost window appears. The location, the adjusted quantity and the current cost of the item at the location are displayed.
Select the Include Matched Receipts checkbox to adjust the cost of those receipts which have already been matched in the ReIM (Retail Invoice match) application.
In the New Cost field, enter the new unit cost for the selected item. This field is a required field.
Select the Create Supplier Cost Change checkbox to update the supplier unit cost with the cost specified in this window.
Select the Apply to all Locations on Order checkbox to indicate that the cost adjustment is applied to all locations on the selected order, not just the selected ones.
Then choose one of the following options.
Click OK to adjust the unit cost and close the window.
Click Cancel to reject all entries and close the window.