| Oracle® Retail Merchandising System User Guide 16.0.22 E88086-01 |
|

 Previous |
 Next |
The Oracle Retail Pricing module provides the ability to define, maintain, and review price changes and clearances, as well as provides the ability to pass approved price events onto downstream selling systems.
With this release, new pricing functionality has been included in Retail Merchandising Foundation Cloud Service (RMFCS). This functionality provides support for initial pricing, regular price changes, and clearance markdowns. It also provides for the execution of these price events to update the selling systems, such as Xstore POS, and to update the item/location price and stock ledger when the price changes go into effect.
|
Note: Users should not access the Oracle Retail Pricing module during the Retail Merchandising System (RMS) batch window as it may cause some unpredictable results. |
The Pricing System Options provides users the ability to choose and specify foundation data, various variables, and system defaults at the system level. This information defines how the system is set up and eventually behaves. Many of these options are defined at the time of installation and cannot be changed. Some options and defaults can be changed at any time and some allow changes but may have a large impact on any data that is already present.
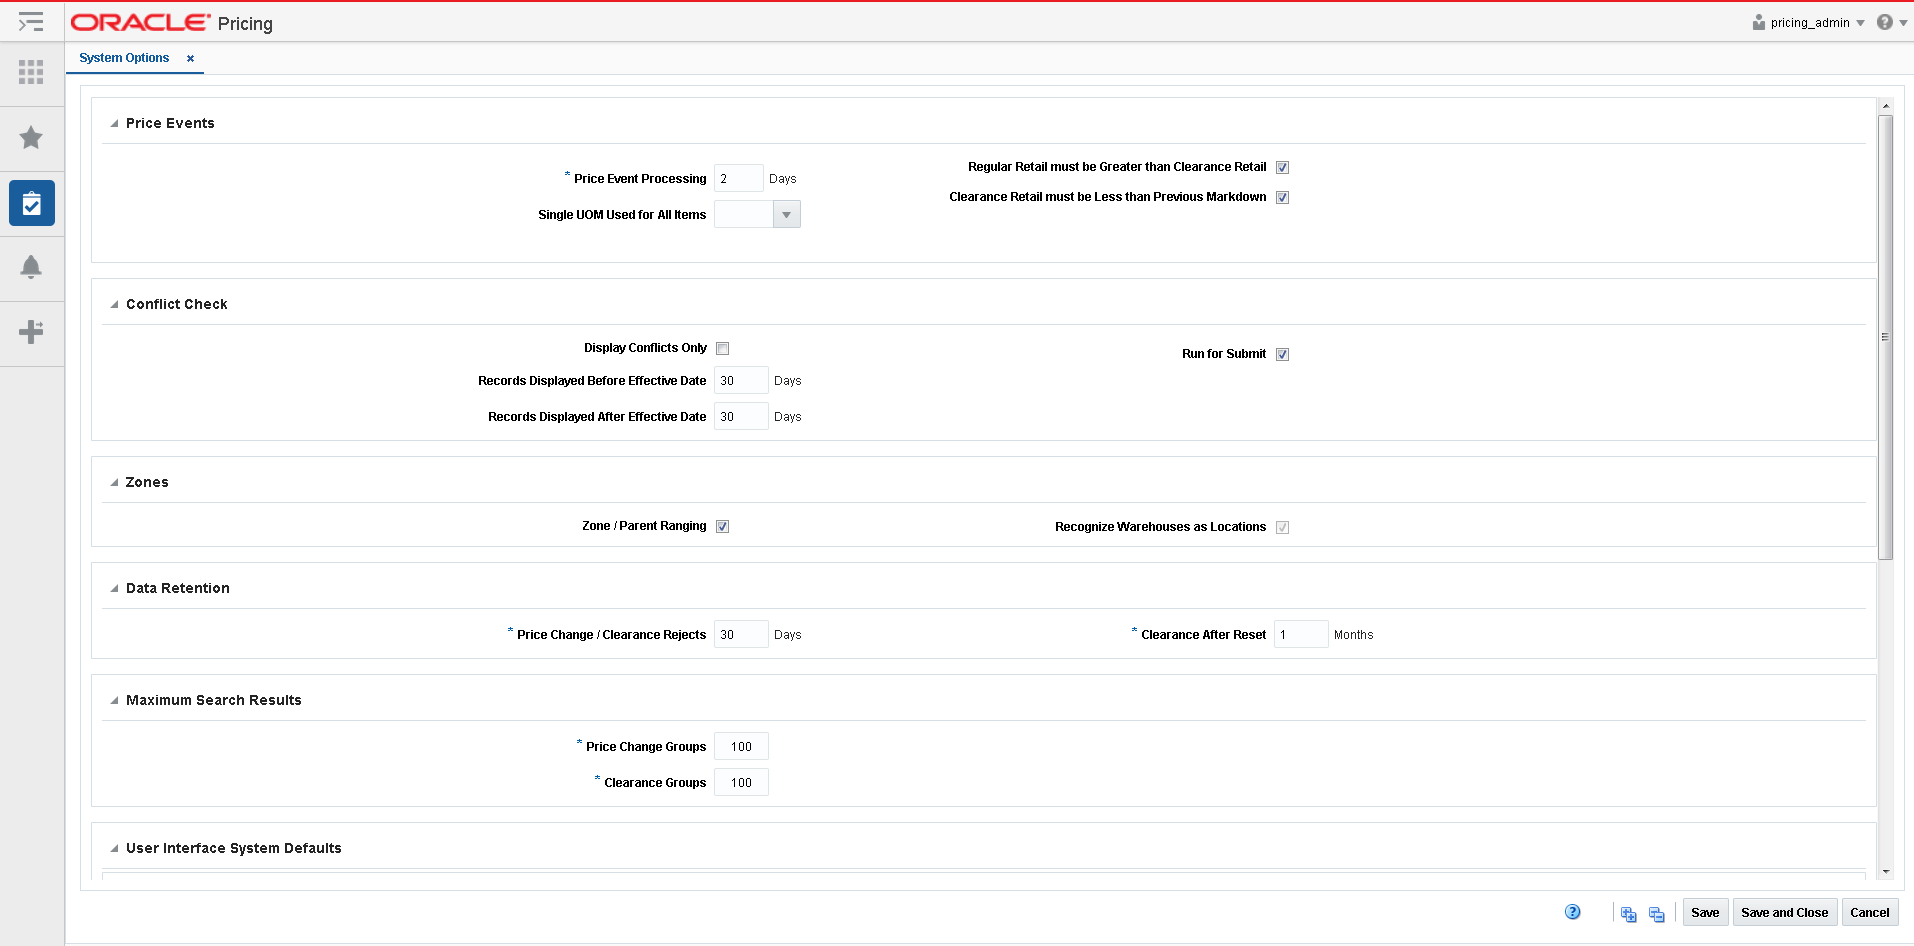
The System Options screen is divided into the following collapsible containers:
The Price Events container allows users to set several parameters which will affect the processing of price events within the pricing system.
From the Tasks menu, select Application Administration > System Options. The System Options tab appears.
From the Price Events container, set the following parameters:
Table 15-1 Price Event Parameters
| Field | Description |
|---|---|
|
Price Event Processing |
This value represents the number of days required between the create date and the effective date of a price event. It does not determine the communication processes or timing but simply allows the retailer to ensure that price events are created with enough advance timing that stores and other process areas can react accordingly. This value will be used in the price change and clearance UI's. |
|
Single UOM Used for All Items |
If this option is populated, it provides the ability to inform the pricing system that there is only one unit of measure (UOM) to be used throughout. This is particularly useful to improve performance when a fixed-price price event is created. |
|
Regular Retail must be Greater than Clearance Retail |
This system option provides retailers the ability to configure the system to allow for a Clearance retail that is greater than the regular retail for an item location. If the indicator is set to YES (checked) conflict checking will raise a conflict for the clearance event when the retail of the clearance is greater than the regular retail for the item location. If the indicator is set to No (unchecked) conflict check will be skipped for this rule. |
|
Clearance Retail must be Less than Previous Markdown |
This system option provides retailers the ability to configure the system to allow for a Clearance retail that is greater than the previous clearance markdown for an item location. If the indicator is set to YES (checked) conflict checking will raise a conflict for the clearance event when the retail of the clearance is greater than the previous clearance markdown for the item location. If the indicator is set to No (unchecked) conflict checking will be skipped for this rule. |
When you have completed your updates, click Save to save your updates and remain on the System Options tab or Save and Close to save your changes and close the tab.
The Conflict Check container allows users to set default options for conflict checking of price changes and clearances.
From the Tasks menu, select Application Administration > System Options. The System Options tab appears.
From the Conflict Check container, set the following parameters:
Table 15-2 Conflict Check Parameters
| Field | Description |
|---|---|
|
Display Conflicts Only |
This system option determines how and what conflict check details are displayed to the user. When the system option is checked only the record that caused the conflict is displayed in the lower portion of the Conflicts tab. When checked, the "Records Displayed Before Effective Date" and "Records Displayed After Effective Date" system options should be disabled. If the system option is unchecked all approved events that have an effective date in the ranged defined by the two options below (Records Displayed before/after Effective Date) as it relates to the effective date of the event in conflict are displayed in the Conflicts tab. |
|
Records Displayed Before Effective Date |
This system option defines the number of days before the price event effective date that a pricing event is displayed on the conflicts screen. This detail is used if the Display Conflicts Only system option is unchecked. |
|
Records Displayed After Effective Date |
This system option defines the number of days after the price event effective date that a pricing event is displayed to the user in the conflicts screen. This detail is used if the Display Conflicts Only system option is unchecked. |
|
Run for Submit |
This option allows the user to run the conflict checking process during the price event Submit action. |
When you have completed your updates, click Save to save your updates and remain on the System Options tab or Save and Close to save your changes and close the tab.
The Zones container allows the user to set zone/parent ranging and warehouse options for price changes and clearances.
From the Tasks menu, select Application Administration > System Options. The System Options tab appears.
From the Zones container, set the following parameters:
Table 15-3 Zones Parameters
| Field | Description |
|---|---|
|
Zone / Parent Ranging |
This system option designates whether or not ranging is required when creating price events including regular price changes, or clearance. For example, when setting up clearances at zone and parent level, it checks that locations and parent items are ranged to zones and locations respectively to ensure that clearances are not set up on items where they are not sold. If this system option is checked, when a user creates a price change/clearance at a level higher than transaction/location (tran/zone, parent/zone, parent/loc, and so on.) the system will ensure there is at least one item/location ranged underneath the event. If there is not at least one, then the system will not allow the user to create the event. If this system option is not checked, then ranging will only be performed on price changes/clearances created at the transaction/location level and ranging checks will not be performed on events created at any other higher level. |
|
Recognize Warehouses as Locations |
This system option controls whether warehouses will exist in Pricing zones and hold retail values for warehouse locations. When the system options is set to Yes, warehouses will appear in the Location LOVs and can be assigned to price zones When the system option is set to No, warehouses are not available in Pricing and will not appear in the Location LOVs. Stock on hand values will be zero and will not be calculated for warehouse locations when set to No. |
When you have completed your updates, click Save to save your updates and remain on the System Options tab or Save and Close to save your changes and close the tab.
The Data Retention container contains settings that allow the user to set the number of days to maintain price change and clearance data prior to purging.
From the Tasks menu, select Application Administration > System Options. The System Options tab appears.
From the Data Retention container, set the following parameters:
Table 15-4 Data Retention Parameters
| Field | Description |
|---|---|
|
Price Change / Clearance Rejects |
This field defines the number of days after the effective date of a rejected price change or clearance when it should be purged from the system. |
|
Clearance After Reset |
Expired clearance records must be purged from the system in order to manage the size of the database. The field holds the number of months past a clearance reset date that should be purged. If a clearance is never reset it cannot be purged, as the item/location still exists as a clearance. In addition, any FUTURE_RETAIL records associated with a clearance will not be purged until the clearance is reset. |
When you have completed your updates, click Save to save your updates and remain on the System Options tab or Save and Close to save your changes and close the tab.
The Maximum Search Results container contains settings that allow the user to limit the number of search results returned for price changes and clearances.
From the Tasks menu, select Application Administration > System Options. The System Options tab appears.
From the Maximum Search Results container, set the following parameters:
When you have completed your updates, click Save to save your updates and remain on the System Options tab or Save and Close to save your changes and close the tab.
The User Interface System Defaults container contains user interface defaults for price change and clearance.
From the Tasks menu, select Application Administration > System Options. The System Options tab appears.
From the User Interface System Defaults container, set the following parameters:
Table 15-6 User Interface System Defaults Parameters
| Sub-Container | Field | Description |
|---|---|---|
|
Price Change |
Item Level |
This is the default indicator to define the item level that is displayed when the user enters the price change workflow wizard. The item selection options include; Item, Parent/Diff. Note: This parameter is included as a placeholder for future functionality, it does not drive any functionality in this release. |
|
Diff Type |
This default defines the Diff type value that will be displayed in the Diff Type field in the Price Change workflow wizard when the user enters and selects Parent/Diff. Note: This parameter is included as a placeholder for future functionality, it does not drive any functionality in this release. |
|
|
Change Type |
This field holds a value for the default price change type that will be displayed when the user is creating a price change. |
|
|
Reason |
This field holds a value for the default reason code that is displayed when the user is creating a price change. Note: During the implementation process, system options are set prior to creating any code values. This system option is only available for setting once the reason code structure has been created/uploaded (API) into the system. |
|
|
Ignore Constraints |
This system default determines whether constraint checking is defaulted as checked in the price event workflow including; price change and worksheet. Note: This parameter is included to be used in conjunction with future functionality, it does not drive any functionality in this release. |
|
|
Clearance |
Item Level |
This is the default indicator to define the item level that is displayed when the user enters the clearance workfow wizard. The item selection options include; Item, Parent/Diff and Item List. Note: This parameter is included as a placeholder for future functionality, it does not drive any functionality in this release. |
|
Diff Type |
This default defines the Diff type value that will be displayed in the Diff Type field in the Clearance workflow wizard when the user enters and selects Parent/Diff. Note: This parameter is included as a placeholder for future functionality, it does not drive any functionality in this release. |
|
|
Change Type |
This field holds a value for the default change type that is displayed when the user is creating a clearance. |
|
|
Reason |
This field holds a value for the default reason code that will be displayed when the user is creating a clearance. Note: During the implementation process system options are set prior to creating any code values. This system option is only available for setting once the reason code structure has been created/uploaded (API) into the system. |
When you have completed your updates, click Save to save your updates and remain on the System Options tab or Save and Close to save your changes and close the tab.
The System Administration container contains system options that are maintained by a system administrator. The user's security privileges determine if this section is displayed.
From the Tasks menu, select Application Administration > System Options. The System Options tab appears.
From the System Administration container, set the following parameters:
Table 15-7 System Administration Parameters
| Field | Description |
|---|---|
|
Auto Purge of Conflict Check Working Tables |
This field determines if the conflict checking engine automatically purges working data from the BULK_CC_PE* tables at the end of processing. The purge only happens when conflict check is initiated via the UI. |
|
Batch Run History |
The number of months the system should retain history of batch runs on the BATCH_RUN_HISTORY table. |
When you have completed your updates, click Save to save your updates and remain on the System Options tab or Save and Close to save your changes and close the tab.
The following information describes the foundation data within the pricing module.
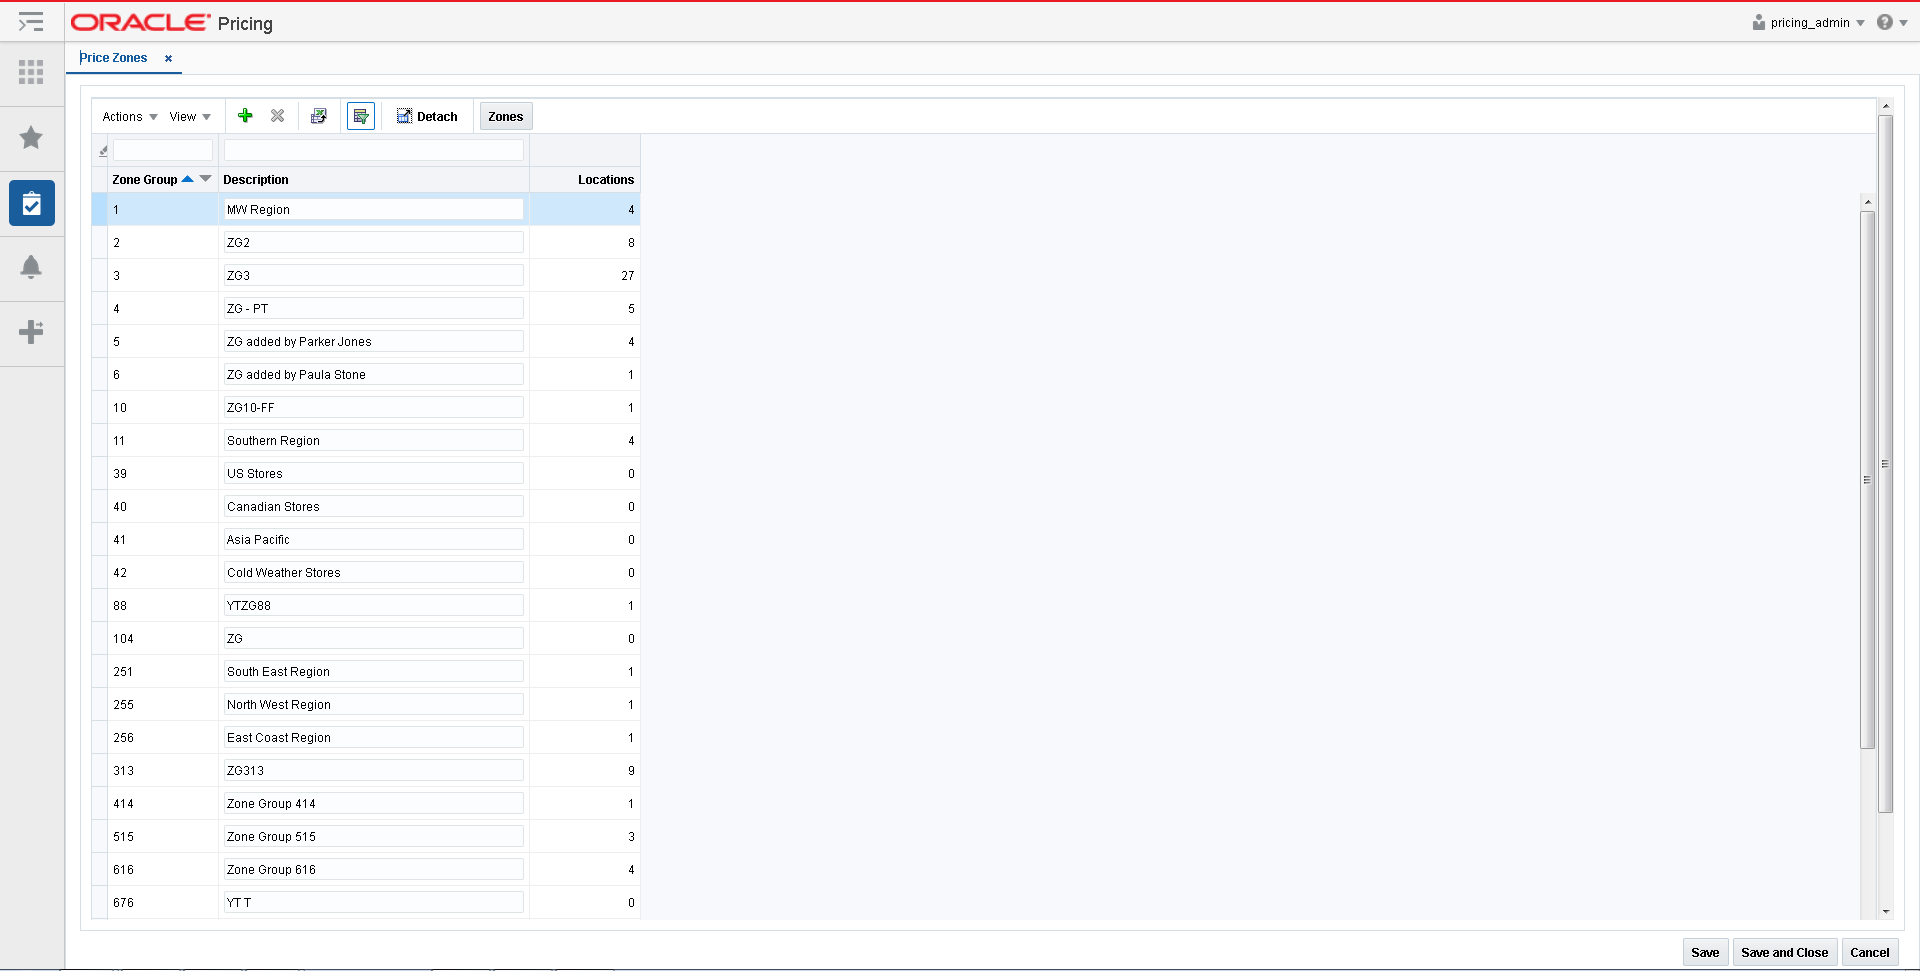
Price zones are used to group locations for the purposes of pricing. Price zones are grouped together in Price Zone Groups. The Zone Structure allows the client to define groupings of locations for the purpose of pricing. Zone Groups can be used for either price changes or clearances.
A Zone Group identifies a particular way of grouping locations for pricing purposes.
Perform the following procedure to create a price zone group:
From the Tasks menu, select Foundation Data > Price Zones. The Price Zones tab appears.
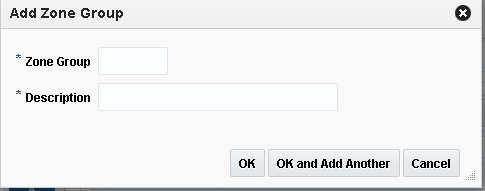
Select Add Zone Group from the Action menu. The Add Zone Group dialog appears.
Enter the zone group details for the following fields:
Zone Group – This field is a unique price zone group identifier.
Description – The description of the zone group.
Click OK to save the new price zone group. You are returned to the Price Zone tab.
Click OK and Add Another to save the current price zone group and create another.
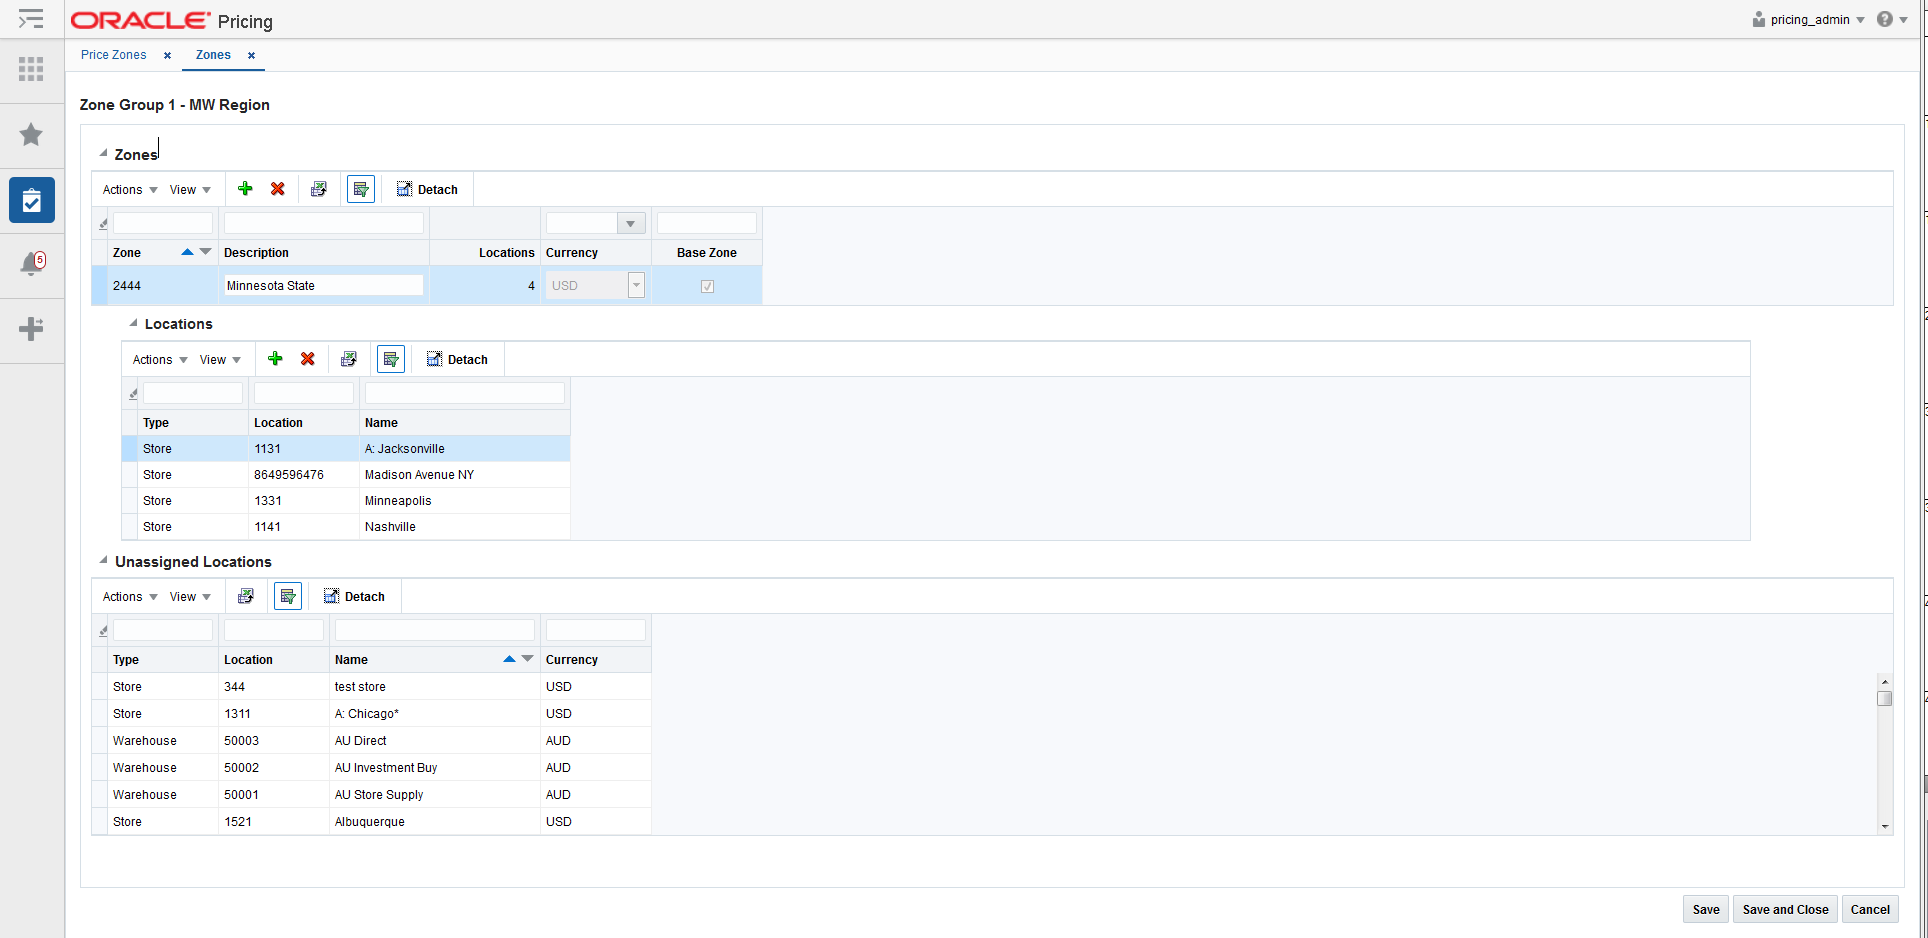
Perform the following procedure to edit a price zone group:
From the Tasks menu, select Foundation Data > Price Zones. The Price Zones tab appears.
From the Zone Group table, highlight the zone group you want to edit and select Zones from the Actions menu. Alternatively, highlight the zone group and click the Zones button. The Zones tab appears.
From the Zones tab, you can perform the following actions:
Add Zones
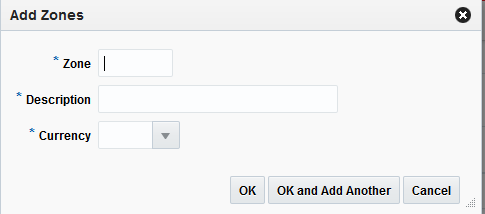
From the Zones table, select Add Zone from the Actions menu. The Add Zones dialog appears.
In the Zones field, enter a unique price zone identifier.
In the Description field, enter a description for the zone.
In the Currency field, select the currency for the price zone from the drop-down list.
Click OK to save the new zone. You are returned to the Zones tab.
Click OK and Add Another to save the current zone and create another.
Delete Zones
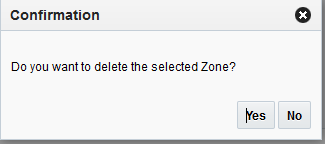
From the Zones table, highlight the zone you want to delete and select Delete from the Action menu. The delete zone confirmation dialog appears.
Click Yes to confirm the deletion. You are returned to the Zones tab.
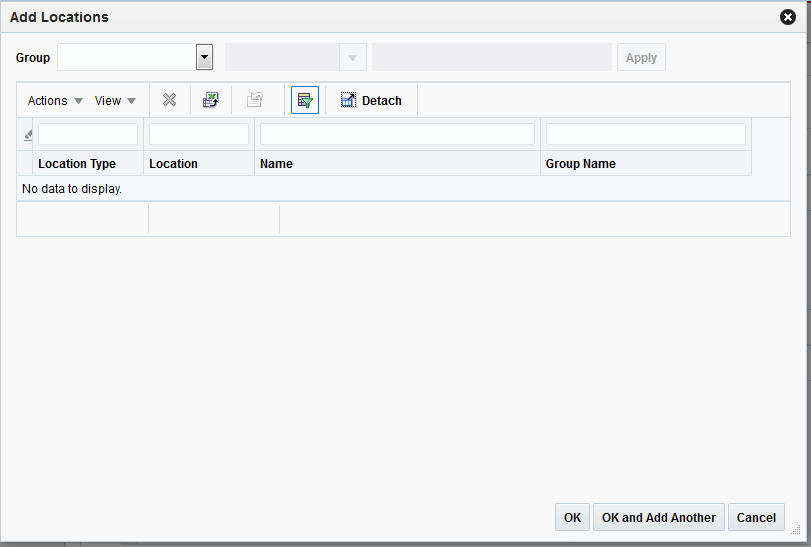
Add Locations
The Add Locations dialog allows users to assign locations to an existing zone.
|
Note: If a location is already in the Locations table, it will not be added a second time. |
From the Locations table, select Add Locations from the Actions menu. The Add Locations dialog appears.
From the Group field, select the group type for the location. Options are:
Location List
Chain
Area
Region
District
Store
Warehouse
|
Note: Warehouse is only shown as an option for group type if the Recognize Warehouses as Locations system option is enabled. |
Unassigned Locations
Once a Group is selected, select or enter a Group Value.
Click Apply to add the new location to the Location table.
When all locations are added, click OK to save the new locations. You are returned to the Zones tab.
Click OK and Add Another to save the current location to the zone and select another.
Delete Locations
The Delete function allows a location to be removed from a zone.
From the Zones table, highlight the zone you want to delete and select Delete from the Action menu. The delete location confirmation dialog appears.
Click Yes to confirm the deletion. You are returned to the Zones tab.
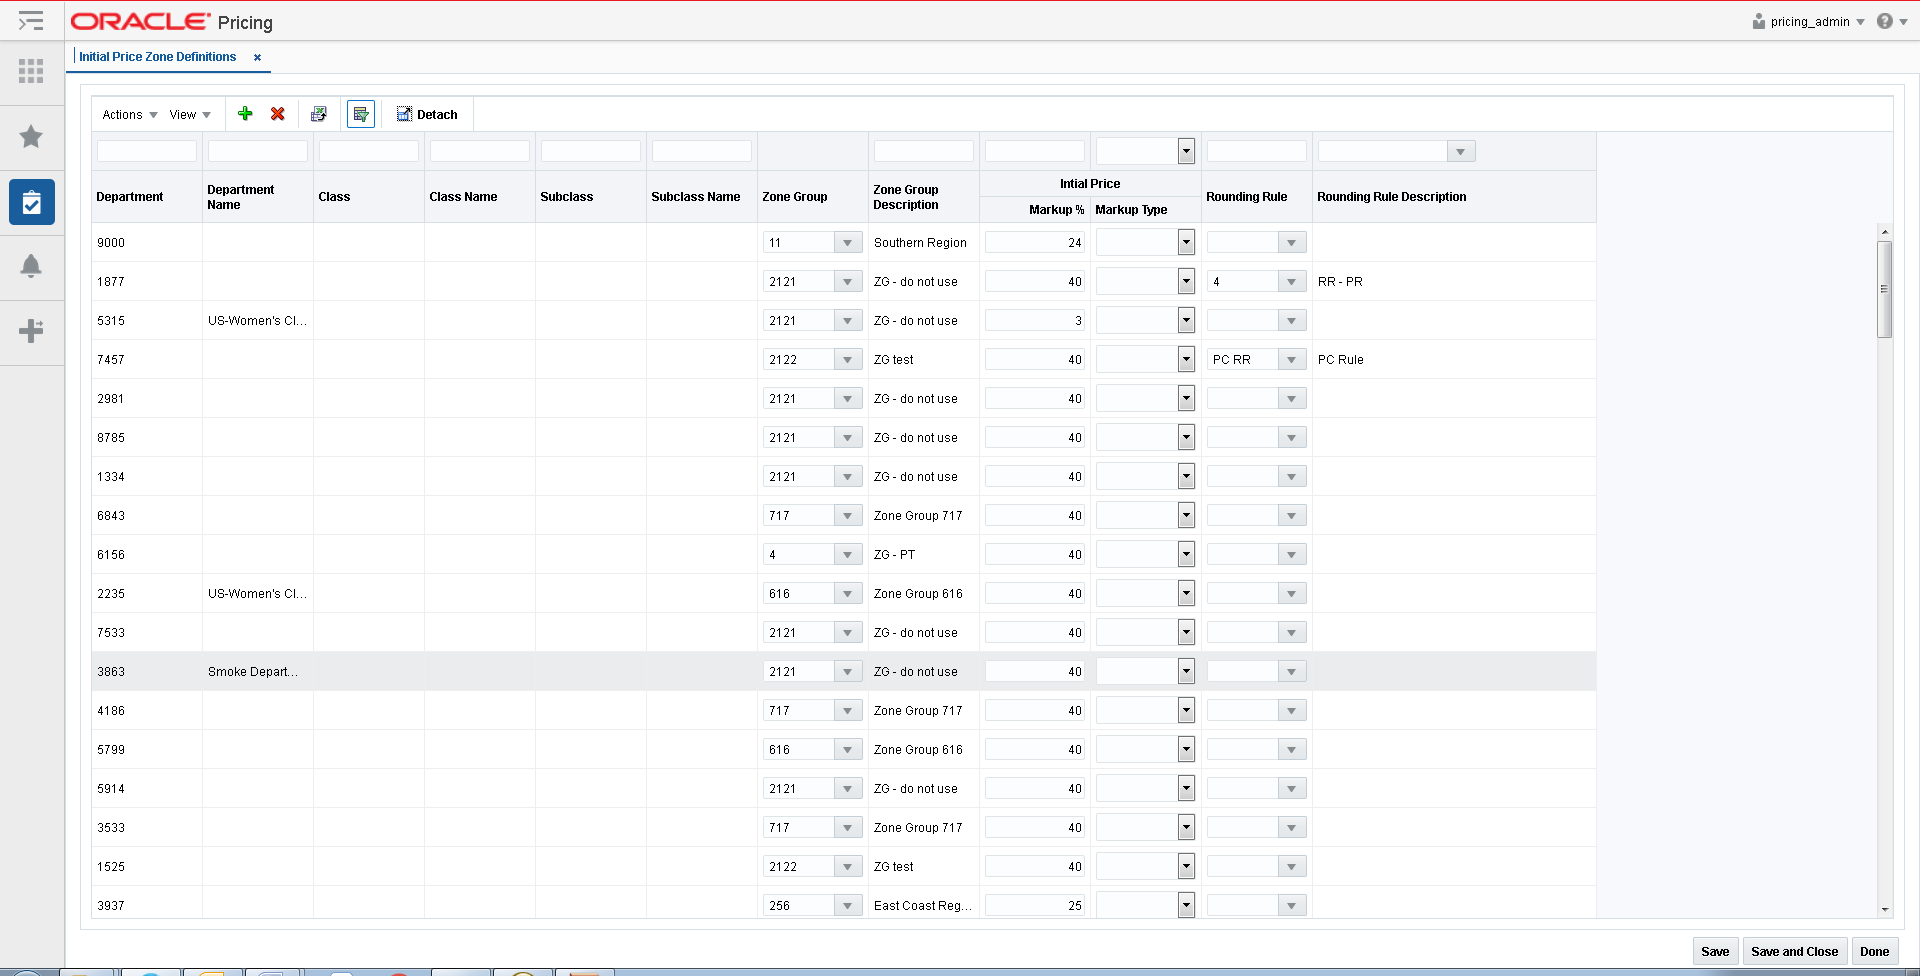
The Initial Price Zone definition enables the user to tie various levels of the merchandise hierarchy to a Zone Group and the markup information necessary to determine the initial retail price of an item. The ability to assign rounding rules by currency to the setting of the initial retail price is also included.
The Initial Price Zone Definitions screen provides a place to map the Merchandise Hierarchy to the Price Zone Groups. The zone group will be mapped to either a Department, Class or Subclass. New items added to a merchandise hierarchy will use the markup information and rounding rules provide to set the initial retail price using the mapping provided.
Perform the following procedure to set up initial price zone definitions:
From the Tasks menu, select Foundation Data > Initial Price Zone Definitions. The Initial Price Zone Definitions tab appears.
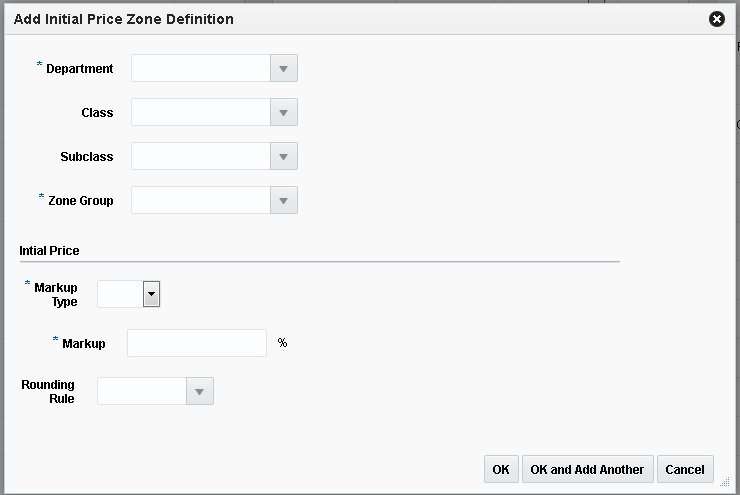
Select Add from the Action menu. The Add Initial Price Zone Definition dialog appears.
Enter the initial price zone definition details for the following fields:
Department – Enter or select a single department.
|
Note: The Department, Class, and Subclass fields have a cascading relationship. You can enter or select values for the three fields in any order but the values will vary depending on selections. |
Class – Enter or select a single class.
Subclass – Enter or select a single subclass.
Zone Group – The Zone Group specified here is used as the structure for the initial price setting for new items added to the defined level of the Merchandise Hierarchy.
Markup Type – The value entered in this field determines how markup is calculated for items existing in the defined hierarchy.
Markup – This percentage field is used to calculate the initial retail based on the item's cost.
Rounding Rule – This field allows you to assign a rounding rule to the initial price zone definition. The rounding rule is used to adjust final price used for the initial price of new items to meet the retailer pricing strategy.
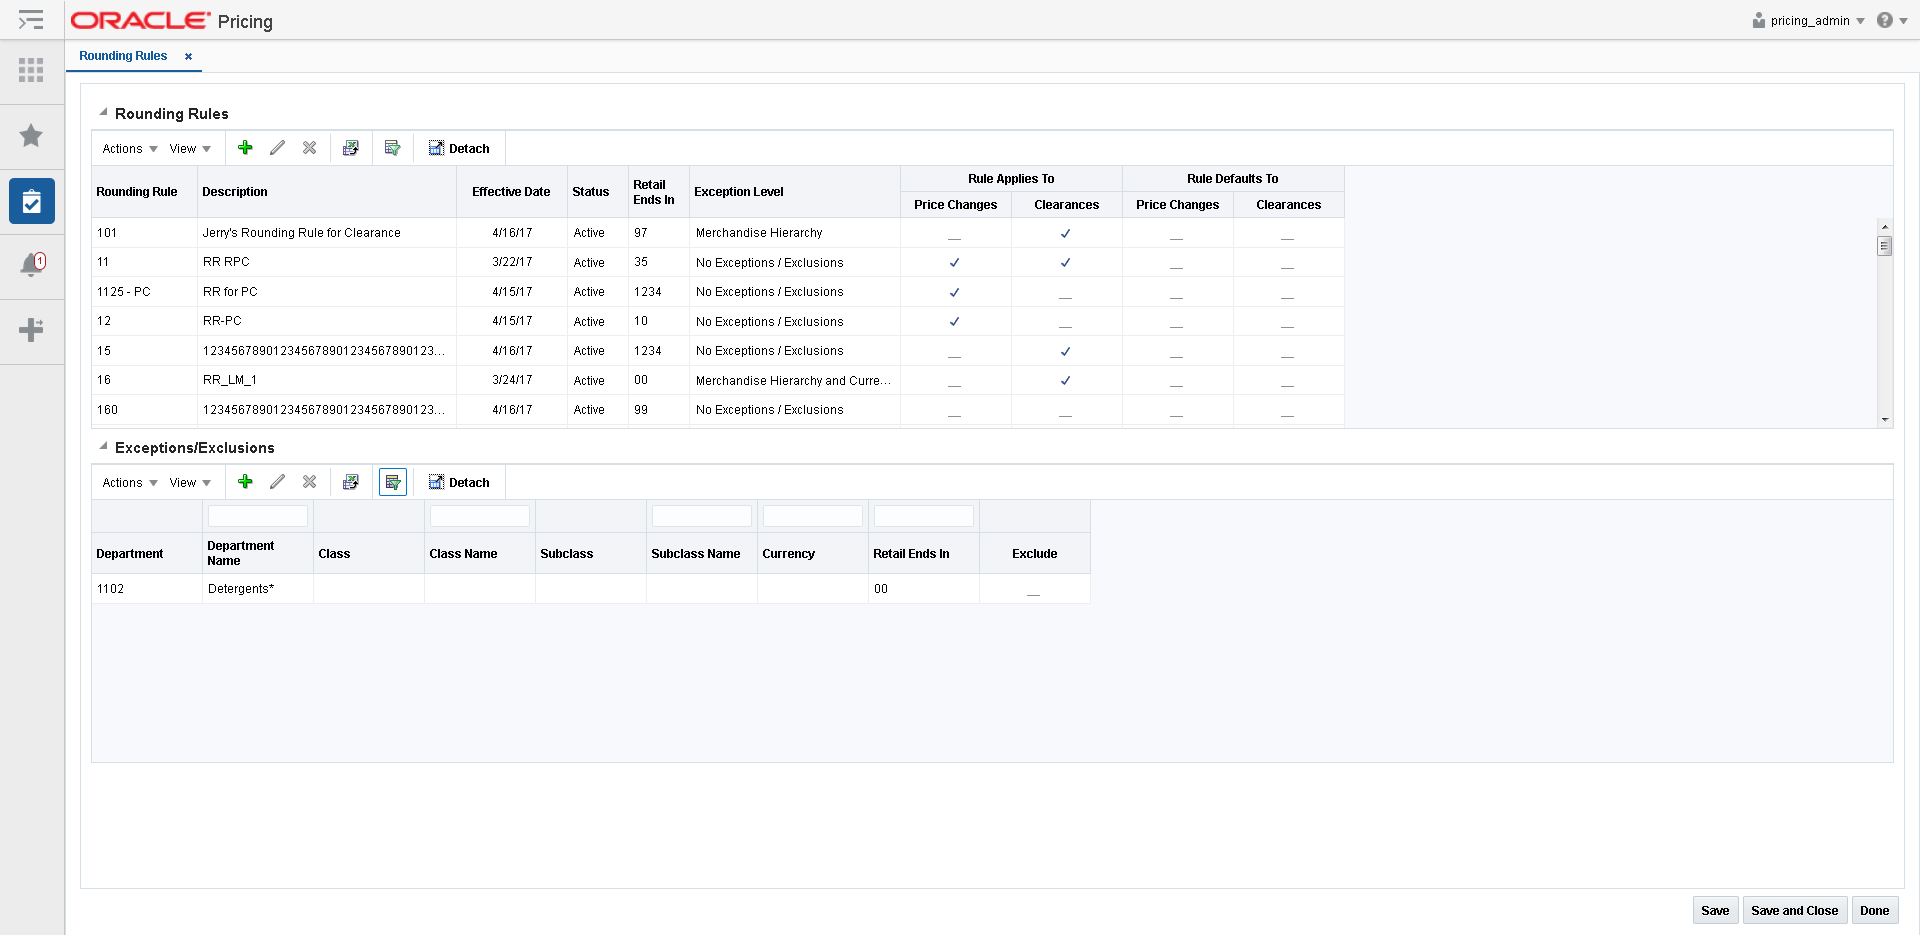
Rounding rules are created to help users setup and manage a uniform pricing strategy. The rules are optional and may be used by retailers to meet their specific needs.
The benefit of rounding rules is that they provide the retailer the ability to smooth proposed retails allowing for a consistent set of price points. This is accomplished by assigning an overall 'ends in' logic to the rounding rule. The user can then define specific exceptions or exclusions to the rule by merchandise hierarchy, currency, or both.
Rounding rules are set up at the Corporate level. If a particular department has rounding rules different than the corporate rule, the department rule is set up as an exception to the corporate rule using the 'merchandise hierarchy' exception feature. Exceptions to (or exclusions from) the corporate rule can be set up at the class or subclass level as well. In addition, exceptions (or exclusions) can also be done for specific currencies. Finally, exceptions or exclusions can be done for a combination of merchandise hierarchy and currency. In other words, exceptions or exclusions to the corporate rounding rule are allowed at the merchandise hierarchy level, the currency level, or the combination of merchandise hierarchy and currency.
Perform the following procedure to create rounding rules:
From the Tasks menu, select Foundation Data > Rounding Rules. The Rounding Rules tab appears.
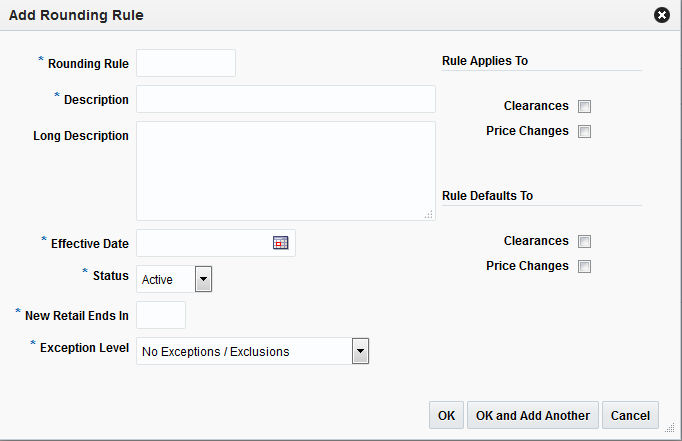
Select Add from the Action menu. The Add Rounding Rule dialog appears.
Enter the rounding rule details for the following fields:
Rounding Rule – The identification number of the rounding rule.
Description – The description of the rounding rule.
Effective Date – The date when the Rounding Rule will become available.
New Retail Ends In – Used for adjusting the decimal value. This field supports 1 to 4 positions. The Ends In value assumes to start in the right most decimal position. For example, if the Retail Ends In is 9 and the currency uses two decimal positions, the value is treated as x9.
Exception Level – The Exception/Exclusion Level of the rounding rule. This field allows the user to decide what type or exceptions or exclusions (if any) are allowed for the rounding rule. This value drives what fields are available in the Exceptions/Exclusions table.
Rule Applies To – The check boxes indicating if this rounding rule applies to Clearances or Price Changes.
Rule Defaults To – The check boxes indicating if this rounding rule is the default for Clearances or Price Changes.
Click OK to save the new rounding rule. You are returned to the Rounding Rule tab.
Click OK and Add Another to save the current rounding rule and create another.
The Exception or Exclusion table will show exceptions and exclusions related to the highlighted row in the Rounding Rules table. Actions taken in the Exception or Exclusion table are related to the highlighted rounding rule. For instance, when the Add action is taken on the Exception/Exclusion table, it means the Exception or Exclusion row being added is for the highlighted rounding rule.
Perform the following procedure to create exceptions or exclusions to rounding rules:
From the Tasks menu, select Foundation Data > Rounding Rules. The Rounding Rules tab appears.
From the Rounding Rules table, select the rounding rule to which you want to add an exception or exclusion.
|
Note: The rounding rule selected must have had the Exception Level specified when it was initially added. |
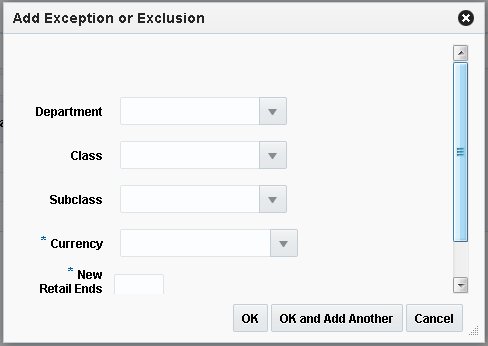
From the Exceptions/Exclusions table, select Add from the Action menu. The Add Exception or Exclusion dialog appears.
|
Note: Fields on the Add Exceptions and Exclusions are enabled or disabled based on the 'Exception Level selected on the Rounding Rule. For instance, when Merchandise Hierarchy is specified as the exception level, the Currency field is disabled. When Currency is specified as the exception level, the Department, Class, and Subclass fields are disabled. |
Enter the Exceptions/Exclusions details for the following fields:
Department – The single department to use as an exception or exclusion to the rounding rule.
Class – The single class to use as an exception or exclusion to the rounding rule.
Subclass – The single subclass to use as an exception or exclusion to the rounding rule.
Currency – The currency to use as an exception or exclusion to the rounding rule.
New Retail Ends In – Used for adjusting the decimal value. This field supports 1 to 4 positions. The Ends In value assumes to start in the right most decimal position. For example, if the Retail Ends In is 9 and the currency uses two decimal positions, the value is treated as x9.
|
Note: This field is enabled for exceptions but disabled for exclusions. |
Click OK to save the exception or exclusion. You are returned to the Rounding Rule tab.
Click OK and Add Another to save the current exception or exclusion and create another.
A price change is the permanent change in the price of an item. You can use the rounding rules to move the new price to established price points or round the price.
When a price change is added, it must go through a series of checks before it can be applied to an item/location. Depending on your user role, you may not be able to move the retail price change to the next status. A change to submitted or approved status, or from approved back to worksheet, results in a conflict check. A price change may be in any of the following statuses:
Table 15-8 Price Change Status
| Status | Definition |
|---|---|
|
Worksheet |
The price change has been started, but not reviewed or sent out. |
|
Submitted |
The price change has been completed and is pending review. Conflict checking has occurred for the price change. |
|
Approved |
The price change has been reviewed and accepted. The price change is communicated to the locations for which the price change is effective. |
|
Executed |
The new prices established are effective for the item/location. |
|
Rejected |
The price change has been reviewed and declined. |
After you create a price change, you can maintain different aspects of the price change.
The Price Change Quick Create feature is designed as a key entry path for users to create a regular price change. The Quick Create feature supports grouping multiple price changes for different items and locations into a single Price Change Group. Mass maintenance can then be performed on this group later in the workflow through the Price Change Group Maintenance workflow.
Use the following procedure to quick create a price change:
|
Note: The Quick Create feature is available in the left pane menu and can be opened at any time regardless of what screens are open. |
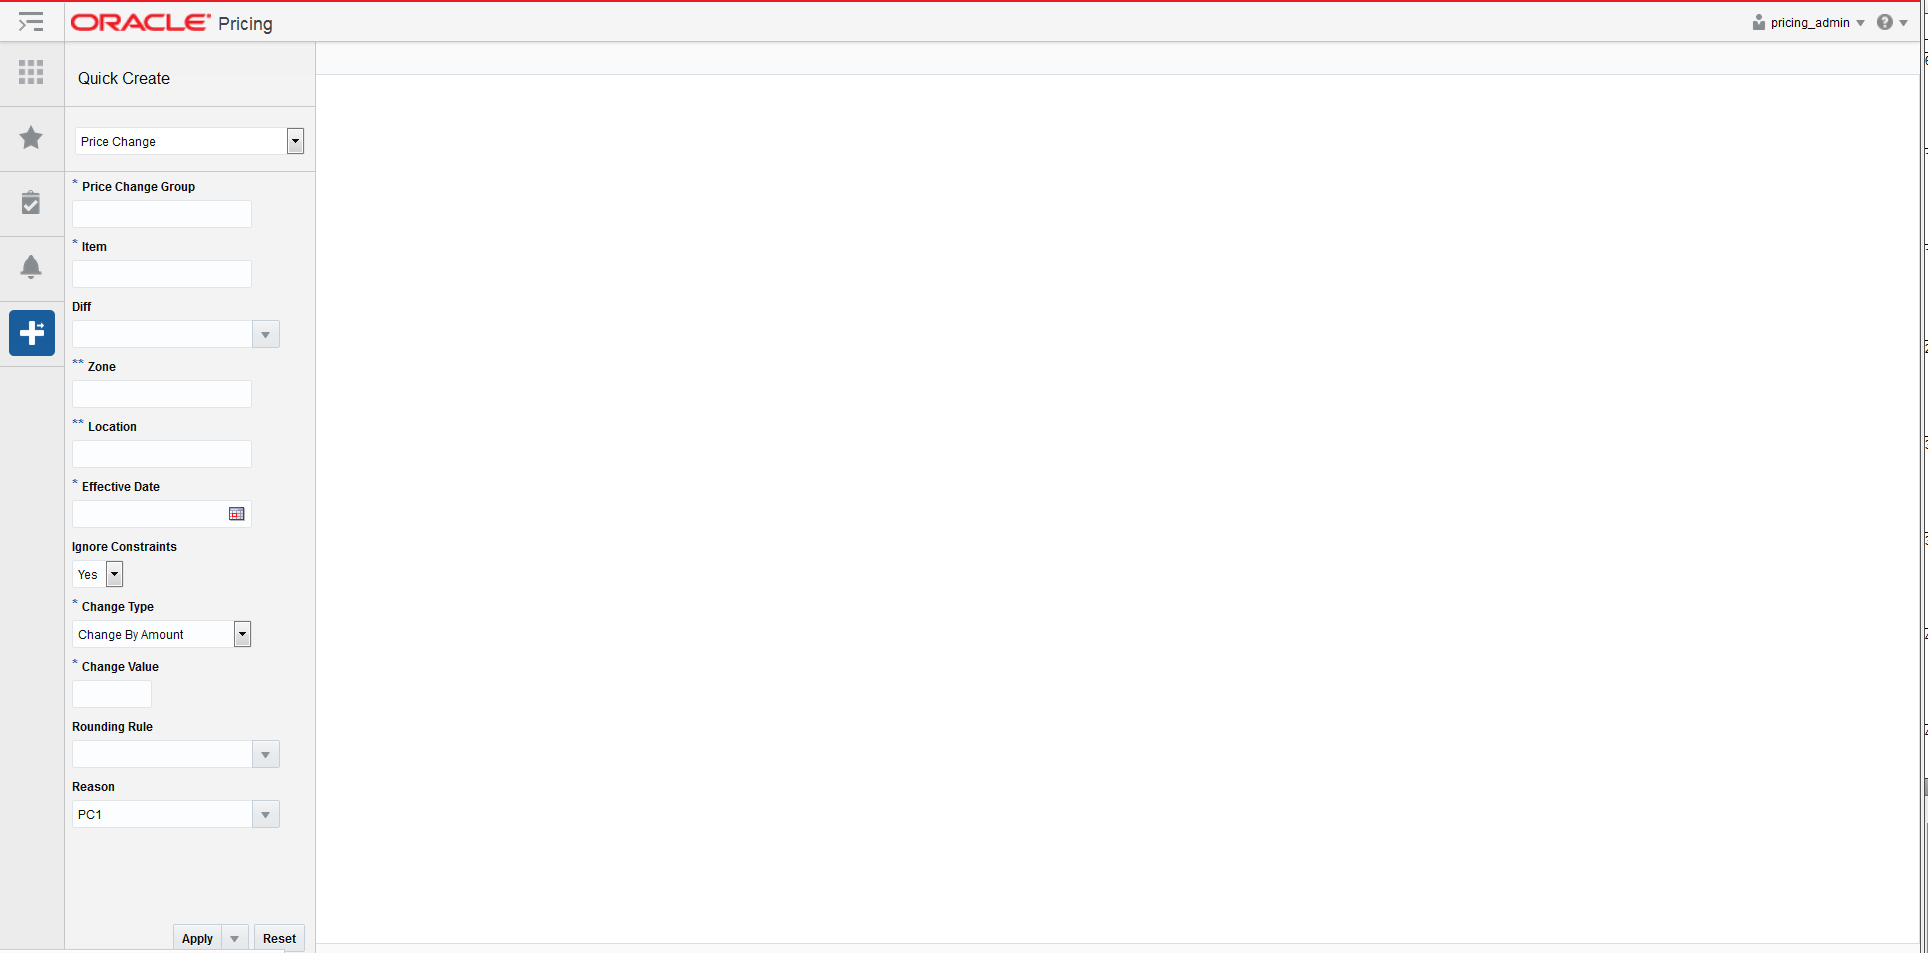
From the Pricing tab Tasks list, click the Quick Create icon.
The Quick Create pane appears.
From the Quick Create pane, select Price Change from the Quick Create drop down list.
From the Quick Create pane, enter information for the following fields:
|
Note: Fields marked with an asterisk are required. Fields marked with a double asterisk means that one of the fields needs to be populated. |
Table 15-9 Price Change Quick Create Fields
| Field | Description |
|---|---|
|
Price Change Group |
The Price Change Group field allows for the entry of a description that can be used to group price changes together. This description may then be used to search for a price change or group of price changes for maintenance purposes. Note: When using Quick Create, each time Apply, Submit or Approve is selected, items and locations that are entered are created under a new Price Change Group. It is not possible to add price changes to an existing group. |
|
Item |
The Item field allows for entry of a parent item or transaction level item. Users may enter a single item or multiple items. If multiple items are entered a semicolon is used to separate values. |
|
Diff |
The Diff field allows for entry or selection of a single Diff Value. Users have the option to use the list of values to search on Diff Type to find the Diff value. |
|
Zone |
The Zone field allows for entry of one or more zones within a single zone group If multiple zones are entered a semicolon is used to separate values. Note: Either a Zone(s) or Location(s) must be entered, but not both. |
|
Location |
The Location field allows for entry of a location. The user may enter a single location or multiple locations. If multiple locations are entered a semicolon is used to separate values. Note: Either a Zone(s) or Location(s) must be entered, but not both. |
|
Effective Date |
The Effective Date is the date when the price change will go into effect. Users have the option to key in a date or select one using the calendar widget. |
|
Ignore Constraints |
This field is included as a placeholder for future functionality, it does not drive any functionality in this release. |
|
Change Type |
The Change Type field provides the options that will derive the new retail price. Options are:
|
|
Change Value |
The Change Value field contains the change by percent, change by amount, or fixed price value depending on the change type selected.
|
|
Rounding Rule |
The Rounding Rule field allows the user to associate a specific rule with a price change record. Users are allowed to enter a single Rounding Rule. A rounding rule helps users create a uniform pricing strategy. |
|
Reason |
The Reason field value defines the reason the price change is being created. |
Once you have entered all information for the newly created price change record, click Apply, Submit, or Approve. The new price change is created.
|
Note: If you select locations (or zones) with multiple currencies, you can only choose to create a price change by percent or to reset the point of sale (POS) price. You cannot create price changes by amount or for a fixed price across multiple currencies. |
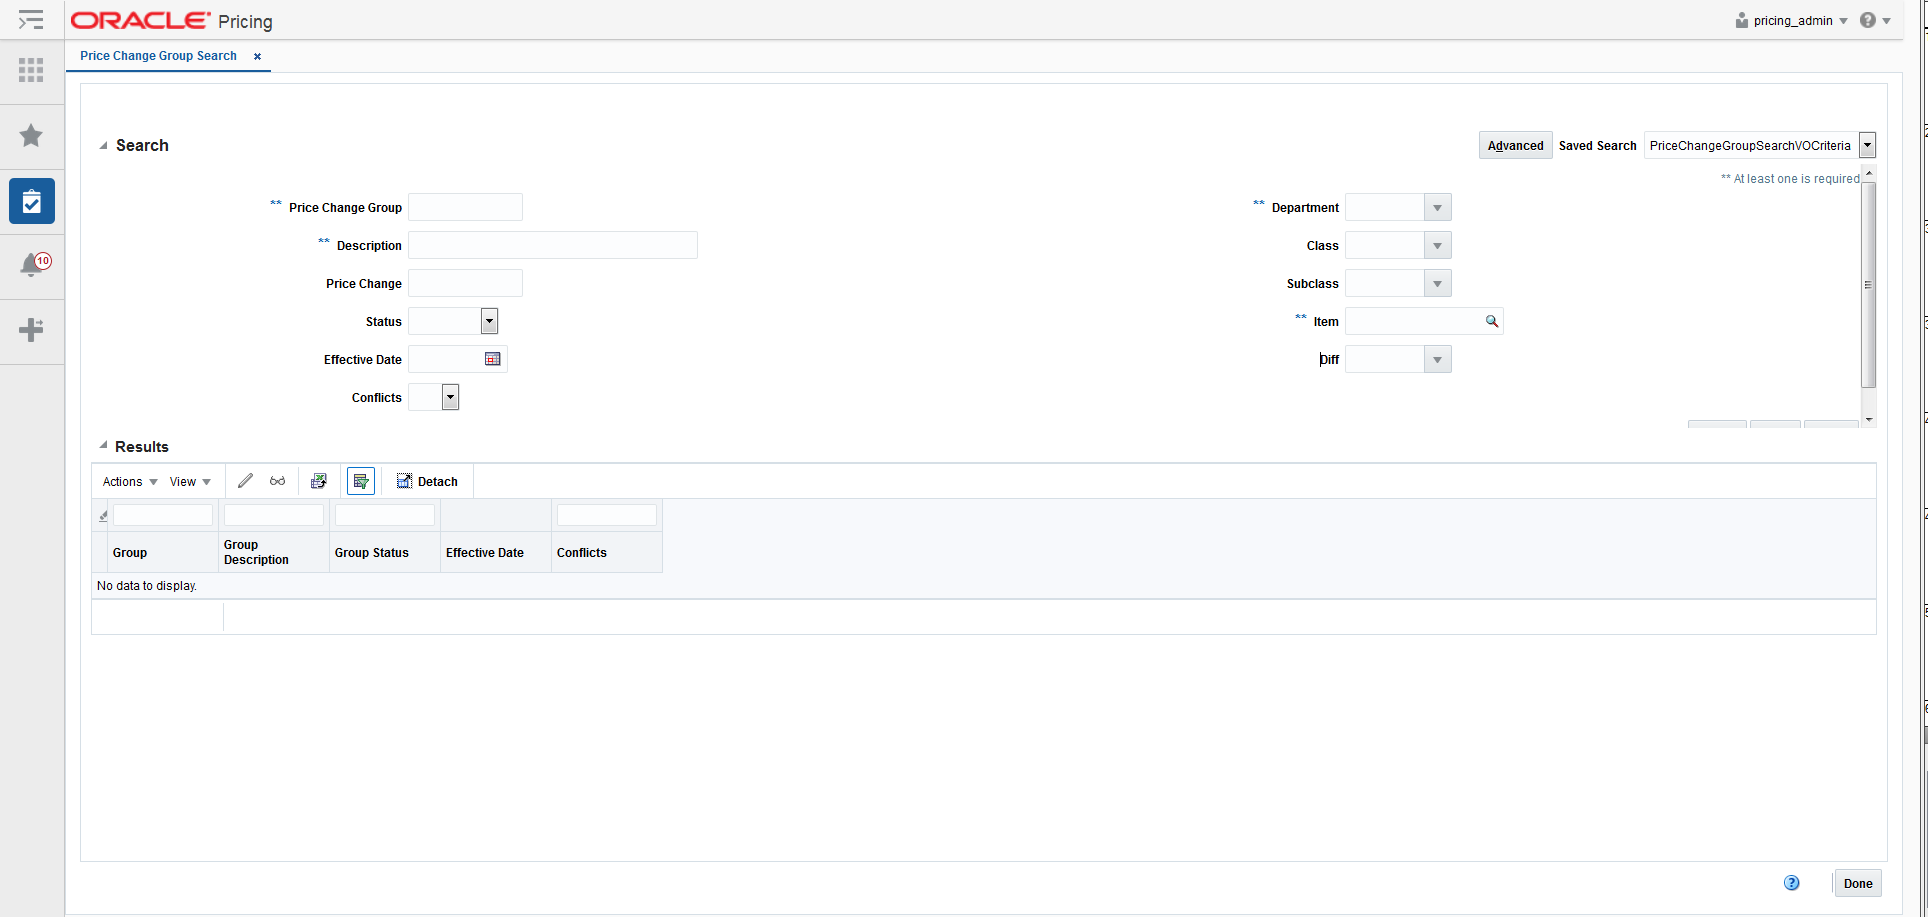
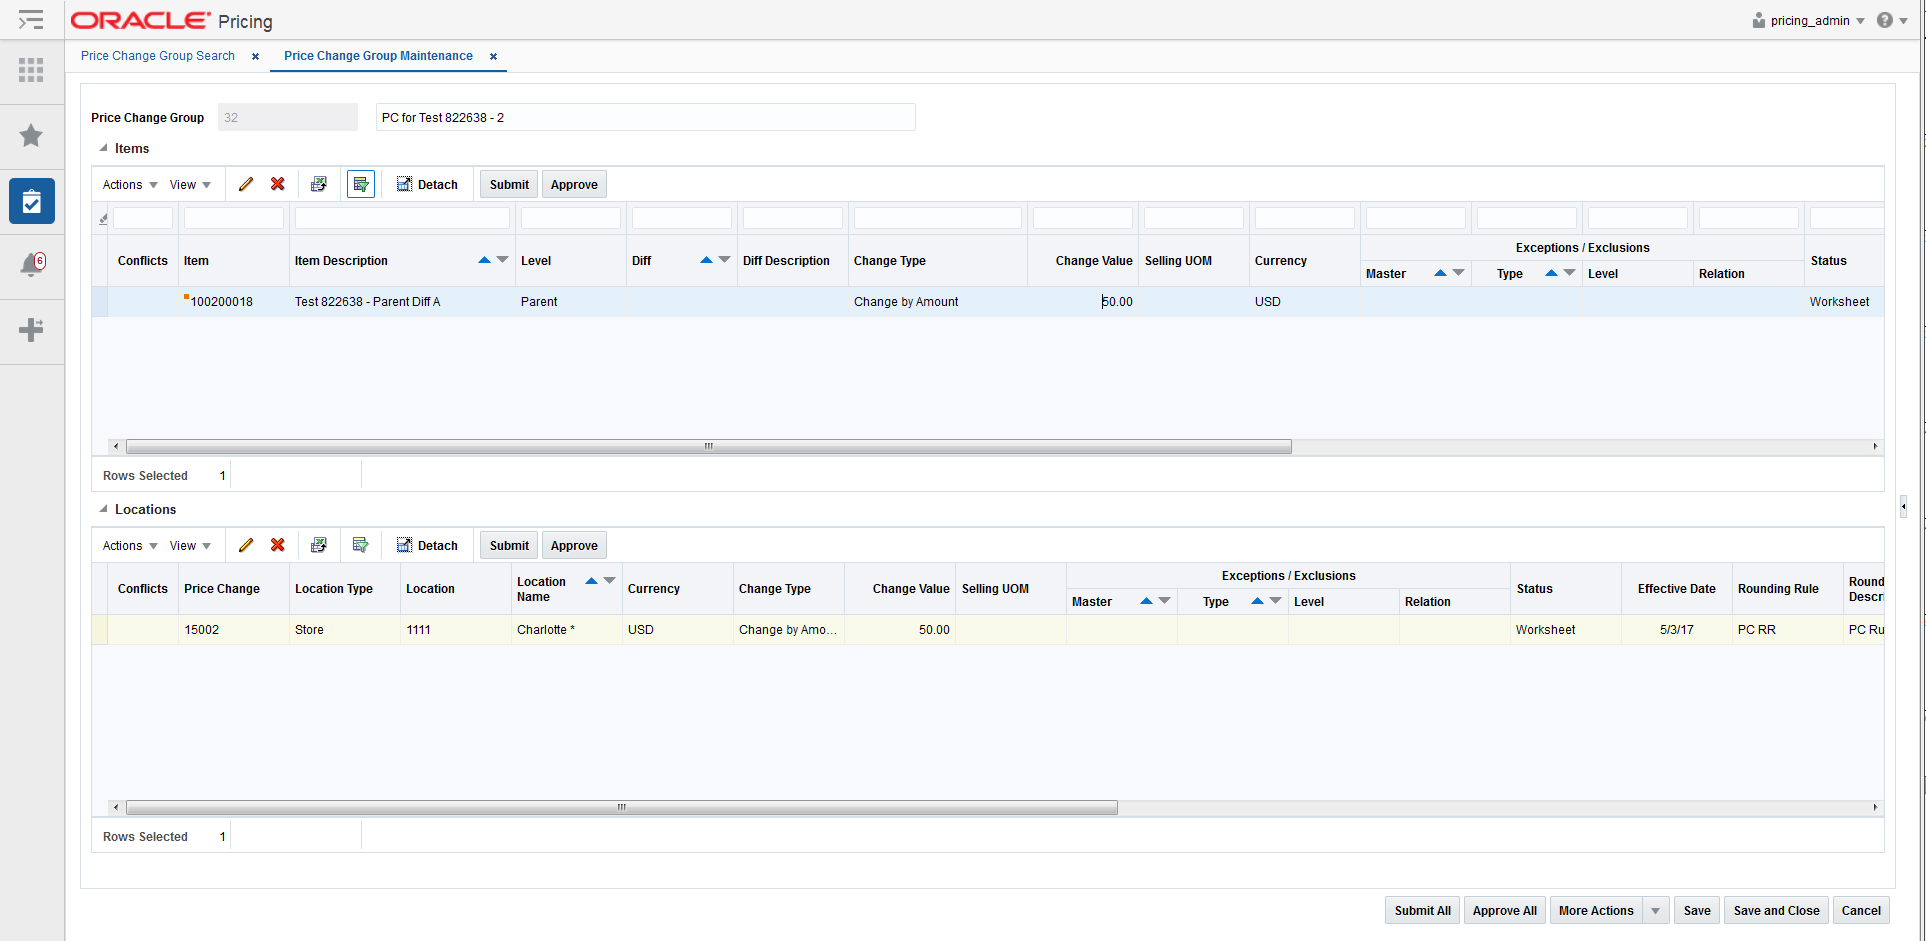
The Price Change Group Maintenance screen allows you to maintain price changes within a price change group. Each price change will contain items needing a change along with the locations or zones where the change should be made.
The Price Change Group tab has two modes; Edit and View. If you enter this screen in View mode, all maintenance options are disabled and the Save, Save and Close, and Cancel buttons are replaced with Done. If you enter in Edit mode the following options are supported:
Perform the following procedure to search for an existing price change group.
From the Tasks menu, select Price Changes > Manage Price Change Groups. The Price Change Group Search tab appears.
Enter your price group search criteria using the following fields:
|
Note: In order to conduct a price group search, users must enter at least one of the following; Department, Group, Group Description or Item. |
Table 15-10 Price Group Search Fields
| Field | Description |
|---|---|
|
Price Change Group |
The Price Change Group field allows the user to enter a Group ID to be used in search criteria. |
|
Description |
The Description field allows the user to enter a description to be used in search criteria. |
|
Price Change |
The Price Change field allows the user to enter a price change to be used as a search criteria. |
|
Status |
The Status field allows the user to select a Status to be used in search criteria. Values for the drop down include: Worksheet, Submitted, Approved, Rejected, or Executed. |
|
Effective Date |
The Effective Date field allows the user to enter or select an effective date to be used in search criteria. |
|
Conflicts |
The Conflicts field allows the user to select one of the following values; Yes, No or NULL (Blank) to be used in search criteria. |
|
Department |
The Department field allows the user to enter or select a Department to be used in search criteria. The Department list of values queries all Departments. Note: The Department, Class, and Subclass fields display the translated names if they exist. |
|
Class |
The Class field allows the user to enter or select a Class to be used in search criteria. The Class list of values queries all Classes or all Classes for the entered Department. |
|
Subclass |
The Subclass field allows the user to enter or select a Subclass to be used in search criteria. The Subclass list of values queries all Subclasses or all Subclasses for the entered Class. |
|
Item |
The Item field allows the user to enter or select an Item(s) to be used in search criteria. Users have the option to go directly to the search icon to look up items. |
|
Diff |
The Diff field allows the user to enter or select a Diff value to be used in search criteria. The Diff list of values includes both Diff Type and Diff Value. |
Once your search criteria are entered, click Search. The search results are displayed in the Results pane.
Editing price changes can be performed on price changes in multiple statuses with the following conditions:
If the Effective Date is in the past, no changes are allowed unless the status of the Price Change is Worksheet. If the status is Worksheet, you have the option to update the Effective Date.
If the date that the update is being performed falls within the Effective Date minus the Price Change Processing Days updates are only allowed for users with emergency security privileges.
Perform the following procedure to edit a price change:
Perform a search for the price change group that you want to edit. See Search for a Price Change Group.
From the search results pane of the Price Change Group Search tab, highlight the price change group you want to edit and select Edit from the Actions menu. The Price Change Group Maintenance tab appears.
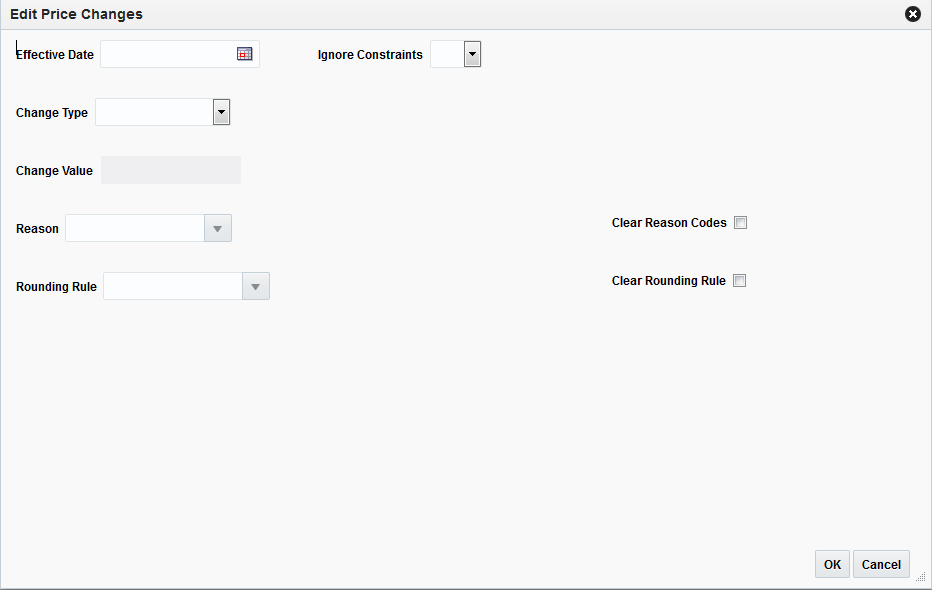
From the Price Change Group Maintenance tab, you can select either items or locations to edit. (Locations shown are associated with the row in the items table which has focus.) Highlight the item(s) or location(s) you want to edit and select Edit from that tables' respective Action menu. The Edit Price Changes dialog appears.
|
Note: If a single location is selected for editing, the Clear Reason Code and Clear Rounding Rules check boxes will not appear. |
From the Edit Price Changes dialog, use the following fields to edit the price change details:
|
Note: When multiple price changes are selected for editing, fields in the popup may show up as empty. This indicates that the value may vary across the selected price changes. Entering a value and updating will update all the rows, leaving the value empty will leave the values unchanged on the individual price changes. |
Table 15-11 Edit Price Changes Fields
| Field | Description |
|---|---|
|
Effective Date |
The date on which the price change is set to take effect. Users have the option to key in a date or select one using the calendar widget. |
|
Change Type |
The Change Type field provides the options that derive the new retail price. Users have the option to modify the Change Type value. Change Type options:
|
|
Change Value |
Users enter the Change Value based on the Change Type entered, including Change by Percent, Change by Amount, or Fixed Price. This field is required entry for every Change Type other than Reset POS Price. The field supports up to four decimal places for Change by Percent value. For Change by Amount and Fixed Price, decimal placement is based on the currency of the selected locations.
|
|
Per (Selling UOM) |
Users have the option to update this field if the Change Type is currently set to Fixed Price or the Change Type field is updated to Fixed Price. For all other change types this field is hidden. |
|
Reason |
The Reason value defines the reason the price change is being created. Users have the option to update this field or remove the value in this field. |
|
Rounding Rule |
The Rounding Rule field provides the ability to smooth retails for an item or location. Users have the option to update this field or remove the value in this field. |
|
Ignore Constraints |
This field is included as a placeholder for future functionality, it does not drive any functionality in this release. |
|
Clear Reason Codes |
The Clear Reason Codes checkbox displays next to the Reasons field when multiple items or locations are selected for Edit. If a users chooses to remove a Reason code for the price change the Clear Reasons checkbox can be clicked. The value for Reasons will be removed from price changes selected to edit. |
|
Clear Rounding Rule |
The Clear Rounding Rule checkbox displays when multiple items or locations are selected for Edit. When the Clear Rounding Rule checkbox is clicked the value for the rounding rule is removed. |
|
Note: If you select multiple items or locations to edit, some fields on the screen will not show a value if there are multiple values for a particular field. For example, if you select two price changes to edit and the Value field in both price changes is 10.00 then the Value field will be populated with 10.00. However, if the price changes have different values (like 10.00 and 11.00,) then the value field in the dialog is blank. If you enter a value, both price changes are changed to the new value. If you do not enter a value, then the original values stay. |
Once updates are complete on the Edit Price Changes dialog, click OK. The Edit Price Changes dialog closes and you are returned to the Price Change Group Maintenance tab.
Users will have options to perform Delete maintenance at Item level for one or many items or at the Item/Location level for one or more Locations tied to an item.
Item Level: Users highlight one or more rows on the Items table and click Delete on the Items table
Location Level: Users will highlight a single row on the Items table and then highlight one or many rows on the Locations table and click Delete on the Locations table
Perform a search for the price change group that you want to delete. See Search for a Price Change Group.
From the search results pane, select the Price Change Group from which you want to delete an item or location and select Edit from the Actions menu. The Price Change Group Maintenance tab appears.
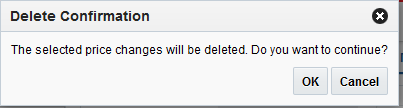
From the Price Change Group Maintenance tab, you can select either items or locations to delete. Highlight the item or location you want to delete and select Delete from that tables' respective Action menu. The Delete Confirmation dialog appears.
From the Delete Confirmation dialog, click OK to confirm the deletion. You are returned to the Price Change Group Maintenance tab.
Users have options to perform status maintenance at Item level for one or many items, at the Item/Location level for one or more Locations tied to an item or they have the option to update for all displayed records using the page level buttons.
Updating Group Level Price Change Status
Perform the following procedure to update the price change status:
Perform a search for the price change group that you want to update. See Search for a Price Change Group.
From the search results pane, select the Price Change Group for which you want to update status. and select Edit from the Actions menu. The Price Change Group Maintenance tab appears.
From the Price Change Group Maintenance tab, use the buttons at the bottom of the page to update the price change group status. Options are:
Submit All
Approve All
Worksheet All (Select from the More Actions button menu.)
Reject All (Select from the More Actions button menu.)
After selecting the status change, click Save to save the updated status and remain on the Price Change Group Maintenance tab. Click Save and Close to save the updated status and return to the Price Change Group Search tab.
|
Note: If a price change is selected for a status change and the new status is not valid, the price change will be ignored and will not be updated. |
Updating Item Level Price Change Status
Perform the following procedure to update the price change status:
Perform a search for the price change group that you want to update. See Search for a Price Change Group.
From the search results pane, select the Price Change Group for which you want to update status. and select Edit from the Actions menu. The Price Change Group Maintenance tab appears.
From the Price Change Maintenance tab, from the Items table, highlight the item or items for which you want to update status.
With the item highlighted, select the desired status update from the Actions menu.
After selecting the status change, click Save to save the updated status and remain on the Price Change Group Maintenance tab. Click Save and Close to save the updated status and return to the Price Change Group Search tab.
|
Note: If a price change is selected for a status change and the new status is not valid, the price change will be ignored and will not be updated. |
Updating Location Level Price Change Status
Perform the following procedure to update the price change status:
Perform a search for the price change group that you want to update. See Search for a Price Change Group.
From the search results pane, select the Price Change Group for which you want to update status. and select Edit from the Actions menu. The Price Change Group Maintenance tab appears.
From the Price Change Maintenance tab, from the Locations table, highlight the location or locations for which you want to update status.
With the location highlighted, select the desired status update from the Actions menu.
After selecting the status change, click Save to save the updated status and remain on the Price Change Group Maintenance tab. Click Save and Close to save the updated status and return to the Price Change Group Search tab.
|
Note: If a price change is selected for a status change and the new status is not valid, the price change will be ignored and will not be updated. |
A clearance is designed to move out-of-date merchandise and slow-selling merchandise out of a store. A clearance is considered a permanent price change, and inventory is consequently revalued. Once the reset date for a clearance has passed, the item's price and inventory value is returned to the regular price. The following clearances can be created:
Regular - The clearance is occurring at the retailer's initiative.
When a clearance is added, it must go through a series of checks before it can be applied to an item/location. Depending on your user role, you may not be able to move the clearance to the next status. A clearance may be in any of the following statuses:
Table 15-12 Clearance Status
| Status | Definition |
|---|---|
|
Worksheet |
The clearance has been started, but not reviewed or sent out. |
|
Submitted |
The clearance has been completed and is pending review. Conflict checking has occurred for the price change. |
|
Approved |
The clearance has been reviewed and accepted. The clearance is communicated to the locations for which the clearance is effective. |
|
Executed |
The clearance prices established are effective for the item/location. |
|
Rejected |
The clearance has been reviewed and declined. |
After you create a clearance, you can maintain different aspects of the clearance.
Perform the following procedure to create a clearance.
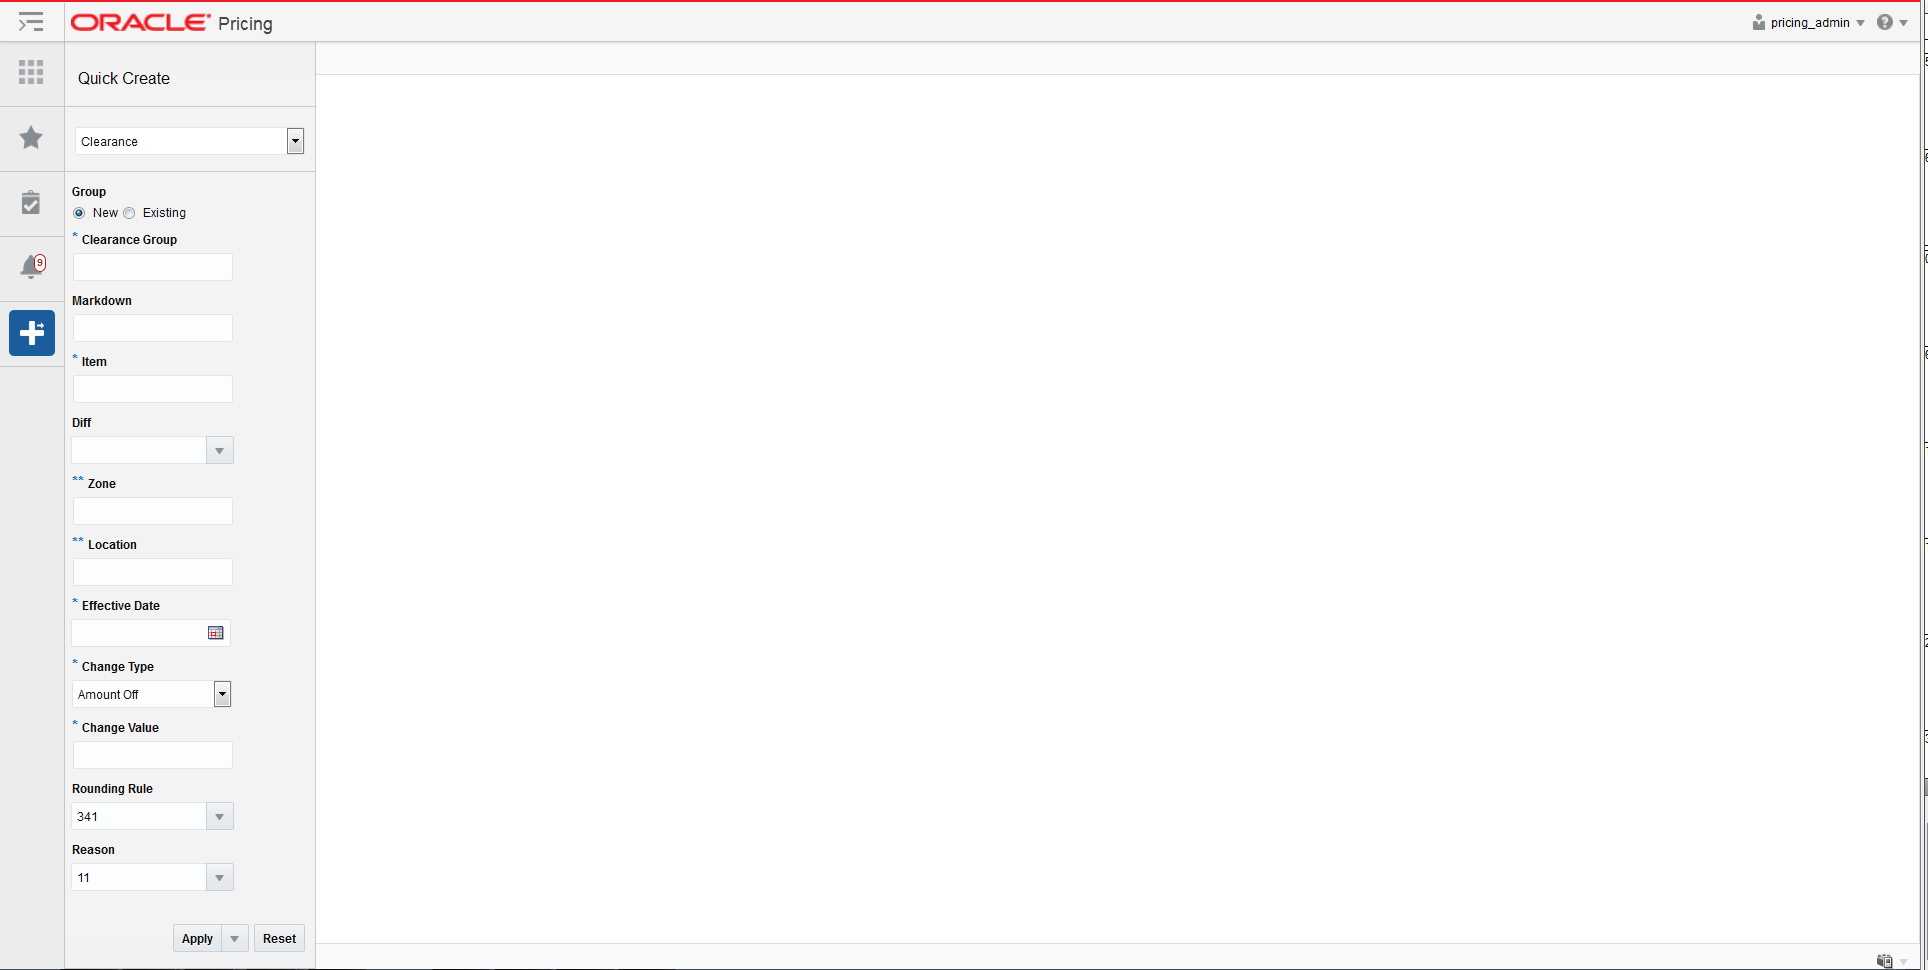
From the Pricing tab Tasks list, click the Quick Create icon.
The Quick Create pane appears.
From the Quick Create pane, select Clearance from the Quick Create drop down list.
From the Quick Create pane, enter information for the following fields:
|
Note: Fields marked with an Asterisk are required. Fields marked with a double asterisk means that one of the fields needs to be populated. |
Table 15-13 Clearance Quick Create Fields
| Field | Description |
|---|---|
|
Group |
The Group field is a radio button which allows users to select if they are creating a clearance under an existing clearance group or a new clearance group. |
|
Clearance Group |
If the user selected the New option in the Group field, this field allows for entry of a description that can be used to create a new clearance group. This description may then be used to search for a clearance or group of clearance for maintenance purposes. If the user has selected the Existing option in the Group field, this field changes to a list of values field where the Clearance Group ID is entered instead of the description. |
|
Markdown |
The Markdown field contains the markdown number for the new clearance that the user wants to create. This field can be left blank. |
|
Item |
The Item field allows for entry of a parent item or transaction level item. Users may enter a single item or multiple items. If multiple items are entered a semicolon is used to separate values. |
|
Diff |
The Diff field allows for entry or selection of a single Diff Value. Users have the option to use the list of values to search on Diff Type to find the Diff value. |
|
Zone |
The Zone field allows for entry of a zone within a single zone group. The user may enter a single zone or multiple zones. If multiple zones are entered a semicolon is used to separate values. Note: Either a Zone(s) or Location(s) must be entered, but not both. |
|
Location |
The Location field allows for entry of a location. The user may enter a single location or multiple locations. If multiple locations are entered a semicolon is used to separate values. Note: Either a Zone(s) or Location(s) must be entered, but not both. |
|
Effective Date |
The Effective Date is the date when the clearance will go into effect. Users have the option to key in a date or select one using the calendar widget. |
|
Change Type |
The Change Type field provides the options that will derive the new retail price. There is a system option default that may display for the Change Type if it exists. The default value can be overridden. Change Type options are:
|
|
Change Value |
The Change Value field contains the change by percent, change by amount, or fixed price value depending on the change type selected. |
|
Rounding Rule |
The Rounding Rule field allows the user to associate a specific rule with a clearance record. Users are allowed to enter a single Rounding Rule. A rounding rule helps users create a uniform pricing strategy. |
|
Reason |
The Reason field defines the reason the clearance is being created. This field is optional. |
Once you have entered all information for the newly created price change record, click Apply, Submit, or Approve. The new clearance is created.
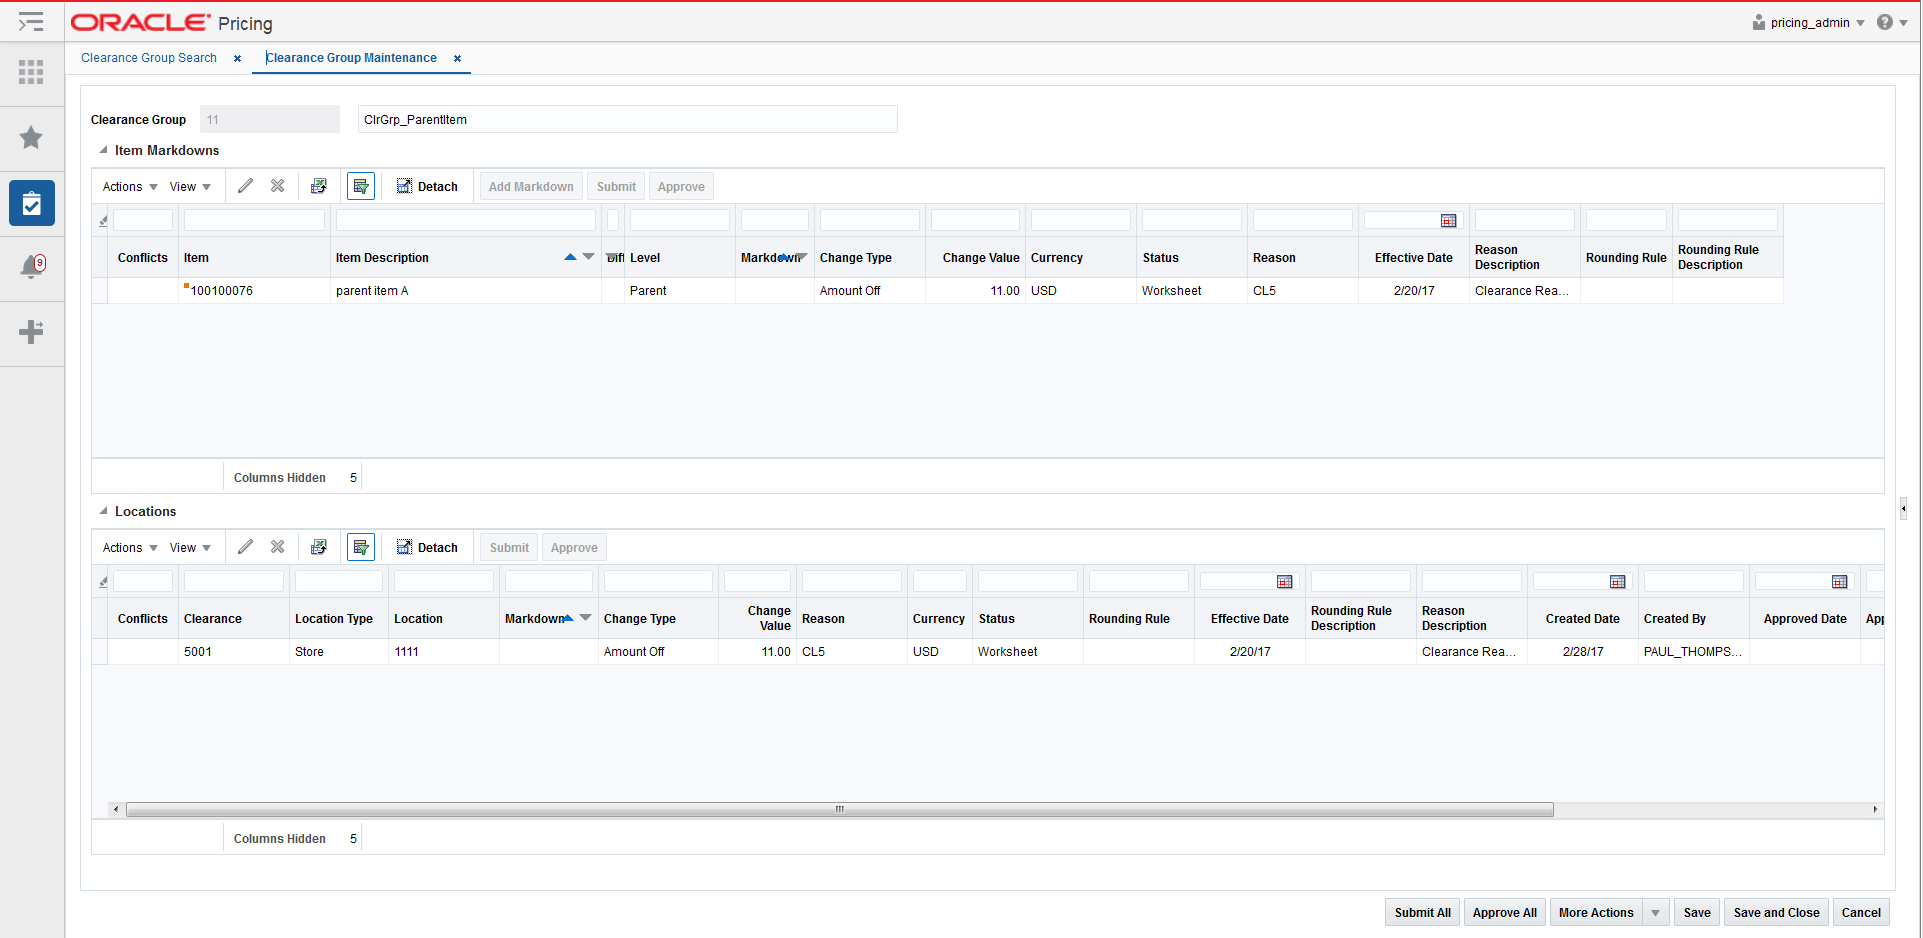
The Clearance Maintenance screen allows you to maintain markdowns within a clearance group. Each markdown will contain items selected for the markdown along with the locations where the markdown should be executed.
The Clearance Group screen has two modes; Edit and View. If the user enters this screen in View mode, all maintenance options are disabled and the Save, Save and Close, and Cancel buttons are replaced with Done. If the user enters in Edit mode the following maintenance options are supported:
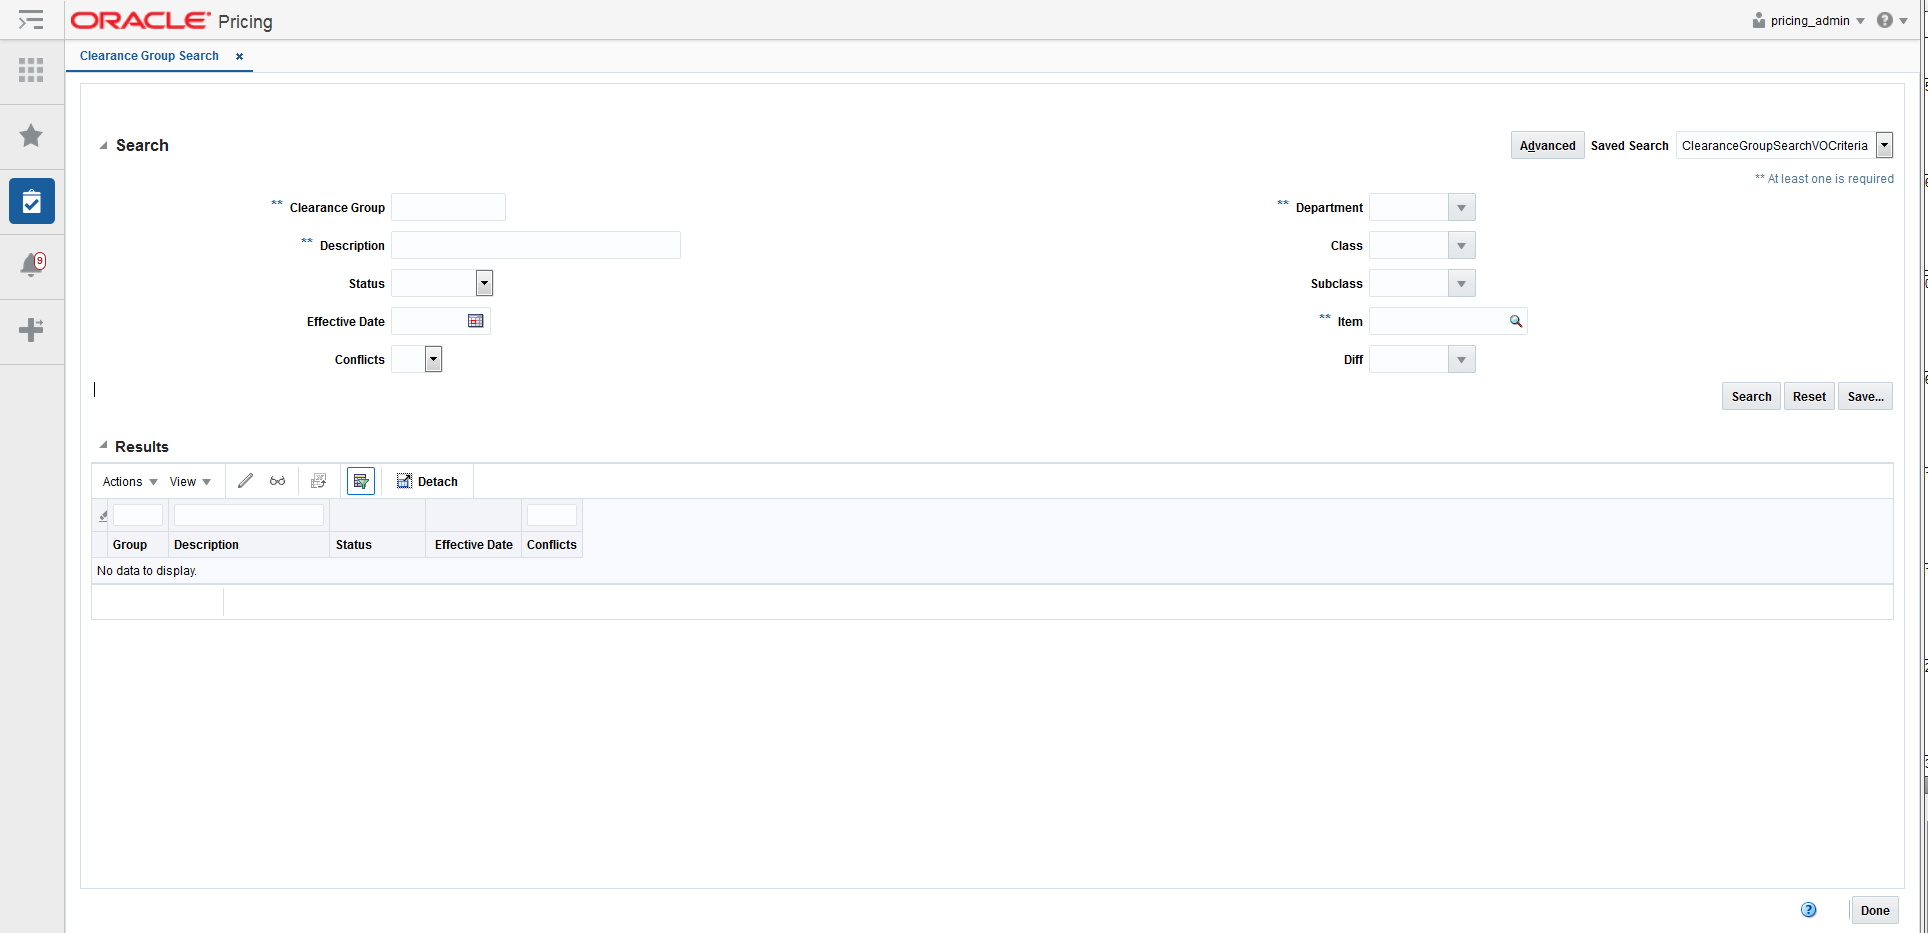
Perform the following procedure to search for an existing clearance group.
From the Tasks menu, select Clearance > Manage Clearance Groups. The Clearance Group Search tab appears.
Enter your clearance search criteria using the following fields:
|
Note: In order to conduct a clearance search, users must enter at least one of the following; Department, Clearance Group, Description, or Item. |
Table 15-14 Clearance Search Fields
| Field | Description |
|---|---|
|
Clearance Group |
The Clearance Group field allows the user to enter a Group ID to be used in search criteria. |
|
Description |
The Description field allows the user to enter a description to be used in search criteria. |
|
Status |
The Status field allows the user to select a Status to be used in search criteria. Values for the drop down include: Worksheet, Submitted, Approved, Rejected, or Executed. |
|
Effective Date |
The Effective Date field allows the user to enter or select an effective date to be used in search criteria. |
|
Conflicts |
The Conflicts field allows the user to select one of the following values; Yes, No or NULL (Blank) to be used in search criteria. |
|
Department |
The Department field allows the user to enter or select a Department to be used in search criteria. The Department list of values queries all Departments. Note: The Department, Class, and Subclass fields display the translated names if they exist. |
|
Class |
The Class field allows the user to enter or select a Class to be used in search criteria. The Class list of values queries all Classes or all Classes for the entered Department. |
|
Subclass |
The Subclass field allows the user to enter or select a Subclass to be used in search criteria. The Subclass list of values queries all Subclasses or all Subclasses for the entered Class. |
|
Item |
The Item field allows the user to enter or select an Item(s) to be used in search criteria. Users have the option to go directly to the search icon to look up items. |
|
Diff |
The Diff field allows the user to enter or select a Diff value to be used in search criteria. The Diff list of values includes both Diff Type and Diff Value. |
Once your search criteria are entered, click Search. The search results are displayed in the Results pane.
Editing clearances can be performed on clearances in multiple statuses with the following conditions:
If the Effective Date is in the past, no changes are allowed unless the status of the Clearance is Worksheet, then users have the option to update the Effective Date.
If the date that the update is being performed falls within the Effective Date minus the Price Event Processing Days, updates are only allowed for users with emergency security privileges.
Perform the following procedure to edit a markdown:
Perform a search for the clearance group that you want to edit. See Search for a Clearance Group.
From the search results pane of the Clearance Group Search tab, highlight the clearance group you want to edit and select Edit from the Actions menu. The Clearance Group Maintenance tab appears.
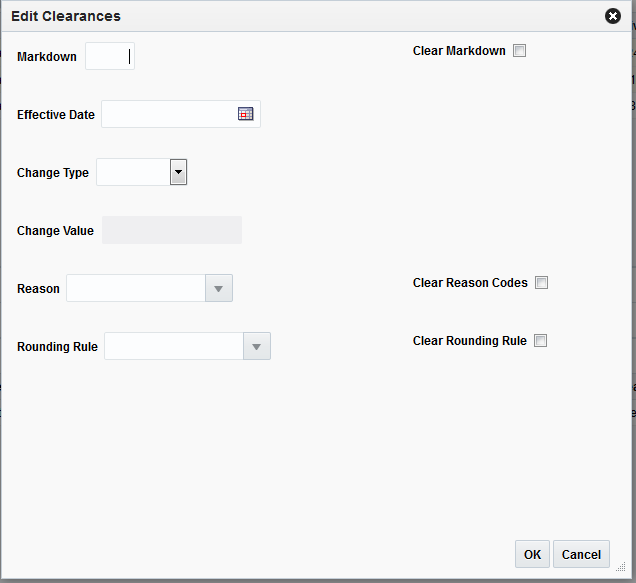
From the Clearance Group Maintenance tab, you can select either item markdowns or locations to edit. Highlight the item markdown(s) or location(s) you want to edit (locations shown are associated with the row in the item markdown table which has focus) and select Edit from that tables' respective Action menu. The Edit Clearances dialog appears.
|
Note: If a single location is selected for editing, the Clear Markdown, Clear Reason Codes, and Clear Rounding Rule check boxes will not appear. |
From the Edit Clearances dialog, use the following fields to edit the clearance details:
|
Note: When multiple clearances are selected for editing, fields in the popup may show up as empty. This indicates that the value may vary across the selected clearances. Entering a value and updating will update all the rows, leaving the value empty will leave the values unchanged on the individual clearances. |
Table 15-15 Edit Clearances Fields
| Field | Description |
|---|---|
|
Markdown |
The Markdown field contains the markdown number for the markdown that the user wants to edit. This field can be left blank. |
|
Effective Date |
The date on which the clearance is set to take effect. Users have the option to key in a date or select one using the calendar widget. |
|
Change Type |
The Change Type field provides the options that derive the new retail price. Users have the option to modify the Change Type value. Change Type options:
|
|
Change Value |
Users will enter the Change Value based on the Change Type entered, including Percent Off, Amount Off, or Fixed Price. This field is required entry for every Change Type. The field supports up to four decimal places for Percent Off value. For Amount Off and Fixed Price decimal placement is based on currency of selected locations. |
|
Reason |
The Reason value defines the reason the clearance is being created. Users have the option to update this field or remove the value in this field. |
|
Rounding Rule |
The Rounding Rule field provides the ability to smooth retails for an item or location. Users have the option to update this field or remove the value in this field. |
|
Clear Reason Codes |
The Clear Reason Codes checkbox displays next to the Reasons field when multiple items or locations are selected for Edit. If a users chooses to remove a Reason code for the Clearances the Clear Reasons checkbox can be clicked. The value for Reasons will be removed from Clearances selected to edit. |
|
Clear Rounding Rule |
The Clear Rounding Rule checkbox displays when multiple items or locations are selected for Edit. When the Clear Rounding Rule checkbox is clicked the value for the rounding rule is removed. |
|
Clear Markdown |
The Clear Markdown checkbox displays when multiple items or locations are selected for Edit. When the Clear Markdown checkbox is clicked the value for the Markdown field is removed. |
|
Note: If you select multiple clearances to edit, some fields on the screen will not show a value if there are multiple values for a particular field. For example, if you select two clearances to edit and the Value field in both clearances is 10.00 then the Value field will be populated with 10.00. However, if the clearances have different values (like 10.00 and 11.00,) then the value field in the dialog is blank. If you enter a value, both clearances are changed to the new value. If you do not enter a value, then the original values stay. |
Once updates are complete on the Edit Clearances dialog, click OK. The Edit Clearances dialog closes and you are returned to the Clearance Group Maintenance tab.
Users will have options to perform Delete maintenance at Item markdown level for one or many item markdowns or at the Item markdown/location level for one or more locations tied to an item markdown.
Item Markdown Level: Users highlight one or more rows on the Item Markdowns table and click Delete on the Item Markdowns table
Location Level: Users will highlight a single row on the Item Markdowns table and then highlight one or many rows on the Locations table and click Delete on the Locations table
Perform a search for the clearance group that you want to delete. See Search for a Clearance Group.
From the search results pane, select the Clearance Group from which you want to delete an item markdown or location and select Edit from the Actions menu. The Clearance Maintenance tab appears.
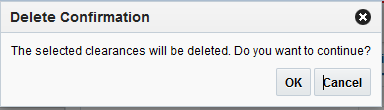
From the Clearance Group Maintenance tab, you can select either items or locations to delete. Highlight the item or location you want to delete and select Delete from that tables' respective Action menu. The Delete Confirmation dialog appears.
From the Delete Confirmation dialog, click OK to confirm the deletion. You are returned to the Clearance Group Maintenance tab.
Users will have options to perform Status maintenance at Item markdown level for one or many item markdowns, at the Item markdown/Location level for one or more Locations tied to an item markdown or they have the option to update for all displayed records using the page level buttons.
Updating Group Level Clearance Status
Perform the following procedure to update the group level clearance status:
Perform a search for the clearance group that you want to update. See Search for a Clearance Group.
From the search results pane, select the clearance group for which you want to update status. and select Edit from the Actions menu. The Clearance Group Maintenance tab appears.
From the Clearance Group Maintenance tab, use the buttons at the bottom of the page to update the price change group status. Options are:
Submit All
Approve All
Worksheet All (Select from the More Actions button menu.)
Reject All (Select from the More Actions button menu.)
After selecting the status change, click Save to save the updated status and remain on the Clearance Group Maintenance tab. Click Save and Close to save the updated status and return to the Clearance Group Search tab.
|
Note: If a clearance is selected for a status change and the new status is not valid, the clearance will be ignored and will not be updated. |
Updating Item Markdown Level Clearance Status
Perform the following procedure to update the item markdown level clearance status:
Perform a search for the clearance group that you want to update. See Search for a Clearance Group.
From the search results pane, select the clearance group for which you want to update status. and select Edit from the Actions menu. The Clearance Group Maintenance tab appears.
From the Clearance Maintenance tab, from the Item Markdowns table, highlight the item markdown for which you want to update status.
With the item markdown highlighted, select the desired status update from the Actions menu.
After selecting the status change, click Save to save the updated status and remain on the Clearance Group Maintenance tab. Click Save and Close to save the updated status and return to the Clearance Group Search tab.
|
Note: If a clearance is selected for a status change and the new status is not valid, the clearance will be ignored and will not be updated. |
Updating Location Level Clearance Status
Perform the following procedure to update the location level clearance status:
Perform a search for the clearance group that you want to update. See Search for a Clearance Group.
From the search results pane, select the clearance group for which you want to update status. and select Edit from the Actions menu. The Clearance Group Maintenance tab appears.
From the Clearance Maintenance tab, from the Locations table, highlight the location for which you want to update status.
With the location highlighted, select the desired status update from the Actions menu.
After selecting the status change, click Save to save the updated status and remain on the Price Change Group Maintenance tab. Click Save and Close to save the updated status and return to the Clearance Group Search tab.
|
Note: If a clearance is selected for a status change and the new status is not valid, the clearance will be ignored and will not be updated. |
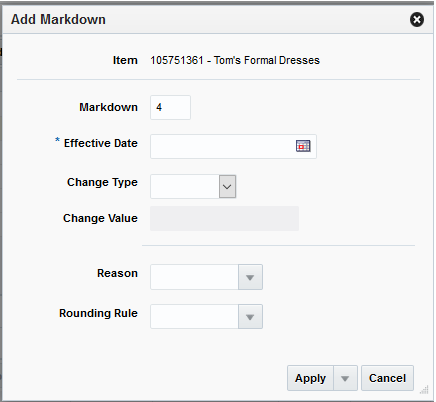
Additional markdowns for items already on markdown can be added to a clearance group through the Clearance Group Maintenance tab.
Perform the following procedure to add a Markdown:
Perform a search for the clearance group that you want to update. See Search for a Clearance Group.
From the search results pane, select the clearance group for which you want to add a markdown. and select Edit from the Actions menu. The Clearance Group Maintenance tab appears.
From the Clearance Group Maintenance tab, highlight the item markdown in the Item Markdowns table to which you want to add an additional markdown and select Add Markdown from the Action menu. The Add Markdown dialog appears.
Table 15-16 Add Markdown Fields
| Field | Description |
|---|---|
|
Markdown |
The Markdown field contains the markdown number for the markdown that the user wants to edit. This field can be left blank. |
|
Effective Date |
The date on which the clearance is set to take effect. Users have the option to key in a date or select one using the calendar widget. |
|
Change Type |
The Change Type field provides the options that derive the new retail price. Users have the option to modify the Change Type value. Change Type options:
|
|
Change Value |
Users will enter the Change Value based on the Change Type entered, including Percent Off, Amount Off, or Fixed Price. This field is required entry for every Change Type. The field supports up to four decimal places for Percent Off value. For Amount Off and Fixed Price decimal placement is based on currency of selected locations. |
|
Reason |
The Reason value defines the reason the clearance is being created. This field is optional. |
|
Rounding Rule |
The Rounding Rule field provides the ability to smooth retails for an item or location. This field is optional. |
Once updates are complete on the Add Markdown dialog, click OK. The Add Markdown dialog closes and you are returned to the Clearance Group Maintenance window.
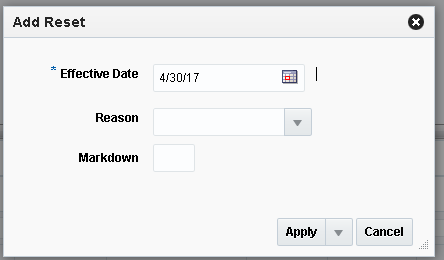
A clearance reset ends the clearance for a set of items at a set of locations which are presently on clearance. A clearance with a change type of Reset (also known as a clearance reset or a reset) ends the clearance on the user defined effective date. The clearance reset is displayed in the Item Markdowns and Locations tables like any other clearance records.
Perform the following procedure to add a Clearance Reset:
Perform a search for the clearance group that you want to update. See Search for a Clearance Group.
From the search results pane, select the clearance group for which you want to add a clearance reset. and select Edit from the Actions menu. The Clearance Group Maintenance tab appears.
From the Clearance Group Maintenance tab, highlight the item markdown or location to which you want to add a clearance reset and select Add Reset from the Action menu. The Add Reset dialog appears.
Table 15-17 Add Reset Fields
| Field | Description |
|---|---|
|
Effective Date |
The date on which the clearance reset is set to take effect. Users have the option to key in a date or select one using the calendar widget. |
|
Reason |
The Reason value defines the reason the clearance reset is being created. This field is optional. |
|
Markdown |
The Markdown field defines the markdown number for the reset. This field is defaulted as NULL, but the user can provide a markdown number if desired. |
Once updates are complete on the Add Reset dialog, click OK. The Add Reset dialog closes and you are returned to the Clearance Group Maintenance window.