| Oracle® Retail Merchandising System User Guide 16.0 E65443-01 |
|

 Previous |
 Next |
Cost Management refers to the procedure of maintaining the cost of the different items that are used in the retailer's setup and allow the user to manage any cost changes that occur during the lifecycle of these items.
You can manage cost changes in two different ways:
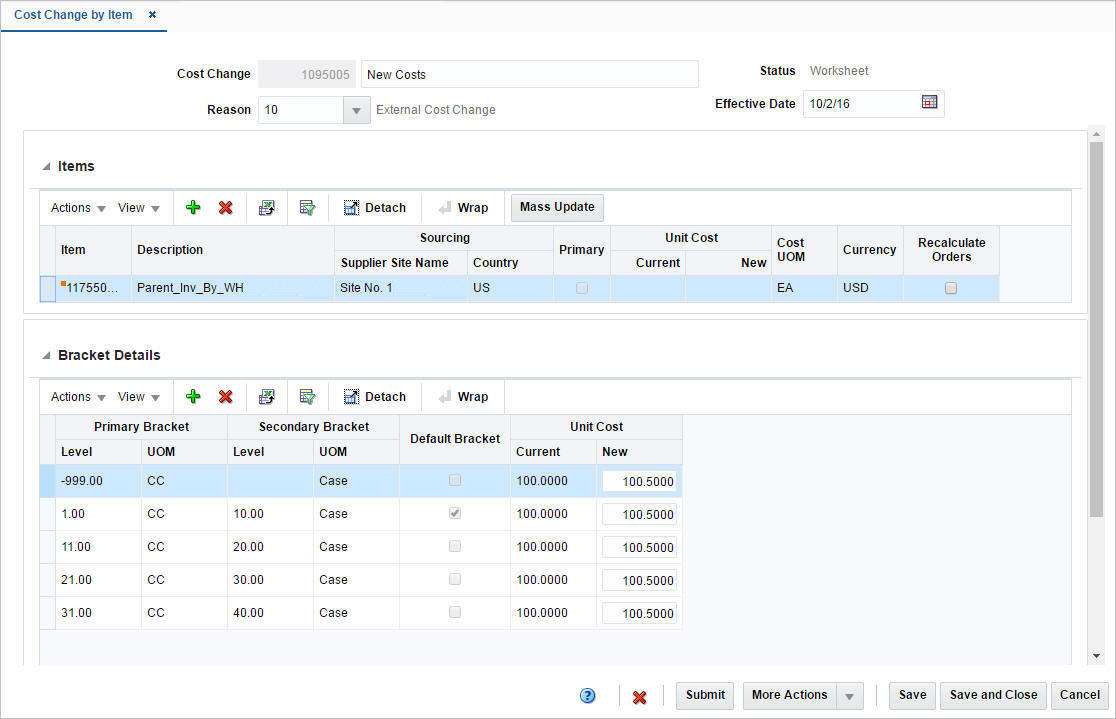
The Cost Change by Item option is used when a cost change needs to be defined at the item/supplier/country of sourcing level.
The Cost Change by Location option is used when a cost change needs to be defined at the item/supplier/country of sourcing/location level.
The initial cost of an item is established at item set-up. The cost of an item can be adjusted in the item record till the item is approved. Any cost changes past that will need to be handled through the cost change windows.
When submitted through EDI, you review the cost change, then submit the cost change for approval.
When entered manually, you enter the cost change, an event description, an effective date and a reason code. Then you can submit the cost change for approval.
|
Note: You cannot create a cost change for a transformed sellable item. |
After you approve the cost change, the item/supplier cost record is updated and any outstanding purchase orders that have not been received are recalculated, based on the updated cost.
You can access the Cost Change by Item window in different ways:
From the Tasks menu, select Cost > Create Cost Change by Item. The Cost Change by Item window appears.
You can also access the Cost Change by Item window through the Cost Change Search.
From the Tasks menu, select Cost > Manage Cost Changes. The Cost Change Search window appears.
Enter or select search criteria as desired to make the search more restrictive.
Click Search. The cost changes that match the search criteria are displayed in the Results section.
In the Results section, select a cost change.
Select Actions > Edit, or use the Edit icon ![]() . The Cost Change by Item window appears.
. The Cost Change by Item window appears.
Additionally, you can access the Cost change through the Item Search window.
From the Tasks menu, select Items > Manage Items. The Item Search window appears.
Search for the desired item.
In the Results section, select a record.
Then select Actions > Cost Change, or use the Cost Change button. The Cost Change by Item window appears.
The window includes the following sections:
The cost change header section includes the following fields.
Table 7-1 Cost Change Header - Fields and Description
| Fields | Description |
|---|---|
|
Cost Change |
Enter a description for the cost change. This field contains the cost change number by default. |
|
Reason |
Enter, select or search for the reason for the cost change. |
|
Status |
The cost change status is displayed. |
|
Effective Date |
Enter the date on which the cost changes become effective, or use the Calendar icon to select a date. |
In the Items section you can add, delete and mass update items for the cost change.
Use the Actions Menu and icons to apply actions to the table. You can perform the actions listed below.
Table 7-2 Items - Actions Menu/Icons and Description
| Actions Menu/Icons | Description |
|---|---|
|
Add and Add icon |
You can add an item by clicking Add from the Actions menu or clicking the Add icon For more information on adding an item, see the Adding Items to a Cost Change section. |
|
Delete and Delete icon |
You can delete items using the following steps:
|
|
Export to Excel and Export to Excel icon |
You can export the records in the table to a Microsoft Excel spreadsheet by selecting Actions > Export to Excel or by using the Export to Excel icon |
|
Wrap icon |
You can wrap the values in the table column by first clicking the column on which you would like the text to wrap and then using the Wrap icon |
|
Mass Update button |
Opens the Mass Update window. For more information about the mass update function, see the Mass Update section. |
You can customize the view of the table by using the options in the View Menu.
Table 7-3 Items - View Menu/Icons Menu and Description
| View Menu/Icons | Description |
|---|---|
|
Columns |
You can manage which of the columns will be shown in the table by clicking the Show All and Manage Columns options. |
|
Detach and Detach icon |
You can view the table in the application in a separate window by clicking Detach or by using the Detach icon |
|
Sort |
You can sort columns by the following options:
|
|
Reorder Columns |
You can reorder columns by clicking the Reorder Columns option. |
|
Query by Example and Query by Example icon |
You can filter the items by one or multiple column values by clicking the Query by Example option or by using the Query by Example icon |
The Bracket Details section is only available, if bracket costing is applicable. The table contains the bracket details for the highlighted item for a supplier that supports bracket costing.
For items with brackets defined, the old unit cost and the new unit cost information is shown in the Bracket Details section and not in the Items section.
For items with no brackets defined, the cost information is displayed in the Item section and the Bracket Details section remains collapsed.
Use the Actions Menu and icons to apply actions to the table. You can perform the actions listed below.
Table 7-4 Bracket Details - Actions Menu/Icons and Description
| Actions Menu/Icons | Description |
|---|---|
|
Add and Add icon |
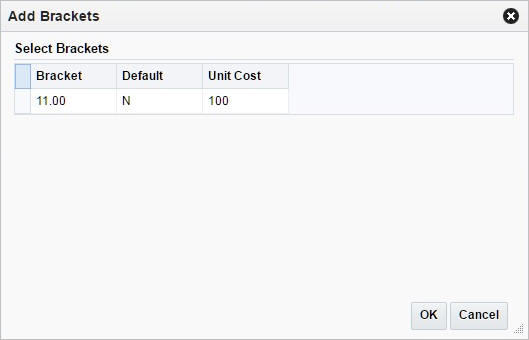
You can add a bracket by clicking Add from the Actions menu or clicking the Add icon This option is only available, if there are already existing brackets set up in the system. You can add them to the current cost change. A location may have multiple brackets linked to it, all of which are added when the location is added. You can delete one or more of the brackets. Later, you can add these brackets to the cost change again by using the Add option. For more information on adding bracket details, see the Adding Bracket Details to a Cost Change section. |
|
Delete and Delete icon |
You can delete bracket details using the following steps:
|
|
Export to Excel and Export to Excel icon |
You can export the records in the table to a Microsoft Excel spreadsheet by selecting Actions > Export to Excel or by using the Export to Excel icon |
|
Wrap icon |
You can wrap the values in the table column by first clicking the column on which you would like the text to wrap and then using the Wrap icon |
You can customize the view of the table by using the options in the View Menu.
Table 7-5 Bracket Details - View Menu/Icons and Description
| View Menu/Icons | Description |
|---|---|
|
Columns |
You can manage which of the columns will be shown in the table by clicking the Show All and Manage Columns options. |
|
Detach and Detach icon |
You can view the tables in the application in a separate window by clicking Detach or by using the Detach icon |
|
Sort |
You can sort columns by the following options:
|
|
Reorder Columns |
You can reorder columns by clicking the Reorder Columns option. |
|
Query by Example and Query by Example icon |
You can filter the items by one or multiple column values by clicking the Query by Example option or by using the Query by Example icon |
The toolbar contains the following icons and buttons.
Table 7-6 Cost Change by Item Toolbar - Icons/Buttons and Description
| Icons/Buttons | Description |
|---|---|
|
Help icon |
You can access the online help for a particular page by clicking the Help icon |
|
Delete icon |
You can delete the cost change:
|
|
Status button |
Use the Status button to change the status of the cost change for the item(s). Possible statuses are:
|
|
More Actions |
Click More Actions to see a list of additional actions that can be performed in the Cost Change by Item window.
|
|
Save |
Click Save to save the entered records. |
|
Save and Close |
Click Save and Close to save the entered records and close the window. |
|
Cancel |
Click Cancel to reject all entries and close the window. |
Open the Cost Change or Cost Change by Item window:
From the Tasks menu, select Cost > Cost Change by Item. The Cost Change by Item window appears.
Additionally, you can access the Cost change through the Item Search window.
From the Tasks menu, select Items > Manage Items. The Item Search window appears, search for the desired item.
In the Results section, select Actions > Cost Change or use the Cost Change button. The Cost Change window appears.
In the Cost Change field, enter a description for the change.
In the Reason field, enter, select or search for a reason code for the cost change.
In the Effective Date field, enter the effective date for the cost change, or use the Calendar icon to select a date.
To add items for a cost change, follow the steps below.
In the Cost Change or Cost Change by Item window, go to Items section.
Select Actions > Add, or use the Add icon ![]() . The Add Items window appears.
. The Add Items window appears.
In the Select Supplier or Items section, enter the following fields.
In the Supplier Site field, enter, select or search for the supplier site.
In the Country of Sourcing field, enter, select or search for the sourcing country.
In the Item field, enter, select or search for the item.
|
Note: If you have accessed the Cost Change window through the Item Search, the selected item is displayed in this field. You cannot change the item and the Item List field is disabled. |
In the Item List field, enter, select or search for the item list.
Select the Expand Parent checkbox to indicate that all the child items linked with the selected parent item need to be added to the cost change.
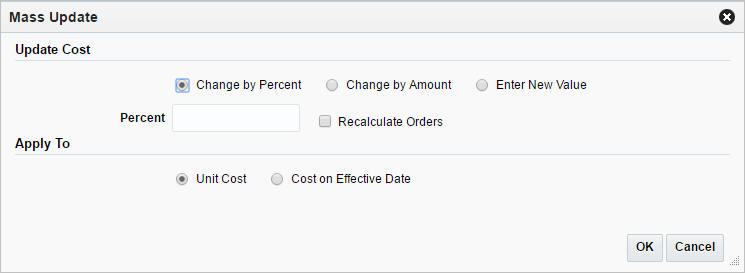
In the Update Cost section, select one of the following radio buttons.
Select Change by Percent to indicate the cost change in percent.
The Percent field enables, enter the percent by which the cost changes. Use a negative symbol (-) before the percent to indicate a decrease in cost by percent.
Select Change by Amount to indicate the cost change by a certain amount.
The Amount field enables, enter the amount by which the cost changes. Use a negative symbol (-) before the amount to indicate a decrease in cost by amount. Then enter, select or search for the currency.
Select Enter New Value to enter a new unit cost value for the item.
The New Value field enables, enter the new cost of the item. The amount entered becomes the cost of all items selected for the cost change. Then enter, select or search for the currency.
Select the Recalculate Order checkbox to recalculate any outstanding purchase orders that have not been received based on the updated cost.
In the Apply To section, select the type of adjustment. Select either Unit Cost or Cost on Effective Date.
Then choose one of the following options.
Click OK to add the item.
Select OK and Add Another to add additional items.
Click Cancel to reject all entries and close the window.
Use the Mass Update option to apply the cost changes to the selected items in the table. To update the costs for multiple items, follow the steps below.
In the Cost Change or Cost Change by Item window, go to the Items section.
Mark the records you want to update in the table. Click the Mass Update button. The Mass Update window appears.
In the Update Cost section, select one of the following radio buttons.
Select Change by Percent to indicate the cost change in percent.
The Percent field enables, enter the percent by which the cost changes. Use a negative symbol (-) before the percent to indicate a decrease in cost by percent.
Select Change by Amount to indicate the cost change by a certain amount.
The Amount field enables, enter the amount by which the cost changes. Use a negative symbol (-) before the amount to indicate a decrease in cost by amount. Then enter, select or search for the currency.
Select Enter New Value to enter a new unit cost value for the item.
The New Value field enables, enter the new cost of the item. The amount entered becomes the cost of all items selected for the cost change. Then enter, select or search for the currency.
Select the Recalculate Order checkbox to recalculate any outstanding purchase orders that have not been received based on the updated cost.
In the Apply To section, select the type of adjustment. Select either Unit Cost or Cost on Effective Date.
Then choose one of the following options.
Click OK to add the changes for the selected items.
Click Cancel to reject all entries and close the window.
This option is only available, if there are already existing brackets set up in the system. A location may have multiple brackets linked to it, all of which are added when the location is added. You can delete one or more of the brackets. Later, you can add these deleted brackets again by using the Add option.
To add the bracket details of cost change:
In the Cost Change or Cost Change by Item window, go to the Bracket Details section.
Select Actions > Add, or click the Add icon ![]() . The Add Brackets window appears.
. The Add Brackets window appears.
Select one or more of these brackets to add them back to the current cost change.
Then choose one of the following option.
Click OK to add the brackets to the current cost change.
Click Cancel to close the window.
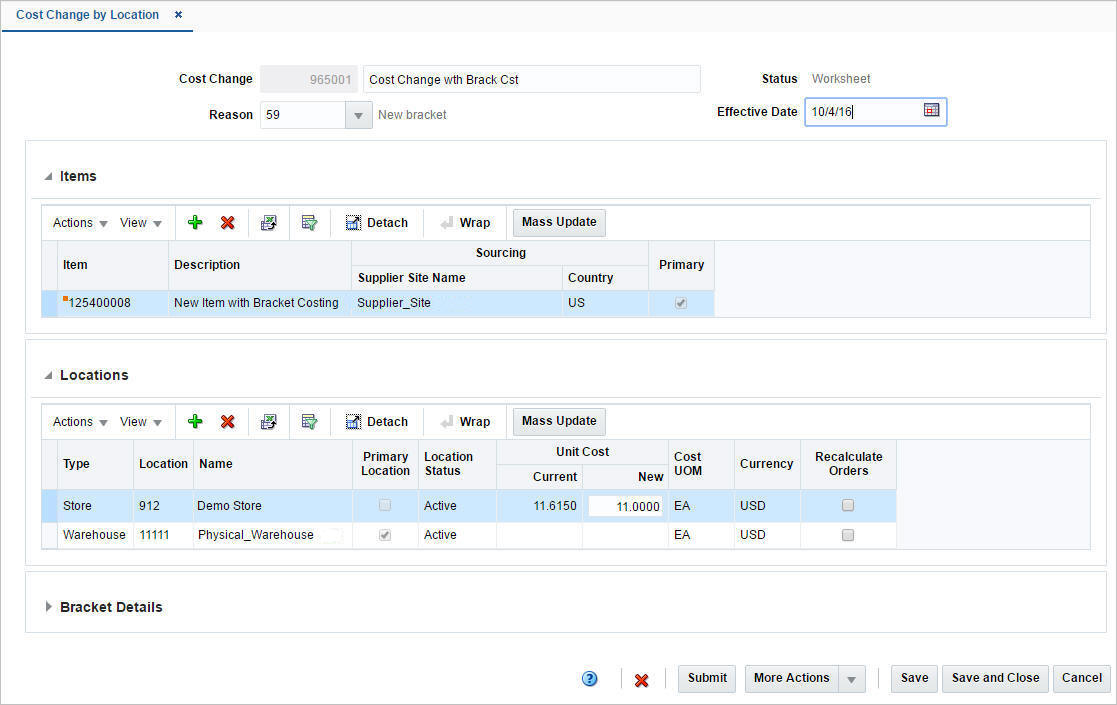
The Cost Change by Location option is used when a cost change needs to be defined at the item/supplier/country of sourcing/location level.
When submitted through EDI, you review the cost change, then submit the cost change for approval.
When entered manually, you enter the cost change, an event description, an effective date and a reason code. Then submit the cost change for approval.
|
Note: You cannot create a cost change for a transformed sellable item. |
After you have approved the cost change, the item/supplier cost record is updated and any outstanding purchase orders that have not been received are recalculated.
You can access the Cost Change by Item Window in different ways:
From the Tasks menu, select Cost > Manage Cost Changes. The Cost Change Search window appears.
Enter or select search criteria as desired to make the search more restrictive.
Click Search. The cost changes that match the search criteria are displayed in the Results section.
In the Results section, select a cost change by location.
Select Actions > Edit, or use the Edit icon ![]() . The Cost Change by Location window appears.
. The Cost Change by Location window appears.
The window includes the following sections:
The cost change header section includes the following fields.
Table 7-7 Cost Change Header - Fields and Description
| Fields | Description |
|---|---|
|
Cost Change |
Enter a description for the cost change. This field contains the cost change number by default. |
|
Reason |
Enter, select or search for the reason for the cost change. |
|
Status |
The cost change status is displayed by default. |
|
Effective Date |
Enter the date on which the cost changes become effective, or use the Calendar icon to select a date. |
In the Items section you can add, delete and mass update items for the cost change.
Use the Actions Menu and icons to apply actions to the table. You can perform the actions listed below.
Table 7-8 Items - Actions Menu/Icons and Description
| Actions Menu/Icons | Description |
|---|---|
|
Add and Add icon |
You can add an item by clicking Add from the Actions menu or clicking the Add icon For more information on adding an item, see the Adding Items to a Cost Change section. |
|
Delete and Delete icon |
You can delete items using the following steps:
|
|
Export to Excel and Export to Excel icon |
You can export the records in the table to a Microsoft Excel spreadsheet by selecting Actions > Export to Excel or by using the Export to Excel icon |
|
Wrap icon |
You can wrap the values in the table column by first clicking the column on which you would like the text to wrap and then using the Wrap icon |
|
Mass Update button |
Opens the Mass Update window. For more information about the mass update function, see the Mass Update Items section. |
You can customize the view of the table by using the options in the View Menu.
Table 7-9 Items - View Menu/Icons Menu and Description
| View Menu/Icons | Description |
|---|---|
|
Columns |
You can manage which of the columns will be shown in the table by clicking the Show All and Manage Columns options. |
|
Detach and Detach icon |
You can view the table in the application in a separate window by clicking Detach or by using the Detach icon |
|
Sort |
You can sort columns by the following options:
|
|
Reorder Columns |
You can reorder columns by clicking the Reorder Columns option. |
|
Query by Example and Query by Example icon |
You can filter the items by one or multiple column values by clicking the Query by Example option or by using the Query by Example icon |
The Locations section contains the location details for the selected record in the Items section. You can add, delete and mass update locations for the cost change.
Use the Actions Menu and icons to apply actions to the table. You can perform the actions listed below.
Table 7-10 Locations - Actions Menu/Icons and Description
| Actions Menu/Icons | Description |
|---|---|
|
Add and Add icon |
You can add a location that has been initially removed from the cost change, since no new cost was specified. When you create a cost change by location, any location for which no new cost is entered, is removed upon saving the cost change. The Add option allows you to add one or more of these locations back to the cost change. If all valid locations for the item are already on the cost change, you receive a message that there are no additional locations to be added. Add a location by clicking Actions > Add or by using the Add icon For more information on adding a location, see the Adding Locations to a Cost Change section. |
|
Delete and Delete icon |
You can delete locations using the following steps:
|
|
Export to Excel and Export to Excel icon |
You can export the records in the table to a Microsoft Excel spreadsheet by selecting Actions > Export to Excel or by using the Export to Excel icon |
|
Wrap icon |
You can wrap the values in the table column by first clicking the column on which you would like the text to wrap and then using the Wrap icon |
|
Mass Update button |
Opens the Mass Update window. For more information about the mass update function, see the Mass Update Locations section. |
You can customize the view of the table by using the options in the View Menu.
Table 7-11 Locations - View Menu/Icons Menu and Description
| View Menu/Icons | Description |
|---|---|
|
Columns |
You can manage which of the columns will be shown in the table by clicking the Show All and Manage Columns options. |
|
Detach and Detach icon |
You can view the table in the application in a separate window by clicking Detach or by using the Detach icon |
|
Sort |
You can sort columns by the following options:
|
|
Reorder Columns |
You can reorder columns by clicking the Reorder Columns option. |
|
Query by Example and Query by Example icon |
You can filter the items by one or multiple column values by clicking the Query by Example option or by using the Query by Example icon |
The Bracket Details section is only available, if bracket costing is applicable. The table contains the bracket details for the highlighted item for a supplier that supports bracket costing.
For items with brackets defined, the old unit cost and the new unit cost information is shown in the Bracket Details section and not in the Items section.
For items with no brackets defined, the cost information is displayed in the Item section and the Bracket Details section remains collapsed.
Use the Actions Menu and icons to apply actions to the table. You can perform the actions listed below.
Table 7-12 Bracket Details - Actions Menu/Icons and Description
| Actions Menu/Icons | Description |
|---|---|
|
Add and Add icon |
You can add a bracket by clicking Add from the Actions menu or clicking the Add icon This option is only available, if there are already existing brackets set up in the system. You can add them to the current cost change. A location may have multiple brackets linked to it, all of which are added when the location is added. You can delete one or more of the brackets. Later, you can add these brackets to the cost change again by using the Add option. For more information on adding bracket details, see the Adding Bracket Details to a Cost Change section. |
|
Delete and Delete icon |
You can delete bracket details using the following steps:
|
|
Export to Excel and Export to Excel icon |
You can export the records in the table to a Microsoft Excel spreadsheet by selecting Actions > Export to Excel or by using the Export to Excel icon |
|
Wrap icon |
You can wrap the values in the table column by first clicking the column on which you would like the text to wrap and then using the Wrap icon |
You can customize the view of the table by using the options in the View Menu.
Table 7-13 Bracket Details - View Menu/Icons and Description
| View Menu/Icons | Description |
|---|---|
|
Columns |
You can manage which of the columns will be shown in the table by clicking the Show All and Manage Columns options. |
|
Detach and Detach icon |
You can view the tables in the application in a separate window by clicking Detach or by using the Detach icon |
|
Sort |
You can sort columns by the following options:
|
|
Reorder Columns |
You can reorder columns by clicking the Reorder Columns option. |
|
Query by Example and Query by Example icon |
You can filter the items by one or multiple column values by clicking the Query by Example option or by using the Query by Example icon |
The toolbar contains the following icons and buttons.
Table 7-14 Cost Change by Location Toolbar - Icons/Buttons and Description
| Icons/Buttons | Description |
|---|---|
|
Help icon |
You can access the online help for a particular page by clicking the Help icon |
|
Delete icon |
You can delete the cost change:
|
|
Status button |
Use the Status button to change the status of the cost change for the location(s). Possible statuses are:
|
|
More Actions |
Click More Actions to see a list of additional actions that can be performed in the Cost Change by Item window.
|
|
Save |
Click Save to save the entered records. |
|
Save and Close |
Click Save and Close to save the entered records and close the window. |
|
Cancel |
Click Cancel to reject all entries and close the window. |
To create a cost change by location, follow the steps below.
Open the Cost Change or Cost Change by Item window:
From the Tasks menu, select Cost > Create Cost Change by Location. The Cost Change by Location window appears.
In the Cost Change field, enter a description for the change.
In the Reason field, enter, select or search for a reason code for the cost change.
In the Effective Date field, enter the effective date for the cost change, or use the Calendar icon to select a date.
To add items to a cost change, follow the steps below.
In the Cost Change by Location window, go to the Items section.
Select Actions > Add, or use the Add icon ![]() . The Add Items window appears.
. The Add Items window appears.
In the Select Supplier or Items section, enter the following fields.
In the Supplier Site field, enter, select or search for the supplier site.
In the Country of Sourcing field, enter, select or search for the sourcing country.
In the Item field, enter, select or search for the item.
|
Note: If you have accessed the Cost Change window through the Item Search, the selected item is displayed in this field. You cannot change the item and the Item List field is disabled. |
In the Item List field, enter, select or search for the item list.
Select the Expand Parent checkbox to indicate that all the child items linked with the selected parent item need to be added to the cost change.
In the Update Cost section, select one of the following radio buttons.
Select Change by Percent to indicate the cost change in percent.
The Percent field enables, enter the percent by which the cost changes. Use a negative symbol (-) before the percent to indicate a decrease in cost by percent.
Select Change by Amount to indicate the cost change by a certain amount.
The Amount field enables, enter the amount by which the cost changes. Use a negative symbol (-) before the amount to indicate a decrease in cost by amount. Then enter, select or search for the currency.
Select Enter New Value to enter a new unit cost value for the item.
The New Value field enables, enter the new cost of the item. The amount entered becomes the cost of all items selected for the cost change. Then enter, select or search for the currency.
Select the Recalculate Order checkbox to recalculate any outstanding purchase orders that have not been received.
In the Apply To section, select the type of adjustment. Select either Unit Cost or Cost on Effective Date.
Then choose one of the following options.
Click OK to add the item.
Select OK and Add Another to add additional items.
Click Cancel to reject all entries and close the window.
Use the Mass Update option to apply the cost changes to the selected items in the table. To update the costs for multiple items, follow the steps below.
In the Cost Change by Location window, go to the Items section.
Mark the records you want to update in the table. Click the Mass Update button. The Mass Update window appears.
In the Update Cost section, select one of the following radio buttons.
Select Change by Percent to indicate the cost change in percent.
The Percent field enables, enter the percent by which the cost changes. Use a negative symbol (-) before the percent to indicate a decrease in cost by percent.
Select Change by Amount to indicate the cost change by a certain amount.
The Amount field enables, enter the amount by which the cost changes. Use a negative symbol (-) before the amount to indicate a decrease in cost by amount. Then enter, select or search for the currency.
Select Enter New Value to enter a new unit cost value for the item.
The New Value field enables, enter the new cost of the item. The amount entered becomes the cost of all items selected for the cost change. Then enter, select or search for the currency.
Select the Recalculate Order checkbox to recalculate any outstanding purchase orders that have not been received.
In the Apply To section, select the type of adjustment. Select either Unit Cost or Cost on Effective Date.
Then choose one of the following options.
Click OK to add the changes for the selected items.
Click Cancel to reject all entries and close the window.
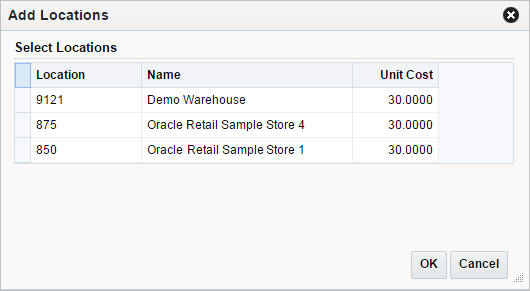
To add the locations to a cost change:
In the Cost Change by Location window, go to the Locations section.
Select Actions > Add, or click the Add icon ![]() . The Add Locations window appears.
. The Add Locations window appears.
All locations initially removed from the cost change, because no new cost was specified, are displayed.
Select one or more locations in the table.
Then select one of the following options.
Click OK to add the locations to the cost change and close the window.
Click Cancel to reject all entries and close the window.
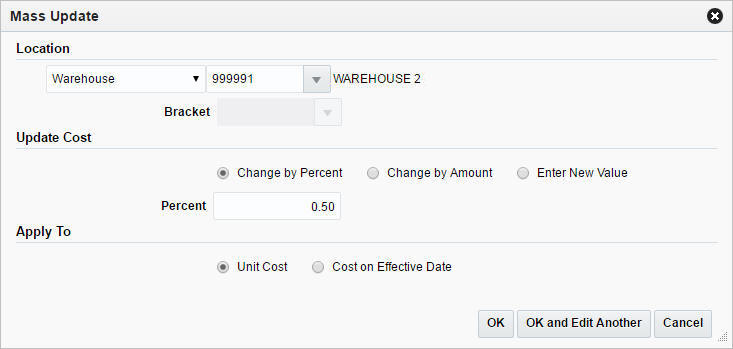
Use the Mass Update option to apply the cost changes to the selected locations in the table. To update the costs for multiple locations, follow the steps below.
In the Cost Change by Location window, go to the Locations section.
Mark the records you want to update in the table. Click the Mass Update button. The Mass Update window appears.
In the Location section, select the location information for the mass update.
In the Update Cost section, select one of the following radio buttons.
Select Change by Percent to indicate the cost change in percent.
The Percent field enables, enter the percent by which the cost changes. Use a negative symbol (-) before the percent to indicate a decrease in cost by percent.
Select Change by Amount to indicate the cost change by a certain amount.
The Amount field enables, enter the amount by which the cost changes. Use a negative symbol (-) before the amount to indicate a decrease in cost by amount. Then enter, select or search for the currency.
Select Enter New Value to enter a new unit cost value for the item.
The New Value field enables, enter the new cost of the item. The amount entered becomes the cost of all items selected for the cost change. Then enter, select or search for the currency.
In the Apply To section, select the type of adjustment. Select either Unit Cost or Cost on Effective Date.
Then choose one of the following options.
Click OK to add the changes for the selected location(s).
Click OK and Edit Another to edit additional locations.
Click Cancel to reject all entries and close the window.
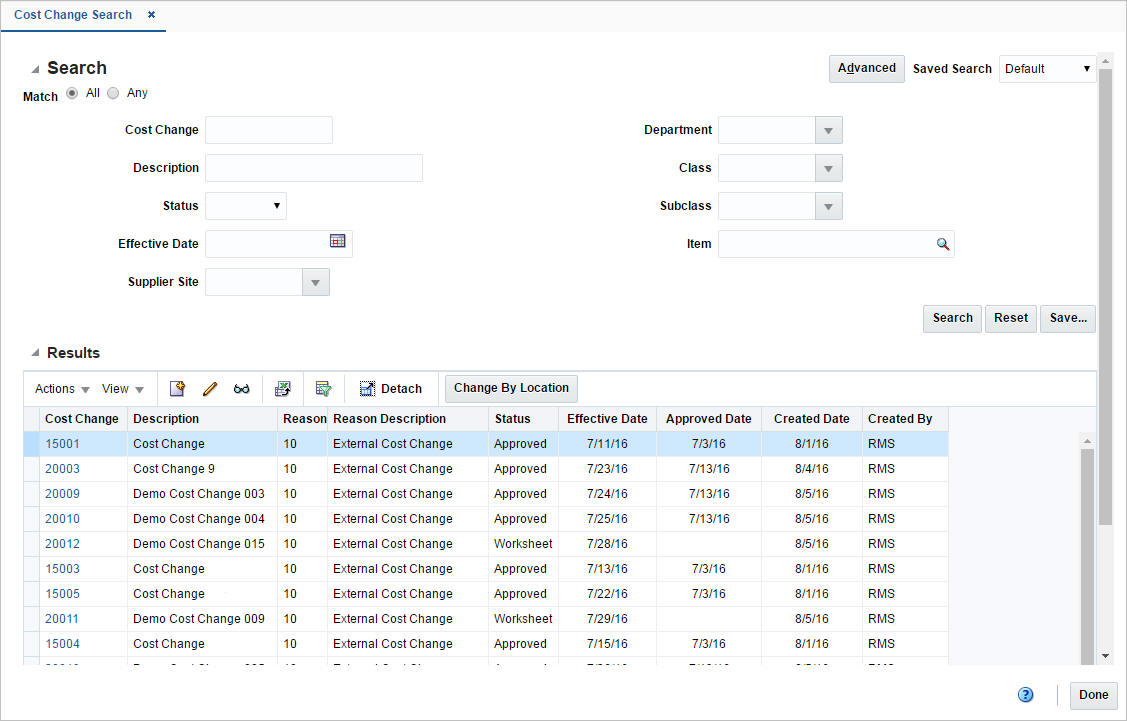
The Manage Cost Changes option opens the Cost Change Search window. In this window you can perform the following actions.
Search for cost changes by various search criteria
View the search results
View cost change information
Create cost changes by item or location
Edit cost change information
View cost changes
You can access the Cost Change Search window from the Task menu, select Cost > Manage Cost Changes. The Cost Change Search window appears.
The Cost Change Search window contains the following sections.
Search
For more information about how to search for cost changes, see the Searching for a Cost Change section.
To search for a cost change:
From the Task menu, select Cost > Manage Cost Changes. The Cost Change Search window appears.
You can search for a cost change by using basic or advanced search criteria, depending on the requirement. The basic mode is the default search mode.
Click Advanced to access the search section in advanced mode.
Click Basic to return to the basic mode.
To search for a cost change using basic search criteria:
Enter, select or search for one or all of the following basic search criteria.
Table 7-15 Cost Change Search - Basic Search Criteria and Description
| Fields | Description |
|---|---|
|
Match option |
Check radio button All or Any. All - only suppliers matching all entered search criteria are shown. Any - suppliers matching any of the entered search criteria are shown. |
|
Cost Change |
Enter the cost change number. |
|
Description |
Enter the cost change description. |
|
Status |
Select the status of the cost change from the list. |
|
Effective Date |
Enter the effective date for the cost change, or use the Calendar icon to select a date. |
|
Supplier Site |
Enter, select or search for the supplier site. |
|
Department |
Enter, select or search for the department. |
|
Class |
Enter, select or search for the class. |
|
Subclass |
Enter, select or search for the subclass. |
|
Item |
Enter, select or search for the item. |
Click on the Saved Search list to select one of the saved search criteria. Selecting a saved search populates the search section with the saved search criteria. If the run automatically function is enabled for the search, the search is executed immediately.
You can also personalize your saved searches by selecting Personalize. The Personalize Saved Searches window appears.
For more information about the Personalized Saved Search, see the Common User Interface Controls chapter, section "Personalize Saved Search".
Click Search. The cost changes that match the search criteria are displayed in the Results section.
Click Reset to clear the search section and results.
Click Save As... to save the current search criteria. The Create Saved Search window appears.
For more information about how to save your search criteria, see the Common User Interface Controls chapter, section "Create Saved Search".
Click Done to close the window.
To search for a cost change using advanced search criteria:
To search using advanced search criteria, enter or select one or all of the advanced search criteria.
To narrow down the search, use the list next to the search fields. For example, determine if the entered value should equal or not equal the search result.
Click on the Saved Search list to select one of the saved search criteria. Selecting a saved search populates the search section with the saved search criteria. If the run automatically function is enabled for the search, the search is executed immediately.
You can also personalize your saved searches by selecting Personalize. The Personalize Saved Searches window appears.
For more information about the Personalized Saved Search, see the Common User Interface Controls chapter, section "Personalize Saved Search".
Click Search. The cost changes that match the search criteria are displayed in the Results section.
Click Reset to clear the search section and results.
Click Save As... to save the current search criteria. The Create Saved Search window appears.
For more information about how to save your search criteria, see the Common User Interface Controls chapter, section "Create Saved Search".
Click Add Fields to add more fields for the advanced search. To remove the field from the search, click the x right next to the field.
Click Reorder to change the order of the available search fields. The Reorder Search Fields window appears.
Select the desired search field and use the up and down arrows to rearrange the order of the fields.
Click OK to confirm the new order of the fields and close the window.
Click Cancel to reject any changes and close the window.
Click Done to close the window.
The Results section lists the retrieved cost changes.
Use the Actions Menu and icons to apply actions to the Results table. You can perform the actions listed below.
Table 7-16 Results - Actions Menu/Icons and Description
| Actions Menu/Icons | Description |
|---|---|
|
Create by Item and Create by Item icon |
Select Actions > Change by Item, or use the Change by Item icon For more details about how to create a cost change by item, see the Creating Cost Changes by Item section. |
|
Edit and Edit icon |
Select Actions > Edit, or use the Edit icon For more information about how to edit a cost change, see the Editing a Cost Change section. |
|
View and View icon |
To view a cost change:
|
|
Export to Excel and Export to Excel icon |
You can export the records in the table to a Microsoft Excel spreadsheet by selecting Actions > Export to Excel or by using the Export to Excel icon |
|
Change by Location button |
Use the Change by Location button to create cost changes by location. For more information about how to create cost changes by location, see the Creating Cost Changes by Location section. |
You can customize the view of the table. Use the View Menu and icons to customize the view as listed below.
Table 7-17 Results - View Menu/Icons and Description
| View Menu/Icons | Description |
|---|---|
|
Columns |
You can manage which of the columns will be shown in the table by clicking the Show All and Manage Columns options. |
|
Detach and Detach icon |
You can view the tables in the application in a separate window by clicking Detach or using the Detach icon |
|
Sort |
You can sort columns by the following options:
|
|
Reorder Columns |
You can reorder columns by clicking the Reorder Columns option. |
|
Query by Example and Query by Example icon |
You can filter the items by one or multiple column values by clicking Query by Example or using the Query by Example icon |
The toolbar contains the following icons and buttons.
To edit a cost change event, follow the steps below.
From the Tasks menu, select Cost > Manage Cost Changes. The Cost Change Search window appears.
Enter or select search criteria as desired to make the search more restrictive.
Click Search. The cost changes that match the search criteria are displayed in the Results section.
Select a cost change in the Results section.
Then select Actions > Edit, or use the Edit icon ![]() , or click on the cost change link. The Cost Change window appears.
, or click on the cost change link. The Cost Change window appears.
Edit the information in the individual sections.
Cost Changes by Item
In the Items section, edit the new unit cost in the Unit Cost New column.
|
Note: If the cost change contains items with defined bracket costs, you can edit the new unit cost in the Bracket Details section, in the Unit Cost New column. |
Select the Recalculate Order checkbox to recalculate any outstanding purchase orders that have not been received.
For more information about the available sections of the Cost Change by Item window, see the Changing Costs by Item section.
Cost Change by Location
In the Locations section, edit the new unit cost in the Unit Cost New column.
|
Note: If the cost change contains items with defined bracket costs, you can edit the new unit cost in the Bracket Details section, in the Unit Cost New column. |
Select the Recalculate Order checkbox to recalculate any outstanding purchase orders that have not been received.
For more information about the available sections of the Cost Change by Location window, see the Creating Cost Changes by Location section.
Then choose one of the following options.
Click Save to save your changes.
Click Save and Close to save your changes and close the window.
Click Cancel to reject all entries and close the window.
For a cost change to take affect, it needs to be in approved status. Depending on your user role, you may be able to move the cost change to the next status. A cost change may be in any of the following statuses:
Table 7-19 Cost Change Statues
| Status | Description |
|---|---|
|
Worksheet |
The cost change event is incomplete. You can edit, submit, or delete the cost change event. |
|
Submitted |
The cost change event is complete and submitted for approval. You can approve, reject, or delete the cost change event. |
|
Approved |
The cost change event is complete and has been approved. You can return the cost change event to Worksheet status for editing or cancel the cost change event. |
|
Rejected |
The cost change event is complete and has been approved. You can return the cost change event to Worksheet status for editing or cancel the cost change event. |
|
Extracted |
The details of the cost change event were extracted to the locations affected by the cost change event. Only cost change events in Approved status are extracted. |
|
Cancelled |
The cost event is deleted. |
To submit a cost change for approval, follow the steps below.
From the Tasks menu, select Cost > Manage Cost Changes. The Cost Change Search window appears.
Restrict the search to cost changes in Worksheet status.
Click Search. The cost changes that match the search criteria are displayed in the Results section.
Select a cost change in the Results section.
Then select Actions > Edit, or use the Edit icon ![]() , or click on the cost change link. The Cost Change window appears.
, or click on the cost change link. The Cost Change window appears.
Select the Submit button.
You are prompted to submit the cost change. Click Yes to confirm the prompt. The status of the cost change changes to Submitted.
Then choose one of the following options.
Click Save to save your changes.
Click Save and Close to save your changes and close the window.
Click Cancel to reject all entries and close the window.
To approve a cost change, follow the steps below.
From the Tasks menu, select Cost > Manage Cost Changes. The Cost Change Search window appears.
Restrict the search to cost changes in Submitted status.
Click Search. The cost changes that match the search criteria are displayed in the Results section.
Select a cost change in the Results section.
Then select Actions > Edit, or use the Edit icon ![]() , or click on the cost change link. The Cost Change window appears.
, or click on the cost change link. The Cost Change window appears.
Select the Approve button.
You are prompted to approve the cost change. Click Yes to confirm the prompt. The status of the cost change changes to Approved.
Then choose one of the following options.
Click Save to save your changes.
Click Save and Close to save your changes and close the window.
Click Cancel to reject all entries and close the window.
To reject a cost change, follow the steps below.
From the Tasks menu, select Cost > Manage Cost Changes. The Cost Change Search window appears.
Restrict the search to cost changes in Submitted status.
Click Search. The cost changes that match the search criteria are displayed in the Results section.
Select a cost change in the Results section.
Then select Actions > Edit, or use the Edit icon ![]() , or click on the cost change link. The Cost Change window appears.
, or click on the cost change link. The Cost Change window appears.
Select the Reject button.
You are prompted to reject the cost change. Click Yes to confirm the prompt. The status of the cost change changes to Rejected.
Then choose one of the following options.
Click Save to save your changes.
Click Save and Close to save your changes and close the window.
Click Cancel to reject all entries and close the window.
To cancel a cost change, follow the steps below.
From the Tasks menu, select Cost > Manage Cost Changes. The Cost Change Search window appears.
Restrict the search to cost changes in Approved status.
Click Search. The cost changes that match the search criteria are displayed in the Results section.
Select a cost change in the Results section.
Then select Actions > Edit, or use the Edit icon ![]() , or click on the cost change link. The Cost Change window appears.
, or click on the cost change link. The Cost Change window appears.
Select the Cancel button.
You are prompted to cancel the cost change. Click Yes to confirm the prompt. The status of the cost change changes to Cancelled.
Then choose one of the following options.
Click Save to save your changes.
Click Save and Close to save your changes and close the window.
Click Cancel to reject all entries and close the window.
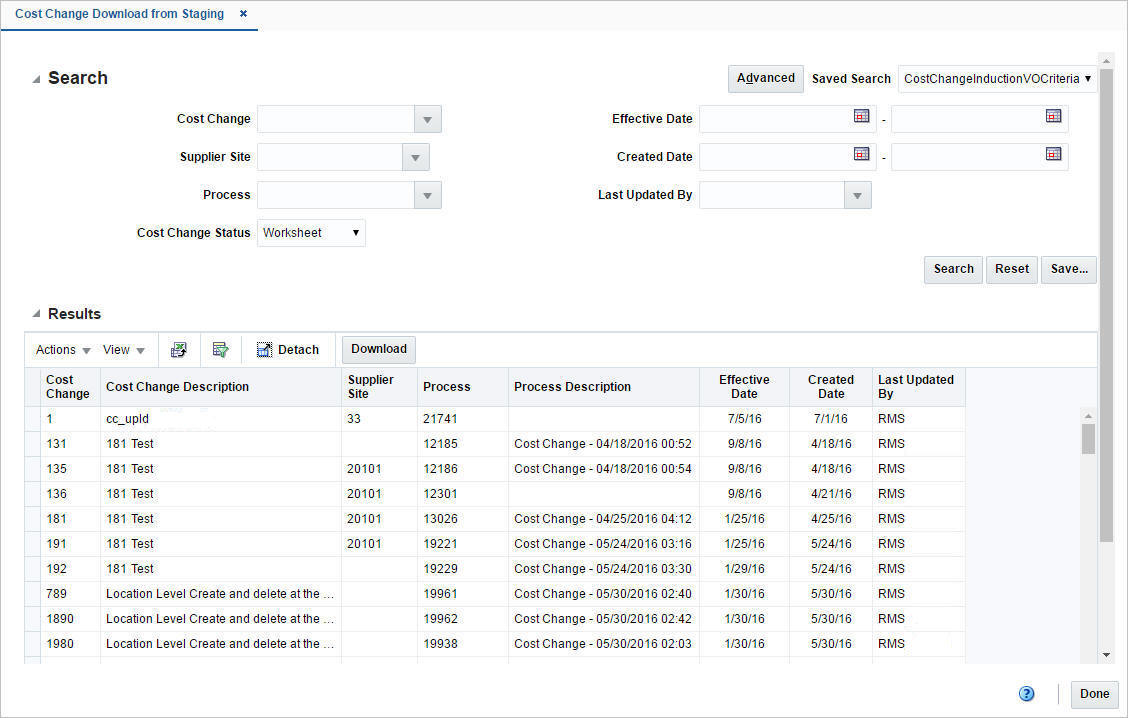
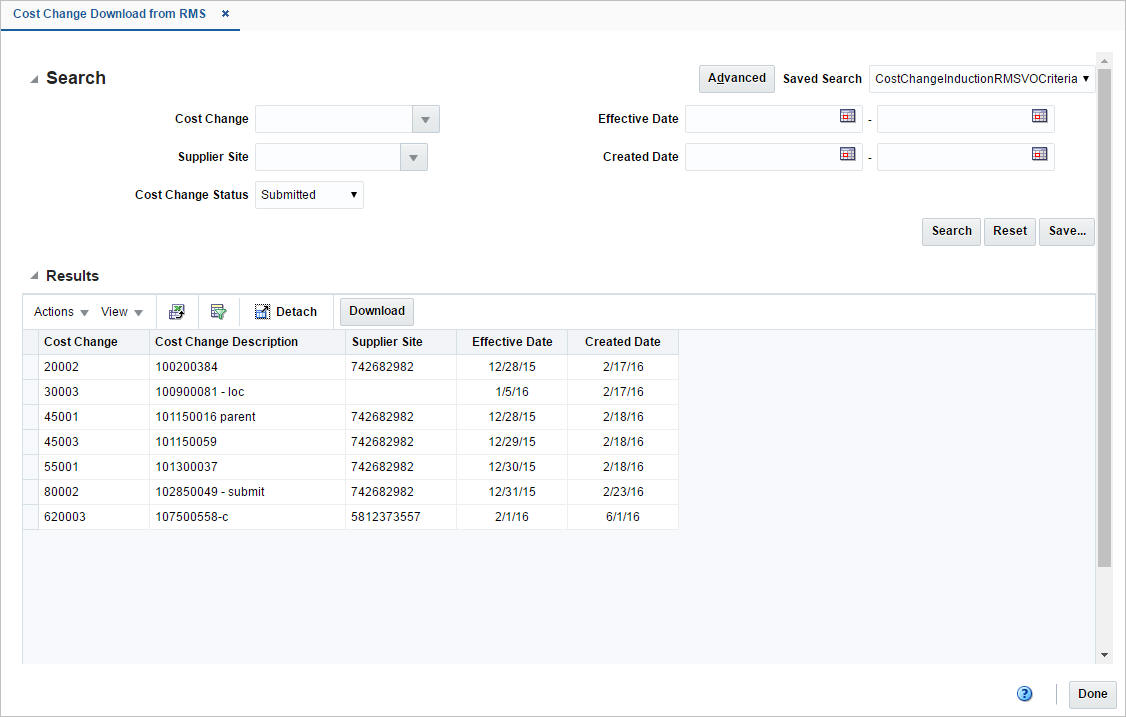
In the Cost Change Download from Staging window you can download cost changes from Cost Changes Staging tables to a spreadsheet.
From the Tasks menu, select Cost> Download from Staging. The Cost Change Download from Staging window appears.
Search for the cost changes you want to download using basic or advanced search criteria. The search results are shown in the Results section.
For more details regarding the basic and advanced search function in RMS see the Common User Interface Controls chapter, section "Searching for an Entity".
To download all cost changes displayed in the Results section, select Actions > Download, or use the Download button. The Download window appears.
|
Note: All cost changes that meet the search criteria will be downloaded. You cannot select certain cost changes. |
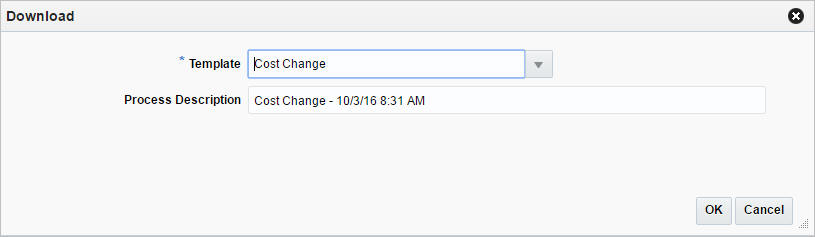
In the Template field, enter, select or search for the template you want to download. This field is a required field.
The Process Description field displays the default process name with the date and timestamp. You can edit the name of the download process in this field.
Then choose one of the following options:
Click OK to open the spreadsheet with the selected items on your desktop.
Click Cancel to reject all entries and close the window.
Click Done to exit the Cost Change Download from Staging window.
In the Cost Change Download from RMS window you can download cost changes from RMS to a spreadsheet.
From the Tasks menu, select Cost> Download from RMS. The Cost Change Download from RMS window appears.
Search for the cost changes you want to download using basic or advanced search criteria. The search results are shown in the Result section.
For more details regarding the basic and advanced search function in RMS see the Common User Interface Controls chapter, section "Searching for an Entity".
To download all cost changes displayed in the Result section, select Actions > Download, or use the Download button. The Download window appears.
|
Note: All cost changes that meet the search criteria will be downloaded. You cannot select certain cost changes. |
In the Template field, select, enter or search for the template you want to download.
The Process Description field displays the default process name with the date and timestamp. You can edit the name of the download process in this field.
Then choose one of the following options:
Click OK to open the spreadsheet with the selected cost changes on your desktop.
Click Cancel to reject all entries and close the window.
Click Done to exit the Cost Change Download from RMS window.
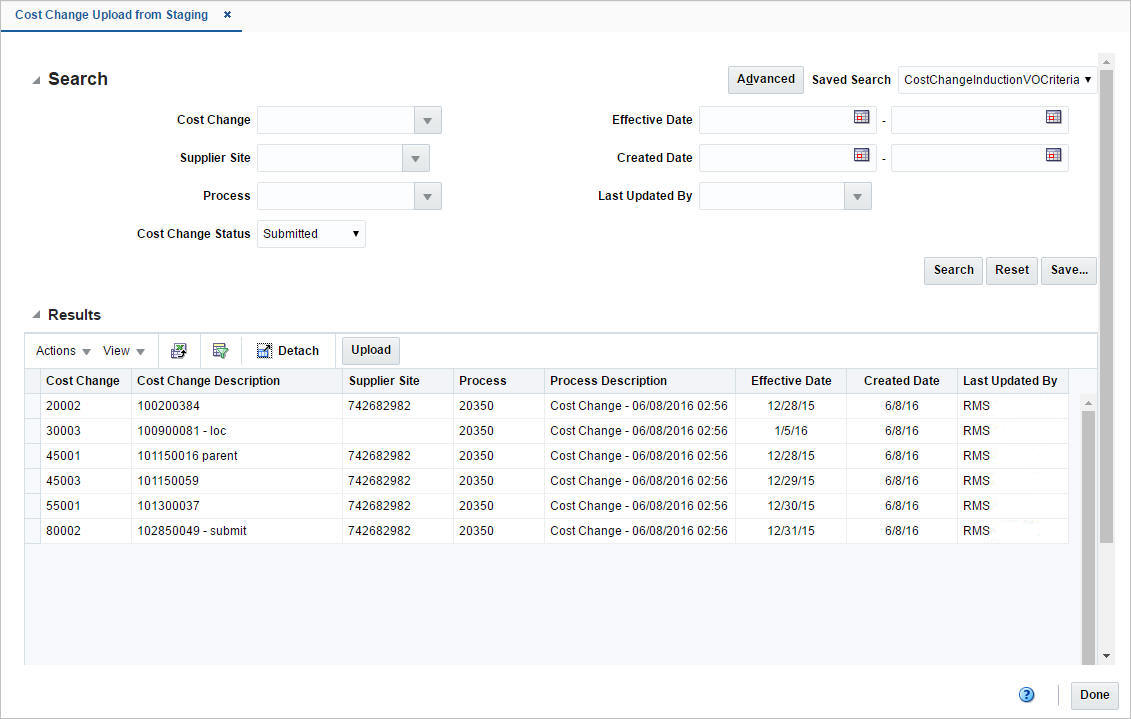
In the Cost Change Upload from Staging window you can upload cost changes from staging tables to RMS.
From the Tasks menu, select Cost> Upload from Staging. The Cost Change Upload from Staging window appears.
Search for the cost changes you want to upload using basic or advanced search criteria. The search results are shown in the Results section.
For more details regarding the basic and advanced search function in RMS see the Common User Interface Controls chapter, section "Searching for an Entity".
To upload all cost changes displayed in the Results section, select Actions > Upload, or use the Upload button. The Upload window appears.
|
Note: All cost changes that meet the search criteria will be downloaded. You cannot select certain cost changes. |
In the Template field, select, enter or search for the template you want to upload.
The Process Description field displays the default process name with the date and timestamp. You can edit the name of the upload process in this field.
Then choose one of the following options:
Click OK to upload the selected cost changes from staging tables to RMS.
Click Cancel to reject all entries and close the window.
Click Done to close the Cost Change Upload from Staging window.
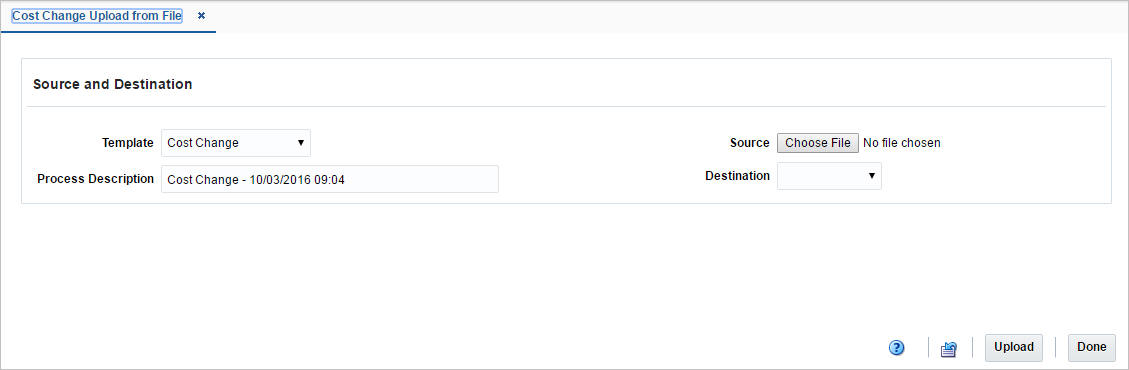
In the Cost Change Upload from File window you can upload a file.
From the Tasks menu, select Cost > Upload from File. The Cost Change Upload from File window appears.
In the Template field, select the template you want to upload to RMS tables or Staging tables.
The Process Description field displays the default process name with the date and timestamp. You can edit the name of the upload process in this field.
In the Source field, click the Choose File button to upload the file.
In the Destination field, choose either RMS Tables or Staging Tables from the list.
After you have entered the upload information, choose one of the following options:
Click Upload to upload the file to the RMS tables or Staging Tables.
Click Revert to undo any changes.
Click the Help icon ![]() to access the online help.
to access the online help.
Click Done to close the Cost Change Upload from File window.