Oracle® Retail Sales Audit
Operations Guide
Release 16.0
E81783-03
April 2019
Oracle Retail Sales Audit Operations Guide, Release 16.0
E81783-03
Copyright © 2018, Oracle and/or its affiliates. All rights reserved.
Primary Author: Anup Chandra, Adam Alamin
Contributors: Randy Kapelke
This software and related documentation are provided
under a license agreement containing restrictions on use and disclosure and are
protected by intellectual property laws. Except as expressly permitted in your
license agreement or allowed by law, you may not use, copy, reproduce,
translate, broadcast, modify, license, transmit, distribute, exhibit, perform,
publish, or display any part, in any form, or by any means. Reverse
engineering, disassembly, or decompilation of this software, unless required by
law for interoperability, is prohibited.
The information contained herein is subject to change
without notice and is not warranted to be error-free. If you find any errors,
please report them to us in writing.
If this software or related documentation is delivered
to the U.S. Government or anyone licensing it on behalf of the U.S. Government,
then the following notice is applicable:
U.S. GOVERNMENT END USERS: Oracle programs, including
any operating system, integrated software, any programs installed on the
hardware, and/or documentation, delivered to U.S. Government end users are
"commercial computer software" pursuant to the applicable Federal
Acquisition Regulation and agency-specific supplemental regulations. As such,
use, duplication, disclosure, modification, and adaptation of the programs,
including any operating system, integrated software, any programs installed on
the hardware, and/or documentation, shall be subject to license terms and
license restrictions applicable to the programs. No other rights are granted to
the U.S. Government.
This software or hardware is developed for general use
in a variety of information management applications. It is not developed or
intended for use in any inherently dangerous applications, including
applications that may create a risk of personal injury. If you use this
software or hardware in dangerous applications, then you shall be responsible
to take all appropriate fail-safe, backup, redundancy, and other measures to
ensure its safe use. Oracle Corporation and its affiliates disclaim any
liability for any damages caused by use of this software or hardware in
dangerous applications.
Oracle and Java are registered trademarks of Oracle
and/or its affiliates. Other names may be trademarks of their respective
owners.
Intel and Intel Xeon are trademarks or registered
trademarks of Intel Corporation. All SPARC trademarks are used under license
and are trademarks or registered trademarks of SPARC International, Inc. AMD,
Opteron, the AMD logo, and the AMD Opteron logo are trademarks or registered
trademarks of Advanced Micro Devices. UNIX is a registered trademark of The
Open Group.
This software or hardware and documentation may provide
access to or information on content, products, and services from third parties.
Oracle Corporation and its affiliates are not responsible for and expressly
disclaim all warranties of any kind with respect to third-party content,
products, and services unless otherwise set forth in an applicable agreement
between you and Oracle. Oracle Corporation and its affiliates will not be
responsible for any loss, costs, or damages incurred due to your access to or
use of third-party content, products, or services, except as set forth in an
applicable agreement between you and Oracle.
Value-Added
Reseller (VAR) Language
Oracle Retail VAR Applications
The following restrictions and provisions only apply to
the programs referred to in this section and licensed to you. You acknowledge
that the programs may contain third party software (VAR applications) licensed
to Oracle. Depending upon your product and its version number, the VAR
applications may include:
(i) the MicroStrategy Components developed and
licensed by MicroStrategy Services Corporation (MicroStrategy) of McLean, Virginia to Oracle and imbedded in the MicroStrategy for Oracle Retail Data
Warehouse and MicroStrategy for Oracle Retail Planning & Optimization
applications.
(ii) the Wavelink component developed and
licensed by Wavelink Corporation (Wavelink) of Kirkland, Washington, to Oracle
and imbedded in Oracle Retail Mobile Store Inventory Management.
(iii) the software component known as Access Via™
licensed by Access Via of Seattle, Washington, and imbedded in Oracle Retail
Signs and Oracle Retail Labels and Tags.
(iv) the software component known as Adobe Flex™ licensed
by Adobe Systems Incorporated of San Jose, California, and imbedded in Oracle
Retail Promotion Planning & Optimization application.
You acknowledge and confirm that Oracle grants you use
of only the object code of the VAR Applications. Oracle will not deliver source
code to the VAR Applications to you. Notwithstanding any other term or
condition of the agreement and this ordering document, you shall not cause or
permit alteration of any VAR Applications. For purposes of this section,
"alteration" refers to all alterations, translations, upgrades,
enhancements, customizations or modifications of all or any portion of the VAR
Applications including all reconfigurations, reassembly or reverse assembly,
re-engineering or reverse engineering and recompilations or reverse
compilations of the VAR Applications or any derivatives of the VAR
Applications. You acknowledge that it shall be a breach of the agreement to
utilize the relationship, and/or confidential information of the VAR
Applications for purposes of competitive discovery.
The VAR Applications contain trade secrets of Oracle and
Oracle's licensors and Customer shall not attempt, cause, or permit the
alteration, decompilation, reverse engineering, disassembly or other reduction
of the VAR Applications to a human perceivable form. Oracle reserves the right
to replace, with functional equivalent software, any of the VAR Applications in
future releases of the applicable program.
Send Us Your Comments....................................................................................... xiii
Preface.................................................................................................................... xv
Documentation Accessibility.......................................................................................................... xv
Related Documents............................................................................................................................ xv
Customer Support............................................................................................................................... xv
Review Patch Documentation....................................................................................................... xvi
Improved Process for Oracle Retail Documentation Corrections........................................ xvi
Oracle Retail Documentation on the Oracle Technology Network.................................... xvi
Conventions........................................................................................................................................ xvi
1 Introduction.......................................................................................................... 1
2 Technical Architecture.......................................................................................... 3
Overview.................................................................................................................................................. 3
Oracle Application Development Framework (ADF)......................................................... 3
Retail Fusion Platform................................................................................................................. 5
Data Access Patterns.................................................................................................................... 5
Data Storage.................................................................................................................................... 6
3 Backend System Administration and Configuration.............................................. 7
Managing Application Navigator................................................................................................... 7
Managing Functional Security.......................................................................................................... 7
Introduction to Retail Roles....................................................................................................... 7
Retail Role Hierarchy................................................................................................................... 9
Default Security Reference Implementation........................................................................ 10
Disabling Content............................................................................................................................... 12
Safe Mode...................................................................................................................................... 12
Disabling Links in the Sidebar............................................................................................... 12
Managing Oracle Metadata Services (MDS)............................................................................... 12
Overview of Oracle Metadata Services (MDS).................................................................... 12
Using the system MBean Browser and the MDSAppRuntime MBean....................... 13
Exporting All MDS Customizations..................................................................................... 16
Exporting MDS Customization for a Specific User........................................................... 16
Deleting all MDS Customizations for a User...................................................................... 17
Deleting a Customization for a Specific Page for All Users........................................... 18
Deleting a Customization for a Specific Page for a Particular
User............................. 19
Importing All MDS Customizations..................................................................................... 20
Importing a Specific Page Customization for a User........................................................ 20
Creating Metadata Labels........................................................................................................ 21
Promoting Metadata Labels..................................................................................................... 22
4 Security in Retail Applications............................................................................ 23
Displaying External Application Contents in Non SSO
Environments............................ 23
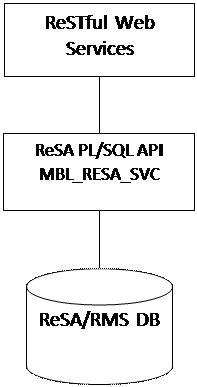
5 Web Services in Retail Applications.................................................................... 25
Common Characteristics of Retail application ReSTful Web
Services............................... 25
Deployment.................................................................................................................................. 25
Security.......................................................................................................................................... 25
Standard Request and Response Headers.......................................................................... 26
Standard Error Response......................................................................................................... 26
List of ReSTful Web Services........................................................................................................... 26
Platform ReSTful Web Services............................................................................................... 26
Summary of Open Store Days................................................................................................. 27
Summary of Errors...................................................................................................................... 29
Summary of Over/Short Count.............................................................................................. 29
Summary of Over/Short Amount.......................................................................................... 30
Get Store Days.............................................................................................................................. 31
Get Store Errors............................................................................................................................ 33
Input Parameters......................................................................................................................... 33
Get Store Aggregations.............................................................................................................. 34
Store Search.................................................................................................................................. 36
Get Store Day Date Indicator................................................................................................... 38
6 In-Context Launchable Task Flows in Retail Applications................................... 39
Limitations of In-Context Launch via URLs............................................................................... 39
List of In-Context Launchable Task Flows.................................................................................. 39
7 Customization of Retail Applications.................................................................. 41
Understanding the Deployment of Retail Applications......................................................... 41
Understanding the Retail Application Interface............................................................... 42
Supported Customization Scenarios.................................................................................... 44
Creating New ADF Content..................................................................................................... 54
Custom Shared Library Must Be Regenerated................................................................... 55
New Components Should Have Security Grants.............................................................. 55
ADF Best Practices Must Be Applied.................................................................................... 55
Task Flow and Page Configuration Must Be Supported................................................. 55
The Same Data Source Must Be Used................................................................................... 56
Adding or Modifying an Item in the Reports Menu......................................................... 56
Report Menu Model XML Items............................................................................................. 57
Item Attributes............................................................................................................................. 57
Item Sub-elements....................................................................................................................... 60
Securing Access to Items........................................................................................................... 61
Adding or Modifying an Item in the Tasks Menu............................................................. 61
8 Dashboard Customization Scenarios.................................................................. 63
Understanding Dashboards in Retail Applications................................................................ 63
Anatomy of a Dashboard................................................................................................................. 64
Supported Implementation of Dashboards................................................................................. 64
Retail Application Included Dashboards................................................................................... 65
Adding a New ADF based Dashboard in Reports Menu....................................................... 65
Adding a New External Dashboard into the Reports Menu................................................. 65
Retail Application Included Dashboard Customization Scenarios.................................... 66
Understanding Design Patterns of Included Dashboards..................................................... 66
The Dashboard Prompt Configuration XML File...................................................................... 69
Refreshing Reports on Prompt Changes...................................................................................... 71
List of Retail Sales Audit Included Dashboards....................................................................... 72
Adding or Replacing a Report in an Included Dashboard.................................................... 73
Removing a Report from an Included Dashboard.................................................................... 74
Change the Layout of an Included Dashboard.......................................................................... 74
Adding Contextual Reports............................................................................................................. 75
List of Contextual Business Events and Payloads.................................................................... 76
Preparing the Custom Shared Library for Adding Contextual
Reports............................. 77
Adding a URL Based Contextual Report..................................................................................... 78
Adding a DVT Taskflow-Based Contextual Report................................................................. 81
Enabling Dynamic Tasks in the Retail Application................................................................. 84
The DynamicContentHandlerInterface........................................................................................ 85
Dynamic Content Type..................................................................................................................... 85
Example Implementation of the DynamicContentHandler Interface.................................. 86
TaskMenuItem class.......................................................................................................................... 88
Default Dynamic Task Items........................................................................................................... 92
In Context Launch of Dynamic Task Patterns........................................................................... 93
Report Adapters.................................................................................................................................. 94
OBIEE Report Adapter...................................................................................................................... 94
Creating the BI Connection.............................................................................................................. 96
Configuring the Reports Menu..................................................................................................... 101
BIPublisher Report Adapter.......................................................................................................... 101
Store the BIPublisher Admin Credentials................................................................................. 102
WebLogic Scripting Tool................................................................................................................ 102
Enterprise Manager......................................................................................................................... 103
Configuring the Reports Menu..................................................................................................... 104
9 Oracle Retail Sales Audit Batch Process and Designs....................................... 105
Oracle Retail sales Audit Dataflow Diagram........................................................................... 105
Oracle Retail Sales Import Process.............................................................................................. 106
POS File Validation/Upload Sub-Process saimiptlog vs
saimptlogi....................... 107
Total Calculations and Rules....................................................................................................... 107
Oracle Retail Sales Export Process.............................................................................................. 108
Batch Design Summary of ReSA Modules................................................................................ 108
sastdycr (Create Store Day for Expected Transactions)........................................................ 110
Design Overview...................................................................................................................... 110
Scheduling Constraints.......................................................................................................... 110
Restart/Recovery...................................................................................................................... 110
Key Tables Affected.................................................................................................................. 110
Integration Contract................................................................................................................. 111
Design Assumptions............................................................................................................... 111
sagetref (Get Reference Data for Sales Audit Import
Processing)....................................... 112
Design Overview...................................................................................................................... 112
Scheduling Constraints.......................................................................................................... 113
Restart/Recovery...................................................................................................................... 113
Key Tables Affected.................................................................................................................. 113
Integration Contract................................................................................................................. 114
Design Assumptions............................................................................................................... 119
saimptlog/saimptlogi (Import of Unaudited Transaction Data
from POS to ReSA)... 122
Design Overview...................................................................................................................... 122
Scheduling Constraints.......................................................................................................... 123
Restart and Recovery............................................................................................................... 124
Key Tables Affected.................................................................................................................. 124
Design Assumptions............................................................................................................... 164
DCLOSE Transaction Type................................................................................................... 164
saimptlogtdup_upd (Processing to Allow Re-Upload of Deleted
Transactions).......... 166
Design Overview...................................................................................................................... 166
Scheduling Constraints.......................................................................................................... 166
Restart/Recovery...................................................................................................................... 166
Key Tables Affected.................................................................................................................. 167
Integration Contract................................................................................................................. 167
Design Assumptions............................................................................................................... 167
saimptlogfin (Complete Transaction Import Processing)..................................................... 167
Design Overview...................................................................................................................... 167
Scheduling Constraints.......................................................................................................... 167
Restart/Recovery...................................................................................................................... 168
Key Tables Affected.................................................................................................................. 168
Integration Contract................................................................................................................. 169
Design Assumptions............................................................................................................... 169
savouch (Sales Audit Voucher Upload).................................................................................... 170
Design Overview...................................................................................................................... 170
Scheduling Constraints.......................................................................................................... 170
Restart/Recovery...................................................................................................................... 170
Key Tables Affected.................................................................................................................. 171
Integration Contract................................................................................................................. 171
Input File Layout...................................................................................................................... 171
Design Assumptions............................................................................................................... 173
saimpadj (Import Total Value Adjustments From External Systems
to ReSA)............... 174
Design Overview...................................................................................................................... 174
Scheduling Constraints.......................................................................................................... 174
Restart/Recovery...................................................................................................................... 174
Key Tables Affected.................................................................................................................. 174
Integration Contract................................................................................................................. 175
Input File..................................................................................................................................... 175
Design Assumptions............................................................................................................... 176
satotals (Calculate Totals based on Client Defined Rules).................................................. 177
Design Overview...................................................................................................................... 177
Scheduling Constraints.......................................................................................................... 177
Restart/Recovery...................................................................................................................... 177
Key Tables Affected.................................................................................................................. 178
Integration Contract................................................................................................................. 178
Design Assumptions............................................................................................................... 178
sarules (Evaluate Transactions and Totals based on Client
Defined Rules).................. 179
Design Overview...................................................................................................................... 179
Scheduling Constraints.......................................................................................................... 179
Restart/Recovery...................................................................................................................... 179
Key Tables Affected.................................................................................................................. 180
Integration Contract................................................................................................................. 180
Design Assumptions............................................................................................................... 180
sapreexp (Prevent Duplicate Export of Total Values from ReSA)...................................... 181
Design Overview...................................................................................................................... 181
Scheduling Constraints.......................................................................................................... 181
Restart/Recovery...................................................................................................................... 181
Key Tables Affected.................................................................................................................. 182
Integration Contract................................................................................................................. 182
Design Assumptions............................................................................................................... 182
saexprms (Export of POS transactions from ReSA to RMS)................................................. 183
Design Overview...................................................................................................................... 183
Scheduling Constraints.......................................................................................................... 183
Restart/Recovery...................................................................................................................... 183
Key Tables Affected.................................................................................................................. 184
Design Assumptions............................................................................................................... 188
saordinvexp (Export Inventory Reservation/Release for In Store
Customer Order & Layaway Transactions from ReSA) 189
Design Overview...................................................................................................................... 189
Scheduling Constraints.......................................................................................................... 189
Restart/Recovery...................................................................................................................... 189
Key Tables Affected.................................................................................................................. 190
Integration Contract................................................................................................................. 190
Output File Layout................................................................................................................... 190
Design Assumptions............................................................................................................... 192
saexpdw (Export from ReSA to Oracle Retail Analytics)..................................................... 193
Design Overview...................................................................................................................... 193
Scheduling Constraints.......................................................................................................... 193
Restart/Recovery...................................................................................................................... 193
Key Tables Affected.................................................................................................................. 194
Integration Contract................................................................................................................. 194
Oracle Retail Sales Audit (ReSA) – File Layout – Retail
Analytics........................... 195
Design Assumptions............................................................................................................... 219
saexpsim (Export of Revised Sale/Return Transactions from ReSA
to SIM)................. 220
Design Overview...................................................................................................................... 220
Scheduling Constraints.......................................................................................................... 220
Restart/Recovery...................................................................................................................... 220
Key Tables Affected.................................................................................................................. 221
Integration Contract................................................................................................................. 221
Design Assumptions............................................................................................................... 223
saexpim (Export DSD and Escheatment from ReSA to Invoice
Matching)..................... 224
Design Overview...................................................................................................................... 224
Scheduling Constraints.......................................................................................................... 225
Restart/Recovery...................................................................................................................... 225
Key Tables Affected.................................................................................................................. 225
Integration Contract................................................................................................................. 226
Design Assumptions............................................................................................................... 226
saexpgl (Post User Defined Totals from ReSA to General Ledger).................................... 227
Design Overview...................................................................................................................... 227
Scheduling Constraints.......................................................................................................... 227
Restart/Recovery...................................................................................................................... 227
Key Tables Affected.................................................................................................................. 228
Integration Contract................................................................................................................. 228
Design Assumptions............................................................................................................... 228
ang_saplgen (Extract of POS Transactions by Store/Date from
ReSA for Web Search) 229
Design Overview...................................................................................................................... 229
Scheduling Constraints.......................................................................................................... 229
Restart/Recovery...................................................................................................................... 229
Key Tables Affected.................................................................................................................. 229
Integration Contract................................................................................................................. 230
Design Assumptions............................................................................................................... 231
saescheat (Download of Escheated Vouchers from ReSA for
Payment).......................... 232
Design Overview...................................................................................................................... 232
Scheduling Constraints.......................................................................................................... 232
Restart/Recovery...................................................................................................................... 232
Key Tables Affected.................................................................................................................. 233
Design Assumptions............................................................................................................... 233
saescheat_nextesn (Generate Next Sequence for Escheatment
Processing)................... 234
Design Overview...................................................................................................................... 234
Scheduling Constraints.......................................................................................................... 234
Restart/Recovery...................................................................................................................... 234
Key Tables Affected.................................................................................................................. 234
Design Assumptions............................................................................................................... 234
saexpach (Download from ReSA to Account Clearing House (ACH)
System).............. 235
Design Overview...................................................................................................................... 235
Scheduling Constraints.......................................................................................................... 235
Restart/Recovery...................................................................................................................... 236
Security Considerations......................................................................................................... 236
Key Tables Affected.................................................................................................................. 237
Integration Contract................................................................................................................. 237
Design Assumptions............................................................................................................... 241
saexpuar (Export to Universal Account Reconciliation System
from ReSA).................. 242
Design Overview...................................................................................................................... 242
Scheduling Constraints.......................................................................................................... 242
Restart/Recovery...................................................................................................................... 242
Key Tables Affected.................................................................................................................. 242
Integration Contract................................................................................................................. 243
Design Assumptions............................................................................................................... 244
saprepost (Pre/Post Helper Processes for ReSA Batch Programs).................................... 245
Design Overview...................................................................................................................... 245
Scheduling Constraints.......................................................................................................... 246
Restart/Recovery...................................................................................................................... 246
Key Tables Affected.................................................................................................................. 246
Integration Contract................................................................................................................. 247
Design Assumptions............................................................................................................... 247
sapurge (Purge Aged Store/Day Transaction, Total Value and
Error Data from ReSA) 248
Design Overview...................................................................................................................... 248
Scheduling Constraints.......................................................................................................... 249
Restart/Recovery...................................................................................................................... 249
Key Tables Affected.................................................................................................................. 249
Integration Contract................................................................................................................. 251
Design Assumptions............................................................................................................... 251
10 In-Context Launching Task Flows in Retail Applications................................... 253
Limitations of an In-Context Launch via URLs...................................................................... 253
List of In-Context Launchable Task Flows............................................................................... 253
11 ReSA ReSTful Web Service Implementation...................................................... 255
Using ReSTful Web Service during Batch Window............................................................... 255
Common Characteristics of Retail Application ReSTful Web
Services............................ 255
Deployment................................................................................................................................ 255
Security........................................................................................................................................ 256
Standard Request and Response Headers........................................................................ 256
Standard Error Response....................................................................................................... 256
URL Path..................................................................................................................................... 256
HTTP Header............................................................................................................................. 257
Date Format................................................................................................................................ 257
Paging.......................................................................................................................................... 257
Process Flow for the Web Service APIs.............................................................................. 258
List of ReSTful Web Services......................................................................................................... 258
Summary of Open Store Days............................................................................................... 258
Summary of Errors................................................................................................................... 259
Summary of Over/Short Count............................................................................................ 260
Summary of Over/Short Amount........................................................................................ 261
Get Store Days........................................................................................................................... 262
Get Store Errors......................................................................................................................... 263
Get Store Aggregations........................................................................................................... 264
Store Search................................................................................................................................ 266
Get Store Day Date Indicator................................................................................................. 267
12 Internationalization........................................................................................... 269
Translation......................................................................................................................................... 269
ReSA User Interface Language..................................................................................................... 270
Oracle Retail Sales Audit, Operations Guide, Release 16.0
Oracle welcomes customers' comments and suggestions on the
quality and usefulness of this document.
Your feedback is important, and helps us to best meet your needs
as a user of our products. For example:
§
Are the implementation steps correct and complete?
§
Did you understand the context of the procedures?
§
Did you find any errors in the information?
§
Does the structure of the information help you with your tasks?
§
Do you need different information or graphics? If so, where, and in
what format?
§
Are the examples correct? Do you need more examples?
If you find any errors or have any other suggestions for
improvement, then please tell us your name, the name of the company who has
licensed our products, the title and part number of the documentation and the
chapter, section, and page number (if available).
Note:
Before sending us your comments, you might like to check that you have the
latest version of the document and if any concerns are already addressed. To do
this, access the Online Documentation available on the Oracle Technology
Network Web site. It contains the most current Documentation Library plus all
documents revised or released recently.
Send your comments to us using the electronic mail address: retail-doc_us@oracle.com
Please give your name, address, electronic mail address, and
telephone number (optional).
If you need assistance with Oracle software, then please contact
your support representative or Oracle Support Services.
If you require training or instruction in using Oracle software,
then please contact your Oracle local office and inquire about our Oracle
University offerings. A list of Oracle offices is available on our Web site at www.oracle.com.
This Oracle Retail
Sales Audit Operations Guide provides critical information
about the processing and operating details of Oracle Sales Audit (ReSA),
including the following:
§
System configuration settings
§
Technical architecture
§
Functional integration dataflow across the enterprise
§
Batch processing
Since ReSA is still closely integrated with the Oracle Retail
Merchandising System (RMS) for data inputs, processes, and outputs, see the Oracle
Retail Merchandising System Operations Guide for more information.
This Operations Guide provides
critical information about the processing and operating details of Oracle Retail Sales Audit,
including the following::
§ System configuration settings
§ Technical architecture
§ Functional integration dataflow across the enterprise
§ Batch processing
This guide is for:
§
Systems administration and operations personnel
§
Systems analysts
§
Integrators and implementers
§
Business analysts who need information about the Oracle Retail Sales Audit processes and interfaces
For information about Oracle's commitment to accessibility, visit
the Oracle Accessibility Program website at http://www.oracle.com/pls/topic/lookup?ctx=acc&id=docacc.
Access to Oracle Support
Oracle customers that have purchased support have access to
electronic support through My Oracle Support. For information, visit http://www.oracle.com/pls/topic/lookup?ctx=acc&id=info
or visit http://www.oracle.com/pls/topic/lookup?ctx=acc&id=trs
if you are hearing impaired.
For more information, see the following
documents in the Oracle Retail Sales Audit Release documentation set:
§
Oracle Retail Sales Audit Installation Guide
§
Oracle Retail Sales Audit User Guide
§
Oracle Retail Operational Insights User Guide
§
Oracle Retail Merchandising Implementation Guide
§
Oracle Retail Merchandising Security Guide
§
Oracle Retail Xstore Suite 16.0/Merchandising 16.0 Implementation
Guide
§
Oracle Retail Merchandising Batch Schedule
§
Oracle Retail Merchandising System documentation
To contact Oracle
Customer Support, access My Oracle Support at the following URL:
https://support.oracle.com
When contacting
Customer Support, please provide the following:
§
Product version and program/module name
§
Functional and technical description of the problem (include
business impact)
§
Detailed step-by-step instructions to re-create
§
Exact error message received
§
Screen shots of each step you take
When you install the application for the first time, you install
either a base release (for example, 16.0) or a later patch release (for
example, 16.01). If you are installing the base release or additional patch
releases, read the documentation for all releases that have occurred since the
base release before you begin installation. Documentation for patch releases
can contain critical information related to the base release, as well as
information about code changes since the base release.
To more quickly address critical corrections to Oracle Retail
documentation content, Oracle Retail documentation may be republished whenever
a critical correction is needed. For critical corrections, the republication of
an Oracle Retail document may at times not be attached to a numbered
software release; instead, the Oracle Retail document will simply be replaced
on the Oracle Technology Network Web site, or, in the case of Data Models, to
the applicable My Oracle Support Documentation container where they reside.
This process will prevent delays in making critical corrections
available to customers. For the customer, it means that before you begin
installation, you must verify that you have the most recent version of the
Oracle Retail documentation set. Oracle Retail documentation is available on
the Oracle Technology Network at the following URL:
http://www.oracle.com/technetwork/documentation/oracle-retail-100266.html
An updated version of the applicable Oracle Retail document is
indicated by Oracle part number, as well as print date (month and year). An
updated version uses the same part number, with a higher-numbered suffix. For
example, part number E123456-02 is
an updated version of a document with part number E123456-01.
If a more recent version of a document is available, that version
supersedes all previous versions.
Oracle Retail product documentation is available on the following
web site:
http://www.oracle.com/technetwork/documentation/oracle-retail-100266.html
(Data Model documents are not available through Oracle Technology
Network. You can obtain them through My Oracle Support.)
Navigate:
This is a navigate statement. It tells you how to get to the start of the
procedure and ends with a screen shot of the starting point and the statement
“the Window Name window opens.”
This is a code sample
It is used to display examples of code
1
The purpose of the Oracle Retail Sales Audit (ReSA) is to accept
transaction data from Point-Of-Sale (POS) and Order-Management-System (OMS)
applications and move the data through a series of processes that culminates in
clean data. Data that ReSA finds to be inaccurate is brought to the
attention of the retailer’s sales auditors who use the features of the sales
audit system to correct the exceptions.
By using ReSA, retailers can quickly and accurately validate and
audit transaction data before it is exported to other applications. ReSA uses
several batch-processing modules to do the following:
§
Import POS/OMS transaction data sent from the store to the ReSA
database.
§
Produce totals from user-defined totaling calculation rules that
a user can review during the interactive audit.
§
Validate transaction and total data with user-defined audit rules
that generate errors whenever data does not meet the criteria. You can review
these errors during the interactive audit.
§
Create and export files in formats suitable for transfer to other
applications.
§
Update the ReSA database with adjustments received from external
systems on previously exported data.
§
Integrate Out of the Box (OOTB) with Xstore.
2
This chapter describes the overall software architecture for
Oracle Retail Sales Audit and provides a high-level discussion of the general structure
of the system, including the various layers of Java code.
Retail Applications are based on the Oracle Application
Development Framework (ADF). The following diagram shows the key components
that make up the architecture of Retail Sales Audit.
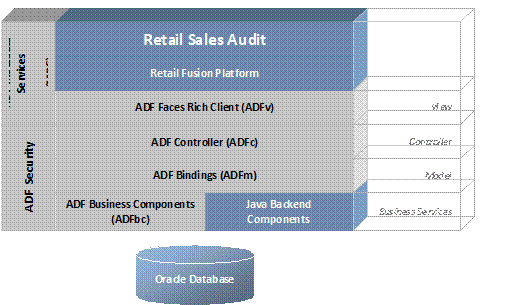
Oracle Application Development Framework (ADF) supports
organizations in building cutting-edge rich enterprise business applications
that can be customized and personalized in all dimensions. Customizations are
global changes, visible to all users that are performed by an administrator.
Personalizations are user-made changes that are only visible to the person
making the change. ADF is based on the Java Enterprise Edition platform
Model-View-Controller (MVC) Architectural Pattern
Applications built using ADF follow a Model-View-Controller (MVC)
architectural pattern. The goal of the MVC pattern is to clearly separate the
application’s functionality into a set of cooperating components.
ADF provide a set of components that realize the goals of each
part of MVC pattern
§
Model is realized by the ADF Bindings Layer
§
Controller is realized by the ADF Controller Layer
§
View is realized by the ADF Faces Layer
§
ADF Business components and other backend components that sit
below the Model layer are called Business Services
ADF Security
The ADF security layer provides the following:
§
Standards based (Oracle Platform Security Services (OPSS))
security framework with default roles and permissions.
§
Tools to generate file-based identity store (for both Oracle
Internet Directory and AD) based on the framework.
§
Tools to migrate file-based security store in to database for QA
and production environments.
§
Reference implementation for clients to manage the security based
on their business needs.
§
OPSS-based batch security framework (RAF).
§
Tools/documentation to implement centralized logout in SSO
(Oracle Access Management (OAM)) environments.
ADF View (ADFv)
The View layer provides the user interface to the application.
The view layer uses HTML, rich Java components or XML and its variations to
render the user interface. JSF based tag libraries are used for displaying the
UI.
ADF Controller (ADFc)
The ADF Controller layer controls the application's flow. Web
based applications are composed of multiple web pages with dynamic content. The
controller layer manages the flow between these pages. Different models can be
used when building this later. The most prominent architecture for Java-based
web applications relies on a servlet that acts as the controller. The Apache
Jakarta Struts controller, an open source framework controller, is the de facto
standard for Java-based web systems. Oracle ADF uses the Struts controller to
manage the flow of web applications.
ADF Business Components (ADFbc)
The business service layer manages the interaction with a data
persistence layer. It provides services as data persistence, object/relational
mapping, transaction management and business logic execution.
The idea behind Business Components is to abstract the data layer
from the view layer. This is a key concept in the MVC pattern. Business
Components will expose the interface to the view layer by using an application
module that contains View Object. Those view objects contain a specific usage
of the data layer.
ADF Business Components implements the business service through
the following set of cooperating components:
§
Entity object: An entity object represents a row in a database
table and simplifies modifying its data by handling all data manipulation
language (DML) operations for you. It can encapsulate business logic for the
row to ensure that your business rules are consistently enforced. You associate
an entity object with others to reflect relationships in the underlying
database schema to create a layer of business domain objects to reuse in
multiple applications.
§
View object: A view object represents a SQL query. You use the
full power of the familiar SQL language to join, filter, sort, and aggregate
data into exactly the shape required by the end-user task. This includes the
ability to link a view object with others to create master-detail hierarchies
of any complexity. When end users modify data in the user interface, view
objects collaborate with entity objects to consistently validate and save the
changes.
§
Application module: An application module is the transactional
component that UI clients use to work with application data. It defines an
updatable data model and top-level procedures and functions (called service
methods) related to a logical unit of work related to an end-user task.
ADF Model (ADFm)
This component acts as the connector between the view and
business logic layers. The Model layer connects the Business Services to the
objects that use them in the other layers. Oracle ADF provides a Model layer
implementation that sits on top of Business Services, providing a single
interface that can be used to access any type of Business Services.
Developers get the same development experience when binding any
type of Business Service layer implementation to the view and Controller
layers. The Model layer in Oracle ADF served as the basis for JSR 227, A
Standard Data binding & Data Access Facility for J2EE.
Oracle Metadata Services (MDS)
The ability of an application to adapt to changes is a necessity
that needs to be considered in the application design and should drive the
selection of the development platform and architecture. Flexible business
applications must be able to adapt to organizational changes, different end
user preferences, and changes in the supported business are required.
MDS is the customization and personalization framework integral
to Oracle Fusion Middleware and a key differentiator of the Oracle development
platform. MDS provides a repository for storing metadata for applications, such
as customizations and persisted personalization files and configurations.
Retail applications allow the following through MDS:
§
Personalization of saved searches through MDS.
§
Implicit personalization of few ADF UI attributes
The Retail Fusion Platform (commonly referred to as Platform) is
a collection of common, reusable software components that serve as foundation
for building Oracle Retail’s next generation ADF-based applications. The
Platform imposes standards and patterns along with a consistent look and feel
for Oracle Retail’s ADF applications.
Database interaction between the middle tier and database is done
using the industry standard Java Database Connectivity Protocol (JDBC). JDBC
facilitates the communication between a Java application and a relational
database.
Database Access Using ADFbc
JDBC is engrained within Oracle ADF Business Components as the
primary mechanism for its interaction between the middle tier and database. SQL
is realized within ADF business components to facilitate create, read, update,
and delete (CRUD) actions.
Connection Pooling
When the application disconnects a connection, the
connection is saved into a pool instead of being actually disconnected. A
standard connection pooling technique, this saved connection enables Retail
Applications to reuse the existing connection from a pool. In other words, the
application does not have to complete the connection process for each
subsequent connection.
The Oracle Database realizes the database tier in a Retail
Application’s architecture. It is the application's storage platform,
containing the physical data (user and system) used throughout the application.
The database tier is only intended to handle the storage and retrieval of
information and is not involved in the manipulation or delivery of the data.
This tier responds to queries; it does not initiate them.
Accessing Merchandising System Data in Real Time
Retail Applications share the same schema as the merchandising
system (RMS, for example), the application is able to interact with the
merchandising system's data directly, in real time.
3
This chapter describes the backend system administration and
configuration.
Retail
Applications provide an ability to switch between applications using the
Application Navigator facility. These applications are configured using the
Manage Application Navigator screens on Retail Application Administration
Console (RAAC). For more details on Application Navigator in RAAC, Refer to the
Oracle Retail Merchandising Implementation Guide.
This chapter discusses the Functional Security for Retail
Applications and the components used to implement it. Functional security is
based on OPSS. For more details on OPSS, refer to the Oracle Fusion
Middleware Application Security Guide.
Users are not assigned to permissions directly; rather access is
assigned to roles. Roles group particular permissions required to accomplish a
task; instead of assigning individual permissions, roles match users with the
permissions required to complete their particular task.
There are two main types of roles, enterprise and application.
The Identity Store contains enterprise roles that are available
across applications. These are created as groups in LDAP, making them available
across applications.
Applicable Retail Applications security provides four types of
roles: abstract, job, duty, and privilege.
Applicable Retail Applications will record job, abstract roles as
enterprise roles and duty, privilege roles as application roles.
Security Policy Stripe
Application roles are stored in the application-specific policy
store. These roles and role mappings are described in the jazn-data.xml file
under the policy stripe. For ReSA, the policy strip is “Resa.
Abstract Roles
Abstract roles are associated with a user, irrespective of their
job or job function. These roles are not associated with a job or duty. These roles
are normally assigned by the system (based on user attributes), but can be
provisioned to a user on request.
Naming Convention: All the Retail Abstract role names end with'
_ABSTRACT'.
Example: APPLICATION_ADMIN-ABSTRACT
Job Roles
Job roles are associated with the job of a user. A user with
this job can have many job functions or job duties.
Note: These
roles are called Job roles as the role names closely map to the jobs commonly
found in most organizations.
Naming
Convention:
All the Retail Job role names end with' _JOB'.
Example: SALES_AUDIT_ANALYST_JOB.
Duty Roles
Job duties are tasks one must do on a job. A person is hired into
a job role. These are the responsibilities one has for a job.
Duty roles are roles that are associated with a specific duty or
a logical grouping of tasks. Generally, the list of duties for a job is a good
indicator of what duty roles should be defined.
Duty roles should:
§
Read as a job description at a job posting site.
§
Duties that are created should be self-contained and pluggable
into any existing or new job or abstract role.
Naming
Convention: All the Retail duty role names end with' _DUTY'.
Example: RESA_AUDITRULE_MGMT_DUTY
Privilege Roles
Privilege is the logical collection of permissions. A privilege
can be associated with any number of UI components. Privileges are expressed
as application roles.
Naming Convention: All the Retail Privilege role names end with' _PRIV'.
Example: SEARCH_AUDITRULE_PRIV.
Privilege roles carry security grants.
<grant>
<grantee>
<principals>
<principal>
<class>oracle.security.jps.service.policystore.
ApplicationRole</class>
<name>
SEARCH_AUDITRULE_PRIV </name>
</principal>
</principals>
</grantee>
<permissions>
<permission>
<class>oracle.adf.controller.security.TaskFlowPermission</class>
<name/WEB-INF/oracle/retail/apps/resa/auditrule/search/publicui/flow/SearchAuditRuleFlow.xml#SearchAuditRuleFlow</name>
<actions>view</actions>
</permission>
</permissions>
</grant>
Retail role hierarchies are structured to reflect the retail
business process model.
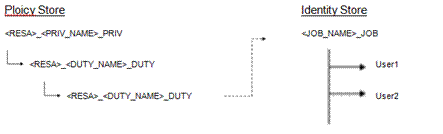
Job roles inherit duty roles. For example, the Sales Audit
Analyst Job role inherits the RESA_AUDITRULE_MGMT_DUTY roles.
<app-role>
<name>RESA_AUDITRULE_MGMT_DUTY</name>
<class>oracle.security.jps.service.policystore.ApplicationRole</class>
<members>
<member>
<class>oracle.security.jps.internal.core.principals.
JpsXmlEnterpriseRoleImpl</class>
<name>SALES_AUDIT_ANALYST_JOB</name>
</member>
</members>
</app-role>
Duty roles inherit Privilege roles. Duty roles can inherit one or
more other Duty roles.
Example: RESA_AUDITRULE_MGMT_DUTY inherits RESA_AUDITRULE_INQUIRY_DUTYrole.
<app-role>
<name>RESA_AUDITRULE_INQUIRY_DUTY</name>
<class>oracle.security.jps.service.policystore.ApplicationRole</class>
<members>
<member>
<class>oracle.security.jps.internal.core.principals.
JpsXmlEnterpriseRoleImpl</class>
<name>SALES_AUDIT_ANALYST_JOB</name>
</member>
<member>
<class>oracle.security.jps.service.policystore.ApplicationRole</class>
<name>RESA_AUDITRULE_MGMT_DUTY</name>
</member>
</members>
</app-role>
Example: RESA_AUDITRULE_INQUIRY_DUTYrole
inherits the SEARCH_AUDITRULE_PRIV role.
<app-role>
<name> SEARCH_AUDITRULE_PRIV
</name>
<class>oracle.security.jps.service.policystore.ApplicationRole</class>
<members>
<member>
<class>oracle.security.jps.service.policystore.ApplicationRole</class>
<name>RESA_AUDITRULE_INQUIRY_DUTY</name>
</member>
</members>
</app-role>
For more details on the roles/privileges for ReSA, refer the Oracle
Retail Merchandising Security Guide
Retail Applications ship with a default security reference
implementations. The source of truth for default reference implementation is
jazn-data.xml.
Privileges
|
Name
|
Description
|
|
Search Store Days Priv
|
A privilege for searching for store days and store day
total transaction data summary information (transaction data summary).
|
Duties
|
Name
|
Description
|
List of Privileges
|
|
Store Day Inquiry Duty
|
A duty for viewing store days.
|
§ Search Store Days
Priv
§ View Store Days
Priv
§ View Flash Reports
Priv
|
Role Mapping
|
Name
|
Description
|
List of Privileges
|
|
Store Day Inquiry Duty
|
A duty for viewing store days
|
§ Search Store Days
Priv
§ View Store Days
Priv
§ View Flash Reports
Priv
|
Extend the Default Security Reference Implementation
The common decisions made to match your enterprise to the default
security reference implementation include the following:
§
Do the default job roles match the equivalent job roles in your
enterprise?
§
Do the jobs in your enterprise exist in the security reference
implementation?
§
Do the duties performed by the jobs in your enterprise match the
duties in the security reference implementation?
Note:
Make sure that the policy store is loaded with the default security
configuration. For more information, see the post-installation steps in the
Oracle Retail Sales Audit Installation Guide.
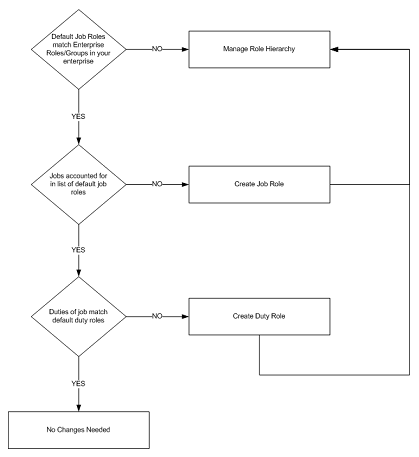
Note: It is important when constructing a
role hierarchy that circular dependencies are not introduced. Best practice is
to leave the default security configuration in place and first incorporate your
customized application roles in a test environment.
Managing Roles in Retail Application Administration Console
Retail Applications provide a way in which retailers can modify
the default roles to map to their security groups through the Retail
Application Administration Console (RAAC).
RAAC is installed along with the Retail Application. Users with
proper security privileges to access RAAC can launch RAAC by clicking on a link
from the Retail Application’s global menu.
For more details about using RAAC, refer to the Oracle Retail Merchandising
Implementation Guide.
There are situations where administrators need to disable certain
links or the default content such as Dashboards due to unavailability or other
reasons. Retail Applications provide the flexibility to disable such content so
that the application remains largely unaffected.
Applications can choose to serve certain content such as
dashboards to users upon launching the application. This is referred to as
“Default Content”. However sometimes this default content may cause delays in
application launch after logging-in or worse it may render the application
unusable.
To handle such scenarios Retail Applications provide a feature
for Administrators called “Safe Mode” which allows the user to log in without
serving up any default content. Once this mode is turned on, no default content
is shown to any user when the application is launched. To turn on this mode the
property “uishell.load.safe.mode” must be set to true in the
RetailAppsViewController.properties file.
Administrators may occasionally need to disable content
launchable from links in the sidebar navigation tree. Retail applications
provide the ability to disable such links.
To disable a link the Administrator must first find the “id” of
that link as specified in the SidebarNavigationModel.xml file. This value must
then be provided to the property “uishell.sidebar.invalid.item.ids” within the
RetailAppsViewController.properties file. To disable more than one link, pass
in multiple ids separated by a comma.
Retail Applications are built using ADF and one of the features
within ADF is the Oracle Metadata Services (MDS) framework which provides a
facility for retailers to customize the applications.
For more information on MDS, refer to the document, Oracle Fusion
Middleware Fusion Developer’s Guide for Oracle Application Development
Framework: https://docs.oracle.com/middleware/1213/adf/develop/adf-web-customizing-apps.htm#ADFFD2077
Oracle Metadata Services (MDS) is a key infrastructure component
in Oracle Fusion Middleware. It is the layer through which metadata is loaded,
saved, cached, stored, managed, and customized both by various middleware
components and by the applications built on Fusion Middleware.
The use of MDS in ADF applications, for example, can allow
applications to remember how users like to work, and therefore not require them
to set up the application for every session. This may include, for example,
saving of common searches and screen layouts for every user. This allows making
use of the application easier and more intuitive for the users. MDS provides a
foundation that can be leveraged by Oracle Application Development Framework
(ADF) applications to provide such persistent personalization.
Oracle Metadata Services (MDS) makes use of metadata repositories
or partitions. A Metadata repository or partition contains metadata for Oracle
Fusion Middleware components. It can also contain metadata about the
configuration of Oracle Fusion Middleware and metadata for applications. Oracle
Metadata Services (MDS) stores the customizations in a metadata repository and
retrieves them at runtime to merge the customizations with the base metadata to
reveal the customized application.
A common problem when a patch is installed for a Retail
Application is that certain screens would fail to load or UI elements fail to
display data properly.
The cause of this issue is commonly attributed to user
personalization on screen elements that are now removed in the patch.
For example, prior to patching the application, users may have
saved search criterias on certain screens as a way to conveniently recall their
desired search results whenever they use the application. Those saved search
criterias are persisted by ADF in the MDS repository. If the patch involves
the removal of one of the attributes used in the search criterias, applying the
patch will cause the screens that have those search criterias fail to load.
The MDS repository is configured in the WebLogic server where the
Retail Application is deployed. The repository is database-based and it is
organized or subdivided into partitions. Retail Applications are deployed with
their own partition within the server’s MDS repository.
It is recommended to not delete the MDS partition during the
upgrade of the Retail application, instead use the functions described in this
document to resolve any issues related to MDS.
For managing MDS Customizations in Retail Fusion Applications,
use the Oracle Enterprise Manager to perform common metadata service tasks such
as exporting, deleting, and importing of MDS Customizations. This can be done
in the Oracle Enterprise Manager using the System MBean Browser and the MDSAppRuntime
MBean.
Perform the following steps to access the MDSAppRuntime MBean:
1. Login
to the Oracle Enterprise Manager by navigating to the URL in the following
format:
http://<host>:<port>/em/
2. From
the Navigation menu, under WebLogic Domain, right-click on the application
domain and navigate to System MBean Browser from the context menu. Choose the
correct domain based on your installation. The screenshot below displays
RAFDomain.

3. Under
Application Defined MBeans, locate MDSAppRuntime which can be found under the
following folder structure:
> oracle.mds.lcm
> Server: AppServer
> Application: Application Name
> MDSAppRuntime
4. Choose
the correct server and the Retail Application name based on your installation.
The screenshot below displays RAFServer and RetailAppsFrameworkTest
application.
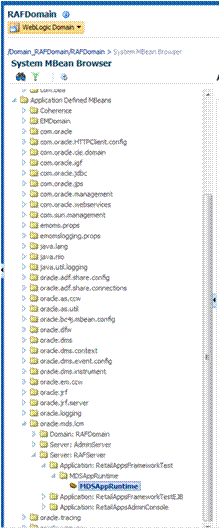
5. Click
on MDSAppRuntime management bean (MBean).
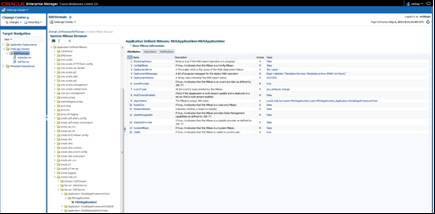
6. Select
the Operations tab to view the operations available for the MDSAppRuntime
MBean.
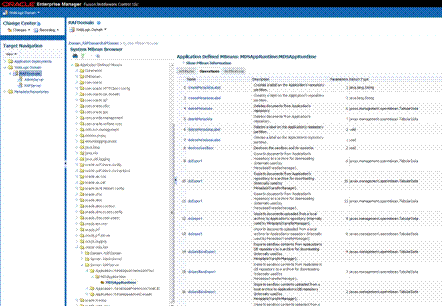
These are the operations which can be used in managing MDS Customizations. The
exportMetadata, deleteMetadata, importMetadata, createMetadataLabel,
listMetadataLabels, deleteMetadataLabel, and promoteMetadataLabel; will be
briefly discussed in the following sections.
1. Navigate
to the MDSAppRuntime management bean (MBean), as described in the section
"Using the System MBean Browser and the MDSAppRuntime MBean".
2. Export
metadata by selecting the exportMetadata operation available from the Operations
tab.
3. For
toLocation, provide a valid absolute path to a directory or archive in
the file system to which the selected documents will be exported. This location
must be accessible from the machine where the application is running. If it
does not exist, a directory will be created except that when the name ends with
".jar", ".JAR", ".zip", or ".ZIP", an
archive will be created. Exporting metadata to an existing archive will
overwrite the existing file.
Example: /tempDir/downloads/mdsExport/RetailAppsFrameworkTestMDS.zip
4. Click
Invoke (located at the upper-right corner of the page) to proceed with
the export operation.
5. Click
Return to return to the list of operations.
1. Navigate
to the MDSAppRuntime management bean (MBean), as described in the section
"Using the System MBean Browser and the MDSAppRuntime MBean".
2. Export
metadata by selecting the exportMetadata operation available from the
Operations tab.
3. For
toLocation, provide a valid absolute path to a directory or archive in the file
system to which the selected documents will be exported. This location must be
accessible from the machine where the application is running. If it does not
exist, a directory will be created except that when the name ends with
".jar", ".JAR", ".zip", or ".ZIP", an
archive will be created. Exporting metadata to an existing archive will
overwrite the existing file.
Example: /tempDir/downloads/mdsExport/RetailAppsFrameworkTestMDS.zip
4. For
docs, click the pencil icon. On the Edit Parameter popup, click Add, and in the
Element box, enter a list of comma-separated, fully qualified document names or
document name patterns to export.
To export customizations for a
specific page, simply enter the fully qualified base document name in the
Element box.
Example: /oracle/retail/apps/framework/uishell/skin/page/TestTablesAndTrees.jsff
You can provide the path to multiple
documents to export, by clicking the Add button. Do not provide any docs in
case you want to export all customizations for the user.
5. For
restrictCustTo, click the pencil icon. On the Edit Parameter popup, click Add,
and in the Element box, enter the list of customization layer names. This can
be a list of comma-separated customization layer names used to restrict the
operation to only customization documents that match the specified
customization layers.
Each customization layer name can contain, within a pair
of brackets, optional customization layer values and value patterns separated
by commas. Wildcards (%) may also be used for restricting the operation.
For Example:
|
Value
|
Description
|
|
user[buyer]
|
restricts operation to the user ‘buyer’
|
|
user[buyer, betty_buyer]
|
restricts operation to the users ‘buyer’, and
‘betty_buyer’
|
|
user[bu%]
|
restricts operation to user names that start with 'bu'
(i.e. buyer)
|
|
user[be%]
|
restricts operation to user names that start with 'be'
(i.e. betty_buyer)
|
|
user[%bu%]
|
restricts operation to users with 'bu' in the name (i.e.
buyer and betty_buyer)
|
6. Click
on the Invoke button, located at the upper-right corner of the page, to proceed
with the export operation.
7. A
confirmation message will display in the page. Click Return to return to the
list of operations.
1. Navigate
to the MDSAppRuntime management bean (MBean), as described in the section
"Using the System MBean Browser and the MDSAppRuntime MBean".
2. Delete
metadata by selecting the deleteMetadata operation available from the
Operations tab.
3. For
docs, click the pencil icon. On the Edit Parameter popup, click Add, and
in the Element box, enter a list of comma-separated, fully qualified document
names or document name patterns.
To delete all customizations for a
user, enter "/**" (without the quotes).
These will recursively delete all
customizations under "/" including any other customizations located
in the folder(s) under it. Click OK.
4. For
restrictCustTo, click the pencil icon. On the Edit Parameter popup,
click Add, and in the Element box, enter the list of customization layer names.
This can be used to restrict the operation to only customization documents that
match the specified customization layers.
Each customization layer name can
contain, within a pair of brackets, optional customization layer values and
value patterns separated by commas. Wildcards (%) may also be used for restricting
the operation.
|
Value
|
Description
|
|
user[buyer]
|
restricts operation to the user ‘buyer’
|
|
user[buyer, betty_buyer]
|
restricts operation to the users ‘buyer’, and
‘betty_buyer’
|
|
user[bu%]
|
restricts operation to user names that start with 'bu'
(i.e. buyer)
|
|
user[be%]
|
restricts operation to user names that start with 'be'
(i.e. betty_buyer)
|
|
user[%bu%]
|
restricts operation to users with 'bu' in the name (i.e.
buyer and betty_buyer)
|
5. Click
on the Invoke button, located at the upper-right corner of the page, to proceed
with the delete operation.
6. A
confirmation message will display in the page. Click Return to return to the
list of operations.
1. Navigate
to the MDSAppRuntime management bean (MBean), as described in the section
"Using the System MBean Browser and the MDSAppRuntime MBean".
2. Delete
metadata by selecting the deleteMetadata operation available from the
Operations tab.
3. For
excludeBaseDocs, select true. This is a Boolean value indicating whether to
exclude base metadata documents from being deleted.
4. For
docs, click the pencil icon. On the Edit Parameter popup, click Add, and in the
Element box, enter a list of comma-separated, fully qualified document names or
document name patterns.
To delete customizations for a specific
page, simply enter the fully qualified base document name in the Element box.
Example:
/oracle/retail/apps/framework/uishell/skin/page/TestTablesAndTrees.jsff
You can provide the path to multiple
documents to be deleted, by clicking the Add button. When done, click on the OK
button.
5. For
restrictCustTo, click the pencil icon. On the Edit Parameter popup, click Add,
and in the Element box, enter the list of customization layer names. This can
be used to restrict the operation to only customization documents that match
the specified customization layers.
Each customization layer name can contain, within a pair
of brackets, optional customization layer values and value patterns separated
by commas. Wildcards (%) may also be used for restricting the operation.
To delete customizations for all users, you may either:
§ remove any values for
restrictCustTo or
§ enter “user[%]"
in the Element box.
|
Value
|
Description
|
|
user[buyer]
|
restricts operation to the user ‘buyer’
|
|
user[buyer, betty_buyer]
|
restricts operation to the users ‘buyer’, and
‘betty_buyer’
|
|
user[bu%]
|
restricts operation to user names that start with 'bu'
(i.e. buyer)
|
|
user[be%]
|
restricts operation to user names that start with 'be'
(i.e. betty_buyer)
|
|
user[%bu%]
|
restricts operation to users with 'bu' in the name (i.e.
buyer and betty_buyer)
|
6. Click
on the Invoke button, located at the upper-right corner of the page, to proceed
with the delete operation.
7. A
confirmation message will display in the page. Click Return to return to the
list of operations.
1. Navigate
to the MDSAppRuntime management bean (MBean), as described in the section
"Using the System MBean Browser and the MDSAppRuntime MBean".
2. Delete
metadata by selecting the deleteMetadata operation available from the
Operations tab.
3. For
excludeBaseDocs, select true. A Boolean value indicating whether to exclude
base metadata documents from being deleted.
4. For
docs, click the pencil icon. On the Edit Parameter popup, click Add, and in the
Element box, enter a list of comma-separated, fully qualified document names or
document name patterns.
To delete customizations for a specific
page, simply enter the fully qualified base document name in the Element box.
Example: /oracle/retail/apps/framework/uishell/skin/page/TestTablesAndTrees.jsff
You can provide the path to multiple
documents to be deleted, by clicking the Add button. When done, click on the OK
button.
5. For
restrictCustTo, click the pencil icon. On the Edit Parameter popup, click Add,
and in the Element box, enter the list of customization layer names. This can
be used to restrict the operation to only customization documents that match
the specified customization layers.
Each customization layer name can contain, within a pair
of brackets, optional customization layer values and value patterns separated
by commas. Wildcards (%) may also be used for restricting the operation.
To delete customizations for a particular user, enter
"user[<username>]" in the Element box. See the table below for
other examples.
|
Value
|
Description
|
|
user[buyer]
|
restricts operation to the user ‘buyer’
|
|
user[buyer, betty_buyer]
|
restricts operation to the users ‘buyer’, and
‘betty_buyer’
|
|
user[bu%]
|
restricts operation to user names that start with 'bu'
(i.e. buyer)
|
|
user[be%]
|
restricts operation to user names that start with 'be'
(i.e. betty_buyer)
|
|
user[%bu%]
|
restricts operation to users with 'bu' in the name (i.e.
buyer and betty_buyer)
|
6. Click
on the Invoke button, located at the upper-right corner of the page, to proceed
with the delete operation.
7. A
confirmation message will display in the page. Click Return to return to the
list of operations.
1. Navigate
to the MDSAppRuntime management bean (MBean), as described in the section
"Using the System MBean Browser and the MDSAppRuntime MBean".
2. Import
metadata by selecting the importMetadata operation available from the
Operations tab.
3. For
fromLocation, enter the path of the directory or archive from which the
documents will be imported.
4. Example:
/tempDir/downloads/mdsExport/RetailAppsFrameworkTestMDS.zip
5. Click
on the Invoke button, located at the upper-right corner of the page, to proceed
with the import operation.
6. A
confirmation message will display in the page. Click Return to return to the
list of operations.
1. Navigate
to the MDSAppRuntime management bean (MBean), as described in the section
"Using the System MBean Browser and the MDSAppRuntime MBean".
2. Import
metadata by selecting the importMetadata operation available from the
Operations tab.
3. For
fromLocation, enter the path of the directory or archive from which the
documents will be imported.
Example: /tempDir/downloads/mdsExport/RetailAppsFrameworkTestMDS.zip
4. For
excludeBaseDocs, select true. A Boolean value indicating whether to exclude
base metadata documents from being imported.
5. For
docs, click the pencil icon. On the Edit Parameter popup, click Add, and in the
Element box, enter a list of comma-separated, fully qualified document names or
document name patterns. To import customizations for a specific page, simply
enter the fully qualified base document name in the Element box.
Example: /oracle/retail/apps/framework/uishell/skin/page/TestTablesAndTrees.jsff.
You can provide the path to multiple
documents to be imported, by clicking the Add button. When done, click on the OK
button.
6. For
restrictCustTo, click the pencil icon. On the Edit Parameter popup, click Add,
and in the Element box, enter the list of customization layer names. This can
be used to restrict the operation to only customization documents that match
the specified customization layers.
Each customization layer name can contain,
within a pair of brackets, optional customization layer values and value
patterns separated by commas. Wildcards (%) may also be used for restricting
the operation.
To import customizations for a
particular user, enter "user[<username>]" in the Element box. See
the table below for other examples.
|
Value
|
Description
|
|
user[buyer]
|
restricts operation to the user ‘buyer’
|
|
user[buyer, betty_buyer]
|
restricts operation to the users ‘buyer’, and
‘betty_buyer’
|
|
user[bu%]
|
restricts operation to user names that start with 'bu'
(i.e. buyer)
|
|
user[be%]
|
restricts operation to user names that start with 'be'
(i.e. betty_buyer)
|
|
user[%bu%]
|
restricts operation to users with 'bu' in the name (i.e.
buyer and betty_buyer)
|
7. Click
on the Invoke button, located at the upper-right corner of the page, to proceed
with the import operation.
8. A
confirmation message will display in the page. Click Return to return to the
list of operations.
1. Navigate
to the MDSAppRuntime management bean (MBean), as described in the section
"Using the System MBean Browser and the MDSAppRuntime MBean".
2. Create
metadata label by selecting the createMetadataLabel operation available from
the Operations tab.
3. For
label, enter a valid name of the new metadata label to be created.
4. Click
on the Invoke button, located at the upper-right corner of the page, to proceed
with the operation.
5. A
confirmation message will display in the page. Click Return to return to the
list of operations.
1. Navigate
to the MDSAppRuntime management bean (MBean), as described in the section
"Using the System MBean Browser and the MDSAppRuntime MBean".
2. Promote
metadata label by selecting the promoteMetadataLabel operation available from
the Operations tab.
3. For
label, enter a valid name of the new metadata label to be promoted. Promoting
metadata labels can be used to roll back to an earlier version of the document,
as captured by the label.
4. Click
on the Invoke button, located at the upper-right corner of the page, to proceed
with the operation.
5. A
confirmation message will display in the page. Click Return to return to the
list of operations.
Listing Metadata Labels
1. Navigate
to the MDSAppRuntime management bean (MBean), as described in the section
"Using the System MBean Browser and the MDSAppRuntime MBean".
2. List
all metadata labels by selecting the listMetadataLabels operation available
from the Operations tab.
3. Click
on the Invoke button, located at the upper-right corner of the page, to proceed
with the operation.
4. This
will list all the available metadata labels previously created. You can use
this, for example, to get the latest metadata label that you want to promote.
5. Click
Return to return to the list of operations.
Deleting Metadata Labels
1. Navigate
to the MDSAppRuntime management bean (MBean), as described in the section
"Using the System MBean Browser and the MDSAppRuntime MBean".
2. Delete
metadata label by selecting the deleteMetadataLabel operation available from
the Operations tab.
3. For
label, enter a valid name of the metadata label to be deleted.
4. Click
on the Invoke button, located at the upper-right corner of the page, to proceed
with the operation.
A confirmation message will display in the page. Click Return to
return to the list of operations.
4
Retail Applications leverage ADF’s security framework that is
based on the Oracle Platform Security Services.
Retail Applications allow retailers to display content from
external applications. These contents are typically business intelligence
reports from a third party application that are configured to display within
the Retail Application’s dashboard.
Some of these contents might be secured requiring users to login
before the contents can be accessed and displayed.
In non-SSO environments, when a user logs out of the Retail
Application, they may not be logged out of any secured content they had
configured access to. Therefore, it is highly recommended that customers only configure
access to external content in a SSO-enabled environment where the application
logout manages the logout from any other secured content that was previously
accessed.
5
Retailers can access backend functionality in Retail Applications
by calling the applications’ ReSTful Web Services.
For more information on ReST as an architectural style applied to
building web services, refer to:
http://www.oracle.com/technetwork/articles/javase/index-137171.html
This section describes the common characteristics of a retail
application ReSTful web services.
A Retail Application will package its ReST services as part of
the application’s Enterprise Archive (EAR) file. Specifically, those services
are packaged as a Web Archive (WAR) within the EAR. Installation of the ReST
web services is therefore done by default.
Services are secured using J2EE-based security model.
1. Realm-based
User Authentication. This verifies users through an underlying realm. The
username and password is passed using Http Basic authentication.
2. Role-based
Authorization. This assigns users to roles, which in turn are granted or
restricted access to resources/services. The authorization of ReSTful web
services is static and cannot be reassigned to other rules post installation.
The following role(s) is/are associated with ReSTful Web Services and should be
added to the Enterprise LDAP:
§ ADMINISTRATOR_JOB
§ AUDITOR_JOB
§ AUDITOR_MANAGER_JOB
§ FINANCE_MANAGER_JOB
All enterprise roles defined above are mapped in web.xml and
weblogic.xml of the ReST Service webapp.
The communication between the server and client is encrypted
using one way SSL. In non-SSL environments the encoding defaults to BASE-64 so
it is highly recommended that these ReST services are configured to be used in
production environments secured with SSL connections.
Retail Application ReSTful web services have the following
standard HTTP headers
Accept: application/xml or application/JSON
Accept-Version: 15.0 (service version number)
Accept-Language: en-US,en;q=0.8
Accept-Versioning: False
Note:
Specify ‘Accept-Versioning: False’ in the Service Request to bypass
‘Accept-Version’ validation on services.
Depending on the type of the operation or HTTP method, the
corresponding response header is updated in the Http response with the
following codes:
GET/READ : 200
PUT/CREATE : 201 created
POST/UPDATE : 204
DELETE : 204
Example response payload in case of service error is depicted
below:
<?xml version="1.0"
encoding="UTF-8" standalone="yes"?>
<messagesRDOes>
<messagesRDO>
<message>REST Service
Version Mismatch</message>
<messageType>ERROR</messageType>
<status>BAD_REQUEST</status>
</messagesRDO>
</messagesRDOes>
§
message: The error message - translated.
§
messageType: Value of 'ERROR' is returned.
§
status : For a bad request or error, the status is
BAD_REQUEST.
§
The http error code for an error response is 400
This section describes the ReSTful web services.
The Platform ReSTful web services are described in detail in the
following sections.
Notification ReST Services
|
Description
|
URL
|
HTTP Method
|
|
Creating Notifications
|
/Notifications/create
|
POST
|
|
Updating Notifications
|
/Notifications/update
|
PUT
|
|
Deleting Notifications
|
/Notifications/delete/{id}
|
DELETE
|
|
Fetch Notifications
|
/Notifications/fetch?appCode={appCode}
|
GET
|
|
Get number of unread Notifications
|
/Notifications/fetch/unreadCount?appCode={appCode}
|
GET
|
|
Search Notifications
|
/Notifications/search?appCode={appCode}
|
GET
|
|
Filter Notifications – Return list of Notifications
|
/Notifications/filter/list
|
POST
|
|
Filter Notifications – Return grouped list of
Notifications
|
/Notifications/filter/group
|
POST
|
|
Filter Notifications – Return a summarized list of
Notifications
|
/Notifications/filter/summarize
|
POST
|
|
Count Notifications matching the filter
|
/Notifications/filter/count
|
POST
|
|
Persist the Criteria
|
/Notifications/criteria
|
POST
|
|
Fetch the Criteria
|
/Notifications/fetch/criteria?appCode={appCode}
|
GET
|
|
Fetch Recipients
|
/Notifications/fetch/recipients/{id}
|
GET
|
|
Fetch Notification Context
|
/Notifications/fetch/context/{id}
|
GET
|
|
Fetch Notification Time Periods
|
/Notifications/fetch/timeperiods?appCode={appCode}
|
GET
|
|
Fetch Notification Hierarchy Levels
|
/Notifications/fetch/hierarchylevels?appCode={appCode}
|
GET
|
|
Fetch Notification Types
|
/Notifications/fetch/notificationtypes?appCode={appCode}
|
GET
|
|
Status update for multiple Notifications
|
/Notifications/update/multiple/status
|
PUT
|
|
Delete multiple Notifications
|
/Notifications/delete/multiple
|
POST
|
Access Control ReST Services
|
Description
|
URL
|
HTTP Method
|
|
FetchFilteredRoles
|
/AccessRoles
|
POST
|
|
Description
|
URL
|
HTTP Method
|
|
Fetch all Favorites
|
/Favorites/fetch
|
GET
|
|
Add a Favorite
|
/Favorites/add
|
POST
|
|
Delete a Favorite
|
/Favorites/delete
|
DELETE
|
|
Update a Favorite
|
/Favorites/update
|
POST
|
|
Replace a Favorite
|
/Favorites/replace
|
POST
|
Summary of Open Store Days
This section gives you a summary of open store days
Business Overview
This service provides at a glance the number of open stores for
which the sales audit manager is responsible. The stores for which the user is
responsible are those associated with the user in ReSA’s employee maintenance
via location traits.
Service Type
Get
ReST URL
/summaryOpenStoreDay
Input Parameters
No Input
Output
§
Record Type-DATE, OLDER, ALL
-
For record type DATE: Five records of type date are displayed for
today minus 1 through today minus 5
-
One record type OLDER: is for store days older than today minus 5
-
One record type ALL: for all store days
§
Record Date --Date of date type rows
§
Open Store Count
Table Impact
|
TABLE
|
SELECT
|
INSERT
|
UPDATE
|
DELETE
|
|
LOC_TRAITS_MATRIX
|
Yes
|
No
|
No
|
No
|
|
SA_STORE_DAY
|
Yes
|
No
|
No
|
No
|
|
SA_USER_LOC_TRAITS
|
Yes
|
No
|
No
|
No
|
Allowed Job Roles
No Input
This section explains the summary of errors
Business Overview
This service provides, at a glance, the number outstanding errors
on the specified days for stores for which the sales audit manager is
responsible. An outstanding error is defined as an error that exists against a
store day that has not been overridden
Service Type
Get
ReST URL
/summaryerror
Input Parameters
No input
Output
§
Record Type - DATE, OLDER, ALL
-
For record type DATE: Five records of type date are displayed for
today minus 1 through today minus 5
-
One record type OLDER: is for store days older than today minus 5
-
One record type ALL: for all store days
§
Record Date - Date of date type rows
§
Error Count
Table Format
|
TABLE
|
SELECT
|
INSERT
|
UPDATE
|
DELETE
|
|
LOC_TRAITS_MATRIX
|
Yes
|
No
|
No
|
No
|
|
SA_ERROR
|
Yes
|
No
|
No
|
No
|
|
SA_STORE_DAY
|
Yes
|
No
|
No
|
No
|
|
SA_USER_LOC_TRAITS
|
Yes
|
No
|
No
|
No
|
Business Overview
This service provides at a glance the count of overages and the
count of shortages for all open stores on a given day for which the sales audit
manager is responsible. If the Over/Short value for the store day is a
positive value it is considered an overage, if the Over/Short value for the
store day is a negative value it is a shortage
Service Type
Get
ReST URL
/summaryOverShortCount
Input Parameters
No Input
Output
§
Record Type - DATE, OLDER, ALL
-
For record type DATE: Five records of type date are displayed for
today minus 1 through today minus 5
-
One record type OLDER: is for store days older than today minus 5
-
One record type ALL: for all store days
§
Record Date - Date of date type rows
§
Over Count
§
Short Count
Table Impact
|
TABLE
|
SELECT
|
INSERT
|
UPDATE
|
DELETE
|
|
LOC_TRAITS_MATRIX
|
Yes
|
No
|
No
|
No
|
|
SA_HQ_VALUE
|
Yes
|
No
|
No
|
No
|
|
SA_POS_VALUE
|
Yes
|
No
|
No
|
No
|
|
SA_STORE_DAY
|
Yes
|
No
|
No
|
No
|
|
SA_SYS_VALUE
|
Yes
|
No
|
No
|
No
|
|
SA_TOTAL
|
Yes
|
No
|
No
|
No
|
|
SA_USER_LOC_TRAITS
|
Yes
|
No
|
No
|
No
|
|
STORE
|
Yes
|
No
|
No
|
No
|
Business Overview
This service provides at a glance the sums of all overages and
all shortages for all open stores on a given day for which the sales audit
manager is responsible. If all locations to which the user is responsible have
the same local currency, all monetary values will be displayed in the local
currency. Otherwise, all monetary values will be displayed in the retailer’s
primary currency. If the Over/Short value for the store day is a positive
value it is considered an overage, if the Over/Short value for the store day is
a negative value it is a shortage.
Service Type
Get
ReST URL
/summaryOverShortAmount
Input Parameters
No Input
Output
§
Record Type - DATE, OLDER, ALL
-
For record type DATE: Five records of type date are displayed for
today minus 1 through today minus 5
-
One record type OLDER: is for store days older than today minus 5
-
One record type ALL: for all store days
§
Record Date - Date of date type rows
§
Over Amount
§
Short Amount
§
Currency Code
Table Impact
|
TABLE
|
SELECT
|
INSERT
|
UPDATE
|
DELETE
|
|
LOC_TRAITS_MATRIX
|
Yes
|
No
|
No
|
No
|
|
MV_CURRENCY_CONVERSION_RATES
|
Yes
|
No
|
No
|
No
|
|
SA_HQ_VALUE
|
Yes
|
No
|
No
|
No
|
|
SA_POS_VALUE
|
Yes
|
No
|
No
|
No
|
|
SA_STORE_DAY
|
Yes
|
No
|
No
|
No
|
|
SA_SYS_VALUE
|
Yes
|
No
|
No
|
No
|
|
SA_TOTAL
|
Yes
|
No
|
No
|
No
|
|
SA_USER_LOC_TRAITS
|
Yes
|
No
|
No
|
No
|
|
STORE
|
Yes
|
No
|
No
|
No
|
Business Overview
The service displays a list of open stores to which the user is
assigned, for a single day, for ‘Older’ days, or for All Days.
Service Type
Get
ReST URL
/getStoreDays?store={store}&recordType={recordType}&recordDate={recordDate}&sortAttrib={sortAttrib}&sortDirection={sortDirection}&pageSize={pageSize}&pageNumber={pageNumber}
Input Parameters
|
Parameter Name
|
Required
|
Description
|
Valid values
|
|
RecordType
|
Yes
|
Record Type
|
ALL, OLDER, DATE
|
|
RecordDate
|
No
|
Record Date, required when recordType is DATE
|
|
|
Store
|
No
|
Store ID
|
|
|
SortAttrib
|
No
|
Sort Attribute
|
STORENAME, AUDITOR, OSVALUE, ERRORCNT, DATASTATUS,
OPENDAYS, OSDAYS and OSSUMS
|
|
SortDirection
|
No
|
Sort Direction
|
ASC, DESC
|
|
PageSize
|
No
|
Maximum number of locations to retrieve per page
|
|
|
PageNumber
|
No
|
Result page to retrieve
|
|
Output
§
Store
§
Store Day Seq No
§
Auditors
§
Business Date
§
Store Name
§
Chain
§
Chain Name
§
Data Status
§
Data Status Description
§
Audit Status
§
Audit Status Description
§
Audit Changed Datetime
§
Fuel Status
§
Fuel Status Description
§
Over Short Amount
§
Currency Code
§
Error Count
§
Transaction Count
§
Loaded File Count
§
Expected File Count
§
Total Record Count
§
Next Page URL
§
Previous Page URL
Table Impact
|
TABLE
|
SELECT
|
INSERT
|
UPDATE
|
DELETE
|
|
LOC_TRAITS_MATRIX
|
Yes
|
No
|
No
|
No
|
|
SA_ERROR
|
Yes
|
No
|
No
|
No
|
|
SA_HQ_VALUE
|
Yes
|
No
|
No
|
No
|
|
SA_POS_VALUE
|
Yes
|
No
|
No
|
No
|
|
SA_STORE_DATA
|
Yes
|
No
|
No
|
No
|
|
SA_STORE_DAY
|
Yes
|
No
|
No
|
No
|
|
SA_SYS_VALUE
|
Yes
|
No
|
No
|
No
|
|
SA_SYSTEM_OPTIONS
|
Yes
|
No
|
No
|
No
|
|
SA_TOTAL
|
Yes
|
No
|
No
|
No
|
|
SA_TRAN_HEAD
|
Yes
|
No
|
No
|
No
|
|
SA_USER_LOC_TRAITS
|
Yes
|
No
|
No
|
No
|
|
V_CHAIN
|
Yes
|
No
|
No
|
No
|
|
V_CODE_DETAIL
|
Yes
|
No
|
No
|
No
|
|
V_STORE
|
Yes
|
No
|
No
|
No
|
This section lists the Get Store errors
Business Overview
The service retrieves summary of store day errors.
Service Type
Get
ReST URL
/getStoreErrors?store={store}&recordType={recordType}&recordDate={recordDate}
5.2.10.4. Input Parameters
|
Parameter Name
|
Required
|
Description
|
Valid values
|
|
RecordType
|
Yes
|
Record Type
|
ALL, OLDER, DATE
|
|
RecordDate
|
No
|
Record Date, required when recordType is DATE
|
|
|
Store
|
No
|
Store ID
|
|
Output
§
Store
§
Error Code
§
Error Description
§
Error Percentage
Table Impact
|
TABLE
|
SELECT
|
INSERT
|
UPDATE
|
DELETE
|
|
SA_ERROR
|
Yes
|
No
|
No
|
No
|
|
SA_STORE_DAY
|
Yes
|
No
|
No
|
No
|
|
V_SA_ERROR
|
Yes
|
No
|
No
|
No
|
|
V_STORE
|
Yes
|
No
|
No
|
No
|
This section describes the Get Store Aggregation details.
Business Overview
Retrieves aggregated store day information for all dates or store
days older than vdate -5.
Service Type
Get
ReST URL
/getStoreAggregations?allOlderInd={allOlderInd}&stores={stores}&sortAttrib={sortAttrib}&sortDirection={sortDirection}&pageSize={pageSize}&pageNumber={pageNumber}
Input Parameters
|
Parameter Name
|
Required
|
Description
|
Valid values
|
|
AllOlderInd
|
Yes
|
search string for locations Id or Name
|
ALL, OLDER
|
|
Stores
|
No
|
Comma Separated values for stores
|
|
|
SortAttrib
|
No
|
Sort Attribute
|
STORENAME, AUDITOR, OSVALUE, ERRORCNT, DATASTATUS,
OPENDAYS, OSDAYS and OSSUMS
|
|
SortDirection
|
No
|
Sort Direction
|
ASC, DESC
|
|
PageSize
|
No
|
Maximum number of locations to retrieve per page
|
|
|
PageNumber
|
No
|
Result page to retrieve
|
|
Output
§
Store
§
Store Name
§
Chain
§
Chain Name
§
Auditors
§
Open Days
§
Over Days
§
Short Days
§
Over Amount
§
Short Amount
§
Currency Code
§
Error Count
§
Total Record Count
§
Next Page URL
§
Previous Page URL
Table Impact
|
TABLE
|
SELECT
|
INSERT
|
UPDATE
|
DELETE
|
|
SA_ERROR
|
Yes
|
No
|
No
|
No
|
|
SA_HQ_VALUE
|
Yes
|
No
|
No
|
No
|
|
SA_POS_VALUE
|
Yes
|
No
|
No
|
No
|
|
SA_STORE_DATA
|
Yes
|
No
|
No
|
No
|
|
SA_STORE_DAY
|
Yes
|
No
|
No
|
No
|
|
SA_SYS_VALUE
|
Yes
|
No
|
No
|
No
|
|
SA_TOTAL
|
Yes
|
No
|
No
|
No
|
|
V_CHAIN
|
Yes
|
No
|
No
|
No
|
|
V_STORE
|
Yes
|
No
|
No
|
No
|
Business Overview
The web service enables store search and return aggregated store
information.
Service Type
Get
ReST URL
/storeSearch?searchString={searchString}&searchFilter={searchFilter}&sortAttrib={sortAttrib}&sortDirection={sortDirection}&pageSize={pageSize}&pageNumber={pageNumber}
Input Parameters
|
Parameter Name
|
Required
|
Description
|
Valid values
|
|
SearchString
|
Yes
|
search string for locations Id or Name
|
|
|
SearchFilter
|
Yes
|
Search all stores or assigned stores
|
ALL, ASSIGN
|
|
SortAttrib
|
No
|
Sort Attribute
|
STORENAME, AUDITOR, OSVALUE, ERRORCNT, DATASTATUS,
OPENDAYS, OSDAYS and OSSUMS
|
|
SortDirection
|
No
|
Sort Direction
|
ASC, DESC
|
|
PageSize
|
No
|
Maximum number of locations to retrieve per page
|
|
|
PageNumber
|
No
|
Result page to retrieve
|
|
Output
§
Store
§
Store Name
§
Chain
§
Chain Name
§
Auditors
§
Open Days
§
Over Days
§
Short Days
§
Over Amount
§
Short Amount
§
Currency Code
§
Error Count
§
Total Record Count
§
Next Page URL
§
Previous Page URL
Table Impact
|
TABLE
|
SELECT
|
INSERT
|
UPDATE
|
DELETE
|
|
LOC_TRAITS_MATRIX
|
Yes
|
No
|
No
|
No
|
|
SA_ERROR
|
Yes
|
No
|
No
|
No
|
|
SA_HQ_VALUE
|
Yes
|
No
|
No
|
No
|
|
SA_POS_VALUE
|
Yes
|
No
|
No
|
No
|
|
SA_STORE_DATA
|
Yes
|
No
|
No
|
No
|
|
SA_STORE_DAY
|
Yes
|
No
|
No
|
No
|
|
SA_SYS_VALUE
|
Yes
|
No
|
No
|
No
|
|
SA_TOTAL
|
Yes
|
No
|
No
|
No
|
|
SA_TRAN_HEAD
|
Yes
|
No
|
No
|
No
|
|
SA_USER_LOC_TRAITS
|
Yes
|
No
|
No
|
No
|
|
STORE
|
Yes
|
No
|
No
|
No
|
|
V_CHAIN
|
Yes
|
No
|
No
|
No
|
|
V_STORE
|
Yes
|
No
|
No
|
No
|
Business Overview
This web service allows the user to find which store days have
records that needs attention.
Service Type
Get
ReST URL
/getStoreDateInd?store={store}
Input Parameters
|
Parameter Name
|
Required
|
Description
|
Valid values
|
|
store
|
Yes
|
Store ID
|
store
|
Output
§
Record Type - DATE, OLDER, ALL
-
For record type DATE: Five records of type date are displayed for
today minus 1 through today minus 5
-
One record type OLDER: is for store days older than today minus 5
-
One record type ALL: for all store days
§
Record Date - Date of date type rows
§
Store Has Value Indicator
Table Impact
|
TABLE
|
SELECT
|
INSERT
|
UPDATE
|
DELETE
|
|
SA_STORE_DAY
|
Yes
|
No
|
No
|
No
|
|
V_STORE
|
Yes
|
No
|
No
|
No
|
6
Retail Applications can expose select task flows retailers can
directly launch into. This feature is referred to as in-context launching
in a Retail Application. Retailers can launch these task flows directly through
specific URLs.
Retail Applications will provide information about the various
task flows retailers can in-context launch into including the URLs and the
required parameters.
Retailers can use these URLs in other web pages as links. For
example: the URL to a task flow that invokes the Create Allocation Flow in a
Retail Application can be added as a link to dashboard report on a BI
server.
When the user clicks on a URL to a task flow, the Retail
Application will open in a new browser window or tab depending on the specified target
of the URL. The requested task flow will be shown as a UI tab
within the Retail Application.
§
The In-Context launch feature will not detect if there is an
already opened window or tab for the Retail Application. So when a user clicks
on a link to a Retail Application’s task flow, a new browser window or tab will
be opened even though the user already has an existing browser window or tab
opened for that same Retail Application.
§
If a dashboard is added on the Retail Application, and if that
dashboard has a report that contains links to in-context launchable task flows
in the same Retail Application, a new browser window or tab will still be
opened.
The following is the list of in-context launchable task flows:
|
Source
|
Mandatory parameter
|
Optional
|
Sample Url
|
|
StoreDay Search
|
Store / BusinessDay
|
AutoExecute, AssignedStores DataStatus, OverAllStatus
|
Error!
Hyperlink reference not valid.= SearchStoreDayTF? Store
=<store Id>& BusinessDay =< BusinessDay >
|
|
Storeday Maintenance
|
StoreSeqNo/ Store / BusinessDate
|
TabToDisclose
|
Error!
Hyperlink reference not valid. ResaPortal
/faces/Home?navModelItemId= MaintainStoreDayTF? StoreSeqNo =<Store day
sequence No.>& Store =<Store ID>
& BusinessDate =< BusinessDate >
|
|
Transaction Maintenance
|
TransactionSeqNo
|
|
Error!
Hyperlink reference not valid. ResaPortal
/faces/Home?navModelItemId= MaintainTransactionTF? TransactionSeqNo=<
TransactionSeqNo>
|
|
Transaction Search
|
TransactionSeq/ StoreId / TranBusinessDate
|
ErrorExists, AutoExecute
|
Error!
Hyperlink reference not valid. ResaPortal
/faces/Home?navModelItemId= ManageTransactionTF? TransactionSeq =<
TransactionSeq >& Store =<Store ID>
& TranBusinessDate =< TranBusinessDate >
|
7
This section discusses supported steps for customizing Retail
Applications
In order to customize the Retail Application, retailers must
understand the deployment of the Retail Application.
A Retail Application can install one or more application artifacts
into a Weblogic server instance. The diagram below shows a typical installation
of a Retail Application:
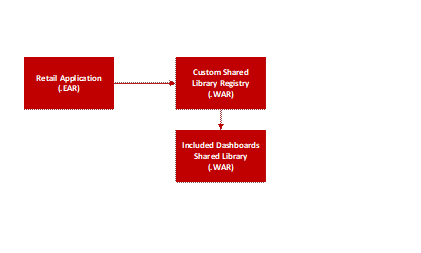
The Retail Application is deployed as a standalone application
and deployed using an EAR file.
Two shared libraries are typically
installed along with the application EAR:
§
The Included Dashboards Shared Library
§
The Custom Shared Library Registry
The Included Dashboards Shared Library contains the Retail
Application-built dashboards. These dashboards can be customized.
A Retail Application that allows for customization will have as
part of its installation an intermediary shared library that will serve as a
registry to reference the actual retailer-built shared libraries. This is
called the Custom Shared Library Registry.
When retailers need to add their own content into the
application, metadata to register their content into the application’s UI including
the binaries for the content itself (for example task flows and pages) are
expected to be packaged into a Web Archive (WAR) file and deployed as a shared
library in the same managed server as the application itself.
Then, the names of these shared libraries have to be referenced
in the Custom Shared Library Registry.
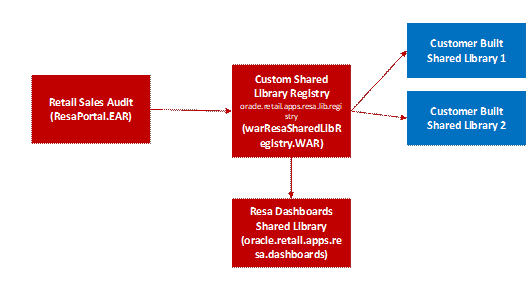
Retail Applications allow retailers to add and display custom
content such as new workflows and dashboards. These custom contents can be
accessed from the Retail Application’s user interface (UI).
The Retail Application user interface organizes the contents into
visual containers that fulfill common layout and navigational requirements in a
structured, consistent manner.

The high-level containers or areas in the UI are highlighted
below:
§
Global Area
§
Navigation Pane and Sliding Sidebar Menu
§
Local Area
§
Contextual Area
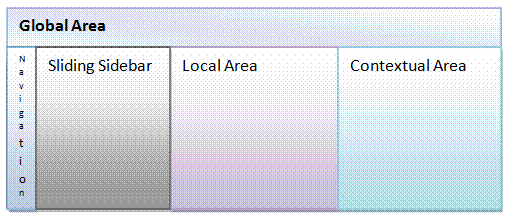
The Local Area is the main content area of the application.
Workflows that allow users to get tasks done in the application are presented
in this area. The workflows are launched into this area as a result of
actions the user take in the navigation pane, sliding sidebar panel and global
area.
The Navigation Pane organizes the different actions a user can
take on the application as iconic menu items. The options or actions available
to the users for each menu item are presented
in the Sliding Sidebar panel next to the Navigation Pane. There are five
(5) standard Navigation Pane menus that are available to users:
§
Application Navigator/Switcher - This menu allows users to switch
between Retail Applications.
§
Favorites - This menu allows users to access their own favorite
list of actions or tasks within the application.
§
Tasks - This menu presents a hierarchy of tasks or actions the
user can access in the application.
§
Reports – This menu presents a hierarchy of links to the
application reports and dashboards.
§
Notification - This menu allows users to access unread and past
notifications around business processes that are happening in the application.
The Global Area of the application contains branding information
on the left hand side and application wide menu options on the right hand
side. Application wide menu options include access to application
preferences, login and logout, application help and application information.
The Contextual Area is a collapsible area on the right of the
page, which provides space to present information that can assist users in
completing their tasks. The Contextual Area is presented per Local Area
tab. Each task flow is presented in the local area can have a contextual
area.
Adding a Custom Shared Library
As discussed in the section, Understanding the Deployment of
Retail Applications, a Retail Application that allows for customization will
have as part of its installation an intermediary shared library that will serve
as a registry to reference the actual retailer-built shared libraries. This is
called the Custom Shared Library Registry.
This section contains steps retailers can follow to create a
custom shared library that will contain new custom made content, reference that
shared library from the registry, and deploy it to the server.
Download JDeveloper
To create the custom shared library, it is recommended that
retailers download and install JDeveloper version 12.2.1 by following the link
below:
http://www.oracle.com/technetwork/developer-tools/jdev/downloads/index.html
Create the Custom Shared Library Workspace through JDeveloper
This section describes the steps to create and configure the
Custom Shared Library Workspace in JDeveloper, which will house the code for
any custom content the retailer wants to add into the Retail Application.
Through JDeveloper, a shared library web application archive file (.WAR) can be
generated which can be deployed in the same managed server as the Retail
Application.
1. Open
JDeveloper and choose Developer Role when prompted
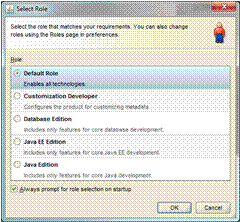
2. Create
a new Fusion Web Application JDeveloper workspace.
a. Go
to File New to invoke the New Gallery dialog. Choose Fusion Web Application
(ADF) as the type of application to create and click OK.
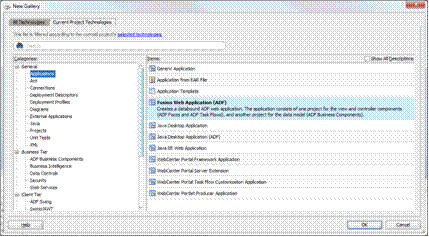
b. Provide
a meaningful application name, a directory path to the workspace and an
application (Java) package prefix and click Finish.
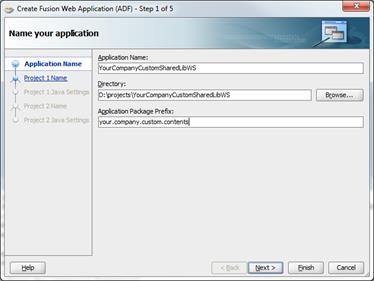
c. JDeveloper
will generate a new workspace with two projects: Model and View-Controller.
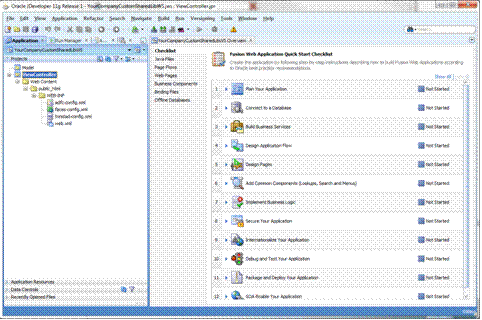
3. Add
a Manifest file containing the name of the shared library.
a. Right-click
on the View-Controller
project and choose New from the context menu
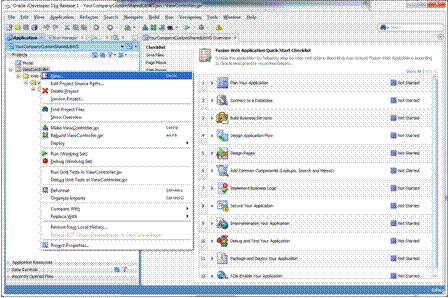
b. The
New Gallery
dialog appears. Choose the option, File (General), in the All Technologies section of
the dialog. Click OK.
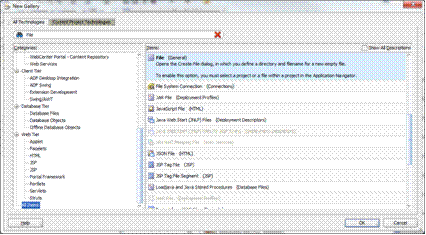
c. The
Create File dialog opens. For the File Name, specify MANIFEST.MF. For the
Directory, the new file must be added under the src/META-INF subdirectory
under the View-Controller project’s directory.
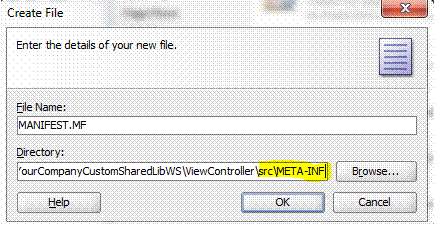
d. Edit
the new MANIFEST.MF
file and add the following entries:
-
Manifest-Version: 1.0
-
Implementation-Vendor: companyName
-
Implementation-Title: Custom Shared Library for companyName
-
Implementation-Version: 1.0
-
Extension-Name: companyname.custom.shared.lib
-
Specification-Version: 1.0
-
Created-By: companyName
Modify the contents such that meaningful and unique values are used
for Implementation-Vendor,
Implementation-Title,
Extension-Name
and Created-By.
Example:
-
Manifest-Version: 1.0
-
Implementation-Vendor: Acme Retail
-
Implementation-Title: Custom Shared Library for Acme Retail
-
Implementation-Version: 1.0
-
Extension-Name: acmeretail.custom.shared.lib.procurement
-
Specification-Version: 1.0
-
Created-By: AcmeRetail
4. Create
a deployment profile for the shared library.
a. Right-click
on the View-Controller project and choose New from the context menu.
b. The
New Gallery
dialog appears. Choose the option, WAR File (Deployment Profiles), in the All Technologies
section of the dialog. Click OK.
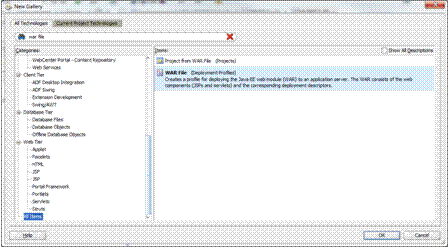
c. Provide
a unique and meaningful name for the Deployment Profile and click OK.
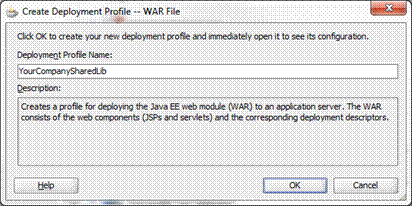
d. The
Edit WAR
Deployment Profile Properties dialog is shown.
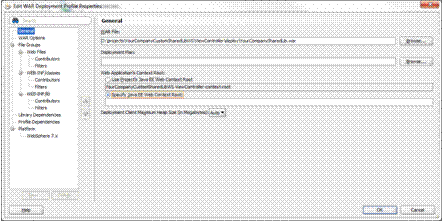
e. Under
the General section, make sure that the Specify Java EE Web Context Root is selected without any
value.
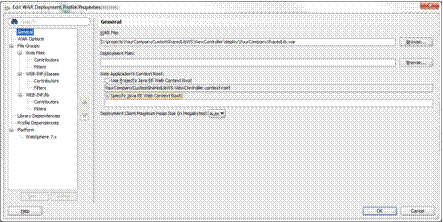
When you navigate away from his section – you will be prompted to
confirm that you really want a blank context root. Respond Yes to the
confirmation dialog.
f. Under
the WAR Options section, enable the Include Manifest File option
and add
the MANIFEST.MF file you created under …/View-Controller/src/META-INF.
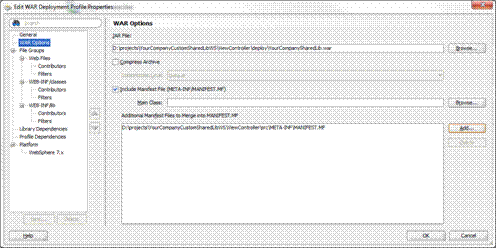
g. Click
OK.
Generate and Deploy the Custom Shared Library WAR
This section describes the steps to generate and deploy the
Custom Shared Library WAR file.
1. Generate
the share library WAR file through JDeveloper.
a. Open
the Custom Shared Library workspace.
b. Right-click
on the View-Controller
project and choose the shared library WAR deployment profile created previously
under the Deploy
option
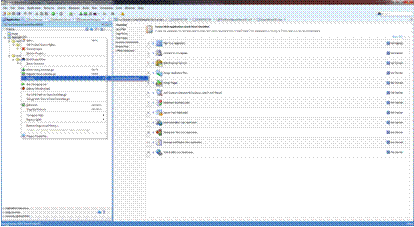
c. The
Deploy
dialog opens. Select Deploy to WAR and click Finish.
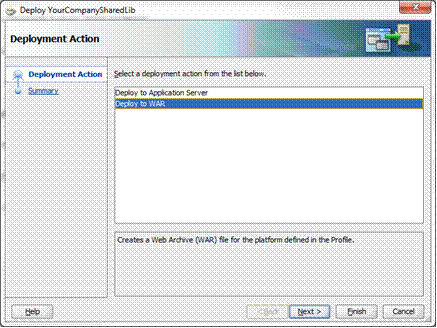
d. JDeveloper
will generate the WAR file into the View-Controller project folder subdirectory,
deploy.

2. Deploy
the generated WAR file to the same managed server as the Retail Application as a shared library.
Refer to section 6 of the Deploying Applications to Oracle
WebLogic Server documentation
(http://docs.oracle.com/middleware/1221/wls/DEPGD/deploy.htm#DEPGD212). This
task has to be done using the WebLogic Administration Console or Enterprise
Manager Fusion Middleware Control with a user having WebLogic administration
permissions
Reference the Custom Shared Library from the Retail Application
Once the retailer has created and deployed its own custom shared
library, the retailer needs to modify the configuration of the Custom Shared
Library Registry to add references to the retailer’s shared library.

The library name of the Custom Shared Library Registry for ReSA
is oracle.retail.apps.resa.portal.extension.
To do this:
1. Log
into the WebLogic Administration Console as a user with administrative
permissions.
2. If
the administration console was configured with domain configuration locking, go
ahead and click on the Lock & Edit button to ensure that other
administrators can be prevented from making changes during your edit session.
3. Navigate
to the Deployments section.
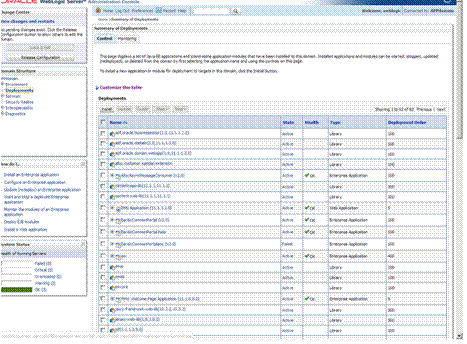
4. Look
for the Retail Application deployment and shut it down. Choose “Force Stop Now”
when appropriate. Wait for the shutdown process to complete.
5. Get
the deployment location of the Retail Application’s custom shared library
registry. Under the deployments list, click on the link for the library
named oracle.retail.apps.resa.lib.registry. The
Settings page for the library appears.
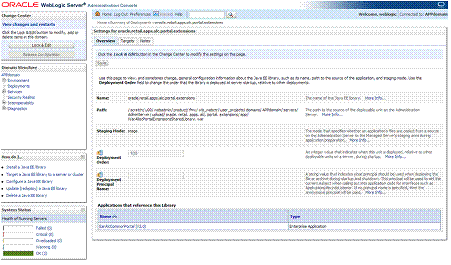
The Settings page will show the file location of the registry’s
WAR file under the Path entry. Make note of this file location.
6. Using
the operating system's file manager application, go to the location of the WAR
file. You will need read and write permissions to the file system where the WAR
file is located.
7. Make
a copy of the WAR file as back-up.
8. Open
the original WAR file using an archive file manager and update the
/WEB-INF/weblogic.xml by adding a new <library-ref> entry pointing to
your custom shared library.
<library-ref>
<library-name>companyname.custom.shared.lib</library-name>
</library-ref>
Note
that the library-name has to match the Extension-Name you provided in your
custom shared library’s MANIFEST.MF file. Once this change is done, you have
now linked your custom shared library to the Retail Application.
9. Return
to the WebLogic Administration Console. Go to the Environments' Servers
section. Under the Control tab, select the managed server where Retail
Application is deployed to. Shut it down and start it back again.
Custom ADF and Java based components can be coded into the Custom
Shared Library workspace. Typically, retailers can include task flows that add
new UI workflows into the Retail Application UI. These task flows may implement:
§
A new workflow to maintain the Retail Application’s data.
§
A dashboard page to highlight key performance indicators and
important metrics based on the Retail Application’s data.
This section contains important points that developers must
consider when building new custom ADF-based contents for Retail Applications.
Custom ADF content must be implemented within the custom shared
library workspace. Retailers must create a new custom shared library
workspace if none exists.
The WAR artifact for the custom shared library must be
regenerated and redeployed.
Refer to the section, Adding
a Custom Shared Library.
Since Retail Applications are secured web applications, the
addition of new ADF UI pages and task flows will need to be secured using the
application roles and policies that are recognized by the Retail Application.
The provisioning process is done using the Oracle Enterprise Manager Fusion
Middleware Control console.
Refer to Section 10, Managing Policies of the Oracle® Fusion
Middleware Securing Applications with Oracle Platform Security Services for
details (https://docs.oracle.com/middleware/1221/opss/JISEC.pdf).
Developers build components in both Model and View-Controller
layers using the tools and standards available for Oracle ADF. New ADF screens
have their own business components, task flows, pages, and bindings. These
components must comply with published best practices and standards for that
technology.
Refer to the Oracle JDeveloper and Oracle ADF Technical Resources
web site http://www.oracle.com/technetwork/developer-tools/jdev/learnmore/index.html
Of particular interests are coding guidelines published under the
ADF Architecture Square section of the site
http://www.oracle.com/technetwork/developer-tools/adf/learnmore/adfarchitect-1639592.html.
Task flows must be built as bounded task flows using JSF page
fragments.
The task flow must have an isolated data control scope. This
is configured in JDeveloper’s task flow designer by going to the Behavior tab
and setting data control share option as “Isolated”.

New application modules must be configured to use Data Sources
and not JDBC URLs when accessing the database layer. This can be configured in
JDeveloper’s application module designer.
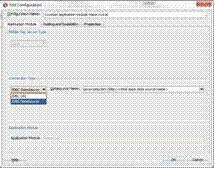
The data source name must be the same as the Retail Application’s
primary data source name (jdbc/ResaDBDS).
§
New application modules must be configured to use Data Sources
and not JDBC URLs when accessing the database layer.
§
This can be configured in JDeveloper’s application module
designer.
§
To add new contents in the Retail Application’s Reports Menu, the
retailer must override the reports menu model.
§
All items seen by the user in the Reports Menu are registered in
an XML file called the Reports Menu Model.
§
This file is kept in the application’s EAR file but can be
extracted, copied and modified so retailers can add references to their own
dashboards or reports.
To add or modify an item in the Reports
Menu, follow the steps below:
1. Add
a custom shared library. Refer to the section, Adding
a Custom Shared Library for details.
2. Using
JDeveloper, open the Custom Shared Library workspace in Developer Role.
3. Add
new custom reports as required.
4. Regenerate
the shared library WAR file from the workspace and redeploy the shared
library. Shutdown and restart of the Retail Application and its shared library
registry is required.
5. Changes
Required in Shared Library Registry for Custom Reports Menu Model
a. Obtain
the application’s Reports menu model XML file
|
Reports Menu Model XML
|
\oracle\retail\apps\resa\view\uishell\config\custom\HomeReportsMenuModel.xml
|
b. Refer
the Section Reference
the Custom Shared Library from the Retail Application., to register
custom reports menu model shared library within the Retail Application.
c. Open
the original WAR file using an archive file manager and copy the above Reports
menu model xml file in View-Controller project src directory, preferably under
a subdirectory called custom.
d. Add
a new or modify existing file called PageTemplateOverrideModel.properties under
the View-Controller/src directory.
e. Modify
this file and add the following entry:
Home.reportsMenuModelXml=<path
to sidebar model xml within view-controller/src>
Example:
Home.reportsMenuModelXml=/custom/HomeReportsMenuModel.xml
f. Modify
the copy of the model. Add new items, which are created in the shared library
project. Refer to the section, Reports Menu Model XML Items.
6. Test
the Retail Application.
The Reports menu model is composed of Item elements. An item
renders as either a launchable link or a submenu in the Reports menu of the
Retail Application. Below is an example of what a Reports Menu Model XML
might look like:
<?xml version="1.0" encoding="UTF-8"
standalone="yes"?>
<NavigationDefinition … >
<Items>
<Item id=”myFolder” title=”My Folder”
type=”folder”>
<Items>
<Item id="myContent" type="taskflow"
title="My Content">
<url>
/WEB-INF/mycompany/CustomDashboardTaskFlow.xml#CustomDashboardTaskFlow
</url>
<Parameters>
<Parameter id="productName">”Acme”</Parameter>
</Parameters>
</Item>
</Items>
</Item>
</Items>
</NavigationDefinition>
|
Attribute
|
Description
|
|
visible
|
Indicates if the item should be rendered (visible) or not.
It can be an EL Expression that evaluates to true or
false. Or it can be a plain string value equal to “true” or “false”. Defaults
to “true”.
|
|
type
|
Indicates the type of the item. The main values are
“folder”,”taskflow”,”link”. The type “folder” indicates that the item contains
additional sub-navigation items. The type “taskflow” indicates it is a task
flow, and the type “link” is used for URLs.
|
|
title
|
The attribute title is used to provide the title of the
sidebar item. This attribute is a required attribute.
|
|
targetTitle
|
The attribute targetTitle is used to provide the title of
the tab in the content area. This attribute is an optional attribute. If not
provided, the value of the title attribute will be used as the title of the
tab in the content area.
|
|
accessKey
|
The attribute accessKey is used to specify the keyboard
keystroke or a group of keystrokes that are used to access the navigation
item using the keyboard.
|
|
shortDesc
|
The attribute shortDesc is used to provide the description
of the navigation item which will be displayed when the user hovers over a
menu item.
|
|
showCloseIcon
|
Mainly used when the content is being rendered in a popup,
and indicates if the ‘x’ icon should show or not on the top right corner of
the popup to facilitate manual closing of the popup. Takes the values “true”
or “false”. Defaults to “false”.
|
|
defaultContent
|
Indicates whether the corresponding items from the model
show up by default in tabs in the content area when the page template loads.
Takes values “true” or “false”, or may even take an EL Expression evaluating
to “true” or “false”.
|
|
reuseInstance
|
The attribute reuseInstance is used to specify whether the
navigation items with the same title and url will use the same tab or not.
When this attribute is set to false, the request to open the content for that
navigation item will always use a new tab. When the attribute is true, the
navigation items with the same title and url will share the same tab in the
content area. It defaults to true.
|
|
keysList
|
Takes name value pairs separated by a semicolon. The
attribute keysList provides a way to differentiate two navigation items with
the same title and url. If keysList is not provided, then the two navigation
items with the same title and url will always use the same tab. When the keysList
is provided, it provides uniqueness to the navigation items with the same
title and url enabling them to use different tabs. Example
keysList="key1=value1;key2=value2"
|
|
urlRendererHeight,
urlRendererWidth
|
Example values are shown below. These used in the case of
a popup and indicate the height and width of the popup.
urlRendererHeight="200px"
urlRendererWidth="200px"
|
|
reloadTab
|
When this attribute is set to true, an already opened tab
will be reloaded with the new input parameters for the taskflow.
When it is set to false, a previously opened tab will only
be re-focused, but not reloaded with new input parameters for the taskflow.
The reload tab functionality has some limitations..
|
|
refreshOnDisclosure
|
When the navigation item has refreshOnDisclosure attribute
set to true then the tab displaying that item in the Content Area will be
refreshed every time it’s disclosed. The attribute can take either of the two
values true or false. Default is false. The attribute is useful in the
scenarios where we want to display to the user the latest information from
the database every time he/she comes back to the tab. The attribute should be
used with caution because if the data in that tab is not committed before
leaving the tab then the uncommitted data will be lost upon coming back to
the tab.
|
|
dynamicTabFocus
|
When a navigation item is invoked, the tab displaying that
item will have its text focused. To override this behavior, set
dynamicTabFocus to “false”. This attribute defaults to “true”.
|
|
popupId
|
Applicable only when target=”_popup”. Must be a number
between 1 and 15.
This attribute allows consuming applications to target a
specific popup within the UI Shell. The framework provides 15 popups that
consuming applications can take advantage of.
In case this attribute has not been specified, a default
popup will be used by the framework. This default popup will not store its
dimensions in MDS.
|
|
popupContentHeight
|
Applicable only when target=”_popup”.
This attribute is used to provide the height in pixels of
the resulting popup dialog window.
|
|
popupContentWidth
|
Applicable only when target=”_popup”.
This attribute is used to provide the width in pixels for
the resulting popup dialog window.
|
|
popupStretchChildren
|
Applicable only when target=”_popup”.
This attribute is used to indicate the stretching behavior
for the contents of the resulting popup window.
The contents are referred to as child components.
Valid values are:
none – does not attempt to stretch any children (the
default value and value you need to use if you have more than a single child;
also the value you need to use if the child does not support being
stretched).
first – stretches the first child (not to be used if you
have multiple children as such usage will produce unreliable results; also
not to be used if the child does not support being stretched).
|
|
popupResize
|
Applicable only when target=”_popup”.
This attribute is used to indicate the resulting popup
window’s resizing behavior. Valid values are:
on – user can resize the dialog with their mouse by
dragging any of the dialog edges.
off – the dialog automatically sizes its contents if
popupStretchChildren is set to “none”
|
|
popupHelpTopicId
|
Applicable only when target=”_popup”.
This attribute is used to look up a topic in a
helpProvider for the resulting popup window.
|
|
popupShortDesc
|
Applicable only when target=”_popup”.
This attribute is used to provide short description of the
resulting popup window.
|
|
contentListener
|
Specifies the fully qualified name of the class
implementing the ContentListener interface.
This allows applications to have the ability to inject any
session or request values before opening tabs.
|
|
tabShortDesc
|
Specifies the text to be shown when the user hovers over
the application tab. Using this attribute application team can keep the title
short and the tabShortDesc as fully qualified tab name which can be shown as
the tooltip of the tab. This attribute will be displayed as tab title in
screen reader mode.
|
|
Sub-element
|
Description
|
|
url
|
The location of the item being launched.
If the type is “taskflow” – then the URL element must
contain the path to the task flow XML.
If the type is “link” – then the URL of the external
system must be indicated in this sub element. The entire URL must be
marked as character data (for example. enclosed in CDATA)
|
|
Parameter
|
The <Parameters> sub-element within <Item>
should list all the parameters to the dashboard page if there are any.
Each parameter is represented as a <Parameter> element inside
<Parameters>.
The <Parameter> id should be the actual parameter
reference name recognized by the dashboard URL.
The value of each <Parameter> is a string value.
This is the only supported data type.
|
To restrict access to report items to specific security roles,
set the visible property on the <Item>
element for the dashboard URL to an Expression Language (EL)
expression that calls ADF’s securityContext
API’s isUserInRole
method.
Example:
<Item
id="myDashboard1"
type="link"
title="Profitability Dashboard"
visible=”#{securityContext.isUserInRole[‘BUYER_JOB’]}” >
The parameter to the securiytContext.isUserInRole
method is a logical security role that is configured for the Retail Application.
The API returns true if the user is included in the specified security role. If
the user is not authenticated or is not found in the role, the API returns
false.
To add new contents in the Retail Application’s Tasks Menu, the
retailer must override the tasks menu model.
All items seen by the user in the Tasks Menu are registered in an
XML file called the Tasks Menu Model.
This file is kept in the application’s EAR file but can be
extracted, copied and modified so retailers can add references to their own
workflows.
To add or modify an item in the Tasks Menu, follow the steps
below:
1. Add
a custom shared library. Refer to the section, Adding a Custom Shared Library for details.
2. Using
JDeveloper, open the Custom Shared Library workspace in Developer Role.
3. Add
all the custom task menu items as required.
4. Regenerate
the shared library registry WAR file from the workspace and redeploy the shared
library. Shutdown and restart of the Retail Application and its shared
library registry is required.
5. Changes
Required in Shared Library Registry for Custom Task Menu Model
a. Obtain
the application’s Tasks menu model XML file
|
Tasks Menu Model XML
|
\oracle\retail\apps\resa\view\uishell\config\custom\
HomeSidebarNavigationTreeModel.xml
|
b. Refer
the section Reference the Custom Shared Library from the Retail Application, to
register custom task menu model shared library with in the Retail Applications.
c. Open
the original WAR File using an archive file manager and copy the above
TaskMenuModel xml file in the View-Controller project src directory, preferably
under a subdirectory called custom.
d. Add
a new file called PageTemplateOverrideModel.properties under the
View-Controller/src directory. Modify this file and add the following entry:
Home.taskMenuModelXml=<path
to sidebar model xml within view-controller/src>
Example:
Home.taskMenuModelXml=/custom/HomeTaskMenuModel.xml
e. Modify the copy of the model.
Add new itemsdefined in the custom shared library above. The format of the
tasks menu model is similar to the format of the reports menu model. Refer to
the section, Reports Menu Model XML Items
6. Test
the Retail Application
8
A dashboard is a page within a Retail Application that displays
the status of metrics and key performance indicators relevant to the Retail
Application. They are typically tailored for specific roles and they
allow users to easily monitor the status of the current data within the
application.
Users can access dashboards from the application’s Reports menu.

The example below shows the dashboard page as rendered in the
local area of a Retail Application’s UI.
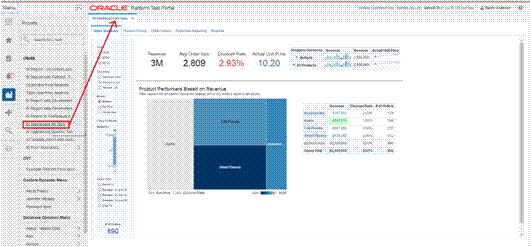
Depicted below is an example of a dashboard that might appear in
a Retail Application:
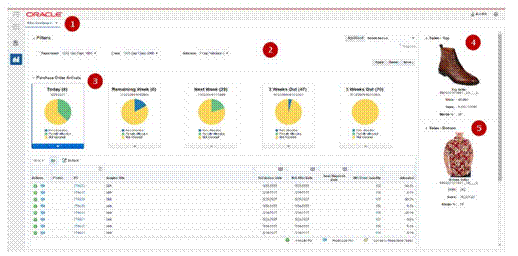
|
1
|
Dashboard Page
|
A page rendering a dashboard. A dashboard is composed of 1
or more reports. The dashboard page is launched as a tab within the Retail
Application
|
|
2
|
Prompt Region
|
The prompt region contains a set of editable input
components that allow users to modify the parameters of the various reports
in the dashboard. This allows users to see different sets of data for the
same set of reports. This is optional on a dashboard page. There can
be multiple prompt regions in a dashboard affecting different sets of reports
on a dashboard.
|
|
3,4,5
|
Report Regions
|
A report region shows a graphical view of the
application’s business data.
|
Retail Applications support the following implementation
dashboards:
§
Dashboards built using Oracle ADF.
§
Dashboards built using external BI reporting tools and accessible
via web browser URL.
§
Dashboards built using Oracle ADF is the recommended
implementation of dashboards as they have seamless integration with the rest of
the Retail Application.
§
Dashboards built in external reporting tools are supported as
long as the dashboards can be accessed in a web browser via a URL.
A Retail Application is installed with a shared library
containing included dashboards that are rendered by default within the
application.
These dashboards have the following characteristics:
§
The dashboards are implemented in Oracle ADF for seamless integration
with the rest of the application workflows.
§
The dashboards are implemented using a common framework called
ADF Dashboard Prompts to allow for a standard way of customizing them.
Retailers can customize included dashboards
This section describes the steps for adding ADF based dashboard
reports into the Retail Application’s UI Sidebar. ADF-based reports can be
integrated into the Retail Application by adding the dashboard report’s task
flow URL in the application’s reports menu model XML file:
1. Add
a new custom shared library. Refer to the section, Adding a Custom Shared
Library.
2. Implement
the dashboard page components in the custom shared library workspace. Dashboard
page components are built as Oracle ADF bounded task flows. Refer to the
section, Creating New ADF Content, for important considerations when building
custom ADF content.
3. Note
the task flow URL and the parameters of the dashboard task flow.
4. Register
the task flow URL and parameters into the application’s Reports Menu Model.
Refer to section, Adding
or Modifying an Item in the Reports Menu.
5. Re-generate
the Custom Shared Library WAR file from the Custom Shared Library workspace.
Shutdown the Retail Application and its Custom Shared Library Registry,
redeploy the Custom Shared Library WAR file, and restart the Retail Application
components.
6. Grant
security permissions to dashboard page components. Refer to the section, Creating New ADF Contents.
7. Test
the Retail Application. Log-in and verify the newly added content.
This section describes the steps for adding external dashboard
reports into the Retail Application’s UI Sidebar. The reports such as OBIEE,
BI Publisher or Microstrategy can be integrated into the Retail Application by
adding the web URL of the dashboard report in the application’s reports menu
model XML file:
1. Create
the dashboard report in the reporting server instance.
2. Obtain
the URL to the dashboard report along with any parameters needed to render it.
3. Add
a New Custom Shared Library. Refer to the section, Adding a Custom Shared
Library.
4. Open
the Custom Shared Library workspace in JDeveloper.
5. Add
a new item in the reports menu for the URL and parameters of the dashboard report.
Refer to the section, Adding or Modifying an Item in the Reports Menu.
6. Re-generate
the Custom Shared Library WAR file from the Custom Shared Library workspace.
Shutdown the Retail Application and its Custom Shared Library Registry, redeploy
the Custom Shared Library WAR file, and restart the Retail Application
components.
7. Test
the Retail Application. Log-in and verify that a link to the BI dashboard
appears in the UI’s sidebar task tree under a folder “My Custom Dashboards”
This section contains supported customization use cases for
out-of-the-box dashboards included in the Retail Application installation.
As mentioned in the section, Anatomy of a Dashboard, dashboards
are composed of prompt regions and report regions.
The representations of those parts at runtime are depicted in the
diagram below:

The dashboard page, prompts and reports are implemented as ADF
bounded task Flows and page fragments. The prompts and regions are configured
in an XML file called a Dashboard Prompt Configuration XML.
The dashboard prompt XML arranges visually the prompts and
regions on the dashboard page.
The dashboard task flow is launchable from the Retail Application
User Interface’s Reports Menu. In order to make the report launchable, the
dashboard task flow is registered in the application’s reports menu model XML.
A set of ADF business components enable data from the Retail
Application schema to be rendered in the report regions.
The figure below shows a rendering of the Retail Sales Audit dashboard:
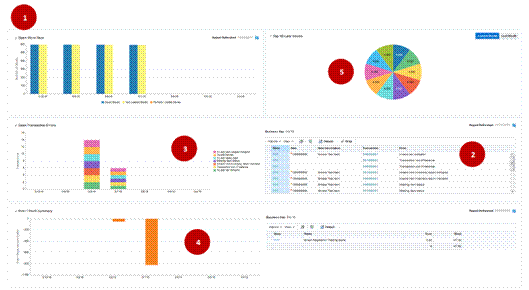
|
1
|
Dashboard Page
|
This is the Retail Sales Audit Dashboard. It contains 3
prompts and 4 reports.
|
|
2
|
Prompt Region
|
This is the prompt region that users modify to change the
view of the various reports in this dashboard.
|
|
3
|
Open Transaction Errors Report
|
A report region showing an information graph and a detail
table.
It is implemented as an ADF bounded task flow called OpenTransactionErrorsReportFlow.
|
|
4
|
Over / Short Summary Report
|
A report region showing an information graph and a detail
table.
It is implemented as an ADF bounded task flow called
OverShortSummaryReportFlow.
|
|
5
|
Late Stores Report
|
A report region showing an information graph and a button
to switch the view.
It is implemented as an ADF bounded task flow called
Top10LatePollingStoresReportFlow.
|
The dashboard is launched from the application’s reports menu.
The retail sales audit model XML file (as shown below) contains all flows for
each report to register the task flows into the reports menu.
<?xml version="1.0"
encoding="UTF-8" ?>
<Dashboard layout="row"
xmlns="urn:www.oracle.com:oracle.retail.apps.framework.dashboard"
xmlns:xsi="http://www.w3.org/2001/XMLSchema-instance"
xsi:schemaLocation="urn:www.oracle.com:oracle.retail.apps.framework.dashboard
classpath:oracle/retail/apps/framework/dashboard/model/schema/dashboardSchema.xsd">
<Vectors>
<Vector height="400px">
<Items>
<Item
id="openStoreDays" type="report">
<url>/WEB-INF/oracle/retail/apps/framework/dvtcontextawarereport/publicui/flow/DVTContextAwareReportFlow.xml#DVTContextAwareReportFlow</url>
<Parameters>
<Parameter
id="taskflowURL">/WEB-INF/oracle/retail/apps/resa/dashboards/view/openstoreday/flow/OpenStoreDaysReportFlow.xml#OpenStoreDaysReportFlow</Parameter>
</Parameters>
</Item>
<Item
id="top10LatePollingStores" type="report">
<url>/WEB-INF/oracle/retail/apps/framework/dvtcontextawarereport/publicui/flow/DVTContextAwareReportFlow.xml#DVTContextAwareReportFlow</url>
<Parameters>
<Parameter
id="taskflowURL">/WEB-INF/oracle/retail/apps/resa/dashboards/view/latepollingstore/flow/Top10LatePollingStoresReportFlow.xml#Top10LatePollingStoresReportFlow</Parameter>
<Parameter
id="actionType">Top10LatePollingStoresSelectedEvent</Parameter>
<Parameter
id="parameterName1">stores</Parameter>
<Parameter
id="payloadKeyName1">Stores</Parameter>
<Parameter
id="parameterValue1">#{payload.valueMap['Stores']}</Parameter>
</Parameters>
</Item>
</Items>
</Vector>
<Vector >
<Items>
<Item
id="openTransactionErrors" type="report">
<url>/WEB-INF/oracle/retail/apps/framework/dvtcontextawarereport/publicui/flow/DVTContextAwareReportFlow.xml#DVTContextAwareReportFlow</url>
<Parameters>
<Parameter
id="taskflowURL">/WEB-INF/oracle/retail/apps/resa/dashboards/view/opentransactionerror/flow/OpenTransactionErrorsReportFlow.xml#OpenTransactionErrorsReportFlow</Parameter>
<Parameter
id="actionType">OpenTransacionErrorsSelectedEvent</Parameter>
<Parameter
id="parameterName1">stores</Parameter>
<Parameter
id="payloadKeyName1">Stores</Parameter>
<Parameter
id="parameterValue1">#{payload.valueMap['Stores']}</Parameter>
</Parameters>
</Item>
</Items>
</Vector>
<Vector >
<Items>
<Item
id="overShortSummary" type="report">
<url>/WEB-INF/oracle/retail/apps/framework/dvtcontextawarereport/publicui/flow/DVTContextAwareReportFlow.xml#DVTContextAwareReportFlow</url>
<Parameters>
<Parameter
id="taskflowURL">/WEB-INF/oracle/retail/apps/resa/dashboards/view/overshort/flow/OverShortSummaryReportFlow.xml#OverShortSummaryReportFlow</Parameter>
</Parameters>
</Item>
</Items>
</Vector>
</Vectors>
</Dashboard>
The root element of the model is the “Dashboard” element. Other
than schema and namespace information, the “Dashboard” element has a “layout”
attribute that must be provided, and must contain a value of either “row” or
“column”. This attribute arranges the regions of the dashboard in rows or columns.
Inside the “Dashboard” element is a “Vectors” element, which
contains a list of “Vector” elements. If the dashboard layout=”row”, then each
“Vector” corresponds to a single row in the dashboard. Conversely, if
layout=”column”, then each “Vector” corresponds to a column. To add a new row
or column, simply add another “Vector” element inside the “Vectors” element.
Up to 12 rows and 6 columns can be displayed in a dashboard, not
including separate header and footer regions. Any items beyond 12 rows or 6
columns will not appear on the dashboard.
Rows in the dashboard display from top to bottom. If
layout=”row”, the first “Vector” will appear toward the top of the page.
Columns appear from left to right, so if layout=”column”, the first “Vector”
will appear toward the left of the page.
Each “Vector” element contains an “Items” element, which contains
a list of “Item” elements. The xml structure for “Item” elements is very
similar to the tasks or reports sidebar menu models.
The following attributes are supported on dashboard items:
|
Name
|
Description
|
Required
|
|
id
|
A unique id for this region
|
Yes
|
|
type
|
The type of content contained in this region.
Valid values: prompt, report
|
Yes
|
|
width
|
The width of this region. See below for more details.
|
No
|
|
height
|
The height of a region. See below for more details.
|
No
|
|
url
|
The task flow url to open in this region
|
Yes
|
|
Parameters
|
Parameters to be sent to the URL
|
No
|
In addition to the items arranged in rows or columns, you can add
a header and footer region to the dashboard. Both horizontally span the full
width of the dashboard, with the header appearing at the top and the footer
appearing at the bottom. These can be added in the model by specifying a
“HeaderItem” or FooterItem” child of the root “Dashboard” element. These
regions support all the same properties as other items in the dashboard.
Vectors and items expose width and height attributes to enable applications to
resize elements to best fit on the dashboard. Certain rules and best practices
apply when using these attributes.
First, if the dashboard is in row layout, then all items in a row
must have the same height. The height attribute from the vector is used to
specify the height of every item in that row. Since rows are assumed to span
the full width, the vector width is ignored in this layout.
In the same way, when the dashboard is arranged in column layout,
all items in a column must have the same width. The vector width is used to
specify the width of every item in that column. Columns should expand vertically
to accommodate all content, allowing a scrollbar if necessary. Therefore,
vector height is ignored in this layout.
In addition to the width and height attributes, a vector also
provides a dimensionsFrom attribute. The valid values of the dimensionsFrom
attribute can be auto, child or parent. The dimensionsFrom attribute is used to
specify whether the Items in the vector inherit their dimensions from the
parent decorative box or not. When the dimensionsFrom attribute is parent, the
Items in the vector will be stretched to fill any available space in the
vector. When the dimensionsFrom attribute is child, the Items in the vector
won’t stretch but will display scroll bars if they cannot be accommodated in
the available space in the decorative box. The default value of the
dimensionsFrom attribute is ‘auto’ which gives preference to the child
dimensions.
The following table indicates which attributes are used, based on
which dashboard layout has been selected.
|
|
Row layout
|
Column layout
|
|
Vector width
|
ignored
|
valid
|
|
Vector height
|
valid
|
ignored
|
|
Item height
|
ignored
|
valid
|
|
Item width
|
valid
|
ignored
|
In column layout, either every vector width should be provided,
or every width should be omitted. If all widths are omitted, columns default to
divide the total width evenly. When the widths are omitted, the dimensionsFrom
attribute of the vector can be set to parent if stretching of the Items is
desired. If widths are provided, they should be specified as a percentage, and
the sum of all widths should equal 100%.
In row layout, heights may be specified or omitted as desired. If
a row’s height is omitted, it will default to get the dimension from the
content inside the regions. When the row’s height is omitted, the
dimensionsFrom attribute of the vector can be set to parent if stretching of
the Items is desired. Heights should be specified using an exact unit such as
px or em. Percentages should not be used.
If these rules and best practices are ignored, results may be
inconsistent or undesirable. Items may not size as intended and horizontal
scrollbars or nested vertical scrollbars may appear.
In addition to resizing entire rows or columns, individual items
inside the row or column can also be resized. As mentioned above, items in a
row should all have the same height, so in row layout, item height is ignored
and only item width is valid. And items in a column should have the same width,
so item width is ignored and only item height is valid. See the table above for
details.
The same rules and best practices that apply to vector height and
width also apply to setting item height and width.
When the user changes a value on the dashboard prompt, that value
translates as a parameter change on the different reports on the dashboard.
This is accomplished through a feature in ADF called Contextual
Events. To put simply, contextual events are signals that a page in a task
flow can generate for which pages in other task flows can listen and react
to. For the included dashboards, prompt regions generate a contextual
event whenever the user changes a prompt field value. When a report “hears”
an event, it will process the contextual event information (called a payload)
to extract the changed prompt value, use that value as a parameter to the
report query and refresh the report region.
In the example depicted in the previous section, the dashboard
prompt configuration XML file shows all three reports registered under a
wrapper task flow called the DVTContextAwareReportFlow.
<Items>
<Item
id="openTransactionErrors" type="report">
<url>/WEB-INF/oracle/retail/apps/framework/dvtcontextawarereport/publicui/flow/DVTContextAwareReportFlow.xml#DVTContextAwareReportFlow</url>
<Parameters>
<Parameter
id="taskflowURL">/WEB-INF/oracle/retail/apps/resa/dashboards/view/opentransactionerror/flow/OpenTransactionErrorsReportFlow.xml#OpenTransactionErrorsReportFlow</Parameter>
<Parameter
id="actionType">OpenTransacionErrorsSelectedEvent</Parameter>
<Parameter
id="parameterName1">stores</Parameter>
<Parameter
id="payloadKeyName1">Stores</Parameter>
<Parameter
id="parameterValue1">#{payload.valueMap['Stores']}</Parameter>
</Parameters>
</Item>
</Items>
</Vector>
<Vector >
<Items>
<Item
id="overShortSummary" type="report">
<url>/WEB-INF/oracle/retail/apps/framework/dvtcontextawarereport/publicui/flow/DVTContextAwareReportFlow.xml#DVTContextAwareReportFlow</url>
<Parameters>
<Parameter
id="taskflowURL">/WEB-INF/oracle/retail/apps/resa/dashboards/view/overshort/flow/OverShortSummaryReportFlow.xml#OverShortSummaryReportFlow</Parameter>
</Parameters>
</Item>
</Items>
The DVTContextAwareReportFlow wrapper task flow enables a report
to listen to contextual events generated by prompt regions.
Note the pairs of parameterNameN and payloadKeyNameN registered
in the <Parameters> section for the report task flow BottomSellerFlow. A
pair of parameter name and payload key name tells the framework what prompt
value is mapped to a specific report parameter. From the example above, parameterName1
is specified as “departmentIds” and payloadKeyName1 as “departmentIds”. This
means the following:
§
There is a task flow parameter for the OpenTransactionErrorsReportFlow
called “stores”
§
When the user changes the value of the store in the prompt
region, the system will generate a contextual event with the new store value stored
as reference “stores”.
§
The report is context aware (as indicated by the wrapper task
flow – DVTContextAwareReportFlow). When the report detects the contextual
event, the framework will get the new store value from the payload by using the
key “store”, use it to update the OpenTransactionErrorsReportFlow task flow’s
“store” parameter, and refresh the report region.
For more details on the DVTContextAwareReportFlow, refer to the
section Adding a DVT Taskflow-based Contextual Report.
This section provides details on the dashboard included in the
Sales Audit application.

The salient
features of Sales Audit Dashboard are:
§
The dashboard will provide graphical views of open store days,
errors, and over/short information of user’s specific stores for a period of
time which will allow them to better focus their work effort.
§
Key responsibilities
-
Month end close process
-
Audit store transaction for exceptions on a daily basis
§
Dashboard focused on
-
Reports that provide the user an improved way to see areas of
work to focus on at a glance, as well as the ability drill to lower level of
detail and launch ReSA screens to execute tasks.
Job
roles with access to the Sales Audit dashboard are as follows:
§
FINANCE_MANAGER_JOB
§
SALES_AUDIT_ANALYST_JOB
§
SALES_AUDIT_MANAGER_JOB
§
RESA_APPLICATION_ADMINISTRATION_JOB
Different reports under the Sales Audit dashboard are as below:
§
Open Store Days
§
Open Transaction Errors
§
Over/Short Summary
§
Top 10 Late Polling Stores
The path for the “ResaDashboardModel” for Sales Audit dashboard
is as below
oracle/retail/apps/resa/dashboards/common/view/model/ResaDashboardModel.xml
This section discusses the steps needed to add or replace a
report on an included dashboard.
1. Add
a custom shared library. Refer to the section, Add a Custom Shared Library.
An existing custom shared library can be reused.
2. Identify
the dashboard to be modified. Refer to the section, List of Retail Sales
Audit Included Dashboards.
3. If
needed, open the custom shared library workspace in JDeveloper and build your
own custom report as an ADF bounded task flow. Refer to the section, Creating
New ADF Content.
If the report has to refresh when a prompt on the dashboard
is changed by the user, make sure that task flow parameters are present for the
prompt values your report will need to react to. Refer to the section, List
of Retail Sales Audit Included Dashboards, for a list of prompt payload values
that can be generated for the dashboard.
4. Note
the new report’s task flow URL and parameters.
5. Obtain
a copy of the dashboard prompt configuration XML file for the dashboard to be
modified. Refer to the section, List of Retail Sales Audit Included
Dashboards.
6. Modify
the copy of the dashboard prompt configuration XML file to add an item or
replace an existing item for the new report. Refer to the section, The Dashboard
Prompt Configuration XML File for details on properly creating a new item entry
in the configuration file.
If the report has to refresh when a prompt on the dashboard
is changed by the user, make sure that report task flow is wrapped in a
DVTContextAwareTaskFlow for its item entry in the dashboard prompt
configuration XML file. Use the example in the section, Understanding
Design Pattern for Included Dashboards, as reference. Refer to the section, Adding
a DVT Taskflow-based Contextual Report for usage of the DVTContextAwareTaskFlow
framework.
7. Modify
the included dashboard’s entry in the application’s Reports Menu to reference
the location of your copy of the dashboard prompt configuration XML file.
Refer to the section, Adding or Modifying an Item in the Reports Menu.
8. Re-generate
the Custom Shared Library WAR file from the Custom Shared Library workspace.
Shutdown the Retail Application and its Custom Shared Library Registry,
redeploy the Custom Shared Library WAR file, and restart the Retail Application
components.
9. Test
the Retail Application.
This section discusses the steps needed to remove a report from
an included dashboard.
1. Add
a custom shared library. Refer to the section, Add a Custom Shared Library.
An existing custom shared library can be reused.
2. Identify
the dashboard to be modified. Refer to the section, List of Retail Sales
Audit Included Dashboards.
3. Obtain
a copy of the dashboard prompt configuration XML file for the dashboard to be
modified. Refer to the section, List of Retail Sales Audit Included
Dashboards.
4. Modify
the copy of the dashboard prompt configuration XML file and remove the
report. You may need to readjust the position of the other reports. Refer
to the section, The Dashboard Prompt Configuration XML File for details on the
configuration XML attributes that control the rendering of the dashboard.
5. Modify
the included dashboard’s entry in the application’s Reports Menu to reference
the location of your copy of the dashboard prompt configuration XML file.
Refer to the section, Adding or Modifying an Item in the Reports Menu.
6. Re-generate
the Custom Shared Library WAR file from the Custom Shared Library workspace.
Shutdown the Retail Application and its Custom Shared Library Registry,
redeploy the Custom Shared Library WAR file, and restart the Retail Application
components.
7. Test
the Retail Application.
This section discusses the steps needed to change the layout of
the reports in included dashboards.
1. Add
a custom shared library. Refer to the section, Add a Custom Shared Library.
An existing custom shared library can be reused.
2. Identify
the dashboard to be modified. Refer to the section, List of Retail Sales Audit
Included Dashboards.
3. Obtain
a copy of the dashboard prompt configuration XML file for the dashboard to be
modified. Refer to the section, List of Retail Sales Audit Included
Dashboards.
4. Modify
the copy of the dashboard prompt configuration XML file and rearrange the position
of the item entries. Refer to the section, The Dashboard Prompt Configuration
XML File for details on the attributes to control the layout of dashboard.
5. Modify
the included dashboard’s entry in the application’s Reports Menu to reference
the location of your copy of the dashboard prompt configuration XML file.
Refer to the section, Adding or Modifying an Item in the Reports Menu.
6. Re-generate
the Custom Shared Library WAR file from the Custom Shared Library workspace.
Shutdown the Retail Application and its Custom Shared Library Registry,
redeploy the Custom Shared Library WAR file, and restart the Retail Application
components.
7. Test
the Retail Application.
Contextual Reports are reports that appear in a task flow’s
contextual area section. As discussed in the section, Understanding the Retail
Application User Interface, the Contextual Area is a collapsible section
to the right of the local area that provides a space to present information
that can assist users in completing their tasks.
Since information presented in a contextual area is presented
depending on the task or workflow the user is on, contextual areas are
associated to task flows and there can be at most one contextual area per task
flow.
Within a contextual area – multiple contextual reports can be
configured.
Each contextual report can change its contents depending on the
action being performed in the user’s current workflow.
For example, in the screenshot below, as the user selects the
item from the item panel table, the bar graph will show the count of open and
closed item level errors by error code over the last 7 days for item selected.
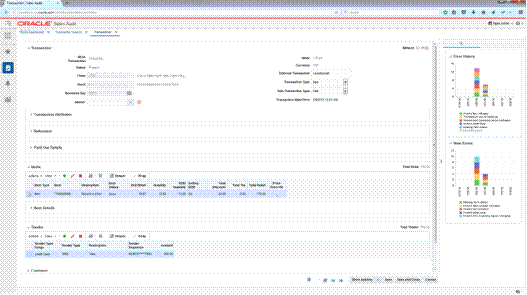
Each task flow publishes contextual business events on key
activities happening in the screen. Contextual reports can listen to those
events and change its content depending on the payload information associated
with the event.
Contextual reports can either be ADF based DVT reports or can be
maintained in a separate BI reporting tool. The ADF based DVT reports are ADF
taskflows, which are built using the ADF Data Visualization components. The
reports maintained in an external reporting tool are URLs accessible in a web
browser via a URL. Oracle Retail recommends using Oracle Business Intelligence
Enterprise Edition (Oracle BI EE) for an external reporting tool.
The contextual reports are added into a Retail Application by
adding and configuring the task flow’s contextual area model XML file into the
Custom Shared Library.
Retail Applications may provide retailers with a list of possible
contextual business events each flow generates. Retailers can configure their
contextual reports to react to these events. Each event will also include
information about the event’s payload information (example: the item ID of
the item being selected in the Transaction Maintenance screen).
|
Event Name
|
Task Flow
|
Contextual Area Name
|
Contextual Area Model XML Location
|
Generated when…
|
Payload Values
|
|
OnloadEvent
(Store Status History)
|
StoreStatusHistoryMyStoreReportFlow
|
StoreStatusHistoryMyStoreReportFlow
|
/oracle/retail/apps/resa/dashboards/view/uishell/config/contextualarea/SearchStoreday_ContextualAreaModel_ContextAwareReport.xml
|
The Store Day Search screen is loaded
|
Store – The store selected by the user.
|
|
OnloadEvent
(Error History)
|
ErrorHistoryStoreDaySearchReportFlow
|
ErrorHistoryStoreDaySearchReportFlow
|
/oracle/retail/apps/resa/dashboards/view/uishell/config/contextualarea/SearchStoreday_ContextualAreaModel_ContextAwareReport.xml
|
The Store Day Search screen is loaded
|
None
|
|
OverShortHistorySelectedEvent
|
OverShortHistoryReportFlow
|
OverShortHistoryReportFlow
|
/oracle/retail/apps/resa/dashboards/view/uishell/config/contextualarea/SearchStoreday_ContextualAreaModel_ContextAwareReport.xml
|
The Store Day Search screen is loaded
|
ReqStore - The store selected by the user.
|
|
OnloadEvent
(Store Status History)
|
StoreStatusHistoryCurrStoreReportFlow
|
StoreStatusHistoryCurrStoreReportFlow
|
/oracle/retail/apps/resa/dashboards/view/uishell/config/contextualarea/MaintainStoreday_ContextualAreaModel_ContextAwareReport.xml
|
The Store Day Summary screen is loaded
|
Store - The store selected by the user.
|
|
OnloadEvent
(Error History)
|
ErrorHistoryStoreDaySummaryReportFlow
|
ErrorHistoryStoreDaySummaryReportFlow
|
/oracle/retail/apps/resa/dashboards/view/uishell/config/contextualarea/MaintainStoreday_ContextualAreaModel_ContextAwareReport.xml
|
The Store Day Summary screen is loaded
|
Store - The store selected by the user.
|
|
OnloadEvent
(Cashier Register)
|
CashierRegisterOverShortPrimFlow
|
CashierRegisterOverShortPrimFlow
|
/oracle/retail/apps/resa/dashboards/view/uishell/config/contextualarea/MaintainStoreday_ContextualAreaModel_ContextAwareReport.xml
|
The Store Day Summary screen is loaded
|
Store Sequence ID – Sequence ID of the Store selected by
the user
Currency – the Currency of the store selected by the user.
|
|
TableSelectedEvent
(Error History)
|
ErrorHistoryTransactionMaintenanceReportFlow
|
ErrorHistoryTransactionMaintenanceReportFlow
|
/oracle/retail/apps/resa/dashboards/view/uishell/config/contextualarea/MaintainTransaction_ContextualAreaModel_ContextAwareReport.xml
|
The Transaction screen is loaded
|
Store - The store selected by the user.
TranSeqNo - The Sequence Number of the Transaction
selected by the user
|
|
TableSelectedEvent
(Item Errors)
|
ItemErrorsReportFlow
|
ItemErrorsReportFlow
|
/oracle/retail/apps/resa/dashboards/view/uishell/config/contextualarea/MaintainTransaction_ContextualAreaModel_ContextAwareReport.xml
|
The user selects an item in the Item table in Transaction
screen
|
Store - The store selected by the user.
ItemSeqNo – The Sequence Number of the Item selected by
the user
TranSeqNo - The Sequence Number of the Transaction
selected by the user
Item
|
|
TableSelectedEvent
(Tender Summary)
|
TenderSummaryReportFlow
|
TenderSummaryReportFlow
|
/oracle/retail/apps/resa/dashboards/view/uishell/config/contextualarea/TenderSummary_ContextualAreaModel_ContextAwareReport.xml
|
Results are returned in the Tender Summary screen
|
Store - The store selected by the user
Currency - the Currency of the store selected by the user.
|
This section describes how to prepare the Custom Shared Library
so retailers will be able to add contextual reports in Retail Application task
flows.
1. Perform
the steps described in the section Add a Custom Shared Library to create a
Custom Shared Library workspace, generate a shared library WAR out of it,
deploying the WAR, and associating the library to the Retail Application.
2. Using
JDeveloper, open the Custom Shared Library workspace in Developer Role.
3. Add
new contents as required.
4. Regenerate
the shared library WAR file from the workspace and redeploy the shared
library. Shutdown and restart of the Retail Application and its shared library
registry is required.
5. Changes
required in Shared Library Registry for Custom Contextual Reports
a. Obtain
a copy of the task flow contextual area model XML files where contextual
reports will be added. Refer to section, List of Contextual Business Events and Payloads.
Example: If the contextual area model XML for the
task flow MaintainRuleAttributeFlow is
called
RuleAttributeFlowContextualAreaModel.xml
– then that file’s path must be View
-Controller/src/custom/ RuleAttributeFlowContextualAreaModel.xml.
b. Register
custom contextual reports shared library with in the Retail Applications.
c. Open
the original WAR file using an archive file manager and copy the contextual
area model XML file in the View-Controller project src directory, preferably
under a subdirectory called custom.
d. Add
a new or open the existing file called PageTemplateOverrideModel.properties
under the View-Controller/src directory. Modify this
file and add the following entry:
<ContextualAreaName>.contextualAreaModel=<path
to the contextual area model for the flow>.
Example:
MaintainRuleAttributeFlow.sidebarModel=/custom/
RuleAttributeFlowContextualAreaModel
6. Test
the Retail Application.Navigate to the flow and make sure the flow is
functional.
Adding a contextual report to a task flow entails the
modification of the task flow’s Contextual Area Model XML file. Multiple
reports can be added to the model. Each report is rendered in a collapsible
panel box.
Before adding a URL based contextual report, the retailer must
have:
§
Built, prepared, deployed, and tested the Custom Shared Library
as described in the section Preparing
the Custom Shared Library for Adding Contextual Reports.
§
Obtained information about the Retail Application’s list of
contextual business events that can be broadcast from various workflows.
§
Created one or more contextual BI reports in the BI reporting
tool (for example. Oracle BI EE).
-
The web URL for each report must be available in order to proceed
with the steps in this section.
-
Any parameters to configure the content of the report must be
known and should be accessible as parameters to the dashboard’s URL.
Once the above pre-requisites have been satisfied, proceed with
the following steps:
1. Assume
the following example scenario when following the steps:
§ A contextual report
called “Store Metrics” showing information about a store is to be added to the
Rule Attribute Maintenance Flow’s main page. When the user selects a store on
the page, the report will show information for the selected store.
§ Retail Application
has provided the following information about the contextual business event:
|
Event Name
|
Task Flow
|
Page
|
Contextual Area Model XML Location
|
Generated when…
|
Payload Values
|
|
RuleAttributeMaintStore SelectedEvent
|
MaintainRuleAttributeFlow
|
MaintainRuleAttributes
|
EAR name à war
nameà jar name à /oracle/retail/apps/xyz/ RuleAttributeFlowContextualAreaModel.xml
|
The user selects a store on the Rule Attribute Maintenance
Flow’s main screen.
|
§ SelectedStore – the
store selected by the user. Always generated.
|
§ The Store Metrics
report was built in the retailer’s BI reporting tool (for example. Oracle BI
EE). It was built considering the payload values the contextual business
event will generate.
2. Open
the Custom Shared Library workspace in JDeveloper.
3. Open
the task flow contextual area model XML file (ex. ViewController/src/custom/ RuleAttributeFlowContextualAreaModel.xml).
4. Add
an <Item>
element within the topmost <Items> element that references the task flow
called ViewContextAwareReportFlow.
The ViewContextAwareReportFlow is a framework for rendering URL based reports
that will be aware of contextual business events emanating from the Retail
Application task flows.
Example:
<?xml version="1.0" encoding="UTF-8"
standalone="yes"?>
<NavigationDefinition … >
<Items>
...
...
<Item id="showStoreMetric"
type="taskflow"
title=”Store Metric”>
<url>
/WEB-INF/oracle/retail/apps/framework/contextawarereport/publicui/flow/ViewContextAwareReportFlow.xml#ViewContextAwareReportFlow
</url>
</Item>
</Items>
</NavigationDefinition>
Note
Make sure that the <Item>
id is unique.
Make sure the <Item>
type
is “taskflow”
Provide a meaningful title.
5. Populate
the parameters to the ViewContextAwareReportFlow
by adding the following <Parameter>/<Parameters>
elements.
<?xml version="1.0" encoding="UTF-8"
standalone="yes"?>
<NavigationDefinition … >
<Items>
<Item id="showCustomerMetric"
type="taskflow"
title=”Customer Metric”>
<url>
/WEB-INF/oracle/retail/apps/framework/contextawarereport/publicui/flow/ViewContextAwareReportFlow.xml#ViewContextAwareReportFlow
</url>
<Parameters>
<Parameter
id="reportDescription">Store Metric</Parameter>
<Parameter
id="actionType">RuleAttributeMaintStoreSelectedEvent</Parameter>
<Parameter id="primaryUrl">
<![CDATA[/faces/oracle/retail/apps/framework/contextawarereport/publicui/page/ViewContextAwareReportTestPage.jspx?paramItemId=<selectedStoreId>¶mItemType=<selectedStoreType:token01>¶mLanguage=<language>]]>
</Parameter>
<Parameter
id="token01">regular</Parameter>
</Parameters>
</Item>
</Items>
</NavigationDefinition>
Note the following:
§
The <Parameter id=”reportDescription”>
element is the title of the contextual area report. Set this to a meaningful
value.
§
The <Parameter id=”actionType”> element
indicates the contextual business event name the report will listen to.
§
The <Parameter id=”primaryUrl”> element
indicates the URL to the contextual area report in the BI server. The
entire URL must be marked as character data (for example. enclosed in CDATA).
Note that the parameters to the URL are tokenized. The example above uses a test page
called ViewContextAwareReportTestPage.jspx which can be replaced with the
actual report URL.
-
The “?paramStoreId=<selectedStoreId>”
portion of the URL instructs the system to pass the contextual
business event payload value called selectedStoreId into the URL parameter paramStoreId when rendering the contextual
report.
-
The “?paramStoreType=<selectedStoreType:token01>”
portion of the URL instructs the system to pass the contextual business event
payload value called selectedStoreType into
the URL parameter paramStoreType when
rendering the contextual report. If that payload value is empty or null at
runtime, then a default value of regular is used as referenced in a <Parameter id=”token01”> entry. The
colon symbol separates the payload value from the default value if the payload
value is null.
-
The “?paramLanguage=<language>”
portion of the URL instructs the system about the current locale of the user.
The “language” identifier is a reference to a
value in the contextual event payload. This is a built-in value that all Retail
Application contextual business event payloads will have.
-
The <Parameter id=”token01”> element
holds the default value for the URL parameter selectedItemType. Token
parameters hold default values and you can define up to 20 default value tokens.
6. Re-generate
the Custom Shared Library WAR file from the Custom Shared Library workspace.
Shutdown the Retail Application and its Custom Shared Library Registry,
redeploy the Custom Shared Library WAR file, and restart the Retail Application
components.
7. Test
the Retail Application. Go to the flow where the report was added and verify
that the report is rendered correctly
Before adding a DVT taskflow based contextual report, the
retailer must have:
§
Built, prepared, deployed, and tested the Custom Shared Library
as described in the section Preparing the Custom Shared Library for Adding
Contextual Reports.
§
Obtained information about the Retail Application’s list of
contextual business events that can be broadcast from various workflows.
§
Created one or more taskflows using the ADF DVT
components.
-
Any parameters to configure the content of the report must be
known and should be accessible as taskflow parameters.
Once the above pre-requisites have been satisfied, proceed with
the following steps:
1. Assume the following example
scenario when following the steps:
§ A contextual report
called “Item Metrics” showing information about an item is to be added to the
Allocation Maintenance Flow’s main page. When the user selects an item on
the page, the report will show information for the selected item.
§ Retail Application
has provided the following information about the contextual business event:
|
Event Name
|
Task Flow
|
Page
|
Contextual Area Model XML Location
|
Generated when…
|
Payload Values
|
|
RuleAttributeMaintStore SelectedEvent
|
MaintainRuleAttributeFlow
|
MaintainRuleAttributes
|
EAR name à war
nameà jar name à /oracle/retail/apps/xyz/
RuleAttributeFlowContextualAreaModel.xml
|
The user selects a store on the Rule Attribute Maintenance
Flow’s main screen.
|
§ Selected Store – the store selected by the user.
Always generated.
§ SelectedStoreType – the type of store. Can be “Regular” or “Franchise”.
Optional. If
not supplied, assume store is a regular type.
|
§ The Store Metrics
report was built in ADF. It was built considering the payload values the
contextual business event will generate
2. Re-generate
the Custom Shared Library WAR file from the Custom Shared Library workspace.
Shutdown the Retail Application and its Custom Shared Library Registry,
redeploy the Custom Shared Library WAR file, and restart the Retail Application
components.
3. Changes
Required in Shared Library Registry for Custom DVT Taskflow based Contextual
Report.
a. Obtain
the task flow contextual area model XML file (ex. ViewController/src/custom/RuleAttributeFlowContextualAreaModel.xml).
b. Add
an <Item>
element within the topmost <Items> element that references the task flow
called DVTContextAwareReportFlow.
The DVTContextAwareReportFlow is a framework for rendering ADF DVT based
reports that will be aware of contextual business events emanating from the
Retail Application task flows.
Example:
<?xml version="1.0" encoding="UTF-8" standalone="yes"?>
<NavigationDefinition … >
<Items>
...
...
<Item id="showIStoreMetric"
type="taskflow"
title=”Store Metric”>
<url>
/WEB-INF/oracle/retail/apps/framework/dvtcontextawarereport/publicui/flow/DVTContextAwareReportFlow.xml#DVTContextAwareReportFlow
</url>
</Item>
</Items>
</NavigationDefinition>
Note
Make sure that the <Item>
id is unique.
Make sure the <Item>
type
is “taskflow”
Provide a meaningful title.
c. Populate
the parameters to the DVTContextAwareReportFlow
by adding the following <Parameter>/<Parameters>
elements.
<?xml version="1.0" encoding="UTF-8"
standalone="yes"?>
<NavigationDefinition … >
<Items>
<Item id="showCustomerMetric"
type="taskflow"
title=”Customer Metric”>
<url>
/WEB-INF/oracle/retail/apps/framework/dvtcontextawarereport/publicui/flow/DVTContextAwareReportFlow.xml#DVTContextAwareReportFlow
</url>
<Parameters>
<Parameter
id="taskflowURL">/WEB-INF/oracle/retail/apps/framework/uishell/navigation/contextualarea/flow/StoreMetricFlow.xml#StoreMetricFlow</Parameter>
<Parameter
id="parameterName1">storeId</Parameter>
<Parameter
id="payloadKeyName1">StoreId</Parameter>
<Parameter id="parameterValue1">#{payload.valueMap['StoreId']}</Parameter>
<Parameter
id="refreshOnDisclosure">#{true}</Parameter>
</Parameters>
</Item>
</Items>
</NavigationDefinition>
Note the following:
§ The <Parameter id=”taskflowURL”> element is the URL of the
DVT taskflow that will be displayed in the contextual area.
§ The <Parameter id=”parameterName1”> element indicates a
parameter for the DVT taskflow. A maximum of 15 parameters can be specified.
§ The <Parameter id=”payloadKeyName1”> element indicates the
name of the payload key that maps to the taskflow parameter parameterName1. A
maximum of 15 payload keys can be specified. The value of the payload key in
the event payload will be used for the parameter in the DVT taskflow.
§ The <Parameter id=”parameterValue1”> element holds the
default value of the DVT taskflow. A maximum of 15 parameter values can be
specified.
§ The <Parameter id=”refreshOnDisclosure”> element is used
to refresh the DVT taskflow on the disclosure of the tab.
4. Test
the Retail Application. Go to the flow where the report was added and verify
that the report is rendered correctly
The Retail Application provides the capability to display both static
and dynamic tasks in the task list. The static tasks are based off an xml model
file, for example, HomeTaskMenuModel.xml, HomeReportsMenuModel.xml. These tasks
should be predefined in the tasks or reports menu model file.
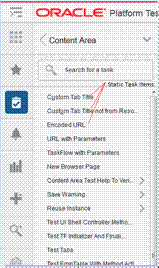
The dynamic tasks can be sourced from any data source like OBIEE,
BIPublisher, database tables, Web Services and so on. The complete hierarchy of
task items including the folders and actions can be generated dynamically at
runtime.
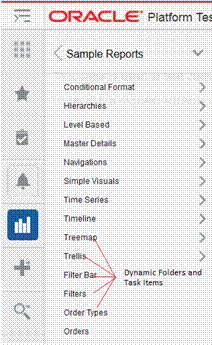
From the user’s perspective, there is no difference between the
static versus the dynamic task items. They look and behave the same.
The Retail Application provides an interface called DynamicContentHandler
that can be implemented to add dynamic tasks in the task menu. The interface is
as follows
package
oracle.retail.apps.framework.uishell.taskmenu.dynamiccontent.handler;
import java.util.List;
import
oracle.retail.apps.framework.uishell.taskmenu.dynamiccontent.dataobject.TaskMenuItem;
import
oracle.retail.apps.framework.uishell.util.RetailUiShellHttpSessionListeners;
public interface DynamicContentHandler
extends RetailUiShellHttpSessionListeners.RemovalListener {
public List<TaskMenuItem>
getChildren(TaskMenuItem taskMenuItem) throws Exception;
public List<TaskMenuItem>
getDefaultTaskMenuItems() throws Exception;
public TaskMenuItem
getInContextTaskMenuItem(String taskMenuItemId) throws Exception;
}
The interface extends another interface called
RetailUiShellHttpSessionListeners.RemovalListener.
The RemovalListener interface provides the following method.
public static interface
RemovalListener extends Serializable {
public void onSessionRemove();
}
The below table explains the use of these methods.
|
getChildren(TaskMenuItem taskMenuItem)
|
This method provides the child task items for a given task
menu item.
|
|
getDefaultTaskMenuItems()
|
This method provides the task items that will be loaded as
the default content in the Retail Application.
|
|
getInContextTaskMenuItem(String taskMenuItemId)
|
This method provides the task item based on a given task
menu id for In-Context launching.
|
|
onSessionRemove()
|
This method will be called by the Retail Application when
the user logs out of the application. The method can be used to do any
resource cleanup or can be used to logout from the external data source.
|
The Item element of the menu model file supports a type called
‘dynamicContent’ along with the type’s taskflow and link. When the Retail
Application encounters the type as dynamicContent, it looks for the attribute
called dynamicContentHandler. The dynamicContentHandler attribute will tell the
Retail Application the name of the implementation class which will be used to
provide the dynamic task items. The class should implement the
DynamicContentHandler interface.
<Item
id="customDynamicMenuFolder" visible="#{true}"
title="Custom Dynamic Menu"
type="folder">
<Items>
<Item
id="customTreeModelDynamicContent" title="Custom Dynamic
Menu"
type="dynamicContent"
dynamicContentHandler="oracle.retail.apps.framework.uishell.taskmenu.handler.custom.CustomTreeModelDynamicContentHandler"
visible="#{securityContext.authenticated}"/>
</Items>
</Item>
The Item element with the type attribute as dynamicContent can be
placed anywhere in the hierarchy of the static task items in the tasks or
reports menu model file. The dynamic task items will begin exactly from the
location where the dynamicContent Item is defined.
The menu model file can be customized to add an entry for the dynamic
content as shown above. Refer to the section Adding or Modifying an Item in the
Tasks Menu for more details.
We will start with a simple example to show how to display the
dynamic task items in the task menu. The example uses the org.apache.myfaces.trinidad.model.TreeModel implementation
called org.apache.myfaces.trinidad.model.RowKeyPropertyTreeModel to
pull and display data in the task menu hierarchy. The class org.apache.myfaces.trinidad.model.RowKeyPropertyTreeModel is
a subclass of org.apache.myfaces.trinidad.model. ChildPropertyTreeModel. The class ChildPropertyTreeModel
creates a TreeModel from a list of beans and the class RowKeyPropertyTreeModel
adds the support of row keys to the TreeModel. Let’s assume that we have a
TreeModel object created for a hierarchy of Employee objects. We want to
display the names of the employees as tasks in the task list. The managers will
be displayed as folders. The action on the manager’s name will open the list of
directs for the manager. The action on the leaf employee names will open the
employee details screen for the selected employee.
The implementation class for the DynamicContentHandler interface
is named as CustomTreeModelDynamicContentHandler. It has a method that builds
the TreeModel from the list of Employee objects.
/**
* Build a custom tree model.
* @return
*/
private TreeModel buildTreeModel()
{
List<Employee>
allEmployees = new ArrayList<Employee>();
Employee manager1 = new
Employee(197, "Kevin Feeny");
Employee emp = new
Employee(198, "Donald OConnel");
manager1.addDirect(emp);
emp = new Employee(199,
"Douglas Grant");
manager1.addDirect(emp);
Employee manager2 = new
Employee(200, "Jennifer Whalen");
emp = new Employee(201,
"Michael Harstein");
manager2.addDirect(emp);
Employee manager3 = new
Employee(203, "Susan Marvis");
emp = new Employee(202,
"Pat Fay");
manager3.addDirect(emp);
manager2.addDirect(manager3);
emp = new Employee(204,
"Hermann Baer");
allEmployees.add(manager1);
allEmployees.add(manager2);
allEmployees.add(emp);
//create a
RowKeyPropertyTreeModel with employeeId as a row key and directs as child
property
return new
RowKeyPropertyTreeModel(allEmployees, "directs",
"employeeId");
}
The TreeModel is initialized on the initialization of the class
CustomTreeModelDynamicContentHandler.
public class
CustomTreeModelDynamicContentHandler implements DynamicContentHandler {
private static final ADFLogger LOG
=
ADFLogger.createADFLogger(CustomTreeModelDynamicContentHandler.class);
private TreeModel treeModel;
private static final String
TASKMENU_ITEM_ID_SEPARATOR = "_";
public
CustomTreeModelDynamicContentHandler() {
super();
this.treeModel =
buildTreeModel();
}
We will implement the getChildren method of the
DynamicContentHandler interface.
/**
* This method is called by the Retail
Application to get the dynamic task items.
* @param taskMenuItem
* @return
*/
public List<TaskMenuItem>
getChildren(TaskMenuItem taskMenuItem) {
//if taskMenuItem is null then
framework is trying to load the root objects,
//otherwise the framework has
already navigated the tree
if (taskMenuItem != null) {
this.treeModel.setRowKey(taskMenuItem.getPath());
this.treeModel.enterContainer();
this.treeModel.setRowIndex(0);
} else {
this.treeModel.setRowKey(null);
//move to root
}
return
getChildrenForCurrentRowKey();
}
/**
* This method returns the children
for the current row key in the tree model.
* @param model
* @return
*/
private List<TaskMenuItem>
getChildrenForCurrentRowKey() {
List<TaskMenuItem>
childTaskMenuItemList = new ArrayList<TaskMenuItem>();
int rowCount =
this.treeModel.getRowCount();
for (int i = 0; i <
rowCount; i++) {
this.treeModel.setRowIndex(i);
TaskMenuItem
childTaskMenuItem = buildTaskMenuItem();
if (childTaskMenuItem !=
null)
childTaskMenuItemList.add(childTaskMenuItem);
}
return childTaskMenuItemList;
}
The Retail Application will instantiate the class
oracle.retail.apps.framework.uishell.taskmenu.handler.custom.CustomTreeModelDynamicContentHandler.
It will cache the class for subsequent requests after instantiating it once.
On the initial load of the page, the Retail Application will call
getChildern on the dynamicContentHandler implementation class by passing it a
null value of the TaskMenuItem object.
When the argument is null, the method getChildern should return
the root dynamic task items. The Retail Application will display the root
items on the initial load of the page. In the example above, the employees
Kevin, Jennifer and Hermann are the root items of the TreeModel so they will be
loaded by the Retail Application and displayed as the initial dynamic task
items for the CustomTreeModelDynamicContentHandler

When the user clicks on a Folder, the Retail Application will
send the current selected TaskMenuItem object to the getChildern method to load
the children of the current selected task item. When the argument of the
getChildren method is a valid TaskMenuItem object, the getChildren method
should return the children of the TaskMenuItem object.
The Retail Application always lazy loads the dynamic items. This
means that the children of a dynamic Folder will only be loaded when the user
clicks on the Folder. Once the children are loaded they are cached by the
Retail Application. In the above example, even though the Retail Application
lazy loads the dynamic items, the TreeModel pre-loads all the employees.
The TaskMenuItem class is an abstraction of a dynamic task in the
task menu. It is an equivalent of the ‘Item’ element in the task menu model
file. The TaskMenuItem class can be used to add dynamic links, taskflows and
folders in the task menu. The class has the following attributes.
private Object path;
private String id;
private String title;
private String url;
private String shortDesc;
private boolean visible = true;
private TaskMenuItemType type = TaskMenuItemType.LINK;
private TaskMenuTarget target;
private List<Parameter>
parameters;
private List<Attribute>
attributes;
private String accessKey;
private boolean disabled;
Following is a java doc screenshot of the TaskMenuItem class. 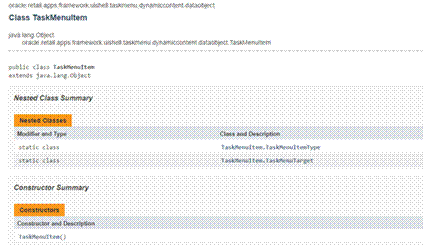
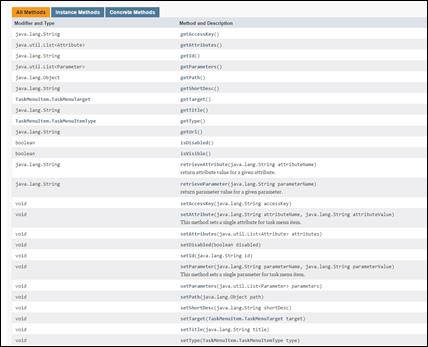

The attribute ‘path’ can be used to store the information of the
current node. The ‘path’ attribute is of type ‘Object’ so it can store any
object which can be used to identify the current node in the external
hierarchy. In the example above, the path stores the row key of the TreeModel
which is an ArrayList of employeeId’s starting from the root to the current
selected node. The path can vary based on the implementation of the
DynamicContentHandler interface. For example, if the DynamicContentHandler
implementation reads the database tables to display a dynamic menu then the
path can be an ArrayList of the primary keys of the database tables, if the
DynamicContentHandler implementation calls an external web service to generate
a dynamic menu then the path can be a String object which identifies a node in
the external system.
The following code snippet shows how a TaskMenuItem can be built
in the DynamicContentHandler implementation class.
/**
* build a task menu item from the
custom object.
* @param rowKey
* @param employee
* @return
*/
private TaskMenuItem
buildTaskMenuItem() {
List<Object> rowKey =
(List<Object>)this.treeModel.getRowKey();
Employee employee =
(Employee)this.treeModel.getRowData();
if
(this.treeModel.isContainer()) {
return
buildContainerTaskMenuItem(rowKey, employee);
} else {
return
buildLeafTaskMenuItem(rowKey, employee);
}
}
/**build container taskmenu item.
* @param rowKey
* @param employee
* @return
*/
private TaskMenuItem
buildContainerTaskMenuItem(List<Object> rowKey, Employee employee) {
TaskMenuItem taskMenuItem = new
TaskMenuItem();
taskMenuItem.setPath(rowKey);
taskMenuItem.setId(generateUniqueId(rowKey));
taskMenuItem.setTitle(employefor
exampleetName());
taskMenuItem.setShortDesc(employefor exampleetName() + " : " +
employefor exampleetEmployeeId());
taskMenuItem.setType(TaskMenuItem.TaskMenuItemType.FOLDER);
return taskMenuItem;
}
/**build leaf task menu item.
* @param rowKey
* @param employee
* @return
*/
private TaskMenuItem
buildLeafTaskMenuItem(List<Object> rowKey, Employee employee) {
TaskMenuItem taskMenuItem = new
TaskMenuItem();
taskMenuItem.setPath(rowKey);
taskMenuItem.setId(generateUniqueId(rowKey));
taskMenuItem.setTitle(employefor
exampleetName());
taskMenuItem.setShortDesc(employefor exampleetName() + " : " +
employefor exampleetEmployeeId());
taskMenuItem.setType(TaskMenuItem.TaskMenuItemType.TASKFLOW);
taskMenuItem.setUrl("/WEB-INF/oracle/retail/apps/framework/uishell/navigation/contentarea/flow/TestOverrideCloseTabFlow.xml#TestOverrideCloseTabFlow");
//set attributes on
taskMenuItem
taskMenuItem.setAttribute("TabTitle",
employefor
exampleetName() + " : " + employefor exampleetEmployeeId());
taskMenuItem.setAttribute("tabShortDesc",
"Employee " + employefor exampleetName() + " has emplyee Id
" +
employefor
exampleetEmployeeId() + ".");
//set parameters on
taskMenuItem
taskMenuItem.setParameter("EmployeeId", String.valueOf(employefor
exampleetEmployeeId()));
return taskMenuItem;
}
/**This method generages a unique
id for the taskmenu item.
* @param rowKey
* @return
*/
private String
generateUniqueId(List<Object> rowKey) {
return rowKey.stream().map(c
-> c.toString()).collect(Collectors.joining(TASKMENU_ITEM_ID_SEPARATOR));
}
When a user logs in the Retail Application, the user sees the
default content that has been configured in the Retail Application. The default
content opens up directly in a Retail UIShell tab without the user having to
launch it from the task menu. The dynamic task items can also be configured as
the default content in the application. The DynamicContentHandler interface
provides a method called getDefaultTaskMenuItems which returns a List of
TaskMenuItem objects. The items returned from this method will be launched
automatically after the user logs in.
Following is a sample implementation of the
getDefaultTaskMenuItems method.
/**Get the default task menu items.
These will be automatically loaded on initial load of the home page.
* @return
*/
@Override
public List<TaskMenuItem>
getDefaultTaskMenuItems() {
List<Object> rowKey = new
ArrayList<Object>();
rowKey.add(200);
//"Jennifer Whalen"
rowKey.add(203); //"Susan
Marvis"
rowKey.add(202); //"Pat
Fay"
Employee employee =
(Employee)this.treeModel.getRowData(rowKey); //get Pat Fay
TaskMenuItem taskMenuItem =
buildLeafTaskMenuItem(rowKey, employee);
List<TaskMenuItem>
defaultTaskMenuItems = new ArrayList<TaskMenuItem>();
defaultTaskMenuItems.add(taskMenuItem);
return defaultTaskMenuItems;
}
The Retail Application provides a way to launch links and
taskflows directly using a browser URL. The content is launched in the context
of the external application by passing parameters in the URL.
The Retail Application requires a navModelItemId
parameter in the request to identify the content that needs to be launched. The
Retail Application checks the static task menu model files to see if an Item
exists with that id in the model file. If the Retail Application does not find
a static item, it consults the list of dynamic content handlers configured with
the application to look for the item. If the dynamic content handler returns a
TaskMenuItem for the given id, it will be launched in the Retail Application.
The dynamic content handler should implement a method called getInContextTaskMenuItem(String taskMenuItemId) which will
return the TaskMenuItem object for the taskMenuItemId received. The
getInContextTaskMenuItem should be able to find the Item using the
taskMenuItemId.
Following is a sample implementation of the
getInContextTaskMenuItem(String taskMenuItemId) method.
/**This method returns an
in-context item.
* @param taskMenuItemId
* @return
*/
@Override
public TaskMenuItem
getInContextTaskMenuItem(String taskMenuItemId) {
TaskMenuItem
inContextTaskMenuItem = null;
Employee employee = null;
List<Object> rowKey =
null;
if (taskMenuItemId != null) {
try {
rowKey =
Arrays.stream(taskMenuItemId.split(TASKMENU_ITEM_ID_SEPARATOR)).map(c ->
Integer.valueOf(c)).collect(Collectors.toList());
employee =
(Employee)this.treeModel.getRowData(rowKey);
if ((employee != null)
&& (employefor exampleetDirects().isEmpty())) {
inContextTaskMenuItem
= buildLeafTaskMenuItem(rowKey, employee);
}
} catch (Exception e) {
if (LOG.isWarning()) {
LOG.warning("Error occurred looking for dynamic In-Context Item with id
" +
taskMenuItemId, e);
}
}
}
return inContextTaskMenuItem;
}
The custom dynamic content handler can be added to the classpath
of the Retail Application by deploying it as a shared library. Refer to the
section Adding a
Custom Shared Library for details on how to deploy a shared library.
The DynamicContentHandler interface can be used to add dynamic
task items in the task menu from a variety of data sources including OBIEE,
BIPublisher, database tables, and custom Web Services and so on. The Retail
Application provides the default implementation of the DynamicContentHandler
interface for OBIEE and BIPublisher. These implementations are called Report
Adapters. The Report Adapters can display the user’s reports from OBIEE and
BIPublisher as tasks in the task list. The user can click on the tasks to
display individual reports and dashboards.
Note: The connection to both the OBIEE and BIPublisher
should be secured using TLS protocol. Ensure that the Report Adapter
integration is done using secured protocol in the production environments.
The RetailAppsObieeAdapter relies on a properties file called
RetailAppsObieeAdapter.properties for the OBIEE configuration. Create
RetailAppsObieeAdapter.properties in any location on the file system. Modify
the setDomainEnv.cmd for the Windows environment or setDomainEnv.sh file for
the Unix environment to add the RetailAppsObieeAdapter.properties as a Java
system property specifying the location in the file system where the
RetailAppsObieeAdapter.properties file resides
For example for windows environment
set
EXTRA_JAVA_PROPERTIES=-DRetailAppsObieeAdapter.properties=D:\Work\RetailAppsFramework\RetailAppsObieeAdapter.properties
%EXTRA_JAVA_PROPERTIES%
For Unix environment
EXTRA_JAVA_PROPERTIES="-DRetailAppsObieeAdapter.properties
=/scratch/u00/product/Oracle/Middleware/user_projects/domains/RAFDomain/custom_properties/RetailAppsObieeAdapter.properties
${EXTRA_JAVA_PROPERTIES}"
export
EXTRA_JAVA_PROPERTIES
The RetailAppsObieeAdapter.properties can be used to specify the
following properties for the OBIEE Report Adapter configuration.
|
Property
|
Required
|
Description
|
|
bi.connection.name
|
Yes
|
This property is used to specify the name of the
BISoapConnection used to display the OBIEE reports. The connection should be
created using the Enterprise Manager. Refer to the section Creating the
BIConnection for more details.
|
|
bi.bipublisher.context.path
|
No
|
If the OBIEE installation includes both the OBIEE
analytics and BIPublisher then the BIPublisher reports can also be displayed
using the RetailAppsObieeAdapter. The bi.bipublisher.context.path is used to
specify the context root of the BIPublisher installation. The default value
is xmlpserver.
|
|
bi.external.integration
|
No
|
This property can be used to disable the RetailAppsObieeAdapter
integration. Setting this to false will disable the RetailAppsObieeAdapter
integratioin. The default value is true.
|
|
bi.report.new.browser.tab
|
No
|
This property can be used to display the OBIEE reports in
a new browser tab on in a new Retail UI Shell tab. The default behavior of
the RetailAppsObieeAdapter is to open the OBIEE reports in a new browser tab.
Setting this property to false opens the reports in a new UI Shell tab. The
default value is true.
|
Use the following steps to create the BIConnection for the
RetailAppsObieeAdapter configuration.
1. Login
to the Enterprise Manager of the environment where the Retail Application is
deployed and go to ‘System MBean Browser’ as shown below.
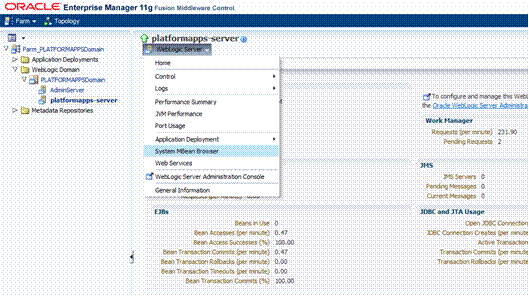
2. Go
to ‘Application Defined MBeans’ and its sub folder ‘oracle.adf.share.connections’

3. Expand
‘Application: <AppName>’ and select ‘ADFConnections’. The following
example uses RetailAppsFrameworkTest as the AppName
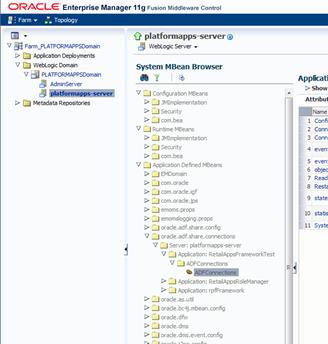
4. Go
to the ‘Operations’ tab and click ‘createConnection’.
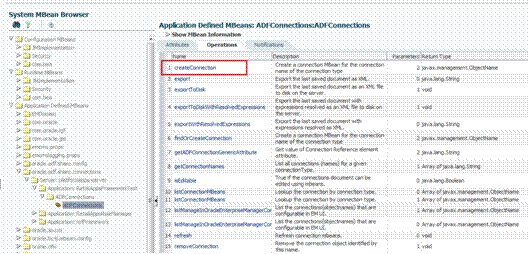
5. Enter
Connection Type as BISoapConnection and Connection Name as BIConnection. Click
Invoke on top right.
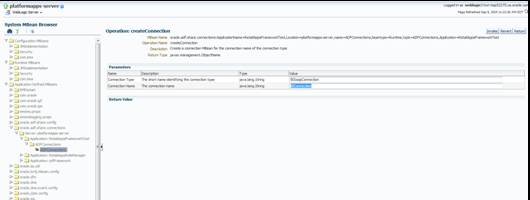
6. Refresh
the tree using the button ‘Refresh cached tree data’
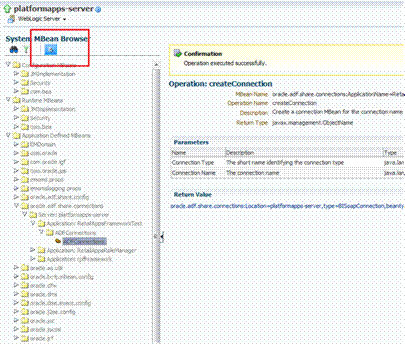
7. Once
the tree is refreshed, you will notice that ‘ADFConnections’ becomes a folder
and it has a new connection ‘BIConnection’. Click on the BIConnection to open
its properties in the right pane.
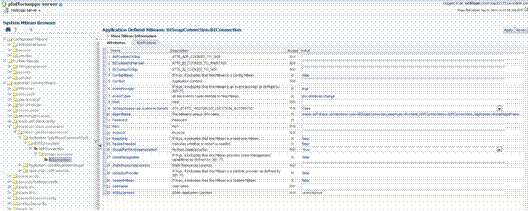
8. Enter
the values shown in the table below. Once done click Apply on the top right.
|
Context
|
The context root of the Oracle BI EE installation.
Example: analytics
|
|
Host
|
The host of the Oracle BI EE installation.
|
|
IsStaticResourcesLocationAutomatic
|
The IsStaticResourcesLocationAutomatic attribute can be
either true or false. When this attribute is true, the BI Presentation Server
will be used to specify the location of the static resources. When this
attribute is false, the attribute ‘StaticResourcesLocation’ should be
provided. The attribute StaticResourcesLocation will be used to find the
static resources when the attribute IsStaticResourcesLocationAutomatic is
false.
|
|
Password
|
The password for the BIImpersonateUser.
|
|
Port
|
The port of the Oracle BI managed server. Example 9704
|
|
Protocol
|
http or https
For production environments, use https.
|
|
ShouldPerformImpersonation
|
true (keep it true, default is true)
|
|
StaticResourcesLocation
|
The path of the location where the static resources are
available.
If the IsStaticResourcesLocationAutomatic attribute is
true then use the following URL for the StaticResourcesLocation attribute.
http://<obiee_host>:<obiee_port>/analytics
If the IsStaticResourcesLocationAutomatic attribute is
false, then use the following URL for the StaticResourcesLocation attribute.
http://<web_tier_host>:<web_tier_port>
The Oracle BI EE static resources, namely the ‘res’ and
‘analyticsRes’ directories should be available from the Oracle Web Tier’s
htdocs directory when the IsStaticResourcesLocationAutomatic attribute is
false.
|
|
Username
|
The username that has been configured on the Oracle BI EE
with the impersonate permissions.
Example: BIImpersonateUser
|
|
WSDLContext
|
analytics-ws
|
9. Go
to ‘ADFConections’ to save the changes. Click on ‘save’ operation in the
Operations tab.
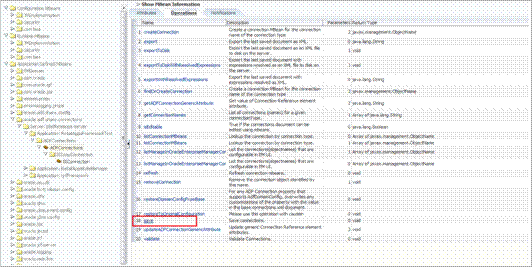
10. Click on
‘Invoke’ on the top right to save the changes.
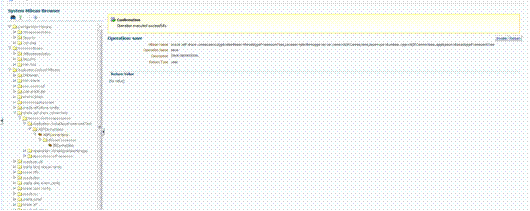
11. Once the
connection is created successfully, modify the RetailAppsObieeAdapter.properties
to add the bi.connection.name as BIConnection.
Once we have configured the RetailAppsObieeAdapter.properties and
created a BIConnection, we can add an Item of type=”dynamicContent” in the
HomeReportsMenuModel.xml file to display the OBIEE Reports in the Reports menu.
The implementation of the DynamicContentHandler interface for OBIEE is called
oracle.retail.apps.framework.report.obiee.handler.ObieeDynamicContentHandler
<Items>
<Item
id="obieeDynamicContent" title="OBIEE Dynamic Menu"
type="dynamicContent"
dynamicContentHandler="oracle.retail.apps.framework.report.obiee.handler.ObieeDynamicContentHandler"
visible="#{securityContext.authenticated}"/>
</Items>
</Item>
The reports menu model can be customized to add an entry for the
dynamic content as shown above. Refer to the section Adding or Modifying an
Item in the Reports Menu for more details.
The RetailAppsBiPublisherAdapter relies on a properties file
called RetailAppsBiPublisherAdapter.properties for the BIPublisher
configuration. Create RetailAppsBiPublisherAdapter.properties in any location
on the file system. Modify the setDomainEnv.cmd for the Windows environment or
setDomainEnv.sh file for the Unix environment to add the
RetailAppsBiPublisherAdapter.properties as a Java system property specifying
the location in the file system where the
RetailAppsBiPublisherAdapter.properties file resides.
For example for windows environment:
set
EXTRA_JAVA_PROPERTIES=-DRetailAppsBiPublisherAdapter.properties=D:\Work\RetailAppsFramework\RetailAppsBiPublisherAdapter.properties
%EXTRA_JAVA_PROPERTIES%
For Unix environment
EXTRA_JAVA_PROPERTIES="-DRetailAppsBiPublisherAdapter.properties=/scratch/u00/product/Oracle/Middleware/user_projects/domains/RAFDomain/custom_properties/RetailAppsBiPublisherAdapter.properties
${EXTRA_JAVA_PROPERTIES}"
export EXTRA_JAVA_PROPERTIES
The RetailAppsBiPublisherAdapter.properties can be used to
specify the following properties for the BIPublisher Report Adapter
configuration.
|
Property
|
Required
|
Description
|
|
bipublisher.wsdl.location
|
Yes
|
This property is used to specify the WSDL URL of the
BIPublisher PublicReportService. For example: https://bipublisher_host:bipublisher_port/
xmlpserver/services/PublicReportService?wsdl
|
|
bipublisher.external.integration
|
No
|
This property can be used to disable the
RetailAppsBiPublisherAdapter integration. Setting this to false will disable
the RetailAppsBiPublisherAdapter integratioin. The default value is true.
|
|
bipublisher.report.new.browser.tab
|
No
|
This property can be used to display the BIPublisher
reports in a new browser tab on in a new Retail UI Shell tab. The default
behavior of the RetailAppsBiPublisherAdapter is to open the BIPublisher
reports in a new browser tab. Setting this property to false opens the
reports in a new UI Shell tab. The default value is true.
|
The RetailAppsBiPublisherAdapter requires the admin credentials
of the BIPublisher to be stored in the WebLogic domain credential store where
the Retail Application is deployed. The admin credentials are used by the
RetailAppsBiPublisherAdapter to connect to the BIPublisher.
The admin credentials can be stored the in domain credential
store by using WebLogic Scripting tool or the Enterprise Manager.
After running the wlst script, connect to the WebLogic Domain
using the connect() command and run the following createCred() command. Replace
the <bip_admin_user> and <bip_admin_password> with the BIPublisher
admin user and password.
createCred(map="oracle.retail.apps.framework.report.bipublisher",
key="bipadmin", user="<bip_admin_user>",
password="<bip_admin_password>", desc="BIPublisher admin
user credentials")
If the credentials already exist for the map ’oracle.retail.apps.framework.report.bipublisher’
and key ‘bipadmin’,
update them using the following command
updateCred(map="oracle.retail.apps.framework.report.bipublisher",
key="bipadmin", user="<bip_admin_user>",
password="<bip_admin_password>")
Navigate to Security/Credentials.
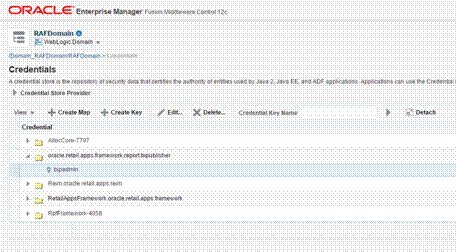
Create a new map called ‘oracle.retail.apps.framework.report.bipublisher’.
Inside this map create a new key called ‘bipadmin’ and enter the BIPublisher
admin credentials.
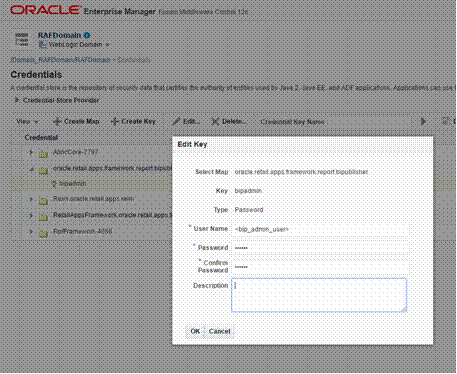
Once we have configured the
RetailAppsBiPublisherAdapter.properties and have added the BIPublisher WSDL URL
property in the properties file, we can add an Item of type=”dynamicContent” in
the HomeReportsMenuModel.xml file to display the BIPublilsher Reports in the
Reports menu. The implementation of the DynamicContentHandler interface for the
BIPublisher is called oracle.retail.apps.framework.report.bipublisher.handler.BiPublisherDynamicContentHandler.
<Item
id="bipublisherFolder" visible="#{true}"
title="BiPublisher" type="folder">
<Items>
<Item
id="bipublisherDynamicContent" title="BIPublisher Dynamic
Menu"
type="dynamicContent"
dynamicContentHandler="oracle.retail.apps.framework.report.bipublisher.handler.BiPublisherDynamicContentHandler"
visible="#{securityContext.authenticated}"/>
</Items>
</Item>
The reports menu model can be customized to add an entry for the
dynamic content as shown above. Refer to the section Adding or Modifying an
Item in the Reports Menu for more details.
9
This chapter describes the batch processing modules that ReSA
uses.
The term store day is used throughout this chapter. Store day
describes all transactions that occur in one business day at one store or
location. Because retailers need the ability to audit transactions on a
store-by-store basis for a defined period of time, store day data is maintained
separately beginning with the initial import of data from the POS/OMS system.
The following diagram illustrates how data flows within ReSA and
between ReSA and other applications.
Note:
All integrations are not depicted in this diagram
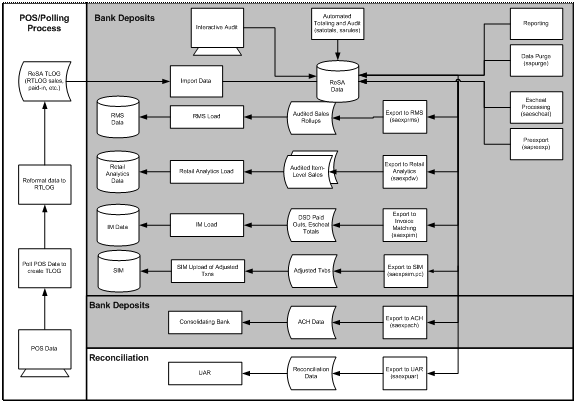
Oracle Retail Sales Audit Dataflow Diagram
Importing data from the POS to ReSA is a multi-step process that
involves several ReSA batch processes.
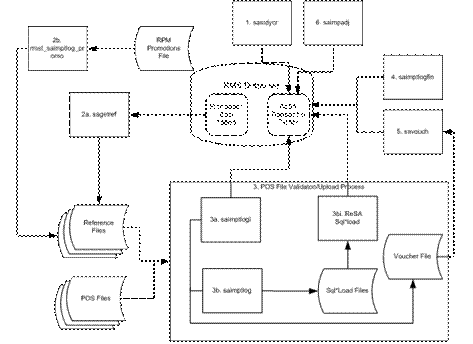
Oracle Retail Sales Import Process
1. sastdycr.pc
prepares the ReSA tables for data upload.
2. Reference
File Creation involves two processes:
a. sagetref.pc
creates a number of reference files to be used for validation in the File
Validation/Upload Process.
§ One of the reference
data files created by sagetref contains code values from the RMS CODE_HEAD and
CODE_DETAIL tables. If the codes that ReSA uses are customized during the
implementation, a library must be recompiled. This is discussed in detail in
the Design Assumptions section of the sagetref program level information below.
§ The way primary
variants are set up in RMS affects the data collected by sagetref and used in
the File Validation/Upload Process. This is discussed in detail in the Design
Assumptions section of the sagetref program level information below.
b. rmst_saimptlog_promo.ksh
transforms a promotions file from Oracle Retail Price Management (RPM) to the
ReSA reference file format
3. The
POS File Validation/Upload Process can be executed one of two sub-processes:
a. saimptlogi.c
validates files and uploads their transactions into the ReSA tables. This
includes (as necessary) creating errors for the auditors to address
b. saimptlog.c
validates POS files and creates Sql*Loader Files. This includes (as necessary)
creating errors for the auditors to address.
§ A Sql*Load process
moves the transactions and errors into the ReSA tables.
c. Both
saimptlog and saimptlogi create a voucher file to be used in later processing.
4. saimptlogfin.pc
executes a number of import cleanup processes.
5. savouch.pc
processes voucher sales and redemptions.
6. saimpadj.pc
imports adjustments.
Each of the processes related to the import process are discussed
in more detail at the program level later in this chapter.
saimptlogi.c and saimptlog.c perform the same business functions.
Saimptlogi.c inserts directly into the database. Saimptlog uses SQL*Load to
insert data. A retailer trickle polling or exporting a relatively small TLOG
would be a good candidate to use saimptlogi.c. The detail discussion of these
programs below contains more detail about the processing of these jobs.
By providing additional values against which auditors can compare
receipts, totaling is integral to the auditing process. Totaling also provides
quick access to other numeric figures about the day’s transactions.
Totaling in ReSA is dynamic. ReSA automatically totals
transactions based on calculation definitions that the retailer’s users create
using the online Totals Calculation Definition Wizard. In addition, the
retailer is able to define totals that come from the POS, but that ReSA does
not calculate. Whenever users create new calculation definitions or edit
existing ones, they become part of the automated totaling process the next time
that satotals.pc runs.
Evaluating rules is also integral to the auditing process. Rules
make the comparisons among data from various sources. These comparisons find
data errors that could be the result of either honest mistakes or fraud.
Finding these mistakes during the auditing process prevents these errors from
being passed on to other systems, (for example, a merchandising system, a data
warehouse system, and so on).
Like totaling, rules in ReSA are dynamic. They are not predefined
in the system—retailers have the ability to define them through the online
Rules Calculation Definition Wizard.
Errors uncovered by these rules are available for review during
the interactive audit. Like satotals.pc, after users modify existing rules or
create new ones, they become part of the rules the next time that sarules.pc
runs.
Totals when Transactions are Modified
If a retailer modifies transactions during the ReSA interactive
audit process, the totaling and auditing processes run again to recalculate
store day totals. The batch module sapreexp.pc tracks all changed totals for
the store day since the last export by comparing the latest prioritized version
of each total defined for export with the version that was previously sent to
each system. The module writes the changes to revision tables that the export
modules later recognize as ready for export.
ReSA prepares data for export to applications after:
§
Some or all of the transactions for the day are imported
(depending upon the application receiving ReSA’s export).
§
Totals have run.
§
Audit rules have run.
§
Errors in transactions and totals relevant for the system
receiving the associated data are eliminated or overridden. Depending upon the
application, exported data consists of either transaction data or totals, or
both. The process of exporting transaction data varies according to the unit of
work selected in ReSA’s system options. There are two units of work,
transaction and store day. If the unit of work selection is transaction, ReSA
exports its transactions to downstream applications, (for example, RMS, SIM,
RA, and so on.) as soon as they are free of errors. If the unit of work
selection is store day, transactions are not exported until all errors for that
store day are either overridden or corrected. The data export jobs, to the
various downstream applications, can be run multiple times in a day.
Full Disclosure and Post Export Changes
If a retailer
modifies data during the interactive audit that was previously exported to RMS,
ReSA export batch modules re-export the modified data in accordance with a process
called full disclosure. Full disclosure means that any previously exported
values (dollars, units, and so on) are fully backed out before the new value is
sent.
For example: a transaction originally shows a sale of 12 items,
and that transaction is exported. During the interactive audit, a retailer
determines that the correct amount is 15 items, (where three are more than the
original amount) and makes the change. ReSA then flags the corrected amount for
export to the application.
The detail discussion of these programs below contains more
detail about the processing of these jobs.
The following list summarizes the ReSA batch modules that are
involved with processing POS/OMS transaction data, audit totals and rules,
exports to other applications, and modifications and adjustments.
Import Process Programs
§
sastdycr.pc (Create Store Day for Expected Transactions)
§
sagetref.pc (Get Reference Data for Sales Audit Import
Processing)
§
rmst_saimptlog_promo.ksh (Transform Promotion Reference File from
RPM format to Sales Audit Import Processing File Format)
§
saimptlog.c/saimptlogi.c (Import of Unaudited Transaction data
from POS to ReSA)
§
saimptloglogtdup_upd (Processing to Allow Re-Upload of Deleted
Transactions)
§
saimptlogfin.pc (Complete Transaction Import Processing)
§
savouch.pc (Sales Audit Voucher Upload)
§
saimpadj.pc (Import Total Value Adjustments From External Systems
to ReSA)
Totals/Rules Programs
§
satotals.pc (Calculate Totals based on Client Defined Rules
§
sarules.pc (Evaluate Transactions and Totals based on Client
Defined Rules)
Export Programs
§
sapreexp.pc (Prevent Duplicate Export of Total Values from ReSA)
§
saexprms.pc (Export of POS transactions from ReSA to RMS)
§
saordinvexp.pc (Export Inventory Reservation/Release for In Store
Customer Order and Layaway Transactions from ReSA)
§
saexpdw.pc (Export from ReSA to Oracle Retail Analytics)
§
saexpsim.pc (Export of Revised Sale/Return Transactions from ReSA
to SIM)
§
saexpim.pc (Export DSD and Escheatment from ReSA to Invoice
Matching)
§
saexpgl.pc (Post User Defined Totals from ReSA to General Ledger)
§
ang_saplgen.ksh (Extract of POS Transactions by Store/Date from
ReSA for Web Search )
§
saescheat.pc (Download of Escheated Vouchers from ReSA for
Payment)
§
saescheat_nextesn.pc (Generate Next Sequence for Escheatment
Processing)
§
saexpach.pc (Download from ReSA to Account Clearing House (ACH)
System)
§
saexpuar.pc (Export to Universal Account Reconciliation System
from ReSA)
Other
Programs
§
saprepost.pc (Pre/Post Helper Processes for ReSA Batch Programs)
§
sapurge.pc (Purge Aged Store/Day Transaction, Total Value, and
Error Data from ReSA)
Module Name
|
sastdycr.pc
|
Description
|
Create Store Day for Expected Transactions
|
Functional
Area
|
Oracle Retail Sales Audit
|
Module Type
|
Business Processing
|
Module
Technology
|
ProC
|
Integration
Catalog ID
|
RSA15
|
The sastdycr batch program will create store/day, import log, and
export log records. This program should run prior to uploading the sales data
from POS/OMS for a given store/day. Store/days will be created for any open
store expecting sales
Schedule Information
|
Description
|
|
Processing Cycle
|
Daily – In the date set phase.
|
|
Scheduling Considerations
|
It should run before the DTESYS batch program and before
the next store/day’s transactions are received.
|
|
Pre-Processing
|
NA
|
|
Post-Processing
|
dtesys
|
|
Threading Scheme
|
NA
|
The logical unit of work in this program is store. Records are
committed to the database when the commit counter is reached. The commit
counter is defined by the value of INCREMENT_BY on the ALL_SEQUENCE table for
the sequence SA_STORE_DAY_SEQ_NO_SEQUENCE.
|
Table
|
Select
|
Insert
|
Update
|
Delete
|
|
ALL_SEQUENCES
|
Yes
|
No
|
No
|
No
|
|
SYSTEM_OPTIONS
|
Yes
|
No
|
No
|
No
|
|
STORE
|
Yes
|
No
|
No
|
No
|
|
SA_STORE_DAY
|
Yes
|
Yes
|
No
|
No
|
|
COMPANY_CLOSED
|
Yes
|
No
|
No
|
No
|
|
COMPANY_CLOSED_EXCEP
|
Yes
|
No
|
No
|
No
|
|
LOCATION_CLOSED
|
Yes
|
No
|
No
|
No
|
|
PERIOD
|
Yes
|
No
|
No
|
No
|
|
SA_STORE_DATA
|
Yes
|
No
|
No
|
No
|
|
SA_IMPORT_LOG
|
No
|
Yes
|
No
|
No
|
|
SA_EXPORT_LOG
|
No
|
Yes
|
No
|
No
|
|
SA_FLASH_SALES
|
No
|
Yes
|
No
|
No
|
Integration
Type
|
NA
|
File Name
|
NA
|
Integration
Contract
|
NA
|
NA
Module Name
|
sagetref.pc
|
Description
|
Get Reference Data for Sales Audit Import Processing
|
Functional
Area
|
Oracle Retail Sales Audit
|
Module Type
|
Integration
|
Module
Technology
|
ProC
|
Integration
Catalog ID
|
RSA00
|
This program will fetch all reference information needed by
SAIMPTLOG.PC for validation purposes and write this information out to various
output files. The following files are produced:
§
Items - contains a listing of all items in the system.
§
Wastage - contains information about all items that have wastage
associated with them.
§
Reference Items - contains reference items, or below
transaction-level items.
§
Primary Variant - contains primary variant information.
§
Variable Weight UPC - contains all variable weight Universal
Product Code (UPC) definitions in the system.
§
Store/Days - contains all of the valid store/day combinations in
the system.
§
Codes & Code Types - contains all code types and codes used
in field level validation.
§
Error Codes & Descriptions - contains all error codes, error
descriptions, and systems affected by the error.
§
Store POS Mappings
§
Tender Types
§
Merchants
§
Partners
§
Suppliers
§
ReSA Employees
§
Banners
§
Currency Codes
§
Promotions (from RPM)
§
Physical Warehouses
§
Inventory Statuses
These files will be used by the automated audit to validate
information without repeatedly hitting the database.
When running sagetref.pc, retailers can either create and specify
the output files, or create only the output that they desire. For example, a
retailer interested in only creating a more recent employeefile would simply
place a hyphen (-) in place of all the other parameters, but still specify an
employeefile name. This technique can be applied to as many or as few of the
parameters as retailers wish. Note, however, that the item-related files
(itemfile, refitemfile, wastefile, and primvariantfile) contain significant
interdependence. Thus, item files must all be created or not created together.
In the list of reference data files above, standard UOM is part
of the itemfile. To obtain the value, ReSA converts the selling Unit of Measure
(UOM) to the standard UOM during batch processing. This conversion enables ReSA
to later export the standard UOM to the systems that require its use
Schedule Information
|
Description
|
|
Processing Cycle
|
Daily – Anytime – Sales Audit is a 24/7 system.
|
|
Scheduling Considerations
|
This module should be executed in the earliest phase,
before the first import of RTLOGs into ReSA.
|
|
Pre-Processing
|
Sastdycr.pc
|
|
Post-Processing
|
Saimptlog.c or saimptlogi.c
|
|
Threading Scheme
|
NA
|
NA
|
Table
|
Select
|
Insert
|
Update
|
Delete
|
|
ITEM_MASTER
|
Yes
|
No
|
No
|
No
|
|
ITEM_LOC
|
Yes
|
No
|
No
|
No
|
|
VAR_UPC_EAN
|
Yes
|
No
|
No
|
No
|
|
SA_STORE_DAY
|
Yes
|
No
|
No
|
No
|
|
SA_STORE
|
Yes
|
No
|
No
|
No
|
|
SA_IMPORT_LOG
|
Yes
|
No
|
No
|
No
|
|
CURRENCIES
|
Yes
|
No
|
No
|
No
|
|
ADDR
|
Yes
|
No
|
No
|
No
|
|
CODE_DETAIL
|
Yes
|
No
|
No
|
No
|
|
SA_ERROR_CODES
|
Yes
|
No
|
No
|
No
|
|
SA_STORE_POS
|
Yes
|
No
|
No
|
No
|
|
POS_TENDER_TYPE_HEAD
|
Yes
|
No
|
No
|
No
|
|
NON_MERCH_CODE_HEAD
|
Yes
|
No
|
No
|
No
|
|
PARTNER
|
Yes
|
No
|
No
|
No
|
|
SUPS
|
Yes
|
No
|
No
|
No
|
|
SA_STORE_EMP
|
Yes
|
No
|
No
|
No
|
|
STORE
|
Yes
|
No
|
No
|
No
|
|
BANNER
|
Yes
|
No
|
No
|
No
|
|
CHANNELS
|
Yes
|
No
|
No
|
No
|
|
CLASS
|
Yes
|
No
|
No
|
No
|
|
VAT_CODES
|
Yes
|
No
|
No
|
No
|
|
RPM_PROMO_V
|
Yes
|
No
|
No
|
No
|
|
RPM_PROMO_COMP_V
|
Yes
|
No
|
No
|
No
|
|
WH
|
Yes
|
No
|
No
|
No
|
|
INV_STATUS_CODES
|
Yes
|
No
|
No
|
No
|
|
SA_STORE_DATA
|
Yes
|
No
|
No
|
No
|
Integration
Type
|
Download from RMS
|
File Name
|
Determined by runtime parameters
|
Integration
Contract
|
IntCon000113 (itemfile)
IntCon000114 (wastefile)
IntCon000115 (refitemfile)
IntCon000116 (primvariantfile)
IntCon000117 (varupcfile)
IntCon000118 (storedayfile)
IntCon000119 (promfile)
IntCon000120 (codesfile)
IntCon000121 (errorfile)
IntCon000122 (storeposfile)
IntCon000123 (tendertypefile)
IntCon000124 (merchcodesfile)
IntCon000125 (partnerfile)
IntCon000126 (supplierfile)
IntCon000127 (employeefile)
IntCon000128 (bannerfile)
IntCon000129 (promfile)
IntCon000130 (whfile)
IntCon000131 (invstatusfile)
|
File
Name: Item File
The ItemFile file name (Itemfile) is not fixed; it is determined
by a runtime parameter.
|
Record Name
|
Field Name
|
Field Type
|
Default Value
|
Description
|
|
|
Item
|
Char(25)
|
|
Item number
|
|
Dept
|
Number(4)
|
|
Department ID
|
|
Class
|
Number(4)
|
|
Class id
|
|
Subclass
|
Number(4)
|
|
Subclass ID
|
|
Standard UOM
|
Char(4)
|
|
Standard Unit of Measure
|
|
Catchweight Ind
|
Char(1)
|
|
Catch weight indicator
|
|
Class vat Ind
|
Char(1)
|
|
Class Vat Ind
|
File
Name: Waste Data File
The Waste Data File file name (wastefile) is not fixed; it is
determined by a runtime parameter.
|
Record Name
|
Field Name
|
Field Type
|
Default Value
|
Description
|
|
|
Item
|
Char(25)
|
|
Item number
|
|
Waste type
|
Char(6)
|
|
Waste type
|
|
Waste pct
|
Number(12,4)
|
|
Waste pct
|
File
Name: Reference Item Data
The Reference Item Data file name (ref_itemfile) is not fixed; it
is determined by a runtime parameter.
|
Record Name
|
Field Name
|
Field Type
|
Default Value
|
Description
|
|
|
Ref Item
|
Char(25)
|
|
Reference Item number
|
|
Item
|
Char(25)
|
|
Item number
|
File
Name: Primary Variant Data File
The Primary Variant Data File file name (prim_variantfile) is not
fixed; it is determined by a runtime parameter
|
Record Name
|
Field Name
|
Field Type
|
Default Value
|
Description
|
|
|
Location
|
Number(10)
|
|
Location number
|
|
Item
|
Char(25)
|
|
Item number
|
|
Prim Variant
|
Char(25)
|
|
Primary variant
|
File
Name: Variable Weight UPC Definition File
The Variable Weight UPC Definition File file name (varupcfile) is
not fixed; it is determined by a runtime parameter.
|
Record Name
|
Field Name
|
Field Type
|
Default Value
|
Description
|
|
|
Format Id
|
Char(1)
|
|
Format id
|
|
Format desc
|
Char(20)
|
|
Format description
|
|
Prefix length
|
Number(1)
|
|
Pefix Length
|
|
Begin item digit
|
Number(2)
|
|
Item digit begin
|
|
Begin var digit
|
Number(2)
|
|
Var digit begin
|
|
Check digit
|
Number(2)
|
|
Check digit
|
|
Default prefix
|
Number(1)
|
|
Default prefix
|
|
Prefix
|
Number(1)
|
|
Prefix
|
File
Name: Valid Store/Day Combination File
The Valid Store/Day Combination File file name (storedayfile) is
not fixed; it is determined by a runtime parameter.
|
Record Name
|
Field Name
|
Field Type
|
Default Value
|
Description
|
|
|
Store
|
Number(10)
|
|
Store number
|
|
Business date
|
Char(8)
|
|
Business date in YYYYMMDD format
|
|
Store day seq no
|
Number(20)
|
|
Store day sequence number
|
|
Day
|
Number(3)
|
|
Day
|
|
Tran no generated
|
Char(6)
|
|
Generated transaction number
|
|
POS data expected
|
Char(1)
|
|
If system_code is POS, then Y; otherwise N
|
|
Currency rtl dec
|
Number(1)
|
|
Currency rtl dec
|
|
Currency code
|
Char(3)
|
|
Currency code
|
|
Country id
|
Char(3)
|
|
Country ID
|
|
Vat Include Ind
|
Char(1)
|
|
Vat Include Indicator
|
File
Name: Codes File
The Codes File file name (codesfile) is not fixed; it is
determined by a runtime parameter.
|
Record Name
|
Field Name
|
Field Type
|
Default Value
|
Description
|
|
|
Code type
|
Char(4)
|
|
Code type
|
|
Code
|
Char(6)
|
|
Code ID
|
|
Code seq
|
Number(4)
|
|
Code sequence
|
File Name: Error
Information File
The Error Information File file name (errorfile) is not fixed; it
is determined by a runtime parameter.
|
Record Name
|
Field Name
|
Field Type
|
Default Value
|
Description
|
|
|
Error code
|
Char(25)
|
|
Error code
|
|
System Code
|
Char(6)
|
|
System Code
|
|
Error desc
|
Char(255)
|
|
Error description
|
|
Rec solution
|
Char(255)
|
|
Error rectify solution
|
File Name: Store
POS Mapping File
The Store POS Mapping File file name (storeposfile) is not fixed;
it is determined by a runtime parameter.
|
Record Name
|
Field Name
|
Field Type
|
Default Value
|
Description
|
|
|
Store
|
Number(10)
|
|
Store
|
|
POS Type
|
Char(6)
|
|
Point Of Sale type
|
|
Start Tran No.
|
Number(10)
|
|
Start transaction number
|
|
End Tran No.
|
Number(10)
|
|
End transaction number
|
File Name: Tender
Type Mapping File
The Tender Type Mapping File file name (tendertypefile) is not
fixed; it is determined by a runtime parameter.
|
Record Name
|
Field Name
|
Field Type
|
Default Value
|
Description
|
|
|
Non Merch Code
|
Char(6)
|
|
Non-merchant code
|
File
Name: Partner Mapping File
The Partner Mapping File file name (partnerfile) is not fixed; it
is determined by a runtime parameter.
|
Record Name
|
Field Name
|
Field Type
|
Default Value
|
Description
|
|
|
Partner Type
|
Char(6)
|
|
Partner Type
|
|
Partner Id
|
Char(10)
|
|
Partner ID
|
File Name:
Supplier Mapping File
The Supplier Mapping File file name (supplierfile) is not fixed; it
is determined by a runtime parameter.
|
Record Name
|
Field Name
|
Field Type
|
Default Value
|
Description
|
|
|
Supplier
|
Number(10)
|
|
Supplier ID
|
|
Sup status
|
Char(1)
|
|
Supplier status
|
File Name: Employee Mapping File
The Employee Mapping File file name (employeefile) is not fixed; it
is determined by a runtime parameter.
Note: The
data in the employee file is not used anymore with the removal of store user
audit and the deprecation of system option, AUTO_VALIDATE_TRAN_EMPLOYEE_ID.
|
Record Name
|
Field Name
|
Field Type
|
Default Value
|
Description
|
|
|
Store
|
Number(10)
|
|
Store ID
|
|
POS Id
|
Char(10)
|
|
Point Of Sale ID
|
|
Emp Id
|
Char(10)
|
|
Employee ID
|
File Name: Banner Information File
The Banner Information File file name (bannerfile) is not fixed; it
is determined by a runtime parameter.
|
Record Name
|
Field Name
|
Field Type
|
Default Value
|
Description
|
|
|
Store
|
Number(10)
|
|
Store ID
|
|
Banner data
|
Number(4)
|
|
Banner ID
|
File Name: Currency Information File
The Currency Information File file name (currencyfile) is not
fixed; it is determined by a runtime parameter.
|
Record Name
|
Field Name
|
Field Type
|
Default Value
|
Description
|
|
|
Currency Code
|
Char(1)
|
|
Currency Code
|
File Name: Promotion Information File
The Promotion Information File file name (promfile) is not fixed;
it is determined by a runtime parameter.
|
Record Name
|
Field Name
|
Field Type
|
Default Value
|
Description
|
|
|
Promotion
|
Number(10)
|
|
Promotion ID
|
|
|
Component
|
Number(10)
|
|
Component ID
|
File Name: Physical Warehouse Information File
The Physical Warehouse Information File filename (whfile) is not
fixed; it is determined by a runtime parameter.
|
Record Name
|
Field Name
|
Field Type
|
Default Value
|
Description
|
|
|
Warehouse
|
Number(10)
|
|
Warehouse ID
|
File Name: Inventory Status Information File
The Inventory Status Information File file name (invstatusfile)
is not fixed; it is determined by a runtime parameter.
|
Record Name
|
Field Name
|
Field Type
|
Default Value
|
Description
|
|
|
Inventory Status
|
Char(10)
|
|
Inventory Status
|
After making changes in the code_detail table for code_types that
ReSA uses, the library programs must be recompiled. Follow these steps:
1. Navigate
to the $l directory and recompile libresa.a and install:
make -f retek.mk resa
make -f retek.mk install
2. Navigate
to the $c directory and recompile the next libraries:
make -f mts.mk resa-libchange
make -f mts.mk resa
a. Recompile
the appropriate library depending upon which of the following products is being
used:
resa-rms
resa-rdw
resa-ach
resa-uar
resa-im
make -f mts.mk ( name of library )
b. make
-f mts.mk resa-install
Depending upon a retailer’s system parameters, the retailer
designates the primary variant during item setup (through the front-end) for
several reasons. One of the reasons is that, in some cases, an item may be
identified at the POS by the item parent, but the item parent may have several
variants.
The primary variant is established through a form at the item
location level. The retailer designates which variant item is the primary
variant for the current transaction level item. For more information about the
new item structure in RMS, see the Oracle Retail Merchandising System User
Guide.
In the example shown in the diagram below, the retailer has
established their transaction level as an Item Level 2. Note that the level of
the primary variant is Item Level 1, and Item Level 3 is the sub-transaction
level (the refitem).
The retailer set up golf shirts in the merchandising system as
its Item Level 1 above the transaction level. The retailer set up two items at
level 2 (the transaction level) based on size (small and medium). Note that the
retailer assigned the level 2 items to all of the available locations
(Minneapolis, China, and Fargo). The retailer also designated a primary variant
for a single location – a medium golf shirt, in the case of Minneapolis, and a
small golf shirt, in the case of China. The retailer failed to designate a
primary variant for Fargo.
The primary variant affects ReSA in the following way. Sometimes
a POS system does not provide ReSA with item level 2 (transaction item) data.
For example, assume that the POS system in Minneapolis sold 10 medium golf
shirts and 10 small golf shirts but only informed ReSA that 20 golf shirts were
sold. 20 golf shirts presents a problem for ReSA because it can only interpret
items at item level 2 (the transaction level). Thus, because medium golf shirts
was the chosen primary variant for Minneapolis, the SAGETREF.PC module
automatically transforms the 20 golf shirts into 20 medium golf shirts. If the
same type of POS system in China informed ReSA of 20 golf shirts (instead of
the 10 medium and 10 small that were sold), the sagetref.pc module would
transform the 20 golf shirts sold in China into 20 small golf shirts. As the
table shows, small golf shirts was the chosen primary variant for the China
location. ReSA then goes on to export the data at the item 2 level (the
transaction level) to, for example, a merchandising system, a data warehouse,
and so on.
Note:
Depending upon system parameters, if a retailer fails to set up the primary
variant for a location, an invalid item error is generated during batch
processing. In the example below, if the POS system in Fargo sold 10 medium
golf shirts and 10 small golf shirts, but only informed ReSA that 20 golf
shirts were sold, the sagetref.pc module would not have a way to transform
those 20 golf shirts to the transaction level. Because ReSA can only interpret
items above the transaction level in conjunction with a primary variant, the
invalid item error would occur during batch processing.
Primary Variant Relationships
Module Name
|
saimptlog.c
saimptlogi.c
|
Description
|
Import of Unaudited Transaction data from POS to ReSA
|
Functional
Area
|
Oracle Retail Sales Audit
|
Module Type
|
Integration
|
Module Technology
|
ProC
|
Integration
Catalog ID
|
RSA11a
RSA11b
|
Importing POS and Order Management System (OMS) data to ReSA is a
5 or 6 step process depending on whether saimptlogi or saimptlog is used.
Saimptlog produces SQL*Loader files, while saimptlogi does inserts directly
into the database. Saimptlogi is meant for use in a trickle feed environment.
To import POS and OMS data, perform the following:
1.  SAGETREF must
be run to generate the current reference files:
SAGETREF must
be run to generate the current reference files:
§ Items
§ Wastage
§ Sub-transaction
level items
§ Primary
variant relationships
§ Variable
weight PLU
§ Store
business day
§ Code
types
§ Error
codes
§ Store
POS
§ Tender
type
§ Merchant
code types
§ Partner
vendors
§ Supplier
vendors
§ Employee
ids
§ Banner
ids
§ Currency
File
§ Warehouse File
§ Inventory Status File
These files are all used as input
to SAIMPTLOG and SAIMPTLOGI. Because SAIMPTLOG and SAIMPTLOGI can be threaded,
this boosts performance by limiting interaction with the database.
2. Either
SAIMPTLOG or SAIMPTLOGI must be run against each file. The files are the
transaction log files in Oracle Retail compatible format called RTLOG. The
retailer is responsible for converting its transaction logs to RTLOGs. Both
SAIMPTLOG and SAIMPTLOGI create a write lock for a store/day combination on ReSA
tables and then set the data_status to loading until SAIMPTLOGFIN is executed.
SAIMPTLOG generates distinct SQL*Loader files for that store/day for the
sa_tran_head, sa_tran_item, sa_tran_disc, sa_tran_igtax (item Level Tax not
VAT), sa_tran_payment ( Payment details), sa_tran_tax, sa_tran_tender,
sa_error, sa_customer, sa_cust_attrib, and sa_missing_tran tables, whereas
SAIMPTLOGI inserts data to the database directly. Both produce an Oracle Retail
formatted voucher file for processing.
3. SQL*Loader
is executed to load the transaction tables from the files created by SAIMPTLOG.
The store/day SQL*Loader files can be concatenated into a single file per table
to optimize load times. Alternatively, multiple SQL*Loader files can be used as
input to SQL*Loader. SQL*Loader may not be run in parallel with itself when
loading a table. Header data (primary keys) must be loaded before ancillary
data (foreign keys). This means that the sa_tran_head table must be loaded
first, sa_tran_item before sa_tran_disc, and sa_customer before sa_cust_attrib.
The remaining tables may be loaded in parallel.
4. SAVOUCH
is executed to load each of the voucher files in Oracle Retail standard
formatted. SAVOUCH may not be multi-threaded.
5. SAIMPTLOGFIN
is executed to populate the sa_balance_group table, cancel post voided
transactions and vouchers, validate missing transactions, and mark the import
as either partially or fully complete loaded. SAIMPTLOGFIN may not be
multi-threaded.
Note: This design covers only Steps 2 and 3.
|
Schedule Information
|
Description
|
|
Processing Cycle
|
Ad Hoc
|
|
Frequency
|
Daily
|
|
Scheduling Considerations
|
saimptlog.c or saimptlogi.c should run after the
sagetref.pc to get the reference files as input. RTLOGs must also be ready as
input files.
|
|
Pre-Processing
|
saprepost saimptlog pre – change constraints on ReSA
tables
OR
saprepost saimptlogi pre – change constraints on ReSA
tables.
|
|
Post-Processing
|
saprepost saimptlog post – change back constraints on ReSA
tables
OR
saprepost saimptlogi post – change back constraints on
ReSA tables
sqlldr – use sql loader to load data into ReSA tables (for
saimptlog only).
|
|
Threading Scheme
|
saimptlog and saimptlogi may be threaded as long as the
parallel executions do not include the same store/day.
|
NA
|
Table
|
Select
|
Insert
|
Update
|
Delete
|
|
SA_ROUNDING_RULE_HEAD
|
Yes
|
No
|
No
|
No
|
|
SA_ROUNDING_RULE_DETAIL
|
Yes
|
No
|
No
|
No
|
|
SA_STORE_DAY
|
Yes
|
No
|
Yes
|
No
|
|
SA_TRAN_HEAD
|
No
|
Yes
|
No
|
No
|
|
SA_CUSTOMER
|
No
|
Yes
|
No
|
No
|
|
SA_CUST_ATTRIB
|
No
|
Yes
|
No
|
No
|
|
SA_TRAN_ITEM
|
No
|
Yes
|
No
|
No
|
|
SA_TRAN_IGTAX
|
No
|
Yes
|
No
|
No
|
|
SA_TRAN_DISC
|
No
|
Yes
|
No
|
No
|
|
SA_TRAN_TAX
|
No
|
Yes
|
No
|
No
|
|
SA_TRAN_PAYMENT
|
No
|
Yes
|
No
|
No
|
|
SA_ERROR
|
No
|
Yes
|
No
|
No
|
|
SA_MISSING_TRAN
|
No
|
Yes
|
No
|
No
|
|
ALL_SEQUENCES
|
Yes
|
No
|
No
|
No
|
Integration Contract
|
Integration Type
|
Upload to ReSA
|
|
File Name
|
Determined by runtime parameter
|
|
Integration Contract
|
Inputs from sagetref.pc:
IntCon000113 (itemfile)
IntCon000114 (wastefile)
IntCon000115 (refitemfile)
IntCon000116 (primvariantfile)
IntCon000117 (varupcfile)
IntCon000118 (storedayfile)
IntCon000119 (promfile)
IntCon000120 (codesfile)
IntCon000121 (errorfile)
IntCon000122 (storeposfile)
IntCon000123 (tendertypefile)
IntCon000124 (merchcodesfile)
IntCon000125 (partnerfile)
IntCon000126 (supplierfile)
IntCon000127 (employeefile)
IntCon000128 (bannerfile)
IntCon000129 (promfile)
IntCon000130 (whfile)
IntCon000131 (invstatusfile)
|
|
Inputs from POS:
IntCon000048 (RTLOG)
|
|
Outputs (if using saimptlog SQL Loader Option
Note that saimptlogi inserts directly into ReSA tables
and does not create these output files)
IntCon000160 (SAVO)
IntCon000161 (satdisc.ctl)
IntCon000162 (saigtax.ctl)
IntCon000163 (sacust.ctl)
IntCon000164 (sathead.ctl)
IntCon000165 (satitem.ctl)
IntCon000166 (sattend.ctl)
IntCon000167 (satypmt.ctl)
|
|
|
IntCon000168 (samisstr.ctl)
IntCon000169 (sattax.ctl)
IntCon000170 (sacustatt.ctl)
IntCon000171 (saerror.ctl)
|
The input files for this program are reference files generated by
sagetref.pc and RTLOGs. For the input file specifications, refer to the details
for the sagetref.pc program.
Output File Layout
File Name: SAVO (Sales Audit Voucher File)
|
Record Name
|
Field Name
|
Field Type
|
Default Value
|
Description
|
|
FHEAD
|
File Type Record Descriptor
|
Char(5)
|
FHEAD
|
File type Record descriptor
|
|
SA File Line No
|
Char(10)
|
|
Sales Audit File Line number
|
|
Translator Id
|
Char(5)
|
SAVO
|
Identifies transaction type
|
|
Sys Date
|
Char(14)
|
|
System date in YYYYMMDDHHMMSS format
|
|
Is business date
|
Char(8)
|
|
Business date in YYYYMMDD format
|
|
FDETL
|
Record Descriptor
|
Char(5)
|
FDETL
|
File Type Record descriptor
|
|
SA File Line No
|
Number(10)
|
|
Sales Audit File Line number
|
|
Voucher seq Number
|
Number(20)
|
|
Unique identifier for an entry to sa_voucher table
|
|
Voucher No
|
Char(25)
|
|
Voucher Number
|
|
Voucher Type
|
Number(6)
|
|
Voucher Type
|
|
Assigned Business Date
|
Char(8)
|
|
Business date in YYYYMMDD format
|
|
Assigned Store
|
Number(10)
|
|
Store to which the voucher is assigned
|
|
Issuing Date
|
Char(8)
|
|
Date this document was issued
|
|
Issuing store
|
Number(10)
|
|
Store this document was issued from
|
|
Issuing POS Register
|
Char(5)
|
|
Issuing Point Of Sale register
|
|
Issuing Cashier
|
Char(10)
|
|
Issuing cashier
|
|
Issued Tran Seq No.
|
Number(20)
|
|
Transaction sequence number
|
|
Issued item seq number
|
Number(4)
|
|
Will hold the item sequence of the item when the voucher
is sold as an item (gift voucher)
|
|
Issued Tender Seq No.
|
Number(4)
|
|
Tender sequence number
|
|
Issued Amount
|
Number(20)
|
|
Issued Amount * 10000 (4 implied digits)
|
|
Issued Cust Name
|
Char(120)
|
|
Issued customer name
|
|
Issued Customer Addr1
|
Char(240)
|
|
Issued customer addr1
|
|
Issued Customer Addr2
|
Char(240)
|
|
Issued customer addr 2
|
|
Issued Customer City
|
Char(120)
|
|
City of the customer, the voucher is issued
|
|
Issued Customer State
|
Char(3)
|
|
State of the customer
|
|
Issued Customer Postal Code
|
Char(30)
|
|
Postal address of the customer
|
|
Issued Customer Country
|
Char(3)
|
|
Country of the customer the voucher was issued
|
|
Recipient Name
|
Char(120)
|
|
Name of the intended recipient
|
|
Recipient State
|
Char(3)
|
|
The state of the intended recipient
|
|
Recipient Country
|
Char(3)
|
|
The country of the intended recipient
|
|
Redemption Date
|
Char(8)
|
|
Date the voucher was redeemed
|
|
Redemption Store
|
Number(10)
|
|
Store, the voucher was redeemed at
|
|
Redemption Register
|
Char(5)
|
|
Register, the document was redeemed at
|
|
Redemption cashier
|
Char(10)
|
|
Cashier redeeming the voucher
|
|
Redemption tran seq number
|
Number(20)
|
|
Transaction number when the document was redeemed
|
|
Redemption Tender seq number
|
Number(4)
|
|
This column will hold the tender sequence of the tender within
the transaction when a voucher is redeemed as tender
|
|
Redemption Amount
|
Number(20)
|
|
Amount the document was redeemed for*10000 (4 implied
decimal places)
|
|
Expiry Date
|
Char(8)
|
|
Expiry date
|
|
Status
|
Char(1)
|
|
Indicator showing the document’s status, issued or
redeemed. Valid values =
I – Issued, R – Redeemed
|
|
Comments
|
Char(2000)
|
|
Comments
|
|
FTAIL
|
Record Descriptor
|
Char(5)
|
FTAIL
|
File Type Record descriptor
|
|
SA File Line No.
|
Number(10)
|
|
Sales Audit File Line Number
|
|
#lines
|
Number(10)
|
|
Total number of transaction lines in the file (not
including FHEAD and FTAIL)
|
Control Files
File Name: Satdisc.ctl
|
Table Name
|
Column Name
|
Field Type
|
Field
Width
|
Position
|
Description
|
|
SA_TRAN_DISC
|
Tran_seq_no
|
Integer external
|
20
|
1:20
|
|
|
Item_seq_no
|
Integer
external
|
4
|
21:24
|
|
|
Discount_seq_no
|
Integer
external
|
4
|
25:28
|
|
|
RMs_promo_type
|
Char
|
6
|
29:34
|
|
|
Promotion
|
Integer
external
|
10
|
35:44
|
|
|
Disc_type
|
Char
|
6
|
45:50
|
|
|
Coupon_no
|
Char
|
16
|
51:66
|
|
|
Coupon_ref_no
|
Char
|
16
|
67:82
|
|
|
Qty
|
Decimal
external
|
14
|
83:96
|
|
|
Unit_discount_amt
|
Decimal
external
|
21
|
97:117
|
|
|
Standard_qty
|
Decimal
external
|
14
|
118:131
|
|
|
Standard_unit_disc_amt
|
Decimal
external
|
21
|
132:152
|
|
|
Ref_no13
|
Char
|
30
|
153:182
|
|
|
Ref_no14
|
Char
|
30
|
183:212
|
|
|
Ref_no15
|
Char
|
30
|
213:242
|
|
|
Ref_no16
|
Char
|
30
|
243:272
|
|
|
Error_ind
|
Char
|
1
|
273:273
|
|
|
Catchweight_ind
|
Char
|
1
|
274:274
|
|
|
Uom_quantity
|
Integer
external
|
12
|
275:286
|
|
|
Promo_comp
|
Integer
external
|
10
|
287:296
|
|
|
Store
|
Integer
external
|
10
|
297:306
|
|
|
Day
|
Integer
external
|
3
|
307:309
|
|
File Name: Saigtax.ctl
|
Table Name
|
Column Name
|
Field Type
|
Field Width
|
Position
|
Description
|
|
SA_TRAN_IGTAX
|
Tran_seq_no
|
Integer
external
|
20
|
1:20
|
|
|
|
Item_seq_no
|
Integer
external
|
4
|
21:24
|
|
|
|
IGTAX_seq_no
|
Integer
external
|
4
|
25:28
|
|
|
|
TAX_AUTHORITY
|
CHAR
|
10
|
29:38
|
|
|
|
IGTAX_CODE
|
CHAR
|
6
|
39:44
|
|
|
|
igtax_rate
|
DECIMAL
external
|
11
|
45:65
|
|
|
|
TOTAl_igtax_amt
|
DECIMAL
external
|
22
|
66:87
|
|
|
|
STANDARD_QTY
|
DECIMAL
external
|
14
|
88:101
|
|
|
|
STANDARD_UNIT_IGTAX_AMT
|
DECIMAL
external
|
21
|
102:122
|
|
|
|
ERROR_IND
|
char
|
1
|
123:123
|
|
|
|
REF_NO_21
|
CHAR
|
30
|
124:153
|
|
|
|
REF_NO_22
|
CHAR
|
30
|
154:183
|
|
|
|
REF_NO_23
|
CHAR
|
30
|
184:213
|
|
|
|
REF_NO_24
|
CHAR
|
30
|
214:243
|
|
|
|
STORE
|
Integer
external
|
10
|
244:253
|
|
|
|
DAY
|
Integer
external
|
3
|
254:256
|
|
File Name: Sacust.ctl
|
Table Name
|
Column Name
|
Field Type
|
Field Width
|
Position
|
Description
|
|
SA_CUSTOMER
|
tran_seq_no
|
INTEGER EXTERNAL
DATE
|
20
|
1 :20
|
|
|
|
cust_id
|
CHAR
|
16
|
21 :36
|
|
|
|
cust_id_type
|
CHAR
|
6
|
37 :42
|
|
|
|
name
|
CHAR
|
240
|
43 :162
|
|
|
|
addr1
|
CHAR
|
240
|
163:402
|
|
|
|
addr2
|
CHAR
|
240
|
403:642
|
|
|
|
city
|
CHAR
|
240
|
643:762
|
|
|
|
state
|
CHAR
|
3
|
763:765
|
|
|
|
postal_code
|
CHAR
|
30
|
766:795
|
|
|
|
country
|
CHAR
|
3
|
796:798
|
|
|
|
home_phone
|
CHAR
|
20
|
799:818
|
|
|
|
work_phone
|
CHAR
|
20
|
819:838
|
|
|
|
e_mail
|
CHAR
|
100
|
839:938
|
|
|
|
birthdate
|
DATE
|
8
|
939:946
|
Format is YYYYMMDD
|
|
|
STORE
|
INTEGER EXTERNAL
|
10
|
947:956
|
|
|
|
DAY
|
INTEGER EXTERNAL
|
3
|
957:959
|
|
File Name: Sathead.ctl
|
Table Name
|
Column Name
|
Field
Type
|
Field Width
|
Position
|
Description
|
|
Sa_tran_head
|
Tran_seq_no
|
Integer external
|
20
|
1:20
|
|
|
|
Rev_no
|
Integer external
|
3
|
21:23
|
|
|
|
Store_day_seq_no
|
Integer external
|
20
|
24:43
|
|
|
|
Tran_datetime
|
date
|
14
|
44:57
|
Format is
YYYYMM
DDHH24MI
SS
|
|
|
Register
|
char
|
5
|
58:62
|
|
|
|
Tran_no
|
Integer external
|
10
|
63:72
|
|
|
|
Cashier
|
char
|
10
|
73:82
|
|
|
|
Salesperson
|
char
|
10
|
83:92
|
|
|
|
Tran_type
|
char
|
6
|
93:98
|
|
|
|
Sub_tran_type
|
char
|
6
|
99:104
|
|
|
|
Orig_tran_no
|
Integer external
|
10
|
105:114
|
|
|
|
Orig_reg_no
|
char
|
5
|
115:119
|
|
|
|
Ref_no1
|
char
|
30
|
120:149
|
|
|
|
Ref_no2
|
char
|
30
|
150:179
|
|
|
|
Ref_no3
|
char
|
30
|
180:209
|
|
|
|
Ref_no4
|
char
|
30
|
210:239
|
|
|
|
Reason_code
|
char
|
6
|
240:245
|
|
|
|
Vendor_no
|
char
|
10
|
246:255
|
|
|
|
Vendor_invc_no
|
char
|
30
|
256:285
|
|
|
|
Payment_ref_no
|
char
|
16
|
286:301
|
|
|
|
Proof_of_delivery_no
|
char
|
30
|
302:331
|
|
|
|
Status
|
char
|
6
|
332:337
|
|
|
|
Value
|
char
|
22
|
338:359
|
Includes an optional negative sign and a
decimal point
|
|
|
Pos_tran_ind
|
char
|
1
|
360:360
|
|
|
|
Update_id
|
char
|
30
|
361:390
|
|
|
|
Update_datetime
|
date
|
14
|
391:404
|
Format is YYYYMM DDHH24MI SS
|
|
|
Error_ind
|
char
|
1
|
405:405
|
|
|
|
Banner_no
|
Integer external
|
4
|
406:409
|
|
|
|
round_amt
|
Integer external
|
22
|
410:431
|
|
|
|
rounded_off_amt
|
Integer
external
|
22
|
432:453
|
|
|
|
credit_promotion_id
|
Integer
external
|
10
|
454:463
|
|
|
|
REF_NO25
|
CHAR
|
30
|
464:493
|
|
|
|
REF_NO26
|
CHAR
|
30
|
494:523
|
|
|
|
REF_NO27
|
CHAR
|
30
|
524:553
|
|
|
|
STORE
|
Integer
external
|
10
|
554:563
|
|
|
|
DAY
|
Integer
external
|
3
|
564:566
|
|
|
|
RTLOG_ORIG_SYS
|
CHAR
|
3
|
567:569
|
|
|
|
TRAN_PROCESS_SYS
|
CHAR
|
3
|
570:572
|
|
File Name: Satitem.ctl
|
Table Name
|
Column Name
|
Field Type
|
Field Width
|
Position
|
Description
|
|
Sa_tran_item
|
Tran_seq_no
|
Integer
external
|
20
|
1:20
|
|
|
|
Item_seq_no
|
Integer
external
|
4
|
21:24
|
|
|
|
Item_status
|
char
|
6
|
25:30
|
|
|
|
Item_type
|
char
|
6
|
31:36
|
|
|
|
Item
|
char
|
25
|
37:61
|
|
|
|
Ref_item
|
char
|
25
|
62:86
|
|
|
|
Non_merch_iteM
|
char
|
25
|
87:111
|
|
|
|
Voucher_no
|
char
|
25
|
112:136
|
|
|
|
Dept
|
Integer
external
|
4
|
137:140
|
|
|
|
Class
|
Integer
external
|
4
|
141:144
|
|
|
|
Subclass
|
Integer
external
|
4
|
145:148
|
|
|
|
Qty
|
decimal
external
|
14
|
149:162
|
Includes an optional negative sign and a
decimal point
|
|
|
Unit_retail
|
decimal
external
|
21
|
163:183
|
Includes a decimal point
|
|
|
UNIt_RETAIL_VAT_INCL
|
CHAR
|
1
|
184:184
|
Indicates whether unit retail includes or
excludes VAT
|
|
|
Selling
UOM
|
char
|
4
|
185:188
|
|
|
|
Override_reason
|
char
|
6
|
189:194
|
|
|
|
Orig_unit_retail
|
decimal external
|
21
|
195:215
|
Includes a decimal point
|
|
|
Standard_orig_unit_retail
|
decimal
external
|
21
|
216:236
|
|
|
|
Tax_ind
|
char
|
1
|
237:237
|
|
|
|
Item_swiped_ind
|
char
|
1
|
238:238
|
|
|
|
Error_ind
|
char
|
1
|
239:239
|
|
|
|
Drop_ship_ind
|
char
|
1
|
240:240
|
|
|
|
Waste_type
|
char
|
6
|
241:246
|
|
|
|
Waste_pct
|
decimal
external
|
12
|
247:258
|
Includes a decimal point
|
|
|
Pump
|
char
|
8
|
259:266
|
|
|
|
Return_reason_code
|
char
|
6
|
267:272
|
|
|
|
Salesperson
|
char
|
10
|
273:282
|
|
|
|
Expiration_date
|
Date
|
8
|
283:290
|
Format is YYYYMMDD
|
|
|
Standard_qty
|
decimal
external
|
14
|
291:304
|
Includes an optional negative sign and a
decimal point
|
|
|
Standard_unit_retail
|
decimal
external
|
21
|
305:325
|
Includes a decimal point
|
|
|
Standard_uom
|
char
|
4
|
326:329
|
|
|
|
Ref_no5
|
char
|
30
|
330:359
|
|
|
|
Ref_no6
|
char
|
30
|
360:389
|
|
|
|
Ref_no7
|
char
|
30
|
390:419
|
|
|
|
Ref_no8
|
char
|
30
|
420:449
|
|
|
|
Catchweight_ind
|
char
|
1
|
450:450
|
|
|
|
Selling_item
|
char
|
25
|
451:475
|
|
|
|
Customer_order_line_no
|
Integer
external
|
6
|
476:481
|
|
|
|
Media_id
|
Integer
external
|
10
|
482:491
|
|
|
|
Uom_quantity
|
Integer
external
|
12
|
492:503
|
|
|
|
TOTAL_IGTAX_AMT
|
DECIMAL
EXTERNAL
|
|
504:524
|
|
|
|
UNIQUE_ID
|
CHAR
|
25
|
525:652
|
|
|
|
STORE
|
INTEGER
EXTERNAL
|
10
|
653:662
|
|
|
|
DAY
|
INTEGER
EXTERNAL
|
3
|
663:665
|
|
|
|
CUST_ORDER_NO
|
CHAR
|
48
|
666:713
|
|
|
|
CUST_ORDER_DATE
|
DATE
|
14
|
714:727
|
Format is Yyyymmddhh24miss
|
|
|
FULFILL_ORDER_NO
|
CHAR
|
48
|
728:775
|
|
|
|
NO_INV_RET_IND
|
CHAR
|
1
|
776:776
|
|
|
|
SALES_TYPE
|
CHAR
|
1
|
777:777
|
|
|
|
RETURN_WH
|
INTEGER
EXTERNAL
|
10
|
778:787
|
|
|
|
RETURN_DISPOSITION
|
CHAR
|
10
|
788:797
|
|
File Name: Sattend.ctl
|
Table Name
|
Column Name
|
Field Type
|
Field Width
|
Position
|
Description
|
|
Sa_tran_tender
|
Tran_seq_no
|
Integer external
|
20
|
1:20
|
|
|
|
Tender_seq_no
|
Integer external
|
4
|
21:24
|
|
|
|
Tender_type_group
|
char
|
6
|
25:30
|
|
|
|
Tender_type_id
|
Integer external
|
6
|
31:36
|
|
|
|
Tender_amt
|
decimal external
|
22
|
37:58
|
Includes an optional negative sign and a decimal point.
|
|
|
Cc_no
|
Integer external
|
40
|
59:98
|
The value must be masked.
|
|
|
Cc_exp_date
|
date
|
8
|
99:106
|
|
|
|
Cc_auth_no
|
char
|
16
|
107:122
|
|
|
|
Cc_auth_src
|
char
|
6
|
123:128
|
|
|
|
Cc_entry_mode
|
char
|
6
|
129:134
|
|
|
|
Cc_cardholder_verf
|
char
|
6
|
135:140
|
|
|
|
Cc_term_id
|
char
|
5
|
141:145
|
|
|
|
Cc_spec_cond
|
char
|
6
|
146:151
|
|
|
|
Voucher_no
|
char
|
25
|
152:167
|
|
|
|
Coupon_no
|
char
|
16
|
168:183
|
|
|
|
Coupon_ref_no
|
char
|
16
|
184:199
|
|
|
|
CHECK_ACCT_NO
|
CHAR
|
30
|
209:238
|
The value must be masked.
|
|
|
CHECK_NO
|
INTEGER EXTERNAL
|
10
|
239:248
|
|
|
|
IDENTI_METHOD
|
CHAR
|
6
|
249:254
|
|
|
|
IDENTI_ID
|
CHAR
|
40
|
255:294
|
|
|
|
ORIG_CURRENCY
|
CHAR
|
3
|
295:297
|
|
|
|
ORIG_CURR_AMT
|
DECIMAL EXTERNAL
|
22
|
298:319
|
|
|
|
Ref_no9
|
char
|
30
|
320:349
|
|
|
|
Ref_no10
|
char
|
30
|
350:379
|
|
|
|
Ref_no11
|
char
|
30
|
380:409
|
|
|
|
Ref_no12
|
char
|
30
|
410:439
|
|
|
|
Error_ind
|
char
|
1
|
440:440
|
|
|
|
STORE
|
INTEGER EXTERNAL
|
10
|
441:450
|
|
|
|
DAY
|
INTEGER EXTERNAL
|
3
|
451:453
|
|
File Name: Satpymt.ctl
|
Table Name
|
Column Name
|
Field Type
|
Field Width
|
Position
|
Description
|
|
SA_TRAN_PAYMENT
|
TRAN_SEQ_NO
|
INTEGER EXTERNAL
|
20
|
1:20
|
|
|
|
PAYMENT_SEQ_NO
|
INTEGER EXTERNAL
|
20
|
21:24
|
|
|
|
PAYMENT_AMT
|
DECIMAL EXTERNAL
|
5
|
25:46
|
|
|
|
ERROR_IND
|
CHAR
|
10
|
47:47
|
|
|
|
STORE
|
INTEGER EXTERNAL
|
6
|
48:57
|
|
|
|
DAY
|
INTEGER EXTERNAL
|
3
|
58:60
|
|
File Name: Samisstr.ctl
|
Table Name
|
Column Name
|
Field Type
|
Field Width
|
Position
|
Description
|
|
SA_MISSING_TRAN
|
MISS_TRAN_SEQ_NO
|
INTEGER EXTERNAL
|
20
|
1:20
|
|
|
|
STORE_DAY_SEQ_NO
|
INTEGER EXTERNAL
|
20
|
21:40
|
|
|
|
REGISTER
|
CHAR
|
5
|
41:45
|
|
|
|
TRAN_NO
|
INTEGER EXTERNAL
|
10
|
46:55
|
|
|
|
STATUS
|
CHAR
|
6
|
56:61
|
|
|
|
RTLOG_ORIG_SYS
|
CHAR
|
3
|
62:64
|
|
File Name: Sattax.ctl
|
Table Name
|
Column Name
|
Field Type
|
Field Width
|
Position
|
Description
|
|
SA_TRAN_TAX
|
tran_seq_no
|
INTEGER EXTERNAL
|
20
|
1:20
|
|
|
|
tax_code
|
CHAR
|
6
|
21:26
|
|
|
|
tax_seq_no
|
INTEGEr extERNaL
|
4
|
27:30
|
|
|
|
tax_amt
|
DECIMAL EXTERNAL
|
22
|
31:52
|
Includes an optional negative sign and a decimal point
|
|
|
error_ind
|
CHAR
|
1
|
53:53
|
|
|
|
ref_no17
|
CHAR
|
30
|
54:83
|
|
|
|
ref_no18
|
CHAR
|
30
|
84:113
|
|
|
|
ref_no19
|
CHAR
|
30
|
114:143
|
|
|
|
ref_no20
|
CHAR
|
30
|
144:173
|
|
|
|
store
|
INTEGER EXTERNAL
|
10
|
174:183
|
|
|
|
day
|
INTEGER EXTERNAL
|
3
|
184:186
|
|
File Name: Sacustatt.ctl
|
Table Name
|
Column Name
|
Field Type
|
Field Width
|
Position
|
Description
|
|
SA_CUST_ATTRIB
|
TRAN_SEQ_NO
|
INTEGER EXTERNAL
|
20
|
1:20
|
|
|
|
ATTRIB_SEQSO
|
CHAR
|
4
|
21:24
|
|
|
|
ATTRIB_TYPE
|
CHAR
|
6
|
25:30
|
|
|
|
ATTRIB_VALUE
|
CHAR
|
6
|
31:36
|
|
|
|
STORE
|
INTEGER EXTERNAL
|
10
|
37:46
|
|
|
|
DAY
|
INTEGER EXTERNAL
|
3
|
47:49
|
|
File Name: Saerror.ctl
|
Table Name
|
Column Name
|
Field Type
|
Field Width
|
Position
|
Description
|
|
SA_ERROR
|
ERROR_SEQ_NO
|
INTEGER EXTERNAL
|
20
|
1:20
|
|
|
|
STORE_DAY_SEQ_NO
|
INTEGER EXTERNAL
|
20
|
21:40
|
|
|
|
BAL_GROUP_SEQ_NO
|
INTEGER EXTERNAL
|
20
|
41:60
|
|
|
|
TOTAL_SEQ_NO
|
INTEGER EXTERNAL
|
20
|
61:80
|
|
|
|
TRAN_SEQ_NO
|
INTEGER EXTERNAL
|
20
|
81:100
|
|
|
|
ERROR_CODE
|
CHAR
|
25
|
101:125
|
|
|
|
KEY_VALUE_1
|
INTEGER EXTERNAL
|
4
|
126:129
|
|
|
|
KEY_VALUE_2
|
INTEGER EXTERNAL
|
4
|
130:133
|
|
|
|
REC_TYPE
|
CHAR
|
6
|
134:139
|
|
|
|
STORE_OVERRIDE_IND
|
CHAR
|
1
|
140:140
|
|
|
|
HQ_OVERRIDE_IND
|
CHAR
|
1
|
141:141
|
|
|
|
UPDATE_ID
|
CHAR
|
30
|
142:171
|
|
|
|
UPDATE_DATE TIME
|
DATE
|
14
|
172:185
|
Format is YYYYMMDDHH24MISS
|
|
|
ORIG_VALUE
|
CHAR
|
70
|
186:255
|
|
|
|
STORE
|
INTEGER EXTERNAL
|
10
|
256:265
|
|
|
|
DAY
|
INTEGER EXTERNAL
|
3
|
266:268
|
|
ReSA Interface File Layout [rtlog]
The following example illustrates the file layout format of the
Oracle Retail TLOG. The content of each Oracle Retail TLOG file is per store
per day. The filename convention is RTLOG_STORE_DATETIME.DAT (for example,
RTLOG_1234_01221989010000.DAT).
Fields, credit promotion ID, tax (vat) at item level and payment
amount of customer orders are rounded off. Both VAT
and tax are handled.
FHEAD (Only 1 per file, required)
THEAD (Multiple expected, one per transaction, required
for each transaction)
TCUST (Only 1 per THEAD record allowed, optional for
some transaction types, see table below)
CATT (Attribute record specific to the TCUST record –
Multiple allowed, only valid if TCUST exists)
TITEM (Multiple allowed per transaction, optional for
some transaction types, see table below)
IDISC (Discount record specific to the TITEM record –
Multiple allowed per item, optional see table below)
IGTAX (Vat/Tax record specific to the TITEM record –
Multiple allowed per item, optional. Either TTAX or IGTAX should appear in a
given RTLOG, but not both, see table below)
TTAX (Vat/Tax record specific to the THEAD record –
Multiple allowed per transaction, optional. Either TTAX or IGTAX should appear
in a given RTLOG, but not both, see table below)
TPYMT (Multiple allowed per transaction, will have the deposit
amount for pickup/delivery/layaway orders, optional see table below)
TTEND (Multiple allowed per transaction, optional for some
transaction types, see table below)
TTAIL (1 per THEAD, required)
FTAIL (1 per file, required)
The order of the records within this transaction layout is
important. It aids processing by ensuring that the information is present when
it is needed.
|
Record Name
|
Field Name
|
Field Type
|
Default Value
|
Description
|
Required?
|
Justification/Padding
|
|
File Header
|
File Type Record Descriptor
|
Char(5)
|
FHEAD
|
Identifies file record type.
|
Y
|
Left/Blank
|
|
|
File Line Identifier
|
Number(10)
|
Specified by external system
|
ID of the current line being processed by input file.
|
Y
|
Right/0
|
|
|
File Type Definition
|
Char(4)
|
RTLG
|
Identifies file as Oracle Retail TLOG.
|
Y
|
Left/Blank
|
|
|
File Create Date
|
Char(14)
|
Create date
|
Date and time file was written by external system
(YYYYMMDDHHMMSS).
|
Y
|
Left/None
|
|
|
Business Date
|
Char(8)
|
Business Date to process
|
Business date of transactions (YYYYMMDD).
|
Y
|
Left/None
|
|
|
Location Number
|
Char(10)
|
Specified by external system
|
Store or warehouse identifier.
|
Y
|
Left/None
|
|
|
Reference Number
|
Char(30)
|
Specified by external system
|
This may contain the Polling ID associated with the
consolidated TLOG file or used for other purpose.
|
N
|
Left/Blank
|
|
|
RTLOG Originating System
|
Char(3)
|
POS
|
Identifies the system the RTLOG file originated from.
Valid values are OMS and POS.
|
Y
|
Left/None
|
|
Transaction Header
|
File Type Record Descriptor
|
Char(5)
|
THEAD
|
Identifies file record type.
|
Y
|
Left/Blank
|
|
|
File Line Identifier
|
Number(10)
|
Specified by external system
|
ID of the current line being processed by input file.
|
Y
|
Right/0
|
|
|
Register
|
Char(5)
|
|
Till used at the store.
|
Y
|
Left/Blank
|
|
|
Transaction Date
|
Char(14)
|
Transaction date
|
Date for the transactions that were processed at the POS
(YYYYMMDDHHMMSS).
|
Y
|
Left/None
|
|
|
Transaction Number
|
Number(10)
|
|
Transaction identifier.
If sa_system_options, wkstation_tran_append_ind is Y, the
first 3 digits indicate the workstation ID and last 7 digits indicate the
transaction number.
Note:
When ReSA is integrated with Oracle Retail Xstore Point of Service , wkstation_tran_append_ind
must be set to N.
|
Y
|
Right/0
|
|
|
Cashier
|
Char(10)
|
|
Cashier identifier.
|
N
|
Left/Blank
|
|
|
Salesperson
|
Char(10)
|
|
Salesperson identifier.
|
N
|
Left/Blank
|
|
|
Transaction Type
|
Char(6)
|
Refer to TRAT code_type for a list of valid types.
|
Transaction type.
|
Y
|
Left/Blank
|
|
|
Sub-transaction type
|
Char(6)
|
Refer to TRAS code_type for a list of valid types.
|
Sub-transaction type. For sale, it can be employee,
drive-off, and so on.
|
N
|
Left/Blank
|
|
|
Orig_tran_no
|
Number(10)
|
|
Populated only for post-void transactions. Transaction
number for the original transaction that will be cancelled.
|
N
|
Right/0
|
|
|
Orig_reg_no
|
Char(5)
|
|
Populated only for post-void transactions. Register number
from the original transaction.
|
N
|
Left/Blank
|
|
|
Reason Code
|
Char(6)
|
Refer to REAC code_type for a list of valid codes. If the transaction
type is PAIDOU and the sub transaction type is MV or EV, the valid codes come
from the non_merch_code_head table.
|
Reason entered by the cashier for some transaction types. Required
for Paid In and Paid out transaction types, but can also be used for voids,
returns, and so on.
|
N
|
Left/Blank
|
|
|
Vendor Number
|
Char(10)
|
|
Supplier ID for a merchandise vendor paid out transaction;
partner ID for an expense vendor paid out transaction.
|
N
|
Left/Blank
|
|
|
Vendor Invoice Number
|
Char(30)
|
|
Invoice number for a vendor paid out transaction.
|
N
|
Left/Blank
|
|
|
Payment Reference Number
|
Char(16)
|
|
The reference number of the tender used for a vendor
payout. This could be the money order number, check number, and so on.
|
N
|
Left/Blank
|
|
|
Proof of Delivery Number
|
Char(30)
|
|
Proof of receipt number given by the vendor at the time of
delivery. This field is populated for a vendor paid out transaction.
|
N
|
Left/Blank
|
|
|
Reference Number 1
|
Char(30)
|
|
Number associated with a particular transaction, for
example, whether for a Store Conditions transaction.
The SA_REFERENCE table defines what this field can contain
for each transaction type.
|
N
|
Left/Blank
|
|
|
Reference Number 2
|
Char(30)
|
|
Second generic reference number.
|
N
|
Left/Blank
|
|
|
Reference Number 3
|
Char(30)
|
|
Third generic reference number.
|
N
|
Left/Blank
|
|
|
Reference Number 4
|
Char(30)
|
|
Fourth generic reference number.
|
N
|
Left/Blank
|
|
|
Value Sign
|
Char(1)
|
Refer to SIGN code_type for a list of valid codes.
|
Sign of the value.
|
Y if Value is present.
|
Left/None
|
|
|
Value
|
Number(20)
|
|
Value, with 4 implied decimal places. Populated by the
retailer for TOTAL transaction, populated by ReSA for SALE and RETURN transactions.
|
Y if tran is a TOTAL.
|
Right/0 when value is present.
Blank when no value is sent.
|
|
|
Banner id
|
Number(4)
|
|
Banner ID of the location.
|
Y
|
Right/0 when value is present.
Blank when no value is sent
|
|
|
Rounded Amount Sign
|
Char(1)
|
Refer to SIGN code_type for a list of valid codes.
|
Sign of rounded amount.
|
Y
|
Left/None
|
|
|
Rounded Amount
|
Number(20)
|
|
Total rounded amount, with 4 implied decimal places.
|
Y
|
Right/0 when RoundedAmount is present otherwise blank
|
|
|
Rounded Off Sign
|
Char(1)
|
Refer to SIGN code_type for a list of valid codes.
|
|
Y
|
Left/None
|
|
|
Rounded Off Amount
|
Number(20)
|
|
Rounded off amount, with 4 implied decimal places
|
Y
|
Right/0 when RoundedAmount is present otherwise blank
|
|
|
Credit Promotion Id
|
Char(10)
|
|
Credit Promotional ID.
|
Y
|
Left/None
|
|
|
Reference Number 25
|
Char(30)
|
|
|
N
|
Left/Blank
|
|
|
Reference Number 26
|
Char(30)
|
|
|
N
|
Left/Blank
|
|
|
Reference Number 27
|
Char(30)
|
|
|
N
|
Left/Blank
|
|
|
Transaction Processing System
|
Char(3)
|
Valid values are OMS and POS.
|
Contains the ID of the system that processed the
transaction.
|
N
|
Left/None
|
|
Transaction Customer
|
File Type Record Descriptor
|
Char(5)
|
TCUST
|
Identifies the file record type.
|
Y
|
Left/Blank
|
|
|
File Line Identifier
|
Number(10)
|
Specified by external system
|
ID of the current line being processed by input file.
|
Y
|
Right/0
|
|
|
Customer ID
|
Char(16)
|
Customer identifier
|
The ID number of a customer.
|
Y
|
Left/Blank
|
|
|
Customer Type ID
|
Char(6)
|
Refer to CIDT code_type for a list of valid types.
|
Customer ID type.
|
Y
|
Left/Blank
|
|
|
Customer Name
|
Char(120)
|
|
Customer name.
|
N
|
Left/Blank
|
|
|
Address 1
|
Char(240)
|
|
Customer address.
|
N
|
Left/Blank
|
|
|
Address 2
|
Char(240)
|
|
Additional field for customer address.
|
N
|
Left/Blank
|
|
|
City
|
Char(120)
|
|
City.
|
N
|
Left/Blank
|
|
|
State
|
Char(3)
|
State identifier
|
State.
|
N
|
Left/Blank
|
|
|
Zip Code
|
Char(30)
|
Zip identifier
|
Zip code.
|
N
|
Left/Blank
|
|
|
Country
|
Char(3)
|
|
Country.
|
N
|
Left/Blank
|
|
|
Home Phone
|
Char(20)
|
|
Telephone number at home.
|
N
|
Left/Blank
|
|
|
Work Phone
|
Char(20)
|
|
Telephone number at work.
|
N
|
Left/Blank
|
|
|
E-mail
|
Char(100)
|
|
E-mail address.
|
N
|
Left/Blank
|
|
|
Birthdate
|
Char(8)
|
|
Date of birth. (YYYYMMDD)
|
N
|
Left/Blank
|
|
Customer Attribute
|
File Type Record Descriptor
|
Char(5)
|
CATT
|
Identifies file record type.
|
Y
|
Left/Blank
|
|
|
File Line Identifier
|
Number(10)
|
Specified by external system
|
ID of the current line being processed by input file.
|
Y
|
Right/0
|
|
|
Attribute type
|
Char(6)
|
Refer to SACA code_type for a list of valid types.
|
Type of customer attribute
|
Y
|
Left/Blank
|
|
|
Attribute value
|
Char(6)
|
Refer to members of SACA code_type for a list of valid
values.
|
Value of customer attribute.
|
Y
|
Left/Blank
|
|
Transaction Item
|
File Type Record Descriptor
|
Char(5)
|
TITEM
|
Identifies file record type.
|
Y
|
Left/Blank
|
|
|
File Line Identifier
|
Number(10)
|
Specified by external system
|
ID of the current line being processed by input file.
|
Y
|
Right/0
|
|
|
Item Status
|
Char(6)
|
Refer to SASI code_type for a list of valid codes.
|
Status of the item within the transaction. Valid values
are:
V – Void item
S - Sold item
R - Returned item
ORI – Order Initiate
ORC – Order Cancel
ORD – Order Complete
LIN – Layaway Initiate
LCA – Layaway Cancel
LCO – Layaway Complete
|
Y
|
Left/Blank
|
|
|
Item Type
|
Char(6)
|
Refer to SAIT code_type for a list of valid codes.
|
Identifies what type of item is transmitted.
|
Y
|
Left/Blank
|
|
|
Item number type
|
Char(6)
|
Refer to UPCT code_type for a list of valid codes.
|
Identifies the type of item number if the item type is ITEM
or REF.
|
N
|
Left/Blank
|
|
|
Format ID
|
Char(1)
|
VPLU format ID
|
Used to interpret VPLU items.
|
N
|
Left/Blank
|
|
|
Item
|
Char(25)
|
Item identifier
|
Identifies the merchandise item.
|
N
|
Left/Blank
|
|
|
Reference Item
|
Char(25)
|
Item identifier
|
Identifies the sub-transaction level merchandise item.
|
N
|
Left/Blank
|
|
|
Non-Merchandise Item
|
Char(25)
|
Item identifier
|
Identifies a non-merchandise item.
|
N
|
Left/Blank
|
|
|
Voucher
|
Char(25)
|
|
Gift certificate number.
|
N
|
Right/0
|
|
|
Department
|
Number(4)
|
|
Identifies the department to which this item belongs.
This is filled in by saimptlog.
|
N
|
Right/Blank
|
|
|
Class
|
Number(4)
|
Class of the item
|
Class of item sold or returned. Not required from a
retailer; populated by ReSA.
This is filled in by saimptlog.
|
N
|
Right/Blank
|
|
|
Subclass
|
Number(4)
|
Subclass of the item
|
Subclass of the item sold or returned. Not required from a
retailer; populated by ReSA.
This is filled in by saimptlog.
|
N
|
Right/Blank
|
|
|
Quantity Sign
|
Char(1)
|
Refer to SIGN code_type for a list of valid codes.
|
Sign of the quantity
|
Y
|
Left/None
|
|
|
Quantity
|
Number(12)
|
|
Number of items purchased, with 4 decimal places.
|
Y
|
Right/0
|
|
|
Selling Unit of Measure
|
Char(4)
|
|
Unit of measure of the item’s quantity.
|
Y
|
Left/None
|
|
|
Unit Retail
|
Number(20)
|
|
Unit retail, with 4 implied decimal places.
|
Y
|
Right/0
|
|
|
Override Reason
|
Char(6)
|
Refer to ORRC code_type for a list of valid codes.
|
This column is populated when an item's price has been
overridden at the POS to define why it was overridden.
|
Y if unit retail was manually entered
|
Left/Blank
|
|
|
Original Unit Retail
|
Number(20)
|
|
Value, with 4 implied decimal places.
This column is populated when the item's price was
overridden at the POS and the item's original unit retail is known.
|
Y if unit retail was manually entered
|
Right/0
|
|
|
Taxable Indicator
|
Char(1)
|
Refer to YSNO code_type for a list of valid codes.
|
Indicates whether or not item is taxable.
|
Y
|
Left/None
|
|
|
Pump
|
Char(8)
|
|
Fuel pump identifier.
|
N
|
Left/Blank
|
|
|
Reference Number 5
|
Char(30)
|
|
Number associated with a particular item within a
transaction, for example, special order number.
The sa_reference table defines what this field can contain
for each transaction type.
|
N
|
Left/Blank
|
|
|
Reference Number 6
|
Char(30)
|
|
Second generic reference number at the item level.
|
N
|
Left/Blank
|
|
|
Reference Number 7
|
Char(30)
|
|
Third generic reference number at the item level.
|
N
|
Left/Blank
|
|
|
Reference Number 8
|
Char(30)
|
|
Fourth generic reference number at the item level.
|
N
|
Left/Blank
|
|
|
Item_swiped_ind
|
Char(1)
|
Refer to YSNO code_type for a list of valid codes.
|
Indicates if the item was automatically entered into the
POS system or if it had to be manually keyed.
|
Y
|
Left/None
|
|
|
Return Reason Code
|
Char(6)
|
Refer to SARR code_type for a list of valid codes.
|
The reason an item was returned.
|
N
|
Left/Blank
|
|
|
Salesperson
|
Char(10)
|
|
The salesperson who sold the item.
|
N
|
Left/Blank
|
|
|
Expiration_date
|
Char(8)
|
|
Gift certificate expiration date (YYYYMMDD).
|
N
|
|
|
|
Drop Ship Ind
|
Char(1)
|
Refer to YSNO code type for a list of valid codes.
|
Indicates whether the item is part of a drop shipment.
|
Y
|
Left/None
|
|
|
Uom_qty
|
Number(12)
|
|
Quantity of items purchased in the given UOM, with 4
decimal places.
|
Y
|
Right/0
|
|
|
Catchweight_ind
|
Char(1)
|
Valid values are Y and N.
|
Identifies if the item is a catchweight item.
|
|
Left/None
|
|
|
Selling item
|
Char(25)
|
Item identifier
|
Identifies the selling item.
|
N
|
Left/Blank
|
|
|
Customer order line no
|
Number(6)
|
|
Identifies the customer order number.
|
N
|
Left/Blank
|
|
|
Media id
|
Number(10)
|
|
Identifies the customer media ID.
|
N
|
Left/Blank
|
|
|
Total Igtax Amount
|
Number(21)
|
|
Contains the Igtax amount.
|
N
|
Right/0
|
|
|
Unique ID
|
Char(128)
|
|
|
N
|
Left/Blank
|
|
|
Customer Order Number
|
Char(48)
|
|
Contains the customer order ID.
|
N
|
Left/None
|
|
|
Customer Order Date
|
Char(14)
|
|
Contains the customer order date. Format is:
YYYYMMDDHHMMSS
|
N
|
Left/Blank
|
|
|
Fulfillment Order Number
|
Char(48)
|
|
Contains the order ID of the fulfillment order.
|
N
|
Left/None
|
|
|
No Inventory Return
|
Char(1)
|
|
Indicates if there is an associated inventory with the
return transaction with an External Customer Order sales type.
|
N
|
Left/Blank
|
|
|
Sales Type
|
Char(1)
|
|
Indicates if the transaction is an In Store Customer
Order, External Customer Order, or Regular Sale.
|
Y
|
Left/Blank
|
|
|
Return Warehouse
|
Char(10)
|
|
Contains the ID of the physical warehouse to which the
inventory is returned.
|
N
|
Left/Blank
|
|
|
Return Disposition
|
Char(10)
|
|
Contains the return disposition of the returned items.
|
N
|
Left/Blank
|
|
Item Discount
|
File Type Record Descriptor
|
Char(5)
|
IDISC
|
Identifies the file record type.
|
Y
|
Left/Blank
|
|
|
File Line Identifier
|
Number(10)
|
Specified by external system
|
ID of the current line being processed by input file.
|
Y
|
Right/0
|
|
|
RMS Promotion Number
|
Char(6)
|
Refer to PRMT code_type for a list of valid types.
|
The RMS promotion type.
|
Y
|
Left/Blank
|
|
|
Discount Reference Number
|
Number(10)
|
|
Discount reference number associated with the discount
type. For example, if the discount type is a promotion, this contains the
promotion number.
|
N
|
Left/Blank
|
|
|
Discount Type
|
Char(6)
|
Refer to SADT code_type for a list of valid types.
|
The type of discount within a promotion. This allows a
retailer to further break down coupon discounts within the In-store
promotion, for example.
|
N
|
Left/Blank
|
|
|
Coupon Number
|
Char(16)
|
|
Number of a store coupon used as a discount.
|
Y if coupon
|
Left/Blank
|
|
|
Coupon Reference Number
|
Char(16)
|
|
Additional information about the coupon, usually contained
in a second bar code on the coupon.
|
Y if coupon
|
Left/Blank
|
|
|
Quantity Sign
|
Char(1)
|
Refer to SIGN code_type for a list of valid codes.
|
Sign of the quantity.
|
Y
|
Left/None
|
|
|
Quantity
|
Number(12)
|
|
The quantity purchased for which the discount is applied,
with 4 implied decimal places.
|
Y
|
Right/0
|
|
|
Unit Discount Amount
|
Number(20)
|
|
Unit discount amount for this item, with 4 implied decimal
places.
|
Y
|
Right/0
|
|
|
Reference Number 13
|
Char(30)
|
|
Number associated with a particular transaction type at
the discount level.
The sa_reference table defines what this field can contain
for each transaction type.
|
N
|
Left/Blank
|
|
|
Reference Number 14
|
Char(30)
|
|
Second generic reference number at the discount level.
|
N
|
Left/Blank
|
|
|
Reference Number 15
|
Char(30)
|
|
Third generic reference number at the discount level.
|
N
|
Left/Blank
|
|
|
Reference Number 16
|
Char(30)
|
|
Fourth generic reference number at the discount level.
|
N
|
Left/Blank
|
|
|
Uom_qty
|
Number(12)
|
|
Quantity of items purchased in the given UOM with 4
decimal places.
|
Y
|
Right/0
|
|
|
Catchweight_ind
|
Char(1)
|
Valid values are Y and N.
|
Identifies if the item is a catchweight item.
|
|
Left/None
|
|
|
Promo component
|
Number(10)
|
|
If the discount is a promotion, this field contains the
promotion component value associated with the promotion (discount reference
number).
|
N
|
Left/Blank
|
|
Item Tax
|
File Type Record Descriptor
|
Char(5)
|
IGTAX
|
Identifies the file record type
|
Y
|
Left/Blank
|
|
|
File Line Identifier
|
Number(10)
|
Specified by external system
|
ID of the current line being processed by input file.
|
Y
|
Right/0
|
|
|
Tax Authority
|
Number(10)
|
|
|
Y
|
Left/0
|
|
|
Igtax Code
|
Char(6)
|
Refer to tax_code/vat_code of tax_codes/vat_codes tables.
|
IGtax code (tax code/VAT code) to represent whether it is
a State, City, or some other tax code/VAT code.
|
Y
|
Left/Blank
|
|
|
Igtax Rate
|
Number(20)
|
|
Igtax rate, with 4 implied decimal places.
|
Y
|
Right/0
|
|
|
Igtax Amount Sign
|
Char(1)
|
Refer to SIGN code_type for a list of valid codes.
|
Sign of the Igtax amount.
|
Y
|
Left/None
|
|
|
Igtax Amount
|
Number(21)
|
|
Total igtax amount for this item, with 5 implied decimal
places.
|
Y
|
Right/0
|
|
|
Reference Number 21
|
Char(30)
|
|
|
N
|
Left/None
|
|
|
Reference Number 22
|
Char(30)
|
|
|
N
|
Left/None
|
|
|
Reference Number 23
|
Char(30)
|
|
|
N
|
Left/None
|
|
|
Reference Number 24
|
Char(30)
|
|
|
N
|
Left/None
|
|
Transaction Tax
|
File Type Record Descriptor
|
Char(5)
|
TTAX
|
Identifies the file record type.
|
Y
|
Left/Blank
|
|
|
File Line Identifier
|
Number(10)
|
Specified by external system
|
ID of the current line being processed by input file.
|
Y
|
Right/0
|
|
|
Tax Code
|
Char(6)
|
Refer to TAXC code_type for as list of valid types.
|
Tax code (tax code/VAT code) to represent whether it is a
State, City, or some other tax code/VAT code.
|
Y
|
Left/Blank
|
|
|
Tax Sign
|
Char(1)
|
Refer to SIGN code_type for a list of valid codes.
|
Sign of the tax amount.
|
Y
|
Left/None
|
|
|
Tax Amount
|
Number(20)
|
|
Total Tax amount for this item, with 4 implied decimal
places.
|
Y
|
Right/0
|
|
|
Reference Number 17
|
Char(30)
|
|
|
N
|
Left/None
|
|
|
Reference Number 18
|
Char(30)
|
|
|
N
|
Left/None
|
|
|
Reference Number 19
|
Char(30)
|
|
|
N
|
Left/None
|
|
|
Reference Number 20
|
Char(30)
|
|
|
N
|
Left/None
|
|
Transaction payment
|
File Type Record Descriptor
|
Char(5)
|
TPYMT
|
Identifies the file record type.
|
Y
|
Left/Blank
|
|
|
File Line Identifier
|
Number(10)
|
Specified by external system
|
ID of the current line being processed by input file.
|
Y
|
Right/0
|
|
|
Payment Sign
|
Char(1)
|
Refer to SIGN code_type for a list of valid codes.
|
Sign of the deposit amount.
|
Y
|
Left/None
|
|
|
Payment Amount
|
Number(20)
|
|
Deposit amount paid, with 4 implied decimal places.
|
Y
|
Right/0
|
|
Transaction Tender
|
File Type Record Descriptor
|
Char(5)
|
TTEND
|
Identifies the file record type.
|
Y
|
Left/Blank
|
|
|
File Line Identifier
|
Number(10)
|
Specified by external system
|
ID of the current line being processed by input file.
|
Y
|
Right/0
|
|
|
Tender Type Group
|
Char(6)
|
Refer to TENT code_type for as list of valid types
|
High-level grouping of tender types.
|
Y
|
Left/Blank
|
|
|
Tender Type ID
|
Number(6)
|
Refer to the pos_tender_type_head table for as list of
valid types.
|
Low-level grouping of tender types.
|
Y
|
Left/Blank
|
|
|
Tender Sign
|
Char(1)
|
Refer to SIGN code_type for a list of valid codes.
|
Sign of the value.
|
Y
|
Left/None
|
|
|
Tender Amount
|
Number(20)
|
|
Amount paid with this tender in the transaction, with 4
implied decimal places.
|
Y
|
Right/0
|
|
|
Cc_no
|
Char(40)
|
|
Credit card number. The value sent in the RTLOG should be
masked.
|
Y if credit card
|
Left/Blank
|
|
|
Cc_auth_no
|
Char(16)
|
|
Authorization number for a credit card.
|
Y if credit card
|
Left/Blank
|
|
|
cc authorization source
|
Char(6)
|
Refer to CCAS code_type for as list of valid types.
|
|
Y if credit card
|
Left/Blank
|
|
|
cc cardholder verification
|
Char(6)
|
Refer to CCVF code_type for as list of valid types.
|
|
Y if credit card
|
Left/Blank
|
|
|
cc expiration date
|
Char(8)
|
|
YYYYMMDD
|
Y if credit card
|
Left/Blank
|
|
|
cc entry mode
|
Char(6)
|
Refer to CCEM code_type for as list of valid types.
|
Indicates whether the credit card was swiped, thus
automatically entered, or manually keyed.
|
Y if credit card
|
Left/Blank
|
|
|
cc terminal id
|
Char(5)
|
|
Terminal number from which the transaction was sent.
|
N
|
Left/Blank
|
|
|
cc special condition
|
Char(6)
|
Refer to CCSC code_type for as list of valid types.
|
|
Y if credit card
|
Left/Blank
|
|
|
Voucher_no
|
Char(25)
|
|
Gift certificate or credit voucher serial number.
|
Y if voucher
|
Right/0
|
|
|
Coupon Number
|
Char(16)
|
|
Number of a manufacturer’s coupon used as a tender.
|
Y if coupon
|
Left/Blank
|
|
|
Coupon Reference Number
|
Char(16)
|
|
Additional information about the coupon, usually contained
in a second bar code on the coupon.
|
Y if coupon
|
Left/Blank
|
|
|
Check Account Number
|
Char(30)
|
|
Account number of the check.
|
N
|
Left/Blank
|
|
|
Check Number
|
Number(10)
|
|
Check number.
|
Required for the tender type CHECK
|
Right/0
|
|
|
Identification Method
|
Char(6)
|
Refer to IDMH code_type for list of valid types.
|
Identification Method (such as a driver’s license number
or photo credit card).
|
N
|
Left/Blank
|
|
|
Identification Id
|
Char(40)
|
|
Identification ID (license ID or photo card number).
|
N
|
Left/Blank
|
|
|
Original Currency
|
Char(3)
|
Refer to the CURRENCIES table for valid currency codes.
|
The original currency with which the customer made the
payment.
|
N
|
Left/Blank
|
|
|
Original Currency Amount
|
Number(20)
|
|
Amount paid with this tender in the original currency,
with 4 implied decimal places.
|
N
|
Right/0
|
|
|
Reference No 9
|
Char(30)
|
|
Number associated with a particular transaction type at
the tender level.
The sa_reference table defines what this field can contain
for each transaction type.
|
N
|
Left/Blank
|
|
|
Reference No 10
|
Char(30)
|
|
Second generic reference number at the tender level.
|
N
|
Left/Blank
|
|
|
Reference No 11
|
Char(30)
|
|
Third generic reference number at the tender level.
|
N
|
Left/Blank
|
|
|
Reference No 12
|
Char(30)
|
|
Fourth generic reference number at the tender level.
|
N
|
Left/Blank
|
|
Transaction Trailer
|
File Type Record Descriptor
|
Char(5)
|
TTAIL
|
Identifies file record type.
|
Y
|
Left/Blank
|
|
|
File Line Identifier
|
Number(10)
|
Specified by external system
|
ID of the current line being processed by input file.
|
Y
|
Right/0
|
|
|
Transaction Record Counter
|
Number(10)
|
|
Number of records processed in the current transaction
(only those records between transaction head and tail).
|
|
|
|
File Trailer
|
File Type Record Descriptor
|
Char(5)
|
FTAIL
|
Identifies the file record type.
|
Y
|
Left/Blank
|
|
|
File Line Identifier
|
Number(10)
|
Specified by external system
|
ID of the current line being processed by input file.
|
Y
|
Right/0
|
|
|
File Record Counter
|
Number(10)
|
|
Number of transactions processed in the current file (only
the records between the file head and tail).
|
Y
|
Right/0
|
The RTLOG file is imported into the Sales Audit tables after
validation by the batch program saimptlog. This section describes the
requirements and validations performed on the records.
Common Requirements/Validations
This section details the common requirements and validations
performed on all transactions. The following sections describe the specific
requirements of each type of transaction. If a transaction is not mentioned, it
does not have specific requirements.
Record Type Requirements:
|
Transaction Type
|
Includes item records?
|
Includes tender records?
|
Includes tax records? IGTAX?
|
Includes customer records?
|
|
OPEN
|
No
|
No
|
No
|
No
|
|
NOSALE
|
No
|
Optional
|
No
|
No
|
|
VOID
|
Optional
|
Optional
|
Optional
|
Optional
|
|
PVOID
|
No
|
No
|
No
|
No
|
|
SALE
|
Optional
|
Yes
|
Optional
|
Optional
|
|
RETURN
|
Yes
|
Yes
|
Optional
|
Optional
|
|
EEXCH
|
Yes
|
No
|
Optional
|
Optional
|
|
PAIDIN
|
No
|
Yes
|
No
|
No
|
|
PAIDOU
|
No
|
Yes
|
No
|
No
|
|
PULL
|
No
|
Yes
|
No
|
No
|
|
LOAN
|
No
|
Yes
|
No
|
No
|
|
COND
|
No
|
No
|
No
|
No
|
|
CLOSE
|
No
|
No
|
No
|
No
|
|
TOTAL
|
No
|
No
|
No
|
No
|
|
REFUND
|
This transaction is not sent through the RTLOG. It is
entered at the HQ level. The TITEM and TCUST records are optional. The TTEND
record is required. A TTAX record should not be included if IGTAX appears in
a transaction. IGTAX is an item-level tax and TTAX is a transaction-level
tax. Either IGTAX or TTAX can be used, but not both.
|
|
METER
|
Yes
|
No
|
No
|
No
|
|
PUMPT
|
Yes
|
No
|
No
|
No
|
|
TANKDP
|
Yes
|
No
|
No
|
No
|
|
TERM
|
TERM records are created by saimptlog and then loaded into
the database. They do not come from the RTLOG file. They require one TITEM,
one TTEND, one TTAX, one TCUST record, one CATT record, IGTAX, and one TPYMT.
|
|
DCLOSE
|
No
|
No
|
No
|
No
|
|
SPLORD
|
Optional
|
Yes
|
Optional
|
Optional
|
Requirements per record type:
|
Record Type
|
Requirements
|
|
IDISC
|
IDISC records must immediately follow their associated
TITEM record.
|
|
IGTAX
|
IGTAX will immediately follow TITEM if IDISC is not coming,
otherwise it should follow IDISC. Even if IGTAX is coming prior to IDISC, it
will be processed, but for maintaining proper format, ReSA expects it to come
after IDISC.
|
|
TTAX
|
Either this record or IGTAX should appear in the
transaction. IGTAX and TTAX cannot be both used at the same time.
|
|
TPYMT
|
This record should be right before the TTEND record. It
contains the deposit amount for pickup/delivery/layaway orders.
|
|
CATT
|
CATT records must immediately follow their associated
TCUST record.
|
Code Type Validations:
|
Record Name
|
Field Name
|
Code Type
|
|
Transaction Header
|
Transaction Type
|
TRAT
|
|
|
Sub-transaction Type
|
TRAS
|
|
|
Reason Code
|
REAC or values from non_merch_code_head if the transaction
type is PAIDOU and the sub-transaction type is MV or EV.
|
|
|
Value Sign
|
SIGN
|
|
|
Vender No
|
If the transaction type is PAIDOU and the sub-transaction
type is MV, this field is validated against the supplier table. If the
transaction type is PAIDOU and the sub-transaction type is EV, this field is
validated against the partner table.
|
|
|
Transaction Processing System
|
TSYS
|
|
Transaction Item
|
Item Type
|
SAIT
|
|
|
Item Status
|
SASI
|
|
|
Item Number Type
|
UPCT
|
|
|
Quantity Sign
|
SIGN
|
|
|
Taxable Indicator
|
YSNO
|
|
|
Price Override Reason Code
|
ORRC
|
|
|
Item Swiped Indicator
|
YSNO
|
|
|
Sales Type
|
SASY
|
|
|
Return Disposition
|
INV_STATUS_CODES table
|
|
|
No Inventory Return
|
YSNO
|
|
|
Return Reason Code
|
SARR
|
|
Item Discount
|
RMS Promotion Type
|
PRMT
|
|
|
Discount Type
|
SADT
|
|
|
Quantity Sign
|
SIGN
|
|
Transaction Customer
|
Customer ID Type
|
CIDT
|
|
Customer Attribute
|
Attribute Type
|
SACA
|
|
|
Attribute value
|
Code types from the codes in SACA.
|
|
Transaction Tax
|
Tax code
|
TAXC from the CODE_DETAIL table or VATC from the VAT_CODES
table.
|
|
|
Tax sign
|
SIGN
|
|
Transaction Payment
|
Payment (Deposit Amount) Sign
|
SIGN
|
|
Transaction Tender
|
Tender Type Group
|
TENT
|
|
|
Tender Sign
|
SIGN
|
|
|
Tender Type ID
|
Pos_tender_type_head table
|
|
|
CC Authorization Source
|
CCAS
|
|
|
CC Cardholder Verification
|
CCVF
|
|
|
CC Entry Mode
|
CCEM
|
|
|
CC Special Condition
|
CCSC
|
The following dates are validated: Business Date, Transaction
Date, and Expiration Date. Also, saimptlog accepts only business dates that are
within the PERIOD.VDATE minus the SA_SYSTEM_OPTIONS.DAYS_POST_SALE value.
The store number is validated against the STORE table. Numeric
fields are checked for non-numeric characters.
For transactions of type SALE, RETURN, and EEXCH, saimptlog
checks whether a transaction is in balance:
§
When TAX is on in the system (system_options.default_tax_type equals
SALES):
Transaction Items (Unit Retail * Unit Retail Sign *
Quantity) of items which are on Regular Sale, Return, or EEXCH
+ Item Discounts (Unit Discount Amount * Unit
Discount Sign * Quantity) of items which are on Regular Sale, Return, or EEXCH
+ Item Level Tax (Total Igtax Amount) of items which
are on Regular Sale, Return, or EEXCH
+ Transaction Tax (Tax Amount * Tax Sign)
+ Transaction payment (Payment Amount * Payment
Sign)
equals Transaction Tenders (Tender Amount * Tender
Sign)
saimptlog will populate the Value field (on THEAD)
with the transaction’s sales value (item value minus discount value plus tax
value) from the preceding calculation if it was not provided in the RTLOG. The
following change is made in the sale total balancing: Value field in THEAD will
be: (item value – discount value + tax value) for items which are on Regular
Sale, Return, or EEXCH + payment value.
Note:
If this Value field is being used in creating some totals, then accordingly,
these totals needs to be modified to accommodate the extra amount coming in.
§
When VAT is on in the system (system_options.default_tax_type in
GTAX, SVAT), look for other system options, along with class level and store
level VAT indicators, which tell whether the unit retail is inclusive or
exclusive of VAT. The logic of balancing will vary:
Transaction Items (Unit Retail * Unit Retail Sign *
Quantity) of items which are on Regular Sale, Return, or EEXCH
+ Item Discounts (Unit Discount Amount * Unit
Discount Sign * Quantity) of items which are on Regular Sale, Return, or EEXCH
+ Item Level Tax (Total Igtax Amount) of items which
are on Regular Sale, Return, or EEXCH (when VAT is off at the item level).
+ Transaction Tax (Tax Amount * Tax Sign)
+ Transaction payment (Payment Amount * Payment
Sign)
equals Transaction Tenders (Tender Amount * Tender
Sign)
Vouchers are treated as follows:
§
If an item sold is as a gift certificate (Transaction Item,
Voucher field has a value), the issued information is written to the SA_VOUCHER
table.
§
If the Transaction Type is RETURN, and the Transaction Tender
Type Group is voucher (VOUCH), the issued information is written to the
SA_VOUCHER table.
§
If the Transaction Type is SALE and the Transaction Tender Type
Group is a voucher (VOUCH), the redeemed information is written to the
SA_VOUCHER table.
§
When a gift certificate is sold, the customer information should
always be included. A receiving customer name value should be populated in the
ref_no5 field, receiving customer state value should be populated in the
ref_no6 field, and receiving customer country should be populated in the
ref_no7 field. These reference fields can be changed by updating the
sa_reference table, but the code needs to be modified as well. The expiration
date is put in the expiration_date field in the TITEM record.
Other validations and
points to consider:
§
The salesperson in the TITEM record takes precedence over the
salesperson in the THEAD record.
§
If an item sold is a sub-transaction (REF) item (Transaction
Item, reference item field has a value and item does not), it will be converted
to the corresponding transaction level item (ITEM).
§
If an item sold is an ITEM (Transaction Item, item field has a
value), it will be validated against the RMS item tables.
§
The corresponding Department, Class, Subclass, and Taxable
Indicator will be selected from the RMS tables and populated for an item.
The balancing level determines whether the register or the
cashier fields are required:
§
If the balancing level is R (register), the register field on the
THEAD must be populated.
§
If the balancing level is C (cashier), the cashier field on the
THEAD must be populated.
§
If the balancing level is S (store), neither field is required to
be populated.
§
The tax_ind and the item_swiped_ind fields can only accept Y or N
values. If an invalid value is passed through the RTLOG, an error will be
flagged and the value will be defaulted to Y.
Transaction of Type SALE
A transaction of type SALE is generated whenever an item is sold.
If a sale is for an employee, the sub-transaction type is EMP. If it is a
drive-off sale, when someone drives off with unpaid gas, the sub-transaction
type is DRIVEO. A special type of sale is an odd exchange, sub-transaction type
EXCH, where items are sold and returned in the same transaction. If the net
value of the exchange is positive, then it is a sale. If the net value is
negative, it is a return.
Requirements per record type (other than what is described in the
preceding Layout section):
|
Record Type
|
Requirements
|
|
THEAD
|
|
|
TEM
|
§ Item Status is a
required field; it determines whether the item is Sold (S), Returned (R), or
Voided (V). If the item status is S, the quantity sign is expected to be P.
If the item status is R, the quantity sign is expected to be N. Also, if the
item status is ORI, LIN, ORD, or LCO, the quantity sign should be P. In the
case of ORC or LCA, it should be N.
§ If the item status
is V, the quantity sign is the reverse of the quantity sign of the voided
item. That is, if an item with status S is voided, the quantity sign would be
N. Furthermore, the sum of the quantities being voided cannot exceed the sum
of the quantities that are Sold or Returned.
Note:
Neither of the two validations are performed by saimptlog, but an audit rule
could be created to check this.
§ The following item
statuses are used for handling items on customer order layaway:
ORI – Order Initiate
ORD – Order Complete
ORC – Order Cancel
LIN – Layaway Initiate
LCA – Layaway Cancel
LCO – Layaway Complete
§ In a typical sale,
the items all have a status of S. In the case of an odd exchange, some items
will have a status of R.
§ In a typical
return, the items all have a status of R. In the case of an odd exchange,
some items will have a status of S.
§ If an item has
status R, then the Return Reason Code field may be populated. If it is, it
will be validated against code type SARR. Also, it is better to capture the
Return Reason Code in the case of items on ORC or LCA, but it is not
mandatory. No validation is kept for these new item statuses for checking of
SARR.
§ If the price of an
item is overridden, the Override Reason and Original Unit Retail fields must
be populated.
|
|
IDISC
|
§ The RMS Promotion
Type field must always be populated with values of code type PRMT.
§ The Promotion field
is validated, when a value is passed, against the promhead table.
§ If the promotion is
In Store (code 1004), the Discount Type field must be populated with values
of code type SADT.
§ The Discount
Reference Number is a promotion number which is of status A, E, or M.
§ If the Discount
Type is SCOUP for Store Coupon, the Coupon Number field must be populated.
The Coupon Reference Number field is optional.
|
|
IGTAX
|
§ The IGTAX_CODE
field must always be populated depending on the system’s default tax type.
For a default tax type of SALES, this field will be populated with values of
code_type TAXC. For a default tax type of SVAT or GTAX,, this field will be
populated with VATC (vat_code from vat_codes table). IGTAX is an Item-level
tax.
§ The TAX_AUTHORITY
field must always be populated when the default tax type is GTAX.
|
|
TTAX
|
§ The TAX_CODE field
must always be populated depending on the system’s default tax type. For a
default tax type of SALES, this field will be populated with values of
code_type TAXC. For a default tax type of GTAX or SVAT, this field will be
populated with VATC (vat_code from vat_codes table). TTAX is a
Transaction-level tax.
|
|
TPYMT
|
Payment (Deposit amount) sign and Payment (Deposit)
amount fields are necessary if this line is appearing. Basically, this is the
accumulation of various items being considered in one transaction, which are
on pick up/delivery/lay away.
|
|
TTEND
|
If the tender type group is COUPON, the Coupon Number
field must be populated. The Coupon Reference Number field is optional.
|
Meaning of reference number fields:
Note:
The meaning of these reference number fields may be changed through the
sa_reference table. The transaction type SPLORD is the same as SALE, but the
inventory will not be reserved for the orders at its line level.
|
Transaction Type
|
Sub-transaction Type
|
Item Type
|
Tender Type Group
|
Reference Number Field
|
Meaning of Reference Field
|
Req?
|
|
SALE
|
|
|
|
1
|
Speed Sale Number
|
Y
|
|
SALE
|
|
GCN
|
|
5
|
Recipient Name
|
N
|
|
SALE
|
|
GCN
|
|
6
|
Recipient State
|
N
|
|
SALE
|
|
GCN
|
|
7
|
Recipient Country
|
N
|
|
SALE
|
|
|
CHECK
|
9
|
Check Number
|
N
|
|
SALE
|
|
|
CHECK
|
10
|
Driver’s License Number
|
N
|
|
SALE
|
|
|
CHECK
|
11
|
Credit Card Number
|
N
|
|
SALE
|
DRIVEO
|
|
|
1
|
Incident Number
|
Y
|
|
SALE
|
EMP
|
|
|
3
|
Employee Number of the employee receiving the goods.
|
N
|
Expected values for sign fields:
|
TRANSACTION TYPE
|
TITEM.Quantity Sign
|
TTEND.Tender Sign
|
TTAX.Tax Sign
|
IDISC.Quantity Sign
|
|
SALE
|
P if item is sold; N if item is returned; reverse of original
item if item is voided.
|
P
|
P
|
P if item is sold; N if item is returned; reverse of
original item if item is voided.
|
|
SALE
|
P if item is on ORI, LIN, ORD, or LCO; N if item is on ORC
or LCA.
|
P
|
P
|
P if item is on ORI, LIN, ORD, or LCO; N if item is on ORC
or LCA.
|
Transaction of Type PVOID
This transaction is generated at the register when another
transaction is being post voided. The orig_tran_no and orig_reg_no fields must
be populated with the appropriate information for the transaction being post voided.
The PVOID transaction must be associated with the same store day as the
original transaction. If the PVOID needs to be generated after the store day is
closed, the transaction needs to be created using the forms.
Transaction of type RETURN
This transaction is generated when a customer returns an item.
This type of transaction has similar record type requirements as
a SALE transaction.
Meaning of reference number fields:
Note: The
assumption is that new item statuses will not come under transaction type
RETURN.
If a customer wants to return the items (ORI, LIN), these will
come under SALE but with item statuses as ORC or LCA.
Note: The
meaning of these reference number fields may be changed through the
sa_reference table.
Transaction Type
|
Sub-transaction Type
|
Reference Number Field
|
Meaning of Reference Field
|
Req?
|
|
RETURN
|
|
1
|
Receipt Indicator (Y/N)
|
Y
|
|
RETURN
|
|
2
|
Refund Reference Number
|
N
|
|
RETURN
|
EMP
|
3
|
Employee Number of the employee returning the goods.
|
N
|
Expected values for sign fields:
|
TRANSACTION TYPE
|
TITEM.Quantity Sign
|
TTEND.Tender Sign
|
TTAX.Tax Sign
|
IDISC.Quantity Sign
|
|
RETURN
|
P if item is sold; N if item is returned; reverse of
original item if item is voided.
|
N
|
N
|
P if item is sold; N if item is returned; reverse of
original item if item is voided.
|
Transaction of type SPLORD
This transaction is generated when a customer picks up an item,
which is not in stock. The item status can be ORI, ORC, or ORD. (Order
Initiate, Order Cancel, or Order Complete).
Transaction of type EEXCH
This transaction is generated when there is an even exchange.
This type of transaction has similar record type requirements as
a SALE transaction.
It is expected that the number of items returned equals the
number of items sold. However, this validation is not performed by saimptlog.
An audit rule could be created for this. Saimptlog only expects that there
would be at least two item records.
No tender changes hands in this transaction.
Meaning of reference number fields:
Note:
The items, which are on customer order or layaway, should not be come under
this transaction type.
The meaning of these reference number fields may be changed
through the sa_reference table.
|
Transaction Type
|
Sub-transaction Type
|
Reference Number Field
|
Meaning of Reference Field
|
Req?
|
|
EEXCH
|
|
1
|
Receipt Indicator (Y/N)
|
Y
|
|
EEXCH
|
EMP
|
3
|
Employee Number of the employee exchanging the goods.
|
N
|
Transaction of Type PAIDIN
This type of transaction has only one TTEND record.
A reason code is required.
Meaning of reference number fields:
Note
The meaning of these reference number fields may be changed through the
sa_reference table.
|
Reason Code
|
Reference Number Column
|
Meaning
|
Req?
|
|
NSF
|
1
|
NFS Check Credit Number
|
N
|
|
ACCT
|
1
|
Account Number
|
N
|
Transaction of Type PAIDOU
This type of transaction has only one TTEND record.
A reason code is required (code type REAC). If the
sub-transaction type is EV or MV, the reason code comes from the
non_merch_codes_head table.
If the sub-transaction type is EV or MV, then at least one field
among the vendor number, vendor invoice number, payment reference number, and
proof of delivery number fields should be populated.
If the sub-transaction type is EV, the vendor number comes from
the partner table. If the sub-transaction type is MV, the vendor number comes
from the supplier table.
Meaning of reference number fields:
Note:
The meaning of these reference number fields may be changed through the
sa_reference table.
|
Sub Transaction Type
|
Reason Code
|
Reference Number Column
|
Meaning
|
Req?
|
|
EV
|
|
2
|
Personal ID Number
|
N
|
|
EV
|
|
3
|
Routing Number
|
N
|
|
EV
|
|
4
|
Account Number
|
N
|
|
|
PAYRL
|
1
|
Money Order Number
|
N
|
|
|
PAYRL
|
2
|
Employee Number
|
N
|
|
|
INC
|
1
|
Incident Number
|
N
|
Transaction of Type PULL
This transaction is generated when cash is withdrawn from the
register.
This type of transaction has only one TTEND record.
Expected values for sign fields
|
TRANSACTION TYPE
|
TITEM.Quantity Sign
|
TTEND.Tender Sign
|
TTAX.Tax Sign
|
IDISC.Quantity Sign
|
|
PULL
|
N/A
|
N
|
N/A
|
N/A
|
Transaction of Type LOAN
This transaction is generated when cash is added to the register.
This type of transaction has only one TTEND record.
Expected values for sign fields:
|
TRANSACTION TYPE
|
TITEM.Quantity Sign
|
TTEND.Tender Sign
|
TTAX.Tax Sign
|
IDISC.Quantity Sign
|
|
LOAN
|
N/A
|
P
|
N/A
|
N/A
|
Transaction Type Cond
This transaction records the condition at the store when it
opens. There can be at most one COND record containing weather information and
at most one COND record containing temperature information. Both of these
pieces of information may be in the same COND record. There may be any number
of COND records containing traffic and construction information.
This type of transaction does not have TITEM, IDISC, IGTAX, TTAX, TPYMT, or TTEND records
Note:
The meaning of these reference number fields may be changed through the
sa_reference table
|
Reference Number Column
|
Meaning
|
Req?
|
|
1
|
Weather – code type WEAT
|
N
|
|
2
|
Temperature – a signed 3 digit number.
|
N
|
|
3
|
Traffic – code_type TRAF
|
N
|
|
4
|
Construction – code_type CONS
|
N
|
Transaction of Type TOTAL
This transaction records the totals that are reported by the POS
and OMS. The value field must be populated. Some systems generate only one
transaction number for all totals. In order to avoid duplicate errors being
reported, only one total transaction can have a transaction number and the
subsequent ones can have blank transaction numbers. In other words, a TOTAL
transaction is not required to have a transaction number.
This type of transaction does not have TITEM, IDISC, IGTAX, TTAX, TPYMT, TTEND records.
Transaction of Type METER
This transaction is generated when a meter reading of a fuel pump
is taken.
This type of transaction has only TITEM records.
Meaning of reference number fields:
Note: The
meaning of these reference number fields may be changed through the
sa_reference table.
|
Reference Number Column
|
Meaning
|
Req?
|
|
1
|
Reading Type: (A for adjustment, S for shift change, P for
price change, or C for store close)
|
Y
|
|
5
|
Opening Meter Readings
|
Y
|
|
6
|
Closing Meter Reading
|
Y
|
|
7
|
If the reading type is P for price change, the old unit
retail should be placed here. Decimal places are required.
|
Y
|
|
8
|
Closing Meter Value
|
Y
|
Transaction of Type PUMPT
This transaction is generated when a pump test is performed. This
type of transaction has only TITEM records.
Transactions of Type TANKDP
This transaction is generated when a tank dip measurement is
taken.
This type of transaction has only TITEM records.
Meaning of reference number fields:
Note:
The meaning of these reference number fields may be changed through the
sa_reference table.
|
Reference Number Column
|
Meaning
|
Req?
|
|
1
|
Tank identifier
|
Y
|
|
5
|
Dip Type (FUEL, WATER, and so on)
|
Y
|
|
6
|
Dip Height Major (decimal places required)
|
Y
|
|
7
|
Dip Height Minor (decimal places required)
|
Y
|
Transaction of Type DCLOSE
This transaction is generated when the day closed. The transaction
number for this type of transaction has to be blank.
Note:
Vouchers are minimally handled by saimptlog. Voucher information is written to
the savouch file which is passed to the program savouch.pc.
§
A voucher will appear on the TITEM record only if it was sold.
When saimptlog encounters a SALE transaction with a voucher, it writes the
voucher to the savouch file as an I for Issued voucher.
§
A voucher will be issued when it appears on the TTEND record of
transactions of type RETURN and PAIDOU. In other words, saimptlog will write it
to the savouch file with status I.
§
A voucher will be redeemed when it appears on the TTEND record of
transactions of type SALE and PAIDIN. In other words, saimptlog will write it
to the savouch file with status R.
Vouchers may not be returned. However, a transaction of type
PAIDOU may be generated when the customer exchanges a voucher for another form
of tender.
Transaction of Type OTHER
This transaction is a generic transaction type to support Micros
Xstore integration. This will identify all the other transaction types that are
not currently supported. This type of transaction has only THEAD and TTAIL
records.
|
Transaction Code
|
Transaction Type
|
|
OPEN
|
Open
|
|
CLOSE
|
Close
|
|
COND
|
Daily Store Conditions
|
|
DCLOSE
|
Day close indicator
|
|
LOAN
|
Loan
|
|
METER
|
Meter Reading for Fuel
|
|
NOSALE
|
No Sale
|
|
PAIDIN
|
Paid In
|
|
PAIDOU
|
Paid Out
|
|
PULL
|
Pull
|
|
PUMPT
|
Pump Test for Fuel
|
|
PVOID
|
Post Void (A transaction that was rung later into the
register to void something that occurred earlier at the same store/day. A
post void updates the original transaction’s sub-transaction type.)
|
|
REFUND
|
Return of customer’s original check.
|
|
RETURN
|
Return
|
|
SALE
|
Sale
|
|
TANKDP
|
Tank Dip
|
|
TOTAL
|
POS generated totals
|
|
EEXCH
|
Even exchange
|
|
VOID
|
Void (aborted transaction)
|
|
OTHER
|
Others
|
When the retailer is sending only one file to the system,
SAIMPTLOG.PC marks the store day record in the ReSA import log as partially or
fully loaded in the database by looking for a transaction type of DCLOSE.
However, if the retailer is sending more than one file (as in, for example, a
trickle polling situation), the retailer can specify the number of files that
the system should expect in combination with the DCLOSE transaction type. This
ensures that the system receives all of the files, even if the DCLOSE
transaction type is, for some reason, received before the final file.
For example, if 24 files are expected over a given amount of
time, and the file with the DCLOSE transaction type is, for some reason, sent
before the 24th file, the RMS system waits until the last file arrives before
marking the store day record as partially or fully loaded in the database.
The import process is completed after SAIMPTLOGFIN.PC has updated
the store, data, and audit status of each store day record.
Module Name
|
saimptlogtdup_upd.pc
|
Description
|
Processing to Allow Re-Upload of Deleted Transactions
|
Functional
Area
|
Oracle Retail Sales Audit
|
Module Type
|
Admin
|
Module
Technology
|
ProC
|
Integration
Catalog ID
|
RSA19
|
The purpose of this batch module is to fetch all deleted
transactions for a store day and modify the tdup<Store><rtlog
originating system>.dat file to remove deleted transactions, from the tdup
range, in order to facilitate the saimptlog/saimptlogi batch to upload deleted
transactions again. The batch will process all the store day with data status
in Partially Loaded and Ready For Import and a business date that lies between
the vdate minus the sa_syatem_options. day_post_sale and the vdate. The batch
will not process a store day, if the tdup<Store><rtlog originating
system>.dat file does not exist. The batch is designed to work only if
sa_system_options.check_dup_miss_tran is set to Y, otherwise, do nothing and
come out with successful completion. Also, the batch will not terminate with an
error, if the deleted transaction to be removed from tdup range does not exist
in the tdup<Store><rtlog originating system>.dat file.
Schedule Information
|
Description
|
|
Processing Cycle
|
Adhoc
|
|
Scheduling Considerations
|
This program should be run before running
saimptlog/saimptlogi if any Store-Day’s have been deleted.
|
|
Pre-Processing
|
NA
|
|
Post-Processing
|
NA
|
|
Threading Scheme
|
NA
|
NA
|
Table
|
Select
|
Insert
|
Update
|
Delete
|
|
SA_STORE_DAY
|
Yes
|
No
|
Yes
|
No
|
|
SA_TRAN_HEAD
|
Yes
|
No
|
No
|
No
|
Integration
Type
|
NA
|
File Name
|
NA
|
Integration
Contract
|
NA
|
NA
Module Name
|
saimptlogfin.pc
|
Description
|
Complete Transaction Import Processing
|
Functional
Area
|
Oracle Retail Sales Audit
|
Module Type
|
Admin
|
Module
Technology
|
ProC
|
Integration
Catalog ID
|
RSA18
|
The saimptlogfin program creates the balances (over or under) by
store, register, or cashier and populates it in the SA_BALANCE_GROUP table. It
also cancels post voided transactions and vouchers and validates missing
transactions. It marks the store day record in the ReSA import log as partially
or fully loaded. This will unlock the store day records after all store
transactions are imported.
Schedule Information
|
Description
|
|
Processing Cycle
|
Ad Hoc
|
|
Frequency
|
Daily
|
|
Scheduling Considerations
|
Run towards the end of loading POS transaction data into
ReSA. It should run after SAIMPTLOG or SAIMPTLOGI and SAVOUCH, but before
SATOTALS.PC.
|
|
Pre-Processing
|
Saimptlog/saimptlogi, savouch
|
|
Post-Processing
|
satotals
|
|
Threading Scheme
|
NA
|
NA
|
Table
|
Select
|
Insert
|
Update
|
Delete
|
|
STORE_DAY_SEQ_NO
|
Yes
|
No
|
No
|
No
|
|
STORE
|
Yes
|
No
|
No
|
No
|
|
SA_STORE_DAY
|
Yes
|
No
|
Yes
|
No
|
|
SA_CUST_ATTRIB
|
Yes
|
No
|
No
|
Yes
|
|
SA_CUSTOMER
|
Yes
|
No
|
No
|
Yes
|
|
SA_TRAN_DISC
|
Yes
|
No
|
No
|
Yes
|
|
SA_TRAN_ITEM
|
Yes
|
No
|
No
|
Yes
|
|
SA_TRAN_TAX
|
Yes
|
No
|
No
|
Yes
|
|
SA_TRAN_TENDER
|
Yes
|
No
|
No
|
Yes
|
|
SA_ERROR
|
Yes
|
No
|
Yes
|
Yes
|
|
SA_MISSING_TRAN
|
Yes
|
No
|
No
|
Yes
|
|
SA_TRAN_HEAD
|
Yes
|
No
|
Yes
|
Yes
|
|
SA_BALANCE_GROUP
|
Yes
|
Yes
|
No
|
No
|
|
SA_TRAN_HEAD CANCEL
|
Yes
|
No
|
No
|
No
|
|
SA_STORE_DATA
|
Yes
|
No
|
No
|
No
|
|
SA_IMPORT_LOG
|
No
|
No
|
Yes
|
No
|
|
SA_TRAN_HEAD_REV
|
No
|
Yes
|
No
|
No
|
|
SA_TRAN_ITEM_REV
|
No
|
Yes
|
No
|
No
|
|
SA_TRAN_TENDER_REV
|
No
|
Yes
|
No
|
No
|
|
SA_TRAN_TAX_REV
|
No
|
Yes
|
No
|
No
|
|
SA_TRAN_DISC_REV
|
No
|
Yes
|
No
|
No
|
|
SA_ERROR_REV
|
No
|
Yes
|
No
|
No
|
|
SA_EXPORTED_REV
|
No
|
Yes
|
No
|
No
|
Integration
Type
|
NA
|
File Name
|
NA
|
Integration
Contract
|
NA
|
NA
Module Name
|
savouch.pc
|
Description
|
Sales Audit Voucher Upload
|
Functional
Area
|
Oracle Retail Sales Audit
|
Module Type
|
Integration
|
Module
Technology
|
ProC
|
Integration
Catalog ID
|
RSA08
|
Because gift certificates can enter the Sales Audit system as
either items or tender, processing must be done to match up the sales and
redemptions. This module is used to aggregate gift certificate and voucher
records. It compares records in the input files to the database. If a record
for the voucher does not exist on the database, the record is inserted. If the
voucher already exists on the database, the record should be updated with the
appropriate information. The voucher details are updated to SA_VOUCHER table.
Some retailers assign gift certificates to a given store, which
means that before a gift certificate is sold at a store, it is assigned to a
given store. When a retailer assigns a gift certificate to a given store, a
record is written to the database. When the gift certificate is then sold by
the store and redeemed by the consumer, this existing record must be updated to
include the sale and redemption information. Some retailers choose not to
assign gift certificates and instead simply sell gift certificates. In that
case, the record will be inserted into the database when the gift certificate
is sold and then updated when the gift certificate is redeemed.
Schedule Information
|
Description
|
|
Processing Cycle
|
Ad Hoc
|
|
Frequency
|
Daily
|
|
Scheduling Considerations
|
This program needs to be scheduled after either
saimpltog.pc and its sqlldr process, or saimpltogi.pc, but before
saimpltogfin.pc.
|
|
Pre-Processing
|
saimptlog/saimptlogi
|
|
Post-Processing
|
Saimptlogfin.pc
|
Restart/recovery logic for file-based processing is used. Records
will be committed to the database when the commit_max_ctr defined in the
RESTART_CONTROL table is reached.
|
Table
|
Select
|
Insert
|
Update
|
Delete
|
|
SA_VOUCHER
|
Yes
|
Yes
|
Yes
|
No
|
Integration
Type
|
Upload to ReSA
|
File Name
|
The input file name is not fixed; the input file name is
determined by a runtime parameter. Records rejected by the import process are
written to a reject file. The reject file name is not fixed; the reject file
name is determined by a runtime parameter.
|
Integration
Contract
|
IntCon000160 (SAVO)
|
|
Record Name
|
Field Name
|
Field Type
|
Default Value
|
Description
|
|
FHEAD
|
Record descriptor/
|
Char(5)
|
FHEAD
|
File head marker.
|
|
|
Line id
|
Number(10)
|
0000000001
|
Unique line ID.
|
|
Translator id
|
Char(5)
|
SAVO
|
Identifies transaction type.
|
|
File create date
|
Char(14)
|
|
Vdate in YYYYMMDDHH24MISS format.
|
|
Business Date
|
Char(8)
|
Business Date
|
Vdate in YYYYMMDD format.
|
|
FDETL
|
Record descriptor/
|
Char(5)
|
FDETL
|
File head marker.
|
|
Line id
|
Number(10)
|
|
Unique line ID.
|
|
Voucher seq Number
|
Number(20)
|
|
Unique identifier for an entry to the SA_VOUCHER table.
|
|
Voucher No
|
Char(16)
|
|
Serial Number of the voucher.
|
|
Tender Type Id
|
Number(6)
|
|
Type of Voucher (Valid values for tender type are
maintained in the pos_tender_type_head table with tender_type_group as VOUCH.
|
|
Assigned Date
|
Char(8)
|
|
Date the voucher was assigned.
|
|
Assigned store
|
Number(10)
|
|
Store to which the voucher is assigned.
|
|
Issuing Date
|
Char(8)
|
|
Date this document was issued.
|
|
Issuing store
|
Number(10)
|
|
Store this document was issued from.
|
|
Issuing Register
|
Char(5)
|
|
Register this document was issued from.
|
|
Issuing Cashier
|
Char(10)
|
|
Cashier issuing the document.
|
|
Issued transaction number
|
Number(20)
|
|
Transaction number at the time of issuance.
|
|
Issued item seq number
|
Number(4)
|
|
Will hold the item sequence of the item when the voucher
is sold as an item (gift voucher).
|
|
Issued tender seq number
|
Number(4)
|
|
Will hold the tender sequence of the tender when the
voucher is sold as a tender (Merchandise Credit).
|
|
Issued Amount
|
Number(20)
|
|
Amount the voucher was issued for*10000 (4 implied decimal
places).
|
|
Issued Customer Name
|
Char(120)
|
|
Name of the customer, who was issued the voucher.
|
|
Issued Customer Addr1
|
Char(240)
|
|
The address of the customer who was issued the voucher.
|
|
Issued Customer Addr2
|
Char(240)
|
|
The second line address of the customer who was issued the
voucher.
|
|
Issued Customer City
|
Char(120)
|
|
City of the customer, the voucher is issued.
|
|
Issued Customer State
|
Char(3)
|
|
State of the customer.
|
|
Issued Customer Postal Code
|
Char(30)
|
|
Postal address of the customer .
|
|
Issued Customer Country
|
Char(3)
|
|
Country of the customer where the voucher was issued.
|
|
Recipient Name
|
Char(120)
|
|
Name of the intended recipient.
|
|
Recipient State
|
Char(3)
|
|
The state of the intended recipient.
|
|
Recipient Country
|
Char(3)
|
|
The country of the intended recipient.
|
|
Redemption Date
|
Char(8)
|
|
Date the voucher was redeemed.
|
|
Redemption Store
|
Number(10)
|
|
Store at which the voucher was redeemed.
|
|
Redemption Register
|
Char(5)
|
|
Register at which the document was redeemed.
|
|
Redemption cashier
|
Char(10)
|
|
Cashier redeeming the voucher.
|
|
Redemption tran seq number
|
Number(20)
|
|
Transaction Number when the document was redeemed.
|
|
Redemption Tender seq number
|
Number(4)
|
|
This column will hold the tender sequence of the tender
within the transaction when a voucher is redeemed as tender.
|
|
Redemption Amount
|
Number(20)
|
|
Amount the voucher was redeemed for*10000 (4 implied
decimal places).
|
|
Expiry Date
|
Char(8)
|
|
Expiry Date.
|
|
Status
|
Char(1)
|
|
Indicator showing the document's status - issued or
redeemed. Valid values = I – Issued, R - Redeemed.
|
|
Comments
|
Char(2000)
|
|
Comments.
|
|
FTAIL
|
Record type
|
Char(5)
|
FTAIL
|
Describes file record and marks the end of file.
|
|
Line id
|
Number(10)
|
|
Unique file line ID.
|
|
#lines
|
Number(10)
|
|
Total number of transaction lines in file (not including
FHEAD and FTAIL).
|
NA
Module Name
|
saimpadj.pc
|
Description
|
Import Total Value Adjustments From External Systems to ReSA
|
Functional
Area
|
Oracle Retail Sales Audit
|
Module Type
|
Integration
|
Module
Technology
|
ProC
|
Integration
Catalog ID
|
RSA07
|
This module posts external system adjustments to the Sales Audit
total value table.
The sales audit adjustments are passed to the module in an
external file.
Records that fail necessary validations would be written to the
reject file. The input and reject file names are passed as arguments.
Schedule Information
|
Description
|
|
Processing Cycle
|
Ad Hoc
|
|
Frequency
|
Daily
|
|
Scheduling Considerations
|
This module should be executed after the ReSA transaction
import process and before the ReSA totaling process.
|
|
Pre-Processing
|
Saimptlogfin.pc
|
|
Post-Processing
|
Satotoals.pc
|
|
Threading Scheme
|
NA
|
Restart/recovery logic for file-based processing is used. The
logical unit of work for this module is a parameterized number defined in the
restart tables.
Record level locking is done on sa_store_day before updating.
|
Table
|
Select
|
Insert
|
Update
|
Delete
|
|
SA_TOTAL
|
Yes
|
No
|
No
|
No
|
|
SA_HQ_VALUE
|
No
|
Yes
|
No
|
No
|
|
SA_STORE_DAY
|
Yes
|
No
|
Yes
|
No
|
|
SA_EXPORT_LOG
|
Yes
|
Yes
|
No
|
No
|
|
SA_TOTAL_USAGE
|
Yes
|
No
|
No
|
No
|
|
Integration Type
|
Upload to ReSA
|
|
File Name
|
Determined by runtime parameters.
|
|
Integration Contract
|
IntCon000047
|
|
Record Name
|
Field Name
|
Field Type
|
Default Value
|
Description
|
|
FHEAD
|
File Type Record Descriptor
|
Char(5)
|
FHEAD
|
Identifies file record type (the beginning of the input
file).
|
|
File Line Identifier
|
Number(10)
|
Sequential number
|
ID of the current line being read from input file.
|
|
File head descriptor
|
Char(4)
|
IMPA
|
Describes file line type.
|
|
Current date
|
Char(14)
|
|
File date in YYYYMMDDHH24MISS format.
|
|
FDETL
|
File Type Record Descriptor
|
Char(5)
|
FDETL
|
Identifies the file record type to upload a new deal
header.
|
|
File Line Identifier
|
Number(10)
|
Sequential number
|
ID of the current line being read from input file.
|
|
Data source
|
Char(6)
|
|
Name of the external system that produced the file.
|
|
New value sign
|
Char(1)
|
|
Sign(+/-) for the new value.
|
|
New Value
|
Number(20)
|
|
Value for the total entered by Headquarters user*10000 (4
implied decimal places).
|
|
Total seq no
|
Number(20)
|
|
Identifies the unique result set for this total ID, total
revision, or store/day.
Balancing group and index values.
|
|
Store
|
Number(10)
|
|
Store number for a store/day combination.
|
|
Business Date
|
Char(8)
|
|
Date for store/day combination.
|
|
Total id
|
Char(10)
|
|
ID to uniquely identify the total.
|
|
Ref no 1
|
Char(30)
|
|
The first reference value based by which the total is
grouped.
|
|
Ref no 2
|
Char(30)
|
|
The second reference value based by which the total is
grouped.
|
|
Ref no 3
|
Char(30)
|
|
The third reference value based by which the total is
grouped.
|
|
FTAIL
|
File Type record descriptor
|
Char(5)
|
FTAIL
|
Identifies the file record type (the end of the input
file).
|
|
File Line Identifier
|
Number(10)
|
Sequential number
|
ID of the current line being read from input file.
|
|
File Record Counter
|
Number(10)
|
Sequential number
|
Number of records/transactions in the current file (only
records between head and tail).
|
NA
Module Name
|
satotals.pc
|
Description
|
Calculate Totals based on Client Defined Rules
|
Functional
Area
|
Sales Audit, Totals
|
Module Type
|
Business Processing
|
Module
Technology
|
ProC
|
Integration
Catalog ID
|
RSA16
|
This module produces totals from user-defined total calculation
rules. Totaling is integral to the sales auditing process. Totaling provides
the values against which auditors can compare receipts. These comparisons find
data errors that could be the result of either honest mistakes or fraud.
Finding these mistakes during the sales auditing process prevents these errors
from being passed on to merchandising and data warehouse systems. Totaling also
provides quick access to other numeric figures about the day’s sales
transactions.
Totaling in ReSA is dynamic. ReSA automatically totals
transactions based on calculation definitions that the retailer’s users create
using the online Totals Calculation Definition Wizard. In addition, the
retailer is able to define totals that come from the POS, but that ReSA does
not calculate. Whenever users create new calculation definitions or edit
existing ones, they become part of the automated totaling process the next time
that this process runs.
Schedule Information
|
Description
|
|
Processing Cycle
|
Ad Hoc
|
|
Frequency
|
Daily
|
|
Scheduling Considerations
|
This program will run after the batch program
saimptlogfin.pc and before sarules.pc.
|
|
Pre-Processing
|
Saimptlogfin.pc
|
|
Post-Processing
|
Sarules.pc
|
|
Threading Scheme
|
This program runs against a single store at a time.
|
The logical unit of work for this program is a SA_STORE_DAY
record. Records are committed to the database when the commit_max_ctr defined
for SATOTALS on the RESTART_CONTROL table is reached. This program achieves
inherent restart/recovery due to the fact that store/day records that are
processed will be updated to an audit_status of T for Totaled and will not be
fetched by the driving cursor when the program restarts.
|
Table
|
Select
|
Insert
|
Update
|
Delete
|
|
SA_STORE_DAY
|
Yes
|
No
|
Yes
|
No
|
|
SA_TOTAL
|
No
|
Yes
|
No
|
No
|
|
SA_TOTAL_HEAD
|
Yes
|
No
|
No
|
No
|
|
SA_ERROR
|
No
|
Yes
|
No
|
Yes
|
|
SA_ERROR_WKSHT
|
No
|
Yes
|
No
|
Yes
|
|
SA_POS_VALUE
|
No
|
Yes
|
No
|
No
|
|
SA_POS_VALUE_WKSHT
|
No
|
Yes
|
No
|
No
|
|
SA_SYS_VALUE
|
No
|
Yes
|
No
|
No
|
|
SA_SYS_VALUE_WKSHT
|
No
|
Yes
|
No
|
No
|
|
SA_ERROR_REV
|
No
|
Yes
|
No
|
No
|
|
SA_EXPORTED_REV
|
No
|
Yes
|
No
|
No
|
|
SA_EXPORTED
|
No
|
No
|
No
|
Yes
|
Integration
Type
|
NA
|
File Name
|
NA
|
Integration
Contract
|
NA
|
NA
Module Name
|
sarules.pc
|
Description
|
Evaluate Transactions and Totals based on Client Defined
Rules
|
Functional
Area
|
Oracle Retail Sales Audit
|
Module Type
|
Business Processing
|
Module
Technology
|
ProC
|
Integration
Catalog ID
|
RSA17
|
Evaluating rules is integral to the sales auditing process. Rules
make the comparisons between data from various sources. These comparisons find
data errors that could be the result of either honest mistakes or fraud.
Finding these mistakes during the sales auditing process prevents these errors
from being passed on to merchandising and data warehouse systems.
Rules in ReSA are dynamic. Aside from basic data validations,
rules are not predefined in the system. Retailers have the ability to define
them through the online Rule Definition Wizard. Errors uncovered by these rules
are available for review online during the interactive audit process. After
users modify existing rules or create new ones, they become part of the rules
the next time that sarules.pc runs.
Schedule Information
|
Description
|
|
Processing Cycle
|
Ad Hoc
|
|
Frequency
|
Daily
|
|
Scheduling Considerations
|
This program will run after SATOTALS and before SAESCHEAT.
It should also be run before SAPREEXP and any of the ReSA export modules that
extract store/day transaction data to other applications (for example,
SAEXPRMS, SAEXPIM, SAEXPRDW, SAEXPACH, SAEXPUAR, and SAEXPGL).
|
|
Pre-Processing
|
satotoals
|
|
Post-Processing
|
Saescheat, sapreexp
|
|
Threading Scheme
|
This program runs against a single store at a time.
|
The logical unit of work for this program is a SA_STORE_DAY
record. Records are committed to the database when the commit_max_ctr defined
for SARULES on the RESTART_CONTROL table is reached. This program achieves inherent
restart/recovery due to the fact that store/day records that are processed will
be updated to an audit_status of A (audited), H (HQ errors pending), or S
(store errors pending) and will not be fetched by the driving cursor when the
program restarts.
|
Table
|
Select
|
Insert
|
Update
|
Delete
|
|
SA_STORE_DAY
|
Yes
|
No
|
Yes
|
No
|
|
SA_RULE_HEAD
|
Yes
|
No
|
No
|
No
|
|
SA_RULE_LOC_TRAIT
|
Yes
|
No
|
No
|
No
|
|
SA_ERROR_WKSHT
|
No
|
Yes
|
No
|
Yes
|
|
SA_ERROR_TEMP
|
No
|
Yes
|
No
|
No
|
|
SA_ERROR
|
No
|
Yes
|
Yes
|
Yes
|
|
SA_TOTAL
|
No
|
No
|
Yes
|
No
|
|
SA_TRAN_HEAD
|
No
|
No
|
Yes
|
No
|
|
SA_TRAN_ITEM
|
No
|
No
|
Yes
|
No
|
|
SA_TRAN_DISC
|
No
|
No
|
Yes
|
No
|
|
SA_TRAN_TENDER
|
No
|
No
|
Yes
|
No
|
|
SA_TRAN_TAX
|
No
|
No
|
Yes
|
No
|
Integration
Type
|
NA
|
File Name
|
NA
|
Integration
Contract
|
NA
|
NA
Module Name
|
sapreexp.pc
|
Description
|
Prevent Duplicate Export of Total Values from ReSA
|
Functional
Area
|
Oracle Retail Sales Audit
|
Module Type
|
Admin
|
Module
Technology
|
ProC
|
Integration
Catalog ID
|
RSA20
|
When a user modifies or revises a transaction through the
ReSAuser application, numerous totals may be affected and require re-totaling.
The sales audit pre-export module is designed to compare the latest prioritized
version of each total defined for export with the version that was previously
sent to each system. If they are the same, an SA_EXPORTED entry is created for
the total for that particular system, so that the same value will not be
exported twice. By determining which totals have not changed since the last
export date time (SA_EXPORTED_REV), this module will then create entries on
SA_EXPORTED to prohibit any third-party application from receiving multiple
export revisions.
Schedule Information
|
Description
|
|
Processing Cycle
|
Ad Hoc
|
|
Frequency
|
Daily
|
|
Scheduling Considerations
|
This module should be run after the ReSA auditing process
and before any export processes.
|
|
Pre-Processing
|
Sarules.pc
|
|
Post-Processing
|
saexpach
saexpgl
saexpim
saexpdw
saexpsim
saexprms
saexpuar
|
|
Threading Scheme
|
NA
|
The logical unit of work for this module is defined as a unique
store/day combination. Only two commits will be done. One to establish the
store/day lock (this will be done by the package) and one at the end after a store/day
or store/day/total has been completely processed.
|
Table
|
Select
|
Insert
|
Update
|
Delete
|
|
SA_EXPORT_LOG
|
Yes
|
No
|
No
|
No
|
|
SA_STORE_DAY
|
Yes
|
No
|
No
|
No
|
|
SA_TOTAL_USAGE
|
Yes
|
No
|
No
|
No
|
|
SA_EXPORT_LOG
|
Yes
|
No
|
No
|
No
|
|
SA_EXPORTED
|
Yes
|
Yes
|
No
|
No
|
|
SA_EXPORTED_REV
|
Yes
|
No
|
No
|
No
|
Integration
Type
|
NA
|
File Name
|
NA
|
Integration
Contract
|
NA
|
NA
Module Name
|
saexprms.pc
|
Description
|
Export of POS transactions from ReSA to RMS
|
Functional
Area
|
Oracle Retail Sales Audit
|
Module Type
|
Integration
|
Module
Technology
|
ProC
|
Integration
Catalog ID
|
RSA01
|
The purpose of this batch module is to fetch all sale and return
transactions that do not have RMS errors from the ReSA database tables for
transmission to Oracle Retail Merchandising System (RMS). Transaction data is
rolled up to the item/store/day/price point/sales type level for the SALES
transaction type and item/store/day/price point/sales type/no inventory return
indicator/return disposition/return warehouse level for the RETURN transaction
types.
If the Unit of Work system parameter is defined as S, the whole
store/day is skipped if any RMS error is found. If this value is T, only
transactions with RMS errors are skipped.
If the transaction has a status of Deleted and it has previously
been transmitted, a reversal of the transaction will be sent.
A file is generated for each store/day.
Schedule Information
|
Description
|
|
Processing Cycle
|
Ad Hoc
|
|
Frequency
|
Daily
|
|
Scheduling Considerations
|
This program should run towards the end of the Sales
Auditing cycle where the total (SATOTALS.PC) and rule (SARULES.PC) data are
ready to be exported to the external systems.
|
|
Pre-Processing
|
NA
|
|
Post-Processing
|
saprepost saexprms post
|
|
Threading Scheme
|
Multi-threaded by store
|
The logical unit of work for this module is defined as a unique
store/day combination. Records will be fetched, updated, and inserted in
batches of pl_commit_max_ctr. Only two commits will be done, one to establish
the store/day lock and another at the end, to release the lock after a
store/day has been completely processed. The POSU formatted output file will be
created with a temporary name and renamed just before the end of store/day
commit.
In case of failure, all work done will be rolled back to the point
right after the call to get_lock() and the lock will be released. Thus, the
rollback segment should be large enough to hold all inserts into sa_exported
for one store/day.
|
Table
|
Select
|
Insert
|
Update
|
Delete
|
|
SA_STORE_DAY
|
Yes
|
No
|
No
|
No
|
|
SA_EXPORT_LOG
|
Yes
|
No
|
Yes
|
No
|
|
V_RESTART_STORE
|
Yes
|
No
|
No
|
No
|
|
STORE
|
Yes
|
No
|
No
|
No
|
|
CURRENCIES
|
Yes
|
No
|
No
|
No
|
|
SA_TRAN_HEAD
|
Yes
|
No
|
No
|
No
|
|
SA_ERROR
|
Yes
|
No
|
No
|
No
|
|
SA_ERROR_IMPACT
|
Yes
|
No
|
No
|
No
|
|
SA_EXPORTED
|
Yes
|
Yes
|
No
|
No
|
|
SA_TRAN_SEQ_TEMP
|
No
|
Yes
|
No
|
Yes
|
|
SA_TRAN_HEAD_REV
|
Yes
|
No
|
No
|
No
|
|
SA_EXPORTED_REV
|
Yes
|
No
|
No
|
No
|
|
SA_SYSTEM_OPTIONS
|
Yes
|
No
|
No
|
No
|
|
SA_TRAN_ITEM_REV
|
Yes
|
No
|
No
|
No
|
|
ITEM_MASTER
|
Yes
|
No
|
No
|
No
|
|
SA_TRAN_DISC_REV
|
Yes
|
No
|
No
|
No
|
|
SA_TRAN_DISC
|
Yes
|
No
|
No
|
No
|
|
SA_TRAN_ITEM
|
Yes
|
No
|
No
|
No
|
|
SA_TRAN_SEQ_TEMP
|
Yes
|
Yes
|
No
|
Yes
|
|
SA_STORE_DAY_READ_LOCK
|
No
|
Yes
|
No
|
Yes
|
|
SA_TRAN_IGTAX_REV
|
Yes
|
No
|
No
|
No
|
|
SA_TRAN_IGTAX
|
Yes
|
No
|
No
|
No
|
|
SA_TRAN_TAX
|
Yes
|
No
|
No
|
No
|
|
SA_TRAN_TAX_REV
|
Yes
|
No
|
No
|
No
|
|
VAT_ITEM
|
Yes
|
No
|
No
|
No
|
Integration Contract
|
Integration Type
|
Download from ReSA
|
|
File Name
|
POSU_ appended with store number, business date and
system date
|
|
Integration Contract
|
IntCon000044
|
|
Record Name
|
Field Name
|
Field Type
|
Default Value
|
Description
|
|
FHEAD
|
Record descriptor
|
Char(5)
|
FHEAD
|
Identifies the file record type.
|
|
File Line Id
|
Char(10)
|
0000000001
|
Sequential file line number.
|
|
File type definition
|
Char(4)
|
POSU
|
Identifies the file type
|
|
File Create Date
|
Char(14)
|
|
File Create Date in YYYYMMDDHHMMSS format.
|
|
Store
|
Number(10)
|
|
Store location.
|
|
Vat include indicator
|
Char(1)
|
|
Determines whether or not the store values include VAT.
Not required, but populated by ReSA.
|
|
Vat region
|
Number(4)
|
|
VAT region the given location is in. Not required, but
populated by ReSA.
|
|
Currency code
|
Char(3)
|
|
Currency of the given location. Not required, but
populated by ReSA.
|
|
Currency retail decimals
|
Number(1)
|
|
Number of decimals supported by given the currency for
retails. Not required, but populated by ReSA.
|
|
THEAD
|
Record descriptor
|
Char(5)
|
THEAD
|
Identifies the file record type.
|
|
File Line Id
|
Char(10)
|
|
Sequential file line number.
|
|
Transaction date
|
Char(14)
|
|
Transaction date in YYYYMMDDHHMMSS format. Corresponds to
the date that the sale/return transaction was processed at the POS.
|
|
Item Type
|
Char(3)
|
REF
or
ITM
|
Can be REF or ITM.
|
|
Item
|
Char(25)
|
|
ID number of the ITM or REF.
|
|
Dept
|
Number(4)
|
|
Department of item sold or returned.
|
|
Class
|
Number(4)
|
|
Class of item sold or returned.
|
|
Sub Class
|
Number(4)
|
|
Subclass of item sold or returned.
|
|
Pack Ind
|
Char(1)
|
|
Pack indicator of item sold or returned.
|
|
Item Level
|
Number(1)
|
|
Item level of item sold or returned.
|
|
Tran level
|
Number(1)
|
|
Transaction level of item sold or returned.
|
|
Wastage Type
|
Char(6)
|
|
Wastage type of item sold or returned.
|
|
Wastage pct
|
Number(12)
|
|
Waste pct (4 implied decimal places).
|
|
Tran type
|
Char(1)
|
|
Transaction type code to specify whether transaction is a
sale or a return.
|
|
Drop Shipment indicator
|
Char(1)
|
|
Indicates whether the transaction is a drop shipment or
not.
|
|
Total sales qty
|
Number(12)
|
|
Total sales quantity (4 implied decimal places).
|
|
Selling UOM
|
Char(4)
|
|
Selling Unit of Measure for the item.
|
|
Sales sign
|
Char(1)
|
|
Determines if the Total Sales Quantity and Total Sales
Value are positive or negative.
|
|
Total Sales Value
|
Number(20)
|
|
Total sales value of goods sold/returned (4 implied
decimal places).
|
|
Last Date time modified
|
Char(14)
|
|
Date and time of last modification in YYYYMMDDHHMMSS
format.
|
|
Catchweight indicator
|
Char(1)
|
|
Indicates if item is a catchweight item.
|
|
Total weight
|
Number(12)
|
|
The actual weight of the item, only populated if
catchweight_ind = Y.
|
|
Sub Tran type indicator
|
Char(1)
|
|
Transction type for ReSA.
Valid values are A, D, and NULL.
|
|
Total IGTAX Value
|
Number(20)
|
|
This indicates total of all IGTAX amount for the item.
|
|
Sales Type
|
Char(1)
|
|
This column indicates whether the line item is a Regular
Sale, a customer order serviced by OMS (External CO), or a customer order
serviced by a store (In Store CO).
|
|
No Inventory Return Indicator
|
Char(1)
|
|
This column contains an indicator that identifies a return
without inventory. This is generally a non-required column, but in the case
of Returns, this is required.
|
|
Return Disposition
|
Char(10)
|
|
This column contains the disposition code published by Oracle
Retail Warehouse Management System (RWMS0 as part of the Returns upload to
OMS.
|
|
Return Warehouse
|
Char(10)
|
|
This column contains the physical warehouse ID for the
warehouse identifier where the item was returned.
|
|
|
|
|
|
|
|
TTAX
|
Record descriptor
|
Char(5)
|
TTAX
|
Identifies the file record type.
|
|
File Line Id
|
Char(10)
|
|
Sequential file line number.
|
|
Tax Code
|
Char(6)
|
|
The Tax Code of the item.
|
|
Tax Rate
|
Number(20)
|
|
The tax rate of the item (10 implied decimal places).
|
|
Total Tax Amount
|
Number(20)
|
|
The item level tax or prorated transaction level tax of
the item (4 implied decimal places).
|
|
|
|
|
|
|
TDETL
|
Record descriptor
|
Char(5)
|
TDETL
|
Identifies the file record type.
|
|
File Line Id
|
Char(10)
|
|
Sequential file line number.
|
|
Promo Tran Type
|
Char(6)
|
|
Code for the promotional type from code_detail where
code_type equals PRMT.
|
|
Promotion Number
|
Number(10)
|
|
Promotion number from RMS.
|
|
Sales quantity
|
Number(12)
|
|
Sales quantity sold for this promotion type (4 implied
decimal places).
|
|
Sales value
|
Number(20)
|
|
Sales value for this promotion type (4 implied decimal
places).
|
|
Discount value
|
Number(20)
|
|
Discount value for this promotion type (4 implied decimal
places).
|
|
Promotion component
|
Number(10)
|
|
Links the promotion to additional pricing attributes.
|
|
|
|
|
|
|
TTAIL
|
Record descriptor
|
Char(5)
|
TTAIL
|
Identifies the file record type.
|
|
File Line Id
|
Char(10)
|
|
Sequential file line number.
|
|
Tran Record Counter
|
Number(6)
|
|
Number of TDETL records in this transaction set.
|
|
|
|
|
|
|
FTAIL
|
Record descriptor
|
Char(5)
|
FTAIL
|
Identifies the file record type.
|
|
File Line Id
|
Number(10)
|
|
Sequential file line number.
|
|
File Record counter
|
Number(10)
|
|
Number of records/transactions processed in the current
file (only records between head and tail).
|
1. Tax
can be sent either in TTAX or IGTAX regardless of the default_tax_type of SVAT,
GTAX, or SALES. But prorated tax in TTAX will only be sent to RMS in an SVAT
configuration since proration is based on VAT_ITEM and VAT_ITEM and is only
defined for SVAT.
2. POS
can send either transactional level tax details in TTAX lines or item-level tax
details in IGTAX lines through the RTLOG file to ReSA. These tax details will
be passed on to RMS in the TTAX lines of the POSU file. Even though POS can
pass multiple IGTAX/TTAX lines to ReSA and from ReSA to RMS, RMS only supports
one tax code per item. If multiple taxes for an item are sent from POS to ReSA,
they will be summed to a single tax in RMS sales upload process and assigned
one of the applicable tax codes when writing tran_data 88.
Module Name
|
saordinvexp.pc
|
Description
|
Export Inventory Reservation/Release for In Store Customer
Order & Layaway Transactions from ReSA
|
Functional
Area
|
Sales Audit
|
Module Type
|
Integration
|
Module
Technology
|
ProC
|
Integration
Catalog ID
|
RSA12
|
This batch program will generate a flat file to reserve or
un-reserve the inventory for items on in-store customer order or layaway
transactions. Inventory will be reserved for items on customer order/layaway
initiate and un-reserved for customer order/layaway cancel or complete
transactions.
Customer orders can be categorized into two categories: In-Store
Customer Orders and External Customer Orders. The In-Store Customer Orders are
defined as orders that are serviced at the store and inventory reservation is
done in Oracle Retail Store Inventory Management (SIM). While the External
Customer orders are serviced by an external order management system, no
inventory reservation will be made at the store in SIM.
This batch should only process records where the sales type is
not equal to External Customer Sales, as it handles only the in-store type
orders.
Schedule Information
|
Description
|
|
Processing Cycle
|
|
|
Frequency
|
|
|
Scheduling Considerations
|
|
|
Pre-Processing
|
NA
|
|
Post-Processing
|
NA
|
|
Threading Scheme
|
Multithreaded based on store number
|
The logical unit of work for this module is defined as a unique
store/day combination.
Records are fetched, updated, and inserted in batches of
pl_commit_max_ctr. Only two commits are done, one to establish the store/day
lock and another at the end, to release
the lock after a store/day is completely processed. The ORIN
formatted output file is created with a temporary name and renamed just before
the end of store/day commit.
In case of failure, all work done is rolled back to the point
right after the call to get_lock() and the lock is released. Thus, the rollback
segment should be large enough to hold all inserts into sa_exported for one
store/day.
|
Table
|
Select
|
Insert
|
Update
|
Delete
|
|
SA_SYSTEM_OPTIONS
|
Yes
|
No
|
No
|
No
|
|
SA_EXPORTED
|
Yes
|
Yes
|
No
|
No
|
|
SA_EXPORT_LOG
|
Yes
|
No
|
Yes
|
No
|
|
SA_STORE_DAY
|
Yes
|
No
|
No
|
No
|
|
SA_ERROR
|
Yes
|
No
|
No
|
No
|
|
SA_ERROR_IMPACT
|
Yes
|
No
|
No
|
No
|
|
SA_TRAN_HEAD
|
Yes
|
No
|
No
|
No
|
|
SA_TRAN_HEAD_REV
|
Yes
|
No
|
No
|
No
|
|
SA_TRAN_ITEM
|
Yes
|
No
|
No
|
No
|
|
SA_TRAN_ITEM_REV
|
Yes
|
No
|
No
|
No
|
|
ITEM_MASTER
|
Yes
|
No
|
No
|
No
|
|
Integration Type
|
Inventory Export from ReSA to RMS
|
|
File Name
|
ORIN_<store>_<tran_date>_<sysdate>
|
|
Integration Contract
|
IntCon000049
|
|
Record Name
|
Field Name
|
Field Type
|
Default Value
|
Description
|
|
FHEAD
|
Record descriptor
|
Char(5)
|
FHEAD
|
Identifies the file record type.
|
|
File Line Id
|
Char(10)
|
0000000001
|
Sequential file line number.
|
|
File type
Definition
|
Char(4)
|
ORIN
|
Identifies the file type.
|
|
File Create Date
|
Char(14)
|
|
File Create Date in
YYYYMMDDHHMMSS format.
|
|
Location
|
Number(10)
|
|
Store location number.
|
|
THEAD
|
Record descriptor
|
Char(5)
|
THEAD
|
Identifies the file record type.
|
|
File Line Id
|
Char(10)
|
|
Sequential file line number.
|
|
Transaction Date & Time
|
Char(14)
|
Transaction Date
|
Date and time of the order processed.
|
|
Transaction Type
|
Char(6)
|
SALE
|
Transaction type code specifies whether the transaction is
sale or return.
|
|
TDETL
|
Record descriptor
|
Char(5)
|
TDETL
|
Identifies the file record type.
|
|
File Line Id
|
Char(10)
|
|
Sequential file line number.
|
|
Item Type
|
Char(3)
|
REF or
ITM
|
Can be REF or ITM.
|
|
Item
|
Char(25)
|
|
ID number of the ITM or REF.
|
|
Item Status
|
Char(6)
|
LIN - Layaway Initiate
LCA – Layaway Cancel
LCO – Layaway Complete
PVLCO – Post void of Layaway complete
ORI – Pickup/delivery Initiate
ORC - Pickup/delivery Cancel
ORD - Pickup/delivery Complete
PVORD – Post void of Pick-up/delivery complete
|
Type of transaction.
|
|
Dept
|
Number(4)
|
|
Department of item sold or returned.
|
|
Class
|
Number(4)
|
|
Class of item sold or returned.
|
|
Sub class
|
Number(4)
|
|
Subclass of item sold or returned.
|
|
Pack Ind
|
Char(1)
|
|
Pack indicator of item sold or returned.
|
|
Quantity Sign
|
Chanr(1)
|
P or N
|
Sign of the quantity.
|
|
Quantity
|
Number(12)
|
|
Quantity * 10000 (4 implied decimal places), number of
units for the given order (item) status.
|
|
Selling UOM
|
Char(4)
|
|
UOM at which this item was sold.
|
|
Catchweight Ind
|
Char(1)
|
|
Indicates if the item is a catchweight item. Valid values
are Y or NULL.
|
|
Customer Order number
|
Char(48)
|
|
Customer Order number.
|
|
TTAIL
|
File Type Record
Descriptor
|
Char(5)
|
TTAIL
|
Identifies file record type.
|
|
File Line Identifier
|
Number(10)
|
Specified by ReSA
|
ID of current line being processed by input file.
|
|
Transaction count
|
Number(6)
|
Specified by ReSA
|
Number of TDETL records in this transaction set.
|
|
FTAIL
|
File Type Record
Descriptor
|
Char(5)
|
FTAIL
|
Identifies file record type.
|
|
File Line Identifier
|
Number(10)
|
Specified by external
system
|
ID of the current line being processed by input file.
|
|
File Record Counter
|
Number(10)
|
|
Number of records/transactions processed in the current
file (only records between FHEAD and FTAIL).
|
NA
Module Name
|
saexpdw.pc
|
Description
|
Export from ReSA to Oracle Retail Analytics
|
Functional
Area
|
Oracle Retail Sales Audit
|
Module Type
|
Integration
|
Module
Technology
|
ProC
|
Integration
Catalog ID
|
RSA02
|
The purpose of this batch module is to fetch all sales and return
transactions that do not have Retail Analytics errors from the ReSA database
tables for transmission to the Oracle Retail Analytics application. The data
will be sent at the store day level. If the transaction has a status of
Deleted, and if it has been previously Transmitted, a reversal of the
transaction will be sent.
|
Schedule Information
|
Description
|
|
Processing Cycle
|
Ad Hoc
|
|
Frequency
|
Daily
|
|
Scheduling Considerations
|
This will run after auditors
have made corrections to the data.
|
|
Pre-Processing
|
sapreexp.pc
|
|
Post-Processing
|
resa2dw
|
|
Threading Scheme
|
Multi-threaded by store
|
The logical unit of work for this module is defined as a unique
store/day combination. Records will be fetched, updated, and inserted based on
the commit_max_ctr. Only two commits will be done: one to establish the
store/day lock and another at the end, to release the lock after a store/day
has been completely processed. The RDWT, RDWF, RDWS, and RDWC formatted output
files will be created with temporary names and renamed just before the end of
store/day commit.
In case of a failure, all the work done will be rolled back to
the point right after the call to get_lock() and the lock is released. The
rollback segment should be large enough to hold all inserts into sa_exported
for one store/day.
|
Table
|
Select
|
Insert
|
Update
|
Delete
|
|
SA_STORE_DAY
|
Yes
|
No
|
No
|
No
|
|
SA_EXPORT_LOG
|
Yes
|
No
|
No
|
No
|
|
V_RESTART_STORE
|
Yes
|
No
|
No
|
No
|
|
SA_STORE_PRICE_HIST_TEMP
|
No
|
Yes
|
No
|
No
|
|
SA_TRAN_HEAD
|
Yes
|
No
|
No
|
No
|
|
SA_CUSTOMER
|
Yes
|
No
|
No
|
No
|
|
SA_STORE_EMP
|
Yes
|
No
|
No
|
No
|
|
SA_ERROR
|
Yes
|
No
|
No
|
No
|
|
SA_ERROR_IMPACT
|
Yes
|
No
|
No
|
No
|
|
SA_EXPORTED
|
Yes
|
No
|
No
|
No
|
|
SA_TRAN_HEAD_REV
|
Yes
|
No
|
No
|
No
|
|
SA_EXPORTED_REV
|
Yes
|
No
|
No
|
No
|
|
SA_TRAN_ITEM
|
Yes
|
No
|
No
|
No
|
|
SA_TRAN_ITEM_REV
|
Yes
|
No
|
No
|
No
|
|
SA_TRAN_DISC
|
Yes
|
No
|
No
|
No
|
|
SA_TRAN_DISC_REV
|
Yes
|
No
|
No
|
No
|
|
SA_TRAN_TENDER
|
Yes
|
No
|
No
|
No
|
|
SA_VOUCHER
|
Yes
|
No
|
No
|
No
|
|
SA_TRAN_TENDER_REV
|
Yes
|
No
|
No
|
No
|
|
SA_STORE_DAY_READ_LOCK
|
No
|
Yes
|
No
|
Yes
|
|
Integration Type
|
Download from ReSA
|
|
File Name
|
RDWT_ appended with store number, business date, and
system date.
RDWF_ appended with store number, business date, and
system date.
RDWS_ appended with store number, business date, and system
date.
RDWC_ appended with store number, business date, and
system date.
|
|
Integration Contract
|
IntCon000041 (RDWT)
IntCon000156 (RDWF)
IntCon000157 (RDWS)
IntCon000158 (RDWC)
|
Four output files will be created for
each store_day:
§
RDWT - Transaction File
§
RDWF - Form of Payment (Tender) file
§
RDWS - Store Totals output file
§
RDWC - Cashier output File
Each output file is converted into a
format for loading into Retail Analytics by the resa2dw Perl script.
§
File layouts for the interface between sales audit and Retail
Analytics.
§
Char fields are left justified and blank filled.
§
Number fields are right justified and zero filled. They can
contain only numbers.
§
Numeric fields are left justified and blank filled. They can
contain only numbers.
RDWT File
|
Record Name
|
Field Name
|
Field Type
|
Default Value
|
Description
|
Required
|
|
File Header
|
File Type Record Descriptor
|
Char(5)
|
FHEAD
|
Identifies file record type.
|
|
|
|
File Line Identifier
|
Number(10)
|
Specified by external system
|
ID of the current line being processed by input file.
|
Yes
|
|
|
File Type Definition
|
Char(4)
|
RDWT
|
Identifies file as Retail Analytics Transaction file.
|
Yes
|
|
|
File Create Date
|
Number(14)
|
Create date
|
Date file was written by external system. Format
YYYYMMDDHH24MISS
|
Yes
|
|
Transaction Header
|
File Type Record Descriptor
|
Char(5)
|
THEAD
|
Identifies transaction record type.
|
|
|
|
File Line Identifier
|
Number(10)
|
Specified by external system
|
ID of the current line being processed by input file.
|
Yes
|
|
|
Business date
|
Number(8)
|
|
Format YYYYMMDD (Note: This is the date the Retail
Analytics will consider the transaction date.)
|
Yes
|
|
|
Transaction Date
|
Number(14)
|
Transaction date
|
Date sale/return transaction was processed at the POS.
Format YYYYMMDDHH24MISS (Note: the Retail Analytics only uses the HH24MI part
of this date.)
|
Yes
|
|
|
Location
|
Number(10)
|
Specified by external system
|
Store or warehouse identifier.
|
Yes
|
|
|
Register ID
|
Char(5)
|
|
The register identifier.
|
Yes, -1 for null
|
|
|
Banner ID
|
Char(4)
|
|
The unique identifier of the banner.
|
Yes, -1 for null
|
|
|
Line Media ID
|
Char(10)
|
|
The identifier of the media for the order line. For
non-merchandise items, such as Shipping & Handling, Service Lines. and
gift certificates, the media code will be that of the order line with which
it is associated.
|
Yes, -1 for null
|
|
|
Selling Item ID
|
Char(25)
|
|
The unique identifier of a selling item.
|
Yes, -1 for null
|
|
|
Customer Order Header ID
|
Char(48)
|
|
The unique identifier of a customer order.
|
Yes, -1 for null
|
|
|
Customer Order Line ID
|
Char(30)
|
|
The identifier of a customer order line. For a Value Added
Service, such as monogramming, this will be the line number for the item
which the service was applied.
|
Yes, -1 for null
|
|
|
Customer Order Create Date
|
Char(8)
|
|
The date when the customer order was created/placed.
|
Yes, -1 for null
|
|
|
Cashier Identifier
|
Char(10)
|
|
The cashier number. This will be the unique employee
number.
|
Yes, -1 for null
|
|
|
Salesperson Identifier
|
Char(10)
|
|
The salesperson number. This will be the unique employee
number.
|
Yes, -1 for null
|
|
|
Customer ID Type
|
Char(6)
|
|
The type of ID number used by this customer.
|
Yes, -1 for null
|
|
|
Customer ID Number
|
Char(16)
|
|
Customer ID associated with the transaction.
|
Yes, -1 for null
|
|
|
Transaction Number
|
Number(10)
|
|
The unique transaction reference number generated by the
POS.
|
Yes
|
|
|
Original Register ID
|
Char(5)
|
|
Register ID of the original transaction.
|
Yes for a transaction type
of PVOID.
|
|
|
Original Transaction Number
|
Number(10)
|
|
Transaction number of the original transaction.
|
Yes for a transaction type
of ‘PVOID.
|
|
|
Transaction Header Number
|
Numeric(20)
|
|
Unique reference used within sales audit to represent the
date/store/register/tran_no.
|
Yes
|
|
|
Revision number
|
Number(3)
|
|
Number used to identify the version of the transaction
being sent.
|
Yes
|
|
|
Sales Sign
|
Char(1)
|
P - positive
N - negative
|
Determines if the Total Sales Quantity and Total Sales
Value are positive or negative.
|
Yes
|
|
|
Transaction Type
|
Char(6)
|
|
Transaction type code.
|
Yes
|
|
|
Sub Transaction Type
|
Char(6)
|
|
The Sub Transaction type.
|
Yes, -1 for null
|
|
|
Retail Type
|
Char(1)
|
R (Regular), P (Promo), or C (Clearance)
|
|
Yes
|
|
|
Item_Seq_No
|
Number(4)
|
|
The order in which items were entered during the
transaction.
|
No
|
|
|
Employee Number (Cashier)
|
Char(10)
|
|
Employee identification number. This will only be
populated if the sub transaction type is EMP.
|
Yes, -1 for null
|
|
|
Receipt Indicator
|
Char(1)
|
|
Flag that identifies returns that have been processed
without a receipt. This field will only be populated if the transaction type
is RETURN.
|
No
|
|
|
Reason Code
|
Char(6)
|
|
A reason is required with a Paid In/Out transaction type,
and optional with a return transaction.
|
Yes, -1 for null
|
|
|
Vendor number
|
Numeric(10)
|
|
This will only get populated when the paid in code is
Expense Vendor.
|
No
|
|
|
Item Type
|
Char(6)
|
item type identifier
|
Type of item sold: ITEM, REF, GCN (gift certificate
number), or NMITEM.
|
No
|
|
|
Item
|
Char(25)
|
|
ID number of the item or gift certificate.
|
No. Required if Item Type is
not null.
|
|
|
Ref Item
|
Char(25)
|
|
Sub-transaction level item.
|
No. Also, this field can
never be populated without a transaction level item in the item field.
|
|
|
Taxable Indicator
|
Char(1)
|
|
Taxable/non-taxable status indicator.
|
No
|
|
|
Entry/mode
|
Char(6)
|
|
Indicator that identifies whether the item was scanned or
manually entered.
|
No
|
|
|
Department
|
Number(4)
|
|
Department of item sold or returned. Need to validate if
using ReSA.
|
No
|
|
|
Class
|
Number(4)
|
|
Class of item sold or returned. Need to validate if using
ReSA.
|
No
|
|
|
Subclass
|
Number(4)
|
|
Subclass of item sold or returned. Need to validate if
using ReSA.
|
No
|
|
|
Total Sales Quantity
|
Number(12)
|
|
Number of units sold at a particular location, with 4
implied decimal places.
|
No
|
|
|
Total Transaction Value
|
Number(20)
|
|
Sales value, net sales value of goods sold/returned, with
4 implied decimal places.
|
No
|
|
|
Override Reason
|
Char(6)
|
|
This column will be populated when an item’s price has
been overridden at the POS to define why it was overridden. This will also
always be sent if the transaction originated in RCOM.
|
Yes, -1 for null
|
|
|
Return Reason
|
Char(6)
|
|
The reason an item was returned.
|
Yes, -1 for null
|
|
|
Total original sign
|
Char(1)
|
‘P’- positive
‘N’ – negative
|
|
No
|
|
|
Total Original Sales Value
|
Number(20)
|
|
This column will be populated when the item's price was overridden
at the POS and the item's original unit retail is known. This will always be
written when the transaction originated in RCOM. This has 4 implied decimals.
|
No
|
|
|
Weather
|
Char(6)
|
|
For transaction types of COND, this field will store the
type of weather for the store-day.
|
No
|
|
|
Temperature
|
Char(6)
|
|
For transaction types of COND, this field will store the
type of temperature for the store-day.
|
No
|
|
|
Traffic
|
Char(6)
|
|
For transaction types of COND, this field will store the
type of traffic for the store-day.
|
No
|
|
|
Construction
|
Char(6)
|
|
For transaction types of COND, this field will store
information regarding any construction on that store-day.
|
No
|
|
|
Drop Shipment Indicator
|
Char(1)
|
Y or N
|
Indicates whether the item is involved in a drop shipment.
|
No
|
|
|
Item Status
|
Char(6)
|
|
The status of the item, required for voided or exchanged
items. Valid values are found in the code_detail table under code_type SASI.
|
Y, -1 for null
|
|
|
Tran Process Sys
|
Char(3)
|
|
This column holds the name of the system that processed the
transaction. This will be used for filtering duplicate transactions coming
from the different systems for export to downstream systems. Expected values
are POS – Point of Sale, OMS – Order Management System and, SIM – Store
Inventory Management.
|
Y, -1 for null
|
|
|
Return Wh
|
Number(10)
|
|
This column contains the physical warehouse ID for the
warehouse identifier where the item was returned.
|
N, -1 for null
|
|
|
Fulfill Order No
|
Char(48)
|
|
This column holds the number from OMS related to the
fulfillment details. One or more fulfillment orders could relate back to a
single customer order in OMS. This column is required if the order is a cross
channel order (that is, Sales Type equals E) and the item status is ORD.
|
N, -1 for null
|
|
|
No Inventory Return Ind
|
Char(1)
|
|
This column contains an indicator that identifies a return
without inventory. This is generally a non-required column, but in the case
of returns, this is required.
|
N
|
|
|
Sales Type
|
Char(1)
|
|
This column indicates whether the line item is a Regular
Sale, a customer order serviced by OMS (External CO), or a customer order
serviced by a store (In Store CO).
|
Y
|
|
|
Return Disposition
|
Char(10)
|
|
This column will contain the disposition code published by
RWMS as part of the Returns upload to OMS.
|
N, -1 for null
|
|
Transaction Detail
|
File Type Record Descriptor
|
Char(5)
|
TDETL
|
Identifies transaction record type.
|
|
|
|
File Line Identifier
|
Number(10)
|
Specified by external system
|
ID of the current line being processed by input file.
|
Yes
|
|
|
Discount Type
|
Char(6)
|
|
Code for discount type from code_detail, code_type equals
SADT.
|
No
|
|
|
Promotional Transaction Type
|
Char(6)
|
|
Code for promotional type from code_detail, code_type
equals PRMT.
|
Yes
|
|
|
Promotion Number
|
Numeric(10)
|
Promotion number
|
Promotion number from the RMS.
|
No
|
|
|
Promotion Component Number
|
Numeric(10)
|
Promo_comp_id from RPM
|
|
Required if it is a
promotional sale.
|
|
|
|
|
|
|
|
|
|
Coupon Number
|
Char(16)
|
|
|
Yes, if Discount Type is
SCOUP.
|
|
|
Coupon Reference Number
|
Char(16)
|
|
|
No
|
|
|
Sales Quantity
|
Number(12)
|
|
Number of units sold in this promotion type, with 4
implied decimal places.
|
No
|
|
|
Transaction Sign
|
Char(1)
|
P- positive
N – negative
|
|
Yes
|
|
|
Transaction Value
|
Number(20)
|
|
Value of units sold in this promotion type, with 4 implied
decimal places.
|
Yes
|
|
|
Discount Value
|
Number(20)
|
|
Value of discount given in this promotion type, with 4
implied decimal places.
|
Yes
|
|
Transaction Trailer
|
File Type Record Descriptor
|
Char(5)
|
TTAIL
|
Identifies file record type.
|
|
|
|
File Line Identifier
|
Number(10)
|
Specified by external system
|
ID of current line being processed by input file.
|
Yes
|
|
|
Transaction Count
|
Number(6)
|
Specified by external system
|
Number of TDETL records in this transaction set.
|
Yes
|
|
File Trailer
|
File Type Record Descriptor
|
Char(5)
|
FTAIL
|
Identifies file record type.
|
|
|
|
File Line Identifier
|
Number(10)
|
Specified by external system
|
ID of the current line being processed by input file.
|
Yes
|
|
|
File Record Counter
|
Number(10)
|
|
Number of records/transactions processed in the current
file (only records between head and tail).
|
Yes
|
Transaction Item Information Produced by saexpdw.pc after Translation by
resa2dw
|
Record Name
|
Field Name
|
Field Type
|
Default Value
|
Description
|
Required
|
|
|
Business date
|
Number(8)
|
|
Format YYYYMMDD.
|
Yes
|
|
|
Transaction Date
|
Number(14)
|
Transaction date
|
Date sale/return transaction
was processed at the POS. Format YYYYMMDDHH24MISS
|
Yes
|
|
|
Location
|
Number(10)
|
Specified by external system
|
Store or warehouse
identifier.
|
Yes
|
|
|
Register ID
|
Char(5)
|
|
The register identifier.
|
Yes, -1 for null
|
|
|
Banner ID
|
Char(4)
|
|
The unique identifier of the
banner.
|
Yes, -1 for null
|
|
|
Line Media ID
|
Char(10)
|
|
The identifier of the order
line media. For non-merchandise items, such as Shipping & Handling,
Service Lines, and gift certificates, the media code will be that of the
order line with which is it is associated.
|
Yes, -1 for null
|
|
|
Selling Item ID
|
Char(25)
|
|
The unique identifier of a
selling item.
|
Yes, -1 for null
|
|
|
Customer Order Header ID
|
Char(48)
|
|
The unique identifier of a
customer order.
|
Yes, -1 for null
|
|
|
Customer Order Line ID
|
Char(30)
|
|
The identifier of a customer
order line. For a Value Added Service, such as monogramming, this will be
the line number for the item, which the service was applied.
|
Yes, -1 for null
|
|
|
Customer Order Create Date
|
Number(8)
|
|
The customer order creation
date.
|
Yes, transaction date for
null
|
|
|
Cashier Identifier
|
Char(10)
|
|
The cashier number. This
will be the unique employee number.
|
Yes, -1 for null
|
|
|
Salesperson Identifier
|
Char(10)
|
|
The salesperson number. This
will be the unique employee number.
|
Yes, -1 for null
|
|
|
Customer ID Type
|
Char(6)
|
|
The type of ID number used
by this customer.
|
Yes, -1 for null
|
|
|
Customer ID Number
|
Char(16)
|
|
Customer ID associated with
the transaction.
|
Yes, -1 for null
|
|
|
Transaction Number
|
Number(10)
|
|
The unique transaction reference
number generated by the POS.
|
Yes
|
|
|
Original Register ID
|
Char(5)
|
|
Register ID of the original
transaction.
|
Yes for a transaction type
of ‘PVOID’.
|
|
|
Original Transaction Number
|
Number(10)
|
|
Transaction number of the
original transaction.
|
Yes for a transaction type
of ‘PVOID’.
|
|
|
Transaction Header Number
|
Numeric(20)
|
|
Unique reference used within
sales audit to represent the date/store/register/tran_no.
|
Yes
|
|
|
Revision number
|
Number(3)
|
|
Number used to identify the
version of the transaction being sent.
|
Yes
|
|
|
Sales Sign
|
Char(1)
|
P - positive
N - negative
|
Determines if the Total
Sales Quantity and Total Sales Value are positive or negative.
|
Yes
|
|
|
Transaction Type
|
Char(6)
|
|
Transaction type code.
|
Yes
|
|
|
Sub Transaction Type
|
Char(6)
|
|
The Sub Transaction type.
|
Yes, -1 for null
|
|
|
Retail Type
|
Char(1)
|
R (Regular), P (Promo), or C
(Clearance)
|
|
Yes
|
|
|
Item_Seq_No
|
Number(4)
|
|
The order in which items
were entered during the transaction.
|
No
|
|
|
Employee Number (Cashier)
|
Char(10)
|
|
Employee identification
number. This will only be populated if the sub transaction type is EMP.
|
Yes, -1 for null
|
|
|
Receipt Indicator
|
Char(1)
|
|
Flag that identifies returns
that have been processed without a receipt. This field will only be populated
if the transaction type is RETURN.
|
No
|
|
|
Reason Code
|
Char(6)
|
|
A reason is required with a
Paid In/Out transaction type, and optional with a return transaction.
|
Yes, -1 for null
|
|
|
Vendor number
|
Numeric(10)
|
|
This will only get populated
when the paid in code is Expense Vendor.
|
No
|
|
|
Item Type
|
Char(6)
|
Item type identifier
|
Type of item sold, ITEM, REF, GCN (gift certificate number), or
IMITEM.
|
No
|
|
|
Item
|
Char(25)
|
|
ID number of the item or
gift certificate.
|
No. Required if Item Type is
not null.
|
|
|
Ref Item
|
Char(25)
|
|
Sub-transaction level item.
|
No. Also, this field can
never be populated without a transaction level item in the item field.
|
|
|
Taxable Indicator
|
Char(1)
|
|
Taxable/non-taxable status
indicator.
|
No
|
|
|
Entry/mode
|
Char(6)
|
|
Indicator that identifies
whether the item was scanned or manually entered.
|
No
|
|
|
Department
|
Number(4)
|
|
Department of item sold or
returned. Need to validate if using ReSA.
|
No
|
|
|
Class
|
Number(4)
|
|
Class of item sold or
returned. Need to validate if using ReSA.
|
No
|
|
|
Subclass
|
Number(4)
|
|
Subclass of item sold or
returned. Need to validate if using ReSA.
|
No
|
|
|
Total Sales Quantity
|
Number(12)
|
|
Number of units sold at a
particular location, with 4 implied decimal places.
|
No
|
|
|
Total Transaction Value
|
Number(20)
|
|
Sales value, net sales value
of goods sold/returned, with 4 implied decimal places.
|
No
|
|
|
Override Reason
|
Char(6)
|
|
This column will be populated when an item price has been
overridden at the POS to define why it was overridden. This will always be
sent if the transaction originated in RCOM.
|
Yes, -1 for null
|
|
|
Return Reason
|
Char(6)
|
|
The reason an item was returned.
|
Yes, -1 for null
|
|
|
Total original sign
|
Char(1)
|
P- positive
N - negative
|
|
No
|
|
|
Total Original Sales Value
|
Number(20)
|
|
This column will be populated when the item's price was
overridden at the POS and the item's original unit retail is known. This will
always be sent if the transaction originated in RCOM. This has 4 implied
decimals.
|
No
|
|
|
Weather
|
Char(6)
|
|
For transaction types of
COND, this field will store the type of weather for the store-day.
|
No
|
|
|
Temperature
|
Char(6)
|
|
For transaction types of
COND, this field will store the type of temperature for the store-day.
|
No
|
|
|
Traffic
|
Char(6)
|
|
For transaction types of
COND, this field will store the type of traffic for the store-day.
|
No
|
|
|
Construction
|
Char(6)
|
|
For transaction types of
COND, this field will store information regarding any construction on that
store-day.
|
No
|
|
|
Drop Shipment Indicator
|
Char(1)
|
Y or N
|
Indicates whether the item
is involved in a drop shipment.
|
No
|
|
|
Item Status
|
Char(6)
|
|
The status of the item, required for voided or exchanged
items. Valid values are found in the code_detail table under code_type SASI.
|
Y, -1 for null
|
|
|
Tran Process Sys
|
Char(3)
|
|
This column holds the name
of the system that processed the transaction. This will be used for filtering
duplicate transactions coming from the different systems for export to
downstream systems. Expected values are POS – Point of Sale, OMS – Order
Management System and, SIM – Store Inventory Management.
|
Y, -1 for null
|
|
|
Return Wh
|
Number(10)
|
|
This column contains the physical
warehouse ID for the warehouse identifier where the item was returned.
|
N, -1 for null
|
|
|
Fulfill Order No
|
Char(48)
|
|
This column holds the number
from OMS related to the fulfillment details. One or more fulfillment orders
could relate back to a single customer order in OMS. This column is required
if the order is a cross channel order (that is, Sales Type equals E) and the
item status is ORD.
|
N, -1 for null
|
|
|
No Inventory Return Ind
|
Char(1)
|
|
This column contains an
indicator that identifies a return without inventory. This is generally a
non-required column, but in case of returns, this is required.
|
N
|
|
|
Sales Type
|
Char(1)
|
|
This column indicates
whether the line item is a Regular Sale, a customer order serviced by OMS
(External CO), or a customer order serviced by a store (In Store CO).
|
Y
|
|
|
Return Disposition
|
Char(10)
|
|
This column will contain the
disposition code published by RWMS as part of the Returns upload to OMS.
|
N, -1 for null
|
|
|
Discount Type
|
Char(6)
|
|
Code for discount type from
code_detail, code_type equals SADT.
|
No
|
|
|
Promotional Transaction Type
|
Char(6)
|
|
Code for promotional type
from code_detail, code_type equals PRMT.
|
Yes
|
|
|
Promotion Number
|
Numeric(10)
|
Promotion number
|
Promotion number from the
RMS.
|
No
|
|
|
Promotion Component Number
|
Numeric(10)
|
Promo_comp_id from RPM
|
|
Required if it is a
promotional sale.
|
|
|
Coupon Number
|
Char(16)
|
|
|
Yes if Discount Type is
SCOUP.
|
|
|
Coupon Reference Number
|
Char(16)
|
|
|
No
|
|
|
Sales Quantity
|
Number(12)
|
|
Number of units sold in this
promotion type, with 4 implied decimal places.
|
No
|
|
|
Transaction Sign
|
Char(1)
|
P - positive
N - negative
|
|
Yes
|
|
|
Transaction Value
|
Number(20)
|
|
Value of units sold in this
promotion type, with 4 implied decimal places.
|
Yes
|
|
|
Discount Value
|
Number(20)
|
|
Value of discount given in
this promotion type, with 4 implied decimal places.
|
Yes
|
RDWF File
|
Record Name
|
Field Name
|
Field Type
|
Default Value
|
Description
|
Required
|
|
|
File Header
|
File Type Record Descriptor
|
Char(5)
|
FHEAD
|
Identifies file record type.
|
|
|
|
|
File Line Identifier
|
Number(10)
|
Specified by external system
|
ID of the current line being processed by input file.
|
Yes
|
|
|
|
File Type Definition
|
Char(4)
|
RDWF
|
Identifies the file as a Retail Analytics Form of Payment
(Tender) file.
|
Yes
|
|
|
|
File Create Date
|
Numeric(14)
|
Create date
|
Date the file was written by external system. Format
YYYYMMDDHH24MISS.
|
Yes
|
|
|
File Detail
|
File Type Record Descriptor
|
Char(5)
|
FDETL
|
Identifies file record type.
|
|
|
|
|
File Line Identifier
|
Number(10)
|
Specified by external system
|
ID of the current line being processed by input file.
|
Yes
|
|
|
|
Business date
|
Numeric(8)
|
|
Format YYYYMMDD
|
Yes
|
|
|
|
Transaction Date
|
Numeric(14)
|
Transaction date
|
Date sale/return transaction was processed at the POS.
Format YYYYMMDDHH24MISS
|
Yes
|
|
|
|
Location
|
Number(10)
|
Specified by external system
|
Store or warehouse identifier.
|
Yes
|
|
|
Cashier Identifier
|
Char(10)
|
|
The cashier number. This will be the unique employee
number.
|
Yes, -1 for null
|
|
|
Register Identifier
|
Char(5)
|
|
|
Yes, -1 for null
|
|
|
Sales Sign
|
Char(1)
|
P - positive
N - negative
|
Determines if the Total Sales Quantity and Total Sales
Value are positive or negative.
|
Yes
|
|
|
Transaction Sequence Number
|
Numeric(20)
|
|
Unique reference used within sales audit to represent the
date/store/register/transaction number.
|
Yes
|
|
|
Revision number
|
Number(3)
|
|
Number used to identify the version of the transaction
being sent.
|
Yes
|
|
|
Transaction Type
|
Char(6)
|
|
Transaction type code.
|
Yes
|
|
|
Tender type group
|
Char(6)
|
|
|
Yes
|
|
|
Tender type id
|
Numeric(6)
|
|
Tender type code.
|
Yes
|
|
|
Tender amount
|
Number(20)
|
|
Tender amount.
|
Yes
|
|
|
Credit Card Number
|
Numeric(40)
|
|
This value is masked.
|
No
|
|
|
Credit Card Expiration Date
|
Numeric(8)
|
|
Format YYYYMMDD
|
No
|
|
|
Credit Card Authorization Number
|
Char(16)
|
|
|
No
|
|
|
Credit Card Authorization Source
|
Char(6)
|
|
Contains whether the authorization number was electronically
transmitted or manually keyed in after obtaining it through a telephone call.
The code type for this field is CCAS.
|
No
|
|
|
Credit Card Entry Mode
|
Char(6)
|
|
Contains the method in which
the transaction was entered at the POS. Possible entry modes could include:
Terminal Used, Magnetic Strip Track One Read, Magnetic Strip Two Read,
Magnetic Strip One Transmitted, or Magnetic Strip Two Transmitted. The code
type for this field is CCEM.
|
No
|
|
|
Credit Card Cardholder Verification
|
Char(6)
|
|
Contains the method of identification that was used by the
cardholder to verify their identity. Possible values include Signature
Verified (S), Card Shown (C), PIN Entered (P), Mail Order / Phone (M). The
code type for this field is CCVF.
|
No
|
|
|
Credit Card Terminal ID
|
Char(5)
|
|
Contains the identification
code of the terminal within the store that the transaction was transmitted.
|
No
|
|
|
Credit Card Special Conditions
|
Char(6)
|
|
Contains the special
condition of the transaction (mail, phone or electronic-secured or
non-secured authentication). The code type for this field is CCSC.
|
No
|
|
|
Voucher Number
|
Char(25)
|
|
|
No
|
|
|
Voucher Age
|
Numeric(5)
|
|
Age of the gift certificate.
Redeemed date minus sold date.
|
Yes if Tender Type Group is
VOUCH.
|
|
|
Escheat Date
|
Numeric(8)
|
|
Date on which this gift
certificate escheats. Format is YYYYMMDD.
|
Yes if voucher can escheat.
|
|
|
Coupon Number
|
Char(16)
|
|
|
Yes if Tender Type Group is
COUPON.
|
|
|
Coupon Reference Number
|
Char(16)
|
|
|
No. Only if Tender Type
Group is COUPON.
|
|
|
|
|
|
|
|
|
File Trailer
|
File Type Record Descriptor
|
Char(5)
|
FTAIL
|
Identifies file record type.
|
|
|
|
File Line Identifier
|
Number(10)
|
Specified by external system
|
ID of the current line being
processed by input file.
|
Yes
|
|
|
File Record Counter
|
Number(10)
|
|
Number of
records/transaction processed in the current file (only records between head
and tail).
|
Yes
|
Retail Analytics Form of Payment File after translation by resa2dw
|
Record Name
|
Field Name
|
Field Type
|
Default Value
|
Description
|
Required
|
|
|
Business date
|
Numeric(8)
|
|
Format YYYYMMDD
|
Yes
|
|
|
Transaction Date
|
Numeric(14)
|
Transaction date
|
Date the sale/return
transaction was processed at the POS. Format YYYYMMDDHH24MISS
|
Yes
|
|
|
Location
|
Number(10)
|
Specified by external system
|
Store or warehouse
identifier.
|
Yes
|
|
|
Cashier Identifier
|
Char(10)
|
|
The cashier number. This
will be the unique employee number.
|
Yes, -1 for null
|
|
|
Register Identifier
|
Char(5)
|
|
|
Yes, -1 for null
|
|
|
Sales Sign
|
Char(1)
|
P - positive
N - negative
|
Determines if the Total
Sales Quantity and Total Sales Value are positive or negative.
|
Yes
|
|
|
Transaction Sequence Number
|
Numeric(20)
|
|
Unique reference used within
sales audit to represent the date/store/register/transaction number.
|
Yes
|
|
|
Revision number
|
Number(3)
|
|
Number used to identify the
version of the transaction being sent.
|
Yes
|
|
|
Transaction Type
|
Char(6)
|
|
Transaction type code.
|
Yes
|
|
|
Tender type group
|
Char(6)
|
|
|
Yes
|
|
|
Tender type id
|
Numeric(6)
|
|
Tender type code.
|
Yes
|
|
|
Tender amount
|
Number(20)
|
|
Tender amount.
|
Yes
|
|
|
Credit Card Number
|
Numeric(40)
|
This value is masked.
|
|
No
|
|
|
Credit Card Expiration Date
|
Numeric(8)
|
|
Format YYYYMMDD
|
No
|
|
|
Credit Card Authorization
Number
|
Char(16)
|
|
|
No
|
|
|
Credit Card Authorization
Source
|
Char(6)
|
|
Contains whether the
authorization number was electronically transmitted or manually keyed in
after obtaining it through a telephone call. The code type for this field is
CCAS.
|
No
|
|
|
Credit Card Entry Mode
|
Char(6)
|
|
Contains the method in which
the transaction was entered at the POS. Possible entry modes could include:
Terminal Used, Magnetic Strip Track One Read, Magnetic Strip Two Read,
Magnetic Strip One Transmitted, or Magnetic Strip Two Transmitted. The code
type for this field is CCEM.
|
No
|
|
|
Credit Card Cardholder
Verification
|
Char(6)
|
|
Contains the method of
identification that was used by the cardholder to verify their identity.
Possible values include Signature Verified (S), Card Shown (C), PIN Entered
(P), Mail Order / Phone (M). The code type for this field is CCVF.
|
No
|
|
|
Credit Card Terminal ID
|
Char(5)
|
|
Contains the identification
code of the terminal within the store where the transaction was transmitted.
|
No
|
|
|
Credit Card Special
Conditions
|
Char(6)
|
|
Contains the special
condition of the transaction (mail, phone or electronic-secured or
non-secured authentication). The code type for this field is CCSC.
|
No
|
|
|
Voucher Number
|
Char(25)
|
|
|
No
|
|
|
Voucher Age
|
Numeric(5)
|
|
Age of the gift certificate.
Redeemed date minus sold date.
|
Yes if Tender Type Group is
VOUCH.
|
|
|
Escheat Date
|
Numeric(8)
|
|
Date on which this gift
certificate escheats. Format is YYYYMMDD.
|
Yes if voucher can escheat.
|
|
|
Coupon Number
|
Char(16)
|
|
|
Yes if Tender Type Group is
COUPON.
|
|
|
Coupon Reference Number
|
Char(16)
|
|
|
No. Only if Tender Type
Group is COUPON.
|
RDWS File
|
Record Name
|
Field Name
|
Field Type
|
Default Value
|
Description
|
Required
|
|
|
File Header
|
File Type Record Descriptor
|
Char(5)
|
FHEAD
|
Identifies file record type.
|
|
|
|
|
File Line Identifier
|
Number(10)
|
Specified by external system
|
ID of the current line being
processed by input file.
|
Yes
|
|
|
|
File Type Definition
|
Char(4)
|
RDWS
|
Identifies file as a Retail
Analytics Store Totals file.
|
Yes
|
|
|
|
File Create Date
|
Numeric(14)
|
Create date
|
Date file was written by the
external system. Format YYYYMMDDHH24MISS
|
Yes
|
|
|
File Detail
|
File Type Record Descriptor
|
Char(5)
|
FDETL
|
Identifies the transaction
record type.
|
|
|
|
File Line Identifier
|
Number(10)
|
Specified by external system
|
ID of the current line being
processed by input file.
|
Yes
|
|
|
Business date
|
Number(8)
|
|
Format YYYYMMDD
|
Yes
|
|
|
Location
|
Number(10)
|
Specified by external system
|
Store or warehouse
identifier.
|
Yes
|
|
|
Sales Sign
|
Char(1)
|
P - positive
N - negative
|
Determines if the Total
Sales Quantity and Total Sales Value are positive or negative.
|
Yes
|
|
|
Total ID
|
Char(10)
|
|
Category identifier used to
determine the type of total.
|
Yes
|
|
|
Reference Number 1
|
Char(30)
|
|
|
No
|
|
|
Reference Number 2
|
Char(30)
|
|
|
No
|
|
|
Reference Number 3
|
Char(30)
|
|
|
No
|
|
|
Total Sign
|
Char(1)
|
P - positive
N - negative
|
|
Yes
|
|
|
Total Amount
|
Number(20)
|
|
Total over/short amount,
with 4 implied decimal places.
|
Yes
|
|
File Trailer
|
File Type Record Descriptor
|
Char(5)
|
FTAIL
|
Identifies the file record
type.
|
|
|
|
File Line Identifier
|
Number(10)
|
Specified by external system
|
ID of the current line
being processed by input file.
|
Yes
|
|
|
File Record Counter
|
Number(10)
|
|
Number of
records/transactions processed in the current file (only records between head
and tail).
|
Yes
|
Store Totals Information after
Translation by resa2dw
|
Record Name
|
Field Name
|
Field Type
|
Default Value
|
Description
|
Required
|
|
|
Business date
|
Number(8)
|
|
Format YYYYMMDD
|
Yes
|
|
|
Location
|
Number(10)
|
Specified by external system
|
Store or warehouse
identifier.
|
Yes
|
|
|
Sales Sign
|
Char(1)
|
P - positive
N - negative
|
Determines if the Total
Sales Quantity and Total Sales Value are positive or negative.
|
Yes
|
|
|
Total ID
|
Char(10)
|
|
Category identifier used to
determine the type of total.
|
Yes
|
|
|
Reference Number 1
|
Char(30)
|
|
|
No
|
|
|
Reference Number 2
|
Char(30)
|
|
|
No
|
|
|
Reference Number 3
|
Char(30)
|
|
|
No
|
|
|
Total Sign
|
Char(1)
|
P - positive
N - negative
|
|
Yes
|
|
|
Total Amount
|
Number(20)
|
|
Total over/short amount,
with 4 implied decimal places.
|
Yes
|
RDWC File
|
Record Name
|
Field Name
|
Field Type
|
Default Value
|
Description
|
Required
|
|
File Header
|
File Type Record Descriptor
|
Char(5)
|
FHEAD
|
Identifies file record type.
|
|
|
|
File Line Identifier
|
Number(10)
|
Specified by external system
|
ID of the current line being
processed by input file.
|
Yes
|
|
|
File Type Definition
|
Char(4)
|
RDWC
|
Identifies the file as a
Retail Analytics Cashier/Register Totals file.
|
Yes
|
|
|
File Create Date
|
Numeric(14)
|
Create date
|
Date the file was written by
the external system. Format YYYYMMDDHH24MISS
|
Yes
|
|
File Detail
|
File Type Record Descriptor
|
Char(5)
|
FDETL
|
Identifies the transaction
record type.
|
|
|
|
File Line Identifier
|
Number(10)
|
Specified by external system
|
ID of the current line being
processed by input file.
|
Yes
|
|
|
Business date
|
Number(8)
|
|
Format YYYYMMDD
|
Yes
|
|
|
Location
|
Number(10)
|
Specified by external system
|
Store or warehouse
identifier.
|
Yes
|
|
|
Cashier Identifier
|
Char(10)
|
|
The cashier number.
|
If Cashier_id is NULL, then
Register_id has value. If Cashier_id has value, then Register_id is NULL.
Yes, -1 for null
|
|
|
Register ID
|
Char(5)
|
|
The register identifier.
|
If Cashier_id is NULL, then
Register_id has value. If Cashier_id has value, then Register_id is NULL.
Yes, -1 for null
|
|
|
Sales Sign
|
Char(1)
|
P - positive
N - negative
|
Determines if the Total
Sales Quantity and Total Sales Value are positive or negative.
|
Yes
|
|
|
Total ID
|
Char(10)
|
|
Category identifier used to
determine the type of total.
|
Yes
|
|
|
Reference Number 1
|
Char(30)
|
|
|
No
|
|
|
Reference Number 2
|
Char(30)
|
|
|
No
|
|
|
Reference Number 3
|
Char(30)
|
|
|
No
|
|
|
Total Sign
|
Char(1)
|
P - positive
N - negative
|
|
Yes
|
|
|
Total Amount
|
Number(20)
|
|
Total over/short amount,
with 4 implied decimal places.
|
Yes
|
|
File Trailer
|
File Type Record Descriptor
|
Char(5)
|
FTAIL
|
Identifies the file record
type.
|
|
|
|
File Line Identifier
|
Number(10)
|
Specified by external system
|
ID of the current line being
processed by input file.
|
Yes
|
|
|
File Record Counter
|
Number(10)
|
|
Number of records/transactions
processed in the current file (only records between head and tail).
|
Yes
|
Cashier/ Register Totals
Information after Translation by resa2dw
|
Record Name
|
Field Name
|
Field Type
|
Default Value
|
Description
|
Required
|
|
|
Business date
|
Number(8)
|
|
Format YYYYMMDD
|
Yes
|
|
|
Location
|
Number(10)
|
Specified by external system
|
Store or warehouse
identifier
|
Yes
|
|
|
Cashier Identifier
|
Char(10)
|
|
The cashier number
|
If Cashier_id is NULL, then
Register_id has value. If Cashier_id has value, then Register_id is NULL.
Yes, -1 for null
|
|
|
Register ID
|
Char(5)
|
|
The register identifier.
|
If Cashier_id is NULL, then
Register_id has value. If Cashier_id has value, then Register_id is NULL.
Yes, -1 for null
|
|
|
Sales Sign
|
Char(1)
|
P - positive
N - negative
|
Determines if the Total
Sales Quantity and Total Sales Value are positive or negative.
|
Yes
|
|
|
Total ID
|
Char(10)
|
|
Category identifier used to
determine the type of total.
|
Yes
|
|
|
Reference Number 1
|
Char(30)
|
|
|
No
|
|
|
Reference Number 2
|
Char(30)
|
|
|
No
|
|
|
Reference Number 3
|
Char(30)
|
|
|
No
|
|
|
Total Sign
|
Char(1)
|
P - positive
N - negative
|
|
Yes
|
|
|
Total Amount
|
Number(20)
|
|
Total over/short amount,
with 4 implied decimal places.
|
Yes
|
NA
Module Name
|
Saexpsim.pc
|
Description
|
Export of Revised Sale/Return Transactions from ReSA to
SIM
|
Functional
Area
|
Oracle Retail Sales Audit
|
Module Type
|
Integration
|
Module
Technology
|
ProC
|
Integration
Catalog ID
|
RSA14
|
The purpose of this batch module is to fetch all revised sale and
return transactions that do not have SIM errors from the ReSA database tables
for transmission to SIM. It retrieves all quantity revision transaction data
for SALES, RETURN, EEXCH, VOID, and SPLORD transaction types.
If sa_system_options.unit_of_work is S, the whole store/day is
skipped if any SIM error is found. If this value is T, then only transactions
with SIM errors are skipped.
The batch will only export transactions whose quantity has been
revised. The batch will write these revised transactions to the output file
along with a reversal of the quantity.
A file of type SIMT is generated for each store/day.
Schedule Information
|
Description
|
|
Processing Cycle
|
Ad Hoc
|
|
Scheduling Considerations
|
This program should run towards the end of the Sales
Auditing cycle where the total (SATOTALS.PC) and rule (SARULES.PC) data are
ready to be exported to the external systems.
|
|
Pre-Processing
|
Satotals, sarules, sapreexp
|
|
Post-Processing
|
saprepost saexpsim post, resa2sim
|
|
Threading Scheme
|
Multi-threaded by store
|
The logical unit of work for this module is defined as a unique
store/day combination. Records will be fetched, updated, and inserted in
batches of pl_commit_max_ctr. Only two commits will be done, one to establish
the store/day lock and another at the end, to release the lock after a
store/day has been completely processed. The SIMT formatted output file will be
created with a temporary name and renamed just before the end of store/day
commit.
In case of failure, all work done will be rolled back to the
point right after the call to get_lock() and the lock released. Thus, the rollback
segment should be large enough to hold all inserts into SA_EXPORTED for one
store/day.
|
Table
|
Select
|
Insert
|
Update
|
Delete
|
|
SA_STORE_DAY
|
Yes
|
No
|
No
|
No
|
|
SA_EXPORT_LOG
|
Yes
|
No
|
Yes
|
No
|
|
V_RESTART_STORE
|
Yes
|
No
|
No
|
No
|
|
STORE
|
Yes
|
No
|
No
|
No
|
|
SA_TRAN_HEAD
|
Yes
|
No
|
No
|
No
|
|
SA_ERROR
|
Yes
|
No
|
No
|
No
|
|
SA_ERROR_IMPACT
|
Yes
|
No
|
No
|
No
|
|
SA_EXPORTED
|
Yes
|
Yes
|
No
|
No
|
|
SA_TRAN_HEAD_REV
|
Yes
|
No
|
No
|
No
|
|
SA_EXPORTED_REV
|
Yes
|
No
|
No
|
No
|
|
SA_SYSTEM_OPTIONS
|
Yes
|
No
|
No
|
No
|
|
SA_TRAN_ITEM_REV
|
Yes
|
No
|
No
|
No
|
|
ITEM_MASTER
|
Yes
|
No
|
No
|
No
|
|
SA_TRAN_ITEM
|
Yes
|
No
|
No
|
No
|
|
SA_STORE_DAY_READ_LOCK
|
No
|
Yes
|
No
|
Yes
|
|
Integration Type
|
Download from ReSA
|
|
File Name
|
SIMT_ appended by store number, business date, and system
date
|
|
Integration Contract
|
IntCon000045
|
Output File
|
Record Name
|
Field Name
|
Field Type
|
Default Value
|
Description
|
|
FHEAD
|
Record descriptor
|
Char(5)
|
FHEAD
|
Identifies the file record type.
|
|
File Line Id
|
Char(10)
|
0000000001
|
Sequential file line number.
|
|
File type definition
|
Char(4)
|
SIMT
|
Identifies the file type.
|
|
Store
|
Number(10)
|
|
Store location.
|
|
Business Date
|
Char(8)
|
|
Business Date in YYYYMMDD format.
|
|
File Create Date
|
Char(14)
|
|
File Create Date in YYYYMMDDHHMMSS format.
|
|
THEAD
|
Record descriptor
|
Char(5)
|
THEAD
|
Identifies the file record type.
|
|
File Line Id
|
Char(10)
|
|
Sequential file line number.
|
|
Transaction Number
|
Number(10)
|
|
Transaction Identifier.
|
|
Revision Number
|
Number(3)
|
|
Revision Number of the transaction.
|
|
Transaction date
|
Char(14)
|
|
Transaction date in YYYYMMDDHHMMSS format. Corresponds to
the date that the transaction occurred.
|
|
Transaction Type
|
Char(6)
|
|
Transaction Type.
|
|
POS Transaction Indicator
|
Char(1)
|
|
Indicates if the transaction was received from POS or
manually created. Valid values:
Y - POS
N - Manual
|
|
TDETL
|
Record descriptor
|
Char(5)
|
TDETL
|
Identifies the file record type.
|
|
File Line Id
|
Char(10)
|
|
Sequential file line number.
|
|
Item Sequence Number
|
Number(4)
|
|
Item sequence number.
|
|
Item
|
Char(25)
|
|
Identifies the merchandise item.
|
|
Item number type
|
Char(6)
|
|
Identifies the type of item number if the item type is
ITEM or REF.
|
|
Item Status
|
Char(6)
|
|
Status of the item within the transaction, V for item
void, S for sold item, R for returned item.
ORI – Order Initiate
ORC – Order Cancel
ORD – Order Complete
LIN – Layaway Initiate
LCA – Layaway Cancel
LCO – Layaway Complete
|
|
Serial Number
|
Char(128)
|
|
Unique ID.
|
|
Pack Indicator
|
Char(1)
|
|
Pack Indicator.
|
|
Catchweight Indicator
|
Char(1)
|
|
Catchweight Indicator.
|
|
Quantity Sign
|
Char(1)
|
|
Sign of the quantity.
|
|
Quantity Value
|
Number(12)
|
|
Number of items, with 4 implied decimal places.
|
|
Standard Unit of Measure
|
Char(4)
|
|
Standard Unit of Measure of the item.
|
|
Selling Unit of Measure
|
Char(4)
|
|
Unit of Measure of the quantity value.
|
|
Waste Type
|
Char(6)
|
|
Waste Type.
|
|
Waste Percent
|
Number(12)
|
|
Waste Percent.
|
|
Drop Ship Indicator
|
Char(1)
|
|
Indicates whether the item is part of a drop shipment.
|
|
Actual Weight
|
Number(12)
|
|
Contains the weight of the item sold, with 4 implied
decimal places.
|
|
Actual Weight Sign
|
Char(1)
|
|
Sign of the actual weight.
|
|
Reason Code
|
Char(6)
|
|
Reason entered by the cashier for some transaction types.
|
|
Sales Value
|
Number(20)
|
|
Transaction value, with 4 implied decimal places
|
|
Sales Value Sign
|
Char(1)
|
|
Transaction value sign.
|
|
Unit Retail
|
Number(20)
|
|
Unit retail, with 4 implied decimal places.
|
|
Sales Type
|
Char(1)
|
|
Indicates if the transaction is an In Store Customer
Order, External Customer Order, or Regular Sale.
|
|
Customer Order Number
|
Char(48)
|
|
Contains the customer order ID.
|
|
Customer Order Type
|
Char(6)
|
|
Customer order type.
|
|
Fulfillment Order Number
|
Char(48)
|
|
Contains the order ID of the fulfillment order.
|
|
TTAIL
|
Record descriptor
|
Char(5)
|
TTAIL
|
Identifies the file record type.
|
|
File Line Id
|
Char(10)
|
|
Sequential file line number.
|
|
Tran Record Counter
|
Number(6)
|
|
Number of TDETL records in this transaction set.
|
|
FTAIL
|
Record descriptor
|
Char(5)
|
FTAIL
|
Identifies the file record type.
|
|
File Line Id
|
Number(10)
|
|
Sequential file line number.
|
|
File Record counter
|
Number(10)
|
|
Number of records/transactions processed in the current
file (only records between head and tail).
|
NA
Module Name
|
saexpim.pc
|
Description
|
Export DSD and Escheatment from ReSA to Invoice Matching
|
Functional
Area
|
Oracle Retail Sales Audit
|
Module Type
|
Integration
|
Module
Technology
|
ProC
|
Integration
Catalog ID
|
RSA04
|
The purpose of this program is to support interfacing invoices
from Direct Store Delivery and Escheatment sales audit transactions to the
Oracle Retail Invoice Matching (ReIM) application. Direct Store Delivery
invoices refer to products or services that are delivered to the store and paid
for at the store. This program will take DSD invoices that have been staged to
the SA_TRAN_HEAD table by the saimptlog.pc program and move them into the
INVC_HEAD table. All DSD transactions will be assumed paid. They can be assumed
received if there is a proof of delivery number listed on them. Transactions
with a vendor invoice ID or a proof of delivery number should be matched to any
existing invoice in INVC_HEAD, and that invoice updated with the new
information being interfaced. Invoices that do not match an existing invoice in
INVC_HEAD will need to be inserted. Each transaction will be exported to
INVC_HEAD table only once.
The Sales Audit Transaction type used to identify invoices for
Direct Store Delivery transactions will be Paid Out. The Paid Out transaction
has a code of PAIDOU. The Sales Audit sub-transaction types will be used to
identify whether the invoice is an Expense Vendor Payout or a Merchandise
Vendor Payout. The codes are EV for Expense Vendor Payout and MV for
Merchandise Vendor Payout. Any Paid Out transaction with a sub-transaction type
of Expense Vendor will create a non-merchandise invoice and cause a record to
be written to the INVC_NON_MERCH table. ReSA will store non-merchandise codes
in the reason_code field on sa_tran_head. Valid values for these reason codes
should correspond to the codes stored on the non_merch_code_head table.
In addition to DSD invoices, this program will also interface
Escheatment totals to Invoice Matching. Escheatment is the process where an
unredeemed gift certificate/voucher or credit voucher will, after a set period
of time, be paid out as income to the issuing retailer, or in some states, the
state receives this escheatment income. ReSA will be the governing system that
determines who receives this income, but Invoice Matching will send the totals,
with the related Partner, to an Accounts Payable system. Escheatment
information will be stored on the ReSA SA_TOTALS table and will be used to
create non-merchandise invoices in Invoice Matching. These invoices will be
assumed not paid.
Schedule Information
|
Description
|
|
Processing Cycle
|
Ad Hoc
|
|
Frequency
|
Daily
|
|
Scheduling Considerations
|
This module should be executed after the ReSA transaction
import process after sapreexp.
Ideally, after saescheat (if run before, some transactions
will not be posted until the next run).
|
|
Pre-Processing
|
Sapreexp, saescheat
|
|
Post-Processing
|
N/A
|
|
Threading Scheme
|
N/A
|
The logical unit of work for this module is defined as a unique
store/day combination. Records will be fetched, updated, and inserted based on
the commit_max_ctr specified on the restart_control table. Only two commits
will be done, one to establish the store/day lock and another at the end, to
release the lock after a store/day has been completely processed.
In case of failure, all work done will be rolled back to the
point right after the call to get_lock and releases the lock. Thus, the
rollback segment should be large enough to hold all inserts into sa_exported
for one store_day.
|
Table
|
Select
|
Insert
|
Update
|
Delete
|
|
SYSTEM_OPTIONS
|
Yes
|
No
|
No
|
No
|
|
SA_STORE_DAY
|
Yes
|
No
|
No
|
No
|
|
SA_EXPORT_LOG
|
Yes
|
No
|
No
|
No
|
|
SA_TRAN_HEAD
|
Yes
|
No
|
No
|
No
|
|
SA_TRAN_TENDER
|
Yes
|
No
|
No
|
No
|
|
SA_EXPORTED
|
Yes
|
Yes
|
No
|
No
|
|
INVC_HEAD
|
Yes
|
Yes
|
Yes
|
No
|
|
INVC_NON_MERCH
|
No
|
Yes
|
Yes
|
No
|
|
INVC_XREF
|
No
|
Yes
|
No
|
No
|
|
TERMS
|
Yes
|
No
|
No
|
No
|
|
SUPS
|
Yes
|
No
|
No
|
No
|
|
PARTNER
|
Yes
|
No
|
No
|
No
|
|
CURRENCY_RATES
|
Yes
|
No
|
No
|
No
|
|
ADDR
|
Yes
|
No
|
No
|
No
|
|
SA_ERROR
|
Yes
|
No
|
No
|
No
|
|
SA_ERROR_IMPACT
|
Yes
|
No
|
No
|
No
|
|
Integration Type
|
Download from ReSA
|
|
File Name
|
NA
|
|
Integration Contract
|
IntCon000043
INVC_HEAD table
|
NA
Module Name
|
saexpgl.pc
|
Description
|
Post User Defined Totals from ReSA to General Ledger
|
Functional
Area
|
Oracle Retail Sales Audit
|
Module Type
|
Integration
|
Module
Technology
|
ProC
|
Integration
Catalog ID
|
RSA09
|
The purpose of this module is to post
all properly configured user-defined ReSA totals to a general ledger
application (Oracle or PeopleSoft). Totals without errors will be posted to the
appropriate accounting ledger, as defined in the Sales Audit GL cross-reference
module. Depending on the unit of work system parameter, the data will be sent
at either the store/day or individual total level. Newly revised totals, that
have already been posted to the ledger, will have their previous revision
reversed, and the new total posted to the appropriate accounts. Transactions
that are from previous periods will be posted to the current period.
Schedule Information
|
Description
|
|
Processing Cycle
|
Ad Hoc
|
|
Frequency
|
Daily
|
|
Scheduling Considerations
|
This program should run after the ReSA Totaling process
(satotals.pc) and Audit Rules process (sarules.pc) and sapreexp.pc.
|
|
Pre-Processing
|
Satotals. Sarules, sapreexp
|
|
Post-Processing
|
N/A
|
|
Threading Scheme
|
N/A
|
The logical unit of work for this module is defined as a unique
store/day combination. Records will be fetched, updated, and inserted in
batches the size of commit max counter. Only one commit will be done after a
store/day has been completely processed. A call to release_lock() performs a
commit.
|
Table
|
Select
|
Insert
|
Update
|
Delete
|
|
SYSTEM_OPTIONS
|
Yes
|
No
|
No
|
No
|
|
SA_EXPORT_LOG
|
Yes
|
No
|
Yes
|
No
|
|
STORE
|
Yes
|
No
|
No
|
No
|
|
SA_FIF_GL_CROSS_REF
|
Yes
|
No
|
No
|
No
|
|
STG_FIF_GL_DATA
|
No
|
Yes
|
No
|
No
|
|
IF_ERRORS
|
No
|
Yes
|
No
|
No
|
|
SA_EXPORTED
|
No
|
Yes
|
Yes
|
No
|
|
MV_LOC_SOB
|
Yes
|
No
|
No
|
No
|
|
KEY_MAP_GL
|
No
|
Yes
|
No
|
No
|
|
SA_GL_REF_DATA
|
No
|
Yes
|
No
|
No
|
|
SYSTEM_VARIABLES
|
Yes
|
No
|
No
|
No
|
|
Integration Type
|
Download from ReSA
|
|
File Name
|
N/A
|
|
Integration Contract
|
IntCon000019
STG_FIF_GL_DATA
|
NA
ang_saplgen
(Extract of POS Transactions by Store/Date from ReSA for Web Search)
Module Name
|
ang_saplgen.pc
|
Description
|
Extract of POS Transactions by Store/Date from ReSA for
Web Search
|
Functional
Area
|
Oracle Retail Sales Audit (ReSA)
|
Module Type
|
Integration
|
Module
Technology
|
ProC
|
Integration
Catalog ID
|
RMS162
|
The purpose of this batch module is to fetch all corrected sale
and return transactions that do not have RMS errors from the ReSA database
tables for transmission to an external web search engine. If the transaction
has a status of Deleted or Post Voided and has previously been transmitted, a
reversal of the transaction will be sent. A file of type POSLOG is generated
for each store/day.
Schedule Information
|
Description
|
|
Processing Cycle
|
Ad Hoc
|
|
Frequency
|
Daily
|
|
Scheduling Considerations
|
This program should run towards the end of the Sales
Auditing cycle and before SAEXPRMS.PC.
|
|
Pre-Processing
|
N/A
|
|
Post-Processing
|
N/A
|
|
Threading Scheme
|
Multi-threaded by store
|
The logical unit of work for this module is defined as a unique
store/day combination. Records will be fetched, in batches of
pl_commit_max_ctr. The POSLOG formatted output file will be created with a
completion of store/day looping.
|
Table
|
Select
|
Insert
|
Update
|
Delete
|
|
SA_STORE_DAY
|
Yes
|
No
|
No
|
No
|
|
SA_TRAN_HEAD
|
Yes
|
No
|
No
|
No
|
|
SA_TRAN_ITEM
|
Yes
|
No
|
No
|
No
|
|
SA_EXPORT_LOG
|
Yes
|
No
|
No
|
No
|
|
SA_EXPORTED
|
Yes
|
No
|
No
|
No
|
|
SA_ERROR
|
Yes
|
No
|
No
|
No
|
|
SA_ERROR_IMPACT
|
Yes
|
No
|
No
|
No
|
|
STORE
|
Yes
|
No
|
No
|
No
|
|
ITEM_MASTER
|
Yes
|
No
|
No
|
No
|
|
ITEM_LOC
|
Yes
|
No
|
No
|
No
|
|
DEPS
|
Yes
|
No
|
No
|
No
|
|
CODE_DETAIL
|
Yes
|
No
|
No
|
No
|
|
RPM_ITEM_ZONE_PRICE
|
Yes
|
No
|
No
|
No
|
|
RPM_ZONE_LOCATION
|
Yes
|
No
|
No
|
No
|
|
Integration Type
|
Download from ReSA
|
|
File Name
|
POSLOG_<store>_<business date>_<system
date>.xml
|
|
Integration Contract
|
IntCon000018
|
Output File Layout
|
Record Name
|
Field Name
|
Field Type
|
Default Value
|
Description
|
|
|
BatchID
|
CHAR(18)
|
|
A concatenation of store number and business date for a
store.
|
|
RetailStoreID
|
CHAR(10)
|
|
The store number for which the POSLog file has to be
extracted.
|
|
WorkStationID
|
CHAR(5)
|
|
RegistryID for the store.
|
|
TillID
|
CHAR(5)
|
|
RegistryID for the store.
|
|
SequenceNumber
|
CHAR(10)
|
|
Point of Sale system defined transaction number associated
with a transaction.
|
|
BeginDate
|
CHAR(8)
|
|
Starting date time of the transaction.
|
|
EndDate
|
CHAR(8)
|
|
End date time of the transaction.
|
|
CurrencyCode
|
CHAR(3)
|
|
Code of the currency used during the transaction.
|
|
VoidFlag
|
CHAR(5)
|
|
Indicates if the item in the transaction is voided or not.
Valid values are TRUE and FALSE.
|
|
Item_Status
|
CHAR(40)
|
|
Status of the item is required for voided, exchanged, or
returned item.
|
|
MerchandisingHierarchy
|
CHAR(4)
|
|
Department number to which the item belongs.
|
|
Description
|
CHAR(250)
|
|
Item description that has been sold.
|
|
Item
|
CHAR(25)
|
|
Item number.
|
|
TaxIncludedInPrice
|
CHAR(5)
|
|
Indicates if the item is being taxed or not. Valid values
are TRUE and FALSE.
|
|
RegularSalesUnitPrice
|
CHAR(20)
|
|
Field holds the unit retail in the standard unit of retail
for the item/location combination.
|
|
ActualSalesUnitPrice
|
CHAR(20)
|
|
Retail price for the item.
|
|
ExtendedAmount
|
CHAR(20)
|
|
Total sales for the item in the detail level.
|
|
Qty
|
CHAR(21)
|
|
Unit sold of the item.
|
NA
Module Name
|
saescheat.pc
|
Description
|
Download of Escheated Vouchers from ReSA for Payment
|
Functional
Area
|
Oracle Retail Sales Audit
|
Module Type
|
Integration
|
Module
Technology
|
ProC
|
Integration
Catalog ID
|
RSA05
|
The laws of individual states and countries may require a
retailer to return monies for aged, unclaimed gift certificates, and vouchers.
This process is called escheatment. This program writes records for this data
to tables that are read into Oracle Retail Invoice matching (ReIM) by the
program saexpim.pc. The data can then be sent as invoices approved for payment
to a financial application.
The saescheat batch program will set the status of vouchers that
have met certain state’s escheats rules or have expired to the proper status
and produce a total for later export to Invoice Matching. The rules for
escheatment are defined on the sa_escheatment_options table. This program calls
the function nextEscheatSeqNo () in saescheat_nextesn batch program, which will
select a block of available sequence numbers.
Schedule Information
|
Description
|
|
Processing Cycle
|
Ad Hoc
|
|
Frequency
|
Monthly
|
|
Scheduling Considerations
|
Should run after ReSA Totaling and Auditing process
(satotals.pc and sarules.pc) and before the export to Invoice Matching
(saexpim.pc) and Sales Audit purge (sapurge.pc).
|
|
Pre-Processing
|
N/A
|
|
Post-Processing
|
N/A
|
|
Threading Scheme
|
N/A
|
The logical unit of work is a store/day. The program commits when
the number of store/day records processed has reached the commit_max_ctr.
|
Table
|
Select
|
Insert
|
Update
|
Delete
|
|
SA_STORE_DAY
|
Yes
|
No
|
No
|
No
|
|
SA_VOUCHER
|
Yes
|
No
|
Yes
|
No
|
|
STORE
|
Yes
|
No
|
No
|
No
|
|
ADDR
|
Yes
|
No
|
No
|
No
|
|
SA_VOUCHER_OPTIONS
|
Yes
|
No
|
No
|
No
|
|
SA_ESCHEAT_VOUCHER
|
No
|
Yes
|
No
|
No
|
|
SA_ESCHEAT_TOTAL
|
No
|
Yes
|
No
|
No
|
|
SA_ESCHEAT_OPTIONS
|
Yes
|
No
|
No
|
No
|
|
COMPHEAD
|
Yes
|
No
|
No
|
No
|
Integration Contract
|
Integration Type
|
Download from ReSA
|
|
File Name
|
N/A
|
|
Integration Contract
|
IntCon000039
|
NA
Module Name
|
saescheat_nextesn.pc
|
Description
|
Generate Next Sequence for Escheatment Processing
|
Functional
Area
|
Oracle Retail Sales Audit
|
Module Type
|
Admin
|
Module
Technology
|
ProC
|
Integration
Catalog ID
|
RSA25
|
This batch program gets the next free sequence for use in the
saescheat.pc process. This routine goes and gets a block of numbers when
starting, and parcels them out as needed. Once they are all used up, it gets
another block and returns a pointer to the string containing the next available
number or NULL if an error occurs.
Schedule Information
|
Description
|
|
Processing Cycle
|
Ad Hoc
|
|
Frequency
|
Monthly
|
|
Scheduling Considerations
|
This process is executed as a part of the saescheat.pc
processing.
|
|
Pre-Processing
|
NA
|
|
Post-Processing
|
NA
|
|
Threading Scheme
|
NA
|
NA
|
Table
|
Select
|
Insert
|
Update
|
Delete
|
|
ALL_SEQUENCES
|
Yes
|
No
|
No
|
No
|
|
SYSTEM_OPTIONS
|
Yes
|
No
|
No
|
No
|
NA
Module Name
|
saexpash.pc
|
Description
|
Download from ReSA to Account Clearing House (ACH) System
|
Functional
Area
|
Oracle Retail Sales Audit
|
Module Type
|
Integration
|
Module
Technology
|
ProC
|
Integration
Catalog ID
|
RSA03
|
This module will post store/day deposit totals to the
SA_STORE_ACH table and bank deposit totals for a given day in a file formatted
for export to an ACH (Account Clearing House). The ACH export deviations from
the typical Sales Audit export in that store/days must be exported even though
errors may have occurred for a given day or store (depending on the unit of
work defined), and also, the store/day does not need to be closed for the export
to occur. The nature of the ACH process is such that as much money as possible
must be sent as soon as possible to the consolidating bank. Any adjustments to
the amount sent can be made using the sabnkach screen in the online system.
Deposits for store/days that have not been Fully (F) loaded will
not be transferred to the consolidating bank. After they are fully loaded,
their deposits will be picked up by the next run of this program.
Schedule Information
|
Description
|
|
Processing Cycle
|
Ad Hoc
|
|
Frequency
|
Daily
|
|
Scheduling Considerations
|
This module should be run towards the end of the Sales
Auditing cycle where the total (SATOTALS.PC) and rule (SARULES.PC) data are
ready to be exported to the external systems.
|
|
Pre-Processing
|
SAPREEXP.PC (preprocessing of sales auditing export
modules that require totals), SATOTALS.PC and SARULES.PC
|
|
Post-Processing
|
NA
|
|
Threading Scheme
|
NA
|
This module is in two distinct parts, with two different logical
units of work. Thus, restart/recovery has to be implemented so that the first
part does not get reprocessed in case the program is being restarted. Details
on the implementation follow.
The first driving cursor in this module retrieves a store/day to
generate ACH totals. Once the first cursor is complete, the second retrieves
bank locations by account numbers.
The first Logical Unit of Work (LUW) is defined as a unique
store/day combination. Records will be fetched, using the first driving cursor,
in batches of commit_max_ctr, but processed and committed one store/day at a
time.
The first driving cursor will fetch all store/days that have been
Fully Loaded (F), whose audit status is Audited (A), HQ Errors Pending (H), or
Store Errors Pending (S) and that are ready to be exported to ACH. Before
processing starts, a write lock is obtained using get_lock (). This driving
cursor only fetches store/days with a sa_export_log.status of SAES_R. After a
store/day is processed, sa_export_log.status is set to SAES_P so that this store/day
will not be selected again if the program is restarted. The commit is performed
using retek_force_commit after each store/day has been processed and
sa_export_log updated, so as to release the lock.
In case a store/day could not be processed due to locking, the
store/day information is placed on a list (called locked store/day list) and
the next store/day is processed. This list is kept in memory and is available
only during processing. If the store for a store/day obtained from the first
driving cursor, is on the locked store/day list, then this store/day cannot be
processed. This is the case because there is a data dependency such that data
from a particular store/day is dependent on data for the same store but at an
earlier date. Thus, if a store/day cannot be processed, then subsequent
store/days for the same store cannot be processed either. After the driving
cursor returns no more data, the program attempts to process each store/day on
the list two more times. If the store/day is still locked, then it is skipped
entirely and a message is printed to the error log.
The second LUW is a bank account number. Again, records will be
fetched in batches of commit_max_ctr. The second driving cursor cannot retrieve
information by the LUW because it is possible for the store’s currency to be
different from the local bank’s currency. In that case, a currency conversion
is needed.
For each store/day, the query should retrieve the required ACH
transfer. The latter is determined by adding the estimated deposit for the next
day, the adjustment to the estimate for the current day, and any manual
adjustment to the estimate.
Since a store can be associated with different accounts at
different banks, only accounts that are consolidated should be retrieved. Since
it is possible for the local bank to be in a different country than the
consolidating bank, the currency of the partner should also be fetched.
Since processing is dependent on the type of account at the RDFI,
the account type should be fetched by this cursor.
Due to differences in transaction processing in cases when the
bank is outside the United States, the partner’s country should also be
fetched. The results of the query should be sorted by partner country. The
results of the query should also be ordered by accounts.
The fact that this program automates the transfer of funds on
behalf of the user makes it a likely target for electronic theft. It must be
made clear that the responsibility of electronic protection lies with the users
themselves.
Following are some tips and recommendation to users:
§
A specific user should be used to run the program. This user
would be the only one (or one of a few) who has access to this program.
§
The umask for this user should be set up so as to prevent other
users from reading/writing its files. This would ensure that when the output
file is created, it would not be accessible to other users.
§
The appropriate permissions should be set up on the directory,
which holds the ACH files. The most restrictive decision would be to not allow
any other user to view the contents of the directory.
§
The password to this user should be kept confidential.
§
A secure means of communication should be implemented for
transferring the file from where it has been created to the ACH network. This
may be done through encryption, or by copying the file to a disk and trusting
the courier to deliver the files intact.
§
The ACH network needs to be secure.
|
Table
|
Select
|
Insert
|
Update
|
Delete
|
|
SA_ACH_INFO
|
Yes
|
No
|
No
|
No
|
|
COMPHEAD
|
Yes
|
No
|
No
|
No
|
|
SA_STORE_DAY
|
Yes
|
No
|
No
|
No
|
|
COMPANY_CLOSED
|
Yes
|
No
|
No
|
No
|
|
COMPANY_CLOSED_EXCEP
|
Yes
|
No
|
No
|
No
|
|
LOCATION_CLOSED
|
Yes
|
No
|
No
|
No
|
|
SA_STORE_ACH
|
Yes
|
Yes
|
Yes
|
No
|
|
SA_BANK_STORE
|
Yes
|
No
|
No
|
No
|
|
SA_EXPORT_LOG
|
Yes
|
No
|
Yes
|
No
|
|
STORE
|
Yes
|
No
|
No
|
No
|
|
PARTNER
|
Yes
|
No
|
No
|
No
|
|
CURRENCY_RATES
|
Yes
|
No
|
No
|
No
|
|
SA_BANK_ACH
|
Yes
|
Yes
|
Yes
|
No
|
|
Integration Type
|
Download from ReSA
|
|
File Name
|
ACH_ appended with the consolidating routing number,
consolidating account number, and current system date.
|
|
Integration Contract
|
IntCon000040
|
Output File
|
Record Name
|
Field Name
|
Field Type
|
Default Value
|
Description
|
|
ACH File Header
|
Section No.
|
Number(3)
|
101
|
Constant number.
|
|
Console Route No
|
Number(10)
|
|
The routing number of the consolidating bank.
|
|
Sender ID
|
Char(10)
|
|
ID used by the Originator to identify itself.
|
|
Current Date
|
Char(6)
|
|
Vdate in YYMMDD format.
|
|
Day Time
|
Char(4)
|
|
Time of file creation in HH24MM format.
|
|
File Header No.
|
Number(7)
|
0094101
|
Constant number.
|
|
Console Bank Name
|
Char(23)
|
|
Name of the Originating Financial Depository Institution.
|
|
Company Name
|
Char(23)
|
|
The name of the company name.
|
|
Ref Code
|
Char (8)
|
|
Reference code.
|
|
ACH CCD Batch Header
|
Section No.
|
Number(4)
|
5225
|
Constant number.
|
|
Company Name
|
Char(16)
|
|
The name of the company.
|
|
Comp Disc Data
|
Char(20)
|
NULL
|
Any kind of data specific to the company.
|
|
Comp Id
|
Char(10)
|
|
Alphanumeric code to identify the company.
|
|
CCD Header Id
|
Char(3)
|
CCD
|
Constant value.
|
|
Comp Entry Desc
|
Char(10)
|
“CONSOL “
|
A short description from the Originator about the purpose
of the entry.
|
|
Tomorrow
|
Char(6)
|
|
Vdate+1 in YYMMDD format.
|
|
Tomorrow
|
Char(6)
|
|
Vdate+1 in YYMMDD format.
|
|
Settle Date
|
Char(3)
|
NULL
|
This is inserted by receiving the ACH Operator.
|
|
Reserved
|
Number(1)
|
1
|
Constant number.
|
|
Odfi Id
|
Number(8)
|
|
8-digit routing number of the ODFI.
|
|
Batch No
|
Number(7)
|
|
Batch number.
|
|
ACH CBR Batch Header
|
Section No.
|
Number(4)
|
5225
|
Constant number.
|
|
Company Name
|
Char(16)
|
|
The name of the company.
|
|
Reserved
|
Char(3)
|
FV1
|
Constant value.
|
|
Exch Rate
|
Number(15)
|
|
Exchange rate for the specified currency.
|
|
Reserved
|
Char(2)
|
US
|
Constant value.
|
|
Comp Id
|
Char(10)
|
|
Alphanumeric code to identify the company
|
|
CBR Header Id
|
Char(3)
|
CBR
|
Constant value.
|
|
Comp Entry Desc
|
Char(10)
|
“CONSOL “
|
A short description from the Originator about the purpose
of the entry.
|
|
Partner Curr Code
|
Char(3)
|
|
Code identifying the currency the partner uses for
business transactions.
|
|
Reserved
|
Char(3)
|
USD
|
Constant value.
|
|
Tomorrow
|
Char(6)
|
|
Vdate+1 in YYMMDD forma.
|
|
Settle Date
|
Char(3)
|
NULL
|
This is inserted by the receiving ACH Operator.
|
|
Reserved
|
Number(1)
|
1
|
Constant number.
|
|
Odfi Id
|
Number(8)
|
|
8-digit routing number of the ODFI.
|
|
Batch No
|
Number(7)
|
|
Batch number.
|
|
ACH CCD Entry
|
Section No.
|
Number(1)
|
6
|
Constant number.
|
|
Trans Code
|
Char(2)
|
|
Code used to identify the type of debit and credit.
Value accepted are 27 and 37.
|
|
Routing No
|
Number(9)
|
|
Routing number for the bank account.
|
|
Acct No
|
Char(17)
|
|
Account number of the bank.
|
|
Deposit
|
Number(10)
|
|
The amount involved in the transaction* 10000 (4 implied
decimal places).
|
|
Id
|
Char(15)
|
Null
|
Identification number. Optional field containing a number
used by the Originator to insert its own number for tracing purposes.
|
|
Store Name
|
Char(22)
|
|
Name of the local store.
|
|
Disc Data
|
Char(2)
|
Null
|
Discretionary data. Any kind of data specific to the
transaction.
|
|
Reserved
|
Number(1)
|
0
|
Constant number.
|
|
Trace No
|
Number(15)
|
|
Used to uniquely identify each entry within a batch. The
first 8 digits contain the routing number of the ODFI and the other 7
contains a sequence number.
|
|
ACH CBR Entry
|
Section No.
|
Number(1)
|
6
|
Constant number.
|
|
Trans Code
|
Char(2)
|
|
Code used to identify the type of debit and credit.
Values accepted are 27 and 37.
|
|
Routing No
|
Number(9)
|
|
Routing number for the bank account.
|
|
Acct No
|
Char(17)
|
|
Account number of the bank
|
|
Deposit
|
Number(10)
|
|
The amount involved in the transaction* 10000 (4 implied
decimal places).
|
|
Id
|
Char(15)
|
Null
|
Identification number. Optional field containing a number
used by the Originator to insert its own number for tracing purposes.
|
|
Store Name
|
Char(22)
|
|
Name of the local store.
|
|
Disc Data
|
Char(2)
|
Null
|
Discretionary data. Any kind of data specific to the
transaction.
|
|
Reserved
|
Number(1)
|
1
|
Constant number.
|
|
Trace No
|
Number(15)
|
|
Used to uniquely identify each entry within a batch. The
first 8 digits contain the routing number of the ODFI and the other 7
contains a sequence number.
|
|
ACH CBR Addendum
|
Section No.
|
Number(3)
|
701
|
Constant number.
|
|
Payment Info
|
Char(80)
|
Null
|
Payment related information.
|
|
Reserved
|
Number(4)
|
0001
|
Constant number.
|
|
Trace Seq No
|
Number(7)
|
|
Sequence number part of the Trace Number of the entry
record to which this addendum is referring.
|
|
ACH Batch Control
|
Section No.
|
Number(4)
|
8225
|
Constant number.
|
|
Batch Line Count
|
Number(6)
|
|
The number of entries and addenda in the batch.
|
|
Hash Count
|
Number(10)
|
|
Sum of the RDFI IDs in the detail records.
|
|
Total Batch Debit
|
Number(12)
|
|
Contains the accumulated debit and debit for the file *
10000 (4 implied decimal places).
|
|
Total Batch Credit
|
Number(12)
|
|
Contains the accumulated credit and credit for the file *
10000 (4 implied decimal places).
|
|
Comp Id
|
Char(10)
|
|
An alphanumeric code identifying the company.
|
|
Auth
|
Char(19)
|
Null
|
Message Authentication Code. The first 8 characters
represent a code from the Data Encryption Standard (DES) algorithm. The
remaining eleven characters are blanks.
|
|
Reserved
|
Char(6)
|
Null
|
Reserved.
|
|
ODFI Id
|
Number(8)
|
|
8-digit routing number of the ODFI.
|
|
Batch No
|
Number(7)
|
|
Batch number.
|
|
ACH File Control
|
Section No.
|
Number(1)
|
9
|
Constant number.
|
|
Batch count
|
Number(6)
|
|
The number of batches sent in the file.
|
|
Block count
|
Number(6)
|
|
The number of physical blocks in the file, including both
File Header and File Control Records. This is the ceiling of the number of
records divided by the blocking factor, which is 10.
|
|
Entry count
|
Number(8)
|
|
The number of entries and addenda in the file.
|
|
Total hash count
|
Number(10)
|
|
Sum of the Entry Hash fields on the Batch Control Records.
|
|
Total file debit
|
Number(12)
|
|
Contains the accumulated debit and debit for the file *
10000 (4 implied decimal places).
|
|
Total file credit,
|
Number(12)
|
|
Contains the accumulated credit and credit for the file *
10000 (4 implied decimal places).
|
|
Reserved
|
Char(39)
|
Null
|
Reserved.
|
|
ACH Completed Block
|
End string
|
Char(94)
|
|
Mark the end of the file: a string of 94 ‘9’ characters.
The number of end lines with a string of 94 ‘9’ characters
is identified by the following equation:
10 - mod (number of lines in the file, 10).
|
Oracle Retail assumes that there is only one total to be exported
for ACH per store/day.
Module Name
|
saexpuar.pc
|
Description
|
Export to Universal Account Reconciliation System from
ReSA
|
Functional
Area
|
Oracle Retail Sales Audit
|
Module Type
|
Integration
|
Module
Technology
|
ProC
|
Integration
Catalog ID
|
RSA06
|
The SAEXPUAR program is used to select the lottery, bank deposit,
money order, and credit card totals and write them to output files for export
to an external account clearing house application. For each store day, saexpuar
posts specified totals to their appropriate output files.
Schedule Information
|
Description
|
|
Processing Cycle
|
Ad Hoc
|
|
Frequency
|
Daily
|
|
Scheduling Considerations
|
This program should run after the ReSA Totaling process
and Audit Rules process.
|
|
Pre-Processing
|
Satotals, sarules, sapreexp
|
|
Post-Processing
|
N/A
|
|
Threading Scheme
|
N/A
|
The logical unit of work for this module is defined as a unique store/day
combination. Records will be fetched, updated, and inserted in batches of
commit_max_ctr. Only two commits will be done. One to establish the store/day
lock (this will be done by the package) and the other is done at the end, after
a store/day has been completely processed.
|
Table
|
Select
|
Insert
|
Update
|
Delete
|
|
SA_STORE_DAY
|
Yes
|
No
|
No
|
No
|
|
SA_EXPORT_LOG
|
Yes
|
No
|
Yes
|
No
|
|
SA_EXPORTED
|
No
|
Yes
|
Yes
|
No
|
|
SA_EXPORTED_REV
|
Yes
|
No
|
No
|
No
|
|
SA_TOTAL
|
Yes
|
No
|
No
|
No
|
|
SA_TOTAL_HEAD
|
Yes
|
No
|
No
|
No
|
|
SA_HQ_VALUE
|
Yes
|
No
|
No
|
No
|
|
SA_STORE_VALUE
|
Yes
|
No
|
No
|
No
|
|
SA_SYS_VALUE
|
Yes
|
No
|
No
|
No
|
|
SA_POS_VALUE
|
Yes
|
No
|
No
|
No
|
|
SA_TOTAL_USAGE
|
Yes
|
No
|
No
|
No
|
|
SA_STORE_DAY_WRITE_LOCK
|
Yes
|
No
|
No
|
No
|
|
SA_STORE_DAY_READ_LOCK
|
Yes
|
Yes
|
No
|
Yes
|
|
Integration Type
|
Download from ReSA
|
|
File Name
|
UAR usage type appended with system date.
|
|
Integration Contract
|
IntCon000046
|
Output File Layout
The output file will contain one line for each store/day detail
record in a comma-delimited format. The fields are surrounded by double quotes.
For example, a record for store 1000 on May 20, 2001 with an amount of 19.99
will look something like this:
“1”, “1000”, “1999”,
“20010520”,”2”,””,”1”,””,””,””,””,””,””,””,””,”MN”,”RET”
|
Field Name
|
Field Type
|
Description
|
|
Detail Flag
|
Char
|
“1” for detail record.
|
|
Store
|
Number
|
Store number.
|
|
Amount
|
Number
|
Total Value * 100 (with 2 implied decimal places).
|
|
TranDate
|
Char
|
Transaction Date in YYYYMMDD format.
|
|
UAR TranCode
|
Char
|
Transaction Code. “1” for negative amount, “2” for
positive amount.
|
|
User Defined Value 1
|
Char
|
Ref Number 1 on SA_TOTAL.
|
|
User Defined Value 2
|
Char
|
Total Seq Number on SA_TOTAL.
|
|
User Defined Value 3
|
Char
|
Ref Number 2 on SA_TOTAL.
|
|
User Defined Value 4
|
Char
|
Ref Number 3 on SA_TOTAL.
|
|
User Defined Value 5
|
Char
|
Not used.
|
|
User Defined Value 6
|
Char
|
Not used.
|
|
User Defined Value 7
|
Char
|
Not used.
|
|
User Defined Value 8
|
Char
|
Not used.
|
|
User Defined Value 9
|
Char
|
Not used.
|
|
User Defined Value 10
|
Char
|
Not used.
|
|
State
|
Char
|
State.
|
|
Account
|
Char
|
Total Identification on SA_TOTAL.
|
NA
Module Name
|
saprepost.pc
|
Description
|
Pre/Post Helper Processes for ReSA Batch Programs
|
Functional
Area
|
Oracle Retail Sales Audit
|
Module Type
|
Admin
|
Module Technology
|
ProC
|
Integration
Catalog ID
|
RSA26
|
The Sales Audit pre/post module facilitates multi-threading by
allowing general system administration functions (such as table deletions or
mass updates) to be completed after all threads of a particular Sales Audit
program have been processed.
This program will take three parameters: username/password to log
in to Oracle, a program before or after which this script must run, and an
indicator of whether the script is a pre or post function. It will act as a
shell script for running all pre-program and post-program updates and purges.
saprepost contains the following helper functions, which are
should be individually scheduled with the related main programs.
|
Catalog ID
|
Saprepost Job
|
Related Main Program
|
|
|
|
saprepost saimptlog saimptlogi pre
|
|
saprepost saimptlog saimptlogi post
|
|
saprepost sapurge pre
|
|
saprepost sapurge post
|
|
|
|
RSA27
|
saprepost saexprms post
|
saexprms
|
|
RSA28
|
saprepost saexpdw post
|
saexpdw
|
|
RSA29
|
saprepost saordinvexp post
|
saordinvexp
|
|
RSA30
|
saprepost saexpsfm post
|
|
|
RSA31
|
saprepost saexpsim post
|
saexpsim
|
|
RSA32
|
saprepost (saimptlog) (saimptlogi) pre
|
Either saimptlog or saimptlogi, depending on which is
being run. See the detail design for information about how the two related
jobs differ.
|
|
RSA33
|
saprepost saimptlog saimptlogi post
|
Either saimptlog or saimptlogi, depending on which is
being run. See the detail design for information about how the two related
jobs differ.
|
|
RSA34
|
saprepost sapurge pre
|
Sapurge.pc
|
|
RSA35
|
saprepost sapurge post
|
Sapurge.pc
|
Schedule Information
|
Description
|
|
Processing Cycle
|
Ad Hoc
|
|
Frequency
|
Daily
|
|
Scheduling Considerations
|
NA
|
|
Pre-Processing
|
NA
|
|
Post-Processing
|
NA
|
|
Threading Scheme
|
NA
|
NA
|
Table
|
Select
|
Insert
|
Update
|
Index
|
Delete
|
Truncate
|
Trigger
|
|
SA_EXPORT_LOG
|
Yes
|
Yes
|
No
|
No
|
No
|
N
|
No
|
|
SA_STORE_DAY
|
Yes
|
No
|
No
|
No
|
No
|
No
|
No
|
|
SA_TRAN_SEQ_TEMP
|
No
|
No
|
No
|
No
|
No
|
Yes
|
No
|
|
ALL_OBJECTS
|
Yes
|
No
|
No
|
No
|
No
|
No
|
No
|
|
ALL_SYNONYMS
|
Yes
|
No
|
No
|
No
|
No
|
No
|
No
|
|
ALL_CONSTRAINTS
|
Yes
|
No
|
No
|
No
|
No
|
No
|
No
|
|
DBA_OBJECTS
|
Yes
|
No
|
No
|
No
|
No
|
No
|
No
|
|
SA_EXPORTED
|
No
|
No
|
No
|
Yes
|
No
|
No
|
No
|
|
RESTART_PROGRAM_STATUS
|
Yes
|
No
|
Yes
|
No
|
No
|
No
|
No
|
|
Integration Type
|
NA
|
|
File Name
|
NA
|
|
Integration Contract
|
NA
|
NA
Module Name
|
sapurge.pc
|
Description
|
Purge Aged Store/Day Transaction, Total Value and Error
Data from ReSA
|
Functional
Area
|
Oracle Retail Sales Audit
|
Module Type
|
Admin
|
Module
Technology
|
ProC
|
Integration
Catalog ID
|
RSA21
|
This program will be run daily to control the size of the tables
in the sales audit database. Older information will be deleted to ensure
optimal performance of the system as a whole.
Different kinds of data need to be kept in the system for different
amounts of time. Transactions, all associated transaction details, and Totals
calculated or reported for a store day will be deleted when they meet the
following criteria:
§
The Business Date for those transactions and totals is older than
or equal to today’s date minus the days_before_purge parameter set up on the
sales audit system parameters.
§
No locks exist on the store/day.
§
One of the two following statements is true for the store/day:
-
Fully loaded, and all errors either corrected or overridden (sa_store_day.audit_status
is A (Audited) and sa_store_day.data_status equals F (Fully loaded)). In
addition, there are no outstanding exports (records for the store/day in the
sa_export_log table where sa_export_log.status equals R (Ready for export)).
-
Never loaded (sa_store_day.audit_status is U (Unaudited) and
sa_store_day.data_status equals R (Ready for import)).
Flash Sales data will be deleted when it meets the following
criteria:
§
Date is two years before today’s date minus the days_before_purge
parameter set up on the sales audit system parameters.
§
Company open and close dates will also need to be kept for two
years plus days_before_purge, so that the historical comparisons in flash sales
reporting carry the appropriate weight.
Voucher data will be deleted when it meets the following
criteria:
§
The redeemed date or the escheat date for the specific voucher
type is before today’s date minus the purge_no_days on sales audit voucher
options table for the corresponding voucher type.
The program can also take in a list of store_day_seq_no to
delete. For example, the command line could be: sapurge userid/passwd 1000 1001
1002, where 1000, 1001 and 1003 are store_day_seq_nos that the user wants to
delete. These must also meet the criteria defined above. If a store_day_seq_no
is passed to this program, but does not meet the criteria, an error will be
written out to the error log.
An output file will be created to store a record for each store
and business date that was purged. The file name must be passed in at the
command line as a parameter to sapurge.
Schedule Information
|
Description
|
|
Processing Cycle
|
Ad Hoc
|
|
Frequency
|
Daily
|
|
Scheduling Considerations
|
This program should be run as the last program in the ReSA
batch flow. It can be run as part of the daily or monthly ReSA schedules.
|
|
Pre-Processing
|
saprepost sapurge pre
|
|
Post-Processing
|
saprepost sapurge post
|
|
Threading Scheme
|
Threaded by store
|
Restart/recovery is implicit in purge programs. The program only
needs to be run again to restart appropriately.
|
Table
|
Select
|
Insert
|
Update
|
Delete
|
|
SA_STORE_DAY
|
Yes
|
No
|
Yes
|
Yes
|
|
SA_SYSTEM_OPTIONS
|
Yes
|
No
|
No
|
No
|
|
SA_EXPORT_LOG
|
Yes
|
No
|
No
|
Yes
|
|
SA_TRAN_HEAD_REV
|
Yes
|
No
|
No
|
Yes
|
|
SA_TRAN_ITEM_REV
|
Yes
|
No
|
No
|
Yes
|
|
SA_TRAN_HEAD
|
Yes
|
No
|
No
|
Yes
|
|
SA_TRAN_HEAD_TEMP
|
Yes
|
Yes
|
No
|
Yes
|
|
SA_TOTAL
|
Yes
|
No
|
No
|
Yes
|
|
SA_BALANCE_GROUP
|
Yes
|
No
|
No
|
Yes
|
|
SA_ESCHEAT_TOTAL
|
Yes
|
No
|
No
|
Yes
|
|
SA_VOUCHER_OPTIONS
|
Yes
|
No
|
No
|
No
|
|
SA_EXPORTED
|
No
|
No
|
No
|
Yes
|
|
SA_EXPORTED_REV
|
No
|
No
|
No
|
Yes
|
|
SA_ERROR_REV
|
No
|
No
|
No
|
Yes
|
|
SA_TRAN_TAX_REV
|
No
|
No
|
No
|
Yes
|
|
SA_TRAN_DISC_REV
|
No
|
No
|
No
|
Yes
|
|
SA_TRAN_TENDER_REV
|
No
|
No
|
No
|
Yes
|
|
SA_TRAN_TAX
|
No
|
No
|
No
|
Yes
|
|
SA_TRAN_DISC
|
No
|
No
|
No
|
Yes
|
|
SA_TRAN_ITEM
|
No
|
No
|
No
|
Yes
|
|
SA_TRAN_TENDER
|
No
|
No
|
No
|
Yes
|
|
SA_CUST_ATTRIB
|
No
|
No
|
No
|
Yes
|
|
SA_CUSTOMER
|
No
|
No
|
No
|
Yes
|
|
SA_COMMENTS
|
No
|
No
|
No
|
Yes
|
|
SA_ERROR
|
No
|
No
|
No
|
Yes
|
|
SA_POS_VALUE
|
No
|
No
|
No
|
Yes
|
|
SA_POS_VALUE_WKSHT
|
No
|
No
|
No
|
Yes
|
|
SA_SYS_VALUE
|
No
|
No
|
No
|
Yes
|
|
SA_SYS_VALUE_WKSHT
|
No
|
No
|
No
|
Yes
|
|
SA_STORE_VALUE
|
No
|
No
|
No
|
Yes
|
|
SA_HQ_VALUE
|
No
|
No
|
No
|
Yes
|
|
SA_ERROR_WKSHT
|
No
|
No
|
No
|
Yes
|
|
SA_MISSING_TRAN
|
No
|
No
|
No
|
Yes
|
|
SA_IMPORT_LOG
|
No
|
No
|
No
|
Yes
|
|
SA_BANK_ACH
|
No
|
No
|
No
|
Yes
|
|
SA_ESCHEAT_VOUCHER
|
No
|
No
|
No
|
Yes
|
|
SA_STORE_DAY_WRITE_LOCK
|
No
|
No
|
No
|
Yes
|
|
SA_FLASH_SALES
|
No
|
No
|
No
|
Yes
|
|
SA_VOUCHER
|
No
|
No
|
No
|
Yes
|
|
SA_STORE_ACH
|
No
|
No
|
No
|
Yes
|
|
KEY_MAP_GL
|
No
|
No
|
No
|
Yes
|
|
SA_GL_REF_DATA
|
No
|
No
|
No
|
Yes
|
|
SA_TRAN_PAYMENT_REV
|
No
|
No
|
No
|
Yes
|
|
SA_TRAN_IGTAX_REV
|
No
|
No
|
No
|
Yes
|
|
SA_TRAN_ITEM_TEMP
|
Yes
|
Yes
|
No
|
Yes
|
|
SA_TRAN_IGTAX
|
No
|
No
|
No
|
Yes
|
|
SA_TRAN_PAYMENT
|
No
|
No
|
No
|
Yes
|
|
Integration Type
|
NA
|
|
File Name
|
An optional output file name is passed into the program as
a runtime parameter; the output file lists deleted items.
|
|
Integration Contract
|
NA
|
NA
10
Retail applications can expose select task flows that you can
directly launch. This feature is referred to as an in-context launch in a
Retail application. You can launch these task flows directly through specific
URLs.
Retail applications provide information about the various task
flows that you can in-context launch into, including the URLs and the required
parameters.
You can use these URLs in other web pages as links. For example,
the URL to a task flow that invokes the Store Day Search Flow in a ReSA Application
can be added as a link to dashboard report on a BI server. Since access to the
task flows are initiated through URL links, the Retail application, with the
requested task flow opened in a UI Shell local area, is shown in a new browser
instance of either a window or a tab.
This section provides details on how the ReSA application is
functionally integrated with other systems (including other Oracle Retail
systems). The discussion primarily concerns the flow of ReSA-related business
data across the enterprise:
§
The In-Context launch feature does not detect if there is a
window or tab already open for the Retail application. If you click on a link
to a Retail application’s task flow, a new browser window or tab opens even
though you already have an existing browser window or tab open for that same
Retail application.
The following is the list of in-context launchable task flows:
|
Source
|
Mandatory parameter
|
Optional
|
Sample Url
|
|
StoreDay Search
|
Store / BusinessDay
|
AutoExecute, AssignedStores DataStatus, OverAllStatus
|
http://<host>:<port>/ResaPortal/faces/Home?navModelItemId=
SearchStoreDayTF? Store =<store Id>& BusinessDay =< BusinessDay
>
|
|
Storeday Maintenance
|
StoreSeqNo/ Store / BusinessDate
|
TabToDisclose
|
http://<host>:<port>/
ResaPortal /faces/Home?navModelItemId= MaintainStoreDayTF? StoreSeqNo
=<Store day sequence No.>& Store =<Store ID>
& BusinessDate =< BusinessDate >
|
|
Transaction Maintenance
|
TransactionSeqNo
|
|
http://<host>:<port>/
ResaPortal /faces/Home?navModelItemId= MaintainTransactionTF?
TransactionSeqNo=< TransactionSeqNo>
|
|
Transaction Search
|
TransactionSeq/ StoreId / TranBusinessDate
|
ErrorExists, AutoExecute
|
http://<host>:<port>/
ResaPortal /faces/Home?navModelItemId= ManageTransactionTF? TransactionSeq
=< TransactionSeq >& Store =<Store ID>
& TranBusinessDate =< TranBusinessDate >
|
11
This chapter gives an overview about the ReSA ReSTful Web Service
Implementation API designs used in the ReSA environment and various functional
attributes used in the APIs.
Retailers can access backend functionality in Retail Applications
by calling the applications’ ReSTful Web Services.
Refer to http://www.oracle.com/technetwork/articles/javase/index-137171.html
to learn more about ReST as an architectural style applied to building web
services.

The services can be used as is for the client’s custom mobile
application. The ReSTful Web Services Java code cannot be customized, but the
MBL PL/SQL functions and object types can be customized for client use. In
addition the client can use the RSL tool to create their own custom services in
place of the ReSTful Web Services.
The services should not be used during the restricted batch
window.
A Retail Application will package its ReST services as part of
the application’s Enterprise Archive (EAR) file. Specifically, those services
are packaged as a Web Archive (WAR) within the EAR.
Installation of the ReST web services is therefore done by
default.
Services are secured using J2EE-based security model.
§
Realm-based User Authentication. This verifies users through an
underlying realm. The user name and password is passed using Http Basic
authentication.
§
Role-based Authorization. This assigns users to roles, which in
turn are granted or restricted access to resources/services. The authorization
of ReSTful web services is static and cannot be reassigned to other rules
post-installation.
§
The communication between the server and client is encrypted
using one way SSL.
§
RMS\ReSA user data security are implemented in the APIs.
Retail Application ReSTful web services have the following
standard HTTP headers:
Accept: application/xml or
application/JSON
Accept-Version: 15.0 (service
version number)
Accept-Language: en-US,en;q=0.8
Depending on the type of the operation or HTTP method, the
corresponding response header is updated in the Http response with the
following codes:
§
GET/READ
: 200
§
PUT/CREATE
: 201 created
§
POST/UPDATE
: 204
§
DELETE
: 204
Example response payload in case of service error is depicted
below:
<?xml version="1.0" encoding="UTF-8"
standalone="yes"?>
<messagesRDOes>
<messagesRDO>
<message>REST Service Version
Mismatch</message>
<messageType>ERROR</messageType>
<status>BAD_REQUEST</status>
</messagesRDO>
</messagesRDOes>
§
message: The error message - translated.
§
messageType: Value of ERROR is returned.
§
status : For a bad request or error, the status is BAD_REQUEST.
§
The http error code for an error response is 400
To access the ReSA ReSTful web services javadoc:
http://host:port/ResaReSTService
To access the ReSA ReSTful web services javadoc:
http://host:port/ResaReSTService/services/private/Resa</service>
§
Accept-Version:
the value should match the ReSA release version. Example: 15.0
§
Accept and
Content-Type: determines output/input style. Supported styles are
JSON and XML. Example: application/json
All output date fields are in long format, and all input date
must also be in long format.
Some of the ReSA ReSTful web services have the potential to bring
back a large number of records and, therefore, these services are equipped to
segment the result into pages. The page number to retrieve and size of the page
are added as input parameters to all the paged services.
Each paged result will include the following information:
§
Total Record Count: the number of all records matching the
service input criteria.
§
Next Page URL: the service URL with the same input
parameters, but with the pageNumber plus 1 when more records exist.
§
Previous Page URL: the service URL with same input
parameters and the pageNumber input value minus 1 when the page number is not
1.
Both the next and pervious page URL will not be provided when:
§
No records are returned.
§
When the page number is 1 and there is no previous page.
§
When last page of records and there is no next page.
Following are the different ReSTful web services:
Business Overview
This service provides, at a glance, the number of open stores for
which the sales audit manager is responsible. The stores for which the user is
responsible are those associated with the user in ReSA’s employee maintenance
through location traits.
Service Type
Get
ReST URL
/summaryOpenStoreDay
Input Parameters
No input.
Output
Record Type – DATE, OLDER, ALL
§
For record type DATE: five records of type date are displayed for
today minus 1 through today minus 5
§
One record type OLDER: for store days older than today minus 5
§
One record type ALL: for all store days
Record Date – Date of date type rows
Open Store Count
Table Impact
|
TABLE
|
SELECT
|
INSERT
|
UPDATE
|
DELETE
|
|
LOC_TRAITS_MATRIX
|
Yes
|
No
|
No
|
No
|
|
SA_STORE_DAY
|
Yes
|
No
|
No
|
No
|
|
SA_USER_LOC_TRAITS
|
Yes
|
No
|
No
|
No
|
Business Overview
This service provides, at a glance, the number outstanding errors
on the specified days for stores for which the sales audit manager is
responsible. An outstanding error is defined as an error that exists against a
store day that has not been overridden.
Service Type
Get
ReST URL
/summaryError
Input Parameters
No input.
Output
Record Type – DATE, OLDER, ALL
§
For record type DATE: five records of type date are displayed for
today minus 1 through today minus 5
§
One record type OLDER: for store days older than today minus 5
§
One record type ALL: for all store days
Record Date – Date of date type rows
Error Count
Table Impact
|
TABLE
|
SELECT
|
INSERT
|
UPDATE
|
DELETE
|
|
LOC_TRAITS_MATRIX
|
Yes
|
No
|
No
|
No
|
|
SA_ERROR
|
Yes
|
No
|
No
|
No
|
|
SA_STORE_DAY
|
Yes
|
No
|
No
|
No
|
|
SA_USER_LOC_TRAITS
|
Yes
|
No
|
No
|
No
|
Business Overview
This service provides, at a glance, the count of overages and shortages
for all open stores on a given day for which the sales audit manager is
responsible. If the Over/Short value for the store day is a positive value, it
is considered an overage. If the Over/Short value for the store day is a
negative value, it is a shortage.
Service Type
Get
ReST URL
/summaryOverShortCount
Input Parameters
No input.
Output
Record Type – DATE, OLDER, ALL
§
For record type DATE: five records of type date are displayed for
today minus 1 through today minus 5
§
One record type OLDER: for store days older than today minus 5
§
One record type ALL: for all store days
Record Date – Date of date type rows
Over Count
Short Count
Table Impact
|
TABLE
|
SELECT
|
INSERT
|
UPDATE
|
DELETE
|
|
LOC_TRAITS_MATRIX
|
Yes
|
No
|
No
|
No
|
|
SA_HQ_VALUE
|
Yes
|
No
|
No
|
No
|
|
SA_POS_VALUE
|
Yes
|
No
|
No
|
No
|
|
SA_STORE_DAY
|
Yes
|
No
|
No
|
No
|
|
SA_SYS_VALUE
|
Yes
|
No
|
No
|
No
|
|
SA_TOTAL
|
Yes
|
No
|
No
|
No
|
|
SA_USER_LOC_TRAITS
|
Yes
|
No
|
No
|
No
|
|
STORE
|
Yes
|
No
|
No
|
No
|
Business Overview
This service provides, at a glance, the sum of all overages and
shortages for all open stores on a given day for which the sales audit manager
is responsible. If all locations to which the user is responsible have the same
local currency, all monetary values will be displayed in the local currency. Otherwise,
all monetary values will be displayed in the retailer’s primary currency. If
the Over/Short value for the store day is a positive value, it is considered an
overage. If the Over/Short value for the store day is a negative value, it is a
shortage.
Service Type
Get
ReST URL
/summaryOverShortAmount
Input Parameters
No input.
Output
Record Type – DATE, OLDER, ALL
§
For record type DATE: five records of type date are displayed for
today minus 1 through today minus 5
§
One record type OLDER: for store days older than today minus 5
§
One record type ALL: for all store days
Record Date – Date of date type rows
Over Amount
Short Amount
Currency Code
Table Impact
|
TABLE
|
SELECT
|
INSERT
|
UPDATE
|
DELETE
|
|
LOC_TRAITS_MATRIX
|
Yes
|
No
|
No
|
No
|
|
MV_CURRENCY_CONVERSION_RATES
|
Yes
|
No
|
No
|
No
|
|
SA_HQ_VALUE
|
Yes
|
No
|
No
|
No
|
|
SA_POS_VALUE
|
Yes
|
No
|
No
|
No
|
|
SA_STORE_DAY
|
Yes
|
No
|
No
|
No
|
|
SA_SYS_VALUE
|
Yes
|
No
|
No
|
No
|
|
SA_TOTAL
|
Yes
|
No
|
No
|
No
|
|
SA_USER_LOC_TRAITS
|
Yes
|
No
|
No
|
No
|
|
STORE
|
Yes
|
No
|
No
|
No
|
Business Overview
The service displays a list of open stores to which the user is
assigned, for a single day, Older days, or All Days.
Service Type
Get
ReST URL
/getStoreDays?store={store}&recordType={recordType}&recordDate={recordDate}&sortAttrib={sortAttrib}&sortDirection={sortDirection}&pageSize={pageSize}&pageNumber={pageNumber}
Input Parameters
|
Parameter Name
|
Required
|
Description
|
Valid values
|
|
RecordType
|
Yes
|
Record Type
|
ALL, OLDER, DATE
|
|
RecordDate
|
No
|
Record Date, required when recordType is DATE
|
|
|
Store
|
No
|
Store ID
|
|
|
SortAttrib
|
No
|
Sort Attribute
|
STORENAME, AUDITOR, OSVALUE, ERRORCNT, DATASTATUS,
OPENDAYS, OSDAYS and OSSUMS
|
|
SortDirection
|
No
|
Sort Direction
|
ASC, DESC
|
|
PageSize
|
No
|
Maximum number of locations to retrieve per page
|
|
|
PageNumber
|
No
|
Result page to retrieve
|
|
|
|
|
|
|
Output
§
Store
§
Store Day Seq No
§
Auditors
§
Business Date
§
Store Name
§
Chain
§
Chain Name
§
Data Status
§
Data Status Description
§
Audit Status
§
Audit Status Description
§
Audit Changed Datetime
§
Fuel Status
§
Fuel Status Description
§
Over Short Amount
§
Currency Code
§
Error Count
§
Transaction Count
§
Loaded File Count
§
Expected File Count
Table Impact
|
TABLE
|
SELECT
|
INSERT
|
UPDATE
|
DELETE
|
|
LOC_TRAITS_MATRIX
|
Yes
|
No
|
No
|
No
|
|
SA_ERROR
|
Yes
|
No
|
No
|
No
|
|
SA_HQ_VALUE
|
Yes
|
No
|
No
|
No
|
|
SA_POS_VALUE
|
Yes
|
No
|
No
|
No
|
|
SA_STORE_DATA
|
Yes
|
No
|
No
|
No
|
|
SA_STORE_DAY
|
Yes
|
No
|
No
|
No
|
|
SA_SYS_VALUE
|
Yes
|
No
|
No
|
No
|
|
SA_SYSTEM_OPTIONS
|
Yes
|
No
|
No
|
No
|
|
SA_TOTAL
|
Yes
|
No
|
No
|
No
|
|
SA_TRAN_HEAD
|
Yes
|
No
|
No
|
No
|
|
SA_USER_LOC_TRAITS
|
Yes
|
No
|
No
|
No
|
|
V_CHAIN
|
Yes
|
No
|
No
|
No
|
|
V_CODE_DETAIL
|
Yes
|
No
|
No
|
No
|
|
V_STORE
|
Yes
|
No
|
No
|
No
|
Business Overview
Retrieves the summary of store day errors.
Service Type
Get
ReST URL
/getStoreErrors?store={store}&recordType={recordType}&recordDate={recordDate}
Input Parameters
|
Parameter Name
|
Required
|
Description
|
Valid values
|
|
RecordType
|
Yes
|
Record Type
|
ALL, OLDER, DATE
|
|
RecordDate
|
No
|
Record Date, required when recordType is DATE
|
|
|
Store
|
No
|
Store ID
|
|
Output
§
Store
§
Error Code
§
Error Description
§
Error Percentage
Table Impact
|
TABLE
|
SELECT
|
INSERT
|
UPDATE
|
DELETE
|
|
SA_ERROR
|
Yes
|
No
|
No
|
No
|
|
SA_STORE_DAY
|
Yes
|
No
|
No
|
No
|
|
V_SA_ERROR
|
Yes
|
No
|
No
|
No
|
|
V_STORE
|
Yes
|
No
|
No
|
No
|
Business Overview
Retrieves aggregated store day information for all dates or store
days older than vdate -5.
Service Type
Get
ReST URL
/getStoreAggregations?allOlderInd={allOlderInd}&stores={stores}&sortAttrib={sortAttrib}&sortDirection={sortDirection}&pageSize={pageSize}&pageNumber={pageNumber}
Input Parameters
|
Parameter Name
|
Required
|
Description
|
Valid values
|
|
AllOlderInd
|
Yes
|
search string for locations Id or Name
|
ALL, OLDER
|
|
Stores
|
No
|
Comma Separated values for stores
|
|
|
SortAttrib
|
No
|
Sort Attribute
|
STORENAME, AUDITOR, OSVALUE, ERRORCNT, DATASTATUS,
OPENDAYS, OSDAYS and OSSUMS
|
|
SortDirection
|
No
|
Sort Direction
|
ASC, DESC
|
|
PageSize
|
No
|
Maximum number of locations to retrieve per page
|
|
|
PageNumber
|
No
|
Result page to retrieve
|
|
Output
§
Store
§
Store Name
§
Chain
§
Chain Name
§
Auditors
§
Open Days
§
Over Days
§
Short Days
§
Over Amount
§
Short Amount
§
Currency Code
§
Error Count
Table Impact
|
TABLE
|
SELECT
|
INSERT
|
UPDATE
|
DELETE
|
|
SA_ERROR
|
Yes
|
No
|
No
|
No
|
|
SA_HQ_VALUE
|
Yes
|
No
|
No
|
No
|
|
SA_POS_VALUE
|
Yes
|
No
|
No
|
No
|
|
SA_STORE_DATA
|
Yes
|
No
|
No
|
No
|
|
SA_STORE_DAY
|
Yes
|
No
|
No
|
No
|
|
SA_SYS_VALUE
|
Yes
|
No
|
No
|
No
|
|
SA_TOTAL
|
Yes
|
No
|
No
|
No
|
|
V_CHAIN
|
Yes
|
No
|
No
|
No
|
|
V_STORE
|
Yes
|
No
|
No
|
No
|
Business Overview
The web service enables store search and returns aggregated store
information.
Service Type
Get
ReST URL
/storeSearch?searchString={searchString}&searchFilter={searchFilter}&sortAttrib={sortAttrib}&sortDirection={sortDirection}&pageSize={pageSize}&pageNumber={pageNumber}
Input Parameters
|
Parameter Name
|
Required
|
Description
|
Valid values
|
|
SearchString
|
Yes
|
Search string for locations ID or name
|
|
|
SearchFilter
|
Yes
|
Search all stores or assigned stores
|
ALL, ASSIGN
|
|
SortAttrib
|
No
|
Sort attribute
|
STORENAME, AUDITOR, OSVALUE, ERRORCNT, DATASTATUS,
OPENDAYS, OSDAYS and OSSUMS
|
|
SortDirection
|
No
|
Sort direction
|
ASC, DESC
|
|
PageSize
|
No
|
Maximum number of locations to retrieve per page
|
|
|
PageNumber
|
No
|
Result page to retrieve
|
|
Output
§
Store
§
Store Name
§
Chain
§
Chain Name
§
Auditors
§
Open Days
§
Over Days
§
Short Days
§
Over Amount
§
Short Amount
§
Currency Code
§
Error Count
Table Impact
|
TABLE
|
SELECT
|
INSERT
|
UPDATE
|
DELETE
|
|
LOC_TRAITS_MATRIX
|
Yes
|
No
|
No
|
No
|
|
SA_ERROR
|
Yes
|
No
|
No
|
No
|
|
SA_HQ_VALUE
|
Yes
|
No
|
No
|
No
|
|
SA_POS_VALUE
|
Yes
|
No
|
No
|
No
|
|
SA_STORE_DATA
|
Yes
|
No
|
No
|
No
|
|
SA_STORE_DAY
|
Yes
|
No
|
No
|
No
|
|
SA_SYS_VALUE
|
Yes
|
No
|
No
|
No
|
|
SA_TOTAL
|
Yes
|
No
|
No
|
No
|
|
SA_TRAN_HEAD
|
Yes
|
No
|
No
|
No
|
|
SA_USER_LOC_TRAITS
|
Yes
|
No
|
No
|
No
|
|
STORE
|
Yes
|
No
|
No
|
No
|
|
V_CHAIN
|
Yes
|
No
|
No
|
No
|
|
V_STORE
|
Yes
|
No
|
No
|
No
|
Business Overview
This web service enables the user to find which store days have
records that need attention.
Service Type
Get
ReST URL
/getStoreDateInd?store={store}
Input Parameters
|
Parameter Name
|
Required
|
Description
|
|
store
|
Yes
|
Store ID
|
Output
Record Type – DATE, OLDER, ALL
§
For record type DATE: five records of type date are displayed for
today minus 1 through today minus 5
§
One record type OLDER: for store days older than today minus 5
§
One record type ALL: for all store days
Record Date – Date of date type rows
Store Has Value Indicator
Table Impact
|
TABLE
|
SELECT
|
INSERT
|
UPDATE
|
DELETE
|
|
SA_STORE_DAY
|
Yes
|
No
|
No
|
No
|
|
V_STORE
|
Yes
|
No
|
No
|
No
|
12
Internationalization
is the process of creating software that can be translated more easily. Changes
to the code are not specific to any particular market. ReSA is
internationalized to support multiple languages.
This section describes configuration settings and features of the
software that ensure that the base application can handle multiple languages.
Translation is the process of interpreting and adapting text from
one language into another. Although the code itself is not translated, components
of the application that are translated may include the following:
§
Graphical user interface (GUI)
§
Error messages
§
Reports
The following components are not translated:
§
Documentation (online help, release notes, installation guide,
user guide, operations guide)
§
Batch programs and messages
§
Log files
§
Configuration tools
§
Demonstration data
§
Training materials
The user interface for ReSA is available in these languages:
§
Chinese (simplified)
§
Chinese (traditional)
§
Croatian
§
Dutch
§
French
§
German
§
Greek
§
Hungarian
§
Italian
§
Japanese
§
Korean
§
Polish
§
Portuguese (Brazilian)
§
Russian
§
Spanish
§
Swedish
§
Turkish
When you first log into ReSA, the user interface will be set to
the default language for that installation. The default language is specified
in the <default-locale> tag in the faces-config.xml. You can change the
language in the User Preferences screen.
There are two dropdown menus for language settings:
§
Default
§
Current Session
If you change the default language, that language will be the
default language whenever you use ReSA. If you change the Current Session, that
setting will only affect the current session.
The values for the language menus are set in the
faces-config.xml file in the application archive file EarResaPortal.ear (located
under the WEB-INF folder in the web archive WarResaPortal.war).
All user data, include default language, is stored internally in
the ADF Metadata Stored (MDS) provided by the RAF platform library.
The User Interface strings are stored in a series of xlf files
deployed with the application. The data translation for content fetched from
the database like rtk_errors or code_detail uses the RMS translation tables
like tl_shadow or code_detail_trans.
Unlike RMS which relies on the language code mapped to the
database user id, ReSA uses the locale of the logged in application user. The
language is set to the database session context RETAIL_CTX. APP_ISO_LANGUAGE.
The base RMS data translation packages are changed to refer to RETAIL_CTX. APP_ISO_LANGUAGE
if available, otherwise use database user’s language to fetch the translated
data.