14. Processing Post Dated Cheques
Oracle FLEXCUBE supports processing of post dated Cheques (PDCs) both at Branch and Host levels.
PDCs have four events in their life cycle:
- Booking (Entry) of PDCs, where details of the PDC are entered in Oracle FLEXCUBE
- Initiation of PDCs, where the PDC is authorized and becomes active. Contingent entries, if required, are passed for the PDC during initiation
- Liquidation of PDCs, where the PDC becomes a normal Cheque to be sent through clearing.
- If the discounted cheque is returned from the clearing, then the system will process the debit from the past due account or create loan based on the parameters captured in the ‘Post Dated Cheque product preference’ screen.
- On re-presentation of PDC, the system will process the debit from the past due account maintained at ‘Customer Cheque Discounting Maintenance’ screen.
- During return of PDC, if the limits are maintained at any of the levels, utilization will be updated.
- Cancellation, when the PDC is cancelled before liquidation. It is also possible to reverse a PDC after liquidation
For processing PDCs, you will first have to create PDC products in Oracle FLEXCUBE and then process individual PDCs as contracts under the products that you create.
This chapter contains the following sections:
- Section 14.1, "Post Dated Cheque Maintenance"
- Section 14.2, "PDC Products"
- Section 14.3, "Post Dated Cheque Transaction "
- Section 14.4, "Other Operations on PDCs"
- Section 14.5, "Events and Accounting Roles"
14.1 Post Dated Cheque Maintenance
This section contains the following topics:
- Section 14.1.1, "Drawer Maintenance"
- Section 14.1.2, "Post Dated Cheque Reject Code Maintenance"
- Section 14.1.3, "Customer Cheque Discount Details Maintenance"
14.1.1 Drawer Maintenance
You can maintain the drawer status details using ‘Drawer Status Maintenance’ screen.
14.1.1.1 Maintaining Drawer Status Details
You can invoke this screen by typing ‘PDDDWRST’ in the field at the top right corner of the Application tool bar and clicking on the adjoining arrow button.
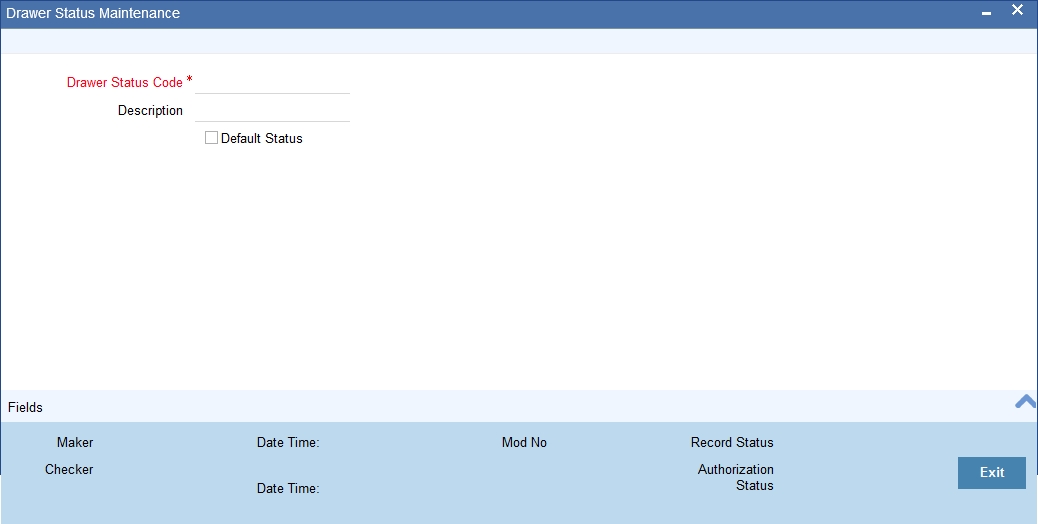
You can enter the following details:
Drawer Status Code
Specify a unique drawer status code here.
Description
Enter a brief description about the status code.
Default Status
Check this box to indicate the whether to default the status or not.
14.1.1.2 Maintaining Drawer Details
You can maintain the drawer details using ‘Drawer Maintenance’ screen. You can invoke this screen by typing ‘PDDDWRMT’ in the field at the top right corner of the Application tool bar and clicking on the adjoining arrow button.
You can enter the following details:
Drawer Identification
Specify a unique drawer Id here.
Customer Identification
Specify the customer Id if the drawer belongs to the same bank. This adjoining option list displays all valid customer ids maintained in the system. You can choose the appropriate one. This is a mandatory field.
Liability Identification
The system displays the liability Id if the drawer is a bank customer. However you can specify the liability Id for a drawer, when a cheque discounting transaction is input, the limit utilization for the drawer will be tracked against this liability.
Drawer Status
Specify the drawer status. This adjoining option list displays all valid drawer statuses maintained in the system. You can choose the appropriate one.
Drawer Name
Enter the drawer name. However If drawer is bank’s customer, then the name will get defaulted here.
Drawer Black Listed
The system defaults this field. The drawer will be blacklisted based on the number of times the cheque gets returned. The cheque return count will be maintained at ‘Bank parameters’ screen. If the number of cheque returns is greater than or equal to the count then drawer will be marked as blacklisted.
Address
Enter the drawer address. However If drawer is bank’s customer, then the address will get defaulted here.
Cheque Return Count
The system displays the number of cheque returns for a drawer.
Remarks
Specify any additional information.
Drawer Bank Details
Bank Code
Specify bank code. You can link multiple bank codes to one drawer.
Bank Name
Specify the bank name of the drawer.
Account Number
Specify the account number of drawer bank. This adjoining option list displays all valid account numbers maintained in the system. You can choose the appropriate one.
Status
Specify the drawer status against each drawer bank. This adjoining option list displays all valid drawer statuses maintained in the system. You can choose the appropriate one.
Date Of Change
The system displays the date of update for each bank.
Remarks
Enter any comments you wish to record pertaining to this screen.
Cheque Details
Cheque Status
The system displays the status of cheque. On realization, the status will be updated as ‘Used’ and upon return the status will be updated as ‘Return’.
Cheque Amount
The system displays the amount on the cheque.
Discounted Date
The system displays the date of discounting.
Cheque Date
The system displays the date of cheque clearing.
14.1.1.3 Viewing Drawer Summary
You can query, view the drawer details of the post dated cheques in the ‘Drawer Summary’ screen. You can invoke this screen by typing ‘PDSDWRMT’ in the field at the top right corner of the Application tool bar and clicking the adjoining arrow button
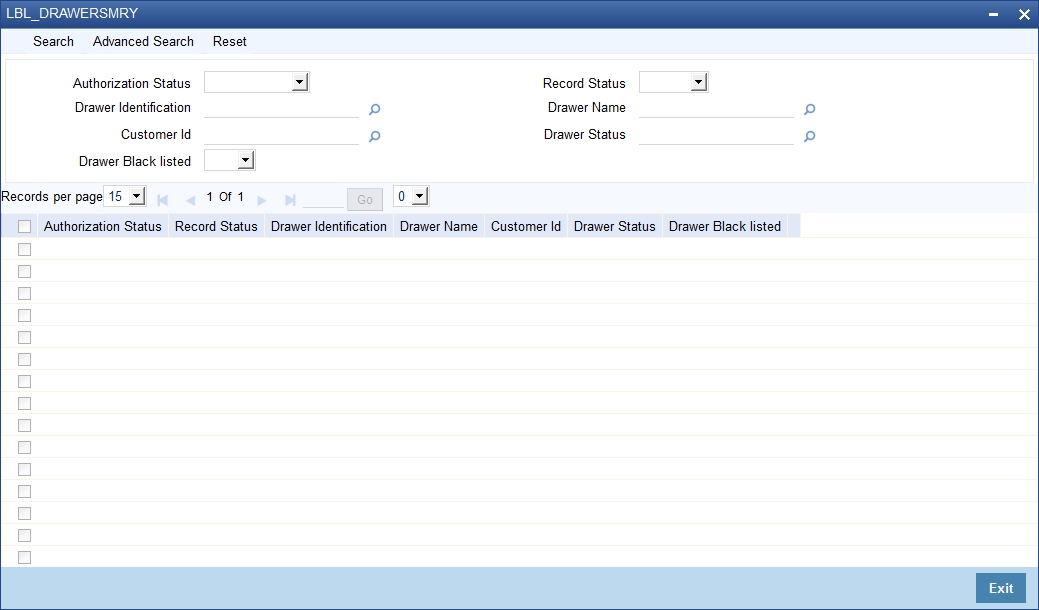
Here, you can query on drawer details based on any one or all of the following criteria:
- Drawer Identification
- Drawer Name
- Drawer Status
- Customer Number
Click ‘Search’ button. The system identifies all records satisfying the specified criteria and displays the following details for each one of them.
- Authorization status
- Record status
- Drawer Identification
- Drawer Name
- Drawer Status
- Customer Number
- Drawer Blacklisted
14.1.2 Post Dated Cheque Reject Code Maintenance
You can maintain reject codes that are applicable to the rejection of post dated cheques using ‘Post Dated Cheque Reject Code Maintenance’ screen. To invoke this screen, type PDDRJCOD’ in the field at the top right corner of the application toolbar and click the adjoining arrow button.
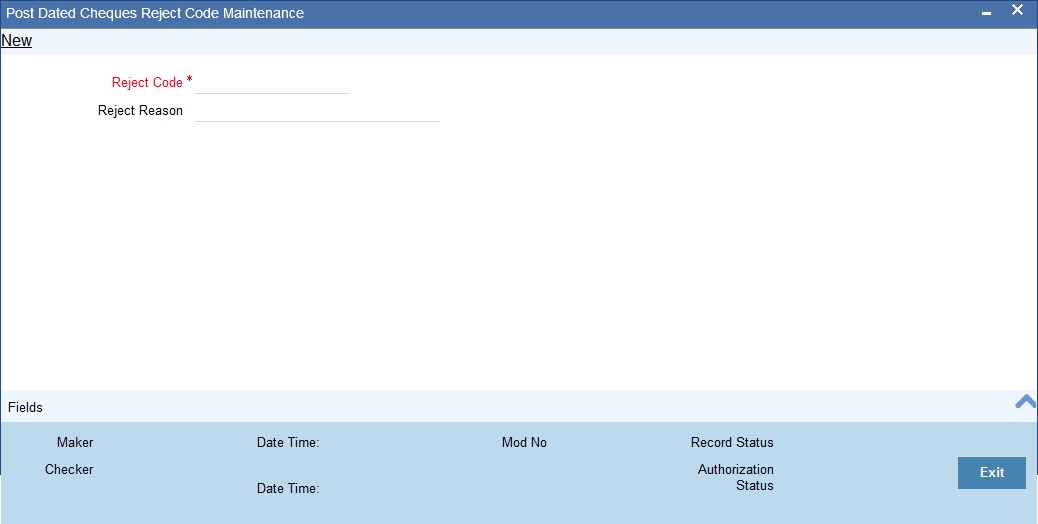
Specify the following details:
Reject Code
Specify a unique reject code. This code can be used to identify the reason for rejecting or cancelling a post dated cheque.
Description
Enter the reject reason. Once you have captured the details, save the maintenance.
14.1.3 Customer Cheque Discount Details Maintenance
You can maintain the customer cheque discounting details using ‘Customer Cheque Discounting Detail’ screen.
14.1.3.1 Maintaining Customer Cheque Discount Details
You can invoke this screen by typing ‘PDDCHDMT’ in the field at the top right corner of the Application tool bar and clicking on the adjoining arrow button.
You can enter the following details:
Customer Details
Customer Identification
Specify the customer identification. This adjoining option list displays all valid customer ids maintained in the system. You can choose the appropriate one. This is a mandatory field.
Customer Name
On selecting customer Id, the system displays the corresponding customer name.
Account Details
Liability Account Branch
Specify the customer liability account branch code. This adjoining option list displays all valid branch codes maintained in the system. You can choose the appropriate one.
Liability Account
Specify the customer liability account/PDC settlement account. This adjoining option list displays all valid customer accounts maintained in the system. You can choose the appropriate one. This is a mandatory field.
To view the joint holder’s details of an account and the mode of operation maintained at the account level, place the cursor on the Liability Account Number field and press Ctrl+J. The system displays the ‘Joint Holder’ screen.
For more information on the ‘Joint Holder’ screen refer to the section ‘Joint Holder Maintenance’ in this User Manual.
Liability Account Currency
Specify liability account currency.
Total Available Amount
The system displays the total available balance inclusive of limit amount, for the selected account.
Past Due Account Branch
Specify the past due account branch code. This adjoining option list displays all valid branch codes maintained in the system. You can choose the appropriate one.
Past Due Account
Specify the customer past due account. This adjoining option list displays all valid customer accounts maintained in the system. You can choose the appropriate one. This is a mandatory field.
To view the joint holder’s details of an account and the mode of operation maintained at the account level, place the cursor on the Past Due Account field and press Ctrl+J. The system displays the ‘Joint Holder’ screen.
For more information on the ‘Joint Holder’ screen refer to the section ‘Joint Holder Maintenance’ in this User Manual.
Past Due Account Currency
Specify the past due account currency.
Available Amount
The system displays the available balance for the selected account.
Drawer Details
Drawer Identification
Specify the drawer identification. This adjoining option list displays all valid drawer Ids maintained in the system. You can choose the appropriate one. You can as well attach multiple drawer identification.
Drawer Name
The system displays the drawer name.
Customer – Drawee Line ID
Specify the limit line for customer and drawer combination. This adjoining option list displays all valid limit lines maintained for the liability Id. You can choose the appropriate one.
14.1.3.2 Viewing Customer Cheque Discount Summary
You can query, view the customer cheque discount details of the post dated cheques in the ‘Customer Cheque Discounting Summary’ screen. You can invoke this screen by typing ‘PDSCHDMT’ in the field at the top right corner of the Application tool bar and clicking the adjoining arrow button.
Here, you can query on customer cheque discounting details based on any one or all of the following criteria:
- Customer Number
- Liability Account/ PDC settlement account
- Past Due account
Click ‘Search’ button. The system identifies all records satisfying the specified criteria and displays the following details for each one of them.
- Authorization status
- Record status
- Customer Number
- Liability Account/ PDC settlement account
- Past Due account
14.2 PDC Products
This section contains the following topics:
- Section 14.2.1, "Maintaining PDC Products"
- Section 14.2.2, "Accounting Roles Button"
- Section 14.2.3, "Events button"
- Section 14.2.4, "Preferences Button"
14.2.1 Maintaining PDC Products
You will have to create a product for PDCs and define attributes specific to it.
You can invoke the ‘Post Dated Cheques Product Definition’ screen by typing ‘PDDPRMNT’ in the field at the top right corner of the Application tool bar and clicking on the adjoining arrow button. In this screen, you can enter basic information relating to a PDC product such as Product Code, Description, and so forth.
For any product you create in Oracle FLEXCUBE, you can define generic attributes, such as accounting roles, events, MIS details, etc., by clicking on the appropriate icon in the horizontal array of icons in this screen. For a post dated Cheques product, in addition to these generic attributes, you can specifically define other attributes. These attributes are discussed in detail in this section.
You can define the attributes specific to a PDC product in the PD Product Definition Main screen and the PDC Product Preferences screen. In these screens, you can specify the product type and set the product preferences respectively.
For further information on the generic attributes that you can define for a product, please refer the following Oracle FLEXCUBE User Manuals:
- Products
- Interest
- Charges and Fees
- Tax
- User Defined Fields
- Settlements
In the Product Definition screen, you can also enter the following:
Product Code
Specify the code for the product. This is a code for the specific PDC product that you are creating.
Product Description
Specify a brief description for the product code.
Product Type
Select the type for the product from the option list provided. The first attribute that you define for a product is its type. For a PDC product, the product type is PD.
Description
Specify a brief description for the product type.
Slogan
Select a slogan, or a marketing punch line, for the product.
Product Group
Select the product group to which you wish to assign the PDC product. Products can be categorized into groups based on the common elements that they share. Associating a product with a group will facilitate retrieval of information of a class of products at one stroke. You can maintain Product Groups in the Product Group Definition screen, invoked from the Application Browser.
Start Date / End Date
The period during which you wish the PDC product to be current – you specify this by entering a Start and an End Date.
Remarks
Enter any additional remarks about the product.
Exchange Rate Variance (in %)
Exchange Rate Variance particulars for any currency conversion is involved – the extent of variance that will be allowed without requiring an override, the extent beyond which the transaction will not be allowed, the rate code and the rate type.
14.2.2 Accounting Roles Button
Click ‘Accounting Roles’ button to invoke the ‘Accounting Roles’ screen.
You can capture all the accounting role details related to individual post dated cheque in this screen.
14.2.3 Events button
Click ‘Events’ button to invoke the ‘Events’ screen.
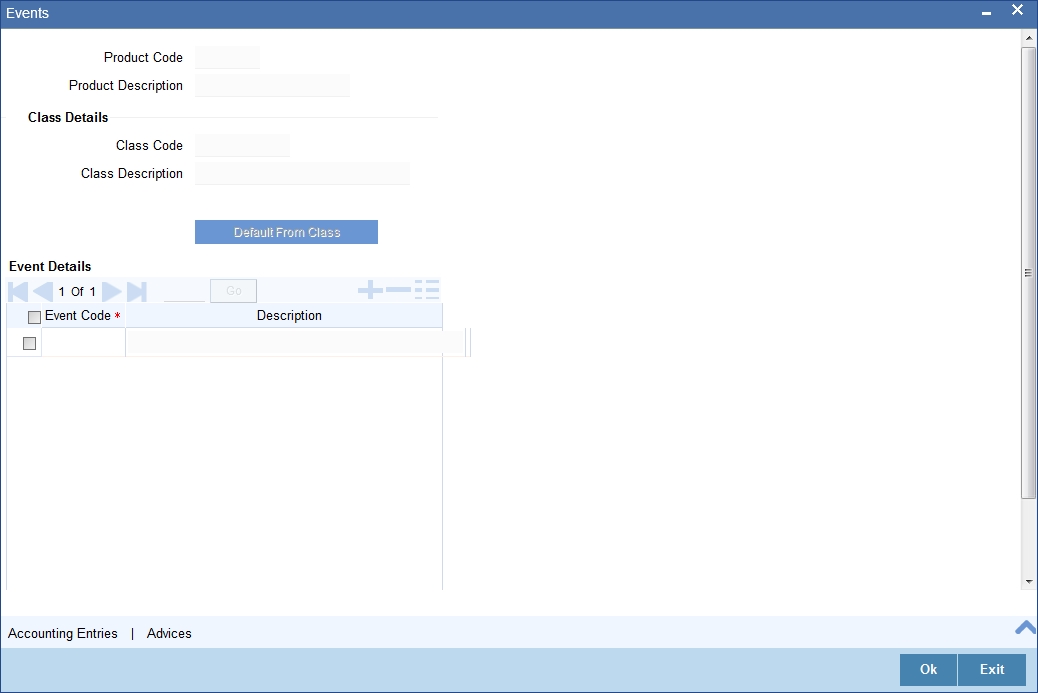
You can capture all event related details pertaining to post dated cheque.
14.2.4 Preferences Button
Click ‘Preferences’ button to invoke the ‘Post Dated Cheques Product Preference’ screen.
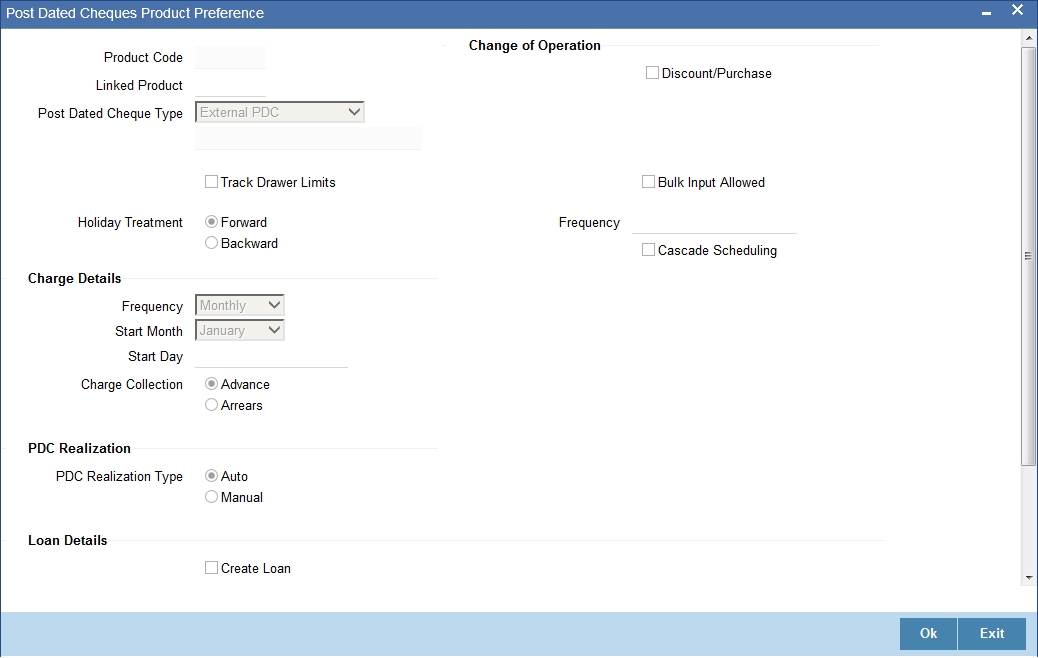
Product Code
Specify the code for the Product.
Linked Product
Select the Clearing product to be used when the product matures and the cheque is sent for outward clearing. This is only applicable to External PDCs.
Post Dated Cheque Type
Oracle FLEXCUBE processes the following types of PDCs :
- Own account: PDCs issued against the customer’s account
- External PDC: PDCs from other banks deposited in the customer’s account
- Bank-issued PDC: PDCs issued against the bank’s Nostro accounts
Track Drawer Limits
Check this box to track the drawer limits at the PDC transaction. The Drawer limits will be tracked at the PDC transaction only if this checkbox is checked.
Pass Contingent
Cheque this box if you wish contingent entries to be passed during PDC initiation. Depending on the type of PDC, the following contingent entries should be defined:
When a customer deposits PDC into own account
Amount Tag |
Dr / Cr Indicator |
|
Contingent Asset |
PDC_RECEV |
Dr |
Contingent Liability |
PDC_RECEV_CONTRA |
Cr |
Bank Issues PDC
Accounting Role / Head |
Amount Tag |
Dr / Cr Indicator |
Contingent Asset |
PDC_ISSUE_CONTRA |
Dr |
Contingent Liability |
PDC_ISSUE |
Cr |
Discount / Purchase
Check this box, to allow discounting/purchasing for the PDC instrument.
Discounting/purchasing will be allowed for the PDC instrument, only if the product is defined for this change of operation,
Bulk Input Allowed
Cheque this box to indicate that this product can be used for bulk inputs. If this box is not checked, this product is available only for single online contracts. Oracle FLEXCUBE supports bulk input of PDCs, where a single contract is entered for multiple PDCs.
If you allow bulk input, you can indicate the default instrument number and frequency of the PDCs. This value defaults to bulk input contracts, but can be changed while entering the bulk input contract.
Holiday Treatment
If the liquidation event for a PDC falls on a holiday, you may wish that event to take effect either on the previous or on the following day. Select either Backward or Forward to indicate your preference. You may also desire that the schedule for bulk upload of PDCs gets modified according to the holiday treatment that you specify. That is, if a particular schedule day, falling on a holiday, is shifted backward / forward, then you may wish the subsequent schedule days also to move
- Forward
- Backward by the same number of days
Accrual Frequency
Specify the frequency in which the interest components are to be collected .The frequency can be Daily, Monthly, Quarterly, Half yearly and Annual.
Accrual start month
Specify the month when the accrual should happen, if the frequency is selected as “Quarterly” or above.
Accrual start date
Specify the date of the month when the accrual should happen, if the frequency is selected as “Monthly” or above.
Charge to be collected in
Specify the option for collecting the charges from the adjoining drop-down list. The available options are:
- Advance- The charge defined can be collected in advance.
- Arrears- The charge defined can be collected in arrears. The overdue charge component is always collected in arrears irrespective of preferences defined.
Frequency & Cascade Scheduling
Cheque the Cascade scheduling option if you wish subsequent schedule days to be recalculated when a particular schedule day is shifted. If you do not select this option, then the original schedule is maintained. This Cheque box is enabled only if you have chosen to allow bulk input of PDCs.
Select the type of PDC realization from the following options:
- Auto- Select this option for the automatic “movement of funds to collected” as a batch on the Customer Float day.
- Manual- Select this option for the manual “movement of funds to collected”.
Loan Details
Create Loan
Check this box to create a loan automatically. When a financed PDC check is returned from clearing, a loan will be created based on the loan product and parameters captured at PDC product.
If ‘Create Loan’ field is checked and if PDC type is not External PDC, then the system displays an error message as ‘Create Loan option should be selected only for External PDC’.
While saving the PDC product, if ‘Create Loan’ field is checked and PDC type is External PDC but change of operations is not selected, the system displays an error message as ‘Create Loan option should be selected for External PDC and Discount / Purchase Operation’.
Loan Product
Specify the loan product. Alternatively, you can select the loan product from the option list. The list displays all valid bearing type loan products maintained in the system.
If the loan product value is captured when ‘Create Loan’ field is not checked, the system displays an error message as ‘Loan Product should not be captured when create loan is not selected’.
If ‘Create Loan’ field is checked but loan product value is not captured, the system displays an error message as ‘Loan product is mandatory if create loan flag is selected’.
Check Available Balance
Select the balance availability check that you want to perform. The options are as follows:
- Verify Balance-To verify the available balance of the customer
- Without Verify Balance - To create a loan for finance outstanding amount without verifying the customer balance
If create loan is not checked but verify balance is selected, the system displays an error message as ‘Verify Balance option to be chosen if create loan flag is selected’.
Loan Amount
Select the loan amount. The options are as follows:
- Instrument Amount- To create loan for instrument amount
- Total Outstanding Amount-To create loan for total outstanding amount (Instrument amount + any other charges)
14.3 Post Dated Cheque Transaction
This section contains the following topics:
- Section 14.3.1, "Entering Details of Post Dated Cheques"
- Section 14.3.2, "Viewing Post Dated Cheques Transaction Input summary"
- Section 14.3.3, "Accounting Entries Button"
- Section 14.3.4, "ICCF Details Button"
- Section 14.3.5, "Project Details Button"
- Section 14.3.6, "Limits Button"
- Section 14.3.7, "Viewing Summary of Post Dated Cheques Transaction"
- Section 14.3.8, "Bulk Input of Post Dated Cheques"
- Section 14.3.9, "Project Details Button"
- Section 14.3.10, "Viewing Post Dated Cheques Bulk Input Summary"
14.3.1 Entering Details of Post Dated Cheques
You can invoke the ‘Post Dated Cheques Transaction Input’ screen by typing ‘PDDTRONL’ in the field at the top right corner of the Application tool bar and clicking on the adjoining arrow button.
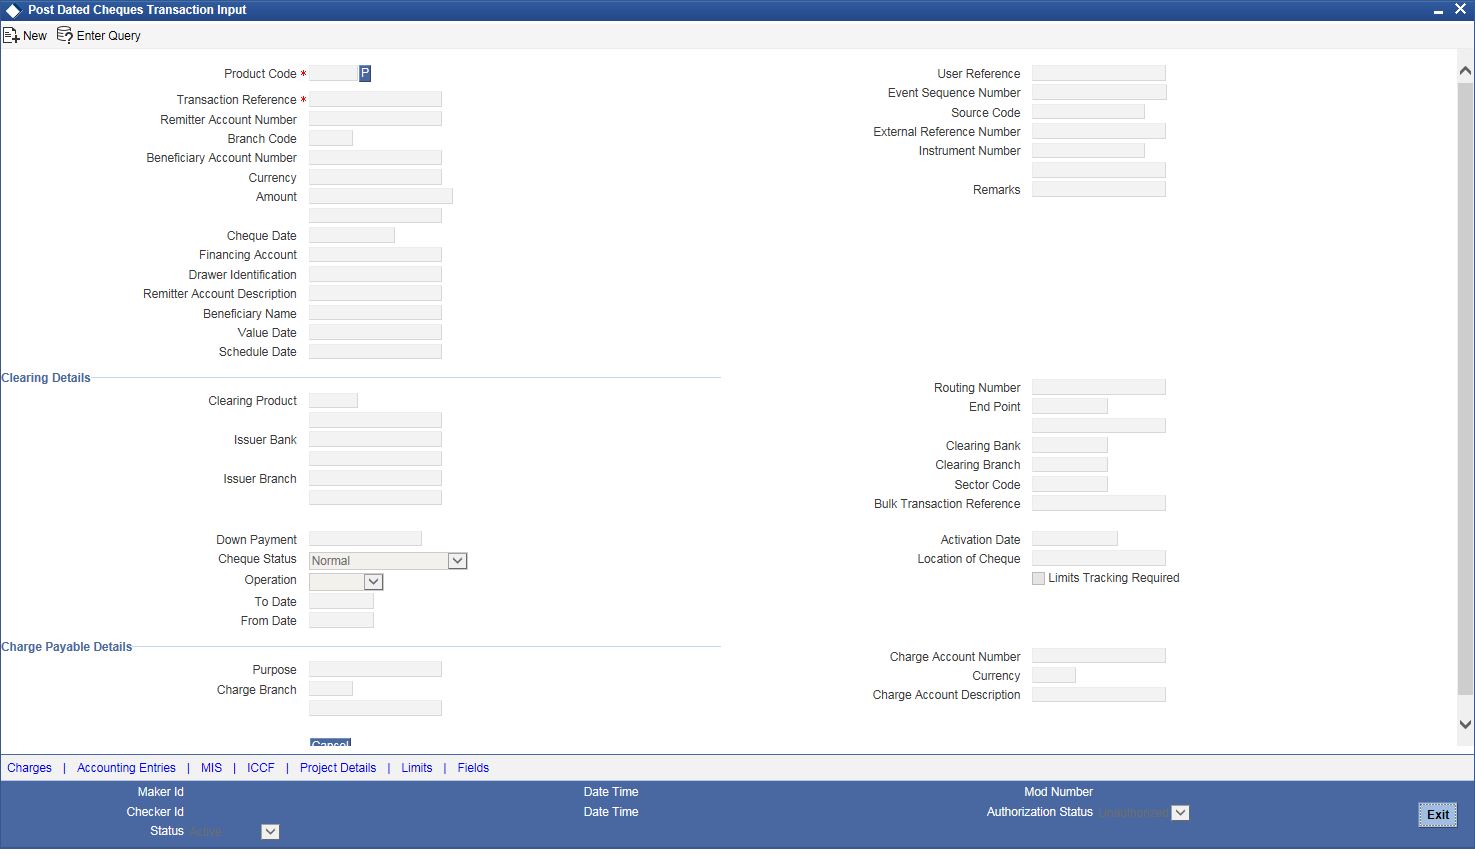
Transaction Reference Number
Specify the Transaction Reference Number of the post dated cheque.
Product Code
From the option list of product codes that you have created in the Product Definition screen, specify the PDC product code that has to be used for the Cheque.
Remitter Account Number
This is the account which has to be debited for clearing the Cheque. Depending on the PDC type, you will have to select the following values for the remitter account:
- If the PDC type is ‘Own A/c PDC’, the remitter account should be a valid customer account
- If the PDC type is ‘PDC issued by the bank’, the remitter account can either be a GL or Nostro account
- If the PDC type is ‘External PDC’, the remitter account should be a valid GL
To view the joint holder’s details of an account and the mode of operation maintained at the account level, place the cursor on the Remitter Account Number field and press Ctrl+J. The system displays the ‘Joint Holder’ screen.
For more information on the ‘Joint Holder’ screen refer to the section ‘Joint Holder Maintenance’ in this User Manual.
Branch Code
Specify the code for the branch that has issued the post dated cheques. Alternatively, you can select the branch code from the option list. The list displays all valid branch codes maintained in the system i.e both current branch code and other branch codes.
Beneficiary Account Number
Specify the Beneficiary account number in favour of which the PDC is drawn. Alternatively you can select the beneficiary account number from the option list. The list displays all valid beneficiary account number maintained in the system for the specified branch code
To view the joint holder’s details of an account and the mode of operation maintained at the account level, place the cursor on the Beneficiary Account Number field and press Ctrl+J. The system displays the ‘Joint Holder’ screen.
For more information on the ‘Joint Holder’ screen refer to the section ‘Joint Holder Maintenance’ in this User Manual.
Amount and Currency
From the option list, select the currency in which the PDC is denominated. Also specify the amount of the PDC.
Value Date
Specify the date on which the PDC was deposited.
Cheque Date
Specify the date on which the cheque is issued.
Financing Account
Specify the financing account number linked to the PDC. Alternatively, you can select the financing account from the option list. The list displays all valid financing account maintained in the system for the current branch..
For this loan account, if the customer pays an advance instalment or makes an early settlement, the system will delete the outstanding cheques. A report of such cancelled cheques is generated on a daily basis.
Drawer Identification
Specify the unique drawer Id here.
Beneficiary Name
The system displays the name of the specified beneficiary based on the details maintained at ‘Customer Maintenance’ level.
Remarks
Specify the reason for cancellation of post dated cheque.
Event Sequence Number
Specify the event sequence number for processing a post dated cheque.
Source Code
User Reference
Specify the user reference number. This is a mandatory field.
External Reference Number
Specify the external reference number while processing a post dated cheque.
Instrument Number
This is the PDC number. If PDC type is External, this number should be unique for the given clearing branch & bank.
Clearing Details
In the fields provided, enter / select the:
Clearing product
Select the product that is ready for clearing.
Issuer Branch
Select the branch that is issuing the post dated Cheques.
Clearing Bank
Select the bank that is clearing the post dated Cheques issued.
Clearing Branch
Select the branch that is clearing the post dated Cheques issued.
Sector Code
Select the code of the sector that is processing the post dated Cheques,
Issuer Bank
Select the bank that is issuing the post dated Cheques.
Bulk Transaction Reference Number
Specify the bulk transaction number that is used in transactions.
For detailed field explanation on End Point & Routing Number, refer to the Clearing User Manual.
The clearing details are needed only for External type PDCs.
Discount/Purchase details
Operation
Select the operation from the adjoining drop-down list. The available options are:
- Purchase- Select this option if the Activation date is current date and when selected, CPUR event will be fired.
- Discount - Select this option if the Activation date is future date and when selected, the event CDIS will be fired.
A validation will be done for the operations while saving the PDC transaction.
Amount
Specify the Purchase / discount amount. The full amount of the PDC will be the discount amount.
Cheque Status
Select the status of the cheque from the adjoining drop-down list.
The available options are:
- Normal – This is a normal cheque which is not discounted / purchased. For this you should choose the ‘null’ option.
- Discounted – This status is set to Discounted, when the operation is selected as Discount
- Purchased - This status is set to Purchased, when the operation is selected as Purchase
- Collection – When a normal cheque launched for collection (Activation of PDC)
- Collection after Discount - When a Discounted cheque launched for collection (Activation of PDC)
- Collection after Purchase - When a Purchased cheque launched for collection (Activation of PDC)
- Returned – When the cheque is dishonored/rejected, the status of the PDC would be updated to ‘Returned ‘
- Passed - When the status of the funds is marked as collected, the status of the PDC will be updated as ‘Passed’.
- Pullback – When the pullback operation is performed the cheque status will be Pullback.
Interest Computation Dates
Select the appropriate dates for interest computation from the adjoining list.
From date
Select the date from which the interest computation has to start, from the adjoining calendar button. These details are allowed only for the CDIS/CPUR event.
To date
Select the date till which the interest should be collected for discount, from the adjoining calendar button .It is arrived by adding the days from the date of discounting till the activation date + number of float days of customer value date defined in the ARC maintenance for the clearing product defined for a PDC product.
Charge Payable Details
You need to enter the following details for the processing of charges for the PDC:
Charge Branch
Select the branch in which the charge payable account is maintained.
Status
Indicate the current status of the PDC by selecting from the following values:
- U : Unprocessed
- A : Active (Initiated)
- V : Reversed
- L: Liquidated
- C : Cancelled
Charge Account Number
The account which is to be debited for the charge – this is necessary for passing accounting entries for the charge calculated for any of the events associated with a PDC.
To view the joint holder’s details of an account and the mode of operation maintained at the account level, place the cursor on the Charge Account Number field and press Ctrl+J. The system displays the ‘Joint Holder’ screen.
For more information on the ‘Joint Holder’ screen refer to the section ‘Joint Holder Maintenance’ in this User Manual.
Charge Account Description
The system displays the description of the specified charge account number based on the details maintained at ‘Customer Account Maintenance’ level.
Purpose
You have the option of specifying the purpose for which the PDC is issued. This is for information only.
Currency
Specify the currency in which the charge should be calculated.
Activation Date
Enter the date on which the PDC becomes a normal Cheque, that is, the maturity date of the PDC or the loan linked to PDC. Therefore, this can also be viewed as the value date of the normal Cheque. The value that you enter here is validated as per the holiday treatment maintained at the PDC product level. This date should be greater than or equal the current date & less than the end date specified for this PDC product.
Location of Cheque
Specify the location where the PDCs are held till activation. This is for reporting purposes only.
Actions allowed in the PDC Online screen
- Add: Entering details of a new PDC
- Unlock: Changing details of an unprocessed PDC. You can only modify an unauthorized and unprocessed PDC. If, during modification, you change the amount, activation date, currency, remitter account number or charge payable details, then the contingent entries passed during initiation gets deleted and new entries are passed based on the modification done.
- Delete: Deleting a PDC prior to its first authorization
- Reverse: Reversing a PDC that has been liquidated. Contingent entries passed for the PDC are reversed.
- Cancellation: Cancelling a PDC that is active but has not been liquidated. The accounting entries specified for the cancellation event are passed.
Limits Tracking
Limits Tracking required
If Limits tracking is enabled at product level then this box will be displayed as checked. This is defaulted from the product and you are allowed to change it. For Discounted and Purchase operations limits tracking should be checked.
The system will perform the following validations for limit tracking while saving the PDC transaction.
- If operation is discount and beneficiary belongs to other branch and Limit tracking is not selected, the system displays an override message as ‘Limit tracking is not selected. Is it ok?’.
- If operation is discount and beneficiary belongs to the same branch and Limit tracking is not selected, the system displays an override message as ‘Limit tracking is not selected. Is it ok?’.
Note
Limit utilization will get updated at liability level, Drawer level and for drawer + customer level.
Limit tracking for customer will be tracked against limit line captured in ‘Customer Cheque Discounting’ screen.
Limit tracking for drawer would be tracked against the overall limit for the Liability id captured at ‘Drawer Maintenance’ screen.
Limit tracking for drawer +customer combination is tracked against the line id captured at ‘Customer Cheque Discounting’ screen.
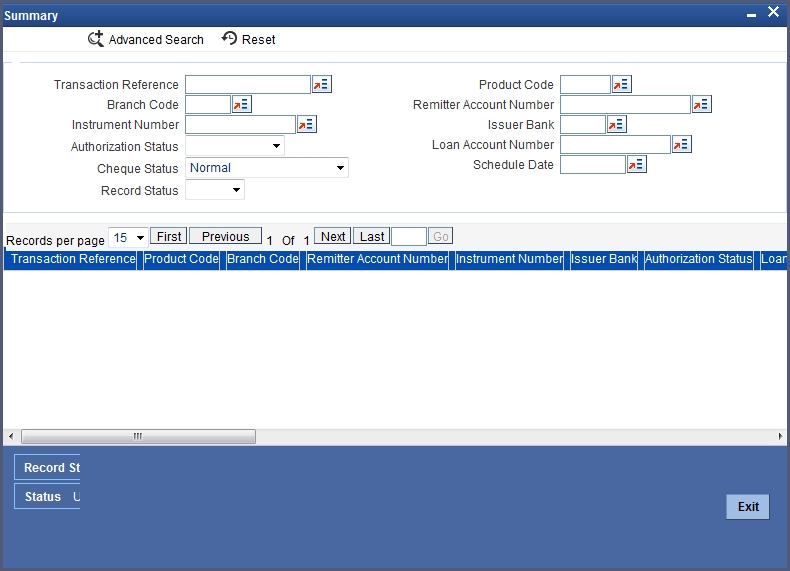
14.3.2 Viewing Post Dated Cheques Transaction Input summary
You can invoke the ‘Post Dated Cheques Transaction Input’ summary screen by typing ‘PDSTRONL’ in the field at the top right corner of the Application tool bar and clicking the adjoining arrow button.
In the above screen, you can base your queries on any or all of the following parameters and fetch records:
- Transaction reference
- Branch Code
- Instrument Number
- Financing Account
- Authorization Status
- Schedule Date
- Product Code
- Remitter Account Number
- Issuer Bank
- Cheque Status
- Status
Note
Specify the Beneficiary account branch in the branch code field.
Select any or all of the above parameters for a query and click ‘Search’ button. The records meeting the selected criteria are displayed.
System displays the following details pertaining to the fetched records:
- Transaction reference
- Branch Code
- Instrument Number
- Financing Account
- Authorization Status
- Schedule Date
- Product Code
- Remitter Account Number
- Issuer Bank
- Cheque Status
- Event Sequence Number
- Source Code
- External Reference Number
- Clearing Product
- Routing Number
- End Point
- Issuer Branch
- Purpose
- Remarks
- Status
14.3.2.1 Charges Button
Charge parameters specified for a particular product default for the individual PDCs entered under that product.
You can view these charges for individual PDCs. Click ‘Charges’ button in the ‘Post Dated Cheques Transaction Input’ screen to invoke the ‘Charge Details’ sub-screen.
14.3.3 Accounting Entries Button
Click ‘Accounting Entries’ button in the ‘Post Dated Cheques Transaction Input’ screen to invoke the ‘Accounting Entries’ sub-screen. You can view the accounting entries and overrides specified for the individual PDCs.
14.3.4 ICCF Details Button
Click the ‘ICCF Details button in the ‘Post Dated Cheques Transaction Input’ screen to invoke the ‘ICCF Details’ sunscreen.
The following fields are displayed here:
- Grace Period
- Contract Reference Number
- Component
- Currency
- Event
- Rate Type
- Maximum Rate
- Minimum Rate
- Customer Margin
- Interest Periods
- Fixed Rate
- Rate Code
- Description
- Interest Amount
- Spread
14.3.5 Project Details Button
Click the ‘Project Details’ button in the ‘Post Dated Cheques Transaction Input’ screen to invoke the ‘Project Details’ screen. You will have to capture project details in this screen only if the beneficiary account is a Trust account.
Specify the following details:
Project Name
Specify the developer project name for which payment is being made. The adjoining option list displays all valid projects maintained in the system. You can select the appropriate one. Input to this field is mandatory.
If you specify the Unit ID, the system will display the corresponding project name here.
Unit Payment
Indicate whether the transaction is a unit payment or not by choosing the appropriate value from the adjoining drop-down list. The following values are available:
- Yes
- No
Unit ID
Specify the unit ID of the project. This field will be enabled only if you have selected ‘Yes’ against ‘Unit Payment’. The adjoining option list displays all unit IDs along with the unit holder names corresponding to the project name chosen. You can select the appropriate one.
Deposit Slip Number
Specify the deposit slip number for the payment.
14.3.6 Limits Button
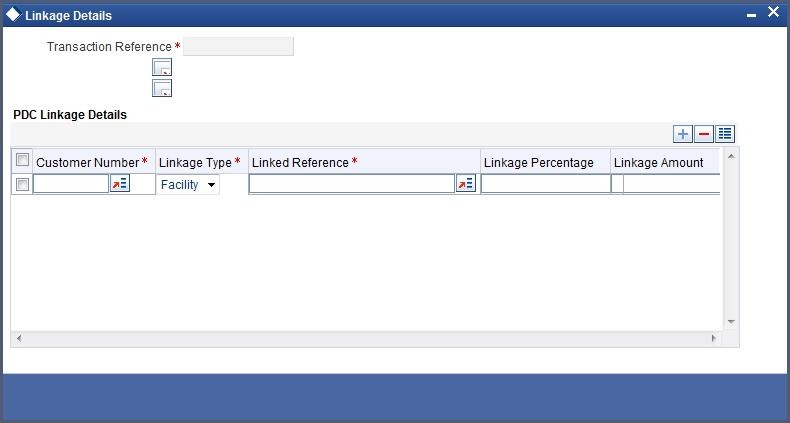
Click the ‘Limits’ button in the ‘Post Dated Cheques Transaction Input’ screen to invoke the ‘Linkage Details’ screen. You can capture multiple credit lines in this screen.

Specify the following details:
Customer Number
Specify the customer number. The adjoining option list displays all the valid customer names maintained in the screen. You can choose the appropriate one.
Linkage Type
Specify the linkage type from the adjoining drop-down list. The list displays the following values:
- Facility (credit line)
- Pool
- Collateral
Linked Reference
Specify the linkage reference number based on the type of linkage. You can specify the following:
- If you have selected linkage type as ‘Facility’ then you have to enter facility code in the Linkage reference number.
- If you have selected linkage type as ‘Pool’ then you have to enter collateral pool code in the Linkage reference number field.
- If you have selected linkage type as ‘Collateral’ then you have to enter collateral code in the Linkage reference number field.
Linkage Percentage
Specify the percentage of contribution that needs to be tracked for each Credit Line or Collateral Pool.
Note
The total sum of ‘Percentage of Contribution’ should be equal to 100%, excluding the line for joint venture customers. If the total sum is not equal to 100%, then the system will raise an error message as “‘Sum total of Limits Percentage should be 100”.
Linkage Amount
The system displays the amount contributed for the credit line.
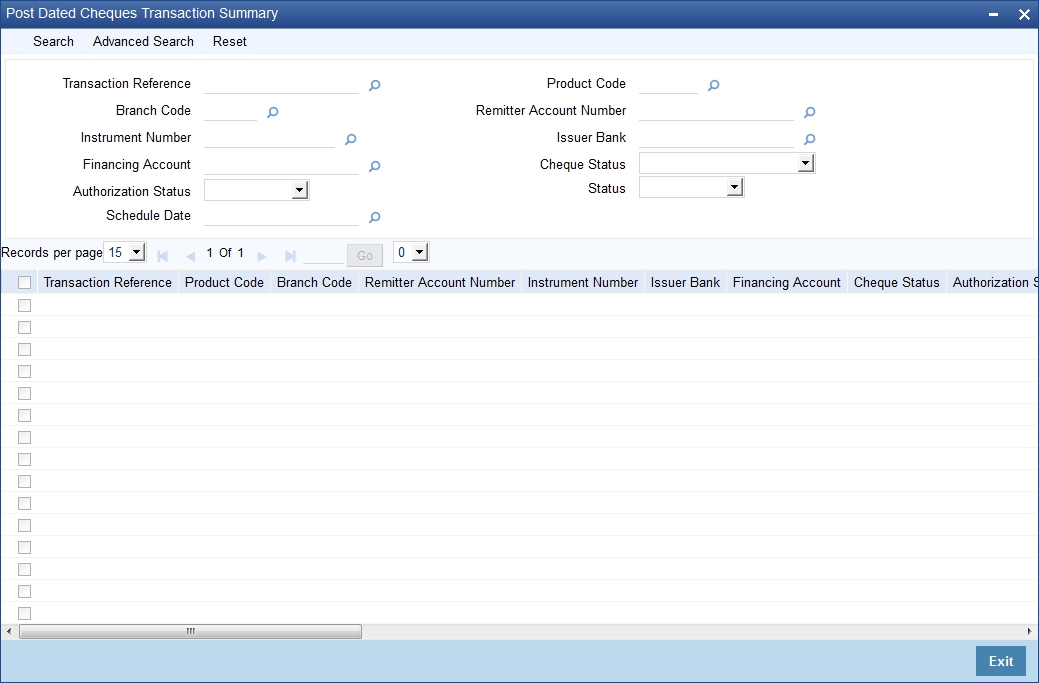
14.3.7 Viewing Summary of Post Dated Cheques Transaction
You can query, view and delete the transaction details of the post dated cheques in the ‘Post Dated Cheques Transaction Summary’ screen. You can invoke this screen by typing ‘PDSONLIN’ in the field at the top right corner of the Application tool bar and clicking the adjoining arrow button.
Here, you can query on post dated cheques based on any one or all of the following criteria:
- Transaction Reference Number
- Branch Code
- Instrument Number
- Loan Account Number
- Product Code
- Remitter Account Number
- Issuer Bank
- Cheque Status
- Schedule Due Date
Click ‘Search’ button. The system identifies all records satisfying the specified criteria and displays the following details for each one of them:
- Transaction Reference Number
- Event Sequence Number
- Source Code
- External Reference
- Product Code
- Branch Code
- Remitter Account Number
- Beneficiary Account Number
- Instrument Number
- Currency
- Amount
- Value Date
- Clearing Product
- Routing Number
- End Point
- Issuer Bank
- Issuer Branch
- Purpose
- Activation Date
- Location of Cheque
- Record Status
- Status
- Loan Account Number
- Remarks
14.3.8 Bulk Input of Post Dated Cheques
Oracle FLEXCUBE allows bulk inputs of PDCs with different due dates. You can invoke the ‘Post Dated Cheques Bulk Input’ screen by typing ‘PDDBLKIN’ in the field at the top right corner of the Application tool bar and clicking on the adjoining arrow button.
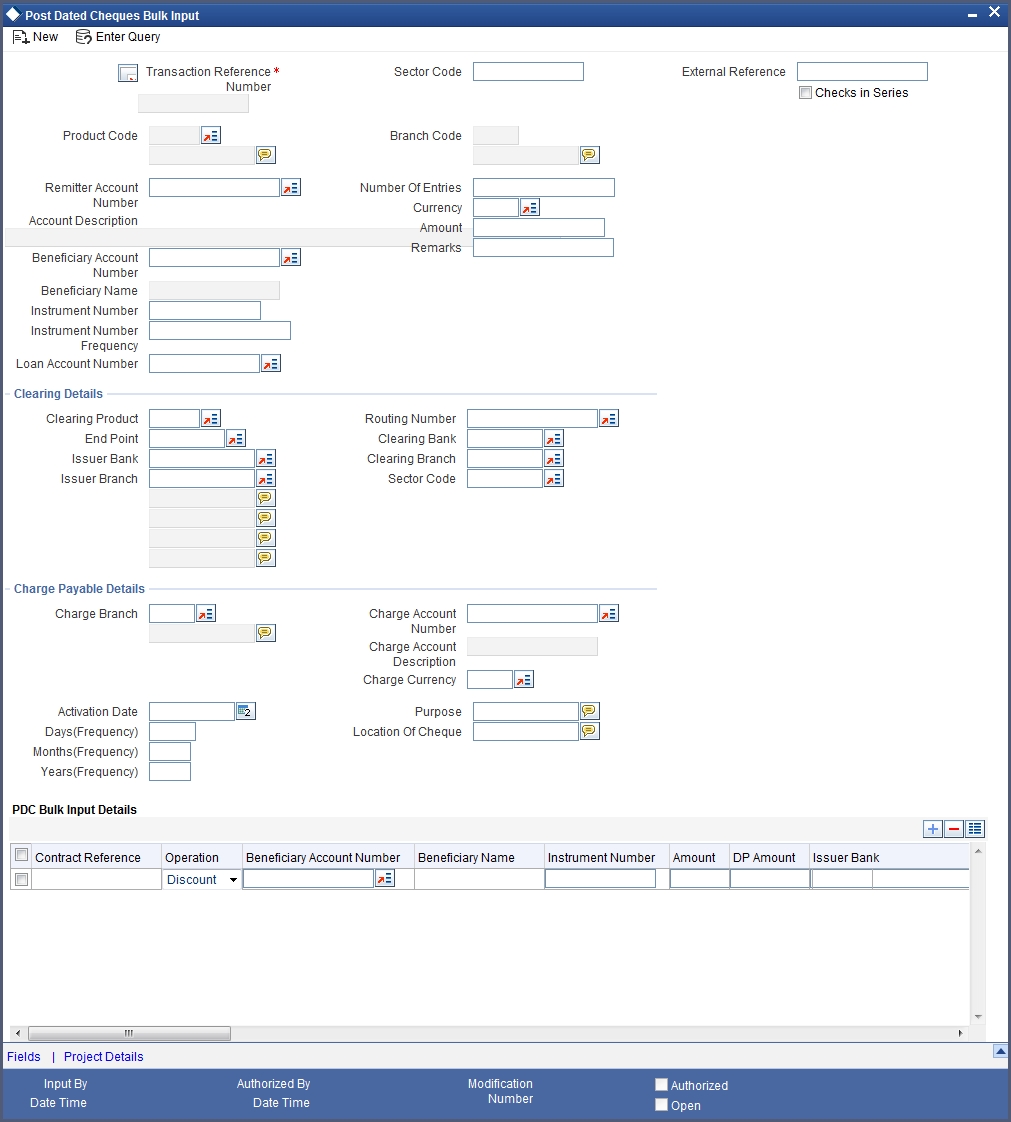
The fields in this screen are the same as those in the ‘Post Dated Cheques Transaction Input’ screen mentioned above. Additionally, you have to specify the number of instruments, the instrument number frequency and the activation date frequency, i.e., the frequency with which the PDCs fall due - in days, months and years.
Check in Series
Check this box to enable bulk input of post dated cheques. If this box is not checked, you have to enter the individual details of the cheque for the same clearing product and currency. If you check this box, you can specify project details in the ‘Project Details’ screen.
Note
Check in series is supported only when instrument number mask is maintained as numeric.
Refer the section ‘Specifying Project Details’ in this User Manual for details about the ‘Project Details’ screen.
To view the joint holder’s details of an account and the mode of operation maintained at the account level, place the cursor on the Remitter Account Number or Beneficiary Account Number field or Charge Account Number field and press Ctrl+J. The system displays the ‘Joint Holder’ screen.
For more information on the ‘Joint Holder’ screen refer to the section ‘Joint Holder Maintenance’ in this User Manual.
Bulk Input Details
You can input bulk number of cheques even if it is drawn on different accounts and different amounts here.
The following details are captured here:
Operation
Select the operation from the adjoining drop-down list. The available options are:
- Purchase- Select this option if the Activation date is current date and when selected, CPUR event will be fired.
- Discount - Select this option if the Activation date is future date and when selected, the event CDIS will be fired.
A validation will be done for the operations while saving the PDC transaction
Account Description
The system displays the description of the specified account number based on the details maintained at ‘Customer Account Maintenance’ level.
Branch Code
Specify the code for the branch that has issued the post dated cheques. Alternatively, you can select the branch code from the option list. The list displays all valid branch codes maintained in the system i.e both current branch code and other branch codes.
Beneficiary Account Number
Specify the Beneficiary account number in favour of which the PDC is drawn. Alternatively you can select the beneficiary account number from the option list. The list displays all valid beneficiary account number maintained in the system for the specified branch code .
Beneficiary Name
The system displays the name of the specified beneficiary based on the details maintained at ‘Customer Maintenance’ level.
Instrument Number
Specify the PDC number. If PDC type is External, this number should be unique for the given clearing branch and bank.
Amount
Specify the amount of the PDC.
Account Number
Specify the loan account number linked to the PDC. The adjoining option list displays all valid account numbers maintained in CL, MO and LE modules of Oracle FLEXCUBE. You can choose the appropriate one.
For this loan account, if the customer pays an advance instalment or makes an early settlement, the system will delete the outstanding cheques. A report of such cancelled cheques is generated on a daily basis.
Remarks
Specify the reason for cancellation of post dated cheque.
DP amount
Specify the discount amount. The full amount of the PDC will be the discount amount.
Issuer Bank
Specify the name of the bank of the issuer.
Issuer Branch
Select the branch that is issuing the post dated Cheques.
Activation Date
Specify the date of activation of PDC.
Purpose
Specify the purpose for which the PDC is issued. This is for information only.
Location of Cheque
Specify the location where the PDCs are held till activation. This is for reporting purposes only.
Charge Branch
Select the branch in which the charge payable account is maintained.
Charge Account Number
The account which is to be debited for the charge – this is necessary for passing accounting entries for the charge calculated for any of the events associated with a PDC.
Charge Account Description
The system displays the description of the specified charge account number based on the details maintained at ‘Customer Account Maintenance’ level.
Charge Currency
Specify the currency in which the charge should be calculated.
User Reference
Specify the user reference number. This is a mandatory field.
Cheque Value Date
Specify the value date on which the cheque is issued.
Project Name
Specify the developer project name for which payment is being made. The adjoining option list displays all valid projects maintained in the system. You can select the appropriate one. Input to this field is mandatory.
If you specify the Unit ID, the system will display the corresponding project name here.
Unit Payment
Indicate whether the transaction is a unit payment or not by choosing the appropriate value from the adjoining drop-down list. The following values are available:
- Yes
- No
Unit ID
Specify the unit ID of the project. This field will be enabled only if you have selected ‘Yes’ against ‘Unit Payment’. The adjoining option list displays all unit IDs along with the unit holder names corresponding to the project name chosen. You can select the appropriate one.
Schedule Date
Select the due date of the schedule from the adjoining option list. The list displays all the future dated unpaid schedule of the loan account for which the debit settlement mode of the component is PDC.
Deposit Slip Number
Specify the deposit slip number for the payment.
If you enter the fields, instrument number frequency, no of entries for a bulk input where the check in series flag is not selected, an error would be thrown on saving.
You will be able to upload bulk cheque transactions using file upload.
Once you have entered all the details and saved the contract, individual PDC contracts are created based on the activation date and instrument number frequency you have specified for the bulk input. The individual contracts become active when you authorize the bulk input, and can be viewed through the PDC contract online screen.
The actions allowed in this screen are Add and Delete. Delete is allowed only before authorization. Other actions are performed on individual PDCs through the PDC Online screen as explained above.
14.3.9 Project Details Button
Click the ‘Project Details’ button in the ‘Post Dated Cheques Bulk Input’ screen to invoke the ‘Project Details’ screen. You will have to capture project details in this screen only if the beneficiary account is a Trust account.
Specify the following details:
Project Name
Specify the developer project name for which payment is being made. The adjoining option list displays all valid projects maintained in the system. You can select the appropriate one. Input to this field is mandatory.
If you specify the Unit ID, the system will display the corresponding project name here.
Unit Payment
Indicate whether the transaction is a unit payment or not by choosing the appropriate value from the adjoining drop-down list. The following values are available:
- Yes
- No
Unit ID
Specify the unit ID of the project. This field will be enabled only if you have selected ‘Yes’ against ‘Unit Payment’. The adjoining option list displays all unit IDs along with the unit holder names corresponding to the project name chosen. You can select the appropriate one.
Deposit Slip Number
Specify the deposit slip number for the payment.
14.3.10 Viewing Post Dated Cheques Bulk Input Summary
You can query, view and delete the transaction details of the post dated cheques bulk inputs in the ‘Post Dated Cheques Bulk Input Summary’ screen. You can invoke this screen by typing ‘PDSBULKI’ in the field at the top right corner of the Application tool bar and clicking the adjoining arrow button.
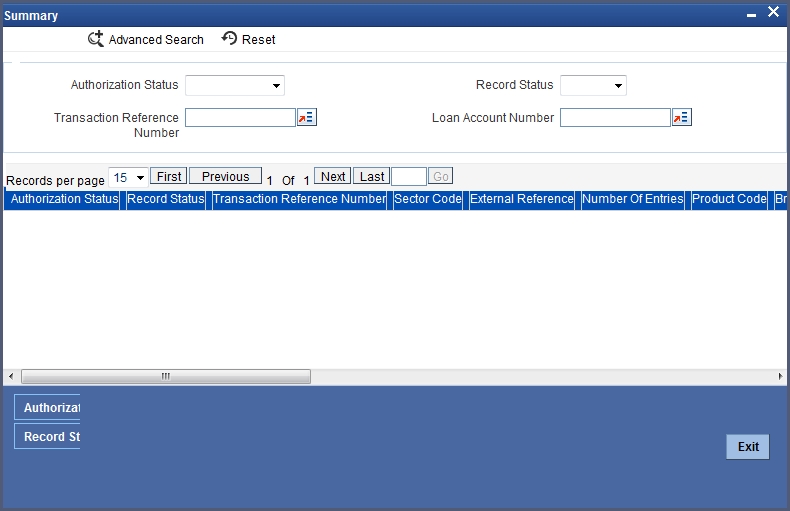
Here, you can query on post dated cheques transaction details based on any one or all of the following criteria:
- Authorization Status
- Transaction Reference Number
- Record Status
- Loan Account Number
Click ‘Search’ button. The system identifies all records satisfying the specified criteria and displays the following details for each one of them.
- Authorization Status
- Record Status
- Transaction Reference Number
- Sector Code
- External Reference
- Number of Entries
- Product Code
- Branch Code
- Remitter Account Number
- Beneficiary Account Number
- Instrument Number
- Currency
- Issuer Bank
- Issuer Branch
- Charge Branch
- Charge Account Number
- Charge Currency
- Account Number
- Remarks
- Processing of PDCs that you have entered
Oracle FLEXCUBE initiates unprocessed PDCs as per product definition on authorization. The status for the PDCs is set to ‘Active’ and contingent entries are passed.
14.4 Other Operations on PDCs
This section contains the following topics:
- Section 14.4.1, "Cancellation and Reversal of PDCs"
- Section 14.4.2, "Liquidation of PDCs"
- Section 14.4.3, "Return of Post Dated Cheque"
- Section 14.4.4, "Re-Presentation of Post Dated Cheque"
14.4.1 Cancellation and Reversal of PDCs
An active PDC can be cancelled before liquidation. You can cancel a post dated cheque using ‘Post Dated Cheques Reject’ screen. Invoke ‘Post Dated Cheque Reject Summary’ screen by typing ‘PDSONREJ’ in the field at the top right corner of the Application toolbar and clicking the adjoining arrow button.
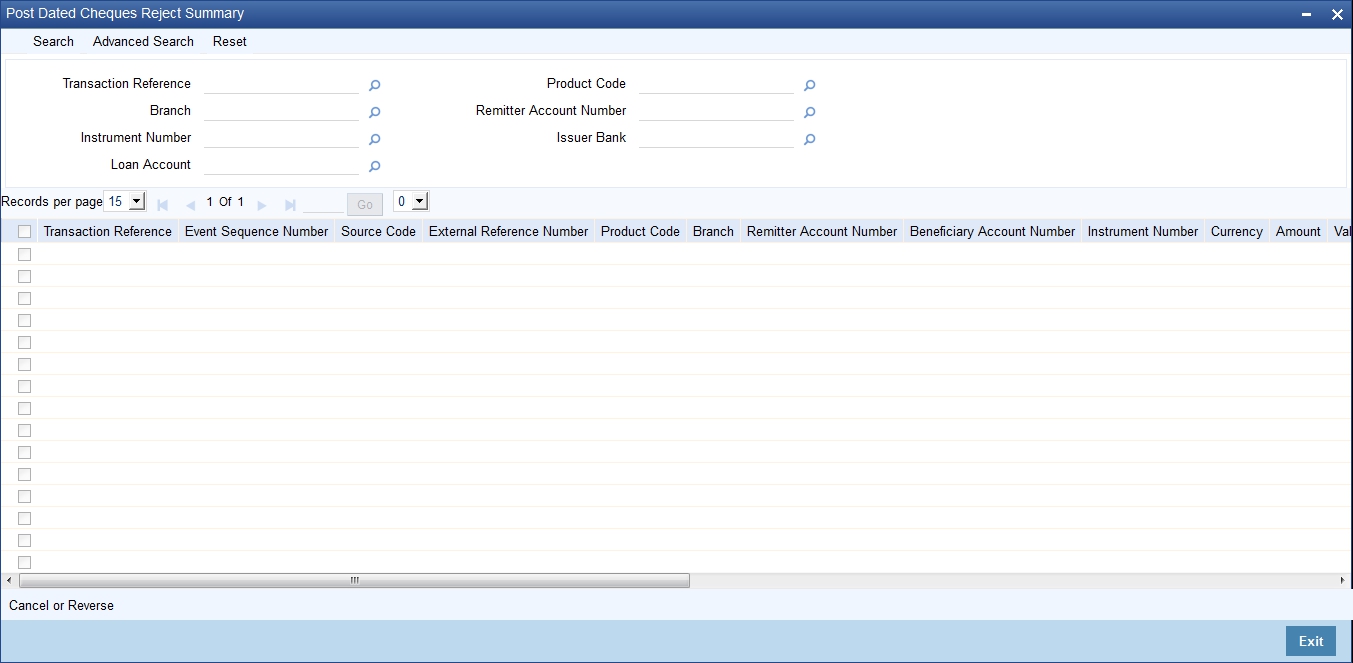
You can set the required parameters and search the records. Select the record that you wish to reverse or cancel. Further, click ‘Cancel or Reverse’ button.
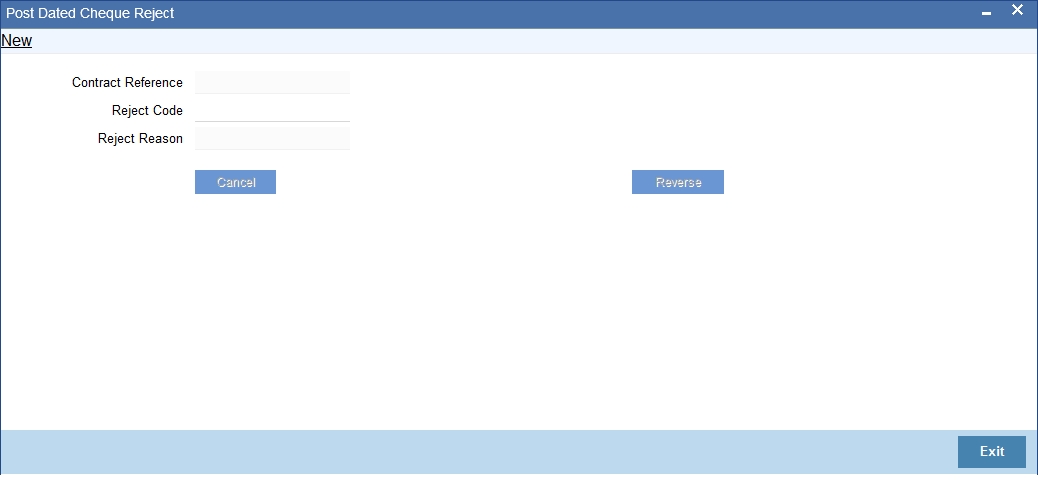
You can specify the following details:
Contract Reference
The system displays the reference number of the post dated cheque transaction.
Reject Code
Specify the code that identifies the reason for cheque rejection/ cancellation. The option list displays all valid reject codes maintained in the system. Choose the appropriate one.
Reject Reason
Based on the reject code selected, the system displays the reason for rejection/ cancellation.
To cancel the cheque, click ‘Cancel’ button. To reverse the cheque, click ‘Reverse’ button.
On cancellation, the accounting entries you defined for the CANL event are passed.
After the PDC has been liquidated, you also have the option to reverse it, by selecting ‘Reverse’ from the Actions menu in the Application toolbar or clicking reverse icon. All accounting entries passed for the PDC will be reversed.
Oracle FLEXCUBE cancels the outstanding PDCs that are linked to loan after the prepayment of the loan. If you want to cancel the PDC after the partial prepayment, you will have to cancel manually through the ‘Post Dated Cheque Transaction Input’ screen. If you want to reverse the prepayment and authorization, you will have to manually link the cancelled loan payment through ‘Post Dated Cheque Transaction Input’ screen.
Note
The system will generate advices when the PDC is cancelled. This advice contains the message type ‘PD_PDC_CAN’ with ‘PD’ module.
14.4.1.1 Bulk Cancellation of PDCs
The system can cancel all the post dated cheques of the loan account whose Schedule due date is greater than the Schedule date entered in the screen and which are yet to be sent for collection. You can cancel the PDCs using the ‘Loan Account PDC – Bulk Cancellation’ screen. You can invoke this screen by typing ‘PDDBULKC’ in the field at the top right corner of the Application tool bar and clicking the adjoining arrow button.
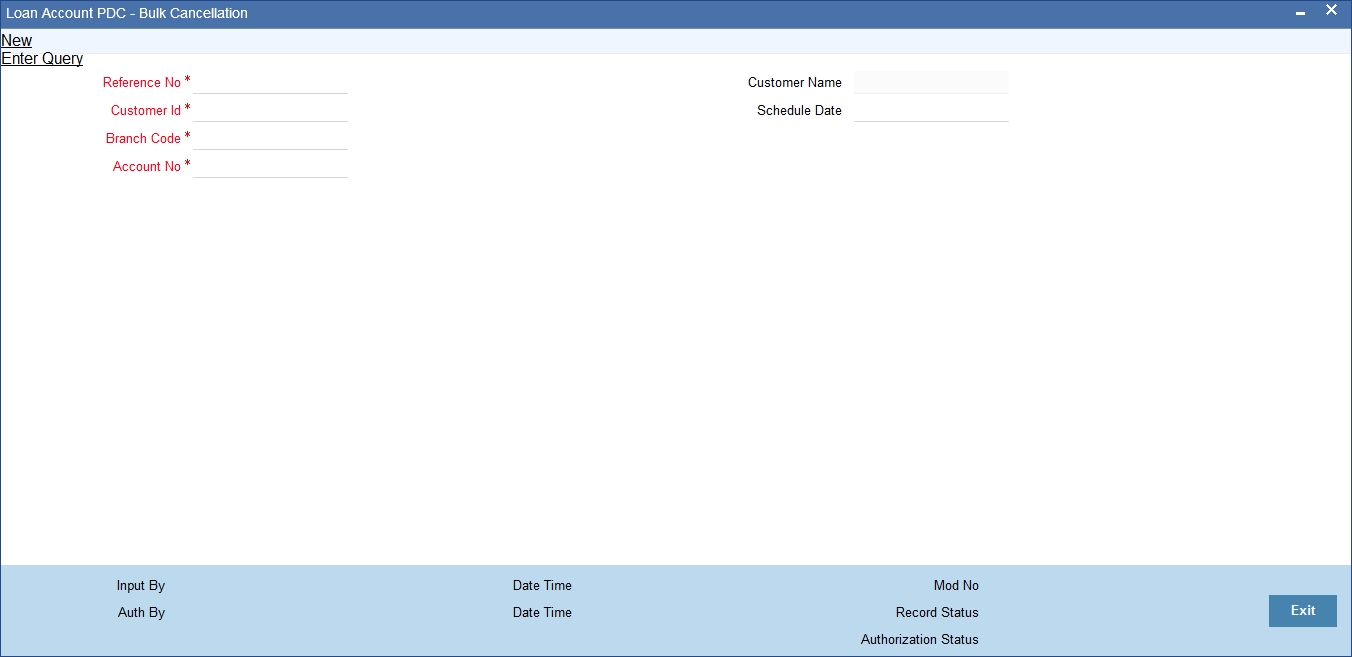
Specify the following details:
Reference No
The system displays the Reference Number of the transaction.
Customer Id
Select the Customer Id from the adjoining option list.
Customer Name
The system displays the Customer Name of the selected customer id.
Schedule Date
Specify the Schedule date.
Account No
Select the Account Number from the adjoining option list.
To view the joint holder’s details of an account and the mode of operation maintained at the account level, place the cursor on the Account No field and press Ctrl+J. The system displays the ‘Joint Holder’ screen.
For more information on the ‘Joint Holder’ screen refer to the section ‘Joint Holder Maintenance’ in this User Manual.
14.4.2 Liquidation of PDCs
PDCs that have reached or are past their activation date are liquidated as part of beginning-of-day batch process in Oracle FLEXCUBE. For PDCs with ‘Active’ status, the system performs the following actions on liquidation:
- Reverse contingent entries if any were passed
- Update status to Liquidated
- Log the instrument with Clearing, if necessary
- Call Accounts Rates Charge (ARC) upload to create a Cheque deposit transaction as per the ARC product set up for the PDC.
- Failed transactions are logged as exceptions
An active PDC can also be manually liquidated, on or after its activation date. To manually liquidate a PDC, select ‘Liquidate’ in the Application toolbar or click liquidate icon.
14.4.2.1 Manual Realization of PDCs
There are two possible ways of PDC realization based on the product setup:
- Auto Realization
- Manual Realization – For early/late realization
You can invoke the ‘Post Dated Cheques Manual Realization’ screen by typing ‘PDDMNLIQ’ in the field at the top right corner of the Application tool bar and clicking on the adjoining arrow button. PDC Manual Realization is query screen where you can enter the ‘Reference number’ of the clearing transaction.
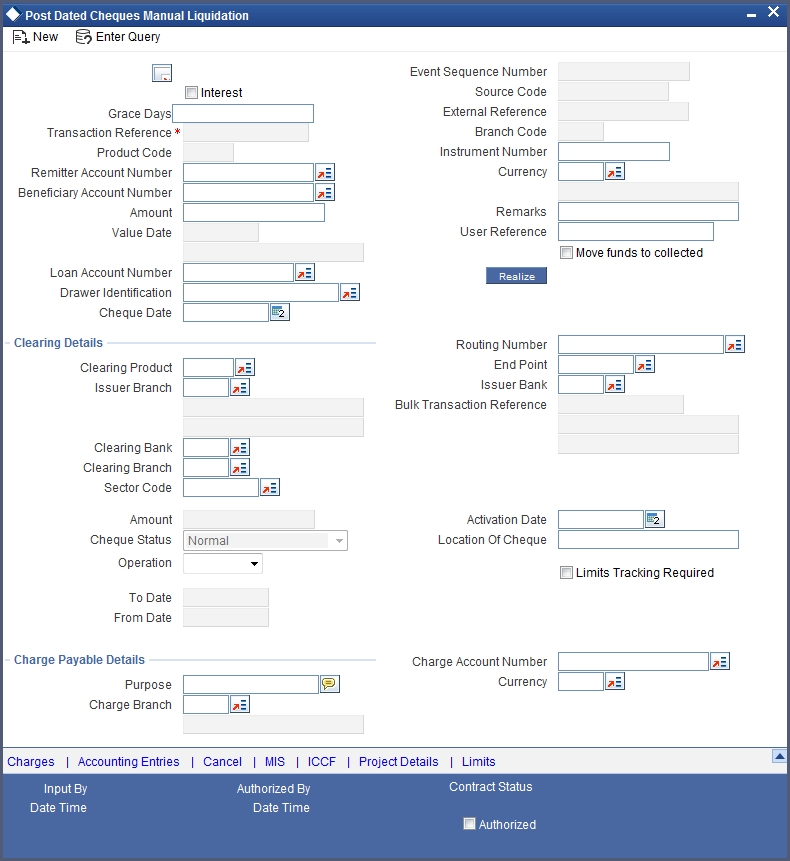
You can initiate the movement of funds to collect manually and can enter the ‘Reference number’ of the clearing transaction.
Transaction Reference Number
Specify the Transaction Reference Number of the post dated cheque.
Product Code
From the option list of product codes that you have created in the Product Definition screen, specify the PDC product code that has to be used for the Cheque.
Remitter Account Number
This is the account which has to be debited for clearing the Cheque. Depending on the PDC type, you can select the following values for the remitter account:
- If the PDC type is ‘Own A/c PDC’, the remitter account should be a valid customer account
- If the PDC type is ‘PDC issued by the bank’, the remitter account can either be a GL or Nostro account
- If the PDC type is ‘External PDC’, the remitter account should be a valid GL
To view the joint holder’s details of an account and the mode of operation maintained at the account level, place the cursor on the Remitter Account Number field and press Ctrl+J. The system displays the ‘Joint Holder’ screen.
For more information on the ‘Joint Holder’ screen refer to the section ‘Joint Holder Maintenance’ in this User Manual.
Beneficiary Account Number
This is the number of the account, in favor of which the PDC is drawn. If the customer draws a PDC on his account for depositing into another account held in your bank, then you can enter the beneficiary account number here. The beneficiary account can either be a valid customer account or a valid GL.
To view the joint holder’s details of an account and the mode of operation maintained at the account level, place the cursor on the Beneficiary Account Number field and press Ctrl+J. The system displays the ‘Joint Holder’ screen.
For more information on the ‘Joint Holder’ screen refer to the section ‘Joint Holder Maintenance’ in this User Manual.
Amount and Currency
From the option list, select the currency in which the PDC is denominated. Also specify the amount of the PDC.
Value Date
Specify the date on which the PDC was deposited.
Loan Account Number
Specify the unique loan account number. Alternatively, you can select the loan account number from the option list. The list displays all valid loan account number for the current branch.
Drawer Identification
Specify a drawer Id here.
Cheque Date
Specify the date on which the cheque is issued.
User Reference
Specify the user reference number. This is a mandatory field.
Remarks
Specify the explanation for the cancellation of post dated cheque.
Event Sequence Number
Specify the event sequence number for processing a post dated cheque.
Source Code
Specify the source code for processing a post dated cheque.
Branch Code
Specify the code for the branch that has issued the post dated cheques. Alternatively, you can select the branch code from the option list. The list displays all valid branch codes maintained in the system i.e both current branch code and other branch codes
External Reference Number
Specify the external reference number while processing a post dated cheque.
Instrument Number
This is the PDC number. If PDC type is External, this number should be unique for the given clearing branch & bank.
Clearing Details
In the fields provided, enter / select the:
Clearing product
Select the product that is ready for clearing.
Issuer Branch
Select the branch that is issuing the post dated Cheques.
Clearing Bank
Select the bank that is clearing the post dated Cheques issued.
Clearing Branch
Select the branch that is clearing the post dated Cheques issued.
Sector Code
Select the code of the sector that is processing the post dated Cheques,
Issuer Bank
Select the bank that is issuing the post dated Cheques.
Bulk Transaction Reference Number
Specify the bulk transaction number that is used in transactions.
For detailed field explanation on End Point & Routing Number, refer to the Clearing User Manual.
The clearing details are needed only for External type PDCs.
Charge Payable Details
You need to enter the following details for the processing of charges for the PDC:
Charge Branch
Select the branch in which the charge payable account is maintained.
Status
Indicate the current status of the PDC by selecting from the following values:
- U - Unprocessed
- A - Active (Initiated)
- V - Reversed
- L - Liquidated
- C - Cancelled
Charge Account Number
The account which is to be debited for the charge – this is necessary for passing accounting entries for the charge calculated for any of the events associated with a PDC.
To view the joint holder’s details of an account and the mode of operation maintained at the account level, place the cursor on the Charge Account Number field and press Ctrl+J. The system displays the ‘Joint Holder’ screen.
For more information on the ‘Joint Holder’ screen refer to the section ‘Joint Holder Maintenance’ in this User Manual.
Purpose
You have the option of specifying the purpose for which the PDC is issued. This is for information only.
Currency
Specify the currency in which the charge should be calculated.
Move funds to be collected
Check this box to trigger the realization of funds to customer account manually.
Check this box only when the funds are not in collected stage and when the cheque status is not rejected. Checking this field in any other scenarios, will throw an error while saving.
Drawer ID
Specify the drawer Id. This adjoining option list displays all valid drawer Ids maintained in the system. You can choose the appropriate one.
Also if you enter the fields, instrument number frequency, no of entries for a bulk input where the check in series box is not selected, an error will be thrown while saving.
The following operations are also allowed for this screen after the query operation.
- Unlock
- Save
- Authorization
- Unlock: Changing details of an unprocessed PDC. You can only modify an unauthorized and unprocessed PDC. If, during modification, you change the amount, activation date, currency, remitter account number or charge payable details, then the contingent entries passed during initiation gets deleted and new entries are passed based on the modification done.
14.4.2.2 Project Details Button
Click the ‘Project Details’ button in the ‘Post Dated Cheques Manual Liquidation’ screen to invoke the ‘Project Details’ screen. You will have to capture project details in this screen only if the beneficiary account is a Trust account.
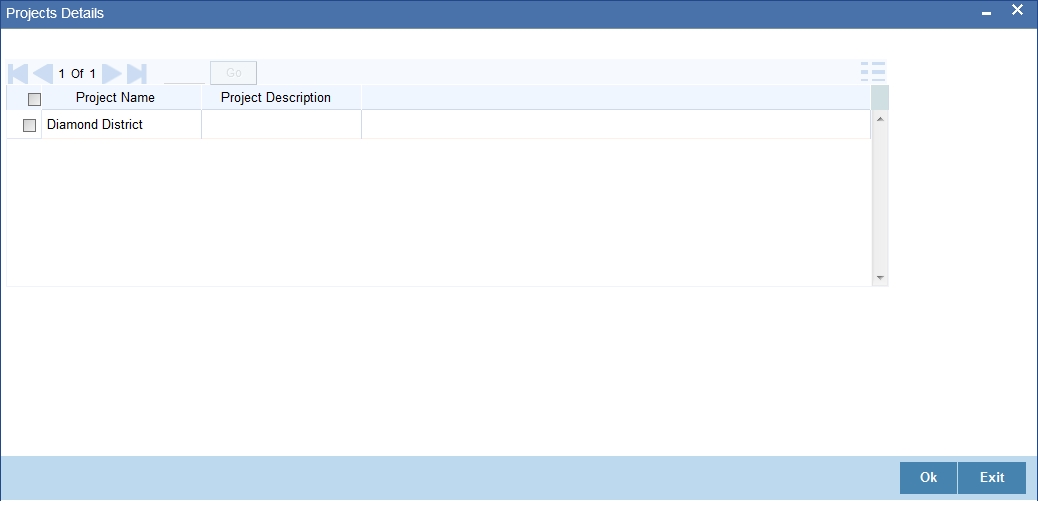
Specify the following details:
Project Name
Specify the developer project name for which payment is being made. The adjoining option list displays all valid projects maintained in the system. You can select the appropriate one. Input to this field is mandatory.
If you specify the Unit ID, the system will display the corresponding project name here.
Unit Payment
Indicate whether the transaction is a unit payment or not by choosing the appropriate value from the adjoining drop-down list. The following values are available:
- Yes
- No
Unit ID
Specify the unit ID of the project. This field will be enabled only if you have selected ‘Yes’ against ‘Unit Payment’. The adjoining option list displays all unit IDs along with the unit holder names corresponding to the project name chosen. You can select the appropriate one.
Deposit Slip Number
Specify the deposit slip number for the payment.
14.4.2.3 Limits Button
Click the ‘Limits’ button in the ‘Post Dated Cheques Manual Liquidation’ screen to invoke the ‘Linkage Details’ screen. You can capture multiple credit lines in this screen.
Specify the following details:
Customer Number
Specify the customer number. The adjoining option list displays all the valid customer names maintained in the screen. You can choose the appropriate one.
Linkage Type
Specify the linkage type from the adjoining drop-down list. The list displays the following values:
- Facility (credit line)
- Pool
- Collateral
Linked Reference
Specify the linkage reference number based on the type of linkage. You can specify the following:
- If you have selected linkage type as ‘Facility’ then you have to enter facility code in the Linkage reference number.
- If you have selected linkage type as ‘Pool’ then you has to enter collateral pool code in the Linkage reference number field.
- If you have selected linkage type as ‘Collateral’ then you have to enter collateral code in the Linkage reference number field.
Linkage Percentage
Specify the percentage of contribution that needs to be tracked for each Credit Line or Collateral Pool.
Note
The total sum of ‘Percentage of Contribution’ should be equal to 100%, excluding the line for joint venture customers. If the total sum is not equal to 100%, then the system will raise an error message as “Sum total of Limits Percentage should be 100”.
Linkage Amount
The system displays the amount contributed for the credit line.
14.4.3 Return of Post Dated Cheque
When a financed PDC cheque is returned from clearing, the system will trigger ‘RETN’ event at PDC. When Create loan field in the ‘Post Dated Cheques Product Preference’ screen is not checked, then when a cheque is returned from the clearing, the system will process the debit from the past due account maintained in the ‘Customer cheque Discounting Maintenance Screen’. During return if limits are maintained then utilization will be updated.
When Create loan field is checked, and when a financed PDC cheque is returned from clearing then the cheque status will be updated as ‘Returned’ and system will create loan.
Following validations will be performed if Create loan field is checked:
- If Verify balance option is selected and Loan amount option is selected as Instrument amount, then the system will verify the available balance of the customer to the extent of instrument amount. And if the available balance is sufficient, the system will not create loan and debits the customer account to recover the instrument amount. If the available balance is not sufficient, then the system will debit the customer account to the extent of available balance and will create loan for the remaining Instrument amount.
- If verify balance option is selected and Loan amount is selected as total outstanding amount, then the system will verify the available balance of the customer to the extent of total outstanding amount. And if the available balance is sufficient, the system will not create loan and debits the customer account to recover the total outstanding amount. If the available balance is not sufficient, then the system will debit the customer account to the extent of available balance and will create loan for the remaining Total outstanding amount.
- If without verify option is selected and Loan amount option is selected as Instrument amount, then the system will create loan for instrument amount without verifying the available balance.
- If without verify option is selected and Loan amount option is selected as Total outstanding amount, then the system will create loan for Total outstanding amount without verifying the available balance.
During Loan creation:
- The system will pass ‘PDE Account’ as debit settlement account to the loan module. This will be used as settlement account during loan repayment.
- The system will pass ‘BRIDGE GL’ as credit settlement account to the loan module. This will be used as credit account during loan disbursement.
14.4.4 Re-Presentation of Post Dated Cheque
User can re-present a post dated cheque that is returned or bounced. The system supports re-presentation of cheques when returned.
14.5 Events and Accounting Roles
This section contains the following topics:
- Section 14.5.1, "Events"
- Section 14.5.2, "Amount Tags"
- Section 14.5.3, "Accounting Roles"
- Section 14.5.4, "Event-wise Accounting Entries"
- Section 14.5.5, "Discounted cheque, Advance Charge collection, with Accrual"
- Section 14.5.5, "Discounted cheque, Advance Charge collection, with Accrual"
- Section 14.5.6, "Discounted, Advance charge collection, without Accrual"
- Section 14.5.7, "Discounted, Arrear charge collection, with Accrual"
- Section 14.5.8, "Discounted, Arrear charge collection, without Accrual"
- Section 14.5.9, "Purchase"
This section has event-wise accounting entries for PDC module of Oracle FLEXCUBE.
14.5.1 Events
The following is an exhaustive list of events that can take place during the lifecycle of a PDC. In the subsequent paragraphs we shall examine the accounting entries for the various events listed below:
Module |
Event Code |
Event Description |
PD |
ACCR |
Accrual of PDC |
PD |
CANL |
Cancellation of PDC |
PD |
CDIS |
Discounting of PDC. |
PD |
CPUR |
Purchase of PDC |
PD |
INIT |
Initiation of PDC |
PD |
LIQN |
Liquidation of PDC |
PD |
PULL |
Pull back of PDC |
PD |
RADJ |
Relalization of PDC |
PD |
RETN |
Returning of PDC |
14.5.2 Amount Tags
Representative set of amount tags are listed below:
Module |
Amount Tags |
Description |
PD |
PD_TAG |
Instrument Amount |
PD |
PD_LIQN |
PDC Liquidation |
PD |
PD_CAN |
PDC Cancellation Amount Tag for Charges |
PD |
PD_CHG_TAG |
PDC Amount Tag for Charges |
PD |
PD_LOAN_TAG |
Loan Amount |
PD |
PD_RETN_TAG |
PDC Return Amount |
PD |
PCNEWCL_DISC |
PDC New Chrg |
PD |
PCNEWCL_LIQD |
PDC New Chrg |
PD |
PCNEWCL_PREM |
PDC New Chrg |
PD |
PCOLDCL |
PDC LIQD CHARGE |
PD |
PDCHG1 |
Exec Fees |
PD |
PDCHRG_DISC |
PDC charge |
PD |
PDCHRG_LIQD |
PDC charge |
PD |
PDCHRG_PREM |
PDC charge |
PD |
PDCH_DISC |
PDCH amt |
PD |
PDCH_LIQD |
PDCH amt |
PD |
PDCH_PREM |
PDCH amt |
PD |
DISCINT_ACCR |
|
PD |
DISCINT_ADJ |
|
PD |
DISCINT_LIQD |
|
PD |
DISCINT_REF |
|
14.5.3 Accounting Roles
Representative set of accounting roles are listed below:
Accounting Role |
Description |
BRIDGE_GL |
Bridge GL between PDC and Loan |
CHECK DISCOUNTING |
Check discounting Asset |
CLG BRIDGE GL |
Clearing Bridge Suspense GL |
PAST DUE ACCOUNT |
Past Due Account |
PDC_BEN |
Beneficiary |
PDC_CANCELCHG |
PDC Charges for Cancellation - Bank Income |
PDC_CANLCHGCUST |
PDC Charges for Cancellation - Customer Expense |
PDC_CHARGE |
Charge Income GL |
PDC_CHG_CUST |
Charge Account |
PDC_ISSUE |
Contingent Liability |
PDC_ISSUE_CONTR |
Contingent Asset |
PDC_RECEV |
Contingent Asset |
PDC_RECEV_CONTR |
Contingent Liability |
PDC_REM |
Remitter |
14.5.4 Event-wise Accounting Entries
Accounting entries for various events are mentioned in the below table:
Event Code: INIT
ACCOUNT_ROLE_CODE |
AMT_TAG |
Dr/Cr Indicator |
PDC_CHARGE |
PD_TAG |
C |
PDC_CHG_CUST |
PD_TAG |
D |
PDC_ISSUE |
PD_TAG |
D |
PDC_ISSUE_CONTR |
PD_TAG |
C |
PDC_RECEV |
PD_TAG |
D |
PDC_RECEV_CONTR |
PD_TAG |
C |
Event Code: CDIS
ACCOUNT_ROLE_CODE |
AMT_TAG |
Dr/Cr Indicator |
PDC_CHARGE |
PDCHG1 |
C |
PDC_CHG_CUST |
PDCHG1 |
D |
CHECK DISCOUNTING |
PD_TAG |
D |
PDC_BEN |
PD_TAG |
C |
PDC_BEN |
<Component>_LIQD |
D |
<Component>RIA |
<Component>_LIQD |
C |
Event Code: CPUR
ACCOUNT_ROLE_CODE |
AMT_TAG |
Dr/Cr Indicator |
PDC_BEN |
PD_TAG |
C |
CHECK DISCOUNTING |
PD_TAG |
D |
PDC_CHARGE |
PDCHG1 |
C |
PDC_CHG_CUST |
PDCHG1 |
D |
Event Code: ACCR
ACCOUNT_ROLE_CODE |
AMT_TAG |
Dr/Cr Indicator |
<Component>REC |
<Component>_ACCR |
D |
<Component>INC |
<Component>_ACCR |
C |
<Component>INC |
<Component>_ACCR |
C |
<Component>RIA |
<Component>_ACCR |
D |
Event Code: CANL
ACCOUNT_ROLE_CODE |
AMT_TAG |
Dr/Cr Indicator |
CHECK DISCOUNTING |
PD_TAG |
C |
PDC_BEN |
PD_TAG |
D |
PDC_BEN |
PD_TAG |
C |
<Component>RIA |
PD_TAG |
D |
PDC_ISSUE |
PD_TAG |
C |
PDC_ISSUE_CONTR |
PD_TAG |
D |
Event Code: LIQN
ACCOUNT_ROLE_CODE |
AMT_TAG |
Dr/Cr Indicator |
PDC_RECEV |
PD_TAG |
C |
PDC_RECEV_CONTR |
PD_TAG |
D |
PDC_BEN |
PDCH_LIQD |
C |
PDC_REM |
PDCH_LIQD |
D |
PDC_ISSUE |
PD_TAG |
C |
PDC_ISSUE_CONTR |
PD_TAG |
D |
CLG_BRIDGE_GL |
PD_TAG |
D |
CHECK DISCOUNTING |
PD_TAG |
C |
Event Code: PULL
ACCOUNT_ROLE_CODE |
AMT_TAG |
Dr/Cr Indicator |
PD_PULLINC |
PD_CHG_TAG |
C |
PDC_BEN |
PD_CHG_TAG |
D |
CHECK DISCOUNTING |
PD_TAG |
C |
PDC_BEN |
PD_TAG |
D |
PDC_ISSUE |
PD_TAG |
C |
PDC_ISSUE_CONTR |
PD_TAG |
D |
<Component>INC |
<Component>_LIQD |
C |
<Component>RIA |
<Component>_LIQD |
D |
PDC_BEN |
<Component>_REF |
C |
<Component>RIA |
<Component>_REF |
D |
PAST DUE ACCOUNT |
PD_TAG |
C |
PDC_BEN |
PD_TAG |
D |
Event Code: RADJ
ACCOUNT_ROLE_CODE |
AMT_TAG |
Dr/Cr Indicator |
PDC_BEN |
<Component>_LIQD |
D |
<Component>RIA |
<Component>_LIQD |
C |
<Component>INC |
<Component>_LIQD |
C |
<Component>RIA |
<Component>_LIQD |
D |
Event Code: RETN
ACCOUNT_ROLE_CODE |
AMT_TAG |
Dr/Cr |
PDC_CHARGE |
PD_CHG_TAG |
C |
PDC_CHG_CUST |
PD_CHG_TAG |
D |
BRIDGE_GL |
PD_LOAN_TAG |
D |
CLG BRIDGE GL |
PD_LOAN_TAG |
C |
PAST DUE ACCOUNT |
PD_RETN_TAG |
D |
CLG BRIDGE GL |
PD_RETN_TAG |
C |
PAST DUE ACCOUNT |
<Component>_LIQD |
D |
<Component>INC |
<Component>_LIQD |
C |
14.5.5 Discounted cheque, Advance Charge collection, with Accrual
Event: CDIS
ACCOUNT_ROLE_CODE |
AMT_TAG |
Dr/Cr |
Check discounted |
PD_TAG |
Dr |
Customer |
PD_TAG |
Cr |
Customer |
<Interest comp>_LIQD |
Dr |
RIA |
<Interest comp>_LIQD |
Cr |
Event: PULL
ROLE |
AMT_TAG |
Dr/Cr |
CHECK DISCOUNTING |
PD_TAG |
Cr |
Customer |
PD_TAG |
Dr |
Income |
<Interest comp> _LIQD |
Cr |
Customer |
<Interest comp> _LIQD |
Cr |
PDC_ISSUE |
PD_TAG |
Cr |
PDC_ISSUE_CONTR |
PD_TAG |
Dr |
Customer |
PD_CHG_TAG |
Dr |
PD_PULLINC |
PD_CHG_TAG |
Cr |
Event: RETN
ROLE |
AMT_TAG |
Dr/Cr |
Customer |
PD_TAG |
Dr |
Cheque discounted |
PD_TAG |
Cr |
RIA |
<interest comp>_Adj |
Dr |
Income |
<interest comp>_Adj |
Cr |
Event: ACCR
ROLE |
AMT_TAG |
Dr/Cr |
RIA |
<Interest comp> _ACCR |
Dr |
Income |
<Interest comp> _ACCR |
Cr |
14.5.6 Discounted, Advance charge collection, without Accrual
Event: CDIS
ROLE |
AMT_TAG |
Dr/Cr |
Check discounted |
PD_TAG |
Dr |
Customer |
PD_TAG |
Cr |
Customer |
<Interest comp>_LIQD |
Dr |
RIA |
<Interest comp>_LIQD |
Cr |
Event: PULL
ROLE |
AMT_TAG |
Dr/Cr |
Cheque discounted |
PD_TAG |
Cr |
Customer |
PD_TAG |
Dr |
RIA |
<interest comp>_Ref |
Dr |
Customer |
<interest comp>_Ref |
Cr |
Customer |
PD_CHG_TAG |
Dr |
RIA |
<interest comp>_LIQD |
Dr |
PD_PULLINC |
PD_CHG_TAG |
Cr |
PDC_ISSUE |
PD_TAG |
Cr |
PDC_ISSUE_CONTR |
PD_TAG |
Dr |
Income |
<interest comp>_LIQD |
Cr |
RIA |
<interest comp>_LIQD |
Dr |
Event: RETN
ROLE |
AMT_TAG |
Dr/Cr |
Customer |
PD_TAG |
Dr |
Cheque discounted |
PD_TAG |
Cr |
RIA |
<interest comp>_LIQD |
Dr |
Income |
<interest comp>_LIQD |
Cr |
Event: RADJ
ROLE |
AMT_TAG |
Dr/Cr |
RIA |
<Interest comp> _LIQD |
Dr |
Income |
<Interest comp> _LIQD |
Cr |
14.5.7 Discounted, Arrear charge collection, with Accrual
Event: CDIS
ROLE |
AMT_TAG |
Dr/Cr |
Cheque discounted |
PD_TAG |
Dr |
Customer |
PD_TAG |
Cr |
Event: PULL
ROLE |
AMT_TAG |
Dr/Cr |
Cheque Discounting |
PD_TAG |
CR |
Customer |
PD_TAG |
DR |
Income |
<Interest comp> _LIQD |
CR |
Customer |
<Interest comp> _LIQD |
CR |
PDC_ISSUE |
PD_TAG |
CR |
PDC_ISSUE_CONTR |
PD_TAG |
DR |
Customer |
PD_CHG_TAG |
DR |
PD_PULLINC |
PD_CHG_TAG |
CR |
Event: RETN
ROLE |
AMT_TAG |
Dr/Cr |
Customer |
PD_TAG |
Dr |
Cheque discounted |
PD_TAG |
Cr |
Customer |
<Interest comp> _LIQD |
Dr |
Interest Receivable |
<Interest comp> _LIQD |
Cr |
Event: ACCR
ROLE |
AMT_TAG |
Dr/Cr |
Income |
<Interest comp> _ACCR |
Dr |
Interest Receivable |
<Interest comp> _ACCR |
Dr |
Event: RADJ
ROLE |
AMT_TAG |
Dr/Cr |
Customer |
<Interest comp> _LIQD |
Dr |
Interest Receivable |
<Interest comp> _LIQD |
Cr |
14.5.8 Discounted, Arrear charge collection, without Accrual
Event: CDIS
ROLE |
AMT_TAG |
Dr/Cr |
Cheque Discounted |
PD_TAG |
Dr |
Customer |
PD_TAG |
Cr |
Event: PULL
ROLE |
AMT_TAG |
Dr/Cr |
Cheque Discounting |
PD_TAG |
Cr |
Customer |
PD_TAG |
Dr |
Income |
<Interest comp> _LIQD |
CR |
Customer |
<Interest comp> _LIQD |
CR |
PDC_ISSUE |
PD_TAG |
CR |
PDC_ISSUE_CONTR |
PD_TAG |
DR |
Customer |
PD_CHG_TAG |
DR |
PD_PULLINC |
PD_CHG_TAG |
CR |
Event: RETN
ROLE |
AMT_TAG |
Dr/Cr |
Customer |
PD_TAG |
Dr |
Cheque discounted |
PD_TAG |
Cr |
Customer |
<Interest comp> _LIQD |
Dr |
Income |
<Interest comp> _LIQD |
Cr |
Event: RADJ
ROLE |
AMT_TAG |
Dr/Cr |
Customer |
<Interest comp> _LIQD |
Dr |
Income |
<Interest comp> _LIQD |
Cr |
14.5.9 Purchase
Event: CPUR
ROLE |
AMT_TAG |
Dr/Cr |
Cheque Discounted |
PD_TAG |
Dr |
Customer |
PD_TAG |
Cr |
Event: RETN
ROLE |
AMT_TAG |
Dr/Cr |
Customer |
PD_TAG |
Dr |
Cheque discounted |
PD_TAG |
Cr |
Event: RADJ
ROLE |
AMT_TAG |
Dr/Cr |
Customer |
<Charge comp> _LIQD |
Dr |
<Charge_comp>_REC |
<Charge comp> _LIQD |
Cr |