9. Processing Incoming Messages
To recall, in the ‘MCS Maintenance’ screen, you have indicated the Media Control Systems that are connected to the node in which the database of your branch is installed. You have also specified the media that the MCS should handle. Besides, you have specified a hand-off directory into which all incoming messages transmitted through a specific media should be stored.
The final destination of an incoming message is the end user queue. These queues represent departments responsible for acting on the received messages.
This chapter contains the following sections:
9.1 Incoming Messages
This section contains the following topics:
- Section 9.1.1, "Background Processing of Incoming Messages"
- Section 9.1.2, "Manual Processing of Incoming Messages"
- Section 9.1.3, "Invoking Incoming Message Browser Screen"
- Section 9.1.4, "Linking Guarantee Issuance Contract to an Incoming Message"
- Section 9.1.5, "Operations that you can perform on an Incoming Message"
- Section 9.1.6, "Viewing Details of Incoming Message"
- Section 9.1.7, "Editing Incoming Message"
9.1.1 Background Processing of Incoming Messages
All incoming messages that are intended for your bank will be handled based on the MCS specifications that you have maintained for your branch. You can choose to receive the incoming messages in the ASCII format from an MCS, and manually direct them to the appropriate queues, or indicate that the background process should automatically pickup incoming messages from an MCS and transfer them to the appropriate queues.
If you indicate that incoming messages for your branch should be processed in the background, messages will be routed to the relevant queues as and when they come in without manual intervention.
You can configure the background process to begin when the Beginning of Day process is run or you can invoke it at any time in the day. This screen (CSSJOBBR/ CSSJMNTR) can also be used to check whether the background process is running for outgoing and incoming messages.
Messages that are transmitted by mail will have to be handled manually. Messages transmitted through media like Telex and S.W.I.F.T. will be automatically routed to the relevant queues. A unique reference number (DCN) is assigned to each incoming message.
Incoming messages, which have an error, will be moved to the error queue.
9.1.2 Manual Processing of Incoming Messages
You will have to manually process incoming messages if:
- the background message process is not running
- to route messages that cannot be routed to a user queue automatically
If the background process is not running, the messages that have come in to your bank will be stored in the incoming directory located on the node at which the database of your branch is installed. To recall, you have specified this directory in the ‘MCS maintenance’ screen. On invoking the Incoming Message Browser, you should upload all the messages from the directory on the node. All the incoming messages will be displayed in the Incoming Browser.
9.1.3 Invoking Incoming Message Browser Screen
From the ‘Incoming Message Browser’ screen, you can receive messages that have come in through the MCS connected to the node in which the database of your branch is installed. You can invoke the ‘Incoming Message Browser’ screen by typing ‘MSSINBRW’ in the field at the top right corner of the Application tool bar and clicking on the adjoining arrow button.
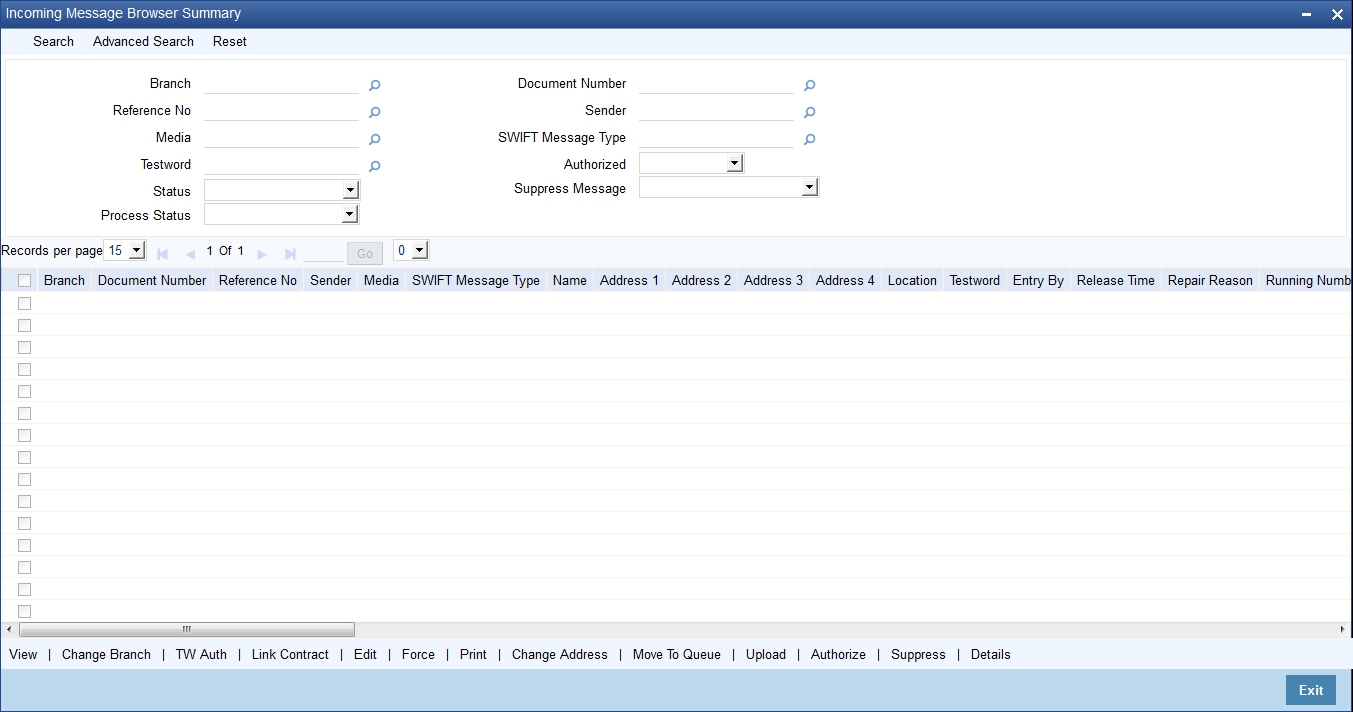
9.1.3.1 Features on Incoming Message Browser
From the Incoming Message Browser you can:
- upload incoming messages from the incoming directory on the node
- check Testwords for Telex messages
- authorize the Testword check for messages
- link an incoming message to a contract
- route the incoming messages to appropriate queues
You can query for the records based on any or all of the following:
- Branch
- Document Number
- Reference No
- Sender
- Media
- Swift Message Type
- Testword
- Auth Status
- Status
- Suppress Message
- Process Status
The following details of an incoming message will be displayed:
- Branch
- Document Number (DCN) assigned to the incoming message -- the DCN
is the delivery control number used to identify the message. It is a
10-digit number prefixed with a letter of the English alphabet. The DCN
ID is made up as follows:
- 1-2 Characters -- Last two digits of the current year
- 3-5 Characters -- Day of the year (Julian Date)
- 6-10 Characters -- Sequential number starting from 00001 each day
- Reference No
- Sender- the name address and location of the sender of the message
- Media - the media through which the message was transmitted
- SWIFT Message Type of the message
- Customer Name – the name of the sender of the message
- Address 1–4 – the location of the sender of the message
- Location – the location of the sender of the message
- Testword (in case of a Telex message)
- Entry By
- Maker Date Stamp
- Repair Reason
- Running Number
- Generated Reference
- Queue in which the message is stored
- Auth Status
- Checker Date Stamp
- Checker ID
- Remarks
- Status
- Currency
- Amount
- Suppress Message
- External Reference
- Multi Credit Reference
- RTGS Network
- Process Status
- Modification Number
- PDE Flag
- Required Execution Date
You can set some of the above parameters to make a query. Specify the details in the respective fields and click ‘Search’ button to view the details.
Checking the testword for a telex message
Telex messages that come into your bank need to be checked for validity if you have specified so in the messaging branch preferences screen. This is done by entering a testword. The test word that you enter depends on the testword arrangement with the counterparty, the important aspects of the message like customer, date and currency.
If the testword you enter does not match the telex testword the message is registered as a defective message and put into the repair status.
External Reference Number
This is a unique message identification number that will be used to identify an incoming message coming from an external system. This is defined as the ICN number. On upload of an incoming message into Oracle FLEXCUBE, this number, given by the external system, will be stored in Oracle FLEXCUBE and passed on to the contract generated as a result of the incoming message. If the incoming message results in an outgoing message, the ICN number will be linked to the outgoing message also.
This number will help you in creating a relationship between the incoming message, the resultant contract in Oracle FLEXCUBE, and the outgoing message, if any.
For instance, if an incoming MT103 results in an FT transaction, then ICN number of the incoming MT103 will be linked to the FT contract generated due to the upload of the incoming payment message.
If an Incoming message results in an outgoing contract (outgoing message), Oracle FLEXCUBE will store the External reference number (ICN Number) at the following levels.
- Incoming Message Level
- Contract Level (Resulted due to the Incoming message)
- Outgoing message (As a result of the above contract)
RTGS Network
The service identifier of the RTGS network will be picked up from field 113 of block 3 header of the incoming message and displayed here.
For TARGET 2 clearing network, the service identifier specified for the network in the ‘Clearing Networks’ screen will be defaulted and displayed here.
Status
You can filter the records based on the status. The drop-down list displays the following statuses:
- Unprocessed
- Processed
- Repair
- Suppressed
- Funding Exception
- Pending Cover Match
- Failed Verification
- Pending Authorization
- Pending liquidation
- Pending Auth Receipt
If the Bill Liquidation is failed for the trade related MT202 message, the status will be updated as ‘L (Pending liquidation)’.
You can list all the trade related MT202 which are failed during Bill Liquidation by filtering by ‘Status’ as ‘L’. On successful processing of Trade Related MT202, the ‘Generated Ref No’ is displayed with the Bill Contract Ref No in the ‘Incoming Message Browser’ screen.
9.1.4 Linking Guarantee Issuance Contract to an Incoming Message
You can link guarantee issuance contract to an incoming MT760 message in the Incoming Message Browser screen.
While linking the incoming MT760 message to a Guarantee contract, the system validates:
- if the reference in the Tag20 of the incoming MT760 message is same as the reference captured against the applicant bank in the guarantee contract.
- value in the Tag 23 of the incoming MT760 message linked to the contract is 'Request' for the contracts where the product type is 'G'.
- value in the Tag 23 of the incoming MT760 message linked to the contract is 'Issue' when the product type of the Guarantee contract is 'A'
An error message is displayed if the above validations fail during linking of an incoming MT760 message to guarantee contract.
After linking, the incoming MT760 message will be displayed in the ‘All Messages’ sub-system of the linked Guarantee contract.
9.1.5 Operations that you can perform on an Incoming Message
Action |
Operation |
View Delete |
Viewing and deleting the contents of a message
|
Printing a message You can choose to print the details of an incoming message. To print the details of an incoming message,
When you select the print option, you will be prompted to indicate whether you want to spool or directly print the message. You can also view the SWIFT tag description |
|
Change Branch |
Changing the Branch of the message
The details of the message will be displayed with only the Branch field enabled. Choose the new branch from the list of values provided and save the message. |
TW Auth |
Authorizing a Testword A telex message for which you entered a testword should be authorized before it can be routed to a user queue (if you have specified so in the Branch Preferences screen). To authorize a test word that was entered for a telex message, click the ‘TW Auth’ button from the Browser on this screen. During the authorization of a testword the authorizer will be required to re-enter the testword. |
Move To Queue |
Routing a message to a queue After you have made the checks that are necessary for the media through which a message is transmitted you can route the message to a user queue. To change the queue in which an incoming message should be stored:
The message will be automatically moved to the queue that you specify. The final destination of an incoming message is the end-user queue. These queues represent departments or printers responsible for acting on the received messages. Once a message is lodged into an end user queue, it can be viewed on-screen or printed by the users who have access to the queue. You can move messages from one end user queue to another as well. For a message that was transmitted through Telex, you should enter the testword and have it authorized before you can route it to the relevant end user queue. |
Link Contract |
Linking the message to a contract In the browser, select the message with which you want to associate a contract and click on the ‘Link Contract’ button. The Reference Number option-list is enabled for the selected message. You can select the appropriate contract from the list. The message will be subsequently associated with the contract selected here. |
Upload |
Uploading incoming messages If the background process for incoming messages is not running you will have to upload the messages that have come into your bank from the incoming directory on the node to which your branch is connected. To upload messages from the incoming directory (specified in the MCS maintenance screen) click the ‘Upload’ button. All messages that were stored in the Incoming Directory will be uploaded to Oracle FLEXCUBE and displayed in the Incoming Message Browser. |
Edit |
Editing the Incoming Message Click ’Edit Message’ button if you wish to make changes to the SWIFT message, especially the messages marked for repair. This is explained in the next Section. |
Authorize |
Authorizing the Incoming Message Use ‘Authorize’ button to authorize the message. All the amendments made to a SWIFT payment message have to be authorized by a user with appropriate authorization rights. At the time of authorizing, Oracle FLEXCUBE will display the earlier version of the SWIFT payment message along with the amended version, in the same window. A list of all the errors due to which the message was marked for repair is also displayed. The authorizer can view all the errors and also verify the changes that were made to correct them. After verification, if all the details are found to be appropriate, the message is authorized. Oracle FLEXCUBE maintains a detailed audit log of all amended SWIFT Payment Messages. The following details are captured for each authorized message:
At any point during the verification and authorization process, the authorizer can choose to cancel the entire operation without changing the status of the message. |
Force |
Force Releasing Messages Use ‘Force Release’ button to forcibly release all Payment Message Transactions with ‘Funding Exception’ status and insufficient funds. In other words, the system will post the required accounting entries for such transactions regardless of insufficient funds in the accounts. However, an override will be displayed. The system will also maintain a detailed audit trail for such transactions. A user with appropriate rights can perform this function. |
Supress |
Suppressing the Incoming Message To suppress a message, click ‘Suppress’ button in the Incoming Browser and invoke the ‘Suppress Message’ screen. The following options are available to suppress a Payment Message:
Specifying the ‘Suppress Message Generation’ option If you select this option, Oracle FLEXCUBE will stop the generation of the Payment Message. However, the system will post the necessary accounting entries for the messages being suppressed. Indicating the ‘Suppress Full’ option If you select the full suppress option for a message, the system will not post the related accounting entries. Advice generation will also be stopped. In other words, the system will not pick up the Payment Message for any further processing. Specifying the ‘No Suppress’ option A message marked with the ‘No Suppress’ option will be processed like any other normal Incoming SWIFT Payment Message. Specifying the remarks for a suppressed message You can specify the reason for suppressing a Payment Message in the ‘Remarks’ field. |
Click ‘Exit’ or ‘Cancel’ to return to the Application Browser.
9.1.6 Viewing Details of Incoming Message
You can view an incoming message in the Incoming Message Summary screen by selecting the message and clicking ‘Details’ button.

The following details regarding the incoming message are displayed in the above screen:
- DCN
- Reference Number
- Sender
- Media
- Swift Message Type
- Queue
- Operation
- Status
- Currency
- Amount
- Value Date
- External Reference Number
- Multi Credit Reference Number
- Branch
- Media Control System
- Node
- Test Word
- Repair Reason
- Name
- Address
- Location
- Process
- PDE Flag
- Suppress Options
- Remarks
- Auth By
- Entry By
- Mod No
- Checker Date Stamp
- Maker Date Stamp
- Suppress Status
- Funding Exception Status
- Cover Match Status
- Authorization Status
9.1.7 Editing Incoming Message
An incoming message can be edited by invoking the ‘Edit‘ function in the Incoming Messages Browser. On pressing the ‘Edit Message’ button, the message is displayed in edit mode. Only a user with requisite rights for editing can edit an incoming message.
The screen is as shown below:
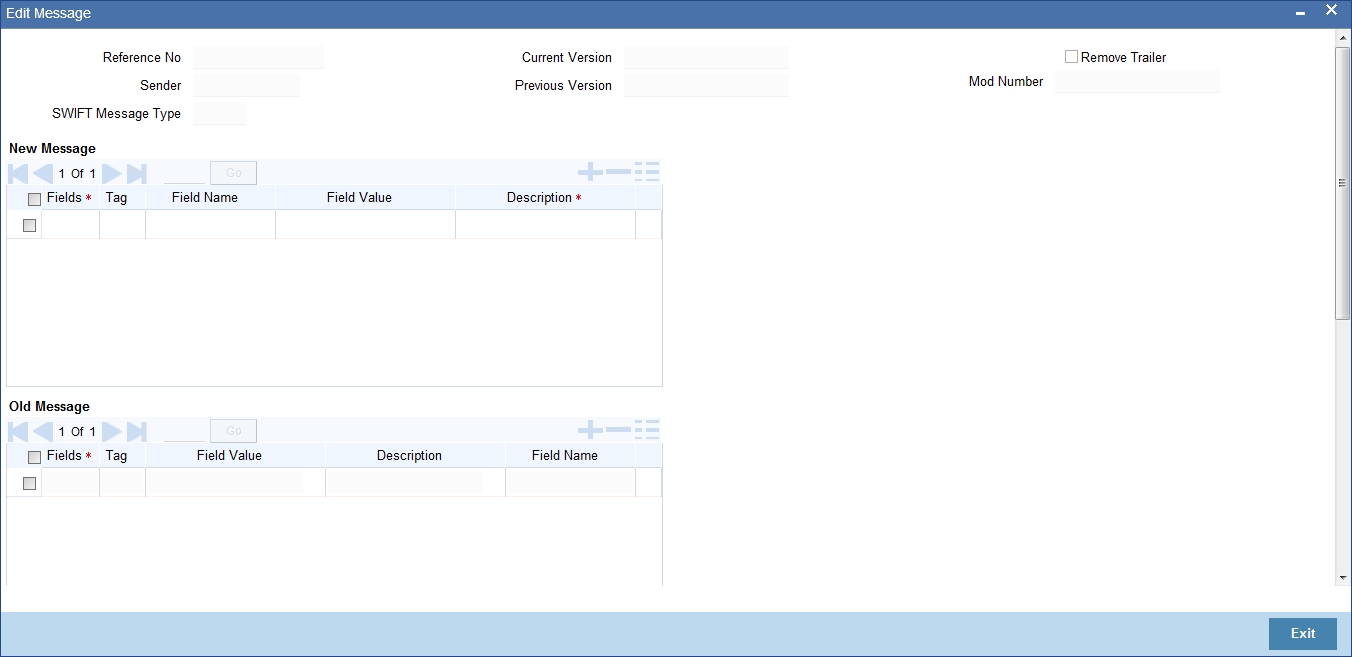
If editing is possible for the user, the message is displayed and is available for amendment. The list of fields, which can be modified are maintained through back-end database tables appropriately during implementation of Oracle FLEXCUBE. Most typically, fields like amount, currency would be maintained as non-modifiable whereas fields such as value date could be maintained as modifiable. Based on the maintenance in these tables, the appropriate fields are enabled for amendment.
On saving the amendment of the message, a new version is created and must be authorized. The screen shown above displays two versions of an incoming message. If the verifier needs to reject the change for any reason the same can be mentioned in the ‘Reject Reason’ field.
Note
In the case of incoming messages with a PDE trailer, the ‘PDE Flag’ check box in the ‘Incoming Message Browser’ screen will be checked. In the ‘Edit Message’ screen, check ‘Remove Trailer’ option to remove the PDE trailer (message contains the text {‘PDE:’}) and save the message.
9.2 SWIFT Message Details
This section contains the following topic:
9.2.1 Maintaining MT Task Details
Using the ‘STP Message Maintenance Details’ screen, you can maintain the basis for creation of MT tasks for SWIFT message. You can invoke this screen by typing ‘MSDSTPSC’ in the field at the top right corner of the Application tool bar and clicking the adjoining arrow button.
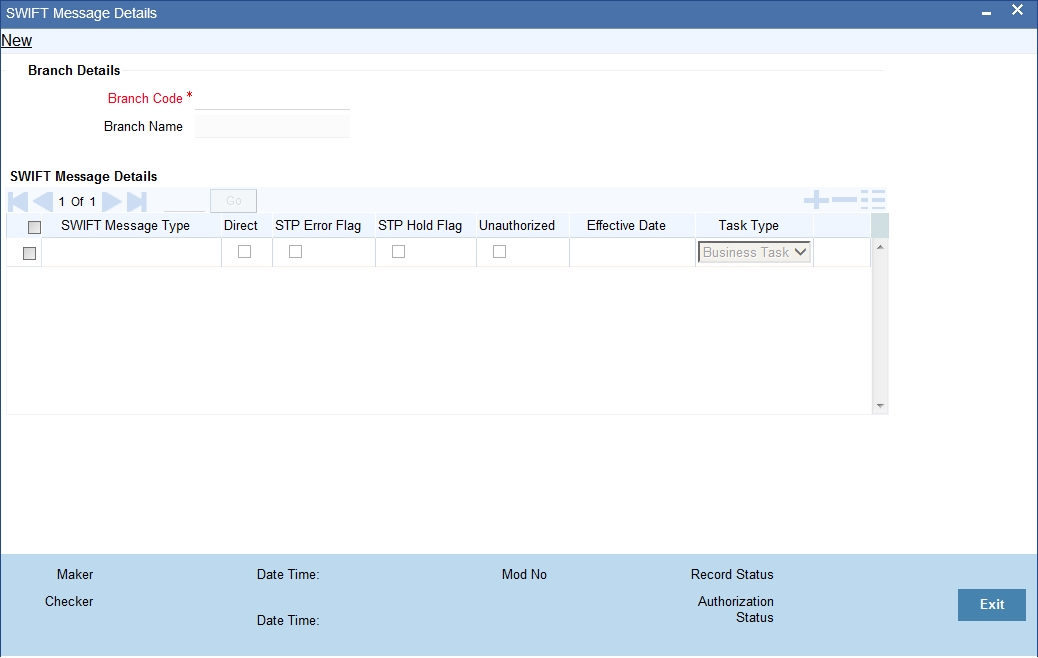
In this screen, you can specify the following details:
Branch Code
Specify the branch code for which the task creation has to be made. This adjoining option list displays all valid branches maintained in the system. You can choose the appropriate one.
Branch Name
On selecting the branch code, the system defaults the branch name of the bank.
SWIFT Msg Type
Specify the type of the SWIFT Message here. This adjoining option list displays all the SWIFT messages that are maintained in the system. You can choose the appropriate one.
Direct
Check this option to indicate that a MT task/business task should be created for the SWIFT message without subjecting it to the STP process. This is applicable for STP messages.
If this option is checked for Non-STP messages, then a MT task will be created for the Non-STP messages.
STP Error Flag
Check this option to indicate that a MT task/business task should be created when the STP process fails. This is applicable only for the STP Messages.
STP Hold Flag
Check this box to indicate that a MT task/business task should be created for a contract that is put on hold during successful STP processing.
This option is applicable only for the STP messages.
UnAuthorized
Check this box to indicate that a MT task/business task should be created for a contract that is unauthorised during successful STP processing.
This option is applicable only for the STP messages.
Effective Date
Specify the date from which the STP message maintenance becomes effective. Effective date should be equal to or greater than the application date.
Task Type
Select the task type from the adjoining drop-down list. This list displays the following values:
- MT Task
- Business Task