2. Maintenances
2.1 Introduction
As part of general maintenance required for the successful functioning of Credit Appraisal Management Origination, you should maintain the following in the system:
- Maintaining System Date Elements
- Maintaining Ratio Template
- Maintaining Credit Ratios
- Maintaining Benchmark Ratio
- Maintaining Document Details
- Maintaining Application Category Details
- Creating Conversations
- Maintaining Origination Dashboard Details
- Maintaining Credit Bureau Details
- Maintaining Credit Rating Rules
- Configuring Queues
- Maintaining Field Investigation Details
- Maintaining Override Details
- Maintaining Balance Sheet Size Details
- Maintaining Document Upload
- Covenant Maintenance
- Uploading Modified Excel
- Configuring Landing Page
- Maintaining Entity Details
- Maintaining Entity Dependency Details
- Maintaining Customer Economic Dependency Details
This chapter contains the following topics:
- Section 2.2, "SDE Maintenance"
- Section 2.3, "Ratio Template Definition"
- Section 2.4, "Credit Ratios Maintenance"
- Section 2.5, "Ratio Benchmark Maintenance"
- Section 2.6, "Document Verify Maintenance"
- Section 2.7, "Application Category Maintenance Details"
- Section 2.8, "Conversation Capture Details"
- Section 2.9, "Dashboard"
- Section 2.10, "Bureau Maintenance Details"
- Section 2.11, "Rules Maintenance"
- Section 2.12, "Queue Maintenance"
- Section 2.13, "Field Investigation Maintenance"
- Section 2.14, "Override Maintenance"
- Section 2.15, "Balance Sheet Size Maintenance"
- Section 2.16, "Document Upload Maintenance"
- Section 2.17, "Covenant Maintenance"
- Section 2.18, "Excel Upload Modify Screen"
- Section 2.19, "Landing Page Configuration"
- Section 2.20, "Entity Code Maintenance"
- Section 2.21, "Entity Dependency Details"
- Section 2.22, "Customer Economic Dependency Details"
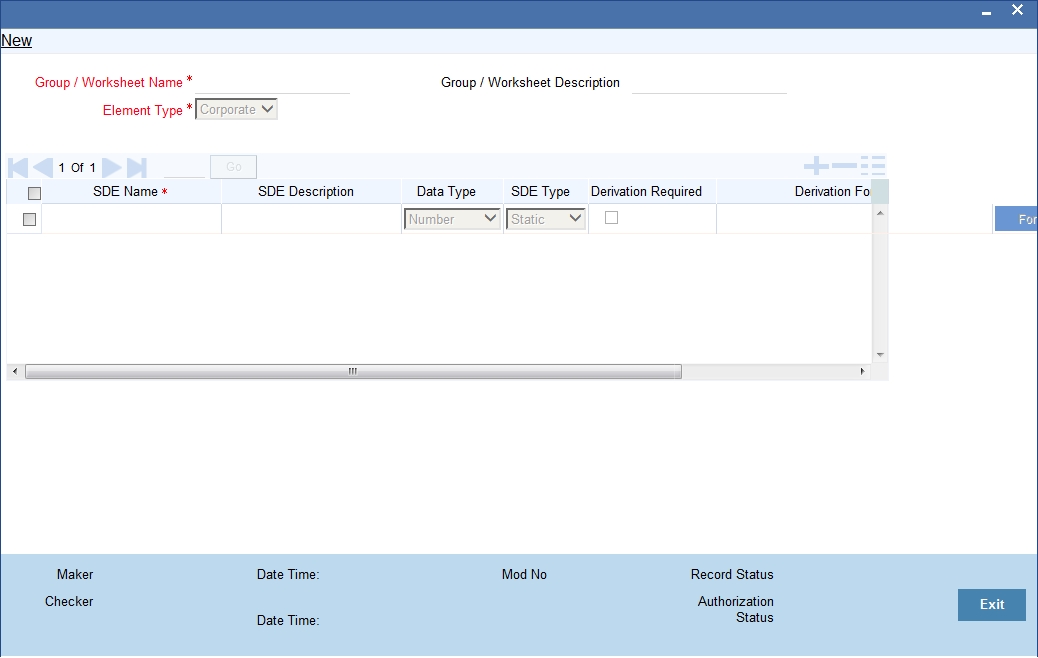
2.2 SDE Maintenance
This section contains the following topic:
2.2.1 Maintaining System Data Elements
In order to calculate financial ratios, you can maintain System Data Elements (SDEs) using the ‘SDE Maintenance’ screen. You can invoke this screen by typing ‘ORDSDEMT’ in the field at the top-right corner of the Application tool bar and clicking the adjoining arrow button.
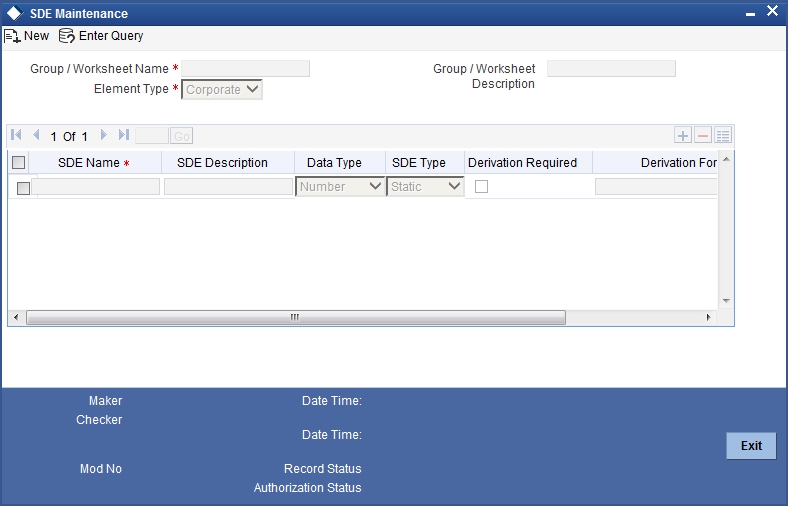
Specify the following details:
Group/Worksheet Name
Specify the group/worksheet name here.
Element Type
Select the element type from the adjoining drop-down list. This list displays the following values:
- Corporate
- Retail
- Both
Group/Worksheet Description
Specify a brief description of the group/worksheet you are maintaining.
SDE Name
Specify a unique name for the SDE you are maintaining.
SDE Description
Specify a description for the SDE you are maintaining.
Data Type
Select the data type of the SDE from the adjoining drop-down list. This list displays the following values:
- VARCHAR2
- Number
- Date
SDE Type
Select the SDE type from the adjoining drop-down list. This list displays the following values:
- Template
- Static
Derivation Required
Check this box to indicate that derivation formula is required for the SDE.
Derivation Formula
Specify the derivation formula here. You can also maintain the derivation formula in the ‘Condition Builder’ screen which is invoked by clicking the ‘Formula’ button.
Specify the following details:
Condition
Specify the condition for the rule here.
Business Rule
Braces
Select the braces from the adjoining drop-down list.
Functions
Select the functions from the adjoining drop-down list.
Elements
Select the elements from the adjoining option list. This list displays all valid elements maintained in the system.
Operators
Select the mathematical operators from the adjoining drop-down list. This list displays the following values:
- Equal To
- Greater Than
- Greater Than or Equal To
- Less Than
- Less Than or Equal To
- Like
- Not Like
- Not Equal To
Logical Operators
Select the logical operators from the adjoining drop down list. This list displays the following values:
- And: Use ‘And’
- Or: Use ‘OR’
Value
Specify the value of the SDE to define the condition. The value may be numeric or alphanumeric, as required for the condition.
After building the condition, click the ‘Insert’ button to insert the same. To remove a condition, click the ‘Clear’ button in the screen.
2.3 Ratio Template Definition
This section contains the following topic:
2.3.1 Defining Template for Calculating Ratios
You can define templates for calculating financial ratios taken from the balance sheet, income statement, statement of cash flows, or statement of retained earnings within the product. You can capture the template related details through the ‘Ratio Template Definition’ screen.
You can invoke this screen by typing ‘ORDTEMDF’ in the field at the top-right corner of the Application tool bar and clicking the adjoining arrow button.
Specify the following details:
Industry
Specify the industry name here.
Sheet Name
Specify the worksheet name here.
Short Description
Specify a brief description about the template.
Click the ‘Generate’ button to view an excel sheet, which is generated on the basis of the System Data Elements (SDE) maintained in the system.
Worksheet
Worksheet Name
Specify the name of the worksheet.
Worksheet Description
Specify a brief description about the worksheet.
Work sheet Required
Check this box to include the worksheet in the generated excel.
SDE Details
SDE Name
Specify the SDE name here.
SDE Description
Specify a brief description of the SDE.
Data Type
Select the data type from the adjoining drop-down list. This list displays the following values:
- VARCHAR2
- Number
- Date
Category
Select the SDE category from the adjoining drop-down list. This list displays the following values:
- Asset
- Liability
- Income
- Expense
Sub Category
Select the sub-category of the SDE from the adjoining option list. This list displays all valid sub-categories maintained in the system. Sub- Category has to be maintained as part of SDE maintenance only if the subcategory is used as part of Ratio formula.
For example:
If SDE's defined are SDE1, SDE2, SDE3 and all of them belong to a SUB-CATEGORY1, then you can use SDE1, SDE2 and SDE3 directly in the Ratio formula.
You can also define SUBCATGORY1 in the SDE maintenance and use the same in ratio formula. The system will then internally derive the formula:
SUB-CATEGORY1 =SDE1+SDE2+SDE3
Note
The sub-category should be defined as an SDE in the ‘SDE Maintenance’ (ORDSDEMT) screen.
SDE Type
System displays the SDE type here. The SDE type could either be General SDE or Derived SDE based on the SDE maintenance.
2.4 Credit Ratios Maintenance
This section contains the following topic:
- Section 2.4.1, "Maintaining Credit Ratio"
- Section 2.4.2, "Specifying Formula Details"
- Section 2.4.3, "Viewing Credit Ratio Summary"
2.4.1 Maintaining Credit Ratio
You can maintain the rules to calculate the credit ratios in ‘Credit Ratio Maintenance’ screen. You can invoke this screen by typing ‘ORDRATMT’ in the field at the top right corner of the Application tool bar and clicking the adjoining arrow button.
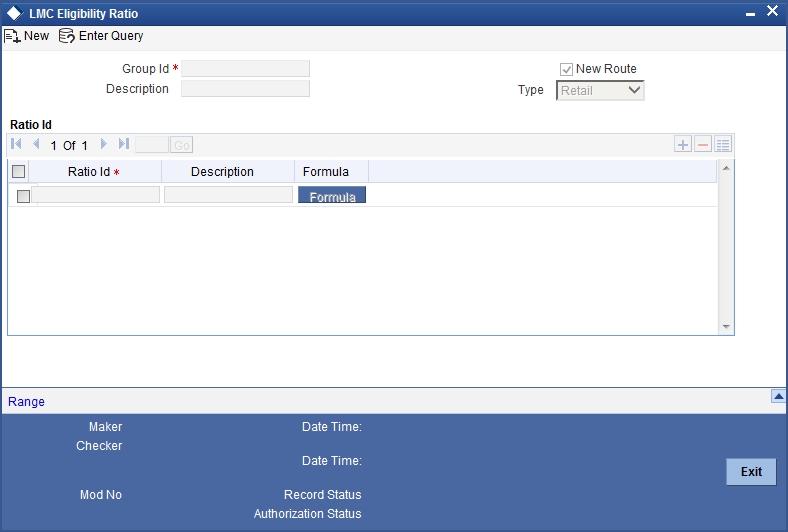
You can specify the following details in this screen:
Group ID
Specify a unique identification code for the ratio group.
Description
Specify a suitable description for the ratio group.
Type
Select the type of the customer from the following options available:
- Retail
- Corporate
- Ijarah
- Istisna
- Mudarabah
- Murabaha
- Musharaka
- Tawarooq
Ratio ID
Specify a unique identification for the credit ratio being maintained.
Description
Specify a suitable description for the credit ratio.
2.4.2 Specifying Formula Details
You can specify the formula to calculate the credit ratio by clicking the ‘Formula’ button corresponding to a ratio ID. The ‘Formula’ screen is displayed where you can specify the condition for calculating the credit ratio associated with a ratio ID.
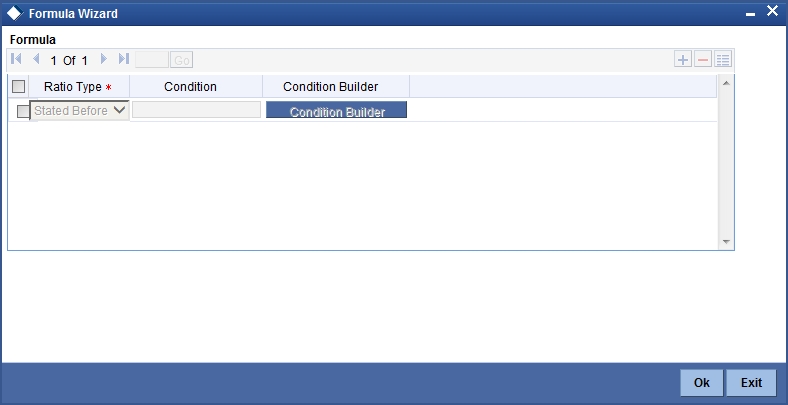
You can specify the following details here:
Ratio Type
Select the type of the ratio being maintained, from the drop down list provided. The following options are available:
- Stated Before
- Stated After
- Actual Before
- Actual After
Note
All of the above mentioned options are applicable for retail ratio type maintenance. For Corporate Ratio Type Maintenance only Actual Ratio Types can be maintained.
Condition
The condition specified using the Elements, Functions, Operators etc. is displayed here.
Click the Condition Builder button to define the following fields.
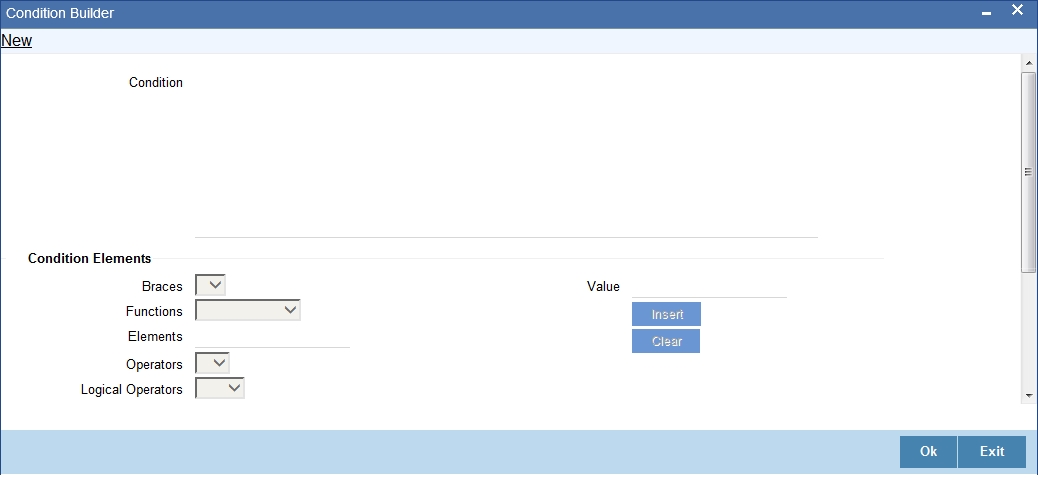
Elements
Specify the data elements to be used to define the formula for credit ratio calculation or select the element from the option list provided.
Functions
Select the mathematical function to be used to define the formula from the drop-down list provided.
Braces
Select the opening or the closing brace from the drop-down list provided, to define the credit ratio calculation formula.
Operators
Select the mathematical operator to be used to define the credit ratio calculation formula. You can select ‘+’, ‘-‘, ‘*’, or ‘/’.
Logical Operators
Select the logical operators from the adjoining drop down list. This list displays the following values:
- And: Use ‘And’
- Or: Use ‘OR’
Value
Specify the value of the SDE to define the condition. The value may be numeric or alphanumeric, as required for the condition.
After building the condition, click the ‘Insert’ button to insert the same. To remove a condition, click the ‘Clear’ button in the screen.
2.4.3 Viewing Credit Ratio Summary
You can view a summary of the credit ratios in ‘Credit Ratio Maintenance’ screen. You can also query for a particular record based on desired search criteria.
You can invoke this screen by typing ‘ORSRATMT’ in the field at the top right corner of the Application tool bar and clicking the adjoining arrow button.
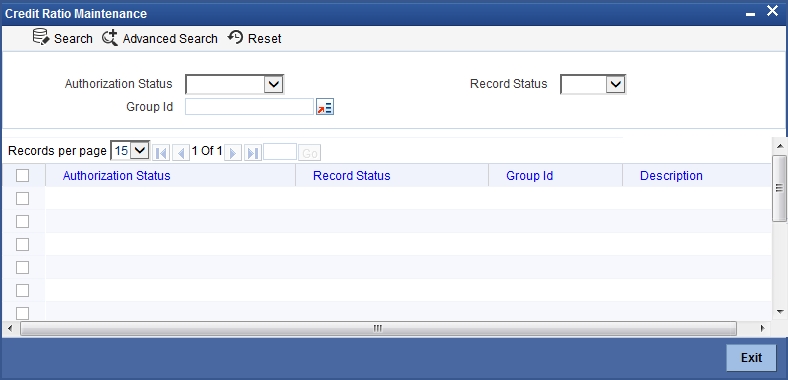
You can specify any of the following details to search for a record:
- Authorization Status
- Record Status
- Group ID
Click ‘Search’ button to search for a record based on the search criteria specified. You can double click a desired record to view the detailed screen.
2.5 Ratio Benchmark Maintenance
This section contains the following topics:
2.5.1 Maintaining Benchmark Ratio
You can maintain the benchmark details for criteria like category, industry, and balance sheet size through ‘Ratio Benchmark Maintenance’ screen. The maintained benchmark values will be used to generate report for the customer financial status against the bank benchmark details.
You can invoke this screen by typing ‘ORDRATBM’ in the field at the top right corner of the Application tool bar and clicking the adjoining arrow button.
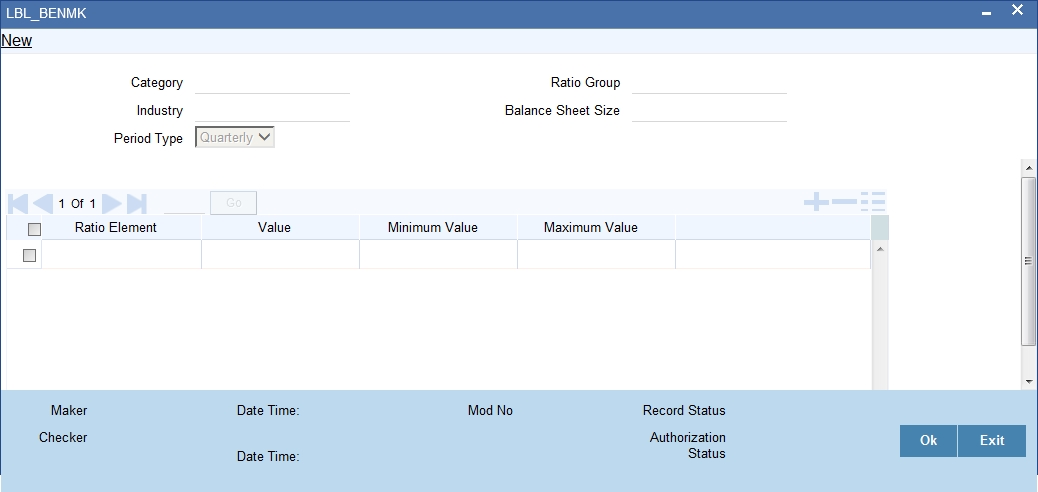
You can enter the following details:
Category
Specify the benchmark category. The adjoining option list displays all the categories maintained in the system. Select the appropriate one.
Ratio group
Specify the ratio group.
Industry
Specify the industry name for which benchmark is defined.
Balance sheet size
Specify the balance sheet size.
Period Type
Specify the period for upload (QQ, YY).
Ratio Element
Specify the ratio element.
Value
Specify the ratio value.
Minimum Value
Specify the minimum ratio value.
Maximum Value
Specify the maximum ratio value.
2.5.2 Viewing Benchmark Ratio Details
You can view the benchmark ratio details using ‘Ratio Benchmark Summary’ screen. To invoke this screen, type ‘ORSRATBM’ in the field at the top right corner of the Application tool bar and click the adjoining arrow button.
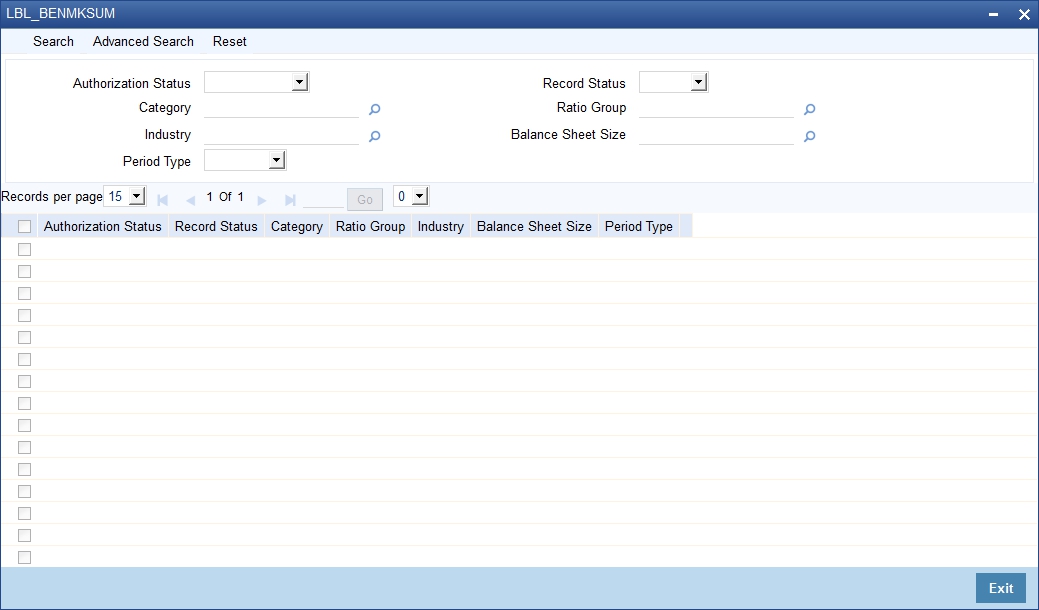
You can click ‘Search’ button to view all the pending functions. However, you can to filter your search based on any of the following criteria:
Authorization Status
Select the authorization status of the contract from the drop-down list.
Category
Select the category from the option list.
Industry
Select the industry from the option list.
Period Type
Select the period type from the option list.
Record Status
Select the record status from the drop-down list.
Ratio Group
Select the ratio group from the option list
Balance Sheet Size
Select the balance sheet size from the option list.
When you click ‘Search’ button the records matching the specified search criteria are displayed. For each record fetched by the system based on your query criteria, the following details are displayed:
- Authorization Status
- Record Status
- Category
- Ratio Group
- Industry
- Balance Sheet Size
- Period Type
2.6 Document Verify Maintenance
This section contains the following topics:
2.6.1 Maintaining Document Details
You can maintain the list of documents that are required during the CAM origination process, in ‘Documents Verify Maintenance’ screen. Document checklists are maintained for an application category and for the various stages in the origination process. You can also maintain the details of the Advices that need to be generated on completion of a stage in the process.
You can invoke ‘Documents Verify Maintenance’ screen by typing ‘ORDDOCMT’ in the field at the top right corner of the Application tool bar and clicking the adjoining arrow button.
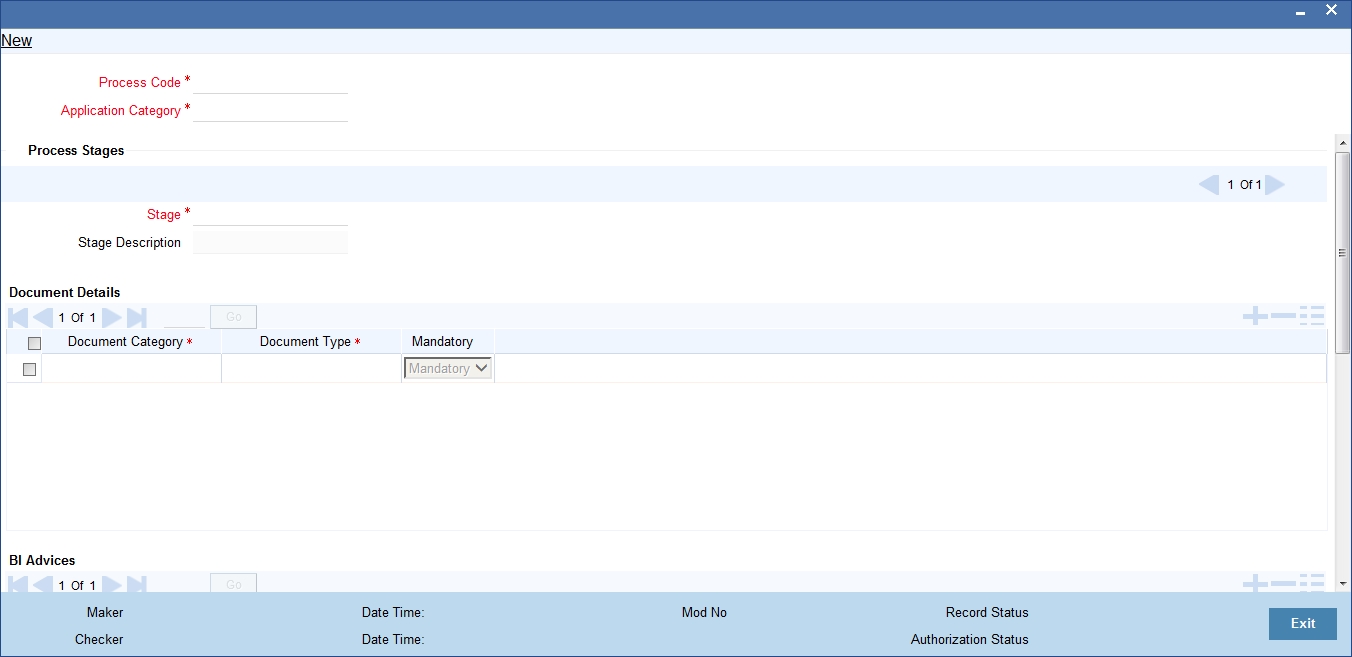
You can specify the following details in this screen:
Process Code
Specify the process code of the process for which you wish to maintain override conditions or select the process code from the option list provided.
Application Category
Specify the category to which the application belongs or select the application category from the option list provided.
Stage
Select the stage of the CAM origination process from the option list provided.
Stage Title
Specify a suitable description for the loan origination stage.
Document Details
Document Category
Specify the category to which the document belongs or select the document category from the option list provided.
Document Type
Specify the type of the document or select the document type from the option list provided.
Mandatory
Select the option to indicate whether the document is mandatory or not. You can select any of the following options from the drop-down list provided:
- Mandatory
- Overridden
- Others
BI Advices
Report Name
Specify the name of the advice report to be generated on completion of the process stage.
Template
Specify the template to be used to generate the advice report.
Format
Select the format in which the advice report needs to be generated from the drop-down list provided. The following options are available:
- RTF
Locale
Select the locale information to be used for generating the advices from the drop-down list. The following options are available:
- en-US
Out come
Specify the outcome for which the report needs to be generated.
Checklist Details
Sequence Number
The system displays the sequence number.
Checklist Item
Specify the checklist to be maintained.
Mandatory
Check this box to indicate whether the checklist is mandatory or optional.
2.6.2 Viewing Document Checklist Summary
You can view a summary of the document checklists and advices in ‘Document Details’ screen. You can also query for a particular record based on desired search criteria.
You can invoke this screen by typing ‘ORSDOCMT’ in the field at the top right corner of the Application tool bar and clicking the adjoining arrow button.
You can specify any of the following details to search for a record:
- Authorization Status
- Record Status
- Process Code
- Application Category
Click ‘Search’ button to search for a record based on the search criteria specified. You can double click a desired record to view the detailed screen.
2.7 Application Category Maintenance Details
This section contains the following topics:
- Section 2.7.1, "Maintaining Application Category Details"
- Section 2.7.2, "Main Tab"
- Section 2.7.3, "Agency Tab"
- Section 2.7.4, "Viewing Application Category Summary"
2.7.1 Maintaining Application Category Details
You can maintain various application categories linked to multiple products that cater to the requirements of different customers, in ‘Application Category Maintenance’ screen. The entire process of loan origination depends mainly on the category to which the application belongs.
You can invoke ‘Application Category Maintenance’ screen by typing ‘ORDCATMT’ in the field at the top right corner of the Application tool bar and clicking the adjoining arrow button.
You can specify the following details in this screen:
Application Category
Specify a unique identification for the application category.
Category Description
Specify a suitable description for the application category.
Category Type
Select the category type from the drop-down list. The list displays the following values:
- Retail
- Corporate
- Ijarah
- Istisna
- Lease
- Mudarabah
- Murabaha
- Musharaka
- Tawarooq
- Import LC
- Export LC
- CASA
- Term Deposit
Application Type
Select the application type from the drop-down list. The list displays the following values:
- Home
- Vehicle
- Personal
- Mortgage
- Others
Rule ID
Specify the credit rule to be associated with the application category or select the Rule Id from the option list provided.
Ratio ID
Specify the credit ratio to be associated with the application category or select the Ratio Id from the option list provided.
Pricing Group
Specify the pricing group. The pricing group comprises of the multiple pricing IDs containing formula.
2.7.2 Main Tab
You can capture the following details in the ‘Main’ tab.
Product Details
You can specify the following details related to the loan product here:
Product Code
Specify the identification code of the product to be linked to the application category being maintained. You can also select the product code from the option list provided.
Product Description
The description associated with the selected product gets displayed here.
Default
Check this box to indicate if the product selected should be maintained as the default product for the application category.
Card/Cheque Product Details
You can avail facilities like cheque book, credit and debit card along with the loan application.
Facility Type
The system displays the facility type availed by the customer.
Product Code
Specify the product code of the facility type. Alternatively, you can select the product code from the option list.
Description
The system displays the description of the facility product.
Other Details
You can capture the additional details related to the product here:
Offer ID
Specify a unique identification for the offer being made to the customer.
No of Installments
Specify the number of installments.
Units
Select the units based on which the disbursement should be carried out. The following options are available in the option list:
- Daily
- Weekly
- Monthly
- Quarterly
- Half Yearly
- Yearly
Frequency
Specify the frequency at which the disbursement should be carried out.
Rate
Specify the interest rate.
Rate Code
Specify the rate code used to derive the interest rate or select the rate code from the option list provided.
Spread
Specify the spread that is applicable.
Effective Rate
The effective rate of interest gets displayed here, based on the interest and the spread specified.
Default
Check this box to indicate if the loan offer specified should be maintained as the default offer for the application category.
2.7.3 Agency Tab
In ‘Agency’ tab, you can capture the details of the credit rating agencies and credit bureaus that provide credit rating details for customer securities.
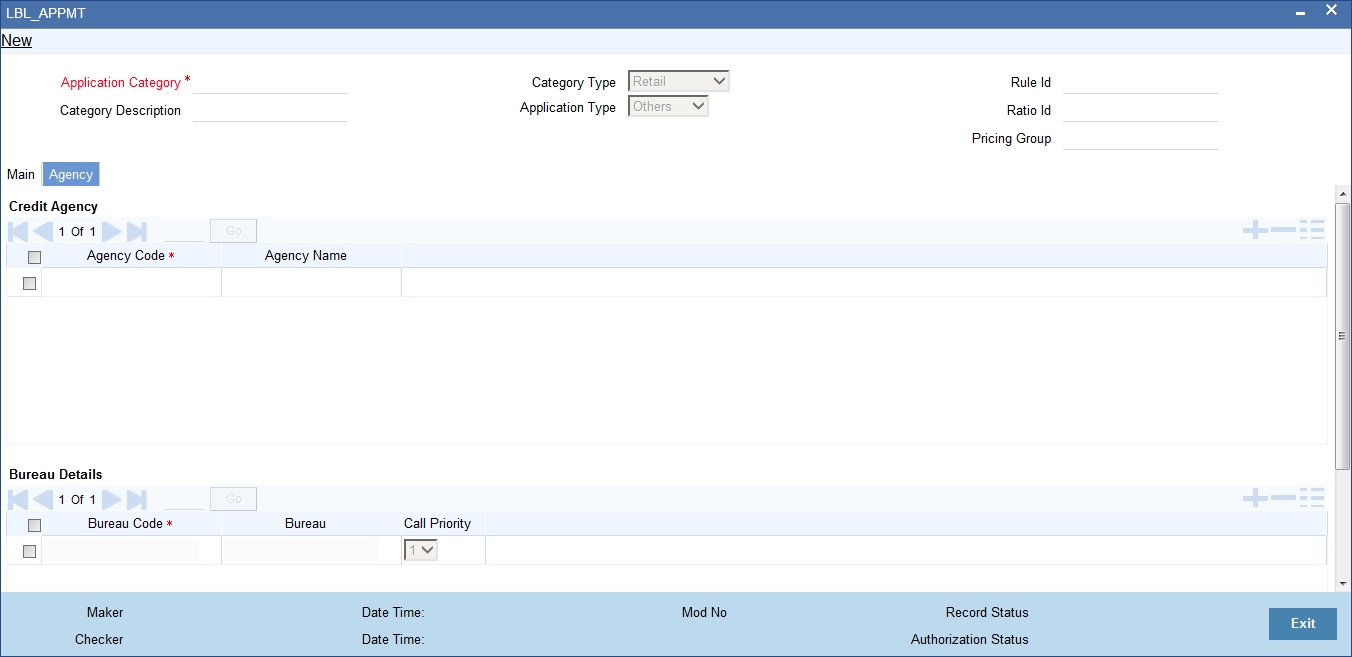
You can specify the following details in this screen:
Credit Agency
You can capture the details related to the credit rating agencies here.
Agency Code
Specify the identification code of the rating agency that provides credit rating details for customer securities.
Agency Name
Specify the name of the rating agency that provides credit rating details for customer securities.
Bureau Details
You can capture the details related to the credit bureau here.
Bureau Code
Specify the identification code of the credit bureau that provides credit ratings for customer securities.
Bureau
Specify the name of the credit bureau that provides credit rating details for customer securities.
2.7.4 Viewing Application Category Summary
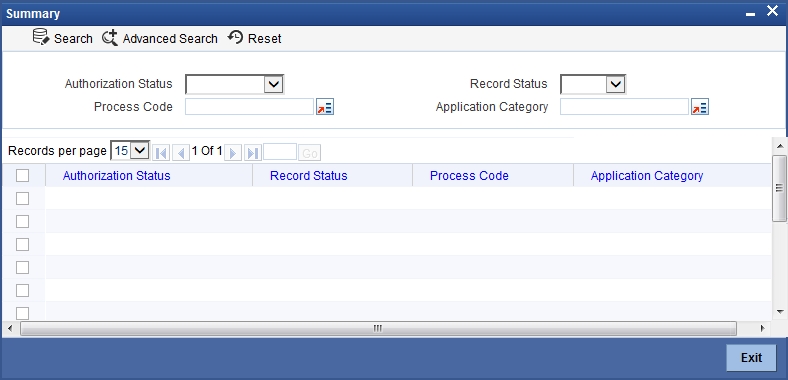
You can view a summary of the application categories in ‘Category Details’ screen. You can also query for a particular record based on desired search criteria.
You can invoke this screen by typing ‘ORSCATMT’ in the field at the top right corner of the Application tool bar and clicking the adjoining arrow button.

You can specify any of the following details to search for a record:
- Authorization Status
- Record Status
- Application Category
Click ‘Search’ button to search for a record based on the search criteria specified. You can double click a desired record to view the detailed screen.
2.8 Conversation Capture Details
This section contains the following details
- Section 2.8.1, "Creating Conversations"
- Section 2.8.2, "Uploading Documents"
- Section 2.8.3, "Viewing Conversation Summary"
- Section 2.8.4, "Viewing Conversations on User Dashboard"
2.8.1 Creating Conversations
You can create conversations using the ‘Conversation Input’ screen. To invoke this screen, type ‘ITDINTRN’ in the field at the top right corner of the Application tool bar and clicking the adjoining arrow button.
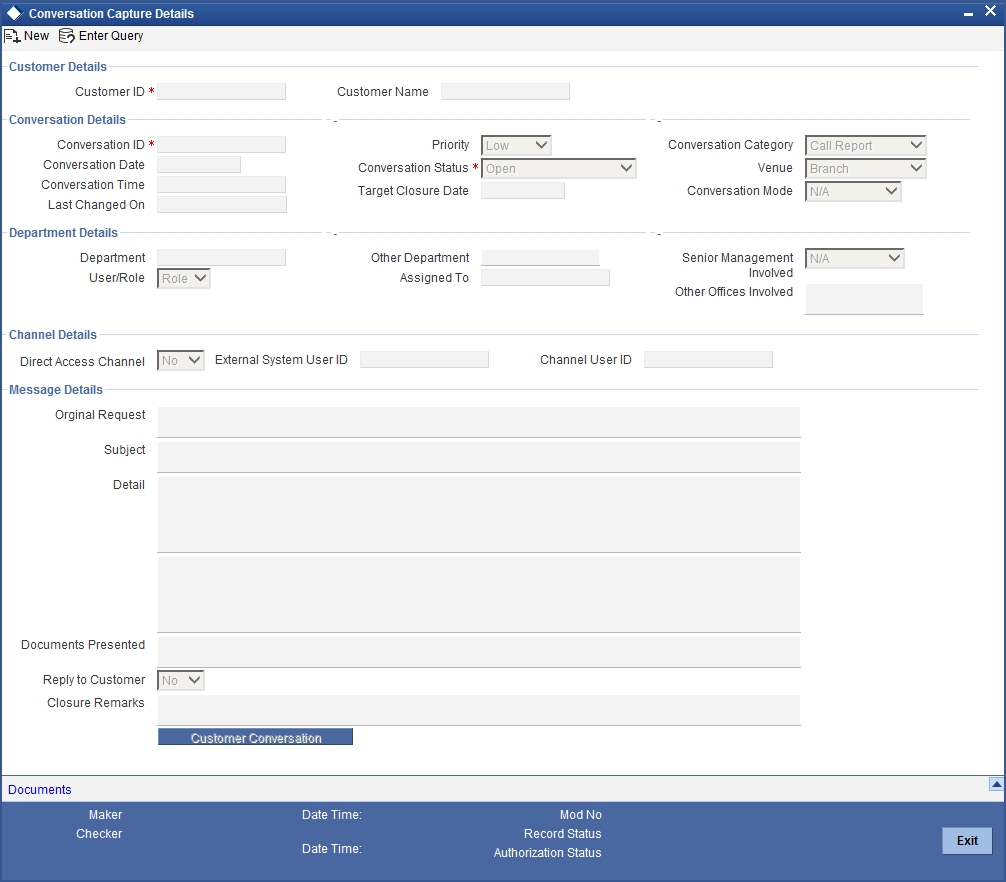
In this screen, you need to specify the following information:
Conversation ID
The system generates and displays the conversation ID. This is a unique identifier of the conversation.
Conversation Status
The system displays the conversation status as ‘Open’. However, you can modify the conversation status. The drop-down list displays the following statuses:
- Open - Select ‘Open’ to create a new conversation.
- WIP - Select WIP to assign the conversation to a user.
- Close - Select Close when the conversation is closed.
- Pending with Customer - Select Pending with Customer if the conversation is pending with Customer.
- Re-Open - Select Re-Open to modify a closed conversation.
Customer ID
Specify the customer ID. The option list displays all valid customer IDs maintained in the system. You can select the appropriate one.
Customer Name
Based on the customer ID selected, the system displays the name of the customer.
Department
Specify the corresponding department. You can also click on the adjoining option list and select the corresponding Department.
Other Department
Specify other departments, if any.
User/Role
Select the category to which the conversation is being assigned to from the following options:
- User
- Role
Assigned To
Specify the bank user or role, to which the conversation needs to be assigned by clicking on the adjoining option list.
Conversation Category
Select the category of the corresponding conversation from the following list:
- Call Report
- Courtesy Meeting
- Customer Interaction
- Service Request
- Complaints
- Lead
Venue
Select the venue of the corresponding conversation from the following list:
- Branch
- Face to Face
- Client Office
- Client Residence
- Public Place
Conversation Date
Specify the date when the conversation started. The system defaults the conversation date in accordance with the system date and branch offset. Conversation date cannot be future dated.
Conversation Time
Specify the time when the conversation started. The system defaults the conversation time in 24 hours format.
Senior Management Involved
Select the corresponding senior management involved from the following options:
- COO
- Region Head
- Senior RM
- CEO
Other Offices Involved
Specify other offices involved, if any.
Last Changed On
Last Changed On is a read-only field displaying the date and time of the last modification.
Priority
The system defaults the priority as Low. Select the priority of the corresponding conversation from the following list:
- Low
- Medium
- High
Target Closure Date
Specify the tentative conversation closure date that was communicated to the customer.
Conversation Mode
Select the mode of conversation from the following options:
- Meeting
- Telephone
- Other
- Face to Face
Subject
Specify a subject for the corresponding conversation.
Detail
Specify the additional details of the corresponding conversation, if any.
Original Request
Specify the initial conversation message.
Documents Presented
Specify the details of the documents presented.
Display Closure Remarks for Customer
Select the option to specify whether to display closure remarks for customer or not. The system defaults the Closure Remarks for Customer as ‘Yes’.
Closure Remarks
Specify the closure remarks
Note
Closure Remarks is mandatory if ‘Display Closure Remarks to Customer’ is opted; and Conversation Status belongs to the following options:
- Open
- WIP
- Pending with Customer
- Close
Direct Access Channel
The system displays the Direct Access Channel as checked if conversation is initiated from FCDB-Direct access channels
External System User ID
The system displays the system user ID of FCDB.
Channel User ID
The system displays the channel used by FCDB for the conversation.
2.8.2 Uploading Documents
You can upload documents during conversation using 'Document Upload' screen. These documents are retrievable to the bank users or customers involved in the conversation. To invoke this screen, click 'Documents' button in 'Conversation Input' screen.
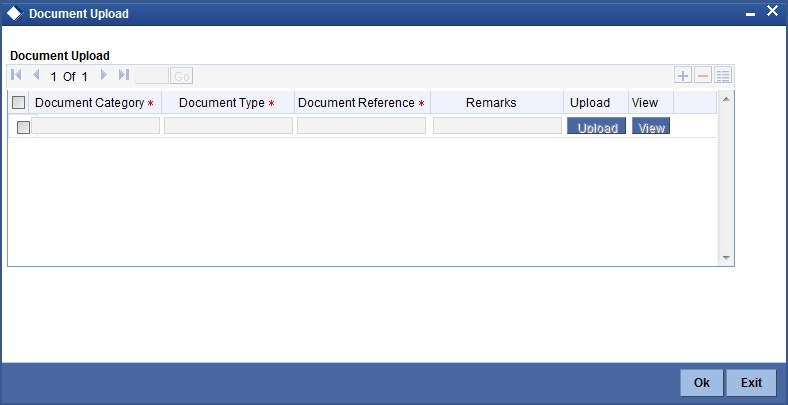
You can specify the following details here:
Document Category
Select the appropriate Document Category from the adjoining option list.
Document Type
Select the appropriate Document Type from the adjoining option list.
Document Reference
System displays the document reference number when you upload the document in the server.
Remarks
Provide the additional remarks related to the document to be uploaded.
Upload
Click 'Upload' button to upload the document.
You can browse through the document path and click 'Submit' to generate the document reference number.
View
Click 'View' button to retrieve and view the uploaded document.
System stores the uploaded documents in the server as a binary image in the Web Content Management Repository. The bank users and customers will be able to retrieve these documents and documents related information during conversation enquiries.
2.8.3 Viewing Conversation Summary
You can view the summary of all conversation created in Oracle FLEXCUBE using the ‘Conversations Summary’ screen. To invoke this screen, type ‘ITSINTRN’ in the field at the top right corner of the Application tool bar and clicking the adjoining arrow button.
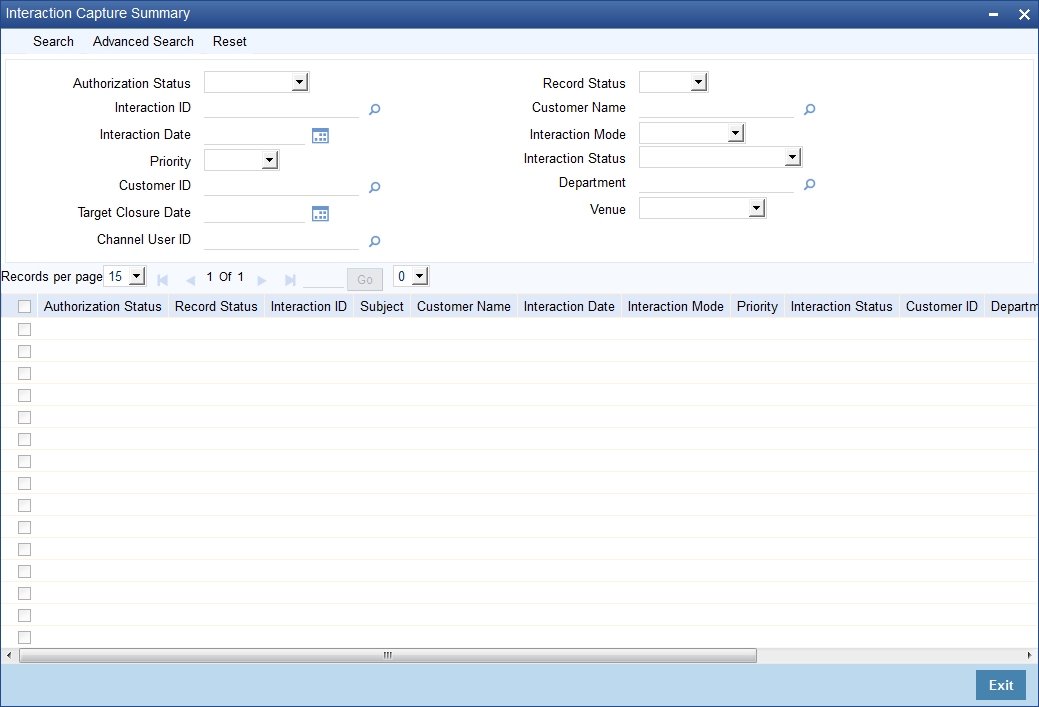
You can search for the conversations based on one or more of the following parameters:
- Authorization Status
- Record Status
- Conversation ID
- Customer Name
- Conversation Date
- Conversation Mode
- Priority
- Conversation Status
- Customer ID
- Department
- Target Closure Date
- Venue
- Channel User ID
Once you have set the search parameters, click the ‘Search’ button. The summary screen displays the following information:
- Conversation ID
- Subject
- Customer Name
- Conversation Date
- Conversation Mode
- Priority
- Conversation Status
- Customer ID
- Department
- Target Closure Date
- Venue
- Channel User ID
2.8.4 Viewing Conversations on User Dashboard
You can view the conversation details through ‘Dashboard Maintenance, screen. You can invoke this screen by clicking on the ‘Interactions’ tab available on the main screen.
The conversation dashboard is mapped to the role ‘IT-CONV-VW’.
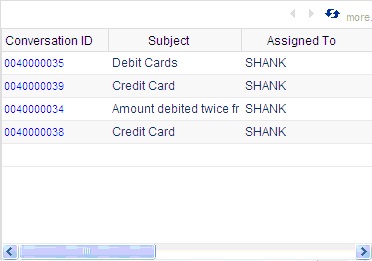
The dashboard displays the following information pertaining to the first five conversations:
- Conversation ID
- Subject
- Assigned to
You can use the arrow buttons on the top right corner of the dashboard to view the next/previous set of conversations.
The system displays the conversation details in the following sequence starting with the oldest conversation:
- Assigned to me and Open
- Assigned to my role and Open
- Assigned to me and in WIP status
- Assigned to my role and in WIP status
- Assigned to me and in Pending with customer status
- Assigned to my role and in Pending with customer status
2.9 Dashboard
This section contains the following topics:
- Section 2.9.1, "Maintaining Origination Dashboard Details"
- Section 2.9.2, "Specifying the Mapping Details"
2.9.1 Maintaining Origination Dashboard Details
You can maintain dashboard related information using the ‘Origination Dashboard Maintenance’ screen. You can invoke this screen by tying ‘ORDDSHMT’ in the field at the top right corner of the Application tool bar and clicking the adjoining arrow button.
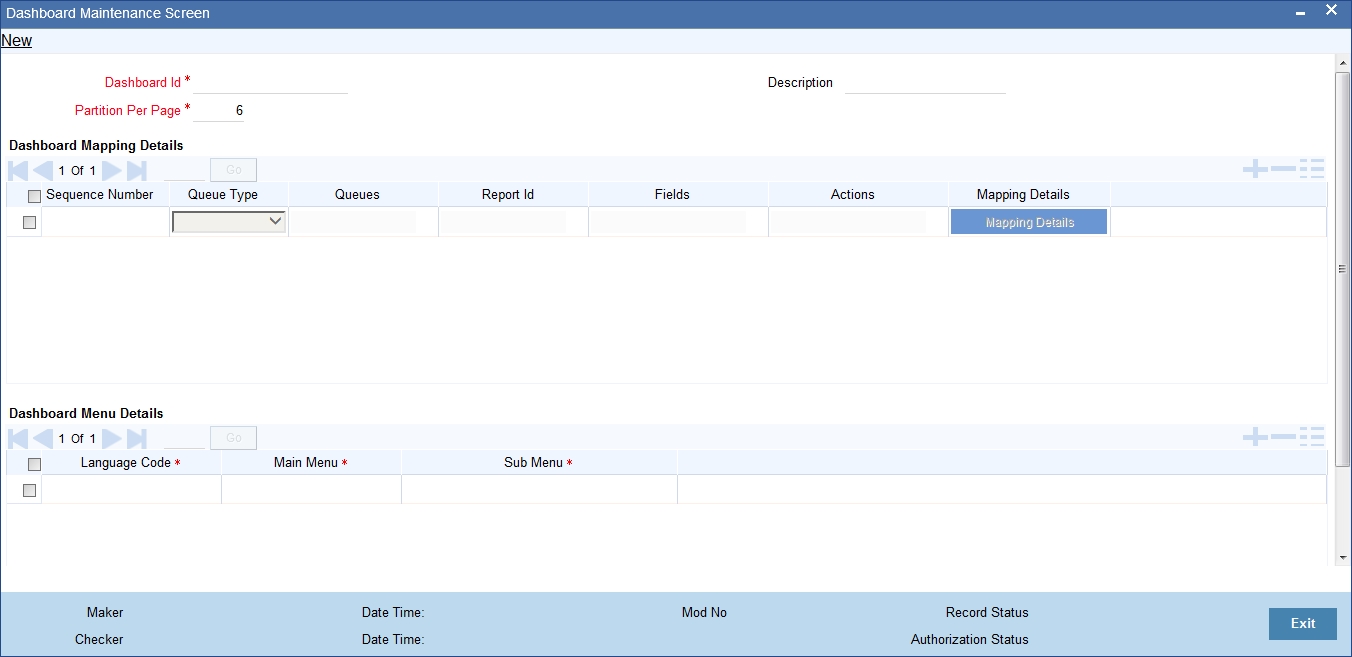
Specify the following details:
Dashboard Id
Specify the dashboard id here.
Description
Specify a brief description of the dashboard.
Partition Per Page
Specify the maximum number of partitions to be displayed in each dashboard page.
Dashboard Mapping Details
Sequence Number
Specify the sequence number for the dashboard. It is used to sequence the order in which the frames are displayed in dashboard.
Queue Type
Select the queue type from the adjoining drop-down list. This list displays the following values:
- Queue - If you select this option, then system displays all valid queue ids in the ‘Queue Id’ option list.
- Count - If you select this option, then system displays the title for the frame selected.This is used when you want to configure a summary dashboard having multiple queue and their corresponding count.
Queue ID
If the ‘Queue Type’ is ‘Queue’, then the adjoining option list displays all valid queue ids maintained in the system. If the ‘Queue Type’ is ‘Count’, then the adjoining option list displays the title for the view.
Report ID
Select the report id for the dashboard from the adjoining option list. This list displays all valid report ids maintained in the system.
Fields
System displays the fields of the dashboard here, based on the fields selected from the ‘Mapping Details’ screen.
Actions
System displays the fields of the dashboard here, based on the fields selected from the ‘Mapping Details’ screen.
Dashboard Menu Details
Main Menu
Specify the main menu name here,
Language Code
Specify the language code of the dashboard.
Sub Menu
Specify the name of the sub menu.
2.9.2 Specifying the Mapping Details
You can select the fields and actions by clicking the ‘Mapping Details’ button in the ‘Origination Dashboard Maintenance’ screen. This screen is used to select the action and columns that you want to perform on a particular frame of the dashboard ..
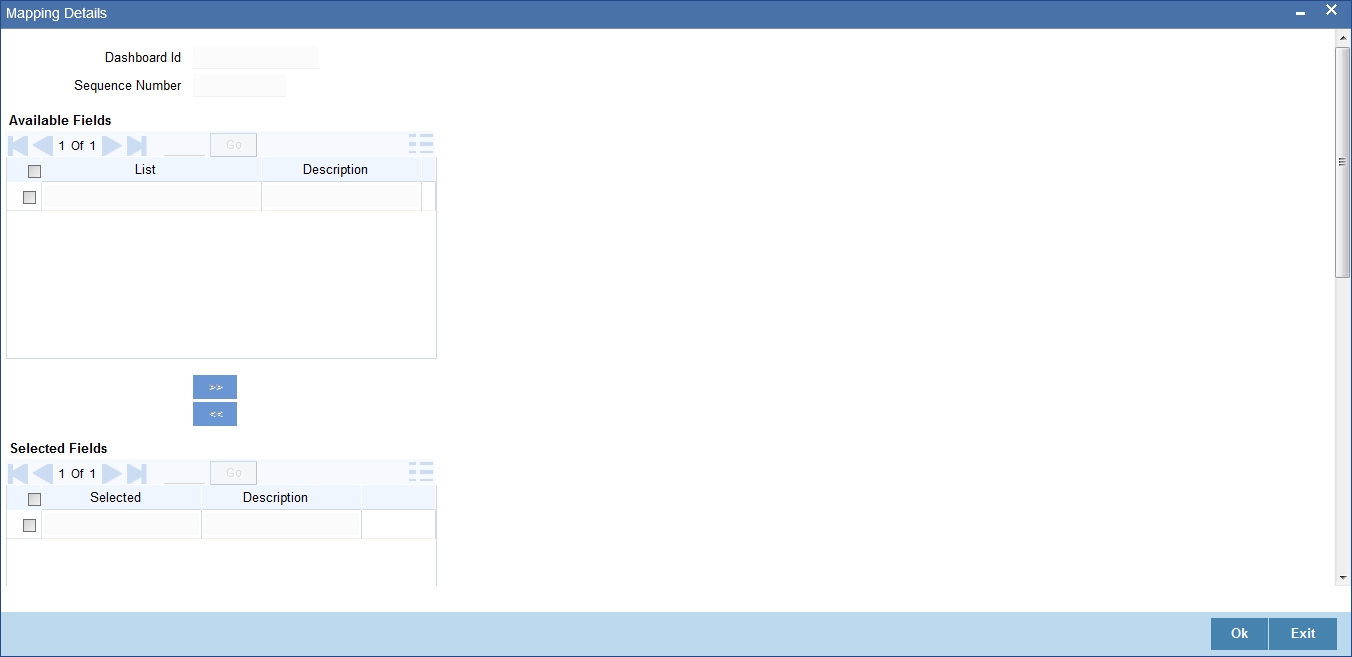
In this screen, you can select the required fields and actions for the dashboard from the Available Fields and Available Actions. Available fields displays all the queues maintained from SMDQUEMT screen, if the option selected is Count in queue type. Available action displays all the actions listed in the header of the task bar. On clicking the right-arrow button, system moves the selected fields and actions to the Selected Fields and Selected Actions sections respectively. Similarly, to de-select an action or a field, click the left-arrow button. Available fields displays blank if the queue type is selected queue and if the option is selected as ‘Queue’.The mapping details are not allowed if the queue type is selected as BAM. The system displays an error message as “No field mappings available for selected queue criteria”.
2.10 Bureau Maintenance Details
This sections contains the following topics:
2.10.1 Maintaining Credit Bureau Details
You can maintain the details of external credit bureaus using ‘Credit Bureau Maintenance’ screen. You can use the credit bureau information while retrieving the credit information of customers through external credit checks.
To invoke the ‘Credit Bureau Maintenance’ screen, type ‘ORDCBRMT’ in the field at the top right corner of the application toolbar and click the adjoining arrow button.
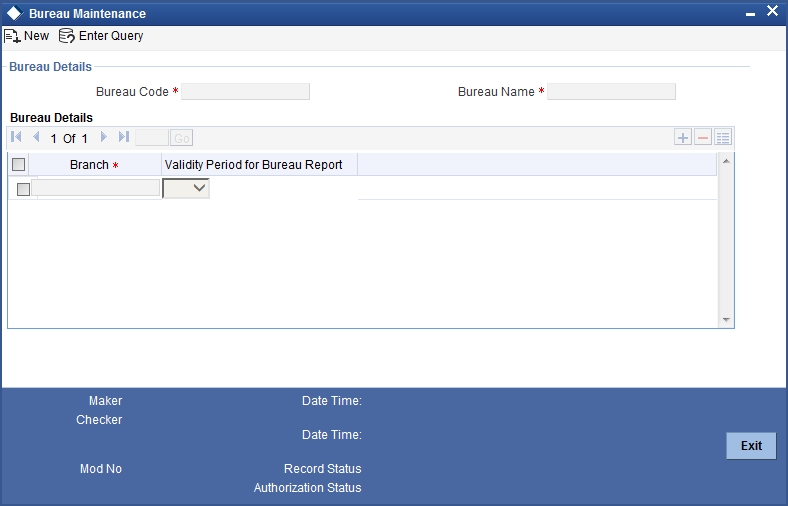
Specify the following details:
Bureau Code
Specify a unique code that identifies the credit bureau that you are maintaining.
Bureau
Specify the name of the bureau.
Branch Code
Specify the branch code for which the bureau details are maintained. Use add row button to add more rows to the list of branches.
Validity Period for Bureau Report
Select the number of days during which the credit report from this bureau is considered as valid. The drop-down list displays the following values:
- 30 days
- 60 days
- 90 days
- 120 days
- Blank Space - If the credit check is initiated for the same bureau either automatically or manually by underwriter, a new bureau report will be fetched and displayed irrespective of any bureau report existing for same applicant from the same bureau.
Select the appropriate one. The system will store the credit bureau report of the applicant for the validity period from the date of report request.
You can add more rows to the list of branches using add row button. Once you have specified all the details, save the maintenance.
The following credit bureaus are already available in the system.
| Bureau Name | Bureau Code | ||
|---|---|---|---|
| Equifax | EQFX | ||
| TransUnion | TRUN | ||
| Credco | CRDC | ||
| Experian | EXPN | ||
| CIBIL | CIBL |
You can add the details of other credit bureaus as per requirement.
2.10.2 Viewing Credit Bureau Summary
You can view a summary of credit bureau details maintained in the system using ‘Credit Bureau Details’ screen. To invoke the screen, type ‘ORSCBRMT’ in the field at the top right corner of the application toolbar and click the adjoining arrow button.
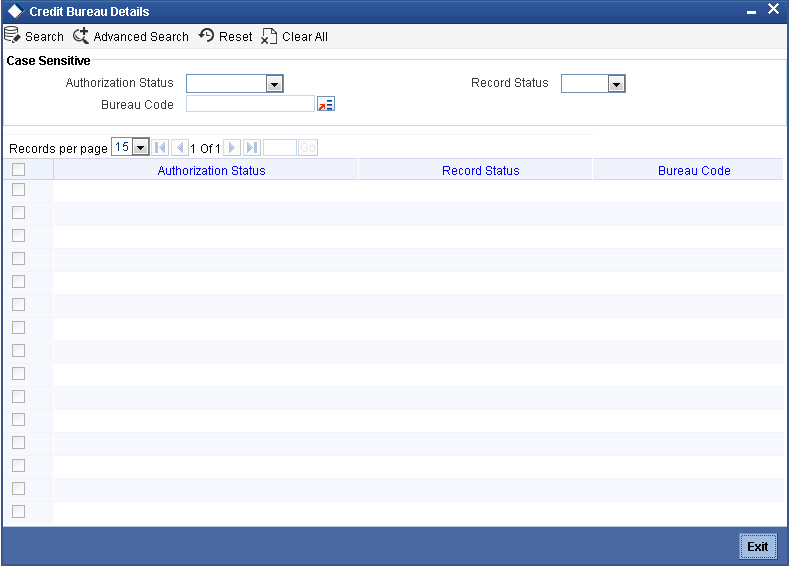
You can search for the records based on one or more of the following parameters:
- Authorization status
- Record status
- Bureau code
Once you have specified the search parameters, click search button. The system displays the following details of each result.
- Authorization status
- Record status
- Bureau code
2.11 Rules Maintenance
This section contains the following topics:
- Section 2.11.1, "Maintaining Credit Rating Rules"
- Section 2.11.2, "Main Tab"
- Section 2.11.3, "Risk Factor Tab"
- Section 2.11.4, "Specifying Credit Grades"
- Section 2.11.5, "Specifying Auto Decision"
- Section 2.11.6, "Viewing Credit Rule Summary"
2.11.1 Maintaining Credit Rating Rules
You can maintain a set of questions along with a possible set of answers with associated scores, to assess the credit rating of a prospective customer. You can also calculate the risk factor associated with the customer and arrive at a credit grade based on the scores obtained.
You can maintain these details in ‘Rule Details’ screen. You can invoke this screen by typing ‘ORDRULMT’ in the field at the top right corner of the Application tool bar and clicking the adjoining arrow button.’
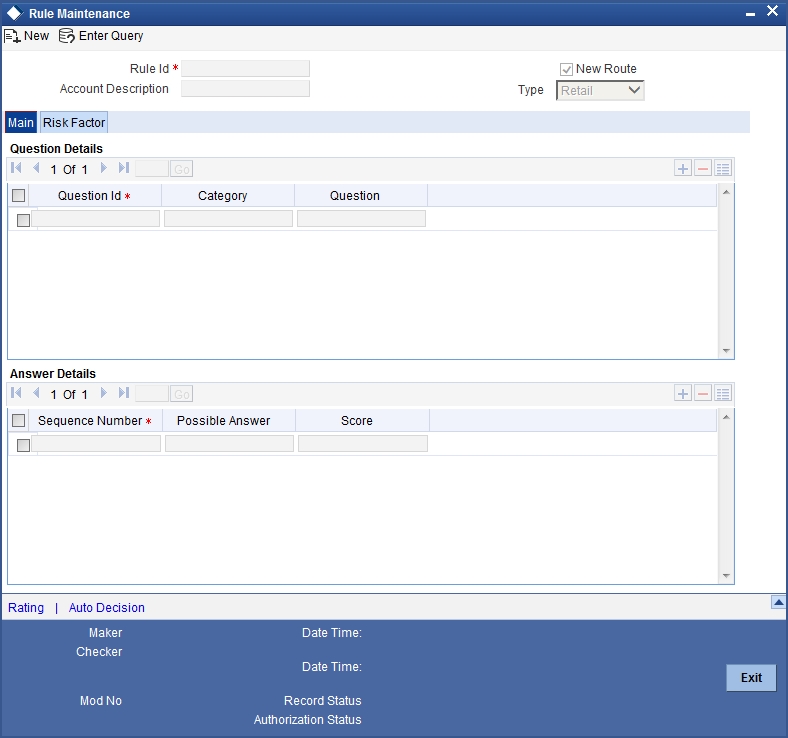
You can specify the following details in this screen:
Rule ID
Specify a unique identification for the credit rating rule.
Description
Specify a suitable description for the credit rating rule.
Type
Select the type of customer from the following options available:
- Retail
- Corporate
- Ijarah
- Istisna
- Mudarabah
- Murabaha
- Musharaka
- Tawarooq
2.11.2 Main Tab
You can maintain the following details in this tab:
Question Details
Question ID
The question ID is automatically generated by the system.
Category
Select the category to which the question belongs from the option list provided.
Question
Specify the question to be asked to the prospective customer to derive the credit rating score.
Answer Details
Sequence Number
The sequence number is automatically generated by the system.
Possible Answer
Specify a set of possible answers to be associated with a question.
Score
Specify the score associated with an answer.
2.11.3 Risk Factor Tab
You can specify the risk details associated with the customer and also indicate the formula for calculating the credit score in this tab.
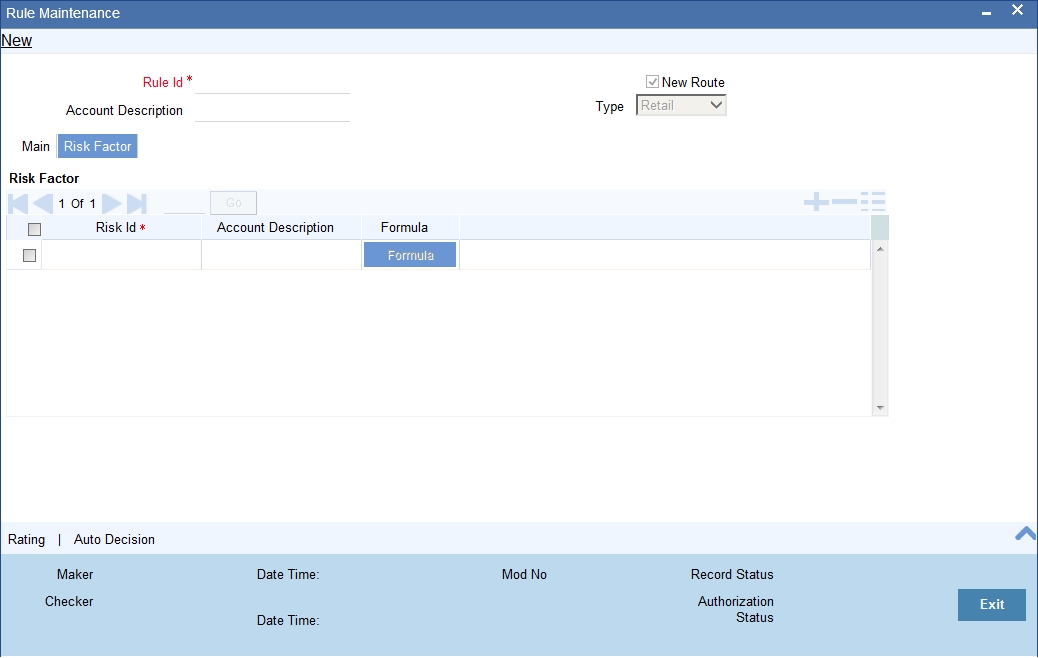
You can specify the following details here:
Risk ID
Specify a unique identifier for the credit risk being maintained.
Description
Specify a suitable description for the credit risk.
2.11.3.1 Specifying Formula Details
You can specify the formula to calculate the credit score by clicking the ‘Formula’ button corresponding to a credit risk entry in Risk Factor tab. The ‘Formula’ screen is displayed where you can specify the condition for calculating the credit score associated with a risk condition.
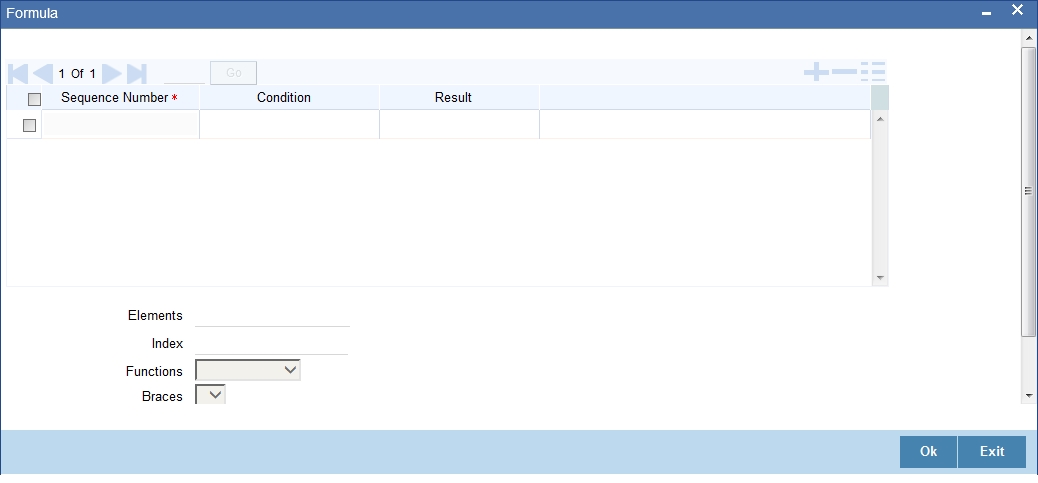
You can specify the following details here:
Sequence Number
The sequence number is automatically generated by the system.
Condition
The condition specified using the Elements, Functions, Operators etc. gets displayed here.
Result
Specify the result to be associated with the condition specified.
Elements
Specify the data elements to be used to define the formula for credit score calculation or select the element from the option list provided.
Functions
Select the mathematical function to be used to define the formula from the drop-down list provided.
Braces
Select the opening or the closing brace from the drop-down list provided, to define the credit score calculation formula.
Operators
Select the mathematical operator to be used to define the credit score calculation formula. You can select ‘+’, ‘-‘, ‘*’, or ‘/’.
Logical Operators
Select the logical operator to be used to define the credit score calculation formula. You can select ‘<’, ‘>‘, ‘=’, ‘<>’, ‘>=‘, ‘<=’, ‘AND’ or ‘OR’.
2.11.4 Specifying Credit Grades
You can maintain different credit grades based on the credit scores obtained. Click ‘Rating’ button in Rule Details screens to invoke the ‘Rating’ screen, where you can maintain these details.
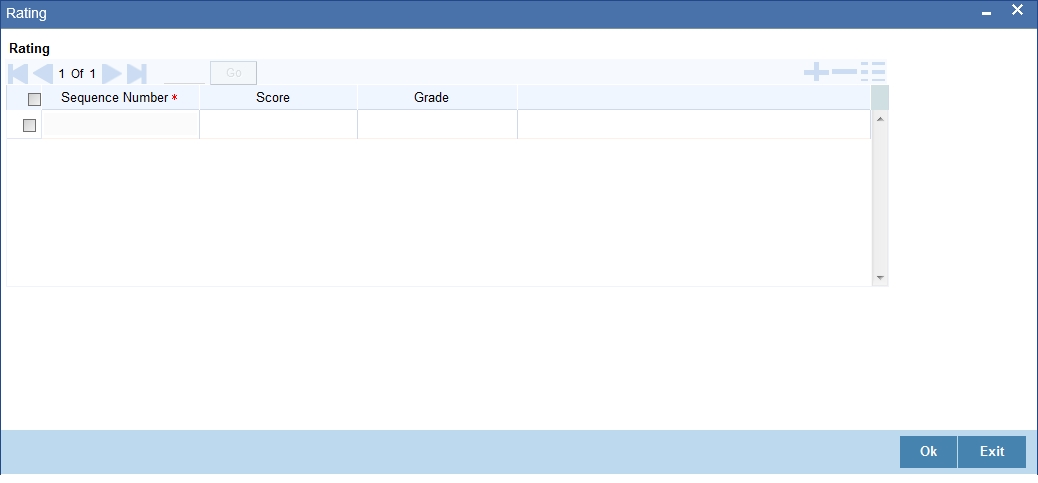
You can specify the following details here:
Sequence Number
The sequence number is automatically generated by the system.
Score
Specify the score associated with a credit risk.
Grade
Specify the credit grade based on the score obtained.
2.11.5 Specifying Auto Decision
You can maintain decisions based on the credit scores obtained to decide applicants eligibility for customer. Click ‘Auto Decision’ button in Rule Details screens to invoke the ‘Auto Decision’ screen, where you can maintain these details.
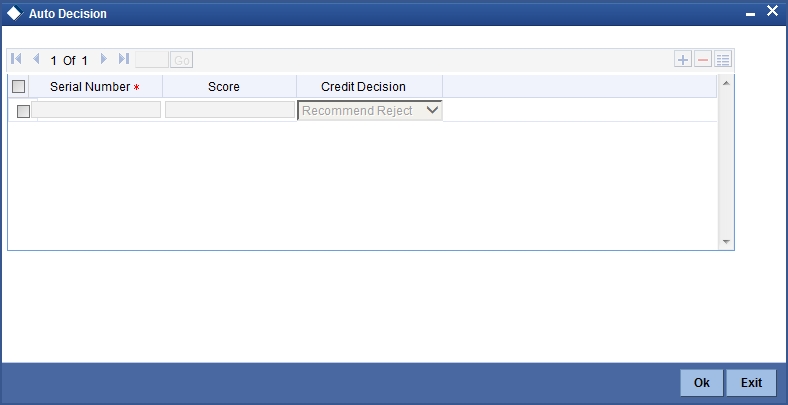
Serial Number
System generates the unique serial number for each auto decision status.
Score
Specify the maximum credit score for the applicant based on the auto decision.
Credit Decision
Specify the credit decision for the applicant based on the auto decision. You can select any of the following options from the drop-down list provided:
- AUTO APPROVED
- RECOMMEND-APPROVAL
- RECOMMEND-REJECT
- AUTO REJECTED.
2.11.6 Viewing Credit Rule Summary
You can view a summary of the credit rules in ‘Rule Maintenance’ screen. You can also query for a particular record based on desired search criteria.
You can invoke this screen by typing ‘ORSRULMT’ in the field at the top right corner of the Application tool bar and clicking the adjoining arrow button.
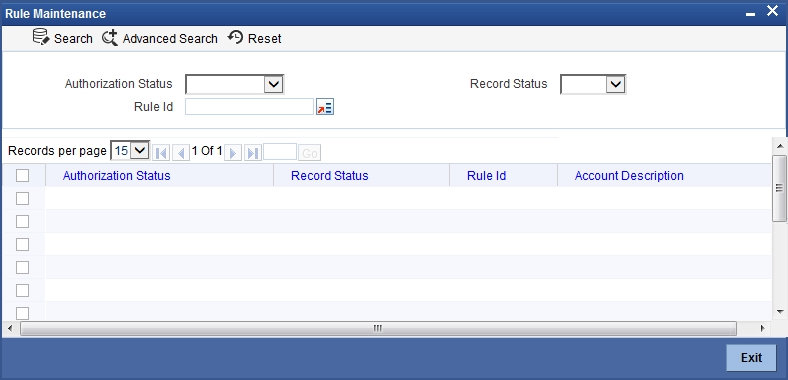
You can specify any of the following details to search for a record:
- Authorization Status
- Record Status
- Rule ID
Click ‘Search’ button to search for a record based on the search criteria specified. You can double click a desired record to view the detailed screen.
2.12 Queue Maintenance
This section contains the following topics:
2.12.1 Configuring Queues
A queue represents a set of human tasks that are grouped on the basis of the common characteristics they share. For instance, you could have groups based on whether the tasks have been completed, deleted or the type of transaction
You can define the basis for grouping for each queue in the ‘Queue Maintenance’ screen. To invoke this screen, type ‘SMDQUEMT’ in the field at the top right corner of the Application tool bar and click the adjoining arrow button. The following screen is displayed:
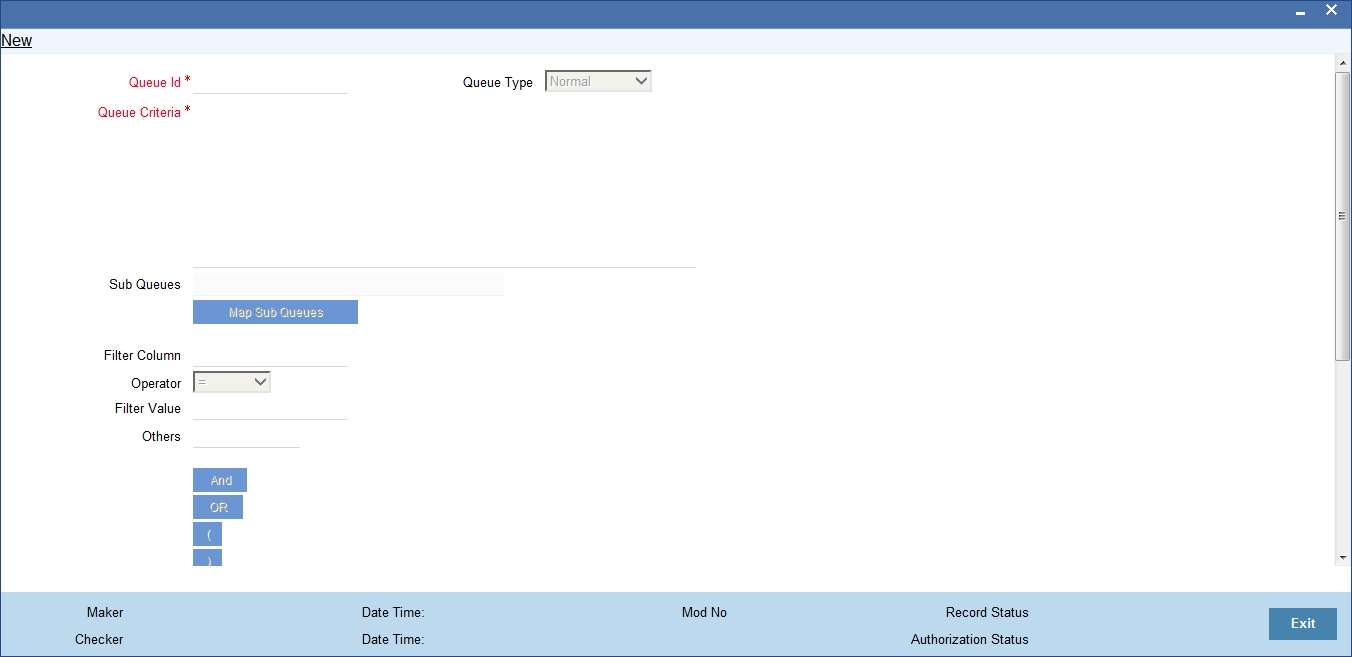
In this screen, you are required to specify the following details:
Queue ID
Specify a unique identification code for the queue.
Queue Type
Indicate the type of tasks that should be displayed for the queue you are defining. Select one of the following values from the adjoining drop-down list:
- Editable tasks: Tasks where the user will be allowed to modify existing data.
- Read-only Tasks: Tasks where the user can only view existing information.
- Normal Tasks – All the tasks for which the user has rights (editable/read-only)
- Supervisor – All tasks pertaining to the all the subordinates of the user.
- Current stage – The current stage of a process instance in which the user has performed at least one task.
- Dashboard - Select this queue type to define the queue as a dashboard. Dashboard queues will not be displayed in the queue navigation tree in the landing page.
- Audit - Select this option to define this queue as an audit queue.
Queue Criteria
Specify the criteria to be used to filter all tasks. The criteria specified here and the queue type you have indicated earlier determine the tasks that are displayed under each queue.
You can also associate Function IDs to queues by specifying them here. If you do so, only those Function IDs that have been associated can be accessed by the user. If there is no such association in the criteria, all Function IDs will be made available for the queue.
Sub Queues
The system displays the names of sub queues mapped to this queue.
You can map additional sub queues using ‘Map Sub Queues’ button.
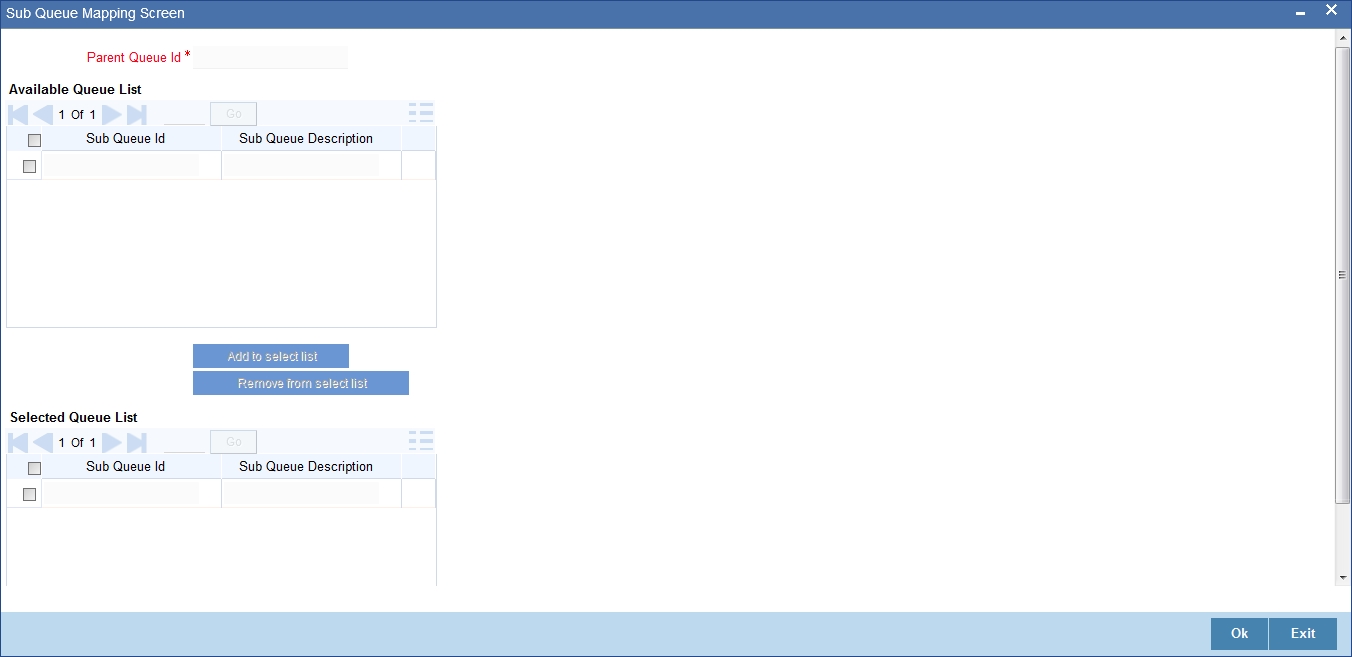
Available Queue List displays the sub queue IDs available for selection. You can add one or more sub queues to the Selected Queue List using ‘Add to select list’ button. Identify the required sub queues, check the adjoining check box and and click ‘Add to select list’ button. The selected queues are added to Selected Queue List.
You can also remove a sub queue from the Selected Queue List. From the Selected Queue List, identify the queue to remove, check the adjoining check box and click ‘Remove from select list’ button. The selected queues are removed from the list.
You can view the sub queues under the respective parent queues in the queue navigation tree.
Filter Column
Indicate the basis for filtering the tasks.
Operator
Indicate the operator.
Filter Value
Specify the value to be considered for filtering.
Others
If ‘Filter Value’ chosen is ‘Others’, you can specify the value here.
Language Code
Indicate the language code to be used for the queue ID.
Main Menu
Indicate the name of the group under which the queue should be placed.
Sub-Menu
Specify the name for the queue. This will appear under the Main Menu.
Description
Specify a relevant description that will be displayed when you point the mouse on the Sub-Menu.
Workflow places the tasks that meet the criteria specified for each queue as shown below:
2.13 Field Investigation Maintenance
This section contains the following topics:
- Section 2.13.1, "Maintaining Field Investigation Details"
- Section 2.13.2, "FI Agency Tab"
- Section 2.13.3, "Valuation Agency Tab"
- Section 2.13.4, "Others Tab"
- Section 2.13.5, "Viewing Field Investigation Summary"
2.13.1 Maintaining Field Investigation Details
You can maintain field investigation details and valuation details including the agency details and the corresponding verification types using ‘Field Investigation Maintenance’ screen. To invoke this screen, type ‘ORDFIAMT’ at the top right corner of the application toolbar and click the adjoining arrow button.
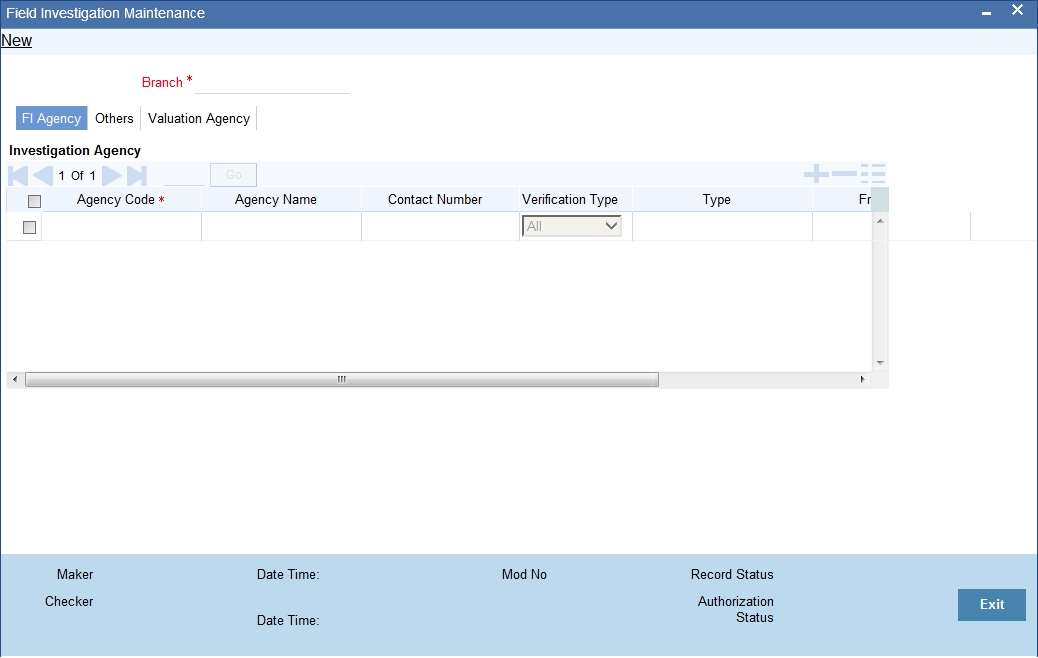
Specify the following details:
Branch Code
Specify the branch code.
2.13.2 FI Agency Tab
Under ‘Agency’ tab, you can capture the details of the investigation agency and the corresponding verification type.
Agency Code
Specify a unique agency code. The system will use this code to identify the agency whose details you are maintaining.
Agency Name
Specify the name of the investigation agency whose details you are maintaining.
Contact Number
Specify the contact number of the agency.
Verification Type
Select the verification type that you need to associate with the agency. The drop-down list displays the following verification types:
- Address - Select ‘Address’ to indicate that the agency deals in address verification only
- Employment - Select ‘Employment’ to indicate that the agency deals in employment verification only
- Collateral - Select ‘Collateral’ to indicate that the agency deals in collateral verification only
- All - Select ‘All’ to indicate that the agency deals in all kind of verifications, i.e. address, employment and collateral verifications.
Collateral Type
Select the collateral type from the adjoining option list.
From ZIP
Specify the zip code starting value which is to be used along with ending value to auto populate valuation agency based on collateral zip code (mainly applicable for retail collaterals).
To ZIP
Specify the zip code ending value.
2.13.3 Valuation Agency Tab
Specify the following details in this tab:
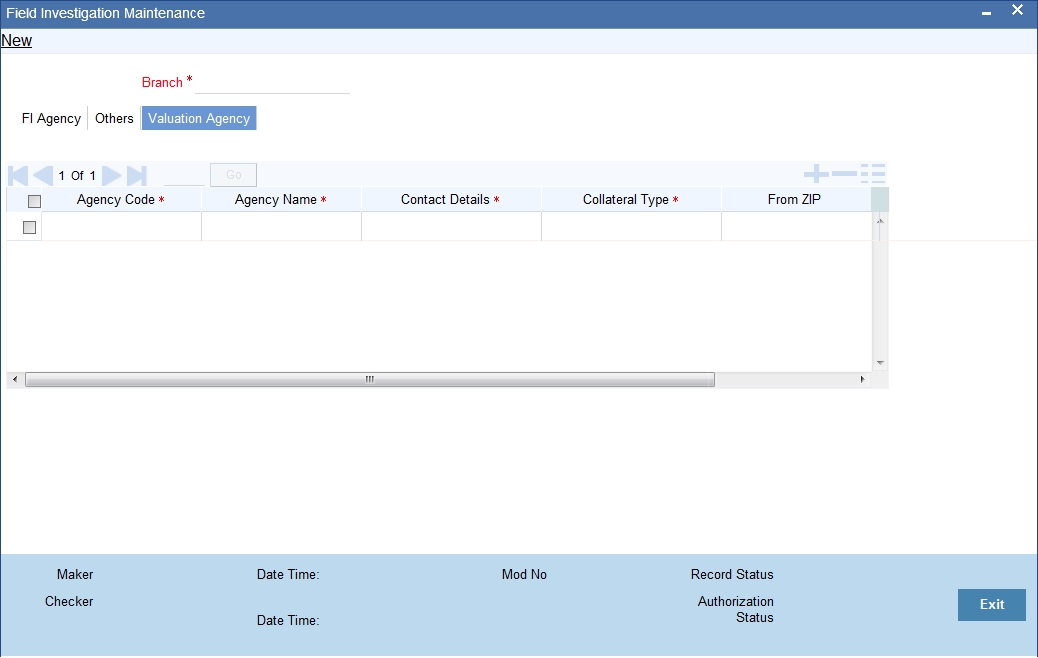
Agency Code
Specify a unique agency code. The system will use this code to identify the agency whose details you are maintaining.
Agency Name
Specify the name of the investigation agency whose details you are maintaining.
Contact Details
Specify the contact number of the agency.
Collateral Type
Select the collateral type from the adjoining option list.
From ZIP
Specify the zip code starting value which is to be used along with ending value to auto populate valuation agency based on collateral zip code (mainly applicable for retail collaterals).
To ZIP
Specify the zip code ending value.
2.13.4 Others Tab
Click ‘Others’ tab on the ‘Field Investigation Maintenance’ screen.
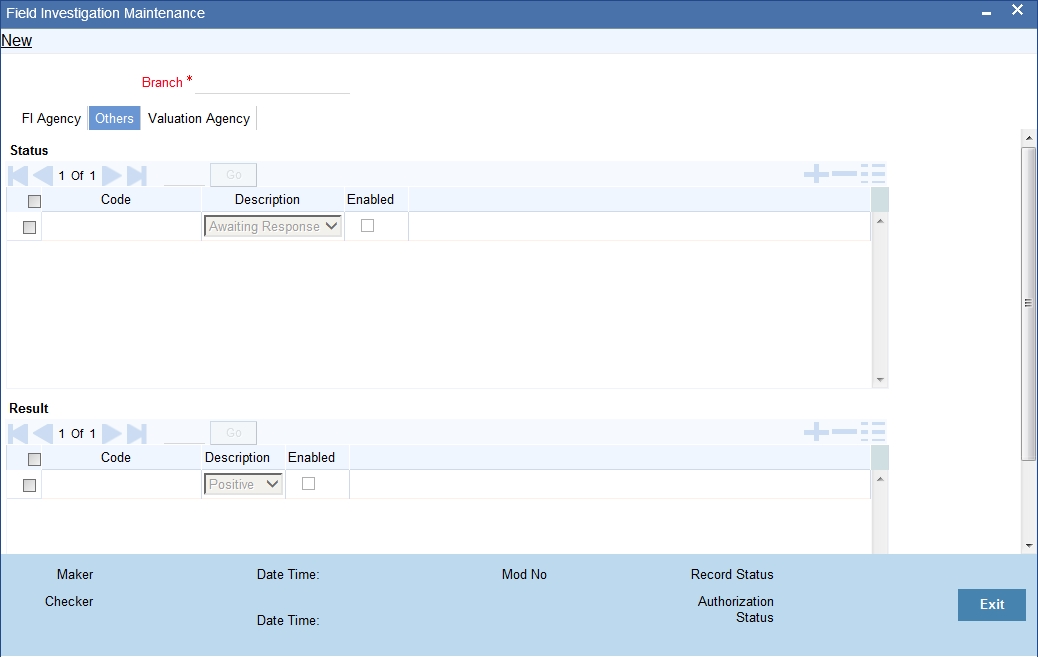
Under ‘Others tab, you can configure the statuses and results that should be enabled for the field investigation.
Status
You can configure the statuses here. The statuses that you enable here will be available at the following places for selection:
You can add a new status or delete an existing status using the add row button or delete row button respectively.
Code
Specify a unique code that identifies the status that you are maintaining.
Description
Specify a brief description of the status.
Enabled
Check this box to enable the status. If you do not check the box for a particular status, you will not get that status for selection in the above screens
Result
You can configure the results here.
You can add a new result or delete an existing result using the add row button or delete row button respectively.
Code
Specify a unique code that identifies the result that you are maintaining.
Description
Specify a brief description of the result.
Enabled
Check this box to enable the result.
If you do not check the box for a particular result, you will not get that result for selection in the above screens.
Once you have captured the details, save the maintenance.
2.13.5 Viewing Field Investigation Summary
You can view a summary of the field investigations maintained in the system using ‘Field Investigation Summary’ screen. To invoke the screen, type ‘ORSFIAMT’ in the field at the top right corner of the application toolbar and click the adjoining arrow button.
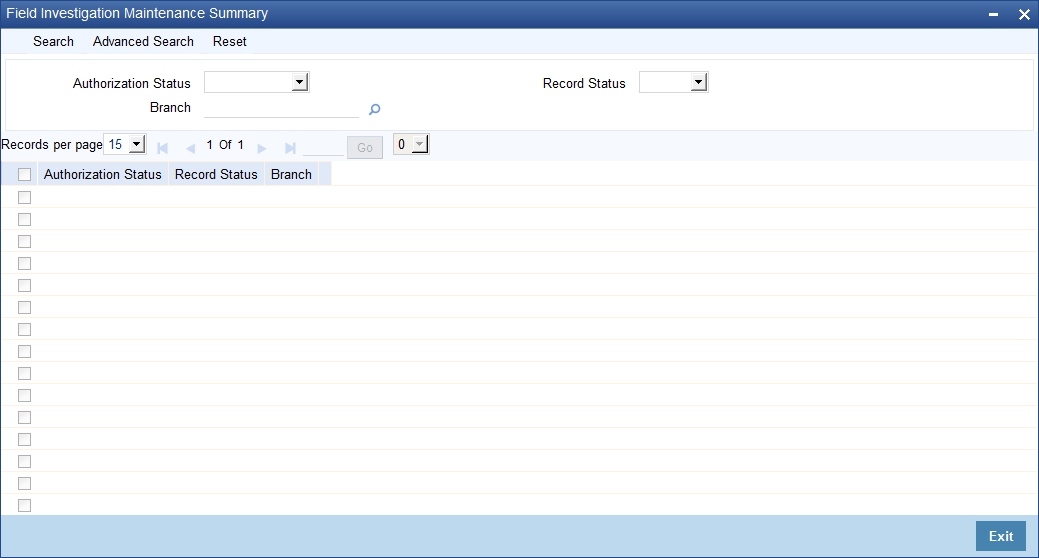
You can search for the records based on the of parameters available on the screen. The system will display the records based on the search criteria specified. You can double-click a record to open the detailed screen.
2.14 Override Maintenance
This section contains the following topics:
2.14.1 Maintaining Override Details
You can maintain the formulae to verify if overrides need to be generated dynamically, in ‘Override Maintenance’ screen. You can invoke this screen by typing ‘ORDOVDMT’ in the field at the top right corner of the Application tool bar and clicking the adjoining arrow button. You can specify the following details in this screen:
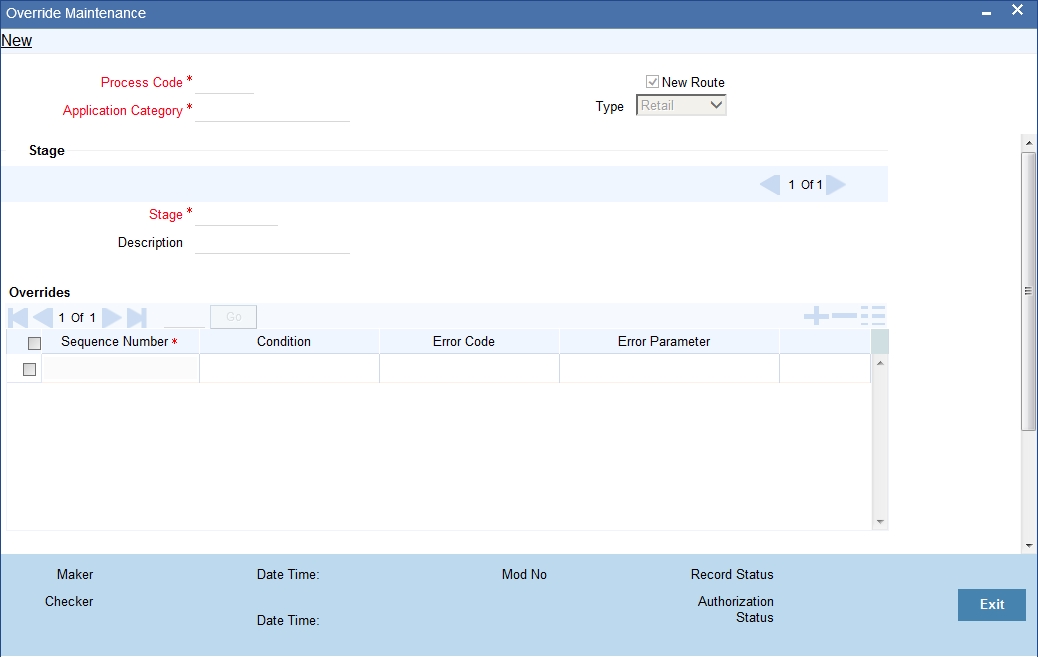
Process Code
Specify the process code of the process for which you wish to maintain override conditions or select the process code from the option list provided.
Application Category
Specify the category to which the application belongs or select the application category from the option list provided.
Type
Select the type of the customer from the following options available:
- Retail
- Corporate
- Ijarah
- Istisna
- Mudarabah
- Murabaha
- Musharaka
- Tawarooq
Stage
Select the stage of the CAM origination process from the option list provided.
Description
Specify a suitable description for the CAM origination stage.
Overrides
Here, you can capture the details of the conditions to be checked for generating override messages.
Sequence Number
The sequence number is automatically generated by the system.
Condition
The condition specified using the Elements, Functions, Operators etc. gets displayed here.
Error Code
Specify the error code to be used to generate the override message or select the error code from the option list provided.
Error Parameter
Specify the error parameter to be substituted in the override messages.
Elements
Specify the data elements to be used to define the conditions for generating override messages or select the element from the option list provided.
Functions
Select the mathematical function to be used to define the condition from the drop-down list provided.
Braces
Select the opening or the closing brace from the drop-down list provided, to define the conditions for generating override messages.
Operators
Select the mathematical operator to be used to define the conditions for generating override messages. You can select ‘+’, ‘-‘, ‘*’, or ‘/’.
Logical Operators
Select the logical operator to be used to define the conditions for generating override messages. You can select ‘<’, ‘>‘, ‘=’, ‘<>’, ‘>=‘, ‘<=’, ‘AND’ or ‘OR’.
2.14.2 Viewing Override Summary
You can view a summary of the overrides in ‘Override Maintenance’ screen. You can also query for a particular record based on desired search criteria. You can invoke this screen by typing ‘ORSOVDMT’ in the field at the top right corner of the Application tool bar and clicking the adjoining arrow button.
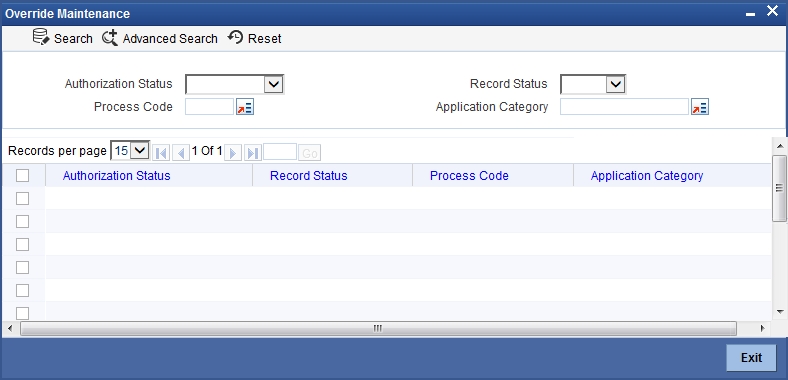
You can specify any of the following details to search for a record:
- Authorization Status
- Record Status
- Process Code
- Application Category
Click ‘Search’ button to search for a record based on the search criteria specified. You can double click a desired record to view the detailed screen.
2.15 Balance Sheet Size Maintenance
This section contains the following topics:
- Section 2.15.1, "Maintaining Balance Sheet Size"
- Section 2.15.2, "Viewing Balance Sheet Size Details"
2.15.1 Maintaining Balance Sheet Size
You can maintain the balance sheet size and the size of the balance sheet are classified based on the Amount range using ‘Balance Sheet Maintenance’ screen.
You can invoke this screen by typing ‘ORDBSZMT’ in the field at the top right corner of the Application tool bar and clicking the adjoining arrow button.
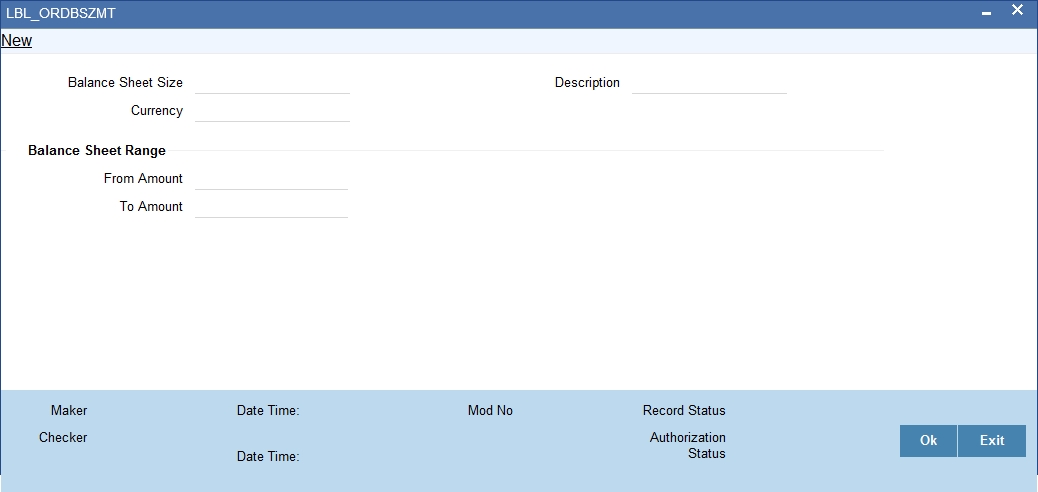
You can enter the following details:
Balance Sheet Size
Specify the unique name to identify the balance sheet size.
Description
Enter a brief description about the balance sheet size.
Currency
Specify the currency to define the balance sheet size.
Balance Sheet amount range
From Amount
Specify the range for balance sheet size.
To Amount
Specify the range for balance sheet size.
2.15.2 Viewing Balance Sheet Size Details
You can view the balance sheet size details using ‘Balance Sheet Size Maintenance Summary’ screen. To invoke this screen, type ‘ORSBSZMT’ in the field at the top right corner of the Application tool bar and click the adjoining arrow button.
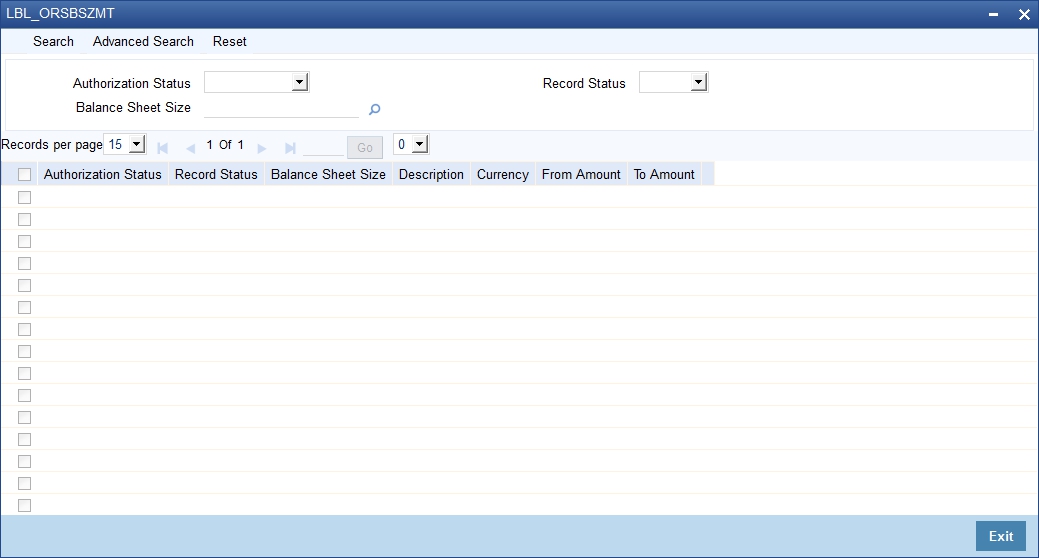
You can click ‘Search’ button to view all the pending functions. However, you can to filter your search based on any of the following criteria:
Authorization Status
Select the authorization status of the contract from the drop-down list.
Balance Sheet Size
Select the balance sheet size from the option list.
Record Status
Select the record status from the drop-down list.
When you click ‘Search’ button the records matching the specified search criteria are displayed. For each record fetched by the system based on your query criteria, the following details are displayed:
- Authorization Status
- Record Status
- Balance Sheet Size
- Description
- Currency
- From Amount
- To Amount
2.16 Document Upload Maintenance
This section contains the following topics:
2.16.1 Maintaining Document Upload
You can upload the workflow supportive documents using ‘Document Upload Maintenance’ screen.
You can invoke this screen by typing ‘ORDEXLUP’ in the field at the top right corner of the Application tool bar and clicking the adjoining arrow button.
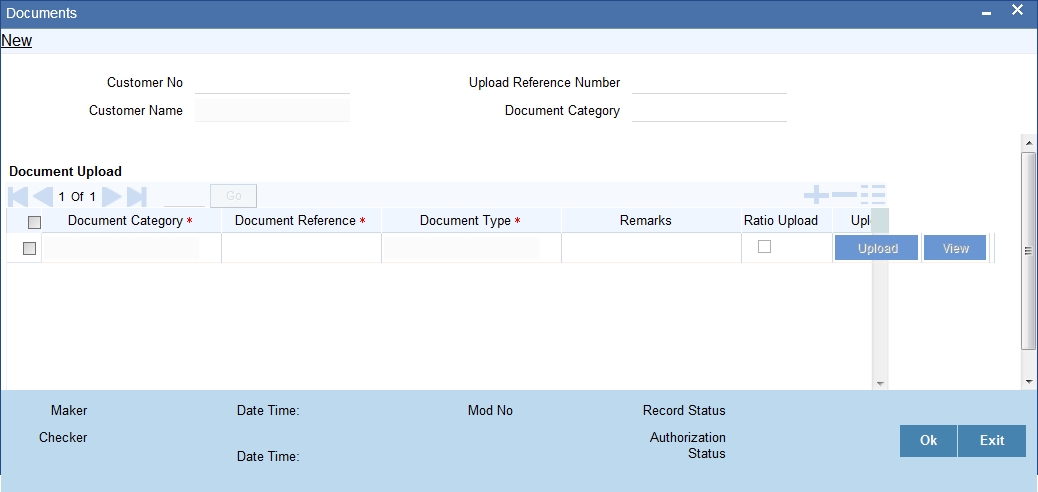
You can enter the following in this screen:
Customer No
Specify the customer number whose document needs to be uploaded. The adjoining option list displays all the customer numbers maintained in the system. Select the appropriate one.
Customer Name
The system displays the customer name whenever you select Customer No.
Upload Reference Number
The system will display the upload reference number.
Document Category
Specify the document category for upload. The adjoining option list displays all the document categories maintained in the system. Select the appropriate one.
Document Upload
Document Category
Specify the document category for document upload. The adjoining option list displays all the document categories maintained in the system. Select the appropriate one.
Document Reference
Specify the document reference number.
Document Type
Specify the document type for upload. The adjoining option list displays all the document types maintained in the system. Select the appropriate one.
Remarks
Specify remarks, if any.
Ratio Upload
Check this box if you require ratio upload.
Upload
Click Upload Button to upload the document.
View
Click View Button to view the uploaded document.
2.16.2 Viewing Document Upload Details
You can view the document upload details using ‘Document Upload Summary’ screen. To invoke this screen, type ‘ORSEXLUP’ in the field at the top right corner of the Application tool bar and click the adjoining arrow button.
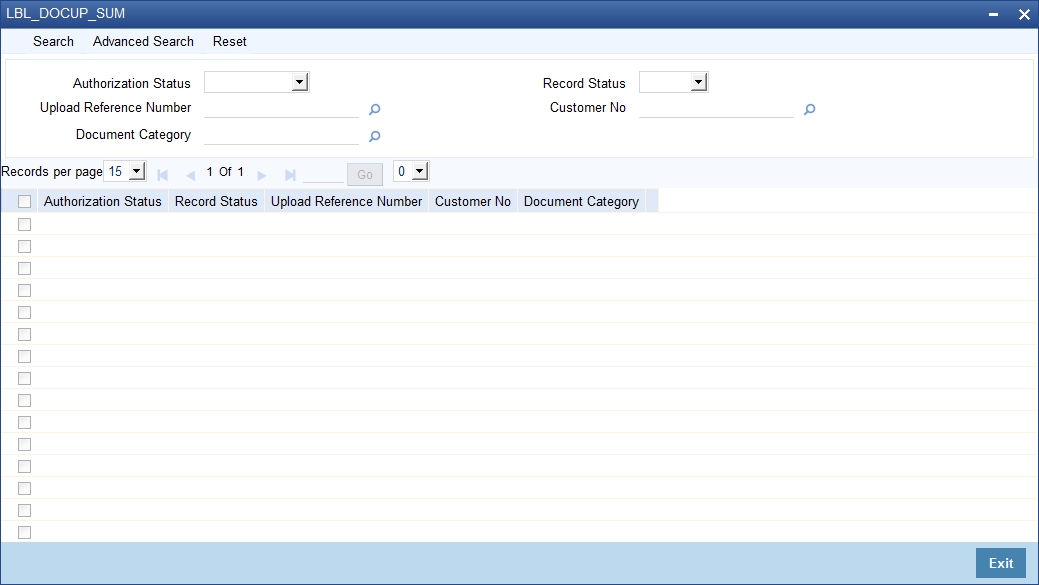
You can click ‘Search’ button to view all the pending functions. However, you can to filter your search based on any of the following criteria:
Authorization Status
Select the authorization status of the contract from the drop-down list.
Upload Reference Number
Select the upload reference number from the option list.
Document Category
Select the document category from the option list.
Record Status
Select the record status from the drop-down list.
Customer No
Select the customer No from the option list.
When you click ‘Search’ button the records matching the specified search criteria are displayed. For each record fetched by the system based on your query criteria, the following details are displayed:
- Authorization Status
- Record Status
- Upload Reference Number
- Customer No
- Document Category
2.17 Covenant Maintenance
This section contains the following topic:
2.17.1 Maintaining Covenant Process Initiation
The bank receives an application covenant details which will be tracked in the process. Facility will be provided to view the interaction which has been carried out with the customers and list of covenants which are pending / received from the customer. To capture the no of days before the covenant task needs to be created from the due date / revision date.
You can key-in the covenant details required in ‘Covenant Process Initiation Maintenance’ screen. You can also invoke this screen by typing ‘ORDCTRMT’ in the field at the top right corner of the Application tool bar and clicking the adjoining arrow button.
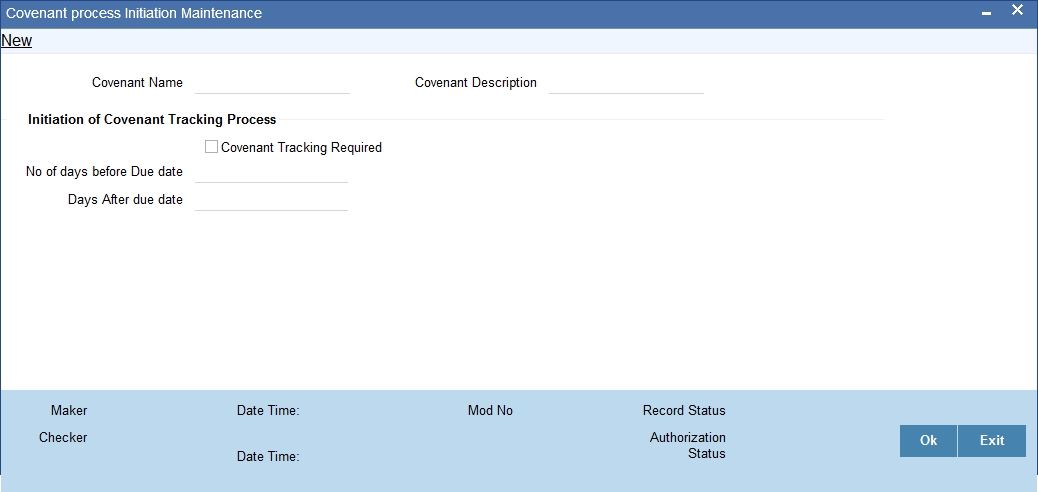
You can enter the following details:
Covenant Name
Specify the name of the covenant to which the task initiation parameter is maintained. The adjoining option list displays all the covenant names maintained in the system. Select the appropriate one.
Covenant Description
The system will display the description. However you can modify it.
Initiation of Covenant Tracking Process
Covenant Tracking Required
Check this box to indicate whether the covenant tracking is required.
No of days before Due date
Specify the number of days before which the task needs to be initiated from the due date.
Days after due date
Specify the number of days before which the task needs to be initiated from the revision date.
2.18 Excel Upload Modify Screen
This section contains the following topics:
2.18.1 Uploading Modified Excel
The system displays the financial entities which have been uploaded through the excel sheet, Industry, customer no, fin type (PL/BS), financial year, financial cycle will be used as key elements for retrieving the uploaded details through ‘Excel Upload Modify Screen’ screen.
You can invoke this screen by typing ‘ORDEXLMD’ in the field at the top right corner of the Application tool bar and clicking the adjoining arrow button.
You can enter the following details:
Application Category
The system will display the application category.
Ratio Group
The system will display the ratio group.
Industry
Specify the Industry code for the financial statement. The adjoining option list displays all the industries maintained in the system. Select the appropriate one.
Customer No
Specify the customer No for the financial statement. The adjoining option list displays all the customer numbers maintained in the system. Select the appropriate one.
Sheet Name
Specify the uploaded sheet name. The adjoining option list displays all the sheet names maintained in the system. Select the appropriate one.
Financial cycle
Specify the financial cycle for the financial statement. The adjoining option list displays all the financial cycles maintained in the system. Select the appropriate one.
Financial year
Specify the financial year for the financial statement. The adjoining option list displays all the financial years maintained in the system. Select the appropriate one.
Work Sheet Name
Specify the worksheet name for the financial statement. The adjoining option list displays all the work sheet names maintained in the system. Select the appropriate one.
Parameter
Specify the financial element name.
Value
Specify the value for the financial element.
From Date
Specify the From date for the financial cycle.
To Date
Specify the To date for the financial cycle.
Currency
Specify the currency for the financial element.
2.18.2 Viewing Modified Excel Details
You can view the modified excel details using ‘Excel Upload Modify Screen Summary’ screen. To invoke this screen, type ‘ORSEXLMD’ in the field at the top right corner of the Application tool bar and click the adjoining arrow button.
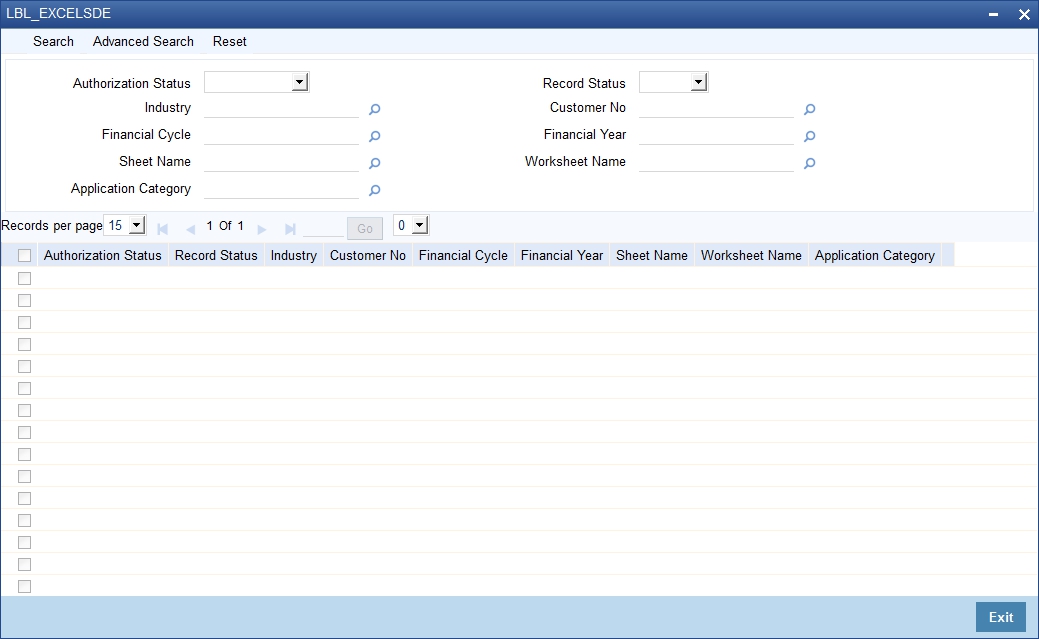
You can click ‘Search’ button to view all the pending functions. However, you can to filter your search based on any of the following criteria:
Authorization Status
Select the authorization status of the contract from the drop-down list.
Industry
Select the industry from the option list.
Financial Cycle
Select the financial cycle from the option list.
Sheet Name
Select the sheet name from the option list.
Application Category
Select the application category from the option list.
Record Status
Select the record status from the drop-down list.
Customer No
Select the customer No from the option list.
Financial Year
Select the financial year from the option list.
Worksheet Name
Select the work sheet name from the option list.
When you click ‘Search’ button the records matching the specified search criteria are displayed. For each record fetched by the system based on your query criteria, the following details are displayed:
- Authorization Status
- Record Status
- Industry
- Customer No
- Financial Cycle
- Financial Year
- Sheet Name
- Worksheet Name
- Application Category
2.19 Landing Page Configuration
This section contains the following topic:
2.19.1 Configuring Landing Page
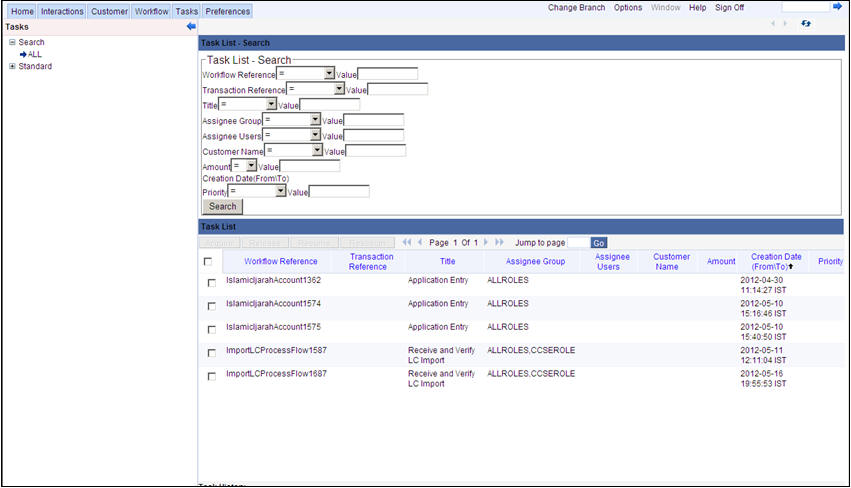
The page that is displayed on invoking the application is called as the ‘Landing Page’. As mentioned above, you can launch a search for a particular task on the basis of the fields displayed in the Task List pane under the ‘All’ sub-menu in the ‘Search’ main menu item. The fields under this sub-menu (All) are pre-defined in the system and represent all process flows. The search fields under the ‘All’ sub-menu are displayed as shown in the screen below:
You can also choose to maintain additional fields for specific process flows, When you maintain additional fields for search operation for a process flow, the process flow is displayed under the ‘Search’ main menu and all the fields (pre-defined and the additional ones maintained for the process flow) become available for you to search on.
You can define the process-flow specific additional fields in the ‘Landing Page Configuration’ screen, which you can invoke by typing ‘SMDLNDPG’ in the field at the top right corner of the Application tool bar and clicking the adjoining arrow button. The following screen is displayed:
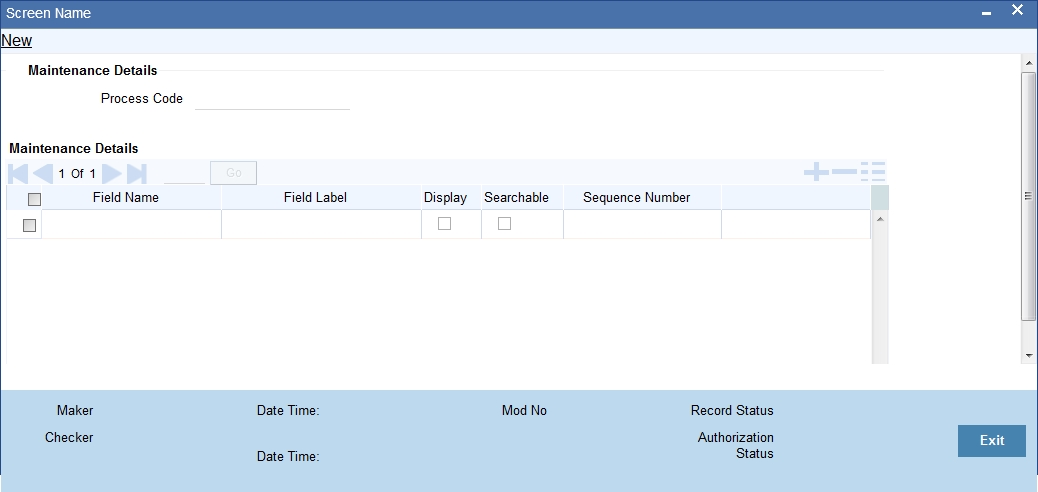
Here, you can capture the following details:
Process Code
Specify the function ID associated with the process work flow for which you are defining additional details.
Field Name
Select the field name which should appear in the Task List pane when you carry out a search for a task under the process flow mentioned above.
Field Label
Specify the name that should be displayed in the Task List pane.
Display
Check this box if the value of the field specified should be displayed as part of task details when you click on a task. This is applicable only when the ‘Process Code’ field is ‘specified as ‘All’.
Searchable
Check this box to indicate that the field should be made available for searching tasks. This facility is available for any ‘Process Code’.
Seq No
Specify the order of display for the filed.
For instance, if you have maintained the fields ‘Currency’ and Product ID as an additional field for the Export LC process flow, you can see these fields along with the ones available under the ‘All’ sub-menu, when you click the ‘Export LC’ queue under the ‘Search’ main menu item as shown in the screen below:
2.20 Entity Code Maintenance
This section contains the following topics:
- Section 2.20.1, "Maintaining Entity Details"
- Section 2.20.2, "Corporate Tab"
- Section 2.20.3, "Director Tab"
- Section 2.20.4, "Duplicate Check"
2.20.1 Maintaining Entity Details
In the ‘Entity Details Maintenance’ screen, you can capture entity details such as Entity Short Name, Full Name, Address details and so on. This will eventually help in capturing the customer’s economic dependency details like supplier details, shareholder details, lender details and so on, during the credit appraisal management process. Based on this maintenance you can generate reports to analyse the customer’s economic dependency details during the Credit Appraisal Management Process. For more information on these reports, refer to the ‘Customer Economic Dependency Analysis Reports’ User Manual.
You can invoke this screen by typing ‘ORDENTYM’ in the field at the top right corner of the Application tool bar and clicking the adjoining arrow button.
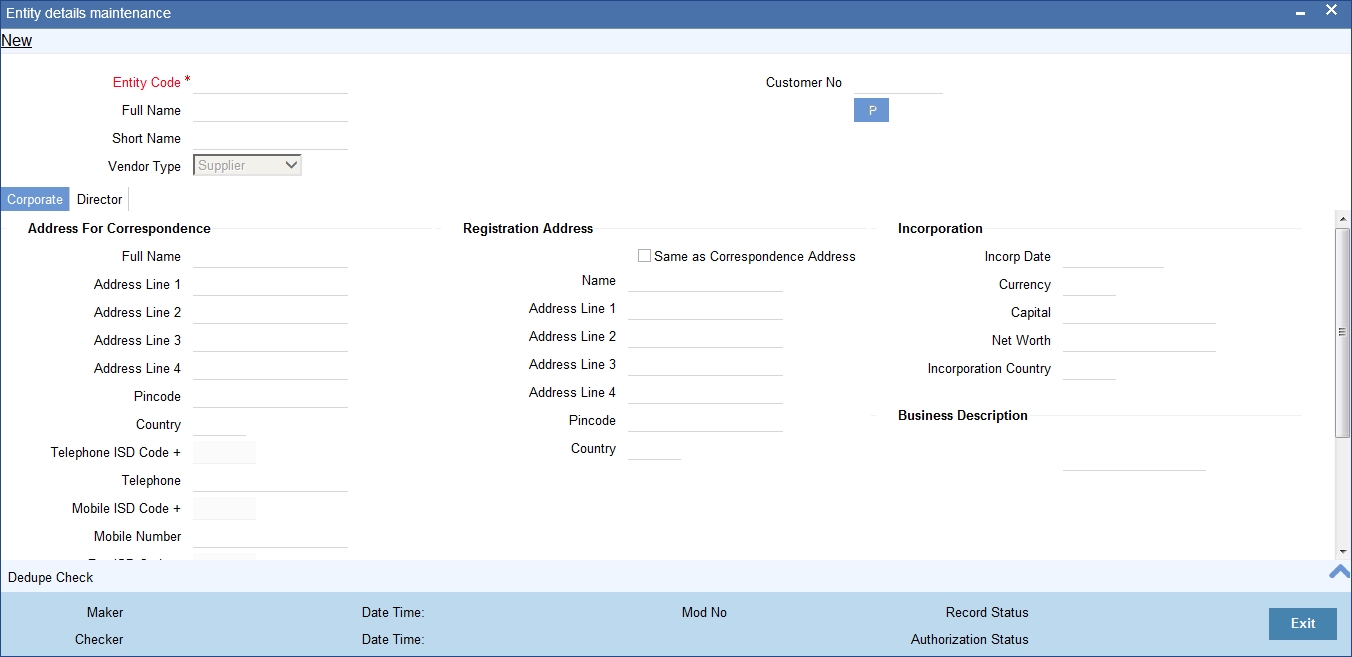
Specify the following details in this screen:
Entity Code
Specify a reference number to identify the vendor.
Full Name
The system defaults the full name of the customer specified at STDCIF by pressing the populate button, same can be modified by the user..
Short Name
Specify the vendor’s abbreviated name. The description that you capture is unique for each vendor. It helps in conducting a quick alpha-search or generating queries regarding the vendor and user can default the short name of the customer by pressing populate, same can be modified by use
Vendor Type
Select the vendor type from the drop-down list. The following values are provided in the drop down list:
- Supplier
- Consumer
- Lender
- Share Holder
- Holdings
- Guarantor
- Borrower
- All
Customer Number
Select the CIF number of the vendor. The system displays the corporate customers in this list.
2.20.2 Corporate Tab
This tab consists of corporate information. When you click the populate button in the STDCIF screen the values in this screen will get populated.
Address for Correspondence
Full Name
Specify the name of the vendor. The vendor will be addressed by this name on all correspondence sent from the bank.
Address Line 1 - 4
Specify the mailing address of the vendor in the four rows that are provided.
Pincode
Specify the pincode of the address.
Country
Select a country code from the adjoining option list. This is the country as given in the address of correspondence of the vendor. A list of countries maintained in the Country Codes screen is displayed. You can select the appropriate country.
Telephone ISD Code
Specify a valid international dialling code for the telephone number of the vendor.
Telephone
Specify the telephone number of the vendor.
Mobile ISD Code
Specify a valid international dialling code for the mobile number of the vendor.
Mobile Number
Specify the mobile number of the vendor.
Fax ISD Code
Specify a valid international dialling code for the fax number of the vendor.
Fax
Specify the fax number of the vendor.
Language
Select the language in which the vendor wants the statements and advices to be generated, from the adjoining option list. English is defaulted as the language of correspondence; you have the option to change the default.
Communication Mode
Select the mode of the communication to the vendor. You can select one of the following options:
- Mobile
- Email ID
Registration Address
Same as Correspondence Address
Select the check box if the ‘Address For Correspondence’ is the same as “Registration Address’. If the address is the same, then you need not provide the details of the registration address. If not, you need to specify the registration address.
Name
Specify the name of the vendor. The vendor will be addressed by this name on all correspondence sent from the bank. These characters should conform to SWIFT standards.
Address Line 1 to 4
Specify the registration address of the vendor in the four rows that are provided
Pincode
Specify pincode of the address specified.
Country
Select the country from the adjoining option list. This is the country as given in the address of correspondence of the vendor. A list of countries maintained in the Country Codes screen is displayed. You can select the appropriate country.
Incorporation
Incorp Date
Specify the date on which the vendor’s company was registered as an organization
Currency Code
Specify the Currency in which the particular vendor’s various financial details, like the net worth of the customer organization, the total paid up capital and so on, needs to be specified.
Capital
Specify the initial investment in the company.
Net Worth
Specify the net worth of the company
Incorporation Country
Specify the country of registration of the office of the corporate.
Business Description
Specify a brief description of the vendor’s business.
2.20.3 Director Tab
This tab consists of the director’s basic information.
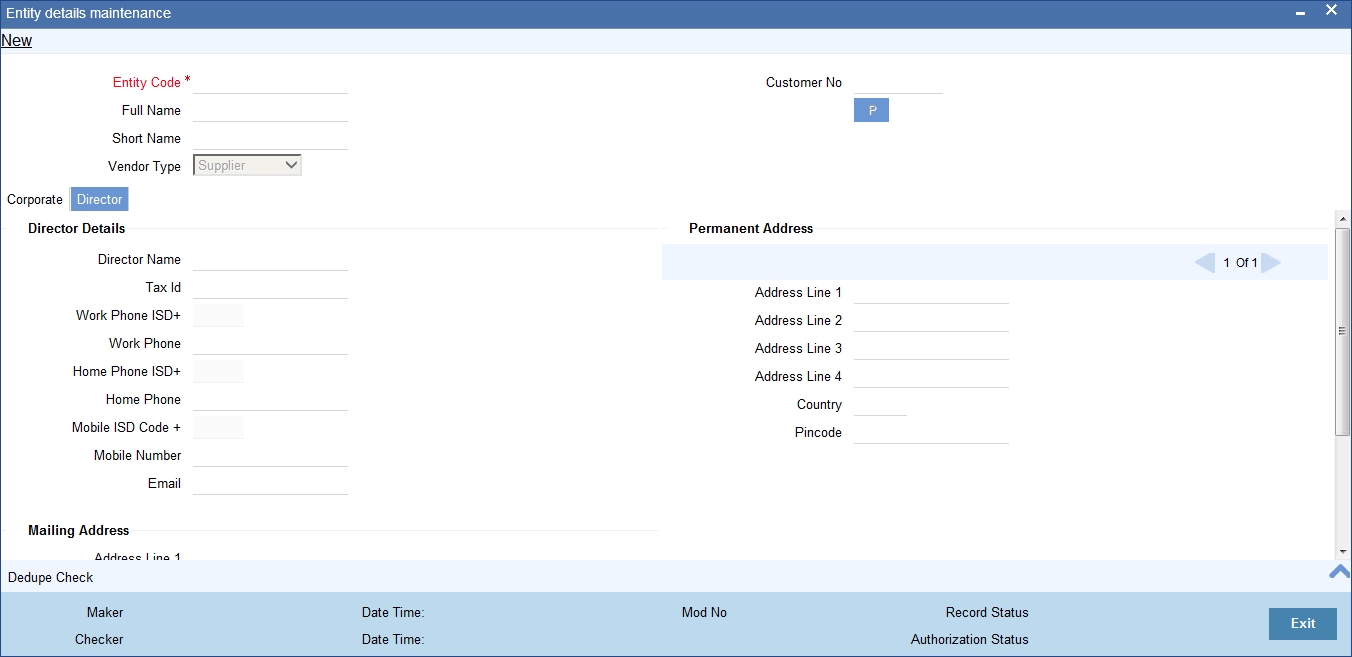
Director Details
Director Name
Specify the corresponding director’s name.
Tax ID
Specify the Tax Id of the corresponding director.
Work Phone ISD +
Specify a valid international dialling code for the work telephone number of the director.
Work Phone
Specify the work telephone number of the director.
Home Phone ISD +
Specify a valid international dialling code for the home telephone number of the director.
Home Phone
Specify the home telephone number of the director.
Mobile ISD Code +
Specify the international dialling code for the mobile number of the director.
Mobile Number
Specify the mobile number of the corresponding director.
Specify a valid email address of the corresponding director.
Mailing address
Address Line 1 - 4
Specify the mailing address of the director. Four rows have been provided for this purpose.
Pincode
Specify pincode of the mailing address specified.
Country
Specify the country of the mailing address of the corresponding director.
Permanent Address
Address Line 1 -4
Specify the permanent address of the director. Four rows have been provided for this purpose.
Country
Specify the country of the permanent address of the corresponding director.
Pincode
Specify pincode of the permanent address specified.
2.20.4 Duplicate Check
The ‘Dedupe Check’ screen enables in providing a list of duplicate customers that share the same name. The entity code, short name, full name, customer number, and vendor type is displayed in this screen. If a duplicate record is displayed in this screen, then the Customer Number can be changed in the main screen. You can invoke this screen by clicking the ‘Dedup Check’ button at bottom of the main screen.

2.21 Entity Dependency Details
This section contains the following topic:
Section 2.21.1, "Maintaining Entity Dependency Details"
2.21.1 Maintaining Entity Dependency Details
You can also capture the dependency details of the entity like the following:
- Supplier’s products, sectors and so on
- Lender’s products, sectors and so on
- Customer products, sectors and so on
These details will be defaulted when the customer’s economy dependency details are captured, during the credit appraisal management process. You can invoke this screen by typing ‘ORDEDEPM’ in the field at the top right corner of the Application tool bar and clicking the adjoining arrow button.
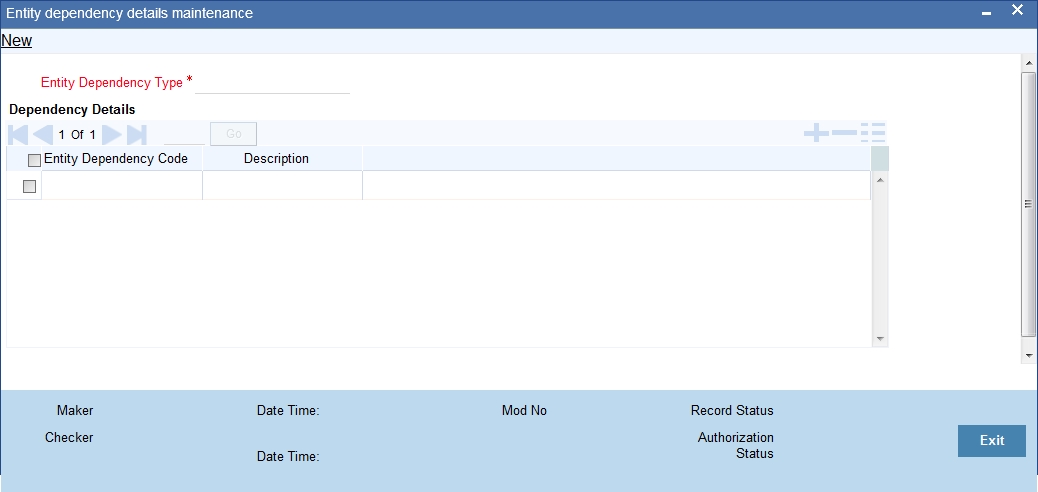
Specify the following details in this screen:
Entity Dependency Type
Specify the entity dependency type. This dependency type can be the supplier’s product, supplier’s currency, lender’s products and so on.
Entity Dependency Code
Specify a code for the dependency type selected in the ‘Entity Dependency Type’ field. Multiple rows can be added to capture multiple dependency codes.
Description
Specify a description for each code that is specified.
2.22 Customer Economic Dependency Details
This section contains the following topics:
- Section 2.22.1, "Maintaining Customer Economic Dependency Details"
- Section 2.22.2, "Supplier Details Tab"
- Section 2.22.3, "Consumer Details Tab"
- Section 2.22.4, "Lender Details Tab"
- Section 2.22.5, "Borrower Details Tab"
- Section 2.22.6, "Share Holder Details Tab"
- Section 2.22.7, "Guarantor Details Tab"
- Section 2.22.8, "Holdings Details Tab"
2.22.1 Maintaining Customer Economic Dependency Details
The system provides a facility to capture the bank customer’s dependency details in the ‘Customer Economic Details’ screen. Eventually, during the credit appraisal management process, when the customer requests for a new facility or modification of an existing facility, then reports can be generated to analyse the customer’s economic dependency. The details that are captured in the ‘Customer Economic Details’ screen are as follows:
- Supplier Details: List of organizations that are supplying raw materials to the customer who has requested for a facility.
- Customer/Consumer Details: List of organizations that are consuming the products of the customer who has requested for a facility.
- Lender Details: List of organizations that are lending money to the customer who has requested for a facility.
- Borrower Details: List of organizations that have borrowed loans from the customer who has requested for a facility.
- Share Holder Details: List of organizations that own shares of the customer who has requested for a facility.
- Guarantor Details: List of organizations providing guarantee to the customer who has requested for a facility.
- Share Holding: List of organizations whose shares the customer holds.
Based on the details maintained in this screen, you can extract reports to analyse the customer economic details. For more information on these reports, refer to the ‘Customer Economic Dependency Analysis Reports’ User Manual.
You can invoke the ‘Customer Economic Dependency Details’ screen by typing ‘ORDCEDM’ in the field at the top right corner of the Application tool bar and clicking the adjoining arrow button.
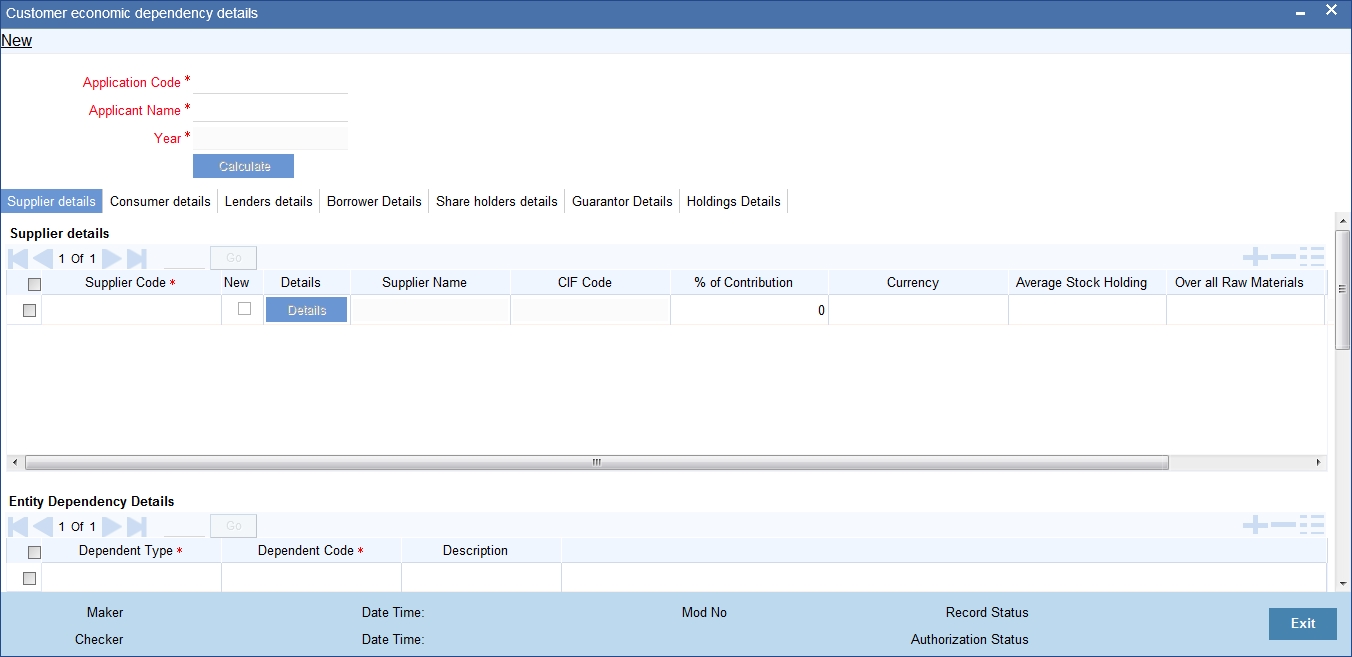
Specify the following details in this screen:
Applicant Code
Specify the CIF number of the applicant/customer who is requesting for a new facility.
Applicant Name
Specify the short name of the applicant.
Year
Specify the financial year.
2.22.2 Supplier Details Tab
In this tab list of organizations that are supplying raw materials to the customer who has requested a new facility are maintained.
Specify the following details in this screen:
Supplier Details
Supplier Code
Select the supplier code as maintained in the ‘Entity Details Maintenance’ (ORDENTYM) screen. You can alternatively specify a new supplier code which is not already maintained in the ‘Entity Details Maintenance’ screen.
New
Check this box if the supplier code maintained in the supplier code field is a new supplier code which is not already maintained in the ‘Entity Details Maintenance’ (ORDENTYM) screen.
Details
Click the ‘Details’ button to launch the ‘Entity Details Maintenance’ (ORDENTYM) screen. If the supplier code is already maintained in the ‘Entity Details Maintenance’ screen, then the supplier details are displayed in this screen. You can modify these details.
If ‘New’ check box is selected, then on clicking the’ Details’ button the ‘Entity Details Maintenance’ (ORDENTYM) screen is displayed, where details of the new supplier is to be maintained. For more information on maintaining these details, refer to the section Maintaining Entity Details in this User Manual.
Supplier Name
The system displays the name of the supplier as maintained in the ‘Entity Details Maintenance’ (ORDENTYM) screen.
CIF Code
The system displays the CIF code of the supplier as maintained in the ‘Entity Details Maintenance’ (ORDENTYM) screen.
% of Contribution
Specify the percentage contribution of the supplier in supplying raw materials to the customer.
Currency
Select the reporting currency from the adjoining option list.
Average Stock Holding
Specify the average stock holding of the supplier.
Overall Raw Materials
Specify the overall raw materials supplied.
Reporting Amount
The system displays the amount in reporting currency.
Entity Dependency Details
Dependent Type
Select the dependency type from the adjoining option list. The dependency types as maintained in the ‘Entity Dependency Details’ (ORDEDEPM) screen are listed here.
Dependent Code
Select the dependent code from the adjoining option list. The dependency codes as maintained in the ‘Entity Dependency Details’ (ORDEDEPM) screen are listed here.
Description
The system displays the description of the dependency code in this field.
Currency Level Distribution
Currency Code
Select the currency code from the adjoining option list. The currency in which the supplier has supplied raw materials is selected in this field.
% of Contribution
Specify the percentage of contribution, in the currency specified, in supplying raw materials to the bank customer.
Amount
Specify the amount of contribution, in the currency specified, in supplying raw materials to the bank customer.
Reporting Amount
The system displays the amount in the reporting currency.
Country Level Distribution
Country Code
Select the country, which the supplier belongs to, from the adjoining option list.
% of Contribution
Specify the percentage of contribution in supplying raw materials to the bank customer.
Currency Code
Select the currency code from the adjoining option list.
Amount
Specify the amount of contribution in supplying raw materials to the bank customer.
Reporting Amount
The system displays the amount in the reporting currency.
2.22.3 Consumer Details Tab
In this tab list of organizations that are consuming products of the customer who has requested for this facility, is maintained.
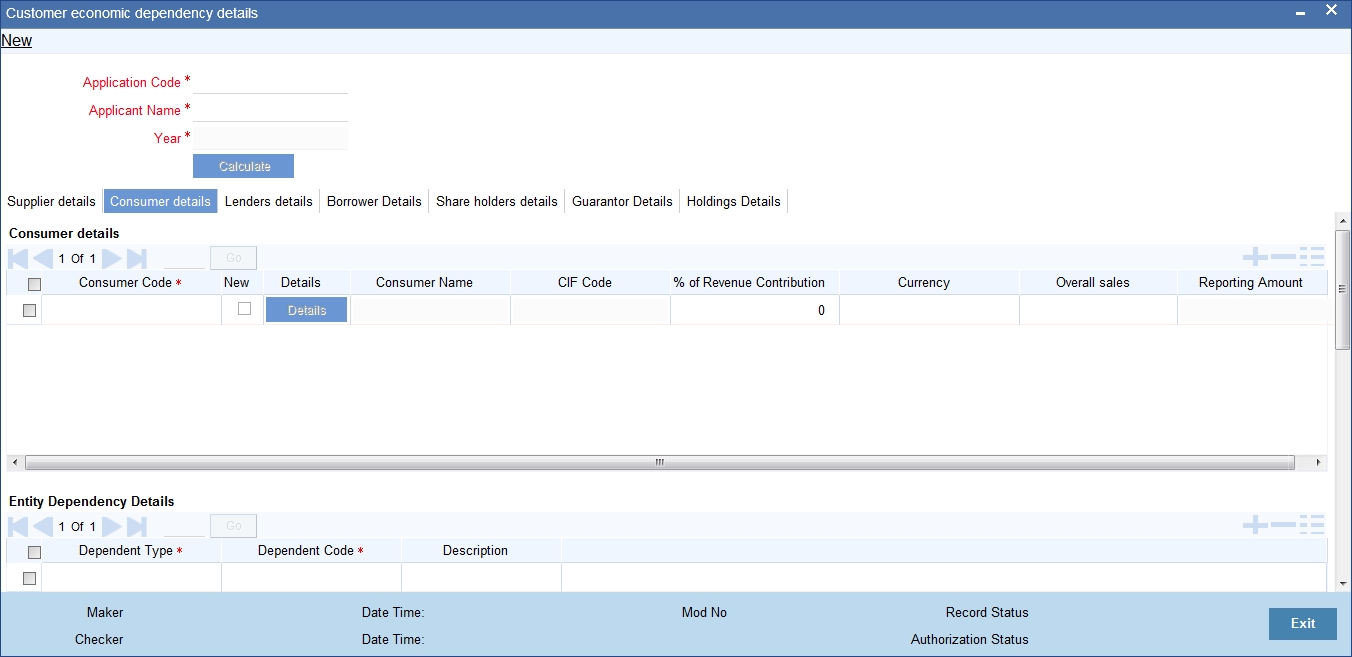
Consumer Details
Consumer Code
Select the consumer code as maintained in the ‘Entity Details Maintenance’ (ORDENTYM) screen. You can alternatively specify a new consumer code which is not already maintained in the ‘Entity Details Maintenance’ screen.
New
Check this box if the consumer code maintained in the consumer code field is a new consumer code which is not already maintained in the ‘Entity Details Maintenance’ (ORDENTYM) screen.
Details
Click the ‘Details’ button to launch the ‘Entity Details Maintenance’ (ORDENTYM) screen. If the consumer code is already maintained in the ‘Entity Details Maintenance’ screen, then the consumer details are displayed in this screen. You can modify these details.
If ‘New’ check box is selected, then on clicking the’ Details’ button the ‘Entity Details Maintenance’ (ORDENTYM) screen is displayed, where further details of the new consumer is to be maintained. For more information on maintaining these details, refer to the section Maintaining Entity Details in this User Manual.
Consumer Name
The system displays the consumer name as maintained in the ‘Entity Details Maintenance’ (ORDENTYM).
CIF Code
The system displays the CIF code of the consumer as maintained in the ‘Entity Details Maintenance’ (ORDENTYM) screen.
% of Revenue Contribution
Specify the percentage contribution of the consumer to the bank customer’s revenue.
Currency
Select the reporting currency from the adjoining option list.
Overall Sales
Specify the overall sales amount of the customer.
Reporting Amount
The system displays the amount in reporting currency.
Entity Dependency Details
Dependency Type
Select the dependency type from the adjoining option list. The dependency types as maintained in the ‘Entity Dependency Details’ (ORDEDEPM) screen are listed here.
Dependent Code
Select the dependent code from the adjoining option list. The dependency codes as maintained in the ‘Entity Dependency Details’ (ORDEDEPM) screen are listed here.
Description
The system displays the description of the dependency code in this field.
Currency Level Distribution
Currency Code
Select the currency code from the adjoining option list.
% of Contribution
Specify the percentage of contribution of the consumer to the bank customer’s revenue in the currency specified.
Amount
Specify the amount of contribution of the consumer to the bank customer’s revenue in the currency specified.
Reporting Amount
The system displays the amount in the reporting currency.
Country Level Distribution
Country Code
Select the country which the consumer belongs to, from the adjoining option list.
% of Contribution
Specify the percentage of contribution of the consumer to the bank customer’s revenue.
Currency Code
Select the currency code from the adjoining option list.
Amount
Specify the amount of contribution of the consumer to the bank customer’s revenue.
Reporting Amount
The system displays the amount in the reporting currency.
2.22.4 Lender Details Tab
In this tab list of organizations lending money to the customer who has requested for a facility, is maintained.
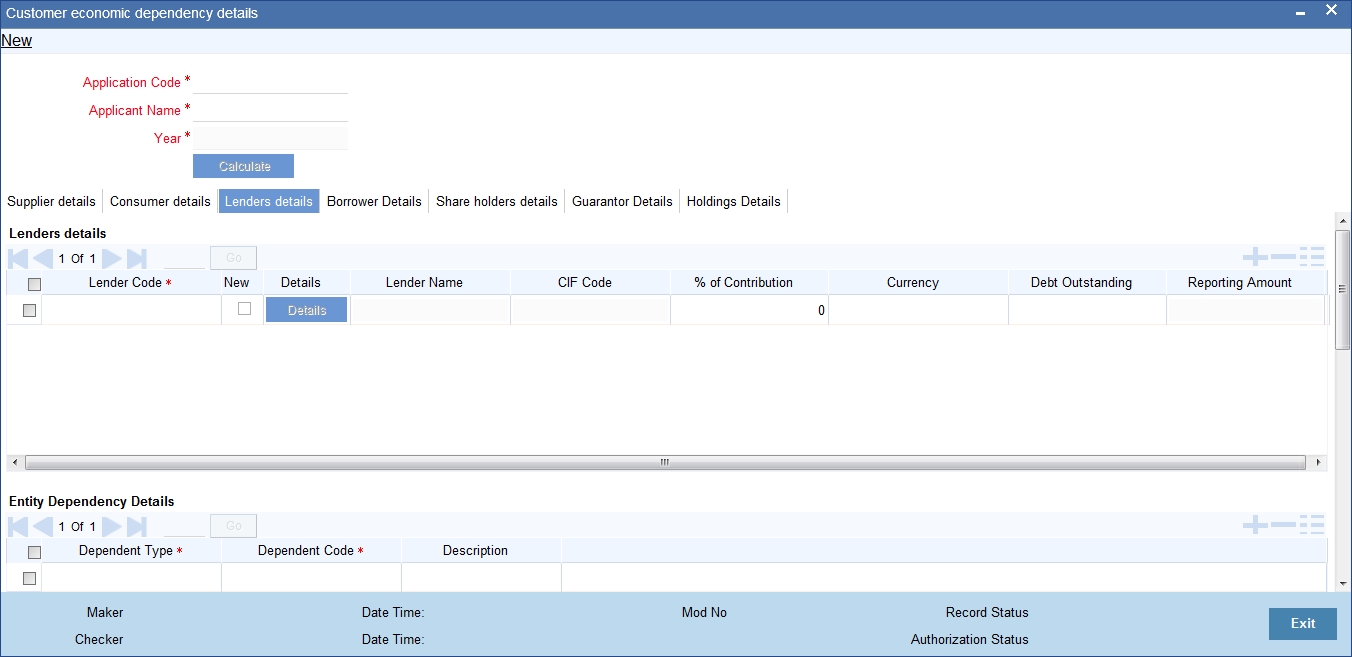
Lenders Details
Lender Code
Select the lender code as maintained in the ‘Entity Details Maintenance’ (ORDENTYM) screen. You can alternatively specify a new lender code which is not already maintained in the ‘Entity Details Maintenance’ screen.
New
Check this box if the lender code maintained in the lender code field is a new lender code which is not already maintained in the ‘Entity Details Maintenance’ (ORDENTYM) screen.
Details
Click the ‘Details’ button to launch the ‘Entity Details Maintenance’ (ORDENTYM) screen. If the lender code is already maintained in the ‘Entity Details Maintenance’ screen, then the lender details are displayed in this screen. You can modify these details.
If ‘New’ check box is selected, then on clicking the’ Details’ button the ‘Entity Details Maintenance’ (ORDENTYM) screen is displayed, where further details of the new lender is to be maintained. For more information on maintaining these details, refer to the section Maintaining Entity Details in this User Manual.
Lender Name
The system displays the lender name as maintained in the ‘Entity Details Maintenance’ (ORDENTYM).
CIF Code
The system displays the CIF code of the lender as maintained in the ‘Entity Details Maintenance’ (ORDENTYM) screen.
% of Contribution
Specify the lending percentage or the percentage of outstanding debt amount.
Currency
Specify the reporting currency.
Debt Outstanding
Specify the outstanding debt amount of the lender.
Reporting Amount
The system displays the amount in the reporting currency.
Entity Dependency Details
Dependency Type
Select the dependency type from the adjoining option list. The dependency types as maintained in the ‘Entity Dependency Details’ (ORDEDEPM) screen are listed here.
Dependent Code
Select the dependent code from the adjoining option list. The dependency codes as maintained in the ‘Entity Dependency Details’ (ORDEDEPM) screen are listed here.
Description
The system displays the description of the dependency code in this field.
Currency Level Distribution
Currency Code
Select the currency code from the adjoining option list.
% of Contribution
Specify the percentage of contribution of the lender in the currency specified.
Amount
Specify the amount of contribution of the lender in the currency specified.
Reporting Amount
The system displays the amount in the reporting currency.
Country Level Distribution
Country Code
Select the country which the lender belongs to, from the adjoining option list.
% of Contribution
Specify the percentage of contribution of the lender.
Currency Code
Select the currency code from the adjoining option list.
Amount
Specify the amount of contribution of the lender.
Reporting Amount
The system displays the amount in the reporting currency.
2.22.5 Borrower Details Tab
In this tab list of organizations which are borrowing loans from the customer who has requested this facility is maintained.
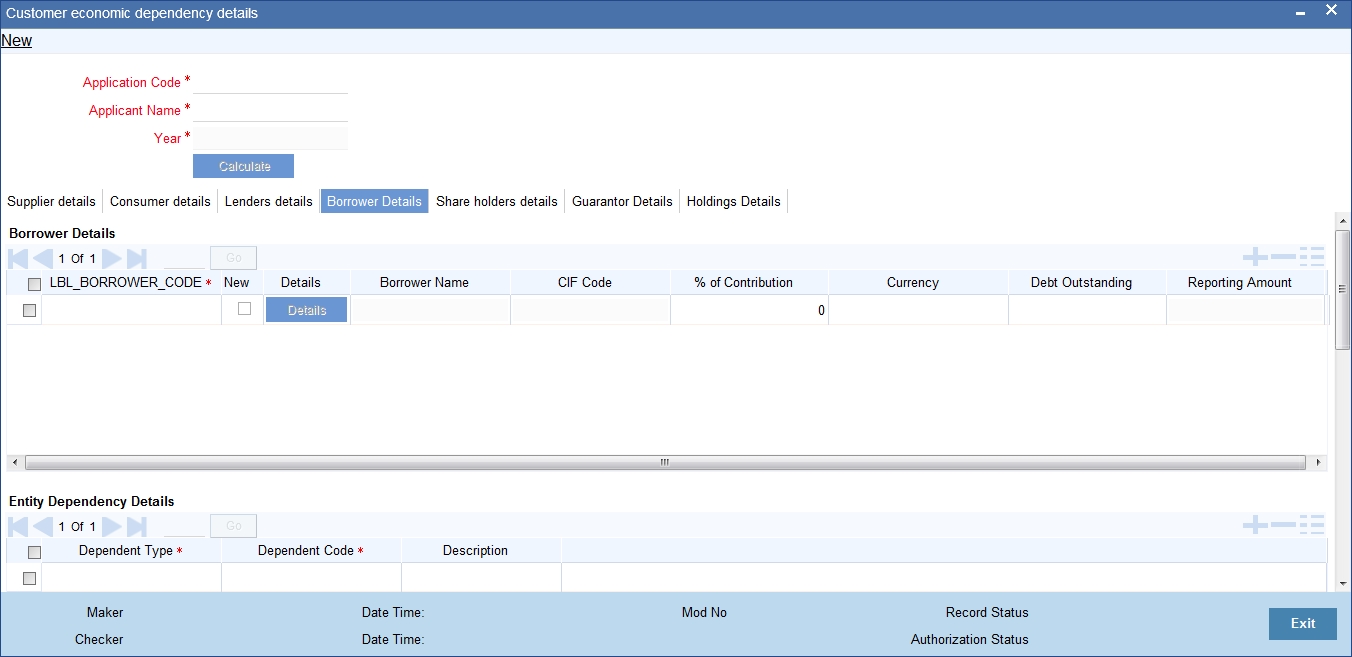
Borrower Code
Select the borrower code as maintained in the ‘Entity Details Maintenance’ (ORDENTYM) screen. You can alternatively specify a new borrower code which is not already maintained in the ‘Entity Details Maintenance’ screen.
New
Check this box if the borrower code maintained in the borrower code field is a new borrower code which is not already maintained in the ‘Entity Details Maintenance’ (ORDENTYM) screen.
Details
Click the ‘Details’ button to launch the ‘Entity Details Maintenance’ (ORDENTYM) screen. If the borrower code is already maintained in the ‘Entity Details Maintenance’ screen, then the borrower details are displayed in this screen. You can modify these details.
If ‘New’ check box is selected, then on clicking the’ Details’ button the ‘Entity Details Maintenance’ (ORDENTYM) screen is displayed, where further details of the new borrower is to be maintained. For more information on maintaining these details, refer to the section Maintaining Entity Details in this User Manual.
Borrower Name
The system displays the borrower name as maintained in the ‘Entity Details Maintenance’ (ORDENTYM).
CIF Code
The system displays the CIF code of the borrower as maintained in the ‘Entity Details Maintenance’ (ORDENTYM) screen.
% of Contribution
Specify the percentage of loan borrowed from the customer who has requested this facility.
Currency
Specify the reporting currency in this field.
Debt Outstanding
Specify the loan outstanding amount in this field.
Reporting Amount
The system displays the amount in the reporting currency.
Entity Dependency Details
Dependency Type
Select the dependency type from the adjoining option list. The dependency type as maintained in the ‘Entity Dependency Details’ (ORDEDEPM) screen are listed here.
Dependent Code
Select the dependent code from the adjoining option list. The dependency code as maintained in the ‘Entity Dependency Details’ (ORDEDEPM) screen are listed here.
Description
The system displays the description of the dependency code in this field.
Currency Level Distribution
Currency Code
Select the currency code from the adjoining option list.
% of Contribution
Specify the percentage of contribution of the borrower in the currency specified.
Amount
Specify the amount of contribution of the borrower in the currency specified.
Reporting Amount
The system displays the amount in the reporting currency.
Country Level Distribution
Country Code
Select the country which the borrower belongs to, from the adjoining option list.
% of Contribution
Specify the percentage of contribution of the borrower.
Currency Code
Select the currency code from the adjoining option list.
Amount
Specify the amount of contribution of the borrower.
Reporting Amount
The system displays the amount in the reporting currency.
2.22.6 Share Holder Details Tab
In this tab, list of organizations that own shares of the customer who has requested a facility is maintained.
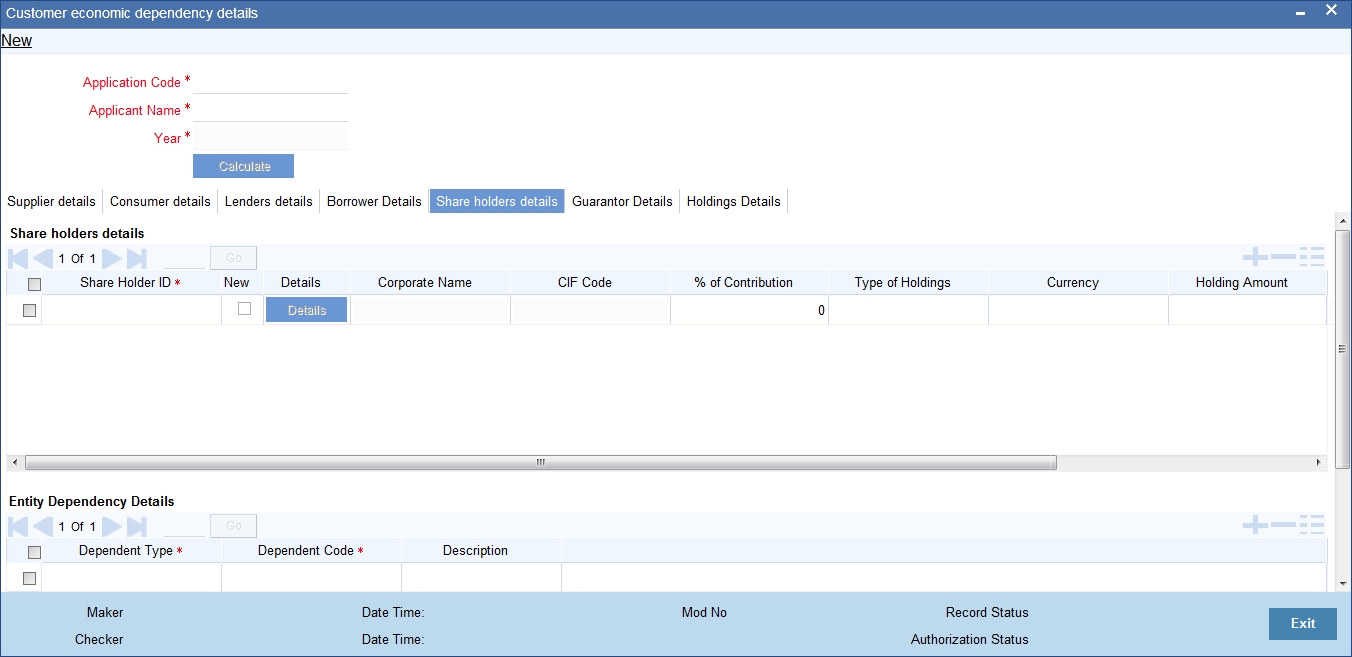
Share Holder ID Code
Select the share holder ID code as maintained in the ‘Entity Details Maintenance’ (ORDENTYM) screen. You can alternatively specify a new Share Holder ID code which is not already maintained in the ‘Entity Details Maintenance’ screen.
New
Check this box if the share holder ID code maintained in the share holder ID field is a new share holder ID code which is not already maintained in the ‘Entity Details Maintenance’ (ORDENTYM) screen.
Details
Click the ‘Details’ button to launch the ‘Entity Details Maintenance’ (ORDENTYM) screen. If the share holder ID code is already maintained in the ‘Entity Details Maintenance’ screen, then the share holder details are displayed in this screen. You can modify these details.
If ‘New’ check box is selected, then on clicking the’ Details’ button the ‘Entity Details Maintenance’ (ORDENTYM) screen is displayed, where further details of the new share holder is to be maintained. For more information on maintaining these details, refer to the section Maintaining Entity Details in this User Manual.
Corporate Name
The system displays the share holder name as maintained in the ‘Entity Details Maintenance’ (ORDENTYM).
CIF Code
The system displays the CIF code of the share holder as maintained in the ‘Entity Details Maintenance’ (ORDENTYM) screen.
% of Contribution
Specify the percentage of holdings owned by the corporate.
Type of Holdings
Specify the type of holdings.
Currency
Specify the reporting currency in this field.
Holding Amount
Specify the holding amount in this field.
Reporting Amount
The system displays the amount in the reporting currency.
% of Voting Rights
Specify the percentage of voting rights owned by the corporate.
Entity Dependency Details
Dependency Type
Select the dependency type from the adjoining option list. The dependency type as maintained in the ‘Entity Dependency Details’ (ORDEDEPM) screen are listed here.
Dependent Code
Select the dependent code from the adjoining option list. The dependency code as maintained in the ‘Entity Dependency Details’ (ORDEDEPM) screen are listed here.
Description
The system displays the description of the dependency code in this field.
2.22.7 Guarantor Details Tab
In this tab list of organizations that are providing guarantee to the customer who has requested a facility is maintained.
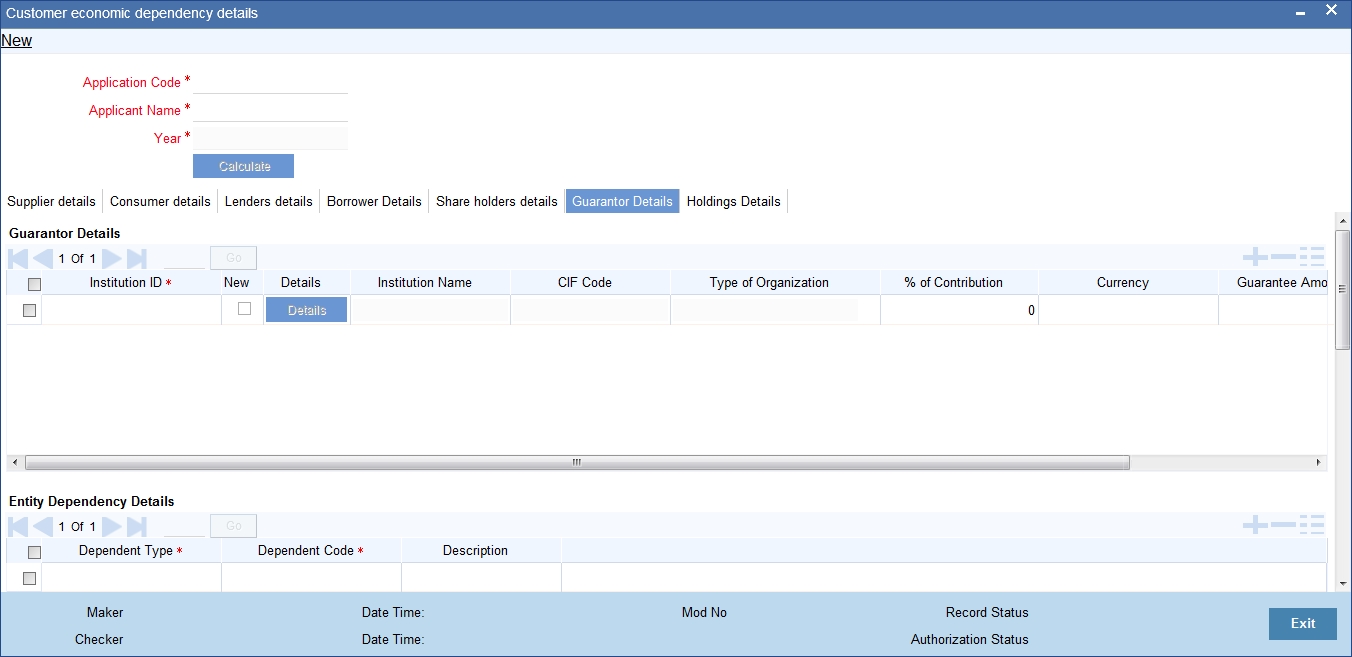
Guarantor Details
Institution ID
Select the Institution ID code as maintained in the ‘Entity Details Maintenance’ (ORDENTYM) screen. You can alternatively specify a new Institution ID code which is not maintained in the ‘Entity Details Maintenance’ screen.
New
Check this box if the Institution ID code maintained in the Institution ID field is a new Institution ID code which is not already maintained in the ‘Entity Details Maintenance’ (ORDENTYM) screen.
Details
Click the ‘Details’ button to launch the ‘Entity Details Maintenance’ (ORDENTYM) screen. If the Institution ID code is already maintained in the ‘Entity Details Maintenance’ screen, then the Institution details are displayed in this screen. You can modify these details.
If ‘New’ check box is selected, then on clicking the’ Details’ button the ‘Entity Details Maintenance’ (ORDENTYM) screen is displayed, where further details of the new Institution is to be maintained. For more information on maintaining these details, refer to the section Maintaining Entity Details in this User Manual.
Institution Name
The system displays the Institution name as maintained in the ‘Entity Details Maintenance’ (ORDENTYM).
CIF Code
The system displays the CIF code of the Institution as maintained in the ‘Entity Details Maintenance’ (ORDENTYM) screen.
Type of Organization
Specify the type of organization such banking or financial.
% of Contribution
Specify the percentage of contribution or guarantee provided to the customer.
Currency
Specify the reporting currency amount.
Guarantee Amount
Specify the guarantee amount.
Reporting Amount
The system displays the amount in reporting currency.
Entity Dependency Details
Dependency Type
Select the dependency type from the adjoining option list. The dependency types as maintained in the ‘Entity Dependency Details’ (ORDEDEPM) screen are listed here.
Dependent Code
Select the dependent code from the adjoining option list. The dependency codes as maintained in the ‘Entity Dependency Details’ (ORDEDEPM) screen are listed here.
Description
The system displays the description of the dependency code in this field.
Currency Level Distribution
Currency Code
Select the currency code from the adjoining option list.
% of Contribution
Specify the percentage of contribution of the guarantor in the currency specified.
Amount
Specify the amount of contribution of the guarantor in the currency specified.
Reporting Amount
The system displays the amount in the reporting currency.
Country Level Distribution
Country Code
Select the country which the guarantor belongs to, from the adjoining option list.
% of Contribution
Specify the percentage of contribution of the guarantor.
Currency Code
Select the currency code from the adjoining option list.
Amount
Specify the amount of contribution of the guarantor.
Reporting Amount
The system displays the amount in the reporting currency.
2.22.8 Holdings Details Tab
In this tab, list of organizations whose shares the customer holds is maintained.
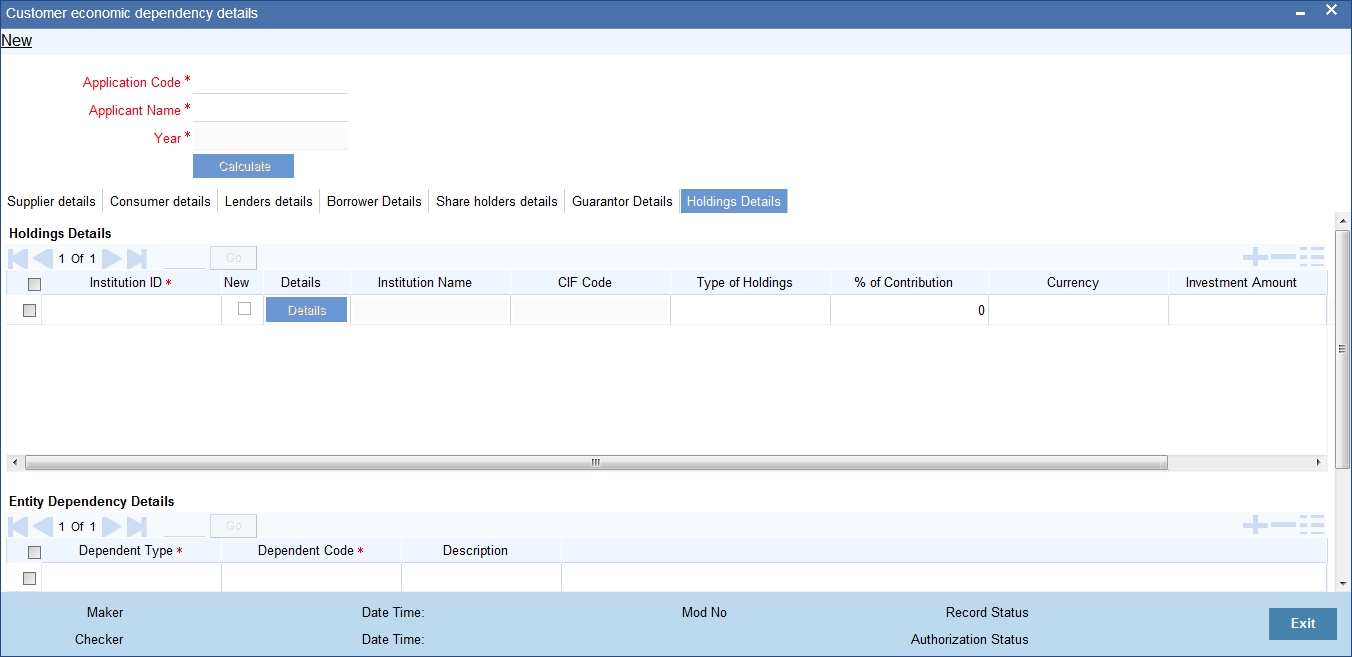
Institution ID
Select the Institution ID code as maintained in the ‘Entity Details Maintenance’ (ORDENTYM) screen. You can alternatively specify a new Institution ID code which is not maintained in the ‘Entity Details Maintenance’ screen.
New
Check this box if the Institution ID code maintained in the Institution ID field is a new Institution ID code which is not already maintained in the ‘Entity Details Maintenance’ (ORDENTYM) screen.
Details
Click the ‘Details’ button if you wish to launch the ‘Entity Details Maintenance’ (ORDENTYM) screen. If the Institution ID code is already maintained in the ‘Entity Details Maintenance’ screen, then the Institution details are displayed in this screen. You can modify these details.
If ‘New’ check box is selected, then on clicking the’ Details’ button the ‘Entity Details Maintenance’ (ORDENTYM) screen is displayed, where further details of the new Institution is to be maintained. For more information on maintaining these details, refer to the section Maintaining Entity Details in this User Manual.
Institution Name
The system displays the Institution name as maintained in the ‘Entity Details Maintenance’ (ORDENTYM).
CIF Code
The system displays the CIF code of the Institution as maintained in the ‘Entity Details Maintenance’ (ORDENTYM) screen.
% of Contribution
Specify the percentage of investment of the customer towards owning the shares.
Type of Holdings
Specify the type of holdings.
Currency
Specify the reporting currency in this field.
Invested Amount
Specify the investment amount to own the shares in this field.
Reporting Amount
The system displays the amount in the reporting currency.
Entity Dependency Details
Dependency Type
Select the dependency type from the adjoining option list. The dependency types as maintained in the ‘Entity Dependency Details’ (ORDEDEPM) screen are listed here.
Dependent Code
Select the dependent code from the adjoining option list. The dependency codes as maintained in the ‘Entity Dependency Details’ (ORDEDEPM) screen are listed here.
Description
The system displays the description of the dependency code in this field.