2. Retrieving Information in Oracle FLEXCUBE
During the day, or at the end of the day, you may want to retrieve information on any of the several operations that were performed during the day in your bank. You can generate this information in the form of reports in Oracle FLEXCUBE.
For every module you can generate reports, which give you data about the various events in the life of a specific contract, or across contracts, at a specific point in time. You can have analysis reports, daily reports, exception reports (reports on events that ought to have taken place on the contract but have not, due to various reasons), history reports and so on. A set of report formats is pre-defined for every module.
This chapter contains the following sections:
- Section 2.1, "Report Generation"
- Section 2.2, "Printer Maintenance"
- Section 2.3, "Reporting Parameters Maintenance"
- Section 2.4, "Message Preview Window"
2.1 Report Generation
This section contains the following topics:
2.1.1 Generating Reports
From the Application Browser, select the Report option. The system displays a list of all the modules to which you have access rights. Each module contains a list of all reports that you can access. Select the report that you want to generate. The system displays a screen where you can set the filters for the reports to be generated.
Set the filters and click ‘OK’ button to generate the report. To cancel the operation, click ’Exit’ button.
2.1.1.1 Specifying the Output of a Report
When you select a report that you want to generate, the ‘Report Options’ screen is displayed. In this screen, you can set your preferences for the output of a report.
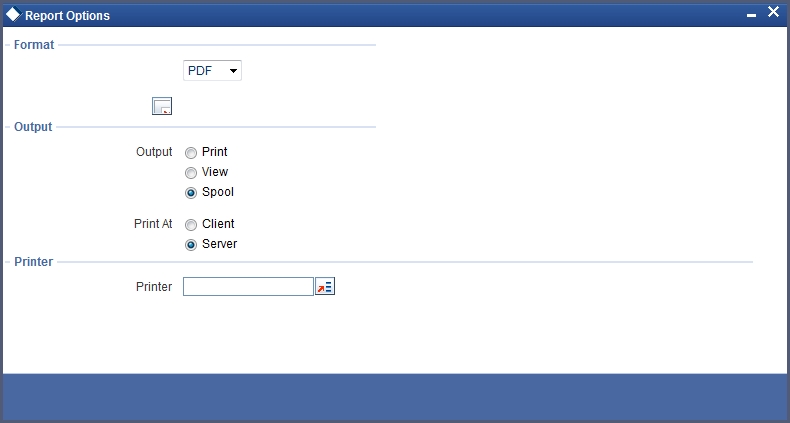
In Oracle FLEXCUBE, you may generate a report in three formats:
- HTML
- RTF
- Excel
Output
You can direct a report to one of the following destinations:
- The printer
- On-line
- Stored as spool files and printed later using the spool
The reports that have been spooled can be printed or viewed through the Reports Browser screen. The Reports Browser is detailed in the Common Procedures manual.
You can specify the destination of the report you want to generate. The options available are:
- Print - The report will be printed directly on to a printer of your choice.
- View - The details of the report will be displayed on the screen.
- Spool - The details of the report will be stored in a spool file and can be printed later.
Print At
If you choose the ‘Print’ option, indicate the location of printing by choosing one of the following values:
- Client
- Server
Printer
Specify the printer details.
Printer
From the option list, select the name of a printer defined in the Printer Maintenance table. The report will be printed on this printer.
2.1.2 Contents of the report
The contents of the report are discussed under the following heads:
Header
The Header section of the report carries the title of the Report, information on the User who generated the report, the branch code, the date and time and the page number of the report.
Body of the report
The actual contents of the report are displayed in this section. It is detailed for each report, in the subsequent sections of this document.
2.2 Printer Maintenance
This section contains the following topic:
2.2.1 Maintaining Printer for Reports
In Oracle FLEXCUBE, you can maintain the printers for the reports using ‘Printer Maintenance’ screen. You can invoke this screen by typing ‘RPDRNMNT’ in the field at the top right corner of the Application tool bar and clicking on the adjoining arrow button.
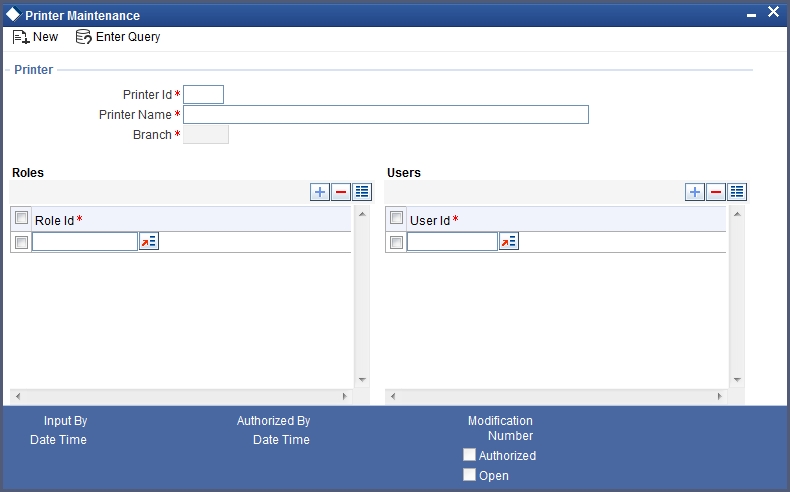
Here, you need to specify the following details:
Printer ID
Specify a unique printer ID. This ID will be used to identify the printer.
Printer Name
Specify the name of the printer.
Branch
The system defaults the current branch code. However, you cannot modify this.
Printer Roles
Identify the user who can use the printer. You can add more rows to the list of roles using Add icon. Select appropriate role from the option list.
Printer Users
Identify the users who can use the printer. You can add more rows to the list of roles using Add icon. Select the user from the option list.
Once you have captured the details, click Save icon to save the maintenance. The system makes the printer available for the selected roles, to the users maintained. Further, if you choose to print a report, the system will send the reports for print as per the options specified.
2.3 Reporting Parameters Maintenance
This section contains the following topic:
2.3.1 Maintaining Report Spool Path
You can maintain a location to spool the reports for a specific branch using ‘Reporting System – Parameters’ screen. You can invoke this screen by typing ‘RPDPARAM’ in the field at the top right corner of the Application tool bar and clicking on the adjoining arrow button.
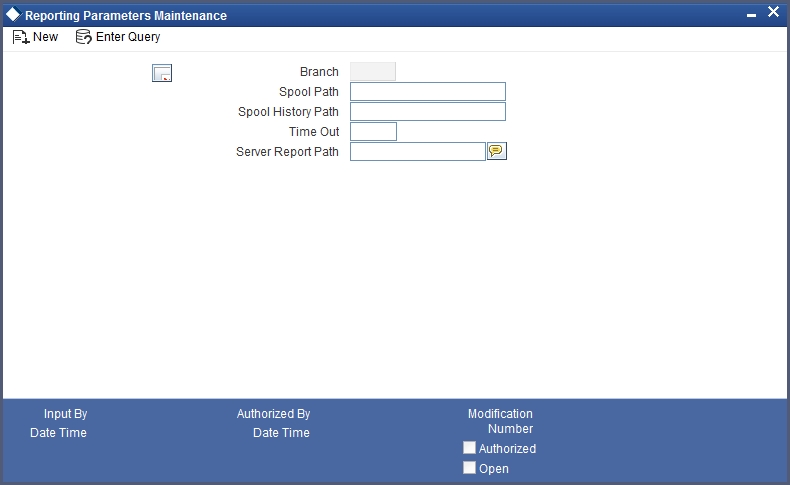
Here, you need to specify the following details:
Branch
The system displays the branch for which you are maintaining the spool path. However, you cannot modify it.
Spool Path
Specify the location to which the reports should be spooled. The system stores the generated reports into this location, if you have selected ‘Spool’ in the ‘Printing Preferences’ screen.
Spool History Path
Specify the spool history path. This is the generation where the system saves the generated report. It is usually the same as the spool path.
Time Out
Specify the time span within which you wish to complete the process. The system reports if it takes longer time to generate it.
Server Report Path
This is the location where the system stores the report, if you have selected the option ‘View’ in the ‘Printing Preferences’ screen.
2.4 Message Preview Window
This section contains the following topic:
2.4.1 Viewing Messages for Unauthorized Contracts
You can view all messages to be generated for unauthorized contracts. You can invoke this screen by typing ‘MSDMPREV’ on the field at the top right corner of the Application tool bar and click on the adjoining arrow button.
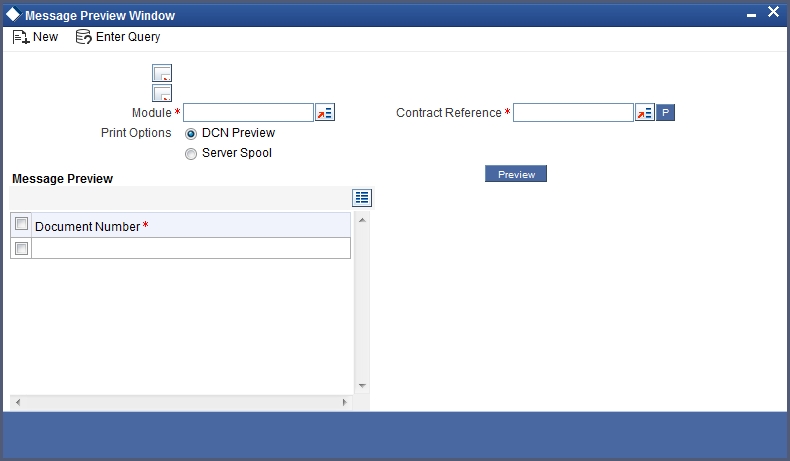
First of all, specify the Module from which you would like to view messages. You can opt to view messages for one or several unauthorized contracts. To view messages for an unauthorized contract, specify the Contract Reference Number.