4. Retail Bill Product
4.1 Introduction
This chapter takes you through the steps involved in creating a retail bill product. The product codes thus defined will be available for selection during the creation of retail bill contract.
4.2 Retail Bill Product
This section contains the following topics:
- Section 4.2.1, "Defining Retail Bill Product"
- Section 4.2.2, "Setting Preferences for a Product"
- Section 4.2.3, "Accounting Roles"
- Section 4.2.4, "Event Details"
- Section 4.2.5, "Maintaining Branch Currency Restrictions"
- Section 4.2.6, "Maintaining Customer Restrictions"
- Section 4.2.7, "MIS Details"
- Section 4.2.8, "Charge Details"Section 4.2.9, "UDF Details"
- Section 4.2.9, "UDF Details"
- Section 4.2.10, "Viewing Summary of Retail Bill Products"
4.2.1 Defining Retail Bill Product
You can create Retail Bill products using the ‘Product Maintenance’ screen. You can invoke the ‘Product Maintenance' screen by typing ‘RBDPRMNT’ in the field at the top right corner of the Application tool bar and clicking on the adjoining arrow button.
In this screen, you can enter basic information relating to a retails bills product.
For any product you create in Oracle FLEXCUBE, you can define generic attributes, such as branch, currency and customer restrictions, MIS details, charge details etc., by clicking on the appropriate icon in the horizontal array of buttons in this screen.
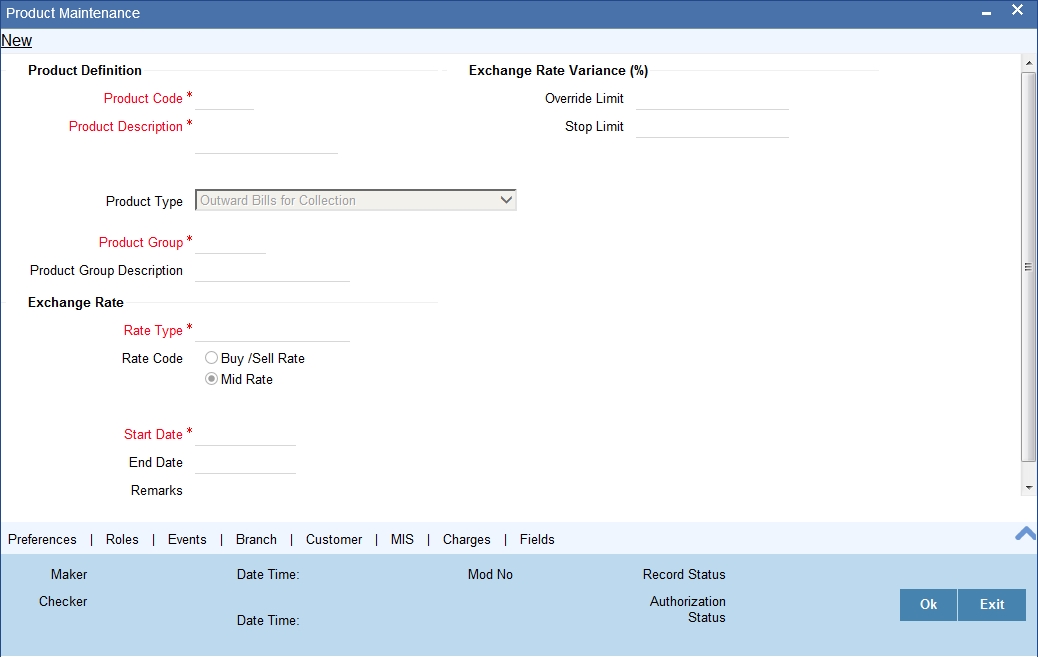
Specify the following details:
Product Definition
Product Code
Specify a unique identifier for the product.
Product Description
Enter a brief description of the product.
Product Type
Specify the Product Type.
When you create a product, you must specify the ‘type’ to which it belongs. Retail Bill products can be classified into the following types:
- Outward Bills for Collection
- Outward Cheques for Collection
- Outward Cheques Clearing (PDCs)
- Inward Bills on Collection
- Inward Cheques on Collection
- FCY Cheques on Cash Letter Basis
- Overseas Cheques Payable Abroad under Collection
- Cash Letter
Under each product type you can create any number of products.
Product Group
Specify the product group.
Products can be categorized into groups based on the common elements that they share. You must associate a product with a group. This would facilitate retrieval of information of a class of products at one stroke.You can select a group to which the product belongs from the adjoining option list.
The list of product groups maintained in the 'Product Group Maintenance' screen under bank parameters will be available for selection.
Product Group Description
The system displays the description of the product group selected above.
Start Date
Specify the date from which the product is effective.
End Date
Specify the date till which the product can be used.
Remarks
Specify your remarks, if any.
Exchange Rate Variance(%)
Override Limit
Specify the percentage limit up to which the user can modify the exchange rate in case of a transaction with an override.
The limit percentage should be between 0 and 100.
Stop Limit
Specify the percentage limit after which the user should not be allowed to modify exchange rate in case of a transaction with an override.
The limit percentage should be between 0 and 100.
Exchange Rate
Rate Type
Select the rate type applicable to the product. The ‘Rate Code’ and ‘Rate Type’ are used in combination to determine the actual rate applicable for currency conversion.
The option list displays all valid rate type codes maintained in ‘Currency Rate type Maintenance’ screen.
Rate Code
Specify the exchange rate applicable for the product that you are maintaining. The following options are available:
- Mid Rate
- Buy/Sell Rate
By default, the Mid Rate is used. However, you can change it.
4.2.2 Setting Preferences for a Product
Preferences are the options available for defining the attributes of a product. The options that you specify here will ultimately shape the product. To invoke the ‘Preferences’ screen click ‘Preferences’ button in the product maintenance screen.
Specify the following details:
Product Code
The system displays the product code for which you are maintaining preferences.
Product Description
The system displays the description of the product.
Linked Product
Loan Product
Select a loan product from adjoining option list. The option list displays all discounted loan product codes maintained in the system.
The loan product that you specify here is not applicable for Inward product types.
Note
You need to select a loan product that has bullet type of schedules for repayment. Also, the loan product should have manual liquidation enabled.
You need to manually ensure this.
Clearing Product
Select a clearing product that should be associated with retail bills product. The option list displays all outward clearing product cheque codes from the clearing module.
Note
Clearing product can be specified only for Outward Clearing cheques product type.
Other Preferences
Grace Days
Specify the number of grace days. The number of grace days should be between 0 and 99.
Auto Liquidate
Check this box to enable automatic liquidation of the contracts associated with this product on the due date.
No. of Retrials
Specify the number of times the system needs to retry for the liquidation of the contract. This is applicable when the auto liquidation process fails.
If you have checked the option ‘Auto liquidation', then it is mandatory to specify the number of retrials.
Liquidation with Booking
Check this box to enable liquidation of inward cheque drawn on the bank on the date of booking, when the due date for payment of the instrument is less than or equal to the booking date.
Liquidation with booking is applicable only for Inward product types.
Other party limit check required
Check this box to indicate that the limit validation for other party and drawer - drawee combination will be done while financing or collateralizing an outward instrument.
Note
If Other party limit check required is checked for product types other than Outward bills, Outward cheques and Outward Clearing cheques, then it will be automatically unchecked on save.
4.2.2.1 Rule Mapping Details
You can link the events with the rules that determine the resultant location and the status of instrument using ‘Rule Mapping’ screen. Click on 'Rule Mapping’ button on the 'Preferences' sub-screen of the 'Rule Maintenance' to invoke this screen.
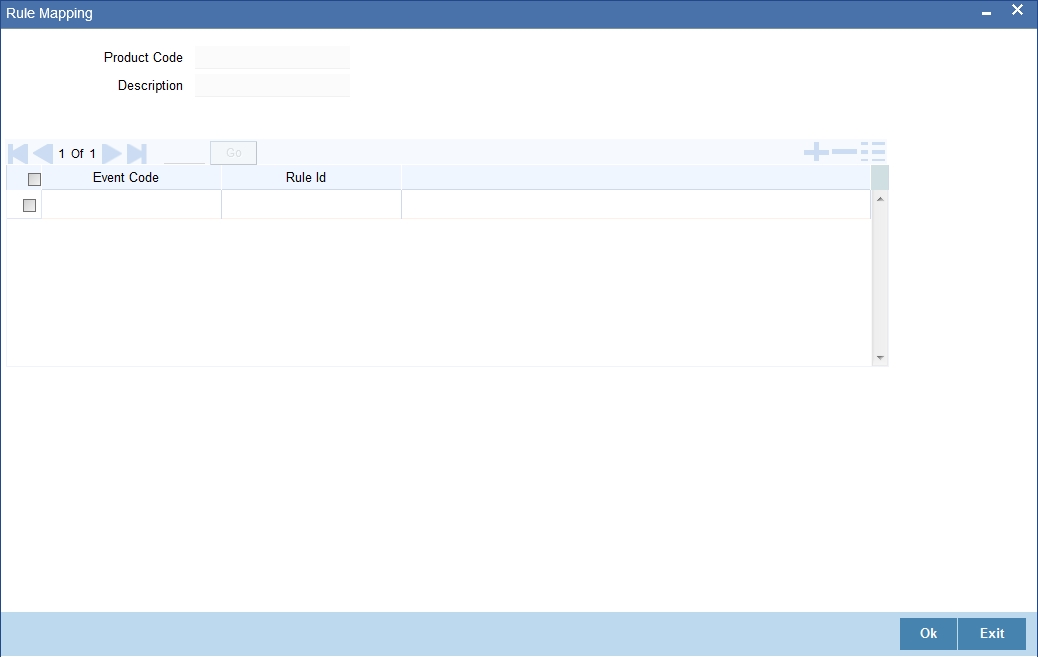
Specify the following details:
Product Code
The system displays the product code.
Description
The system displays the product description.
Event Code
Specify an event code to which the rule needs to be associated.
Note
- The event which is not defined in product is mapped a rule, then error will be thrown.
- For single event only single rule can be attached.
Rule Id
Select a rule ID from the option list. The option list displays all the rule IDs defined in the ‘Retail Bills Rule Maintenance’ screen.
4.2.3 Accounting Roles
You can capture the accounting role details using ‘Accounting Roles’ screen. Click ‘Roles’ button on the ‘Product Maintenance’ screen to invoke this screen.
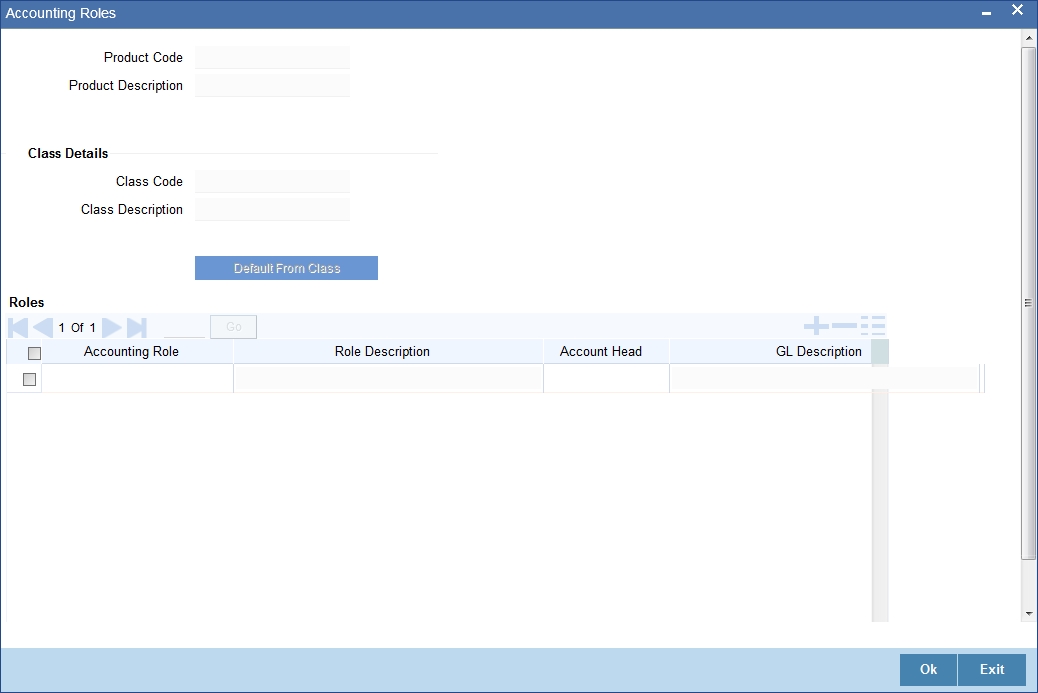
Specify the following details:
Product Code
The system displays the product code entered in the main screen.
Product Description
The system displays the description of the product. The description is for information purpose only and will not be printed on any customer correspondence.
Class Details
Class Code
Specify the class code that should be linked to the product.
Click ‘Default from Class’ button to get the class code defaulted from the class.
Class Description
The system displays a brief description of the class code linked to the product.
Roles
Accounting Role
Select the accounting role from the option list.
Role Description
The system displays the description of the selected accounting role.
Account Head
Select the account head from the option list.
GL Description
The system displays the description of the selected accounting head.
4.2.4 Event Details
A contract goes through different stages in its life cycle. In Oracle FLEXCUBE, the different stages that a contract passes through in its life cycle are referred to as ‘Events‘.
An event, generally requires posting of accounting entries to the appropriate account heads and generation of the advices.
Therefore, for the required events you have to specify the Accounting entries and advices. To do this, click ‘Events’ button on the ‘Product Maintenance’ screen.
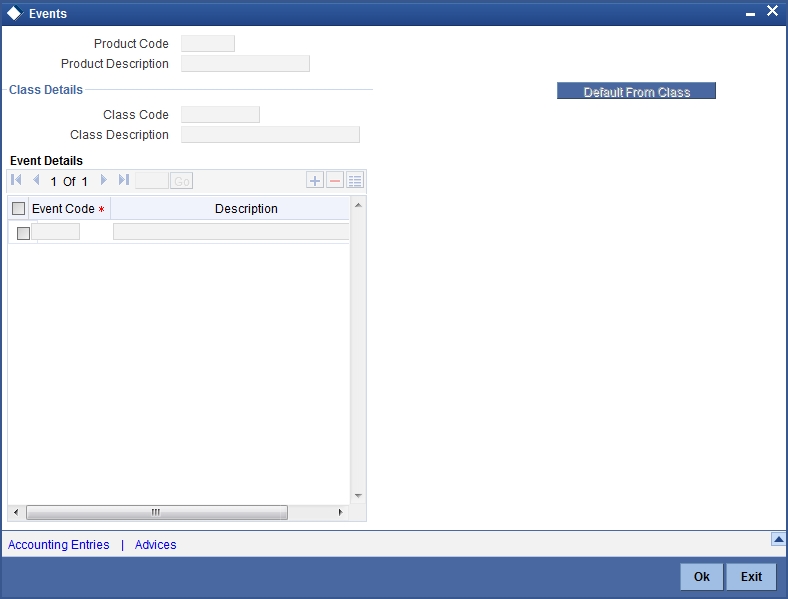
Specify the following details:
Product Code
The product code is defaulted for all the sub screens after you enter the same in the retail bills 'Product maintenance' main screen.
Product Description
The description is defaulted for all the sub screens after you enter the same in the retail bills 'Product maintenance' main screen.The description is for information purpose only and will not be printed on any customer correspondence.
Class Details
Class Code
The system displays the class code linked to the product.
Class Description
The system displays a brief description of the class code linked to the product.
Event Details
Event Code
The event codes applicable for the module are available in the option list provided. This list also includes user defined events set up for the module. Select the relevant events for the product from this list.
Event Description
The description for the event chosen is displayed.
4.2.4.1 Advices for an Event
You can select the advices that should be triggered for various events. The selected advices are generated, once the product is authorized.
To specify the advices for an event, click on ‘Advices’ in the ‘Events’ sub-screen of the Retail Bills 'Product Maintenance’ screen.
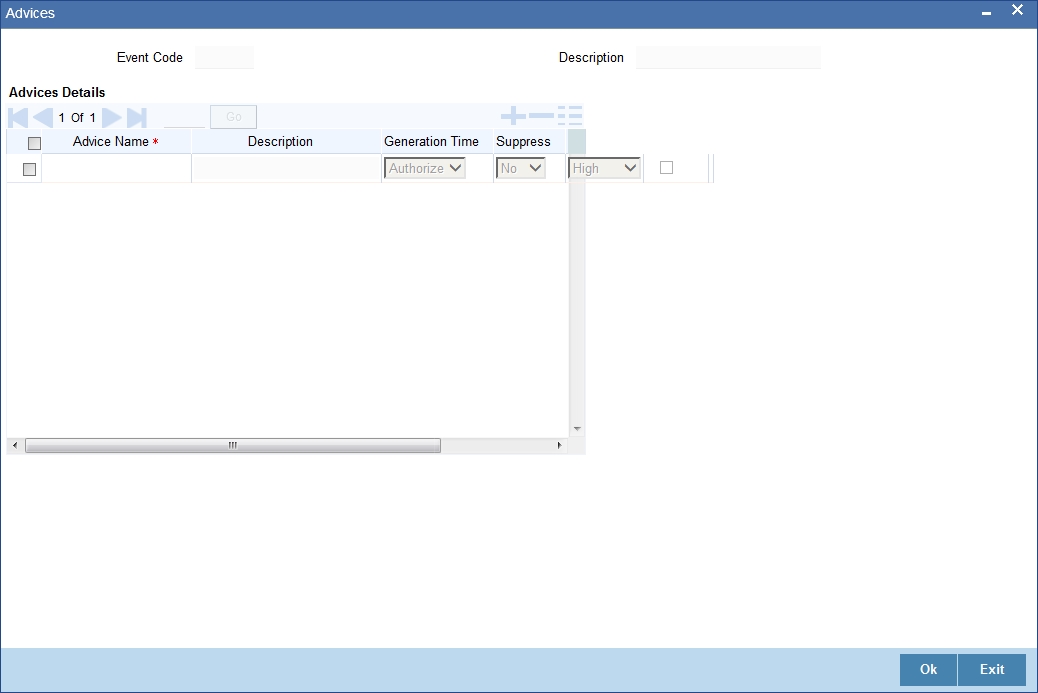
Specify the following details:
Event Code
Code of the specified event is defaulted from the Event level.
Description
Description of the specified event is defaulted from the Event level.
Advice Details
Advice Name
Specify a valid advice you want to trigger, from the adjoining option list. This option list displays advices applicable for the module.
Description
Description of the specified advice is defaulted here.
Generation Time
Authorization is defaulted as the generation time for all advices which need to be generated for a specified Event.
Suppress
Select ‘Y’ or ‘N’ from the adjoining drop-down list to either suppress or allow the generation of some advices.
Priority
Select the importance of the advice generation from the adjoining drop-down list. This list displays the following values:
- High
- Medium
- Low
Charges
Check this box if you want to collect charges for advice generation.
4.2.4.2 Accounting Entries for an Event
To specify the accounting entries for an event, click on ‘Accounting Entries’ in the ‘Events’ sub-screen of the Retail Bills 'Product Maintenance’ screen.
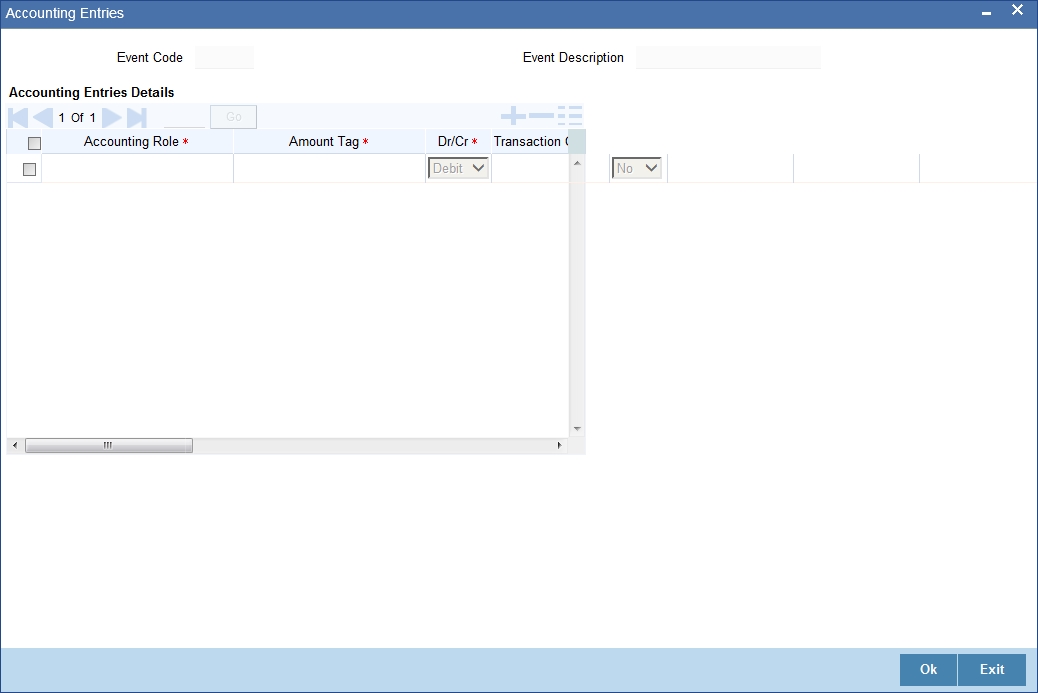
Specify the following details:
Event Code
Code of the specified event is defaulted from the Event level.
Event Description
Description of the specified event is defaulted from the Event level.
Accounting Entries Details
Accounting Role
Specify the accounting role that should be used at the event. The option list displays all the accounting roles specified for the product. Select the role appropriate for the event.
Dr/CR
Select the type of accounting entries to be posted from the adjoining drop-down list and the available options are:
- Debit
- Credit
Transaction Code
Every accounting entry in Oracle FLEXCUBE is associated with a transaction code that describes the nature of the entry. Specify the transaction code that should be used to post the accounting entry to the account head. You can group all similar transactions under a common transaction code. The transaction codes maintained in the ‘Transaction Code Maintenance’ screen are available in the option list provided.
Netting
Specify whether accounting entries should be netted at an event. You can net the accounting entries that are generated at an event by selecting ‘Yes’ from the drop down list. The system will then net the entries and show the resultant value in account statements. If you do not net, the entries will be shown separately in the statements.
MIS Head
An MIS Head indicates the manner in which the type of entry should be considered for profitability reporting purposes. This classification indicates the method in which the accounting entry will be reported in the profitability report. It could be one of the following:
- Balance
- Contingent Balance
- Income
- Expense
Revaluation Required
Online Revaluation refers to revaluation done on transaction amounts during transaction posting, and not as part of an end-of-day process. The Revaluation profit /loss are booked to the Online ‘Profit GL’ or Online ‘Loss GL’ that you maintain for the GL being revalued.
You can opt for online revaluation by selecting the ‘Revaluation Required’ option.
Profit GL and Loss GL
If you have opted for online revaluation and the result of revaluation is a profit, the profit amount is credited to the Profit GL you select here. Similarly, if the result of revaluation is a loss, the loss amount is credited to the Loss GL you specify here.
Revaluation Transaction Code
If you opt for online revaluation, you need to associate the transaction code to be used for booking revaluation entries. The system will use this transaction code to track the revaluation entries.
Amount Tag
Specify the amount tag applicable for the Accounting Role. An amount tag identifies the amount/value that is actually due for a component. Depending on the components defined for the product, the system dynamically creates a set of amount tags.
Select the appropriate amount tag from this list.
Holiday Treatment
Specify whether holiday treatment is applicable for processing accounting entries falling due on holidays. Select one of the following:
- Yes
- No
Rate Type Indicator
Select the rate type indicator used for revaluation purpose from the drop-down list. Following are the options available in the drop-down list:
- Mid
- Buy
- Sale
4.2.5 Maintaining Branch Currency Restrictions
To specify the Branch Currency restrictions, click on ‘Branch’ button in the ‘Product Maintenance’ screen.
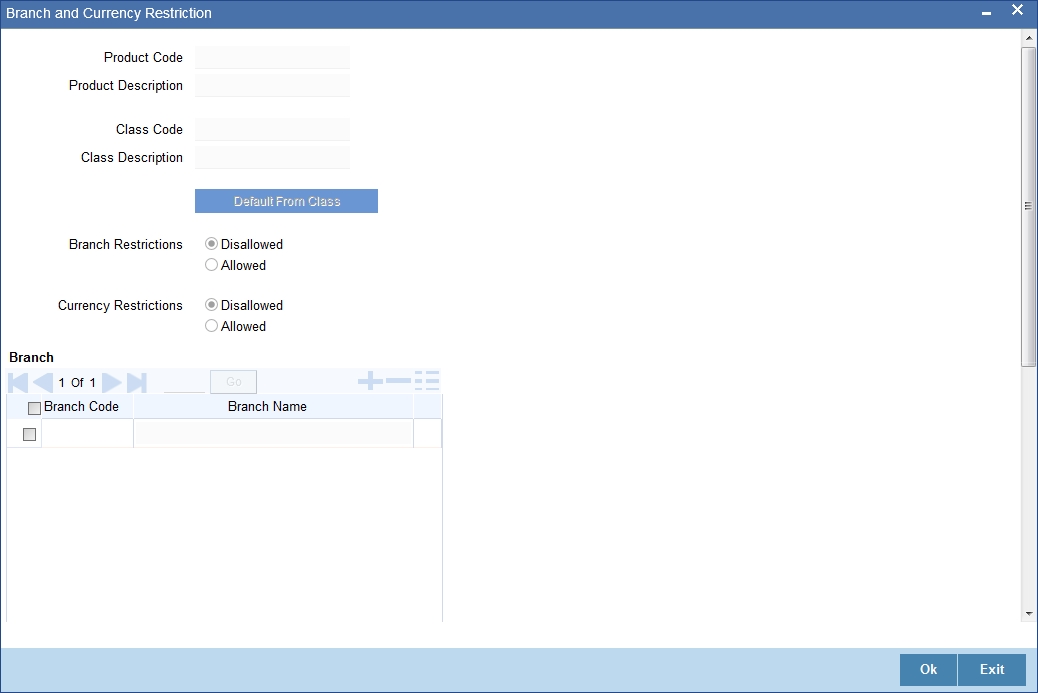
Specify the following details:
Product Code
The product code is defaulted for all the sub screens after you enter the same in the retail bills 'Product maintenance' main screen.
Product Description
The description is defaulted for all the sub screens after you enter the same in the retail bills 'Product maintenance' main screen.The description is for information purpose only and will not be printed on any customer correspondence.
Class Code
The system displays the class code linked to the product.
Class Description
The system displays a brief description of the class code linked to the product.
Branch Restrictions
Select whether Branch Restriction is Disallowed or Allowed.
Branch
Branch Code
Enter the branch code from the list.
Branch Name
This displays the description for the corresponding branch code, when you select the branch code from the list.
Currency
Currency Code
Enter the currency code from the list.
Currency Name
This displays the description for the corresponding currency code, when you select the currency code from the list.
4.2.6 Maintaining Customer Restrictions
To invoke the 'Customer Restrictions' screen, click on 'Customer' button in the ‘Product maintenance’ screen.
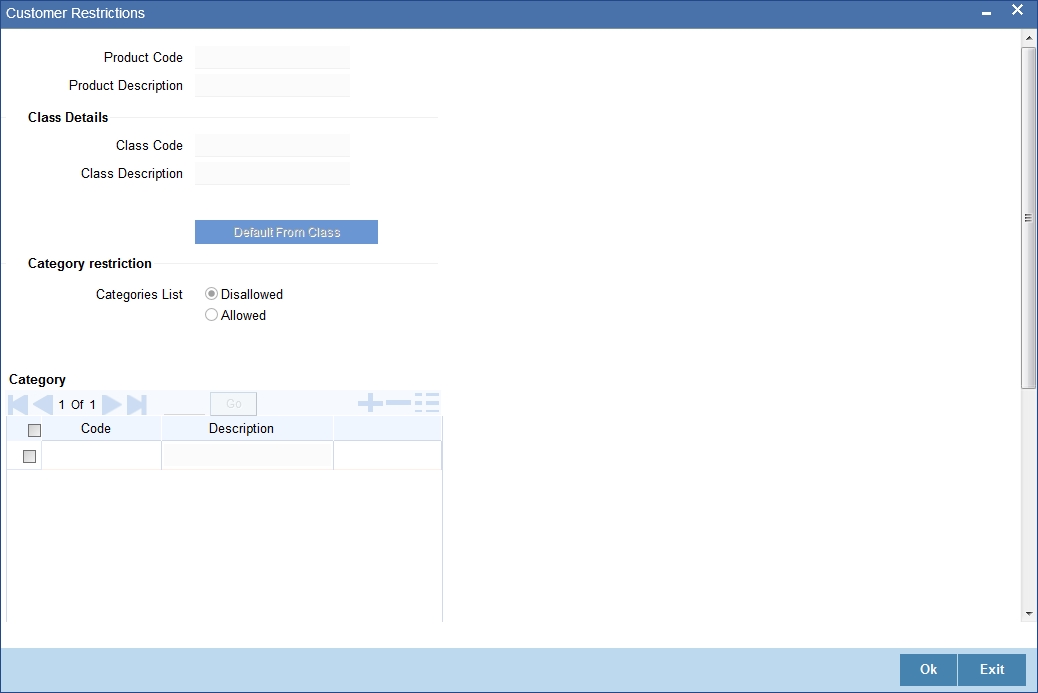
Specify the following details:
Product Code
The product code is defaulted for all the sub screens after you enter the same in the retail bills 'Product maintenance' main screen.
Product Description
The description is defaulted for all the sub screens after you enter the same in the retail bills 'Product maintenance' main screen.The description is for information purpose only and will not be printed on any customer correspondence.
Class Details
Class Code
The system displays the class code linked to the product.
Class Description
The system displays a brief description of the class code linked to the product.
Branch Restriction
Categories List
Specify the type of restriction being placed on the account by selecting from the following option list:
- Disallowed
- Allowed
Category
Code
Select the code from the adjoining option list.
Description
System displays the description for the corresponding code, when you select the code from the list.
Customers
Customer ID
Select the customer ID from the option list.
Customer Name
This displays the customer name.
Restriction Type
This displays whether allowed or disallowed.
4.2.7 MIS Details
To invoke the MIS details screen for a product, click on the ‘MIS’ button in the ‘Product Maintenance’ screen.
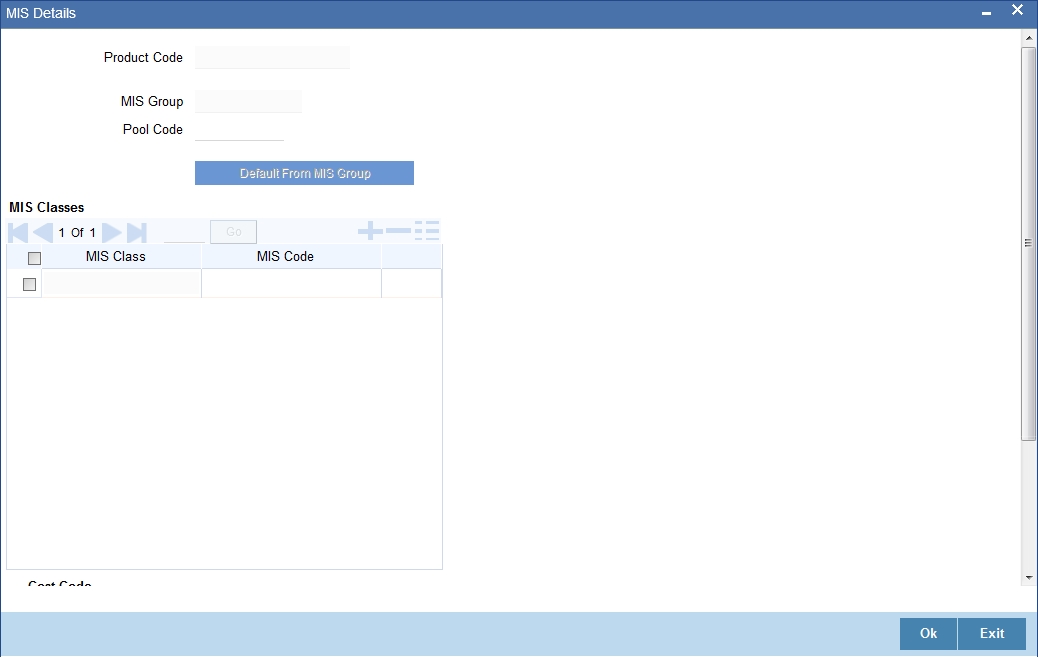
Specify the following details:
Product Code
The product code is defaulted for all the sub screens after you enter the same in the retail bills 'Product Maintenance' main screen.
MIS Group
When you click ‘Default from MIS Group’, the following ‘MIS Group’ will be displayed. Select an MIS Group from the adjoining option list.
Pool Code
Select the pool code from the list.
MIS Classes
MIS Class
This displays the MIS class.
MIS Code
Select the MIS code from the list.
Cost Code
Select the cost code from the list.
4.2.8 Charge Details
To invoke the charge details screen for a product, click on the ‘Charges’ button in the ‘Product Maintenance’ screen.
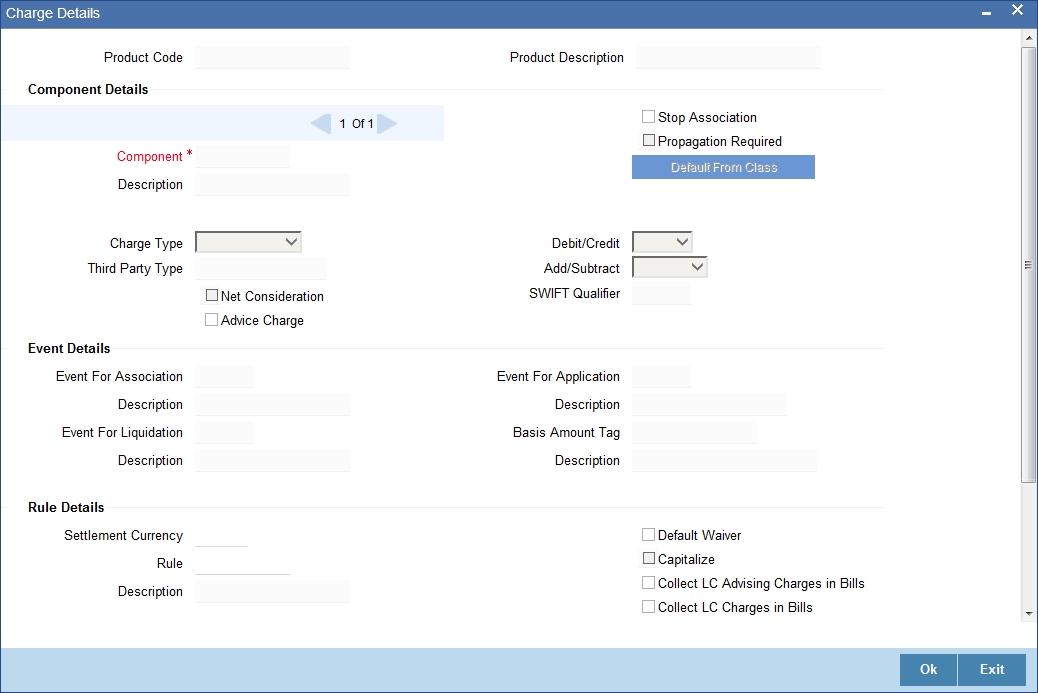
Specify the following details:
Product Code
The product code is defaulted for all the sub screens after you enter the same in the retail bills 'Product maintenance' main screen.
Product Description
The description is defaulted for all the sub screens after you enter the same in the retail bills 'Product maintenance' main screen.The description is for information purpose only and will not be printed on any customer correspondence.
Component Details
Component
The list of components displays, when you click ‘Default From Class’. Select the component
details from the list.
Description
System displays the description for the component selected above.
Charge Type
Select the charge type from the drop-down list.This list displays the following values:
- Counter Party – This indicates that the customer is captured as part of the contract.
- Third Party – This indicates that the charges are levied on another entity on behalf of customer (Eg: Custodian)
- Their Charges – This indicates that your bank is collecting other bank’s charges as in the case of LC and BC contracts.
Third Party Type
Specify the party type if a charge component that you associate with a product is of ‘third party’ type.
Advice Charge
Check this box to determine whether the charges incurred for sending the relevant advices to the customer through the various media should be charged to the customer account or should be waived.
Stop Association
Check this box to indicate that the charge should not be calculated for a product.
Propagation Required
Check this box to indicate that the charge collected from the borrower must be passed on to the participants of the contract.
Debit/Credit
Select the either one of the following values from the adjoining drop-down list:
- Debit-selected if the charge component associated with the product is to be debited to the customer.
- Credit-selected if you bear the charge component.
Add/Subtract
You can include the charge component in the net value by selecting the appropriate option from the adjoining drop-down list.This list displays the following values:
- Add-indicates if the charge component is to be added, while calculating the net consideration amount.
- Subtract-indicates if the charge component is to be subtracted, while calculating the net consideration amount.
SWIFT Qualifier
You can report the charge component of a contract in the SWIFT messages that you generate. To do this, Identify the component, when building it in the ‘Charge Class Maintenance’ screen, with the appropriate SWIFT code.
Net consideration
The sum of the different components of a contract determines the net value of the contract. Check this box to indicate that a charge component should be taken into account when determining the net value of a contract.
Event Details
Event for Association
The corresponding event for association displays when you select the component from default class.
Description
The description for corresponding event for association displays when you select the component from default class.
Event for Liquidation
The corresponding event for liquidation displays when you select the component from default class.
Description
The description for corresponding event for liquidation displays when you select the component from default class.
Event for Application
The corresponding event for application displays when you select the component from default class.
Description
The description for corresponding event for application displays when you select the component from default class.
Basis Amount Tag
The corresponding basis amount tag displays when you select the component from default class.
Description
The description for corresponding basis amount tag displays when you select the component from default class.
Rule Details
Settlement Currency
Specify the currency in which the corporate action should be settled.
Rule
Select rule from the list or when you select the component from default class, the corresponding rule displays.
Description
This displays the description for the selected rule.
Default Waiver
Check this box to opt for the waiver of charges.
Capitalize
Check this box to capitalize the payment of charges and fees.If the charge is not paid on a scheduled date, the outstanding charge amount will be added to the outstanding principal and this becomes the principal for the next schedule.If a partial payment has been made, the unpaid amount will be capitalized (the unpaid charge is added to the unpaid principal and this becomes the principal for the next schedule),
Other Details
Check the required options from the following:
- Allow Rule Amendment
- Amend after Association
- Allow Amount Amendment
- Accrual Required
- Amend after Application
- Consider as Discount
- Discount Basis
4.2.9 UDF Details
Click ‘Fields’ button to invoke the ‘Product User Defined Fields’ screen.
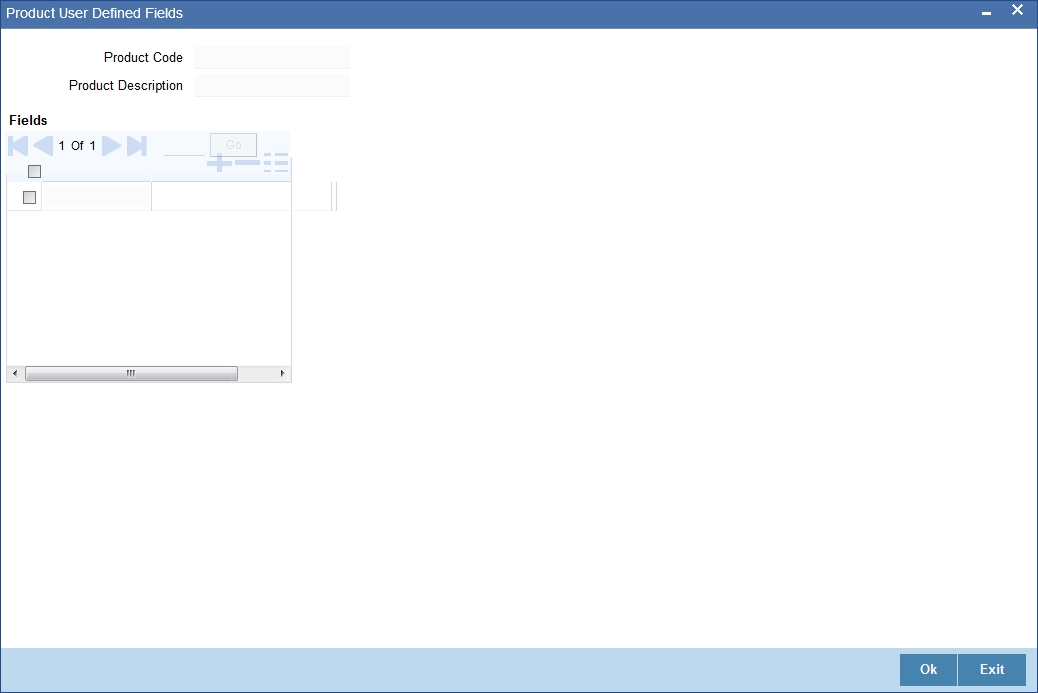
Specify the following details:
Product Code
The product code is defaulted for all the sub screens after you enter the same in the retail bills 'Product maintenance' main screen.
Product Description
The description is defaulted for all the sub screens after you enter the same in the retail bills 'Product maintenance' main screen.The description is for information purpose only and will not be printed on any customer correspondence.
Fields
In this screen, you can link the user-defined fields to the product that you are defining. Oracle FLEXCUBE allows you to link up to two hundred fields to a product.
Here a list of all the user-defined fields for which the Usage Allowed as ‘Product’ will be displayed for selection.You can choose specific fields and make them applicable for the product.
4.2.10 Viewing Summary of Retail Bill Products
You can view a summary of the products maintained in Retail Bills module using ‘Product Maintenance Summary’ screen. To invoke this screen, type ‘RBSPRMNT’ in the filed at the top right corner of the application toolbar and click the adjoining arrow button.
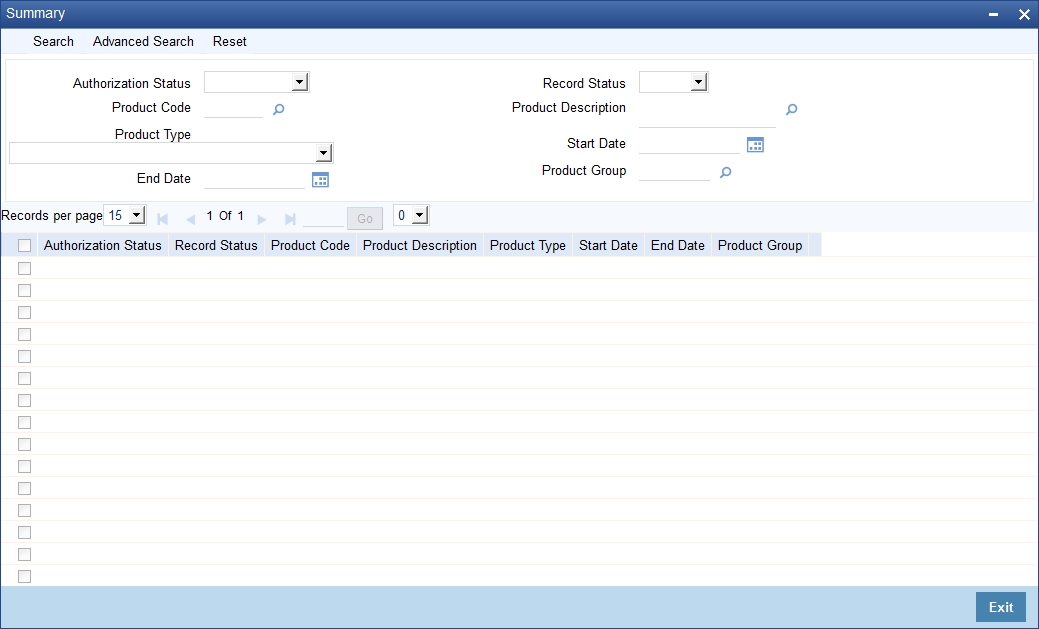
You can search for the records based on one or more of the following parameters:
- Authorization Status
- Product Code
- Product Type
- End Date
- Record Status
- Product Description
- Start Date
- Product Group
Once you have set the search parameters, click ‘Search’ button. The system displays the following details of the records that match the search criteria:
- Authorization Status
- Record Status
- Product Code
- Product Description
- Product Type
- Start Date
- End Date
- Product Group