| Oracle® Argus Safety Administrator's Guide Release 8.1 E68427-01 |
|

 Previous |
 Next |
This chapter provides information about configuring the system. It includes information about how to configure the following:
Case Priority
Field Validations
LAM System Numbering
Common Profile Switches
Reporting Configuration
Workflow
System Numbering
Field Properties
User-Defined Fields
The following table describes how the system options are configured:
| Section | Description |
| Case Priority | This screen enables the administrator to configure rules to determine the priority of new cases that are entered into the system. |
| Field Validation | This screen enables the administrator to configure field level validations for the Case Form fields. |
| Field Properties | This screen enables the administrator to configure field properties. |
| LAM System Numbering | This section enables the administrator to specify the case numbering preferences for LAM cases. |
| System Management (Common Profile Switches) | This screen enables the administrator to configure common profile switches. |
| Workflow | This screen enables the administrator to configure Workflow states and rules. |
| System Numbering | This screen enables the administrator to specify the case numbering preferences. |
| SMTP | This screen enables the administrator to configure SMTP for e-mails |
Configure rules to determine the priority of new cases that are entered into the system. Based on these rules, the system assigns each case a priority that is displayed in the Worklist.
Each row in the Case Priority Configuration screen represents the priority level assigned to a case that meets the specific criteria selected for that level. This data is reflected in multiple expedited and periodic reports and case form-product information section.
The user can select the priority level for which the criterion is to be configured.
Select System Configuration -> Case Priority to view the Case Priority page.
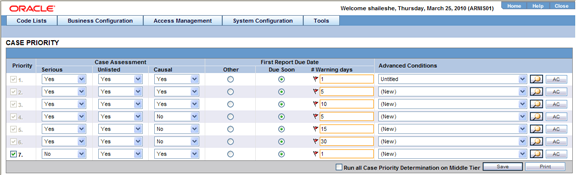
The following table lists and describes the fields in this section.
| Field/Control Name | Description |
|---|---|
| Priority | Enables the user to select the priority level whose criterion is to be configured.
The user can disable only the last enabled priority. Example: If a user has priority 1-4 checked, the priority can be disabled only in the order of 4-1. |
| Case Assessment - Serious | Enables the user to configure the seriousness for case assessment.
|
| Case Assessment - Unlisted | Enables the user to configure the priority level for unlisted case assessment.
|
| Case Assessment - Causal | Enables the user to configure the priority level for causal case assessment.
|
| Report Due Date-Due Soon | Enables the user to configure the report date due soon.
If this option is selected, the case is given the specified priority if at least one expedited report is due after the number of warning days specified from the current system date. |
| First Report Due Date - Ignore | Enables the user to configure the first report due date to ignore status.
This option is used to ignore this parameter when assessing the priority. |
| No. of Warning Days Before Due | Enables the user to enter the number of days before a case's report due date when the priority is raised to Due Soon. |
| Advance Condition Drop Down List Box | Enables the user to select an existing advance condition from the drop-down list. |
| AC Button | Enables the user to create a new advanced condition set or modify an existing one. |
| Run All Case Priority Determination on Middle Tier | Enables the user to run all case priority determination on Middle Tier.
|
Use the following procedure to configure Case Priority
Select the priority level whose criterion is to be configured.
Select the Case Assessment - Serious. The options in the drop-down list are Yes, No, Ignore.
Select the Case Assessment - Listed. The options in the drop-down list are Yes, No, Ignore.
Select the Case Assessment - Casual. The options in the drop-down list are Yes, No, Ignore.
Select First Report Due Date as Due Soon or Ignore. Enter the #Warning days for Due Soon.
Select the Advanced Conditions from the drop-down list.
Use the AC button to create a new Advanced Condition.
Select Run All Case Priority Determination on Middle Tier to ensure that the application does not assess priority when a case is saved in Web and Client/Server.
Click Save to save the changes made.
This screen enables you to configure field level validations for the Case Form fields. Be aware of the following:
These validation rules are expressed as an advanced condition, with their criteria marked as required or warning.
The field level validations feature helps in automatic checking of data as it is entered on the Case Form, to ensure consistency of data as per company requirements. Consider the following example:
Suppose that the year in the patient's date of birth is entered as 1860. The patient's date of birth probably could not have been prior to 1880; hence, a warning is issued to ensure the accuracy of the entered data.
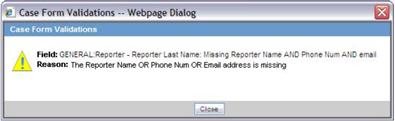
A field level validation message such as this one is a "warning violation" and the user can therefore enter a justification and continue working on the case.
An example of a mandatory violation would be a dosage regimen stop date that occurs before the dosage regimen start date. Cases cannot be saved without correcting mandatory violations.
For dependent fields, Argus Safety is pre-loaded with several field level validations. Some of these validations are protected and cannot be disabled. Others can be disabled, if required by company policy.
The system displays the Advance Condition Description for field validations on the case form after the Advanced Condition name in the following format: Field: XXXX:YYYYReason: ZZZZ
where:
| XXXX | Is the Field Label Tree view followed by the field label as configured in the field label configuration. |
| YYYY | Is the Advance Condition name configured for the field validation. |
| ZZZZ | Is the advance conditions descriptions as configured for the Advance conditions.
This text prints only if there is a description available for the Advanced Condition. Otherwise, the system disables the field label. |
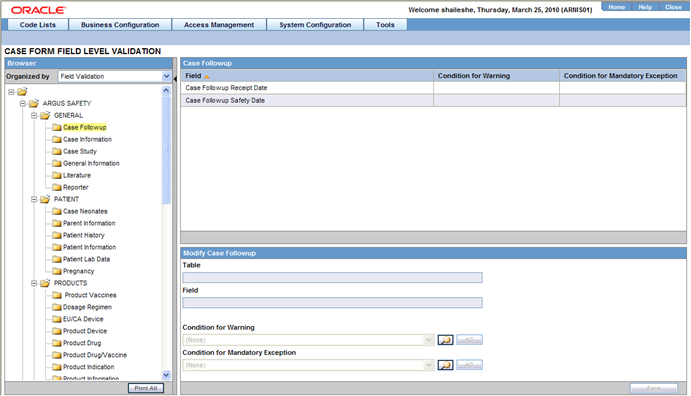
Select System Configuration->Field Validation to view the Case Form Field Level Validation screen. The following is an illustration of the screen.
|
Tip: The Case Form tabs appear on the left panel and are categorized as folders. Each folder contains all the field labels associated with that section. |
Consider the following example:
The General Tab in the Case Form contains sections such as Study, Follow-up, Case Literature, etc. To view the list of field names associated with the Study section, click Study in the left panel. The field names associated with Study appear in the right panel.
The following table lists and describes the fields in this section.
| Field/Control Name | Description |
|---|---|
| Field | Displays the name of the field. |
| Condition for Warning | Displays the advanced condition for warning. |
| Table | Displays the name of the selected sub-folder as displayed in the browser tree view. This field cannot be edited. |
| Field | Displays the name of the selected field label in the browser tree-view. This field cannot be edited. |
| Condition for Warning | Displays the advanced condition for warning. |
| Condition for Mandatory Exception | Displays the advanced condition for mandatory exception. |
| Print All | Displays a list of validations on all tables, fields and advanced conditions of each Group in the Case Form as a PDF. |
This section enables the user to edit the information already entered in fields.
Use the following procedure to modify a field validation.
Select the Case Form folder and field for which, the validation rule is to be modified.
|
Tip: The information of the selected field is displayed in the Modify section. |
Click Select icon to create/select advanced conditions for Condition forWarning and Condition forMandatory Exception.
|
Tip: Click here for details on Advanced Conditions. |
|
Note:
|
Click Save to save the changes made.
|
Note: Label Changes will not be reflected in Argus Case Form unless IIS is reset. |
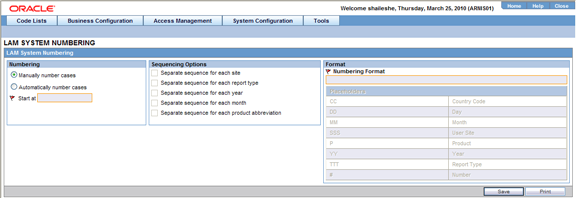
This section enables you to specify the case numbering preferences for LAM cases. The system provides the ability to use multiple case numbering schemes for global use. For example, if site is used in the numbering, the system provides the option to keep separate sequences for each site.
Select System Configuration->LAM System Numbering to view the LAM System Numbering screen shown in the following illustration.
The following table lists and describes the fields in this section.
| Field/Control Name | Description |
|---|---|
| Manually Number Cases | The option is used to enable the user to manually number the cases on booking or while copying the case, using the save as' option on the case form. |
| Automatically Number Cases | On selection, the system automatically numbers the cases as defined by the user in the numbering format. |
| Start at | Enables the user to initialize the counter of the sequence number. |
| Separate sequence for each site | Enables the user to separate the sequence numbering for cases on site by site basis. If there are cases being entered from two different sites then each site will have different sequencing of case numbers. |
| Separate sequence for each report type | Enables the user to separate the sequence numbering for cases by the report type of the case. |
| Separate sequence for each year | Enables the user to reset the sequence numbering for cases after each year, based on the initial receipt date of the case. |
| Separate sequence for each month | Enables the user to reset the sequence numbering for cases after each month, based on the initial receipt date of the case. |
| Separate sequence for each product abbreviation | Enables the user to reset the sequence numbering for cases for each different product abbreviation. |
| Numbering Format | Enables the user to select the numbering format by selecting the different placeholders.
|
| Placeholder | Enables the user to enter a placeholder.
|
Use the following procedure to configure LAM Numbering.
Select the Numbering feature as required. This can be manual numbering or automatic numbering of cases.
Select the Sequencing Options as required.
|
Tip: For the complete explanation of the sequencing option refer to the Field Descriptions. |
Select the Numbering Format. Use Placeholders to enter the required format.
|
Tip: To customize the Numbering Format, use the placeholder values. Consider the following example:To select Country Code, Month and Year (as values to be incorporated from the database ) as the Case numbering format, execute the following steps.
|
Click Save to save the changes made.
This section lists the configurable sections for Common Profile Switches.
Select System Configuration and then System Management to view the Common Profile Configuration screen.
|
Tip: The Common Profile folder appears in a tree-view on the left panel. The components are categorized as folders. Each folder contains all the field labels associated with that section. |
|
Note: If any change is made in the System Management (Common Profile Switches) screen, the Argusvr2.exe and Argusvr2a.exe should be killed from each Web Server and the IIS on Argus Web / Report Servers must be reset, in order to reflect the changes made in the Argus application. |
The following table provides the list of configurable sections associated with Common Profile Switches.
| Section | Sub Section | Description |
|---|---|---|
| Advanced Conditions | ~ | The Advanced Conditions configuration screen enables you to specify the number of rows to be displayed on the Advanced Condition search screen. |
| Argus Dossier | Report Configuration | The Argus Dossier screen enables you to modify the customizable fields of Argus Dossier. |
| Argus J | E2B
Reporting ~Device Report Responsible Officer |
The Argus J Configuration screen enables you to modify the customizable fields on the Argus J form. |
| Case Form Configuration | ~ | This screen enables you to configure Common Profile Switches that affect the behavior of the Argus application |
| Case Processing | Assessments
Always Show Literature Data Auto Archiving Case Numbering Dictionary Browser Enable Local Unlocking Lot Number Processing Performance |
This section enables you to configure the case processing fields and items. |
| Document Management | ~ | This screen enables you to configure the Documentum fields and items for Documentum. |
| Local Labeling | LAM | The Local Labeling Configuration screen enables you to modify the options available through local labeling. |
| Network Settings | ~ | The Network Settings screen enables you to modify the settings on the Argus Safety Load Balancer Server. |
| Reporting | BIP Aggregate Reporting
E2B eMDR eVAERS Expedited Expedited - BfArM Expedited - Canada Expedited - CIOMS Expedited - MedWatch MedWatch Configuration Periodic Scheduling |
The Reporting Configuration screen enables you to modify the options available for reporting. |
| Security | Cryptography
LDAP |
The Security Configuration screen enables you to modify the options available for security. |
| Session Timeout | Session expiration time in minutes | The maximum idle time allowed for a user's session. Valid range for this value is 5-1440. Default value is 30 min. Note that long running processes like CDA are controlled through the table CMN_URL_ACCESS_GLOBAL where user can specify a timeout value local to that process. Further, the user would need to set the process as IS_LONG_RUNNING = 1. By default, the following are categorized as long running:
'/REPORTS/CIOMSII/CIOMS2_SAVING.ASP' '/AUDITLOG/AUDITLOGLIST.ASP'; '/REPORTS/CDA/CDAGENERATE.ASP', |
| Single Sign-On | ~ | The Single Sign-On screen enables you to modify the options available for Single Sign-On such as enabling or disabling it, its HTTP Header, Logout URL, and using Oracle Access Server SDK for LDAP Validation.
Note that in a SSO configured environment, for the SSO to take effect, the session timeout value should be set to maximum value. |
| User Interface | ~ | The User Interface screen enables you to modify the options available for User Interface. |
| Workflow | ~ | The Workflow Items screen enables you to modify the options available for Workflow Items. |
Select System Configuration -> System Management to view the Common Profile Configuration screen.
|
Tip: The Common Profile folder appears in a tree-view on the left panel. The components are categorized as folders. Each folder contains all the field labels associated with that section. |
To configure the rows to display on each page of an advanced condition screen, click the Advanced Conditions folder in the left panel.
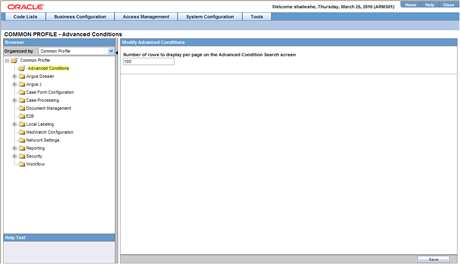
The following table lists and describes the fields in Advanced Conditions Configuration.
| Field/Control Name | Description |
|---|---|
| Number of rows to display per page on the Advanced Condition Search screen | Enables the user to specify the number of rows to be displayed on the Advanced Condition search screen. |
Use the following procedure to configure Advanced Conditions.
Enter the Number of rows to display per page on the Advanced Conditions Search screen.
Click Save to save the changes made.
This screen enables you to configure Common Profile Switches that affect the behavior of the Argus application.
|
Tip: The Common Profile folder appears in a tree-view on the left panel. The components are categorized as folders. Each folder contains all the field labels associated with that section. |
To view the list of field names associated with the Case Form Configuration section, click the Case Form Configuration folder in the left panel. The field names associated with Case Form Configuration appears in the right panel.
The Case Form Configuration dialog helps you customize the case processing activities in order to meet the company's requirements. The Administrator can configure the following items by using the Case Form Configuration dialog shown in the following illustration.
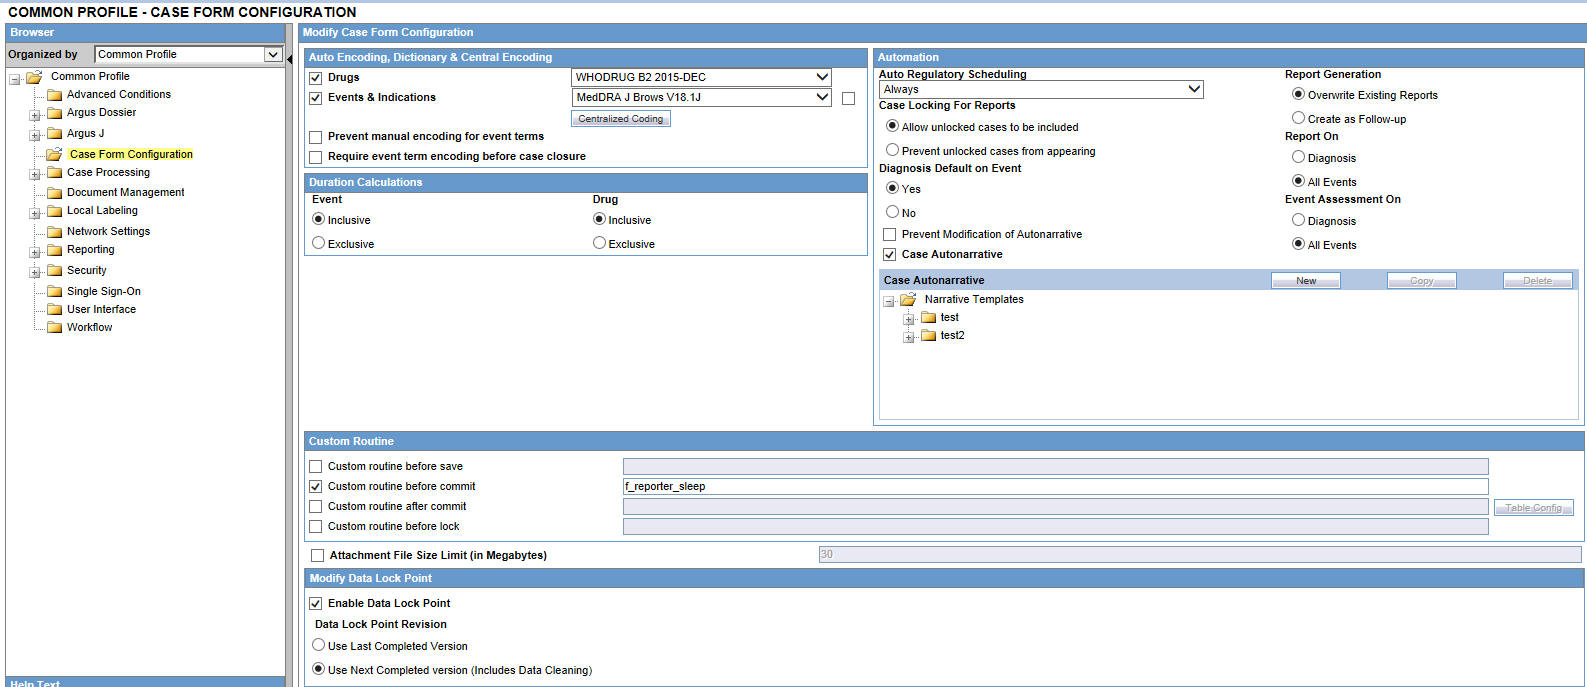
To enable the use of standardized medical terminology throughout the adverse event reporting process, dictionaries can be used to encode certain terms in the Case Form.
The dictionaries that will be used to encode drugs, Events & Indications, and events can be specified in the Autoencoding section of the Case Form Configuration dialog.
Field Descriptions
The following table lists and describes the fields in this section.
| Field/Control Name | Description |
|---|---|
| Central Coding | You can independently turn On/Off Centralized Coding for individual enterprises from the Argus Console -> System Management -> Case Form Configuration by marking the checkbox next to the Events & Indications MedDRA dictionary version drop-down list.
The enterprise can use its own MedDRA version using the Argus Console -> System Management -> Case Form Configuration -> Centralized Coding -> Centralized Coding Configuration. |
| Drugs | The Drugs dictionary list enables the selection of the WHO-DRUG dictionary. Select the Drugs check box and tab out of the product name field in the Case Form to search the company product followed by the license trade names.
|
| Events & Indications | Select Events & Indications to be prompted for the term as you enter it to be encoded on the Events & Indications tab. If an exact match is found in the dictionary, the term populates automatically. If an exact match is not found, the Event Coding dialog is displayed to select the desired event.
Auto encodes primary indication for the drug encoding, Patient Condition description in Other Relevant History section and Death Details dialog. |
| Prevent manual encoding for Events & Indications | Prevents users from encoding the Events & Indications manually. |
| Require event term encoding before case closure | Ensures that users encode the events prior to formally closing a case. |
The Automation section enables the user to generate an Auto narrative based on one of the templates configured by the method described in this topic.
Field Descriptions
The following table lists and describes the fields in the Automation dialog box.
| Field/Control Name | Description |
|---|---|
| Auto Regulatory Scheduling | This enables the user to configure the manner in which Argus Safety handles the Auto-scheduling of Regulatory Reports.
The available options are:
Selecting Always will run the auto-scheduling algorithm when any field from a specific list of fields is modified on the Case Form and the case is saved. |
| Report Generation | The Report Generation option helps you to configure how the system responds to new data when generating auto-scheduled regulatory reports.
Aware date and Due date of a scheduled report can be overwritten or retained with original dates based on the internal common profile swtich "Scheduled Report Update". If "Scheduled Report Update" is set to "Update to current aware date and new due date", the current Aware date is used and due dat is updated based on the current aware date while overwriting a scheduled report. If "Scheduled Report Update" is set to "Keep original aware date and due date" the aware date/due date are not updated based on current aware date while overwriting a scheduled report. If the common profile switch Report Generation is set to Create as Follow-up then, system allows generation of follow-up reports irrespective of submission status of previously scheduled reports based on the settings made to the internal common profile switch Allow Report Generation. If the ’Allow generation of report' is set to Only when previously scheduled reports are submitted or marked for ”submission not required” (default), then follow-up reports are not generated if the previously scheduled report are not yet submitted or not marked as ’Submission not required'. If the ’Allow generation of report' is set to Even when previously scheduled reports are neither submitted nor marked for ”submission not required", then follow-up reports are generated even if the previously scheduled report are not yet submitted or not marked as ’Submission not required'. |
| Case Locking for Report | The Administrator has the option of indicating whether cases that are not locked can appear in periodic reports.
|
| Report On | Selecting Diagnoses will only list the events marked as diagnoses plus events unassociated with a diagnosis in Regulatory Reports.
|
| Diagnosis Default on Event | The options are Yes or No
|
| Event Assessment On | The Event Assessment section of the case form will only list diagnosis and unrelated events. If there are no diagnoses, all events are listed. You can configure a default setting for selecting the Diagnoses state at a system level.
|
| Prevent Modification of Autonarrative | Selecting the Preventing Modification of Autonarrative check box will prevent users from modifying autonarratives. |
| Case Autonarrative | Selecting the Case Autonarrative check box enables the user to generate an Autonarrative based on one of the templates configured by the method described in this topic. |
Clicking the Templates button enables the Administrator to create a new Autonarrative template, modify/copy an existing template, or delete an existing template.
Use the following procedure to create a new Autonarrative template.
Click the Templates button in the Case Form Configuration dialog to open the Autonarrative Configuration dialog.
Click New to open the Narrative Configuration dialog.
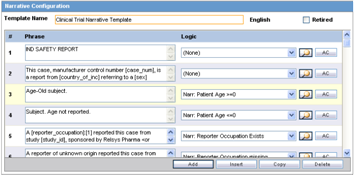
Under Template Name, enter a name for this new template.
Click the Add button at the bottom of the dialog. A new row for entering a phrase and its associated logic will appear.
Enter a text phrase in the Phrase field. The text can include placeholders that will be substituted by the appropriate case data when the Autonarrative is generated.
For example:A phrase might be entered as: "The patient was [age] at the onset of this event". When the Autonarrative is being generated, the "[age]" placeholder will be substituted for the actual age of the particular patient in the case.
Click the ellipsis button to the right of the Logic column. Select or enter an Advanced Condition for the logic section.
This search will be used to determine whether or not the corresponding phrase will appear in a narrative for a particular case.For example:An advanced condition can be specified such that only cases involving children younger than five years old will have the phrase "
The patient was [age] at the onset of this event" in the Autonarrative.
Repeat steps 4 through 6 to add other text phrases to the template. Click OK to save the template or Cancel to exit the dialog without saving the changes.
|
Note: Selecting the Preventing Modification of Autonarrative checkbox in the Case Form Configuration dialog will prevent users from modifying autonarratives.. |
Use the following procedure to create a template in another language.
Once a template is created, double-click the "Narrative Templates" folder to expand the template tree in the Autonarrative Configuration dialog.
|
Tip: To open the Autonarrrative Configuration dialog, click the Autonarrative button in the Case Form Configuration dialog. |
Expand the selected template folder to display the languages for this template. To configure this template in a language other than English, double-click the appropriate language icon.
Configure the foreign language template as described in steps 4 through 7 of the procedure for creating the Autonarrative template above.
Click Close to exit the Autonarrative Configuration dialog.
|
Note: Autonarrative placeholders in a language other than English will get substituted by text from that particular language. If no text is available in that language, English language text will be used to substitute the placeholders. |
Use the following procedure to copy a template to another language.
Select the original language from which the target language copy is to be created. The original language can be selected in the tree-view of the Autonarrative Configuration dialog.
|
Tip: To open the Autonarrrative Configuration dialog, click the Autonarrative button in the Case Form Configuration dialog. |
Click Copy. The Autonarrative Copy dialog will appear.
|
Note: In the Autonarrative Configuration dialog, the Copy button for a selected language template will only be available if a template has already been created in that language. |
Select the language to which the narrative template is to be copied and click Copy.
The contents of the original language template will now be copied into the selected language template.
Use the following procedure to delete templates.
To delete a language template, select the appropriate language icon for the template in the Autonarrative Configuration dialog and click Delete.
To delete the entire Autonarrative template, select the template folder icon in the Autonarrative Configuration dialog and click Delete.
The following table lists and describes the fields associated with this section.
| Field/Control Name | Description |
| Event | The Duration Calculations section is used to indicate whether the system should calculate event duration (the time from Event Onset Date to Event Stop Date) in an inclusive or an exclusive manner.
For instance, select Inclusive to calculate a range from 01 January to 10 January as ten days. Select Exclusive to calculate a range from 01 January to 10 January as nine days. If the user has entered both the date and time, the exclusive/inclusive designation is ignored. |
| Drug | The Drug Duration Calculations section is used to indicate whether the system should calculate drug duration in an inclusive manner or an exclusive manner, as described under Event Duration Calculations. |
The Documentum Common Login information is used to connect to the Documentum server to perform Documentum related activities to the case form. The system uses this information only if the common profile switch to use the common login is set. This option is only available if the system is configured to use Documentum.
The following table lists and describes the fields associated with this section.
| Field/Control Name | Description |
|---|---|
| Username | This is the username associated with the Documentum Common Login. |
| Password | This is the password associated with the Documentum Common Login username. |
The following table lists the Field Descriptions associated with this section.
| Field/Control Name | Description |
|---|---|
| Custom Routine Before Save | The function behaves the same way as the Custom Routine Before Commit. The case ID is passed as a parameter to the function. The return value is a string format. If a null string is returned, the system assumes the procedure executed without any error, and continues with the case save operation. If any numeric/string value is returned, the case save routine is aborted and the system displays the returned string as an error message to the user. |
| Custom Routine Before Commit | This is the Custom routine to be called before case save. Ensure that the custom routine is present in the database, and the application has access to it. |
| Custom Routine After Commit | This is the after-save Custom routine to be called after case save. Ensure that the custom routine is present in the database, and the application has access to it.
Select the Table Config button to select the tables that are being modified in the post-save script. |
| Custom Routine Before Lock | This is the Custom routine to be called before case lock Ensure that the custom routine is present in the database, and the application has access to it. |
| Attachment File Size Limit (in Megabytes) | The file size entered in this field enables you to specify the maximum size limit for attaching a file. The upload limit defined here can be seen in the Attachments and References section of the Bookin screen. The default size for uploading an attachment is 30 MB. You can also configure the file size as per your requirement, up to 300 MB. |
The Table Config button enables you to fetch only the delta table data after post-save, so that the entire case is not reloaded. This button is enabled only when the Custom Routine After Commit checkbox is selected.
Use the following procedure to remove case tables.
Select the Custom Routine After Commit checkbox and click the TableConfig button. The following screen appears.
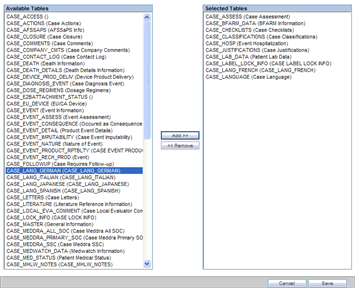
Initially, all case tables open under the Available Tables list box.
Select the required table(s) and click Add>> to include them to the Selected Tables list.
Alternatively, you can select the required table(s) and click <<Remove to exclude them from the Selected Tables list.
Click Cancel to close the screen without making any changes or click Save to save this configuration.
The Case Save routine gets modified to retrieve only the table data from the Selected Tables in the configuration.
If no Post Save is configured, the Case Save does not execute the Case Load routine.
This section is displayed only if the DLP_SETUP switch is set to ON in the database schema in the CMN_Profile_Global table.
The following table lists and describes the fields in this section.
| Field/Control Name | Description |
| Enable Data Lock Point | Enables you to activate a data lock point by selecting this checkbox. If this checkbox is not selected, the Modify Data Lock Point section displays only this field as editable. |
| Use Last Completed Version | Enables you to use the last completed version. |
| Use Next Completed Version (Includes Data Cleaning) | Enables you to use the next completed version that includes data cleaning. |
The system enables you to attach a Custom SMTP Header along with the preconfigured text as the Header for every e-mail it sends.

The Custom SMTP Header text is enabled only when the Custom SMTP Header check box is checked.
The user can define the Header and the Header text in the Custom SMTP Header configuration by separating them with a colon ( : ).
The system does not validate the value for the Custom SMTP Header text.
You can enter a maximum of 255 characters.
All e-mail messages sent using the following processes are sent as Confidential:
AG Service : Bulk Transmit Email
AG Service : General Email
ESM Service : Business / User / IT Email
The Audit Log tracks updates to this field.
This section enables you to configure the case processing fields and items. Select System Configuration -> System Management to view the Common Profile Configuration screen
| Tip: The Common Profile folder appears in a tree-view on the left panel. The components are categorized as folders.
Each folder contains all the field labels associated with that section. |
To view the list of field names associated with the Case Processing section, click the Case Processing folder in the left panel.
The field names associated with Case Processing Configuration appear in the right panel.
The Case Processing folder has been further categorized into the following sub-folders:
Configuring Assessments
Configuring Always Show Literature Data
Configuring Auto Archiving
Configuring Case Numbering
Configuring Dictionary Browser
Configuring Lot Number Processing
Configuring Performance
The following table lists the fields available under Case Processing Configuration:
| Field/Control Name | Description |
|---|---|
| Create follow-up on unblinding | The available options are Yes and No. |
| Perform Field Validation | The available options are:
|
| Perform Safe length check on Validation check | The available options are:
|
| Manually Schedule reports | The available options are:
|
| Events to Display on Assessment Tab | The available options are:
|
| Access on Patient Information | The available options are:
|
| Enable Local Unlocking | Provides a system level control permitting local users to locally unlock a case and make any corrections to the previously entered local data. Enables you to select whether to locally unlock a case or not.
The available options are:
|
| Search product on Case Form | The available options are:
|
| Select Type of WHO drug search for auto drug encoding | The available options are:
|
| Action Item Code when QC info is entered | The available action item codes are listed in the drop-down list box. |
| ActiveX Compatibility Mode (This option is applicable only if "Auto Upload letter" is checked) | The available options are:
|
| Default Network directory for scanned images | Enter the path of the default network directory of scanned images in this text box.
When the user selects New Case from Image from the Quick Launch toolbar, the Windows Open dialog opens, and displays the path specified in this textbox, by default. |
| Valid Attachment File Types | Allows users to attach files in Case Form with the file types mentioned in this parameter. |
| SQL to prevent case unlock when reports are pending generation | Allows customization to prevent users from unlocking the case from Case Form, E2B, and LAM if there were reports pending generation.
You can configure this behavior by adding a SQL or database function in the given text field.
The default for this configuration will stop the users from unlocking the case if there are scheduled reports pending generation. The checks for reports pending generation is applicable only when DLP_EXPEDITED_E2B_REPORTS is set to 0 (i.e., DLP is not enabled for Expedited Reporting). Make sure that the name that is being used for the bind parameter is P_CASE_ID. |
| Generate auto-narrative for the other language without user confirmation | This common profile switch helps to suppress user confirmation during generation of auto-narrative for the other language while the user performs the operation in the English side or Japanese side.
Click Yes to generate or No (default) to not generate the auto-narrative. If auto-narrative is being performed prior to global lock: If a user is performing the auto-narrative from the Japanese side of the case form and if the auto-narrative template has any other language other than Japanese configured, and if the new common profile switch "Generate auto-narrative for the other language without user confirmation" is set to "No", the system shall first prompt the user if they wanted to generate the English and other language narratives as well. The system shall proceed with all the non-Japanese language narrative generation steps only if the user chose Yes to this dialog (note that existing generation steps and prompts still hold good) or if the new common profile switch "Generate auto-narrative for the other language without user confirmation" is set to "Yes. If they chose No to the user prompt, the system shall proceed with only Japanese narrative generation (note that existing generation steps and prompts still holds true). If they chose Cancel, the system shall not proceed with auto-narrative generation for any language. If a user is performing the auto-narrative from the English side of the case form and if the chosen Narrative template has Japanese language configured, and if the new common profile switch "Generate auto-narrative for the other language without user confirmation" is set to "No", the system shall first prompt the user if they wanted to generate the Japanese narrative as well. The system shall proceed with the Japanese language narrative generation steps only if the user chose Yes to this dialog (note that existing generation steps and prompts still hold good) ) or if the new common profile switch "Generate auto-narrative for the other language without user confirmation" is set to "Yes". If they chose No to the user prompt, the system shall proceed with only the non-Japanese (English and all other languages except Japanese) narrative generation (note that existing generation steps and prompts still holds true). Note that the prompt shall not display if Japanese language was not configured in the template. If they chose Cancel, the system shall not proceed with auto-narrative generation for any language. |
| Truly Local Case (Note: Bind variable :P_CASE_ID must be used in SQL) | Provides a system level control allowing customers to define SQL or PL/SQL block or specify database function to test if a case with suspect Local (Japanese) License product is a Local PRPT case. This field is a multi-line text fields with a limit of up to 1000 characters. It is partitioned by enterprises for multi-tenant customers.
The SQL or PL/SQL block or the database function shall accept a bind variable :P_CASE_ID representing the case from which this switch is being invoked. If the value returned from the configured SQL or PL/SQL block or the database function is > 0, the system shall consider the case with suspect products having local (Japanese) license as a Local PRPT case. If the value returned is 0, the system shall not consider the case a Local PRPT case (unless there is already a local report pending generation i.e., Scheduled or New data available report states). If there is no SQL or PL/SQL block or database function configured in this switch, the system shall consider that the switch returns a default value of 1. The system does not allow illegal data manipulations (e.g., UPDATE/INSERT/DELETE statements) to the underlying Argus schema via this switch. This switch is also used to determine if a report is a Local report. |
| Uploading Letter after generation | Select Auto Upload Letter (enabling Active X) to upload letters automatically through the Active X control. The Active X control supports the following versions of MS Office - Office XP, Office 2003 and Office 2007.
Select Manually upload letter to manually upload a letter saved on the local machine. |
| Always show Literature Data section on Case Form | When configured to Yes, the application always displays the literature section in the Case Form and Book-in.
Default: 0 |
Use the following procedure to configure the case processing options.
Select the required option in Create follow-up on unblinding.
Select the required option in Allow User to regenerate reports.
Select the required option in Manually Schedule reports.
Select the required option in Events to Display on Assessment Tab.
Select the required option in Access on Patient Information.
Select the required option in Search product on Case Form.
Select the required option in Select Type of WHO drug search for auto drug encoding.
Select the required action item code from the drop-down list box in Action Item Code when QC info is entered.
Enter the path of the default network directory of scanned images in the Default Network directory for scanned images text box.
Select whether to upload letters automatically or manually by making the required selection under Uploading Letter after generation.
Click Save to save the changes made to this section.
This screen enables you to configure the case processing fields and items for assessments. Select System Configuration -> System Management to view the Common Profile Configuration screen.
|
Tip: The Common Profile folder appears in a tree-view on the left panel. The components are categorized as folders. Each folder contains all the field labels associated with that section. |
To view the list of field names associated with the Case Processing -> Assessments section, click the Assessments folder in the left panel.
The field names associated with Assessments Configuration appear in the right panel.
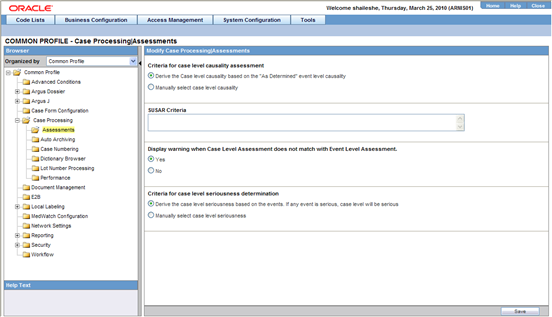
The following table lists the fields available under Assessments Configuration:
| Field/Control Name | Description |
|---|---|
| Display warning when Case Level Assessment does not match with Event Level Assessment | The available options are Yes and No. |
| Criteria for case level causality assessment | The available options are:
|
| Criteria for case level Seriousness determination | The available options are:
|
| SUSAR Criteria | Enables you to enter an SUSAR criteria as an SQL query.
An SUSAR is identified as a Serious, Unexpected, Related Case. Note: The SQL should not exceed 2000 characters. |
Use the following procedure to Configure the Case Processing Options
Select the required option for Display warning when Case Level Assessment does not match with Event Level Assessment.
Select the required option for Criteria for case level causality assessment.
Select the required option for Criteria for case level Seriousness determination.
Enter the SUSAR Criteria.
Click Save to save the changes made.
This screen enables you to configure the auto-archiving. Select System Configuration -> System Management to view the Common Profile Configuration screen.
|
Tip: The Common Profile folder appears in a tree-view on the left panel. The components are categorized as folders. Each folder contains all the field labels associated with that section. |
The default rule requires that the following options must be completed before a case is auto-archived:
All Action Items Closed
All Reports Submitted or Marked required for Non-Submission
All Events are encoded
All Letters are sent
All Cases are locked
Apart from this default rule, you can also configure additional rules/criteria for auto-archiving cases from this screen.
Workflow State (Configurable by the user) - This option enables you to select Workflow States. Cases that fall in the specified workflow states can be auto-archived.
Advanced Conditions selection (Configurable by the user) - This option enables you to specify advanced conditions. Cases that meet the specified advanced conditions, can be auto-archived.
This feature enables you to define rules for automatically archiving those cases that meet the defined rules.
To view the list of field names associated with the Case Processing -> Auto Archiving section, click the Auto Archiving folder in the left panel.
The field names associated with Auto Archiving Configuration appear in the right panel.

The following table lists the fields available under Auto Archiving Configuration:
| Field/Control Name | Description |
|---|---|
| Workflow States | The Select button enables you to select workflow states from a list of workflow states. The selected workflow states are displayed in the text box.
Cases that belong to these workflow states are marked to be auto-archived. |
| Advanced Condition | Enables you to specify advanced conditions for auto-archiving cases. Cases that meet the advanced conditions are marked to be auto-archived.
Refer to Advanced Conditions for details on creating advanced conditions. |
| Case Archiving Comment | Enables you to enter a pre-defined case close comment, of up to 200 characters. The information entered in this field is displayed in the Case Routing and Case Archive notes. |
| Execution Period (in Days) | Enables you to define how often the cases will be archived.
Note: You can enter up to 99 days only. If no value is entered, the cases will not be auto-archived. |
Use the following procedure to configure the auto archiving options
Select the workflow states for auto-archiving cases from Workflow States.
Create the advanced conditions for archiving cases in Advanced Condition.
Enter the Case Archiving Comment as a pre-defined case close comment.
Enter how often the cases will be archived, as per number of days, under Execution Period.
Click Save to save the changes made.
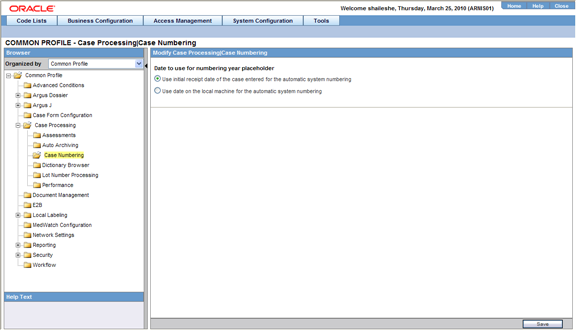
This screen enables you to configure the case processing fields and items for case numbering. Select System Configuration -> System Management to view the Common Profile Configuration screen
|
Tip: The Common Profile folder appears in a tree-view on the left panel. The components are categorized as folders. Each folder contains all the field labels associated with that section. |
To view the list of field names associated with the Case Processing -> Case Numbering section, click the Case Numbering folder in the left panel. The field names associated with Case Numbering appear in the right panel.
The following table lists the fields available under Case Numbering Configuration:
| Field/Control Name | Description |
| Date to use for numbering year placeholder | The available options are:
|
Use the following procedure to configure the case numbering options.
Select the required option for Date to use for numbering year placeholder.
Click Save to save the changes made.
A common profile switch determines whether a user can override an un-validated lot number and enter them in the case form.
The following table lists and describes the fields available under Lot Number Processing:
| Field/Control Name | Description |
|---|---|
| Allow Users to enter non-configured Lot Numbers | Enables you to select whether or not to allow users to enter non-configured lot numbers. Select Yes to allow, and No to diallow. |
| Use Centralized Lot Number Validation | Enables you to select whether or not to allow centralized lot number validation. Select Yes to use, and No to not use this option. |
| Lot Number Web Service Configuration XML File | Enables you to select and/or edit (if required) the Lot Number Web Service Configuration XML File. The file path textbox is a read-only field, which displays the path of the uploaded file. This field stores the configuration of the Centralized Lot Number Web Service in XML format. The Edit button is enabled only after the XML file has been successfully uploaded. |
| Lot Number Web Service XSLT | Enables you to select and/or edit (if required) the Lot Number Web Service XSLT File. This field stores the XSLT associated with the Centralized Lot Number Web Service. The file path textbox is a read-only field, which displays the path of the uploaded file. The Edit button is enabled only after the XSLT file has been successfully uploaded. |
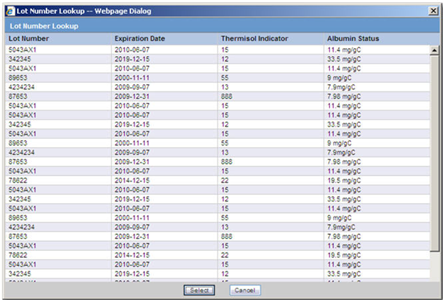
Yes is the default. This enables the user to select the options for the Lot Number Validation as current functionality This message box displays the following message:
No matching lot number was found.
If centralized lot search is used, the system hides the Lookup button since a list is automatically returned and displayed.
No: The system does not permit the user to keep the existing value. The user can only obtain it from a Look up dialog that lists the available Lot Numbers.
The system hides the Keep button.
A common profile switch determines whether lot validation uses Argus or a centralized lot validation.
No (default): This enables the user to select the options for the Lot Number Validation as current functionality from within the Argus Product Families Lot Numbers
Yes: This enables the system to query outside the Argus Safety system through a web service return the following parameters for Lot Number Validation
Argus sends the user-entered lot number to central system for validation/look-up and retrieves a response to act on.
The message format for the retrieved lot is as follows:
<Lots>
<Lot>
<Lot Number>: Lot number
<Expiration>: Lot expiration date
<Custom name=name metadata=text>: Custom data to a lot number
If more than one lot number is returned, the system displays a lot selection dialog.
The metadata attribute is as labels in the selection dialog that displays the data. The name attribute is used to identify the case form field to be populated with the data in the node.
Clients can use an XSLT document to map the custom data to case fields present on the active case form page.
If an error occurs during the web service transaction, a message box will appear with the proper error message.
This screen enables you to configure the case processing fields and items for MedDRA Browser.
Select System Configuration -> System Management to view the Common Profile Configuration screen
|
Tip: The Common Profile folder appears in a tree-view on the left panel. The components are categorized as folders. Each folder contains all the field labels associated with that section. |
A switch in Argus enables you to use either local MedDRA Coding or Central System MedDRA Coding (Web Service Method).
Local (Default): Current functionality of Dictionary browser using Local Dictionary within the Database.
Web Services: Returns the MedDRA hierarchy via the configured Web Services.
This enables the User Local MedDRA if term is not found by Web Service function.
To view the list of field names associated with the Case Processing -> Dictionary Browser section, click the Dictionary Browser folder in the left panel. The field names associated with Dictionary Browser are in the right panel.
The following table lists the fields available under Dictionary Browser Configuration:
| Field/Control Name | Description |
| Term Selection in Dictionary Browser | The available options are:
|
| Allow User to Add Non-Current MedDRA Terms for | The available options are:
|
| On change of LLT Term Sync English and Japan LLT's, irrespective of the currency | The available options are Yes or No.
This profile switch is enabled only when the user configures the Allow User to Add Non-Current Meddra Terms for to Yes. |
Use the following procedure to configure the Dictionary Browser.
Select the required option for Date to use for numbering year placeholder.
Click Save to save the changes made.
Argus supports WHO-Drug encoding using a locally installed version of the WHO-Drug dictionary through the WHO-Drug browser.
A switch in Argus enables you to use either local WHO-Drug Coding or Central System WHO-Drug Coding (Web Service Method) under the Dictionary browser category
Local (Default): Uses the current functionality of WHO-Drug browser that uses the Local Dictionary in the Database
Web Service: Returns the WHO-Drug fields via the configured Web Services
The system enables the User Local MedDRA if term is not found by Web Service"
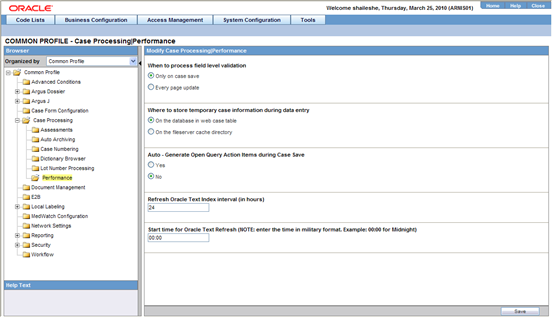
This screen enables you to configure the case processing fields and items for performance.
Select System Configuration -> System Management to view the Common Profile Configuration screen.
|
Tip: The Common Profile folder appears in a tree-view on the left panel. The components are categorized as folders. Each folder contains all the field labels associated with that section. |
To view the list of field names associated with the Case Processing -> Performance section, click the Performance folder in the left panel. The field names associated with Performance appear in the right panel.
The following table lists and describes the fields available under Performance Configuration:
| Field/Control Name | Description |
|---|---|
| When to process field level validation | Enables you to configure the frequency of field level validation. Select Only on case save to validate only when a case is saved.
Alternatively, select Every page update to validate fields whenever a page is updated. |
| Where to store temporary case information during data entry | Enables you to select the location where you can save the temporary case information during data entry.
You can select the location to be On the database in web case table or On the fileserver cache directory. |
| Use Oracle Text for duplicate search querying | Enables you to select Oracle Text for duplicate search querying. Click Yes to enable this feature. |
| Refresh Oracle Text Index interval (in Minutes) | Enables you to configure the interval (in minutes) between each refresh of an Oracle Text Index.
This feature is useful while searching for duplicate cases. It is advisable to enter a high interval for low number of cases and vice versa. |
| Start Time for Oracle Text Refresh | Enables you to specify the time when the Oracle text will be refreshed. |
Use the following procedure to configure performance.
Select the required option for When to process field level validation, as applicable.
Select the required option for Where to store temporary case information during data entry, as applicable.
Select the required option for Use Oracle Text for duplicate search querying, as applicable.
Enter the time difference between each refresh (in minutes), under Refresh Oracle Text Index interval (in Minutes).
Enter the time (in military format) when the Oracle text refresh will begin, under Start Time for Oracle Text Refresh.
Click Save to save the changes made.
The system enables you to configure to choose Document Management from the Common Profile Switches: Document Management
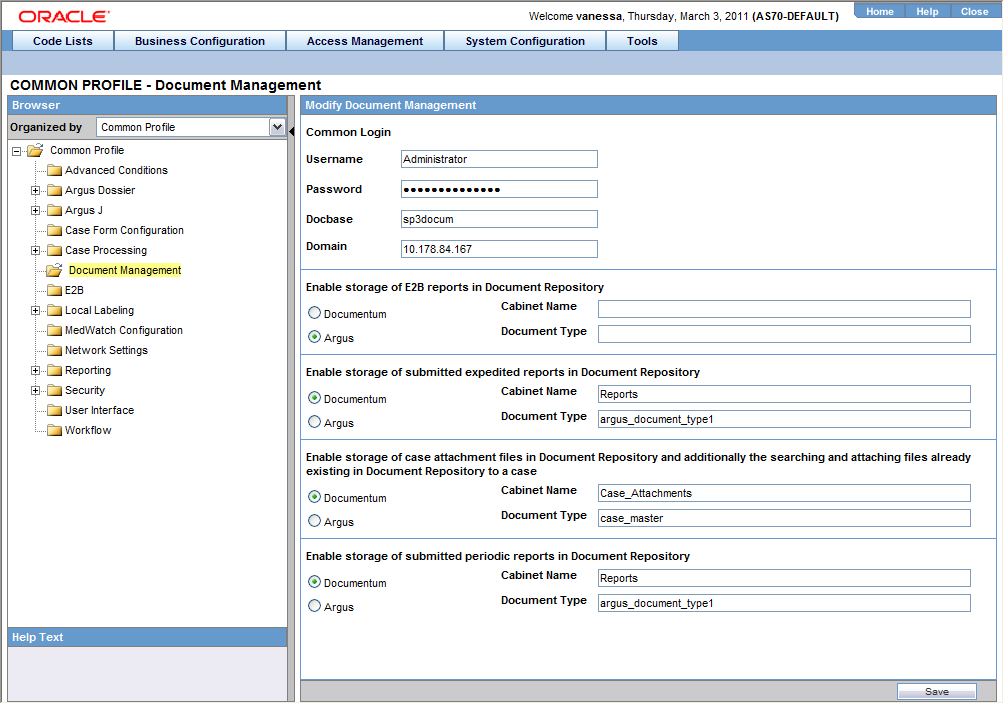
You may select from the following:
Documentum: Cabinet Name and Document Type textboxes are only enabled when the "Documentum" radio option is selected. These text boxes allow upto 255 characters.
Docbase and Domain are textbox fields. These fields can be a maximum of 255 characters.
Configure the following for Document Management:
E2B Reports
Expedited Paper Reports
Periodic Reports
Attachments saved within the cases
E2B Reports:
If the E2B switch is enabled and the user transmits an E2B Report (Before submission to the Gateway), the system stores the E2B XML Message in Documentum.
When the Report Submission is successful and the report is marked as submitted in Argus, the system updates a flag in the Documentum database to designate the same.
Expedited Reports
If the Expedited switch is enabled and the user submits an expedited report, the Argus Safety Service inserts the report into Documentum as a PDF file.
When the Report Submission is successful and the report is marked as submitted, the system updates a flag in the Documentum database to signify the same.
Periodic Reports:
If the Periodic Switch is enabled and a Periodic Report is approved in Argus, an Argus Safety Service exports the report as a PDF file and saves it in the Documentum database.
When the Report Submission is successful and the report is marked submitted, the system updates a flag in the Documentum database to indicate the same.
Attachments:
When this switch is enabled, a new button is available on the Argus Attachments screen, LAM Attachments Section label Attach Documentum Link.
The Argus Bookin dialog has an additional drop down option for attaching to Documentum.
When the Links Switch is enabled, the system stores all Argus Attachments in the Documentum database.
Clicking the Attach Documentum Link button opens a search dialog to enable the user to search the Documentum database for a document. This document is then linked as an attachment within Argus.
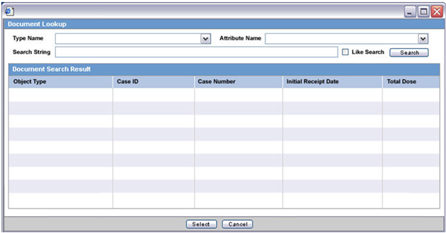
When the user clicks the Attach Documentum Link button, the following occurs:
The system presents a search dialog to enable the user to search for a document in the Documentum database.
The user must select a Table to Search. This list is a distinct Table List from the Documentum_table_info Table.
After the user selects a Table, the system populates the Column drop down with all the columns available for that table based on configuration from the same table.
When the user selects the Full Search option, the system performs a like search in Documentum.
If LDAP is enabled, the system automatically send the login information from Argus to Documentum.
After selecting a document from the Search results, the system saves the URL for the Argus attachment.
If the user clicks the URL, Argus automatically opens the document from Documentum.
Argus refers to two (2) that enables you to specify which tables/columns can be searched in Documentum and which Table Fields to display in the Search Results.
documentum_table_info - This table holds the table / fields the user will be able to search.
Type_Name - Table to Search
Attribute_Name - Field in the Table to Search
Attribute_Type - Type of field being searched.
Documentum_display_info - This table stores the Return Search Parameters.
Type_Name - Table to Search
Attribute_Name - Field in the Table to Search
Sort_Id - The order in which the fields will be displayed
The Document Management (Central or Documentum) database gets a new document each time a document attachment is added as a new attachment. Existing documents are modified for changes.
The system does not create a new document in the Document Management (Central or Documentum) database each time a case /event is saved in Argus or Affiliate
When cases are copied, the document copy has the same DOC ID (Object ID) as the original case. If the Document is modified after the cases are copied, the system gets a new DOC ID only for the case attachments that were modified.
The icon is similar to the Additional Info requirements for attachment types
When the user clicks the attachment to open it, the system retrieves the attachment from Documentum
When events from the Affiliate are accepted in Argus as Argus cases, the system keeps the DOC ID(Object ID) from the Affiliate Event
Attachments can be entered to the case / affiliate event via
Affiliate Events
Bookin in Argus or Affiliate
Case Form / Affiliate Event Form
Intake WL
Error Messages
If the system cannot connect to the document system, it displays the following message:
Argus was unable to connect to the document management system. Please contact your Administrator for more details.
If the document system does not return any rows, the system returns a dialog with the following message
No documents returned.
Select System Configuration -> System Management to view the Common Profile Configuration screen
|
Tip: The Common Profile folder appears in a tree-view on the left panel. The components are categorized as folders. Each folder contains all the field labels associated with that section. |
To view the list of field names associated with the Case Processing -> Documentum section, click the Documentum folder in the left panel. The field names associated with Documentum appear in the right panel.
The following table lists the fields available under Documentum Management:
| Section | Field | Description |
|---|---|---|
| Common Login | Use Common Login Password | Users use a common login password to access the system |
| Docbase | The name of the document database. | |
| Domain | The name of the domain where the database resides. | |
| Enable Storage of E2B Reports in Document Repository | Documentum | Enables the system to store E2B reports in the document repository. |
| Argus | Enables the system to store E2B reports in the Argus document repository.
This is the default. |
|
| Cabinet Name | The storage location of the E2B reports. | |
| Document Type | The type of document that is being stored. | |
| Enable Storage of submitted expedited reports in Document Repository | Documentum | Enables the system to store submitted expedited reports in the Documentum document repository. |
| Argus | Enables the system to store submittedd expedited reports in the Argus document repository.
This is the default. |
|
| Cabinet Name | The storage location of the submitted expedited reports. | |
| Document Type | The type of document that is being stored. | |
| Enable storage of case attachment files in the Document Repository | Documentum | Enables the system to store case attachment files in the Documentum document repository. |
| Argus | Enables the system to store case attachment files in the Argus document repository.
This is the default. |
|
| Cabinet Name | The storage location of the case attachment files. | |
| Document Type | The type of document that is being stored. | |
| Enable storage of submitted periodic reports in the Document Repository | Documentum | Enables the system to store submitted periodic reports in the Documentum document repository. |
| Argus | Enables the system to store submitted periodic reports in the Argus document repository.
This is the default. |
|
| Cabinet Name | The storage location of the submitted periodic reports. | |
| Document Type | The type of document that is being stored. |
Use the following procedure to configure Documentum
Select the Common Login to configure the login for the user.
Select the option for Enable Storage of E2B Reports in Documentum.
Select the option for Enable Storage of submitted expedited reports in Documentum.
Select the option for Enable storage of case attachment files in Documentum and additionally the searching and attaching files already existing in Documentum to a case.
Select the option for Enable storage of submitted periodic reports in Documentum.
Click Save to save the changes made.
This section enables you to configure the common profile switches for Local Labeling and includes discussions of the following:
Configuring Local Labeling
Configuring Local Labeling LAM
The Local Labeling Configuration screen enables you to modify the options available through local labeling. Select System Configuration -> System Management to view the Common Profile Configuration screen.
|
Tip: The Common Profile folder appears in a tree-view on the left panel. The components are categorized as folders. Each folder contains all the field labels associated with that section. |
To configure the fields associated with the Local Labeling section, click the Local Labeling folder in the left panel. The configurable fields associated with Local Labeling appear in the right panel.
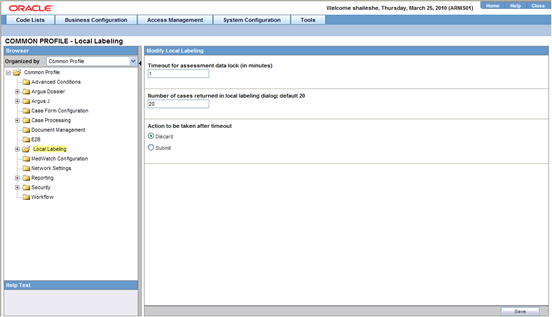
The following table lists and describes the fields available under Local Labeling:
| Field/Control Name | Description |
|---|---|
| Number of Cases returned in local labeling dialog: default X | This field enables the user to configure the number of cases that are returned in the local labeling dialog.
Example: If the value is entered as 20 then 20 cases are returned in the local labeling dialog. |
| Action to be taken after timeout | The available options are :
|
| Timeout for assessment data lock (in minutes) | This field enables the user to enter the minutes after which the time-out for assessment data lock is applicable. |
Use the following procedure to configure local labeling
Enter the number in Number of Cases returned in local labeling dialog: default.
Select the option for Action to be taken after timeout.
Enter the value in minutes for Timeout for assessment data lock (in minutes).
Click Save to save the changes made.
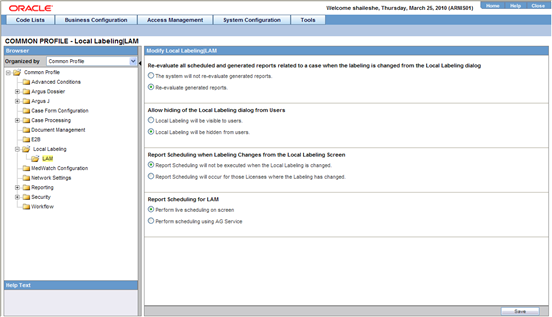
The Local Labeling LAM Configuration screen enables you to modify the options available through local labeling for LAM.
The Argus Console Field Labels option enables the user to modify the field labels for the Argus Affiliate Event Information form.
The existing Argus fields are under the Argus Safety folder structure.
Please refer to the tables in the LAM Information section for the details about the Help Text for the fields.
The system enables the user to hide the field on the LAM form.
The system prints the Affiliate field labels.
The system tracks all field label updates in the audit log.
Argus Affiliate enables the user to configure Field Validations for Mandatory and Warning for the LAM Event fields.
The existing Argus fields are under the Argus Safety folder structure.
Please refer to the table for LAM Event Info for the fields in the Field Validations.
The Affiliate fields for advanced conditions are only visible for field validations. They are not visible to the rest of the application.
The system prints the information for the configured field validations.
The system tracks all updates to field validations in the audit log.
The system displays the standard Justifications dialog to enable the user to enter the justifications for overriding the warnings, but does not permit the user to save the case for a mandatory error.
Select System Configuration -> System Management to view the Common Profile Configuration screen
|
Tip: The Common Profile folder appears in a tree-view on the left panel. The components are categorized as folders. Each folder contains all the field labels associated with that section. |
To configure the fields associated with the Local Labeling LAM section, click the Local Labeling folder in the left panel.
The LAM sub-folder is displayed in the left panel.
Click on LAM sub-folder to configure the LAM options.
The configurable fields associated with Local Labeling Lam appear in the right panel.
Field Descriptions
The following table lists and describes the fields available under Local Labeling LAM:
| Field/Control Name | Description |
| Report Scheduling when Labeling Changes from the Local Labeling Screen | The available options are:
|
| Re-evaluate all scheduled and generated reports related to a case when the labeling is changed from the Local Labeling dialog | The available options are:
|
| Report Scheduling for LAM | The available options are:
|
Use the following procedure to configure local labeling for LAM.
Select the option for Allow hiding of the Local Labeling dialog from Users.
Select the option for Report Scheduling when Labeling Changes from the Local Labeling Screen.
Select the option for Re-evaluate all scheduled and generated reports related to a case when the labeling is changed from the Local Labeling dialog.
Click Save to save the changes made.
This section enables you to configure the common profile switches for User Interface.
The User Interface Configuration screen enables you to configure the user interface, as per the options available. Select System Configuration -> System Management to view the Common Profile Configuration screen.
|
Tip: The Common Profile folder appears in a tree-view on the left panel. The components are categorized as folders. Each folder contains all the field labels associated with that section. |
To configure the fields associated with the User Interface section, click the User Interface folder in the left panel. The configurable fields associated with User Interface appear in the right panel.
The Reporting Configuration screen enables you to modify the options available for reporting. Select System Configuration -> System Management to view the Common Profile Configuration screen
|
Tip: The Common Profile folder appears in a tree-view on the left panel. The components are categorized as folders. Each folder contains all the field labels associated with that section. |
To configure the fields associated with the Reporting section, click the Reporting folder in the left panel. The configurable fields associated with Reporting appear in the right panel.
The following table lists the fields available under Reporting:
| Field/Control Name | Description |
|---|---|
| Allow User to regenerate reports | The available options are Yes and No. |
| Determine the minimum length of the routing comment text length on report routing dialog | The available options are:
|
Use the following procedure to configure reporting.
Select the option for Determine the minimum length of the routing comment text length on report routing dialog.
Enter the numeric value in the Minimum length of text required text-box, if applicable.
Click Save to save the changes made to this screen.
This screen enables you to configure the E2B fields and items for E2B. Select System Configuration -> System Management to view the Common Profile Configuration screen
|
Tip: The Common Profile folder appears in a tree-view on the left panel. The components are categorized as folders. Each folder contains all the field labels associated with that section. |
To view the list of field names associated with the E2B section, click the E2B folder in the left panel. The field names associated with E2B appear in the right panel.
The following table lists the fields available under E2B:
| Field/Control Name | Description |
|---|---|
| Auto Accept Notes | Enables the user to enter notes (up to 190 characters). It is required for these notes to be entered for the acceptance of the E2B. The notes entered here, are automatically provided during E2B acceptance. |
| Blind status during E2B report generation | The available options are:
|
| Default DTD | Enables the user to select the Default DTD from the drop-down list box. |
| Default view for E2B (R3) | Specifies the default view of E2B (R3) reports in the ICSR viewer. Decoded, HL7, and XML are the available options. |
| Default viewing format of the E2B report (used in E2B (R2) reports) | The available options are:
|
| Drug assessment method (used by E2B/Interchange module) | Enables the user to incorporate the drug assessment method used by E2B/Interchange module. |
| File attachments allowed for ICH E2B (R3) Profile | Verifies the applicable files that can be attached with an E2B (R3) report generated using the ICH profile. |
| File attachments allowed for EMA E2B (R3) Profile | Verifies the applicable files that can be attached with an E2B (R3) report generated using the EMA profile. |
| Onset Date Calculation | Enables the user to configure if the onset date is to be calculated based on any suspect drug or on the primary suspect drug only. |
| Perform E2B Check on Save | Performs data check on Argus fields against E2B standard while saving the case.
The available options are:
|
| Send E2B nullification report | Enables the user to send an E2B nullification report. You can select whether to automatically schedule it or to not send the report. |
Use the following procedure to configure E2B
Enable the check-box option for Drug assessment method (used by E2B/ESM module), if required.
Select the option for Blind status during E2B report generation.
Select the option for Perform length check of Argus fields against E2B standard.
Select the option for Default viewing format of the E2B report (used with Electronic Submission Module (ESM)).
Select the option for Default DTD.
Select the required radio button under Onset Date Calculation, as applicable.
Enter the comments for the automatically generated notes, when an E2B is accepted, under Auto Accept Notes.
Click Save to save the changes made to this screen.
The eMDR Reporting Configuration screen enables you to modify the options available for eMDR reporting.
Select System Configuration -> System Management to view the Common Profile Configuration screen.
To configure the fields associated with the Reporting section, click the Reporting folder in the left panel. The eMDR sub-folder is displayed in the left panel. Click this sub-folder to configure the reporting options. The configurable fields associated with eMDR appear in the right panel.
Field Descriptions
The following table lists and describes the fields available under eMDR:
| Field/Control Name | Description |
|---|---|
| Default Reporting Destination for draft eMDR generation | Displays all Reporting Destinations in the drop-down list. It is used only when the user generates a draft eMDR using the Draft icon or Medical Review eMDR View Draft options. |
| File attachments allowed for eMDR | Verifies the files that are attached to an eMDR. Only configured file types are allowed to be attached to an eMDR. |
| Allowed file size for eMDR (in MB) | Checks the default permissible report file size for an eMDR. |
| Default view for eMDR | Specifies the default view of eMDR in ICSR viewer. |
The eVAERS Reporting Configuration screen enables you to modify the options available for eVAERS reporting.
Select System Configuration -> System Management to view the Common Profile Configuration screen.
|
Tip: The Common Profile folder appears in a tree-view on the left panel. The components are categorized as folders. Each folder contains all the field labels associated with that section. |
To configure the fields associated with the Reporting section, click the Reporting folder in the left panel. The eVAERS sub-folder is displayed in the left panel.
Click this sub-folder to configure the reporting options. The configurable fields associated with eVAERS appear in the right panel.
Field Descriptions
The following table lists and describes the fields available under eVAERS:
| Field/Control Name | Description |
| Default view for eVAERS | Enables you to select either XML View or HL7 view as the default view for eVAERS. |
| File attachments allowed for eVAERS | Enables you to specify the types of files which are allowed as attachments for eVAERS. |
| Allowed file size for eVAERS (in MB) | Enables you to specify the maximum file size (in MB) allowed in eVAERS. |
| Default Reporting Destination for draft eVAERS generation | Enables you to select the default Reporting Destination for draft eVAERS generation. |
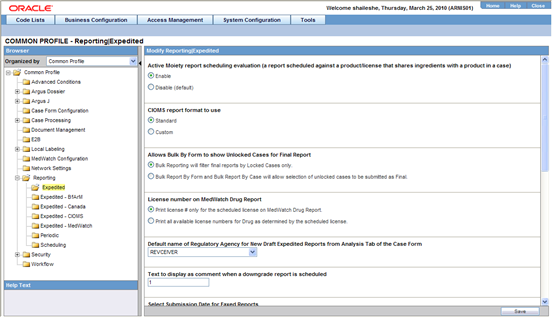
The Expedited Reporting Configuration screen enables you to modify the options available for expedited reporting. When configuring expedited reporting rules, be aware of the following:
If the user does not have permission to access Advanced Conditions on the Expedited Reporting Rules, the system does the following:
Displays the advanced condition name instead of displaying a blank.
Does not permit the user to modify or view advanced condition details.
Disables the Adv Condition button.
The system enables the user configure the Blinding Study Products option for those included in the case (default unchecked).
The system track updates to this field in the audit log.
The Reporting Rules reports print the new options
For cases where expedited reports are due, the user can force-distribute expedited reports even if processing is incomplete.
The reporting rules have a Forced Distribute XXX days before due check box. The default is unchecked.
If the user checks the Force Distribute option, the # of days before due field is entered and automatically checks the Auto Distribute check box on the reporting rule (grayed out).
The user can enter the number of days from 0 - # of days defined within the time frame.
If the user enters a value greater than the defined time frame, the system displays the following message:
Please enter a value less than the Time Frame defined for the Reporting Rule.
If the user has not checked Force Distribute, the system disables the days before due.
The system tracks updates made to the new Argus Console fields in the audit log.
The system prints the new fields on the Reporting Rules report.
Select System Configuration -> System Management to view the Common Profile Configuration screen.
|
Tip: The Common Profile folder appears in a tree-view on the left panel. The components are categorized as folders. Each folder contains all the field labels associated with that section. |
To configure the fields associated with the Reporting section, click the Reporting folder in the left panel. The Expedited sub-folder opens in the left panel.
Click on Expedited sub-folder to configure the expedited reporting options. The configurable fields associated with ExpeditedReporting open in the right panel.
Field Descriptions
The following table lists and describes the fields available under Expedited Reporting:
| Field/Control Name | Description |
|---|---|
| Active moiety report scheduling evaluation (a report scheduled against a product/license that shares ingredients with a product in a case) | The available options are:
|
| Allows Bulk Reporting screen to show Unlocked Cases for Final Report | The available options are:
|
| Allows Bulk Reporting screen to show Generated Reports Only | Enables the administrator to allow the Bulk Reporting screen to display only the generated reports. |
| Nomenclature System on EU Device Vigilance Form | Nomenclature system (Preferable GMDN)" box of EU Device Vigilance Form. By default, this common profile switch is set to ’GMDN'. |
| Default name of Regulatory Agency for Draft Expedited English Reports | This enables the user to select the Default Name of the Regulatory agency from the drop-down list. |
| Text to display as comment when a downgrade report is scheduled | This enables the user to enter the text to display when a downgrade report is scheduled. |
| Auto Distribution Transmission Comments | Enables the user to enter transmission comments of up to 2000 characters, for Expedited Reports Transmission.
These comments are auto-distributed, based on Expedited Reporting Rules or Reporting Destinations. |
| Auto Distribution Submission Comments | Enables the user to enter submission comments of up to 2000 characters, for Expedited Reports Transmission.
These comments are auto-distributed, based on Expedited Reporting Rules or Reporting Destinations. |
| Print Case Version of Expedited Reports (x.y.z) | This switch enables the user to enable or disable the printing of the case version of expedited reports. |
| SQL mapping for CIOMS/CERFA/MHRA Spontaneous/EU EMEA Spontaneous/Spanish Clinical/Spanish Spontaneous Literature Report Source (Parameters: P_CASE_ID) | For more details on the default mapping, refer to the Mapping Document. |
Use the following procedure to configure expedited reports.
Select the option for Active moiety report scheduling evaluation (a report scheduled against a product/license that shares ingredients with a product in a case).
Select the option for enables Bulk by Form to show Unlocked Cases for Final Report.
Select the option for Default name of Regulatory Agency for New Draft Expedited Reports from Analysis Tab of the Case Form from the drop-down text-box.
Enter the text in the Text to display as comment when a downgrade report is scheduled text-box, if applicable.
Enter the transmission comments in Auto Distribution Transmission Comments.
Enter the submission comments in Auto Distribution Submission Comments.
Select whether to enable or disable printing the case version of expedited reports in Print Case Version of Expedited Reports (x.y.z).
Click Save to save the changes made to this screen.
The BIP Aggregate Reporting Configuration screen enables you to modify the options available for BIP Aggregate reporting. To enable execution of BIP reports from the Argus Safety UI, you must configure the BIP Aggregate Reports module from Enabled Modules.
Select System Configuration -> System Management to view the Common Profile Configuration screen.
|
Tip: The Common Profile folder appears in a tree-view on the left panel. The components are categorized as folders. Each folder contains all the field labels associated with that section. |
To configure the fields associated with the Reporting section, click the Reporting folder in the left panel. The BIP Aggregate Reporting sub-folder is displayed in the left panel.
Click this sub-folder to configure the reporting options. The configurable fields associated with BIP Aggregate Reporting appear in the right panel.
Field Descriptions
The following table lists and describes the fields available under BIP Aggregate Reporting:
| Field/Control Name | Description |
| BIP Common User | Enables you to enter the name of the BIP common user. |
| BIP Common User Password | Enables you to enter the password of the BIP common user. |
| Persist data in BIP Aggregate Temp Tables | Enables you to select whether to persist data in BIP Aggregate Temporary Tables.
The available options are:
|
| Number of days for which data of BIP Aggregate Temp Tables should be persisted | Enables you to specify the number of days for which data in BIP Aggregate Temporary Tables should be persisted. |
The Expedited BfArM Reporting Configuration screen enables you to modify the options available for expedited BfArM reporting.
Select System Configuration -> System Management to view the Common Profile Configuration screen.
|
Tip: The Common Profile folder appears in a tree-view on the left panel. The components are categorized as folders. Each folder contains all the field labels associated with that section. |
To configure the fields associated with the Reporting section, click the Reporting folder in the left panel. The Expedited- BfArM sub-folder is displayed in the left panel.
Click on the Expedited-BfArM sub-folder to configure the expedited BfArM reporting options. The configurable fields associated with Expedited - BfArMReporting appear in the right panel.
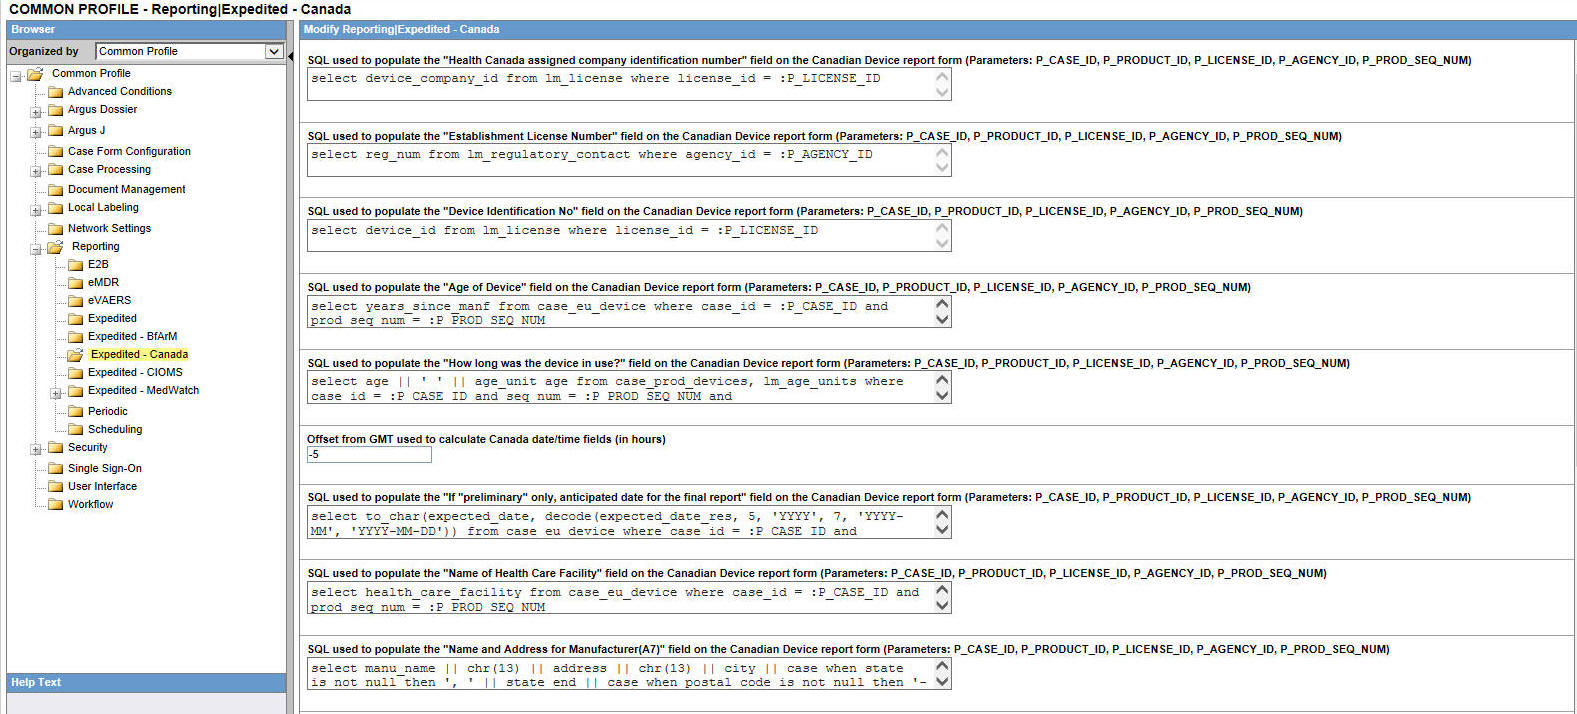
Field Descriptions
The following table lists and describes the fields available under Expedited - BfArMReporting:
| Field/Control Name | Description |
| Causality Value on BfArM Report | The available options are:
|
| Value of field "Grunderkrankung" on the BfArM/PEI form | The available options are:
|
Use the following steps to configure the expedited BfArM reports.
Select the option for Causality Value on BfArM Report.
Select the option for Value of field "Grunderkrankung" on the BfArM/PEI form.
Click Save to save the changes made to this screen.
The Expedited Canada Reporting Configuration screen enables you to modify the options available for expedited Canada reporting.
Select System Configuration -> System Management to view the Common Profile Configuration screen.
|
Tip: The Common Profile folder appears in a tree-view on the left panel. The components are categorized as folders. Each folder contains all the field labels associated with that section. |
To configure the fields associated with the Reporting section, click the Reporting folder in the left panel. The Expedited- Canada sub-folder is displayed in the left panel.
Click on the Expedited-Canada sub-folder to configure the reporting options. The configurable fields associated with Expedited - CanadaReporting appear in the right panel.
Field Descriptions
The following table lists and describes the fields available under Expedited- Canada Reporting:
| Field/Control Name | Description |
|---|---|
| SQL used to populate the "Health Canada assigned company identification number" field on the Canadian Device report form | This field enables the user to enter the associated SQL syntax. |
| SQL used to populate the "Establishment License Number" field on the Canadian Device report form | This field enables the user to enter the associated SQL syntax. |
| SQL used to populate the "Device Identification No" field on the Canadian Device report form | This field enables the user to enter the associated SQL syntax. |
| SQL used to populate the "Age of Device" field on the Canadian Device report form | This field enables the user to enter the associated SQL syntax. |
| SQL used to populate the "How long was the device in use?" field on the Canadian Device report form | This field enables the user to enter the associated SQL syntax. |
| Offset from GMT used to calculate Canada date/time fields (in hours) | This switch enables the GMT offset to the Submitted dates getting printed in Canadian Device Form. |
| SQL used to populate the "If "preliminary" only, anticipated date for the final report" field on the Canadian Device report form | This field enables the user to enter the associated SQL syntax. |
| SQL used to populate the "Name of Health Care Facility" field on the Canadian Device report form | This field enables the user to enter the associated SQL syntax. |
| SQL used to populate the "Name and Address for Manufacturer(A7)" field on the Canadian Device report form | This field enables the user to enter the associated SQL syntax. |
| SQL used to populate the "Is there a new drug submission for this drug under review in Canada" field on the Canadian Expedited ADR report form | This field enables the user to enter the associated SQL syntax. |
| SQL used to populate the "Is there a clinical trial application for this drug under review in Canada" field on the Canadian Expedited ADR report form | This field enables the user to enter the associated SQL syntax. |
| SQL used to populate the "Is there an ongoing clinical trial for this drug in Canada" field on the Canadian Expedited ADR report form | This field enables the user to enter the associated SQL syntax. |
| SQL used to populate the "Report ADR occurred in Phase I-IV Study" field on the Canadian Expedited ADR report form | This field enables the user to enter the associated SQL syntax. |
| SQL used to populate the "Report ADR occurred in Phase I-III Study" field on the Canadian Expedited ADR report form | This field enables the user to enter the associated SQL syntax. |
Use the following procedure to configure expedited Canada reports.
Enter the SQL syntax for SQL used to populate the "Is there an ongoing clinical trial for this drug in Canada" field on the Canadian Expedited ADR report form.
Enter the SQL syntax for SQL used to populate the "Is there a clinical trial application for this drug under review in Canada" field on the Canadian Expedited ADR report form.
Enter the SQL syntax for SQL used to populate the "Is there a new drug submission for this drug under review in Canada" field on the Canadian Expedited ADR report form.
Enter the SQL syntax for SQL used to populate the "Report ADR occurred in Phase I-III Study" field on the Canadian Expedited ADR report form.
Enter the SQL syntax for SQL used to populate the "Report ADR occurred in Phase I-IV Study" field on the Canadian Expedited ADR report form.
Click Save to save the changes made to this screen.
The Expedited CIOMS Reporting Configuration screen enables you to modify the options available for expedited CIOMS reporting. Select System Configuration -> System Management to view the Common Profile Configuration screen.
|
Tip: The Common Profile folder appears in a tree-view on the left panel. The components are categorized as folders. Each folder contains all the field labels associated with that section. |
To configure the fields associated with the Reporting section, click the Reporting folder in the left panel.
The Expedited- CIOMS sub-folder is displayed in the left panel. Click on the Expedited-CIOMS sub-folder to configure the expedited CIOMS reporting options.
The configurable fields associated with Expedited - CIOMSReporting appear in the right panel.
Field Descriptions
The following table lists the fields available under Expedited- CIOMS Reporting:
| Field/Control Name | Description |
|---|---|
| CIOMS Form Selection | This enables the user to select the CIOMS form to be used across the application for Expedited Reporting / Periodic Reporting. |
| CIOMS report format to use | The available options are:
When Custom is selected, a second version of the CIOMS form is used. This form is almost identical to the Standard form. The only difference is that the Custom form includes superscripts in the label text for boxes 15, 16, 18 and 19. The superscript is simply an asterisk (*) to draw the user's attention to the following footnote also included in the Custom form: *Boxes 15, 16, 18, and 19 on page 1 contain first dose regimen information for suspected product #1 and #2. Suspected Drug(s) information is continued on Additional Information page, if applicable. Thus, the Custom form simply provides the user the option to clearly identify fields that have overflow information on the Additional Information page. |
| Print Patient ID, Study ID, Center ID in 26. REMARKS section of the CIOMS form | Enables the user to print the Patient ID, Study ID and Center ID fields in the "26. REMARKS" section of the CIOMS form. |
| Print Medically Confirmed in the 26. REMARKS section of the CIOMS form | Enables the user to print Medically Confirmed in the 26. REMARKS section of the CIOMS form. |
| Print World Wide Number in the 26. REMARKS" section of the CIOMS form | Enables the user to print World Wide Number in the "26. REMARKS" section of the CIOMS form. |
Use the following procedure to configure the expedited CIOMS reports.
Select the Print Patient ID, Study ID, Center ID in the "26. REMARKS" section of the CIOMS form checkbox to print these fields in the CIOMS form.
Select the Print Medically Confirmed in the "26. REMARKS" section of the CIOMS form checkbox to print this field in the CIOMS form.
Select the Print World Wide Number in the "26. REMARKS" section of the CIOMS form checkbox to print this field in the CIOMS form.
Select the option for CIOMS report format to use.
Select the relevant CIOMS form, from CIOMS Form Selection.
Click Save to save the changes made to this screen.
The Expedited MedWatch Reporting Configuration screen enables you to modify the options available for expedited MedWatch reporting.
Select System Configuration -> System Management to view the Common Profile Configuration screen.
|
Tip: The Common Profile folder appears in a tree-view on the left panel. The components are categorized as folders. Each folder contains all the field labels associated with that section. |
To configure the fields associated with the Reporting section, click the Reporting folder in the left panel. The Expedited- MedWatch sub-folder is displayed in the left panel.
Click on the Expedited-MedWatch sub-folder to configure the expedited MedWatch reporting options. The configurable fields associated with Expedited - MedWatch Reporting appear in the right panel.
Field Descriptions
The following table lists the fields available under Expedited- MedWatch Reporting:
| Field/Control Name | Description |
|---|---|
| Value for Field E4 on MedWatch | Select the applicable value from the available options. |
| Data to print on follow up MedWatch Device form | The available options are:
|
| Number from LM_REF_TYPES.REF_TYPE_ID for Reference Type containing Legacy Case Number (to print MedWatch forms) | This field enables the user to select the required option from the drop-down list. |
| SQL used to print the BLA # | Enables you to enter the SQL query used to print the BLA#. |
| SQL used to print Unique Identifier (UDI #) in MedWatch Device Form | Enables you to enter the SQL query used to print the UDI# in MedWatch Device Forms. |
| License number on MedWatch Drug Report | The available options are:
|
| License number on MedWatch Drug Report | This field enables the user to select the option for License number on MedWatch Drug Report. |
| SQL mapping for MedWatch Literature Box 3. Report Source (Parameters: P_CASE_ID) | SQL mapping for the field: "This type includes cases from literature" for MedWatch.
For more details on the default mapping, refer to the Mapping Document. |
| Value for Field G8 on MedWatch | Select the applicable value from the available options. |
Use the following procedure to configure expedited MedWatch reports.
Select the option for the Value for Field E4 on MedWatch.
Select the option for the Data to print on follow up MedWatch Device form.
Select the required option for Number from LM_REF_TYPES.REF_TYPE_ID for Reference Type containing Legacy Case Number (to print MedWatch forms) from the drop-down list box.
Select the option for License number on MedWatch Drug Report.
Add an SQL for BLA# and UDI#, if there is a need to change the default logic for these fields in MedWatch report.
Click Save to save the changes made to this screen.
Configuring MedWatch
The MedWatch Configuration screen enables you to modify the customizable fields on the MedWatch form. Select System Configuration -> System Management to view the Common Profile Configuration screen.
|
Tip: The Common Profile folder appears in a tree-view on the left panel. The components are categorized as folders. Each folder contains all the field labels associated with that section. |
To view the list of field names associated with the MedWatch Configuration section, click the MedWatch Configuration folder in the left panel.
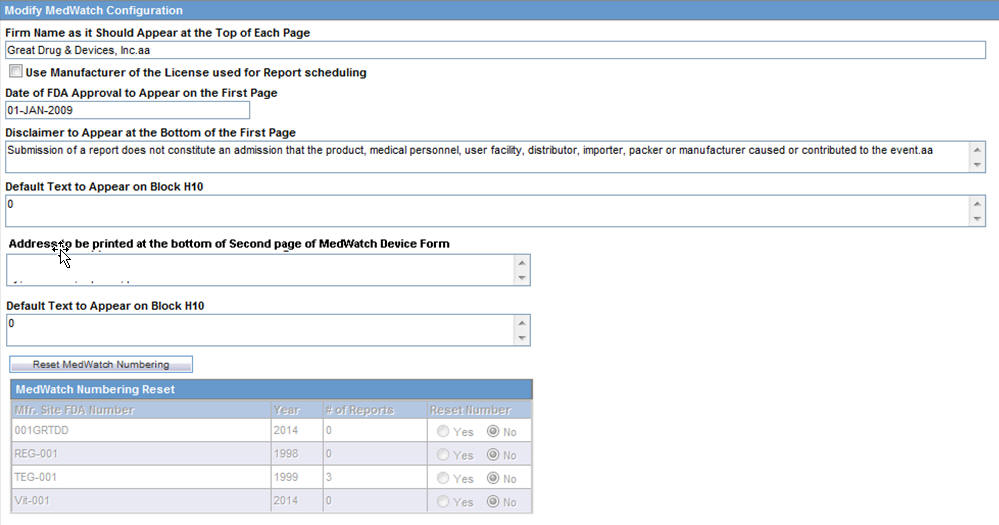
The field names associated with MedWatch Configuration appear in the right panel.
Field Descriptions
The following table lists and describes the fields available under MedWatch Configuration:
| Field/Control Name | Description |
|---|---|
| Firm Name as it Should Appear at the Top of Each Page | Enables the user to enter the name of the reporting firm on the MedWatch form. |
| Use Manufacturer of the License Used for Report scheduling | Enables the user to use the manufacturer of the license that was used for report scheduling, by checking this checkbox. |
| Date of FDA Approval to Appear on the First Page | Enables the user to enter the FDA approval date of the manufacturer. |
| Disclaimer to appear at the Bottom of the First Page | Enables the user to enter a brief disclaimer. |
| Default text to appear on Block H10 | Enables the user to enter default text. |
| Address to be printed at the bottom of Second page of MedWatch Device Form | Enables the user to enter the address to be printed at the bottom of Second page of MedWatch Device Form.
The default address is as follows: Department of Health and Human Services Food and Drug Administration Office of Chief Information Officer Paperwork Reduction Act (PRA) Staff PRAStaff@fda.hhs.gov |
| Reset MedWatch Numbering | Enables the user to reset the sequence number that appears on the MedWatch form for the manufacturer. |
| Mfr. Site FDA Number | Displays the FDA number for the Manufacturer Site which submitted the MedWatch 3500 Device report in the year. |
| Year | Displays the year of report submission. |
| # of Reports | Displays the number of submitted reports for products associated with a Manufacturing Site in that year |
| Reset Number | Enables the user to reset the Sequence Number. |
Use the following procedure to configure the MedWatch form options.
Enter the Firm Name as it Should Appear at the Top of Each Page.
Enter the Date of FDA Approval to appear on the first page.
Enter the Disclaimer to appear at the bottom of the first page.
Enter the Default text to appear on Block H10.
Click Reset MedWatch Numbering to reset the sequence number that appears on the MedWatch form, for the manufacturer as required.
The Periodic Reporting Configuration screen enables you to modify the options available for periodic reporting.
Select System Configuration -> System Management to view the Common Profile Configuration screen.
|
Tip: The Common Profile folder appears in a tree-view on the left panel. The components are categorized as folders. Each folder contains all the field labels associated with that section. |
To configure the fields associated with the Reporting section, click the Reporting folder in the left panel. The Periodic sub-folder is displayed in the left panel.
Click on the Periodic sub-folder to configure the periodic reporting options. The configurable fields associated with Periodic Reporting appear in the right panel.
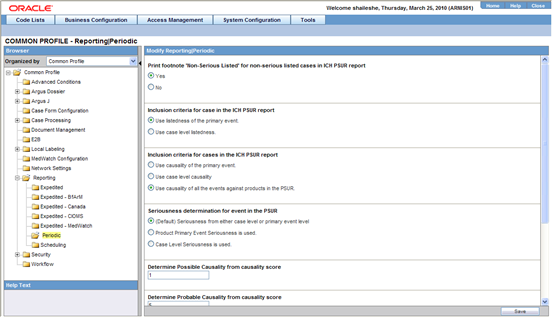
Field Descriptions
The following table lists and describes the fields available under Periodic Reporting:
| Field/Control Name | Description |
|---|---|
| Determine Primary Event for use in ICH PSUR/CTPR report | The available options are:
|
| Listedness grouping logic for ICH PSUR/CTPR report output | The available options are:
|
| Seriousness grouping logic for ICH PSUR/CTPR report output | The available options are:
|
| Inclusion Criteria for cases in the ICH PSUR/CTPR report | The available options are:
|
| Determine Possible Causality from the causality score | This field enables the user to enter a numeric value. |
| Determine Probable Causality from the causality score | This field enables the user to enter a numeric value. |
| On PSUR, NDA, IND, Medical Review List Reports | The available options are:
|
| Print footnote 'Non-Serious Listed' for non-serious listed cases in ICH PSUR report | The available options are:
|
| Assessment of Listedness and Causality when both Licenses and Studies are selected in CTPR | The available options are:
|
Use the following procedure to configure periodic reports.
Select the option for Inclusion Criteria for cases in the ICH PSUR report.
Select the option for Print footnote "Non Serious Listed" for non-serious listed cases in ICH PSUR report.
Select the option for Inclusion criteria of event for a product in the PSUR.
Enter the value for Determine Possible Causality from the causality score.
Enter the value for Determine Probable Causality from causality score.
Select the option for On PSUR, NDA, IND, Medical Review List Reports.
Click Save to save the changes made to this screen.
The Scheduling Reports Configuration screen enables you to modify the options available for scheduling reporting. Select System Configuration -> System Management to view the Common Profile Configuration screen.
|
Tip: The Common Profile folder appears in a tree-view on the left panel. The components are categorized as folders. Each folder contains all the field labels associated with that section. |
To configure the fields associated with the Reporting section, click the Reporting folder in the left panel. The Scheduling sub-folder is displayed in the left panel.
Click on the Scheduling sub-folder to configure the scheduling report options. The configurable fields associated with Scheduling Reports appear in the right panel.
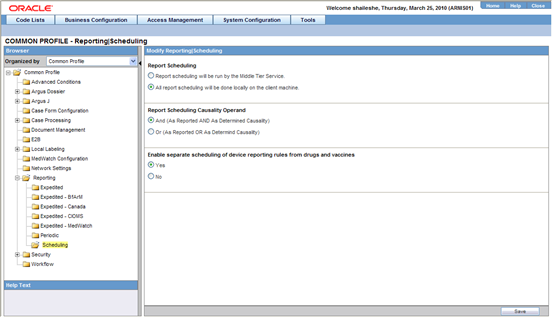
Field Descriptions
The following table lists and describes the fields available under Schedule Reports:
| Field/Control Name | Description |
| Report Scheduling | The available options are:
|
| Enable separate scheduling of device reporting rules from drugs and vaccines | The available options are:
|
| Report Scheduling Causality Operand | Enables the user to select from the causality operands AND/OR to use for scheduling a report. |
Use the following procedure to configure scheduling.
Select the option for Report Scheduling.
Select the option for Enable separate scheduling of device reporting rules from drugs and vaccines.
Select the operand to use for scheduling a report from Report Scheduling Causality Operand.
Click Save to save the changes made to this screen.
The Security Configuration screen enables you to modify the options available for security. Select System Configuration -> System Management to view the Common Profile Configuration screen.
|
Tip: The Common Profile folder appears in a tree-view on the left panel. The components are categorized as folders. Each folder contains all the field labels associated with that section. |
To configure the fields associated with the Security section, click the Common Profile-> Security folder in the left panel. The configurable fields associated with Security appear in the right panel.
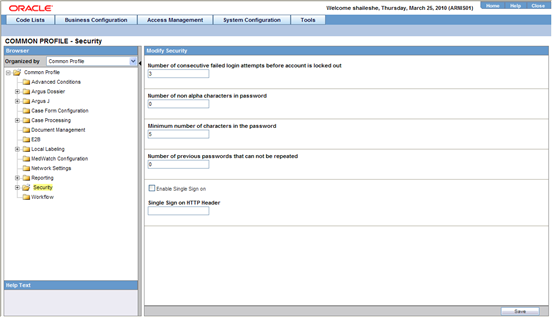
Field Descriptions
The following table lists the fields available under Security:
| Field/Control Name | Description |
|---|---|
| Number of previous passwords that cannot be repeated | Enables you to configure the number of passwords that can be allowed.
For example, if you enter 4 in this field, it configures the system to enable up to 4 previous passwords that cannot be used as passwords again. |
| Number of non-alpha characters in password | Enables you to configure the number of non-alpha characters that should exist in a password. Non-alpha characters include characters such as @, $, etc.
Note: To avoid bad configuration, we recommend that the value of this switch is kept as 0 or 1 only. |
| Minimum number of characters in the password | Enables you to configure the minimum number of characters that a password must have.
For example, if you enter 8 in this field, it configures the system to ensure that every password contains at least 8 characters. |
| Use Secure property for cookies | Enables you to select whether to use secure property for cookies. |
| Number of consecutive failed login attempts before account is locked out | Enables you to configure the number of consecutive failed login attempts that can be allowed before an account is locked out.
For example, if you enter 3, it means that up to 3 consecutive failed login attempts are allowed. If the fourth consecutive login attempt also fails, the account gets locked out. |
Use the following procedure to configure security.
Enter the value for the number of unique previous passwords in Number of previous passwords that cannot be repeated.
Enter the value for the number of non-alpha characters in Number of non-alpha characters in password.
Enter the value for the minimum number of characters for a password in Minimum number of characters in the password.
Enter the value for the number of consecutive failed login attempts in Number of consecutive failed login attempts before account is locked out.
Click Save to save the configured values.
Click LDAP to configure the LDAP fields.
The configurable fields associated with LDAP appear in the right panel.
Field Descriptions
The following table lists and describes the fields available under LDAP:
| Field/Control Name | Description |
| Enable LDAP at system level | The available options for this are :
|
Use the following procedure to configure security:
Select the option for Enable LDAP at system level.
Click Yes to enable the LDAP Search Domain Account. This displays the LDAP Search Domain Account dialog.
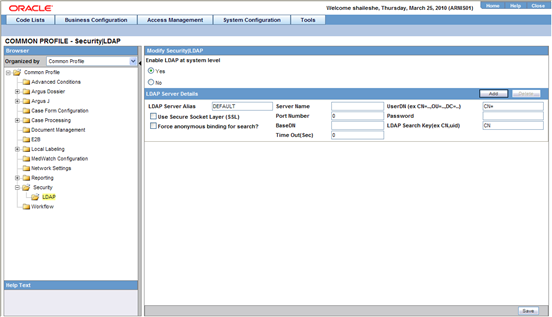
The following table describes the fields of the LDAP Search Domain Account dialog:
| Field/Control Name | Description |
|---|---|
| Use Secure Socket Layer | If your LDAP Server is configured to use SSL for communication, please check this box. Use of SSL enables for a Secure communication between the client and the server using secure keys. |
| Force Anonymous Binding for Search | When setting up the LDAP Server, you have the option to force users to bind (authenticate) to the LDAP Server prior to being able to search the LDAP Tree. If this option has been setup in your LDAP server, this option must be checked. |
| UserDN | During the setup of the LDAP server, the distinguished name and tree structure is created for users to be configured under. Enter in the defined structure as defined in your LDAP server into this box. This is required only if the server is setup for Force Anonymous Binding for Search". |
| Password | Enter in the password for the User entered in the UserDN box for the bind to the server. |
| Server Name | Enter in the LDAP Server name or IP Address to which LDAP Authentication needs to occur on. |
| Port Number | Enter the port on which the LDAP Authentication Services are enabled on the LDAP Server (Default Value: 389). |
| BaseDN | Enter in the topmost distinguished name of your tree defined on the LDAP Server for which you would like to search for users under. |
| Time Out (Sec) | Enter a value in seconds, which will tell Argus how long to wait for a response from the LDAP Server during any authentication before timing out (Default Value: 10). |
| LDAP Search Key | Enter the key to authenticate the user name against in the LDAP Tree structure. For Example, when using Microsoft Active Directory, to authenticate using the Windows Username (Not Full Name), enter in sAMAccountName. |
If you select the Use Secure Socket Layer (SSL) checkbox, the Port Number is auto-populated with the value 636.
If this checkbox is not selected, the Port Number is auto-populated with the value 389.
A generic LDAP server can accept anonymous as well as non anonymous binding, based on the configuration.
If the Force anonymous binding for search? checkbox is not selected, both UserDN andPassword are enabled.
Enter the LDAP username and password in the UserDN and Password fields, respectively.
Enter the values for Server Name, Port Number, Base DN, Time Out and LDAP Search Key, as required.
The field length for Port Number and Time Out is 5 characters, while the Server Name, BaseDN, LDAP Search Key, UserDN and Password can be up to 255 characters.
Click Save to save the changes made to this screen.
Common Profile > Security > Cryptography contains two key settings:
Configured hashing algorithm to use - This setting determines the Hashtag algorithm that will be used in encrypting passwords.
*De-optimizer counter for hashtag routine* - This setting determines the strength of encryption (for example, the higher the value of this setting, the stronger will be the encryption, and vice-versa). The default/recommended value is 1000.
A common profile switch determines whether the system uses the Single Sign-on function. The Enable Single Sign-on checkbox, enables you to configure the system to use the single sign-on feature.
Before enabling the single sign-on feature, be aware of the following:
If the user enables the Single Sign-on feature, the user must enter Single Sign-on the HTTP Header element Argus application uses for authentication.
This field can contain a maximum of 40 characters
If the Single Sign-on feature is enabled and the user does not enter the Single Sign-on HTTP Header, the system displays the following error message:
Please enter the Single Sign-on HTTP Header or disable the Single Sign-on feature.
The following new entries which are common across all enterprises have been added in Argus Console -> System Management (Common Profile Switches) -> Single Sign-On:
A new checkbox called Use Oracle Access Server SDK for LDAP Validation under Single Sign-On tree will become available for selection only when 'Enable Single Sign-On' is checked.
This configuration is used to identify use of Oracle ASDK for user action confirmation , ESM login and EOSU Login functionality.
If this checkbox is checked, Oracle ASDK is user for action confirmation , ESM Login and EOSU Login when Argus Safety is configured for Single Sign-On.
If this checkbox is not checked, LDAP server information is used from Argus Safety database for user action confirmation, ESM Login and EOSU Login.
A new textbox called Oracle Access Server Login URL has been added under the Use Oracle Access Server SDK for LDAP Validation checkbox.
This is the base URL which is be passed to Oracle ASDK for user validation against Oracle Access Manager.
A new textbox called Oracle Access Server Login URL has been added under the Use Oracle Access Server SDK for LDAP Validation checkbox.
This is an HTTP Header variable for retrieving the short org ID which is to be passed with ASDK Login URL.
If the Use Oracle Access Server SDK for LDAP Validation checkbox is checked, the application ignores any LDAP configuration present in Argus Safety database and it is not be possible to select LDAP Server Alias for any user from Argus configuration.
The following table lists dialog boxes in the Argus Application that must require passwords. In such cases, the system Single Sign-on feature redirects the password to Argus for validation. When single sign-on is enabled, the system locks the user account if the user enters and incorrect password three consecutive time. The Administrator must unlock the account to enable the user to log in to the application.
| Function | Section | Procedure |
|---|---|---|
| Case Locking | Activities|Lock | Locking a case |
| Case Unlocking | Activities|Lock | Unlocking a case |
| Case Closing | Activities|Close | Closing a case |
| Case Unclosing | Activities|Close | Unclosing a case. |
| Case Unblinding | General|Blinding Status | Breaking a blind |
| E2B Incoming Accept | Reports|Incoming E2B Reports | Accepting E2B Reports |
| E2B Incoming Reject | Reports|Incoming E2B Reports | Rejecting E2B Reports |
| E2B Incoming Follow-up Accept | Reports|Incoming E2B Reports | Accepting E2B Follow-up Reports |
| E2B Incoming Follow-up Reject | Reports|Incoming E2B Reports | Rejecting E2B Follow-up Reports |
| E2B Incoming Nullification Accept | E2B Incoming Nullification Accept | Accepting E2B Nullification Reports |
| E2B Incoming Nullification Reject | E2B Incoming Nullification Reject | Rejecting E2B Nullification Reports |
| LAM Incoming | Local Affiliate Incoming Review | Accepting an Affiliate Event |
| Workflow Routing | Workflow Routing on Password on Route | Workflow Routing on Password on Route |
Oracle Access Server SDK Support for LDAP Validation in Single Sign-On Environment
Argus Safety has been enhanced to support action confirmation (user id/password) using Oracle Access Server SDK.
If customers do not want to store the LDAP information in Argus database for single sign-on environment, this new feature of Argus Safety can be used to validate a user's actions through ASDK.
This feature is available only while using Oracle Access Manager as the Single Sign-On tool.
The following is a list of places where the Argus Safety web dialog which requires action confirmation to perform respective actions, has now been enhanced to validate a user using Oracle ASDK:
Case Lock/Unlock
Case Routing
Case Delete/Undelete
Case Archiving
LAM Routing
Study Unblinding
ESM Login
EOSU Login
There is no change in the user experience while performing actions which requires password validation for logged-in user.
The following modules launched in the Argus Application, continue to use Single Sign-on feature:
Argus Insight
Argus Affiliate
Argus J
The following modules do not use the Single Sign-on feature:
End of Study Unblinding
Argus Safety Services
Argus Interchange Services (ESM)
Argus Interchange Mapping (ESM Mapping Utility)
Once the user is configured, the system automatically logs the user into the Argus Application without requiring reauthentication on the Argus Login application. If there is an authentication error, the system displays the current login page so the user can log in manually.
This screen enables you to configure SMTP.
Currently there are multiple issues such as, Outlook related problems with AG Service due to new security features introduced by Microsoft. Due to these security enhancements, a new method to submit emails from AG Service has been implemented using the SMTP Protocol.
Select System Configuration -> SMTP Configuration to view the SMTP configuration pop-up dialog. The pop-up dialog opens as shown.
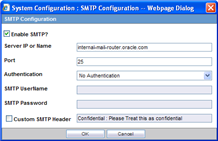
The following table lists and describes the fields associated with this section.
| Field/Control Name | Description |
| Server IP or Name | Enables the user enter the SMTP server name / IP address. |
| Port | Enables the user to enter the port number to use for SMTP server. |
| Authentication | Enables the user to select the Authentication mode for SMTP configuration |
| SMTP User Name | This is the username that the AG Service authenticates with for SMTP Emailing. |
| SMTP Password | This is the password that the AG Service authenticates with for SMTP Emailing.
This field is required when Basic Authentication is selected in Authentication. |
| Enable SMTP | When this checkbox is checked, SMTP is used by AG Service to send emails. |
Use the following procedure to modify SMTP.
Enter the SMTP Server IP or Name.
Enter the Port number to use for SMTP server.
Select the Authentication mode for the SMTP configuration, from the drop-down list.
Enter the SMTP User Name.
Enter the SMTP Password.
Select Enable SMTP? to ensure that the AG Service implements SMTP to send e-mails.
Click OK to save the changes made.
The Workflow Items screen enables you to modify the options available for Workflow Items.
Select System Configuration -> System Management to view the Common Profile Configuration screen.
|
Tip: The Common Profile folder appears in a tree-view on the left panel. The components are categorized as folders. Each folder contains all the field labels associated with that section. |
To configure the fields associated with the User Interface section, click the Common Profile-> Workflow folder in the left panel. The configurable fields associated with Workflow appear in the right panel.
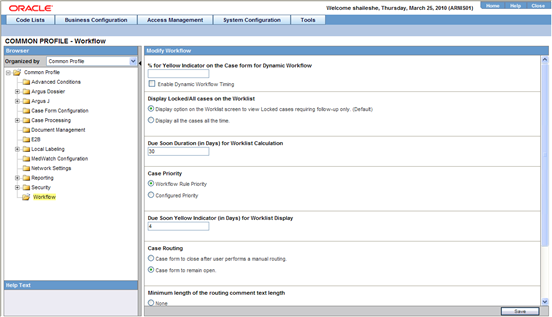
This section enables you to configure the total number of hours remaining for the present workflow state as well as the Total Number of the hours remaining for the case lock.
The first element displays the number of hours remaining for the case to be processed with the current workflow state.
The second element displays the number of hours remaining for the entire workflow for the case till Case Approval (Case Lock).
If the time remaining is less than the specified value in % for Yellow Indicator on the Case form for Dynamic Workflow, the elements are highlighted in yellow.
If the time remaining is more than the specified value in % for Yellow Indicator on the Case form for Dynamic Workflow, the elements are highlighted in green.
If the time remaining has exceeded the allocated time for the case process, the value is displayed in red, with the time displayed in negative.
The exceptions to this feature are those cases, which are archived and locked.
The Worklist > New and Worklist > Open also display a ! status beside Priority, denoting that the time remaining has exceeded the allocated time.
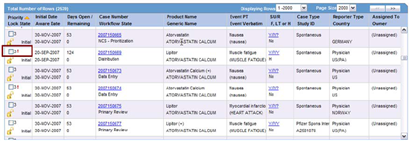
The total number of units is calculated by navigating across the possible routes the case can traverse. In case a case has to traverse through multiple possible routes, the preferred route is selected.
The following table lists the fields available under Workflow:
| Field/Control Name | Description |
|---|---|
| Case Routing | The available options are:
|
| Display Locked/All cases on the worklist | The available options are:
|
| Minimum length of the routing comment text length | The available options are:
|
| Due Soon Duration (in Days) for Worklist Calculation | Enter the number of days in which the worklist calculation is due. |
| Due Soon Red Indicator (in Days) for Worklist Display | Enter the number of days in which the red indicator is to due to be displayed for the worklist. |
| % for Yellow Indicator on the Case form for Dynamic Workflow | Enter the percentage for the yellow indicator on the case form for dynamic workflow. This field cannot have a value more than 99. |
| Enable Dynamic Workflow Timing | Select this checkbox to view the dynamic workflow indicators on the case form. |
Use the following procedure to configure workflow items.
Select the option for Case Routing.
Select the option for Display Locked/All cases on the worklist.
Enter the Minimum length of the routing comment text length in the text box.
Select the option for Display date for cases in the worklist.
Enter the number of days in which the worklist calculation is due in Due Soon Duration (in Days) for Worklist Calculation.
Enter the number of days in which the red indicator is to due to be displayed for the worklist in Due Soon Red Indicator (in Days) for Worklist Display.
Enter the percentage for the yellow indicator on the case form for dynamic workflow in % for Yellow Indicator on the Case form for Dynamic Workflow.
Select the Enable Dynamic Workflow Timing checkbox to view the dynamic workflow indicators on the case form.
Click Save to save the changes made to this screen.
When a case is received by the company and initial details have been entered and saved into Argus Safety, its status in the system becomes 'New' or 'Data Entry'. Various actions may be required before a case makes the transition from one workflow state to another.
Example: The case may require review, letters may need to be issued, the case may need to be reported elsewhere in the company, or regulatory reports need to be submitted to regulatory authorities. The case can be closed after all outstanding actions have been carried out and it flows through its life cycle.
For each stage in case processing, Argus Safety enables responsibility for cases to be assigned to specific user or group of users. Click the following link for information about how worklist permissions have changed.
The Worklist is driven by the group permissions defined for each user.
Granular permissions have replaced the current worklist options for the following worklist elements in group permissions:
Worklist - New
Worklist - Open
Worklist - Reports
Worklist - Action Items
Worklist - Coding Action Items
Worklist - Contacts
Worklist - Bulk Transmit
Worklist - Bulk Print
Worklist - Bulk E2B Transmit
Worklist - Local Labeling
Worklist - Coding Status
Worklist - Letters
Worklist - Intake (default is disabled)
If the worklist is disabled during the upgrade, then all the sub-elements are disabled; otherwise, all are enabled.
The default for New Group Creation is enabled.
The User Group Permissions Report has been updated to reflect granular permissions.
Configuring case workflow involves configuration of:
Workflow States
Workflow Rules
This screen enables you to configure the workflow states. The following illustration shows the fields associated with this section.
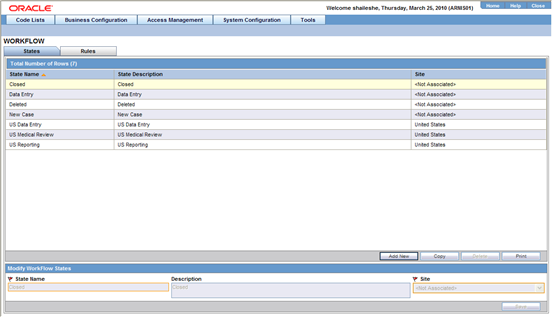
Field Descriptions
The following table lists and describes the fields available under Total Number of Rows:
| Field/Control Name | Description |
|---|---|
| State Name | Displays the name of a workflow state. |
| State Description | Displays a brief description about the workflow state. |
| Site | Displays the site associated with a workflow state. |
|
Tip: Click Add New to add a new workflow state to the list of existing workflow states. |
Use the following to modify workflow states
Enter the name of the workflow state under State Name.
|
Tip: This name is displayed as Case Status in the General Information section of the Case Form. |
Enter the description of the workflow state under Description.
Select the site to be associated with the workflow state from the Site drop-down list.
The drop-down list is populated with the configured user sites.
Click Save to save the changes made.
This screen enables you to configure workflow rules. The following illustration shows the fields associated with this section.
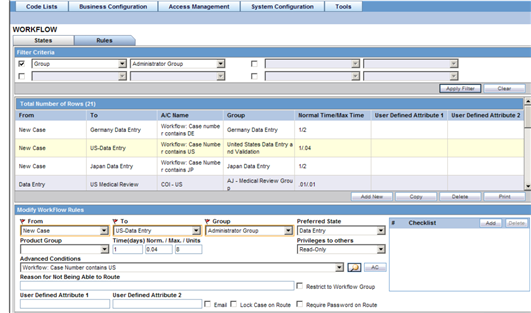
Field Descriptions
The following table lists the Field Descriptions for this section.
| Field/Control Name | Description |
|---|---|
| From | Defines the original state for the transition. |
| To | Defines the destination state for the transition. |
| Group | Specifies the group which will own the case once it moves from the From state to the To state (via this transition).
The drop-down list displays all the configured user groups of Argus. |
| Normal Time (days) | The workflow system monitors the time frames of each case in a state with respect to the Normal and Maximum parameters through AG Service.
This escalation occurs only once for a case within a given state.
|
| Max Time (days) | |
| User Defined Attribute 1
/ User Defined Attribute 2 |
Lets a user define a custom attribute for a work flow rule such as logically grouping workflow rules. Used only for filtering purposes on the same screen. |
| Units | Enables the user to specify the number of units. |
| Product Group | Enables the user to associate a specific Product group as additional criteria for the workflow transition. |
| Restrict to Workflow Group | Enables the user belonging to the identified workflow rule group to have case access rights, based on the definitions of only the identified group. |
| When checked, the system sends an email notification to the user group address specified in group information whenever a case makes this particular transition.
By default, the checkbox is unchecked. |
|
| Require Password on Route |
|
| Lock Case on Route | Enables the user to lock the case on routing. Users might need to enter a password when routing to the case. |
| Reason for not being able to route | Enables the user to enter the description needed by the system to display while routing the case, when the case is ineligible to be routed to any of the configured To State. |
| Privileges to others | Specifies the access rights for groups other than To Group' of the transition have to the case when it follows that transition. The choices are:
|
| Preferred State | Enables the user to specify the preferred state for the rule. |
Use the following procedure to modify workflow rules.
Select the appropriate Filter Criteria.
Execute the following steps to apply a filtering criteria to search for specific workflow rules.
Select the check boxes to enable the drop-down lists containing a filtering criteria.
Select the appropriate filtering criteria from the drop-down lists.
Click Search to remove the selected criteria or click Apply Filter to apply the selected criteria. This displays the search results under Total Number of Rows.
The entities in Total Number of Rows display the From and To states, the Advanced Condition, Group, Normal Time/Max Time and Number of User Defined Attributes in the Workflow.
Select the rule displayed under Total Number of Rows that needs to be modified.
The ModifyWorkflow Rules section is populated with information about the selected rule.
Select the original state of the workflow rule from the From drop-down list.
Select the destination state of the workflow rule from the To drop-down list.
Select the group from the Groups drop-down list.
Select the product from the Product Group drop-down list.
Select the Email checkbox, if required.
Select the Lock Case on Route checkbox, if required.
Select the Require Password on Route checkbox, if required.
Enter the number of days in the Normal Time (days) field.
Enter the number of days in the Max. Time (days) field.
Enter the number of units in the Units field.
Select the preferred state for the rule from Preferred State.
Select the relevant Advanced Condition, if any from the button.
|
Tip: Click here for details on Advanced Conditions |
Enter the reason for not being able to route, if applicable, under Reason for not being able to route.
Specify the access levels available to others from the Privilegesto others drop-down list. The options available under this list are No Access, Read-Only and Read/Write.
|
Tip: Select the No Access option to disallow users outside the transition's group to open the case when it follows the transition.Select the Read-Only option to enable users outside the transition's group to view the case, but not to modify it. Select the Read/Write option to enable users outside the transition's group to modify the case when it follows the transition. |
Specify the checklist of items to appear under Checklist.
|
Tip: The Checklist row cannot be left blank. Click Add and Delete to add and delete checklist items. |
Define custom attributes for a workflow rule under User Defined Attribute.
Click Save to save the changes made.
This section provides information about the Worklist Intake feature.
The system enables the user to view a list of incoming attachments in Worklist View. In this view, the user can select an attachment for the case creation for Argus and Affiliate cases in the Pending dialog.
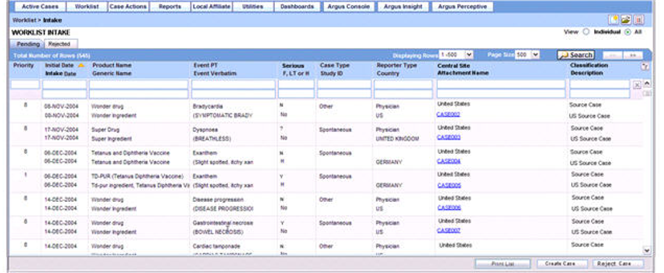
The following table lists and describes the fields available for the worklist
| Field/Control Name | Description | Bookin Field | Property |
|---|---|---|---|
| Priority | Enables you to view the priority of a case | N/A | Non-scrollable field label |
| Initial Date | Enables you to view the Initial Receipt Date of the case. | Initial Receipt Date | Non-scrollable field label |
| Intake Date | Enables the user to view the date the system imported the attachment in the Intake Worklist | N/A | Non-scrollable field label |
| Product Name | Enables you to view the suspect product in questions. | Product Name | Scrollable field label |
| Generic Name | Enables you to view the generic name of the suspect product in question. | Generic Name | Scrollable field label |
| Event PT | Enables you to view the primary event and verbatim as reported | N/A | Scrollable field label |
| Event Verbatim | The following format will be used:
Primary Event (Verbatim as Reported) |
N/A | Non-scrollable field label |
| Serious | Enables you to view the Case Level Assessments Serious (Y/N) | N/A | Non-scrollable field label |
| F, LT, or H | Fatal (F) or Life Threatening (LT) or Hospitalized (H)
|
Death for F
Hospitalized for H Life Threatening for LT |
Non-scrollable field label |
| Case Type | Enables you to view report type information. | Report Type | Non-scrollable field label |
| Study ID | Enables you to view the Study ID for the study cases
This field is empty for cases where the Study ID is not available. |
Study ID | Non-scrollable field label |
| Reporter Type | Enables you to view the reporter type for the primary reporter in the case.
This field is empty if the reporter type is not available. |
N/A | Non-scrollable field label |
| Country | Enables you to view the country of incidence | Country of Incidence | Scrollable field label |
| Central/Affiliate Site | Enables you to view the current Argus or Affiliate site of the case.
You can view all the source documents from the site folder the user belongs to Workflow enterprise users can view all cases across all site |
N/A | Scrollable field label |
| Attachment | Enables you to view the attachment associated with the case. If there are multiple files, they are separated by a comma. | N/A | Non-scrollable field label link |
| Classification | Enables you to view the attachment classifications associated with the attachment. | Classification | Scrollable field label |
| Description | Enables you to view the attachment description associated with the case. | Description | Scrollable field label |
| View All | Enables the administrator and workflow manager/enterprise to see all items in the system across all sites. | N/A | Radio button |
| View Individual | Enables you to view all items assigned to this user site.
|
N/A | Radio button |
The following table describes the Worklist Intake View:
| Argus Site | Folder | Worklist Intake View |
| US | C:\USINTAKE | All users belonging to the US site can see the case and workflow enterprise users. |
| DE | C:\EUINTAKE | All users belonging to the DE, FR, CH site can see the case and workflow enterprise users. |
| CH | C:\EUINTAKE | All users belonging to the DE, FR, CH site can see the case and workflow enterprise users. |
| FR | C:\EUINTAKE | All users belonging to the DE, FR, CH site can see the case and workflow enterprise users. |
| JP | C:\JPINTAKE | All users belonging to the JP site can see the case and workflow enterprise users. |
The system reads the XML that contains the preceding fields as tags and creates the Worklist based on the tags.
<Cases>
<Case>
<PRIORITY>: Single number from 1 - 8. All others to be ignored
<INITIAL_DATE>: Format of Date DD-MMM-YYYY
<PRODUCT_NAME>: Text Field up to 70 Characters
<GENERIC_NAME>: Text Field up to 70 Characters
<EVENT_PT>: Text Field up to 250 Characters
<EVENT_VERBATIM>: Text Field up to 250 Characters
<SERIOUS>: Yes / No. All others are ignored
<FLTH>: Format of F. All other after that are ignored
<LT>: Format of LT All other after that are ignored
<H>: Format of H. All other after that are ignored
<CASE_TYPE>: Text field of report type
<STUDY_ID>: Text field of Study ID
<REPORTER_TYPE>: Text field of Reporter Type
<COUNTRY_OF_INCIDENCE>: Text field of Country
<ASSIGNED_TO>: Text field of User
<GROUP>: Text field of Group
<SITE>: Text field of Site
<ATTACHMENTS>
<ATTACHMENT>:
<FILENAME>: Text field of Attachment File Name
<DOCID>: Document ID from Document Storage System
<CLASSIFICATION>: Text field of Attachment Classifications
<DESCRIPTION>: Text field of Attachment Classifications Descriptions
The text on the worklist prints as specified in the XML and no lookup is performed.
If any of the Tag elements are empty they will be empty in the Intake Worklist.
If any fields are not available on the initial case entry, the system ignores them.
If there are multiple tags for the same element, the system retrieves the first tag element.
If the values do not match any elements in the Initial Case entry, the system ignores them.
The minimum fields required for the Attachment to be visible in the Intake Worklist are
Filename
DocID
DocID is only required if a central document system is enabled. If DocID is blank then the physical file with the same name as specified in the tag <Filename> is also required in the same folder.
If there is an error occurs while processing the Worklist, AG Service sends an e-mail to the General E-mail address.
The system enables you to select only one case at a time when creating cases in the Initial Case entry dialog.
When you select an attachment row and click Create case, the system locks the file to prevent others users from booking in the same case.
The system displays the following message:
The case attachment is being currently used by XXXX user.
where:
XXXX is the full name of the user who has locked the attachment row
The system displays the standard Initial Case Entry where the system populates the fields within the XML Properties to the Initial Case entry dialog and display the PDF file for 40% of the screen (Similar to the New case from Image functionality)
If multiple attachments are available, the system opens them. The end user system must be setup to open multiple documents in the same window in Internet Explorer.
If the system is setup to use a central document storage system and the user clicks Create Case, the system retrieves the PDF from the central document system.
The system adds the attachment to the Initial Case entry dialog and also includes the Classifications and Descriptions for the attachment.
If the system is setup to use a central document storage system, Argus stores the document ID from the central document system. The file attachment will not be stored in Argus.
The system fills all available fields in the Initial Case Entry dialog with data from the XML Messages.
If you choose to open the cases after book-in, the system keeps the Attachment open in the split screen to enable the user to complete the case data entry.
If you book in the case from the Worklist Intake and chooses not to open the case from the Initial Case Entry dialog after book in is complete, the system returns to the Worklist Intake dialog.
When you perform a Duplicate Search and select a Case from the list, you can attach an incoming file to an existing case.
The system displays the Accept As Follow-up button and enables it when the user selects a case from the Duplicate search for the current Attachments to be added.
When you click Accept as Follow-up, the system opens the selected case and continues to display the Source attachments.
The system adds the attachments with the Classification and description (if provided) to the follow up case
The system opens multiple attachments if they are available. The end user system must be setup to open multiple documents in the same window.
Once you accept the initial or Follow up case and successfully create the case in Argus / Affiliate, the system generates an Acknowledgement in the OUT folder at the same level. For example, if the incoming folder for Site US is C:\USSITE\Incoming, the system generates ACKS in the C:\USSITE\OUT folder.
a. The Message format for the ACK is as follows::
<CASES>
<CASE>
<CASE_NUMBER>: Argus Generated Case Number
<PRODUCT_NAME>: Text Field up to 70 Characters for Primary Suspect Product of Case
<DATETIME>: The Date and time in the DD-MMM-YYYY hh:mm:ss format when the file was accepted / rejected by the system
<ATTACHMENTS>
<ATTACHMENT>:
<FILENAME>: Text field of Attachment File Name
<DOCID>: Document ID from Document Storage System
If you click Copy to copy a case in Argus, the system generates an ACKS and puts it into the out folder for the site the original case belongs to. For example, Case A belongs to US Site and the user copies the case to Case B. The system creates an ACK in the US\Out Folder as configured in the US Site.
In Argus Safety, the Workflow Manager or Enterprise User can click Reject Case to reject cases from the Intake Worklist.
Affiliate Users can reject cases in the Intake Worklist.
When you try to reject a case, the system presents the Standard Justification dialog.
The Status row displays the following message:
Case Rejected by XXXX on YYYY at MMM due to: ZZZZ
where:
XXX is the User Full Name,
YYYY is the Date when the case was rejected in GMT
MMM is the time in GMT
ZZZ is the justification for rejecting the case as entered by the user.
Rejected Date: Date in GMT when the user rejected the case
Rejected By: User Full Name who rejected the case.
The system displays the Total number of Rows in the Worklist header section.
You can select the number of cases to display on the by selecting a value from page size drop-down list on the Worklist dialog.
The page drop-down list contains the following values:
50
100 (default)
250
500
1000
2000
The system displays the number of cases currently in view and updates the range automatically. For example. if you select 100 from the page size drop-down list, the system separates the displaying rows into groups of 100 cases.
The system enables you to go directly to a range of cases from the Displaying Rows drop-down list.
The system enables you to scroll through the Worklist page-by-page increments as defined by the Page Size drop-down list.
The system enables you to sort on ALL the columns in the Worklist view by clicking the header column. The system displays a triangle to show which column is sorted currently.
The initial sorted column is Initial Date.
The default sort order is ascending
Clicking the column header again, toggles between ascending and descending order.
The system maintains the worklist view with the sorting and filtering options defined by the user.
The Intake Worklist enables you to filter on each element.
The system enables you to filter on any element when you click the Filter button.
The system provides a Type Ahead feature to enables users to filter on any text/date element.
The system enables you to Close the filtering options by clicking the X icon on the filtering options.
If filtering criteria are specified, the Filter icon has the paper clip icon to indicate there are filtering elements.
The system permits a Like search (e.g. if you search for Cure, it returns all elements starting with Cure).
The system enables wild card searches . For example, if the user searches for %Cure, the system returns all elements containing Cure
Clicking the Search button enables you to filter for the reports in the list of reports.
These are filtering options are available from Worklist-specific views and when you drill down for cases or reports.
The system saves all user preferences for future use.
Clicking the Search button enables you to filter the elements on the dialog.
You can configure the Path for the File Intakes per Site (Argus and LAM) in the Site configuration
When you click the Browse button, the system enables you to browse to the Folder for the Site where the XMLS and the PDFs are stored
The Path length is up to 255 characters
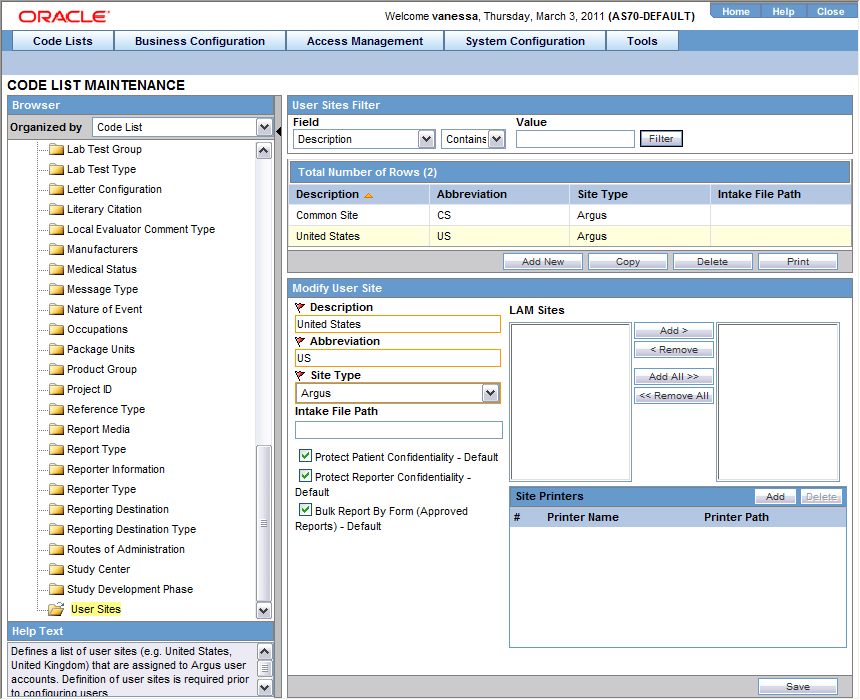
The current Worklist options are replaced with granular permissions for Worklist elements in the Group Permissions as per the following:
Worklist Intake (default is disabled)
The Audit Log tracks the updates made to Site Configuration
The User Site print out displays the File Intake Path.
This screen enables you to specify the case numbering preferences. Select System Configuration -> System Numbering to view the LAM System Numbering screen.
The screen appears as shown.
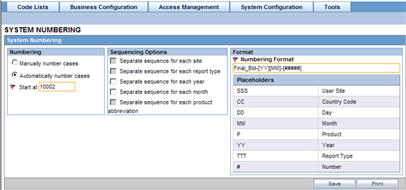
The following table lists and describes the fields for this section.
| Field/Control Name | Description |
|---|---|
| Manually Number Cases | Enables the user to manually number the cases on booking or while copying the case, using the save as' option on the case form. |
| Automatically Number Cases | On selection, the system automatically numbers the cases as defined by the user in the numbering format. |
| Start at | Enables the user to initialize the counter of the sequence number. |
| Separate sequence for each site | Enables the user to separate the sequence numbering for cases on site by site basis. If there are cases being entered from two different sites then each site will have different sequencing of case numbers. |
| Separate sequence for each report type | Enables the user to separate the sequence numbering for cases by the report type of the case. |
| Separate sequence for each year | Enables the user to reset the sequence numbering for cases after each year based on the initial receipt date of the case. |
| Separate sequence for each month | Enables the user to reset the sequence numbering for cases after each month based on the initial receipt date of the case. |
| Separate sequence for each product abbreviation | Enables the user to reset the sequence numbering for cases for each different product abbreviation. |
| Numbering Format | Enables the user to select the numbering format by selecting the different placeholders.
Define the numbering format by typing in custom keywords to print on every case number and selecting different placeholders. [YY][MM]-[###] is the default format. |
| Placeholder | Placeholders are used to pickup values from the database to be used in the Case numbering format.
The possible values populated in this list are: # - Number: defines the digits to be used as the sequence number in the format. The field is used to display the sequence number on the case numbers. CC- Country Code: When selected, this uses the A2 code for the country of incidence for the case number. DD - Day: When selected, this uses the date of the Initial receipt date' field of the case. MM - month: When selected, this uses the month of the Initial receipt date' field of the case. P - When selected , this uses either of the two values: If report type is Spontaneous' or other' during booking: the system uses the value of the Product Abbreviation' field specified in the Product configuration for the selected Primary suspect product. If report type is of the type report from study' during booking: the system uses the Product Abbreviation' field specified in the study configuration. SSS - User Site: When selected this uses the Site abbreviation of the site belonging to the user who booked in the case. TTT - Report Type: When selected this uses the report type abbreviation of the report type selected during bookin of the case. YY- Year: When selected, this uses the year of the Initial receipt date' field of the case. |
Use the following procedure to configure LAM system numbering.
Select the Numbering feature as required. This can be manual numbering or automatic numbering of cases.
Select the Sequencing Options as required.
|
Tip: For the complete explanation of the sequencing options refer to the Field Descriptions |
Select the Numbering Format.
|
Tip: To customize the Numbering Format, use the placeholder values.Example: To select Country Code, Month and Year (as values to be incorporated from the database ) as the Case numbering format, execute the following steps.
The final data listed in the Numbering Format field is the Case Numbering Format. |
Click Save to save the changes made.
This section enables you to change field label names and hide or display fields in the Case Form.
Select System Configuration -> Field Properties to view the Case Form Field Configuration screen shown in the following illustration.

|
Tip: The Case Form tabs appear in the left panel and are categorized as folders. Each folder contains all the field labels associated with that section. Example: The General Tab in the Case Form contains sections such as Study, Follow-Up, Case Literature etc.
|
The following table describes the fields associated with this section.
| Field/Control Name | Description |
|---|---|
| Field Name | Enables the user to view the field name. This is a read only field. |
| Field Form Label | Enables the user to enter the field label names for those fields that can be edited. |
| Help Text | Enables you to enter help text for fields that can be edited. |
| Read Only | Enables you to make inrug, device, or vaccine field read- only. |
| Drug | Enables the user to make a field Read only in the Product tab, when the Argus user chooses Drug" option on the Product screen. |
| Device | Enables the user to make a field Read only in the Product tab, when the Argus user chooses Device option on Product screen. |
| Vaccine | Enables the user to make a field Read only in the Product tab, when the Argus user chooses Vaccine option on Product screen. |
| Hidden | Enables the user to hide or unhide a field by selecting the radio button.
Select Yes to hide the field on case form; select No to unhide the field on case form. Note: Some fields cannot be hidden. Hidden fields do not appear in the case form printout. |
| E2B Field | When checked, displays which fields are required for E2B. |
| Max Length | Displays the maximum data length allowed for the fields. This information is displayed for all fields except for Date and Codelist fields. |
| Null Flavors | This drop-down list displays the Null Flavor sets that are configured in Null Flavor codelist. Null Flavors are displayed in the Case Form field as per Null Flavor set associated. |
| Safe Length | Allows the user configure the safe length for all fields except for Date and Codelist fields. Safe length is populated by default for E2B R2 fields which have been extended as per the E2B R3 Regulation. |
Use the following to modify case form field names.
Select the folder (or section) in the left pane, for which the field names are to be modified.
The places the list of field labels associated in the right panel.
Click on the Field Name to be modified.
The system highlights the selected row is highlighted and puts the details about this field in the Modify section at the bottom of the screen.
Enter the new field name in Field Form Label.
|
Tip: : This label will appear in the Case Form section. |
Select the Hidden preference. Select Yes if you want to hide the field on the Case Form.
Click this checkbox to indicate which fields are required for E2B.
Select any or all of the following options Drug, Device or Vaccine as Read Only based on your requirement.
Click Save to save the changes made.
|
Note: Label Changes will not be reflected in Argus Case Form unless IIS is reset. |
User defined fields of type Text, Date, and Number may be added to a Case Form. Follow the steps listed below to add a user defined field to a Case Form and/or confirm that the Case Form supports user-defined fields:
In Argus Console, navigate to System Configuration > Field Labels.
In the left-hand section, select a Case Form by clicking on its name.
In the right-hand section with a title bar matching the selected Case Form, scroll down till the words "User Defined.." are visible in the Field Name column.
Click on the desired Field Name.
In the lower, right-hand section, make the appropriate corrections and save any changes.
|
Note: Oracle Argus Safety controls the total number of User Defined Fields on any given Case Form by only allowing a single occurrence of each sequence number. Therefore, if "User Defined Number 1" is used, "User Defined Text 1" and "User Defined Date 1" cannot be activated. If a Date and/or Text field is desired the user must select from the fields that have a higher sequence number such as User Defined Date 2, User Defined Date 3, etc., thus always ensuring that the sequence number is unique. |
The Argus Safety administrator can customize a user-defined field as a drop-down list. These drop-down lists may contain customized lookup data which can be independent of Argus data.
Use the following procedure to create a user-defined field.
Identify the User Defined field in the CMN_FIELDS table.
Create a custom table containing lookup information.
Create a custom index and specify the required values for the table.
Update the record in the CMN_FIELDS table for the User Defined Field.
Create a Role and Synonym for the table.
Restart IIS.
Verify the update made in the application.
Consider the following example that show a sample set of scripts required to configure User Defined Fields as a drop-down list. Assume the requirement is for a User Defined Field (UDF) with the following features:
Requirement: A User Defined field SOURCE_OF_INFORMATION to be created, with its drop-down values as Fax, E2B, Letter, Email and Telephone under Case Form -> General Tab -> General Information.
| Attribute | Value |
| Field Name | SOURCE_OF_INFORMATION |
| Field Type | Numeric (Text field type would not work) |
| Drop-down Values | Fax, E2B, Letter, Email and Telephone |
| Field Location | Case Form => General tab => General Information |
Use the following procedure to create a user-defined field:
Login to Argus -> Argus Console -> System Configuration -> Field Labels.
Select User Defined Number <N> at desired page from tree shown in the left pane.
Choose No at Hidden.
Check Selectable.
Click Add and specify items stored in the drop-down in both English and Japanese if the field is multi-language, otherwise specify only in the English text box.
Go to General tab -> General Information and check that the configured user-defined fields display the updated drop-down text.
