| Oracle® Argus Insight User's Guide Release 8.1 E68408-01 |
|

 Previous |
 Next |
In Argus Insight, you use queries to search the data mart and retrieve a set of cases (known as a case series) with similar attributes. Based on your reporting requirements, your querying criteria may be as simple as a few Argus Safety case form fields with specific values or as complex as a SQL query that uses Boolean and Set operations between data mart fields.
Argus Insight provides several tools that you can use to enter, modify, and save queries. This chapter, which describes how to use the Query by Example (QBE) tool, includes the following topics:
In addition to the QBE tool, Argus Insight provides the following query tools:
Filters (see Chapter 4, "Using Filters to Create Queries")
Advanced Conditions (see Chapter 5, "Using Advanced Conditions to Create Queries on Insight Mart")
Library (see Chapter 6, "Using Advanced Conditions to Create Point-in-Time Queries on Argus Mart")
If you are familiar with the Argus Safety case form, you may want to use Query by Example (QBE) to create simple queries. For a QBE, the querying criteria consists of specific values that you enter in the fields on the QUERY BY EXAMPLE page, which looks substantially like the Argus Safety case form. See Figure 3-1.
|
Note: Query By Example is NOT supported, if target data source is set as Argus Mart only. |
The QUERY BY EXAMPLE page has a tab-based interface consisting of eight multiple section tabs.
Each tab on the QUERY BY EXAMPLE page lets you enter query criteria about a specific aspect of a case:
General tab — Specify general, study, reporter, and literature information about the case.
Patient tab — Specify information about the patient, lab data, other relevant history, and the patient's parent.
Products tab — Specify product information and dosage regimens.
Events tab — Specify event information and its seriousness criteria.
Analysis tab — Specify information about case analysis and imputability.
Activities tab — Specify case activity information, such as contact logs, action items, and case lock/archive dates.
Additional Info tab — Specify additional information about the case such as reference type, ID, and notes.
Advanced Conditions tab — Integrate a QBE with an advanced condition stored in Argus Insight. The advanced conditions based on Insight Mart only are displayed.
In addition, you can convert a QBE into an advanced condition. For more information, see Chapter 5, "Using Advanced Conditions to Create Queries on Insight Mart."
For example, your QBE may consist of values in the following fields:
| Tab Name | Field Name | Value |
|---|---|---|
| General | Country of Incidence | United States |
| Products | Product Name | Algoheal Injection |
| Events | Event Description to be Coded | Injection site rash |
| Seriousness Criteria | Hospitalized |
When you execute this QBE, the system retrieves only those cases in the United States where the patient was given an algoheal injection, and then broke out in a rash due to the injection and was hospitalized.
Argus Insight provides type-ahead functionality for some fields in the QUERY BY EXAMPLE page.
When you begin to type a value into a field that supports type-ahead functionality, Argus Insight displays a list of valid values that match your entry. You can then select one of the suggested values from the list. For example:
Alternatively, you can double-click any field that supports type-ahead functionality. In this case, Argus Insight displays a complete list of the valid values for the field. You can then select a value from the list. For example:
Table 3-1 lists the input fields in the QUERY BY EXAMPLE page that support the type-ahead feature.
Table 3-1 Fields that Support the Type-Ahead Feature
|
Accidental Exposure |
Action Taken |
Action Type |
|
Age Group |
Age Units |
Case Outcome |
|
Classification |
Code (Activities: Action Items) |
Code (Activities: Contact Log) |
|
Condition Type |
Dosage Frequency |
Dosage Units |
|
Ethnicity |
Event Frequency |
Event Intensity |
|
Event Outcome (Outcome of Event) |
Formulation |
Gender |
|
Group (Activities: Action Items) |
Group (Activities: Contact Log) |
Intermediary |
|
Locked or Closed By |
Manufacturer |
Occupation |
|
Pack Units |
Product Units |
References Type |
|
Report Media |
Report Type |
Reporter Type |
|
Route of Administration (Patient and Parent) |
User (Activities: Action Items) |
User (Activities: Contact Log) |
This section describes the tasks for creating a new QBE:
To enter your criteria for a QBE and execute the QBE:
Navigate to Queries > Query by Example, and select New.
The QUERY BY EXAMPLE page appears with the General tab in focus.
Specify the criteria for your query.
You may enter values into any of the fields on any of the QBE tabs, as appropriate.
|
Note: The field labels are displayed as per the field labels configured in Argus Safety. |
For a description of each field and for additional information about entering values into certain fields, see the following sections:
|
Tip: When you are entering criteria for your query:
|
Click Execute to run your query.
The system searches for cases that match your query, begins to build the case series, and displays a progress message during the process.
Wait until the system completes the search.
See "Reviewing the Results of Your QBE", for information about how to continue.
When you click Execute to run a QBE, the system searches for all the cases that match your query criteria and builds a case series.
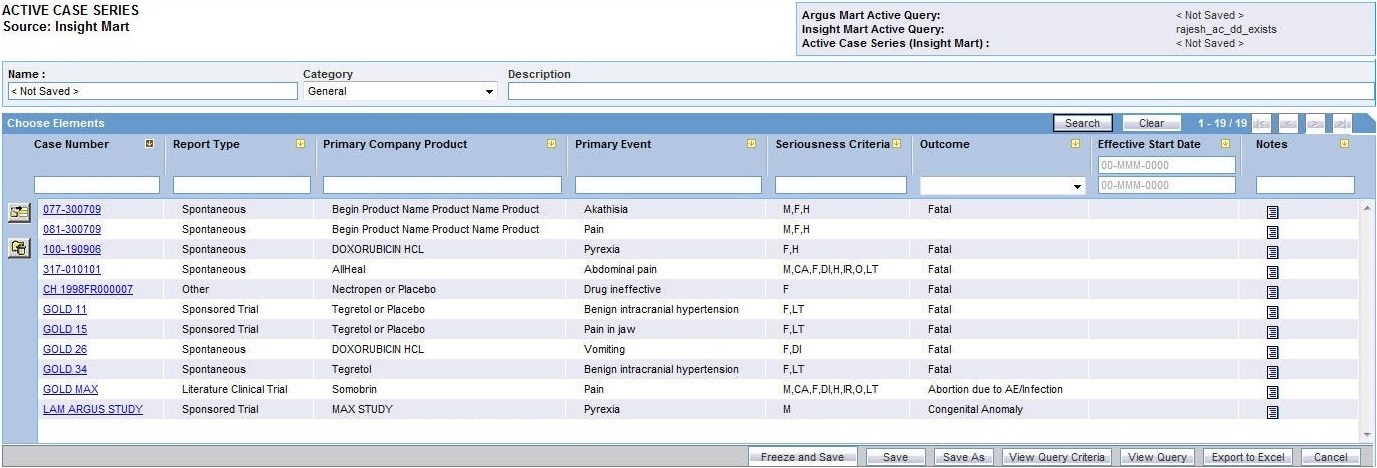
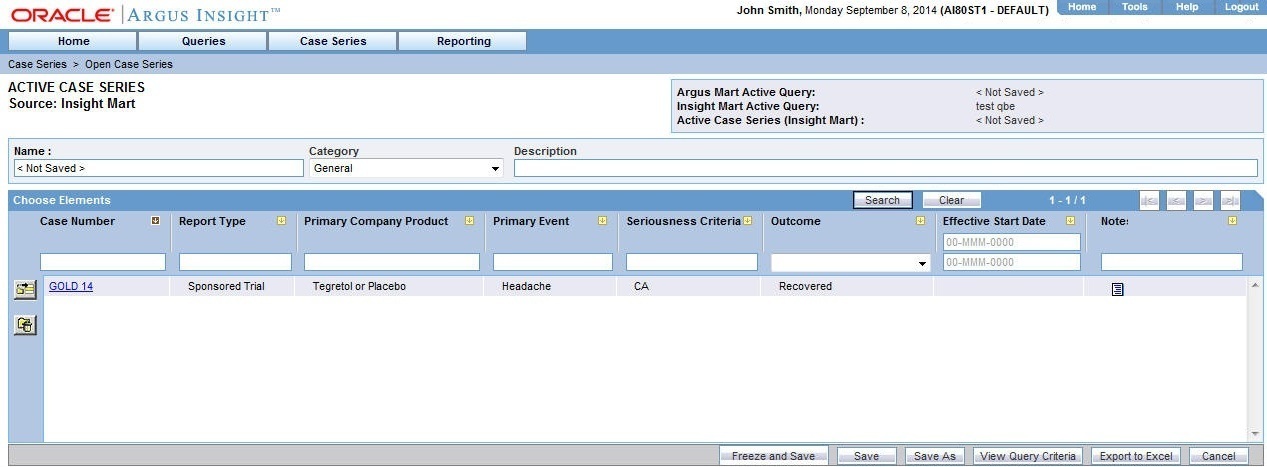
If the system finds cases that match your query criteria, the ACTIVE CASE SERIES page displays the results.
See Figure 3-2 for an example.
Examine the results in the ACTIVE CASE SERIES page:
If the case series is too large, you may want to modify your query by specifying additional field values in the QBE form to narrow down the case series.
For more information, see "Reviewing and Modifying the Criteria for an Executed QBE".
If the case series is appropriate, you may want to save your QBE. For more information, see "Saving the QBE".
If the system does not find any cases that match your query criteria, the ACTIVE CASE SERIES page displays the following message:
No Cases found!
You probably want to modify your query and then execute the QBE again.
For more information, see "Reviewing and Modifying the Criteria for an Executed QBE".
The ACTIVE CASE SERIES page displays the results of your QBE. When you review the results, you may want to modify your query and execute the QBE again.
For example, perhaps the results are too limiting and you want to remove some of the query criteria.
From the ACTIVE CASE SERIES page, you have several options:
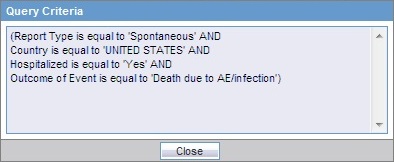
To open a dialog box and review the criteria that you specified for the active case series, click View Query Criteria.
For example:
To return to the QBE form and modify your query, click View Query.
The ACTIVE QUERY BY EXAMPLE page appears.
Note that the page retains all the values you entered for your query.
When you execute a QBE or save modifications to a QBE, the system assigns the active status to the QBE. Therefore, when you click View Query to return to the QBE form, note that the page title changes to ACTIVE QUERY BY EXAMPLE.
See "Working with the Last Modified or Executed QBE" for details on active QBEs.
To cancel the current QBE and return to the QUERY BY EXAMPLE page, click Cancel.
You can continue to modify the QBE, execute the QBE again, and review the results.
To save a QBE:
View your QBE on the ACTIVE QUERY BY EXAMPLE page.

Use the Category field to assign a category to the QBE.
The category indicates the reporting aspect to which your QBE pertains.
For example, Case Processing, Compliance, Configuration, General, Management, or Pharmacovigilance. Specifying the category helps you when searching for relevant QBEs from a list of all the QBEs saved in the system.
Use the Description field to enter summary information about the QBE.
For example, you can describe the type of cases the QBE retrieves.
Click Save As.
The Save QBE As dialog box appears.
Enter the name of the QBE.
|
Note: Names cannot contain these characters: % " ' $ ^ ~ , ` / ; | # |
Click OK.
Note that:
The page title changes to QUERY BY EXAMPLE.
The Active Query Name field in the upper-right corner of the page now displays the name you specified when saving the QBE.
The Category and Description fields display the information you entered before you saved the QBE.

|
Note: The QUERY BY EXAMPLE LIBRARY page lists all the QBEs saved to the system. See "Working with Saved QBEs" for more information. |
|
Tip: If you make modifications to the field values after you saved the QBE to the system, click Save to save the changed field values. |
When you enter criteria for a QBE, you can enter values into any of the fields in any of the tabs on the QUERY BY EXAMPLE page.
This section summarizes the contents of each tab, describes each field, and provides additional information about entering values into certain fields.
In the General tab (see Figure 3-3), you can:
Specify only one follow-up date.
Specify only one case classification.
Specify information only about one reporter.
Scroll the page to view all the fields available.
Table 3-2 describes the fields in the General tab. The field values you specify are used as the query criteria to retrieve matching cases.
Table 3-2 QUERY BY EXAMPLE Page > General Tab — Field Description
| Section | Field or Check Box | Description |
|---|---|---|
|
General Information |
Report Type |
Select the case source that the query looks for in cases. |
|
Country |
Select the country of incidence that the query looks for in cases. |
|
|
Initial Receipt Date |
Enter the date when your company first became aware of the case. |
|
|
Central Receipt Date |
Enter the date on which Central Safety received the case. |
|
|
Case Status |
Select the workflow state that the query looks for in cases. |
|
|
Follow-up Received |
Enter the follow-up information receipt date. |
|
|
Safety Received |
Enter the date on which follow-up information was received by Central Safety. |
|
|
Significant |
Select this check box to retrieve cases that had a significant follow-up. |
|
|
Aware Date |
Enter the most recent significant follow-up date or initial receipt date (if there are no follow-ups) that the query looks for in cases. |
|
|
Classification |
Select the classification that the query looks for in cases. |
|
|
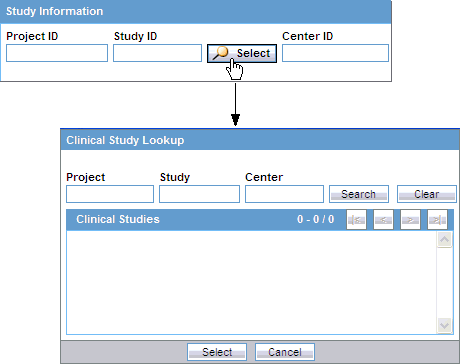
Study Information |
Project ID |
Click the Select button associated with these fields to select the Project ID, the Study ID, and the Center ID. See "Selecting the Study Information" for details. |
|
Other ID |
Enter any other ID that can be relevant to the study. |
|
|
Study Type |
Select the study type to include in the query. |
|
|
Week # |
Enter the week number of the study during which the adverse event occurred. The query will only look for such cases. |
|
|
Visit # |
Enter the visit number of the study during which the adverse event occurred. The query will only look for such cases. |
|
|
Blinding Status |
Select the study blinding status that the query looks for in cases. |
|
|
Unblinding Date |
Enter the date on which the study was broken. The query will only look for cases with matching study broken date. |
|
|
Reporter Information |
Sal. |
Enter the reporter's salutation that the query looks for in cases. |
|
First Name |
Enter the reporter's first name to look for in cases. |
|
|
Middle Name |
Enter the reporter's middle name to look for in cases. |
|
|
Last Name |
Enter the reporter's last name to look for in cases. |
|
|
Suffix |
Enter the reporter's suffix to look for in cases. |
|
|
Health Care Professional |
Select an option from the list to include a query criterion based on whether the reporter is a health care professional. |
|
|
Occupation |
Select the reporter's occupation that the query looks for in cases. |
|
|
Address |
Enter the report address that the query looks for in cases. |
|
|
Institution |
Enter the reporter's institution that the query looks for in cases. |
|
|
Department |
Enter the reporter's department that the query looks for in cases. |
|
|
City |
Enter the reporter's city that the query looks for in cases. |
|
|
State/Province |
Enter the reporter's state that the query looks for in cases. |
|
|
Postal Code |
Enter the reporter's postal code that the query looks for in cases. |
|
|
Country |
Enter the reporter's country ID that the query looks for in cases. |
|
|
Phone Number |
Enter the reporter's phone number that the query looks for in cases. |
|
|
Alternate Phone |
Enter the reporter's alternate phone number that the query looks for in cases. |
|
|
FAX Number |
Enter the reporter's fax number that the query looks for in cases. |
|
|
Reporter ID |
Enter the reporter's ID that the query looks for in cases. |
|
|
Reporter's Reference # |
Enter the reporter's reference number that the query looks for in cases. |
|
|
Email Address |
Enter the reporter's email address that the query looks for in cases. |
|
|
Reporter Type |
Select the reporter type that the query looks for in cases. |
|
|
Report Media |
Select the report media that the query looks for in cases. |
|
|
Intermediary |
Select the intermediary that the query looks for in cases. |
|
|
Report Sent to Regulatory Authority by Reporter? |
Select the Yes, No, Unknown, or Ignore option, as appropriate, to indicate whether the query looks for cases where the reporter has already informed a regulatory authority about the event. |
|
|
Protect Confidentiality |
Select this check box to have the query retrieve only those cases where reporter information is specified as confidential. |
|
|
Primary Reporter |
Select this check box to have the query retrieve only those cases where the reporter is marked as the primary reporter. |
|
|
Correspondence Contact |
Select this check box to have the query retrieve only those cases where the reporter is marked as a correspondence contact. |
|
|
Literature Information |
Author |
Enter the literature author name that the query looks for in cases. |
|
Title |
Enter the literature title that the query looks for in cases. |
|
|
Journal |
Enter the literature journal name that the query looks for in cases. |
|
|
Vol |
Enter the literature volume that the query looks for in cases. |
|
|
Year |
Enter the literature publication year that the query looks for in cases. |
|
|
Pgs |
Enter the journal page number in which the article appeared. The query will look for this information in cases. |
In the Study Information section, Argus Insight populates the Project ID, Study ID, and Center ID fields when you select a study from the Clinical Study Lookup dialog box.
To select a clinical study:
Click the Select button associated with the Study ID field.
The Clinical Study Lookup dialog box appears.
Enter the first few letters of the project name, study ID, or study center name in their respective text boxes.
|
Tip: Alternatively, if you are not sure about the information you are looking for, click Search to list the project name, study, and center for all the clinical studies. |
Click Search.
The Clinical Study Lookup dialog box appears with the search results in tabular format.
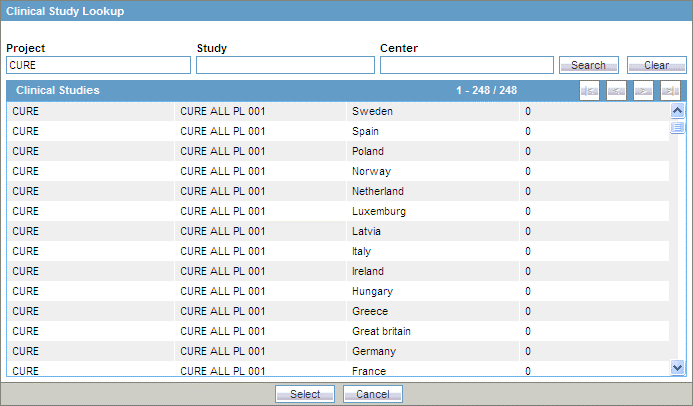
Select a clinical study row from the list, and click Select.
You return to the QUERY BY EXAMPLE page, where the selected information is populated into the Project ID, Study ID, and Center ID fields in the Study Information section.

|
Note: The Study ID and Center ID are optional fields. |
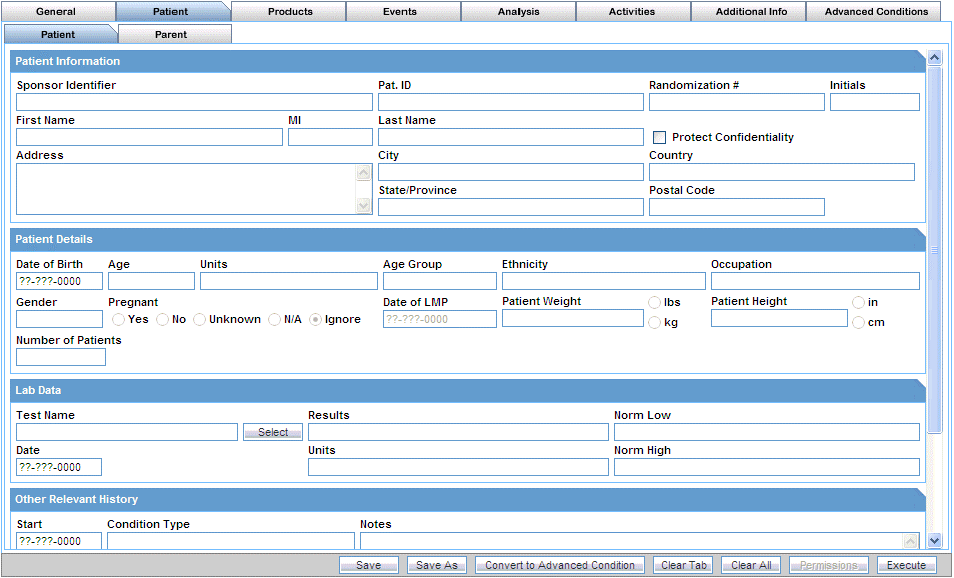
The Patient tab has two views: Patient and Parent.
In the Patient view (see Figure 3-4), you can:
Specify information only about one lab data element
Specify details of only one relevant history
Scroll the page to view all the fields available.
Table 3-3 describes the fields in the Patient view of the Patient tab. The field values you specify are used as the query criteria to retrieve matching cases.
Table 3-3 QUERY BY EXAMPLE > Patient Tab > PAtient View — Field Description
| Section | Field or Check Box | Description |
|---|---|---|
|
Patient Information |
Sponsor Identifier |
Enter the study sponsor's ID. The query will look for this information in cases. |
|
Pat. ID |
Enter the patient number that the query looks for in cases. |
|
|
Randomization # |
Enter the patient randomization number that the query looks for in cases. |
|
|
Initials |
Enter the patient's initials that the query looks for in cases. |
|
|
First Name |
Enter the patient's first name that the query looks for in cases. |
|
|
MI |
Enter the patient's middle initials that the query looks for in cases. |
|
|
Last Name |
Enter the patient's last name that the query looks for in cases. |
|
|
Protect Confidentiality |
Select this check box to retrieve those cases where patient information is marked as confidential. |
|
|
Address |
Enter the patient's address that the query looks for in cases. |
|
|
City |
Enter the patient's city that the query looks for in cases. |
|
|
Country |
Enter the patient's country that the query looks for in cases. |
|
|
State/Province |
Enter the patient's state that the query looks for in cases. |
|
|
Postal Code |
Enter the patient's postal code that the query looks for in cases. |
|
|
Patient Details |
Date of Birth |
Enter the patient's date of birth that the query looks for in cases. |
|
Age |
Enter the patient's age that the query looks for in cases. |
|
|
Units |
Select the age unit for the value you specified in the Patient Age field. |
|
|
Age Group |
Select the patient age group that the query looks for in cases. |
|
|
Ethnicity |
Select the patient's ethnicity that the query looks for in cases. |
|
|
Occupation |
Select the patient occupation that the query looks for in cases. |
|
|
Gender |
Select the patient gender that the query looks for in cases. |
|
|
Pregnant |
Select the Yes, No, Unknown, N/A, or Ignore option, as appropriate, to indicate whether the query looks for cases where the patient's pregnancy status is specified. This field is available only if you specify the patient gender as Female. |
|
|
Date of LMP |
Enter the date of the patient's last menstrual period (LMP) that the query looks for in cases. |
|
|
Patient Weight |
Enter the patient weight that the query looks for in cases. Select the lbs or kg option, as appropriate. |
|
|
Patient Height |
Enter the patient's height that the query looks for in cases. Select the in or cm option, as appropriate. |
|
|
Number of Patients |
Enter the number of patients. |
|
|
Lab Data |
Test Name |
Click the associated Select button to select the lab test that the query looks for in cases. See "Selecting a Lab Test" for more information. |
|
Results |
Enter the lab data results that the query looks for in cases. |
|
|
Norm Low |
Enter the lab data normal low value that the query looks for in cases. |
|
|
Date |
Enter the lab test date that the query looks for in cases. |
|
|
Units |
Enter the unit for the value you specified in the Results field in the Lab Data section. |
|
|
Norm High |
Enter the lab data normal high value that the query looks for in cases. |
|
|
Other Relevant History |
Start |
Enter the relevant history start date that the query looks for in cases. |
|
Condition Type |
Select the relevant history condition type that the query looks for in cases. |
|
|
Notes |
Enter the relevant history notes that the query looks for in cases. |
|
|
Stop Date |
Enter the relevant history stop date that the query looks for in cases. |
|
|
Coded PT |
Click the associated Encode button to select the relevant history condition by using the MedDRA Browser. The query will look for the encoded term. See "Using the MedDRA Browser" for more information. |
|
|
Ongoing |
Select this check box to retrieve cases where the relevant history condition is continuing/ongoing. |
|
|
Patient Relevant Tests |
Enter the relevant patient tests that the query looks for in cases. |
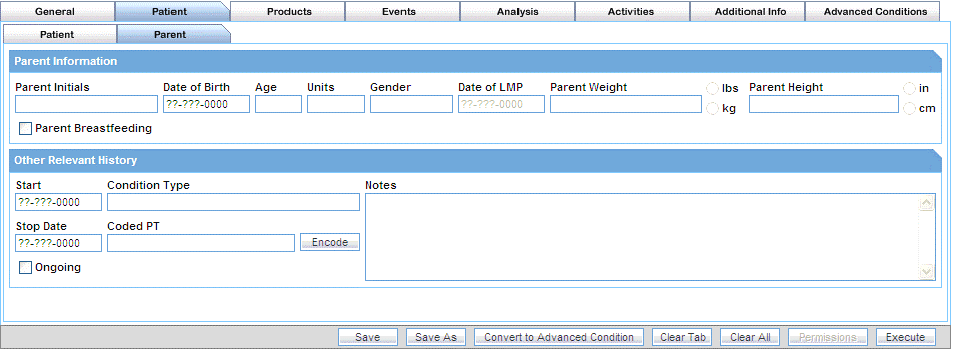
In the Parent view (see Figure 3-5), you can:
Specify details of only one relevant history.
Specify details of only one medical history.
Table 3-4 describes the fields in the Parent view of the Patient tab. The field values you specify are used as the query criteria to retrieve matching cases.
Table 3-4 QUERY BY EXAMPLE Page > Patient Tab > Parent View — Field Description
| Section | Field or Check Box | Description |
|---|---|---|
|
Parent Information |
Parent Initials |
Enter the parent's initials that the query looks for in cases. |
|
Date of Birth |
Enter the parent's data of birth that the query looks for in cases. |
|
|
Age |
Enter the parent's age that the query looks for in cases. |
|
|
Units |
Select the age unit for the value you specified in the Age field. |
|
|
Gender |
Select the parent gender that the query looks for in cases. |
|
|
Date of LMP |
Enter the date of the parent's last menstrual period (LMP) that the query looks for in cases. This field is available only if the parent gender is specified as Female. |
|
|
Parent Weight |
Enter the parent's weight that the query looks for in cases. Select the lbs or kg option, as appropriate. |
|
|
Parent Height |
Enter the parent's height that the query looks for in cases. Select the in or cm option, as appropriate. |
|
|
Parent Breastfeeding |
Select this check box to retrieve cases where parent is breast feeding. |
|
|
Other Relevant History |
Start |
Enter the relevant history start date that the query looks for in cases. |
|
Condition Type |
Select the relevant history condition type that the query looks for in cases. |
|
|
Notes |
Enter the relevant history notes that the query looks for in cases. |
|
|
Stop Date |
Enter the relevant history stop date that the query looks for in cases. |
|
|
Coded PT |
Click the associated Encode button to select the relevant history condition by using the MedDRA Browser. The query will look for the encoded term. See "Using the MedDRA Browser" for more information. |
|
|
Ongoing |
Select this check box to retrieve cases where the relevant history condition is continuing / ongoing. |
To select a lab test:
Navigate to the QUERY BY EXAMPLE page.
Click the Patient tab.
The Patient view appears, by default.
In the Lab Data section, click Select associated with the Test Name field.
The Lab Test Name dialog box appears.
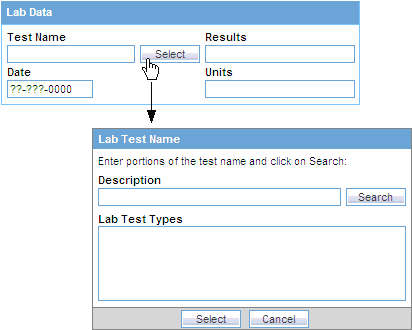
Search for a lab test:
To find only those lab tests that match your criteria, enter one or more letters of the test name in the Description field, and click Search.
To display all lab tests, leave the Description field blank, and click Search.
The search results appears in the Lab Test Types section.
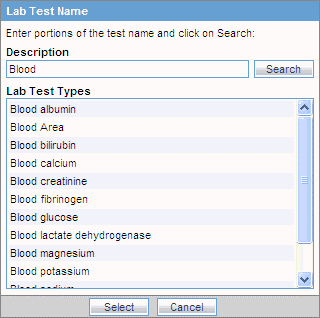
Select the required test name, and click Select.
The selected test is populated in the Test Name field.
To use the MedDRA Browser to search and select MedDRA terms for an event:
Click the Encode associated with the QBE tabs to start the MedDRA Browser.
The MedDRA Browser dialog box appears.
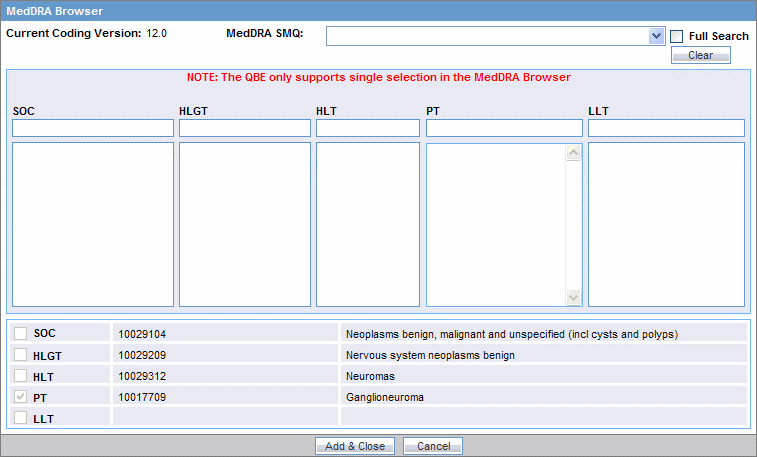
|
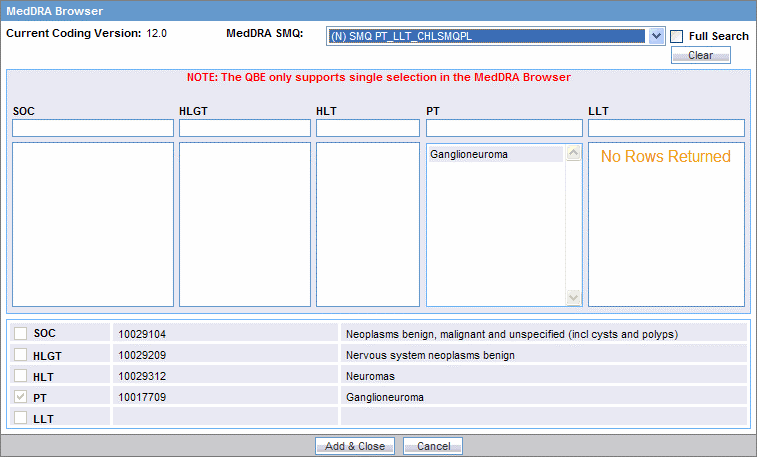
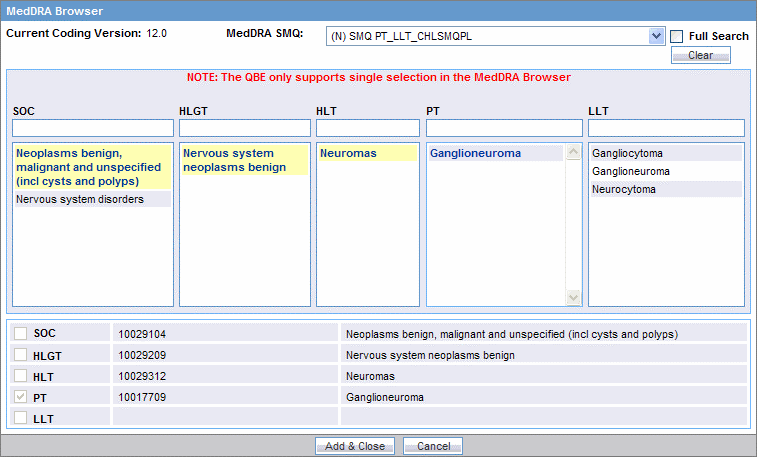
Note: The output returned by the MedDRA Browser for the Patient, Product and Analysis tabs of QBE is the Preferred Term (PT). The Events tab of QBE provides output for multiple options. You can select and search the required term(s), based on the Seriousness Criteria. |
Enter the first few letters of the SOC, HLGT, HLT, PT, or LLT term in the respective text box.
If you want the system to search for the specified word in the entire event term, select the Full Search check box.
|
Note: The Special Category drop-down list displays all the SMQs that can be selected. The selected SMQ searches across PT and LLT levels of the MedDRA dictionary.The Special Category drop-down list is hidden in MedDRA 10. The MedDRA SMQs drop-down list is hidden in versions lesser than MedDRA 9. |
Press Tab.
The MedDRA Browser appears with the search results (for the specified word in the event terms) in a column below the text box in which you entered the text string.
Select the required event term from the search results.
The SOC, HLGT, HLT, PT, and LLT fields in the MedDRA Browser display the respective terms for the selected event.
Note that:
Fields highlighted in yellow indicate the selected hierarchy is the primary SOC path.
Fields highlighted in gray indicate the selected hierarchy is not the primary SOC path.
Select the SOC, HLGT, HLT, PT, and LLT check boxes to populate the corresponding fields in the QBE form.
Click Add & Close.
The selected codes for the selected event appears in the respective fields in the QBE form.
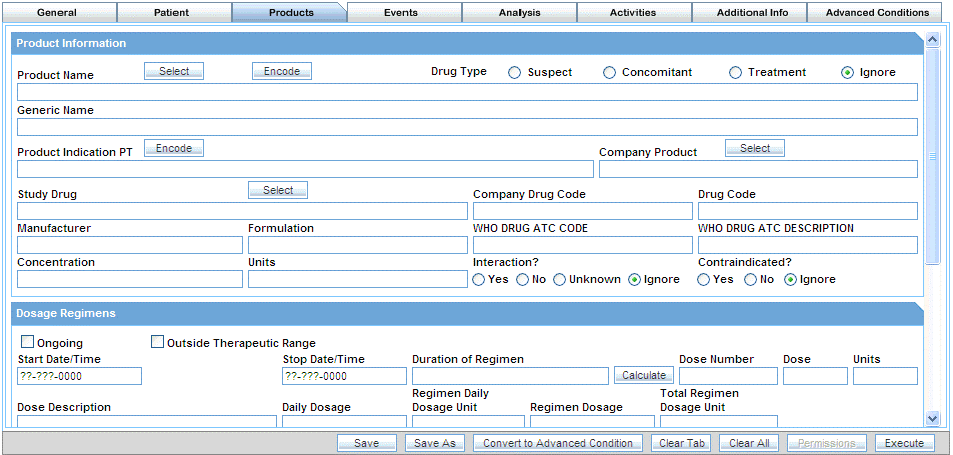
In the Products tab (see Figure 3-6), you can:
Enter information only about one product.
Specify details of only one dosage regimen.
Scroll the page to view all the fields available.
Table 3-5 describes the fields in the Products tab. The field values you specify are used as the query criteria to retrieve matching cases.
Table 3-5 QUERY BY EXAMPLE Page > Products Tab — Field Description
| Section | Field or Check Box | Description |
|---|---|---|
|
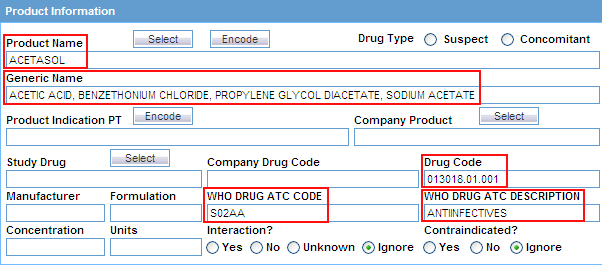
Product Information |
Product Name |
Click the associated Select button to use the Product Browser to specify product information for your query criteria. Selecting the product name populates the Product Name, Generic Name, Company Drug Code, Formulation, Concentration, and Units fields with the details of the product you selected. See "Using the Product Browser" for details. Alternatively, click the associated Encode button to use the Drug Coding Browser to specify the WHO drug name as the query criteria. See "Using the WHO Drug Browser" for details. |
|
Drug Type |
Select the Suspect, Concomitant, Treatment, or Ignore option, as appropriate, to indicate whether the query looks for cases where drug type is specified. |
|
|
Generic Name |
Click the Select button associated with the Product Name field to select a generic name that the query looks for in cases. See "Using the Product Browser" for details. |
|
|
Product Indication PT |
Click the associated Encode button to use the MedDRA Browser to specify the drug primary indication event term as the query criteria. See "Using the MedDRA Browser" for details. |
|
|
Company Product |
Click the associated Select button to select the company product that the query looks for in cases. |
|
|
Study Drug |
Click the associated Select button to use the Study Drug Lookup dialog box to specify the study drug name as the query criteria. Use this field to retrieve clinical trial cases with the selected study drug. See "Using the Study Drug Lookup" for details. |
|
|
Company Drug Code |
Click the Select button associated with the Product Name field to select the company drug code that the query looks for in cases. See "Using the Product Browser" for details. |
|
|
Drug Code |
Enter the drug code that the query looks for in cases. |
|
|
Manufacturer |
Enter the product manufacturer that the query looks for in cases. |
|
|
Formulation |
Click the Select button associated with the Product Name field to select a drug formulation that the query looks for in cases. See "Using the Product Browser" for details. |
|
|
WHO DRUG ATC CODE |
Enter the Anatomical, Therapeutic, Chemical (ATC) classification code that the query looks for in cases. |
|
|
WHO DRUG ATC DESCRIPTION |
Enter the Anatomical, Therapeutic, Chemical (ATC) classification description that the query looks for in cases. |
|
|
Concentration |
Click the Select button associated with the Product Name field to select a drug concentration that the query looks for in cases. See "Using the Product Browser" for details. |
|
|
Units |
Click the Select button associated with the Product Name field to select the units that the query looks for in cases. See "Using the Product Browser" for details. |
|
|
Interaction? |
Select the Yes, No, Unknown, or Ignore option, as appropriate, to indicate whether the query looks for cases where drug interaction status is specified. |
|
|
Contraindicated? |
Select the Yes, No, or Ignore option, as appropriate, to indicate whether the query looks for cases where drug contraindication status is specified. |
|
|
Dosage Regimens |
Ongoing |
Select this check box to retrieve cases where the dosage regimen is ongoing. |
|
Outside Therapeutic Range |
Select this check box to retrieve cases where the dosage regimen is outside therapeutic range. This means that the drug has not been used in accordance with the label or has been used for outside the Therapeutic Range. Consult with your administrator for further company-specific information about the use of this field. |
|
|
Start Date/Time |
Enter the dosage regimen start date that the query looks for in cases. |
|
|
Stop Date/Time |
Enter the dosage regimen start date that the query looks for in cases. |
|
|
Duration of Regimen |
Enter the dosage regimen duration (specified in minutes) as the query criteria. You can click Calculate to view the Duration Calculator dialog box. You can enter the time in hours, days, weeks, months, or years, and then convert the time to minutes. Alternatively, you can select a duration band and value if available. A system administrator must define the bands. |
|
|
Dose Number |
Enter the drug dose number as the query criteria. |
|
|
Dose |
Enter the drug dose received by the patient as the query criteria. |
|
|
Units |
Specify the units for the value you specified in the Dose field. |
|
|
Dose Description |
Enter the dose description based on the values you specified in Dose, Dose Units, and Frequency fields. |
|
|
Daily Dosage |
Enter the daily dose based on the values you specified in Dose and Frequency fields. |
|
|
Regimen Daily Dosage Unit |
Select the same option you selected in the Dose Units field. |
|
|
Regimen Dosage |
Daily dose, duration, and frequency. |
|
|
Regimen Dosage Unit |
Select the total dose regimen unit based on the values you specified in Dose, Dosage Regimen Duration, and Frequency fields. |
|
|
Patient Route of Administration |
Select the route of dosage administration as the query criteria. |
|
|
Frequency |
Specify the dosage frequency as the query criteria. |
|
|
Expiration Date |
Enter the product expiration date as the query criteria. |
|
|
Accidental Exposure |
Select the area of accidental exposure as the query criteria. |
|
|
Package ID |
Enter the package ID as the query criteria. |
|
|
Pack Units |
Enter the package units. |
|
|
Batch/Lot # |
Enter the batch/lot number as the query criteria. Alternatively, click the associated Select button to view the Batch/Lot #s dialog box, enter search criteria to find the batch/ lot number you need, and make your selection. |
|
|
Parent Route of Administration |
Select the route of dosage administration of the parent as the query criteria. |
|
|
Product Details |
First Dose |
Enter the earliest dosage regimen start date as the query criteria. |
|
Last Dose |
Enter the latest regimen stop date as the query criteria. |
|
|
Duration of Administration |
Enter the duration of drug administration as the query criteria. This duration is the difference between the first and last dose for all dosage regimens. You can click Calculate to view the Duration Calculator dialog box. You can enter the time in hours, days, weeks, months, or years, and then convert the time to minutes. Alternatively, you can select a duration band and value if available. A system administrator must define the bands. |
|
|
Date |
Enter the date on which the drug dechallenge was carried out. Note that this date is the same as the Drug Dechallenge Date. |
|
|
Other Information |
Select the Abuse, Overdose, and Tampering check boxes. |
|
|
Time between First Dose / Primary Event |
Enter the time between the event onset and the first dose. |
|
|
Time between Last Dose / Primary Event |
Enter the time between the event onset and the last dose. |
|
|
Total Dose to Primary Event |
Enter the total dose for the drug. |
|
|
Action Taken |
Select the action taken to mitigate the adverse event. |
|
|
Dechallenge Results |
Select the Yes, No, Unknown, N/A, or Ignore option, as appropriate, to indicate whether the query looks for cases where drug dechallenge status is specified. |
|
|
Drug Dechallenge Date |
Enter the date on which the drug dechallenge was carried out. |
|
|
Total Dosage |
Enter the total drug usage duration as the query criteria. |
|
|
Units |
Enter the total dosage unit as the query criteria. This is based on the daily dose, duration and frequency. |
|
|
Start Date/Time |
Enter the rechallenge start date as the query criteria. |
|
|
Stop Date/Time |
Enter the rechallenge stop date as the query criteria. |
|
|
Taken Previously/Tolerated |
Select the Yes, No, Unknown, or Ignore option, as appropriate, to indicate whether the query looks for cases where drug was taken previously. |
|
|
Rechallenge Results |
Select the Yes, No, Unknown, N/A or Ignore option, as appropriate, to indicate whether the query looks for cases where drug rechallenge status is specified. |
To select a product by using the Product Browser:
On the QUERY BY EXAMPLE page, select the Products tab.
Click the Select button associated with the Product Name field.
The Product Browser dialog box appears.
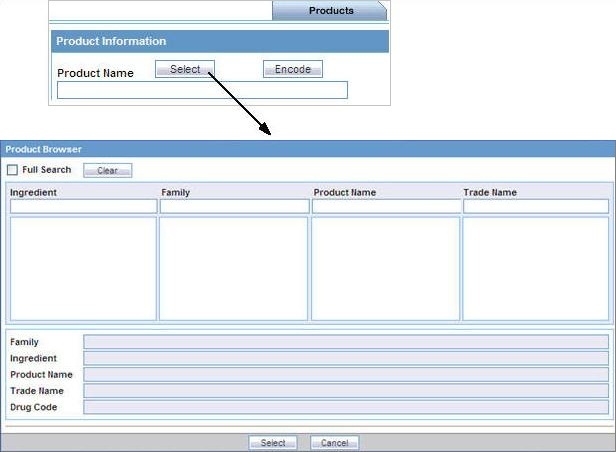
Enter the first few letters (text string) of the product ingredient, family name, product name, or trade name in the respective field.
To search for the specified string in the entire product information, select the Full Search check box.
To remove your search criteria and start over, click Clear.
Press Tab (or click another field in the dialog box) to begin the search.
The Product Browser appears with the search results (for the specified text string) in the column below the field in which you entered the search string.
Select an item from the search results list.
The details for the selected item are displayed in all the Product Browser fields.
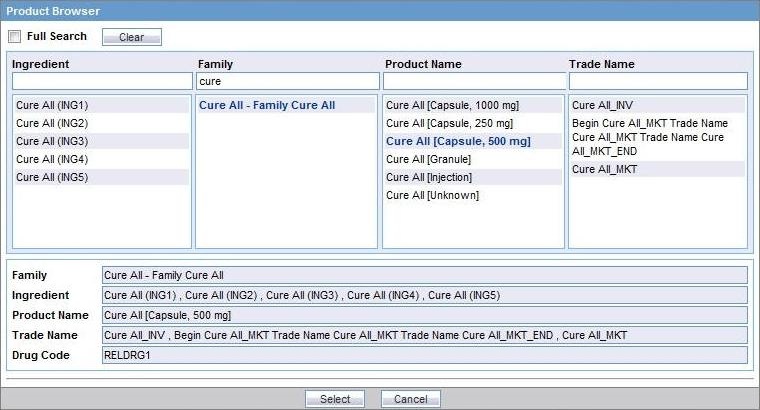
Select the required product name or trade name, and click Select.
The Product Name, Generic Name, Company Drug Code, Formulation, Concentration, and Units fields with the details of the selected product are populated on the Products tab.

To select a WHO drug product by using the WHO Drug Browser:
On the QUERY BY EXAMPLE page, select the Products tab.
Click the Encode button associated with the Product Name field.
The WHO Drug Browser dialog box appears.
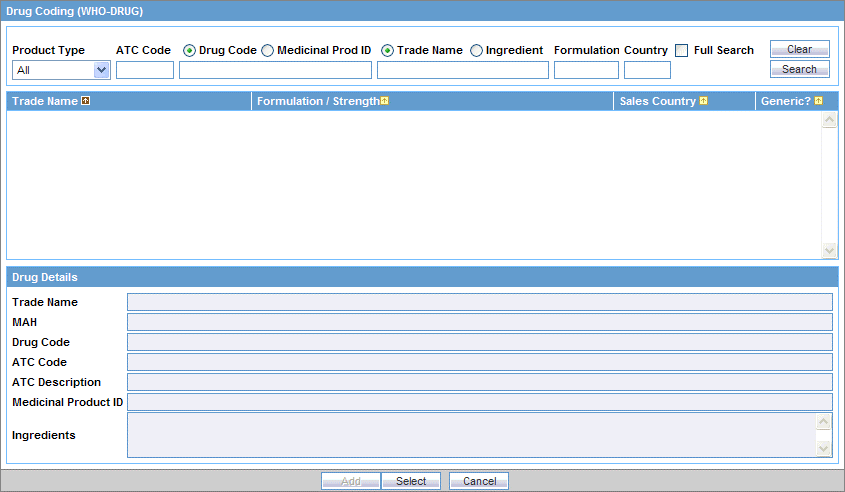
|
Note: The WHO Drug Browser that appears depends on the configuration settings defined for your account by the administrator.The browser categories (B or C) are not displayed in the browser window. The primary difference between the two browsers is the availability of the following fields in WHO Drug Browser:
|
Use the fields at the top of the WHO Browser dialog box to define your search criteria. You may enter values in one, several, or all fields.
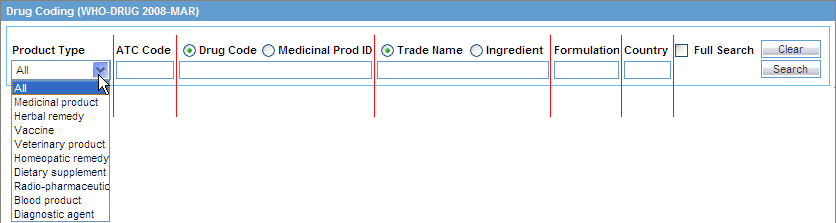
In the Product Type field, select the type of product.
You may include all products or a single product. The default value is All.
In the ATC Code field, type all or part of the Anatomical Therapeutic Chemical (ATC) classification code.
Select either the Drug Code or the Medicinal Prod ID option as one of the search criterion, and then enter the appropriate search string in the text box below the options.
The default option is Drug Code.
Select either the Trade Name or Ingredient option as one of the search criterion, and then enter the appropriate search string in the text box below the options.
The default selection is Trade Name.
Enter the Formulation and Country details for the drug to be searched.
Select the Full Search check box if you want the system to search for the specified string in the entire product information.
Click Search.
The WHO Drug Browser appears with the search results (for the specified drug products) in a grid format.
Select the required WHO drug.
The WHO Drug Browser highlights the selected drug and populates the fields in the Drug Details section.
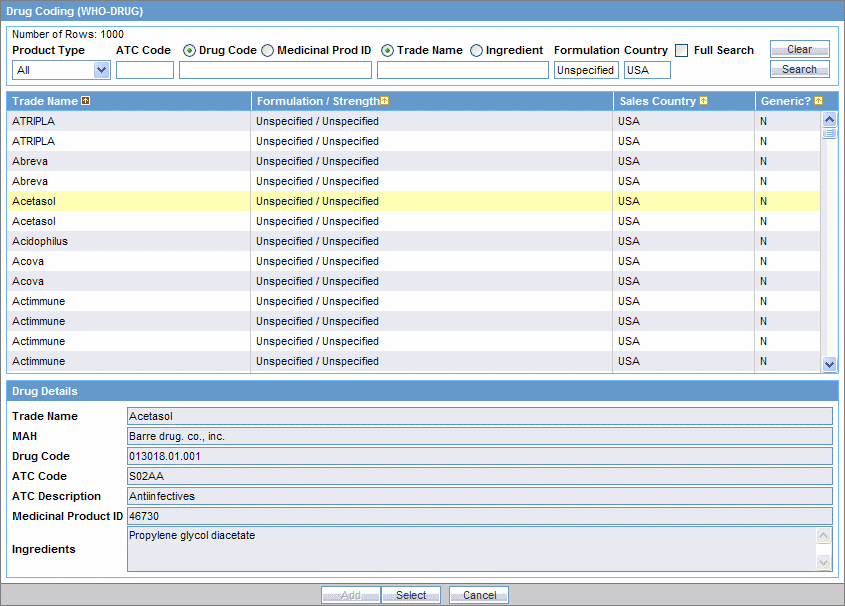
Click Select.
The Product Name, Generic Name, Drug Code, WHO DRUG ATC CODE, and WHO DRUG ATC DESCRIPTION fields for the selected WHO drug are populated in the Products tab.
Note that the Generic Name field displays all the ingredients for the selected WHO drug.
To select a study drug:
On QUERY BY EXAMPLE page, select the Products tab.
Click the Select button next to the Study Drug field.
The Study Drugs Lookup dialog box appears.
In the Study Drug field, enter the first few letters of the study drug name.
Click Search.
The search results based on the specified search string appears.
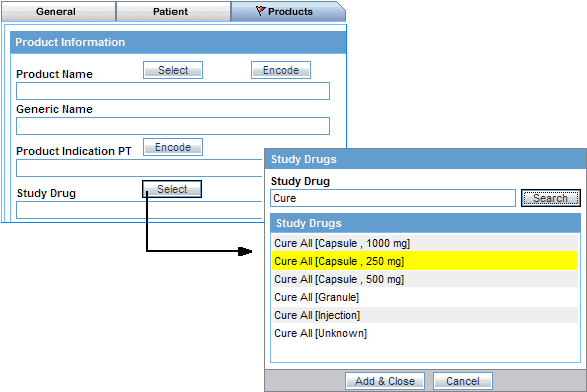
Select the required study drug from the list, and click Add & Close.
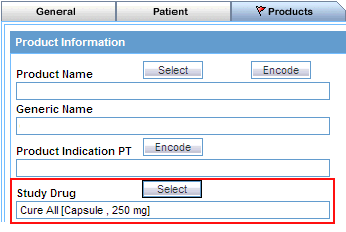
You return to the PRoducts tab and the Study Drug field is populated with the selected.
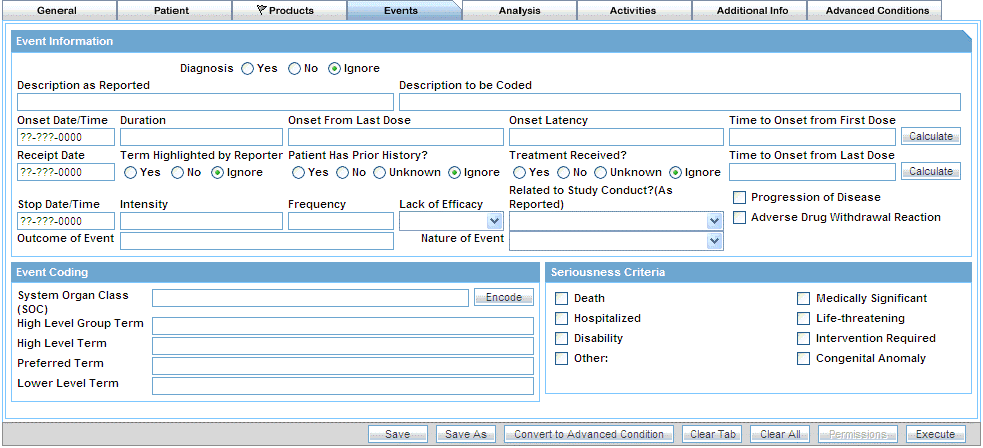
In the Events tab (see Figure 3-7) the details of only one event can be specified at a time.
Table 3-6 describes the fields in the Events tab. The field values you specify are used as the query criteria to retrieve matching cases.
Table 3-6 QUERY BY EXAMPLE Page > Events Tab — Field Description
| Section | Field or Check Box | Description |
|---|---|---|
|
Event Information |
Diagnosis |
Select the Yes, No, or Ignore option, as appropriate, to indicate whether the query looks for cases where event diagnosis flag is set. |
|
Description as Reported |
Enter the reported event description that the query looks for in cases. |
|
|
Description to be Coded |
Tab out of this field to use the MedDRA Browser to specify an event term as query criteria. See "Using the MedDRA Browser" for more information. The MedDRA event terms for the selected term are displayed in the Seriousness Criteria section. The query is restricted to the terms displayed. |
|
|
Onset Date/Time |
Enter the event onset date that the query looks for in cases. |
|
|
Duration |
Enter the event duration that the query looks for in cases. |
|
|
Onset From Last Dose |
Enter the event onset duration from last dose as the query criteria. |
|
|
Onset Latency |
Enter the event onset latency duration that the query looks for in cases. |
|
|
Time to Onset from First Dose |
Enter the duration from first dose to the event onset as the query criteria. Alternatively, click the associated Calculate button to view the Duration Calculator dialog box and make your selection. |
|
|
Receipt Date |
Enter the event receipt date that the query looks for in cases. |
|
|
Term Highlighted by Reporter |
Select the Yes, No, or Ignore option, as appropriate, to indicate whether the query looks for cases where case seriousness status is specified. |
|
|
Patient Has Prior History? |
Select the Yes, No, Unknown, or Ignore option, as appropriate, to indicate whether the query looks for cases where event past history is specified. |
|
|
Treatment Received? |
Select the Yes, No, Unknown, or Ignore option, as appropriate, to indicate whether the query looks for cases where patient received treatment for the event. |
|
|
Time to Onset from Last Dose |
Enter the duration from last dose to the event onset as the query criteria. Alternatively, click the associated Calculate button to view the Duration Calculator dialog box and make your selection. |
|
|
Progression of Disease |
Select this check box to retrieve cases where Event Progression of Disease is selected. |
|
|
Adverse Drug Withdrawal Reaction |
Select this check box to retrieve cases where Event Withdrawal Reaction is selected. |
|
|
Stop Date/Time |
Enter the event stop date that the query looks for in cases. |
|
|
Intensity |
Select the event intensity option that the query looks for in cases. |
|
|
Frequency |
Select the event frequency option that the query looks for in cases. |
|
|
Lack of Efficacy |
Select Yes from the drop-down list to retrieve cases where Event Lack of Efficacy is selected, else select No. |
|
|
Related to Study Conduct? (As Reported) |
Select the Yes, No, Unknown, or N/A from the drop-down list, to indicate whether the query looks for cases where the event is related to a study. |
|
|
Outcome of Event |
Enter the event outcome that the query looks for in cases. |
|
|
Nature of Event |
Enter the nature of the event that the query looks for in cases. |
|
|
Event Coding |
System Organ Class (SOC) |
Click the associated Encode button to use the MedDRA Browser to specify event terms as query criteria. See "Using the MedDRA Browser" for details. |
|
Seriousness Criteria |
Seriousness Criteria check boxes |
Select one or more check boxes to specify the seriousness criteria that the query looks for in cases. The available values are:
|
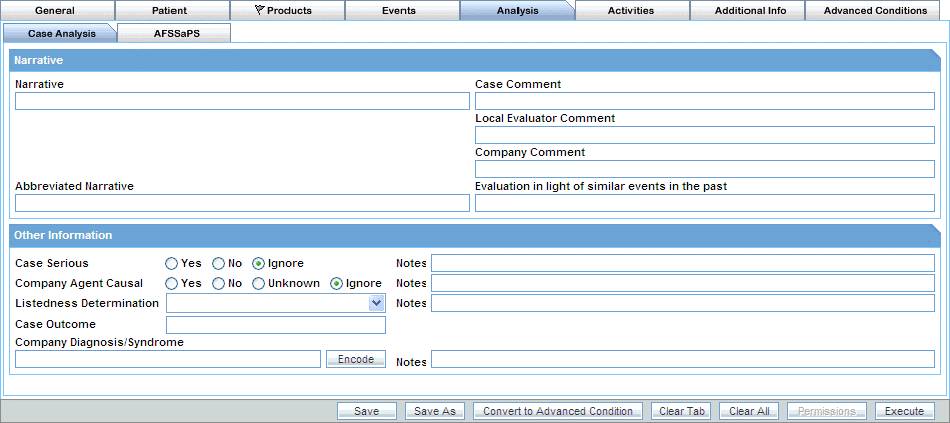
The Analysis tab (see Figure 3-8) has two views: Case Analysis and AFSSaPS.
Analysis information about Regulatory Information (notification log), MedWatch Information, BfArM Information, and EU devices is not available. For more sophisticated queries, use filters or advanced conditions.
Table 3-7 describes all the fields in the Case Analysis view. The field values you specify are used as the query criteria to retrieve matching cases.
Table 3-7 QUERY BY EXAMPLE Page > Analysis Tab > Case Analysis View — Field Description
| Section | Field or Check Box | Description |
|---|---|---|
|
Narrative |
Narrative |
Enter the case narrative that the query looks for in cases. |
|
Case Comment |
Enter the case comment that the query looks for in cases. |
|
|
Local Evaluator Comment |
Enter the local evaluator' comment that the query looks for in cases. |
|
|
Company Comment |
Enter the company's comment that the query looks for in cases. |
|
|
Abbreviated Narrative |
Enter the abbreviated case narrative that the query looks for in cases. |
|
|
Evaluation in light of similar events in the past |
Enter the evaluation comment that takes in to consideration similar events that have occurred in the past. The query will look for the specified text in cases. |
|
|
Other Information |
Case Serious |
Select the Yes, No, or Ignore option, as appropriate, to indicate whether the query looks for cases where case seriousness status is specified. |
|
Notes |
Enter the case seriousness notes that the query looks for in cases. |
|
|
Company Agent Causal |
Select the Yes, No, Unknown, or Ignore option, as appropriate, to indicate whether the query looks for cases where the company agent causality status is specified. |
|
|
Notes |
Enter the company agent causality notes that the query looks for in cases. |
|
|
Listedness Determination |
Select the case listedness status that the query looks for in cases. |
|
|
Notes |
Enter the case assessment listedness notes that the query looks for in cases. |
|
|
Case Outcome |
Select the case outcome that the query looks for in cases. |
|
|
Company Diagnosis/Syndrome |
Click the associated Encode button to use the MedDRA Browser to specify the company diagnosis as query criteria. See "Using the MedDRA Browser" for more information. |
|
|
Notes |
Enter the company diagnosis/syndrome notes that the query looks for in cases. |
Table 3-8 describes all the fields in the AFSSaPS view. The field values you specify are used as the query criteria to retrieve matching cases.
Table 3-8 QUERY BY EXAMPLE Page > Analysis Tab > AFSSaPS View — Field Description
| Section | Field | Description |
|---|---|---|
|
Case Event Imputability Details |
Preferred Term |
Click the associated Select button to use the MedDRA Browser to specify the Event Preferred Term as query criteria. See "Using the MedDRA Browser" for more information. |
|
Agent |
Click the associated Select button to choose the suspect product that the query looks for in cases. |
|
|
Chronology |
Select the imputability chronology code that the query looks for in cases. |
|
|
Semiology |
Select the imputability semiology code that the query looks for in cases. |
|
|
Bibliography |
Select the imputability bibliography code that the query looks for in cases. |
|
|
Imputability |
Select the imputability score that the query looks for in cases. |
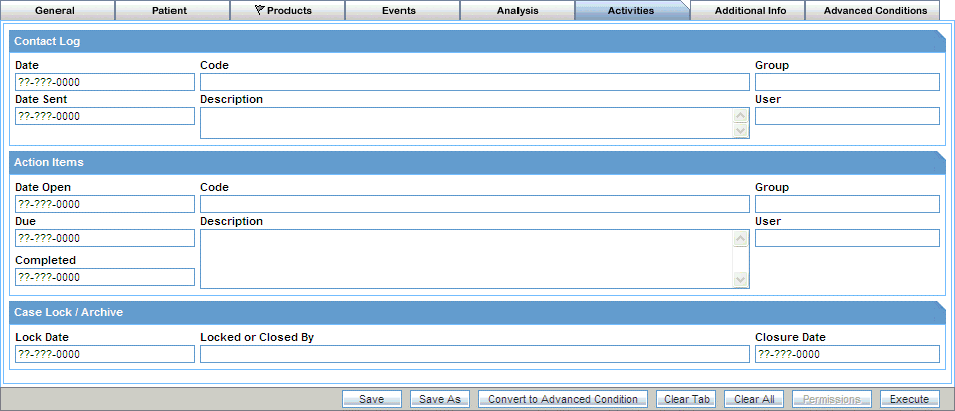
In the Activities tab (see Figure 3-9), you can:
Specify information only about one contact log.
Specify information only about one action item.
Note that routing search is not applicable in Argus Insight.
Table 3-9 describes all the fields in the Activities tab. The field values you specify are used as the query criteria to retrieve matching cases.
Table 3-9 QUERY BY EXAMPLE Page > Activities Tab — Field Description
| Section | Field | Description |
|---|---|---|
|
Contact Log |
Date |
Enter the contact log date that the query looks for in cases. |
|
Code |
Select the contact log code that the query looks for in cases. |
|
|
Group |
Select the contact log group that the query looks for in cases. |
|
|
Date Sent |
Enter the sent date for the contact. |
|
|
Description |
Enter the contact log description that the query looks for in cases. |
|
|
User |
Select the user responsible for the contact log. The query will look for the user name you select. |
|
|
Action Items |
Date Open |
Enter the action item opening date that the query looks for in cases. |
|
Code |
Select the action type that the query looks for in cases. |
|
|
Group |
Select the responsible group that the query looks for in cases. |
|
|
Due |
Enter the action item due date that the query looks for in cases. |
|
|
Description |
Enter the action item description that the query looks for in cases. |
|
|
User |
Select the user responsible for the action item. The query looks for the specified user name. |
|
|
Completed |
Enter the action item completion date that the query looks for in cases. |
|
|
Case Lock/Archive |
Lock Date |
Enter the case lock date that the query looks for in cases. |
|
Locked or Closed By |
Enter the user who locked or closed the case. |
|
|
Closure Date |
Enter the date when the case was closed. |
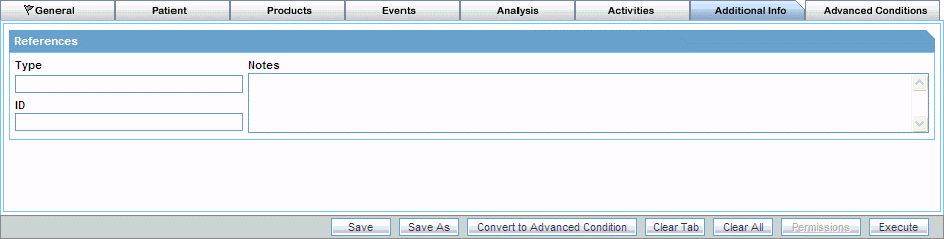
In the Additional Info tab (see Figure 3-10):
You can specify information only about one note.
Attachments are not permitted.
You can specify information only about one reference.
Table 3-10 describes all the fields in the Additional Info tab. The field values you specify are used as the query criteria to retrieve matching cases.
Table 3-10 QUERY BY EXAMPLE Page > Additional Information Tab — Field Description
| Section | Field | Description |
|---|---|---|
|
References |
Type |
Enter the reference type that the query looks for in cases. |
|
ID |
Enter the referenced case ID that the query looks for in cases. |
|
|
Notes |
Enter the reference notes that the query looks for in cases. |
To assign group-level permissions to a saved QBE:
Click Permissions.
The Permissions dialog box appears with the names of all the groups (except the Administrator group) that the system administrator has created.
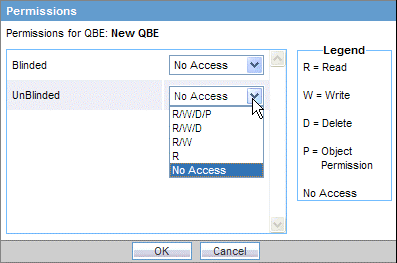
Use the drop-down list next to a group name to assign permissions to the group members on the QBE you have created. The available options are:
| Permission | Description |
|---|---|
| R/W/D/P | Group members will be able to view, modify, delete, and assign permission on the QBE. |
| R/W/D | Group members will be able to view, modify, and delete the QBE. |
| R/W | Group members will be able to view and modify the QBE. |
| R | Group members will be able to only view the QBE. |
| No Access (Default) | No group members will be able to access the QBE. |
Click OK.
The permission settings are saved.
This section describes how to view the QBE that you last modified or executed.
The system assigns the active status to a QBE when you save modifications to it or execute it. Unless you save the modifications to another QBE or execute another QBE, the last QBE you modified or executed remains active. This is helpful in situations when you want to access a frequently used QBE.
To view an active QBE:
Navigate to Queries > Query by Example > Active.
The ACTIVE QUERY BY EXAMPLE page appears with the QBE form for the last QBE you executed. For example: 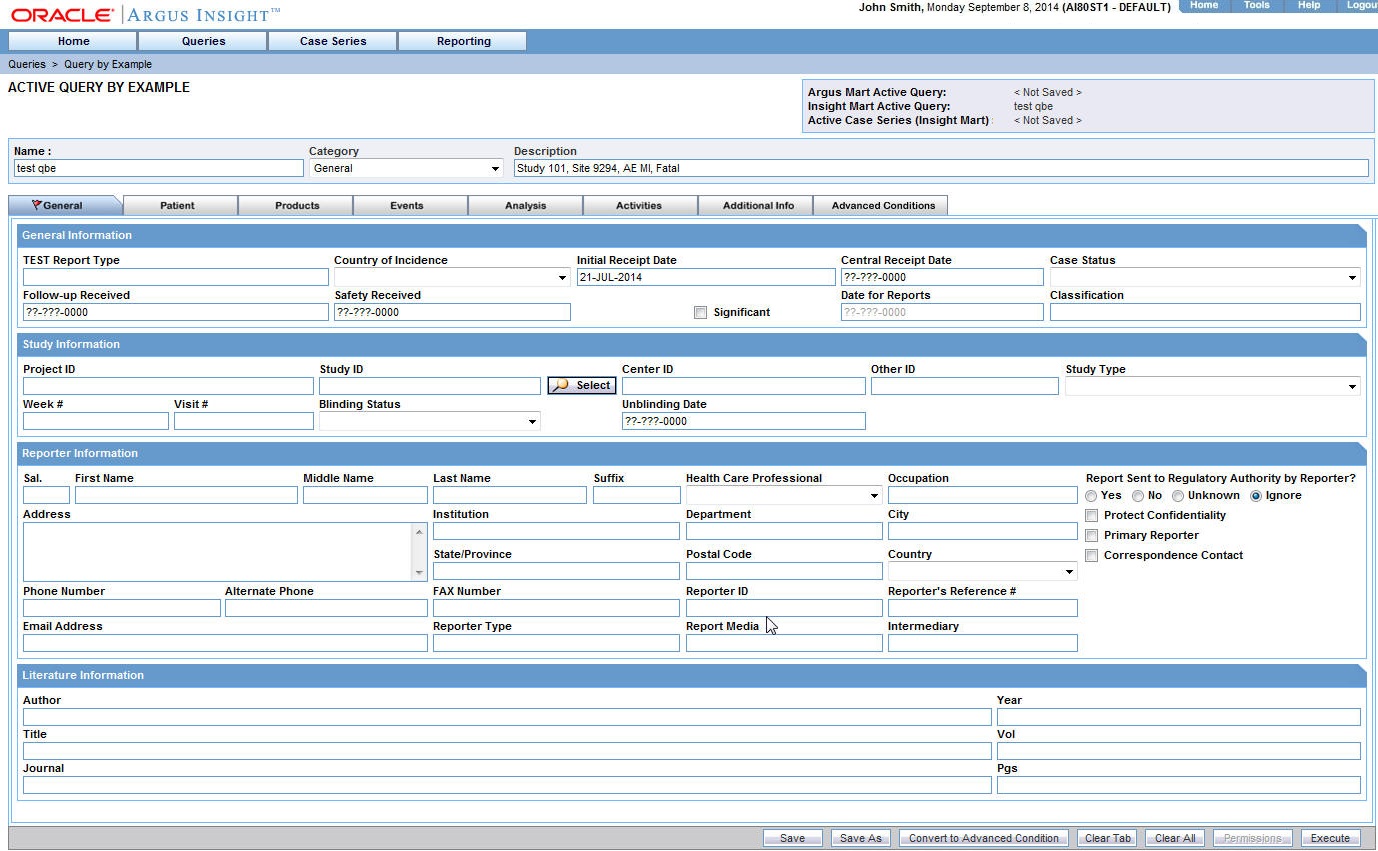
If the active QBE was saved to the system before executing, both the Active Query Name field and the Name field appears with the name of the QBE.
If the active QBE was not saved before executing, the Active Query Name field displays the following text:
<Not Saved>
You may enter the name of the QBE in the Name field, and click Save.
To rename an already saved QBE, enter the new name in the Name field, and click Save.
Modifying the Description and Values for the Active QBE
To change the description of the active QBE, add or modify the text in the Description field.
In addition, you may modify the value of any field on any of the QBE tabs (that is, the QBE form).
When you modify the values of a QBE:
To clear all the values for the current tab, click Clear Tab.
To clear all the values specified in all the tabs for this active QBE, click Clear All.
Saving the Active QBE
You have two options for saving the active QBE:
To save any changes or updates you make to the active QBE, click Save.
The Save button is enabled for a saved active QBE only.
To save the active QBE with a different name, click Save As.
The QUERY BY EXAMPLE LIBRARY page lists all the QBEs saved to the system.
See "Working with Saved QBEs" for more information.
Converting the Active QBE to an Advanced Condition
To convert the QBE to an Advanced Condition, click Convert to Advanced Condition.
See "Using QBEs with Advanced Conditions" for more information.
Assigning Permissions
To set the group-level access permissions on the QBE, click Permissions.
The Permissions button is only available for saved active QBEs.
See "Assigning Group-Level Permissions to a Saved QBE" for more information.
Executing the Active QBE
To generate a case series by using the active QBE, click Execute.
Modifying the field values in the QBE form for an active QBE or saving the active QBE with a different name changes the active QBE to reflect the most recent changes. The active QBE also changes if you modify the field values in the QBE form and execute the QBE without saving the QBE form modifications.
The QUERY BY EXAMPLE LIBRARY page lists all the QBEs saved to the system.
To view the list of saved QBEs, navigate to Queries > Query by Example > Library.
The QUERY BY EXAMPLE LIBRARY page appears (See Figure 3-11) with the following information about the saved QBE:
Name of the QBE that was entered when the query was saved.
Description of the QBE that was entered in the Description field on the QBE form.
Date when the QBE was last modified.
Full name of the user who created the QBE.
Category that was selected on the QBE form and assigned to the query.
To search for a saved QBE:
Perform one of the following to specify the search criteria:
To search for a QBE by its name, type the QBE name in the Name field.
To search for a QBE by its description, type the first few words of the description in the Description field.
The system searches for the specified search string in all QBE descriptions.
To search for a QBE by its date of modification, enter the modification date in the first Last Modified date field.
You may also specify a date range by typing the start and end dates in the first and second date fields, respectively.
To search for a QBE by its author, select the author name from the User Full Name drop-down list.
To search for a QBE by its category, select the category from the Category drop-down list.
|
Note: If you search for a text comprising an underscore, it is treated as a wildcard and is replaced by a letter in the displayed results. For example, If you have queries with names - CURE, CORE, and CARE and you search for C_RE, all three queries are displayed in the result. |
Click Search.
The search results appear in a list based on the search criteria.
To sort search results, click the sort icon next to the column headers in the list.
To clear the search results and display all the saved QBEs in the list, click Clear.
To create a new QBE, navigate to Queries > Query By Example > New.
Alternatively, click New in the QUERY BY EXAMPLE LIBRARY page to open a new QBE form directly.
To modify a saved QBE:
On the QUERY BY EXAMPLE LIBRARY page, select a QBE from the list of QBEs.
Click Modify.
The QBE form for the selected QBE appears.
Modify the field values in the QBE form, and save the changes.
To save the current query, click Save.
To save the current query by another name, click Save As.
To delete a saved QBE:
On the QUERY BY EXAMPLE LIBRARY page, select a QBE from the list of QBEs.
Click Delete.
A confirmation dialog box appears.
Click OK.
To execute a saved QBE:
Navigate to Queries > Query by Example > Library.
The QUERY BY EXAMPLE LIBRARY page appears.
Select a QBE from the list.
Click Execute.
When execution is complete, the ACTIVE CASE SERIES page appears.
After generating the case series, you may add cases to or delete cases from the series, freeze the case series, or export the case series results into a Microsoft Excel file.
For more information, see Chapter 7, "Working with Case Series."
Just as the system assigns the active status to a QBE when you save modifications to it or execute it, the last saved or generated case series becomes the active case series.
You may want to run an existing QBE on an active case series instead of creating and running a new QBE on the entire data mart and generating a new case series.
To narrow down the list of cases in the active case series:
Generate the case series on which you want to run another QBE as follows:
If the case series on which you want to run another QBE is not yet generated or active, you can either create a new QBE and execute it, or execute a saved QBE as explained in "Executing a Saved QBE".
This case series becomes the active case series and remains so until you execute another query to generate a different case series.
Alternatively, if the case series on which you want to run another QBE is already saved in the system, navigate to Case Series > Open Case Series > Library.
When the CASE SERIES LIBRARY page opens, select the case series, and click Make Active.
Navigate to Queries > Query by Example > Library.
The QUERY BY EXAMPLE LIBRARY page appears.
Select a query to run on the active case series that was generated in Step 1.
Select the Limit Query to Active Case Series check box.
Click Execute.
The selected QBE is executed on the active case series and the ACTIVE CASE SERIES appears.
Note that the case series you just generated becomes the active case series.
Advanced conditions let you create complex queries that involve Boolean and set operations among fields.
To create advanced conditions, use the Advanced Conditions Editor, which uses a spreadsheet-like approach for adding query conditions (fields and their values) and conditional operators (Boolean or set).
In Argus Insight, QBEs are integrated with advanced conditions to let you perform the following tasks:
You can use an existing QBE to start to build an advanced condition that uses Boolean or set operations between QBE form fields that have specific values. When you convert a QBE to an advanced condition, all the QBE form fields in which you entered values are listed on the ACTIVE ADVANCED CONDITIONS EDITOR page as advanced condition attributes.
To convert a QBE to an advanced condition:
Open a QBE form by either starting a new QBE, opening the active QBE, or opening a saved QBE.
Verify the field values you specified in the tab pages in the QBE form.
Click Convert to Advanced Condition.
The ACTIVE ADVANCED CONDITIONS EDITOR page appears.
All the fields in which you specified values in the QBE form are listed as advanced condition attributes.
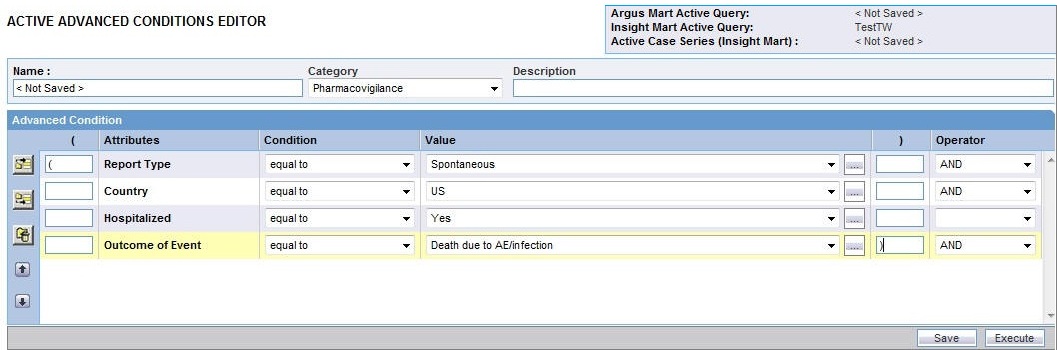
Build your query further by:
Adding additional attributes (fields) and specifying their values.
Adding another advanced condition as an attribute.
Placing runtime parameters in attributes.
Placing parentheses to determine the query execution order.
Specifying conditions for attributes values.
Specifying Boolean and set operators to join the attributes.
See Chapter 5, "Using Advanced Conditions to Create Queries on Insight Mart" for detailed information about using the Advanced Conditions Editor.
You can integrate a new, active, or saved QBE with an existing advanced condition through these set operators:
INTERSECT
MINUS
UNION
If required, you can integrate your QBE with multiple advanced conditions that can have Boolean or set operations between them.
To integrate a QBE with existing advanced conditions:
Open a QBE form by either starting a new QBE, opening the active QBE, or opening a saved QBE.
Verify the field values you specified in the tab pages in the QBE form.
Click the Advanced Conditions tab.
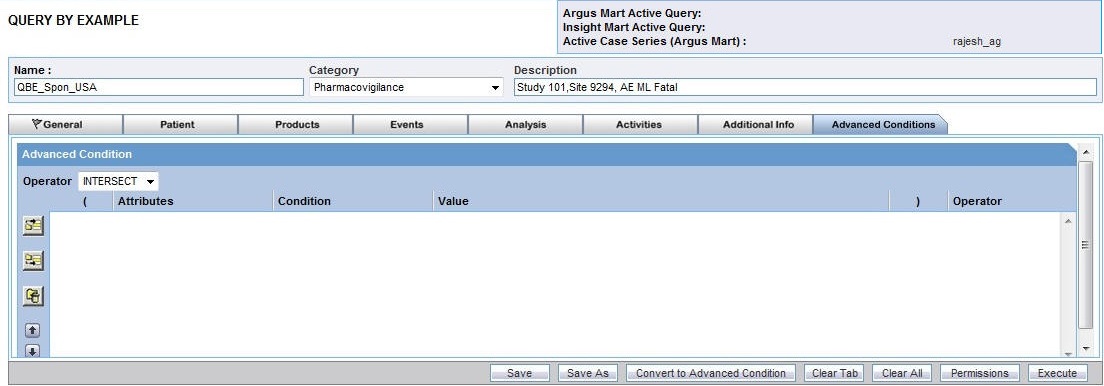
In the Operator field, select a set operator to integrate the QBE and the advanced condition.
You may select INTERSECT, MINUS, or UNION.
Select the advanced condition to integrate with the QBE as follows:
Click the Add Advanced Condition Above icon on the left bar to open the Advanced Conditions menu.
This menu lists all the advanced conditions (based on Insight Mart only) that are stored in the system and accessible to you. The conditions are organized by categories.
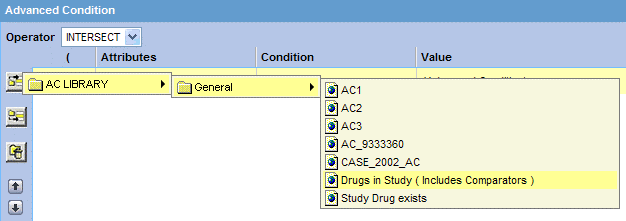
Browse to the appropriate category, and select the required advanced condition.
The selected row is added in the Advanced Conditions Editor.
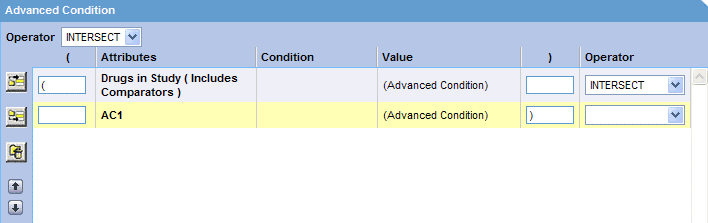
Click the Add Advanced Condition Above icon, or the Add Advanced Condition Below icon to insert another advanced condition above or below the existing advanced condition.
|
Tip: To change the structure of the query by changing the order of the rows, select a row and then click the arrow icons to move the row up or down. |
Enter parentheses in the ( and ) columns to determine the order of execution for the selected advanced conditions.
In the Operator column, specify the set operation to perform between the selected advanced conditions.
Click Save As to save your integrated query.
To run the integrated QBE and generate the case series, click Execute.
The ACTIVE CASE SERIES page appears with the case series.
See Chapter 7, "Working with Case Series" for more information.
To convert the integrated QBE and advanced condition into a single advanced condition, click Convert to Advanced Condition.
See "Converting a QBE to an Advanced Condition" for more information.
For detailed information about using the Advanced Conditions Editor, see Chapter 5, "Using Advanced Conditions to Create Queries on Insight Mart."