2 Setting Up Oracle Flow Builder
This chapter explains how to get started using Oracle Flow Builder. This chapter contains the following sections:
2.1 Getting Started
The following table provides an overview of the Oracle Flow Builder application setup tasks.
2.2 System Requirements
Oracle Flow Builder has the following system requirements:
-
OS: Oracle Enterprise Linux version 5.
-
CPU: P4 or higher @ 2GHz (Intel Dual core recommended, Intel Xeon Quad core preferred).
-
Memory: 4GB or higher (8GB preferred).
-
Free Disk space: 20 GB (50 GB recommended, 200 GB preferred).
-
Browser: Firefox 17 ESR.
2.3 Prerequisites
Oracle Flow Builder installer has the following prerequisites:
-
An installed and functioning Oracle Database 11g Enterprise Edition (v. 11.2.0.3.0) or Oracle Database 12c Enterprise Edition (v. 12.1.0.2.0).
-
Oracle Enterprise Linux version 5.
2.4 Installing Oracle Flow Builder
This section describes the basic installation procedures required for setting up the database and installing the application.
Oracle Flow Builder requires a functioning database which:
-
Is running Oracle Database 11g Enterprise Edition (v. 11.2.0.3.0), which can be accessed from:
https://updates.oracle.com/Orion/PatchDetails/process_form?patch_num=10404530
-
Or, is running Oracle Database 12c Enterprise Edition (v. 12.1.0.2.0), which can be accessed from:
http://www.oracle.com/technetwork/database/enterprise-edition/downloads/index.html
-
Can be accessed from a remote machine (i.e., connect using the machine hostname instead of using
localhost).
Note:
This section provides basic summary steps for installing Oracle Database Enterprise Edition and remote access configuration for use with the Oracle Flow Builder application. These steps are not intended to provide complete database installation instructions. For detailed database installation instructions, see the "Installing Oracle Database" chapter of the Oracle Database documentation at the following location:http://docs.oracle.com/en/database/database.html
2.4.1 Installing Oracle Database Enterprise Edition
The Oracle Flow Builder application requires an installed and functioning Oracle Database 11g or 12c Enterprise Edition. If necessary, download and install the database prior to installing the Oracle Flow Builder application.
To download and install Oracle Database:
-
Download the database zip files and extract the files:
-
Run .
/database/runInstaller. -
Clear the I wish to receive security updates checkbox and click Next.
-
Click Skip software updates.
-
Select Create and configure a database and click Next.
-
Select Desktop Class and click Next.
-
Specify the Install Configuration as follows:
-
Oracle base:
/scratch/<username>/oracle/oee/app -
Software location:
/scratch/<username>/oracle/oee/app /product/<version>/dbhome_1(auto populated). -
Database file location:
/scratch/<username>/oracle/oee/app /oradata(auto populated). -
Database edition:
Enterprise Edition (4.5GB). -
Character Set:
Unicode (AL32UTF8). -
OSDBA Group:
dba. -
Global database name:
orcl.us.oracle.com. -
Administrative password: (any password you wish to use as the default database administrator password). Passwords must contains at least 8 characters, cannot start with a number, and must contain at least one number. This password should be the same password used when installing Oracle Flow Builder.
-
-
Click Yes on the "Admin password entered does not conform to the Oracle standards" dialog box.
-
On Prerequisite Checks, if there are errors, click Ignore All and click Next.
-
Click Yes on the "You have chosen to ignore some of the prerequisites" dialog box.
-
On the Summary page, confirm your entries and click Install.
-
If installing the database for the first time, execute the
orainstRoot.shscript when prompted by the installer then click OK, as follows:> sudo <Path to oraInventory>/orainstRoot.shfor example:
> sudo /scratch/${USER}/oracle/oee/oraInventory/orainstRoot.sh -
Execute the
root.shscript when prompted by the installer then click OK to complete the installation, as follows:> sudo /scratch/<username>/oracle/oee/app/product/<version>/dbhome_1/root.shDuring the
root.shfile execution, if you get '/usr/local/bin is read only', then continue without copy.
2.4.2 Configuring Oracle Database for Remote Access
The Oracle Database must be configure for remote access to be used with the Oracle Flow Builder application.
To configure Oracle Database for remote access:
-
Modify
tnsnames.oraand changelocalhostto the fully qualified domain name (FQDN) of the machine where the Database is installed. For example:> sed -i -e 's/localhost/machineName.company.com/g' $ORACLE_HOME/network/admin/tnsnames.oraNote:
If you receive an "Undefined variable" error, verify the$ORACLE_HOMEenvironment variable is set or manually enter the full path to Oracle's home directory in place of$ORACLE_HOME. -
Modify
listener.oraand changelocalhostto the fully qualified domain name (FQDN) of the machine where the Database is installed. For example:> sed -i -e 's/localhost/machineName.company.com/g' $ORACLE_HOME/network/admin/listener.ora -
Stop the Listener and then Start it back up so that the new changes are in effect, as follows:
> $ORACLE_HOME/bin/lsnrctl stop
> $ORACLE_HOME/bin/lsnrctl start
-
Restart the database (optional), as follows:
$> sqlplus
$> username: SYS AS SYSDBA
$> password: <database password>
$> shutdown immediate
$> startup
2.4.3 Installing the Oracle Flow Builder Application
The Oracle Flow Builder application is installed using the setup script included in the downloaded application zip file.
To install the Oracle Flow Builder application:
-
Download the Oracle Flow Builder zip file from Oracle Technology Network (OTN):
http://www.oracle.com/technetwork/oem/downloads/index-084446.html
-
Extract the Oracle Flow Builder Zip, as follows:
> unzip ./OFB_MAIN_GENERIC_xxxxxx.xxxx.S.zip -d /tmp/OFB_MAIN
-
Add execute permission to setup.sh, as follows:
> chmod 744 /tmp/OFB_MAIN/setup.sh
Note:
You may need to add execute permission to other.shscript files also if you receive a "Permission denied" message when running the script. -
Start the Oracle Flow Builder setup, as follows:
> /tmp/OFB_MAIN/setup.sh install
-
Enter the configuration information as prompted by the setup script. For example:
-
Enter the Oracle Flow Builder installation directory:
/scratch/username/oracle/OracleOFB -
Enter the Administrator Password: (any password you wish to use as the default OFB administrator account password). Passwords must contains at least 8 characters, cannot start with a number, and must contain at least one number. This password should be the same password used when installing Oracle Database.
-
Enter the Oracle Flow Builder Server host-name (press enter to accept [auto-detected-hostname]):
machineName.company.com -
Enter Database port (press enter to accept [1521]):
1521. -
Enter database SID (press enter to accept [orcl]):
orcl. -
Enter database admin user name:
system(or the user name and password of a user with privileges to create the OFB user). -
Enter database admin Password: This password should be the same password used when installing Oracle Database and the password for db user OFB and OFB UI user "administrator".
-
When prompted
OFB user already exists in database? [1:No;2:Yes]: (Enter for No), select 1 for a new database and the installation will create the OFB user in the database, then create the tables for OFB. If you select 2 for yes, you will need to create the OFB user manually.Log in to SqlPlus as a user with create user privileges and run the following SQL commands:
CREATE USER OFB IDENTIFIED BY <password> DEFAULT TABLESPACE users;
GRANT CREATE SESSION, UNLIMITED TABLESPACE, CREATE TABLE, CREATE CLUSTER, CREATE SEQUENCE, CREATE PROCEDURE, CREATE TRIGGER, CREATE TYPE, CREATE OPERATOR, CREATE INDEXTYPE, CREATE ANY VIEW to OFB;
<password>is the password for db user OFB.
After a successful installation, the Oracle Flow Builder will be left in a running state.
-
-
Open a browser and start the Oracle Flow Builder application using the URL:
http://machineName.company.com:9090 -
Log in to the application using the default administrator username and password (administrator/password-entered-during-product-installation is the default).
See the Section 2.5, "Initial Setup for Administrators" section for initial setup tasks for the Oracle Flow Builder application. See the Section 2.4.5, "Oracle Flow Builder Server Maintenance" section for additional server options.
2.4.4 Upgrading from Earlier Versions
If you are upgrading from an earlier version of Oracle Flow Builder, there are additional steps required to update the database schema and reference the updated schema using the newer version. This section explains the steps required.
2.4.4.1 Checking Versions
The Oracle Flow Builder 12.5.0.2 (and higher) version includes features for checking versions:
-
Use
./setup.sh versionto display the version of the download zip file. Thesetup.shfile is located in the location where the download zip file is unzipped. -
Use
./control.sh versionto display which version of Oracle Flow Builder is installed. Thecontrol.shfile is located in<ofb-install-dir>/bin.
2.4.4.2 Upgrading Oracle Flow Builder 12.4.0.2 to 12.5.0.1
The Oracle Flow Builder upgrade scripts support user upgrades only to the next higher version. For example, 12.4.0.2 to 12.5.0.1 and then 12.5.0.1 to 12.5.0.2. You cannot update directly from 12.4.0.2 to 12.5.0.2. This section explains the steps to upgrade a version 12.4.0.2 instance of Oracle Flow Builder to a version 12.5.0.1 instance of Oracle Flow Builder. You will need the Oracle Flow Builder 12.5.0.2 download zip file to obtain the upgrade scripts.
To upgrade Oracle Flow Builder 12.4.0.2 to 12.5.0.1:
-
Make a backup of the Oracle Flow Builder 12.4.0.2 database schema.
-
Open sqlplus and connect to the Oracle Flow Builder 12.4.0.2 database schema.
-
Locate the SQL update scripts for Oracle Flow Builder version 12.5.0.1 in the following location of the 12.5.0.2 download zip file:
/common/install/static/data/scripts/en/12.5.0.1
-
Run the sql update files using the following commands:
SQL> @ofb.sql;
SQL> @ofb_template_data.sql;
SQL> @ofb_template_data_ebs.sql;   (do this step if your product is ebs)
-
When the update script finishes, exit sqlplus.
-
Install Oracle Flow Builder 12.5.0.1 on a different host and database.
-
Change the Oracle Flow Builder data source to point to the updated 12.4.0.2 Oracle Flow Builder schema by performing the following steps:
-
Login to the Weblogic console:
http://<server_name>:9190/console(ofb/<install_password>) where Oracle Flow Builder 12.5.0.1 is running. -
Click the Data Sources link on the Home page.
-
Click the KWDT Data Source link.
-
Click the Connection Pool tab.
-
Replace the URL field with the database connection pointing to the updated Oracle Flow Builder 12.4.0.2 database instance.
-
Logout from the Weblogic console.
-
Restart the Weblogic console running on the Oracle Flow Builder 12.5.0.1 instance using the following commands:
<ofb-install-dir>/scripts/control.sh stop
<ofb-install-dir>/scripts/control.sh start
-
-
Copy configuration files as needed from the Oracle Flow Builder 12.4.0.2 instance to the Oracle Flow Builder 12.5.0.1 instance, as follows:
-
<ofb-install-dir>/ofb/config/mail.properties -
<ofb-install-dir>/ofb/config/repository.propertiesif using repositories other than the default "OATS" repository. -
<ofb-install-dir>/ofb/data/function-librariesif using custom libraries.
-
-
Login to the Oracle Flow Builder 12.5.0.1 instance, which should point to the upgraded Oracle Flow Builder 12.4.0.2 database schema.
2.4.4.3 Upgrading Oracle Flow Builder 12.5.0.1 to 12.5.0.2
The Oracle Flow Builder upgrade scripts support user upgrades only to the next higher version. For example, 12.4.0.2 to 12.5.0.1 and then 12.5.0.1 to 12.5.0.2. You cannot update directly from 12.4.0.2 to 12.5.0.2. This section explains the steps to upgrade a version 12.5.0.1 instance of Oracle Flow Builder to a version 12.5.0.2 instance of Oracle Flow Builder. If you have an Oracle Flow Builder 12.4.0.2 instance, see Section 2.4.4.2, "Upgrading Oracle Flow Builder 12.4.0.2 to 12.5.0.1" before completing these steps. You will need the Oracle Flow Builder 12.5.0.2 download zip file to obtain the upgrade scripts.
To upgrade Oracle Flow Builder 12.5.0.1 to 12.5.0.2:
-
Make a backup of the Oracle Flow Builder 12.5.0.1 database schema.
-
Open sqlplus and connect to the Oracle Flow Builder 12.5.0.1 database schema.
-
Locate the SQL update scripts for Oracle Flow Builder version 12.5.0.2 in the following location of the 12.5.0.2 download zip file:
/common/install/static/data/scripts/en/12.5.0.2
-
Run the sql update files using the following commands:
SQL> @ofb.sql;
SQL> @ofb_template_data.sql;
SQL> @ofb_template_data_ebs.sql;   (do this step if your product is ebs)
-
When the update script finishes, exit sqlplus.
-
Install Oracle Flow Builder 12.5.0.2 on a different host and database.
-
Change the Oracle Flow Builder data source to point to the updated 12.5.0.1 Oracle Flow Builder schema by performing the following steps:
-
Login to the Weblogic console:
http://<server_name>:9190/console(ofb/<install_password>) where Oracle Flow Builder 12.5.0.2 is running. -
Click the Data Sources link on the Home page.
-
Click the KWDT Data Source link.
-
Click the Connection Pool tab.
-
Replace the URL field with the database connection pointing to the updated Oracle Flow Builder 12.5.0.1 database instance.
-
Logout from the Weblogic console.
-
Restart the Weblogic console running on the Oracle Flow Builder 12.5.0.2 instance using the following commands:
<ofb-install-dir>/scripts/control.sh stop
<ofb-install-dir>/scripts/control.sh start
-
-
Copy configuration files as needed from the Oracle Flow Builder 12.5.0.1 instance to the Oracle Flow Builder 12.5.0.2 instance, as follows:
-
<ofb-install-dir>/ofb/config/mail.properties -
<ofb-install-dir>/ofb/config/repository.propertiesif using repositories other than the default "OATS" repository. -
<ofb-install-dir>/ofb/data/function-librariesif using custom libraries.
-
-
Login to the Oracle Flow Builder 12.5.0.2 instance, which should point to the upgraded Oracle Flow Builder 12.5.0.1 database schema.
2.4.4.4 Upgrading Oracle Flow Builder 12.5.0.2 to 12.5.0.3
The Oracle Flow Builder upgrade scripts support user upgrades only to the next higher version. For example, 12.5.0.1 to 12.5.0.2 and then 12.5.0.2 to 12.5.0.3. You cannot update directly from 12.5.0.1 to 12.5.0.3. This section explains the steps to upgrade a version 12.5.0.2 instance of Oracle Flow Builder to a version 12.5.0.3 instance of Oracle Flow Builder. If you have an Oracle Flow Builder 12.5.0.1 instance, see Section 2.4.4.3, "Upgrading Oracle Flow Builder 12.5.0.1 to 12.5.0.2" before completing these steps. You will need the Oracle Flow Builder 12.5.0.3 download zip file to obtain the upgrade scripts.
To upgrade Oracle Flow Builder 12.5.0.2 to 12.5.0.3:
-
Make a backup of the Oracle Flow Builder 12.5.0.2 database schema.
-
Open sqlplus and connect to the Oracle Flow Builder 12.5.0.2 database schema.
-
Locate the SQL update scripts for Oracle Flow Builder version 12.5.0.3 in the following location of the 12.5.0.3 download zip file:
/common/install/static/data/scripts/en/12.5.0.3
-
Run the sql update files using the following commands:
SQL> @ofb.sql;
SQL> @ofb_template_data.sql;
SQL> @ofb_template_data_ebs.sql;   (do this step if your product is ebs)
-
When the update script finishes, exit sqlplus.
-
Install Oracle Flow Builder 12.5.0.3 on a different host and database.
-
Change the Oracle Flow Builder data source to point to the updated 12.5.0.2 Oracle Flow Builder schema by performing the following steps:
-
Login to the Weblogic console:
http://<server_name>:9190/console(ofb/<install_password>) where Oracle Flow Builder 12.5.0.3 is running. -
Click the Data Sources link on the Home page.
-
Click the KWDT Data Source link.
-
Click the Connection Pool tab.
-
Replace the URL field with the database connection pointing to the updated Oracle Flow Builder 12.5.0.2 database instance.
-
Logout from the Weblogic console.
-
Restart the Weblogic console running on the Oracle Flow Builder 12.5.0.3 instance using the following commands:
<ofb-install-dir>/scripts/control.sh stop
<ofb-install-dir>/scripts/control.sh start
-
-
Copy configuration files as needed from the Oracle Flow Builder 12.5.0.2 instance to the Oracle Flow Builder 12.5.0.3 instance, as follows:
-
<ofb-install-dir>/ofb/config/mail.properties -
<ofb-install-dir>/ofb/config/repository.propertiesif using repositories other than the default "OATS" repository. -
<ofb-install-dir>/ofb/data/function-librariesif using custom libraries.
-
-
Login to the Oracle Flow Builder 12.5.0.3 instance, which should point to the upgraded Oracle Flow Builder 12.5.0.2 database schema.
2.4.5 Oracle Flow Builder Server Maintenance
The following maintenance functions are available to start, stop, or check the running status of an Oracle Flow Builder application.
-
Starting the Oracle Flow Builder Application Server
Run
<ofb-install-dir>/bin/control.sh start. For example:> /scratch/username/oracle/ofb/bin/control.sh start -
Stopping the Oracle Flow Builder Application Server
Run
<ofb-install-dir>/bin/control.sh stop. For example:> /scratch/username/oracle/ofb/bin/control.sh stop -
Getting the Oracle Flow Builder Application Server running status
Run
<ofb-install-dir>/bin/control.sh status. For example:> /scratch/username/oracle/ofb/bin/control.sh status -
Getting the Oracle Flow Builder Application version number
Run
<ofb-install-dir>/bin/control.sh version. For example:> /scratch/username/oracle/ofb/bin/control.sh version
2.4.6 Deinstalling the Oracle Flow Builder Application
The Oracle Flow Builder application can be completely removed by running the deinstall script located under the scripts folder.
To deinstall the Oracle Flow Builder application:
-
Run
<ofb-install-dir>/bin/deinstall.sh. For example:> /scratch/username/oracle/ofb/bin/deinstall.sh
Deinstalling Oracle Flow Builder only deletes the application files, any user data created on the file system and in the database will not be deleted by the deinstaller.
To remove user files and data:
Caution:
The following steps remove user data from the machine. Be sure you wish to do this before proceeding.-
User created files on the file system can be removed by simply deleting the product installation folder.
-
User created data in the database can be removed by running the following query as a database admin user:
> Drop user OFB cascade;
2.5 Initial Setup for Administrators
This section explains the initial setup procedures for a newly installed Oracle Flow Builder. See Chapter 9, "Administering Oracle Flow Builder" for additional information about the administrator tasks and procedures.
| Step | Task | Role |
|---|---|---|
|
1 |
Set up the Email Server. |
Administrator |
|
2 |
Review and customize Releases. |
Administrator |
|
3 |
Review and customize Product Families. |
Administrator |
|
4 |
Review and customize Products. |
Administrator |
|
5 |
Review and customize product Features. |
Administrator |
|
6 |
Review and customize user roles. |
Administrator |
|
7 |
Add users and specify application roles. Note: Users can also request registration from the login screen. An administrator or other user with an "approver" role would then approve the user registration request. See Section 2.6, "Initial Setup for Users" and Section 9.2.6, "Setting Up Users" |
Administrator/users |
|
8 |
Optional. Review and customize function libraries. |
Administrator |
2.6 Initial Setup for Users
This section explains the basic steps to get started using the Oracle Flow Builder application. The following are the basic steps new users must do to get started using the application:
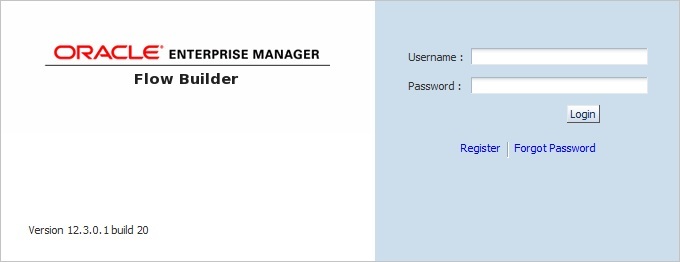
2.6.1 Starting the Application
To start the Oracle Flow Builder application:
-
Launch a Web browser.
-
Enter the URL:
http://<machineName>:9090Where
machineNameis the name of the machine where Oracle Flow Builder is installed, such asmachine.company.com.
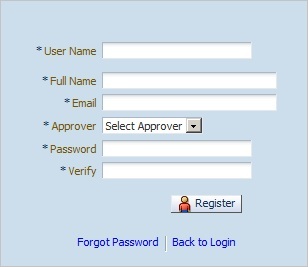
2.6.2 Registering User Credentials
New users can request access to the application by registering a user name and password at the main log in screen. A request will be sent to the specified approver to authorize the user registration and login credentials.
To register user credentials:
-
Start the application to get to the log in screen.
-
Click the Register link.
-
Enter the user details, select the Approver, and click Register. The User Name must be between 4 and 8 characters. The Confirmation message appears upon successful registration. Once the Approver approves the request, the user can log into the application from the main login screen.
2.6.3 Changing Passwords
Users who are added to the application by an administrator rather than through the Register screen will receive an initial system-generated password via Email to log in to the application. You can change the system-generated password to a new password.
To change a user password:
-
Log in to the application using the username and system-generated password provided.
-
Click the Change Password link at the top of the page.
-
Enter a new password.
-
Confirm the new password.
-
Click OK.
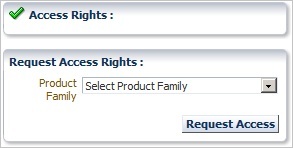
2.6.4 Requesting Product Family Access
First time users must request access rights to specific product families defined within the application.
To request access rights to a product family:
-
Start the application and login with your user credentials.
-
If necessary click the Home link at the top of the page.
-
Select a product family from the Request Access Rights list.
-
Click Request Access. An Access Request notice appears indicating that the request has been sent to the designated approver.
Figure 2-4 Request Access Rights Confirmation Notice
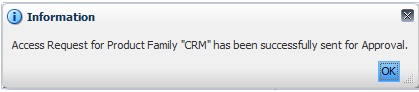
Description of "Figure 2-4 Request Access Rights Confirmation Notice"
-
Click OK.
-
Repeat steps 3 through 5 to request access to additional product families. You can request access to more than one product family available in the application. However, only one can be requested at a time.
-
Log out of the application until notified by the designated approver that the access rights have been approved. After the designated approver approves the access rights, the Access Rights list shows the Product Families with the Application role assigned to the user after the next log in.
Figure 2-5 Approved Access Rights to Product Families List
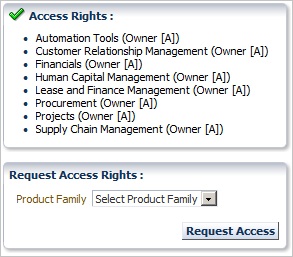
Description of "Figure 2-5 Approved Access Rights to Product Families List"