9 Configuring the Tablet R-Series and the Wireless Card

The Tablet R-Series is pre-installed with the Microsoft Windows Embedded CE 6.0 operating system. It comes with a pre-installed, embedded wireless networking module.

All network configuration and security settings are dependent upon the site’s infrastructure and configuration of the wireless network. If you encounter problems with the wireless network, see your site administrator.

To connect the Tablet E-Series to a wireless network:
  1. On the Desktop, click the Laird Connection Manager (LCM) icon.
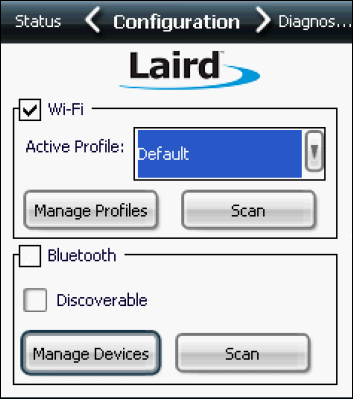
  2. On the Configuration tab, ensure that the settings are as follows, and then click Scan:
    1. Ensure that the Wi-Fi is selected.
    2. Ensure that the Active Profile is set to Default.
    3. Click Scan.

      Figure 9-1 Configuration Tab of the Laird Connection Manager


      This figure shows the Configuration tab of the Laird Connection Manager with the appropriate settings.
  3. Double-click a wireless network, and then click Yes to create a new profile.
  4. If the SSID does not have a name, enter a unique name for the profile, and then click OK.
  5. In Manage Profiles, the Profile tab is pre-populated with the settings of the selected wireless network by default.
  6. To view the default global settings, click the Global tab.

    These settings are dependent upon the site’s infrastructure. Contact your site administrator before adjusting.

  7. To save the profile and any changes made to the global settings:
    1. Click Commit.
    2. In the upper right corner of the dialog box, click OK.
  8. On the Configuration tab:
    1. Set the Active Profile to your newly created profile.
    2. Click Scan.
    3. Close the Scan dialog box.

      The device is now connected to the selected wireless network.

  9. To view the status and strength of the wireless connection, click the Status tab.
  10. To close the LCM, click OK in the upper right corner of the dialog box.