Configuring the Microsoft Windows 7 Wireless PCWS 2015 and the Mini-PCI Wireless Card

All network configuration and security settings are dependent upon the site’s infrastructure and configuration of the wireless network. If you encounter problems with the wireless network, see your site administrator.

Follow this procedure if you are using the 802.11i WPA2-Personal security method.

To connect the Microsoft Windows 7 Wireless PCWS 2015 to a wireless network using (WPA-PSK) Wi-Fi Protected Access with Pre-Shared Key:

  1. Click Start, click Control Panel, and then click Network and Internet.
  2. Click Network and Sharing Center.
  3. Click Set up a new connection or Network.
  4. Click Manually connect to a wireless network, and then click Next.

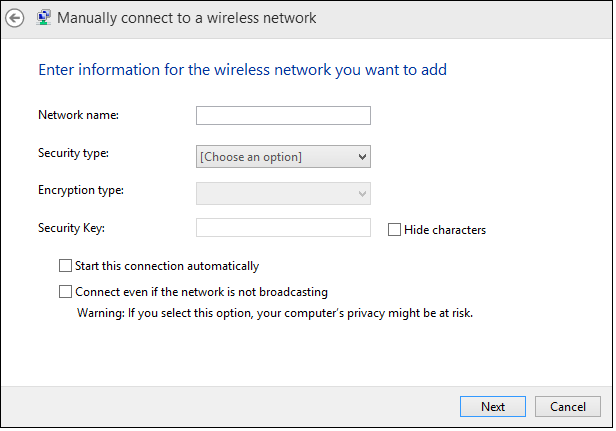
    Figure 13-4 Manually Connect to a Wireless Network for the Microsoft Windows 7 PCWS 2015


    This figure shows the dialog box that appears when manually connecting to a wireless network.

  5. In the Network Name field, enter the SSID for your Access Point. Note that this is case sensitive.
  6. In the Security Type drop-down list, select WPA2-Personal.
  7. In the Encryption Type drop-down list, select AES.
  8. In the Security Key field, select Hide Characters, and then enter the secure paraphrase that matches the one entered on your Access Point.
  9. Select Start this connection automatically.
  10. Select Connect even if the network is not broadcasting.

    Microsoft Windows recommends against connecting to Access Points that do not broadcast; however, the PCI White Paper v2.0 Section 4.2.1 states that while suppressing SSID is not required, broadcasting an SSID that advertises the organization’s name or is easily identifiable with the organization is not recommended. Default SSID values should always be changed.

  11. Click Next.

    If you are using DHCP, the PCWS 2015 automatically makes an association with the selected Access Point.

  12. If you are using a static IP address:
    1. In the Network and Sharing Center, click Wireless Network Connection (SSID), and then click Properties.
    2. Select Internet Protocol Version 4 (TCP/IPv4), and then click Properties.

      The Internet Protocol Properties dialog box opens.

    3. Select Use the following IP addresses, and then enter the proper IP, subnet, and gateway addresses.
  13. Click OK twice to close and save. You are now associated with your Access Point.
  14. Run the MICROS CAL normally.