10 Integrating Movie2Me with DIVArchive
Movie2Me integration is available for use as a special Source/Destination. This Source/Destination uses a separate installation process and requires additional licensing. The integration is compatible with DIVArchive releases 7.2.1 and later. It performs similar to a combination of an FTP client and FTP server.
This chapter describes the general configuration and workflow of Movie2Me. Operational details can be found in the Movie2Me documentation delivered with your system. This chapter includes the following information:
Minimum Requirements
The following are the minimum requirements for a complete Move2Me installation:
-
DIVArchive Manager
-
DIVArchive Actor
-
Local Storage
-
Remote Storage
-
Local Disk Cache
-
Two Movie2Me Cores
-
One Movie2Me Core local to the DIVArchive system
-
One Movie2Me Core remote from the DIVArchive system
-
-
Cloud between the two cores
Movie2Me Workflow
The following figure and process described are representative of a basic Movie2Me workflow.
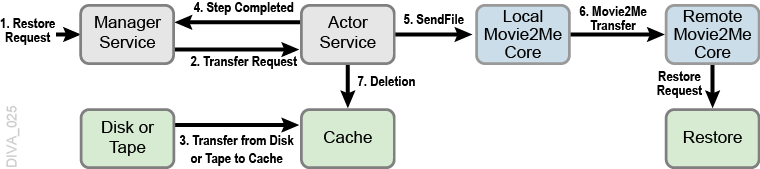
The step numbers in the following sequence refer to the numbering in the previous workflow diagram:
-
A Restore request is received by the Manager.
-
The Manager sends the transfer request to the selected Actor. The purpose of the transfer is to copy the content of the object to the Actor Cache (with or without AXF encapsulation).
-
The Actor performs the transfer from the disk or tape instance to its cache using a Source/Destination. The use of a Source/Destination permits more flexibility because you can specify some useful options including -axf, -rm and -rxml. The Actor reports the progress to the Manager as usual.
-
When the object is in the cache (transfer completed), the Manager receives a Step Completed message from the Actor indicating that the Actor will start the Movie2Me Transfer. This permits the Manager to release some resources (for example, the tape and the drive) used during the first transfer (to cache). The Manager resets the Request Progress to zero percent.
-
The Actor connects to a local Movie2Me Core and issues a
SendFilecommand for each file being restored. This could actually be two files with an AXF Restore (object.axfandObject.mdf). -
The local Movie2Me sends all files to the remote Movie2Me. While the transfer is running, the Actor monitors the progress and reports it to the Manager. When the transfer is one hundred percent complete the Actor sends a Request Complete message to the Manager.
-
The Manager sends a Server Delete request to the Actor, and the Actor deletes the temporary space in cache.
If you use Movie2Me during a Restore request to a system's DFM folder, and the request contains the -rm option, the .mdf file must be the last file transferred. Otherwise, an incomplete archive may result. If you use the -axf option instead, and the DFM folder is in Single File Mode, the order of the transfer does not matter.
The Movie2Me Core can be a restore folder, archive folder, DFM drop folder, and so on, depending on the request.
Configuring Movie2Me Integration
The first part of setting up the Movie2Me Integration requires that you configure a cache disk in DIVArchive, and then associate it with the Actor where the Movie2Me Local Core will be connecting.
An array and disk must be created. Only the name of the array and disk are relevant. Use the following procedure to setup the required array and disk:
-
Open the DIVArchive Configuration Utility.
-
Click the Drives tab, and then click the + button on the top of the Arrays frame to add an array.
-
Enter a name for the array (for example,
Move2MeArray) in the Array Name field, and (optionally) add a description in the Description field. -
Click OK to save the array.
-
Click the Disk tab, and then click the + button on the top of the Disks frame to add a disk. You can create multiple disks if there are multiple Movie2Me Cores in the system.
-
Enter a name for the disk in the Disk Name field, and select the array (for example,
Move2MeArray) from the Array menu list. -
Click OK to save the disk.
Next you must associate the disk with an Actor. Define the Actor that can see the new disk previously created in the Actor-Disk Connections Entry dialog box.
You must identify the Mount Point field as the root directory of the cache from the Actor's point of view.
For example, cifs://Administrator:diva@\\172.16.3.201\Movie2MeWorkspace.
The cache must be used for Movie2Me transfers only. Therefore, you must set the Used For field to WAN_TRANSFER_CACHE_ONLY.
The destination configuration defines how Actors will connect to the Local Movie2Me Core and the Peer ID of the Remote Movie2Me Core. The configuration requires the following Connect Options:
-login-
The log in user name of the Local Movie2Me Core HTTP server.
-pass-
The password associated with the user name of the Local Movie2Me Core HTTP server.
IP Address-
The IP address of the Local Movie2Me Core.
-port-
The listening port of the Local Movie2Me Core HTTP Server. In the following example the Actor uses the parameter to be able to connect to
http://172.16.3.201:8080/transferService. -peer-
The ID of the Remote Movie2Me Core. You can obtain the ID from the Local Movie2Me Core as follows:
-
Stop the m2m-core service.
-
Open the file
C:\ProgramData\M2M-Core\database\m2mdb.scriptfile with a plain text editor (Notepad or Notepad++). -
Search for entries similar to
INSERT INTO PEER VALUES(. -
The first value in braces is the Peer-ID.
-
The following limitations apply to this type of Source/Destination:
-
Archives are not supported from this type of Source/Destination.
-
N-Restore is not supported.
-
The Cache Type can be Remote or Local only (not FTP, Mediagrid, or Metasan).
-
Delete and Write QOS is not supported.
-
Do Not Overwrite QOS is not supported.
-
VFR is not supported.
-
This configuration is for a single Movie2Me Core for each DIVArchive Production System.
-
Single Actor-Disk Connection with WAN_TRANSFER option per Actor. One Actor cannot see more than one WAN_TRANSFER cache.
After Movie2Me is installed, it uses its own utility for configuration as described below. The configuration should be the same on both cores as indicated.
First you must configure the local Movie2Me Core as follows:
-
Open the Movie2Me Core Configuration.
-
Enter the following information into the appropriate fields:
- Peer Name
-
Enter the name of the local Movie2Me system.
- IP address
-
The IP address must be set to either
localhostor127.0.0.1. - Port
-
The local port number must be set to
9000. - Mode
-
Set the Encryption Mode to
AES256here and in the remote configuration. - Passphrase
-
Create a secure passphrase, enter it here. Remember this passphrase for the remote configuration.
The following database settings refer to the local Movie2Me Database and not the DIVArchive Database. Confirm that the settings are correct.
- Type
-
Use the menu list to select the correct type of database (typically
hsqldsb). - Path
-
Enter the path to the database.
- Databasename
-
Enter the name of the database.
- Username
-
Enter the user name to connect to the database.
- Password
-
Enter the password associated with the database connection user name.
- Workspace
-
The Workspace is one of the most important settings because it identifies the workspace in the cache.
The Workspace is the mount point identified in the DIVArchive configuration for the system cache. You create the mount point by setting up a disk in DIVArchive and associating that disk with the selected Actor. It must be set to use the WAN_Transfer_Cache_Only Usage Type. This is a new Usage Type.
-
Click Save to save the configuration.
Next you must configure the Movie2Me Peer (remote) as follows:
-
Open the Movie2Me Peer Configuration.
-
Enter (at least) the following information into the appropriate fields:
- General Section
-
Enter the appropriate information into each field in this section of the dialog box.
- Login Section
-
Enter the appropriate information into each field in this section of the dialog box.
- Port (Connection Section)
-
The port number must be the same as on the Local Movie2Me Configuration.
- Mode (Encryption Section)
-
Select the appropriate option for the encryption mode so it is the same as the Local Movie2Me configuration. In this case select the AES option.
- Passphrase (Encryption Section)
-
The encryption should be set the same as in the Local Movie2Me Configuration. Confirm that the Passphrase matches the entry in the local configuration.
-
Click Save to save the configuration.