2 Installing DIVArchive
This chapter describes DIVArchive software components and system installation, and includes the following information:
Software Component Relationships
The following figure displays the relationships and dependencies among the software components of a DIVArchive system. It specifically points out the client/server links between them.
A client/server link between two components does not necessarily mean that the server software must be started before the client. For example, the DIVArchive Manager to Actor connection. Each Actor acts as a server and the Manager initiates a client connection to the Actor. However, an Actor can be launched after the Manager is running since the Manager will attempt to reconnect to the Actor at periodic intervals.
See Appendix A for DIVArchive options and licensing information.
Note:
DIVArchive can run independently of the Control GUI and Configuration Utility. They can be launched at any time after the DIVArchive Manager is running.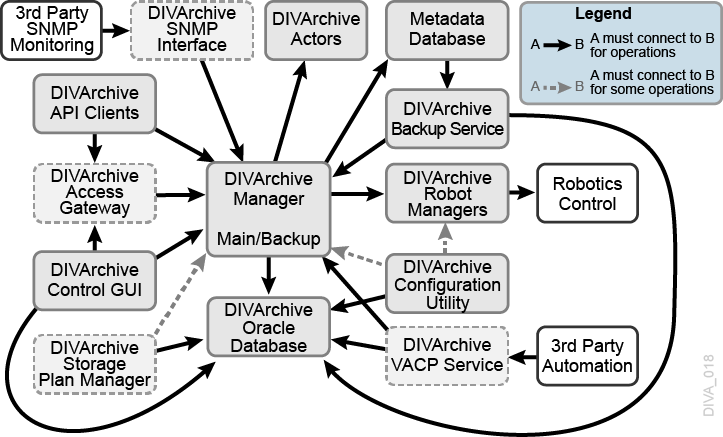
Software Component Distribution
The DIVArchive platform is flexible and scalable, so the installation of some software components can vary depending on the degree of storage and servers that are managed. Small installations can have all DIVArchive software components installed on a single computer. A very large installation will have these components distributed among several servers. All of these components run as system services.
The following list identifies where the components are typically installed:
- DIVArchive Managers
-
Main and Backup DIVArchive Manager servers
- DIVArchive Oracle Database
-
Main and Backup DIVArchive Manager servers
- DIVArchive Metadata Database
-
Main and Backup DIVArchive Manager servers
- DIVArchive Backup Service
-
Main and Backup DIVArchive Manager and Actor servers
- DIVArchive Robot Managers
-
Main and Backup DIVArchive Manager servers. Robot Managers can also be installed on a separate server when the tape library is installed a substantial distance from the DIVArchive Manager servers.
- DIVArchive Storage Plan Manager
-
Main and Backup DIVArchive Manager servers
- DIVArchive VACP Services
-
Main and Backup DIVArchive Manager servers
- DIVArchive SNMP Agent
-
Main and Backup DIVArchive Manager servers
- DIVArchive Access Gateway
-
Main and Backup DIVArchive Manager servers
- DIVArchive Actors
-
DIVArchive Actor servers
- DIVArchive Transfer Manager Communicator (TMC)
-
DIVArchive Actor servers
- DIVArchive Archive Manager Communicator (AMC)
-
DIVArchive Actor servers
- DIVArchive Drop Folder Monitor (DFM)
-
DIVArchive Actor servers
DIVArchive Backup Service
Caution:
Users should have an elevated awareness of error messages from the Backup Service. See the Oracle DIVArchive Database User's Guide in the Oracle DIVArchive 7.5 Core documentation library for more information.The DIVArchive Backup Service ensures reliability and monitoring of both the Oracle Database and Metadata Database backups.
The DIVArchive Backup Service component is installed as an integral part of the standard DIVArchive system installation. The component is typically installed on the same server as the DIVArchive Manager and Oracle Database. The DIVArchive Backup Service enables configuration of scheduled backups through its configuration file. The DIVArchive Backup Service manages and monitors the entire backup process.
When using complex objects, it is strictly required to use the Backup Service. The DIVArchive Backup Service is the only component backing up the Metadata Database and removing outdated Metadata files. When a delete request for a complex object is sent and processed, the data is removed from the Oracle Database, but the Metadata Database file is not deleted. The Metadata Database file is removed by the Backup Service after the configured clean up period (define by the Recovery Period parameter) has been reached.
Caution:
Do not change the Metadata Location parameter when the system is running.If a database or system failure occurs, where restoring from a system backup is necessary, restoration of a stored backup is accomplished manually through existing Oracle scripts and should be performed by Oracle Support personnel only.
The DIVArchive Backup Service uses existing Oracle RMAN backup scripts to generate full database backups and incremental database backups. Oracle Database backups and Metadata Database backups are incrementally replicated to all remote backup systems by the DIVArchive Backup Service.
The DIVArchive Backup Service periodically sends status messages to the DIVArchive Manager. The DIVArchive Manager saves all error messages received in the Manager Events Log, and also forwards messages to all connected Control GUI applications to be displayed in a dialog box. If no Control GUIs are connected at the time of the error, no error dialog boxes will be displayed, but errors can be reviewed later in the Events Log.
You can configure the service to monitor specific disks for space and send warnings and errors accordingly. By default, the monitored disks are C: and H: drives. You can change this configuration modifying the MONITORED_DRIVES=d1:,d2: parameter in the Backup Service configuration file.
MONITORED_DRIVES=d1:,d2:-
Identifies the drive letters to be monitored buy the DIVArchive Backup Service. The default is C: and H: and may be changed as required. The
d1andd2represent the drive letters to backup.
Set the value for the Backup Service monitor timeout in the Configuration Utility Manager Setting tab. The default setting is fifteen minutes.
See the Oracle DIVArchive Database User's Guide in the Oracle DIVArchive 7.5 Core documentation library for more information.
Installing the DIVArchive System
The following sections describe installation of the DIVArchive system. Contact Oracle Support if you need assistance.
Downloading the Software
You must stay current with the release of DIVArchive that you install and operate. Current releases of the software are found on the Oracle Software Delivery Cloud.
Use the following procedure to obtain the DIVArchive software:
-
Log in to the Oracle Software Delivery Cloud (
https://edelivery.oracle.com) and search for DIVArchive. -
Select the licenses you require (for example, DIVArchive Actor, DIVArchive Manager, and so on). You must search each time after adding a new license to the list.
-
Select the operating system you run for each selected license using the Select Platform button.
-
Continue through the download wizard, accepting the terms, until the final download screen appears.
-
Confirm that all the licenses you require are listed.
-
Click Download All on the bottom right of the screen, or click the file name link, to download the software.
-
Save the download where it is easily accessible.
Installing DIVArchive in a Windows Environment
Use the following procedure to install DIVArchive on a Windows computer:
-
Locate the executable file on your computer.
-
Double-click the file to begin the installation.
-
After installation begins, select the components to be installed and then click Next to proceed.
-
Enter the desired installation folder in the Destination Folder field. Oracle highly recommends using the default installation folder (
C:\DIVA). However, if another location is desired, click Browse to navigate the computer to locate the folder. -
Click Install to proceed.
-
Installation will continue in the specified destination folder using the selected components. The installation progress screen is displayed until installation is complete. Clicking Show Details will show the detailed progress (per file) of the installation.
-
The Close button will be highlighted when the wizard is finished.
-
Click Close to complete installation and close the program.
Installing DIVArchive in a Linux Environment
Installing DIVArchive in a Linux environment is a manual installation and is somewhat different than the Windows installation procedure. The following sections describe installation procedures for DIVArchive 7.5 on a Linux host computer.
Prerequisites and Initial Set-up
These instructions assume that Oracle Linux 7, x86_64 or later, is installed with sqlplus, and the Oracle client.
If you require a Linux environment in a language other than English, create a user and identify the desired language in the user profile. Oracle Linux 7 x86_64 and later has support for a variety of languages (other than English) and the language can be selected during Linux installation.
Windows installations must use the English language and Oracle only supports English-based Windows environments.
For more information on Oracle Linux 7 x86_64 and later see the documentation located at https://docs.oracle.com/en/operating-systems/?tab=2, or contact Oracle Support for assistance.
Note:
Linux paths, file names are case-sensitive.Use the following procedure to prepare for installation:
-
Use the following command to create a directory on the host computer:
mkdir /home/oracle/Downloads/DIVA_INSTALL
-
Copy the installation packages to the directory.
-
Confirm you have the latest DIVArchive and DIVArchive API (7.5 or later) releases and copy them into the directory you created in Step 1. The file transfer can take a bit of time due to the large file size.
If the shared memory on the server where the Oracle Database is installed is less than 16 GB, you must set it to at least 70 percent of your RAM.
-
Use the following command to confirm the computer's RAM size:
# free -m
The output will look similar to the following:
total used free shared buff/cache available Mem: 15791 186 15456 8 148 15516 Swap: 16380 0 16380 -
Use the following command to check your shared memory setting in MB:
# df -m /dev/shm
The output will look similar to the following:
Filesystem     1M-blocks  Used Available Use% Mounted on
tmpfs            7896       0    7896     0%   /dev/shm
-
To change the size of shared memory you must add the following line into
/etc/fstab. The setting must not exceed the size of your installed memory. You must restart the computer after making this change for it to take affect.For example, the following command will increase the size of
/dev/shmto 11GB:tmpfs /dev/shm tmpfs defaults,size=11g 0 0
Creating the Oracle Database Partitions
First you must configure the drive partitions for the Oracle Database as follows:
-
Navigate to Applications, and then Utilities.
-
Click Disks from the menu.
-
Locate your disk in the Disks dialog box. Selecting the disk will display the Device Name.
-
In Linux you must add the disk (that you want to add partitions to) to the partition table using the
fdiskutility. For example,fdisk /dev/xvdb1. You can use thegandwoptions to add it to the partitions table. -
Click the Plus button on the right side of the Disks dialog box to add a partition.
-
When the Create Partition dialog box appears create the following four partitions. For each partition leave the Erase option and Type option at their default settings, and then click Create. Repeat this step for each partition.
/u01-
This partition must be 10 GB in Linux. Use the operating system default block size.
/u02-
This partition must be 30 GB in Linux. Oracle recommends using an 8 KB cluster size.
/u03-
This partition must be 5 GB in Linux. Oracle recommends using a 4 KB cluster size.
/u04-
This partition must be either 100 GB or all of the remaining disk space. Oracle recommends using a 64 KB cluster size.
-
When you are done creating the partitions and returned to the Disks dialog box, click the Gears icon on the right side of the screen.
-
Click Edit Mount Options.
-
Change Automatic Mount Options to OFF.
-
Select the Mount at startup check box.Enter the appropriate mount point in the Mount Point field for that specific partition (
/u01,/u02,/u03,/u04). -
Click OK.
-
When this is completed successfully, all four partitions are identified and displaying their appropriate mount points in the Disks dialog box.
Use the following procedure for the Managed Disk partition (this must be 54 GB):
-
Locate the Managed Disk in the Disks dialog box.
-
Click the Gears icon on the right side of the screen.
-
Click Format.
-
Leave all settings at their defaults, but enter
/managedin the Mount Point field. -
Click Format.
-
When asked, click Format to confirm that you want to format the disk.
-
Click the Gears icon.
-
Click Edit Mount Options.
-
Change Automatic Mount Options to OFF.
-
Select the Mount at startup check box.
-
Enter
/managedin the Mount Point field. -
Confirm that the Filesystem Type is set to ext4.
-
Click OK.
Installing FTP Services
Use the following procedure to install FTP services on the host computer:
-
Open a terminal console.
-
At the prompt enter
yum install vsftpd.x86_64and press Enter. -
When prompted if it is ok to install, enter
yand press Enter. -
When installation is complete, start the service and confirm that it starts on system startup using the following commands:
service vsftpd start
chkconfig vsftpd on
-
Create a directory in the
/home/divapath for managed storage and then mount the/managedpartition in this location as follows:mkdir /home/diva/managed mount --bind /managed /home/diva/managed
Installing the Oracle DIVArchive Database
Confirm your RAM settings using the commands in Prerequisites and Initial Set-up. After you confirm the RAM settings, use the following procedure to install the Oracle DIVArchive database:
-
Open a terminal console.
-
If you run in a Virtual Machine (VM), confirm that your host name is in the
/etc/hostsfile using the following command:gedit /etc/hosts
If the hosts file looks similar to this:
127.0.0.1   localhost localhost.localdomain localhost4 localhost4.localdomain4
::1         localhost localhost.localdomain localhost6 localhost6.localdomain6
You must replace
localhostwith your host name. For example, if the host name isclefvm015L, it will look like this:127.0.0.1 celfvm015L localhost.localdomain localhost4 localhost4.localdomain4 ::1 celfvm015L localhost.localdomain localhost6 localhost6.localdomain6
-
If you made changes to the host file save the changes and exit
gedit. -
Change to the directory of the shell script for the Oracle Database Package.
-
Change the permissions on the shell script using the following command to make it an executable file:
chmod +x OracleDivaDB_3-0-0_12_1_0_2_0_SE2_OEL7_x86_64.sh
-
Execute the script as follows:
./OracleDivaDB_3-0-0_12_1_0_2_0_SE2_OEL7_x86_64.sh
If an Oracle operating system account has already been created, you may be asked whether you want to change the password. Follow the prompts if you require a password change for this account.
-
When prompted for a
SYSaccount password, ensure you use a secure password.
If at some point during the installation you receive the following error:
[FATAL] [INS-35172] Target database memory (5181MB) exceeds available shared memory (3866MB) on the system
You must run the commands below to extend your tmpfs partition (if it is still not large enough):
-
Check the current size of the
tmpfspartition:df -h /dev/shm
-
Extend the amount of the target database memory size as follows:
-
Execute
gedit /etc/fstab. -
Add the following line to the bottom of the file:
tmpfs /dev/shm tmpfs defaults,size=6G 0 0
-
Save the file and exit
gedit.
-
-
Execute the following commands:
umount tmpfs
mount -a
-
If the commands in Step 3 do not work, restart the computer and run the
df -h /dev/shmcommand again to check that the size oftmpfshas actually increased. -
Run the Oracle Database shell script again.
Installing DIVArchive 7.5
Use the following procedure to install DIVArchive 7.5 for Linux:
-
Open a terminal console.
-
Use the following command to change the permissions and make the installation script executable:
chmod +x DIVArchive-7.5.{build_number}.shThe
{build_number}in this command will be the last two digits of the file name. For example, inDIVArchive-7.5.0.17.sh, the0.17is the build number -
Use the following command to execute the installation script:
./DIVArchive-7.5.{build_number}.sh -
When the
Please specify diva user home directory [/home/diva]prompt is displayed, press Enter to accept the default directory. -
When the installation is complete you will be returned to the command prompt.
Creating the Database User
The database user must be created using the DIVA operating system user account. Use the following procedure to create the database user:
-
Open a terminal console.
-
Change to the
/home/diva/DIVA/Program/Database/Core/Installdirectory. -
Use the following command to change the permissions and make the installation script executable:
chmod +x create_diva_user.sh
-
Execute the script using the following command, and replacing the
{IPADDRESS}in the parameter with the IP address of your system:./create_diva_user.sh {db_sys_password} {diva_dbuser} {diva_dbuser_password} {IPADDRESS}:1521/lib5.world -
When the script completes the database user account will be active.
Installing the DIVArchive Services
You control the DIVArchive services using the divaservice script. The following are valid divaservice script parameters:
command-
Can be one of the following:
configure,install,start-all,stop-all,start,stop,restart,uninstall,status, orlist. You can display the usage information of this list by running./divaservicewith no additional parameters. See the following list for descriptions of each command. SERVICE-
Can be one of the following:
manager,actor,robotmanager,migrate,dfm,dbbackup,lynxlocaldelete,spm, orrsync. You can display the usage information of this list by running./divaservicewith no additional parameters. SERVICE_NAME-
The name of any currently installed DIVArchive service. You can view the services by running
./divaservice list. configuration file-
This must be the absolute path to a valid configuration file.
The following are valid divaservice commands:
configure-
This command expects a valid SERVICE_NAME and configures the specified (already installed) DIVArchive service.
install-
This command expects a valid SERVICE_NAME and configuration file path. It installs the specified DIVArchive service using the specified configuration file.
start-all-
This command starts all currently installed DIVArchive services.
stop-all-
This command stops all currently installed DIVArchive services.
restart-all-
This command restarts all currently installed DIVArchive services.
start-
This command expects a valid SERVICE_NAME and starts the specified DIVArchive service.
stop-
This command expects a valid SERVICE_NAME and stops the specified DIVArchive service.
restart-
This command expects a valid SERVICE_NAME and restarts the specified DIVArchive service.
uninstall-
This command expects a valid SERVICE_NAME and uninstalls the specified DIVArchive service.
status-
This command expects a valid SERVICE_NAME and returns the status of the specified DIVArchive service.
list-
This command lists the names of all currently installed DIVArchive services.
profile-
This checks the DIVArchive services profile.
Use the following procedure to install and configure the DIVArchive services:
-
Open a terminal console.
-
Change to the
/home/diva/DIVA/Programdirectory. -
Execute the
divaservicescript using the following options for each of these conditions:-
Available service names to use with the script are
manager,actor,robotmanager,migrate,dfm,dbbackup,lynxlocaldelete,spm, andrsync. -
The script is located in the
/home/diva/DIVA/Program/directory. Use the path in the command if you are not already in this directory.The first time you install a service you must use the
configureoption to include the configuration settings. It will generate a configuration file, install, and then start the service.divaservice configure {SERVICE_NAME} -
If you already have a fully configured (configuration) file, use the install option and include the absolute path to the configuration file for that service:
divaservice install {SERVICE_NAME} {configuration_file_absolute_path} -
To start, stop, or restart all of the service at the same time use one of these options:
divaservice {start-all|stop-all|restart-all} -
To start, stop, restart, uninstall, or get the current status of a specific service use one of these options:
divaservice {start|stop|restart|uninstall|status} {SERVICE_NAME} -
Use the following command to display a list of services:
divaservice list
-
Use the following command to display the service profile:
divaservice profile
-
If you are upgrading, or want to install the services with preconfigured configuration files, you can use the
&&command to do it consecutively (linking them together):divaservice install manager '/home/diva/DIVA/Program/conf/manager/manager.conf' && divaservice install actor '/home/diva/DIVA/Program/conf/actor/actor.conf' && divaservice install robotmanager '/home/diva/DIVA/Program/conf/robot_manager/robotmanager.conf'
-
Use the following command to start the DIVArchive services when Linux starts:
chkconfig {SERVICE_NAME} onFor example,
chkconfig DIVAmanager_manager80on will cause the Manager service to start with Linux.
-
For example, to install the Actor service use the following command. You can accept the default settings by pressing Enter.
divaservice configure actor
The displayed output will resemble the following:
Configuration File [actor.conf]:

# DIVA Actor connection port number
DIVAACTOR_PORT [9900]:

# DIVA Actor service name
# This is required when multiple actors are running on the same server by giving different names for each actor.
# If this variable is set, the service name will be "DIVAactor_<SERVICE_NAME>" and the name of actor will be "<SERVICE_NAME>".
# Default: If this variable is unset, the service name will be "DIVAactor_<host_name>"
SERVICE_NAME [celfpdovm015L]: actor80

Adding tape group to diva user.  Setting will take affect after logout and login
Adding DIVAactor_actor80 tcp port 9900 to firewalld default zone
Enabled DIVAactor_actor80 as a service...
Started DIVAactor_actor80 as a service...
Creating Control GUI and Configuration Utility Shortcuts
You can add Control GUI and Configuration Utility shortcuts to your desktop (for easy access) using the following procedure:
-
Open a terminal console.
-
Open the
geditprogram with root user permissions. If you are not logged in as the root user, use the following command:sudo gedit
-
To create the Control GUI shortcut, enter the following text and save the file as
/usr/share/applications/diva-control-gui.desktop:[Desktop Entry] Version=7.5 Name=Control GUI Comment=Oracle DIVArchive CSM Exec=sh -c "cd /home/diva/DIVA/Program/GUI/bin/ && ./gui.sh" Icon=/home/diva/DIVA/Program/GUI/bin/gui.ico Terminal=false Type=Application Categories=Application;DIVA;Oracle;
-
To create the Configuration Utility shortcut, enter the following text and save the file as
/usr/share/applications/diva-config-util.desktop:[Desktop Entry] Version=7.5 Name=Config Utility Comment=Oracle DIVArchive Configuration Utility Exec=sh -c "cd /home/diva/DIVA/Program/ConfigUtility/bin/ && ./configUtility.sh" Icon=/home/diva/DIVA/Program/ConfigUtility/bin/configUtility.ico Terminal=false Type=Application Categories=Application;DIVA;Oracle;
-
Use the following command to copy the shortcuts to the desktop after you have created both files:
cp /usr/share/applications/{diva-control-gui.desktop,diva-config-util.desktop} /home/diva/Desktop
When you click each shortcut for the first time you may be asked if you trust the file. You must confirm them as being trusted files and they will be marked trusted.
Starting, Stopping, and Accessing DIVArchive in Linux
The following aliases become available after DIVArchive installation and are defined in /home/diva/DIVA/Program/.divaenv.:
alias DIVAgui="CurrDIR=`pwd`; cd /home/diva/DIVA/Program/GUI/bin; ./gui.sh; cd ${CurrDIR}"

alias DIVAconf="CurrDIR=`pwd`; cd /home/diva/DIVA/Program/ConfigUtility/bin; ./configUtility.sh; cd ${CurrDIR}"
Note:
All Linux paths, file names and command are case-sensitive.Use the following procedure to start DIVArchive when running in a Linux environment:
-
Open a terminal console.
-
Change to the proper directory as follows:
cd /home/diva/DIVA/std_linux
-
Start all DIVArchive services as follows:
./divaservice start-all
-
Open the Configuration Utility as follows (or use the Desktop shortcut):
DIVAconf
Use the following connection parameters:
- User Name
-
Enter the database user name that was created.
- Password
-
Enter the database user's associated password.
- SID
-
Enter
lib5 - Service Name
-
Leave this field blank.
- IP Address
-
Enter the IP address of the database host computer.
- Oracle Port
-
Enter
1521
-
Open the Control GUI as follows (or use the Desktop shortcut):
DIVAgui
When shutting DIVArchive down, close the Control GUI and Configuration Utility. When they have closed, use the following command to stop all DIVArchive services:
./divaservice stop-all
You can use the following command to restart the services (if necessary) for any reason when they are already running:
./divaservice restart-all