| Oracle® Retail Integration Bus Oracle Retail Integration Bus Installation Guide Release 14.0 E48350-03 |
|

 Previous |
 Next |
| Oracle® Retail Integration Bus Oracle Retail Integration Bus Installation Guide Release 14.0 E48350-03 |
|
Previous |
Next |
This chapter describes the steps that must be completed after installation.
After the RIB installation process is finished, run the following commands from inside rib-home directory.
chmod -R go-rwx
This command revokes read, write, and execute permissions from the group and other users. Only the current user will have read, write, and execute permissions.
find . -name "*.sh" -exec chmod u+rwx {} \;
This command grants to the current user read, write, and execute permission for all executable scripts.
The .profile for the OS user for rib-home should include umask 077 set.
Go to the $DOMAIN_HOME/servers/$SERVER_NAME folder, which is the managed server home where RIB application is installed, and run this command:
chmod -R go-rwx .
This command revokes read, write, and execute permissions from the group and other users. Only the current user will have read, write, and execute permissions.
Verify that correct URL's to the RIB Functional Artifacts are configured in the Java EE Applications.
Functional Artifact URL
JNDI URL
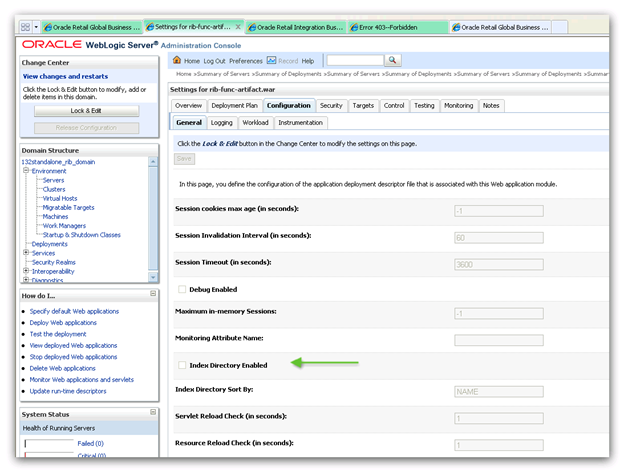
If an Error 403-Forbidden screen is received upon launching the rib-func-artifact URL, complete the following steps to enable indexing & correct the error.
Go to the configuration tab of the rib-func-artifact.war deployment in the WLS console. In the Change Center, click Lock & Edit. Check the Index Directory Enabled box, as shown in the following illustration.
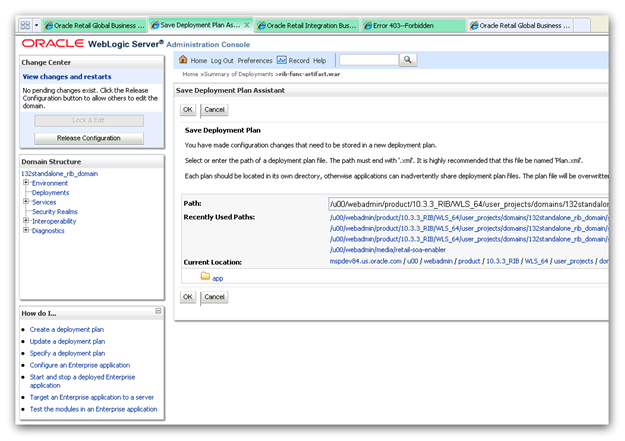
Click Save. Click OK to save deployment plan.
In the Change Center, click Activate Changes and relaunch the rib-func URL.
The RIB Diagnostic and Monitoring Tool (RDMT) kit is a collection of command line tools, written in Unix shell script along with supporting Java classes packaged in jar files. There are various tools to address these areas:
Installation Verification (reports)
Operations (scanning and monitoring)
Production (scanning and quick triage)
Test and Support (scanning and fine grain control)
AQ JMS support and tools
Complete the following steps.
The RDMT Java support classes require Java 7.0. Installation will perform a check and fail if the path is not correct. Before you begin the installation process, verify that your Java version is correct.
Determine the location for installation. The recommended location is to put it in rib-home/tools-home directory. There is an empty rdmt subdirectory already there. This is only a placeholder. However, RDMT can be installed under any user in any directory.
Download the tar file (Rdmt14.0.0ForAll14.x.xApps_eng_ga.tar) and extract it (tar xvf Rdmt14.0.0ForAll14.x.xApps_eng_ga.tar).
cd to the RDMT directory and execute the configbuilder.sh script supplied with the toolkit (configbuilder.sh).
Once executed, it checks if the RDMT has been extracted under rib-home/tools-home directory. If so, it fetches all the necessary configuration information from rib-deployment-env-info.xml present under rib-home/deployment-home/conf directory and it automatically completes the RDMT installation.
If RDMT was extracted under some other directory with rib-home present on the same server, it prompts for the rib-home path. Provide the same and it fetches all the necessary configuration information from rib-deployment-env-info.xml present under specified rib-home/deployment-home/conf directory and it automatically completes the RDMT installation.
If rdmt was extracted in a remote server, it prompts for RIB configuration values during setup. The installation script prompts for the configuration settings needed to run the tools in the toolkit.
The installation automatically configures for all the rib-<apps> depending upon the applications in scope as defined in rib-deployment-env-info.xml. In case of remote installation, select Yes to configure additional rib<-apps>. It is recommended that you configure all the rib-apps that have been installed in the RIB Installation.
Run the RibConfigReport. This report runs a series of tests to validate the RIB components installed.
The following are the necessary directory parameters.
| Parameters | Setting |
|---|---|
| RDMT Home Directory | Rib1400ForAll14xxApps/rib-home/tools-home/rdmt/ |
| RDMTLOGS Directory | Rib1400ForAll14xxApps/rib-home/tools-home/rdmt /RDMTLOGS |
| Temp Files Directory | Rib1400ForAll14xxApps/rib-home/tools-home/rdmt /RDMTLOGS/tmp |
| RIB App Builder rib-home Directory | /Rib1400ForAll14xxApps/rib-home |
The following are parameters for the JMS provider.
| Parameter | Setting |
|---|---|
| AQ JMS User ID | <rib aq user> |
| AQ JMS Password | <rib aq password> |
| JMS Connection URL | jdbc:oracle:thin:@host-name:port:sid |
The following are WLS parameters for JMX functions:
| Parameter | Setting |
|---|---|
| WLS/JMX Host | ribhost |
| WLS Admin Port | 8001 |
| WLS Protocol | http or https |
| WLS Instance Name | rib-rms-server |
| WLS Instance Port | 8002 |
| WLS Protocol | http or https |
| WLS App Name | rib-rms |
| WLS User Name | <weblogic user> |
| WLS Password | <weblogic password> |
The following are parameters for each hospital (RMS, RWMS, SIM, and others).
| Parameter | Setting |
|---|---|
| User Name | <rms user> |
| Password | <rms password> |
| Database URL | jdbc:oracle:thin:@host-name:port:sid |
|
 Copyright © 2013, Oracle and/or its affiliates. All rights reserved. Legal Notices |
|