| Oracle® Retail Service Backbone Security Guide 14.0 E49442-01 |
|

 Previous |
 Next |
This chapter provides an overview of the installation framework for the RSB.
RSB provides the framework and toolset for centralized software product lifecycle management of RSB components. All configuration and management tasks are done from a single centralized location defined as rsb-home using specific tools that support all phases of the RSB product lifecycle. The framework and the toolset are collectively referred to as RSB Kernel or RSB Builder tool.
For information on RSB Kernel and installation details, see the Oracle Retail Service Backbone Installation Guide and the Oracle Retail Service Backbone Implementation Guide.
RSB security principles are based on the following assumptions:
Participating Retail Applications or external applications are hosted on a WebLogic server.
The Web services are secured using WebLogic policies (as opposed to OWSM policies).
If the application services are secured with any policy other than what is mentioned in this document or custom policies, the instructions in the document do not work.
The security setup in the document does not address authorization. Authorization must be taken care by the individual application hosting the services.
<DomainHome> is the home directory of the WebLogic domain where the application services are deployed.
Security configurations for Web services are generally performed after the services are deployed. The application services need to be secured before security configurations can be applied in the integration layer (RSB). There are no programmatic changes needed for securing the application services.
Administrative access to the application server is required for completing the security configuration of the application services.
Security configurations must be executed with accuracy. A small mistake in the security configuration setup can make the whole system nonfunctional. Troubleshooting of security related issues are generally harder than troubleshooting of application issues. Considering this, Oracle recommends that you verify the configuration after every step. Oracle provides ”sample” scripts and detailed instructions to minimize the chances of error.
Application teams may need to modify the sample scripts to suit their needs and/or incorporate similar concepts in their install scripts/process.
Security configuration comprises broadly of three phases, each must be performed sequentially as described. The following sections describe each phase and the detailed steps that you need to take for a successful configuration. Most of the steps have been automated and can be achieved by running the scripts provided. However, there are some required manual steps.
Perform the following steps regardless of the policy (A or B) you are using to secure the services. Once these are done, perform the policy specific tasks described in the following sections.
Download and extract the RTG provided RsbAppServiceSecuritySetupSamplesPak14.0.0ForAll14.0.0Apps.zip. The zip file contains the sample scripts to help you configure the application server for Web service security. The structure of the extracted zip file should be as shown in the figure below:
security-setup-home/ service-provider/ config/ security-setup/ app-lib lib service-consumer/
Copy the contents of security-setup-home/service-provider directory to <DomainHome>/config directory of the WebLogic application server where your RSE generated Web service is deployed.
scp security-setup-home/service-provider/* <user>@<your host>:/<your path>/<DomainHome>/config/
Run setDomainEnv.sh in the current shell. (In order to run a script in the current shell, enter a dot and space before the script. This is required to make the variables set in the script be available to the current shell.)
. <DomainHome>/bin/setDomainEnv.sh
This section describes the steps you need to take to secure the edge application services with Policy A.
To enable the HTTPS port, take the following steps:
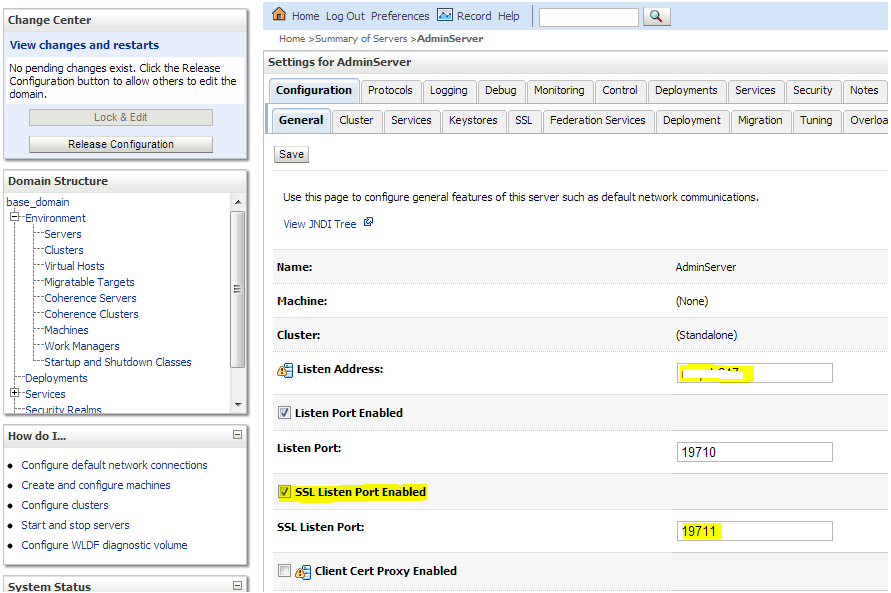
In WebLogic Admin Console, click Environment --> Servers.
Click the server where the Web service is deployed.
Click the Configuration -- > General tab.
Check the SSL Listen Port Enabled check box. Do not uncheck the Listen Port Enabled check box. The OSB needs both the HTTP and SSL listen ports enabled.
Enter a port number for the SSL Listen Port. This is the port number for the service endpoint.
Enter the hostname in Listen Address field.
Click Save.
If your credentials are stored in an external repository (e.g., LDAP), follow the WebLogic documentation to make these credentials available to the WebLogic Web service infrastructure so that it can authenticate you during Web service invocation. If you are testing with users in the built-in user registry of WebLogic, you may follow the instructions below.
You can add a user using the provided script or through the WebLogic Admin Console.
If you are using the script, run the following command from the security-setup-home created during pre-installation steps:
cd security-setup-home/service-provider
app-service-security-config.sh -add-user
The script prompts for the following:
username
password
WebLogic admin URL
WebLogic Admin username
WebLogic Admin password
The username and password from the service consumer is authenticated against the username and password entered in this step. For manual steps to create users in the WebLogic server, refer to the WebLogic 10.3.6 documentation.
This section describes steps to configure and use security policies.
|
Note: To secure an EJB app, it must be deployed with custom role and policies. During application deployment, after selecting the target server, select the "Custom Roles and Policies" option under Security settings. Security policies (Policy A and Policy B) can be attached to edge app Web services using either the provided script or by attaching the policies manually. |
Take the following steps:
Copy the ear files of the Web service provider EJBs to the service-provider/config/security-setup/app-lib folder.
Run app-service-security-policy-condition-config.sh –u <WebLogic Admin Server URL> –a -e <Enterprise Application Name> –t user –n <user>.
Change directory using cd security-setup-home/service-provider.
Run app-service-security-policy-config.sh –u <WebLogic Admin Server URL> –a -e <Enterprise Application Name> –p PolicyA.
The usage of the script is displayed when the script is run with the –usage parameter. The script extracts the ear file and uses all the jars from the ear file in classpath. It attaches the Web service policies corresponding to Policy A to the services defined in the ear file.
For each of the services to be secured, perform the following steps in WebLogic Admin Console. Make sure you attach the user created in the Configuring and Using Authentication section to the EJB.
Click Deployments. Click on the EJB (not the Service) you want to secure and then click Security --> Policies. 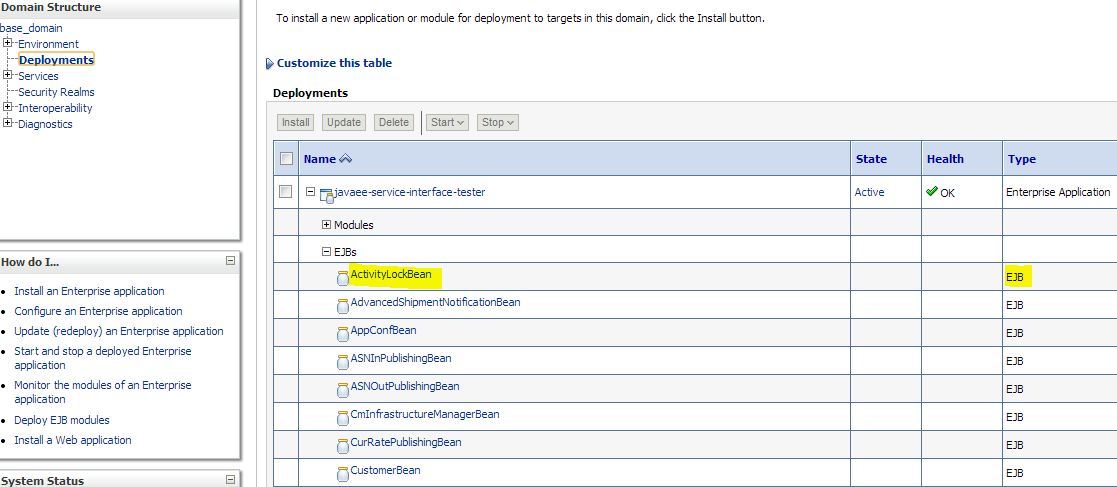
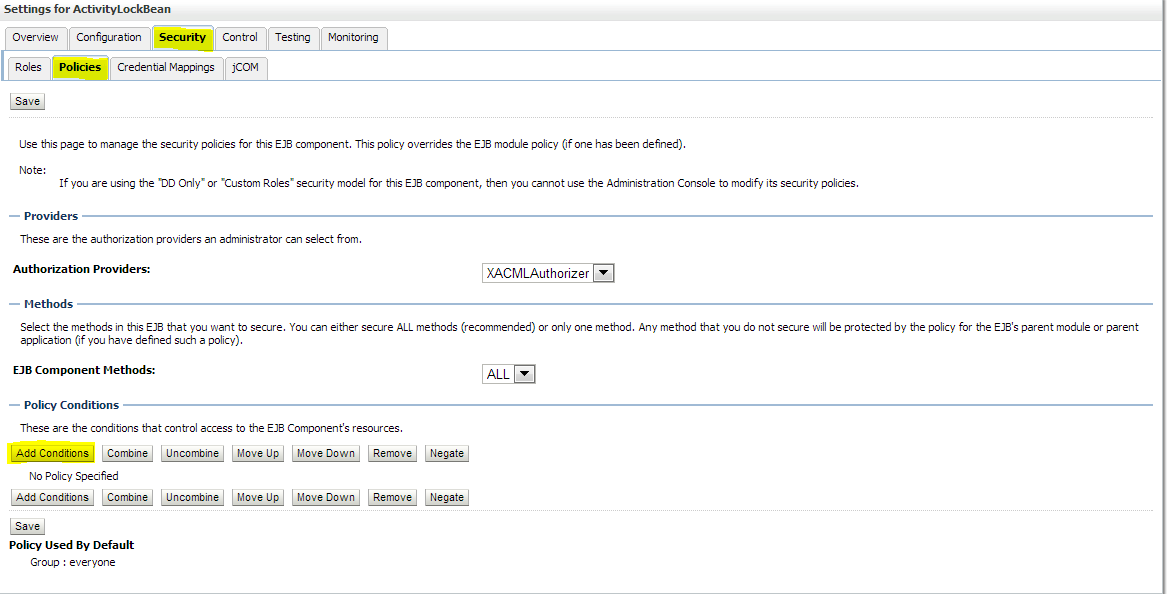
Click Add Conditions --> Predicate List. Pick User from the dropdown list and then click Next --> User Argument Name. Type the username you created and then click Add --> Finish --> Save. 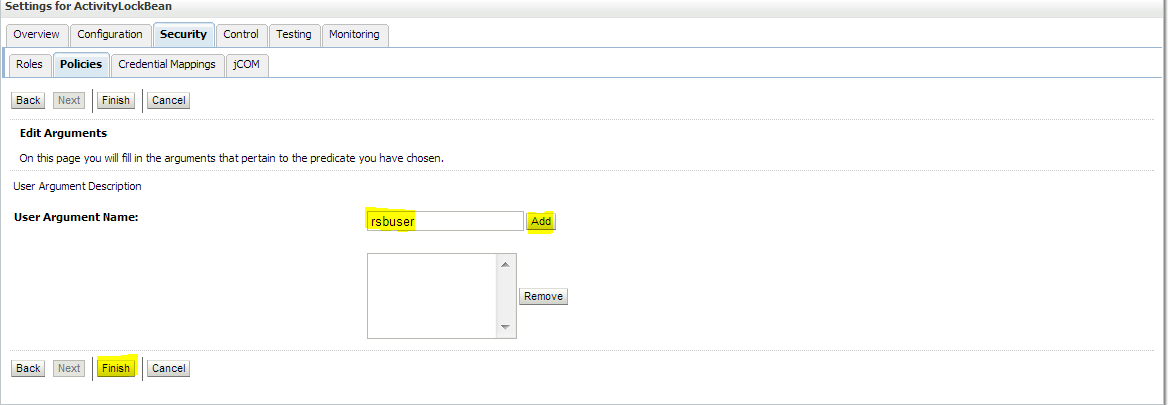
Attach policy to the service and navigate to Configuration tab --> WS-Policy --> click on the service port. 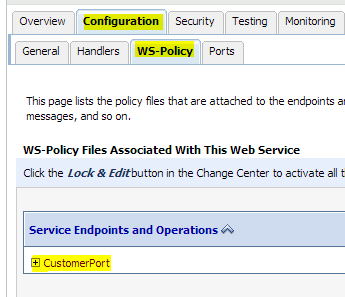
Pick WebLogic --> Next --> Service Endpoint Policies. Select policy: Wssp1.2-2007-Https-UsernameToken-Plain.xml and then click Finish. 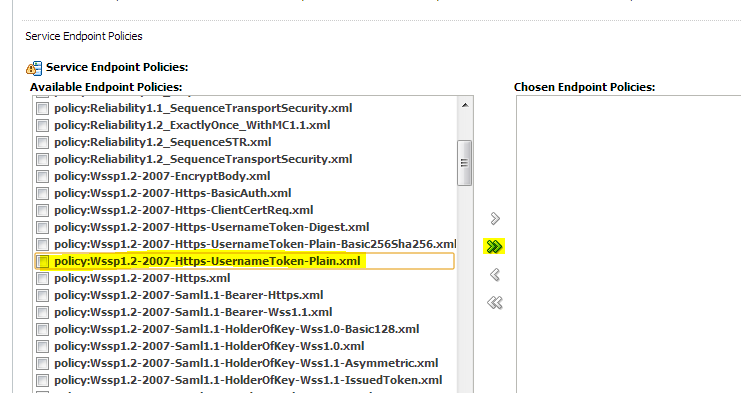
Click OK if WebLogic asks to save Plan.xml.
Restart the WebLogic server.
Verify the configuration by checking the WSDL of the service. The WSDL must have the policy information in it.
Decorator services can be secured using rsb-home if their edge application service is secured using one of the supported security configurations. If the edge-app security configuration is not one of the supported security configuration, then you need to follow the fusion middleware documentation for security and secure the proxy and business services manually from the OSB console.
As described earlier in the Installing Infrastructure Components section, the complete RSB lifecycle management including security configuration and maintenance must be performed using the tool set packaged as rsb-home.
There are no changes to the decorator deployment process. Initially the decorators are deployed as unsecured services. After deploying decorator services, it is recommended that you test the services to make sure that they are able to invoke the edge application services and the flows are working as expected. The https configurations in the rsb-deployment-env-info.properties must be correctly configured with the https settings. For more information, see the Oracle Retail Service Backbone Installation Guide.
Once the services are verified, secure the edge application services as described in the Securing Edge Application Services with Policy A section.
After securing the edge application services, secure the business and proxy services. rsb-home consists of scripts to configure security for the decorator services. When these scripts are executed, the following events take place in the background:
The edge application service WSDL downloads from the URL which is available in rsb-deployment-env-info.properties file.
The WSDLs contain information about the policy files that are used to secure the Web service.
Based on the policy, the script determines which OWSM client policy is suitable for business service and which OWSM service policy is suitable for a proxy service. This can be achieved only for the security configurations that are supported by RSB. If the policy file of edge application service does not match with the supported configurations, then the script throws an error that the decorator services cannot be secured using the script and they should be secured manually following the fusion middleware security documentation.
If the security configuration is one of the supported configurations, then the proxy and business service files in the decorator jar are updated with the changes that are required for that security configuration.
The structure of the directory is shown below. The scripts responsible for security configuration are shown in bold/bold-italics and the folders that stage the security related files are shown in italics.
rsb-home
|
|---- deployment-home
|        |---- bin
|        |     |---- configure-rsb-app-server-for-security-policy-b.sh
|        |     ---- rsb-deployer.sh
|        |---- conf
|        |     |---- ddl
|        |     |   `---- RSB_INFRASTRUCTURE_SCHEMA_DEFINITION.SQL
|        |     |---- rsb-decorator-instrumentation.properties
|        |     |---- rsb-decorator-service-to-family-name-association.properties
|        |     |---- rsb-deployment-env-info.properties
|        |     `---- rsb-integration-flows.xml
|        `---- log
|---- download-home
|        |---- admin-app
|        |---- all-app-service-decorator
|        |---- all-business-process-service-decorator
|        |---- all-functional-business-process
|        |---- all-functional-service-int-flow
|        |---- bin
|        |     `---- check-version-and-unpack.sh
|        |---- integration-guide
|        `---- log
|---- integration-lib
`---- service-assembly-home
        |---- admin-app
        |---- app-service-decorator
          |---- bin
        |     |---- download-app-service-wsdl.sh
        |     |---- generate-rsb-decorator-security-config.sh
        |     |---- rsb-compiler.sh
        |     `---- setup-message-protection-security-credentials.sh
        |---- business-process-orchestration
        |---- business-process-service-decorator
        |---- conf
        |     |---- logging.properties
        |     `---- rsb-builder-internal-trust-store.jks
        |---- integration-guide
        |---- log
        |---- service-integration-flow
        `---- service-policy-config
                |---- input
                |        |---- app-service-provider-wsdl
                |        `---- security-policy
                `---- output
                        |---- app-service-provider-security-policy
                        |---- decorator-service-biz-security-policy
                        |---- decorator-service-consumer-client-security-policy
                        |---- decorator-service-proxy-security-policy
                        |        `---- service-name-to-policy-id-map.properties
                        `---- decorator-service-proxy-wsdl
For more information on securing the decorator services, see the Oracle Retail Service Backbone Installation Guide.
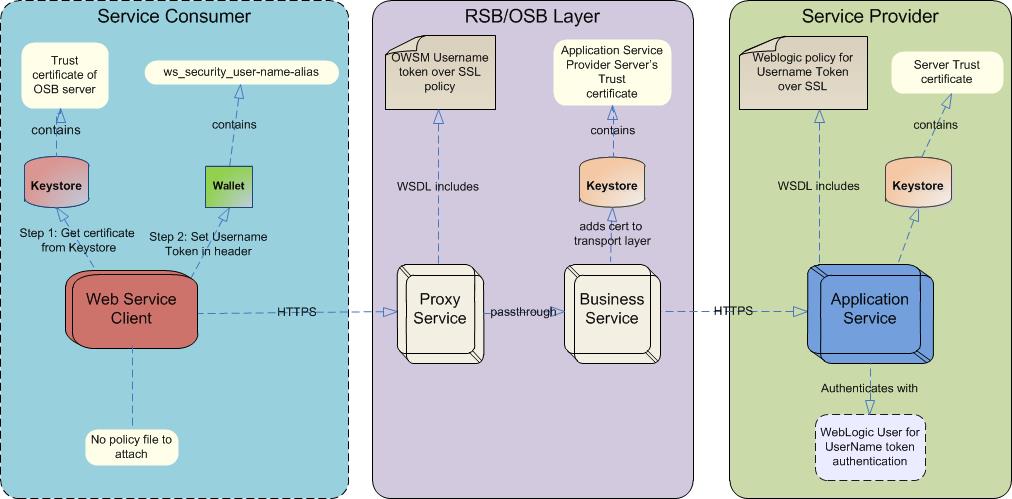
For invoking services over SSL, consumer applications must be able to validate service provider server certificate. For more information on installing certificates on a WebLogic server, see the WebLogic documentation.
After the certificates are installed, the consumer applications should have access to a wallet file. This wallet file contains the username and password required for user authentication by the Web services.
Refer to Appendix A for a sample Java code for invoking a service over SSL. In the sample code, the username and password have been hard-coded for simplicity. But in real applications, it is recommended that you use a wallet file.
|
Note: For access to the wallet file, you may use the CSM package that Oracle provides. |
If the service consumer is a PLSQL based application as opposed to a Java application, the security is configured from inside the database. The PLSQL consumer invokes the service. The Retail SOA Enabler (RSE) tool accesses the database and generates PLSQL consumer sample code. It describes step-by-step process to invoke a secured service from a PLSQL client in PLSQLServiceConsumer_ReadMe packaged inside the RSE generated consumer artifacts. For more information, see the Oracle Retail Integration Bus Service-Oriented Architecture Enabler Tool Guide.
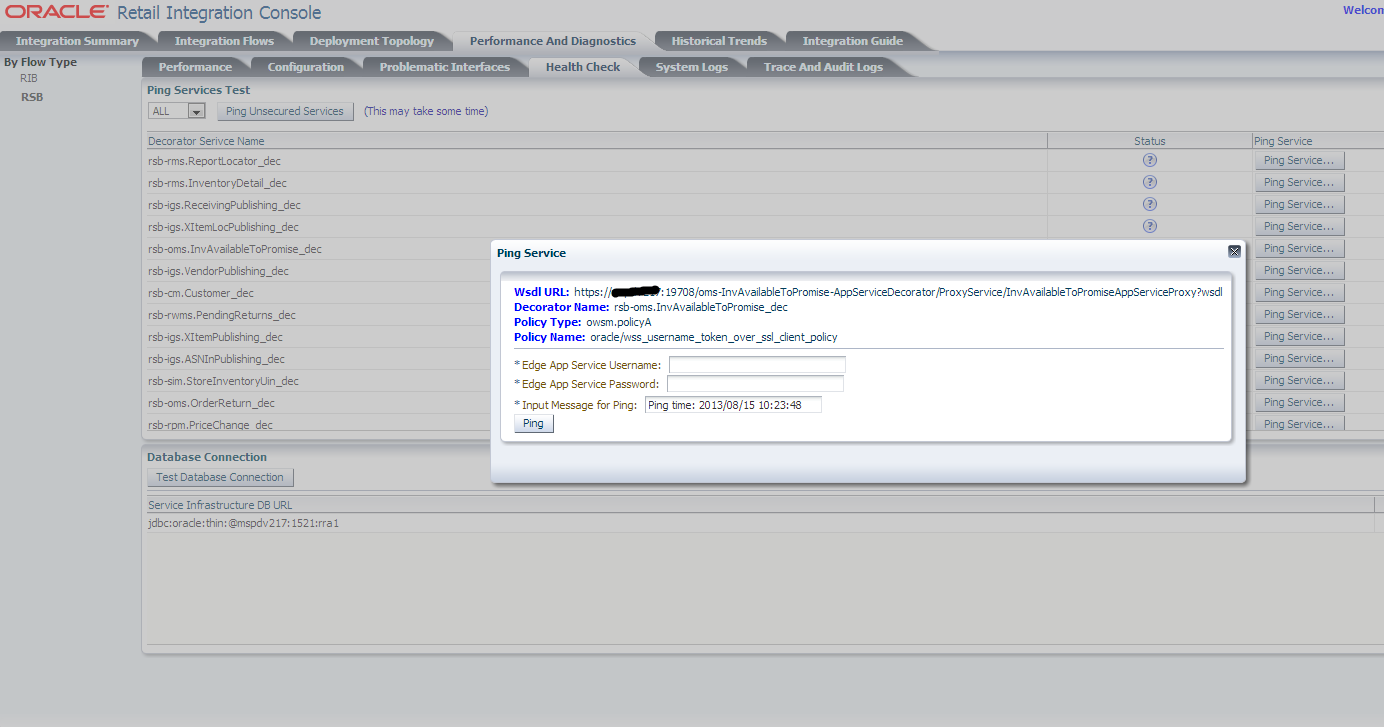
After the successful configuration of security, verify it before running the real functional tests. Verification can be done by invoking a ping operation of a RSB decorator service securely in the following ways:
Using the Retail Integration Console (RIC)
Using a SOAP User Interface
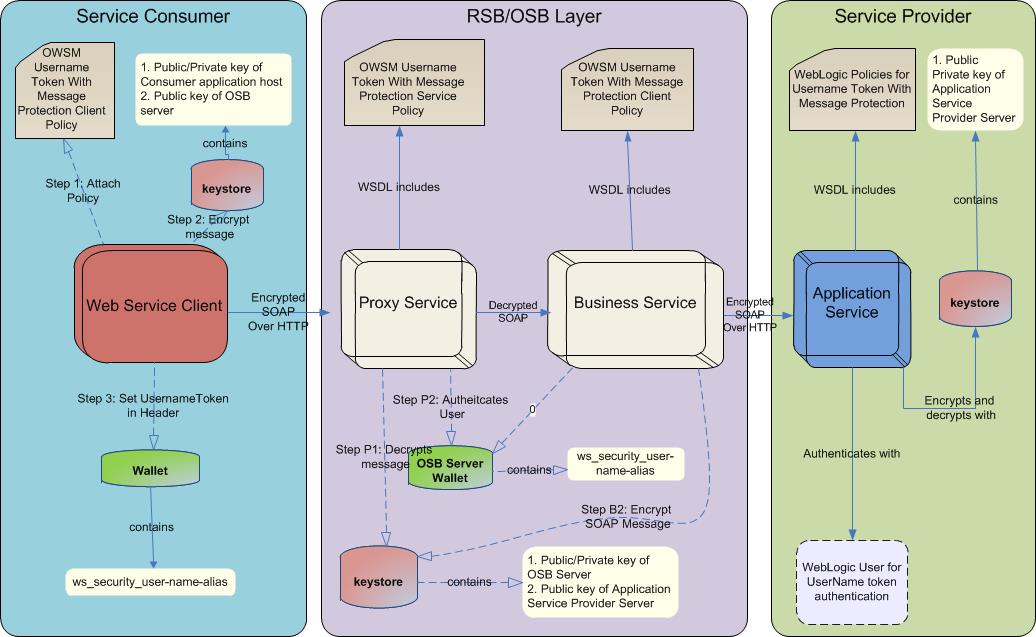
This section describes the steps that you can take to secure an edge application service using Policy B.
Generate public and private keys and key store for message encryption and digital signing. Scripts must be copied from the RsbAppServiceSecuritySetupSamplesPak14.0.0ForAll14.0.0Apps_eng_ga.zip/security-setup-home/service-provider to the <domain-home>/config folder. Run the script located in security-setup-home/service-provider to generate necessary certificates, keys, and key store.
app-service-security-config.sh -generate-cert
Enter the key store password and private key password. Note down these passwords for use in the next step.
|
Note: You should obtain certificates from CA in production environments. Generated certificates should be used only for development and demo purposes. |
Configure the WebLogic server to use the certificate, keys, and key store to protect messages. Make sure your WebLogic server is up before running the following commands.
app-service-security-config.sh -config-wls-cert-keystore
Enter the WebLogic admin URL, username, password, key store password and private key password. The key store password and private key password must be same as the passwords given in the previous step.
If needed, restart the WebLogic server after the configuration updates.
Verify if the WebLogic configuration is correctly set for protecting messages. In the WebLogic Admin console, click the domain name in Domain Structure. Then click Web Service Security --> default_wss --> default_x509_cp. The configuration screen is displayed. 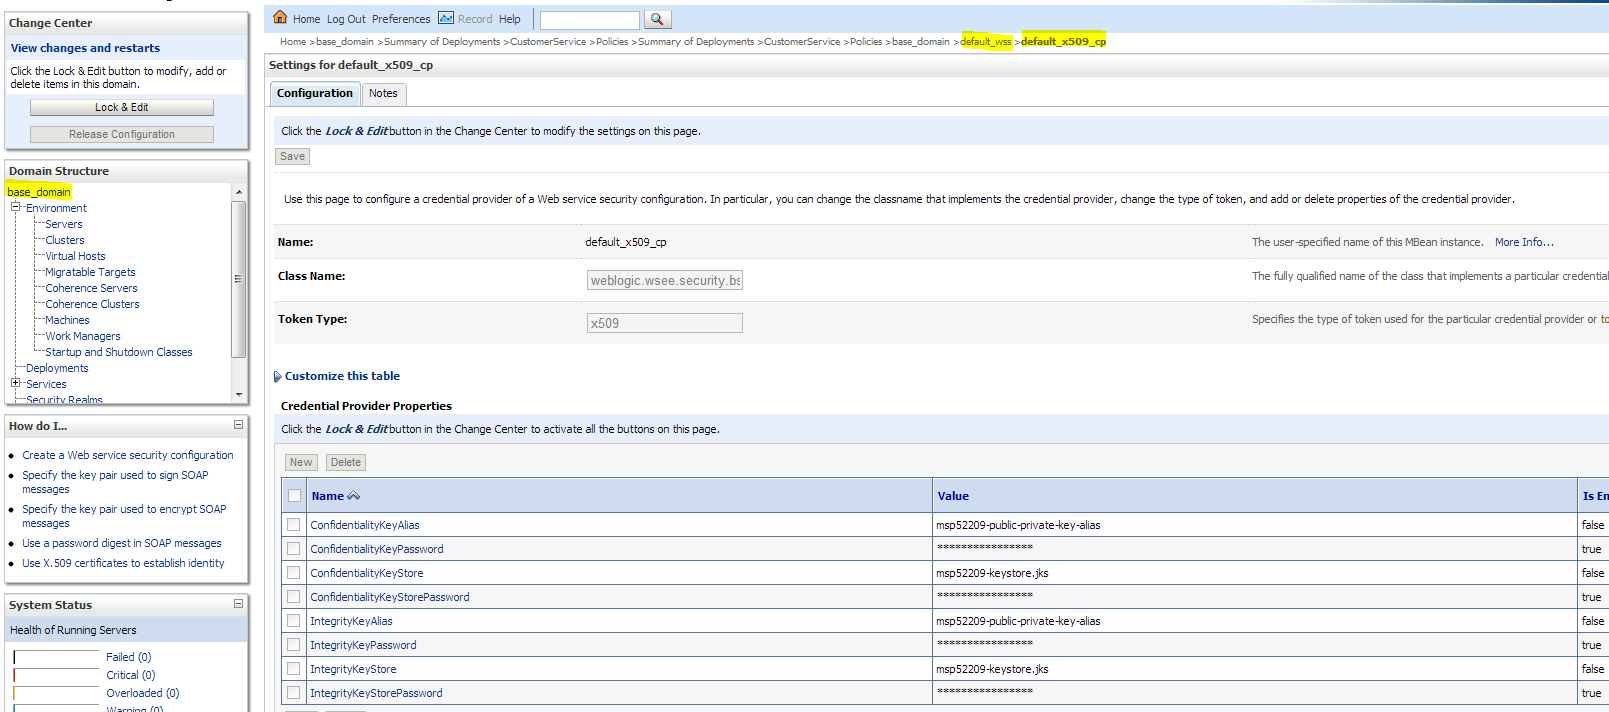
If your credentials are stored in an external repository (e.g., LDAP), follow the WebLogic documentation to make these credentials available to WebLogic Web service infrastructure so that it can authenticate you during the Web service invocation. If you are testing with users in the built-in user registry of WebLogic, follow the instructions below.
You can add a user using the provided script or through the WebLogic Admin console. If you are using the script, run the following command:
app-service-security-config.sh -add-user
The script prompts you for the following:
Username
Password
WebLogic Admin URL
WebLogic Admin username
WebLogic Admin password
The username and password from the service consumer is authenticated against the username and password entered in this step.
Security policies (Policy A and Policy B) can be attached to edge app Web services using either the provided script or by attaching the policies manually.
Take the following steps:
Copy the ear files of the Web service providers EJBs to the ser-vice-provider/config/security-setup/app-lib folder.
Change directory using cd security-setup-home/service-provider.
Run app-service-security-policy-condition-config.sh –u <WebLogic Admin Server URL> –a -e <Enterprise Application Name> –t user –n <user>.
Run app-service-security-policy-config.sh –u <WebLogic Admin Server URL> –a -e <Enterprise Application Name> –p PolicyB.
The usage of the script is displayed when the script is run with the –usage parameter. The script extracts the ear file and uses all the jars from the ear file in classpath. It attaches the Web service policies corresponding to Policy B to the services defined in the ear file.
To secure each of the services, perform the following steps in WebLogic Admin Console:
Attach the user, created in the Configuring and Using Authentication section, to the service.
Click Deployments and then click on the EJB you want to secure. Click Security --> Policies --> Add Conditions --> Predicate List. Pick the user from the dropdown list and click Next --> User Argument Name. Type the username you created and then click Add --> Finish --> Save.
Attach the three policies to the service.
Navigate to the Configuration tab --> WS-Policy. Click on the service port and pick WebLogic -->Next --> In Service Endpoint Policies. Select the following policies from available policy list:
policy:Wssp1.2-2007-Wss1.1-UsernameToken-Plain-EncryptedKey-Basic128.xml
policy:Wssp1.2-2007-EncryptBody.xml
policy:Wssp1.2-2007-SignBody.xml

Click Finish.
Restart WebLogic servers.
Verify the configuration by checking the WSDL of the service. The WSDL must have the information of all the three policies in it.
Export the certificate from the application server. Copy the certificate file to the RSB WebLogic server.
Use the following command to export the certificate:
app-service-security-config.sh -export-cert
You will have to provide the key store password. The exported certificate file name can be <hostname>-certificate.der.
The following provide an easy reference to the important steps that you need to take related to Policy B that should be run from rsb-home.
For more information on steps to secure the decorator services with Policy B, see the Oracle Retail Service Backbone Installation Guide.
Make sure that the endpoint URL is correct in the RSB deployment properties file and run the script to download app service WSDL.
cd <rsb-home>/service-assembly-home/bindownload-app-service-wsdl.sh
Run the following script to populate rsb-home/service-assembly-home/service-policy-config/output/decorator-service-proxy-security-policy/ service-name-to-policy-id-map.properties file.
cd <rsb-home>/service-assembly-home/bingenerate-rsb-decorator-security-config.sh
Copy the PKI generation utility shell script from rsb-home to the OSB service server machine's <domain_home>/config folder.
cd <rsb-home>/integration-lib/rsb-tools/scripts
scp generate-pki-certificate-keystore.sh <user>@<host>:<rsb_domain>/config
Login to the OSB service server machine. Change directory to <domain_home>/config and run generate-pki-certificate-keystore.sh.
cd <domain_home>/bin
. setDomainEnv.sh
cd ../config
generate-pki-certificate-keystore.sh
Copy <hostname>-certificate.der from AppService server's <domain-home>/config to OSB server's <domain-home>/config folder. Run the following command to import the application service's public key in the OSB key store with alias name <appName>-<AppServiceHostName>-remote-host-public-key-alias.
cd <rsb-home>/integration-lib/rsb-tools/scripts
scp import-remote-server-public-key-certificate-into-keystore.sh <user>@<host>:<domain-home>/config
Login to OSB Server.
cd <domain-home>/config
Copy the certificate from the application server to OSB server.
scp <user>@<host>:<app-server-domain>/config/<host>-certificate.der
import-remote-server-public-key-certificate-into-keystore.sh <appName> <appServiceHostName>
e.g.,
import-remote-server-public-key-certificate-into-keystore.sh igs <rsbhost>
Restart the OSB Server.
Run the following command which asks for the key store password, password for OSB server key alias, password for remote server's key alias, and username/password for usernametoken authentication for the Web services. The passwords for these aliases must match with the passwords that are used in the key store.
cd <rsb-home>/service-assembly-home/bin
setup-message-protection-security-credentials.sh
The first alias is the keystore-csf-key where the username is pre-populated with the same name as the alias name. The password for this entry should be the key store password of OSB server.
The second alias is the <hostname>public-private-key-alias where hostname is the OSB server. The username is pre-populated with the same name as the alias name and password of the private key in the key store.
The third alias is the <appName>-<AppServiceHostName>-remote-host-public-key-alias. The username is pre-populated with the same name as the alias name and password of the private key in the key store. This step is repeated for all the applications for which services are secured with Policy B.
The fourth alias is <appName>-user-alias. Here the username and password are prompted. The values must match with the username/password configured in application service's WebLogic server for UsernameToken authentication. This step is repeated for all the applications for which services are secured with Policy B.
Run the following command to create the user in the OSB WebLogic server and also update the domain-level wallet file with aliases of OSB and application service keys.
cd <rsb-home>/deployment-home/bin
configure-rsb-app-server-for-security-policy-b.sh
(Optional Step) Using EM, point the Domain -> Security -> SecurityProviderConfiguration -> default key store for the domain to ../<hostname>-keystore.jks. You will also be required to provide a keystore password, OSB server's private key alias, and password.
Restart the server so that it can load the wallet file and key store contents. It is important to restart the server after this step because WebLogic maintains a cache of these files which get refreshed when you restart the server.
Run the following command to update decorator jars with security policy configurations.
<rsb-home>/service-assembly-home/bin/rsb-compiler.sh
Run the following command to deploy the decorator:
cd <rsb-home>/deployment-home/bin
rsb-deployer.sh -deploy-all-rsb-service-for-app <app>
This section provides details on setting up security in the service-consumer side of the RSB application.
Service consumer application must be run inside the WebLogic server. To consume services secured with Policy B, the application accesses the key store from the <DomainHome>/config folder of the WebLogic server where it is deployed. The application must also provide the username and password to authenticate the user with the service. Oracle recommends that you save the user credentials in a wallet file that is accessible from the consumer application. For simplicity purposes, the sample code provided below uses a hard coded username and password.
|
Note: For a wallet file, access the CSM package that Oracle provides. |
|
Note: In the steps where keystore is created, it is important to note that the naming convention for alias and password are followed as provided in the samples below. The naming conventions that you can use are provided below. |
The key store name must be <hostname>-keystore.jks.
The alias name for the server's public/private key must be <hostname>-public-private-key-alias.
The alias name of remote RSB/OSB server's when imported in the key store must be <remoteHostname>-remote-host-public-key-alias.
The same naming convention must be followed in the service consumer code for calling remote OSB services.
Take the following steps to set up the keystore and call the service:
Copy security-setup-home/service-consumer/generate-pki-certificate-keystore.sh and import-remote-osb-server-public-key-certificate-into-keystore.sh from the RsbAppServiceSecuritySetupSamplesPak14.0.0ForAll14.0.0Apps_eng_ga.zip to the <domain-home>/config directory of the WebLogic application server where the service consumer application would be deployed.
Generate the certificate and the public/private key for the WebLogic server where the client application is deployed. Run the script located in security-setup-home/service-consumer.
generate-pki-certificate-keystore.sh
Copy the certificate from the OSB server to the WebLogic server of the client application and run the script located in security-setup-home/service-consumer.
import-remote-osb-server-public-key-certificate-into-keystore.sh <remoteHostName>
Note down the key store password and private key password. The aliases used for the certificates and keys are fixed in this script. In your client code, you will have to use the following values for the program variables in the sample code mentioned in Appendix B.
Table 3-1 Configuring Consumer Side (Policy B)
| Program Variable | Value |
|---|---|
|
clientKeyStore |
<DomainHome>/config/<HostName>-keystore.jks |
|
clientKeyStorePass |
Keystore password you entered in this step 2 |
|
clientKeyAlias |
<HostName>-public-private-key-alias |
|
clientKeyPass |
Private key password you entered in this step 2 |
|
remoteHostAlias |
<RemoteHostName>-remote-host-public-key-alias |
|
userNameTokenProvider |
The username and the password for the Web service provider. |
The client also needs to provide a username and password for authentication. Oracle recommends that you store the username and password in a wallet file and read from there in the client code. In the sample code, the username and password have been hard-coded for simplicity.
|
Note: For a wallet file, access the CSM package that Oracle provides. |
When the OSB services are consumed from an application, the application could be running in a WebLogic server where the OWSM is also installed. Alternatively, it can also be consumed from inside a WebLogic server where it is only a base WebLogic server and there is no OWSM component installed. The approach differs based on the situation.
In the WebLogic server where the OWSM is not available, the client code uses the WebLogic policies in the client side. A sample program is available in Appendix B.
When the client application is running on a WebLogic server where the OWSM is available, the OWSM client policy can be used in client code. A sample program is available in Appendix C. The security related code is shown in bold-italics.
If the Policy B consumer is running in the WebLogic server, it can use the WebLogic Web service configuration for the policy related processing. The consumer code need not specify the keystore location, aliases etc. In order to utilize the container's security configuration, the WebLogic server must be configured for it. This can be done by running the following command in the <domain-home>/config directory.
|
Note: The script must be run after running thesetDomainEnv.sh in the current shell. |
$JAVA_HOME/bin/java -classpath $CLASSPATH weblogic.WLST configWss.py
The RIB-OMS application is an example of such usage.
After the successful configuration of security, verify it before running the functional tests. You can verify security by invoking a ping operation of a RSB decorator service securely.It can be done in the following two ways:
Using Retail Integration Console (RIC)
Using the OSB Console
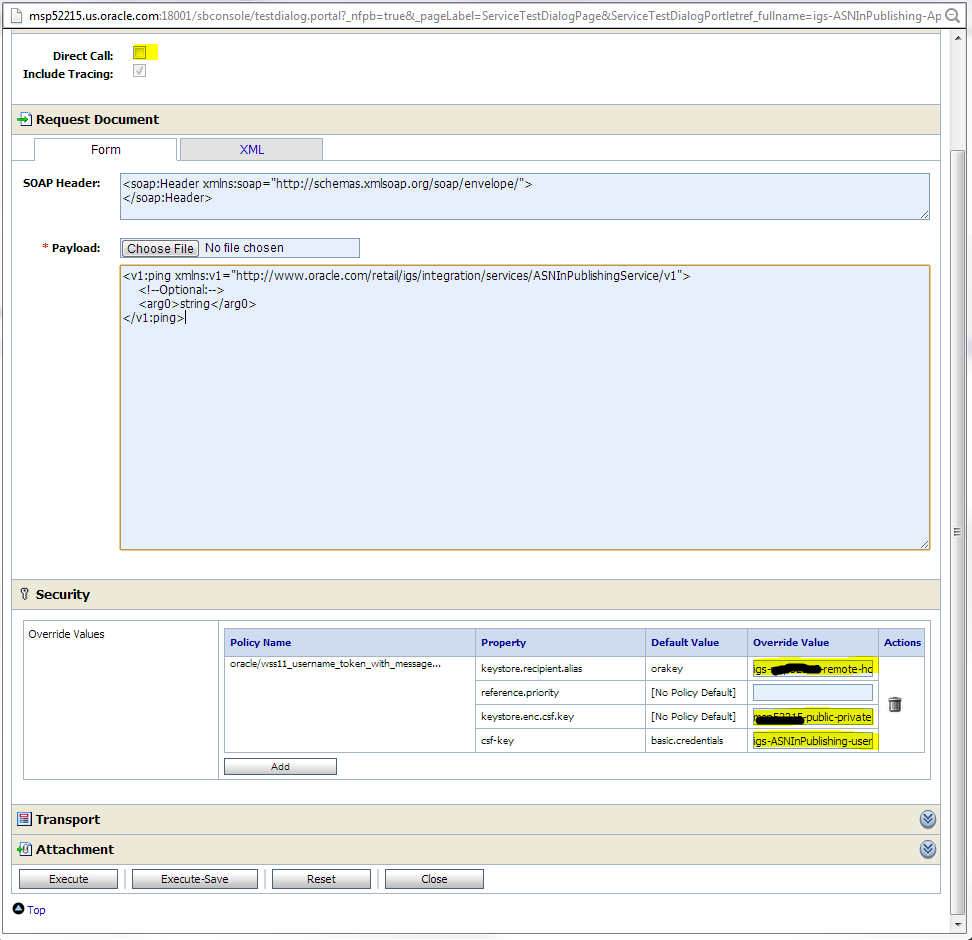
Click on the proxy service and then the Test Launch Console icon to test the service. You can invoke using any method. The ping method is the easiest to test. If the invocation is successful, it shows both the encrypted and decrypted versions of the request and response messages.
To test the proxy service from test page, provide values for following fields which are at the bottom of the test page:
keystore.recipient.alias
keystore.enc.csf.key
csf-key
You can find the values for these fields in the Business Services --> <Business Service> --> Security tab of the same decorator project. You will see these values pre-populated in that page. Copy these values and enter them on the proxy service test page for a successful invocation of the service.
A sample Java code is shown in Appendix B that shows how a Java application can call a service secured with Policy B.
|
 Copyright © 2013, Oracle and/or its affiliates. All rights reserved. Legal Notices |
|