| Oracle® Retail Integration Bus Security Guide Release 14.1 E57322-01 |
|

 Previous |
 Next |
IGS Web services can be secured in two ways. One approach is to use a simple username and password authentication method. The second approach is to use passwords that are encrypted with certificates.
The following describes both approaches for server-side and client-side setup.
|
Note: The various policy files that can be used to secure Web services are listed in the WS-Policy tab of the Web service in the WebLogic Server Administration Console. |
This section describes the two-step process required for securing Web services on the server side. These steps are performed using the Oracle WebLogic Server Administration Console.
The usernametoken.xml contains the policy used by the web service and is found in the META_INF/policies folder in the .ear file.
Complete the following steps to attach the policy file to a Web service:
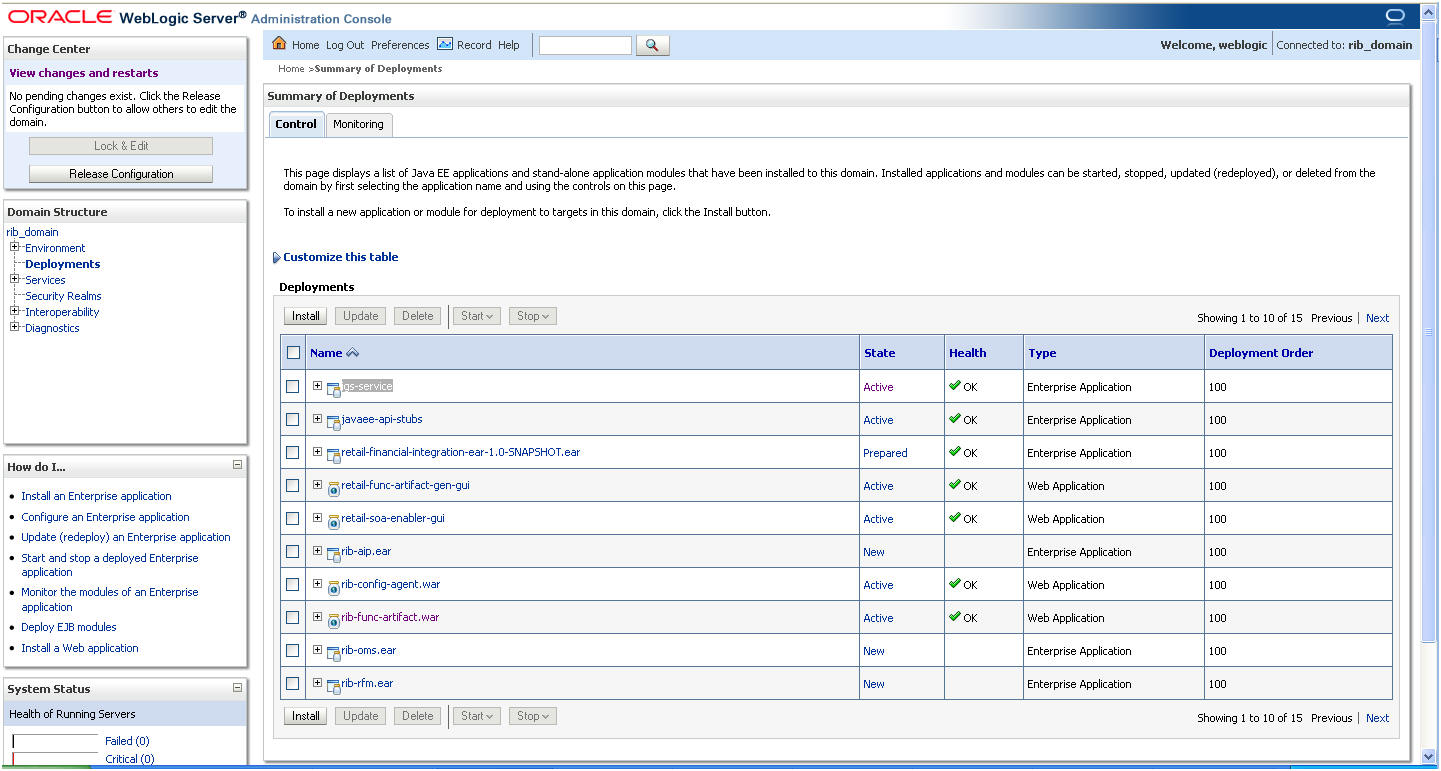
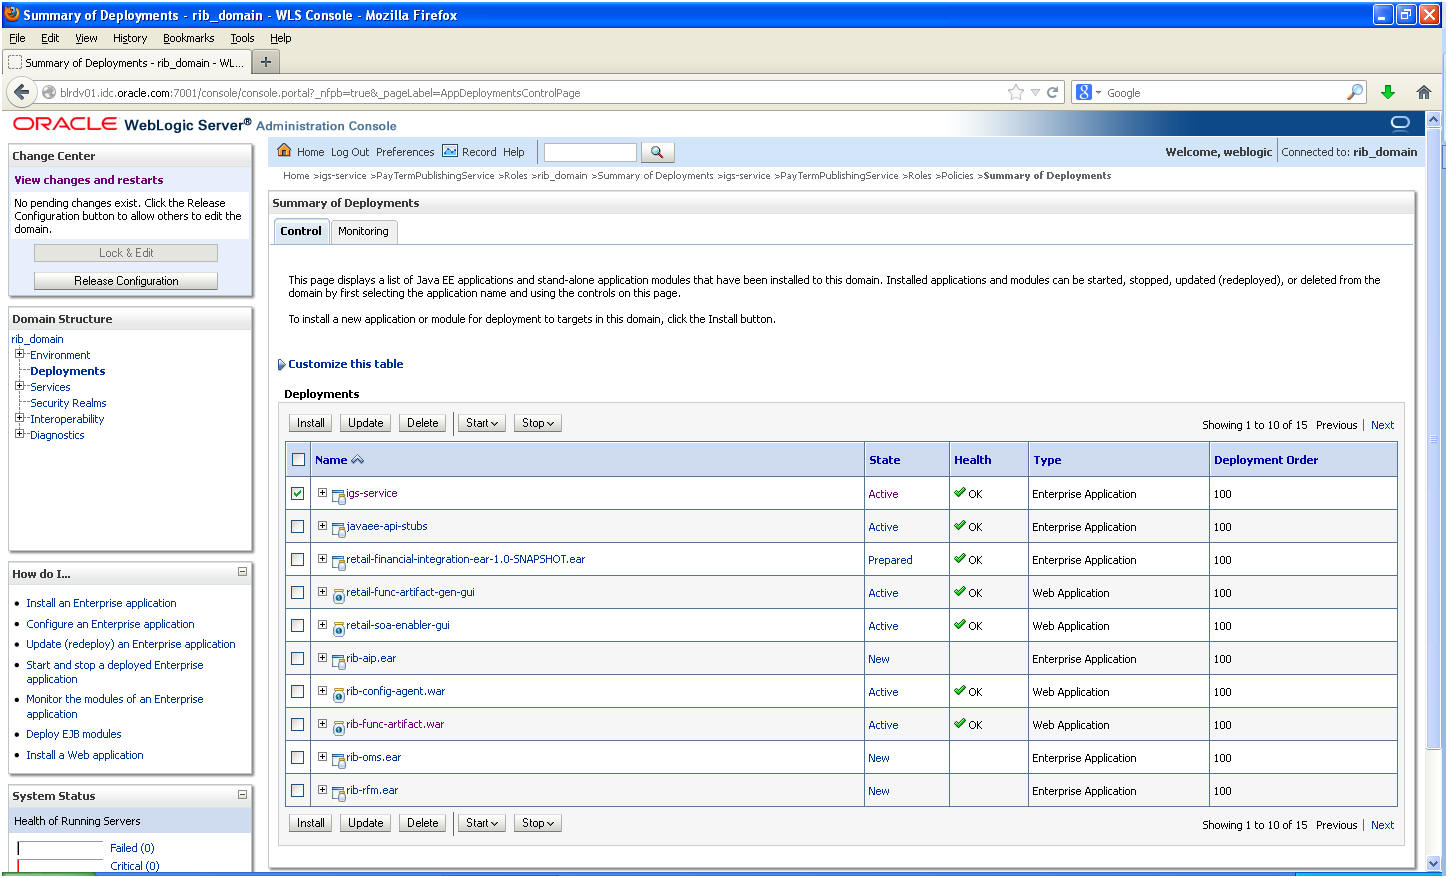
In the Summary of Deployments screen, click on the application. In the illustration below, the application is igs-service.
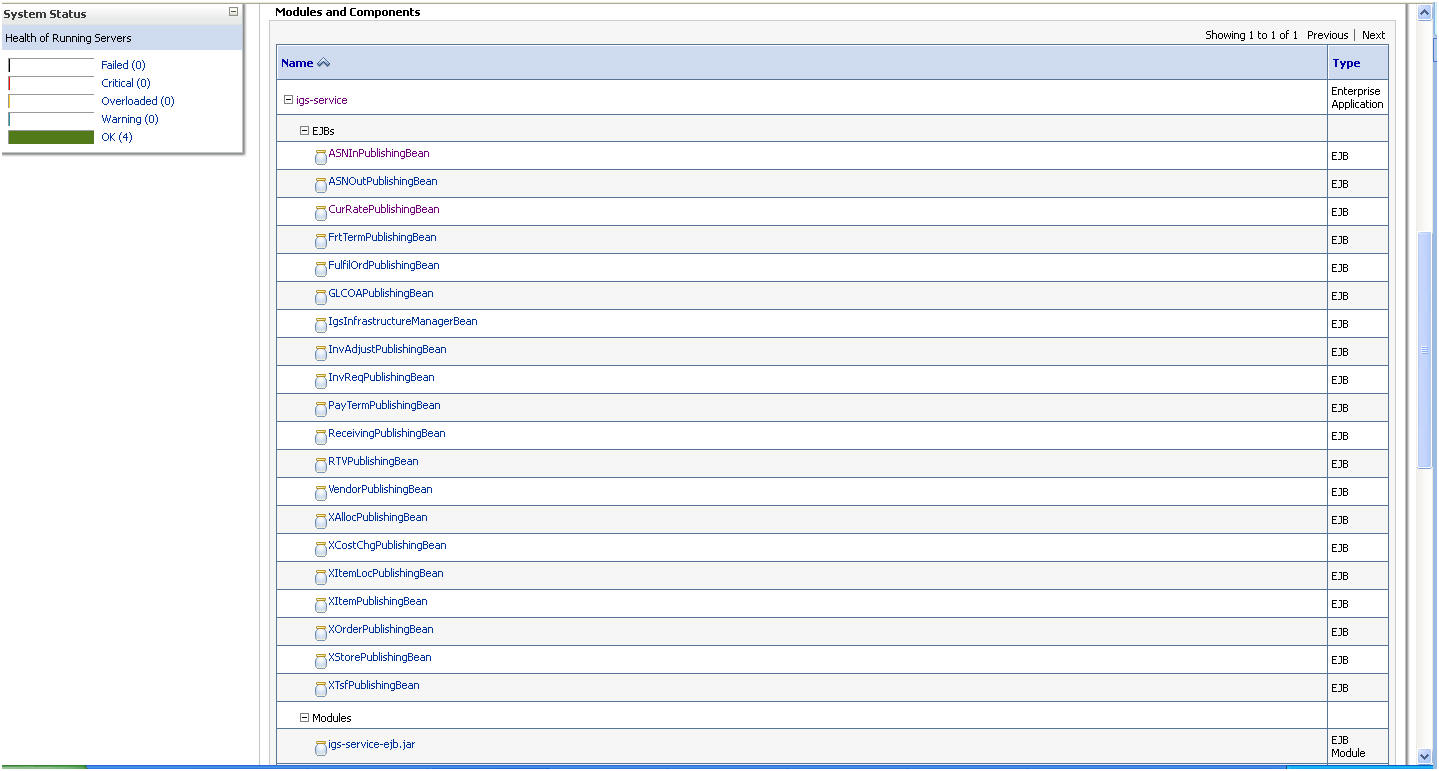
An overview page is displayed, including a list of modules and components installed as part of the application.
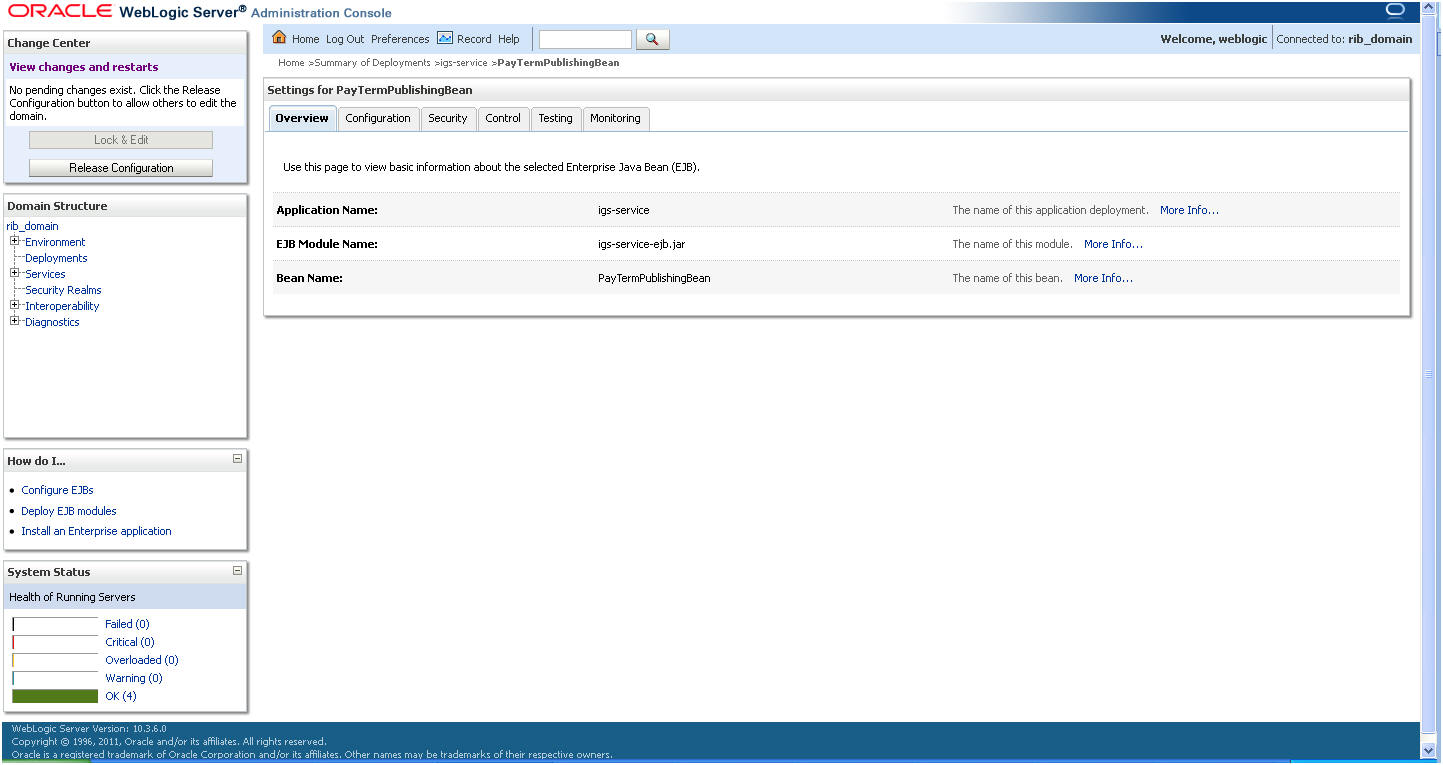
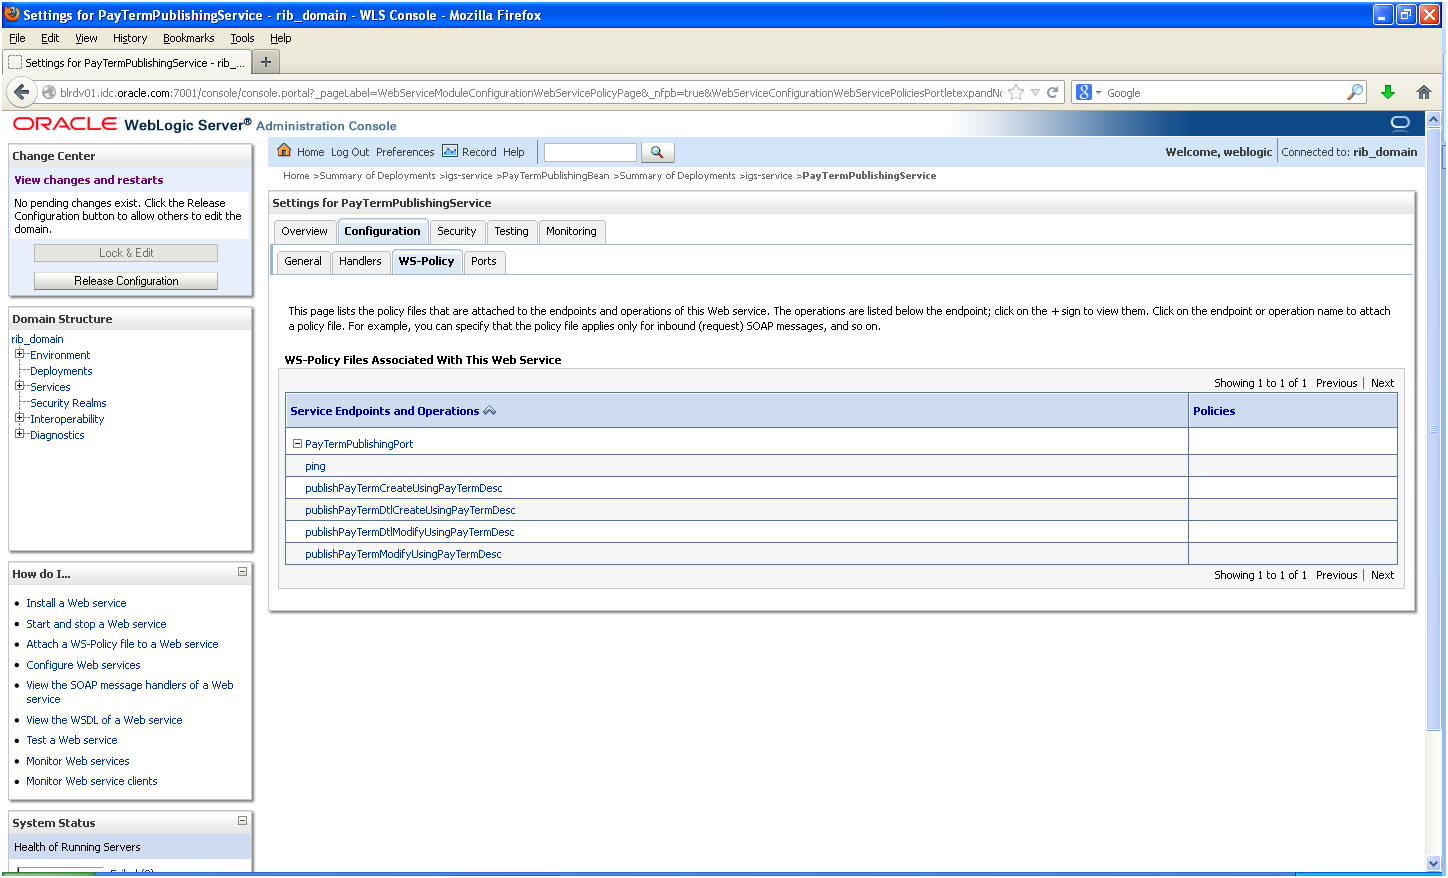
In the Web service list, click the service for which you want to enable security. The following screen is displayed to provide an overview of the Web service.
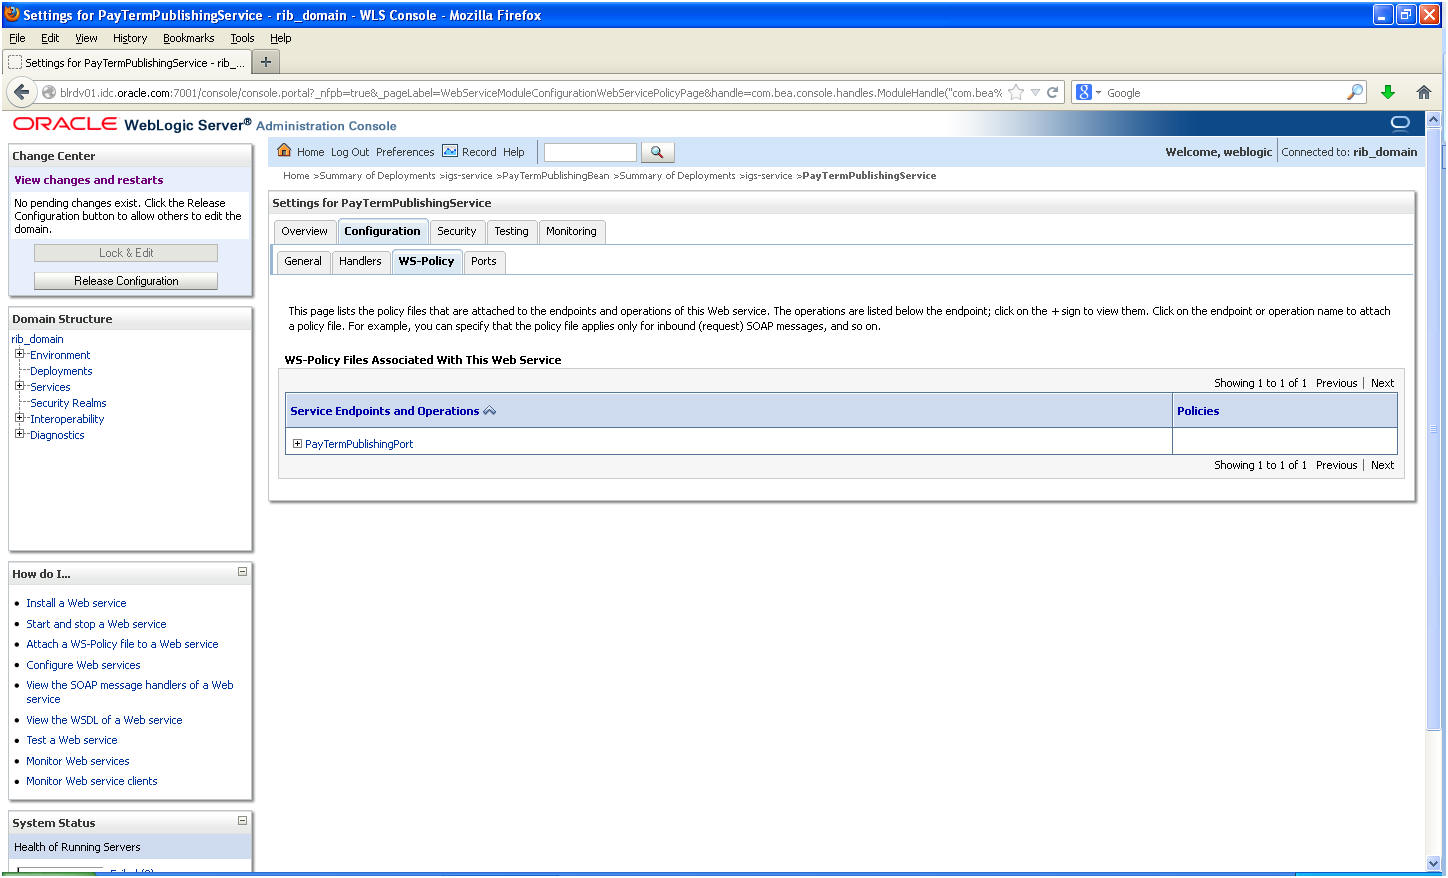
On this overview screen, click the Configuration tab. Click the WS-Policy tab. The Web service port is shown under Service Endpoints and Operations.
Click the plus sign next to the port name. The Web service operations are displayed.
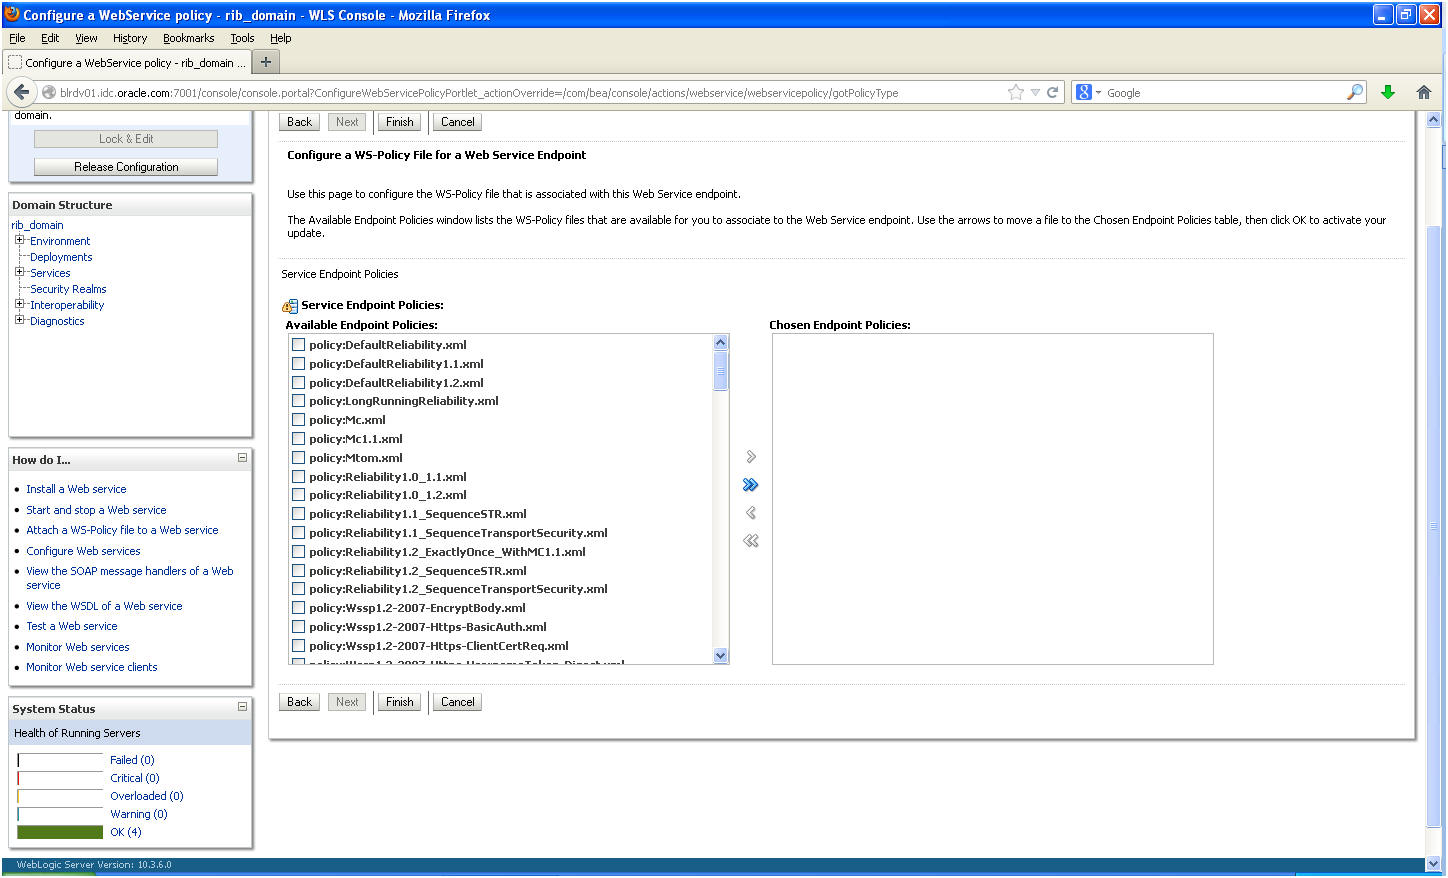
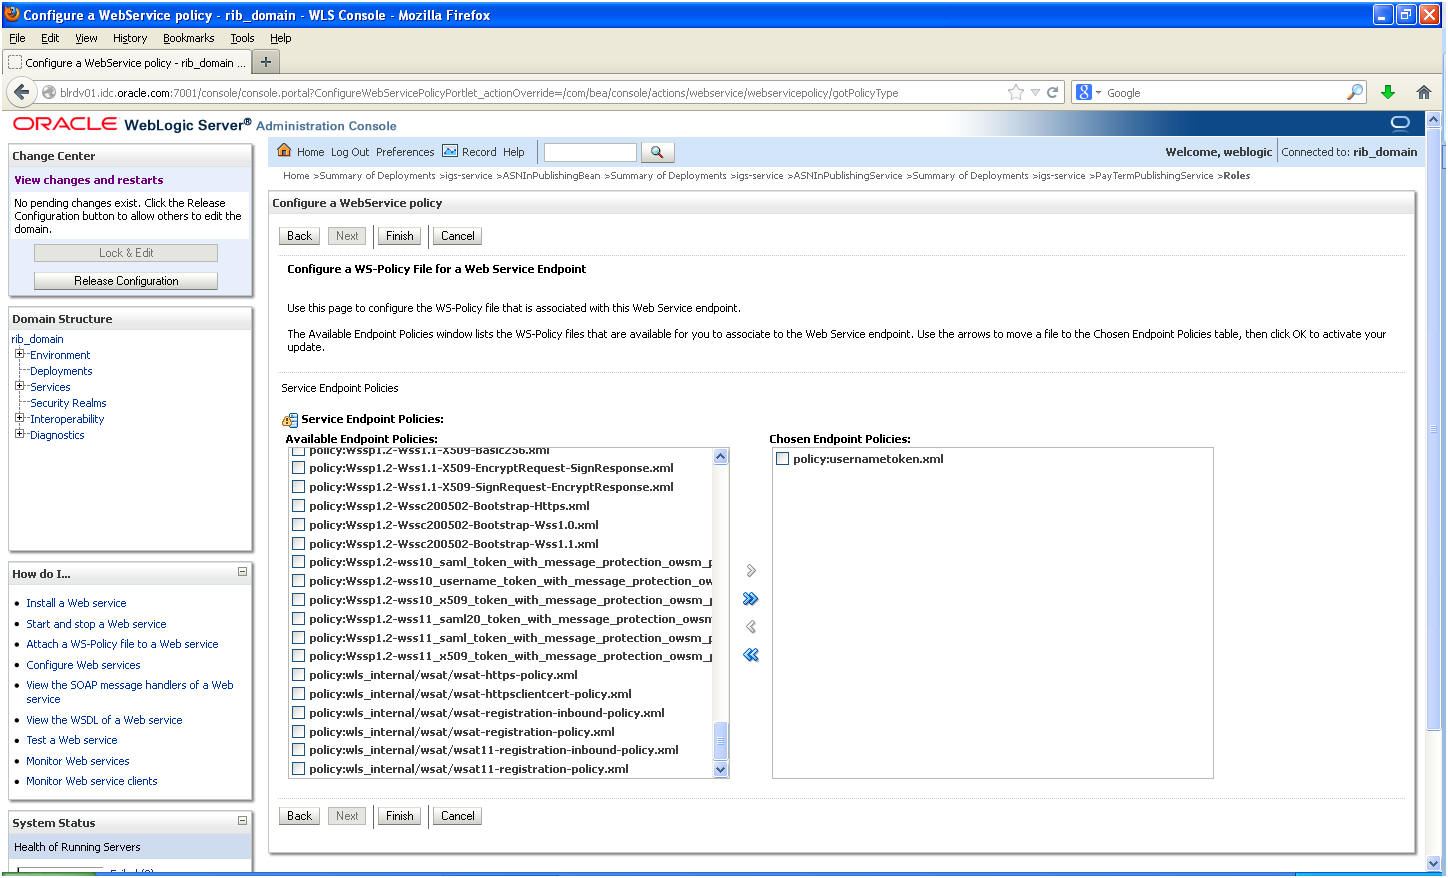
You can secure all the Web service operations at once or select only the operations you want to secure. Click the name of the port. On the Configure a Web Service Policy screen, you can attach the policy file to the Web service.
From the Available Endpoint Policies list, select policy:usernametoken.xml. Click the right arrow to move it to the drop down list below Chosen Endpoint Policies. Click Finish.
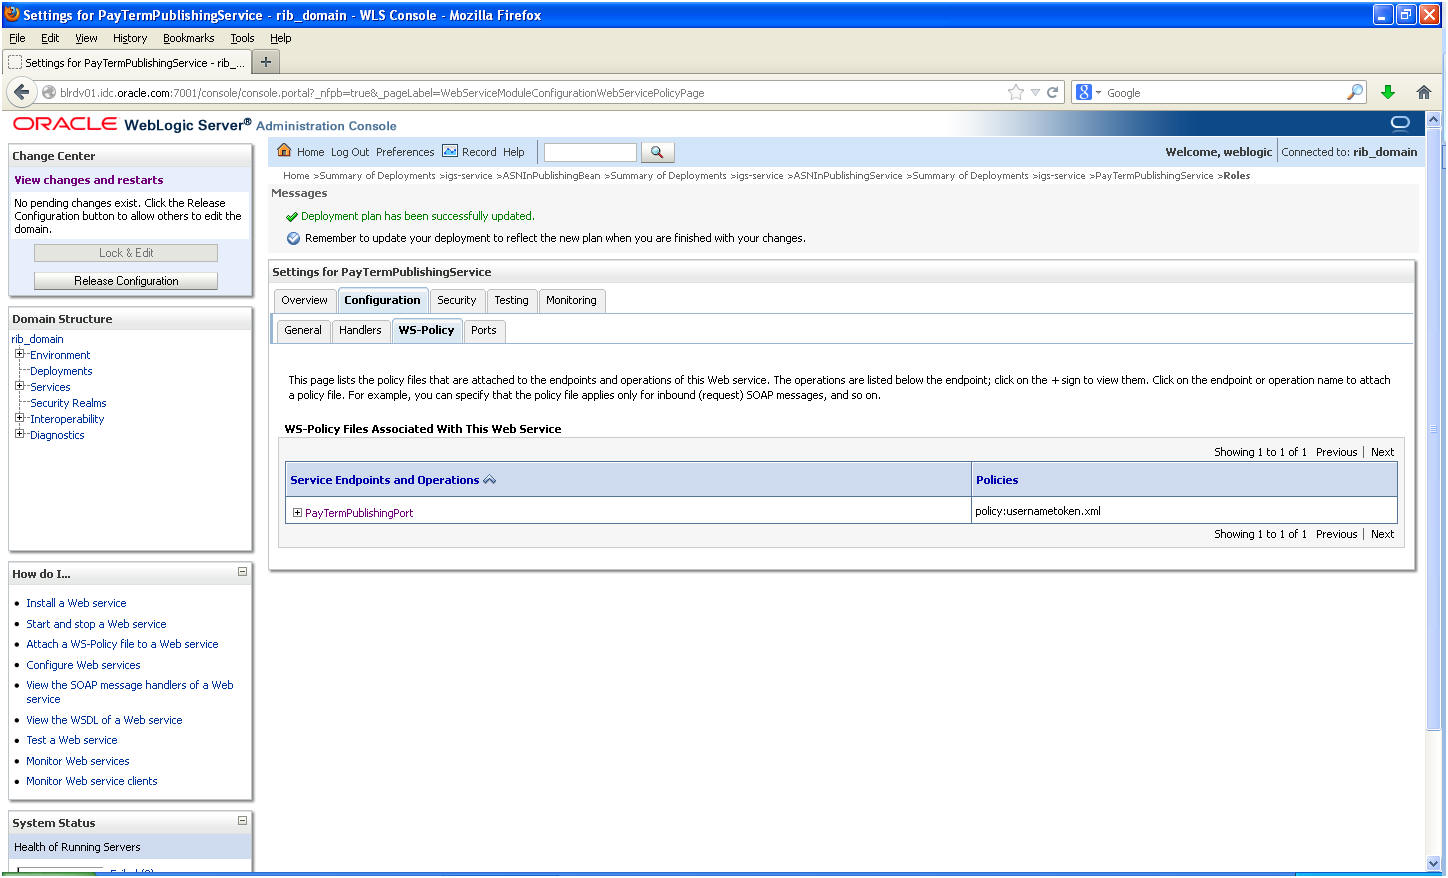
The following screen is displayed, including status messages near the top.
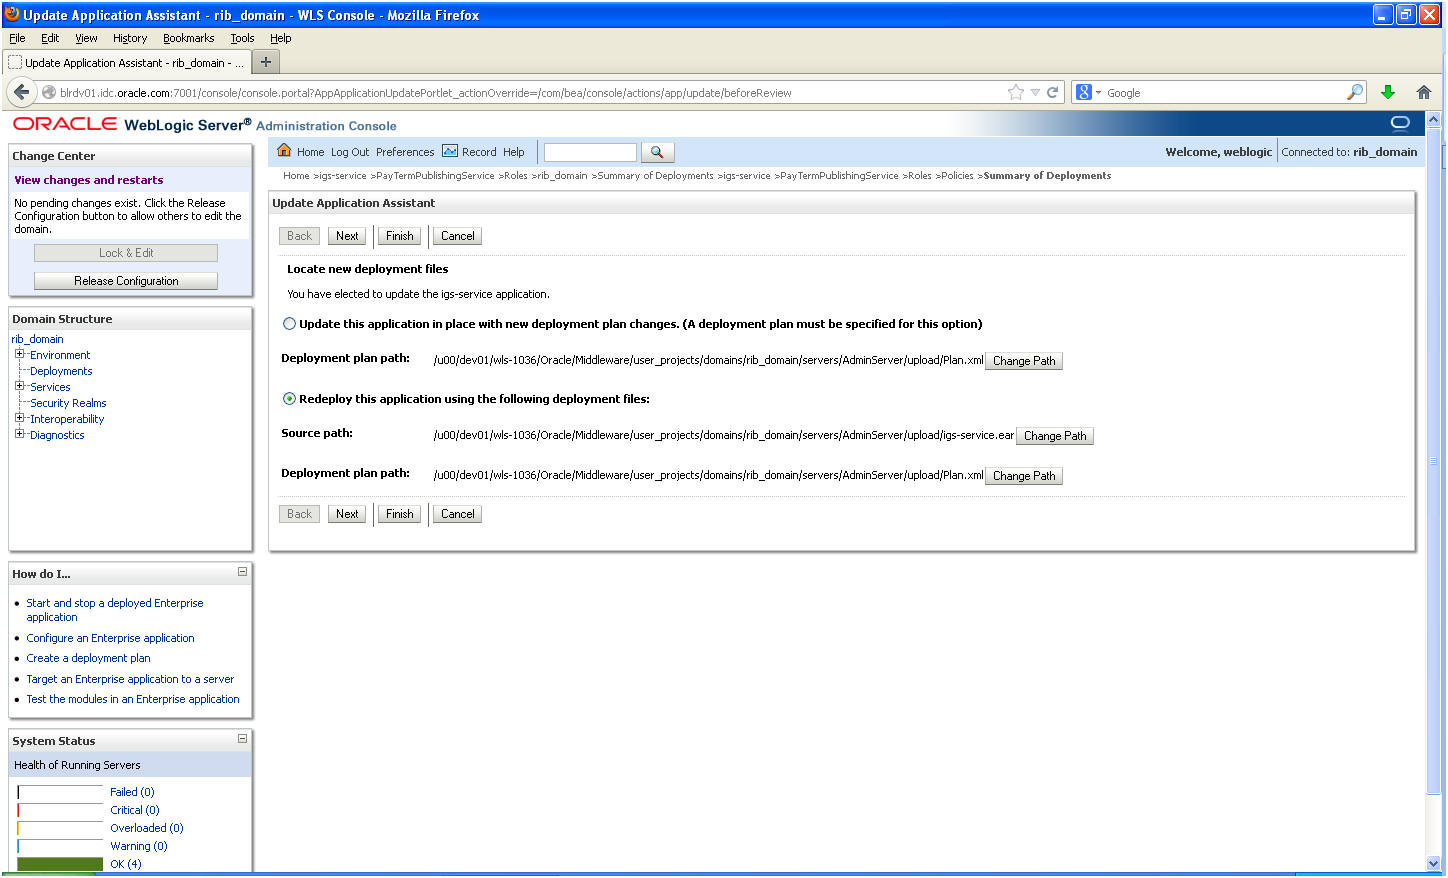
Now update the application to reflect the new deployment plan. Go to Deployments and select igs-service. The following screen is displayed.
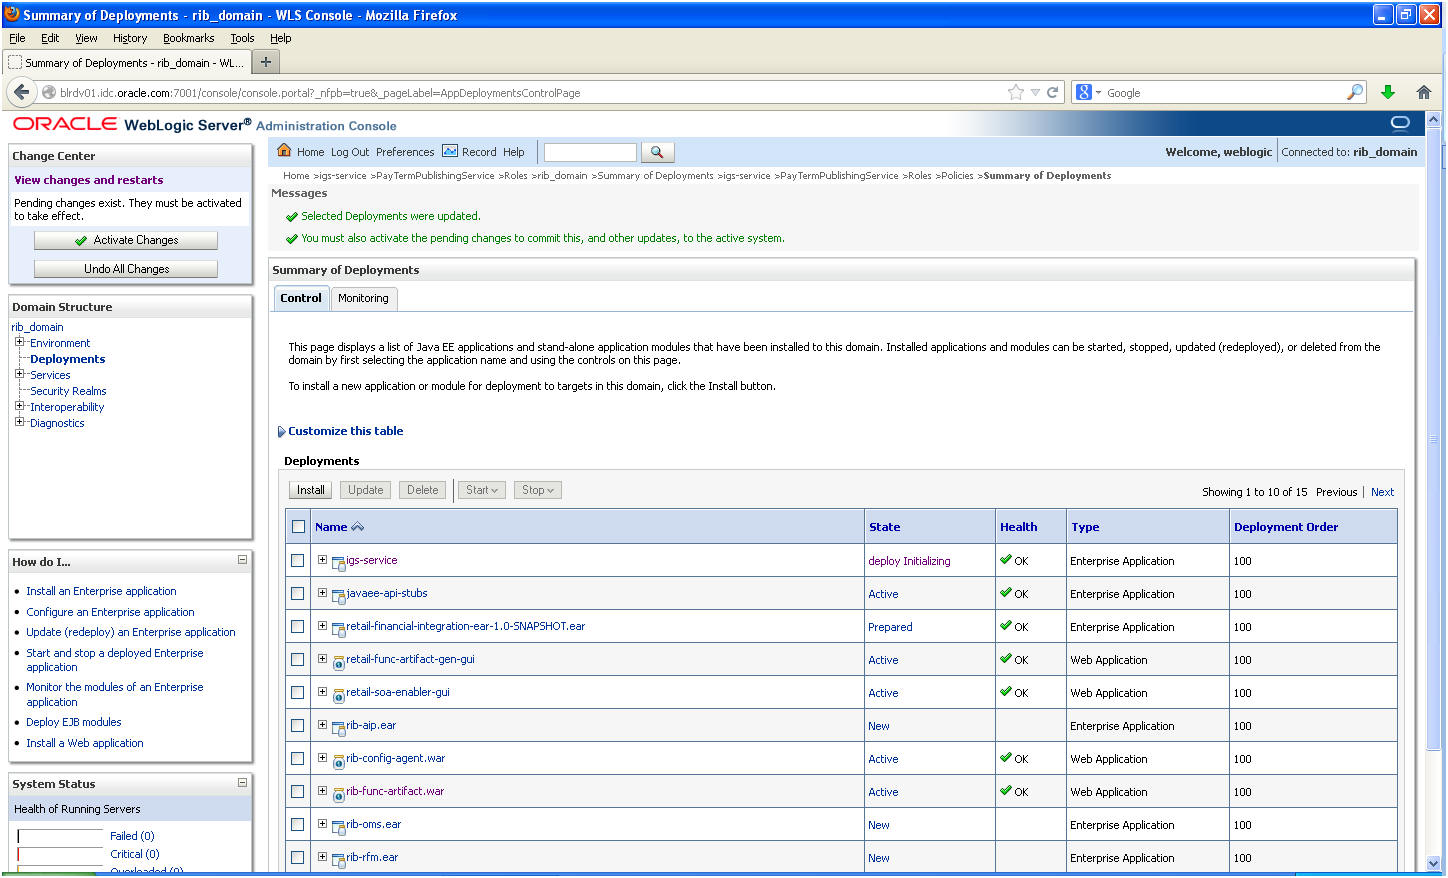
Click Update and then Finish.
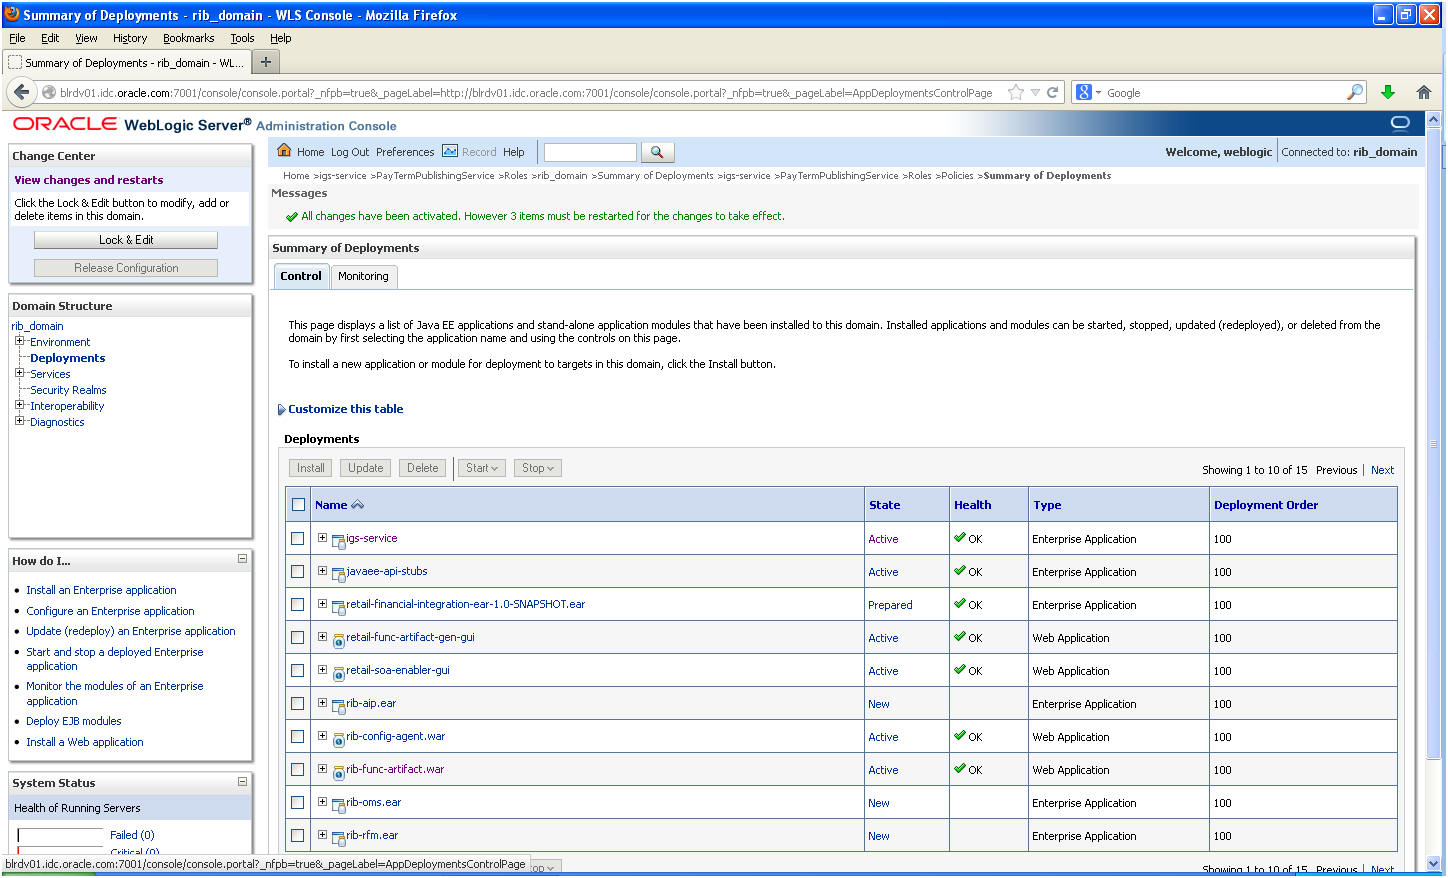
Click Activate Changes.
After activating changes following screen is displayed.
Under the Testing tab, on the Web Service page, click the WSDL to view the details of the policy just added to the Web service. The WSDL contains information similar to the following:
<?xml version='1.0' encoding='UTF-8'?><definitions xmlns:tns="http://www.oracle.com/retail/igs/integration/services/PayTermPublishingService/v1" xmlns:ns1="http://www.oracle.com/retail/integration/bus/gateway/services/BusinessObjectId/v1"xmlns:wsaw="http://www.w3.org/2006/05/addressing/wsdl" xmlns:xsd="http://www.w3.org/2001/XMLSchema" xmlns:ns2="http://www.oracle.com/retail/integration/services/exception/v1" xmlns:soap="http://schemas.xmlsoap.org/wsdl/soap/" xmlns="http://schemas.xmlsoap.org/wsdl/" name="PayTermPublishingService" targetNamespace="http://www.oracle.com/retail/igs/integration/services/PayTermPublishingService/v1"xmlns:wsp="http://schemas.xmlsoap.org/ws/2004/09/policy" xmlns:wssutil="http://docs.oasis-open.org/wss/2004/01/oasis-200401-wss-wssecurity-utility-1.0.xsd"><wsp:UsingPolicy wssutil:Required="true" /><wsp:Policy wssutil:Id="usernametoken"><ns0:SupportingTokens xmlns:ns0="http://docs.oasis-open.org/ws-sx/ws-securitypolicy/200512"><wsp:Policy><ns0:UsernameToken ns0:IncludeToken="http://docs.oasis-open.org/ws-sx/ws-securitypolicy/200512/IncludeToken/AlwaysToRecipient"><wsp:Policy><ns0:WssUsernameToken10/></wsp:Policy></ns0:UsernameToken></wsp:Policy></ns0:SupportingTokens></wsp:Policy>
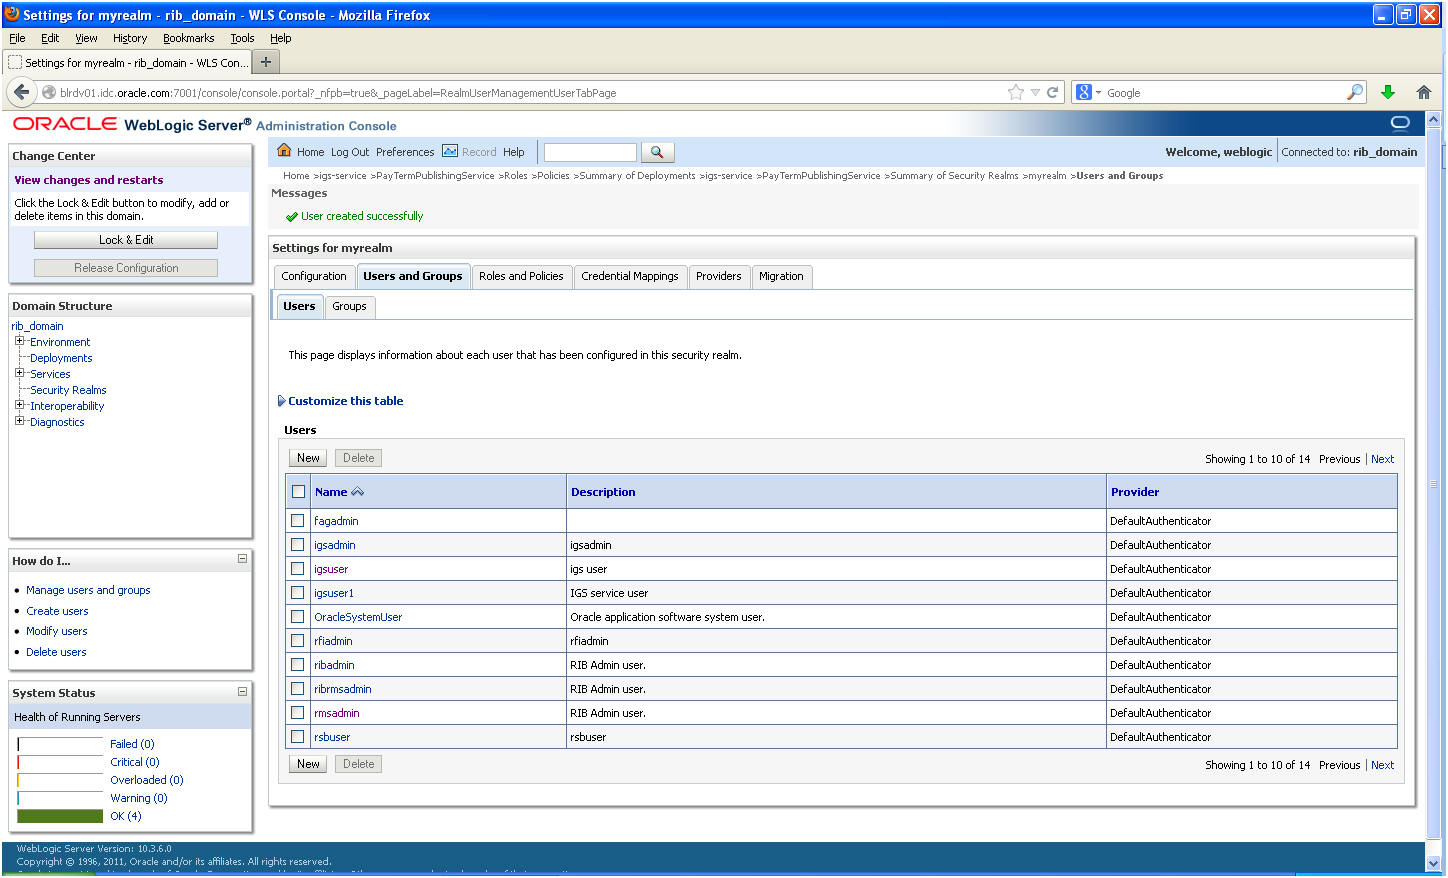
This section describes steps to add roles and users who can access the Web services. The first step is to add users to the security realm.
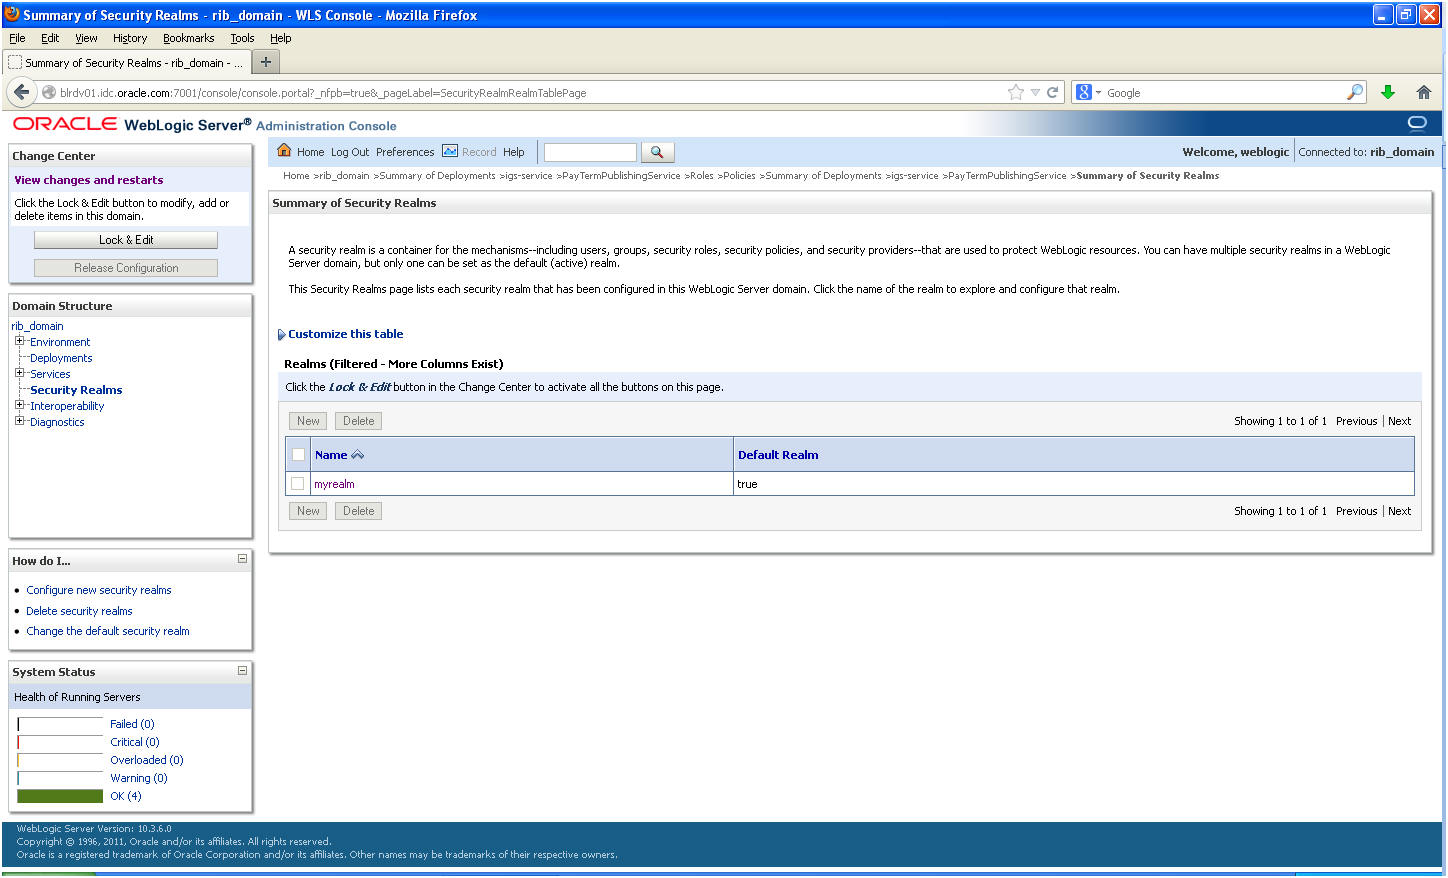
In the Domain Structure window of the Oracle WebLogic Services Administration Console, click the Security Realms link. The Summary of Security Realms screen is displayed, including the name of the default realm.
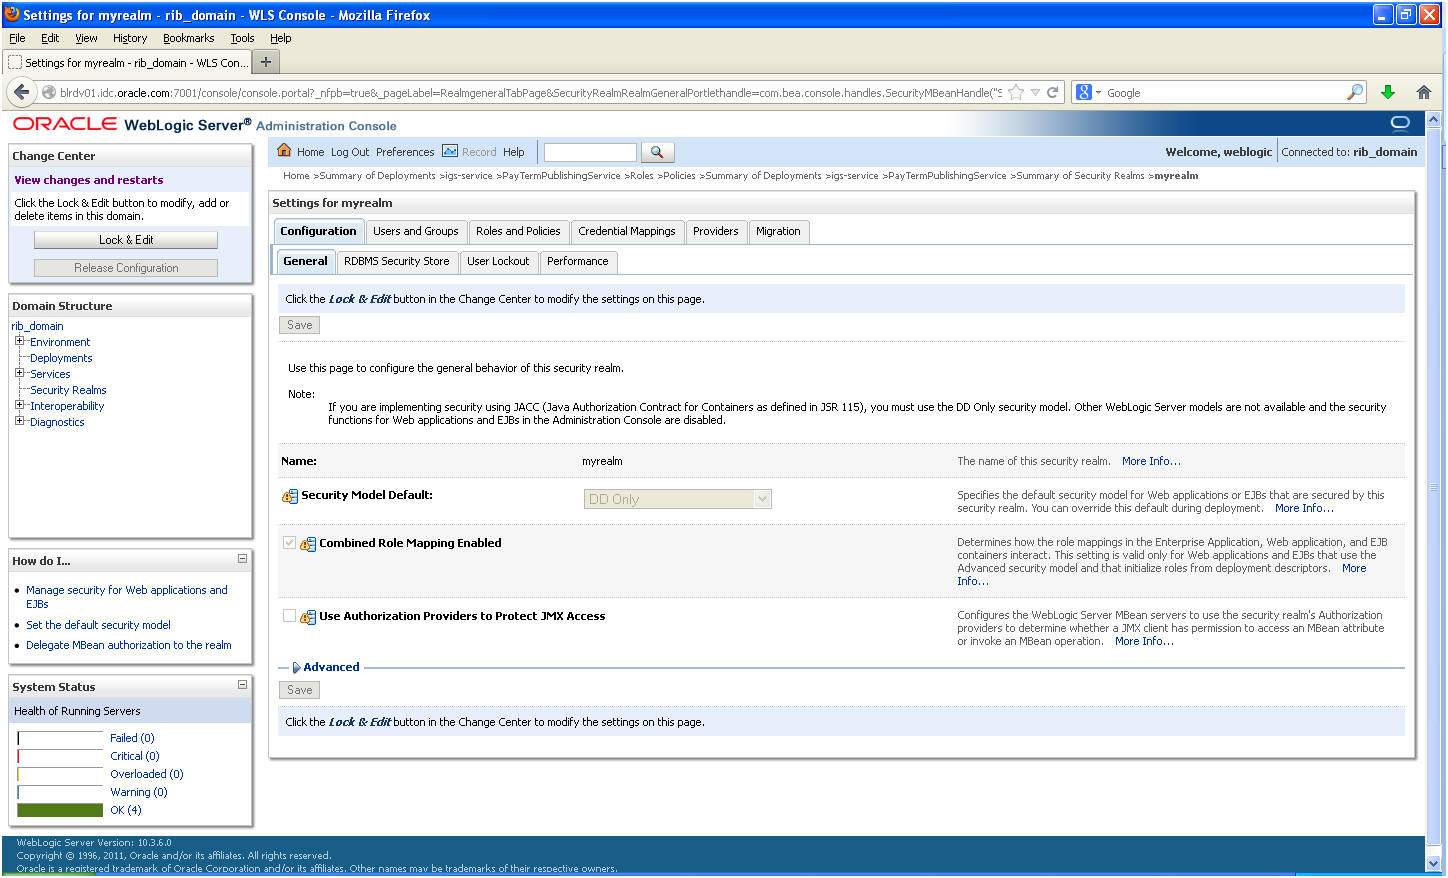
Click the name of the default realm. The settings for the realm are displayed.
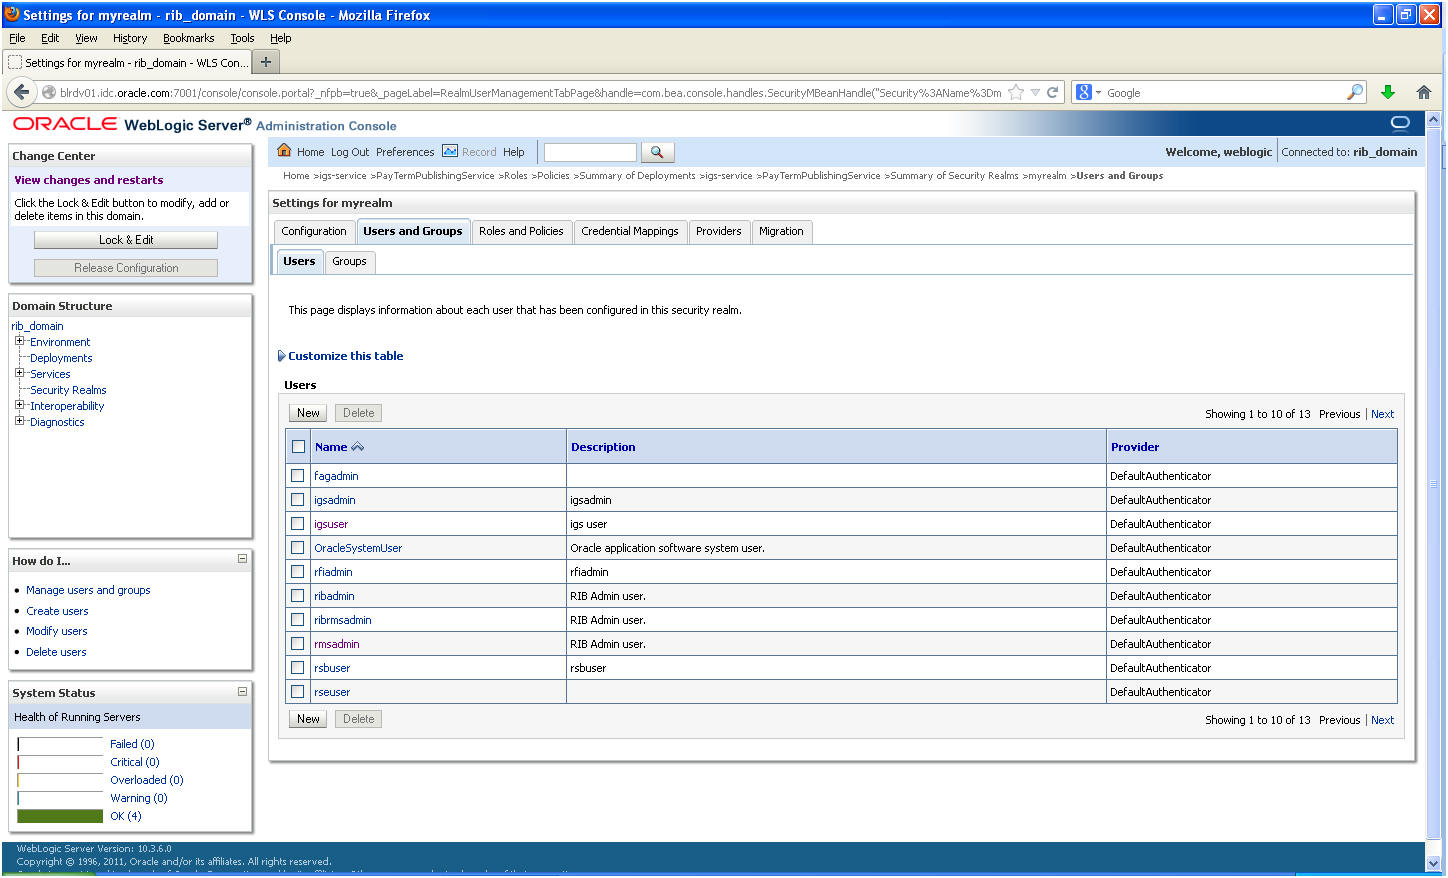
On the Setting screen, click the Users and Groups tab.
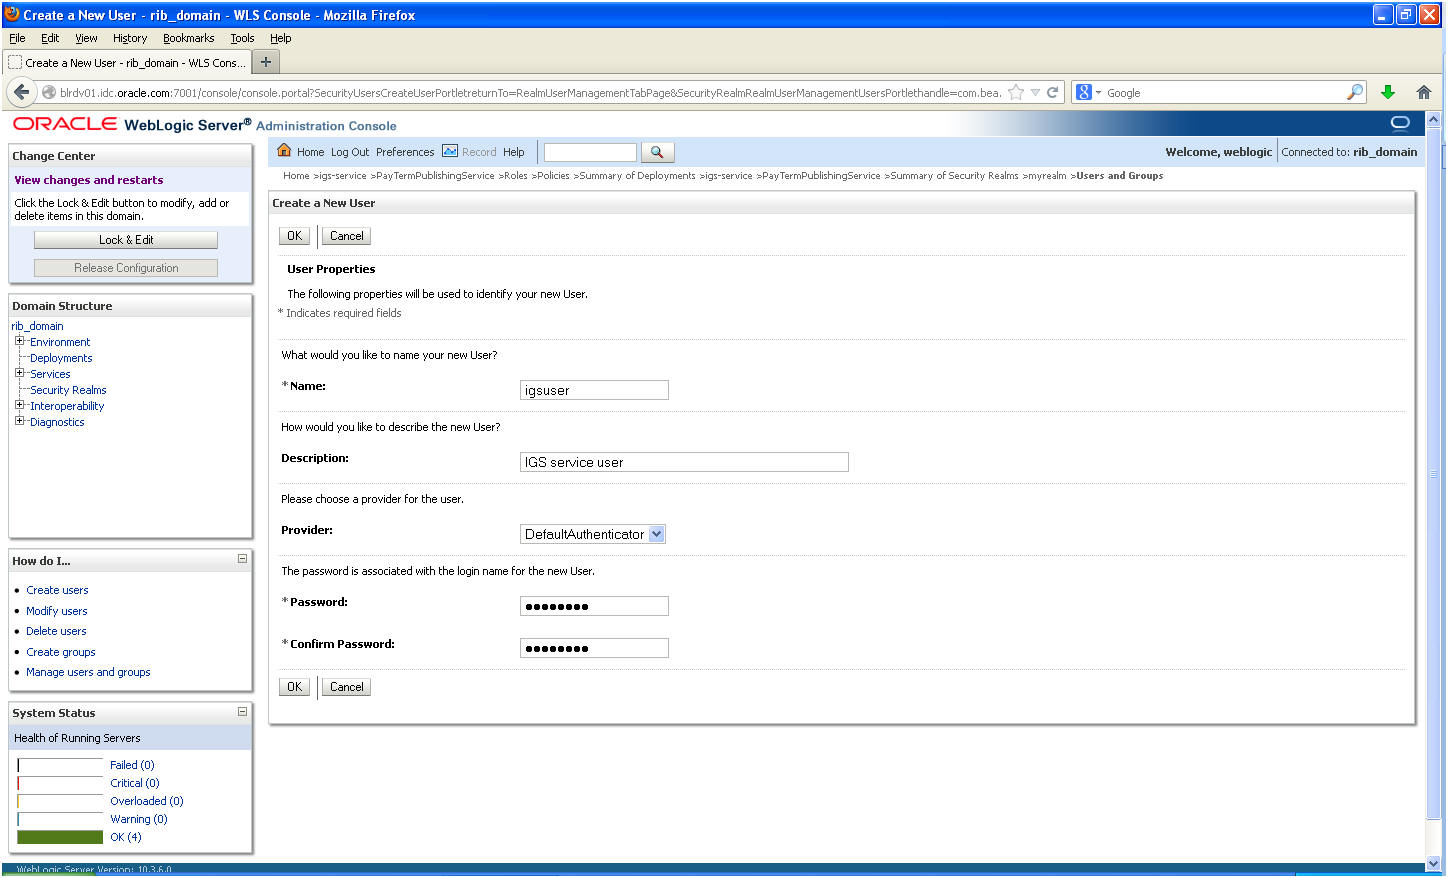
In the Users and Groups tab, click the Users tab. At the bottom of the Users tab, click New. The Create a New User screen is displayed.
In the Create a New User screen, enter a username and password. Leave the default value for Provider. Click OK to save the information. The new user is added to the list of users.
|
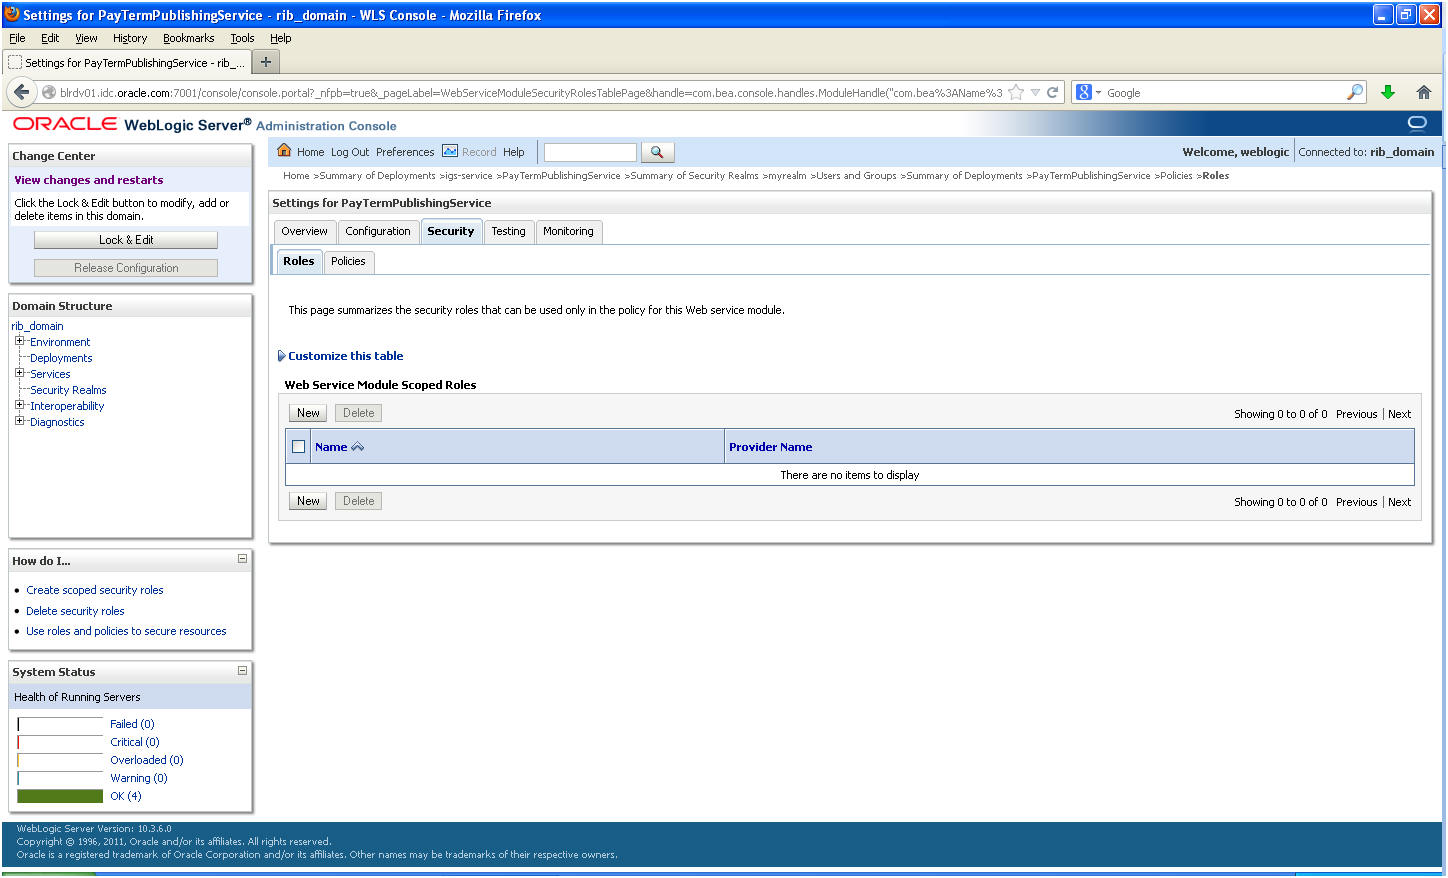
Note: You can add roles from the Roles and Policies tab of the security realm or through the Security tab of the Web service. The following instructions are for creating a role through the Security tab of the Web service. |
Navigate to the Security tab of the Web service. Click the Roles tab.
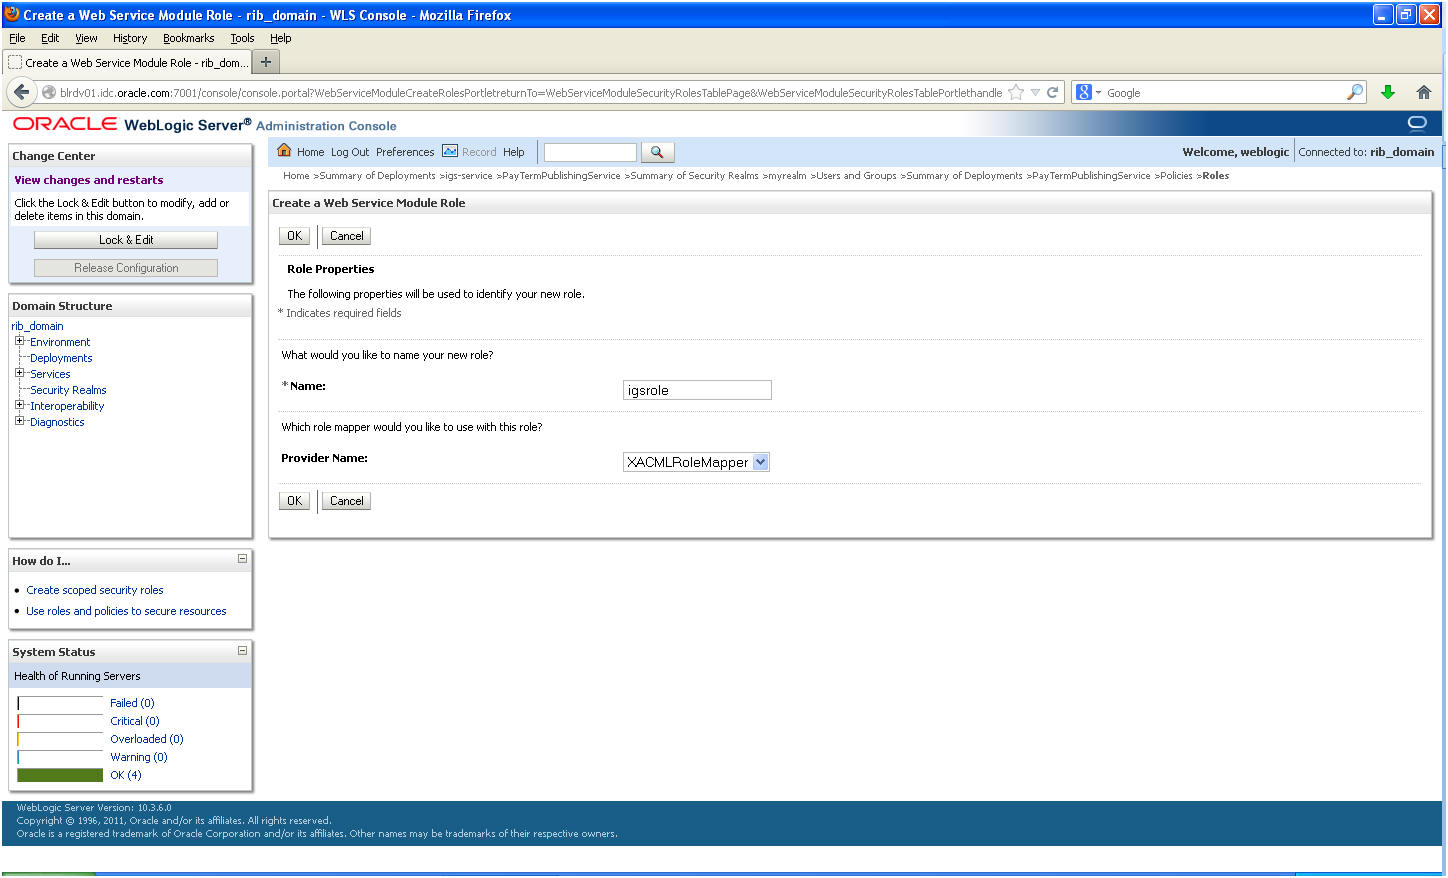
In the Roles tab, click New. The Create a Web Service Module Role screen is displayed.
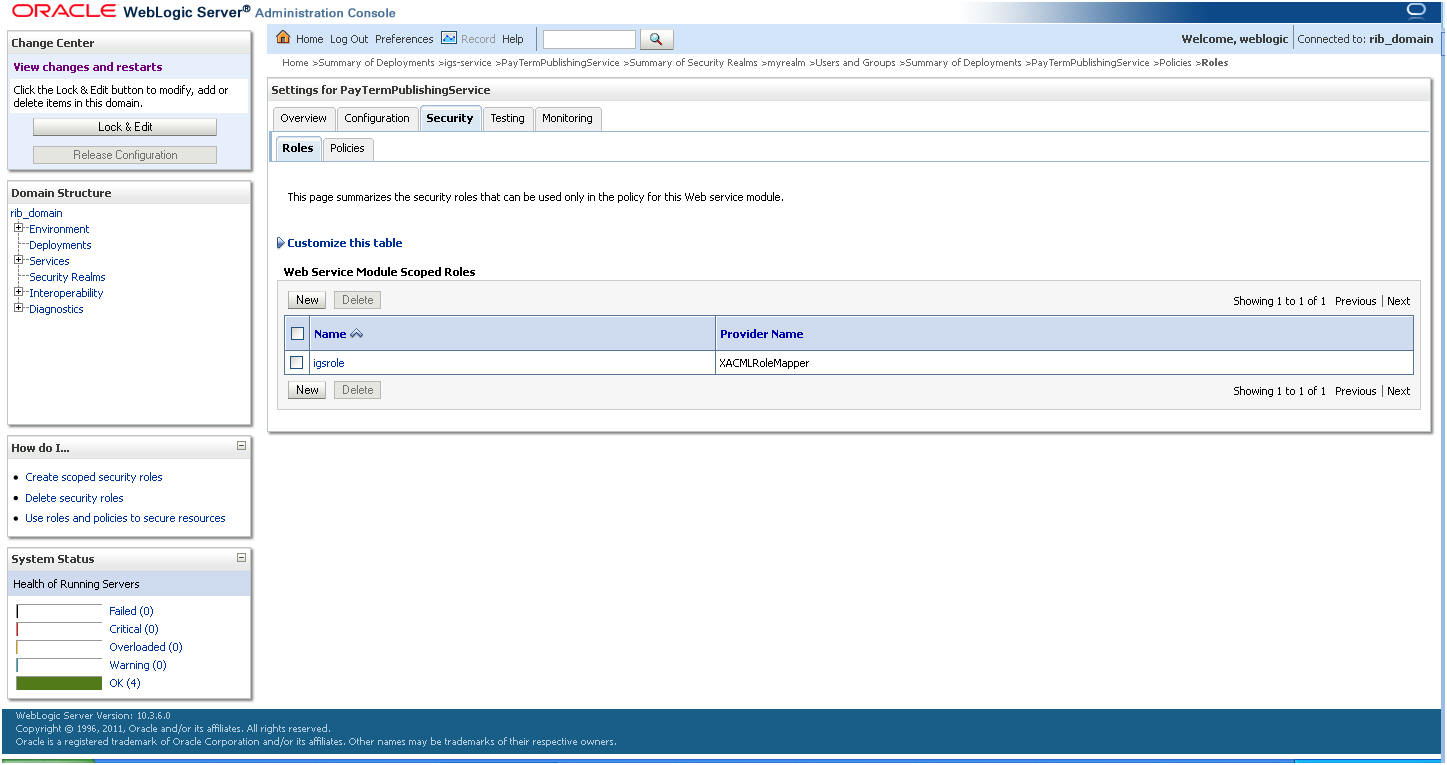
In the Create a Web Service Module Role screen, enter the role name in the Name field (for example, rmsrole). Leave the default value in the Provider Name field. Click OK. The new role is displayed in the Roles tab of the Web service.
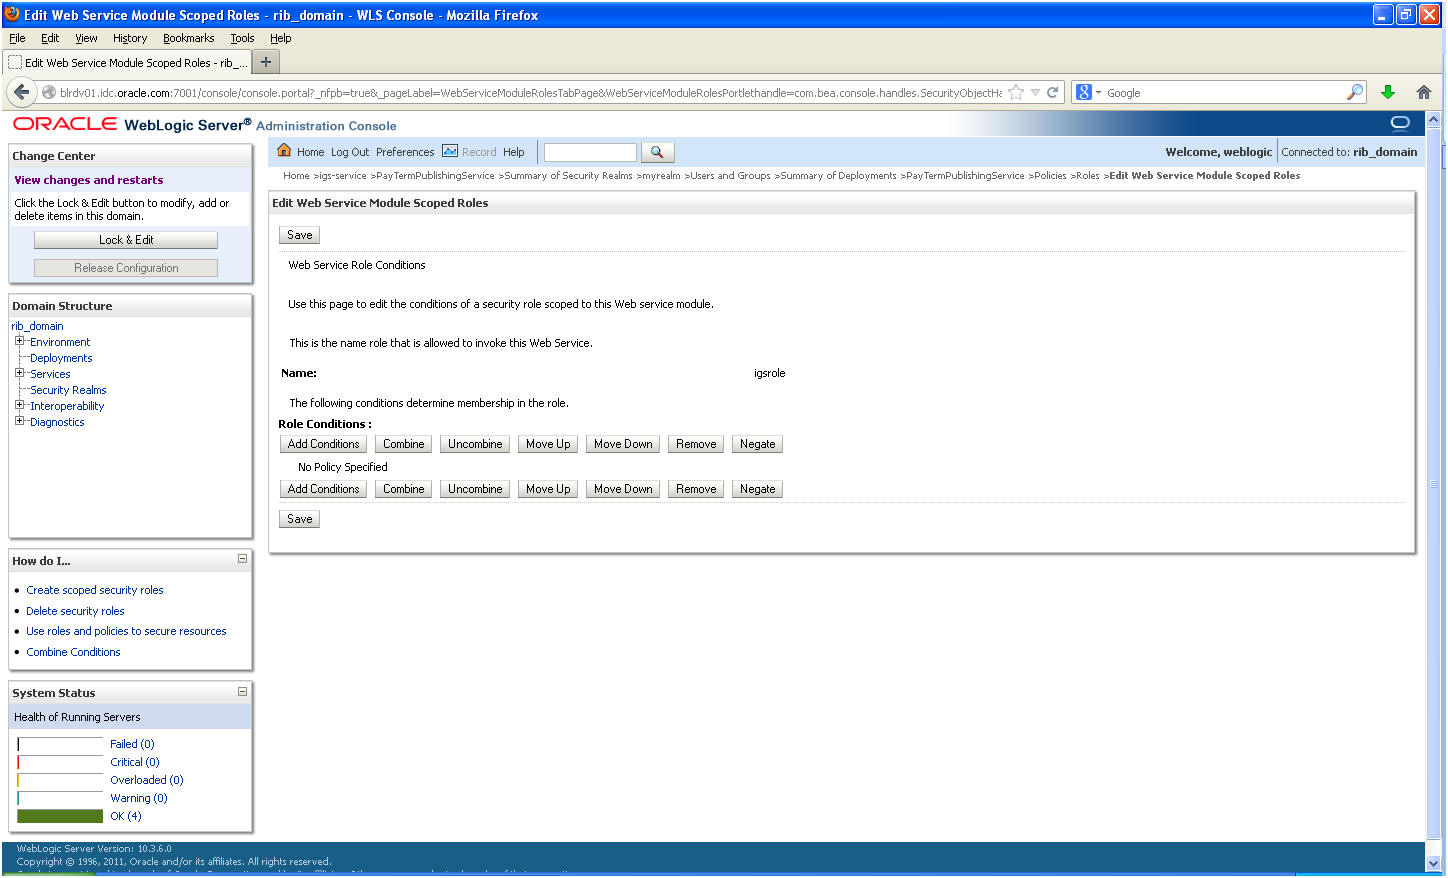
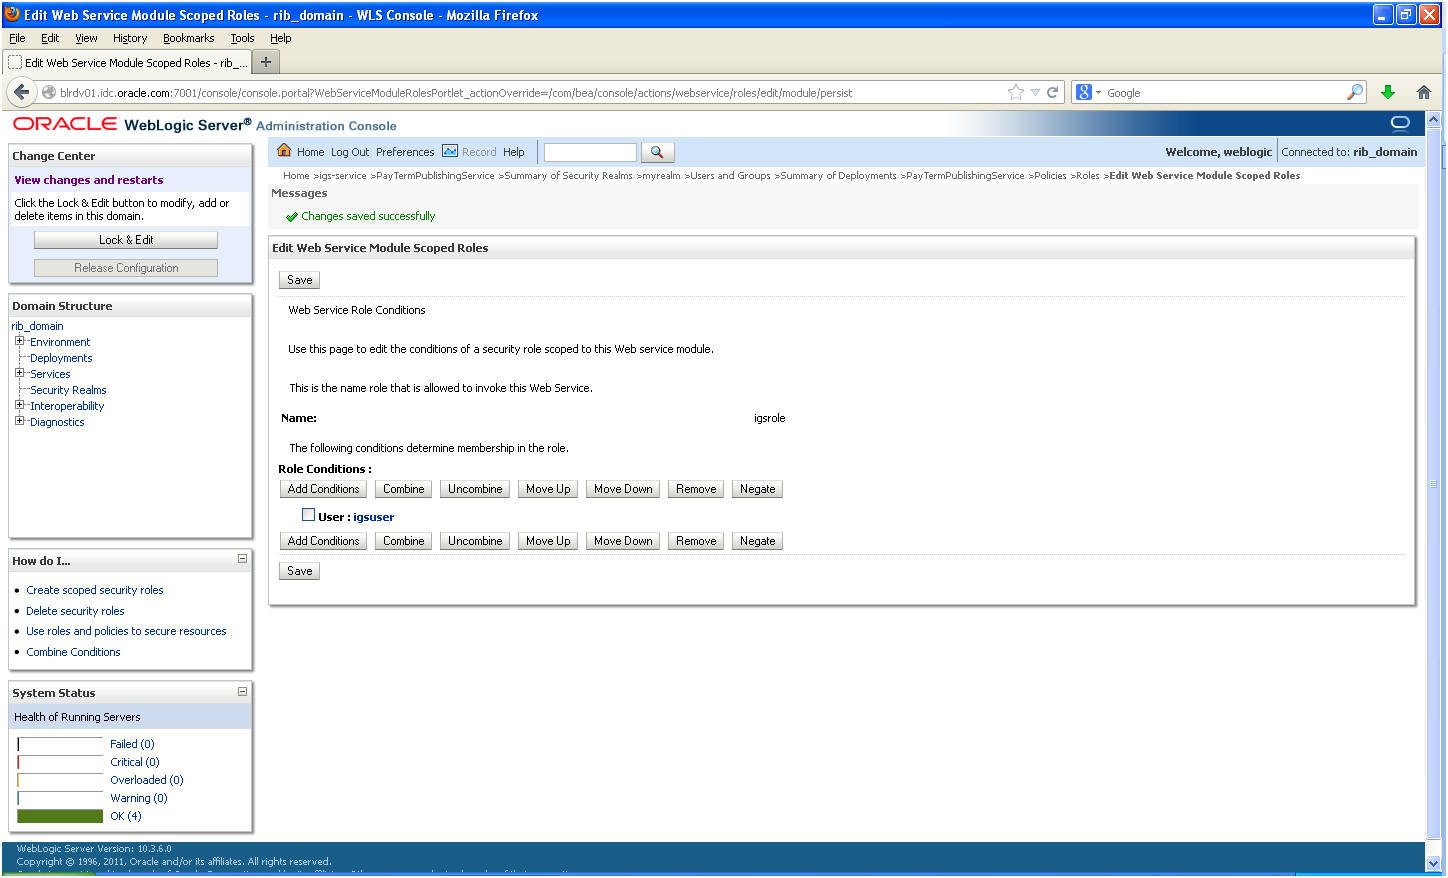
To add the user to the role, click the name of the new role in the Roles tab. The Edit Web Service Module Scoped Roles screen is displayed.
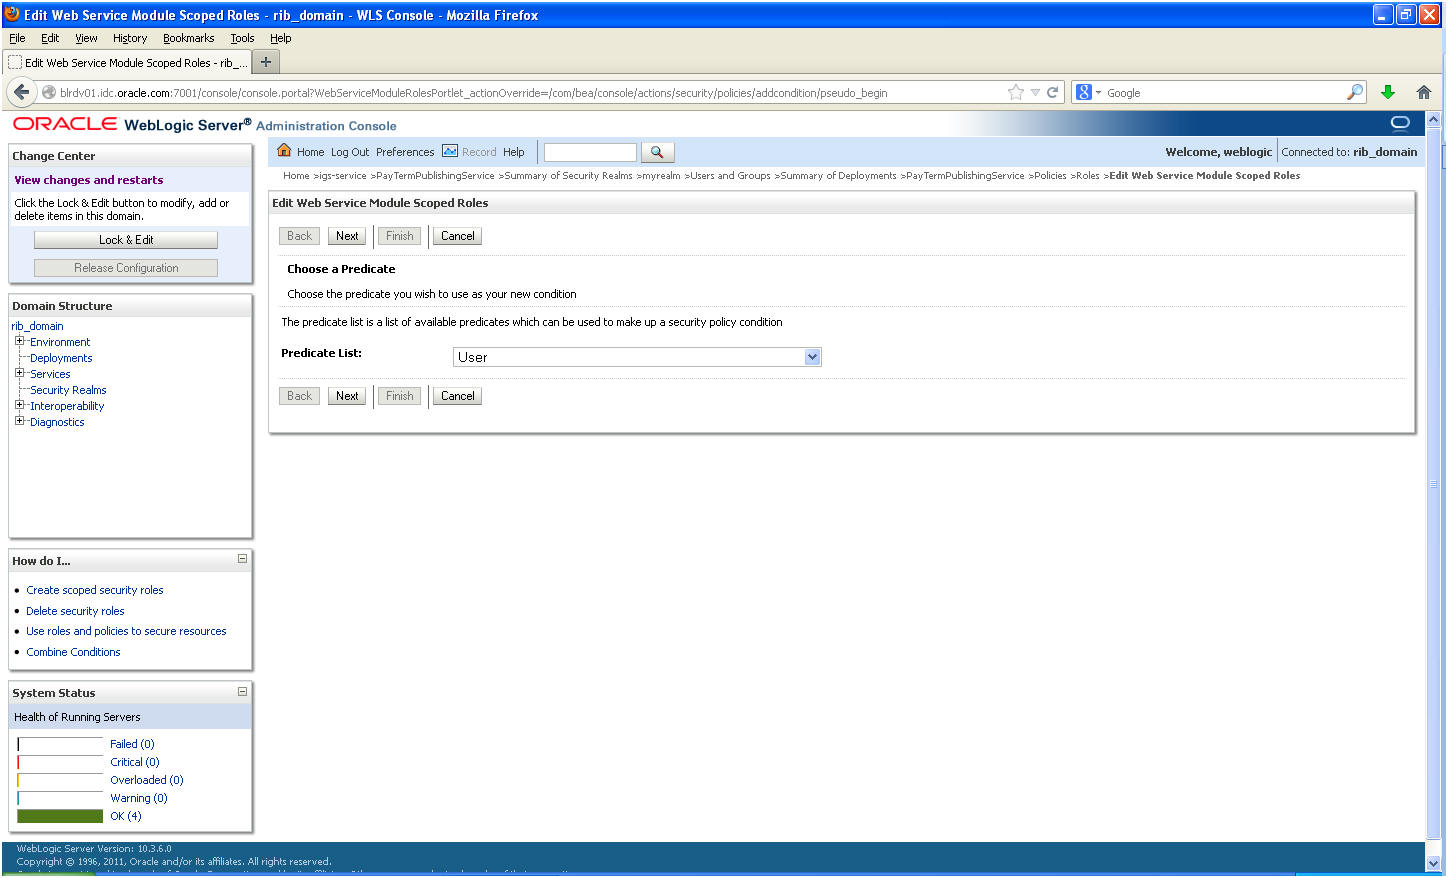
In the Edit Web Service Module Scoped Roles screen, click Add Conditions. The Choose a Predicate option is displayed.
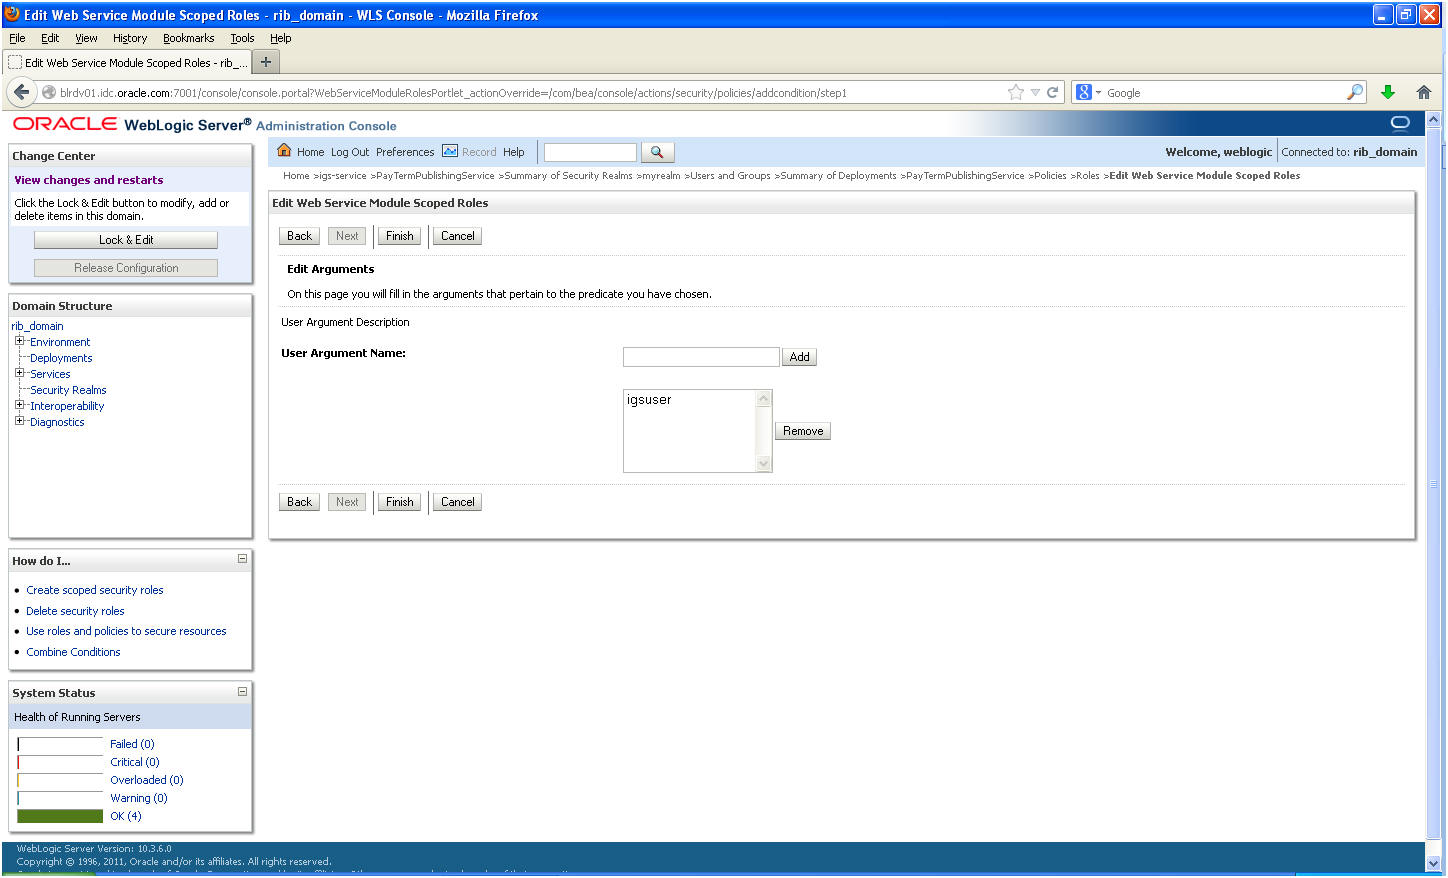
From the Predicate List, select User. Click Next. The Edit Arguments option is displayed.
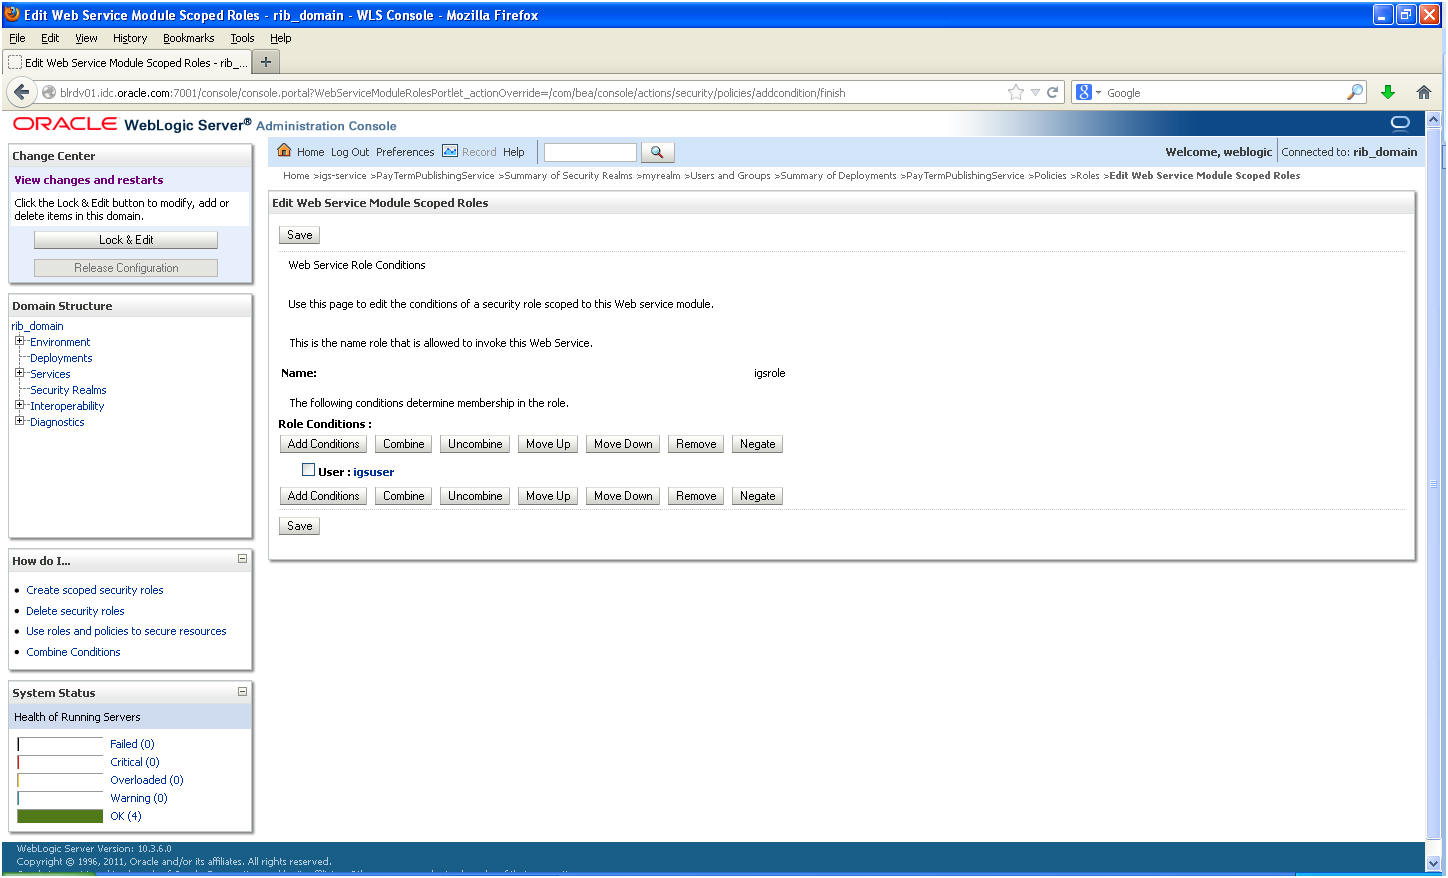
In the User Argument Name field, enter the username created in the security realm. Click Add. The name will move down to the box below the Add button. Click Finish. The following screen is displayed.
Click Save. The same screen is displayed with this message near the top: Changes saved successfully.
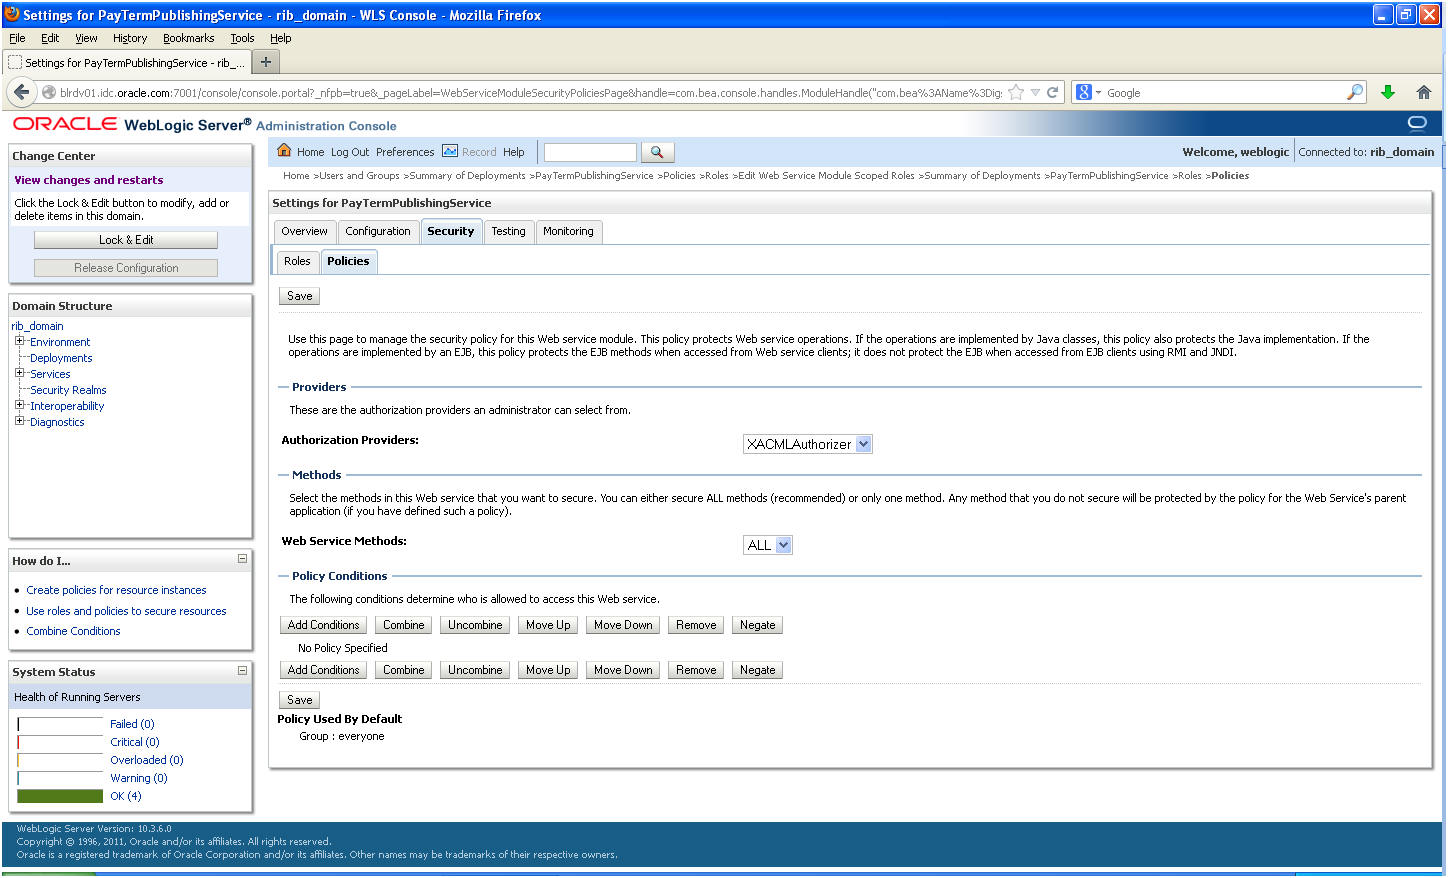
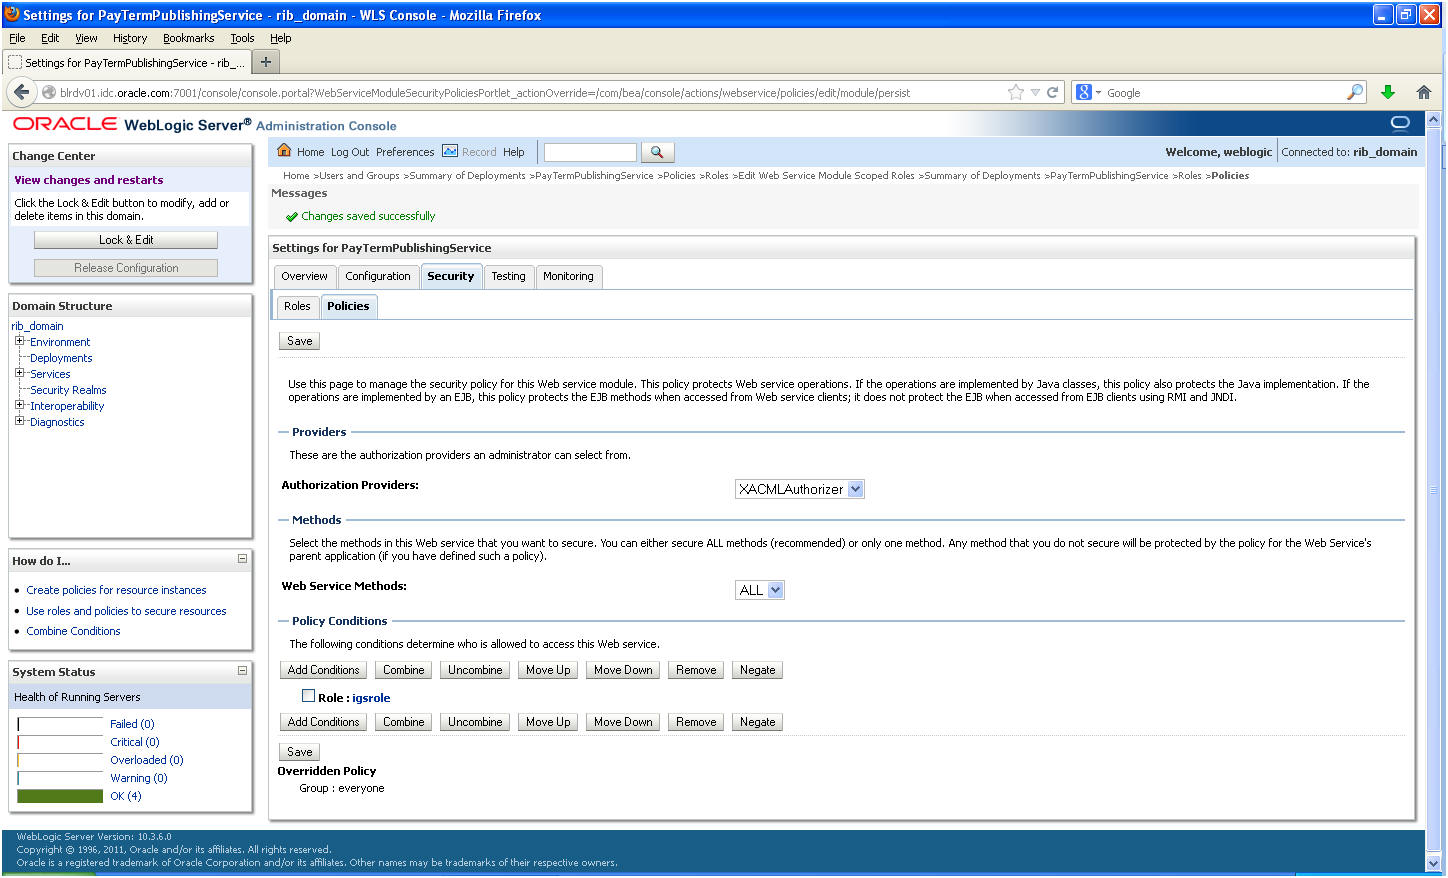
Return the Security tab of the Web service and click the Policies tab.
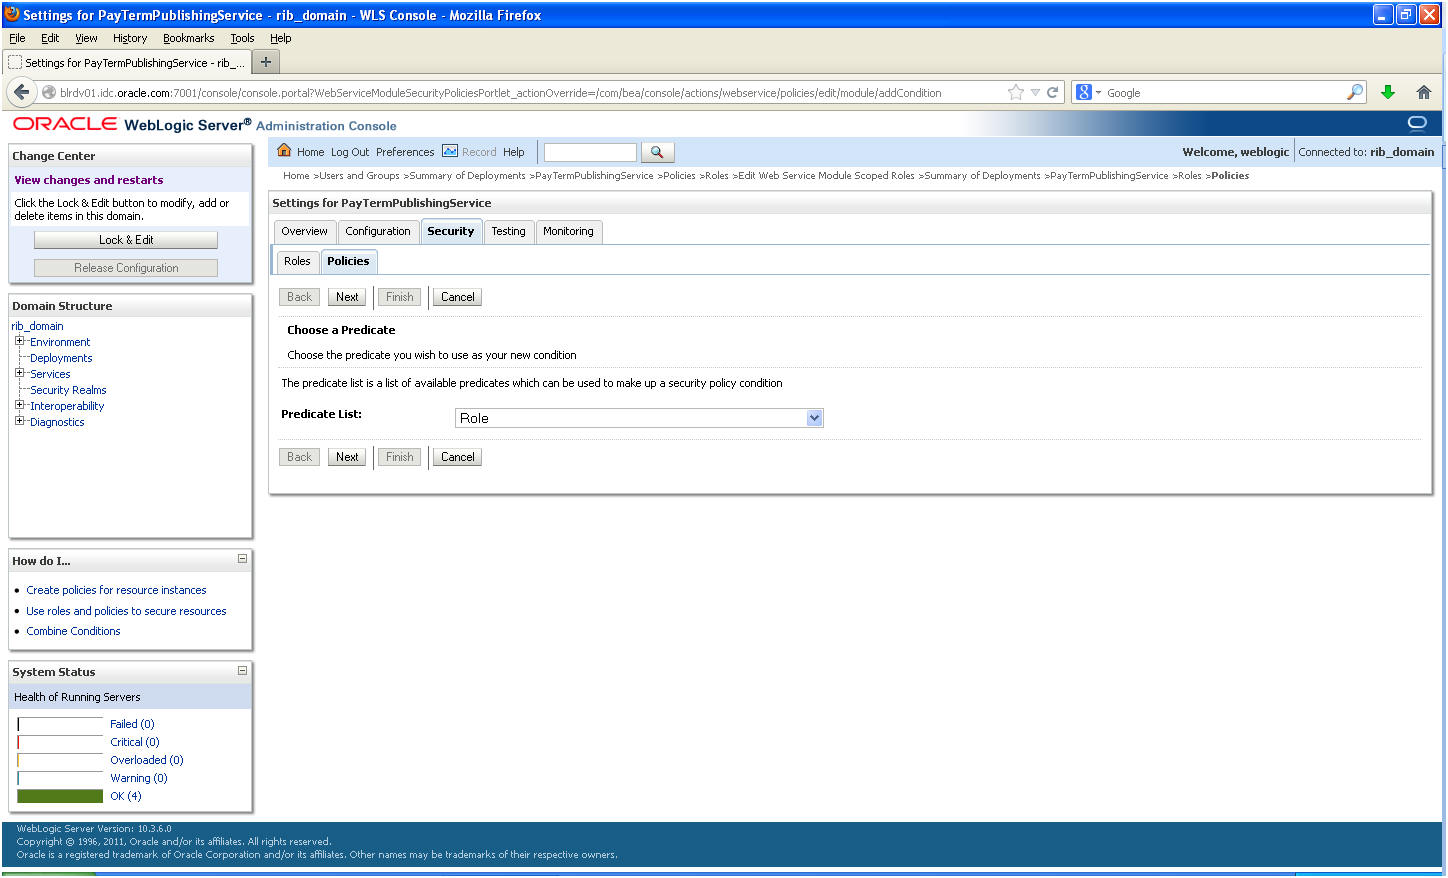
On the Policies tab, click Add Conditions. The Choose a Predicate option is displayed.
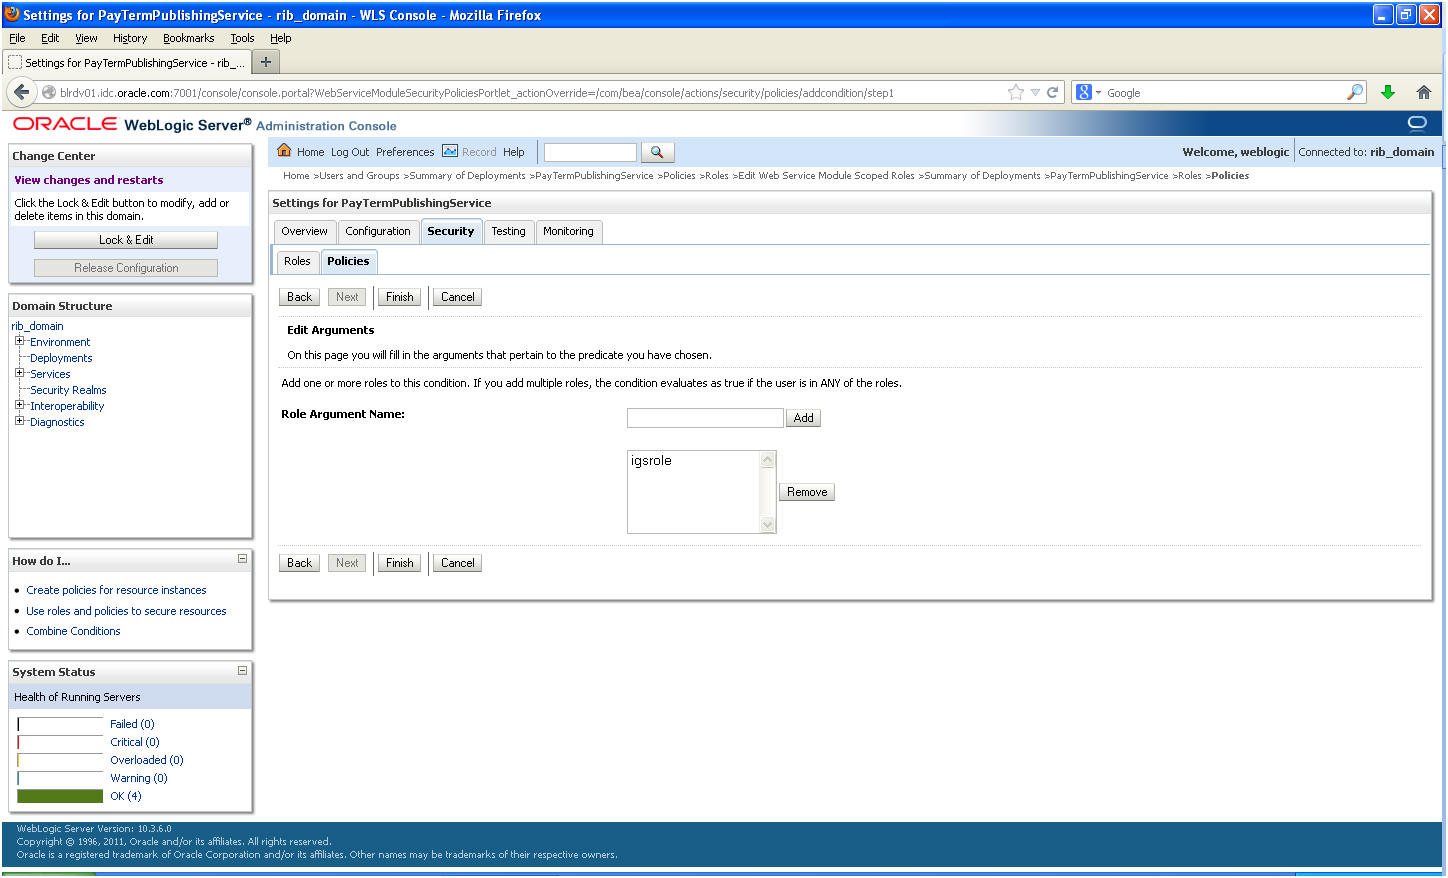
From the Predicate List, select Role. Click Next. The Edit Arguments option is displayed.
In the Role Argument Name field, enter the role name created earlier. Click Add. The role name will move down to the box below the Add button. Click Finish to return to the Policy Conditions screen.
Click Save. The Policy Conditions screen is displayed with this message near the top: Changes saved successfully.
The following is sample code for calling a secure IGS Web service.
|
Note: The following is sample code for invoking the PayTermPublishingService service. When you generate Java consumer for a Web service, the generated jar file contains classes specific to that Web service. Use the appropriate classes in the client code. Service namespace and WSDL location also should be changed accordingly. |
package com.oracle.retail.rms.client;

import java.net.URL;
import java.util.ArrayList;
import java.util.List;
import java.util.Map;
import javax.xml.namespace.QName;
import javax.xml.ws.BindingProvider;
import com.oracle.retail.igs.integration.services.paytermpublishingservice.v1.PayTermPublishingPortType;
import com.oracle.retail.igs.integration.services.paytermpublishingservice.v1.PayTermPublishingService;
import com.oracle.retail.igs.integration.services.paytermpublishingservice.v1.PublishPayTermCreateUsingPayTermDesc;
import com.oracle.retail.igs.integration.services.paytermpublishingservice.v1.PublishPayTermCreateUsingPayTermDescResponse;
import com.oracle.retail.integration.base.bo.paytermdesc.v1.PayTermDesc;
import weblogic.wsee.security.unt.ClientUNTCredentialProvider;
import weblogic.xml.crypto.wss.WSSecurityContext;
import weblogic.xml.crypto.wss.provider.CredentialProvider;
import junit.framework.TestCase;

public class PayTermPublishingClient extends TestCase {
public void testCreatePayTermDesc() {
try {

// qName is namespace of the service
QName qName = new                 QName("http://www.oracle.com/retail/igs/integration/services/PayTermPublishingService/v1"," PayTermPublishingService");

// url is the URL of the WSDL of the web service
URL url = new     URL("http://10.141.29.190:18030/PayTermPublishingBean/PayTermPublishingService?WSDL");

// Create an instance of the web service
PayTermPublishingServiceservice = new PayTermPublishingService (url,qName);
PayTermPublishingPortType =   service.getPayTermPublishingPort ();

// Set the security credentials in the service context
List credProviders = new ArrayList();
CredentialProvider cp = new ClientUNTCredentialProvider("<rms user>","<rms password>");
credProviders.add(cp);
Map<String, Object> rc =            ((BindingProvider)port).getRequestContext();
rc.put(WSSecurityContext.CREDENTIAL_PROVIDER_LIST, credProviders);

// Populate the service method input object
PayTermDesc payTermDesc = new PayTermDesc();
payTermDesc.setTerms("terms");
PublishPayTermCreateUsingPayTermDesc payTermCreateDesc = new P  PublishPayTermCreateUsingPayTermDesc();
payTermCreateDesc.setPayTermDesc(payTermDesc);

// Call the web service
PublishPayTermCreateUsingPayTermDescResponse response =  port.publishPayTermCreateUsingPayTermDesc(payTermCreateDesc,"1");
System.out.println("response="+response);
}catch(Exception e){
  e.printStackTrace();
}
}
}
WebLogic provides predefined policy files for securing Web services. This section describes the process required to secure a Web service where username and password are encrypted and signed.
Take the following steps to secure the Web service:
Follow the steps to attach the policy file to the Web service described in the section, Attach Policy File to the Web Service, with this exception: In Step 7, select policy:Wssp1.2-2007-Wss1.1-UsernameToken-Plain-X509-Basic256.xml (instead of policy:usernametoken.xml). Follow the remaining steps as described.
After attaching the policy file, the header for the WSDL of the Web service contains the following:
<wsp:UsingPolicy wssutil:Required="true"/>
<wsp:Policy wssutil:Id="Wssp1.2-2007-Wss1.0-UsernameToken-Plain-X509-Basic256.xml">
<ns1:AsymmetricBinding xmlns:ns1="http://docs.oasis-open.org/ws-sx/ws-securitypolicy/200702">
<wsp:Policy>
<ns1:InitiatorToken>
<wsp:Policy>
<ns1:X509Token ns1:IncludeToken="http://docs.oasis-open.org/ws-sx/ws-securitypolicy/200702/IncludeToken/AlwaysToRecipient">
<wsp:Policy>
<ns1:WssX509V3Token10/>
</wsp:Policy>
</ns1:X509Token>
</wsp:Policy>
</ns1:InitiatorToken>
<ns1:RecipientToken>
<wsp:Policy>
<ns1:X509Token ns1:IncludeToken="http://docs.oasis-open.org/ws-sx/ws-securitypolicy/200702/IncludeToken/Never">
<wsp:Policy>
<ns1:WssX509V3Token10/>
</wsp:Policy>
</ns1:X509Token>
</wsp:Policy>
</ns1:RecipientToken>
<ns1:AlgorithmSuite>
<wsp:Policy>
<ns1:Basic256/>
</wsp:Policy>
</ns1:AlgorithmSuite>
<ns1:Layout>
<wsp:Policy>
<ns1:Lax/>
</wsp:Policy>
</ns1:Layout>
<ns1:IncludeTimestamp/>
<ns1:ProtectTokens/>
<ns1:OnlySignEntireHeadersAndBody/>
</wsp:Policy>
</ns1:AsymmetricBinding>
<ns2:SignedEncryptedSupportingTokens xmlns:ns2="http://docs.oasis-open.org/ws-sx/ws-securitypolicy/200702">
<wsp:Policy>
<ns2:UsernameToken ns2:IncludeToken="http://docs.oasis-open.org/ws-sx/ws-securitypolicy/200702/IncludeToken/AlwaysToRecipient">
<wsp:Policy>
<ns2:WssUsernameToken10/>
</wsp:Policy>
</ns2:UsernameToken>
</wsp:Policy>
</ns2:SignedEncryptedSupportingTokens>
<ns3:Wss10 xmlns:ns3="http://docs.oasis-open.org/ws-sx/ws-securitypolicy/200702">
<wsp:Policy>
<ns3:MustSupportRefKeyIdentifier/>
<ns3:MustSupportRefIssuerSerial/>
</wsp:Policy>
</ns3:Wss10>
</wsp:Policy>
The key combination used by the client to sign the message is a valid one for the server. The client certificate must be signed with a certificate authority that is trusted by the server.
WebLogic instances include a demo CA. The certificate and key for it is in $WL_HOME/Middleware/wlserver_10.3/server/lib/CertGenCA.der and CertGenCAKey.der. The key does not appear to change between WebLogic installations and is trusted by the default DemoTrust store. For this reason, the DemoTrust store must never be enabled in a production environment. Otherwise anybody can become "trusted" fairly easily.
WebLogic CertGen command can be used for generating keys of the correct key length and signing them with the demo CA noted above. A client certification/key pair is required to sign the outgoing message and server certificate to encrypt the critical information.
java -classpath $WL_HOME/Middleware/wlserver_10.3/server/lib/weblogic.jar utils.CertGen -certfile ClientCert -keyfile ClientKey -keyfilepass ClientKey -cn <rms user>
The above command generates the following files:
ClientCert.der
ClientCert.pem
ClientKey.der
ClientKey.pem
In the above example of a command, the username is <rms user>. Replace <rms user> with the username of the user who will access the Web service.
The command below generates the four files that follow it:
java -classpath $WL_HOME/Middleware/wlserver_10.3/server/lib/weblogic.jar utils.CertGen -certfile ServerCert -keyfile ServerKey -keyfilepass ServerKey -cn <rms user>
ServerCert.der
ServerCert.pem
ServerKey.der
ServerKey.pem
In the above example of a command, the username is <rms user>. Replace <rms user> with the username of the user who will access the Web service.
Using the following commands, import the files into key stores:
java -classpath $WL_HOME/Middleware/wlserver_10.3/server/lib/weblogic.jar utils.ImportPrivateKey -certfile ClientCert.der -keyfile ClientKey.der -keyfilepass ClientKey -keystore ClientIdentity.jks -storepass ClientKey -alias identity - keypass ClientKey

java -classpath $WL_HOME/Middleware/wlserver_10.3/server/lib/weblogic.jar utils.ImportPrivateKey -certfile ServerCert.der -keyfile ServerKey.der -keyfilepass ServerKey -keystore ServerIdentity.jks -storepass ServerKey -alias identity - keypass ServerKey
Using the script in Appendix: configWss.py, configure the WebLogic server to use the key. Copy the script and save it in the location from which it will run.
java -classpath $WL_HOME/Middleware/wlserver_10.3/server/lib/weblogic.jar weblogic.WLST configWss.py <weblogicuser> <WebLogic Password> <weblogichost> <weblogic admin port> ServerIdentity.jks ServerKey identity ServerKey
For example:
java -classpath $WL_HOME/Middleware/wlserver_10.3/server/lib/weblogic.jar weblogic.WLST configWss.py weblogic <WebLogic Password> localhost 7001/home/wls/ServerIdentity.jks ServerKey identity ServerKey
In the WebLogic logic console, check the Web Service Security tab to verify that the command ran properly. Note that the default_ww configuration is used for all Web services unless otherwise indicated.
After the certificate setup is completed for the Web service, follow the steps in the "Create Roles and Users" section to create a user in WebLogic to access the Web service.
Restart the server. Create a client to invoke the Web service.
The following is sample code for calling a Web service that is secured using the policy file, policy:Wssp1.2-2007-Wss1.1-UsernameToken-Plain-X509-Basic256.xml:
package com.test;
import java.net.URL;
import java.security.cert.X509Certificate;
import java.util.ArrayList;
import java.util.List;
import java.util.Map;
import javax.xml.namespace.QName;
import javax.xml.ws.BindingProvider;
import javax.xml.ws.WebServiceRef;
import com.oracle.retail.igs.integration.services.paytermpublishingservice.v1.PayTermPublishingPortType;
import com.oracle.retail.igs.integration.services.paytermpublishingservice.v1.PayTermPublishingService;
import com.oracle.retail.igs.integration.services.paytermpublishingservice.v1.PublishPayTermCreateUsingPayTermDesc;
import com.oracle.retail.igs.integration.services.paytermpublishingservice.v1.PublishPayTermCreateUsingPayTermDescResponse;
import com.oracle.retail.integration.base.bo.paytermdesc.v1.PayTermDesc;
import weblogic.security.SSL.TrustManager;
import weblogic.wsee.security.bst.ClientBSTCredentialProvider;
import weblogic.wsee.security.unt.ClientUNTCredentialProvider;
import weblogic.wsee.security.util.CertUtils;
import weblogic.xml.crypto.wss.WSSecurityContext;
import weblogic.xml.crypto.wss.provider.CredentialProvider;
public class Client {
public static void main(String args[]){
try {
//qName is namespace of the service
QName qName = new QName("http://www.oracle.com/retail/igs/integration/services/PayTermPublishingService/v1"," PayTermPublishingService");

// url is the URL of the WSDL of the web service
URL url = new URL("http://10.141.29.190:18030/PayTermPublishingBean/PayTermPublishingService?WSDL";

// Create an instance of the web service
PayTermPublishingServiceservice = new PayTermPublishingService(url,qName);
PayTermPublishingPortType = service.getPayTermPublishingPort ();
PayTermDesc payTermDesc = new PayTermDesc();
payTermDesc.setTerms("terms");
PublishPayTermCreateUsingPayTermDesc payTermCreateDesc = new PublishPayTermCreateUsingPayTermDesc();
payTermCreateDesc.setPayTermDesc(payTermDesc);

String serverCertFile = "D:/head/retail-soa-enabler/dist/client/ServerCert.der";
String clientKeyStore = "D:/head/retail-soa-enabler/dist/client/ClientIdentity.jks";
String clientKeyStorePass = "ClientKey";
String clientKeyAlias = "identity";
String clientKeyPass = "ClientKey";

List credProviders = new ArrayList();
ClientUNTCredentialProvider unt =  new ClientUNTCredentialProvider("<rms user>","<rms password>");
credProviders.add(unt);
final X509Certificate serverCert = (X509Certificate)CertUtils.getCertificate(serverCertFile);
serverCert.checkValidity();

CredentialProvider cp = new ClientBSTCredentialProvider(clientKeyStore, clientKeyStorePass,clientKeyAlias, clientKeyPass, "JKS", serverCert);
credProviders.add(cp);
Map requestContext = ((BindingProvider)port).getRequestContext();
requestContext.put(WSSecurityContext.CREDENTIAL_PROVIDER_LIST, credProviders);
requestContext.put(WSSecurityContext.TRUST_MANAGER,      new TrustManager() {
public boolean certificateCallback(X509Certificate[] chain,int validateErr) {
boolean result = chain[0].equals(serverCert);
return result;
}
});

PublishPayTermCreateUsingPayTermDescResponse response =  port.publishPayTermCreateUsingPayTermDesc(payTermCreateDesc,"1");
System.out.println("response="+response);

} catch(Exception e){
e.printStackTrace();
}
}
}