| Oracle® Retail Integration Bus Implementation Guide Release 15.0 E67950-02 |
|

 Previous |
 Next |
The customization of an Oracle Retail Application often drives requirements to customize or extend the messages that flow among the Oracle Retail applications, or to create new message flows to support new business logic.
This section discusses the customization/extension approaches and best practices (from a RIB perspective) for extending base messages, creating new messages and adapters. These are complex topics and should be performed with great care to avoid making future generally available (GA) releases difficult or impossible to accept.
Retailers often modify retail software either in-house or through third-party system integrators. The customization and extension of Oracle Retail base products and messages are not supported by Oracle Retail, including My Oracle Support. This chapter aims to mitigate the risks of unsupported customization by providing guidance and references on how to attempt to customize safely and effectively. The tools and approaches described in this chapter are complex and require a high level of skill and knowledge of the product. Any issues that may arise with custom flows, custom APIs or customized message families are the responsibility of the customer and not Oracle Retail.
Customization requires careful consideration and planning for extending the RIB. Planning helps to avoid re-installation or re-architecture because of operational or performance problems.
The following prerequisites help to ensure a successful customization of RIB:
A functional RIB environment without any customizations.
Familiarity with the Core RIB Concepts, components, and architecture, including an understanding of all of the following:
Oracle database triggers, RIB adapters, RIB Message envelope, RIB Message payloads and the functionality of GETNXT () and CONSUME () stored procedures.
Integration message flow paths.
RIB life cycle
Physical and logical requirements and limitations of the RIB components.
RIB operational considerations.
The tools used in the customization and extension of the RIB are separately documented. The primary tools are the Retail Functional Artifact Generator and the rib-app-builder tools. The message (payload) structure and packaging is covered in the Oracle Retail Functional Artifacts Guide.
The following documents are referenced throughout this chapter and are required for the customization effort.
Oracle Retail Functional Artifacts Guide
Oracle Retail Functional Artifact Generator Guide
Oracle Retail Integration Bus Operations Guide
Understand the following customization rules.
Always keep an environment with a base version release to reproduce any base version issues. Only GA base code and messages are supported.
Always take a backup of the particular files being modified during the customization, to allow for reversal of the changes.
Always use RIB tools such as RDMT, RIHA, the PL/SQL and Java EE API-simulators (also known as Stubby) and the PLSQL and JavaEE Service Interface Testers to test the customization changes whenever possible.
Never modify the existing base flows in rib-integration-flows.xml. Modification can cause errors in functionality that is difficult to detect. Also, modifications you make to base flows do not carry over to new releases, nor are they retained when defect fixes are applied to base code and objects.
When customizing or extending the RIB messages or flows, all publishing and subscribing applications participating in the flow must be considered.
In scenarios where payload customization or the addition of a new message type for a particular message family is planned, and the flow contains a TAFR, the following rules apply:
TAFRs that do not examine RIB Message types/payloads do not require modification.
For TAFRs that examine message type/payloads for filtering or transformation purposes, the TAFR implementation code must be changed. If this code is not changed, the messages will fail and land in RIB Error Hospital tables.
In the RIB, all messages are categorized by message family and message type. A message family is specific to one or more Business Objects. It defines all publishable events occurring on the Business Object(s).
The message type classifies a specific event. For example, the Order message family is designed for messages regarding purchase orders, and the Vendor message family is associated with supplier or vendor information.
Typical message types for a message family includes at least one create, modify, and delete operation.
To add a new message to an existing message family, the simplest approach is to add a new message type. The first step is to determine and create the payload for the new message type. The message payload must be created following the guideline and packaging rules for RIB messages.
|
Note: See the Oracle Retail Functional Artifact Generator Guide and the Oracle Retail Functional Artifacts Guide. |
Once the desired payload is ready, follow the appropriate steps for the type of applications in the message family and the message flow.
The new message type created for an already existing or new message family must be added in the rib-<app>-plsql-api.xml of the subscribing PL/SQL retail application.
|
Note: No configuration changes are needed in rib-<plsql-app> whenever PL/SQL applications publish a new message type to which no PL/SQL applications subscribe. |
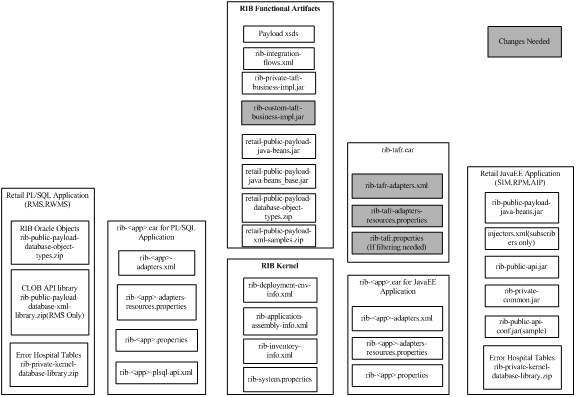
The following illustration indicates the files that must be changed inside the RIB infrastructure during the addition of a new message type when a PL/SQL application is involved in the message flow.
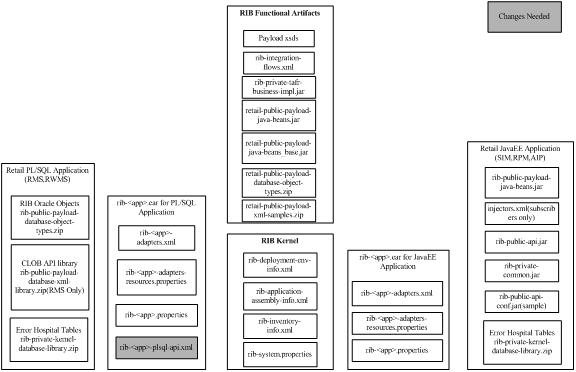
To add a new message type for PL/SQL applications, complete the following steps.
Add the new message type in rib-<app>-plsql-api.xml where app = rms, rfm, or rwms, present under <RIB_HOME>/application-assembly-home/rib-<app> directory.
For example, to add a new message type, DiffGrpFooCre, for the DiffGrp message family using DiffGrpFooDesc as the payload XML that is subscribed by RWMS app: Add the message type under the <adaptorClassDef name="DiffGrp_sub"> of rib-rwms-plsql-api.xml present under <RIB_HOME>/application-assembly-home/rib-rwms as below.
> cd <RIB_HOME>/application-assembly-home/rib-rwms
> vi rib-rwms-plsql-api.xml

<adaptorClassDef name="DiffGrp_sub">

          <messageFamily name="DiffGrp">
              <storedProc>
                   <signature>{call RDMSUB_DIFFGRP.CONSUME(?,?,?,?,?)}</signature>
                   <useFacilityType>true</useFacilityType>
              </storedProc>
              <messageType name="DIFFGRPDEL">
                  <oracleObject>RIB_DiffGrpRef_REC</oracleObject>
              </messageType>
              <messageType name="DIFFGRPDTLCRE">
                  <oracleObject>RIB_DiffGrpDtlDesc_REC</oracleObject>
              </messageType>
              <messageType name="DIFFGRPDTLDEL">
                  <oracleObject>RIB_DiffGrpDtlRef_REC</oracleObject>
              </messageType>
              <messageType name="DIFFGRPHDRCRE">
                  <oracleObject>RIB_DiffGrpHdrDesc_REC</oracleObject>
              </messageType>
              <messageType name="DIFFGRPDTLMOD">
                  <oracleObject>RIB_DiffGrpDtlDesc_REC</oracleObject>
              </messageType>
              <messageType name="DIFFGRPHDRMOD">
                  <oracleObject>RIB_DiffGrpHdrDesc_REC</oracleObject>
              </messageType>
              </messageType name="DIFFGRPFOOCRE">
                  <oracleObject>RIB_DiffGrpFooDesc_REC</oracleObject>
                        </messageType>
             </messageFamily>
       </adaptorClassDef>
Create a temporary working directory, customization workarea, under <RIB_HOME>/tools-home to perform any customization related tasks.
Using the Functional Artifact Generator tool, create custom-retail-public-payload-java-beans-<version>.jar. Copy it to the customization workarea directory created in the previous step.
> cd <RIB_HOME>/tools-home/customization-workarea
> cp <RIB_HOME>/application-assembly-home/rib-func-artifacts/ retail-public-payload-java-beans-<version>.jar
|
Note: See the Oracle Retail Functional Artifact Generator Guide for steps to create custom artifacts. |
Create custom-payload.properties and add the new payload message definitions. The format of the definition is:
"RIBFAMILY.TYPE=IMPLEMENTATION CLASS NAME"
> vi payload.properties (make changes)
For example, when adding the new message type, DiffGrpFooCre, under the DiffGrp message family, the custom-payload.properties file is modified as follows:
DIFFGRP.DIFFGRPFOOCRE=com.oracle.retail.integration.custom.bo.extofdiffgrpfoodesc.v1.ExtOfDiffGrpFooDesc
For this example, DiffGrpFooCre calls the implementation class, ExtOfDiffGrpFooDesc.
|
Note: If there is a TAFR involved in the flow, the appropriate changes must be made to the TAFR to handle the new message types. |
Add custom-payload.properties to custom-retail-public-payload-java-beans-<version>.jar.
> jar -uvf custom-retail-public-payload-java-beans-<version>.jar META-INF/custom-payload.properties
Copy the updated custom-retail-public-payload-java-beans-<version>.jar to <RIB_HOME>/application-assembly-home/rib-func-artifacts/ directory.
Run the rib-app-builder compiler: Run the rib-app-compiler.sh script from <RIB_HOME>/application-assembly-home/bin directory to generate/assemble a rib-<app> and make it ready for deployment.
|
Note: See the Oracle Retail Integration Bus Operations Guide - (rib-app-builder tools). |
> cd <RIB_HOME>/application-assembly-home/bin
> sh rib-app-compiler.sh
Run the rib-app-builder deployer: Run the rib-app-deployer.sh script from <RIB_HOME>/deployment-home/bin directory as follows:
> cd <RIB_HOME>/tools-home/customization-workarea> cp <RIB_HOME>/application-assembly-home/rib-func-artifacts/retail-public-payload-java-beans-<version>.jar
This deploys the rib-func-artifact-war.
> sh rib-app-deployer.sh -deploy-rib-app-ear rib-<app>
This deploys the rib-<app>. Repeat this step for each rib-<app> in scope for this integration environment.
|
Note: The <app> must be an RMS, RFM, or RWMS application. |
The illustration below indicates the files that must be changed inside the RIB infrastructure during the addition of a new message type when a Java EE application is involved in the message flow.
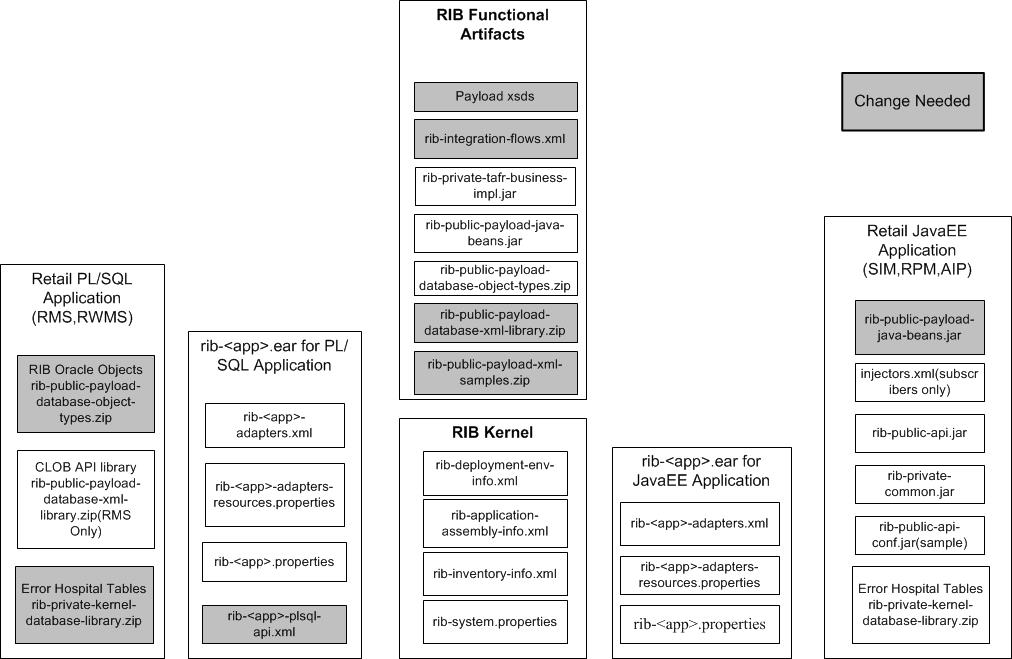
Create a temporary working directory, customization-workarea, under <RIB_HOME>/tools-home to perform any customization related tasks
Go to the customization-workarea directory and create a file called custom-payload.properties.
> cd <RIB_HOME>/tools-home/customization-workarea
> vi custom-payload.properties
Edit the custom-payload.properties created in the step above. The custom-payload.properties would contain the new payload message definitions.
The format of the definition is:
"RIBFAMILY.TYPE=IMPLEMENTATION CLASS NAME"
> vi custom-payload.properties (make changes)
For example, when adding the new message type, DiffFooCre, under the Diffs message family, the custom-payload.properties file is modified as follows:DIFFGRP.DIFFGRPFOOCRE=com.oracle.retail.integration.custom.bo.extofdiffgrpfoodesc.v1.ExtOfDiffGrpFooDescFor this example, DiffGrpFooCre calls the implementation class, ExtOfDiffGrpFooDesc.
If this involves a customized payload, then copy over the custom-retail-public-payload-java-beans-<version>.jar generated using Functional Artifact Generator tool to customization-workarea directory.
> cp <path-to-the-jar-generated-by-artifact-generator>/custom-retail-public-payload-java-beans-<version>.jar .For example,:cp <RIB_HOME>/tools-home/retail-func-artifact-gen/dist/custom-retail-public-payload-java-beans-<version>.jar .and add the custom-payload.properties to the jar
> jar -uvf custom-retail-public-payload-java-beans-<version>.jar custom-payload.properties
Copy the updated custom-retail-public-payload-java-beans-<version>.jar to <RIB_HOME>/application-assembly-home/rib-func-artifacts/ directory.
For example: cp <path-to-the-jar-generated-by-artifact-generator>/custom-retail-public-payload-java-beans-<version>.jar <RIB_HOME>/application-assembly-home/rib-func-artifacts/
Go to <RIB_HOME>/ application-assembly-home/conf and edit rib-application-assembly-info.xml.
> cd <RIB_HOME>/ application-assembly-home/conf
> vi rib-application-assembly-info.xml
Add the following line, as shown in the code example below:
<include name="payload-lib/custom-retail-public-payload-java-beans-<version>.jar"/>
|
Note: You don't have to specify the version of the jar for entry in the rib-application-assembly-info.xml.If there is a TAFR involved in the flow, the appropriate changes must be made to the TAFR to handle the new message types. Refer to Message Family and Message Type Customization. |
Example:
<rib-app id="rib-tafr" type="javaee-app">
 <ear>
 <classpath>
 <classpath refid="rib-app.global.ejb-jar.classpath"/>
 <fileset dir=".">
 <include name="lib/rib-private-tafr-business-impl.jar"/>
 <include name="lib/rib-custom-tafr-business-impl.jar"/>
 <include name="payload-lib/custom-retail-public-payload-java-beans-<version>.jar"/>
 <include name="payload-lib/retail-public-payload-java-beans-<version>.jar"/>
 </fileset>
 </classpath>
 <java-ee-module>
 <web-war/>
 <ejb-jar>
 <classpath>
 <classpath refid="rib-app.global.ejb-jar.classpath"/>
 <fileset dir=".">
 <include name="lib/rib-private-tafr-business-impl.jar"/>
 <include name="lib/rib-custom-tafr-business-impl.jar"/>
 <include name="payload-lib/custom-retail-public-payload-java-beans-<version>.jar"/>
 <include name="payload-lib/retail-public-payload-java-beans-<version>.jar"/>
 </fileset>
 </classpath>
 </ejb-jar>
 <jms-jca-connector>
 <classpath refid="rib-app.global.jms-jca-connector.classpath"/>
 </jms-jca-connector>
 </java-ee-module>
 </ear>
 <resource>
 <resource-path refid="rib-app.global.resource-path"/>
 <resource-path>
 <fileset dir=".">
 <include name="rib-tafr.properties"/>
 <include name="rib-tafr-adapters.xml"/>
 <include name="rib-tafr-adapters-resources.properties"/>
 </fileset>
 </resource-path>
 </resource>
Run the rib-app-compiler: Run the rib-app-compiler.sh script from <RIB_HOME>/application-assembly-home/bin directory as follows.
>cd <RIB_HOME>/application-assembly-home/bin
>sh rib-app-compiler.sh
Run the rib-app-builder deployer: Run the rib-app-deployer.sh script from <RIB_HOME>/deployment-home/bin directory as follows.
> cd <RIB_HOME>/deployment-home/bin
> sh rib-app-deployer.sh -deploy-rib-func-artifact-war
This deploys the rib-func-artifact-war.
> sh rib-app-deployer.sh -deploy-rib-app-ear rib-<app>
This deploys the rib-<app>. Repeat this step for all rib-<app> that is in scope for this integration environment.
|
Note: The <app> must be a TAFR, SIM, AIP, or RPM application. |
|
Note: To verify the addition of a new message type for a message family, see "Verifying the New Message Type". |
In RIB, all messages are categorized by message family and message type. One option for customizing the RIB is to create a new message family with a new publishing adapter and a new subscribing adapter.
If the new message family also corresponds to a topic, it is recommended that the customization also include the creation of a new topic for that family.
A publishing adapter cannot publish to more than one JMS topic.
A subscribing adapter cannot subscribe to more than one JMS topic.
The first custom message flow must start with 901, with each subsequent custom message flow id increasing by one from 901. For example, 901, 902, 903, and so on.
Each customized message flow id should be unique and must follow the sequence.
A new message family requires new (or custom) Oracle Retail Application side API(s). Each API should be written, installed and tested independently, and then connected to the custom message family flows.
The following illustration indicates the files that require changes during the addition of a new message family inside the RIB infrastructure:
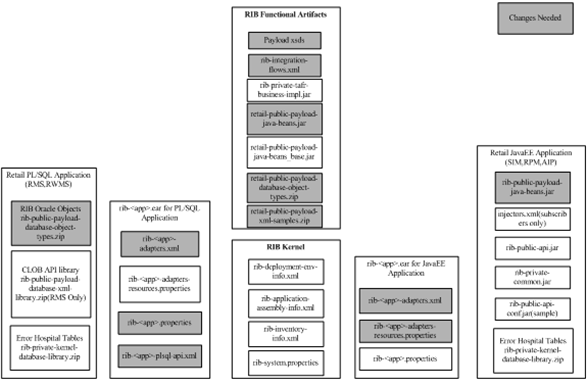
To add a new message family, complete the following steps.
Create a temporary working directory, customization-workarea, under <RIB_HOME>/tools-home to perform any customization related tasks.
Copy the rib-func-artifact.war present under <RIB_HOME>/application-assembly-home/rib-func-artifacts/ directory into <RIB_HOME>/tools-home/ customization-workarea/ directory.
> cd <RIB_HOME>/application-assembly-home/rib-func-artifacts
> cp rib-func-artifact.war <RIB_HOME>/tools-home/ customization-workarea
Extract the rib-integration-flows.xml from the copied rib-func-artifact.war requiring modification.
> cd <RIB_HOME>/tools-home/ customization-workarea
> jar -xvf rib-func-artifact.war integration/rib-integration-flows.xml
Define the entire flow for the particular message family in rib-integration-flows.xml present under /integration/ directory of <RIB_HOME>/tools-home/ customization-workarea.
The first custom message flow should always begin with <message-flow id="901">. Each customized message flow id should be unique and must follow the sequence. Adding a new customized message flow with a message-flow ID between 1 and 900 is not recommended, as this range is reserved for adding base flows in higher versions of RIB.
For example, when adding a new message family, Foo, that flows from the RMS application to the RWMS application, the flow is defined in rib-integration-flows.xml as follows:
   <message-flow id="901">
         <node id="rib-rms.Foo_pub" app-name="rib-rms"
                adapter-class-def="Foo_pub" type="DbToJms">
                <in-db>default</in-db>
                <out-topic>etFooFromRMS</out-topic>
          </node>
          <node id=" rib-rwms.Foo_sub" app-name=" rib-rwms"
               adapter-class-def="Foo_sub" type="JmsToDb">
                <in-topic>etFooFromRMS</in-topic>
               <out-db>default</out-db>
        </node>
</message-flow>
The convention is as follows:
node id = rib-<app>.<family>_pub or = rib-<app>.<family>_sub or could be external-system.<family>_pub or external-system.<family>_sub.
app-name = rib-<app> is the application name. The <app> is one of the following: rms, rwms, sim, rpm aip, orfm, oms, or tafr-- or external-system.
adapter-class-def = <family>_pub or <family>_sub.
type = DbToJms, JmsToDb, or JmsToJms.
<in-db> means the source of the message is a database.
<out-db> means the destination of the message is a database.
<out-topic> is the topic name to which the message is published.
<in-topic> is the topic name from which the message is consumed.
Replace the previous existing rib-integration-flows.xml with the changed rib-integration-flows.xml in the /integration/ directory of rib-func-artifact.war under <RIB_HOME>/tools-home/customization-workarea/ directory and generate the rib-func-artifact.war as follows.
> cd <RIB_HOME>/tools-home/customization-workarea
> jar -uvf rib-func-artifact.war integration/rib-integration-flows.xml
Create a new publishing adapter, subscribing adapter and TAFR adapter (only if necessary), depending on the requirement for the new message family as explained later in this chapter.
Create the message family XSD.
|
Note: See the Oracle Retail Functional Artifact Guide for information about adding a new payload. |
The newly created XSD should conform to the Meta schema, IntegrationMetaschema.xsd. The artifact generator tool checks the validity of the schema before generating any artifacts. If the schema is not compliant with the IntegrationXmlMetaSchema, the artifact generator fails.
Create a new message type.
Edit the custom-payload.properties file present in /conf directory of Rib Artifact Generator tool installation. The custom-payload.properties contains the new payload message definitions. The format of the definition is:
"RIBFAMILY.TYPE=IMPLEMENTATION CLASS NAME"
> cd conf
> vi custom-payload.properties (make changes)
For example, when adding a new message type, FooCre, (under the Foo message family) that calls the implementation class, FooDesc, the custom-payload.properties file is modified as follows:
FOO.FOOCRE=com.oracle.retail.integration.custom.bo.extoffoodesc.v1.ExtOfFooDesc
|
Note: See the RibMessages.xsd bundled inside rib-func-artifact.war for the maximum supported length for message type. |
Run the Artifact Generator to generate functional artifacts.
> $GROOVY_HOME/bin/groovy com.oracle.retail.integration.artifact.generator.GenArtifacts.groovy -g generateCustom
Upon completion of this step, the generated artifacts are in the appropriate ./output*/dist folders: custom-retail-public-payload-database-object-types-<version>.jar and custom-retail-public-payload-java-beans-<version>.jar
Copy these newly generated artifacts from the appropriate ./output*/dist folders to <RIB_HOME>/application-assembly-home/rib-func-artifacts/ directory: custom-retail-public-payload-database-object-types-<version>.jar and custom-retail-public-payload-java-beans-<version>.jar.
New entries may be needed in RIB_SETTINGS in the RMS application database to reference the new message family only if the RMS application is in scope.
Run the rib-app-builder compile: Run the rib-app-compiler.sh script from <RIB_HOME>/application-assembly-home/bin directory to generate/assemble a rib-<app> and make it ready for deployment.
> cd <RIB_HOME>/application-assembly-home/bin
> sh rib-app-compiler.sh
Run the rib-app-builder deployer: Run the rib-app-deployer.sh script from <RIB_HOME>/deployment-home/bin directory as follows to create the new topic (etFooFromRMS) in the flow. (The prepare jms step is not destructive, so even if it is run again it would remove all the topics and recreate them.)
> cd <RIB_HOME>/deployment-home/bin
> sh rib-app-deployer.sh -prepare-jms
Run the rib-app-builder deployer: Run the rib-app-deployer.sh script from <RIB_HOME>/deployment-home/bin directory as follows.
> cd <RIB_HOME>/deployment-home/bin
> sh rib-app-deployer.sh -deploy-rib-func-artifact-war
This deploys the rib-func-artifact.war.
> sh rib-app-deployer.sh -deploy-rib-app-ear rib-<app>
The rib-<app> is deployed. Repeat this step for each rib-<app> in scope for this integration environment.
|
Note: The <app> value must be rms, rwms, tafr, sim, orfm, aip, or rpm. |
A RIB Adapter is a component that coordinates business event (message) generation and processing with the respective Oracle Retail application interface. Each adapter in the RIB is created to handle a specific functional interface.
While adding a custom publishing, subscribing or TAFR adapter, it is necessary to add or modify the message flows to which you are adding a custom adapter in the rib-integration-flows.xml, update the rib-func-artifact.war, and deploy the updated rib-func-artifact.war.
Example: Adding a new publisher Foo_pub that publishes a message for a message family Foo that flows from RMS to RWMS. We need to define the flow in rib-integration-flows.xml.
<message-flow id="901">
          <node id="rib-rms.Foo_pub" app-name="rib-rms"
               adapter-class-def="Foo_pub" type="DbToJms">
              <in-db>default</in-db>
              <out-topic>etFooFromRMS</out-topic>
         </node>
      <node id=" rib-rwms.Foo_sub" app-name=" rib-rwms"
              adapter-class-def="Foo_sub" type="JmsToDb">
               <in-topic>etFooFromRMS</in-topic>
               <out-db>default</out-db>
           </node>
     </message-flow>
To add the flow to the rib-integration-flows.xml file, complete the following steps:
|
Note: Before adding the above flow to the rib-integration-flows.xml flow, it is recommended that a temporary working directory ("customization-workarea" under <RIB_HOME>/tools-home) be created. This directory can be used for performing any customization related tasks. |
Copy the rib-func-artifact.war from <RIB_HOME>/ application-assembly-home/rib-func-artifacts to <RIB_HOME>/tools-home/customization-workarea/ directory.
> cd <RIB_HOME>/ application-assembly-home/rib-func-artifacts
> cp rib-func-artifact-<version>.war <RIB_HOME>/tools-home/customization-workarea
Extract the rib-integration-flows.xml requiring modification from the copied rib-func-artifact.war as follows:
> jar -xvf rib-func-artifact-<version>.war integration/ rib-integration-flows.xml
Add the flow shown above to the rib-integration-flows.xml.
Update the rib-func-artifact-<version>.war with the modified rib-integration-flows.xml.
> jar -uvf rib-func-artifact-<version>.war integration/ rib-integration-flows.xml
Copy the rib-func-artifact-<version>.war from <RIB_HOME>/tools-home/customization-workarea to <RIB_HOME>/application-assembly-home/rib-func-artifacts/ directory.
> cd <RIB_HOME>/tools-home/customization-workarea
> cp rib-func-artifact.war <RIB_HOME>/ application-assembly-home/rib-func-artifacts
Run the rib-app-builder compiler: Run the rib-app-compiler.sh script from <RIB_HOME>/application-assembly-home/bin directory to generate/assemble a rib-<app> and make it ready for deployment.
> cd <RIB_HOME>/application-assembly-home/bin
> sh rib-app-compiler.sh
Run the rib-app-builder deployer: Run the rib-app-deployer.sh script from <RIB_HOME>/deployment-home/bin directory as follows.
"cd <RIB_HOME>/deployment-home/bin
"sh rib-app-deployer.sh -deploy-rib-func-artifact-war
The rib-func-artifact.war is deployed.
Publishing adapters create messages from the information captured by the applications. These publishing adapters are designed to publish events for a single message family and are specific to an Oracle Retail application. This section explains how to create a new publishing adapter for a message family for a PL/SQL application (such as RMS and RWMS).
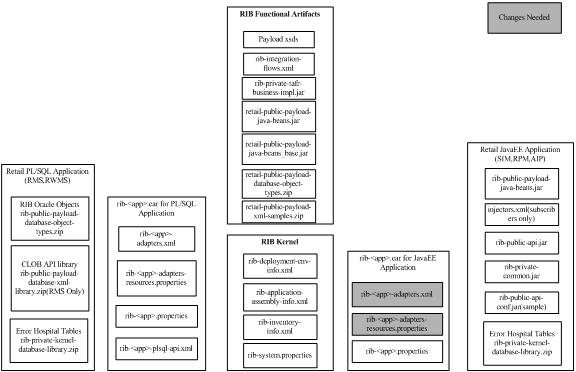
The illustration below indicates the files that require changes inside the RIB infrastructure for the addition of a new publishing adapter for a PL/SQL application:

To add a publishing adapter for PL/SQL applications, complete the following steps.
Identify the flow to which the new adapter in being added.
Define the name of the publishing adapter. It should always follow the naming convention, RIBFAMILY_pub_ADAPTER INSTANCE NO.
Define the particular publishing adapter in rib-<app>-adapters.xml under <RIB_HOME>/application-assembly-home/rib-<app>, where <app> refers to either RMS, RFM, or RWMS. The customer also must mention a custom attribute equal to "true" whenever a new customized publishing adapter is added.
For example, a new publishing adapter, Foo_pub_1, (for the Foo message family) is defined in rib-<app>-adapters.xml as follows:
<timer-driven id="Foo_pub_1" initialState="running" timeDelay="10" custom="true">
        <timer-task>
            <class name="com.retek.rib.app.getnext.impl.GetNextTimerTaskImpl"/>
            <property name="maxChannelNumber" value="1" />
        </timer-task>
</timer-driven>
Define the particular publishing adapter in rib-<app>-adapters-resources.properties under <RIB_HOME>/application-assembly-home/rib-<app>, where <app> refers to either RMS, ORFM, or RWMS.
Foo_pub_1.name=Foo Publisher, channel 1
Foo_pub_1.desc=Publisher for the Foo family through channel 1.
Define the particular publishing adapter in rib-<app>-plsql-api.xml under <RIB_HOME>/application-assembly-home/rib-<app>, where <app> refers to either RMS, ORFM, or RWMS, as shown in the example below.
|
Note: The signature of the stored procedure should come from the corresponding PL/SQL applications. |
<adaptorClassDef name="Foo_pub">
 <class>com.retek.rib.collab.general.OracleObjectPublisherComponentImpl</class>
        <messageFamily name="Foo">
       <storedProc>
       <signature>{call RMSMFM_FOO.GETNXT(?,?,?,?,?,?,?,?)}</signature>
       <storedProc>
       </messageFamily>
 </adaptorClassDef>
Run the rib-app-builder compiler: Run the rib-app-compiler.sh script from <RIB_HOME>/application-assembly-home/bin directory to generate/assemble a rib-<app> and make it ready for deployment.
> cd <RIB_HOME>/application-assembly-home/bin
> sh rib-app-compiler.sh
Run the rib-app-builder deployer: Run the rib-app-deployer.sh script from <RIB_HOME>/deployment-home/bin directory as follows.
> cd <RIB_HOME>/deployment-home/bin
> sh rib-app-deployer.sh -deploy-rib-app-ear rib-<app>
The <app> is deployed.
Make the required changes to the rib-integration-flows.xml. See "Adding the Custom Adapter to the rib-integration-flows.xml File."
Publishing adapters create messages from the information captured by the applications. These publishing adapters are designed to publish events for a single message family and are specific to an Oracle Retail application. This section explains how to create a new publishing adapter for a message family for a Java EE application, such as RPM, AIP, or SIM.
The illustration below indicates the files that require changes inside the RIB infrastructure for the addition of a new publishing adapter for a Java EE application.

To add a publishing adapter for Java EE applications, complete the following steps.
Identify the flow to which the new adapter in being added.
Define the name of the publishing adapter. It should always follow the naming convention, RIBFAMILY_pub_ADAPTER INSTANCE NO.
Define the particular publishing adapter in rib-<app>-adapters.xml under <RIB_HOME>/application-assembly-home/rib-<app>, where <app> refers to RPM, AIP, or SIM. The customer also must mention a custom attribute equal to "true" whenever a new customized publishing adapter is added.
For example, a new publishing adapter, Foo_pub_1, (for the Foo message family) is defined in rib-<app>-adapters.xml as follows:
<request-driven id=" Foo_pub_1" initialState="notConfigurable" custom="true" />
Define the particular publishing adapter in rib-<app>-adapters-resources.properties under <RIB_HOME>/application-assembly-home/rib-<app>, where <app> refers to RPM, AIP, or SIM.
Foo_pub_1.name=Foo Publisher, channel 1
Foo_pub_1.desc=Publisher for the Foo family through channel 1.
Run the rib-app-builder compiler: Run the rib-app-compiler.sh script from <RIB_HOME>/application-assembly-home/bin directory to generate/assemble a rib-<app> and make it ready for deployment.
> cd <RIB_HOME>/application-assembly-home/bin
> sh rib-app-compiler.sh
Run the rib-app-builder deployer: Run the rib-app-deployer.sh script from <RIB_HOME>/deployment-home/bin directory as follows.
> cd <RIB_HOME>/deployment-home/bin
> sh rib-app-deployer.sh -deploy-rib-app-ear rib-<app>
The <app> is deployed.
Make the required changes to the rib-integration-flows.xml. See "Adding the Custom Adapter to the rib-integration-flows.xml File."
Subscribing adapters are specific to Oracle Retail and designed to consume all messages from a specific message family.
The illustration below indicates the files that require changes inside the RIB infrastructure for the addition of a new subscriber adapter (for a particular message family) for PL/SQL applications, such as RMS, ORFM, or RWMS.

To add a new subscribing adapter for a PL/SQL application, complete the following steps.
Identify the flow to which the new adapter is being added.
Define the name of the subscribing adapter. It should always follow the naming convention, "RIBFAMILY_sub_ADAPTER INSTANCE NO".
Define the particular subscribing adapter in rib-<app>-adapters.xml under <RIB_HOME>/application-assembly-home/rib-<app>, where <app> refers to either RMS, ORFM, or RWMS. The customer also must mention a custom attribute equal to true whenever a new customized subscribing adapter is added.
For example, a new subscribing adapter, Foo_sub_1, (for the Foo message family) is defined in rib-<app>-adapters.xml as follows:
<message-driven id="Foo_sub_1" initialState="running" custom="true"/>
Define the particular subscribing adapter in rib-<app>-adapters-resources.properties under <RIB_HOME>/application-assembly-home/rib-<app>, where <app> refers to either RMS, ORFM, or RWMS.
Foo_sub_1.name=Foo Subscriber, channel 1
Foo_sub_1.desc=Subscriber for the Foo family through channel 1.
Define the particular subscribing adapter in rib-<app>-plsql-api.xml under <RIB_HOME>/application-assembly-home/rib-<app>, where <app> refers to either RMS, ORFM or RWMS, as shown in the example below.
|
Note: The signature of the stored procedure should come from the corresponding PL/SQL applications. |
<adaptorClassDef name="Foo_sub">
<class>com.retek.rib.collab.general.OracleObjectSubscriberComponentImpl</class>
      <messageFamily name="Foo">
            <storedProc>
            <signature>{callRMSSUB_FOO.CONSUME(?,?,?,?)}</signature>
            </storedProc>
      <messageType name=" FOOCRE">
            <oracleObject>RIB_FooDesc_REC</oracleObject>
      </messageType>
      <messageType name=" FooMOD">
            <oracleObject>RIB_FooDesc_REC</oracleObject>
      </messageType>
      <messageType name=" FooDEL">
             <oracleObject>RIB_FooRef_REC</oracleObject>
      </messageType>
      </messageFamily>
  </adaptorClassDef>
Run the rib-app-builder compiler: Run the rib-app-compiler.sh script from <RIB_HOME>/application-assembly-home/bin directory to generate/assemble a rib-<app> and make it ready for deployment.
> cd <RIB_HOME>/application-assembly-home/bin
> sh rib-app-compiler.sh
Run the rib-app-builder deployer: Run the rib-app-deployer.sh script from <RIB_HOME>/deployment-home/bin directory as follows.
> cd <RIB_HOME>/deployment-home/bin
> sh rib-app-deployer.sh -deploy-rib-app-ear rib-<app>
The <app> is deployed.
Make the required changes to the rib-integration-flows.xml. See "Adding the Custom Adapter to the rib-integration-flows.xml File."
Subscribing adapters are specific to Oracle Retail and designed to consume all messages from a specific message family.
The illustration below indicates the files that require changes inside the RIB infrastructure for the addition of a new subscriber adapter (for a particular message family) for Java EE applications, such as RPM, AIP, or SIM.
Identify the flow to which the new adapter is being added.
Define the name of the subscribing adapter. It should always follow the naming convention, RIBFAMILY_sub_ADAPTER INSTANCE NO.
Define the particular subscribing adapter in rib-<app>-adapters.xml under <RIB_HOME>/application-assembly-home/rib-<app>, where <app> refers to SIM, RPM, or AIP. The customer also must mention a custom attribute equal to "true" whenever a new customized subscribing adapter is added.
For example, a new subscribing adapter, Foo_sub_1, (for the Foo message family) is defined in rib-<app>-adapters.xml as follows:
<message-driven id="Foo_sub_1" initialState="running" custom="true"/>
Define the particular subscribing adapter in rib-<app>-adapters-resources.properties under <RIB_HOME>/application-assembly-home/rib-<app>, where <app> refers to SIM, RPM, or AIP.
Foo_sub_1.name=Foo Subscriber, channel 1
Foo_sub_1.desc=Subscriber for the Foo family through channel 1.
Run the rib-app-builder compiler: Run the rib-app-compiler.sh script from <RIB_HOME>/application-assembly-home/bin directory to generate/assemble a rib-<app> and make it ready for deployment.
> cd <RIB_HOME>/application-assembly-home/bin
> sh rib-app-compiler.sh
Run the rib-app-builder deployer: Run the rib-app-deployer.sh script from <RIB_HOME>/deployment-home/bin directory as follows.
> cd <RIB_HOME>/deployment-home/bin
> sh rib-app-deployer.sh -deploy-rib-app-ear rib-<app>
The <app> is deployed.
Make the required changes to the rib-integration-flows.xml. See "Adding the Custom Adapter to the rib-integration-flows.xml File."
Transformation Address Filters/Router (TAFR) adapters transform message data and route messages. Multiple, message family specific TAFRs have already been implemented. Different TAFR adapters may be active on different message families or on the same message family depending on the needs of an application. Not all message families require TAFRs.
The following topics should be considered before writing a customized TAFR implementation for transformation, filtering or routing.
Transformation is handled in the TAFR implementation class. Here is an example method of a TAFR that handles transformation:
public RibMessage transformRibMessage(RibMessage inMsg) throws TafrException {
// Transforms the incoming RibMessage into an outgoing RibMessage
RibMessage newMsg = transform(inMsg);
return newMsg; }
Filtering configuration involves updating the rib-tafr.properties file with the appropriate information. The property follows the usual properties naming convention (name=value). The property used for filtering is:
"for.<tafr name>_tafr.drop-messages-of-types"
Example:
for.ItemsToItemsISO_tafr.drop-messages-of-types=ISCDimCre,ISCDimMod,ISCDimDel,ItemImageCre,ItemImageMod,ItemImageDel,ItemUdaDateCre,ItemUdaDateMod,ItemUdaDateDel,ItemUdaFfCre,ItemUdaFfMod,ItemUdaFfDel,ItemUdaLovCre,ItemUdaLovMod,ItemUdaLovDel
This property should be read as, "for ItemsToItemsISO TAFR, drop these message types." A comma delimits the message types. If customization is required, rib-tafr.properties files must be updated for filtering to take place.
Routing is enabled by default for TAFRs; the RIB infrastructure handles this routing. If a TAFR requires routing based on message content, implementation classes override the following method.
public void routeRibMessage(RibMessage newMsg,MessageRouterIface router) throws TafrException {
    router.addMessageForTopic(eventType, newMsg);
}
This section explains how to create a new TAFR adapter for a particular message family.
The illustration below indicates the files that require changes inside the RIB infrastructure during the addition of a new TAFR adapter to a message family.
To add a new TAFR adapter, complete the following steps.
Identify the flow to which the new adapter is being added.
Define the name of the TAFR adapter. It should always follow the naming convention, RIBFAMILY_tafr_ADAPTER INSTANCE NO.
Define the corresponding implementation class name the TAFR needs to call.
Write the implementation class for the TAFR.
The default implementation of a TAFR implements the following interface in the RIB infrastructure:
package com.retek.rib.collab.tafr;

import com.retek.rib.domain.ribmessage.bo.RibMessage;

public interface TafrIface {
        @return ribMessage that has been modified from the original one
        public RibMessage transformRibMessage(RibMessage ribMsgIn) throws TafrException;

        /**
         * Filters message or messages contents accordingly. It is possible that
         * this method could filter away the entire message thus returning null
         * from this method.
         *
         * @param ribMsg
         * @return ribMessage that may have been modified from the original one
         *  passed in or null.
         */
        public RibMessage filterRibMessage(RibMessage ribMsgIn) throws TafrException;

        /**
         * Routes the message to the appropriate topic for publication.
         *
         * @param ribMsg RibMessage to be routed to the appropriate topic.
         */
        public void routeRibMessage(RibMessage ribMsgIn, MessageRouterIface
                router) throws TafrException;

        public void processRibMessage(RibMessage ribMsgIn, MessageRouterIface
                router) throws TafrException;
}
To complete custom TAFR implementation, do the following.
First check if the default implementation that comes with the RIB infrastructure is appropriate.
Create a rib-custom-tafr-business-impl-<version>.jar containing the customized implementation class for the specific message family and replace the same under <RIB_HOME>/application-assembly-home/rib-func-artifacts.
|
Note: See the My Oracle Support document, "How to Create a Custom TAFR Implementation." |
Define the particular TAFR adapter in rib-tafr-adapters.xml under <RIB_HOME>/application-assembly-home/rib-tafr. The customer must mention a custom attribute equal to "true" whenever a new customized TAFR adapter is added.
For example, when adding a new TAFR adapter, Foo_tafr_1, for a Foo message family, the implementation class written is SampleToSampleWH. It is under the package com.retek.rib.collab.tafr.bo.impl inside rib-custom-tafr-business-impl-<version>.jar and should be defined in rib-tafr-adapters.xml as shown below:
<message-driven id="Foo_tafr_1" initialState="running" tafr-business- impl="com.retek.rib.collab.tafr.bo.impl.SampleToSampleWH" custom="true" />
Define the particular TAFR adapter as below in rib-tafr-adapters-resources.properties under <RIB_HOME>/application-assembly-home/rib-tafr:
Foo_tafr_1.name=Foo TAFR, channel 1Foo_tafr_1.desc=TAFR for the Foo family through channel 1.
Run the rib-app-builder compiler: Run the rib-app-compiler.sh script from <RIB_HOME>/application-assembly-home/bin directory to generate/assemble a rib-<app> and make it ready for deployment.
> cd <RIB_HOME>/application-assembly-home/bin
> sh rib-app-compiler.sh
Run the rib-app-builder deployer: Run the rib-app-deployer.sh script from <RIB_HOME>/deployment-home/bin directory as follows.
> cd <RIB_HOME>/deployment-home/bin
> sh rib-app-deployer.sh -deploy-rib-app-ear rib-tafr
Make the required changes to the rib-integration-flows.xml. See "Adding the Custom Adapter to the rib-integration-flows.xml File."
|
Note: To verify the addition of the new TAFR adapter, see the section, "Verifying the New TAFR Adapter." |
If there is a need to add more functionality than what is already provided for an existing TAFR, a class can be added to extend from the original TAFR class.
To change an existing TAFR adapter, complete the following steps.
Identify the TAFR to which more functionality should be added.
Define the corresponding implementation class name the TAFR needs to call. This class should extend from the original TAFR implementation class.
For example, if additional functionality is required for the ASNOutToASNIn_tafr_1 TAFR, for which the implementation class is ASNOutToASNInLocFromRibBOImpl, a new class can be written for the additional functionality that extends from ASNOutToASNInLocFromRibBOImpl. Also, if additional functionality is needed for the transformation of the message, call the transform method of the ASNOutToASNInLocFromRibBOImpl class and write the additional code/logic.
|
Note: For information on how to write the implementation class., see the My Oracle Support document, "How to Create a Custom TAFR Implementation." |
Write the implementation class for the TAFR.
Create a rib-custom-tafr-business-impl-<version>.jar containing the implementation class and place the same under <RIB_HOME>/application-assembly-home/rib-func-artifacts.
|
Note: For more information on how to create the rib-custom-tafr-business-impl-15.0.0.jar, see the My Oracle Support document, "How to Create a Custom TAFR Implementation." |
Replace the name of the implementation class with the new class name in the rib-tafr-adapters.xml as shown below.
For example, if the name of the new class name is CustomASNOutToASNInLocFromRibBOImpl, the entry in rib-tafr-adapters.xml should be:
<message-driven id="ASNOutToASNIn_tafr_1" initialState="running" tafr-business-impl=" com.retek.rib.collab.tafr.bo.impl.
CustomASNOutToASNInLocFromRibBOImpl " custom ="true"/>
Run the rib-app-builder compiler: Run the rib-app-compiler.sh script from <RIB_HOME>/application-assembly-home/bin directory to generate/assemble a rib-<app> and make it ready for deployment.
> cd <RIB_HOME>/application-assembly-home/bin
> sh rib-app-compiler.sh
Run the rib-app-builder deployer: Run the rib-app-deployer.sh script from <RIB_HOME>/deployment-home/bin directory as follows.
> cd <RIB_HOME>/deployment-home/bin
> sh rib-app-deployer.sh -deploy-rib-app-ear rib-tafr
One aspect of RIB customization/extension includes adding a new rib-app for a new application which user wants to integrate using RIB. This new app can be a PLSQL application, JavaEE application or a SOAP application. This section discusses the general steps required to add a new rib-app followed by the detailed steps for adding a rib-app specific to PLSQL Application, JavaEE Application or a SOAP application.
General steps to add a new rib-<app> are as follows:
Create a rib-<app> folder for new application in rib-home/application-assembly -home. Add rib-<app>-adapters.xml, rib-<app>-adapters-resources.properties, rib-<app>.properties. If new app is a plsql-app, add rib-<app>-plsql-api.xml too.
Update rib-<app>-adapters.xml with information about subscriber, publisher and hospital adapters.
Update rib-<app>-adapters-resources.properties with name, description of subscribers, publishers and hospital retriers.
Update rib-application-assembly-info.xml with new rib-app information under <rib-applications>.
rib-<app>.properties file cannot be left empty, add some text (example below) in case nothing specific to rib-<app> in properties file:
#####################################################
# rib-<app> application specific properties go here.#
# All properties have default values, add the #
# property here only if the default value does not #
# suit your environment. # #####################################################
Update the various sections of the deployment-home/conf/rib-deployment- env-info.xml file to include information about the new rib-<app>.
Update the rib-integration-flows.xml file to add the publisher and subscriber flow information for the new rib-app.
Follow RIB installation defined lifecycle steps to complete compilation and deployment of rib-<app>.ear
Following section lists down the detailed steps required to create a new PLSQL rib-<app> corresponding to a PLSQL application named foo. The application name (foo) is for sample purposes only. The new rib application will be named rib-foo, (i.e. rib-<app> where <app> = foo). Subscribing adapter will be for family Banner and will subscribe from jms topic etBannerFromRMS. The publishing adapter will be for family CurRate and will publish to jms topic etEXTCurRate.
The publishing adapter and subscribing adapter and business objects that are used, while actual, are illustrative only and chosen for their simplicity in the example and should be replaced with the actual ones that match the business case.
|
Note: The application (foo.ear) that integrates with the rib-foo is designed and developed to satisfy whatever business requirements have driven the need for a new rib-<app> and is beyond the scope of this document. |
|
Note: It is assumed that rib-home is already in place and working properly without the rib-foo application. |
The following are the steps to create a new rib-foo.ear application that can communicate with a new application (called foo.ear in this example) designed to meet the business objective.
Go to rib-home and create a directory rib-foo under application-assembly-home.
> cd rib-home
> mkdir application-assembly-home/rib-foo
Add rib-foo-adapters.xml, rib-foo-adapters-resources.properties, rib-foo.properties and rib-foo-plsql-api.xml to rib-foo folder created above.
> touch application-assembly-home/rib-foo/rib-foo-adapters.xml
application-assembly-home/rib-foo/rib-foo-adapters-resources.properties
application-assembly-home/rib-foo/rib-foo.properties
application-assembly-home/rib-foo/rib-foo-plsql-api.xml
Add rib adapter (subscriber, publisher and hospital) details to the file application-assembly-home/rib-foo/rib-foo-adapters.xml.
<?xml version="1.0" encoding="UTF-8"?>
<rib-adapters xmlns:xsi="http://www.w3.org/2001/XMLSchema-instance" xsi:noNamespaceSchemaLocation="rib-adapters.xsd" appName="rib-foo">
   <subscribers>
      <message-driven id="Banner_sub_1" initialState="running" />
   </subscribers>
   <publishers>
     <timer-driven id="CurRate_pub_1" initialState="running" timeDelay="10" >
     <timer-task>
     <class name="com.retek.rib.app.getnext.impl.GetNextTimerTaskImpl"/>
     <property name="maxChannelNumber" value="1" />
     </timer-task>
    </timer-driven>
   </publishers>
   <hospitals>
      <timer-driven id="sub_hosp_0" initialState="running" timeDelay="10"  >
         <timer-task>
            <class name="com.retek.rib.j2ee.ErrorHospitalRetryTimerTask"/>
            <property name="reasonCode" value="SUB" />
         </timer-task>
      </timer-driven>
      <timer-driven id="jms_hosp_0" initialState="running" timeDelay="10"  >
         <timer-task>
            <class name="com.retek.rib.j2ee.ErrorHospitalRetryTimerTask"/>
            <property name="reasonCode" value="JMS"/>
         </timer-task>
      </timer-driven>
   </hospitals>
</rib-adapters>
Add publisher, subscriber and hospital retrier details to the file application-assembly-home/rib-foo/rib-foo-adapters-resources.properties.
#
# If this changes, ManagedAdaptersResourcesPropertiesTest will need to
# change accordingly.
#
sub_all.name=Subscribers
sub_all.desc=Manages all subscribers at the same time.
Banner_sub_1.name=Banner Subscriber, channel 1
Banner_sub_1.desc=Subscriber for the Banner family through channel 1.
CurRate_pub_1.name=CurRate Publisher, channel 1
CurRate_pub_1.desc=Publisher for the CurRate  family through channel 1.
hosp_all.name=Hospital Retriers
hosp_all.desc=Manages all hospital retriers at the same time.
sub_hosp_0.name=SUB Hospital Retry
sub_hosp_0.desc=Inject messages into from the Error Hospital.
jms_hosp_0.name=JMS Hospital Retry
jms_hosp_0.desc=Re-publish messages from to JMS after JMS is brought back up.
Put the following xml content into rib-foo-plsql-api.xml
<?xml version="1.0" encoding="UTF-8"?>
<rib-app-plsql-api xmlns="http://www.oracle.com/retail/integration/rib/rib-app-plsql-api" xmlns:xsi="http://www.w3.org/2001/XMLSchema-instance" xsi:noNamespaceSchemaLocation="http://www.oracle.com/retail/integration/rib/rib-app-plsql-api.xsd">
<adaptorClassDef name="Banner_sub">
<class>com.retek.rib.collab.general.CLOBSubscriberComponentImpl</class>
<messageFamily name="Banner">
<storedProc>
<signature>{call RMSSUB_BANNERCRE.CONSUME(?, ?, ?)}</signature>
</storedProc>
</messageFamily>
</adaptorClassDef>
<adaptorClassDef name="CurRate_pub">
<class>com.retek.rib.collab.general.CLOBPublisherComponentImpl</class>
<messageFamily name="CURRATE">
<storedProc>
<signature>{call RMSMFM_CURRATE.GETNXT(?,?,?,?,?,?)}</signature>
<outParameter index="5">
<type>
<value>NUMERIC</value>
</type>
<!--NUMERIC, VARCHAR, INTEGER, FLOAT, DATE -->
<toJavaField>ID</toJavaField>
</outParameter>
<outParameter index="6">
<type>
<value>NUMERIC</value>
</type>
<!--NUMERIC, VARCHAR, INTEGER, FLOAT, DATE -->
</outParameter>
</storedProc>
</messageFamily>
</adaptorClassDef>
</rib-app-plsql-api>
Update rib-application-assembly-info.xml under application-assembly-home/conf. Near the end (before </rib-applications>), append the following section to application-assembly-home/conf/rib-application-assembly-info.xml.
       <rib-app id="rib-foo" type="plsql-app">
            <ear>
                <classpath refid="rib-app.global.ear.classpath" />
                <java-ee-module>
                    <web-war />
                    <ejb-jar>
                        <classpath refid="rib-app.global.ejb-jar.classpath" />
                    </ejb-jar>
                    <jms-jca-connector>
                        <classpath refid="rib-app.global.jms-jca-connector.classpath" />
                    </jms-jca-connector>
                </java-ee-module>
            </ear>
            <resource>
                <resource-path refid="rib-app.global.resource-path" />
                <resource-path>
                    <fileset dir=".">
                        <include name="retail/remote_service_locator_info_ribserver.xml"
/>
                        <include name="rib-foo.properties" />
                        <include name="rib-foo-adapters.xml" />
                        <include name="rib-foo-adapters-resources.properties" />
                        <include name="rib-foo-plsql-api.xml" />
                    </fileset>
                </resource-path>            </resource>
        </rib-app>
Update the various sections of the deployment-home/conf/rib-deployment-env-info.xml file.
Update <app-in-scope-for-integration> section to add the new application.
Add the following XML section under <app-in-scope-for-integration>.
<app id="foo" type="plsql-app"/>
Define the WebLogic Server information for the foo application. Add the following XML section under the <weblogic> (before </weblogic>). Refer to the Oracle Retail Integration Bus Installation Guide for details about the WLS path and ports.
<wls id="rib-foo-wls1">
         <wls-instance-name>rib-foo-server</wls-instance-name>
<wls-instance-home>webadmin@ribhost.example.com://u01/rrtswls/Oracle/Middleware/user_projects/domains/base_domain/servers/rib-foo-server</wls-instance-home>
         <wls-listen-port protocol="http">7003</wls-listen-port>
         <wls-user-alias>rib-foo-wls-user-alias</wls-user-alias>
</wls>
Add the following XML section under the <rib-applications> (before </rib-applications>) section. In the jndi/url xml tag section, point it to the location where foo.ear (not rib-foo.ear) is deployed. Refer to Oracle Retail Integration Bus Installation Guide for details.
<rib-app id="rib-foo" type="plsql-app">
         <deploy-in refid="rib-foo-wls1" />
         <rib-admin-gui>
<web-app-url>http://ribhost.example.com:7003/rib-foo-appserver-gui/index.jsp</web-app-url>
           <web-app-user-alias>rib-foo_rib-admin-gui_web-app-user-alias</web-app-user-alias>
         </rib-admin-gui>
         <error-hospital-database>
<hosp-url>jdbc:oracle:thin:@hospdbhost.example.com:1521:orcl</hosp-url>
            <hosp-user-alias>rib-foo_error-hospital-database_user-name-alias</hosp-user-alias>
         </error-hospital-database>
         <app-database>
<app-db-url>jdbc:oracle:thin:@hospdbhost.example.com:1521:orcl</app-db-url>
            <app-db-user-alias>rib-foo_app-database_user-name-alias</app-db-user-alias>
         </app-database>
         <notifications>
           <email>
               <email-server-host>mail.example.com</email-server-host>
               <email-server-port>25</email-server-port>
               <from-address>admin@example.com</from-address>
               <to-address-list>admin@example.com</to-address-list>
           </email>
           <jmx/>
         </notifications>
         <app id="foo" type="plsql-app">
           <jndi-not-applicable/>
         </app>
      </rib-app>
Update the rib-integration-flows.xml to add the publisher and subscriber flow information for the app.
Create a customization-workarea directory under rib-home, extract rib-integration-flows.xml present in rib-func-artifact-<version>.war.
> mkdir customization-workarea
> cd customization-workarea
> jar xf ../ application-assembly-home/rib-func-artifacts/rib-func-artifact-<version>.war integration/rib-integration-flows.xml
Edit integration/rib-integration-flows.xml to add message flow details for new app (rib-foo).
Add the following xml section as the last node of message-flow ID number 2. Search for Banner to take you to the right message-flow.
<node id="rib-foo.Banner_sub" app-name="rib-foo"
       adapter-class-def="Banner_sub" type="JmsToDb">
        <in-topic>etBannerFromRMS</in-topic>
      <out-db>default</out-db>
</node>
Add the following XML section as the first node of message-flow ID number 40. Search for CurRate to take you to the right message-flow.
<node id="rib-foo.CurRate_pub" app-name="rib-foo"
                adapter-class-def="CurRate_pub" type="DbToJms">
<in-db>default</in-db>
<out-topic>etEXTCurRate</out-topic>
</node>
Add updated rib-integration-flows.xml to rib-func-artifact-<version>.war.
> jar  uvf
../application-assembly-home/rib-func-artifacts/rib-func-artifact-<version>.war integration/rib-integration-flows.xml
Cleanup and remove the temporary working directory
> cd ..
> rm -rf customization-workarea
Run the rib-app-builder compiler: Run the rib-app-builder script from <RIB_HOME>/application-assembly-home/bin directory to generate/assemble a rib-<app> and make it ready for deployment.
> cd <RIB_HOME>/application-assembly-home/bin
>sh rib-app-compiler.sh -setup-security-credential
Run the rib-app-builder deployer: Run the rib-app-deployer.sh script from <RIB_HOME>/deployment-home/bin directory as follows to register the new publishing and subscribing adapters in the flow. (The prepare jms step is not destructive, so even if it is run again it will just remove all the topics and recreate them.)
> cd <RIB_HOME>/deployment-home/bin
> sh rib-app-deployer.sh -prepare-jms
Run the rib-app-builder deployer: Run the rib-app-deployer script from <RIB_HOME>/deployment-home/bin directory as follows:
> cd <RIB_HOME>/deployment-home/bin
> sh rib-app-deployer.sh -deploy-rib-func-artifact-war
This deploys the rib-func-artifact-war
> sh rib-app-deployer.sh -deploy-rib-app-ear rib-foo
This deploys the new javaee rib-<app>.
Following section lists down the detailed steps required to create a new JavaEE rib-<app> corresponding to a JavaEE application named foo. The application name (foo) is for sample purposes only. The new rib application will be named rib-foo, (i.e. rib-<app> where <app> = foo). Subscribing adapter will be for family Banner and will subscribe from jms topic etBannerFromRMS. The publishing adapter will be for family CurRate and will publish to jms topic etEXTCurRate.
The publishing adapter and subscribing adapter and business objects that are used, while actual, are illustrative only and chosen for their simplicity in the example and should be replaced with the actual ones that match the business case.
|
Note: The application (foo.ear) that integrates with rib-foo is designed and developed to satisfy whatever business requirements have driven the need for a new rib-<app> and is beyond the scope of this document. |
|
Note: It is assumed that rib-home is already in place and working properly without the rib-foo application. |
The following are the steps to create a new rib-foo.ear application that can communicate with a new application (called foo.ear in this example). Design to meet the business objective.
Go to rib-home and create a directory rib-foo under application-assembly-home.
> cd rib-home
> mkdir application-assembly-home/rib-foo
Add rib-foo-adapters.xml, rib-foo-adapters-resources.properties and rib-foo.properties to rib-foo folder created above.
> touch application-assembly-home/rib-foo/rib-foo-adapters.xml application-assembly-home/rib-foo/rib-foo-adapters-resources.properties application-assembly-home/rib-foo/rib-foo.properties
Add rib adapter (subscriber, publisher and hospital) details to the file application-assembly-home/rib-foo/rib-foo-adapters.xml.
<?xml version="1.0" encoding="UTF-8"?>
<rib-adapters xmlns:xsi="http://www.w3.org/2001/XMLSchema-instance" xsi:noNamespaceSchemaLocation="rib-adapters.xsd" appName="rib-foo">
   <subscribers>
      <message-driven id="Banner_sub_1" initialState="running" />
   </subscribers>
   <publishers>
      <request-driven id="CurRate_pub_1" initialState="notConfigurable" />
   </publishers>

   <hospitals>
      <timer-driven id="sub_hosp_0" initialState="running" timeDelay="10"  >
         <timer-task>
            <class name="com.retek.rib.j2ee.ErrorHospitalRetryTimerTask"/>
            <property name="reasonCode" value="SUB" />
         </timer-task>
      </timer-driven>
      <timer-driven id="jms_hosp_0" initialState="running" timeDelay="10"  >         <timer-task>
            <class name="com.retek.rib.j2ee.ErrorHospitalRetryTimerTask"/>
            <property name="reasonCode" value="JMS"/>
         </timer-task>
      </timer-driven>
   </hospitals></rib-adapters>
Add publisher, subscriber and hospital retrier details to the file application-assembly-home/rib-foo/rib-foo-adapters-resources.properties.
#
# If this changes, ManagedAdaptersResourcesPropertiesTest will need to
# change accordingly.
#
sub_all.name=Subscribers
sub_all.desc=Manages all subscribers at the same time.
Banner_sub_1.name=Banner Subscriber, channel 1
Banner_sub_1.desc=Subscriber for the Banner family through channel 1.
CurRate_pub_1.name=CurRate Publisher, channel 1
CurRate_pub_1.desc=Publisher for the CurRate  family through channel 1.
hosp_all.name=Hospital Retriers
hosp_all.desc=Manages all hospital retriers at the same time.
sub_hosp_0.name=SUB Hospital Retry
sub_hosp_0.desc=Inject messages into from the Error Hospital.
jms_hosp_0.name=JMS Hospital Retry
jms_hosp_0.desc=Re-publish messages from to JMS after JMS is brought back up.
rib-<app>.properties file cannot be left empty, add some text (example below) in case nothing specific to rib-<app> to set in properties file:
#####################################################
# rib-<app> application specific properties go here.#
# All properties have default values, add the #
# property here only if the default value does not #
# suit your environment. #
#####################################################
Update rib-application-assembly-info.xml under application-assembly-home/conf. Near the end (before </rib-applications>), append the following section to application-assembly-home/conf/rib-application-assembly-info.xml.
       <rib-app id="rib-foo" type="javaee-app">
            <ear>
                <classpath refid="rib-app.global.ear.classpath" />
                <java-ee-module>
                    <web-war />
                    <ejb-jar>
                        <classpath refid="rib-app.global.ejb-jar.classpath" />
                    </ejb-jar>
                    <jms-jca-connector>
                        <classpath refid="rib-app.global.jms-jca-connector.classpath" />
                    </jms-jca-connector>
                </java-ee-module>
            </ear>
            <resource>
                <resource-path refid="rib-app.global.resource-path" />
                <resource-path>
                    <fileset dir=".">
                        <include name="retail/remote_service_locator_info_ribserver.xml"
/>
                        <include name="rib-foo.properties" />
                        <include name="rib-foo-adapters.xml" />
                        <include name="rib-foo-adapters-resources.properties" />
                    </fileset>
                </resource-path>
            </resource>
        </rib-app>
Update the various sections of the deployment-home/conf/rib-deployment-env-info.xml file.
Update <app-in-scope-for-integration> section to add the new application.
Add the following XML section under <app-in-scope-for-integration>.
<app id="foo" type="javaee-app"/>
Define the WebLogic Server information for the foo application. Add the following XML section under the <weblogic> (before </weblogic>). Refer to the Oracle Retail Integration Bus Installation Guide for details about the WLS path and ports.
<wls id="rib-foo-wls1">
         <wls-instance-name>rib-foo-server</wls-instance-name>

<wls-instance-home>pbora@ribhost.example.com://u01/rrtswls/Oracle/Middleware/user_projects/domains/base_domain/servers/rib-foo-server</wls-instance-home>
         <wls-listen-port protocol="http">7003</wls-listen-port>
         <wls-user-alias>rib-foo-wls-user-alias</wls-user-alias>
</wls>
Add the following XML section under the <rib-applications> (before </rib-applications>) section. In the jndi/url xml tag section, point it to the location where foo.ear (not rib-foo.ear) is deployed. Refer to Oracle Retail Integration Bus Installation Guide for details.
<rib-app id="rib-foo" type="javaee-app">
<deploy-in refid="rib-foo-wls1"/>
<rib-admin-gui>
<web-app-url>http://ribhost.example.com:7003/rib-foo-appserver-gui/index.jsp</web-app-url>
<web-app-user-alias>
rib-foo_rib-admin-gui_web-app-user-alias
</web-app-user-alias>
</rib-admin-gui>
       <error-hospital-database>
<hosp-url>
jdbc:oracle:thin:@hospdbhost.example.com:1521:orcl</hosp-url>
<hosp-user-alias>rib-foo_error-hospital-database_
user-name-alias</hosp-user-alias>
       </error-hospital-database>
        <app-database-not-applicable/>
        <notifications>
          <email>
            <email-server-host>mail.example.com</email-server-host>
            <email-server-port>25</email-server-port>
            <from-address>admin@example.com</from-address>
            <to-address-list>admin@example.com</to-address-list>
         </email>
         <jmx/>
         </notifications>
         <app id="foo" type="javaee-app">
            <jndi>
             <url>t3://foohost.example.com:7002/foo</url>
<factory>weblogic.jndi.WLInitialContextFactory</factory>
              <user-alias>foo_jndi_user-name-alias</user-alias>
            </jndi>
          </app>
</rib-app>
Update the rib-integration-flows.xml to add the publisher and subscriber flow information for the app.
Create a customization-workarea directory under rib-home, extract rib-integration-flows.xml present in rib-func-artifact-<version>.war.
> mkdir customization-workarea
> cd customization-workarea
> jar xf ../ application-assembly-home/rib-func-artifacts/rib-func-artifact.war
integration/rib-integration-flows.xml
Edit integration/rib-integration-flows.xml to add message flow details for new app (rib-foo).
Add the following xml section as the last node of message-flow ID number 2. Search for Banner to take you to the right message-flow.
<node id="rib-foo.Banner_sub" app-name="rib-foo"
       adapter-class-def="Banner_sub" type="JmsToDb">
      <in-topic>etBannerFromRMS</in-topic>
      <out-db>default</out-db>
</node>
Add the following XML section as the first node of message-flow ID number 40. Search for CurRate to take you to the right message-flow.
<node id="rib-foo.CurRate_pub" app-name="rib-foo"
                adapter-class-def="CurRate_pub" type="DbToJms">
<in-db>default</in-db>
<out-topic>etEXTCurRate</out-topic>
</node>
Add updated rib-integration-flows.xml to rib-func-artifact-<version>.war.
> jar uvf ../application-assembly-home/rib-func-artifacts/rib-func-artifact-<version>.war integration/rib-integration-flows.xml
Cleanup and remove the temporary working directory
> cd ..
> rm -rf customization-workarea
Run the rib-app-builder compiler: Run the rib-app-builder script from <RIB_HOME>/application-assembly-home/bin directory to generate/assemble a rib-<app> and make it ready for deployment.
> cd <RIB_HOME>/application-assembly-home/bin
>sh rib-app-compiler.sh -setup-security-credential
Run the rib-app-builder deployer: Run the rib-app-deployer.sh script from <RIB_HOME>/deployment-home/bin directory as follows to register the new publishing and subscribing adapters in the flow.
> cd <RIB_HOME>/deployment-home/bin
> sh rib-app-deployer.sh -prepare-jms
Run the rib-app-builder deployer: Run the rib-app-deployer script from <RIB_HOME>/deployment-home/bin directory as follows:
> cd <RIB_HOME>/deployment-home/bin
> sh rib-app-deployer.sh -deploy-rib-func-artifact-war
This deploys the rib-func-artifact-war
> sh rib-app-deployer.sh -deploy-rib-app-ear rib-foo
This deploys the new javaee rib-<app>.
Following section lists down the detailed steps required to create a new SOAP rib-<app> corresponding to a SOAP application named foo. The application name (foo) is for sample purposes only. The new rib application will be named rib-foo, (i.e. rib-<app> where <app> = foo). Subscribing adapter will be for family Receiving and will subscribe from jms topic etReceiving. The publishing adapter will be for family FulfilOrder and will publish to jms topic etFulfillOrder.
The publishing adapter and subscribing adapter and business objects that are used, while actual, are illustrative only and chosen for their simplicity in the example and should be replaced with the actual ones that match the business case.
|
Note: The application (foo.ear) that integrates with the rib-foo is designed and developed to satisfy whatever business requirements have driven the need for a new rib-<app> and is beyond the scope of this document. |
|
Note: It is assumed that rib-home is already in place and working properly without the rib-foo application. |
The following are the steps to create a new rib-foo.ear application that can communicate with a new application (called foo.ear in this example) designed to meet the business objective.
Go to rib-home and create a directory rib-foo under application-assembly-home.
> cd rib-home
> mkdir application-assembly-home/rib-foo
Add rib-foo-adapters.xml, rib-foo-adapters-resources.properties and rib-foo.properties to rib-foo folder created above.
> touch application-assembly-home/rib-foo/rib-foo-adapters.xml application-assembly-home/rib-foo/rib-foo-adapters-resources.properties application-assembly-home/rib-foo/rib-foo.properties application-assembly-home/rib-foo/rib-foo-plsql-api.xml
Add rib adapter (subscriber, publisher and hospital) details to the file application-assembly-home/rib-foo/rib-foo-adapters.xml.
<?xml version="1.0" encoding="UTF-8"?>
<rib-adapters xmlns:xsi="http://www.w3.org/2001/XMLSchema-instance" xsi:noNamespaceSchemaLocation="rib-adapters.xsd" appName="rib-foo">
   <subscribers>
     <message-driven id="Receiving_sub_1" initialState="running" />
   </subscribers>
   <publishers>
     <request-driven id="FulfilOrd_pub_1" initialState="notConfigurable" />
   </publishers>
   <hospitals>
      <timer-driven id="sub_hosp_0" initialState="running" timeDelay="10"  >
         <timer-task>
            <class name="com.retek.rib.j2ee.ErrorHospitalRetryTimerTask"/>
            <property name="reasonCode" value="SUB" />
         </timer-task>
      </timer-driven>
      <timer-driven id="jms_hosp_0" initialState="running" timeDelay="10"  >
         <timer-task>
            <class name="com.retek.rib.j2ee.ErrorHospitalRetryTimerTask"/>
            <property name="reasonCode" value="JMS"/>         </timer-task>
      </timer-driven>
   </hospitals>
</rib-adapters>
Add publisher, subscriber and hospital retrier details to the file application-assembly-home/rib-foo/rib-foo-adapters-resources.properties.
#
# If this changes, ManagedAdaptersResourcesPropertiesTest will need to
# change accordingly.
#
sub_all.name=Subscribers
sub_all.desc=Manages all subscribers at the same time.
Receiving_sub_1.name=Receiving Subscriber, channel 1
Receiving_sub_1.desc=Subscriber for the Receiving family through channel 1.
FulfilOrd_pub_1.name=FulfillOrder Publisher, channel 1
FulfilOrd_pub_1.desc=Publisher for the FulfilOrd  family through channel 1.
hosp_all.name=Hospital Retriers
hosp_all.desc=Manages all hospital retriers at the same time.
sub_hosp_0.name=SUB Hospital Retry
sub_hosp_0.desc=Inject messages into from the Error Hospital.
jms_hosp_0.name=JMS Hospital Retry
jms_hosp_0.desc=Re-publish messages from to JMS after JMS is brought back up.
Update rib-application-assembly-info.xml under application-assembly-home/conf. Near the end (before </rib-applications>), append the following section to application-assembly-home/conf/rib-application-assembly-info.xml.
       <rib-app id="rib-foo" type="soap-app">
            <ear>
                <classpath refid="rib-app.global.ear.classpath" />
                <java-ee-module>
                    <web-war />
                    <ejb-jar>
                        <classpath refid="rib-app.global.ejb-jar.classpath" />
                    </ejb-jar>
                    <jms-jca-connector>
                        <classpath refid="rib-app.global.jms-jca-connector.classpath" />
                    </jms-jca-connector>
                </java-ee-module>
            </ear>
            <resource>
                <resource-path refid="rib-app.global.resource-path" />
                <resource-path>
                    <fileset dir=".">
                        <include name="retail/remote_service_locator_info_ribserver.xml"
/>
                        <include name="rib-foo.properties" />
                        <include name="rib-foo-adapters.xml" />
                        <include name="rib-foo-adapters-resources.properties" />
                    </fileset>
                </resource-path>
            </resource>
        </rib-app>
rib-<app>.properties file cannot be left empty, add some text (example below) in case nothing specific to rib-<app> to set in properties file
#####################################################
# rib-<app> application specific properties go here.#
# All properties have default values, add the #
# property here only if the default value does not #
# suit your environment. #
#####################################################
Update the various sections of the deployment-home/conf/rib-deployment-env-info.xml file.
Update <app-in-scope-for-integration> section to add the new application.
Add the following XML section under <app-in-scope-for-integration>
<app id="foo" type="soap-app"/>
Define the WebLogic Server information for the foo application. Add the following XML section under the <weblogic> (before </weblogic>). Refer to the Oracle Retail Integration Bus Installation Guide for details about the WLS path and ports.
<wls id="rib-foo-wls1">
         <wls-instance-name>rib-foo-server</wls-instance-name>
<wls-instance-home>webadmin@ribhost.example.com://u01/rrtswls/Oracle/Middleware/user_projects/domains/base_domain/servers/rib-foo-server</wls-instance-home>
         <wls-listen-port protocol="http">7003</wls-listen-port>
         <wls-user-alias>rib-foo-wls-user-alias</wls-user-alias>
</wls>
Add the following XML section under the <rib-applications> (before </rib-applications>) section. In the jndi/url xml tag section, point it to the location where foo.ear (not rib-foo.ear) is deployed. Refer to the Oracle Retail Integration Bus Installation Guide for details.
<rib-app id="rib-foo" type="soap-app">
        <deploy-in refid="rib-foo-wls1"/>
        <rib-admin-gui>
<web-app-url>https://ribhost.example.com:8108/rib-foo-appserver-gui/index.jsp</web-app-url>
<web-app-user-alias>rib-foo_rib-admin-gui_web-app-user-alias</web-app-user-alias>
        </rib-admin-gui>
        <error-hospital-database>
<hosp-url>jdbc:oracle:thin:@hospdbhost.example.com:1521:orcl</hosp-url>
<hosp-user-alias>rib-foo_error-hospital-database_user-name-alias</hosp-user-alias>
        </error-hospital-database>
        <app-database-not-applicable/>
        <notifications>
                <email>
                        <email-server-host>mail.example.com</email-server-host>
                        <email-server-port>25</email-server-port>
                        <from-address>admin@example.com</from-address>
                        <to-address-list>admin@example.com</to-address-list>
                </email>
                <jmx/>
        </notifications>
        <app id="foo" type="soap-app">
                <end-point>
                        <url>http://hostname:9001/injector-service/InjectorService</url>
                        <ws-policy-name>X/Y/Z</ws-policy-name>
                        <user-alias>rib-foo_ws_security_user-name-alias</user-alias>
                </end-point>
        </app>
</rib-app>
Update the rib-integration-flows.xml to add the publisher and subscriber flow information for the app.
Create a customization-workarea directory under rib-home, extract rib-integration-flows.xml present in rib-func-artifact-<version>.war.
> mkdir customization-workarea
> cd customization-workarea
> jar xf ../ application-assembly-home/rib-func-artifacts/rib-func-artifact-<version>.war integration/rib-integration-flows.xml
Edit integration/rib-integration-flows.xml to add message flow details for new app (rib-foo).
Add the following xml section as the last node of message-flow ID number 28. Search for Receiving to take you to the right message-flow.
<node id="rib-foo.Receiving_sub" app-name="rib-foo"
               adapter-class-def="Receiving_sub" type="JmsToDb">
       <in-topic>etReceiving</in-topic>
       <out-db>default</out-db>
</node>
Add the following XML section as the first node of message-flow ID number 65. Search for FulfilOrd to take you to the right message-flow.
<node id="rib-foo.FulfilOrd_pub" app-name="rib-foo"
                adapter-class-def="FulfilOrd_pub" type="DbToJms">
      <in-db>default</in-db>
      <out-topic>etFulfillOrder</out-topic>
</node>
Add updated rib-integration-flows.xml to rib-func-artifact.war.
> jar  uvf
../application-assembly-home/rib-func-artifacts/rib-func-artifact-<version>.war integration/rib-integration-flows.xml
Cleanup and remove the temporary working directory
> cd ..
> rm -rf customization-workarea
Run the rib-app-builder compiler: Run the rib-app-builder script from <RIB_HOME>/application-assembly-home/bin directory to generate/assemble a rib-<app> and make it ready for deployment.
> cd <RIB_HOME>/application-assembly-home/bin
> sh rib-app-compiler.sh -setup-security-credential
Run the rib-app-builder deployer: Run the rib-app-deployer.sh script from <RIB_HOME>/deployment-home/bin directory as follows to register the new subscribing and publishing adapters in the flow.
> cd <RIB_HOME>/deployment-home/bin
> sh rib-app-deployer.sh -prepare-jms
Run the rib-app-builder deployer: Run the rib-app-deployer script from <RIB_HOME>/deployment-home/bin directory as follows:
> cd <RIB_HOME>/deployment-home/bin
> sh rib-app-deployer.sh -deploy-rib-func-artifact-war
This deploys the rib-func-artifact-war
> sh rib-app-deployer.sh -deploy-rib-app-ear rib-foo
This deploys the new javaee rib-<app>.
This section explains how to verify the various customizations using the RIB diagnostic and test tools, RDMT, the PL/SQL API simulator, and the Java EE API simulator.
These verification tests are described only from a RIB perspective and not as end-to-end testing. They should be considered only as the first step in a process to move the customizations through the RIB life cycle.
The verification steps assume that these RIB tools have already been installed and are in working condition.
|
Note: See "Testing the RIB" in the Oracle Retail Integration Bus Operations Guide. |
To verify the addition of a new message type under a message family from a RIB perspective, complete the following steps.
Log in to the RDMT main menu.
Select menu option 3 - PUB/SUB/TAFR Msg Menu.
Publish a message using 8 - EJB Publish Utility.
Provide the new message type when prompted for the <type> parameter.
Use the sample message that was generated using the RIB Artifact Generator tool after adding the new message type for the corresponding message family.
Check the corresponding adapter's RIBLOGS to be sure the message was published successfully. The logs are written to the path, <rib-application_instance_home>/<rib-app>/logs/<rib-app>.
For example, for /home/dev01/wls1036/Oracle/Middleware/user_projects/domains/rib_domain/servers/rib-rpm-server/logs/rib-rms, the RIBLOG filenames are in the format, <adapter-instance-name>.rib.log.
Example:
Alloc_pub_1.rib.log
ASNIn_sub_1.rib.log
Enable the RIB Audit Logs for all the corresponding adapters involved in the message flow. The auditing feature logs the message as it passes though the RIB infrastructure. This helps the tracing of message content from publication to subscription and all steps, such as a TAFR, in between.
|
Note: To enable RIB Audit logs, see the section, "RIB Logging," in the Oracle Retail Integration Bus Operations Guide . |
Check the RIB audit logs for the particular message family adapters (publisher, subscriber, and TAFR if involved) and verify whether the new message type is part of the message header. Also ensure that the message passes successfully through all the adapters involved in the particular message flow.
Check whether the new message type was successfully consumed by the subscribing adapter. The CONSUME API call from the subscribing adapter should successfully return the status S.
To verify the addition of a new message family in the RIB, complete the following steps:
Once RIB is compiled and deployed (after adding a new message family), check whether the new family adapters (publisher, subscriber, and TAFR if involved) are visible through RIB Admin GUI.
The RIB admin GUI can be accessed via the URL as below.
http://<server>.example.com:<http-port>/rib-<app>-admin-gui/
Replace <server> with the name or IP address of the server in the environment where the rib-<app> is deployed.
Replace <http-port> with the port number that the WebLogic managed server instance is listening on (for example, 7777).
Replace <app> with rms, tafr, rwms, sim, rfm, aip, oms, or rpm.
|
Note: See the section, "Admin GUI," in the Oracle Retail Integration Bus Operations Guide. |
Log in to the RDMT main menu.
Select menu option 3 - PUB/SUB/TAFR Msg Menu.
Publish a message using 8 - EJB Publish Utility.
Provide the new message family when prompted for the <family> parameter.
Use the sample message created by the Functional Artifact Generator.
|
Note: See the Oracle Retail Functional Artifact Generator Guide. |
Check the corresponding adapter's RIBLOGS to be sure the message was published successfully. The logs are written to the path, <rib-application_managed_server>/logs/<rib-app>.
For example, for "/u00/webadmin/product/12.1.3/WLS/user_projects/domains/rib_domain/servers/rib-rms-server/logs/rib-rms" the RIBLOG filenames are in the format, <adapter-instance-name>.rib.log.
Example:
Foo_pub_1.rib.log
Foo_sub_1.rib.log
Also enable the RIB Audit Logs for all the corresponding adapters involved in the message flow. The auditing feature logs the message as it passes though the RIB infrastructure. This helps the tracing of message content from publication to subscription and all steps, such as a TAFR, in between.
|
Note: To enable RIB Audit logs, see "RIB Logging" in the Oracle Retail Integration Bus Operations Guide. |
Check the RIB audit logs for the particular message family adapters (publisher, subscriber, and TAFR if involved) and verify whether the new message family is part of the message header. Also ensure that the message passes successfully through all the adapters involved in the particular message flow.
To verify the addition of a new publishing adapter for PL/SQL or Java EE applications, complete the following steps:
Once the RIB has been compiled and deployed (after adding a new publishing adapter), check whether the new publishing adapter is visible through RIB Admin GUI.
The RIB admin GUI can be accessed via the URL as below:
http://<server>.example.com:<http-port>/rib-<app>-admin-gui/
Replace <server> with the name or IP address of the server in the environment where the rib-<app> is deployed.
Replace <http-port> with the port number that the WebLogic managed server instance is listening on (for example, 7777).
Replace <app> with rms, rwms, sim, orfm, aip, oms, or rpm.
|
Note: See "Admin GUI" in the Oracle Retail Integration Bus Operations Guide |
Log in to the RDMT main menu.
Select menu option 3, PUB/SUB/TAFR Msg Menu.
Publish a message using 8 - EJB Publish Utility.
Use the sample message created by the Functional Artifact Generator for the corresponding message family.
Check the corresponding adapter's RIBLOGS to be sure the message was published successfully. The logs are written to the path, <rib-application_managed_server>/logs/<rib-app>.
For example, for "/u00/webadmin/product/12.1.3/WLS/user_projects/domains/rib_domain/servers/rib-rms-server/logs/rib-rms" the RIBLOG filenames are in the format, <adapter-instance-name>.rib.log.
Example:
Foo_pub_1.rib.log
Also enable the RIB Audit Logs for the corresponding publishing adapter involved in the message flow. The auditing feature logs the message as it passes though the RIB infrastructure. This helps the tracing of message content from publication to subscription.
|
Note: To enable RIB Audit logs, see "RIB Logging" in the Oracle Retail Integration Bus Operations Guide. |
Check the RIB audit logs for the particular publishing adapter and verify whether the message content is displayed correctly as published. Also ensure that the message passes successfully through all the adapters involved in the particular message flow.
To verify the addition of a new subscribing adapter for PL/SQL or Java EE applications, complete the following steps:
Once the RIB has been compiled and deployed (after adding a new subscribing adapter), check whether the new subscribing adapter is visible through RIB Admin GUI.
The RIB admin GUI can be accessed via the URL as below.
http://<server>.example.com:<http-port>/rib-<app>-admin-gui/
Replace <server> with the name or IP address of the server in the environment where the rib-<app> is deployed.
Replace <http-port> with the port number that the WebLogic managed server instance is listening on (for example, 7777).
Replace <app> with rms, rwms, sim, rfm, aip, oms, or rpm.
|
Note: See the section,"Admin GUI," in the Oracle Retail Integration Bus Operations Guide. |
Log in to the RDMT main menu.
Select menu option 3 - PUB/SUB/TAFR Msg Menu.
Publish a message using 1 - Publish Msg Utility to the topic from which the newly added subscriber has to subscribe the message.
Use the sample message.
Check the corresponding adapter's RIBLOGS to be sure the message was subscribed from the topic successfully. The logs are written to the path, <rib-application_instance_home>/logs/<rib-app>.
For example, "/u00/webadmin/product/12.1.3/WLS/user_projects/domains/rib_domain/servers/rib-rms-server/logs/rib-rms" the RIBLOG filenames are in the format, <adapter-instance-name>.rib.log.
Example:
Foo_pub_1.rib.log
Also enable the RIB Audit Logs for the corresponding subscribing adapter involved in the message flow. The auditing feature logs the message as it passes though the RIB infrastructure. This helps the tracing of message content from publication to subscription.
|
Note: To enable RIB Audit logs, see "RIB Logging" in the Oracle Retail Integration Bus Operations Guide. |
Check the RIB audit logs for the particular message family's subscribing adapter and verify whether the message content is displayed correctly. Also ensure that the message is subscribed successfully by the subscribing adapter.
To verify the addition of a new TAFR adapter, complete the following steps:
Once the RIB has been compiled and deployed (after adding a new TAFR adapter), check whether the new TAFR adapter is visible through RIB Admin GUI.
The RIB Admin GUI can be accessed via the URL as below.
http://<server>.example.com:<http-port>/rib-tafr-admin-gui/
Replace <server> with the name or IP address of the server in the environment where the rib-<app> is deployed.
Replace <http-port> with the port number that the WebLogic managed server instance is listening on (for example, 7777).
|
Note: See the section, "Admin GUI," in the Oracle Retail Integration Bus Operations Guide. |
Log in to the RDMT main menu.
Select menu option 3, PUB/SUB/TAFR Msg Menu.
Publish a message using 1—Publish Msg Utility to the topic from which the newly added TAFR has to subscribe the message.
Use the sample message generated by the RIB Artifact Generator tool for the corresponding message family.
Check the corresponding TAFR adapter's RIBLOGS to be sure the message was subscribed by the TAFR from the particular topic and again published to the next destination topic successfully. The logs are written to the path, <rib-application_instance_home>/logs/rib-tafr.
For example, for "/u00/webadmin/product/12.1.3/WLS/user_projects/domains/rib_domain/servers/rib-rms-server/logs/rib-rms" the RIBLOG filenames are in the format, <adapter-instance-name>.rib.log.
Example:
SampleToSampleWH_tafr_1.rib.log
Also enable the RIB Audit Logs for the corresponding TAFR adapter. The auditing feature logs the message as it passes though the RIB infrastructure. This helps the tracing of message content from publication to subscription.
|
Note: To enable RIB Audit logs, see "RIB Logging" in the Oracle Retail Integration Bus Operations Guide. |
Check the RIB audit logs for the particular message family's TAFR adapter and verify whether the message content is displayed correctly.
The tools used for localization extension of the RIB are separately documented. The primary tool is the Retail Functional Artifact Generator. The message (payload) structure and packaging is covered in the Oracle Retail Functional Artifacts Guide.
The following documents are referenced in this chapter and are required for the localization effort:
Oracle Retail Functional Artifacts Guide
Oracle Retail Functional Artifact Generator Guide
