| Oracle® Retail Integration Bus Installation Guide Release 15.0.2 E90690-01 |
|

 Previous |
 Next |
Before you begin the installation process, read the Oracle Retail Integration Bus Implementation Guide to plan a RIB deployment.
Planning may include the decision to employ multiple JMS servers, which can isolate flows for performance and operational QoS. For information, see "Preinstallation Steps for Multiple JMS Server Setup" in this guide.
The user account that installs RIB is an important consideration. Options, pros, and cons are discussed in the Oracle Retail Integration Bus Implementation Guide.
|
Note: See the ”Pre-Implementation Considerations” in the Oracle Retail Integration Bus Implementation Guide. |
The RIB software components can be distributed across multiple application servers depending on the deployment option selected, but they are centrally configured and managed.
|
Note: See the section, "Recommended Deployment Option," in the Oracle Retail Integration Bus Implementation Guide. |
The location from which all rib-<app> applications are managed is known as rib-home. This directory location (rib-home) contains all the tools and configurations to manage the life cycle and operations of the RIB installation across the enterprise. There must be one rib-home directory for each development, test and production environment. The rib-home directory is not a staging (throw away) directory. It must be available at all times to support the lifecycle management of the RIB system. After initial configuration of the Database server and the Java EE application server, all rib-<app> application level work must be done only from the rib-home directory location.
|
Note: See the section, ”RIB Software Life Cycle,” in the Oracle Retail Integration Bus Implementation Guide. |
This section describes the process of preparing the Oracle WebLogic servers to install the rib-<app> Java EE application.
All RIB components are Java EE and run in WebLogic managed server instances in the WebLogic Application Server. The rib-<app> Java EE application runs in its own managed server instance called rib-<app>-server. Each rib-<app> application requires a separate managed server instance that is not shared with any other application. All managed servers can be under one domain; it is optional to create a new domain or to use the JRF domain of WLS. It is a new requirement for 15.0 that the WLS domain for RIB deployment must be a JRF domain. JRF needs RCU.
Use the following steps to create a new managed server instance for rib-<app> and configure it to RIB requirement.
|
Note: For information about using commands to create a managed server instance, see the WebLogic Application Server Administrator's Guide 12.2.1.2. |
Acceptable values for <app> are rms, rwms, tafr, sim, rpm, aip, oms, and rfm.
There is one RIB specific managed server instance that must be created regardless of the other application deployment choices.
rib-func-artifact-server. (This naming convention is recommended, but not required.)
There is one RIB specific managed server instance that must be created depending on the deployment configuration. If RMS is installed with RWMS and/or SIM, the TAFRs must be installed.
rib-tafr-server. (It is recommended, but not required, that this naming convention be followed).
The following is a list of optional application instances, depending on deployment choices. It is recommended, but not required, that you use the following naming convention:
rib-aip-server
rib-rfm-server
rib-rms-server
rib-rpm-server
rib-rwms-server
rib-oms-server
rib-sim-server
|
Note: See Oracle WebLogic Server 12.2.1.2 documentation for more details on How to Create managed servers. |
To create the rib<app>server, complete the following steps:
Log in to the WebLogic administration console GUI (http://<host>:<port>/console) as administrator.
Using the left side menu, navigate to Environment > Servers. 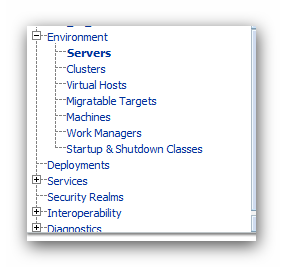
Click Lock & Edit. 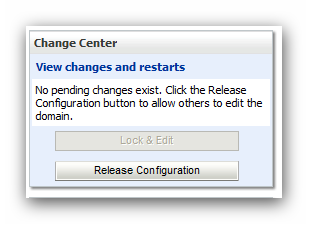
Click New.
Enter the name, port, and listen address of the server instance to be created.
For example:
Server Name: rib-<app>-server
Server Listen Address: <server-name>
Server Listen Port: <listen-port> 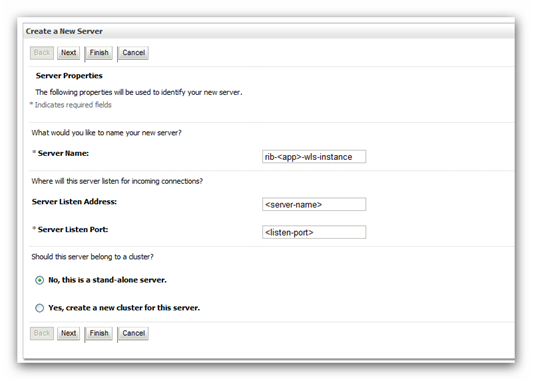
Click Next. Click Finish. Make sure you see this instance listed under Servers
Install NodeManager if it was not created during domain install. NodeManager is required so that the managed servers can be started and stopped through the administration console. Only one NodeManager is needed per WebLogic installation.
Log in to the administration console.
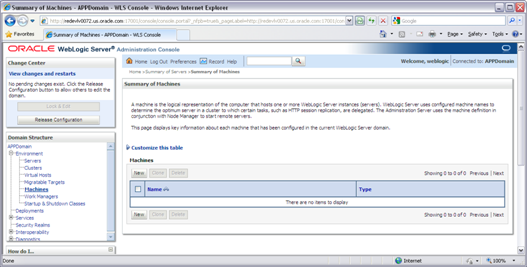
Click Lock & Edit and navigate to Environments> Machines.
Click New.
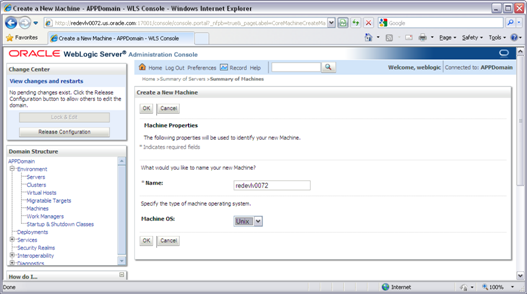
Set the following variables:
Name: Logical machine name
Machine OS: UNIX
Click Next.
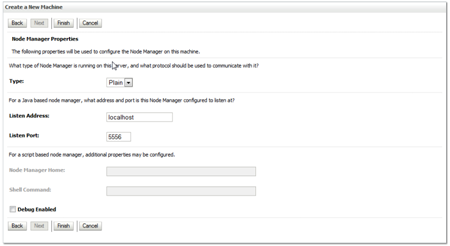
Update the details below and click the Finish button.
Type: Plain
Listen Address: For example, ribhost.example.com
Listen Port: Default port (for example, 5556) or any available port
Click Activate Changes.
Click Lock & Edit.
Navigate to Environments > machines. Click on the machine name and select the Servers tab.
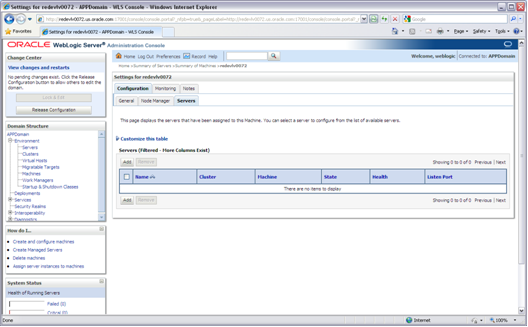
Add the managed servers that need to be configured with NodeManager. Save the changes.
Click Add to repeat for additional servers.
Click Activate Changes.
Start NodeManager from the server using the startNodeManager.sh at $WL_HOME/wlserver/server/bin.
|
Note: To activate changes, the server must be stopped: $WL_HOME/user_projects/domains/<RIB_Domain>/bin/stopManagedWebLogic.sh <rpm>-server ${server_name}:${server_port} |
Edit the nodemanager.properties file at the following location with the below values:
$WLS_HOME/wlserver/common/nodemanager/nodemanager.properties
SecureListener=false
StartScriptEnabled=true
StartScriptName=startWebLogic.sh
NodeManager must be restarted after making changes to the nodemanager.properties file.
|
Note: The nodemanager.properties file is created after NodeManager is started for the first time. It will not be available before that point. |
To expand the RIB kernel distribution, complete the following steps:
Log in to the UNIX server as the user who will own the RIB development workspace. Create a new directory for the workspace. There should be a minimum of 800 MB of disk space available.
Copy the RIB Kernel package (RibKernel15.0.2ForAll15.x.xApps_eng_ga.jar) into the workspace and extract its contents.
Extract the jar file using this command:
$JAVA_HOME/bin/jar -xf RibKernel15.0.2ForAll15.x.xApps_eng_ga.jar
Change directories to Rib1502ForAll15xxApps/rib-home. This location will be referred to as <RIB_HOME> for the remainder of this chapter.
To configure the rib-<app>-wls-instance, complete the following steps.
Configure the startup script
Take a backup of the script $DOMAIN_HOME/base_domain/bin/ startWebLogic.sh
Edit the script $DOMAIN_HOME/base_domain/bin/ startWebLogic.sh to add the following attributes.
JAVA_OPTIONS="-Dweblogic.ejb.container.MDBMessageWaitTime=2 ${JAVA_OPTIONS}"
JAVA_VM="-server"
USER_MEM_ARGS="-Xms1024m -Xmx2048m "
CLASSPATH=$DOMAIN_HOME/servers/$SERVER_NAME:$CLASSPATH
The following is a portion of a startWebLogic.sh sample.
echo "."

echo "."

echo "JAVA Memory arguments: ${MEM_ARGS}"

echo "."

echo "CLASSPATH=${CLASSPATH}"

echo "."

echo "PATH=${PATH}"

echo "."

echo "***************************************************"

echo "*  To start WebLogic Server, use a username and   *"

echo "*  password assigned to an admin-level user.  For *"

echo "*  server administration, use the WebLogic Server *"

echo "*  console at http://hostname:port/console        *"

echo "***************************************************"

# CLASS CACHING

if [ "${CLASS_CACHE}" = "true" ] ; then
        echo "Class caching enabled..."
        JAVA_OPTIONS="${JAVA_OPTIONS} -Dlaunch.main.class=${SERVER_CLASS}
-Dlaunch.class.path="${CLASSPATH}"
-Dlaunch.complete=weblogic.store.internal.LockManagerImpl -cp ${WL_
HOME}/server/lib/pcl2.jar"
        export JAVA_OPTIONS
        SERVER_CLASS="com.oracle.classloader.launch.Launcher"
fi

# START WEBLOGIC

echo "starting weblogic with Java version:"

${JAVA_HOME}/bin/java ${JAVA_VM} -version

if [ "${WLS_REDIRECT_LOG}" = "" ] ; then
        echo "Starting WLS with line:"
        echo "${JAVA_HOME}/bin/java ${JAVA_VM} ${MEM_ARGS}
-Dweblogic.Name=${SERVER_NAME} -Djava.security.policy=${WL_
HOME}/server/lib/weblogic.policy ${JAVA_OPTIONS} ${PROXY_SETTINGS}
${SERVER_CLASS}"
        ${JAVA_HOME}/bin/java ${JAVA_VM} ${MEM_ARGS} -Dweblogic.Name=${SERVER_NAME}
-Djava.security.policy=${WL_HOME}/server/lib/weblogic.policy ${JAVA_
OPTIONS} ${PROXY_SETTINGS} ${SERVER_CLASS}
else
        echo "Redirecting output from WLS window to ${WLS_REDIRECT_LOG}"
        ${JAVA_HOME}/bin/java ${JAVA_VM} ${MEM_ARGS} -Dweblogic.Name=${SERVER_NAME}
-Djava.security.policy=${WL_HOME}/server/lib/weblogic.policy ${JAVA_
OPTIONS} ${PROXY_SETTINGS} ${SERVER_CLASS}  >"${WLS_REDIRECT_LOG}" 2>&1
fi

stopAll
|
Note: In the startWebLogic script, the above statements must be added before the call is made to start the server. |
Update $WL_HOME/<wlserver>/server/lib/weblogic.policy file with the information below.
|
Note: If copying the following text from this guide to UNIX, ensure that it is properly formatted in UNIX. Each line entry beginning with ”permission” must terminate on the same line with a semicolon. |
|
Note: <WEBLOGIC_DOMAIN_HOME> in the following example is the full path of the Weblogic Domain, <managed_server> is the RIB managed server created, and <context_root> correlates to the value entered for the application deployment name/context root of the application that you will supply during installation. Note that the rib-func-artifact-instance does not need to get added to this file. See the example below. There should not be any space between file:<WEBLOGIC_DOMAIN_HOME>. |
|
Note: The path tmp/_WL_user/rib-<app>.ear will not be available before the deployment. |
grant codeBase "file:
<WEBLOGIC_DOMAIN_HOME>/servers/<managed_server>/tmp/_WL_user/<context_root>/-" {
permission java.security.AllPermission;
permission oracle.security.jps.service.credstore.CredentialAccessPermission "
credstoressp.credstore", "read,write,update,delete";
permission oracle.security.jps.service.credstore.CredentialAccessPermission "
credstoressp.credstore.*", "read,write,update,delete";
};
An example of the full entry that might be entered is:
grant codeBase "file: /u00/webadmin/product/ 15.0.2_RIB/WLS/user_projects/domains/RIBDomain/servers/rib-rwms-server/tmp/_WL_user/rib-rwms.ear/-"
        {
        permission java.security.AllPermission;
        permission oracle.security.jps.service.credstore.CredentialAccessPermission "credstoressp.credstore", "read,write,update,delete"
        ;
        permission oracle.security.jps.service.credstore.CredentialAccessPermission "credstoressp.credstore.*", "read,write,update,delete";
        };
|
Note: Add the path to the patch jars. If any patches are installed into WLS (now or in the future) and this line is not included it could cause the RIB to fail. WLS_HOME refers to the location where Weblogic 12.2.1.2 has been installed.For example:
grant codeBase "file:<WLS_HOME>/patch_wls/patch_jars/-" {permission java.security.AllPermission;permission oracle.security.jps.service.credstore.CredentialAccessPermission "credstoressp.credstore", "read,write,update,delete";permission oracle.security.jps.service.credstore.CredentialAccessPermission "credstoressp.credstore.*", "read,write,update,delete";};};
The AdminServer needs to be bounced after the weblogic.policy file is modified. |
Copy the RIB packaged jars to the server library.
Copy aqapi-<version>.jar and ojdbc7-<version>.jar to $WL_HOME/wlserver/server/lib.
Example:
$cd <RIB_HOME>/integration-lib/third-party/oracle/db/12.1.0.2
$cp aqapi-<version>.jar $WL_HOME/wlserver/server/lib
$cp ojdbc7-<version>.jar $WL_HOME/wlserver/server/lib
Start rib-<app>managed server.
WebLogic managed servers where rib-<app> is deployed can be started two ways.
Option 1: Run startup scripts through the command line
Log in to the machine where WLS was installed with the operating system user that was used to install the WebLogic Application Server (WLS).
Navigate to DOMAIN_HOME/bin.
For example:
$cd product/15.0.2_RIB/WLS/user_projects/domains/RIBDomain/bin
Run the startManagedWebLogic script.
For example:
sh startManagedWebLogic.sh rib-rms-wls-instance
Option 2: Start WebLogic using administration console.
NodeManager must be running for starting manged server from the console. The nodemanager.properties and startWeblogic.sh must be configured with the properties that have been mentioned above. (See steps 1 and 3 above.)
|
Note: RIB applications cannot be deployed from the administration console. They must be run through the installer GUI or on the command line. |
Log in to the WebLogic administration console GUI (http://<host>:<port>/console) as administrator
Using the right side menu, navigate to Environment > Servers
Click rib-<app> managed server.
Click the Control tab.
Select the managed server instance that must be started.
Click Start.
Repeat this procedure for all rib-<app>managed servers.
