| Oracle® Retail Financial Integration for Oracle Retail Merchandise Operations Management and Oracle Financials Release 16.0 E79045-01 |
|

 Previous |
 Next |
| Oracle® Retail Financial Integration for Oracle Retail Merchandise Operations Management and Oracle Financials Release 16.0 E79045-01 |
|
Previous |
Next |
This chapter provides an overview of the process integration for accounting entries from Oracle Retail Sales Audit (ReSA), Retail Merchandising System (RMS), and Retail Invoice Matching (ReIM) to Oracle General Ledger (GL) and discusses how to:
Perform setup tasks
Configure and generate data in Oracle Retail applications
Pick up and transform the data
Configure and run the process integration for accounting entries
The process integration for accounting entries enables you to record the financial impact of changes to sellable store and warehouse inventory. It also records the financial impact of sales and returns, cash reconciliation, and void transactions from stores.
The system sends sales audit and stock ledger data in Oracle Retail to Oracle GL through accounting entries. Similarly the system sends the prepaid invoice reversals and write-offs of aged receipts Oracle GL(EBS or PeopleSoft GL). RMS, ReIM, and ReSA are the source for accounting entry. After successful completion of data transfer, the system deletes the data from the source interface tables.
This integration uses the Oracle Data Integrator (ODI) application to transfer the data from the Oracle Retail applications to the Oracle GL application (EBS or PeopleSoft).
The process integration between Oracle Retail (RMS, ReSA, and ReIM) and Oracle GL supports the following integration flows:
Post stock ledger from RMS to Oracle GL
Post channel sales, cash, and deposits from ReSA to Oracle GL
Post write-offs (aged receipts, not invoiced to ledger) from RMS to Oracle GL
Post prepaid invoice reversals after receipt from ReIM to Oracle GL
The overall process includes:
Table 4-1 Business Process Flow for the Integration of Accounting Entries
| Oracle Retail | Step1: Prepare the interface data |
|---|---|
|
Integration Process(ODI) |
Step2: Integration process will wait for the data to arrive in Retail staging tables. Step3: Load and Transform retail data into E-Business Suite GL interface table. Step4: Delete the data from the source staging tables. |
|
OracleFinancials(EBS or PeopleSoft) |
Step5: Launch journal import concurrent program to import data from interface table to journal transaction tables. An event will be raised after the concurrent program is completed. Then manually post to GL. |
Before performing this process integration, ensure that:
The following Domain Value Maps (DVMs) have been entered on the RFI_XREF_DVM table:
BUSINESS_UNIT_DVM
CURR_CODE_DVM
The currency exchange rate is synchronized between Oracle Retail and Oracle Financials.
The journal category and source are set up if in Oracle Financials is E-Business Suite.
Oracle Retail:
RMS, ReSA, and ReIM are the source of the accounting entry flow.
Oracle Retail populates one of the staging tables: STG_FIF_GL_DATA or IM_FINANCIALS_STAGE (depending on whether the RMS or ReIM package is running) on a scheduled basis.
Data in the Oracle Retail staging tables is deleted after the ODI job completes successfully.
Oracle GL:
Oracle GL has one interface table to receive data; GL_INTERFACE (EBS) / PS_ORT_ACT_ENTRY (PeopleSoft).
This section discusses:
Setup Tasks Specific to Oracle Financials (General Ledger)
Synchronize currency exchange rate between Oracle Retail and Oracle Financials (EBS or PeopleSoft).
Set up journal category and source in EBS, if EBS is the financials system. This can be skipped if PeopleSoft is the financials application
The following DVMs/Xref have been entered on the RFI_XREF_DVM table:
BUSINESS_UNIT_DVM
CURR_CODE_DVM
TAX_DVM
SUPPLIER_XREF
The following email options have been entered in the RFI_XREF_DVM table:
RMS_GL_MSG_NOTIFICATION
ReIM_GL_MSG_NOTIFICATION
This section discusses:
Configuring the data in Oracle Retail
Generating the data in Oracle Retail
Before running any accounting data, perform these tasks in RMS and ReIM:
Set up general ledger (GL) account cross-reference
Define GL options.
For more information, see the RMS User Guide, version 16.0.0, "Financial Management," "Stock Ledger," "Maintain general ledger cross reference" and the ReIM User Guide, version 1 , "System Administration," "General Ledger Accounts".
RMS stages GL data for subsequent upload into the integrated financial system. A set of batch processes gather and organize the data before using it to populate the related staging table.
These batch designs are included in this functional area
FIFGLDN1.PC
FIFGLDN2.PC
FIFGLDN3.PC
For more information, see the Chapter 13 General Ledger (GL) Batch in RMS Operations Guide, Volume 1, and Release 16.0.0
In ReIM, the batch process engages in these high-level steps:
Performs any resolution actions (for example, initiate the creation of payment documents).
Calls the posting process to write applicable financial accounting transactions to the financials staging table, IM_FINANCIALS_STAGE.
The processing occurs after discrepancies for documents have been resolved by resolution documents. Once all of the resolution documents for a matched invoice are built, and all of the RCA/RUA external processing has been confirmed, the process inserts financial accounting transactions to the financials staging table, to represent the resolution and consequent posting of the invoice. The process also inserts financial accounting transactions for the approved documents that are being handled.
Once all of the transactions have been written, the process switches the status of the current invoices or documents to "Posted", and then moves on to the next invoice or document. If a segment look-up fails, the failed record is written to a financials error table.
For more information, see the Chapter 9-26 Financial Posting Batch Design of the latest ReIM Operations Guide.
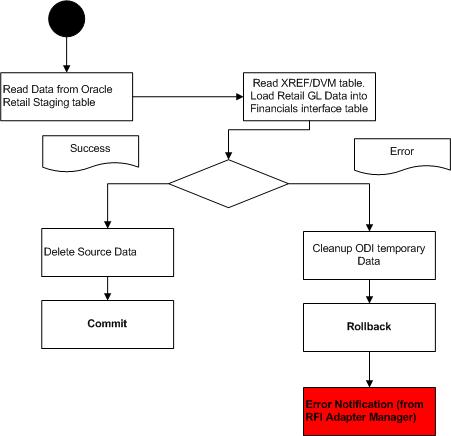
The process integration for accounting entries uses ODI to pick up the data from RMS, ReSA, and ReIM, transform it, and load it into the Oracle staging table for the GL Generator.
This flowchart illustrates the process:
These tasks are performed as a part of the accounting entries load process:
The system polls the STG_FIF_GL_DATA or IM_FINANCIALS_STAGE tables (depending on whether the RMS or ReIM package is running) until the data has been loaded in the tables.
An ODI interface object is run to transform and map the data from the Retail table to the Oracle Financials(EBS or PeopleSoft) interface table.
If the package has errors, an email is sent to the administrator indicating the error in the interface.
The system deletes the processed data in the STG_FIF_GL_DATA and IM_FINANCIALS_STAG E tables.
|
Note: If any of these steps fails, an error message is entered in RFI_ODI_LOGS table. The same information can be viewed using the RFI Administration UI screens. Data in Retail table is not deleted; saving it for another run after the error is fixed. |
This section discusses how to:
Configure the process integration for accounting entries
Set up a schedule
Run the process integration for accounting entries
This section discusses how to set up a schedule.
This section covers the following topics:
Part I: Set Up Master Repository and Work Repository
Part II: Set up Domain Value
Part III: Set up EBS source
Part IV: Scenario test
|
Note: If you haven't had a master and work repository created, you need to create it beforehand according to the sections F.3, F.4, F.5 and F.6 in Oracle Data Integrator Installation guide 12.2.4 or follow the steps given below. It is better to create master and work repository schema in server where ODI is installed. |
Create master repository
Pre-Requisite:
Create Database schemas for Master Repository and Work Repository. It is better to create master and work repository schema in server where ODI is installed.
Make sure RFI_ODI_TEMP schema exists in Oracle Financials (EBS or PeopleSoft) suite database.
Make sure RFI Infrastructure Database setup is completed.
Give DBA privileges to schema "AP" in case of E-Business suite and "SYSADM in case of PeopleSoft database.
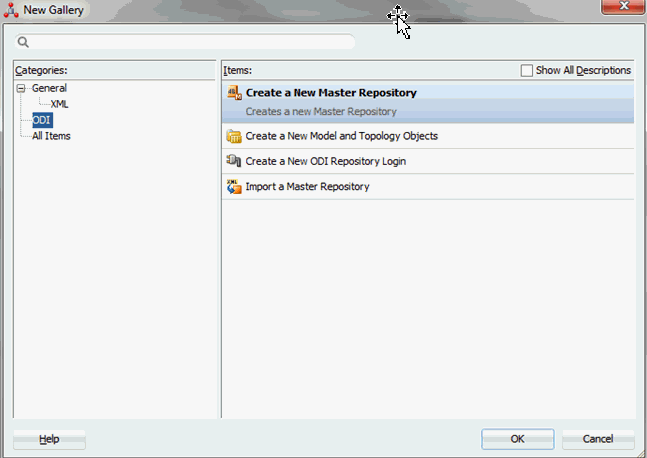
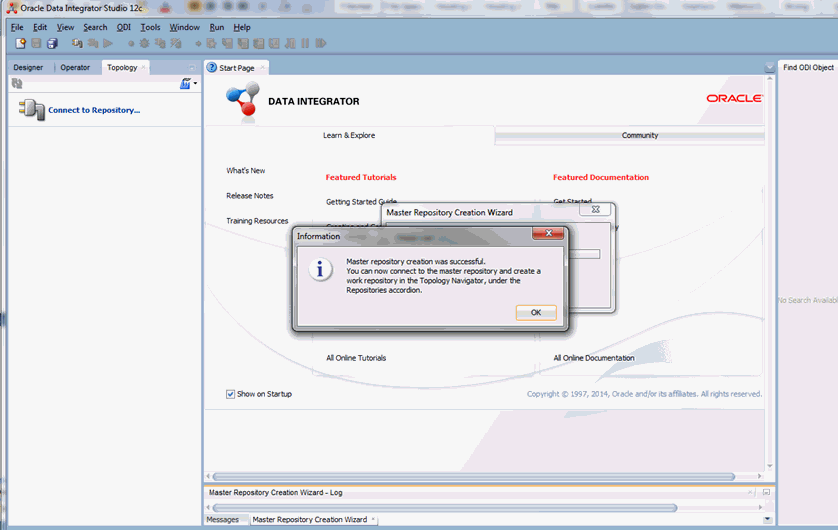
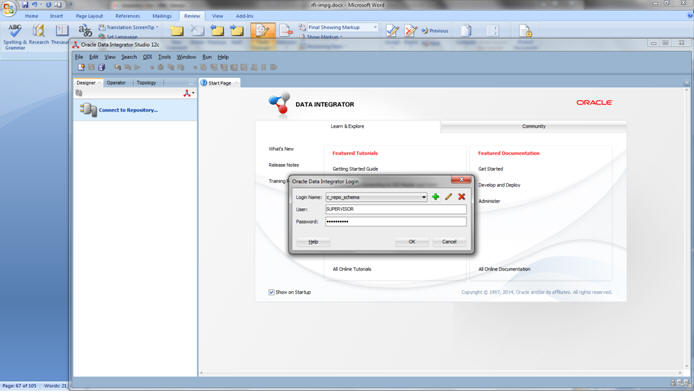
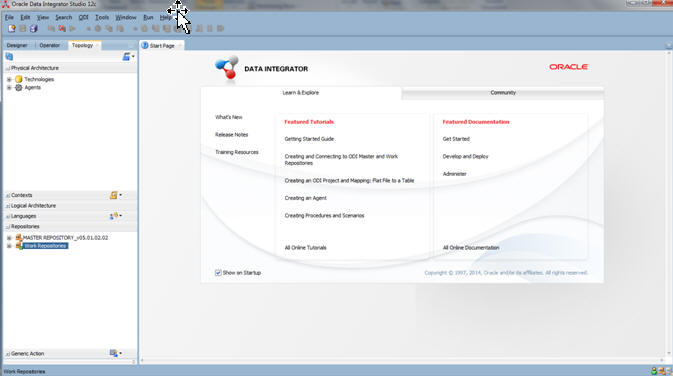
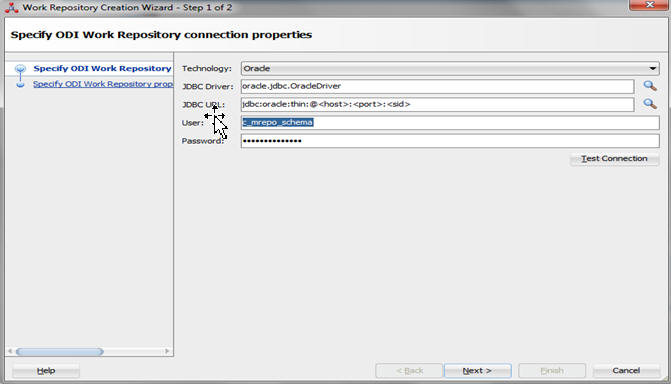
Launch ODI Studio, Click File > New and select Master Repository Creation Wizard
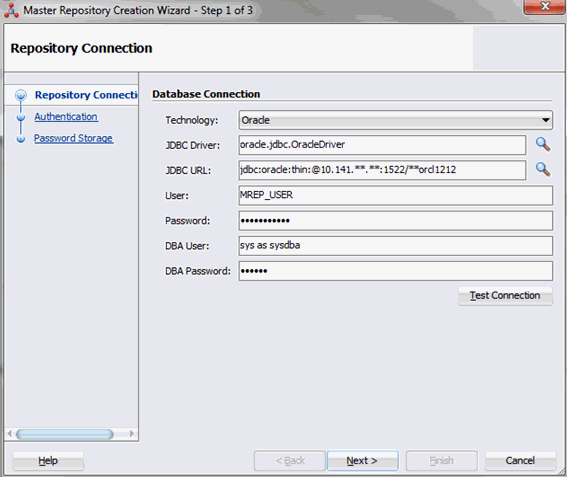
Enter the Master Repository Database connection details and Click Next.
Database Connection
Enter valid Master Repository schema details.
|
Note: You have to enter sysdba credentials in DBA User and DBA Password fields. |
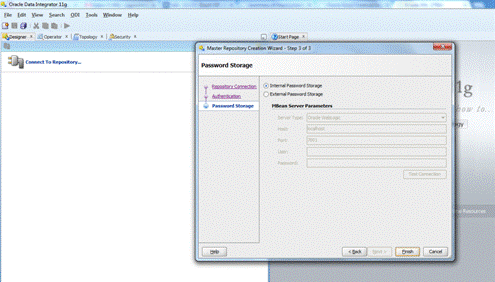
Repository Configuration
Enter any Id other than 804, 805 in ID field.
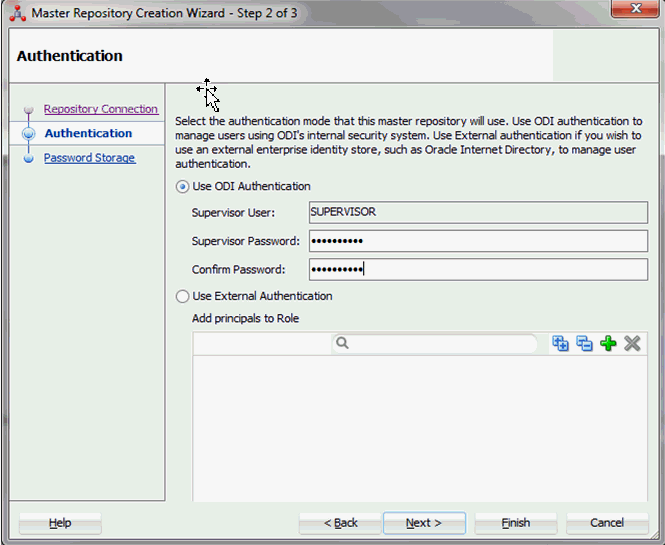
Enter "SUPERVISOR" password and Click Next .
Click Next.
Click Finish.
RFI Create work repository
To create a work repository, take the following steps:
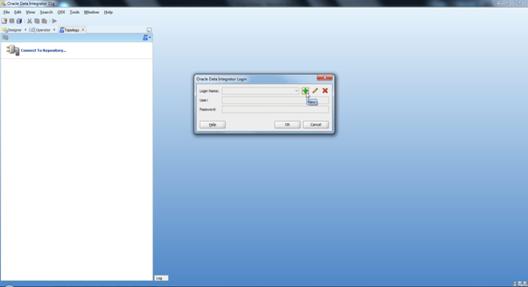
Login to Master Repository in Oracle Data Integrator (ODI) Studio to create a Work Repository.
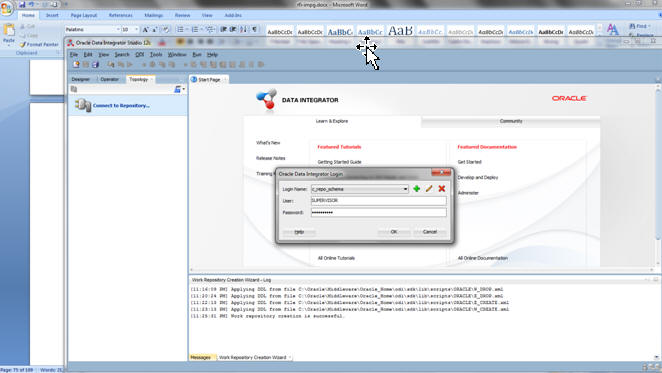
Select the ODI MenuàConnect option.
Create Master Repository login credentials selecting the + button from a Oracle Data Integrator Login popup.
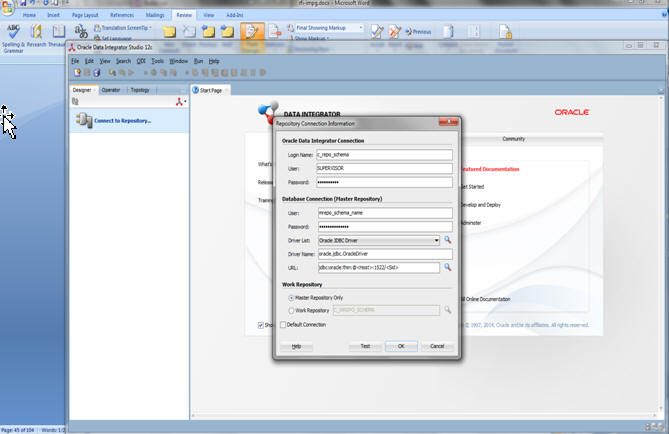
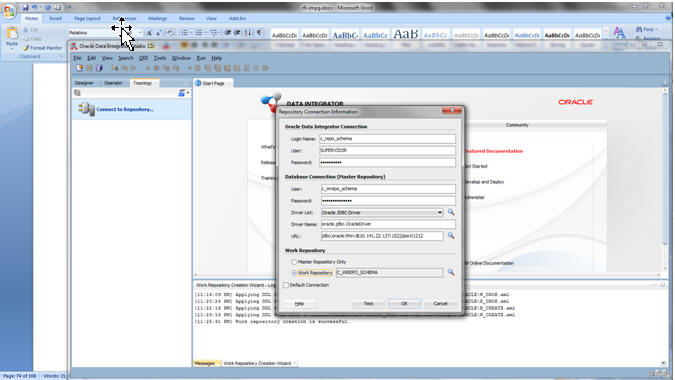
Update Repository Connection Information as below:
Oracle Data Integrator Connection
Login Name: <Login Name>
User: <Enter "SUPERVISOR" in this field>
Password: <Which you had entered in step 2.4 from Create Master Repository section.>
Database Connection (Master Repository)
Enter Master Repository database credentials for User and Password fields.
Select "Oracle JDBC Driver" from dropdown list for Driver List field.
Enter Url field as below:
jdbc:oracle:thin:@<host>:<port>:<sid>
Work Repository
An option should be select as "Master Repository Only".
Test your credentials information by using "Test" button. If it is successful then click OK.
Select OK from Oracle Data Integrator Login popup.
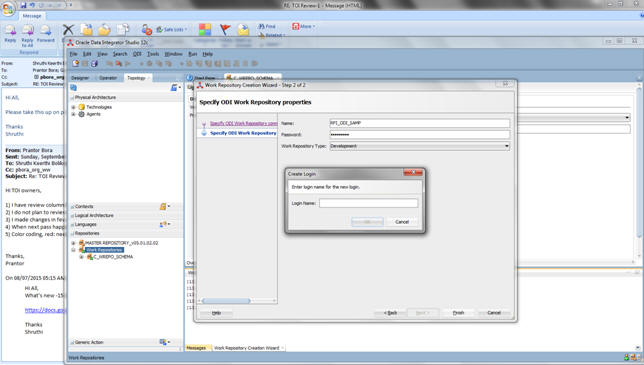
From Topology tab select Repositories, right click on the Work Repositories. Select the New Work Repository option.
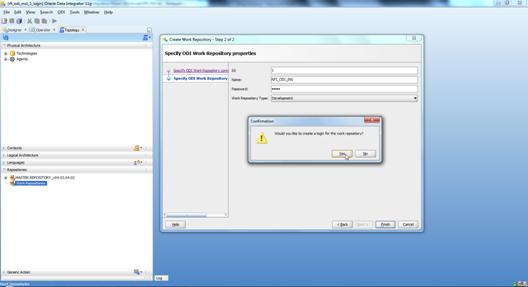
Enter the work repository database credentials details.
Test your credentials information with using "Test" button. If it is successful then click Next.
9. Update ODI Work Repository properties. Enter Name and Password (should be "SUPERVISOR" password) for work repository and click Finish.
Select Yes to create an ODI login for work repository.
Enter ODI work repository login name in the popup.
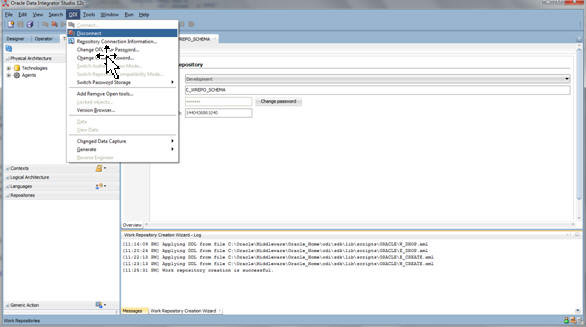
Select the ODI Menu->Disconnect option to connect Work Repository.
Select the ODI Menu->Connect option.
ODI Login popup select Login Name from dropdown list (select which you had created in previous step7).
Enter user as "SUPERVISOR".
Enter "SUPERVISOR" password.
Select edit option.
Validate Repository Connection Information:
Oracle Data Integrator Connection
Login Name: <work repository login name>
User: <"SUPERVISOR">
Password: <SUPERVISOR Password>
Database Connection (Master Repository)
Validate Master Repository database details.
Work Repository
Select Work Repository option and select the repository which you had created in step 1.8.
Test your credentials information with using "Test" button. If it is successful then click OK.
Select OK from Oracle Data Integrator Login popup.
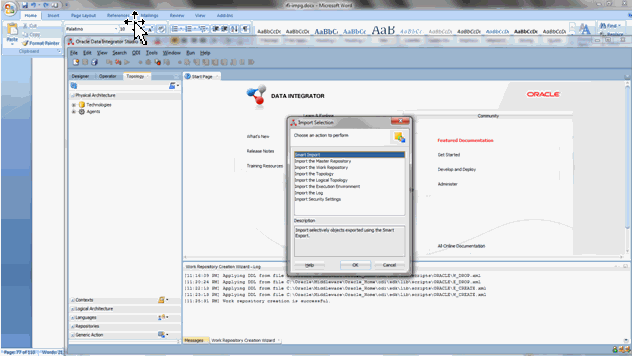
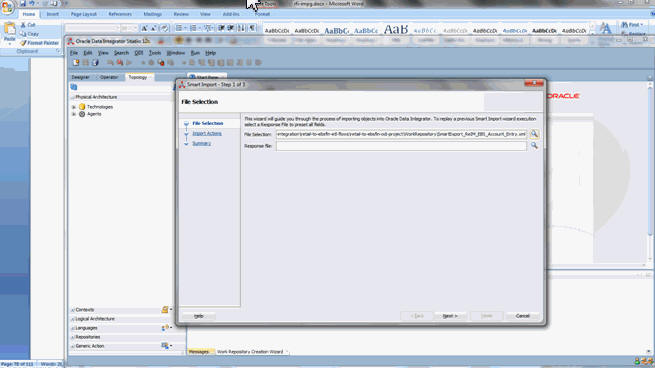
Smart Import the ODI interfaces
Import the ODI interface RMS to E-Business Account Entry or RMS to Peoplesoft Account Entry (Depends on the Oracle Financials System that is integrated to RFI).
Select SmartExport_RMS_EBS_Account_Entry.xml (EBS Integration) or SmartExport_RMS_PSFT_Account_Entry.xml(PeopleSoft Integration) file in the File Selection Field.
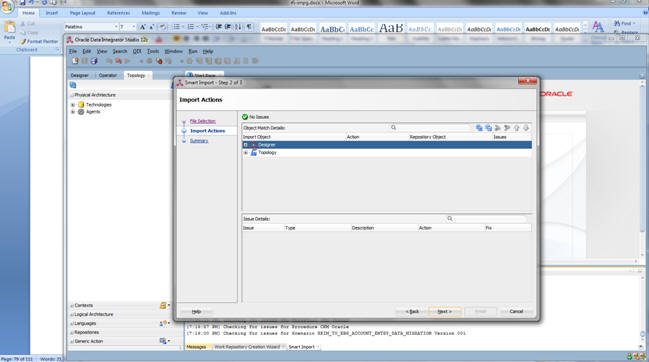
Click Next.
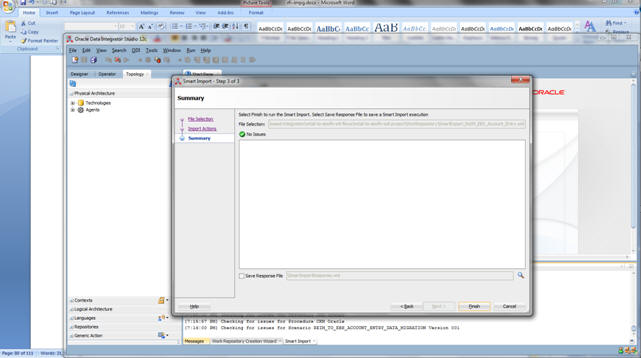
Click Next.
Click Finish.
Similarly perform Smart Import for the other ODI Interfaces.
SmartExport_ReIM_EBS_Account_Entry.xml (EBS integration) Or SmartExport_ReIM_PSFT_Account_Entry.xml (PeopleSoft integration)
SmartExport_ReIM_EBS_Invoice_Entry.xml (EBS integration) Or SmartExport_ReIM_PSFT_Invoice_Entry.xml(PeopleSoft integration)
Update Connection Information
In Topology, under Physical Architecture, Technologies > Oracle, Update Database Connection detail in Physical Servers and Physical Schemas as given in the table below.
The below table shows the Topology Configurations, if the EBS is the Oracle Financials system that is integrated with:-
Table 4-2 Topology Configurations (EBS)
| Physical Server (Data Server) | Physical Schema | |||
|---|---|---|---|---|
| Name | Definition > Connection | JDBC | Schema (Schema) | Schema (Work Schema) |
|
EBIZ DS |
User: <APPS Schema Name> Password: <APPS Schema Password> |
Update EBS JDBCUrl |
APPS Schema |
RFI_ODI_TEMP Schema |
|
EBIZ_AP |
User: <APPS Schema Name> Password: <AP Schema Password> |
Update EBS JDBCUrl |
AP Schema |
RFI_ODI_TEMP Schema |
|
RETAIL DS |
User: <RMS User Schema Name> Password: <RMS User Schema Password> |
Update RMS JDBCUrl |
RMS Schema Owner |
RMS Schema Owner |
|
RFI_LOGS |
User: <RFI Schema Name> Password: <RFI Schema Password> |
Update RFI JDBCUrl |
RFI Schema |
RFI Schema |
|
RFI_RETAIL_XREF |
User: <RFI Schema Name> Password: <RFI Schema Password> |
Update RFI JDBCUrl |
RFI Schema |
RFI Schema |
In Physical Schema, make sure the context (Global and RETL_TO_EBIZ) is mapped to Logical Schemas as given in the table below. If some mapping is missing, map the Logical schemas as given in the table below:
Table 4-3 Physical and Logical Schema Mapping
| Physical Schema | Logical Schema |
|---|---|
|
EBIZ DS.APPS |
EBIZ_GL |
|
EBIZ_AP.AP |
EBIZ_AP |
|
RETAIL DS.RMS01APP |
Retail |
|
RFI_LOGS.RFI |
RFI_LOGS |
|
RFI_RETAIL_XREF.RFI |
RFI_RETAIL_XREF |
If integrating Oracle Financials application is PeopleSoft, Please validate the below details:-
The below table shows the Topology Configurations, if the PeopleSoft is the Oracle Financials system that is integrated with:-
Table 4-4 Topology Configurations (PeopleSoft)
| Physical Server (Data Server) | Physical Schema | |||
|---|---|---|---|---|
| Name | Definition > Connection | JDBC | Schema (Schema) | Schema (Work Schema) |
|
PEOPLESOFT DS |
User: <SYSADM Schema Name> Password: <SYSADM Schema Password> |
Update EBS JDBCUrl |
SYSADM Schema |
RFI_ODI_TEMP Schema |
|
RETAIL DS |
User: <RMS User Schema Name> Password: <RMS User Schema Password> |
Update RMS JDBCUrl |
RMS Schema Owner |
RMS Schema Owner |
|
RFI_LOGS |
User: <RFI Schema Name> Password: <RFI Schema Password> |
Update RFI JDBCUrl |
RFI Schema |
RFI Schema |
|
RFI_RETAIL_XREF |
User: <RFI Schema Name> Password: <RFI Schema Password> |
Update RFI JDBCUrl |
RFI Schema |
RFI Schema |
In Physical Schema, make sure the context (Global and (RETL_TO_PSFT) is mapped to Logical Schemas as given in the table below. If some mapping is missing, map the Logical schemas as given in the table below:
Enter appropriate values to the DVM table (RFI_XREF_DVM).
|
Note: EXT_SYSTEM column mentioned below can have only one of the two values, either EBS or PSFT. It should not have any other value. On the same instance of RFI_XREF_DVM should not have both EBS and PSFT values in the EXT_SYSTEM COLUMN. |
Table 4-6 DVM table values
| DVM Name (CATEGORY_TYPE Column) | Retail Value (RETL_ID column) | Oracle Financials value (EXT_SYSTEM_ID column) | EXT_SYSTEM column |
|---|---|---|---|
|
BUSINESS_UNIT_DVM |
Enter Retail Value for Business Unit |
Enter EBS or PSFT Value for Business Unit |
EBS or PSFT |
|
CURR_CODE_DVM |
Enter Retail Value for Currency Code |
Enter EBS or PSFT Value for Currency Code |
EBS or PSFT |
|
TAX_DVM |
Enter Retail Value for VAT Code |
Enter EBS or PSFT Value for VAT Code |
EBS or PSFT |
|
SUPPLIER_XREF (Inserted by Supplier Integration Adapter) |
Retail Value for Supplier Id |
EBS or PSFT Value for Supplier Id |
EBS or PSFT |
Enter appropriate values for Mail option (RFI_XREF_DVM).
Table 4-7 Mail Option values
| Name (CATEGORY_TYPE Column) | Retail Value (RETL_ID column) | E-Business suite value (EXT_SYSTEM_ID column) | EXT_SYSTEM column |
|---|---|---|---|
|
RMS_GL_MSG_NOTIFICATION |
MAIL_SUBJECT |
Enter the mail Subject for ODI Error Notification. |
RMS |
|
RMS_GL_MSG_NOTIFICATION |
MAIL_BODY |
Enter the mail content for ODI Error Notification, Max length 240 chars |
RMS |
|
ReIM_GL_MSG_NOTIFICATION |
MAIL_SUBJECT |
Enter the mail Subject for ODI Error Notification. |
ReIM |
|
ReIM_GL_MSG_NOTIFICATION |
MAIL_SUBJECT |
Enter the mail content for ODI Error Notification, Max length 240 chars |
ReIM |
The FROM Email Address and TO Email Address List will be specified during RFI deployment.
Login to EBS self-service, navigate to General Ledger responsibility, Setup > Journals, launch Categories form, enter the following categories:
Launch Sources form, enter the following sources:
Navigate to Payables responsibility, Setup > in the Lookups menu, launch Payables form.
Enter the following condition and search:
Type: SOURCE Application: Payables
In the result list, add the following line and save:
In this part, you need to do similar things to the three packages in this RFI. In this guide we only use package, Migrate RMS To EBIZ Acc Entry Package, for example.
Agents and Scenario
Oracle Data Integrator run-time Agents orchestrate the execution of jobs. The run-time agent functions as a listener and a scheduler agent. The agent executes jobs on demand (model reverses, packages, scenarios, interfaces, and so forth). The agent is also to start the execution of scenarios according to a schedule defined in Oracle Data Integrator. Schedules can be attached to scenarios and also to Load Plans. In ODI Topology, navigate to Physical Architecture > Agents.
Make sure the RFI_AGENT is available and default to port 20910.
Run Agent Scheduler
Modify odiparams file and set the following lines to connect them to the work repository. For example:
In Windows OS (odiparams.bat),
set ODI_MASTER_DRIVER=oracl.jdbc.driver.OracleDriver
set ODI_MASTER_URL=<JDBC Connection URL to ODI>
set ODI_MASTER_USER=<ODI Master Schema>
set ODI_MASTER_ENCODED_PASS=< ODI Master Schema password>
set ODI_SUPERVISOR=SUPERVISOR
set ODI_SUPERVISOR_ENCODED_PASS=<ODI SUPERVISOR password>
set ODI_SECU_WORK_REP=<ODI Work Repository name>
In Linux/Unix OS (odiparams.sh),
ODI_MASTER_DRIVER=oracle.jdbc.driver.OracleDriver
ODI_MASTER_URL=<JDBC Connection URL to ODI>
ODI_MASTER_USER=<ODI Master Schema>
ODI_MASTER_ENCODED_PASS=< ODI Master Schema password>
ODI_SUPERVISOR=SUPERVISOR
ODI_SUPERVISOR_ENCODED_PASS=<ODI SUPERVISOR password>
ODI_SECU_WORK_REP=<ODI Work Repository name>
You can use the following command to generate the encoded password:
encode <password>
Go to a CMD prompt and type
agent "-NAME=<physical agent name>"
For example
agent "-NAME=RFI_AGENT"
You should get a message that the agent is started successfully.
Generate scheduler
In ODI designer, navigate to Load Plans and Scenarios, select scenario MIGRATE_RMS_TO_EBIZ_ACC_ENTRY_PACKAGE (For EBS integration) or MIGRATE_RMS_TO_PSFT_ACC_ENTRY_PACKAGE (For PeopleSoft integration).
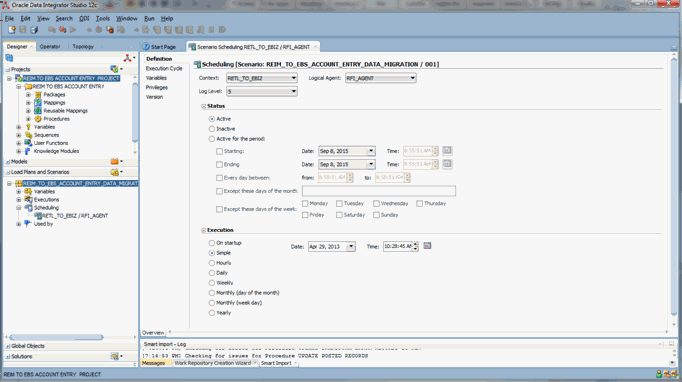
Select Existing Scheduling. Make sure the context is set to RETL_TO_EBIZ (For EBS integration) or RETL_TO_PSFT (For PeopleSoft integration) and agent is selected as RFI_AGENT.
Update schedule
Go back to Topology and find your Physical Agent, right click and update schedule.
Check
The agent runs at a predefined execution time as given in the schedule. When it runs, you can check it in the Operator. You can also check the data in Oracle Financials side in the interface tables if the execution is successful and data has flown to Oracle Financials interface tables.
Run import program
When running the import program, enter the source name you set up in previous steps.
When the import program is complete, you can check the data in the Oracle Financials transaction tables.
This process runs based on the schedules created for it. The integration between Oracle Retail and Oracle GL can be scheduled to occur automatically.
|
Note: You can start or stop the scheduler agent whenever you want, which enables you to control the integration process. For more information about starting and stopping the scheduler agent, see Oracle Data Integrator Installation Guide 12.2.4, Section 3.2.6 "Starting the Standalone Agent" and section C.1.2 for "Stopping a Standalone Agent." |