| Oracle® Retail Bulk Data Integration Installation Guide Release 16.0.027 E94814-01 |
|

 Previous |
 Next |
| Oracle® Retail Bulk Data Integration Installation Guide Release 16.0.027 E94814-01 |
|
Previous |
Next |
The BDI Batch Scheduler supports the same tech stack and platform specifications as given in prior section in this installation guide. The following infrastructure is required for Scheduler application installation.
Before starting the installation, make sure a database schema has been created for the Scheduler application.
Ensure that the WebLogic server where the scheduler application will be deployed is up and running.
Download the BDI scheduler installer archive: BdiScheduler16.0.027ForAll16.x.xApps_eng_ga.zip
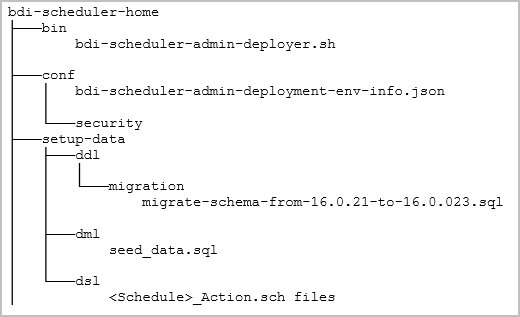
Unzip/extract the archive to a target directory to run the installer. The bdi-scheduler-home directory will be created under the target directory with the artifacts.
The following is part of the directory structure and artifacts that are extracted from the archive (not the complete list shown below).
|
Note: Any seed data schedule definition can be edited if required using the seed_data.sql file. To add a new schedule at the time of deployment, edit seed_data.sql to include an insert statement for the new schedule definition and add the corresponding <ScheduleName>_Action.sch file in the /setup-data/dsl directory.To configure valid Email Recipients for Schedule email notifications, update seed data located in bdi-scheduler-home/setup-data/dml /seed_data.sql. By default value is admin@example.com in BDI_SCHEDULE_DEFINITION For more details, refer to the Oracle Retail Bulk Data Integration Implementation Guide. |
Edit bdi-scheduler-admin-deployment-env-info.json (in bdi-scheduler-home/conf directory) with corresponding values matching the target deployment environment. Update the values of the following configuration properties.
| Configuration Property | Description |
|---|---|
|
DataSourceDef -> SchedulerAdminDataSource -> jdbcUrl |
JDBC URL of the scheduler database schema |
|
MiddlewareServerDef -> SchedulerAdminAppServer -> weblogicDomainName |
Name of the WebLogic domain where the scheduler application is deployed. |
|
MiddlewareServerDef -> SchedulerAdminAppServer -> weblogicDomainHome |
WebLogic Domain home directory. |
|
MiddlewareServerDef->SchedulerAdminAppServer->weblogicDomainAdminServerProtocol |
By default the protocol is t3 and if configured to SSL then update to t3s. |
|
MiddlewareServerDef -> SchedulerAdminAppServer -> weblogicDomainAdminServerUrl |
WebLogic Admin server URL. Example: t3://<serverHostName>:8001 |
|
MiddlewareServerDef -> SchedulerAdminAppServer -> weblogicDomainAdminServerHost |
Host name of WebLogic Admin server. |
|
MiddlewareServerDef -> SchedulerAdminAppServer -> weblogicDomainAdminServerPort |
WebLogic Admin server port. |
|
MiddlewareServerDef -> SchedulerAdminAppServer -> weblogicDomainTargetManagedServerName |
Managed Server name where the Scheduler application is deployed. |
|
MiddlewareServerDef -> SchedulerAdminAppServer -> schedulerAdminUiUrl |
Scheduler Admin app URL. http://<serverHostName>:<managed server port>/bdi-scheduler |
|
MiddlewareServerDef -> ProcessFlowAdminAppServer -> processFlowAdminUiUrl |
BDI Process Flow app base URL. This URL will be used by the scheduler to connect to the process flow app to call process flows. Example: http://<serverHostName>:8001/bdi-process-flow |
If you are migrating from the previous version, run the migration script provided in the "setup-data/ddl/migration" folder. For example, the script "migrate-schema-from-16.0.025-to-16.0.027.sql" migrates the database schema from 16.0.025 to 16.0.027. For migrating from older version, the user needs to run the migration scripts incrementally.
Run the deployer script from the bdi-scheduler-home/bin directory. Use the -setup-credentials option to setup necessary credentials for the application and deploy.
bdi-scheduler-admin-deployer.sh -setup-credentials -deploy-scheduler-admin-app
The deployer will prompt credentials for the following user aliases to be configured. Enter the corresponding username and password as required for each alias.
| Alias Name | Description |
|---|---|
|
bdiAppServerAdminServerUserAlias |
WebLogic admin server credentials |
|
bdiSchedulerAdminUiUserAlias |
Credentials for the user with Admin Role for Scheduler Admin app |
|
bdiSchedulerOperatorUiUserAlias |
Credentials for the user with Operator Role for Scheduler Admin app |
|
bdiSchedulerMonitorUiUserAlias |
Credentials for the user with Monitor Role for Scheduler Admin app |
|
bdiSchedulerAdminDataSourceUserAlias |
Datasource credentials to connect to the Scheduler database schema |
|
processFlowAdminBaseUrlUserAlias |
Credentials of the process flow admin app |
If you have already configured the credentials and can use the same credentials (typically when redeploying the app), you can run the deployer with the -use-existing-credentials option as follows, and you will not be prompted for the credentials again for the deployment.
bdi-scheduler-admin-deployer.sh -use-existing-credentials -deploy-scheduler-admin-app
Restrict access to the bdi-scheduler-home folder:
cd bdi-scheduler-home
chmod -R 700 .
Perform the following procedure to verify the BDI Batch Scheduler installation:
Verify that the deployer script has run successfully with no error. The scheduler application would have been deployed to the target environment.
Launch the Scheduler admin app via the URL - http://<host>:<port>/bdi-scheduler/
Verify you are able to access the URL by logging in using the admin or operator role.
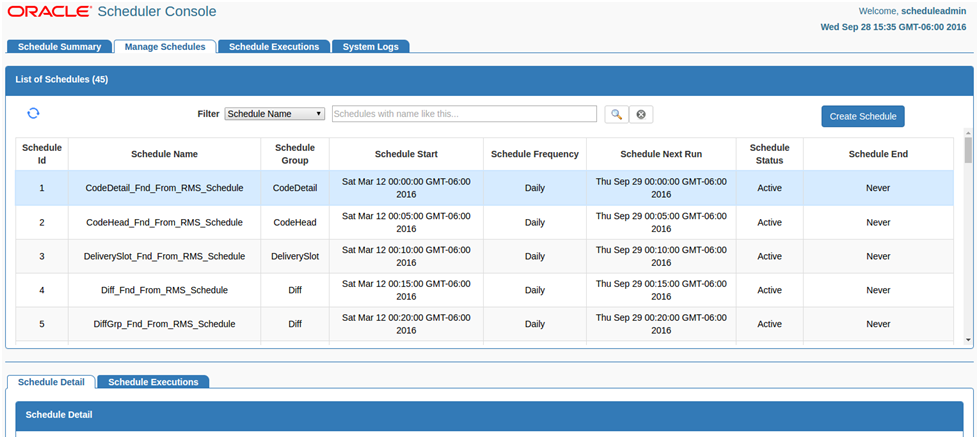
Verify that the list of schedules (created from seed data) is displayed in 'Manage Schedules' page of the app.
Ensure that all the schedules are in 'Active' status.
A schedule can be in 'Disabled' status if no schedule action is loaded for the corresponding schedule or if the schedule action contains any forbidden keyword. The user needs to correct the schedule action and enable the schedule. For more details on this, please refer to the Oracle Retail Bulk Data Integration Implementation Guide.
Scheduler can send email alerts upon success or failure of schedule executions as specified in the schedule definitions. Email Recipients can be set in BDI_SCHEDULE_DEFINITION table at deployment time. The following configuration is required for Scheduler email notification.
Mail Session configuration in WebLogic, for scheduler email notification:
Go to the WebLogic Admin console of the environment where the scheduler app is deployed.
Navigate to Services -> Mail Sessions.
Select 'New' to create a new mail session.
Enter the following details:
Name: BdiSchedulerMailSession
JNDI name: mail/BdiSchedulerMailSession
Session Username: A valid email id, preferably email-id of an administrator.
Session password: The password for the above email id.
Enter the following in the JavaMail properties:
mail.smtp.ssl.enable=true
mail.smtp.auth=true
mail.smtp.ssl.trust=<company's smtp mail server host name>
mail.smtp.port=<mail server smtps port, typically is 465>
mail.transport.protocol=smtps
mail.smtp.host=<company's smtp mail server host name>
mail.from=<A valid email-id for 'from email address' when email is sent>
mail.to(Optional)=<List of valid recipients email-ids>
Web Session Mail.to property is used if no recipients set in BDI_SCHEDULE_DEFINITION table.
Recipients can also be set from Manage Schedule tab in the Scheduler Application.
Click Next. In the Mail Session Targets, select the managed server where the scheduler application is deployed.
Finish creating the mail session.
|
Note: For more information on configuring Mail sessions on WebLogic, see the Oracle® WebLogic Administrator's Guide 12c Release. |
Stop the Scheduler managed server.
Download the BdiScheduler16.0.027ForAll16.x.xApps_eng_ga.zip from the RTG Wiki and extract.
Login to the box. Go to the bdi-scheduler-home directory where the migration scripts are present. (Example: /bdi-scheduler-home/setup-data/ddl/migration)
Using SqlPlus, login to the Scheduler schema configured to BdiSchedulerAdminDataSource. (Note: Make sure ORACLE_HOME is set.)
Run the following migration script. (Example: SQL> @migrate-schema-from-16.0.025-to-16.0.027.sql )
Make sure that no error occurred after running the migration script.
Start the Scheduler managed server.
Login to the Scheduler Application. (Example: http://host:17013/bdi-scheduler.)
Go to Manage Configurations -> System Options and make following changes. LOADSEEDDATA = TRUE
Login to the WLS Console and delete the existing Scheduler Application.
Deploy the Scheduler Application. See Deploying Scheduler Application.
Bounce the managed server.
Login to Scheduler and make sure no errors are displayed in any of the pages.
