| Oracle® Retail Bulk Data Integration Installation Guide Release 16.0.027 E94814-01 |
|

 Previous |
 Next |
| Oracle® Retail Bulk Data Integration Installation Guide Release 16.0.027 E94814-01 |
|
Previous |
Next |
Before starting the installation procedure, identify the retail applications that are in-scope for this installation. BDI requires at least 2 applications in-scope, a sender app and a receiver app. Each bdi-app must be deployed on its own WebLogic managed server. Depending on the site specific deployment topology, create separate WebLogic domains OR managed servers to host the BDI apps in-scope.
|
Note: Repeat the procedures in this chapter for installing other applications that are in-scope. |
This section describes the installation process for a sender app with the BDI-RMS app as an example.
Before you begin installing BDI RMS Batch Job Admin, make sure you have the database schema created for BDI RMS Batch Job Admin.
If you are migrating from previous version of BDI RMS Batch Job Admin to a newer version, run the migration script located in "setup-data/ddl/migration" folder of the BDI Batch Job Admin distribution. For example, the script "migrate-schema-from-16.0.025-to-16.0.027.sql" is provided in this folder to migrate database schema from 16.0.025 to 16.0.027. For migrating from older version, the user needs to run the migration scripts incrementally.
Use the instructions provided in Chapter 3, "BDI Batch Job Admin" to install WebLogic 12.2.1.3.0 and create a domain.
Start the Admin and managed servers.
To deploy the BDI RMS Batch Job Admin war, take the following steps.
Download BdiIntJobAdminPak16.0.027ForRms16.0.027_eng_ga.zip to $BDI_HOME.
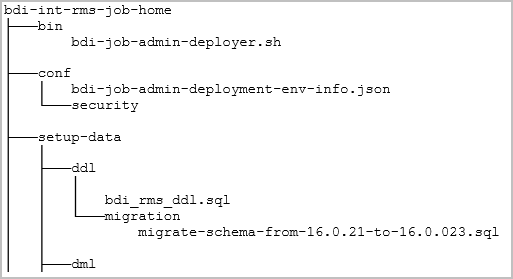
Unzip the downloaded archive.The Bdi Job home directory will be created under the current directory.
unzip BdiIntJobAdminPak16.0.027ForRms16.0.027_eng_ga.zip
This command extracts the archive. The relevant directories for the installation are shown (There are more directories than what is shown).
|
Note: To Integrate BDI-RMS with an external application, additional steps are required. Refer to Appendix A, "Appendix: Integrating BDI-RMS with External Applications" for additional information. |
Edit the rms job configuration file to point to deployment environment (conf/bdi-job-admin-deployment-env-info.json) as follows:
cd bdi-int-rms-job-home/conf
vi  bdi-job-admin-deployment-env-info.json
Provide the following values in the JSON file.
| Configuration Property | Description |
|---|---|
|
BdiRmsJobAdminDataSource -> jdbcUrl |
The JDBC URL for the Oracle database where the RMS integration schema resides. |
|
BdiRmsReceiverServiceDataSource -> jdbcUrl |
The JDBC URL for the Oracle database where the RMS Receiver integration schema resides. BdiRmsJobAdminDataSource and BdiRmsReceiverServiceDataSource can use the same jdbcUrl. |
|
BatchInfraDataSource -> jdbcUrl |
The JDBC URL for the schema created using RCU. The schema user is <prefix>_wls (e.g. INT_WLS). The value of prefix that you provided in schema creation using RCU. |
|
JobAdminAppServer -> weblogicDomainName |
The domain name where BDI RMS Admin app is deployed. |
|
JobAdminAppServer->weblogicDomainHome |
The domain path where BDIRMS Admin app is deployed |
|
JobAdminAppServer -> weblogicDomainAdminServerUrl |
Admin Server URL of the BDI RMS Admin App - http://<Admin host>:<Admin port> |
|
JobAdminAppServer->weblogicDomainAdminServerProtocol |
Admin Server protocol which is by default t3, For SSL deployment update to t3s. |
|
JobAdminAppServer -> weblogicDomainAdminServerHost |
Host Name of the BDI RMS Admin Server |
|
JobAdminAppServer -> weblogicDomainAdminServerPort |
BDI RMS Admin Server Port |
|
JobAdminAppServer -> weblogicDomainTargetManagedServerName |
Managed Server Name where BDI RMS Admin App is installed (e.g. bdi-rms-server) |
|
JobAdminAppServer -> jobAdminUiUrl |
Job Admin URL of BDI RMS http://<host>:<managed server port>/bdi-rms-batch-job-admin |
|
RxmJobAdminAppServer -> jobAdminUiUrl |
Job Admin URL of BDI RXM http://<host>:<rxm managed server port>/bdi-rxm-batch-job-admin |
|
SimJobAdminAppServer -> jobAdminUiUrl |
Job Admin URL of BDI SIM http://<host>:<sim managed server port>/bdi-sim-batch-job-admin |
|
RfiJobAdminAppServer-> jobAdminUiUrl |
Job Admin URL of BDI RFI http://<host>:<sim managed server port>/bdi-rfi-batch-job-admin |
|
SystemOptions |
Optional. Allows to provide system options as name value pairs |
|
Note: The alias names in the configuration files should not be changed. |
Optional – Users can configure system options in the deployment env info json file. Users have to add the system options as part of the configuration in the json file with name value pairs. After the application starts, the system option tables should have system options provided in the json filea=b and c=d values in the system options table. After deploying Jjob Admin, verify that values are getting added to the system option table properly.
Example:
Job Admin JSON Snippet:
        "JobAdminApplication":{
            "appName":"bdijos-rms",
            "JobAdminAppUses":[
                "JobAdminDataSource",
                "JobAdminAppServer"
            ],
            "SystemOptions":[
                {"name":"a", "value":"b"},
                {"name":"c", "value":"d"}
            ]
        }
    }
Run the deployer script to create the data sources and deploy BDI RMS Batch Job Admin.
cd bdi-int-rms-job-home/bin
bdi-job-admin-deployer.sh -setup-credentials -deploy-job-admin-app
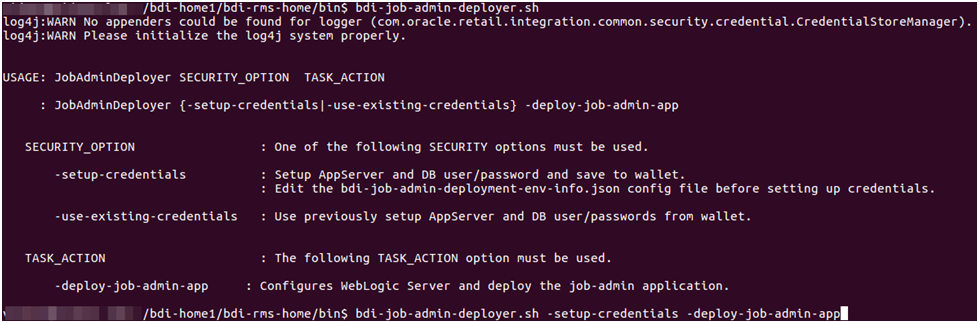
Enter the values prompted by the script for following credentials aliases. JobAdmin user has more privileges (e.g change configuration and run jobs from JobAdmin UI) than JobOperator user. JobOperator can run batch jobs where as JobMonitor has just read privileges.
| Alias | Description |
|---|---|
|
bdiAppServerAdminServerUserAlias |
WebLogic admin server credentials |
|
bdiJobAdminUiUserAlias |
Credentials for Admin Role user for Job Admin app |
|
bdiJobOperatorUiUserAlias |
Credentials for Operator Role user for Job Admin app |
|
bdiJobMonitorUiUserAlias |
Credentials for Monitor Role user for Job Admin app |
|
bdiJobAdminDataSourceUserAlias |
Credentials for the Data Source of the Job Admin Schema |
|
bdiRmsReceiverServiceDataSourceUserAlias |
Credentials for the Data Source of the Job Receiver Schema |
|
batchInfraDataSourceUserAlias |
Credentials for the Data Source of the Batch Infra Schema |
|
rxmJobAdminBaseUrlUserAlias |
BDI RXM job admin app credentials |
|
simJobAdminBaseUrlUserAlias |
BDI SIM job admin app credentials |
|
rfiJobAdminBaseUrlUserAlias |
BDI RFI job admin app credentials |
|
Note: If you have already configured the credentials and can use the same credentials (typically when redeploying the app), you can run the deployer with the -use-existing-credentials option as follows, and you will not be prompted for the credentials again for the deployment.bdi-job-admin-deployer.sh -use-existing-credentials -deploy-job-admin-app |
Deployer script deploys BDI RMS Batch Job Admin to the managed server.
Restrict access to the bdi-int-rms-job-home folder:
cd bdi-int-rms-job-home
chmod -R 700 .
After you deploy to the server successfully, BDI RMS Batch Job Admin can be accessed using the following URL:
http://<server>:<port>/bdi-rms-batch-job-admin
Log in using credentials provided during the installation and verify that jobs are displayed in the Manage Batch Jobs tab and configuration is displayed in the Manage Configurations tab.

This section describes the installation process for a receiver app with the BDI-RXM app as an example. The same procedure can be used for installing other receiver applications like BDI SIM.
Before you begin installing BDI RXM Batch Job Admin, make sure you have the database schema created for BDI RXM Batch Job Admin.
If you are migrating from the previous version of BDI RXM Batch Job Admin to a newer version, run the migration script located in the "setup-data/ddl/migration" folder. For example, the script "migrate-schema-from-16.0.025-to-16.0.027.sql" is provided in this folder to migrate the database schema from 16.0.025 to 16.0.027. For migrating from older version, the user needs to run the migration scripts incrementally.
Use the instructions provided above to install WebLogic 12.2.1.3.0 and create a domain.
Start the Admin and managed servers.
To deploy the BDI RXM Batch Job Admin war, take the following steps.
Download BdiIntJobAdminPak16.0.027ForRxm16.0.027_eng_ga.zip to $BDI_HOME.
Unzip the downloaded archive. The BDI Job home directory will be created under the current directory.
unzip BdiIntJobAdminPak16.0.027ForRxm16.0.027_eng_ga.zip
This command extracts the archive. The relevant directories for the installation are shown (There are more directories than what is shown).

Edit bdi-job-admin-deployment-env-info.json as follows:
cd bdi-int-rxm-job-home/confvi bdi-job-admin-deployment-env-info.json
Provide the following values in the JSON file.
| Configuration Property | Description |
|---|---|
|
BdiRxmJobAdminDataSource ->jdbcUrl |
The JDBC URL for the Oracle database where the RXM integration schema resides. |
|
BdiRxmReceiverServiceDataSource -> jdbcUrl |
The JDBC URL for the Oracle database where the RXM integration schema resides. BdiRxmJobAdminDataSource and BdiRxmReceiverServiceDataSource can use the same jdbcUrl. |
|
BatchInfraDataSource -> jdbcUrl |
The JDBC URL for the schema created using RCU. The schema user is <prefix>_wls (e.g. INT_WLS). The value of prefix that you provided in schema creation using RCU. |
|
JobAdminAppServer -> weblogicDomainName |
The domain name where BDI RXM Admin app is deployed |
|
JobAdminAppServer -> weblogicDomainHome |
The domain home directory of WebLogic where BDI RXM Admin app is deployed |
|
JobAdminAppServer -> weblogicDomainAdminServerUrl |
Admin Server URL of the BDI RXM Admin App - http://<Admin host>:<Admin port> |
|
JobAdminAppServer->weblogicDomainAdminServerProtocol |
AdminServer protocol which is by default t3, For SSL deployment update to t3s. |
|
JobAdminAppServer -> weblogicDomainAdminServerHost |
Host Name of the BDI RXM Admin Server |
|
JobAdminAppServer -> weblogicDomainAdminServerPort |
BDI RXM Admin Server Port |
|
JobAdminAppServer -> weblogicDomainTargetManagedServerName |
Managed Server Name where BDI RXM Admin App is installed (e.g. bdi-rxm-server) |
|
JobAdminAppServer -> jobAdminUiUrl |
Job Admin URL of BDI RXM http://<host>:<bdi rxm managed server port>/bdi-rxm-batch-job-admin |
|
RmsJobAdminAppServer -> jobAdminUiUrl |
Job Admin URL of BDI RMS http://<host>:<bdi rms managed server port>/bdi-rms-batch-job-admin |
Run the deployer script to create the data sources and deploy BDI RXM Batch Job Admin.
cd bdi-int-rxm-job-home/bin
bdi-job-admin-deployer.sh -setup-credentials -deploy-job-admin-app
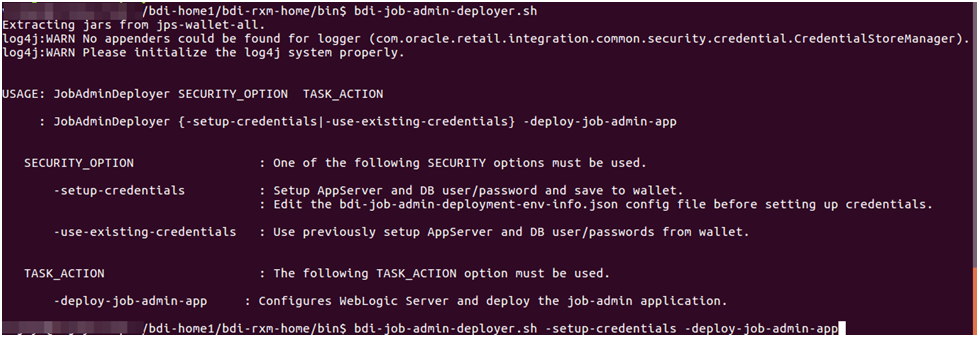
Enter the values prompted by the script for the following credential aliases. JobAdmin user has more privileges(e.g change configuration and run jobs from JobAdmin UI) than JobOperator user. JobOperator can run batch jobs where as JobMonitor has just read privileges.
| Alias | Description |
|---|---|
|
bdiAppServerAdminServerUserAlias |
WebLogic admin server credentials |
|
bdiJobAdminUiUserAlias |
Credentials for Admin Role user for Job Admin app |
|
bdiJobOperatorUiUserAlias |
Credentials for Operator Role user for Job Admin app |
|
bdiJobMonitorUiUserAlias |
Credentials for Monitor Role user for Job Admin app |
|
bdiJobAdminDataSourceUserAlias |
Credentials for the Data Source of the Job Admin Schema |
|
bdiRxmReceiverServiceDataSourceUserAlias |
Credentials for the Data Source of the Job Receiver Schema |
|
batchInfraDataSourceUserAlias |
Credentials for the Data Source of the Batch Infra Schema |
|
rmsJobAdminBaseUrlUserAlias |
BDI RMS job admin app credentials |
|
Note: If you have already configured the credentials and can use the same credentials (typically when redeploying the app), you can run the deployer with the -use-existing-credentials option as follows, and you will not be prompted for the credentials again for the deployment.bdi-job-admin-deployer.sh -use-existing-credentials -deploy-job-admin-app |
Deployer script deploys BDI RXM Batch Job Admin to the server.
Restrict access to the bdi-int-rxm-job-home folder:
cd bdi-int-rxm-job-home
chmod -R 700 .
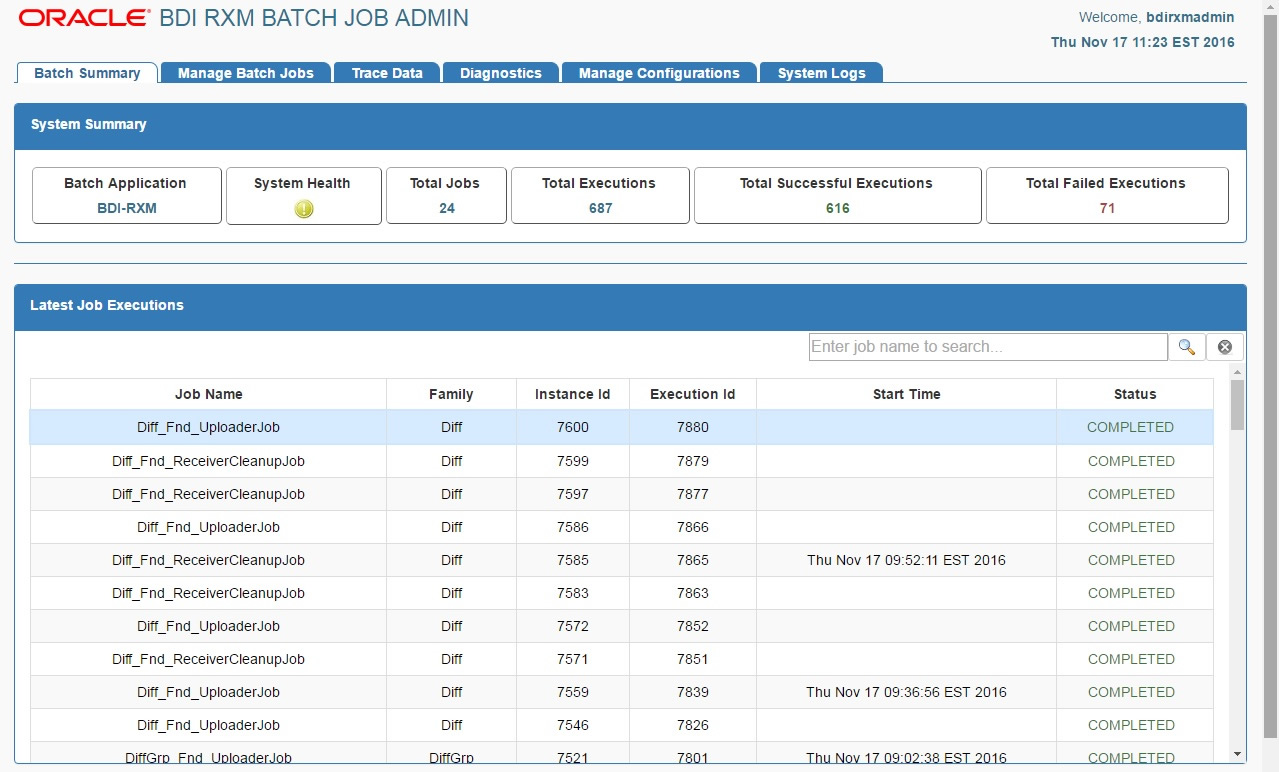
After you deploy to the server successfully, the BDI RXM Batch Job Admin can be accessed using the following URL:
http://<server>:<port>/bdi-rxm-batch-job-admin
Log in using credentials provided during the installation and verify that jobs are displayed in the Manage Batch Jobs tab and configuration is displayed in the Manage Configurations tab.
Go to $BDI_HOME/bdi-int-rxm-job-home/setup-data/ddl folder.
Run the DDL script "bdi_rxm_ddl.sql" provided in this folder in the BDI RXM database schema.
DDL generates the inbound interface tables for RXM.
|
Note: BDI SIM inbound interface tables are created in the SIM database schema instead of the BDI SIM database schema. The BDI SIM database schema will have synonyms for BDI SIM inbound interface tables. |
BDI Int JobAdmin App (BdiIntJobAdminPak16.0.xFor<app>16.0.x_eng_ga.zip) Upgrade Steps
Stop the BDI INT Job Admin App managed server.
Download the BdiIntJobAdminPak16.0.027For<app>16.0.027_eng_ga.zip from RTG Wiki and extract.
Login to the box. Go to the bdi-<app>-home directory where migration scripts are present.
Example: /bdi-int-rxm-job-home/setup-data/ddl/migration
Using SqlPlus, login to the Int App schema. (Note: Make sure ORACLE_HOME is set.)
Run the following migration script in the schemas configured to Bdi<App>JobAdminDataSource and Bdi<App>ReceiverServiceDataSource.
Example: SQL> @migrate-schema-from-16.0.025-to-16.0.027.sql
Make sure there is no error occurred after running the migration script except the known errors mentioned in the Note.
|
Note: In case for any similar errors like ORA-00942: table or view does not exist Verify if the corresponding tables present in the schema or not, as there are cases where Bdi<App>ReceiverServiceDataSource and Bdi<App>JobAdminDataSource might have configured to different schemas.RTG maintains only one migration script for upgrades. Please ignore those errors. |
Start BDI Int Job App managed server.
Login to the BDI Int Job App (Example: http://host:17011/ bdi-rxm-batch-job-admin)
Go to Manage Configurations -> System Options and make following changes.LOADJOBDEF = TRUE and LOADSEEDDATA = TRUE.
Login to the WLS Console and delete the existing Int App.
Deploy the BDI Int App. See Deploying BDI Batch Job Admin Applications for a Sender Application or Deploying BDI Batch Job Admin Application for a Receiver Application.
Bounce the managed server.
Login to BDI Int Job App and make sure no error is displayed in any of the pages.
