| Oracle® Retail Integration Cloud Services Administration Guide Release 16.0.030 E99917-01 |
|

 Previous |
| Oracle® Retail Integration Cloud Services Administration Guide Release 16.0.030 E99917-01 |
|
Previous |
This chapter describes the processes for maintaining users and roles as well as batch processes.
For information regarding standard end user activities like creating and viewing reports, please see the Oracle Retail Integration Cloud Services User Guide.
It is considered to be a best practice to have all Oracle Retail Integration Cloud Services support requests submitted through a single point of contact for that customer environment; the client designated administrator is usually designated to perform this role.
The link to use when submitting Service Requests (SR) is:
Oracle Identity Cloud Service (IDCS) provides an innovative, fully integrated service that delivers all the core identity and access management capabilities through a multi-tenant Cloud platform.
For instructions on managing users and groups in IDCS, follow the Manage Users and Groups IDCS document at the following URL:
https://docs.oracle.com/en/cloud/paas/identity-cloud/index.html
Retail Integration Cloud Services is built with role-based access. Permissions are associated with roles.
The following roles are available:
RIB User Roles
| Role Name | Admin Role | Operator Role | Monitor Role |
|---|---|---|---|
| Group Name | ribAdminGroup | ribOperatorGroup | ribMonitorGroup |
| Start/Stop Adapters | Yes | Yes | No |
| Change Log levels | Yes | Yes | No |
| View Logs | Yes | Yes | Yes |
BDI Batch Admin Security Roles
| Role Name | Admin Role | Operator Role | Monitor Role |
|---|---|---|---|
| Group Name | BdiJobAdminGroup | BdiJobOperatorGroup | BdiJobMonitorGroup |
| Edit configuration from UI | Yes | No | No |
| Create/update/delete system options | Yes | No | No |
| Create/update/delete system credentials | Yes | No | No |
| View credentials | Yes | No | No |
| Run Jobs | Yes | Yes | No |
| Monitor Jobs | Yes | Yes | Yes |
| HTTP GET method access to rest services | Yes | Yes | Yes |
| HTTP POST/PUT/DELETE method access to rest services | Yes | Restricted to few services. | No |
BDI Process Flow Security Roles
| Role Name | Admin Role | Operator Role | Monitor Role |
|---|---|---|---|
| Group Name | BdiProcessAdminGroup | BdiProcessOperatorGroup | BdiProcessMonitorGroup |
| Update Process DSL | Yes | No | No |
| Start/Restart Process | Yes | Yes | No |
| All other services | Yes | Yes | No |
| Read only Access to Process Flow Live, Manage Process Flow,Historical Process Flow Executions,System Logs UI tabs. | Yes | Yes | Yes |
| HTTP GET method access to rest services | Yes | Yes | Yes |
| HTTP POST/PUT/DELETE method access to rest services | Yes | Restricted to few services. | No |
BDI Scheduler Security Roles
| Role Name | Admin Role | Operator Role | Monitor Role |
|---|---|---|---|
| Group Name | BdiSchedulerAdminGroup | BdiSchedulerOperatorGroup | BdiSchedulerMonitorGroup |
| View and search | Yes | Yes | Yes |
| Create schedule | Yes | No | No |
| Edit schedule | Yes | No | No |
| Delete schedule | Yes | No | Yes |
| Manual run schedule | Yes | Yes | Yes |
| Disable schedule | Yes | Yes | No |
| Enable schedule | Yes | Yes | No |
| HTTP GET method access to rest services | Yes | Yes | Yes |
| HTTP POST/PUT/DELETE method access to rest services | Yes | Yes | No |
The following is the file upload process. The Private/Public Keys must be generated and the public Key must be associated with your SFTP Account for the file uploads. The Adding Authorized Keys section describes the step-by-step method to generate the Keys (2048 bit RSA Keys).
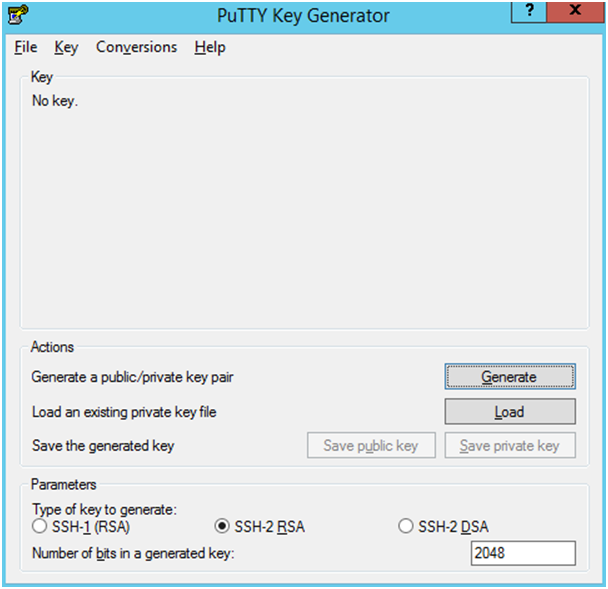
The following is the process to generate a 2048 bit RSA key and add the same to the SFTP server. This is done with the help of WinSCP tool on Windows. However the same can be done using ssh-keygen on Linux as well.
Launch WinSCP and select Tools -> Run PuttyGen.
Select "SSH-2 RSA" for the type of key to generate and enter "2048" for the number of bits in a generated key field and click Generate.
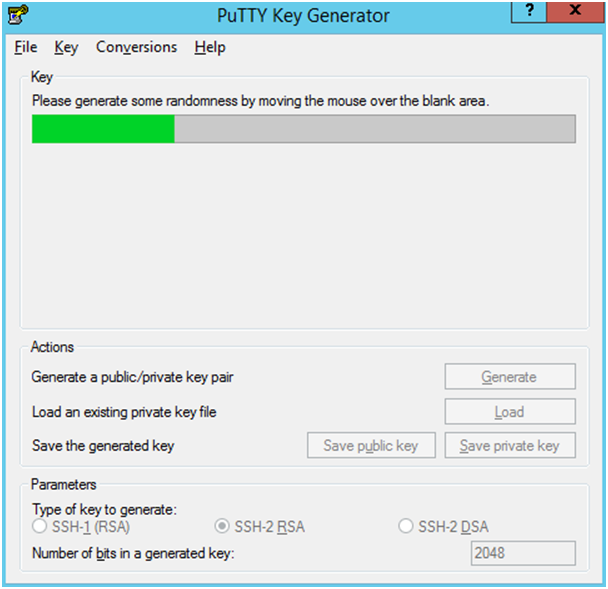
Move the mouse over the blank space in the window until the key is generated.
Once the key is generated, click the Save public key button to save the public key to a file.
Click the Save private key button to save the Private key to a file. Confirm to save it with/without a passphrase.
Open an SR with Oracle Support, to associate the Public half of the Key with your SFTP account (attach the Key with the SR).
The Upload steps uses the private key generated in the earlier section.
Launch WinSCP and connect to <SFTP Server> using port 22.
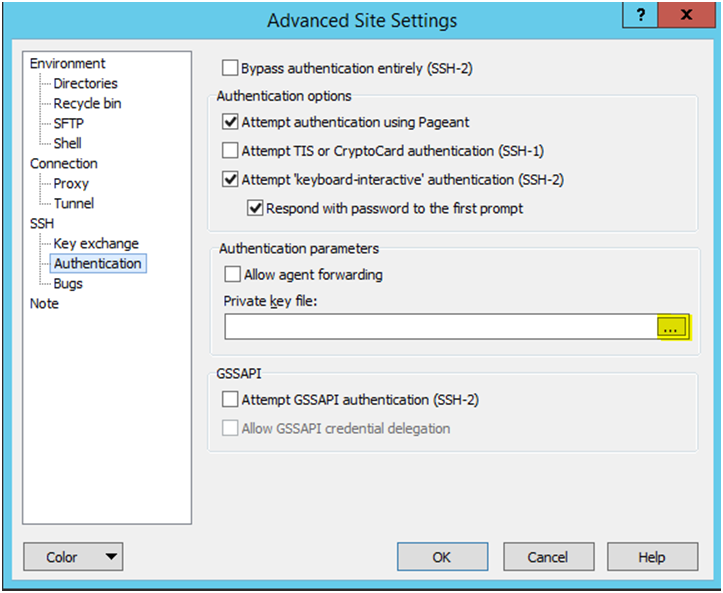
Enter the username and click Advanced.
Click Authentication.
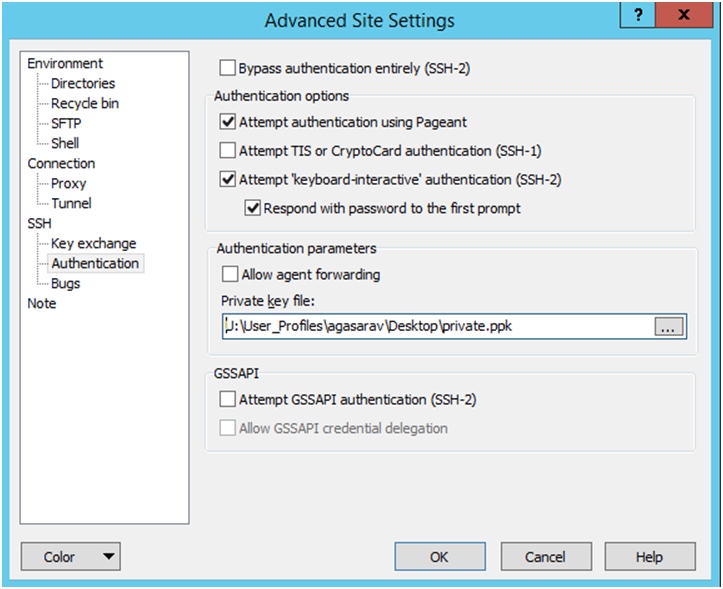
In the Private Key File field, click the Browse button and select the private key created in the earlier section.
After loading the private key file, click OK.
Click Login. The window does not prompt for a password and logs into the SFTP server. Provide a passphrase if one has been set up.
Login to the WinSCP by Following the Steps – Login to WinSCP section.
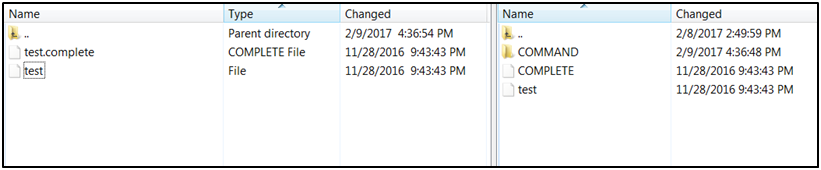
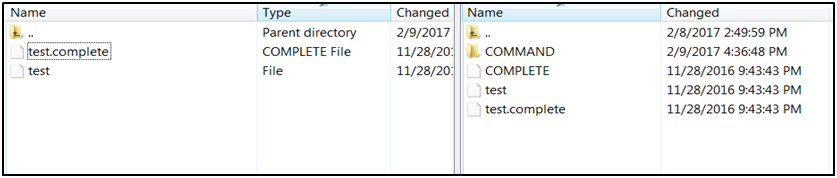
Transfer the file to be copied (e.g., test) to /<SFTP User>.
Transfer an empty file <filename>.complete (eg: test.complete) to the directory /<SFTP User>.
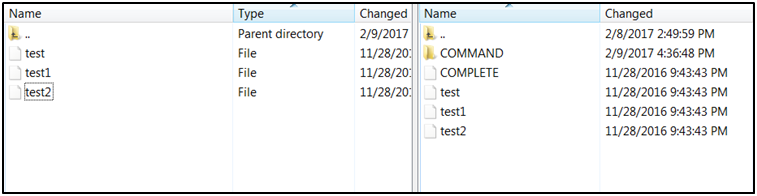
If multiple files have to be transferred, copy all the files to /<SFTP_user>.
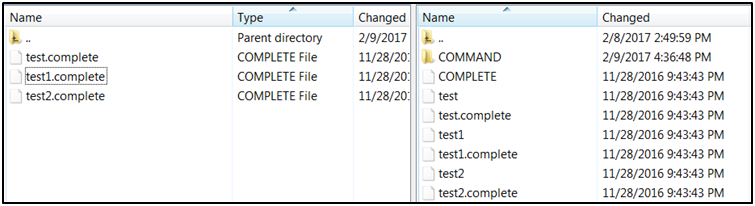
Transfer all the corresponding <filename>.complete files to the /<SFTP_user> directory for the transfer to complete.
Login to the WinSCP by following the Steps – Login to WinSCP section. The following is the download file process.
Change directory to /<SFTP User>/EXPORT.
Download all data files.