| Oracle® Retail Service Backbone Installation Guide Release 16.0.1 E88243-02 |
|

 Previous |
 Next |
This chapter provides instructions for installing RSB. The complete installation of RSB can be broadly divided into four phases:
Download
Configuration
Compilation
Deployment
|
Note: If there is an existing WebLogic installation on the server, you must upgrade to WebLogic 12.2.1.2. All middleware components associated with WebLogic server should be upgraded to 12.2.1.2.Back up the weblogic.policy file ($WLS_HOME/wlserver/server/lib) before upgrading your WebLogic server, because this file could be overwritten. Copy over the weblogic.policy backup file after the WebLogic upgrade is finished and the post patching installation steps are completed. |
Overview of RIC modes and installation of RIC in RSB only mode and DUAL mode.
RIC modes
Installation of RIC in different modes
The following sections describe the process of installing the RSB product.
In this phase, you have to download all the necessary archive files.
Download RsbKernel16.0.1.0ForAll16.x.xApps_eng_ga.zip to a directory in Linux/Unix. The rsb-home will be created inside this directory. Extract the archive file.
unzip RsbKernel16.0.1.0ForAll16.x.xApps_eng_ga.zip
Download all RsbAppServiceDecoratorPak<rsb_major_version>For<app><app_version>_eng_ga.zip to rsb-home/download-home/all-app-service-decorator directory. Do not extract the files.
Download all RsbServiceIntegrationFlowPak<rsb_major_version>For<service-name>_eng_ga.zip to rsb-home/download-home/all-functional-service-int-flow directory. Do not extract the files.
Download the External and Sim Service Integration Paks. Due to constraints on file size, the External and Sim paks have been split up into the following zips:
RsbExt1.zip
RsbExt2.zip
RsbExt3.zip
RsbExt4.zip
RsbExt5.zip
RsbSim1.zip
RsbSim2.zip
RsbSim3.zip
RsbSim4.zip
Merge the RsbExt*.zip files into RsbServiceIntegrationPak16.0.1.0ForExternal16.0.1_eng_ga.zip:
mkdir temp_work_area
cd temp_work_area
download all RsbExt?.zip
cat RsbExt?.zip > whole.zip
zip -FF whole.zip --out RsbServiceIntegrationPak16.0.1ForExternal16.0.1_eng_ga.zip
Merge the RsbSim*.zip files into RsbServiceIntegrationPak16.0.1ForSim16.0.1_eng_ga.zip:
mkdir temp_work_area
cd temp_work_area
download all RsbSim?.zip
cat RsbSim?.zip > whole.zip
zip -FF whole.zip --out RsbServiceIntegrationPak16.0.1ForSim16.0.1_eng_ga.zip
Copy RsbServiceIntegrationPak16.0.1ForExternal16.0.1_eng_ga.zip and RsbServiceIntegrationPak16.0.1ForSim16.0.1_eng_ga.zip to rsb-home/download-home/all-functional-service-int-flow directory. Do not extract the files.
Set JAVA_HOME to a JDK 1.8 64 bit.
For example:
export JAVA_HOME=/usr/bin/java/1.8
Run rsb-home/download-home/bin/check-version-and-unpack.sh script.
check-version-and-unpack.sh
This will verify the versions of the kernel and downloaded decorators and extract them in respective folders.
|
Note: Please run the command uname -n and make sure that the output matches exactly with hostname of the machine. This is important since hostname is a part of the names of many internal configuration attributes. |
Edit rsb-home/deployment-home/conf/rsb-deployment-env-info.properties to configure the following properties:
JAVA_HOME
rsb-deployment-env-info.service-provider-app-in-scope-for-integration
rsb-deployment-env-info.service-requester-app-in-scope-for-integration
rsb-osb-container.domain-name
rsb-osb-container.<domain-name>.home
rsb-osb-container.<domain-name>.cluster-name
rsb-osb-container.<domain-name>.<cluster-name>.http-url (Cluster port is the port of http proxy server )
rsb-osb-container.<domain-name>.admin-server-name
rsb-osb-container.<domain-name>.admin-server-http-url
rsb-osb-container.<domain-name>.admin-server-connection-url
rsb-osb-container.<domain-name>.<cluster-name>.managed-servers: It is a comma-separated list of managed servers in the cluster, excluding the http proxy managed server.
rsb-osb-container.<domain-name>.<cluster-name>.<managed-server>.managed-server-connection-url: Repeat this property for all the managed servers in the cluster.
service-infrastructure-db.jdbc-url
edge-app-container.<app>.connection-url: The host:port of the edge-application.
global.app-service-end-point-url-pattern: The pattern of edge service URLs. (Note: This is different if the service is hosted on glassfish Vs WebLogic 12c)
rib.home.path: It is an optional field, to be given only if a valid rib-home is present.
Following table lists the various properties and their example values:
| Property | Value (Illustration) |
| JAVA_HOME | /usr/java/jdk1.8.0_65 |
| rsb-osb-container.domain-name | rsb_domain |
| rsb-osb-container.<domain>.home | rsb-osb-container.rsb-domain.home =/u00/rsb/Oracle/Middleware/user_projects/do mains/rsb_domain |
| rsb-osb-container.<domain>.cluster-name | rsb-osb-container.rsb_domain.cluster-name=rsb_cluster |
| rsb-osb-container.<domain>.<cluster name>.http-url
(Cluster port is the port of http proxy server ) |
rsb-osb-container.rsb_domain.rsb_cluster.http-url=http://rsbhost:7004 |
| rsb-osb-container.<domain-name>.admin-server-name | rsb-osb-container.rsb_domain.admin-server-name=AdminServer |
| rsb-osb-container.<domain>.admin-server-http-url | rsb-osb-container.rsb_domain.admin-server-http-url=http://rsbhost:7001 |
| rsb-osb-container.<domain>.admin-server-connection-url | rsb-osb-container.rsb_domain.admin-server-connection-url=t3://rsbhost:7001 |
| rsb-osb-container.<domain>.<cluster name>.managed-servers
(Comma separated list of managed servers in the cluster, excluding the http proxy managed server) |
rsb-osb-container.rsb_domain.rsb_cluster.managed-servers=rsb_server1,rsb_server2 |
| rsb-osb-container.<domain>.<cluster name>.<managed server>.managed-server-connection-url
(Repeat this property for all the managed servers in the cluster) |
rsb-osb-container.rsb_domain.rsb_cluster.rsb_server1.managed-server-connection-url=t3://rsbhost:7002 |
| service-infrastructure-db.jdbc-url | jdbc:oracle:thin:@rsbhost:1521:rra1 |
| edge-app-container.<app>.connection-url
(the host:port of the edge application) |
edge-app-container.sim.connection-url=t3://rsbhost:8080 |
| global.app-service-end-point-url-pattern
(The pattern of edge service URLs. Note: This is different if the service is hosted on glassfish Vs WebLogic) |
http://<HTTP_HOSTNAME>:<HTTP_PORT>/<SERVICE_NAME>Service/<SERVICE_NAME>Bean |
| rib.home.path
(optional) |
rib1@ribhost:/u00/rib1/rib2/Rib1601ForAll16xxApps/rib-home |
Additional steps for Policy A configuration
If RSB is configured with Security Policy A, perform the following additional steps:
Property configuration in rsb-deployment-env-info.properties
rsb-osb-container.<domain>.<cluster>.https-url: The property provides the HTTPS URL of the http proxy managed server.
Override the <decorator>.app-service-end-point-url to use https protocol and SSL port. This can be done at global level OR app level too, but it is recommended to test single service end to end with SSL first during initial stabilization
Following table lists the various properties and their example values:
| Property | Value (Illustration) |
| rsb-osb-container.rsb_domain.rsb_cluster.https-url | rsb-osb-container.rsb_domain.rsb_cluster.http-url=https://rsbhost:7104 |
| <decorator>.app-service-end-point-url
oms-AdvancedShipmentNotification-AppServiceDecorator.app-service-end-point-url |
https://rsbhost:7102/AdvancedShipmentNotificationBean/AdvancedShipmentNotificationService |
Set the port in edge-app-container.<app>.connection-url property to point https port or override protocol with https in property global.app-service-end-point-url-pattern to apply pattern at global level in case all the services are secured with policyA for an app, by default its http.
The following table lists the various properties and their example values
| Property | Value (Illustration) |
| edge-app-container.<app>.connection-url
edge-app-container.sim.connection-url |
t3://<hostname>:<httpsport>
t3s://rsbhost:8102 |
| global.app-service-end-point-url-pattern
(The pattern of edge service URLs. Note: This is different if the service is hosted on glassfish Vs WebLogic) |
http://<HTTP_HOSTNAME>:<HTTP_PORT>/<SERVICE_NAME>Bean/<SERVICE_NAME>Service
https://<HTTP_HOSTNAME>:<HTTP_PORT>/<SERVICE_NAME>Bean/<SERVICE_NAME>Service |
Security Configuration: Download edge app service WSDL files.
cd rsb-home/service-assembly-home/bin
download-app-service-wsdl.sh
Create Policy Mapping File: Create security policy mapping file.
generate-rsb-decorator-security-config.sh
Additional steps for Policy B configuration
If RSB is configured with Policy B, perform the following additional steps:
Security Configuration: Download edge app web service WSDL files.
cd rsb-home/service-assembly-home/bin
download-app-service-wsdl.sh
Create Policy Mapping File: Create security policy mapping file
generate-rsb-decorator-security-config.sh
Setup Security Credentials: Setup security credentials for Message Protection.
setup-message-protection-security-credentials.sh
Setup security credentials and compile:
cd rsb-home/service-assembly-home/bin
rsb-compiler.sh-setup-security-credential
During the compilation step, credentials need to be provided for the following aliases.
sidb-jdbc-user-alias
admin-server-user-alias
Example:
| Alias Name | Value (Illustration) |
| sidb-jdbc-user-alias | <soainfra schema> |
| admin-server-user-alias | <weblogic user> |
The -setup-security-credential option creates or updates the wallet file in deployment-home/conf/security folder. The wallet file contains userids and passwords in encrypted form. However it is possible to decrypt the information programmatically by anyone who has access to this file. Hence it is a good idea to lock down this folder from unauthorized users. You may use the following command to remove read access to this folder:
chmod 700 rsb-home/deployment-home/conf/security
|
Note: If the security credentials are already setup for the above aliases (in a previous compilation attempt), compilation can be directly carried out as follows:cd rsb-home/service-assembly-home/bin rsb-compiler.sh |
Start Admin Server, Proxy Server and Managed servers:
cd <domainHome>/bin
startManagedWebLogic.sh <managed server><AdminServer URL>
For example:
startManagedWebLogic.sh "qa_test_managedServer_1" "http://rsbhost:17001"
Prepare instrumentation configurations for WebLogic server.
cd rsb-home/deployment-home/bin
rsb-deployer.sh -prepare-wls
If RSB is configured with Policy B, perform the following steps before proceeding further. For unsecured configuration or RSB configuration with Policy A, move directly to Step 3.
Copy Script: Copy security scripts to RSB server
cd rsb-home/integration-lib/rsb-tools/scripts
scp generate-pki-certificate-keystore-for-osb.sh <user>@<host>:/<domainHome>/config/
scp import-remote-server-public-key-certificate-into-keystore.sh <user>@<host>:/<domainHome>/config/
scp export-server-public-key-certificate-from-keystore.sh <user>@<host>:/<domainHome>/config/
Generate Certs and Key store: Generate private key, public key and key store for the RSB server (To be done in the RSB server).
<domainHome>/bin/setDomainEnv.sh (This command must be run in the current shell. Prefix the command with a period and a space character)
cd <domainHome>/config
generate-pki-certificate-keystore-for-osb.sh
You will be asked for a keystore password and private key password. Please note the passwords. You will have to provide the same passwords in subsequent steps.
|
Note: If you are getting the certificate from a CA, do not run the above command. Instead, create a keystore with the name<hostname>-keystore.jks where hostname is the short hostname of the server (output of hostname -s command) and then import the certificate and key (public key and private key) to the key store. You may use the following command to import to the keystore.
For more information on RSB Policy Configuration, refer to the Oracle Retail Service Backbone Security Guide. |
java utils.ImportPrivateKey -certfile <certificate file> -keyfile <private key file> -keyfilepass <private key password> -keystore <hostname>-keystore.jks -storepass <keystore password> -alias <hostname>-public-private-key-alias -keypass <private key password>
Copy app server certificate(s)
Copy edge app certificate file(s) to <domainHome>/config of the RSB server. The file name must be <remote-host>-certificate.der
Note: See RSB Security Guide for instructions to export certificate from edge app server.
Import app server certificate(s):
Import all the edge app server public key certificates to RSB server's keystore. If the edge apps are deployed in different servers, import all the certificates to the keystore (To be done in the RSB server):
cd <domainHome>/config
import-remote-server-public-key-certificate-into-keystore.sh <app> <remote-host>
For example:
import-remote-server-public-key-certificate-into-keystore.sh cm <hostname>
For the keystore password, provide the password you specified in the step b.
Configure RSB Server: Configure the RSB server to use the key store generate in the previous steps.
cd rsb-home/deployment-home/bin
configure-rsb-app-server-for-security-policy-b.sh
For the keystore password and private key password, provide the passwords you specified in the step ii.
Restart Servers: Restart Admin and Managed Servers
Deploy all the decorators using one of the methods below:
Deploy one decorator at a time.
cd rsb-home/deployment-home/bin
rsb-deployer.sh -deploy-rsb-service <OSB Project jar>
For example, rsb-deployer.sh -deploy-rsb-service igs-ASNInPublishing-AppServiceDecorator.jar
Deploy all the decorators of an app at a time.
cd rsb-home/deployment-home/bin
rsb-deployer.sh -deploy-all-rsb-service-for-app <appName>
For example, rsb-deployer.sh -deploy-all-rsb-service-for-app igs
Deploy all the decorators of all apps in scope at a time.
cd rsb-home/deployment-home/bin
rsb-deployer.sh -deploy-all-rsb-service
Deploy rib4oms injector service
cd rsb-home/deployment-home/bin
rsb-deployer.sh -deploy-rsb-service RibOmsToRsbOmsRouting-ServicesIntegrationFlow.jar
If RSB policy B is configured, perform the following step else jump to Step 6:
Export Certificate: Copy the script from integration-lib. Export the certificate, so that it can be used by the service consumers. (To be done in the RSB server).
cd <wlsHome>/config
export-server-public-key-certificate-from-keystore.sh
Restrict access to the $RSB-HOME folder:
        cd $RSB-HOME
chmod -R 700 .
Restart all the servers i.e. Admin Server, managed servers and proxy server.
|
Note: By default the maximum number of in-memory sessions for WebLogic web applications is unlimited. This setting can be misused by external attackers to create unlimited number of sessions by accessing the web application. In such cases it is possible that the WebLogic server run out of memory and eventually crash. So it is required to limit the number of sessions to a reasonable number (e.g., 100). The settings can be changed through the admin console of the WebLogic server. Follow the steps below to change this configuration setting:
|
RCE decorators have built-in transformation of messages that allows integration of micros Customer Engagement app with Retail Extension Modules (RXM) application. This section describes how to install RCE decorators using the rsb-home toolset.
For non-secured installations: (for implementation OR early test environments only)
Prerequisite: A valid rsb-home.
Download RsbAppServiceDecoratorPakWithTransform<$current_version>ForRce<$current_version>_eng_ga.zip into rsb-home/download-home/all-app-service-decorator
Delete the base decorator (with NO transformations) RsbAppServiceDecoratorPak<$current_version>ForRce<$current_version>_eng_ga.zip if that exists under rsb-home/download-home/all-app-service-decorator
Run all life cycle management scripts in rsb-home listed below
rsb-home/download-home/bin/check-version-and-unpack.sh
rsb-home/service-assembly-home/bin/download-app-service-wsdl.sh
rsb-home/service-assembly-home/bin/rsb-compiler.sh
rsb-home/deployment-home/bin/rsb-deployer.sh -deploy-all-rsb-service-for-app rce
Some transformation enabled RCE decorators have multiple business service components inside a single decorator service. We need to manually update the end-point URL's for these decorators.
Login to SbConsole as Weblogic administrator
Identify the below decorators from navigation bar and perform steps 3 to for each of them.
rce-GiftList-AppServiceDecorator
rce-LoyaltyAccount-AppServiceDecorator
Create a Session, drill down to rce-LoyaltyAccount-AppServiceDecorator ORCE-CardServices Businesss Services as shown below
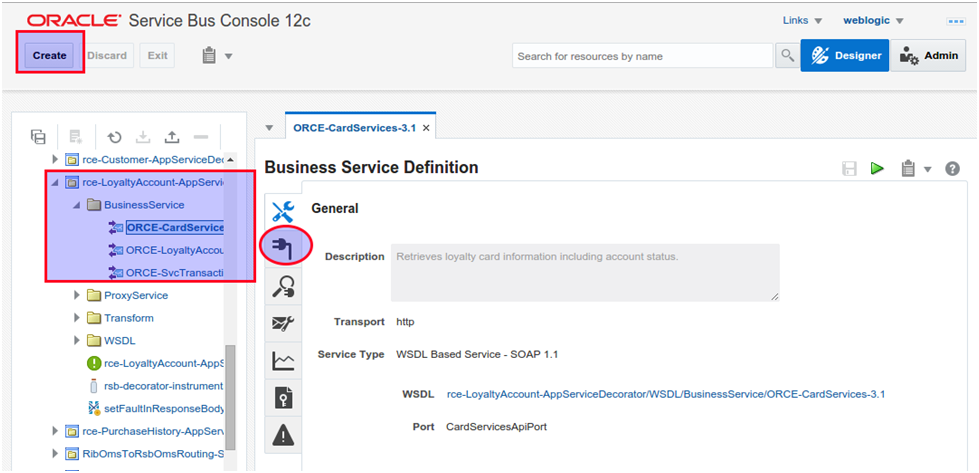
Go to Transport tab, Edit the End Point URL to be http://<HTTP_HOSTNAME>:<HTTP_PORT>/demo/OrceWebServices/v3_1/CardServicesApiService
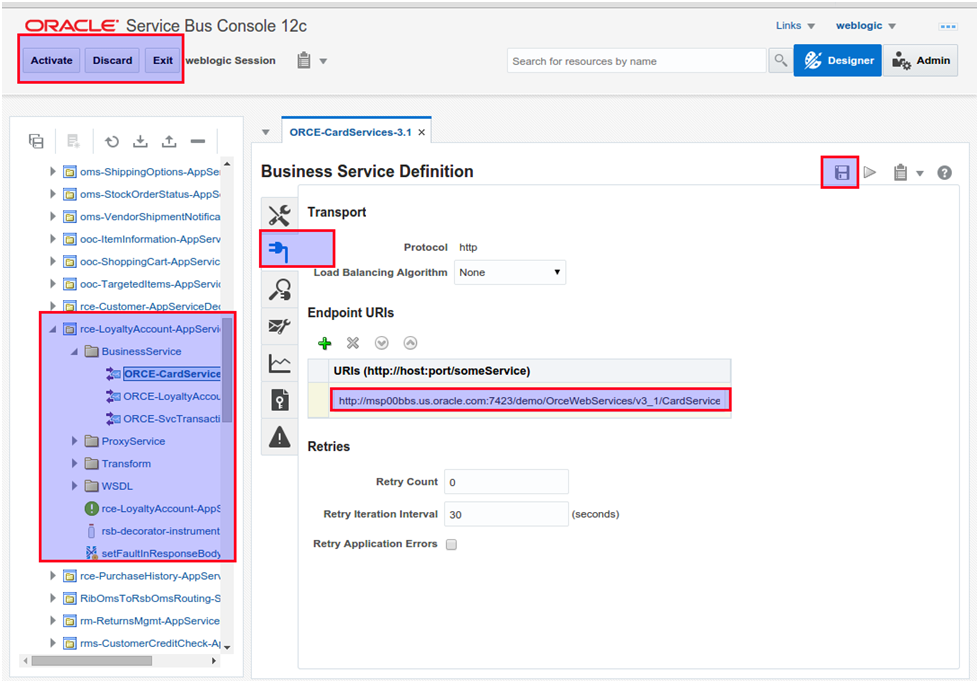
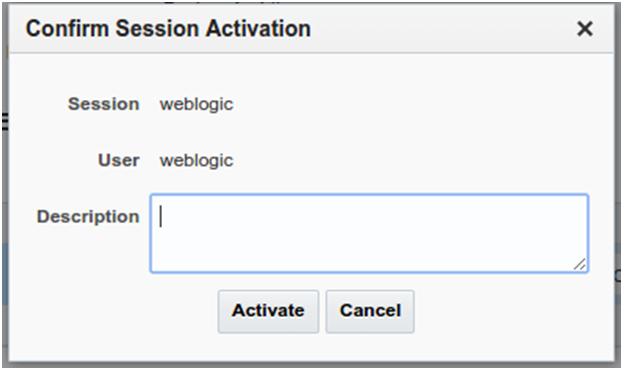
Click on Save button then Activate the Session
Repeat steps 3 to 5 for ORCE-SvcTransactionServices in LoyaltyAccount decorator, with end point URL as in the Business Service to End Point URL mapping table.
Repeat steps 3 to 5 for ORCE-RegistryServices in GiftList decorator, with end point URL as in the Business Service to End Point URL mapping table.
| Decorator | Business Service | End point URL |
|---|---|---|
|
rce-GiftList-AppServiceDecorator |
ORCE-RegistryServices |
<http_OR_https>://<HTTP_HOSTNAME>:<HTTP_PORT>/demo/OrceWebServices/v3_0/RegistryServicesApiService |
|
rce-LoyaltyAccount-AppServiceDecorator |
ORCE-CardServices |
<http_OR_https>://<HTTP_HOSTNAME>:<HTTP_PORT>/demo/OrceWebServices/v3_1/CardServicesApiService |
|
rce-LoyaltyAccount-AppServiceDecorator |
ORCE-SvcTransactionServices |
<http_OR_https>://<HTTP_HOSTNAME>:<HTTP_PORT>/demo/OrceWebServices/v3_1/SvcTransactionServicesApiService |
For Policy-A services, there are a few required manual steps.
A valid rsb-home, from where other secured decorator services have already been deployed. Remove rce from app-in-scope when installing other secured decorator services.
SSL enabled WebLogic servers for RSB
Download RsbAppServiceDecoratorPakWithTransform<$current_version>ForRce<$current_version>_eng_ga.zip into rsb-home/download-home/all-app-service-decorator
Delete the base decorator (with NO transformations) RsbAppServiceDecoratorPak<$current_version>ForRce<$current_version>_eng_ga.zip if that exists under rsb-home/download-home/all-app-service-decorator
Add rce back to app-in-scope list as service provider
rsb-deployment-env-info.service-provider-app-in-scope-for-integration=rce
rsb-deployment-env-info.service-requester-app-in-scope-for-integration=rxm
Run rsb-home/download-home/bin/check-version-and-unpack.sh
Do NOT run the generate-rsb-decorator-security-config.sh, instead find the file rsb-home/service-assembly-home/service-policy-config/output/decorator-service-proxy-security-policy/service-name-to-policy-id-map.properties
|
Note: This manual step is required because the edge app RCE uses a custom security policy (non-Policy-A) but RSB decorator needs to be secured with Policy-A. To handle this special case of mismatch in security policies between the decorator proxy service (Policy-A) and the edge-app service (custom security policy), we need to manually update the file.service-name-to-policy-id-map.properties would exist if there were other secured decorators compiled previously, if the file does not exist the create a new file and copy the below configurations into that file. service-provider.rce-CustomerService=owsm,policyA service-provider.rce-Customer-AppServiceDecorator/ProxyService/CustomerAppServiceProxy=owsm,policyA service-consumer.rce-Customer-AppServiceDecorator/ProxyService/CustomerAppServiceProxy=owsm,policyA service-consumer.rce-Customer-AppServiceDecorator/BusinessService/CustomerAppServiceBiz=owsm,policyA service-provider.rce-GiftListService=owsm,policyA service-provider.rce-GiftList-AppServiceDecorator/ProxyService/GiftListAppServiceProxy=owsm,policyA service-consumer.rce-GiftList-AppServiceDecorator/ProxyService/GiftListAppServiceProxy=owsm,policyA service-consumer.rce-GiftList-AppServiceDecorator/BusinessService/GiftListAppServiceBiz=owsm,policyA service-provider.rce-LoyaltyAccountService=owsm,policyA service-provider.rce-LoyaltyAccount-AppServiceDecorator/ProxyService/LoyaltyAccountAppServiceProxy=owsm,policyA service-consumer.rce-LoyaltyAccount-AppServiceDecorator/ProxyService/LoyaltyAccountAppServiceProxy=owsm,policyA service-consumer.rce-LoyaltyAccount-AppServiceDecorator/BusinessService/LoyaltyAccountAppServiceBiz=owsm,policyA service-provider.rce-PurchaseHistoryService=owsm,policyA service-provider.rce-PurchaseHistory-AppServiceDecorator/ProxyService/PurchaseHistoryAppServiceProxy=owsm,policyA service-consumer.rce-PurchaseHistory-AppServiceDecorator/ProxyService/PurchaseHistoryAppServiceProxy=owsm,policyA service-consumer.rce-PurchaseHistory-AppServiceDecorator/BusinessService/PurchaseHistoryAppServiceBiz=owsm,policyA |
Run rsb-home/service-assembly-home/bin/rsb-compiler.sh
Run rsb-home/deployment-home/bin/rsb-deployer.sh -deploy-all-rsb-service-for-app rce
Refer to Post-Installation steps and update all the Business service end point URL's with relevant URL's as described in the Business Service to End Point URL mapping table.
For Rce Decorators with security setup(proprietary in RCE and Policy-A in RSB), Weblogic requires an additional JAVA_OPTIONS. Locate setDomainEnv.sh file in the RSBDomain and add -Dcom.bea.wli.sb.transports.http.GetHttpAuthorizationHeaderAllowed=true
|
Note: This is required because RCE uses proprietary security headers that the client has to pass in and OSB/RSB has to copy and forward those proprietary headers in the SOAP call to AppService. |
Restart the WebLogic servers.
The following table shows different RIC modes:
Table 6-2
| Supported Modes | Description | When to use? | Settings in the deployment file |
|---|---|---|---|
|
RSB ONLY |
RIC is configured to collect and display only RSB data. |
If RSB is in-scope for your integration and not RIB. |
"ribEnable":"false", "rsbEnable":"true", "ddiEnable":"true", |
|
DUAL (RIB+RSB) |
RIC is configured to collect and display both RIB and RSB data. |
If both RIB and RSB are in-scope for your integration. |
"ribEnable":"true", "rsbEnable":"true", "ddiEnable":"true", |
|
RIB ONLY |
RIC is configured to collect and display only RIB data. |
If RIB is in-scope for your integration and not RSB. |
"ribEnable":"true", "rsbEnable":"false", "ddiEnable":"true", |
Retailer's site specific integration topology must drive this decision. RIC can be installed in DUAL mode if you have a valid rib-home with jms-console and rsb-home on same machine. This configuration yields maximum visibility of Integration system and is our recommended mode. When only service oriented integration (RSB) is used then, one must configure RIC with RSB_ONLY mode.
DDI is enabled by default in all RIC modes, irrespective of the value of ddiEnable flag in the configuration file. The value of the properties ribEnable and rsbEnable in the ric configuration file ric-deployment-env-info.json inside ric-home/conf/ folder decides RIC mode.
|
Note: For more information, see the Oracle Retail Integration Bus Implementation Guide and the RIC User Guide. |
After configuring RIC follow the installation steps according to the selected RIC mode.
RIC can be installed in RIB only mode to provide visibility into RIB.
Pre-requisites
RIB must be deployed.
JMS-Console must be deployed from rib-home/tools-home/.
rib-home must be accessible to ric-home, in other words both reside in the same file system.
RIC can be deployed in RIB_Only mode with the following steps:
Download RicKernel16.0.1ForAll16.x.xApps_eng_ga.zip to a location (for example - RIC-APP-BUILDER) on the computer which has your rib-home.
Edit the configuration file ric-deployment-env-info.json inside ric-home/conf/ folder.
Modify the MiddlewareServerDef and IntegrationProduct with information that is specific to your environment.
Set the value of ribEnable property in the configuration file to true.
Set the value of ribHome property in the configuration file to point to rib-home.
Set the value of RicAppServer fields to point to the environment where you want to deploy RIC.
Go to the ric-home/bin/ folder, run the compiler to update the RIC ear as follows:
$ sh ric-app-compiler.sh -setup-credentials
When prompted by the compiler, enter the user name and password for weblogic server and RIC admin user, the RIC admin user will be used to log in RIC.
From the same folder, run the deployer script to create the user and group and deploy RIC on your weblogic server as follows:
$ sh ric-app-deployer.sh -deploy-ric-app
Restrict access to the $RIC-HOME folder:
        cd $RIC-HOME
chmod -R 700 .
Restart the WebLogic server.
RIC can be installed in RSB only mode to provide RSB visibility if you have a valid rsb-home, with the following steps:
|
Note: RIB is already installed then we recommend configuring DUAL mode, which will provide visibility into both RIB and RSB systems. |
Download RicKernel16.0.1ForAll16.x.xApps_eng_ga.zip to a location (for example - RIC-APP-BUILDER) on the computer which has your rsb-home.
Edit the configuration file ric-deployment-env-info.json inside ric-home/conf/ folder.
Modify the DataSourceDef, MiddlewareServerDef and IntegrationProduct with information that is specific to your environment.
set the value of rsbEnable property in the configuration file to true.
set the value of rsbHome property in the configuration file to point to rsb-home.
set the value of RicDataSource : jdbcUrl property same as service-infrastructure-db.jdbc-url property in rsb-home/deployment-home/conf/rsb-deployment-env-info.properties.
set the value of RicAppServer fields to point to the environment where you want to deploy RIC.
|
Note: RicDataSource and RsbDataSource should point to the same database schema. |
Go to the ric-home/bin/ folder, run the compiler to update the RIC ear as follows:
$ sh ric-app-compiler.sh -setup-credentials
When prompted by the compiler, enter the user name and password for the WebLogic server, RicDataSource and RIC admin user, the RIC admin user will be used to log in RIC.
|
Note: If the DISPLAY environment variable is set but no XWindow is running, the RIC compiler will fail. As a workaround, run this command before running compiling:unset DISPLAY |
Run the deployer script to deploy RIC and create the user and group on your WebLogic server from the same folder as follows:
$ sh ric-app-deployer.sh -deploy-ric-app
Restrict access to the $RIC-HOME folder:
        cd $RIC-HOME
chmod -R 700 .
Restart the WebLogic server.
RIC can be installed in DUAL mode to provide visibility into both RIB and RSB.
Prerequisites
RIB must be deployed.
JMS-Console must be deployed from rib-home/tools-home/.
RSB must be deployed.
rib-home and rsb-home must be accessible to ric-home. rib-home and rsb-home (or copies of them) must reside in the same machine as ric-home.
RIC can be deployed in DUAL mode with the following steps:
Download RicKernel16.0.1ForAll16.x.xApps_eng_ga.zip to a location (for example - RIC-APP-BUILDER) on your computer which has your rib-home and rsb-home.
Edit the configuration file ric-deployment-env-info.json inside ric-home/conf/ folder.
|
Note: Although users can deploy RIC in any domain, for dual mode it is recommended to deploy RIC in the RSB domain. |
Modify the DataSourceDef, MiddlewareServerDef and IntegrationProduct with information that is specific to your environment.
set the value of ribEnable and rsbEnable property in the configuration file to true.
set the value of ribHome property in the configuration file to point to your rib-home.
set the value of rsbHome property in the configuration file to point to your rsb-home.
set the value of ddiHome property in the configuration file to point to rsb-home.
set the value of RicDataSource : jdbcUrl property same as service-infrastructure-db.jdbc-url property in rsb-home/deployment-home/conf/rsb-deployment-env-info.properties.
set the value of RicAppServer fields to point to the environment where you want to deploy RIC.
|
Note: RicDataSource and RsbDataSource should point to the same database schema. |
Go to the ric-home/bin/ folder, run the compiler to update the RIC ear as follows:
$ sh ric-app-compiler.sh -setup-credentials
When prompted by the compiler, enter the user name and password for the WebLogic server, RicDataSource and RIC admin user, the RIC admin user will be used to log in RIC.
|
Note: If the DISPLAY environment variable is set but no XWindow is running, the RIC compiler will fail. As a workaround, run this command before running compiling:unset DISPLAY |
Run the deployer script to deploy RIC and create the user and group on your WebLogic server from the same folder as follows:
$ sh ric-app-deployer.sh -deploy-ric-app
Restrict access to the $RIC-HOME folder:
        cd $RIC-HOME
chmod -R 700 .
Restart the WebLogic server.
