12. Vendors
During the life of an account, a financial institution might require the use of specialized services of a vendor for various purposes; for example, repossessing a vehicle, retaining an attorney for bankruptcy court proceedings or making field calls. With the system’s Vendors screen, you can:
- Maintain vendor information
- Maintain services offered by the vendor
- Assign tasks to the vendors and subsequently track and process those tasks
- Charge vendor expenses to customers
- Enter and update invoices raised by the vendors
- Post vendor transactions
- Process vendor payments
Once an invoice has been presented for a service performed by a vendor, you can enter information on Vendor Management form and create a monetary transaction. You can then choose if the customer should pay any particular expense or not.
12.1 Vendors Screen
The Vendors screen allows you to set up vendor information. You can also use the copy feature to quickly create new vendors with the existing details. By default it will show current address but if the vendor receives escrow disbursement at an address which is different from current business address the information can be entered in Payment Details sub screen. Also, the Payment Details sub screen allows you to enter number of days prior to the due date by which payment to vendor must be processed.
Navigating to Vendor Detail Screen
- On the Oracle Financial Services Lending and Leasing home screen, click Collections > Collections > Vendors.
- The system displays the Vendor screen. The details are grouped under four tabs:
- Vendors
- Assignment Allocation
- Work Orders
- Follow-up
- Invoices
12.1.1 Vendors tab
- Click Collections > Collections > Vendors > Vendors. The details in the screen are grouped into the following tabs:
- Payment Details
- Vendor Groups
- Tracking Attributes
- Comments
- In the Collections > Collections > Vendors > Vendors > Vendor Details section, you can create or edit vendor details. While creating new, you can also use the copy feature to copy the existing details to new vendor. The copy option in the Vendor Details screen is controlled by the system defined parameter (UVN_VEN_NBR_SYS_GENERATED). Based on the valued defined for the parameter in Setup > Administration > System > System Parameter screen, you can copy the existing vendor details in the following ways:
- If the value of the parameter is set to ‘Y’ (default), specify a new name in ‘New Vendor Name’ field and click ‘Create Copy’.
- If the value of the parameter is set to ‘N’, specify a vendor number in ‘New Vendor #’ field and click ‘Create Copy’.
- Perform any of the Basic Operations mentioned in Navigation
chapter.

A brief description of the fields is given below:
Field: |
Do this: |
Enabled |
Check this box to enable the vendor. |
Vendor # |
The vendor number is either editable (default) or auto generated depending on the system parameter defined at setup screen. System auto generates the vendor number when the following system parameter is set to ‘Yes’ in Setup > Administration > System > System Parameter screen. - Parameter: UVN_VEN_NBR_SYS_GENERATED - Description: VENDOR NUMBER IS SYSTEM GENERATED |
Channel |
Select the vendor channel from the drop-down list. |
Old Vendor # |
Displays the old vendor number if exists. |
Name |
Specify the vendor name. |
Status |
Select the vendor status from the drop-down list. |
Company |
Select the vendor portfolio company from the drop-down list. |
Branch |
Select the vendor portfolio branch from the drop-down list. |
Start Dt |
Specify the vendor start date. You can select data even from the adjacent Calendar icon. |
End Dt |
Specify the vendor end date. You can select data even from the adjacent Calendar icon. |
Contact Person |
Specify the vendor contact name. |
Fed Tax # |
If available, enter the vendor federal tax identification number. If the organizational parameter UIX_HIDE_RESTRICTED_DATA is set to Y, this appears as a masked number; for example, XXXXX1234. |
Credit Days |
Specify the credit days for the vendor invoice. This number is used to check that Invoice Due Date is not more than the credit days from Invoice Date. |
Phone 1 |
Specify primary phone number. |
Extn 1 |
Specify the primary phone extension. |
Phone 2 |
Specify alternate phone number. |
Extn 2 |
Specify the alternate phone’s extension. |
Fax |
Specify the fax number. |
Fax 2 |
Specify the fax number 2. |
Country |
Select the country code from the drop-down list. |
Address # |
Specify the vendor address. |
Address Line 1 |
Specify address line 1. |
Address Line 2 |
Specify address line 2. |
Zip |
Select the zip code from the drop-down list. |
Zip Extn |
Specify the extension of the Zip code. |
City |
Specify the city. |
State |
Select the state from the drop-down list. |
Specify the email address. |
- Perform any of the Basic Actions mentioned in Navigation chapter.
12.1.1.1 Payment Details
Click Collections > Collections > Vendors > Vendors > Vendor Details > Payment Details. The Payment Details sub tab allows you to set up automatic clearing house information for vendors.
On the Payment Details sub tab, perform any of the Basic Operations mentioned in Navigation chapter.
A brief description of the fields is given below:
Field: |
Do this: |
Remittance section |
|
Country |
Select the country code from the drop-down list. |
Address Line 1 |
Specify address line 1. |
Address Line 2 |
Specify address line 2. |
Zip |
Specify zip code from the drop-down list. |
Zip Extn |
Specify extension of the zip code. |
City |
Specify city. |
State |
Select state from the drop-down list. |
Pre-Process Days |
Specify the remittance pre-process days. This is the number of days prior to due date by which payment to the vendor must be processed. |
Currency |
View the currency attached to vendor. |
Payment Details section |
|
Mode |
Select the mode of payment from the drop-down list. |
Bank |
Specify the ACH bank. |
Start Dt |
View ACH start date. |
Routing # |
Specify the bank routing number. |
Account Type |
Select the account type from the drop-down list. |
Account # |
Specify the account number. If the organizational parameter UIX_HIDE_RESTRICTED_DATA is set to ‘Y’, this appears as a masked number; for example, XXXXX1234. |
BIC |
Select the Business Identifier Code from the drop-down list. The list displays the BIC codes defined in the system. |
IBAN |
Specify the IBAN (International Bank Account Number). IBAN is used for identifying bank accounts across national borders with a minimal of risk of propagating transcription errors. Ensure that value entered satisfies the check-digit validation based on modulo 97. On save, system automatically validates the IBAN number length based on country code, characters, white spaces, and checksum. Validation is also done during posting non-monetary transaction (ACH Maintenance). You can maintain the IBAN length and other details required as per the country code in the user defined table (Setup > Administration > System > User Defined Tables). Note: IBAN for 'NL' country code (IBAN_FORMAT_NL) is defined by default with length of IBAN as 18. |
Disbursement Currency |
Select the disbursement currency for vendor payment from the drop-down list. The list displays all the available currencies applicable to the vendor. |
Perform any of the Basic Actions mentioned in Navigation chapter.
12.1.1.2 Vendor Groups
Click Collections > Collections > Vendors > Vendors > Vendor Details > Vendor Groups. The Vendors Groups allows you to set up vendor groups.
On the Vendor Groups section, perform any of the Basic Operations mentioned in Navigation chapter.
A brief description of the fields is given below:
Field: |
Do this: |
Sort |
Specify sort sequence. |
Group |
Select the vendor type to which the vendor belongs from drop-down list, based on services provided by the vendor. |
Enabled |
Check this box to enable the vendor service. |
Perform any of the Basic Actions mentioned in Navigation chapter.
12.1.1.3 Tracking Attributes
Click Collections > Collections > Vendors > Vendors > Vendor Details > Tracking Attributes. The Tracking Attributes allows you to load tracking attributes and define the parameter value for various parameters listed.
On the Tracking Attributes sub tab, perform any of the Basic Operations mentioned in Navigation chapter.
A brief description of the fields is given below:
Field: |
Do this: |
Sub-Parameter |
View the Sub-Parameter. |
Parameter |
View the listed Parameter. |
Value |
Specify the required parameter value. By default, NA is displayed. |
Perform any of the Basic Actions mentioned in Navigation chapter.
12.1.1.4 Comments
Click Collections > Collections > Vendors > Vendors > Vendor Details > Comments. The Comments sub tab allows you to add comments and also view comments posted through AP interface.
On the Comments sub tab, perform any of the Basic Operations mentioned in Navigation chapter.
A brief description of the fields is given below:
Field: |
Do this: |
Comment |
View or add the required comment. |
Comment By |
System automatically selects the logged in user details. |
Comment Dt |
System automatically displays the current date. |
Perform any of the Basic Actions mentioned in Navigation chapter.
12.1.2 Assignment Allocation
The Assignment Allocation tab allows you to define criteria for selecting a specific vendor to execute a work order. A criteria here refers to a combination of a Channel, Work Order Type, Company and Branch associated to a vendor. If the same combination or criteria is selected during work order creation, system selects a specific vendor or highest weighted vendor in the list by default for the work order.
Click Collections > Collections > Vendors > Assignment Allocation. The details are grouped under two sections:
- Vendor Assignment Criteria
- Vendor Assignment Allocation
12.1.2.1 Vendor Assignment Criteria
In the Vendor Assignment Criteria section, you can define the criteria used for vendor selection.
- In the Collections > Collections
> Vendors > Work Order > Assignment Allocation,
perform any of the Basic Operations mentioned in Navigation
chapter.

A brief description of the fields is given below:
Field: |
Do this: |
Channel |
Select the OFSLL interfaced channel from the drop-down list. If the channel is selected as ‘GENERIC RECOVERY INTERFACE’, the work order is processed through an external system. For more information, refer to Appendix chapter - ‘Generic Recovery Interface (GRI)’. |
Work Order Type |
Select the work order type from the drop-down list. |
Company |
Select the Company from the drop-down list. |
Branch |
Select the company’s Branch from the drop-down list. |
Enabled |
Check this box to enable the vendor assignment criteria. |
- Perform any of the Basic Actions mentioned in Navigation chapter.
12.1.2.2 Vendor Assignment Allocation
In the Vendor Assignment Allocation section, system fetches the list of vendors qualifying the combination of channel, work order, company and branch selected and allows you to define the weightage for each vendor in percentage.
By default, the allocated assignment percentage for each vendor is ‘0’. During subsequent update, the total of assignment percentage allocation for all vendors should be equal to ‘100’. A vendor with the highest weightage is selected by default during work order creation.
- In the Collections > Collections
> Vendors > Work Order > Assignment Allocation,
perform any of the Basic Operations mentioned in Navigation
chapter.
Field:
Do this:
Vendor #
View the Vendor number. The same is either specified manually or system generated in the Vendors tab.
Name
View the name of the vendor.
Assigned Cases
View the total number of cases assigned to the vendor.
% Allocation
View the percentage of total cases assigned to the vendor.
Assignment %
Specify the percentage allocation value (out of 100) for each vendor. However, ensure that the total of all assignment % is equal to ‘100’.
- Perform any of the Basic Actions mentioned in Navigation chapter.
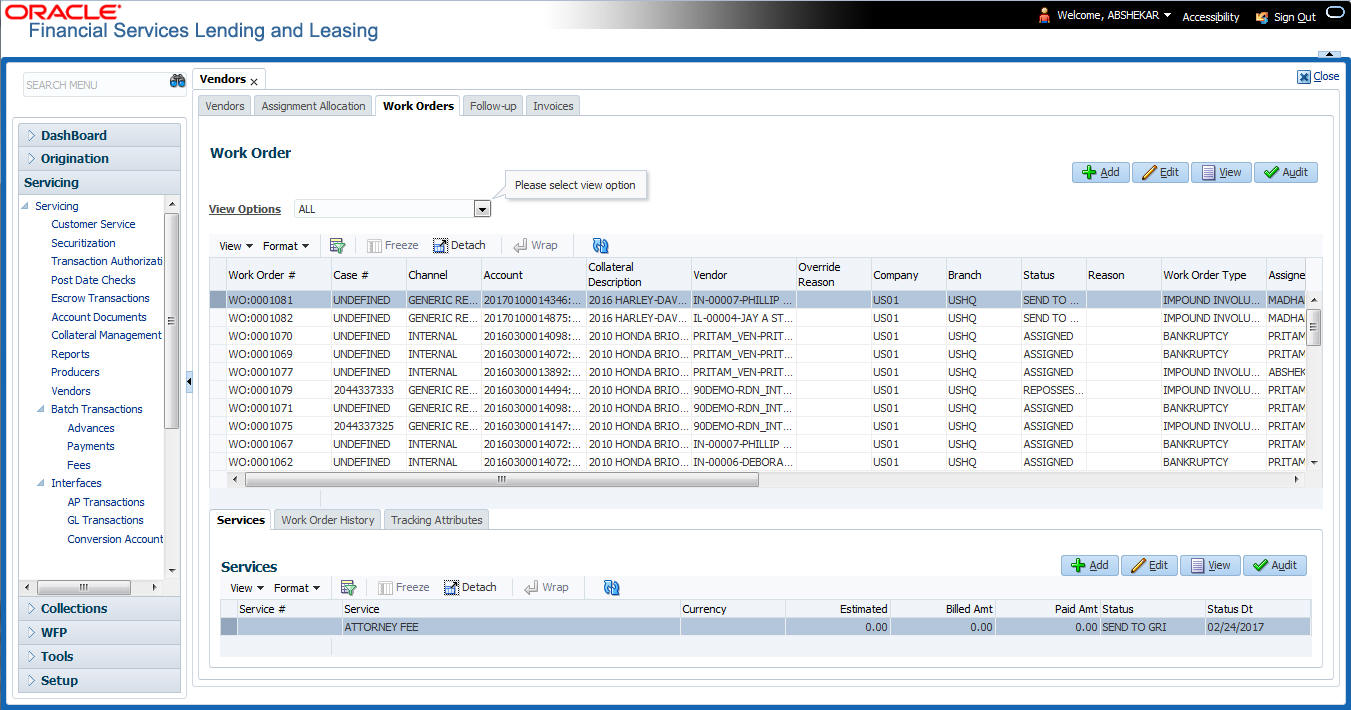
12.1.3 Work Orders Tab
The Work Orders link allows you to assign an account to a vendor for a service that the vendor provides, view the history of work order changes and define tracking attributes.
- Click Collections > Collections > Vendors > Work Order. The details are grouped under three tabs:
- Services
- Work Order History
- Tracking Attributes
- In the Collections > Collections > Vendors > Work Order > Work Order, sort the list of work orders based on status using the ‘View Options’ drop down list.
- Perform any of the Basic Operations mentioned in Navigation
chapter.
A brief description of the fields is given below:
Field: |
Do this: |
Work Order # |
Displays the work order number. |
Case # |
Displays the case number received from third party vendor interface. |
Channel |
Select the OFSLL interfaced channel from the drop-down list. If the channel is selected as ‘GENERIC RECOVERY INTERFACE’, the work order is processed through an external system. For more information, refer to Appendix chapter - ‘Generic Recovery Interface (GRI)’. |
Work Order Type |
Select the work order type from the drop-down list. |
Account |
Select account number for the work order from the drop-down list. |
Company |
Displays the company name based on the account selected. |
Branch |
Displays the branch based on the account selected. |
Vendor |
Select vendor who will service the work order from the drop-down list. The list of vendors are displayed based on the selected Channel, Work Order Type, and Account. |
Override Reason |
In case of vendor re-assignment, select the appropriate override reason for the selected Vendor. |
Status |
Select the work order status from the drop-down list. If the status is selected as ‘SEND TO GRI’, the work order is processed through an external system. For more information, refer to Appendix chapter - ‘Generic Recovery Interface (GRI)’. |
Reason |
This field is enabled only if the status of work order is selected as PENDING ON HOLD, RL RELEASED , or PENDING CLOSE. You can select the appropriate reason from the drop-down list. |
Collector |
Select the Collector from the drop-down list. The list displays all the users defined with ‘Collector’ responsibility. |
Work Order Details section |
|
Dt |
Displays the date when work order was created. |
Status Dt |
Displays the last work order status-change date. |
Currency |
Displays the vendor company currency based on the vendor selected. |
Estimated |
Displays the estimated amount, which is the sum of all the services added to the work order. |
Billed |
Displays amount billed by the vendor for the work order. |
Paid |
Displays amount paid to the vendor for the work order. |
Reference # |
Specify vendor reference details if any. |
Assigned By |
Displays the user who created/assigned the work order to vendor. |
Followup Dt |
Select the subsequent follow-up date from adjoining calendar. |
Account Information section - System displays the following information depending on the account selected for the work order in ‘Work Order’ section. |
|
Account Status |
Displays the status of the account. |
Charged off Dt |
Displays the date when the account was charged off. |
Due Amt |
Displays the due amount to be paid to the account. |
Total Outstanding Balance |
Displays either ‘Account outstanding principal balance’ for active accounts, or ‘Deficiency balance’ for charge-off accounts. |
Total Due |
Displays the total of all dues pending on the account. |
Due Dt |
Displays the last elapsed due date on the account. |
Days Past Due |
Displays the total number of days elapsed past due date. |
Service Address |
Displays the combined details of Customer, Address Type and Address based on the account selected. You can also select the required service address from the drop-down list only while creating work order details (i.e. when status = New). Note: When selecting the service address for an external interfaced channel (i.e. changing primary address), ensure to select the secondary address only. Else, system displays an error message. |
Collateral Details section - This section displays the asset details associated with the work order. |
|
Collateral Description |
System displays the primary collateral associated with the account by default. You can also select the collateral from the drop-down list. The list displays all the assets associated with the account. |
Identification # |
Displays the identification number of the asset. |
Year |
Displays the manufacturing year of the asset. |
Make |
Displays the asset’s manufacturing company. |
Model |
Displays the asset’s model. |
Vendor Information section |
|
Contact |
Specify the vendor contact for the work order. |
Phone |
Specify the vendor contact phone for the work order. |
Extn |
Specify the vendor contact phone extension for the work order. |
Fax |
Specify the vendor contact fax for the work order. |
Comment |
Specify any comments regarding the work order. |
Vendor Messages section - This section is displayed only when the selected channel is ‘GENERIC RECOVERY INTERFACE’ and allows you to add specific communication or instructions as a message to the vendor. |
|
Vendor Msg Type |
Select the type of vendor message from the drop-down list. |
Vendor Msg |
Specify additional information that is to be communicated to the external interface. |
- Perform any of the Basic Actions mentioned in Navigation chapter.
12.1.3.1 Services
In the Collections > Collections > Vendors > Work Order > Services, perform any of the Basic Operations mentioned in Navigation chapter.
Click ‘Load Services’ button in the Services section header to load all the services associated with the selected combination of ‘Work Order Type’ and ‘vendor (Vendor Group)’.
A brief description of the fields is given below:
Field: |
Do this: |
Service # |
Specify an unique service number for the work order. |
Service |
Select the service type from the drop-down list (required). |
Currency |
System defaults the currency defined in work order which is the vendor currency. |
Estimated |
System defaults the Estimated cost of the service offered by the vendor as defined in vendor administration setup screen (Setup > Administration > System > Vendors > Vendor Fees > Vendor Service Fee Definition). However, you can also modify the estimated value to the required amount. |
Billed Amt |
Displays amount billed by the vendor for the service. |
Paid Amt |
Displays amount paid to the vendor for the service. |
Status |
Select the status from the drop-down list. |
Status Dt |
Displays the last service status change date. |
Perform any of the Basic Actions mentioned in Navigation chapter.
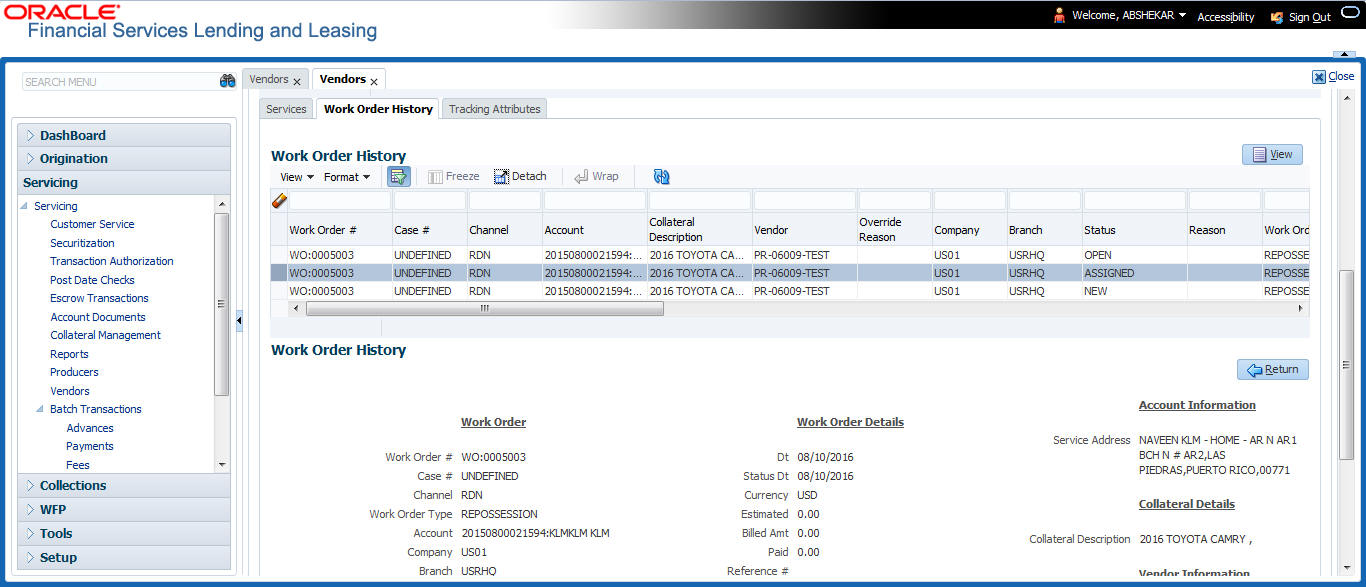
12.1.3.2 Work Order History
The Work Order History sub tab displays the details of the selected work orders in the sequence of the changes done i.e. last change details appear as the first record.
In the Work Order History section, select the required work order and click View.
12.1.3.3 Tracking Attributes
Click Collections > Collections > Vendors > Work Order > Tracking Attributes. The Tracking Attributes allows you to load tracking attributes and define the parameter value for various parameters listed.
On the Tracking Attributes sub tab, perform any of the Basic Operations mentioned in Navigation chapter.
A brief description of the fields is given below:
Field: |
Do this: |
Sub-Parameter |
View the Sub-Parameter. |
Parameter |
View the listed Parameter. |
Value |
Specify the required parameter value. By default, NA is displayed. |
Perform any of the Basic Actions mentioned in Navigation chapter.
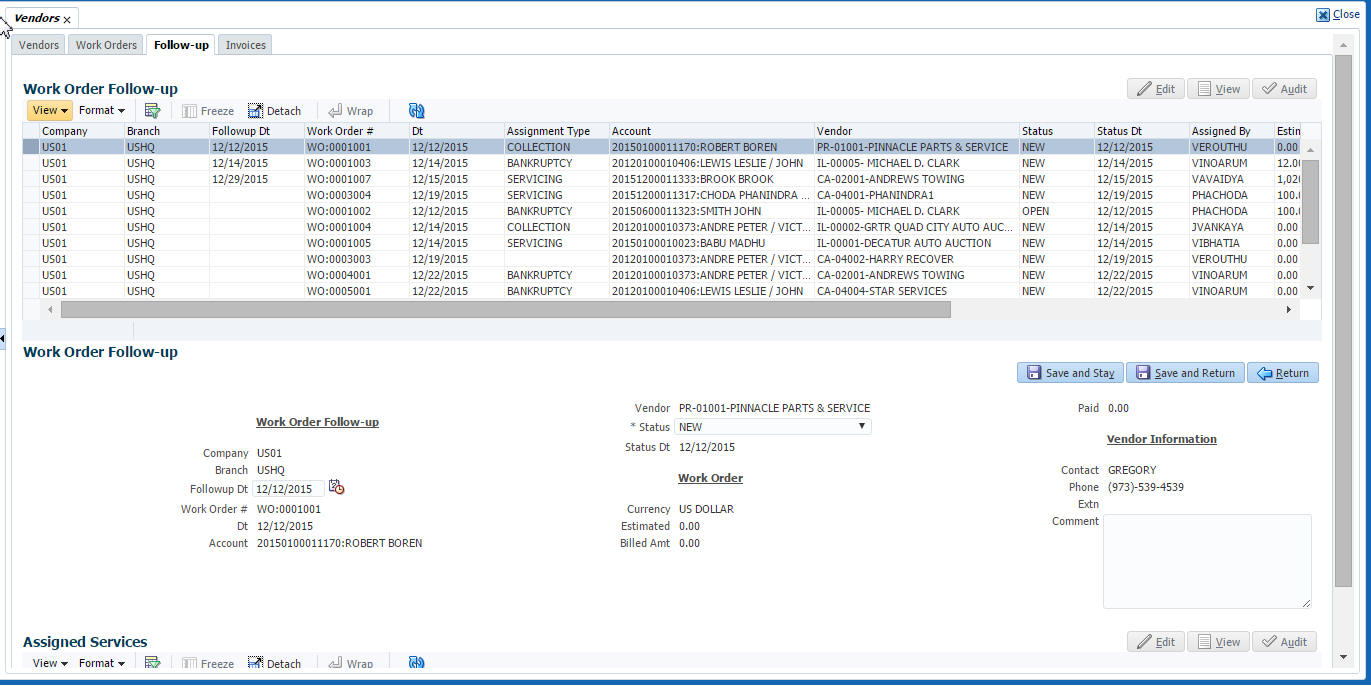
12.1.4 Follow-up Tab
The Work Orders link lists the work orders that are not complete and hence require follow-up.
- Click Collections > Collections > Vendors > Follow-up tab. The details are grouped into two:
- Work Order Follow-up
- Assigned Services
- In the Collections > Collections
> Vendors > Follow-up > Work Order
Follow-up, perform any of the Basic Operations mentioned in Navigation
chapter except for creating a new record.
A brief description of the fields is given below:
Field: |
Do this: |
Company |
Displays the vendor company. |
Branch |
Displays the vendor branch. |
Followup Dt |
Specify the next follow-up date. You can even select the date from adjoining Calendar icon. |
Work Order # |
Displays the work order number. |
Dt |
Displays the work order date. |
Account |
Displays the account associated with the work order. |
Vendor |
Displays the vendor associated with the work order. |
Status |
Select the work order status from the drop-down list. |
Status Dt |
Displays the last work order status change date. |
Work Order section |
|
Currency |
Displays the currency for the work order. |
Estimated |
Displays the estimated amount, which is the sum of all the services added to the work order. |
Billed Amt |
Displays amount billed by the vendor for the work order. |
Paid |
Displays amount paid to the vendor for the work order. |
Vendor Information section |
|
Contact |
Displays the vendor contact name. |
Phone |
Displays the vendor contact phone number. |
Extn |
Displays the vendor contact phone number’s extension. |
Comment |
Specify a comment. |
- Perform any of the Basic Actions mentioned in Navigation chapter.
12.1.4.1 Assigned Services
In the Collections > Collections > Vendors > Follow-up > Assigned Service, perform any of the Basic Operations mentioned in Navigation chapter except for creating a new record. A brief description of the fields is given below:
Field: |
Do this: |
Services |
Displays the service provided by the vendor. |
Currency |
Select currency for the vendor from the drop-down list. |
Estimated |
Specify the estimated amount for the service. |
Billed Amt |
Specify amount billed by the vendor for the service. |
Paid |
Specify amount paid to the vendor for the service. |
Status |
Select the service status from the drop-down list. |
Status Dt |
Specify the last service status change date. You can even select the date from the adjoining Calendar icon. |
- Perform any of the Basic Actions mentioned in Navigation chapter.
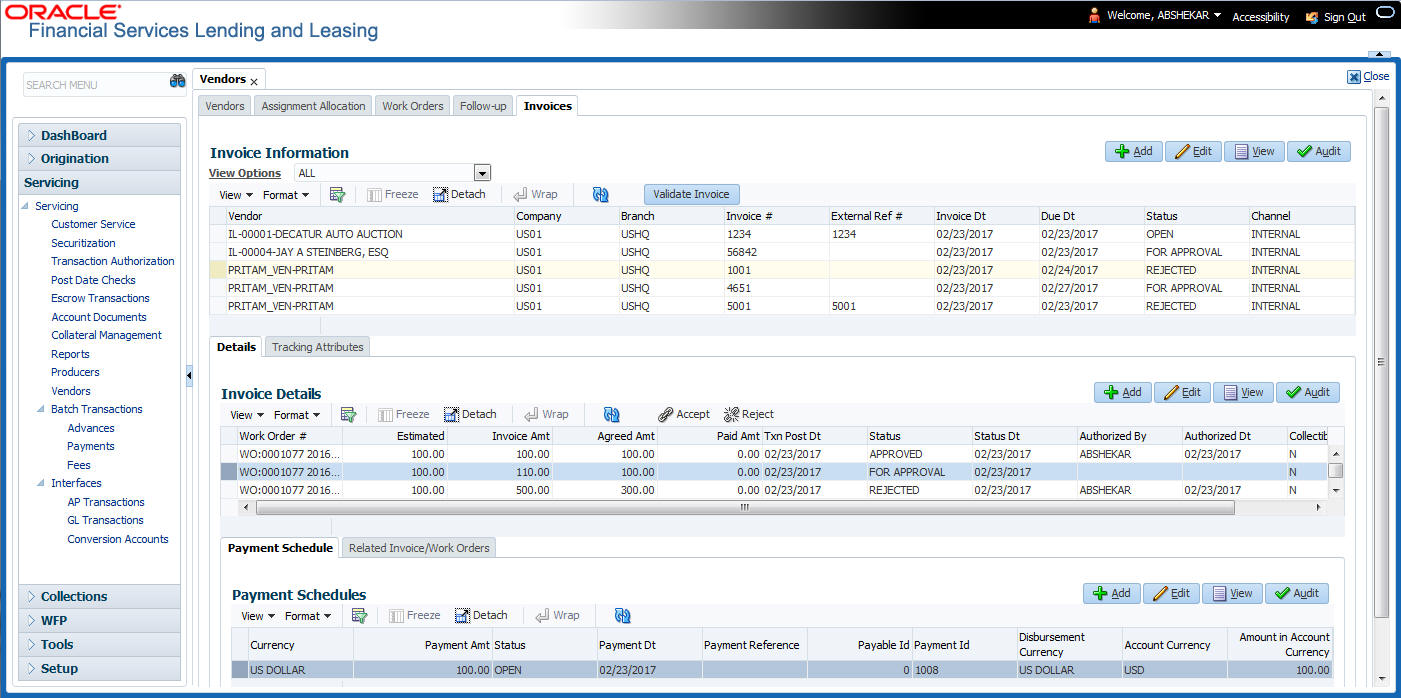
12.1.5 Invoices Tab
In the invoice tab of vendors screen, you can define invoices and process them along with internally generated and externally received invoices. Invoice processing involves validating the invoice information either manually or through an automated process.
Manual validation involves verifying the invoice information, accepting or rejecting the details, updating the invoice status and indicating if the invoiced amount is Collectible.
Auto validation is supported for invoices which are in ‘OPEN’ status and generated internally (i.e. channel = Internal). During auto validation, the invoice details are verified against specific business rules defined in the system and corresponding status update and collectible indicator is updated accordingly.
However, other invoices received from externally interfaced channel would get auto validated with specific business rules when they are received and corresponding status is appended to the invoice while listing in the Invoice Information section.
Post the validation, invoices may still have difference in estimated and invoiced amount. Such invoices are marked with status ‘FOR APPROVAL” and requires to be manually approved.
Further in the Invoices tab, you can define Tracking Attributes, Payment Schedules and view the Related Invoice/Work Orders (if any) in the system.
- Click Collections > Collections > Vendors > Invoices tab. The details are grouped into following sections:
- Details
- Payment Schedules sub tab
- Related Invoice/Work Orders sub tab
- Tracking Attributes
- In the Collections > Collections > Vendors > Invoices > Invoice Information, sort the list of invoice based on status using the ‘View Options’ drop down list.
- Perform any of the Basic Operations mentioned in Navigation
chapter.
A brief description of the fields is given below:
Field: |
Do this: |
Vendor |
Select the vendor name for whom the invoice is to be created. |
Company |
Displays the vendor portfolio company. |
Branch |
Displays the vendor portfolio branch. |
Invoice # |
Specify the invoice number. The invoice number should be unique for every vendor. In case the Invoice # already exists for Vendor, system displays a warning message. |
External Ref # |
Specify the reference number which can be used for invoice tracking. For invoice received from external system, this field is auto populated with the reference number generated in external interfaced system. |
Invoice Dt |
Specify the invoice date. You can even select the date from the adjoining Calendar icon. |
Due Date |
Select the due date. You can even select the date from the adjoining Calendar icon. |
Status |
Select the invoice status from the drop-down list. |
Details section |
|
Status Dt |
Displays the last invoice status change date. |
Address |
Displays the vendor address. |
Currency |
Select the currency from the drop-down list. |
Estimated |
Displays the total estimated amount of all the invoices defined in ‘Invoice Details’ sub tab. |
Invoice Amt |
Displays the total invoice amount. |
Agreed Amt |
Displays the total agreed amount. |
Paid Amt |
Displays the total paid amount. |
Channel |
Displays the Channel as ‘Internal’ for manually defined or internally generated invoice and ‘Generic Recovery Interface (GRI)’ for externally generated invoice. |
- Perform any of the Basic Actions mentioned in Navigation chapter.
12.1.5.1 Auto Validate Invoice
You can auto validate the invoice details in the Invoice Information section for those invoice which are in ‘OPEN’ status. Auto validation with system defined business rules ensure that every approved invoice comply to required processing standards and helps to quickly proceed with further action.
- In the Collections > Collections > Vendors > Invoices > Invoice Information, sort the list of invoice with status as ‘OPEN’ from the ‘View Options’ drop down list.
- Select the required invoice form the list and click ‘Validate Invoice’ button on the Invoice Information section header.
The invoice details are validated and the status of the invoice is updated based on validation. For more information on validations, refer to ‘Business Rules’ section.
12.1.5.2 Invoice Details sub tab
- In the Collections > Collections > Vendors > Invoices > Invoice Details, perform any of the Basic Operations mentioned in Navigation chapter.
A brief description of the fields is given below:
Field: |
Do this: |
Work Order |
Select the work order from the drop-down list. This list displays the generated work orders. Each work order name is defined in the format which consists of work order number, account number, service number and service name. |
Case # |
System displays the Case number only if there is a Case number is associated for the selected work order. |
Estimated |
Displays the estimated cost of selected work order as defined in Vendors > Work Order > Services section. |
Invoice Amt |
Specify the invoice amount. |
Agreed Amt |
Specify the agreed amount. |
Paid Amt |
Displays the paid amount. |
Txn Post Dt |
Specify transaction effective date. You can even select the date from the adjoining Calendar icon. |
Status |
Select the status from the drop-down list. |
Status Dt |
Displays the last status change date. On edit, system updates the current date by default. |
Authorized By |
Displays the name of the user who verified (accepted/rejected) the invoice details. |
Authorized Dt |
Displays the date when the invoice details were verified. |
Collectible |
Check this box to indicate if the agreed amount is collectible from the customer. When checked, the collectible amount is posted as an expense on the customer account. During auto invoice validation, this check box is automatically selected if the same combination of a service and work order status matches with the state specific rule defined in Setup > Administration > System > Vendors > Invoice Rules tab. |
- Perform any of the Basic Actions mentioned in Navigation chapter.
12.1.5.3 Accept/Reject Invoice details
In the Invoice Details sub section, you can accept or reject the details of those invoices which are in ‘FOR APPROVAL’ status. This status is updated during invoice processing and when there is difference in estimated and invoiced amount which needs manual approval.
- In the Collections > Collections > Vendors > Invoices > Invoice Details, select the required invoice record.
- Click ‘Accept’ or ‘Reject’ in the Invoice Details section header and click ‘Yes’ to confirm the action.
- Click
 Refresh button to
view the status update.
Refresh button to
view the status update.
On Accepting or Rejecting the invoice details, the ‘Authorized By’ and ‘Authorized Dt’ fields are auto updated with user name and current date. Also the status of Invoice information and Payment Schedules are updated as either ‘CLOSE’ or ‘REJECTED’ respectively. However, auto update of status is controlled by the ‘Current/Next’ status defined in Cycle Setup screen.
If the status of a particular invoice is updated from ‘APPROVED’ to ‘CLOSE’, system generates a payment requisition record for payment processing.
12.1.5.4 Payment Schedules sub tab
- In the Collections > Collections > Vendors > Invoices > Invoice Details > Payment Schedules, you can maintain the payment schedules information. Perform any of the Basic Operations mentioned in Navigation chapter.
A brief description of the fields is given below:
Field: |
Do this: |
Currency |
System displays the vendor currency. |
Payment Amt |
Specify the actual payment amount for the invoice. |
Status |
Select the payment status from the drop-down list. |
Payment Dt |
Select the payment date from the adjoining calendar. |
Payment Reference |
(Optional) Specify reference details for the payment if any. |
Payable Id |
View the auto-generated payable ID which is the requisition ID in the AP Transaction screen. |
Payment Id |
View the Requisition ID generated during AP transaction. |
Disbursement Currency |
View the vendor disbursement currency. However, you can select the vendor payment disbursement currency from the drop-down list. |
Account Currency |
View the currency of the account selected at in ‘Invoice Details’ sub tab. |
Amount in Account Currency |
View the Invoice Currency amount equivalent of the Account Currency. System displays the ‘Amount in Account Currency’ by converting Vendor Currency value to Account Currency and considering the exchange rate as per the scheduled payment date. |
- Perform any of the Basic Actions mentioned in Navigation chapter.
12.1.5.5 Related Invoice/Work Order Details sub tab
- In the Collections > Collections > Vendors > Invoices > Invoice Details > Related Invoice/Work Order Details, view the following details.
A brief description of the fields is given below:
Field: |
Do this: |
Invoice # |
View the invoice number for the work order. |
Invoice Status |
View the status of invoice generated for the work order. |
Status Dt |
View the date on which the status of invoice is recorded. |
Currency |
View the currency in which the invoice is generated. |
WO Estimated Amt |
View the estimated amount for the work order. |
WO Agreed Amt |
View the vendor agreed amount for the work order. |
WO Paid Amt |
View the amount paid for the work order. |
12.1.5.6 Tracking Attributes sub tab
- In the Collections > Collections > Vendors > Invoices > Tracking Attributes. The Tracking Attributes allows you to load tracking attributes and define the parameter value for various parameters listed.
On the Tracking Attributes sub tab, perform any of the Basic Operations mentioned in Navigation chapter.
A brief description of the fields is given below:
Field: |
Do this: |
Sub-Parameter |
View the Sub-Parameter. |
Parameter |
View the listed Parameter. |
Value |
Specify the required parameter value. By default, NA is displayed. |
Perform any of the Basic Actions mentioned in Navigation chapter.
12.1.5.7 Business Rules
Business rules facilitate to auto validate invoices and approve only those which comply to the invoice processing requirements in OFSLL. Business Rules are always validated on Invoice information, Invoice details and payment schedules which are in ‘OPEN’ status.
Business rule validation for Invoices created or generated internally can be performed in the Vendors > Invoices tab and external invoices are auto validated before listing in Invoices tab.
For invoices received from external system, following pre-validation checks are also performed before validating with the business rules.
- A duplicity check is performed based on External Reference number to ensure that there are no two invoices with same details. In case the external reference number of new and existing invoice in the system are same, the status is auto updated as ‘Rejected’ and invoice is not processed further.
- When the payment for a ‘Service’ in work order is already paid and the same work order is again received with a new external reference number, system validates the ‘Paid’ status and if ‘Yes’, would auto update the invoice status as ‘Rejected’.
Following business rules are defined in the system for invoice validation. During the process, if any of the business rule validation fails, system stops the validation process and updates the status of Invoice as ‘Rejected’.
Rule 1
Every work order should have a specific closure status corresponding to the type of work order defined. Accordingly, an invoice generated for that work order should comply with any of the following combination of ‘Work order Type’ and ‘Work Order status’.
Work Order Type |
Work Order Status |
Door Knock |
Completed |
Involuntary Repossession |
Repossessed |
Voluntary Repossession |
Repossessed |
Impound Involuntary |
Repossessed |
Impound Voluntary |
Repossessed |
Involuntary Repossession |
Closed |
Voluntary Repossession |
Closed |
Impound Involuntary |
Closed |
Impound Voluntary |
Closed |
Skip Investigation |
Repossessed |
Skip Investigation |
Closed |
Rule 2
Validate invoice for the status of ‘Collectible’ check box in Vendors > Invoice tab > Invoice Details section.
During invoice processing, if the combination of Service, Work Order Status and State matches with any of the state specific rule defined in Setup > Administration > System > Vendors > Invoice Rules tab, the ‘Collectible’ check box is selected and invoice is allowed to process the next business rule.
In case the above combination does not exist in Invoice Rules tab, the ‘Collectible’ check box is NOT selected and the invoice is still allowed to process the next business rule.
Rule 3
Validate invoice based on Estimated and Invoiced amount and updated the corresponding status in Invoice Information, Invoice Details and Payment Schedules sections of Vendors screen.
- If the Invoice Amount is ‘Less than or equal’ to Estimated amount, the invoice is approved and the status of Invoice Details and Payment Schedules is updated to ‘APPROVED’.
- If the Invoice Amount is ‘greater than’ the Estimated amount, then the invoice needs manual approval and the status of Invoice Details and Payment Schedules is updated to ’FOR APPROVAL’.
An invoice status in Invoice Information section is auto updated to “APPROVED’ if both Invoice Details and Payment Schedules have the same status. Else, if status is rejected in either of the sections, the status of invoice is also updated as ‘REJECTED’ in Invoice Information section without allowing further edits on the same.