14. Batch Transactions
14.1 Introduction
This chapter discusses about the various batch transactions handled in the application. We can categorize them in to the following:
- Advances
- Payments
- Fees
14.2 Advances
You can enter multiple advances to the account for the draws made by customers. Advances can be entered either by manual entry or batch upload.
Manual Entry
This screen uses the same concepts and has similar features as the Payment Entry screen. An advance can be paid to one or more payees. The payee can be a standard payee that can be selected from a predefined list of values or a non standard payee. For non standard payees, you must enter the details of the remittance.
Oracle Financial Services Lending and Leasing creates entries for the posted advances on the AP Transaction screen. These entries can be used to process the remittances.
Batch Upload
With the advance load process, a batch of advances can be loaded into Oracle Financial Services Lending and Leasing (similar to lockbox processing).
Using the Advance Entry screen, you can enter and view a batch of advance transactions. You can then complete the following tasks:
- Posting a batch
- Reversing a batch
- Placing a batch on hold
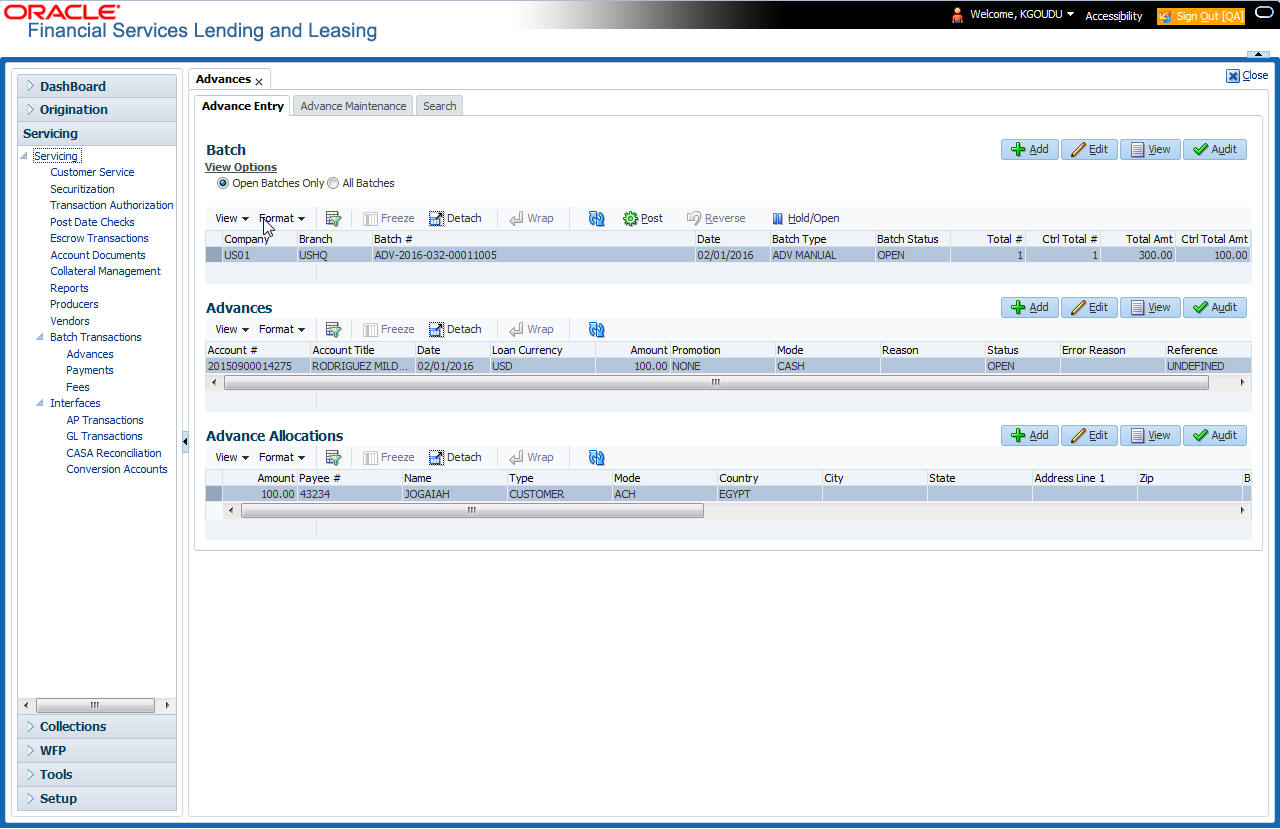
14.2.1 Advance Entry Tab
The Advance Entry tab enables you to view either all batches or only open batches. You can choose which batch you want to view using the View Options section. Viewing all batches enables you to locate batches with a status of open, reverse, hold, error, or posted.
To view open batches
- On the Oracle Financial Services Lending and Leasing Application
home screen, click the Servicing > Servicing > Batch
Transaction > Advances > Advance Entry.
- In the View Options section, click Open Batch Only. In the Batch section, the system displays all batches with a status of open that have not been posted.
To view all batches
- On the Oracle Financial Services Lending and Leasing Application home screen, click the Servicing > Servicing > Batch Transaction > Advances > Advance Entry.
- In the View Options section, click All Batches. In the Batch section, the system displays all batches regardless of the status.
If a batch contains a payment with an error status, the Error Reason field displays the cause.
14.2.1.1 Entering and Posting Advances
The Advance Entry screen enables you to manually post batches of advances. A batch can consist of one or more accounts.
To enter and post a batch for advance transactions
- On the Oracle Financial Services Lending and Leasing A home screen, click the Servicing > Servicing > Batch Transaction > Advances > Advance Entry.
- Perform any of the Basic Operations mentioned in Navigation chapter.
A brief description of the fields is given below:
Field: |
Do this: |
Company |
Select the portfolio company. |
Branch |
Select the branch. |
Date |
Specify the batch date. |
Batch Type |
Select the batch type. |
Total # |
Specify the total number of advances in the batch. |
Total Amt |
Specify the total amount of advances in the batch. |
Batch # |
View the batch number (system generated). |
Batch Status |
View the batch status. |
Ctrl Total # |
View the total number of advances in the batch (actual). |
Ctrl Total Amt |
View the total amount of advances in the batch (actual). |
- Perform any of the Basic Actions mentioned in Navigation chapter.
- In the Advances section, perform any of the Basic Operations mentioned in Navigation chapter.
A brief description of the fields is given below:
Field: |
Do this: |
Account # |
Select the account number. |
Account #: Title |
View the account title. |
Date |
Specify the advance effective date. |
Currency |
Select the currency. |
Amount |
View the advance amount. |
Promotion |
Select the promotion associated with advance. |
Mode |
Select the advance mode. |
Reason |
Select the reason for the advance. |
Status |
View the advance status. |
Error Reason |
View the reason for error. |
Reference |
Specify any reference information (such as check number). |
- Perform any of the Basic Actions mentioned in Navigation chapter.
- In the Advance Allocations section, perform any of the Basic Operations mentioned in Navigation chapter.
A brief description of the fields is given below:
Field: |
Do this: |
Amount |
Specify the advance amount to be paid to this payee. |
Payee Nbr |
Select the payee number. |
Name |
Specify the payee name. |
Type |
Select the payee type. |
Mode |
Select the payee payment mode. |
Country |
Select the country where the payee is located. |
City |
Specify the city where the payee is located. |
State |
Select the state where the payee is located. |
Address |
Specify the address line 1 for the payee. |
Zip |
Select the zip code where the payee is located. |
Zip Extension (unlabeled) |
Specify the zip extension where the payee is located. |
Bank Name |
Specify the payee ACH bank name. |
Routing # |
Specify the payee ACH bank routing number. |
ACH Account Type |
Specify the payee ACH bank account type. |
ACH Account # |
Specify the payee ACH bank account number. |
Account # |
Specify the customer account number with the payee. |
BIC |
Select the Business Identifier Code from the drop-down list. The list displays the BIC codes defined in the system. |
IBAN |
Specify the IBAN (International Bank Account Number). IBAN is used for identifying bank accounts across national borders with a minimal of risk of propagating transcription errors. Ensure that value entered satisfies the check-digit validation based on modulo 97. On save, system automatically validates the IBAN number length based on country code, characters, white spaces, and checksum. Validation is also done during posting non-monetary transaction (ACH Maintenance). You can maintain the IBAN length and other details required as per the country code in the user defined table (Setup > Administration > System > User Defined Tables). Note: IBAN for 'NL' country code (IBAN_FORMAT_NL) is defined by default with length of IBAN as 18. |
Comment |
Specify a comments for this advance allocation. |
Currency |
Specify the currency for disbursement. |
- Perform any of the Basic Actions mentioned in Navigation chapter.
The system updates the display only Total # and Total Amt fields in Batch section to record the contents of Advance section.
When you want to post a batch transaction on Advance Entry screen, ensure that contents of the display only Total # and Total Amt fields match with contents of the required Total # and Total Amt fields in Advance group section.
- In the Action section, click Post.
The system changes batch status from OPEN to PROCESSING and submits batch to the job service. After the batch has been processed, system changes the batch status to POSTED or ERROR.
The posted advances can be viewed on the Customer Service screen’s Transaction screen. The system creates entries for the posted advances on AP Transaction screen. These entries can be used to process the remittances.
14.2.1.2 Holding a Batch of Payment Transactions
Only the batches with the status of Open can be put on hold.
To hold the batch of payments transactions
- On the Oracle Financial Services Lending and Leasing Application home screen, click the Servicing > Servicing > Batch Transaction > Advances > Advance Entry.
- On the Advance Entry screen, click Open Batches Only in the View Options section. Details regarding the selected batch appear in the Advances section.
- Use the Batch section to search for and select the batch you want to hold.
- In the Action section, click Hold/Open.
The system changes the batch status from Open to Hold.
14.2.1.3 Opening or Removing Hold on the Batch of Payment Transactions
Only the batches with a status of Hold can be opened.
To open (or remove hold) on the batch of payments transactions
- On the Oracle Financial Services Lending and Leasing Application home screen, click the Servicing > Servicing > Batch Transaction > Advances > Advance Entry tab.
- On the Advance Entry screen, click All Batches in the View Options section. Details regarding the selected batch appear in the Advances section.
- Use the Batch section to search for and select the batch with the status of hold you want to open.
- In the Action section, click Hold/Open. The system changes the batch status from Hold to Open.
14.2.1.4 Reversing a Batch of Payment Transactions
Following are the pre-conditions while reversing a Batch of Payment Transactions:
- Only the batches with a status as posted can be reversed.
- Only the batches with a status as Hold can be opened.
To reverse the batch of payment transactions
Batches can be reversed in case of problems with the batch. This will reverse all advances that have been posted.
- On the Oracle Financial Services Lending and Leasing Application home screen, click the Servicing > Servicing > Batch Transaction > Advances > Advance Entry tab.
- On the Advance Entry screen, click All Batches in the View Options section. Details regarding the selected batch appear in the Advances section.
- Use the Batch section to search for and select the batch with posted status you want to reverse.
- In the Action section, click Reverse.
The system changes batch status from posted to Processing and submits batch to the job service. After the batch has been processed, the system changes batch status to Reverse.
You can verify the reversal either using Transaction screen on Customer Service screen for each account in the batch, or by running payment history report.
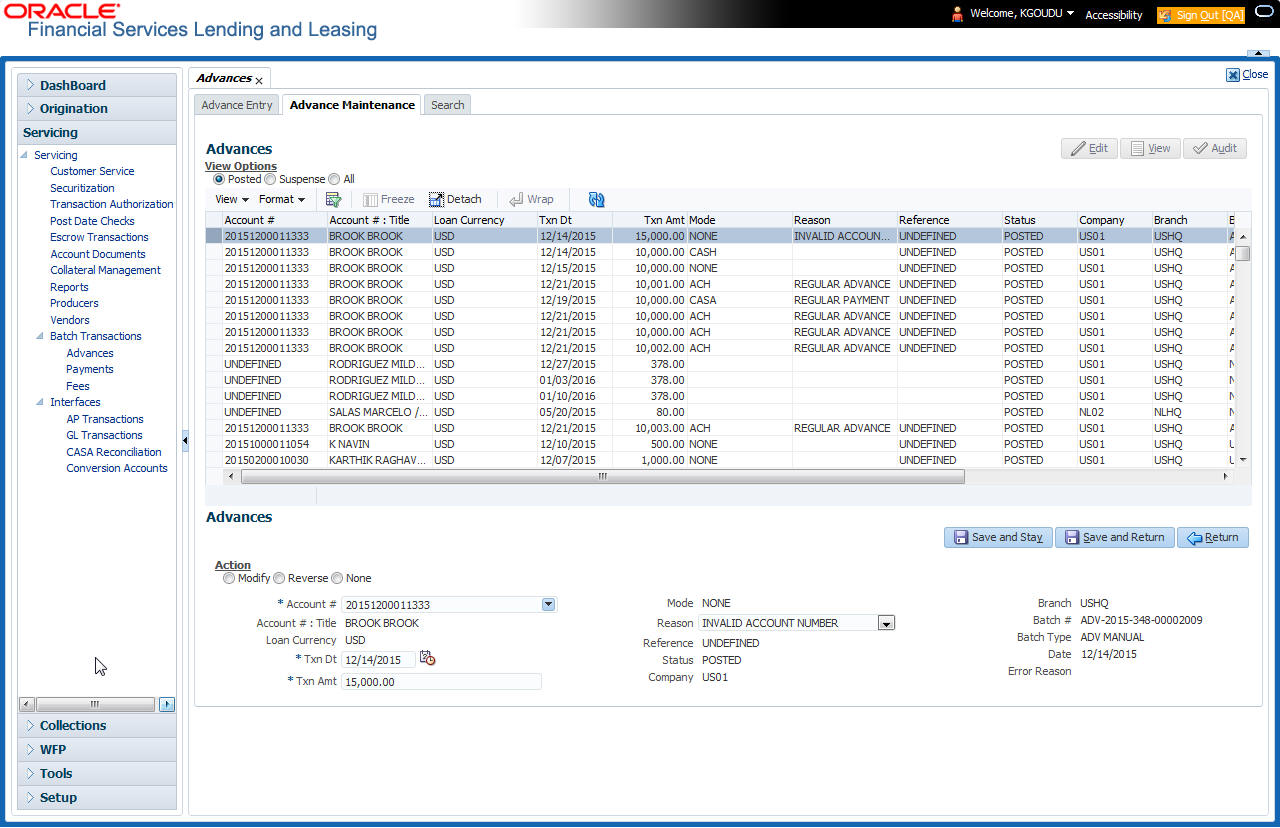
14.2.2 Advance Maintenance Tab
The Advance Maintenance tab on the Advances screen enables you to perform maintenance functions on individual advances that have been posted. The common functions are as follows:
Function: |
Purpose: |
Modify |
enables you to modify advance attributes such as amount, account number, and date. |
Reverse |
enables you to reverse the advance from the account completely. |
In all cases, the system performs ’true backdating’ to post the transaction based upon transaction date. Interest recalculations are automatic and all necessary transactions can be sent to the general ledger for automatic reconciliation.
Suspended advances
In case of advances that are not posted to accounts due to issues such as incorrect account condition, the advances are posted to suspense. You must process these advances using the work queue for suspense advances. This would typically involve identifying the correct amount or correcting problems with the account before attempting to re-post the advance. In this case, the advance is moved out of the suspense account and posted to the specified account.
To view advances
- On the Oracle Financial Services Lending and Leasing Application
home screen, click the Servicing > Servicing > Batch
Transaction > Advances > Advance Maintenance
tab.
- In the View Options section, select which advance
you want to view:
Choose:
View this:
Posted
Posted advances.
Suspense
Suspended advances. In cases of advances that have been posted to suspense, the Suspense work queue can be used to process them (similar to suspense payments).
All
All advances.
The system displays the selected payments in the Advances section.
- Perform any of the Basic Operations mentioned in Navigation chapter.
A brief description of the fields is given below:
Field: |
View this: |
Account # |
Account number. |
Title |
Account title. |
Currency |
Select the currency |
Txn Date |
Advance effective date. |
Txn Amount |
Advance amount. |
Mode |
Advance mode. |
Reason |
Advance reason. |
Reference |
Reference information for advance. |
Status |
Advance status. |
Company |
Portfolio company. |
Branch |
Portfolio branch. |
Batch # |
Batch number. |
Batch Type |
Batch type. |
Date |
Displays batch date. |
- Perform any of the Basic Actions mentioned in Navigation chapter.
14.2.2.1 Modifying/Correcting Advance Transactions
In some cases, an advance may be valid, but how it was posted was incorrect; for example, advance was posted to the wrong account, with the wrong date, or with incorrect spread data. The Advance Maintenance screen enables you to correct such errors.
To modify/correct an individual advance transaction
- On the Oracle Financial Services Lending and Leasing Application home screen, click the Servicing > Servicing > Batch Transaction > Advances > Advance Maintenance.
- In the View Options section, click Posted.
- In the Advances section, select the advance you want to modify and click Edit.
- In the Action section, click Modify.
- In the Details section, update the fields
with information about the advance you want to modify.
Field:
Do this:
Account #: Title
Select account number.
Currency
Select the currency.
Amount
Enter advance amount.
Txn Dt
Enter advance effective date.
Reason
Select the reason for error.
- Click Save And Return.
The system modifies the original advance and posts the new advance.
14.2.2.2 Reversing Advance Transactions
To reverse an individual advance transaction
- On the Oracle Financial Services Lending and Leasing Application home screen, click the Servicing > Servicing > Batch Transaction > Advances > Advance Maintenance.
- In the View Options section, click Posted.
- In the Advances section, select the advance you want to reverse and click Edit.
- In the Action section, click Reverse.
- In the Details section, complete the Reason field (if you choose). You need not have to update any other fields when reversing a transaction.
- Click Save And Return.
The system reverses the original advance.
The reversed advance can be viewed when you load the account on Customer Service screen from Customer Service screen’s Transaction screen.
14.2.3 Search Tab
A Search link is available on the Advances screen to help locate information such as an account’s number, company and branch. This is information that is used on the Advance Entry and Advance Maintenance screens.
To search for an account
- On the Oracle Financial Services Lending and Leasing Application
home screen, click the Servicing > Servicing > Batch
Transaction > Advances > Search
tab.
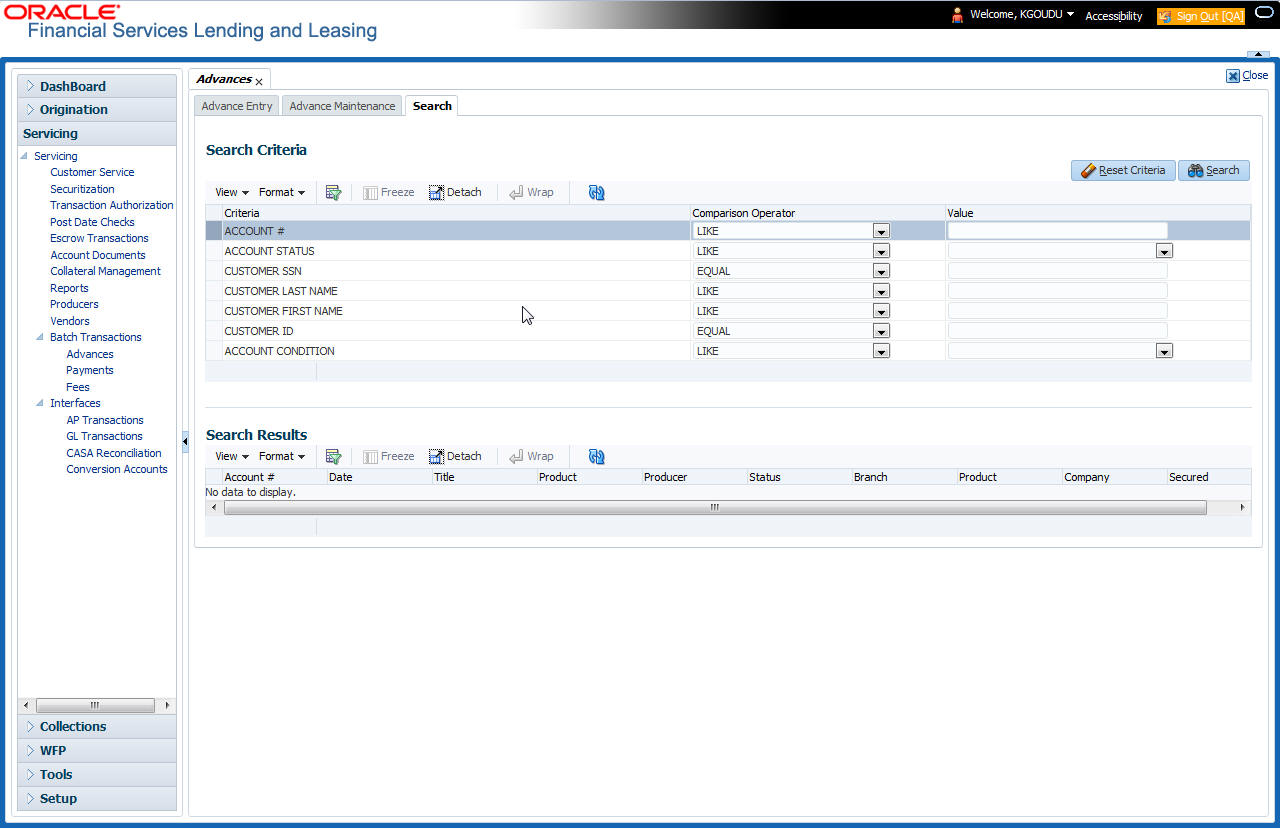
- In the Search Criteria section, use Comparison Operator and Value columns to enter search criteria you want to use to locate an account.
- Click Search.
System displays result of the search in Results section at the bottom of the screen.
You can click Reset Criteria at any time to clear Comparison Operator and Values columns on the Search Criteria section.
14.3 Payments
Oracle Financial Services Lending and Leasing enables you to post payment transactions to accounts in a batch mode, either by manual entry or by using data files. These transactions can be posted in real-time or in batch mode.
This chapter explains how to use the Payments screen to complete the following tasks:
- Posting a payment
- Correcting a payment
Payments can be entered in Oracle Financial Services Lending and Leasing in a variety of ways:
- Lockbox payments
- ACH payments
- Manual entry with the Payment Entry screen
The manual entry option is useful in a low volume or a branch scenario when customers make payments in person or through the mail. The lockbox and ACH options allow for processing payments electronically without manual input.
14.3.1 Lockbox Payments
Oracle Financial Services Lending and Leasing can accept payments from lockboxes in the NACHA format. The NACHA format is an industry standard that can be used to post multiple batches of payments at one time. The Lockbox Load Batch Process can be configured to run at any time of the day and at multiple times if needed. All payments from the lockbox file are loaded into the system as batches. Any errors identified by the system during the load process are logged.
14.3.2 ACH Payments
Oracle Financial Services Lending and Leasing enables you to post directly from the ACH file that has been created for customer payments. This is controlled by the ACA_PAYMENT_AUTO_LOAD system parameter. If the parameter is set to Y, the system automatically creates payment batches for the payments in ACH file and posts them on the day of payment.
Batch NSF Processing
Oracle Financial Services Lending and Leasing provides the upload of the rejected ACH ’Payment Request Files’ sent by financial institution/lender to allow for improved NSF processing for all returned payments. This is done using a ‘Batch Mode’ process.
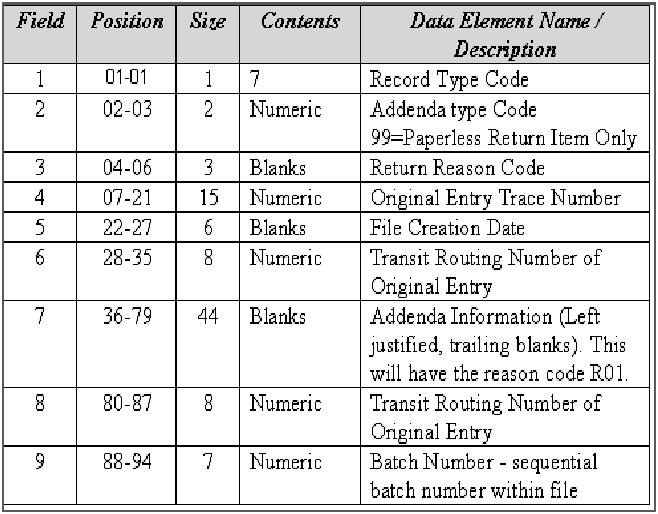
Oracle Financial Services Lending and Leasing supports upload of payment files through lockbox uploads. In addition to the Payment file, system also provides the upload of Payment Return files through lockbox uploads. The system provides an upload of the ‘Entry Detail Addenda Record’ in NSF Notification file received from the client’s financial institution. This record pertains to payment returns.
Entry Detail Addenda Record
14.3.3 Bulk Upload of Payment Transactions
OFSLL supports bulk upload of payment transactions into the system in addition to the option of manually creating the records in the Payment Entry tab.
During the bulk upload process, a set of payment transactions can be grouped together into a single file, in a specific file format and uploaded into the system using the Process File interface. The upload file is then processed through a batch and after successful validation, individual records are created automatically in ‘Payment Entry’ tab with appropriate status.
While creating the upload file, it is necessary to maintain the details in specific format and to ensure that all the payment transactions are uploaded correctly without any issues during validation. The bulk upload file format supports One Header and Multiple Detail records and the currency defined in the header is applicable for all the records. Example of header record is indicated in the following table:
Company |
Currency |
Mode |
Reason |
Total # |
Total Amt |
US01 |
USD |
CASH |
PAYMENT MANUAL |
3 |
3000 |
In the header record, all the fields are mandatory except ‘Reason’. Each field information is validated with the data maintained in the system and in case of any discrepancies, the entire payment upload batch is rejected. For example, when the specified company code or currency code is not maintained, or if ‘Total Amount’ contains a non numeric data, the entire batch is rejected from processing.
The details of each transaction need to be maintained in the following format as indicated with system defined validations:
Field Name |
Expected Values |
Mandatory (Y/N) |
Validation |
Account # |
Account Number |
Y |
Mismatch in Account # is posted as ‘Suspense’ (Account Number as ‘0’) against ‘Company’ specified in header. For suspense account, system defaults the spread where Status, Condition, and State = ‘ALL’. |
Pmt Date |
Payment Date |
Y |
Payment date cannot be beyond the GL date. |
Pmt Amount |
Payment Amount |
Y |
Payment Amount should not contain non-numeric or negative amount. |
Spread |
Spread (Spread Code) |
N |
Spread Code has to be valid. If left blank, default spread is applicable based on spread matrix or value defined in contract. |
Reference |
Free Text |
N |
NA |
Based on the value defined in CLOB system parameter ‘CMN_FILE_PROCESS_TO_LOB’, the file is either processed through Process Files interface (if value is ‘Y’) or Database Files system (if value is ‘N’). For database file upload, the payment transactions file has to be placed in ‘IBU’ directory for upload and for process files interface, the file is shared in common access folder and uploaded by accessing it from the ‘Incoming Process File’ tab. For more information, refer to DashBoard > Process Files section.
On initiating the file upload in ‘Process Files’ screen, new batch job ‘IPUPRC_BJ_100_01’, under Batch Job Sets ‘SET-IFP’ is created to process the same. Each batch can process specific number of records as per the ‘Parameter Value’ defined in the system parameter ‘LBX_TXN_GROUPING_CNT’ (BATCH SIZE OF PAYMENT UPLOAD RECORDS). Note that a batch can get rejected from processing if the total number of records exceed the parameter value or the ‘Total #’ specified in the file header.
While uploading the batch, ensure that the following lookup details are maintained in Lookup Code ‘PAYMENT_UPLOAD’ with Sub Code as ‘PAY’ in Lookup Type ‘GROUP_SUB_TYPE_CD’.
Once the batch is successfully executed after validation, system identifies the 'Header' and 'Detail' records in payment file and creates individual records with the same batch name in 'Payments' and 'Payment Txns' sections automatically. The status of the Batch is updated depending on the status defined in system parameter ‘PMT_BATCH_POSTING’ (PAYMENT BATCH POSTING PREFERENCE) as OPEN or HOLD or POSTED.
14.3.4 Manual Entry
The Payment Entry screen enables you to manually post batches of payments. You can enter payment details such as payment date, payment reason and mode, and payment amount for each batch. A batch is comprised of a number of payments. Oracle Financial Services Lending and Leasing provides audit controls to audit the actual payments entered.
Each batch needs to be associated with a company and one or all branches within the company. The system verifies the actual number of payments against the total of payment amounts you enter.
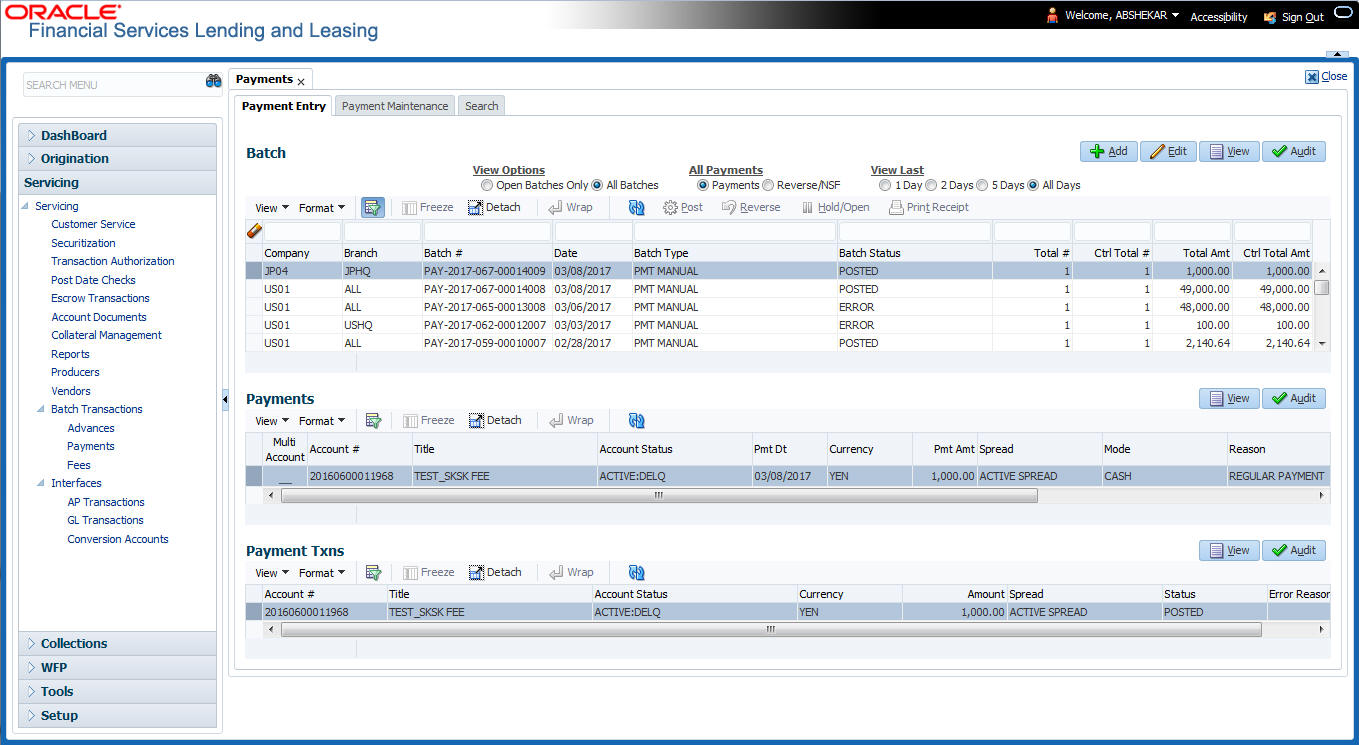
14.3.5 Payments Entry Tab
Using the Payment Entry screen, you can do the following for payment transactions:
- Viewing batches
- Entering a batch
- Posting a batch
- Placing a batch on hold
- Opening a batch on hold
- Reversing a batch
14.3.5.1 Viewing Batches
The Payment Entry screen enables you to select the batch you want to view. Based on your selection, the batches are displayed. You can select one of the following:
View Options |
Descriptions |
Open Batches Only |
Displays batches with the status Open |
All Batches |
Displays all the batches regardless of status. i.e. open, reverse, hold, error, or posted. |
To view open payment batches
- On the Oracle Financial Services Lending and Leasing Application home screen, click Servicing > Servicing > Batch Transaction > Payments > Payment Entry tab.
- On the Payment Entry screen’s View Options
section, click Open Batch Only. In the Batch section,
the system displays all batches with a status open that
have not been posted.
To view all payment batches
On the Payment Entry screen’s View Options section, click All Batches.
In the Batch section, The system displays all payment batches, regardless of status. Details regarding the selected batch appear in the Payments section.
In the Batch section, click View to view batch details. If a batch contains a payment with an error status, Error Reason field under Payment Txns section displays the cause.
In the Payment Entry tab. you can further sort the view of payment transactions based on ‘All Payments’ and ‘View Last’ options. These options allow you to narrow the range of payment transactions that Oracle Financial Services Lending and Leasing displays.
In ‘All Payments’ section, you can either select ‘Payments’ to view only the posted payment transactions or ‘Reverse/NSF’ to view only the transactions which are reversed or posted with Non Sufficient Funds in the account.
In ‘View Last’ section, you can view the payment transactions based on elapsed days.
Choose: |
Oracle Financial Services Lending and Leasing displays: |
1 Day |
All the transactions in last one day. |
2 Days |
All the transactions in last two days. |
5 Days |
All the transactions in last five days. |
All Days |
All the posted transactions. |
14.3.5.2 Entering and Posting Batches
The Payment Entry screen enables you to manually post batches of payments. A batch can consist of one or more payments.
To enter and post a batch for a payment transaction
- On the Oracle Financial Services Lending and Leasing Application home screen, click Servicing > Servicing > Batch Transaction > Payments > Payment Entry.
- Perform any of the Basic Operations mentioned in Navigation chapter.
A brief description of the fields is given below:
Field: |
Do this: |
Company |
Select the portfolio company. |
Branch |
Select the portfolio branch. |
Batch # |
View the batch number (system generated). The batch number format is PAY-YYYY-JJJ-SSSS, where YYYY is the year, JJJ is the Julian date, and SSSS is a sequential number. The system generates a new sequence for every different date, so the first batch of each day starts with SSSS = 0001. |
Date |
Select the batch date, usually either today’s date or the date when batch was received as a whole. |
Batch Type |
Select the batch type. Oracle Financial Services Lending and Leasing identifies each batch with a type signifying the type of payment batch it is; for example, mail, drop box, Western Union, walk in, and so on . |
Batch Status |
View the batch status. |
Total # |
Enter total number of payments in the batch. |
Total Amt |
Enter total amount of payments in the batch. |
- Perform any of the Basic Actions mentioned in Navigation chapter.
- In the Batch section, view the following information:
Field:
View this:
Batch #
The batch number (system generated). The batch number format is PAY-YYYY-JJJ-SSSS, where YYYY is the year, JJJ is the Julian date, and SSSS is a sequential number. The system generates a new sequence for every different date, so the first batch of each day starts with SSSS = 0001.
Branch
View the portfolio branch.
Batch Status
The batch status.
Ctrl Total #*
The total number of payments in the batch (actual).This figure must match the figure in required Total # field before a batch can be posted.
Ctrl Total Amt*
View the total amount of payments in the batch (actual).This figure must match the figure in required Total Amt field before a batch can be posted.
Note: * These two fields update every time you save the itemized payment entries in the Payments section.
The Payments section records itemized information of the batch payment. It enables you to make one payment to one account, or more than one payment to more than one account.
- In the Payments section, perform any of the Basic Operations mentioned in Navigation chapter.
A brief description of the fields is given below:
Field: |
Do this: |
Multi Account |
Check this box when multiple entries of the same or different accounts are to be posted in a single batch. Note the following while selecting Multi Account check box: When Multi Account is checked, you need to specify the “Account number” and “Spread” field details in the 'Payment Txns' section below. Else, the above two field details are to be specified in ‘Payments’ section itself. Every time when you select/deselect the Multi Account check box, system validates the “Account number” and “Spread” fields (as not null) and displays a confirmation message to reset either Payment or Transaction level Account Information and then proceeds. |
Account # |
Select the account number to which the payment entry is to be posted. |
Title |
System displays the account title upon account selection. |
Account Status |
System displays the account status upon account selection. |
Pmt Date |
Select the payment effective date. This date must be less than or equal to the date recorded in the Batch section. By default, system displays the current date. |
Currency |
Select the currency for the payment. |
Pmt Amount |
Specify the payment amount. |
Spread |
Upon account selection, system defaults the spread (payment allocation strategy) based on the matching details defined in Spread Matrix screen (Setup > Products > Spreads > Spread Matrix). If there are no matching details found or spread matrix is not defined, system defaults the spread defined at the contract. However you can also select the required spread for the payment from the drop-down list. |
Mode |
By default, system displays the mode upon account selection. However, you can also select the payment mode from the drop-down list. |
Reason |
Select the reason for the payment. |
Reference |
Specify any reference information (such as check number). |
Total Amount |
View the total amount of the batch. |
Status |
View the status of the payment transaction. |
Action |
You can click on (+) icon to enter multiple accounts. Ensure that you have selected the “Multi Account” check box for entering multiple accounts. |
Delete |
You can remove the selected record by clicking on “Delete” button in the action block. |
- Perform any of the Basic Actions mentioned in Navigation chapter.
The system updates Ctrl Total # and Ctrl Total Amt fields in Batch section to record the contents of Payments section.
Create Multiple Payments
You can use ‘Create Multiple Payments’ option to add multiple payments. Depending on the total payments specified in ‘Total #’ field, equivalent records are created with default value for manual updates.
The system derives the total number of payment rows to be displayed by calculating the difference between ‘Ctrl Total #’ and ‘Total #’ fields. However this option is not available if there is no difference in the above field values.
For each payment, use the Payments Txns section to record information about the account receiving payment. (There might be more than one entry for the same account; for example, one account may required different payment spreads).
- In the Payment Txns section, perform any of the Basic Operations mentioned in Navigation chapter. Ensure that the total Amount in Payments Txns section must match the contents of Total Amt in the Payments section.
- A brief description of the fields is given below.
Field:
Do this:
Account #
Select the account number. This field is available only if ‘Multi Account’ option is not checked in ‘Payments’ section.
Title
View the account title.
Account Status
The current status of the account.
Currency
View the currency for the payment.
Amount
Specify payment amount.
Spread
Upon account selection, system defaults the spread (payment allocation strategy) based on the matching details defined in Spread Matrix screen (Setup > Products > Spreads > Spread Matrix). If there are no matching details found or spread matrix is not defined, system defaults the spread defined at the contract.
However you can also select the required spread for the payment from the drop-down list. This field is available only if ‘Multi Account’ option is not checked in ‘Payments’ section.
Status
View the payment status.
Error Reason
View the reason for error. This field will populate after you click Post if payments aren’t reconciled.
Account Number ‘0’ is a Suspense Account to which unidentified payments and advances are posted.
- Perform any of the Basic Actions mentioned in Navigation chapter.
When you want to post a batch transaction on Payment Entry screen, ensure that the details of the Batch section’s display only Ctrl Total # and Ctrl Total Amt fields match with details of the required Total # and Total Amt fields.
- In the Action section, click Post.
System changes the batch status from Open to Processing and submits batch to the job service. After the batch has been processed, system changes the batch status to Posted or Error.
Only a batch with a batch status of Open can be posted. The batch totals and control totals should match before you post the batch. If they do not and you click Post, the system displays the Error message as “Group control Totals not matching, Posting not allowed. The posted payments can be viewed on the Transactions screen on the Customer Service screen.
14.3.5.3 Holding a Batch of Payment Transactions
The Oracle Financial Services Lending and Leasing allows you to hold the posted batches if required. You can hold the batches only with the Open status.
To hold the batch of payments transactions
- On the Oracle Financial Services Lending and Leasing Application home screen, click Servicing > Servicing > Batch Transaction > Payments > Payment Entry.
- On the Payment Entry screen’s All Payments section, select Payments.
- In the View Option section, select the batches you want to view:
- If the batch status is open, click Open Batches Only in the View Options section.
- If the batch status is Error, click All Batches in the View Options section.
- Select the batch you want to hold from the Batch section.
- In the Action section, click Hold/Open.
The system changes the batch status from Open/Error to Hold.
14.3.5.4 Removing Hold from the Batch of Payments Transactions
The system allows you to remove hold from the batch when required. You can remove hold from the batches only with the Hold status.
To open or remove a hold on the batch of payments transactions
- On the Oracle Financial Services Lending and Leasing Application home screen, click the Servicing > Servicing > Batch Transaction > Payments > Payment Entry.
- In the View Option section, select All Batches section
- Select the batch you want to open from the Batch section.
- In the Action section, click Hold/Open.
The system changes the batch status from Hold to Open.
14.3.5.5 Reversing the Batch of Payment Transactions
The system allows you to reverse the batch of payment transactions. You can reverse batches only with posted status.
To reverse the batch of payments transactions
- On the Oracle Financial Services Lending and Leasing Application home screen, click the Servicing > Servicing > Batch Transaction > Payments > Payment Entry.
- In the View Option section, select All Batches.
- Select the batch you want to reverse from the Batch section.
- In the Action section, click reverse.
System changes the batch status from posted to Processing and submits batch to the job service. After the batch has been processed, system changes the batch status to Reversed.
You can verify the reversal either using Transaction screen on Customer Service screen’s Transactions screen for each account in the batch, or by running payment history report (Reports master tab > Servicing drop-down link > Payment History).
14.3.5.6 Printing a Receipt
You can print receipts for walk-in payments using the Print Receipt button on the Payment Entry screen’s Action section. Receipts can be printed before actually posting the payment. This enables you to create just batch and leave it for end of the day processing, but also print receipt for customer.
To print a receipt of the payments transactions
- On the Oracle Financial Services Lending and Leasing Application home screen, click the Servicing > Servicing > Batch Transaction > Payments > Payment Entry.
- In the Batch section, click Add and specify required information regarding the payment for which you want to print a receipt. (Note: For more information, see the previous section in this chapter, Entering and Posting a Payment). Click Save.
- In the Payment section, click Add and specify the required information regarding payment for which you want to print a receipt. (Note: For more information, see the previous section in this chapter, Entering and Posting a Payment). Click Save.
- In the Payment Txns section, click Add and specify required information regarding the payment for which you want to print a receipt. (Note: For more information, see the previous section in this chapter, Entering and Posting a Payment). Click Save.
- In the Action section, click Print Receipt.
System sends the payment receipt directly to the printer based on the company level system parameter CMN_CMB_DEFAULT_PRINTER.
14.3.6 Payment Maintenance Tab
The Payment Maintenance screen enables you to perform the following maintenance functions on payments that have been posted:
- Modify and re-post single payment to single or multiple account(s)
- Modify and re-post multiple payments to multiple or single account.
- Post suspense payment, initially posted to a single account to multiple accounts.
The common functions are as follows:
Function: |
Purpose: |
Modify Payment |
Enables you to change one or more of the payment attributes, such as the Account number, Spread, Payment Date, Currency, Payment Amount, and Reason. For Single Account Payments, these details are editable in ‘Payments’ section itself and for ‘Multi Account Payments’, only Payment Date, Currency, Payment Amount, and Reason are editable in ‘Payments’ section and other details are editable in ‘New Payment Txns’ section below. |
Multi Account (check box) |
Selecting the check box allows to change the payment account type from Single Account Payment to Multi Account Payment and vice versa. However, doing so will reset the Payment level Account Information and need to be selected carefully. |
Non Sufficient Funds |
Notifies Oracle Financial Services Lending and Leasing that the customer did not have sufficient funds in the account and will post a NSF fee (based on setup). |
Reverse |
Enables you to simply reverse a payment. |
In all cases, system performs a ‘true backdating’ to post the transaction based upon transaction date. Interest recalculations are automatic and all necessary transactions can be sent to the general ledger for automatic reconciliation.
Suspended Payments
In case of payments that are not posted to accounts due to issues such as incorrect account condition, the payments are posted to suspense. You can process these payments using the work queue for suspense payments. This typically involves identifying the correct amount or correcting problems with the account before attempting to re-post the payment. In this case, the payment is moved out of the suspense account and posted to the active account.
To view payments
- On the Oracle Financial Services Lending and Leasing Application
home screen, click the Servicing > Servicing > Batch
Transaction > Payments > Payment Maintenance
tab.
- Search for required payment transaction or a batch using the following options:
- In the View Options section, select which type of payment
you want to load from the following list:
Choose:
To view:
Posted
Posted payments.
Suspense
Suspended payments. (Suspended payments are posted payments that haven’t been applied to accounts because of errors involving account numbers or the account itself, such as its status, spread issues, and so on.)
All
All payments.
- Specify one or more of the following Search Parameters for searching
a payment transaction or a batch:
- Include Multiple Account - By default, this check box is either selected/deselected depending on the status of system parameter ‘ONE PAYMENT TO MULTI ACCOUNTS’ (TPE_PAYMENT_TO_MULTI_ACCOUNTS) defined as (Y/N). Manually selecting or deselecting the same enables the system to search for those payments where single/multiple entries for same or different accounts are posted in a single batch.
- Account # - Search through the Account in which the specific payment entry is to be posted.
- Pmt Dt - Search using Payment Date or the transaction date on which payment was made.
- Pmt Amt - Search using Payment Amount.
- Reference # - Search using Payment transaction reference number.
- Click Search. System displays all payments matching the search criteria from all accounts in ‘Payments’ section.
- You can view or edit the following information in ‘Payments’
section:
Field:
Do this:
Multi Account
If the system displays this check box as selected, then you are allowed to edit the fields in ‘Payment Txns’ section below.
Account #
Select the required account number from the drop-down list.
Title
View the account holders name in this field.
Account Status
The current status of the account.
Spread
Upon account selection, system defaults the spread (payment allocation strategy) based on the matching details defined in Spread Matrix screen (Setup > Products > Spreads > Spread Matrix). If there are no matching details found or spread matrix is not defined, system defaults the spread defined at the contract.
However you can also select the required spread for the payment from the drop-down list.
Pmt Dt
Specify the payment date.
Currency
Select the currency from the drop-down list.
Pmt Amt
Specify the payment amount.
Reference
View the payment reference.
Reason
Select the payment reason from the drop-down list.
Mode
View the payment mode.
Company
View the portfolio company.
Branch
View the portfolio branch.
Batch #
View the batch number.
Batch Type
View the batch type.
Date
View the batch date.
- View the following information for the selected payment
in Payment Txns section:
Field:
View this:
Account #
The account number.
Title
The account title.
Account Status
The current status of the account.
Currency
The currency in which payment is done.
Amount
The payment amount.
Status
The status of payment.
Spread
The spread (payment allocation strategy).
Reason
The payment reason.
Error Reason
The error reason for payment, if any.
The Payment Allocation section details how the selected payment was applied against the account. This is useful in determining whether the payment was posted correctly or whether the spread or transaction date needs to be modified.
14.3.6.1 Modifying/Correcting Payment Transactions
In some cases, a payment may be valid, but how it was posted was incorrect; for example, payment was posted to the wrong account, with the wrong date, or with incorrect spread data. The Payment Maintenance screen enables you to correct such errors.
Consider the following scenarios during payment maintenance:
- When a transaction is posted with lesser amount (i.e. amount changed from $100 to $40), system automatically posts two transactions. A reverse transaction with amount $100 and another transaction with amount $40.
- When a new record is inserted and payment amount is provided, system posts payment on new account.
- When a record is updated with amount as ‘0’, system reverses original payment and does not post any transaction.
To modify/correct an individual payment transaction
- On the Oracle Financial Services Lending and Leasing Application home screen, click the Servicing > Servicing > Batch Transaction > Payments > Payment Maintenance tab.
- In the View Options section, select the type of payments you want to view: Posted, Suspense, or All.
- In the Search Parameters section, use Account number, Payment Date, Payment Amount, or Reference number fields and Search button to locate the account you want to work with. The system displays payments matching your search criteria in the Payments section.
- In the Payments section, select the payment that you want to modify and click Modify Payment.
- In the Payments section, you can modify/correct
the following details:
Field:
Do this:
Pmt Dt
Select the payment date from the adjoining calendar.
Currency
Select the currency from the drop-down list.
Pmt Amt
Specify the payment amount.
Reason
(Optional) Select any of the relevant reason for the payment from the drop-down list.
- In the New Payment Txns section, update the
fields with information about payment you want to modify to reconcile
the payment changes.
Field:
Do this:
Account #
Select account number from the drop-down list.
Amount
Specify the transaction amount.
Spread
Upon account selection, system defaults the spread (payment allocation strategy) based on the matching details defined in Spread Matrix screen (Setup > Products > Spreads > Spread Matrix). If there are no matching details found or spread matrix is not defined, system defaults the spread defined at the contract.
However you can also select the required spread for the payment from the drop-down list.
Reason
(Optional) Select any of the relevant reason for the payment transaction from the drop-down list.
- In the New Payment Txns section, you can also do the following:
- Click
 to add additional
payment transactions. System inserts a new record and allows you to specify
the above details. When new records are added for single account in payment
Txns section, system automatically changes the record to 'Multi Account'
and displays in 'Payments' section.
to add additional
payment transactions. System inserts a new record and allows you to specify
the above details. When new records are added for single account in payment
Txns section, system automatically changes the record to 'Multi Account'
and displays in 'Payments' section.
- Click Delete to remove the selected payment record which in-turn posts a ‘Payment reversal’ transaction on to the account. When records are removed from multi-account in payment Txns section either by deleting or posting with zero amount, system automatically changes the record to single payment account and displays in 'Payments' section with the account number.
- Click Reset to revert to previously saved payment transaction data.
- Click Post and Stay/Return or any of the Basic Actions mentioned in Navigation chapter.
The system modifies the original payment and posts new payment. The modified payment can be viewed on the Customer Service screen’s Transaction screen.
14.3.6.2 Reversing Payment Transactions
To reverse an individual payment transaction
- On the Oracle Financial Services Lending and Leasing Application home screen, click the Servicing > Servicing > Batch Transaction > Payments > Payment Maintenance tab.
- In the View Options section, click Posted.
- In the Search Parameters section, use Account number, Payment Date, Payment Amount, or Reference number fields and Search button to locate the account you want to work with. The system displays payments matching your search criteria in the Payments section.
- In the Payments section, select the payment that you want to reverse.
- Click Reverse, and click ‘Yes’ in Reverse Transaction confirmation dialog.
- Click Post and Stay/Return or any of the Basic Actions mentioned in Navigation chapter.
The system reverses the original payment. The modified payment can be viewed on the Customer Service screen’s Transaction screen.
Access to the Reverse button can be restricted by user responsibility and the account’s product type using the PAYMENT_REV transaction code (Super Group: ACCOUNT MONETARY TXN) on the Administration screen. (For more information, see the Txn Codes screen section in the Oracle Financial Services Lending and Leasing Setup Guide).
14.3.6.3 Reversing Payment Transaction and Assessing NSF Fee
To reverse an individual payment transaction and assess NSF fee
- On the Oracle Financial Services Lending and Leasing Application home screen, click the Servicing > Servicing > Batch Transaction > Payments > Payment Maintenance tab.
- In the View Options section, click Posted.
- In the Search Parameters section, use Account number, Payment Date, Payment Amount, or Reference number fields and Search button to locate the account you want to work with. The system displays payments matching your search criteria in the Payments section.
- In the Payments section, select the payment that you want to reverse with an NSF fee.
- Cick NSF and click ‘Yes’ in Reverse Transaction confirmation dialog.
- Click Post and Stay/Return or any of the Basic Actions mentioned in Navigation chapter.
The system reverses the original payment and assesses the NSF fee. The modified payment can be viewed on the Customer Service screen’s Transaction screen.
14.3.7 Outbound Customer Extracts To Payment Agencies Batch
An outbound customer extract file can be generated and sent to multiple payment vendors like Money gram, Quick Collect, Speed Pay from Western Union, Lockbox etc. Sharing this extract enables various outlets of these payment agencies to verify account’s existence in FI and proceed with payment processing.
After receiving the payment extract file, the vendor validates customer details and sends a notification confirmation of Payment in NACHA format.
Processing
The system generates customer extract of customers from which payment is expected, everyday. This process is configured as ‘Outbound Customer Extracts To Payment Agencies Batch’ batch job which is run daily. The batch generated an extract in text format containing all Accounts relevant details.
Accounts with payment mode ACH or Lockbox can be excluded. The system facilitates setting-up options to pick up payment modes that needs to be included in extract generation.
This file is stored in a configurable shared path from which it is shared to required outlets as discussed earlier.
14.3.8 Search Tab
A Search link is available on the Advances screen to help locate information such as an account’s number, company and branch. This is information that is used on the Advance Entry and Advance Maintenance screens.
To search for an account
- On the Oracle Financial Services Lending and Leasing Application
home screen, click the Servicing > Servicing > Batch
Transaction > Payments > Search
tab.
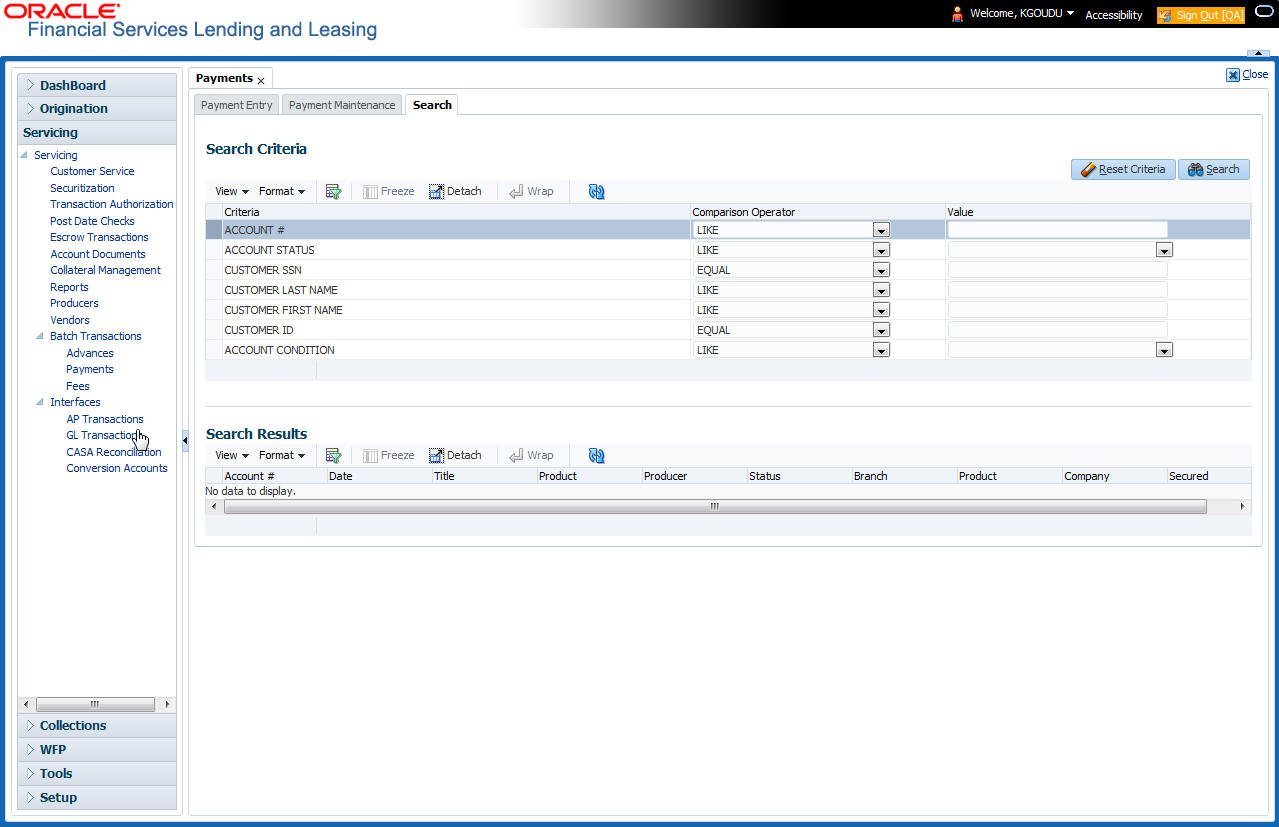
- In the Search Criteria section, use the Comparison Operator and Value columns to enter the search criteria you want to use to locate an account.
- Click Search.
System displays result of the search in Results section at the bottom of the screen. You can click Reset Criteria at any time to clear the Comparison Operator and Values columns on the Search Criteria section.
14.4 Fees
Oracle Financial Services Lending and Leasing enables you to process batch fee and expense assessments for many accounts in one screen outside the preview of automated processing.
This chapter explains how to use the Fees screen to complete the following tasks:
- Posting the batch
- Reversing the batch fees posted on multiple accounts
- Holding / Opening the posting of the current batch
14.4.1 Fees Tab
Using the Fees screen, you can enter and view a batch of fee processing. You can then post a batch, place a batch on hold, open a batch on hold, or reverse a batch.
![]()
14.4.1.1 Viewing Batches
The Fees screen enables you to view either all batches or only open batches. You can choose which batch you want to view using the View Options section. Viewing all batches enables you to locate batches with a status of open, reverse, hold, error, or posted.
To view open fee batches
- On the Oracle Financial Services Lending and Leasing Application home screen, click the Servicing > Servicing > Batch Transaction > Fees > Fee Entry tab.
- On the Fee Entry screen’s View Options section, click Open Batch Only.
In the Batch section, the system displays all batches with a status of open that have not been posted.
Details regarding the selected batch appear in the Fees section.
To view all Fees batches
- On the Oracle Financial Services Lending and Leasing Application home screen, click the Servicing > Servicing > Batch Transaction > Fees > Fee Entry.
- On the Fee Entry screen’s View Options section, click All Batches.
In the Batch section, the system displays all fee batches, regardless of status.
Details regarding the selected batch appear in the Fees section.
If a batch contains a fees with an error status, the Error Reason field displays the cause.
14.4.1.2 Entering and Posting Batches
The Fee Entry screen enables you to manually post batches of fees. A batch can consist of one or more accounts.
To enter and post a batch for a fees processing
- On the Oracle Financial Services Lending and Leasing Application home screen, click the Servicing > Servicing > Batch Transaction > Fees > Fee Entry.
- In the Fee Entry screen’s Batch section, click Add.
- In the Batch section, perform any of the Basic Operations mentioned in Navigation chapter.
A brief description of the fields is given below.
Field: |
Do this: |
Company |
Select the portfolio company. |
Branch |
Select the branch. |
Batch # |
The batch number (system generated). The batch number format is Fee-YYYY-JJJ-SSSS, where YYYY is the year, JJJ is the Julian date, and SSSS is a sequential number. The system generates a new sequence for every different date, so the first batch of each day starts with SSSS = 0001. |
Date |
Select the batch date, usually either today’s date or the date the batch was received as a whole. |
Batch Type |
Select the batch type. The system identifies each batch with a type signifying the type of payment batch it is; for example, mail, drop box, Western Union, walk in, and so on. |
Batch Status |
The status of Batch. |
Total # |
Specify total number of payments in the batch. |
Ctrl Total #* |
The total number of payments in the batch (actual).This figure must match the figure in the required Total # field before a batch can be posted. |
Total Amt |
Specify total amount of payments in the batch. |
Ctrl Total Amt* |
View the total amount of payments in the batch (actual). This figure must match the figure in the required Total Amt field before a batch can be posted. These two fields update every time you save the itemized payment entries in the Fees section. |
- Perform any of the Basic Actions mentioned in Navigation chapter.
The Fees section records itemized information of the fees batch processing. It enables you to make one payment to one account, or more than one payment to more than one account.
- In the Fees section, perform any of the Basic Operations mentioned in Navigation chapter.
A brief description of the fields is given below:
Field: |
Do this: |
Fee Date |
Select the fee effective date. This date must be less than or equal to the date recorded in the Batch section. |
Fee Amount |
Specify the fee amount. |
Status |
View the payment status. |
Txn Codes |
Select the transaction code. |
Reason |
Select the reason for the payment. |
Reference |
Specify any reference information (such as check number). |
Total Amount |
View the total amount of the batch. |
Account # |
Select the account number to which this payment applies. |
- Perform any of the Basic Actions mentioned in Navigation chapter.
System updates Ctrl Total # and Ctrl Total Amt fields in Batch section to record the contents of the Fees section.
- For each fee, use the Fee Txns section to record information about the fee received. (There might be more than one entry for the same account).
- In the Fee Txns section, perform any of the Basic Operations mentioned in Navigation chapter. Ensure that the total Amount in Fee Txns section must match the contents of Total Amt in the Fees section.
A brief description of the fields is given below:.
Field: |
Do this: |
Account # |
Select the account number. |
Title |
View the account title. |
Amount |
Specify payment amount. |
Status |
View the payment status. |
Txn Codes |
View the Transaction codes. |
Error Reason |
View the reason for error. This field will populate after you click Post if payments aren’t reconciled. |
- Perform any of the Basic Actions mentioned in Navigation chapter.
When you want to post a fee transaction on Fees Entry screen, ensure that contents of the Batch section’s display only Ctrl Total # and Ctrl Total Amt fields matches with contents of the required Total # and Total Amt fields. In the following example, batch is ready to post, as these figures match.
- In the Action section, click Post.
System changes the batch status from Open to Processing and submits batch to the job service. After the batch has been processed, The system changes the batch status to Posted or Error.
You can post only those batch with a batch status as OPEN. Also the batch totals and control totals should match before you post the batch. Else, an error message is displayed.
Note
You can post only those batch with a batch status as OPEN. Also the batch totals and control totals should match before you post the batch. Else, an error message is displayed.
14.4.1.3 Holding a Batch of Fee Processing
Only the batches with the status of Open can be put on hold.
To hold the batch of fee processing
- On the Oracle Financial Services Lending and Leasing Application home screen, click the Servicing > Servicing > Batch Transaction > Fees > Fee Entry.
- On the Fee Entry screen’s View Option section, select the batches you want to view.
- If the batch status is open, click Open Batches Only in the View Options section.
- If the batch status is Error, click All Batches
in the View Options section.
Use the Fees section to select the batch you want to hold.
- In the Action section, click Hold/Open.
The system changes the batch status from Open to Hold.
14.4.1.4 Removing a Hold on the Batch of Fee Processing
The status HOLD can be removed for the batch with status Hold.
To open (or remove hold) on the batch of fee processing
- On the Oracle Financial Services Lending and Leasing Application home screen, click the Servicing > Servicing > Batch Transaction > Fees > Fee Entry.
- On the Fee Entry screen’s View Option section, select the fees you want to view.
- Use the Fees section to select the batch you want to open.
- In the Action section, click Hold/Open.
The system changes the batch status from Hold to Open.
14.4.1.5 Reversing the batch of Fee Processing
Only the batches with a status of posted can be reversed.
To reverse the batch of fee processing
- On the Oracle Financial Services Lending and Leasing Application home screen, click the Servicing > Servicing > Batch Transaction > Fees > Fee Entry.
- On the Fee Entry screen’s View Option section, select the batches you want to view.
- Use the Fees section to select the batch you want to reverse.
- In the Action section, click Reverse.
System changes batch status from posted to Processing and submits batch to the job service. After the batch has been processed, system changes the batch status to Reversed.
14.5 Search screen
A Search screen is available on the Fees screen to help locate information such as an account’s number, customer name and company. This is information that is used on the Fees Entry screen.
To search for an account
- On the Oracle Financial Services Lending and Leasing Application home screen, click the Servicing > Servicing > Batch Transaction > Fees > Search. The Fees screen’s Search screen appears.
- In the Search Criteria section, use Comparison Operator and Value columns to enter search criteria you want to use to locate an account.
- Click Search. System displays result of the search in Results section at the bottom of the screen. You can click Reset Criteria at any time to clear the Comparison Operator and Values columns on the Search Criteria section.