4. Product
Under the Setup master tab’s drop-down link bar, the product Setup link opens screens that enable you to configure the basic business guidelines necessary to support one or more products in the system. This includes defining the types of collateral your company supports, creating lending instruments, and determining what is included in credit bureau reporting. Setting up the Products screens requires a thorough understanding of the current rules of your business and must be completed before you can use Oracle Financial Services Lending and Leasing. The Products drop-down link opens screens to record data of all the products supported by the system and contains the following links:
Navigating to Products
In the Setup > Setup > Products link enables you to setup the options related to following closed ended products your company offers:
- Asset Types
- Index Rates
- Currency Exchange
- Scoring Parameters
- Products
- Pricing
- Contract
- Edits
- Cycles
- Scoring Models
- Fees
- Origination Fees
- Insurances
- Checklists
- Stipulations
- Letters
- Promotions
This chapter explains how to setup the screens associated with each one.
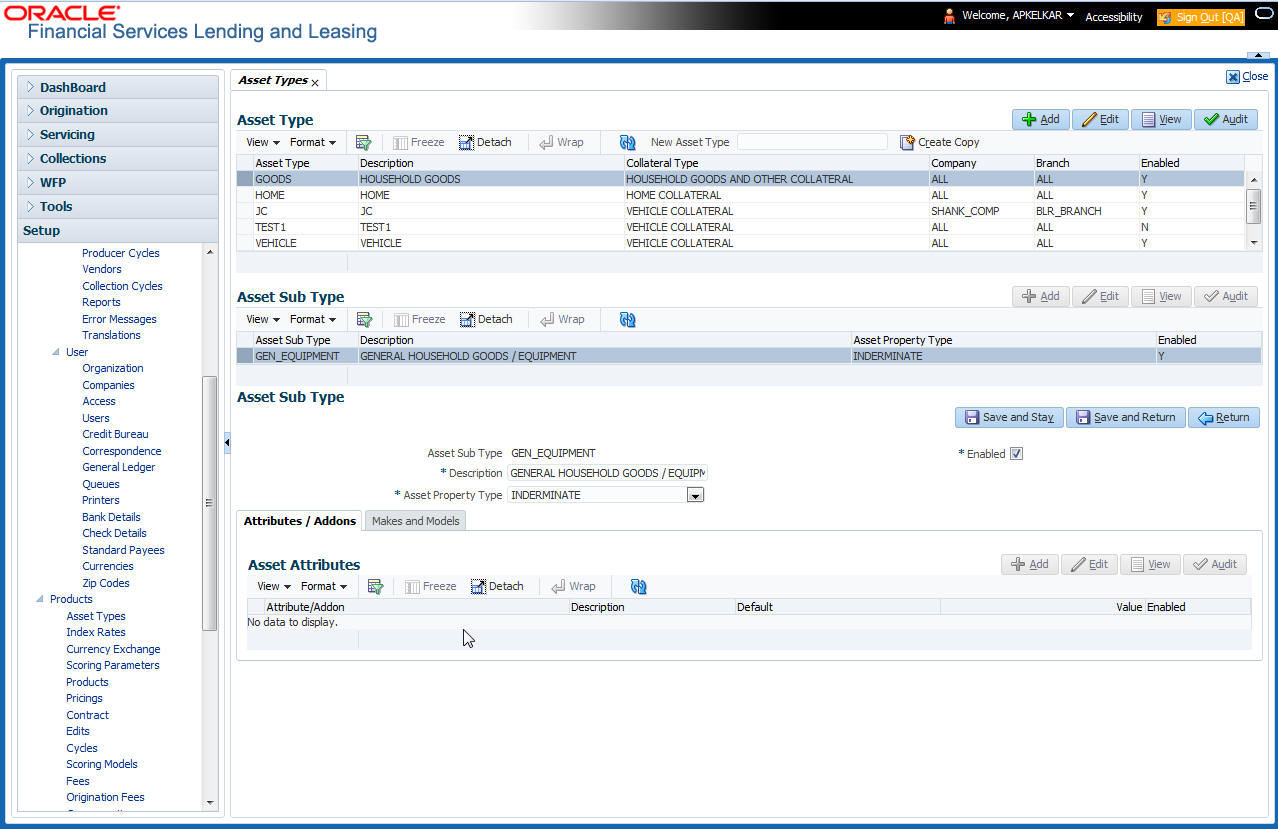
4.1 Asset Types
In Assets types you can setup the asset types that can serve as an application or account’s collateral.
The information on the Assets screen is used by the system to automatically display the appropriate collateral screen (Vehicle, Home, or Other) on the Application Entry screen.
The system recognizes the following four types of collateral:
Collateral Type |
Description |
Home collateral |
Homes, manufactured housing, or any real estate collateral. |
Vehicle collateral |
All vehicle types, such as cars, trucks, and motorcycles. |
Household goods and other collateral |
All other collateral types not defined as home, vehicle, or unsecured; for example, household items such as water heaters, televisions, and vacuums. |
Unsecured collateral |
All unsecured lending instruments. (This collateral type makes the collateral tabs on the system forms unavailable.) |
The Asset Sub Type section allows you to further categorize an asset; for example, the asset type vehicle might be categorized as car, truck, or van.
The Attributes/Addons and Makes and Models sub screens continue to further detail the asset both in description and value. For example, a vehicle asset might include addons such as leather seats and cruise control.
Note
Neither asset types nor asset sub types can be deleted. As they may have been used in the past, the display and processing of that data is still dependent on the existing setup.
To set up the Asset Types
You can either define new Asset Type or specify a new name in the New Asset Type field and click Create Copy to create a copy of selected asset with details.
- Click Setup > Setup > Products > Asset Types.
- In the Asset Type section, perform any of the Basic Operations mentioned in Navigation chapter.
A brief description of the fields is given below:
Field: |
Do this: |
Asset Type |
Specify the asset type. |
Description |
Specify the description for the asset. (This is the asset type which will appear throughout the system). |
Collateral Type |
Select the collateral type (the general category that the asset type falls within) from the drop-down list. Note: There is no need to define an asset for UNSECURED COLLATERAL, as by definition there is no asset on such account. |
Company |
Select the portfolio company to which the asset type belongs, from the drop-down list. These are the companies within your organization that can make Lines using this asset type. This may be ALL or a specific company. |
Branch |
Select the portfolio branch to which the asset type belongs, from the drop-down list. This is the branch within the selected company that can make Lines using this asset type. This may be ALL or a specific branch. This must be ALL if in the Company field you selected ALL. IMPORTANT: By selecting which asset type to use, the system searches for a best match using the following attributes: 1 Company 2 Branch Hence, the system recommends creating one version of each asset type where ALL is the value in these fields. |
Enabled |
Check this box to enable the asset type and indicate that the asset type is currently in use. |
- Perform any of the Basic Actions mentioned in Navigation chapter.
- In the Asset Sub Type section, perform any of the Basic Operations mentioned in Navigation chapter.
A brief description of the fields is given below:
Field: |
Do this: |
Asset Sub Type |
Specify the asset sub type. |
Description |
Specify the description for the asset subtype |
Asset Property Type |
Select the type of property from the drop-down list. |
Enabled |
Check this box to enable the asset sub type. |
- Perform any of the Basic Actions mentioned in Navigation chapter.
- Click Setup > Setup > Products > Assets > Attributes/Addons.
- In the Attributes/Addons section, perform any of the Basic Operations mentioned in Navigation chapter.
A brief description of the fields is given below:
Field: |
Do this: |
Attribute/Addon |
Displays the asset attribute or addon name for the selected asset). |
Description |
Select the description for the asset attribute/addon from the drop-down list. |
Default |
Specify the default text to be copied or displayed when the asset attributes and addons fields are completed on an application for this asset. |
Value |
Specify the default monetary value to be copied or displayed when the asset attributes and addons fields are completed on an application for this asset. |
Enabled |
Check this box to enable the asset attribute/Addon and indicate that it is available for this type of asset. |
- Perform any of the Basic Actions mentioned in Navigation chapter.
- Click the Setup > Setup > Products > Assets > Makes and Models.
- In the Makes and Models section, perform any of the Basic Operations mentioned in Navigation chapter.
A brief description of the fields is given below:
Field: |
Do this: |
Make |
Specify asset make. |
Model |
Specify asset model. |
Style |
Specify asset style type. |
Model Year |
Specify asset model year. |
Enabled |
Check this box to enable the asset make and model and indicate that it is included on fields for this asset type. |
- Perform any of the Basic Actions mentioned in Navigation chapter.
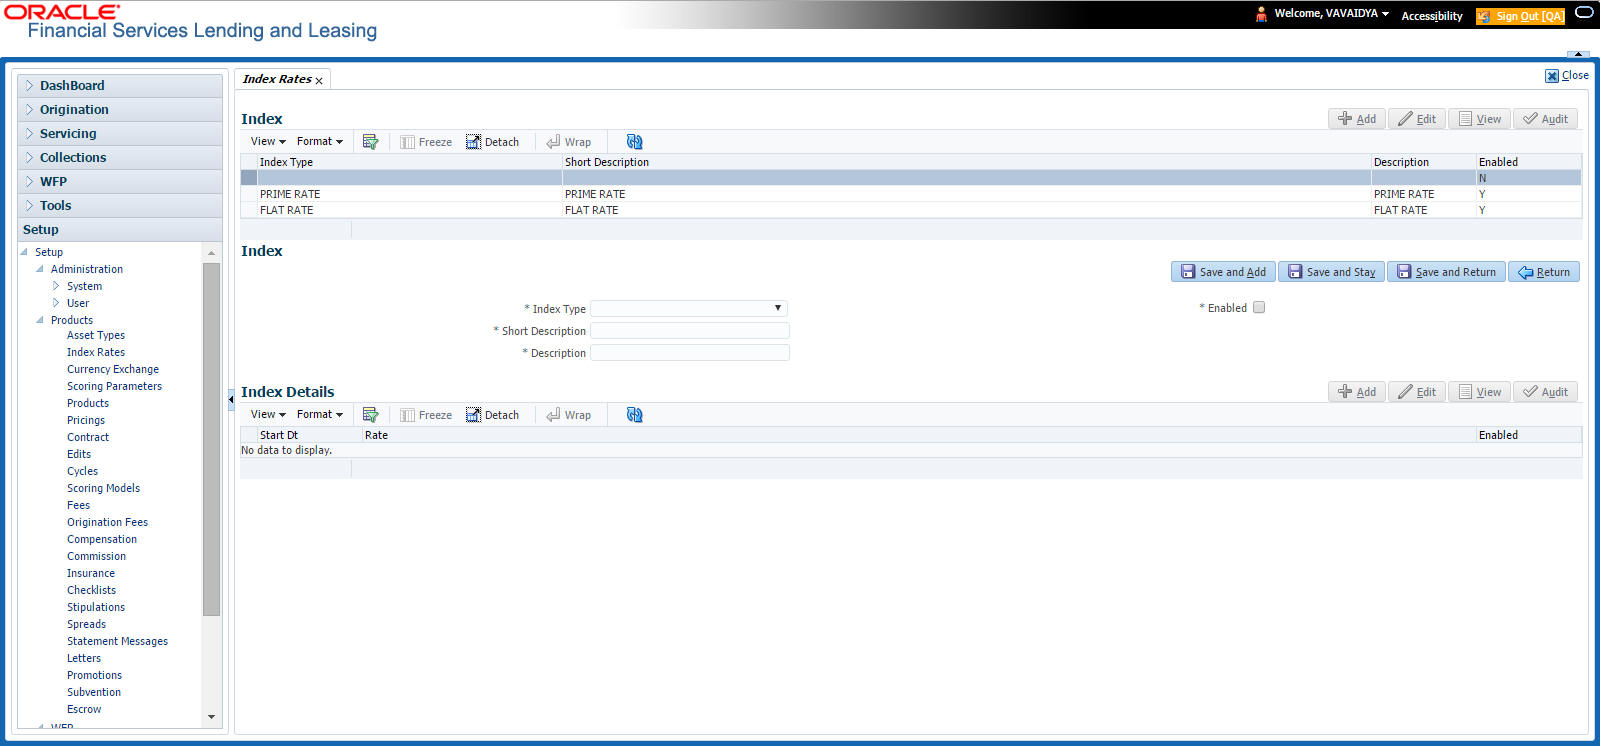
4.2 Index Rates
The Index Rates screen maintains your organization’s history of periodic changes in index rates. It allows you to define index rates to support variable rate lines of credit. The index rate provides the base rate for a credit line where:
interest rate = index rate + margin rate.
The Index section displays the currently defined indexes on the Lookups screen. You may create additional user-defined lookup codes for this lookup type as needed.
Note
You cannot tie an index rate to a product rate.
You can also record any index rate change on the Index Rates screen. During nightly batch processing, all the accounts with that index type are included when posting the RATE CHANGE transaction. After the system processes the batch, the interest rate of the account is changed. The system will use this new interest rate when computing all future interest calculations.
To set up Index Rates
- Click Setup > Setup > Products > Index Rates.
- In the Index section, perform any of the Basic Operations mentioned in Navigation chapter.:
- A brief description of the fields is given below:
Field:
Do this:
Index Type
Select the type of index from the drop-down list.
Short Description
Specify a short description of the index.
Description
Specify the index description.
Enabled
Check this box to activate the index type.
- Perform any of the Basic Actions mentioned in Navigation chapter.
The Index Details section allows you to define multiple index values using the Start Dt and Rate fields.
Note
The history appears in descending order, with the most current record at the top.
- In the Index Details section, perform any of the Basic Operations mentioned in Navigation chapter.
A brief description of the fields is given below:
Field: |
Do this: |
Start Dt |
Specify the effective start date for the index rate. You can even select the date from the adjoining Calendar icon. |
Rate |
Specify the new index rate effective from above mentioned date as a percentage. Note: For the FLAT RATE index there should be only one entry with a Start Dt. = 01/01/1900 and a RATE = 0.0000. |
Enabled |
Check this box to activate the index rate effective from start date mentioned above. |
- Perform any of the Basic Actions mentioned in Navigation chapter.
Note
Variable rate functionality is not extended to pre-compute accounts.
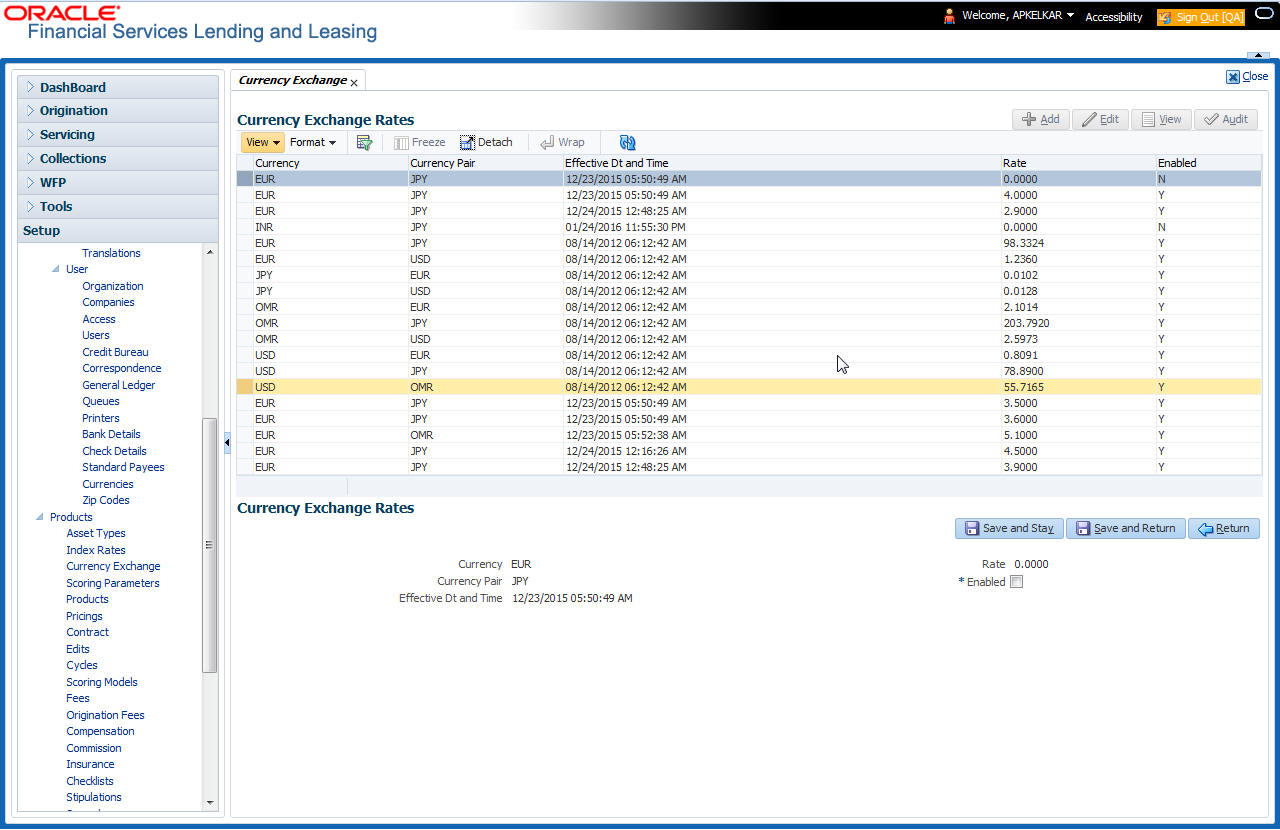
4.3 Currency Exchange
The Currency Exchange screen maintains currency exchange rates. You can define the currency exchange details and schedule a batch job (SET-IFP- ICEPRC_BJ_100_01 - CURRENCY EXCHANGE RATE FILE UPLOAD) which in-turn pulls the currency exchange rates from desired source at scheduled intervals through input file processing.
To set up the Currency Exchange
- Click Setup > Setup > Products > Currency Exchange.
- In the Currency Exchange Rates section, perform any of the Basic Operations mentioned in Navigation chapter.
A brief description of the fields is given below:
Field: |
Do this: |
Currency |
Select the currency being exchanged from the drop-down list. |
Currency Pair |
Select the currency to be paired with from the drop-down list. |
Effective Date and Time |
Specify date and time of the exchange rate. You can even select the date from the adjoining Calendar icon. |
Rate |
Specify the exchange rate (required). |
Enabled |
Check this box to activate the currency exchange rate. |
- Perform any of the Basic Actions mentioned in Navigation chapter.
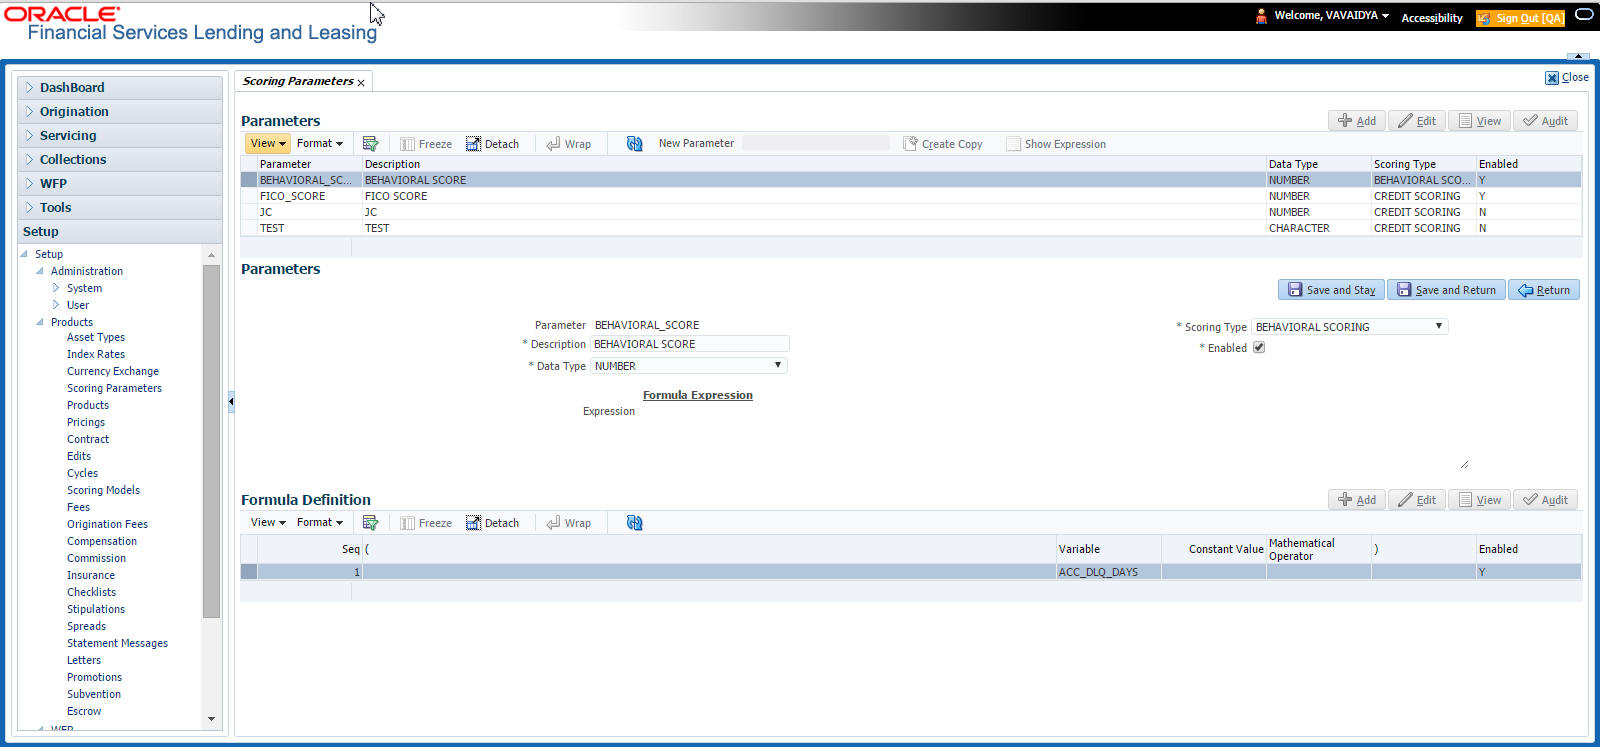
4.4 Scoring Parameters
With the Scoring Parameters, you can define the scoring parameters of a company’s credit scorecard and behavioral scoring.
While the system’s pricing scores apply to applications and are based on information recorded during origination, behavioral scoring applies to accounts and is based on account history attributes and performed on a monthly basis.
Behavioral scoring
Behavioral scoring examines the repayment trends during the life of the account and provides a current analysis of the customer. This logical and systematic method identifies which accounts are more likely to perform favorably versus accounts where poorer performance is probable. This is useful when determining which other Lines of credit/loan products a customer may qualify for. Behavioral scoring applies to all the three products: loans, lines of credit and leases.
This information appears on the Customer Service form in the Account Details screen’s Activities section.
Credit Scoring
Parameters define the factors that can be used when scoring an application during underwriting and generating an initial decision on whether you wish to fund an amount. The combination of the flexible definition of these parameters, along with the scoring set up on the Scoring Models screen, allows you to automate much of the initial decision process in underwriting accounts.
The Formula Definition section on the Scoring Parameters screen allows you to build a mathematical expression to express the scoring parameter, test its validity, and locate specific information with the resulting scoring parameters. The system calculates scoring parameters using application data, credit bureau information, and applicant details.
To set up the Scoring Parameters
You can either define new Scoring Parameters or specify a new name in the New Parameter field and click Create Copy to create a copy of selected parameter with details.
- Click Setup > Setup > Products > Scoring Parameters.
- In the Parameters section, perform any of the Basic Operations mentioned in Navigation chapter.
A brief description of the fields is given below:
Field: |
Do this: |
Parameter |
Specify the name of the scoring parameter. The system recommends entering a name that in some way reflects how the parameter is used; for example, use FICO_SCORE instead of PARAMETER_1. |
Description |
Specify a description of the parameter. Again, Specify a name that reflects how the parameter is used; for example, use FICO SCORE and WEIGHTED FICO SCORE instead of FICO SCORE NUMBER 1 and FICO SCORE NUMBER 2. |
Data Type |
Select the data type of the scoring parameter being defined from the drop-down list. This determines how the system handles the values. (While DATE and CHARACTER are available data types, generally only NUMBER should be used when defining a scoring parameter. |
Scoring Type |
Select the scoring type from the drop-down list: credit scoring or behavioral scoring. |
Enabled |
Check this box to enable and indicate that the scoring parameter is available. |
- Perform any of the Basic Actions mentioned in Navigation chapter.
The Formula Definition section allows you to define a mathematical expression of the scoring parameter you want to define. The expression may consist of one or more sequenced entries. All arithmetic rules apply to the formula definition. If errors exist in the formula definition, the system displays an error message in this section when you choose Show Expression.
- In the Formula Definition section, perform any of the Basic Operations mentioned in Navigation chapter.
A brief description of the fields is given below:
Field: |
Do this: |
Seq |
Specify the sequence number (the order in which the formula definition variable will be assembled and evaluated). |
( |
Specify a left bracket, if you need to group part of your formula definition. |
Variable |
Select the variable from a validated field based on the user-defined table SCR_CRED_SUMMARY: SCORING PARAMETERS, from the drop-down list. |
Constant Value |
Specify the constant value (optional). |
Mathematical Operator |
Select the math operator to be used on the adjacent formula definition rows, from the drop-down list. |
) |
Specify a right bracket, if you are grouping part of your formula definition. |
Enabled |
Check this box to enable the formula and indicate that it is included when building a definition for the scoring parameter. |
- Perform any of the Basic Actions mentioned in Navigation chapter.
- In the Parameters section, click Show Expression.
The mathematical expression appears in the Formula Expression section (in sequential order) in the Expression field.
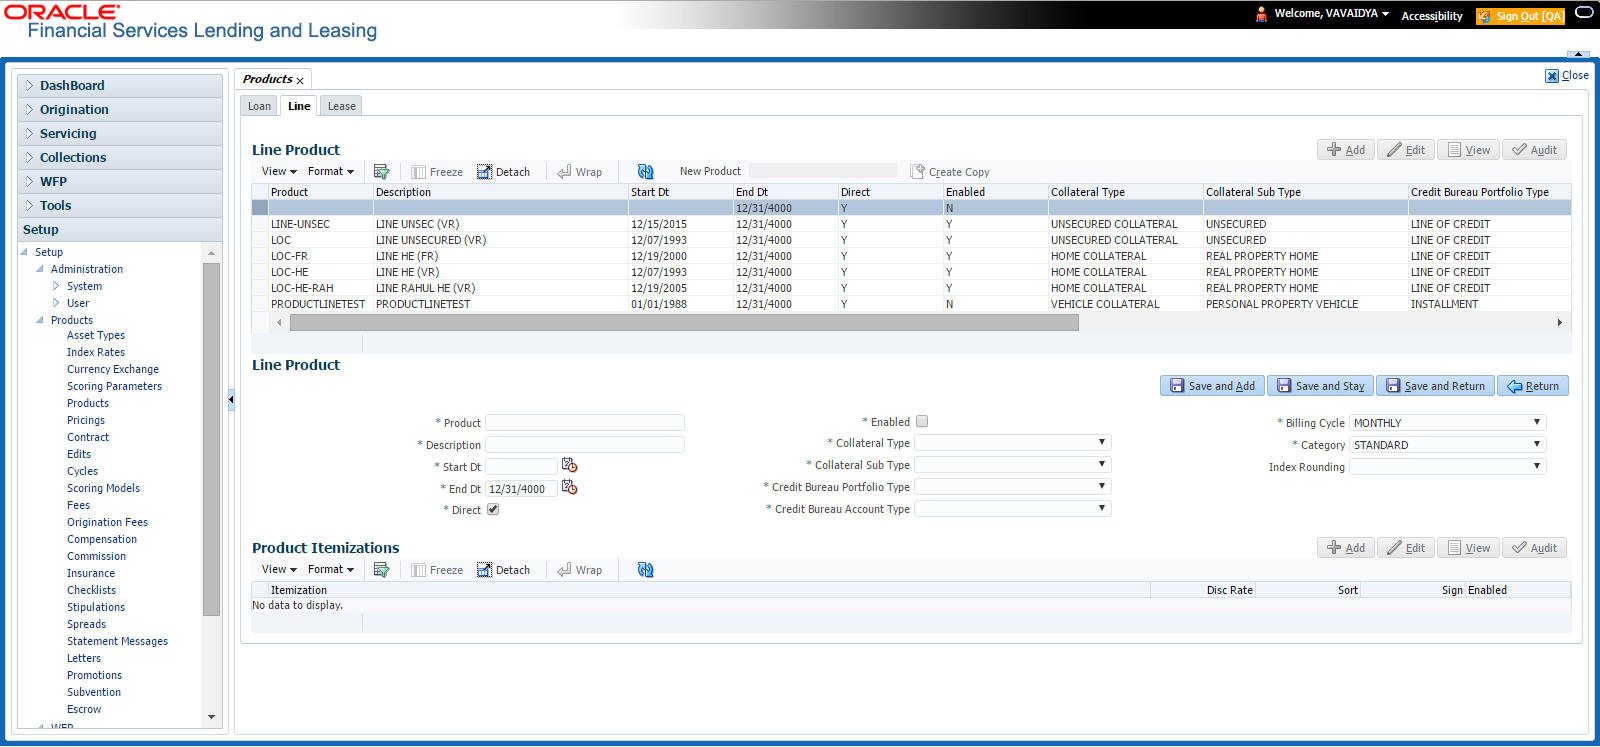
4.5 Products
The Product screen defines the closed ended products your organization offers. This screen is enhanced to support Islamic along with the conventional.
A product is based on the following attributes:
- The collateral type and sub type
- The billing cycle
- Whether the amount is paid directly or indirectly to the customer
The Product Definition section records details about the product, such as the description, collateral type and sub type, credit bureau reporting attributes, and billing cycle.
The Product Itemization section is used to define itemized entries for a product. This information is used on the Itemization sub screens of the Application Entry and Application screens.
To set up the Product
You can either define new Product details or specify a new product code in the New Product field and click Create Copy to create a copy of selected product with details.
- On the Oracle Financial Services Lending and Leasing home screen, Setup > Setup > Administration > User > Products > Products > Line.
- In the Product Definition section, perform any of the Basic Operations mentioned in Navigation chapter.
A brief description of the fields is given below:
Field: |
Do this: |
Product |
Specify the product code as defined by your organization (in other words, how you want to differentiate the products). For example, products can be differentiated according to asset. The product code, or name, is unique. |
Description |
Specify the description of the product. (This is the product description as it appears throughout the system). |
Start Dt |
Specify the start date for the product. You can even select the date from the adjoining Calendar icon. |
End Dt |
Specify the end date for the product. You can even select the date from the adjoining Calendar icon. |
Direct |
Check this box, if you need the product to be originated directly to customer. (In this case, the compliance state is the state listed in the customer’s current mailing address.) If unchecked, the product is an indirect lending product; that is, payment is made to the producer. (In this case, the compliance state is the state listed in the producer’s address.) |
Enabled |
Check this box to activate the product. Note: You can check this box only when Rate adjustment schedule is maintained, i.e., All the products should be variable rate products |
Collateral Type |
Select the collateral type for the product, from the drop-down list. This field identifies what type of collateral is associated with the and assists the system in identifying the correct screen(s) to display. |
Collateral Sub Type |
Select the collateral sub type for the product, from the drop-down list. |
Credit Bureau Portfolio Type* |
Select the credit bureau portfolio type for the product, from the drop-down list. |
Credit Bureau Account Type* |
Select the account type for the product, from the drop-down list. *Note: The Credit Bureau Portfolio Type and Credit Bureau Account Type fields determine how the portfolio is reported back to the credit bureaus. |
Billing Cycle |
Select the billing cycle for the product, from the drop-down list. |
Category |
Select the category as Standard for the conventional product and Islamic for the Islamic product, from the drop-down list. This serves to group products for reporting purposes. |
Index Rounding |
Select the index rate rounding factor for the product, from the drop-down list. Note: For more information, refer Appendix C: Rounding Amounts and Rate Attributes. |
- Perform any of the Basic Actions mentioned in Navigation chapter.
4.5.1 Product Itemizations
- Click Setup > Setup > Administration > User > Products > Products > Line > Product Itemizations.
- In the Product Itemization sub screen, perform any of the Basic Operations mentioned in Navigation chapter.
A brief description of the fields is given below:
Field: |
Do this: |
Itemization |
Select the itemization type for the product selected in product definition section, from the drop-down list. |
Discount Rate |
Specify the discount rate. |
Sort |
Specify the sort order. |
Sign |
Select +ve for a positive number and -ve for a negative number. Note: The +ve and -ve buttons determine whether the values will increase or decrease the itemization total for the product based on the selected product. Together the contents of the Product Itemization sub screen, positive and negative, add up to the amount. |
Enabled |
Check this box to indicate that this product itemization is currently available. |
- Perform any of the Basic Actions mentioned in Navigation chapter.
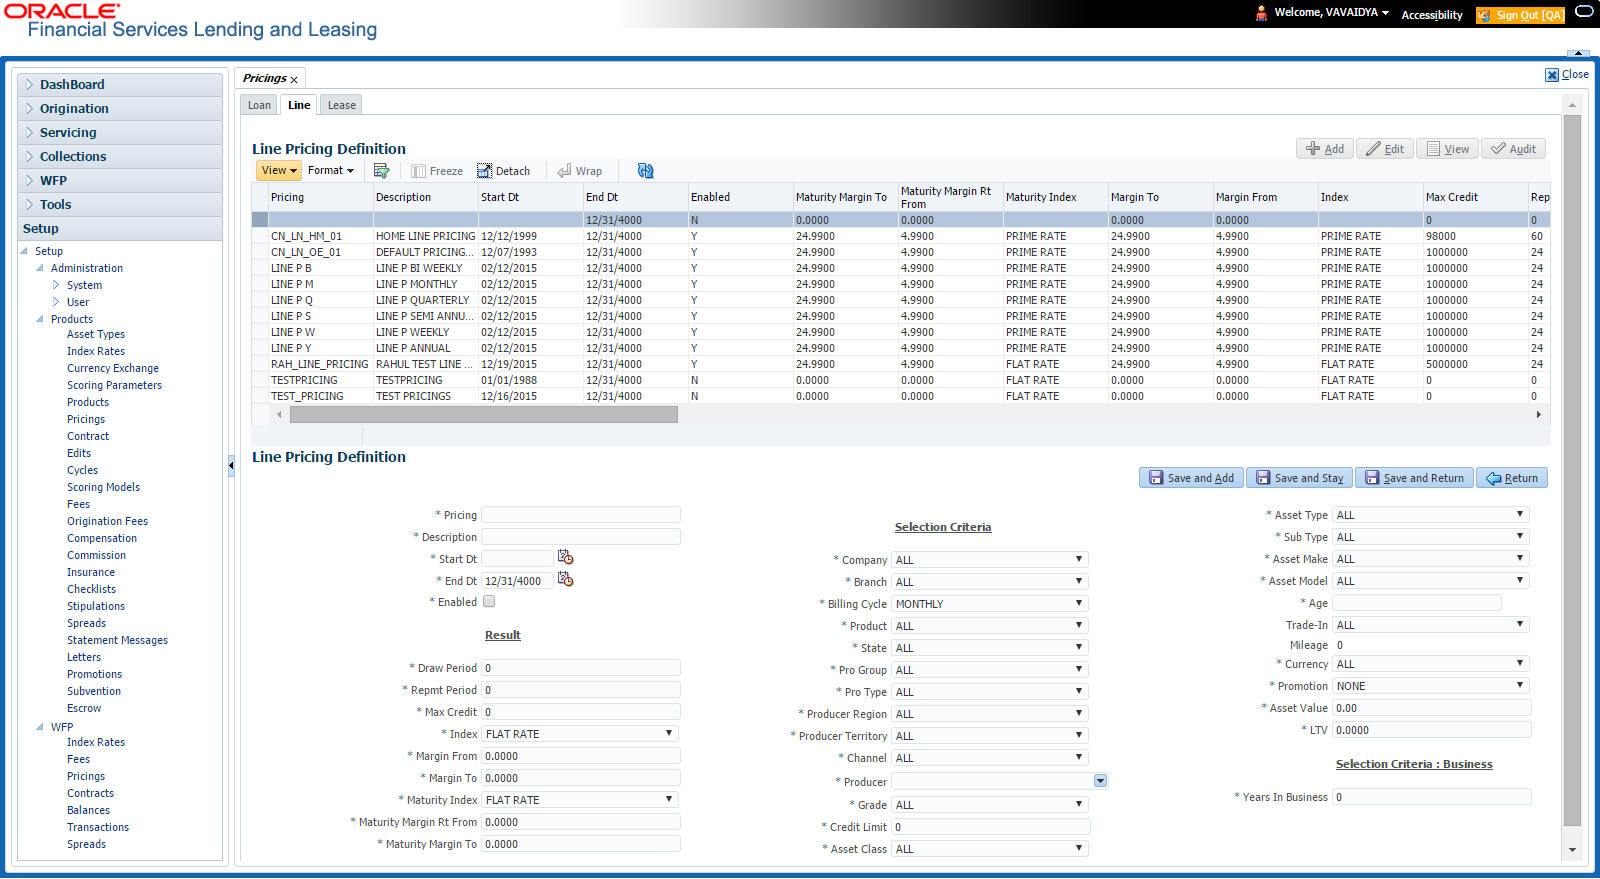
4.6 Pricing
The Pricing screen records pricing information related to your products. the system uses the information in the Pricing Definition section to identify the correct pricing for an application, depending upon the product and the specific application parameters. the system will always search for a unique match.
When you choose the Select Pricing while making a decision on the Underwriting window, the system displays the best match and completes the Pricing and Approved sections under Summary subtab. The information in the Approved section cite the minimum amounts for the loan, though the user can edit these figures.
The system determines the best match by looking at all enabled pricing strings on the Pricing screen that meet the following criteria:
- Exactly match the application values for the Promotion and Billing Cycle fields.
- Are less than or equal to the application values for the Term, Amount, Age, and Start Date fields.
- Match either the application value or ALL for all other criteria.
Exact matches for each field are given a higher weight than matches of ALL. The returned rows are then ranked based on the weighted values and the hierarchical position of the field (see above). They are then ranked by start date. The system recognizes the first row returned as the best match.
Note
- You should set up a default pricing for each billing cycle and pricing that the system can select to ensure error-free performance. Oracle Financial Services Software recommends creating a single version of each edit type, where ALL is the value in the selection criteria fields listed above. If the system cannot find a pricing match, it will display an error message.
- The system supports the bulk uploading of product pricing setup data. This allows you to upload multiple setup data, avoid re-entering setup data, and more importantly, reduce data entry mistakes. The system currently supports uploading using a fixed-length format only, where each data is at a pre-fixed position. You can run batch jobs with the Set Code SET-BLK to upload pricing and GL data.
To set up the Pricing
- On the Oracle Financial Services Lending and Leasing home screen, click Setup > Setup > Administration > User > Products > Pricings > Line.
- In the Pricing Definition section, perform any of the Basic Operations mentioned in Navigation chapter
A brief description of the fields is given below:
Field: |
Do this: |
Pricing* |
Specify the code for the pricing. |
Description* |
Specify the description for the pricing. |
* Together these two fields define the name of the pricing. |
|
Start Dt |
Specify the start date for this pricing. You can even select the date from the adjoining Calendar icon. |
End Dt |
Specify the end date for this pricing. You can even select the date from the adjoining Calendar icon. |
Enabled |
Check this box to enable the pricing. |
Result section |
|
Draw Period |
Specify the draw term for which this pricing is valid. |
Repmt Period |
Specify the repayment term for which this pricing is valid |
Max Credit |
Specify the maximum credit Limit for this pricing. |
Index |
Select the index type associated as FLAT/PRIME RATE from the drop-down list. |
Margin From |
Specify the minimum margin rate for the selected index type. |
Margin To |
Specify the maximum margin rate for the selected index type. |
Maturity Index |
Select the maturity index type associated as FLAT/PRIME RATE from the drop-down list. |
Maturity Margin Rt From |
Specify the minimum margin rate for the selected maturity index type. |
Maturity Margin To |
Specify the maximum margin rate for the selected maturity index type. |
Selection Criteria |
|
Company |
Select the portfolio company for this pricing, from the drop-down list. This may be ALL or a specific company. |
Branch |
Select the portfolio branch for this pricing. This may be ALL or a specific branch. (This must be ALL if in the Company field you selected ALL), from the drop-down list. |
Billing Cycle |
Select the billing cycle for this pricing, from the drop-down list. |
Product |
Select the product for this pricing, from the drop-down list. This may be ALL or a specific product. The available values come from a validated field based on the selected billing cycle and the product setup. |
State |
Select the state for this pricing, from the drop-down list. This may be ALL or a specific state. |
Pro Group |
Select the producer group for this pricing, from the drop-down list. This may be ALL or a specific producer group. |
Pro Type |
Select the producer type for this pricing, , from the drop-down list. This may be ALL or a specific producer type. |
Producer Region |
Select the region of the producer. |
Producer Territory |
Select the territory of the producer. |
Producer |
Select the producer from the drop-down list. This may be ALL or a specific producer. The available values come from a validated field based on the product group and product type. |
Grade |
Select the credit grade for this pricing, from the drop-down list. This may be ALL or a specific grade. |
Credit Limit |
Specify the minimum credit limit for which this pricing is valid. |
Asset Class |
Select the asset class from the drop-down list. This may be ALL or a specific asset class. The available values come from a validated field based on the collateral type. You may create additional user-defined lookup codes for these lookup types as needed. |
Asset Type |
Select the asset type from the drop-down list. This may be ALL or a specific asset type. The available values come from a validated field based your assets setup. |
SubType |
Select the asset sub type from the drop-down list. This may be ALL or a specific asset sub type. The available values come from a validated field based your assets setup, and is linked to the selected asset type. |
Asset Make |
Select the asset make from the drop-down list. The available values come from a validated field based your assets setup and is restricted based on the selected Asset Type and Asset Sub Type. For example, If ALL was selected for either Asset Type or Asset Sub Type, then ALL will be the only available selection for the asset make. |
Asset Model |
Select the asset model from the drop-down list. The available values come from a validated field based your assets setup, and is restricted based on the selected Asset Type and Asset Sub Type. If ALL was selected for either Asset Type or Asset Sub Type, then ALL will be the only available selection for the asset model. |
Age |
Specify the asset age (the minimum age for the selected pricing). Note: If your entry in this field is based on the number of years of age of the asset and not the actual year of make, you must update this entry annually to ensure that the proper pricing is available. |
Trade-In |
Specify if there is a trade in of an asset by selecting Yes/No. |
Mileage |
If there is a Trade-In of an existing asset, then specify its mileage in km. |
Currency |
Select the currency for this pricing, from the drop-down list. |
Promotion |
Select the promotion applicable to this pricing from the drop-down list. The available values come from a validated field based on the promotions setup. |
Asset Value |
Specify the asset value. |
LTV |
Specify the loan to value ratio. |
Selection Criteria : Business - allows you to indicate the age of business by evaluating the total number of years elapsed. |
|
Years In Business |
Specify the total number of years in business. |
- Perform any of the Basic Actions mentioned in Navigation chapter.
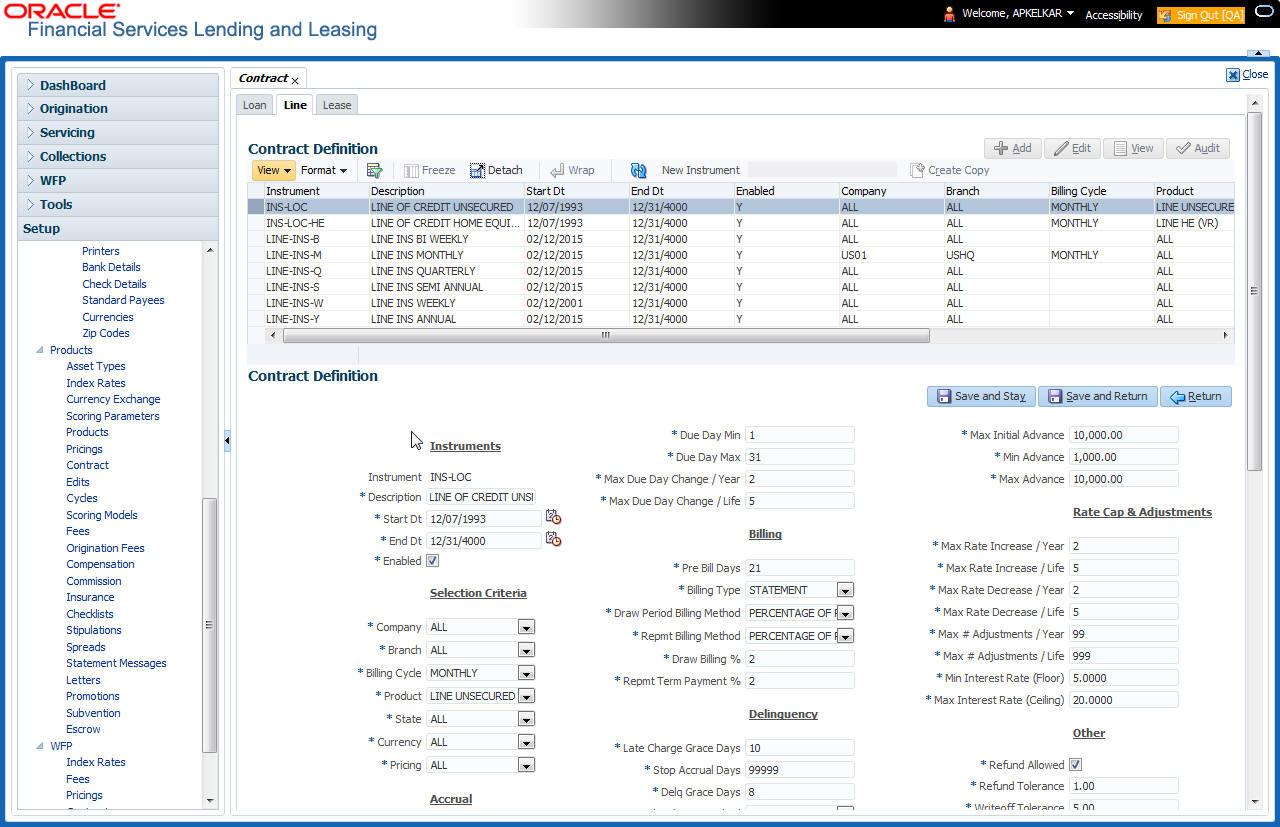
4.7 Contract
The Contract screen allows you to define the instruments used within your system. A instrument is a contract used by a financial organization with specific rules tied to it. When processing an application, an instrument associated with the application informs the system of the type of contract being used for the approved loan. This ensures that all parameters tied to the instrument are setup for the account as it is booked - without requiring you to do it.
Instruments can be setup at different levels:
- Company
- Branch
- Product
- Application state
- Currency
The following groups of parameters are setup at the instrument level (Each has its own section on the Contract screen):
- Accrual
- Rebate
- Scheduled dues
- Billing
- Delinquency
- Extension
- Advance details
- Rate cap and adjustments
- Payment caps
- Other
Items defined in the contract are “locked in” when you choose Select Instrument on the Funding form’s Contract link.
The Contract screen’s Instrument and Description fields allow you to enter the financial instrument’s name and description, for example; INS-LOAN: VEHICLE.
To set up the Contract
You can either define new Contract Definition details or specify a new name in the New Instrument field and click Create Copy to create a copy of selected contract with details.
- On the Oracle Financial Services Lending and Leasing home screen, click Setup > Setup > Administration > Products > Contract > Line
- On the Contract Definition section, perform any of the Basic Operations mentioned in Navigation chapter.
A brief description of the fields is given below:
Field: |
Do this: |
Contract Definition section |
|
Instrument |
Specify the code identifying the instrument. |
Description |
Specify the description of the instrument being defined. |
Start Dt |
Specify the start date for the instrument. You can even select the date from the adjoining Calendar icon. |
End Dt |
Specify the end date for the instrument. You can even select the date from the adjoining Calendar icon |
Enabled |
If you check this box, the system will consider this contract definition when selecting a instrument for an application. Note: Once the field is enabled load balances button in balances sub tab will be disabled |
Selection Criteria section |
|
Company |
Select the company for the instrument from the drop-down list. This may be ALL or a specific company. |
Branch |
Select the branch within the company for the instrument from the drop-down list. This may be ALL or a specific branch. This must be ALL, if you have selected ‘ALL’ in the Company field. |
Billing Cycle |
Select the billing cycle selected from the drop-down list. |
Product |
Select the product for the instrument from the drop-down list. This may be ALL or a specific product. |
State |
Select the state in which the instrument is used from the drop-down list. This may be ALL or a specific state. |
Currency |
Select the currency for the instrument from the drop-down list. IMPORTANT: By selecting which type to use, the system searches for a best match using the following attributes: 1. Billing Cycle 2. Start Date 3. Company 4. Branch 5. Product 6. State Hence, Oracle Financial Services Software recommends creating one version of each type, where ALL is the value in these fields. |
Pricing |
Select the pricing in which the instrument is used from the drop-down list. This may be ALL or a specific pricing. |
Accrual section |
|
Accrual Post Maturity |
Check this box to indicate that this is the post maturity default rate. Extensions allow you to extend the maturity of the contract by one or more terms by allowing the customer to skip one or more payments. The skipped terms are added to the end of the contract. |
Accrual Method |
Select the accrual method used to calculate interest accrual for this instrument from the drop-down list. |
Start Dt Basis |
Select to define the start date from when the interest accrual is to be calculated for this instrument from the drop-down list. Note: If you select the Effective Date, then the interest is calculated from the Contract date. If you select the Payment Date, then the interest is calculated based on (first payment date minus one billing cycle). |
Base Method |
Select the base method used to calculate interest accrual for this instrument from the drop-down list. |
Accrual Start Days |
Specify the number of days for which the interest accrual is to be calculated. |
Int Amortization Freq |
Select the interest amortization frequency from the drop-down list. |
Scheduled Dues section |
|
Max Due Day Change Days |
Specify the maximum number of days a due date can be moved. |
Due Day Min |
Specify the minimum value allowed for the due day for this instrument. |
Due Day Max |
Specify the maximum value allowed for the due day for this instrument. Note: If billing cycle is selected as weekly, then Due Day Max field value cannot be greater than 7. |
Max Due Day Change / Year |
Specify the maximum number of due day changes allowed within a given year for this instrument. |
Max Due Day Change / Life |
Specify the maximum number of due day changes allowed over the life of a product funded with this instrument. |
Billing section |
|
Pre Bill Days |
Specify the prebill days. This is the number of days, before the first payment due, that accounts funded with this instrument will be billed for the first payment. Thereafter, the accounts will be billed on the same day every month. If an account has a first payment date of 10/25/2003 and Pre Bill Days is 21, then the account will bill on 10/04/2003, and then bill on the 4th of every month. |
Billing Type |
Select the billing type for accounts funded using this instrument from the drop-down list. |
Draw Period Billing Method Billing Method |
Select the draw period billing method for accounts funded using this instrument from the drop-down list. |
Repmt Billing Method |
Select the billing method for the repayment period from the drop-down list. |
Draw Billing % |
Enter the payment percentage for the draw period. |
Repmt Term Payment % |
Enter the payment percentage for the repayment draw period. |
Delinquency section |
|
Late Charge Grace Days |
Specify the number of grace days allowed for the payment of a due date before a late charge is assessed on the account. |
Stop Accrual Days |
Specify the number of days a contract can be in delinquent state, after which the interest accrual must stop for an account. A Batch Job is run daily to select accounts in delinquent status for a pre-defined number of days and post ‘No Accrual transaction’ for such accounts on current date. When the account recovers from Delinquency, the system will then post a ‘Start Accrual Transaction’ on the date the account is recovered from delinquency. |
Delq Grace Days |
Specify the number of grace days allowed for the payment of a due date before an account is considered delinquent. This affects DELQ Queues, the system reporting, and the generation of collection letters. |
Time Bar Years |
Specify the total number of years allowed to contact the customer starting from the first payment date and beyond which the account is considered delinquent. You can specify any value between 0-999. |
Delq Category Method |
Select the delinquency category method to determine how the system populates delinquency counters on the Customer Service form. Note: This value does not affect credit bureau reporting. |
Extension section |
|
Max Extn Period / Year |
Specify the maximum number of terms that the contract may be extended, within a given rolling calendar year. |
Max Extn Period / Life |
Specify the maximum number of terms that the contract may be extended, within the life of the loan. |
Max # Extn / Year |
Specify the maximum number of extensions that may be granted within a given rolling calendar year. |
Max # of Extn / Life |
Specify the maximum number of extensions that may be granted within the life of the loan. |
Minimum # Payments |
Specify the minimum number of payments that must be made before extension. |
Extension Gap in Months |
Specify the gap between previous extension provided in the account and current one as specific number of months. |
Advance Details section |
|
Min Initial Advance |
Specify the minimum initial advance amount allowed. This is the smallest possible initial advance that can be disbursed to the borrower after funding. |
Max Initial Advance |
Specify the maximum initial advance amount allowed. This is the largest possible initial advance that can be disbursed to the borrower after funding. |
Min Advance |
Specify the minimum advance amount. This is the smallest advance amount that a borrower may subsequently request after the initial advance. |
Max Advance |
Specify the maximum advance amount. This is the largest advance amount that a borrower may subsequently request after the initial advance. |
Rate Cap & Adjustments section |
|
Max Rate Increase / Year |
Specify the maximum rate increase allowed in a year. |
Max Rate Increase / Life |
Specify the maximum rate increase allowed in the life of the loan. |
Max Rate Decrease / Year |
Specify the maximum rate decrease allowed in a year. |
Max Rate Decrease / Life |
Specify the maximum rate decrease allowed during the life of the loan. |
Max # Adjustments / Year |
Specify the maximum number of rate changes allowed in a year. |
Max # Adjustments / Life |
Specify the maximum number of rate changes allowed during the life of the loan. |
Min Interest Rate (Floor) |
Specify the minimum rate. |
Max Interest Rate (Ceiling) |
Specify the maximum rate. |
Other section |
|
Refund Allowed |
Check this box to indicate that refunding of customer over payments are allowed. |
Refund Tolerance |
Specify the refund tolerance amount. If the amount owed to the customer is greater than the refund tolerance, the over payment amount will be refunded if Refund Allowed box is selected. |
WriteOff Tolerance Amt |
Specify the write off tolerance amount. If the remaining outstanding receivables for accounts funded using this instrument is less or equal to the write off tolerance amount, the remaining balance on the account will be waived. |
Pmt Tolerance Amt* |
Specify the payment tolerance amount. This is the threshold amount that must be achieved before a due amount is considered PAID or delinquent. If (Payment Received + Pmt Tolerance: $Value) >= Standard Monthly Payment, the Due Date will be considered as satisfied in terms of delinquency. The amount unpaid is still owed. |
Pmt Tolerance%* |
Specify the payment tolerance percentage. This is the threshold percentage that must be achieved before a due amount is considered PAID or delinquent. If Payment Received >= (Standard Monthly Payment * Pmt Tolerance% / 100), the due date will be considered satisfied in terms of delinquency. The amount unpaid is still owed. The system uses the greater of these two values. |
Promise Tolerance Amt* |
Specify the promise tolerance amount. This is the threshold amount that must be achieved before a due amount is considered kept or Broken. If (Payment Received + Promise Tolerance: $Value) >= Promise Amount, the Due Date will be considered kept (satisfied). |
Promise Tolerance %* |
Specify the promise tolerance percentage. This is the threshold percentage that must be achieved before a due amount is considered kept or Broken. If Payment Received >= (Promised Amt * Promise Tolerance%), the due date will be considered kept (satisfied). The system uses the greater of these two values. |
Adv Tolerance |
Enter the advance tolerance amount. |
Adv Tolerance % |
Enter the advance tolerance percentage |
Default Pmt Spread |
Select the default payment spread to be used when receiving payments for this account if one is not explicitly chosen, from the drop-down list. |
Min Finance Charge |
Enter the minimum finance charge amount. |
Minimum Pmt |
Enter the minimum billed amount. |
Anniversary Period |
Enter the anniversary term. |
Repmt Currency |
Select the currency from the drop-down list. |
PDC Security Check |
Check this box to indicate that post dated checks are the method of repayment for this contract. |
ACH Fee Ind |
Check this box to indicate that direct debit fee is included. Note: The ACH Fee/Direct Debit Fee balance will be displayed in Balances sub tab only when this checkbox is selected. |
Stmt Preference Mode |
Select the account statement preference mode as either Email or PHYSICAL from the drop-down list. The selected preference will be propagated to Application > Contract screen when the instrument is loaded. |
- Perform any of the Basic Actions mentioned in Navigation chapter.
Extension of Terms
The system facilitates extension of terms, provided the following conditions are satisfied:
- Specified number or more payments made in the account
- Gap between the previous and current extension provided in the account must be a specific number of months that could be specified
If the above conditions are not satisfied, then the system displays an appropriate error message.
A new transaction Force Extension will be available. This transaction will be posted when you want the system to bypass the extension validations defined at the contract level.
When a backdated transaction with TXN Date exists before the transaction date of extension, all the transactions are reversed and posted again. If extension transaction is posted again, then the validation rules are not validated again.
Staged Funding
Staged funding for closed-end loans allows you to disburse funds to customers through multiple advances or draws up to the approved amount within a specified “draw period.”
To create a multiple disbursement contract for a transaction
- In the Contract Definition section, click Add and complete the fields following the instructions above, making sure to complete the following steps:
- In the Advance Details section, select the Multiple Disbursement Permitted check box. When you select a contract instrument that permits staged funding (multiple disbursements) on the Funding screen, the system copies the information for that instrument from the Setup Module screen’s Contract screen to the Funding screen’s Contract screen.
Note
You cannot clear the Multi Disbursement Allowed box in the Advance section on the Contract screen.
- Complete the fields in the Advance Details section to define the limits for initial and subsequent advances for staged funding.
Note
This information appears in the Advance section of the Funding screen’s Contract link.
- If you choose, set the following application contract edits as an Error or Warning on the Setup Module screen’s Edits screen.
Note
For more information, see the Edits link (Edits screen) section in this chapter.
- REQUIRED: ADV DRAW END DATE
- XVL: ADV DRAW END DT MUST BE AFTER CONTRACT DT
- XVL: ADV DRAW END DT MUST BE LESS THAN FIRST PMT DT - PREBILL DAYS
These edits appear on the Funding screen’s Verification screen.
Repayment scheduling for staged funding
When funding a loan, the system computes repayment schedules from the contract date, irrespective of whether funds have been disbursed or not. The system uses the approved amount (amount financed) for computing repayment schedules on the contract date.
As the might have been disbursed through multiple draws, or the draws have been less than the approved amount, or the amount may have been repaid in some amount before the draw end date, you may need to change the payment amount. In such cases, you can manually change the payment in the system by posting the monetary transaction CHANGE PAYMENT AMOUNT on the Customer Service screen’s Maintenance link.
Disbursements for staged funding
The approved amount for staged funding can be disbursed with the Funding screen or at a later time using the Advances screen. If the first disbursement is requested during funding, you may enter it on the Itemization sub screen of the Funding screen’s Contract screen.
If the entire approved amount is not disbursed during initial funding, it can be disbursed using the Advances screen’s Advance Entry screen.
If the initial amount on the Advance Entry screen is not within the minimum or maximum limits (as entered in the Advance Details section on the Setup Module screen’s Contract screen), the system displays any of the following error or warning messages in the Advances section’s Error Reason field:
- Advance amount is less than the initial advance amount minimum
-or-
- Advance amount is more than the initial advance amount maximum
The Advance Entry screen also allows you to enter subsequent funding / disbursements. If subsequent advances are not within the predetermined minimum or maximum amounts, the system displays any of the following warning or error messages in the Advances section’s Error Reason field:
- Advance amount is less than the allowed subsequent advance amount
-or-
- Advance amount is more than the allowed subsequent advance amount
Additional messages in the Error Field regarding Staged Funding
If you attempt to post an advance after the draw end date, then the system displays the message in the Advances section’s Error Reason field as, "ADVANCE DT IS AFTER DRAW PERIOD END DATE".
If you attempt to post an advance above the approved amounts, including tolerance, the system displays the message in the Advances section’s Error Reason field as "ADVANCE AMOUNT IS MORE THAN THE TOTAL APPROVED AMOUNT INCLUDING TOLERANCE".
Since this is not a revolving loan, if any repayment is made against the approved amount principal balance, the system will not adjust the disbursed amount allowing for subsequent additional staged funding or advances.
Note
There is no change to the payoff quote functionality in the system. The system uses the actual amount of the advance(s) and any interest accrued since the date of the last payment or credit in the PAYOFF QUOTE VALID UPTO DATE value when the payoff quote is requested before the draw end date.
4.7.1 Balances
The Balances sub screen lists the balances that will be established when an account is booked and funded.
CAUTION: Please contact your Implementation Manager for changes to this section.
To set up the Balances
- Click Setup > Setup > Administration > User > Products > Contract > Line > Balances.
- On the Balances sub screen, perform any of the Basic Operations mentioned in Navigation chapter.
A brief description of the fields is given below:
Field: |
Do this: |
Balance Type |
Displays the balance type. |
Chargeoff Method |
Select the charge off method to determine how the outstanding amount of this balance type will be handled from the drop-down list, if the account becomes uncollectable and the product is charged off. |
Writeoff Method |
Select the write off method to determine how the outstanding amount of this balance type will be handled from the drop-down list, if the account is within the write off tolerance of being PAID. |
Reschedule Method |
Select the reschedule method to determine how the outstanding amount of this balance type will be handled from the drop-down list, if the account is rescheduled. |
Sort |
Specify the sort order of how account balances will appear on the Customer Service form’s Balance screen. |
Billed |
Check this box to indicate that outstanding amounts for this balance type are considered a part of the billed amount. This also determines whether payments applied to this balance type are considered when satisfying outstanding amounts due. |
Accrued |
Check this box to indicate that outstanding amounts for this balance type will be included when interest is accrued against the account. |
Non Performing Rollover |
Check this box to indicate that “non-performing” is used as an intermediary status on your general ledger prior to charge off and want to create balances for non-performing accounts for this balance type. Note: (The Non-Performing Rollover box applies only to Balance Types of Advance/Principal and Interest. For all other Balance Types, this box would be cleared). |
Non Performing Balance Type |
Select the balance type you want to rollover from drop-down list, if you select the Non-Performing Rollover box (Advance/Principal). |
Enabled |
Check this box to indicate that this balance type will be created when the account is booked and funded |
- Perform any of the Basic Actions mentioned in Navigation chapter.
The system loads the currently defined balances for accounts.
If your organization maintains additional balances, contact your Implementation Manager for information regarding those balances.
4.7.2 Amortized Balances
With the Amortize Balances sub screen, you can select one or more balances to be amortized over the life of the loan. You can also define the amortization method.
To set up the Amortization Balances
- Click Setup > Setup > Administration > User > Products > Contract > Line > Amortized Balances.
- In the Amortization Balances section, perform any of the Basic Operations mentioned in Navigation chapter.
A brief description of the fields is given below:
Field: |
Do this: |
Amortize Balance Type |
Select the amortize transaction type from the drop-down list. |
Amortization Method |
Select the amortization method used to calculate the net amortization amount from the drop-down list. |
Cost/Fee method |
Select the amortization cost/fee method. |
Sort |
Specify the sort sequence to define the order of the amortize balances. |
Enabled |
Check this box to enable the amortize balance to be created when the account is booked and funded. |
- Perform any of the Basic Actions mentioned in Navigation chapter.
4.7.3 Itemizations
On the Itemizations sub screen, you can define the itemized components for each type of contract, indicate if it is required, and determine whether it has a positive or negative bearing on the contract itemization math. You can establish the following groups of itemization transactions:
Advance |
Total amount of the product that is not a part of financed fees; in other words, the total amount the customer requested to be advanced. |
Financed Fees |
Fees rolled into the principal balance of the product. Financed fees are also considered to be a part of the finance charge. |
Pre-Paid Fees |
Fees that are paid by the consumer prior to the funding of the loan. These fees are not rolled into the balance of the product but are considered as part of the finance charge and are included in the calculation of the APR. |
Producer |
Fees that are paid to or by the producer of the loan; for example, a fee that is being charged to the producer. These transactions will affect proceeds. |
Escrow |
Allows you to connect the actual escrow itemization with the escrow type and the funding transaction. |
To set up the Itemizations
- Click Setup > Setup > Administration > User > Products > Contract > Line > Itemizations.
- On the Itemization sub screen select the option button to indicate the type of itemization you are working with: Advance, Financed Fees, Pre-Paid Fees, Producer, or Escrow.
- On the Itemization sub screen, perform any of the Basic Operations mentioned in Navigation chapter.
A brief description of the fields is given below:
Field: |
Do this: |
Itemization |
Select the itemization from the drop-down list. |
Disbursement Type |
Select the disbursement type from the drop-down list. |
Transaction |
Select the funding transaction type from the drop-down list. |
Itemization Type |
Select the itemization type from the drop-down list. Notes: 1. On selecting the "Prefunding Txns" as itemization type, it indicates that this particular itemization expects a payment from the customer prior to funding. 2. The itemization type "Prefunding Txns" is available only for loans. |
Sort |
Specify the sort order to define the order of the itemization transactions. |
Sign |
If the itemized transaction increases the group balance, click +ve. -or- If the itemized transaction decreases the group balance, click -ve. |
Enabled |
Check this box to enable the itemization and indicate that this itemization transaction will be created when the account is booked and funded. |
Amortize Balance |
Select the amortize balance affected by this itemization transaction from the drop-down list. Note: Advance itemizations do not affect amortize balances. |
Refund Calculation Method |
Select the refund calculation method from the drop-down list |
Taxable |
Check this box, if the itemization type is taxable. |
Seller Pmt |
Check this box to enable seller payment |
Escrow |
Select the escrow from the drop-down list. |
Itemization Formula |
Select the itemization formula description from the drop-down list. |
Refund Calculation Method |
Check this box to enable Refund calculation Method. |
Escrow Required |
If this is an escrow account, check this box to indicate that an escrow is required during the application process (though at that time the user can choose Opt Out to decline.) |
Discount. Rate |
Specify the discount rate for the itemization. |
- Perform any of the Basic Actions mentioned in Navigation chapter.
4.7.4 Fees
Any fees that are defined in the contract are set up on the Fees sub screen. The system currently supports the following contract fees:
- Late charges
- Non sufficient funds
- Extensions
- Prepayment penalties
- Delay Fee
- ACH Fee
The Fees sub screen allows you to define those fees whose value and method of calculation are set at the time of the loan. As these amounts cannot be changed after the product is booked and funded, you should only set up fees here that will not change over the life of the loan. Individual contract fee types may be defined multiple times in order to create graduated fees.
Note
Certain fees, like late fees, can be set up at contract, as well as state level. In such cases, the contract fee, if present, is used first.
To set up the Fees
- Click Setup > Setup > Administration > User > Products > Contract > Line > Fees.
- In the Fees section, perform any of the Basic Operations mentioned in Navigation chapter.
A brief description of the fields is given below:
Field: |
Do this: |
Type |
Select the fee type from the drop-down list. |
Txn Amt From |
Specify the lowest transaction amount or balance amount against which this contract fee definition may be applied. |
Credit Limit From |
Specify the minimum value of credit limit for the pricing. |
Method |
Select the method of calculating the fee to be assessed from the drop-down list. |
Frequency |
Select the frequency of calculating the fee to be assessed from the drop-down list. |
Min Amt |
Specify the minimum fee amount to be assessed. |
Max Amt |
Specify the maximum fee amount to be assessed. If you selected FLAT in the Method field, then this field is not used and is normally populated as $0.00. |
Percent |
Specify the fee percentage of the outstanding transaction amount to be assessed as a fee. This amount will be adjusted to fall within the Min Amount and the Max Amount. |
Enabled |
Check this box to create the selected contract fee when the account is booked and funded. |
- Perform any of the Basic Actions mentioned in Navigation chapter.
4.8 Edits
Edits ensure your organization’s guidelines are properly followed and that all exceptions are sent to the appropriate personnel to review.
You can configure your system so that during the origination process, at each change to an application’s status, the system will perform a set of edits on the Verification link’s Edits screen (found on the Application Entry, Underwriting, and Funding windows).
Edits ensure your organization’s guidelines are properly followed and that all exceptions are sent to the appropriate personnel to review. If the edits check fails, then the system will not allow the change of status, and the application will remain in its current status. This screen allows you to define the validations the system must perform on the Verification master tab, as the status of application changes.
Origination edits are used to validate applications entered through the standard Application Entry and Applications windows. The Edits screen contains two sections, the Edit Type Definition section and the Edit Sub Type Definition section.
To set up the Edits
You can either define new Edit Type Definition details or specify a new name in the New Edit Type field and click Create Copy to create a copy of selected edit type definition with details.
- On the Oracle Financial Services Lending and Leasing home screen, click Setup > Setup > Administration > User > Products > Edits > Line.
- On the Edits screen, choose Origination or Open Interface.
- In the Edit Type Definition section, perform any of the Basic Operations mentioned in Navigation chapter.

A brief description of the fields is given below:
Field: |
Do this: |
Edit |
Specify the edit name. |
Description |
Specify the description for the edit. |
Edit Type |
Select the edit type code from the drop-down list. |
System Defined |
Select ‘Yes’, if the entry is system defined. System defined entries cannot be modified. Select ‘No’, if the entry is not system defined and it can be modified. |
Enabled |
Check this box to enable the edit. |
Company |
Select the portfolio company associated with this edit, from the drop-down list. This may be ALL or a specific company. |
Branch |
Select the portfolio branch within the company associated with this edit, from the drop-down list. This may be ALL or a specific branch. This must be ALL if you selected ALL in the Company field. |
Channel |
Select the channel from the drop-down list, This can be ALL or a specific channel. |
Product |
Select the product associated with this edit, from the drop-down list. This may be ALL or a specific product. |
State |
Select the state with this edit from the drop-down list. This may be ALL or a specific product. |
Currency |
Select the currency associated with this edit, from the drop-down list. This may be ALL or a specific branch. |
- Perform any of the Basic Actions mentioned in Navigation chapter.
- In the Edit Sub Type Definition section, perform any of the Basic Operations mentioned in Navigation chapter.
A brief description of the fields is given below:
Field: |
Do this: |
Edit Sub Type |
Select the edit sub type for the edit, from the drop-down list. |
Edit |
Select the description for the edit, from the drop-down list. |
Result |
Select the result type for the edit, from the drop-down list. |
Enabled |
Check this box to enable the edit. |
Value |
Specify the expected value for the first edit. The Value field records the threshold value for the edit. The actual function of the entered value is dependent on the edit category. |
Override Responsibility |
Select the responsibility that can override the edit, from the drop-down list, if the edit result is an override. Designates the user responsibility level required to continue processing applications that fail the edit based on the Value field. You may define the same edit multiple times with a Result = OVERRIDE and different Value and Override Responsibility combinations to encompass various results. |
System Defined |
Select ‘Yes’, if the entry is system defined. System defined entries cannot be modified. Select ‘No’, if the entry is not system defined and it can be modified. |
- Perform any of the Basic Actions mentioned in Navigation chapter.
Using the Edit Type field of the Edit Type Definition section, you can define when you want the edits check to occur by selecting from the following list of edit types:
Edit type: |
Description: |
APP ENTRY EDITS |
Edits that normally run on Application Entry form. |
APP PRESCREENING EDITS |
Edits that run between application entry and the pulling of a credit bureau. These edits determine whether the application should be reviewed further, and whether a credit bureau should be pulled. |
PRE Qualify Edits |
Edits that run to check whether the minimum details which are required to prequalify the application are satisfied or not. |
APP AUTOMATIC APPROVAL EDITS |
Edits that run after a credit bureau has been pulled and scored. These edits determine whether an application should be automatically approved or declined. |
APP APPROVAL EDITS |
Edits that run whenever an application is manually changed to a status/sub status that indicates the application (in its current state) should be approved. |
APP DECLINE EDITS |
Edits that run whenever an application is manually changed to a status/sub status that indicates the application (in its current state) should be declined. |
APP CONTRACT EDITS |
Edits that run whenever an APPROVED or CONDITIONED-APPROVED application is about to be funded. These edits ensure the validity of the contract data. |
Each entry in the Edit Sub Type field is grouped into the following categories:
Origination edit sub types: |
Description |
ORIGINATION APPLICANT EDITS |
Edits that pertain to data entered for an applicant on an application. |
ORIGINATION APPLICATION EDITS |
Edits that pertain to data entered for the requested loan. |
ORIGINATION ASSET EDITS |
Edits that pertain to data entered for asset entered on the application. |
ORIGINATION CONTRACT EDITS |
Edits that pertain to data entered for the contract on the application. |
ORIGINATION CREDIT BUREAU EDITS |
Edits that pertain to data gathered from the credit bureau reports for the applicants on the application. |
ORIGINATION DECISION EDITS |
Edits that pertain to data required to make a decision on the application. |
Each entry in the Edit Sub Type field can be set up with more than one entry in the Description field. The purpose of specific edits fall into the following types:
Description starts with: |
(Edit Category) Description of Edit Category: |
CHD: |
(RECORD POPULATION EDITS) Check for the existence of an entire data record. |
DUPLICATE: |
(DUPLICATION EDITS) Check for duplication of existing data. |
RANGE: |
(VALUE RANGE/TOLERANCE EDITS) Check to determine whether data entered for a specific data field is within the specific tolerance. |
REQUIRED: |
(REQUIRED FIELD EDITS) Check to determine whether a specific data field has been populated within a data record. |
FLK: |
(LOOKUP VALUE EDIT) Check API entered data against the existence of that value in the related lookup types lookup codes. |
XVL: |
(CROSS VALIDATION EDIT) Check to determine whether specific field, or set of fields, value corresponds to a value obtained by calculating them from another field or set of fields (for example, Total Payments = Terms * Standard payment amount). |
An Edits check can produce one of three results: an Error, a Warning, or an Override.
Edit type: |
Results: |
Error |
The system will prevent you from proceeding when an edits check fails. The only option is to change the source data. The application will revert to its previous status/sub status. The user will be directed to correct the specific error. Until the edits that return an ERROR value are addressed, the user cannot continue processing the application. |
Warning |
When an edits check fails in these cases, the system allows the process to continue. Warnings serve as informational messages and can be ignored. The user will be notified that an edit failed, but the failure need not stop the current processing of the application. The user can either ignore the error, or have the application revert to its previous status/sub status and address the error before processing the application further. |
Override |
The edit check has failed; however, the system allows users with the responsibility specified in the Override Responsibility field to continue. Multiple override levels can be setup depending upon the resulting value of the edit. If the user has override responsibility, the application will process as if the edit had not failed. If the user does not have override responsibility, the application will revert to its previous status/sub status and the sub status changes to OVERRIDE REQUIRED. The system will then direct the application to a user with the authority to process the application. (See the Queues chapter for more information). |
Note
Do not set the Result field to Override for credit application edits.
4.8.1 Interfacing OFSLL with Oracle Rule Author
Oracle Business Rules is a component of Oracle Application Server that enables applications to rapidly adapt to regulatory and competitive pressures. This increased agility is possible due to the adoption of Oracle Rule author wherein a lending Institution can create or change a business rule without having to indulge in coding and also without stopping the business process. Also, externalizing business rules allows to manage business rules directly, without involving programmers. It provides best of breed solutions that would help in configuring the rules very quickly by a business analyst or user with some insight on the database.
4.9 Cycles
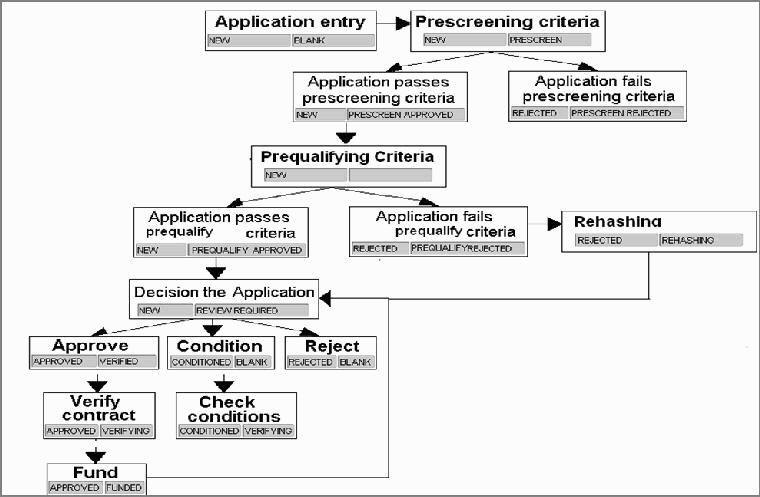
The Cycles screen allows you to define the origination workflow process of your organization. As you delineate the steps in the origination process, you will also define:
- The user responsibilities that have access to perform the steps
- Any edits you want the system to perform between changes in status/sub status.
The following diagram displays the general concept of workflow:
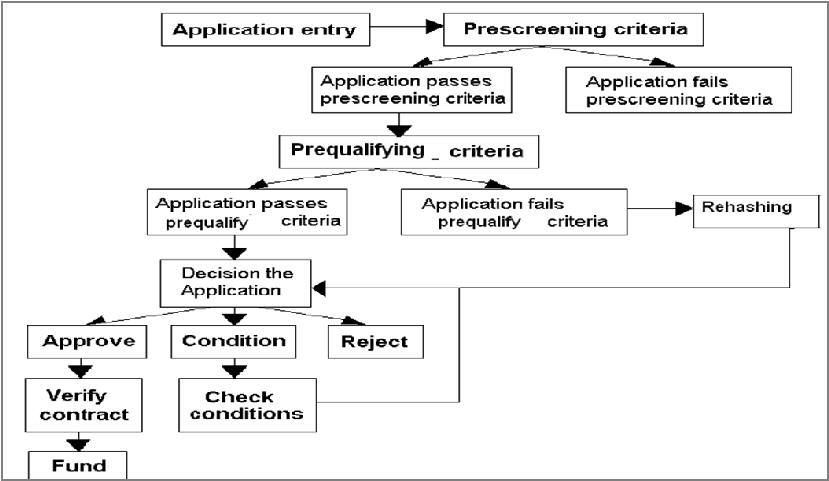
Cycle code definitions drive the application cycle. The following pairs of status/sub status define status/sub statuses that have system defined meanings and should be included in your origination workflow, if they are not already included.
After entering the basic details of the applicant, you can check whether the application pre-qualifies or not. If the pre-qualified edits are satisfied, the status is changed to NEW-PREQUALIFY APPROVED and you can modify or update any further details in the Application Entry screen. If the edits are not satisfied, the application will be pushed to the REJECTED APPLICATIONS queue with a status update to REJECTED-PREQUALIFY REJECTED, then you can also view the rejected pre-qualification in the Underwriting window.
Note
The system status and sub status lists are predefined and cannot be changed by the administrator. If you require additional sub status codes, please contact Oracle Financial Services Software to determine whether they can be added.
Status/Sub status: |
Description: |
NEW-BLANK |
This is the status/sub status of applications during data entry. Applications remain NEW-BLANK until you choose the Next Application on the Application Entry form and the system successfully performs the application edits check. |
NEW-PRESCREEN |
The system processes the prescreen edits to determine whether a credit report should be pulled for this application or not. |
NEW-PRESCREEN APPROVED |
Applications in this status/sub status have passed the prescreen edits. The system will now request a credit bureau pull. |
NEW-PREQUALIFICATION |
The system checks the applicant details whether it is qualified or not. |
NEW-PREQUALIFY APPROVED |
If the pre-qualified edits are satisfied, the status is changed to NEW-PREQUALIFY APPROVED and you can modify or update any further details in the Application Entry screen. |
REJECTED-PREQUALFY REJECTED |
If the edits are not satisfied, the application will be pushed to the REJECTED APPLICATIONS queue with a status update to REJECTED-PREQUALIFY REJECTED. |
REJECTED-PRESCREEN REJECTED |
Applications in this status/sub status failed the prescreen edits. These applications will receive no further processing. The producer will be sent a decision fax and the consumer will receive an adverse action letter. |
NEW- REVIEW REQUIRED |
Either based on the scoring of the application’s credit bureau(s) pull, or the fact that a credit bureau report was not successfully obtained, the application needs to be reviewed by an underwriter. |
NEW- RECOMMEND APPROVAL |
Based on the scoring of the application’s credit bureau(s) pull, the application should be reviewed by an underwriter. However, based on the current setup, the system recommends approving this application. |
NEW- RECOMMEND REJECTION |
Based on the scoring of the application’s credit bureau(s) pull, the application should be reviewed by an underwriter. However, based on the current setup, the system recommends rejecting this application. |
APPROVED-AUTO APPROVED |
Based on the scoring of the application’s credit bureau(s) pull, the system automatically approves the application. The producer will be sent a decision fax, and the application will be passed to funding. |
REJECTED-AUTO REJECTED |
Based on the scoring of the application’s credit bureau(s) pull, the system automatically rejects the application. The producer will be sent a decision fax and the consumer will receive an adverse action letter. |
APPROVED-BLANK |
Application has been manually approved. Normally this occurs when an application is in the NEW- RECOMMEND APPROVAL, NEW- RECOMMEND APPROVAL status/sub status, or less often in the NEW- RECOMMEND REJECTION status/sub status. Any cycle code definition with next values of APPROVED-BLANK should have a lookup value of APP APPROVAL EDITS to ensure that all of the required data has been gathered in making the decision to approve the application (unless the application is currently in a status/sub status that assures the APP APPROVAL EDITS have been run). |
NEW-OVERRIDE REQUIRED |
A user without sufficient override authority attempted to approve an application, which, based on setup, required a higher over-ride authority to approve. |
APPROVED- VERIFYING |
Contract has been received from the producer. |
APPROVED-FINAL DOCUMENT CHECK |
The contract has been reviewed and the data is correct. Normally this occurs when an application is in APPROVED-FINAL DOCUMENT CHECK or CONDITIONED-FINAL DOCUMENT CHECK status/sub status. Any cycle code definition with next values of APPROVED-FINAL DOCUMENT CHECK or CONDITIONED-FINAL DOCUMENT CHECK should have a value of APP CONTRACT EDITS to ensure that all of the required data has been gathered in making the decision to approve the application, unless the application is currently in a status/sub status that assures the APP CONTRACT EDITS have run. |
APPROVED-VERIFIED |
The application has been processed and is awaiting funding. |
APPROVED-FUNDED |
The application has been funded, and a check requisition has been created. If Customer Service form is being used, then an account is also created at this time. |
REJECTED-BLANK |
The application for whatever reason is being manually rejected regardless of its current status/sub status. Any cycle code definition with Next values of REJECTED-BLANK should have a lookup value of APP DECLINE EDITS to ensure that all of the required data has been gathered in making the decision to approve the application (unless the application is currently in a status/sub status that assures the APP DECLINE EDITS have run). |
WITHDRAWN-BLANK |
The applicants have indicated that they are no longer pursuing this loan. |
CONDITIONED-<ANY> |
These status/sub status pairs are analogous to the corresponding APPROVED-<ANY> pair and indicate that the application has had additional conditions placed on its approval. |
<ANY>-<ANY OVERRIDE> |
Requires OVERRIDE approval. The meaning of the sub status is analogous to the corresponding OVERRIDE sub status, and may require that specific EDITS run before proceeding. |
<ANY>-AGED APPLICATION |
These applications have been decisioned but no contract has been received after a period of time determined by setup. If not acted on, these applications will become VOID. |
<ANY>-AGED CONTRACT |
Contracts have been received after a period of time determined by setup. If not acted on these applications will become VOID. |
<ANY>-VOID |
Indicate application previously had a sub status of AGED CONTRACT or AGED APPLICATION. These applications have not been completed and were made VOID after another period of time had passed. |
Using these status and sub status, let us re-examine the early workflow diagram in this section.
Note
It is extremely important that the APP CONTRACT EDITS run prior to an application being funded. All cycle code definitions should be reviewed to ensure that there are no paths through the origination cycle that bypass this EDIT type.
To set up the Cycles
- On the Oracle Financial Services Lending and Leasing home screen, click Setup > Setup > Administration > User > Products > Cycles > Line
- In the Cycle Definition section, perform any of the Basic Operations mentioned in Navigation chapter.
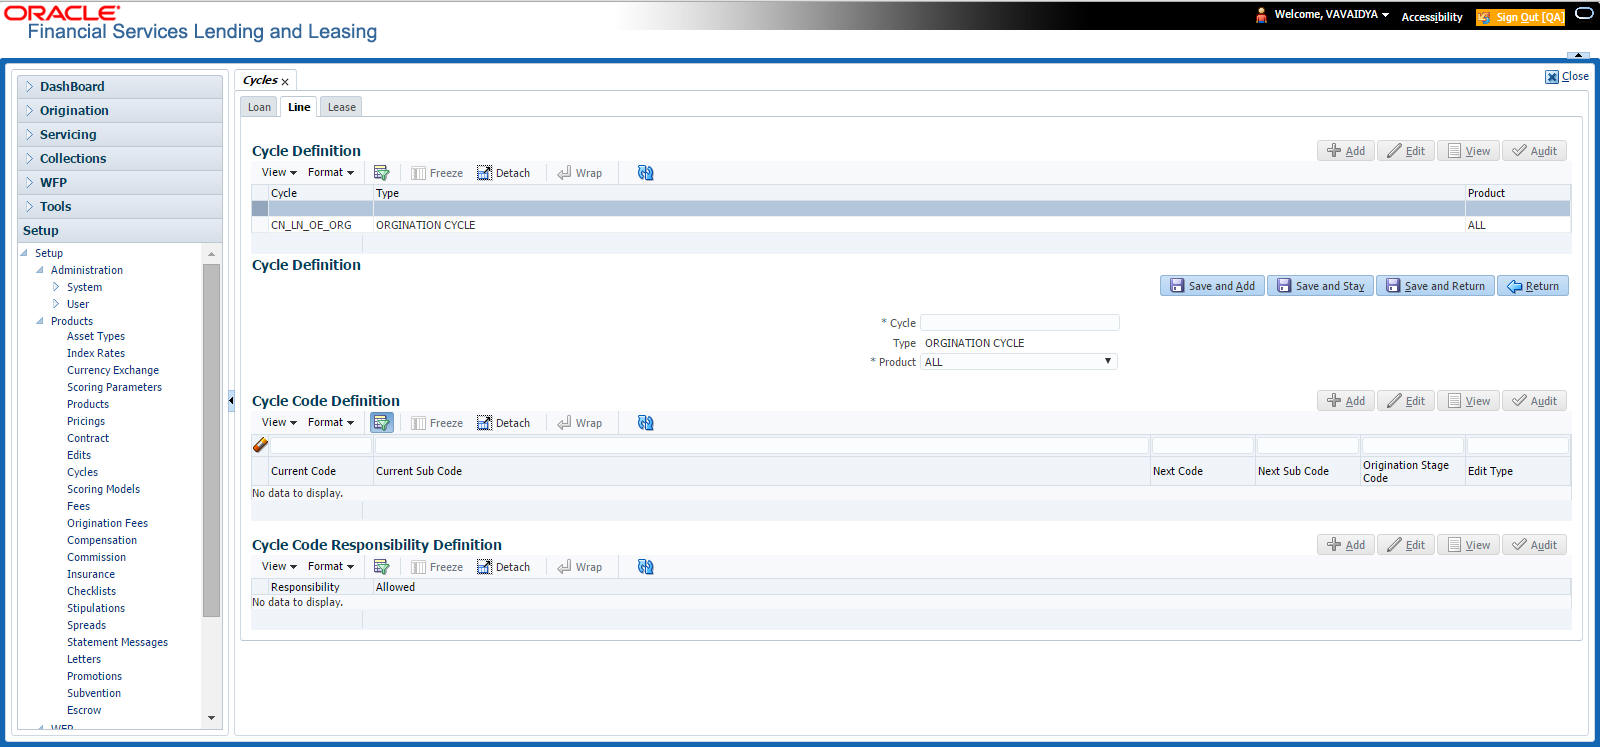
A brief description of the fields is given below:
Field: |
Do this: |
Cycle |
Specify the cycle code. |
Type |
Displays the cycle type. |
Product |
Select the product from the drop-down list. |
- In the Cycle Code Definition section, perform any of the Basic Operations mentioned in Navigation chapter.
A brief description of the fields is given below:
Field: |
Do this: |
Current Code |
Select the current code to transition FROM, from the drop-down list. |
Current Sub Code |
Select the current sub code to transition FROM, from the drop-down list. |
Next Code |
Select the current code to transition TO from the drop-down list. |
Next Sub Code |
Select the next sub code to transition TO, from the drop-down list. |
Origination Stage Code |
Select the origination stage code of the application from the adjoining drop-down list. |
Edit Type |
Select the edit type to associate to the cycles, from the drop-down list. |
- Perform any of the Basic Actions mentioned in Navigation chapter.
- In the Cycle Code Responsibility Definition section, you can define the responsibilities that are authorized to change the code. Perform any of the Basic Operations mentioned in Navigation chapter.
A brief description of the fields is given below:
Field: |
Do this: |
Responsibility |
Select the responsibility that will be capable of executing this transition, from the drop-down list. |
Allowed |
Select ‘Yes’ to allow change to the status responsibility and ‘No’ to disallow. |
- Perform any of the Basic Actions mentioned in Navigation chapter.
4.10 Scoring Models
The Scoring screen allows you to setup individual and multiple scoring models. You can define different scoring models by company, branch, currency and product. Scoring models are used to automate the decisioning process during underwriting and grade applications.
When you complete the Application Entry process, the system determines which scoring model to use by finding a best match. The system searches the Company, Branch, Currency and Product fields of all enabled scoring models that contain either the exact value on the application or ALL. (Exact matches for each field are given a higher weight than matches to ALL.) The system then ranks the returned matches in descending order, based on the weighted values and the hierarchical position of the field and then by Start Date. The system recognizes the first row returned as the best match. This scoring model information is then used to determine the next status and sub status of the application.
If you use a standard bureau score as a scoring model, you can set up the system to use the adverse action reasons provided by the standard bureau score on the Stipulations sub screen.
To set up the Scoring
- On the Oracle Financial Services Lending and Leasing home screen, click Setup > Setup > Administration > User > Products > Scoring Models > Line. You can set the following categories of scoring models:
- Credit Score Models
4.10.1 Credit Score Models
You can either define new Credit Score Model or specify a new name in the New Credit Model field and click Create Copy to create a copy of selected score model with details.
- Click Setup > Setup > Administration > User > Products > Scoring Models > Line > Credit Score Models.
- In the Score Models section, perform any of the Basic Operations mentioned in Navigation chapter.

A brief description of the fields is given below:
Field: |
Do this: |
Results section |
|
Max Score |
Specify the maximum score allowed. (This is normally the sum of the Max Value fields within the scoring parameters.). |
Selection Criteria section |
|
Company |
Select the company for the scoring model, from the drop-down list. This may be ALL or a specific company. |
Branch |
Select branch within the company for the scoring model, from the drop-down list. (This may be ALL or a specific branch. However, if you have selected ‘ALL’ in Company field, then you must select ‘ALL’ for this field). |
Product |
Select the product for the scoring model, from the drop-down list. This may be ALL or a specific product. |
Currency |
Select the currency for the scoring model, from the drop-down list. This may be ALL or a specific currency. |
Bureau Score Reasons |
Check this box to use the score reasons supplied by the credit bureau. If unchecked, then automatically rejected applications scored using this scoring model display the Adverse Action Reasons from the Parameters sub screen. |
Auto Decision |
Check this box to assign an application, a status/sub status based on the grade associated with the score returned for this scoring model. If not selected, the system assigns applications scored using this scoring model a status/sub status of NEW-REVIEW REQUIRED. |
Model |
Specify the code for the scoring model. |
Description |
Specify a description of the scoring model. |
Start Dt |
Specify the start date for the scoring model. You can even select the date from the adjoining Calendar icon. |
End Dt |
Specify the end date for the scoring model. You can even select the date from the adjoining Calendar icon. |
Enabled |
Check this box to enable the scoring model. |
- Perform any of the Basic Actions mentioned in Navigation chapter.
Parameters
The Parameters records the parameters used to determine the score calculated by the scoring model. You can define multiple parameters and adverse action reason associated with each parameter in a scoring model. Each scoring parameter can have maximum values set. The score range is based upon the information in the Range Definition section on the Parameters sub tab.
The system calculates a final score by adding the score for each parameter in the scoring model. A parameter weighted value is used to find the four adverse action reasons, if bureau reasons are not used.
Note
A character parameter range definition should contain the exact value of the parameter.Each scoring parameter should have range definitions defined that encompass all of the values that might result.
- Click Setup > Setup > Administration > User > Products > Scoring Models > Line > Credit Score Models > Parameters.
- In the Parameters section, perform any of the Basic Operations mentioned in Navigation chapter.
A brief description of the fields is given below:
Field: |
Do this: |
Parameter |
Select the parameter from the field, from the drop-down list. |
Max Value |
Specify the maximum value allowed for the selected parameter. |
Adverse Action Reason |
Select the adverse action reason, from the drop-down list. (If, on the Scoring Models screen, the Bureau Screen check box is checked for the scoring model, you cannot update this field). |
Weighted Value |
Specify the adverse action weighted value. This indicates the priority of this parameter when determining which adverse action reasons to use on the application. The top ten adverse action reasons based on the weighted value of the parameter will be populated. |
Enabled |
Check this box to enable the parameter. |
- Perform any of the Basic Actions mentioned in Navigation chapter.
- The Range Definition section allows you to translate the calculated value for a scoring parameter into the value to be used, depending on the returned value of the parameter
- In the Range Definition section, perform any of the Basic Operations mentioned in Navigation chapter.
A brief description of the fields is given below:
Field: |
Do this: |
Value From |
Specify the lowest calculated value to apply the specific translation. The ceiling of the range definition is based on the range definition with the next highest Value From or the Max Value of the scoring parameter (whichever is less). |
Value From |
Select the following options to determine how values for a scoring parameters are translated: % Max Value – If selected, then the calculated values within the range definition receives a value based on a percentage of the Max Value of the scoring parameter. % Param – If selected, then the calculated values within the range definition receives a value based on a percentage of the calculated value of the scoring parameter. Value – If selected, then the calculated values with in the range definition receives a specific value. |
Percent / Value |
Specify the percent or value to be used in the translation of the calculated value of the scoring parameter. |
Enabled |
Check this box to consider this range definition while translating values for this scoring parameter. |
- Perform any of the Basic Actions mentioned in Navigation chapter.
Grades
The Grades sub screen allows you to define how the system translates the scoring model scores into your organization’s grade. The system uses these grades in the auto-decisioning process. Each grade has a specific status/sub status that informs the system what to do with the application of a particular grade as it continues through the origination cycle.
Note
Each scoring model should have grade definitions defined that encompass all of the values that might result.
- Click Setup > Setup > Administration > User > Products > Scoring Models > Line > Credit Score Models > Grades.
- In the Grade Definition section, perform any of the Basic Operations mentioned in Navigation chapter.
A brief description of the fields is given below:
Field: |
Do this: |
Score |
Specify the score the application receives. |
Credit Grade |
Select the grade to assign to an application, from the drop-down list. |
Application Status |
Select the status to assign to applications with a score starting with the value of this grade definition, from the drop-down list. |
Sub Status |
Select the sub status to assign to applications with a score starting with the value of this grade definition, from the drop-down list. Credit scoring allows you to select the following status/sub status pairs: APPROVED - AUTO APPROVED REJECTED - AUTO REJECTED NEW - REVIEW REQUIRED NEW - RECOMMEND APPROVAL NEW - RECOMMEND REJECTION. |
Enabled |
Check this box to indicate that this grade definition will be considered when grading an application using this scoring model. |
- Perform any of the Basic Actions mentioned in Navigation chapter.
4.11 Fees
The Fee screen allows you to define fees that may be automatically assessed by the system. The Fee Definition section records fees not defined within the Contract screen’s Fees sub screen.
The following fee types are currently supported for automatic assessment:
- Late charge
- NSF
- Extension
- Advance
- Over Credit Limit
- Membership
- Prepayment penalty
- Phone Pay
- Payoff Quote
- Periodic Maintenance
- Rental Fee
- ACH Fee
- Delay Fee
- Other Fee and Tax
Fees can be calculated as either a flat amount or a percentage of payment due based on fee type.
You can specify minimums and maximums for fee amounts in the Min Amt and Max Amt fields. Different fee rules can be setup at the company/branch level.
When Fees are assessed, the system determines the best match using all enabled fee definitions that meet the following criteria:
- Exactly match the fee type being assessed.
- Have an effective date that is greater than or equal to the start date.
- Have a Txn Amt From that is greater than or equal to the outstanding amount related to the fee assessment.
- Match either the value or ALL for all other criteria (Exact matches for each field are given a higher weight than matches to ALL.)
The returned rows are then given a descending rank based on the weighted values and the hierarchical position of the following criteria:
- Company
- Branch
- Product
- Application state
- Transaction amount
- Start date
- End date
- Currency
On the ranked rows, the first row is returned as the best match.
Note
Certain fees, like late fees, can be set up at contract, as well as state level. In such cases, the contract fee, if present, is used first. Only if the contract fee is not present in the state fee used.
To set up the Fee
- On the Oracle Financial Services Lending and Leasing home screen, click Setup > Setup > Administration > User > Products > Fees > Line.
- In the Fee Definition section, perform any of the Basic Operations mentioned in Navigation chapter.
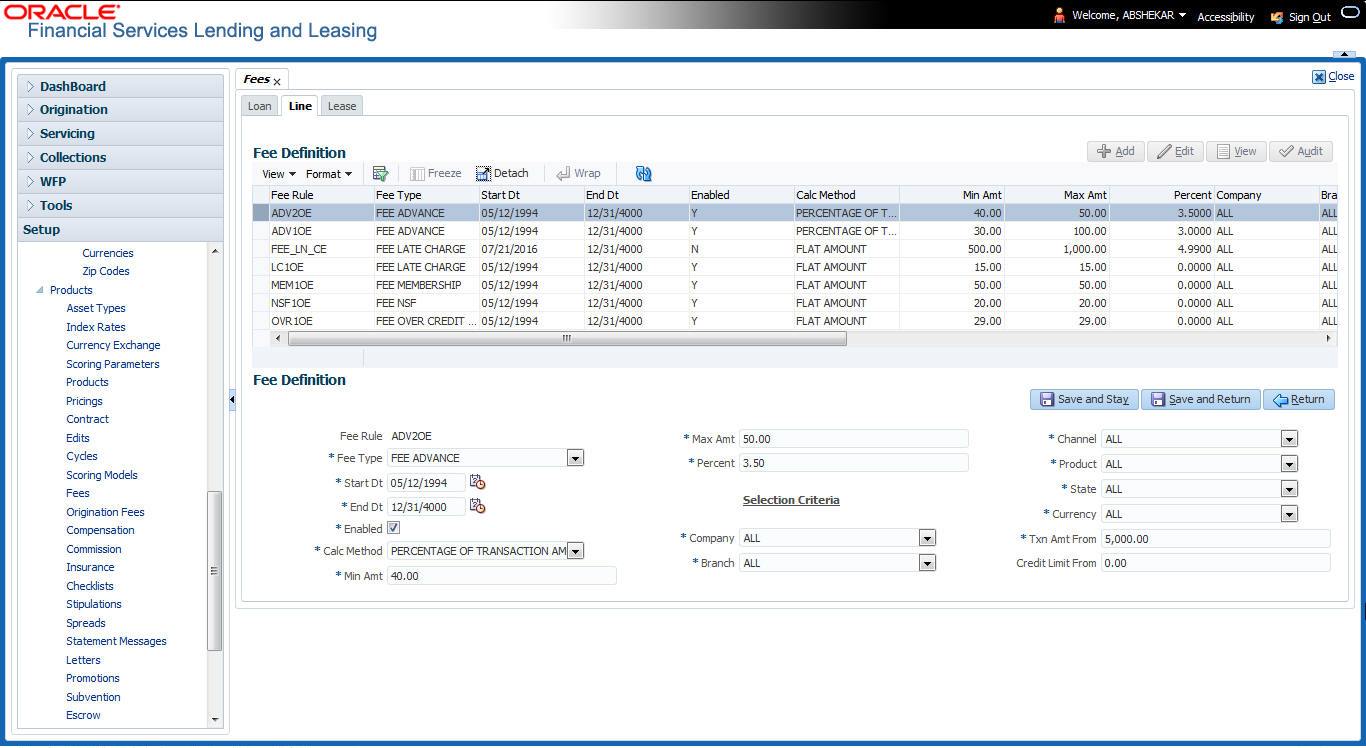
A brief description of the fields is given below:
Field: |
Do this: |
Fee Rule |
Specify the fee rule used to identify the particular fee definition. |
Fee Type |
Select the fee type from the drop-down list. The system computes these drop-down values from the TXN_TYPE_CD Lookup, with FEE as the sub type. |
Start Dt |
Specify the start date. You can even select the date from the adjoining Calendar icon. |
End Dt |
Specify the end date. You can even select the date from the adjoining Calendar icon. |
Enabled |
Check this box to enable the fee. |
Calc Method |
Select one of the following method of calculating the fee, from the drop-down list. If ‘Flat Amount' is selected, then minimum fee will be charged. If ‘Percentage’ is selected, then the amount charged will be based on percentage defined subject to minimum and maximum amount (i.e. 'Txn Amt From'). |
Min Amt |
Specify the minimum amount for the fee. |
Max Amt |
Specify the maximum amount for the fee. If you selected FLAT amount in the Calc Method field, then this field is not used and is normally populated as $0.00. |
Percent |
Specify the percentage value of the outstanding transaction amount to be assessed as a fee. This amount will be adjusted to fall within the Min Amount and the Max Amount. |
Selection Criteria section |
|
Company |
Select the portfolio company from the drop-down list. This may be ALL or a specific company. |
Branch |
Select the portfolio branch from the drop-down list. This may be ALL or a specific branch. (This must be ALL, if you have selected ‘ALL’ in the Company field). |
Channel |
Select the channel from the drop-down list, This can be ALL or a specific channel. |
Product |
Select the product from the drop-down list. This may be ALL or a specific product. The available values come from a validated field based on the selected Billing Cycle setup and the Product setup. |
State |
Select the state for this fee, from the drop-down list. This may be ALL or a specific state. |
Currency |
Select the currency for this fee, from the drop-down list. This may be ALL or a specific currency. |
Txn Amt From |
Specify the transaction or balance amount. The fee is calculated using the specifications of this record only if the transaction amount is greater than the value specified in this field (and less than this field in another record for the same fee). IMPORTANT: When you select the fee to use, the system searches for a best match using the following attributes: 1 Company 2 Branch 3 Product 4 State 5 Amount (Txn Amt From) 6 Effective/start date (Start Dt) Hence, Oracle Financial Services Software recommends creating a version of each fee, where ALL is the value in the these fields. It is also recommended that you define a default printer for an Organization, Division and Department. |
Credit Limit From |
Specify the minimum value of credit limit for the pricing. |
- Perform any of the Basic Actions mentioned in Navigation chapter.
4.12 Origination Fees
The system supports the auto computation of origination itemized fees. System administrators can define and maintain the itemization formula on the Origination Fees screen.
An itemization formula can be set up as a computation of other itemizations (such as adding or subtracting one itemization from another) and can consist of multiple itemizations. An itemization formula will have a minimum and maximum value. You can set up a formula value range to be used as the final value.
Itemizations are linked to a product with the Products screen’s Product Itemizations subtab.
One itemization can be based on one formula, while the same formula can be attached to multiple itemizations. If a formula is attached to a contract itemization and that formula requires an itemization not present in Formula Definitions screen, then the system displays an error message.
The system will search for any “circular dependency” at the time the contract is enabled. An example of a circular dependency is when Itemization1 has Formula1 attached requiring Itemization2 for computation and Itemization2 has Formula2 attached requiring Itemization1 for computation.
To set up the Origination Fees
- On the Oracle Financial Services Lending and Leasing home screen, click Setup > Setup > Administration > User > Products > Origination Fees > Line.
- In the Formula Definitions section, perform any of the Basic Operations mentioned in Navigation chapter.
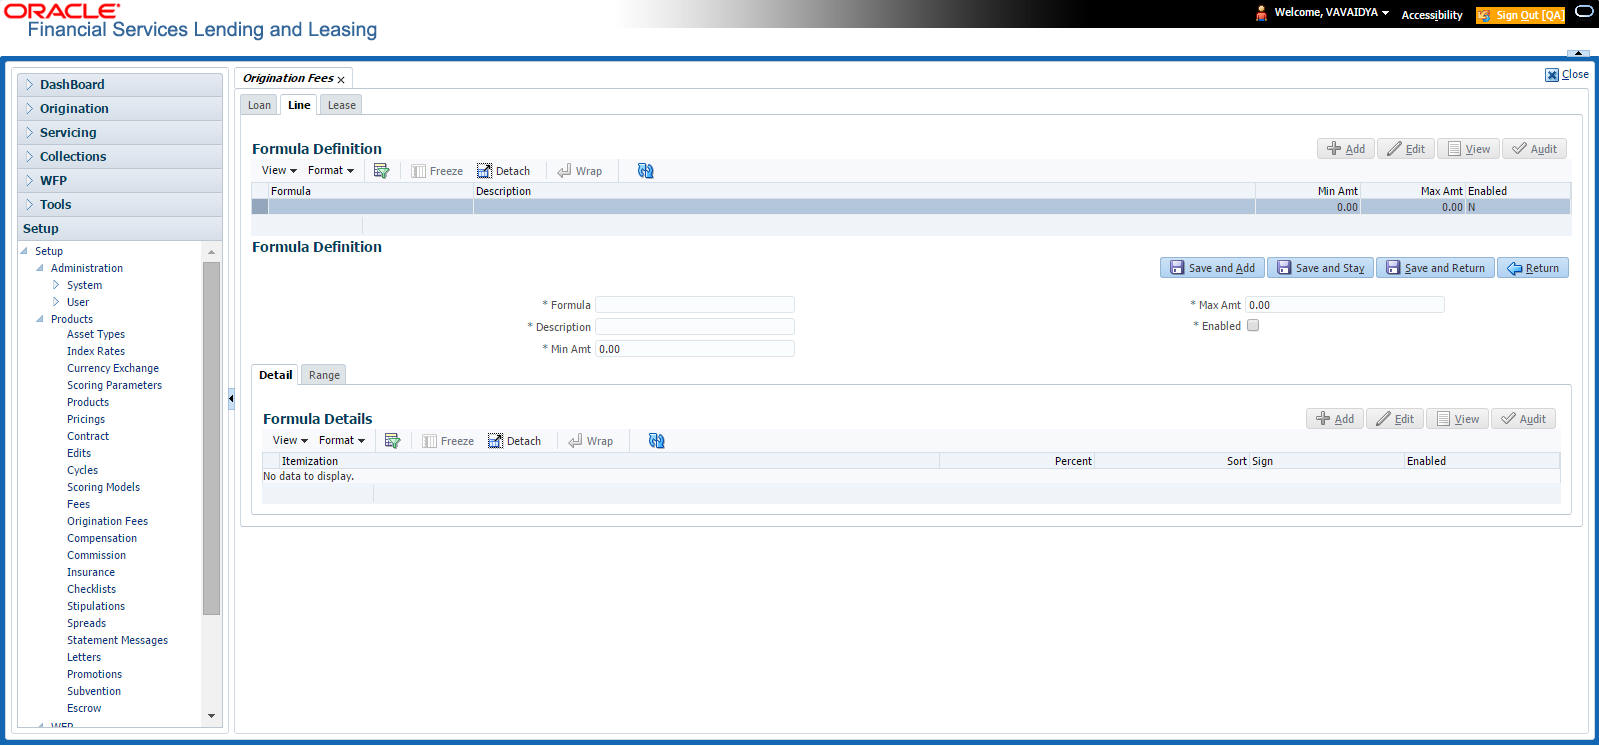
- A brief description of the fields is given below:
Field:
Do this:
Formula
Specify the formula code to define computation.
Description
Specify the description for the formula.
Min Amt
Specify the minimum value that should be considered to compute the final value of formula.
Max Amt
Specify the maximum value that should be considered to compute the final value of formula.
Enabled
Check this box to allow the origination fees.
- Perform any of the Basic Actions mentioned in Navigation chapter.
- In the Formula Details section of Setup > Setup > Administration > User > Products > Origination Fees > Line > Detail, perform any of the Basic Operations mentioned in Navigation chapter.
A brief description of the fields is given below:
Field: |
Do this: |
Itemization |
Select the itemization based on which the itemization formula will derive its computed value, from the drop-down list. |
Percentage |
Specify the percentage value that should be considered while computing value for itemization formula. |
Sort |
Specify the sort sequence for the itemization to be considered while computing the value of the itemization formula. |
Sign |
Select the +ve or -ve sign that needs to be considered between two itemizations for computing the value of the itemization formula. |
Enabled |
Check this box to allow the itemization details to be used by the system. |
- Perform any of the Basic Actions mentioned in Navigation chapter.
- In the Range Details section of Setup > Setup > Administration > User > Products > Origination Fees > Line, perform any of the Basic Operations mentioned in Navigation chapter.
A brief description of the fields is given below:
Field: |
Do this: |
Amt From |
Specify the value up to which the percentage of final value of the itemization formula to be considered for the final value of itemization formula. |
Percent |
Specify the percentage value that should be considered while computing the value for the final value of the itemization formula. |
Enabled |
Check this box to allow the range details to be used by the system. |
- Perform any of the Basic Actions mentioned in Navigation chapter.
4.13 Insurance
Most financial institutes offer financing for insurance to the borrowers; examples include credit life, credit disability, and GAP. The insurance product offer permits the customer to cancel the insurance in mid term or automatically end when the product matures or is paid-off. The system supports financing of insurance products during origination and automatically end the insurance when the product is paid-off. The system also can compute the rebate premium based on “Rule of 78” or “Actuarial” method. As the customer might cancel the insurance in mid term of the loan, the system computes the premium rebate on a prorate basis. This also applies to additional insurance purchase during the life of the loan. Normally, mid term insurance cancellations have associated fees and grace period. In such cases, the customer may cancel the insurance during the grace period without accruing any fees. However, when a customer cancels after the grace period, the result is a predefined fees which the system deducts from the computed rebate.
The system supports mid term insurance cancellation with and without grace period and cancellation fees. With this enhancement of insurance processing, you can define the premium rebate computation with a prorate basis.
You can define financed insurance related itemizations in the Origination Fees screen, as you have in previous releases with the Insurance screen. You can also set the refund method to “Pro Rate Basis” in the Refund Method field in the Contract Itemization section on the Itemization sub screen during setup with the on the Contracts screen.
To set up the Insurances
You can either define new Insurance details or specify a new code in the New Insurance field and click Create Copy to create a copy of selected insurance with details.
- On the Oracle Financial Services Lending and Leasing home screen, click Setup > Setup > Products > Insurance > Line.
- In the Insurance Definition section, perform any of the Basic Operations mentioned in Navigation chapter.
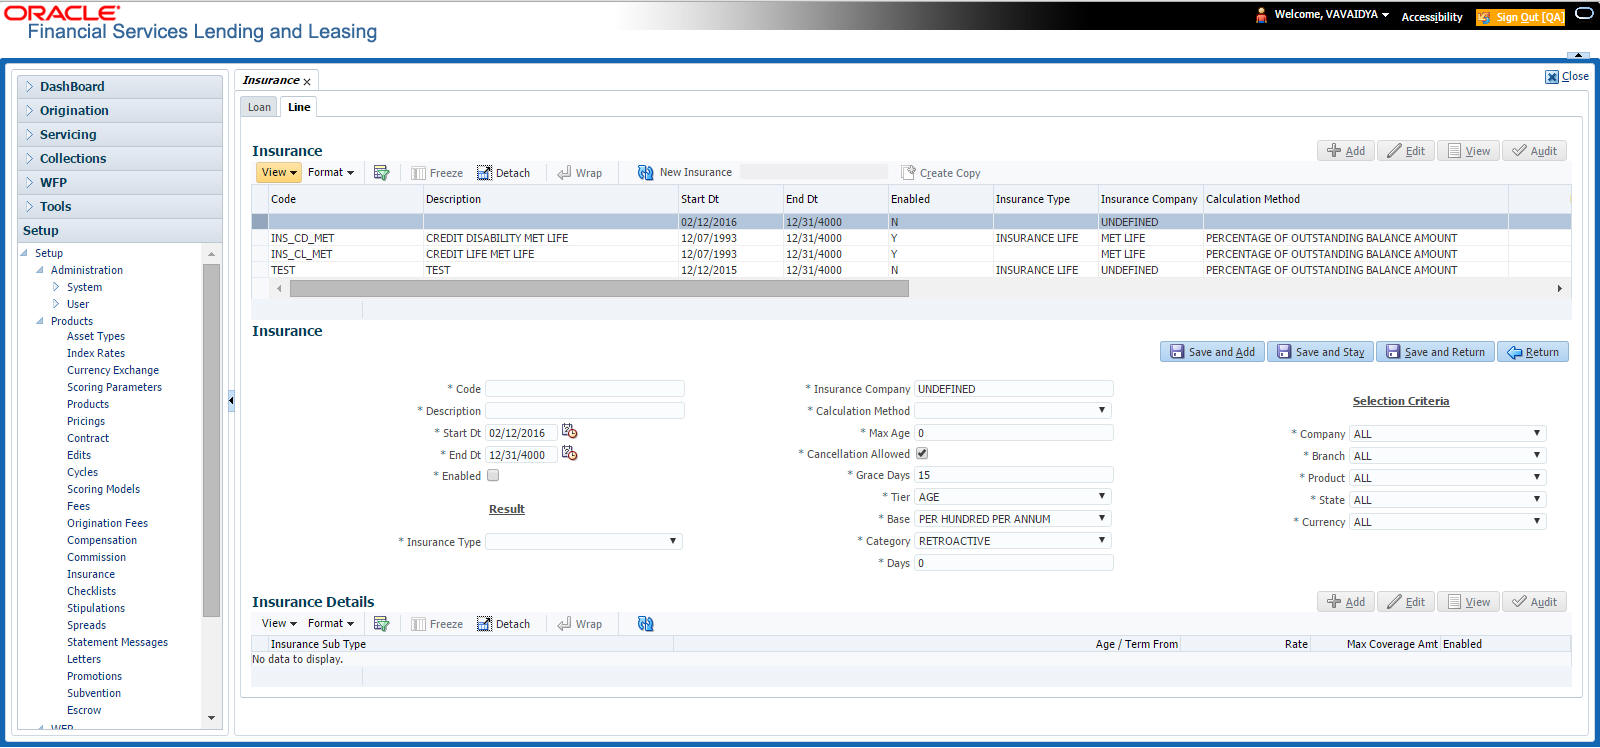
A brief description of the fields is given below:
Field: |
Do this: |
Code |
Specify the code associated with the insurance product. |
Description |
Specify a brief description of the insurance product. |
Start Dt |
Specify the date from which you can start offering the product to customers. You can even select the date from the adjoining Calendar icon. |
End Dt |
Specify the date from which to stop offering the product to customers. You can even select the date from the adjoining Calendar icon. |
Enabled |
Check this box to allow the offering of this insurance product. |
Result section |
|
Insurance Type |
Select the insurance types available for financing, from the drop-down list. |
Insurance Company |
Specify the name of the company through which the insurance product is offered. |
Cancellation Refund Allowed |
Check this box to allow the insurance rebate or refund for cancellation or paid-off. |
Grace Days |
Specify the number of grace days allowed for cancellation without charging a cancellation fee. |
Tier |
Select the tier from the drop-down list. |
Base |
Select the base from the drop-down list. |
Category |
Select he category from the drop-down list. |
Refund Calculation Method |
Select the insurance premium refund/rebate calculation method to be used when insurance is cancelled, from the drop-down list. |
Cancellation Fee |
Specify the amount of the cancellation fee to be charged when the insurance is cancelled. |
Grace Day's Cancellation Fee Allowed |
Check this box to allow cancellation fees during grace period. |
Selection Criteria Section |
|
Company |
Select the portfolio company that can offer the insurance product, from the drop-down list. Select ALL if offered by all companies. |
Branch |
Select the branch of the specified portfolio company that can offer the insurance product, from the drop-down list. Select ALL if offered by all the branches of the specified portfolio company. |
Product |
Select the product for which you can offer the insurance product, from the drop-down list. Select ALL if offered for all the products. |
State |
Select the state for which you can offer the insurance product, from the drop-down list. Select ALL if this is offered for all the states. |
Currency |
Select the currency for which you can offer the insurance product, from the drop-down list. Select ALL if this is offered for all the states. |
- Perform any of the Basic Actions mentioned in Navigation chapter.
- Click ‘Create Copy’ button in the Insurance Definition section to create copy of selected record with details.
- In the Insurance Details section, perform any of the Basic Operations mentioned in Navigation chapter.
A brief description of the fields is given below:
Field: |
Do this: |
Insurance Sub Type |
Select the insurance sub type you want to define for the entry in the Insurance section, from the drop-down list. For example SINGLE. |
Term From |
Specify the minimum term for the insurance sub type. |
Rate |
Specify the rate for premium calculation per $1,000.00 for the insurance sub type. |
Max Coverage Amt |
Specify the maximum coverage amount covered by the insurance sub type. |
Enabled |
Check this box to enable the insurance. |
- Perform any of the Basic Actions mentioned in Navigation chapter.
4.14 Checklists
A checklist is an optional set of steps to follow when completing a task in the system, such as the underwriting and funding processes.
Checklists can be used as guidelines to help ensure that the system users follow your business’s standard operating procedures and enter all required data. Some checklists are optional, but others such as those related to application decisions or contract verification, may be required depending on the edit sets defined in your system. The Checklists screen allows you to specify the contents of the checklist.
You can define additional checklists for your organization. You can set up multiple checklists for a single type of checklist. These checklists can be differentiated by:
- Company
- Branch
- Product
- Account state
To set up the Checklists
You can either define new Checklist Type Definition details or specify a new code in the New Checklist field and click Create Copy to create a copy of selected checklist type definition with details.
- On the Oracle Financial Services Lending and Leasing home screen, click Setup > Setup > Administration > User > Products > Checklists > Line.
- In the Checklist Type Definition section, perform any of the Basic Operations mentioned in Navigation chapter.
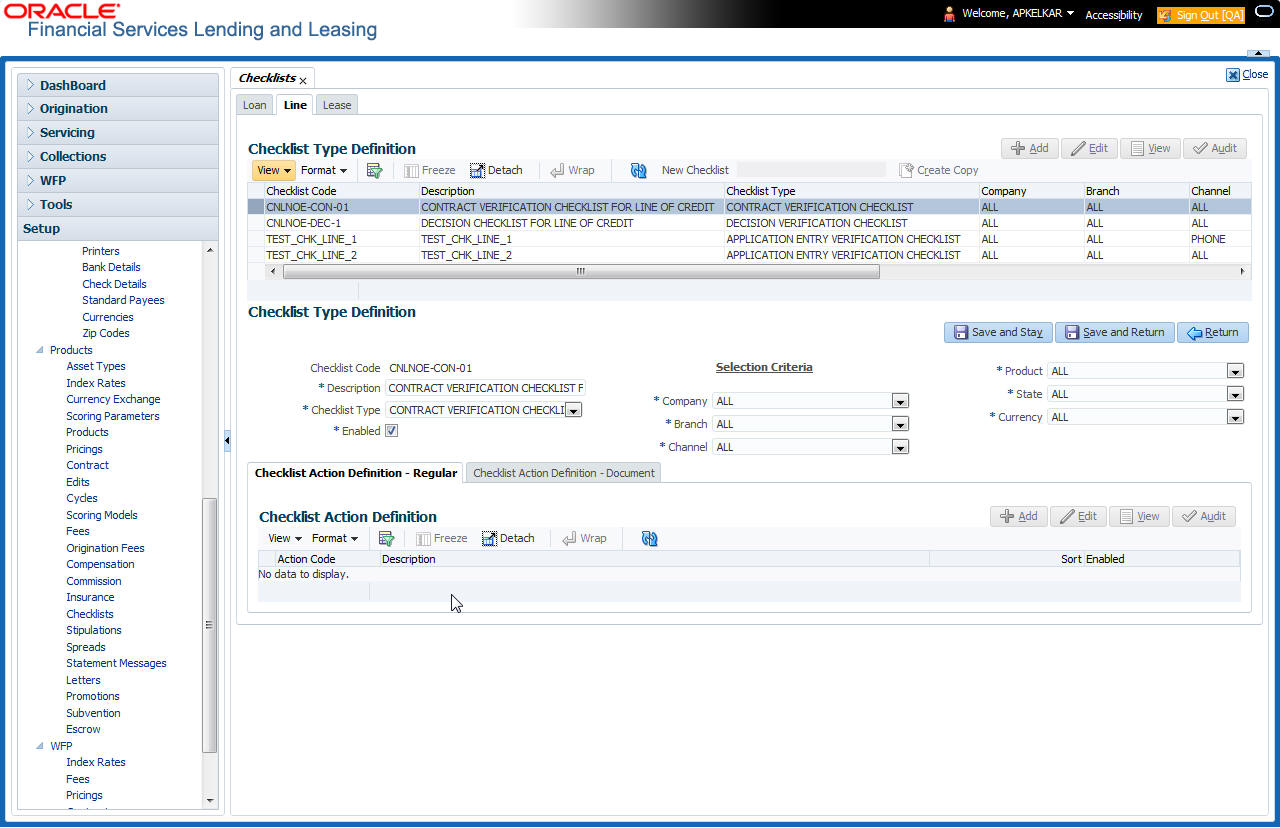
- A brief description of the fields is given below:
Field:
Do this:
Checklist Code
Specify the checklist code that identifies checklist being defined.
Description
Specify the description for the checklist.
Checklist Type
Select the checklist type from the drop-down list, to define where the specific checklist will be available in the system.
Company
Select the portfolio company associated with the checklist from the drop-down list. This may be ALL or a specific company.
Branch
Select the portfolio branch associated with the checklist from the drop-down list. This may be ALL or a specific branch. This must be ALL if in the Company field you selected ALL).
Channel
Select the channel from the drop-down list, This can be ALL or a specific channel.
Product
Select the product associated with the checklist from the drop-down list. This may be ALL or a specific product. The available values come from a validated list based on the selected Billing Cycle setup and the Product setup.
State
Select the state associated with the checklist type from the drop-down list. This may be ALL or a specific state.
IMPORTANT: By selecting which edits type to use, the system searches for a best match using the following attributes:
1 Company
2 Branch
3 Product
4 State
Hence, Oracle Financial Services Software recommends creating one version of each checklist type where ALL is the value in these fields.
Currency
Select the currency associated with the checklist from the drop-down list. This may be ALL or a specific currency.
Enabled
Check this box to enable the checklist.
- Perform any of the Basic Actions mentioned in Navigation chapter.
Checklist actions are steps (a set of one or more tasks) related to the checklist you are creating. They are loaded on the Checklist Action Definition section.
- In the Checklist Action Definition - Regular section, perform any of the Basic Operations mentioned in Navigation chapter
A brief description of the fields is given below:
Field: |
Do this: |
Action Code |
Specify the action code for the checklist. |
Description |
Specify the description for the action type. |
Sort |
Specify the sort order to define the placement of the action type on the Checklist sub screen. |
Enabled |
Check this box to include this action in the checklist. |
- Perform any of the Basic Actions mentioned in Navigation chapter.
- In the Checklist Action Definition - Document section, perform any of the Basic Operations mentioned in Navigation chapter.
A brief description of the fields is given below:
Field: |
Do this: |
Action Code |
Specify the action code for the checklist. |
Description |
Specify the description for the action type. |
Document Type |
Select the document type from the drop-down list. |
Document Sub Type |
Select the document sub type from the drop-down list. |
Document Mandatory |
Check this box to indicate that the document is mandatory. |
Sort |
Specify the sort order to define the placement of the action type on the Checklist sub screen. |
Enabled |
Check this box to include this action in the checklist. |
- Perform any of the Basic Actions mentioned in Navigation chapter.
4.15 Stipulations
The system supports the automatic generation of default stipulations for loans during origination on the Underwriting window’s Stipulation sub screen (Decision link). The default stipulations can be maintained by company, branch, product, state, application status and application sub-status on the Stipulations screen.
To set up the Stipulations
- On the Oracle Financial Services Lending and Leasing home screen, click Setup > Setup > Administration > User > Products > Stipulations > Line.
- In the Stipulation Setup section, perform any of the Basic Operations mentioned in Navigation chapter.
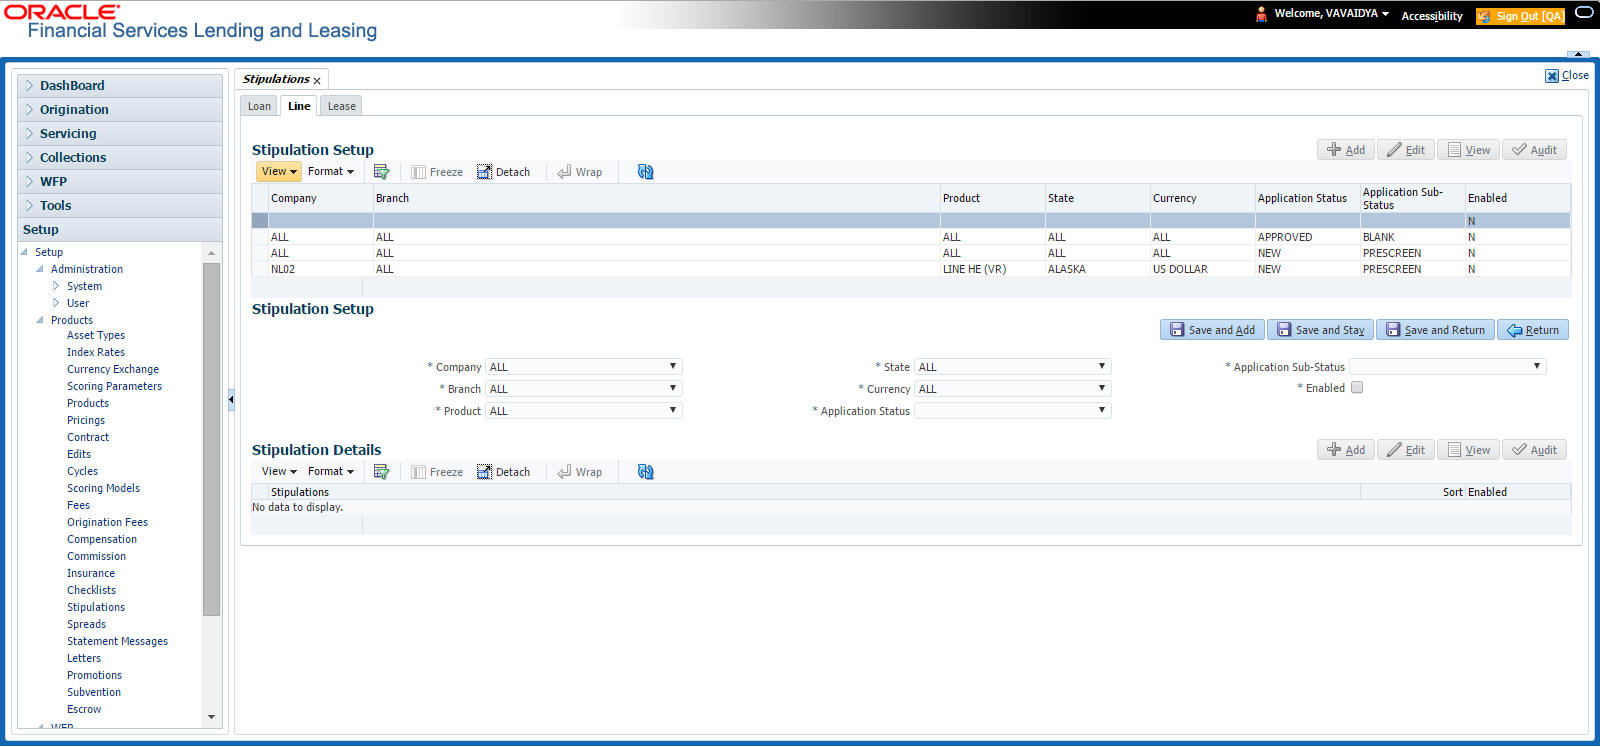
A brief description of the fields is given below:
Field: |
Do this: |
Company |
Select the portfolio company associated with the default stipulations, from the drop-down list. |
Branch |
Select the portfolio branch associated with the default stipulations, from the drop-down list. |
Product |
Select the product associated with the default stipulations, from the drop-down list. |
State |
Select the state associated with the default stipulations, from the drop-down list. |
Currency |
Select the currency associated with the default stipulations, from the drop-down list. |
Application Status |
Select the application status associated with the default stipulations, from the drop-down list. |
Application Sub-Status |
Select the application sub status associated with the default stipulations, from the drop-down list. |
Enabled |
Check this box to allow the default stipulations to be used. |
- Perform any of the Basic Actions mentioned in Navigation chapter.
- In the Stipulation Details section, perform any of the Basic Operations mentioned in Navigation chapter.
A brief description of the fields is given below:
Field: |
Do this: |
Stipulations |
Select the stipulation from the drop-down list. |
Sort |
Specify the sort sequence for the stipulation. |
Enabled |
Check this box to allow the stipulations details to be used by the system. |
- Perform any of the Basic Actions mentioned in Navigation chapter.
4.16 Letters
The Letters screen allows you to define letters that the system automatically generates when the application or the account for a products meets certain conditions, or “trigger events.” Each letter has its own trigger event. For example, you can configure the system to automatically send a welcome letter when an application becomes an account or send a collection letters when an account becomes delinquent.
The system supports the following types of letters:
Type of letter: |
Definition: |
ACCOUNT STATEMENT |
Generated when account is to receive a billing statement (this time is defined in contract setup). Letter is sent to customer. |
ADVERSE Action letter |
Generated in nightly batch jobs for applications that were declined. This letter is sent to the consumer to indicate the reasons why the application was declined. |
CONDITIONAL ADVERSE |
Generated in nightly batch jobs for applications that were |
ACTION LETTER |
declined. This letter is sent to the consumer to indicate the reasons why the application was declined. This letter also indicates steps that the consumer may take to gain approval of the application. |
COLLECTION LETTER 1 |
Generated when an account becomes delinquent. This is the first dunning letter sent to the customer. |
COLLECTION LETTER 2 |
Generated when an account remains in delinquency for an extended period. This is the second dunning letter sent to the customer. |
COLLECTION LETTER 3 |
Generated when an account remains in delinquency for an extended period, even after having received previous notices. This is the final dunning letter sent to the customer. |
CONTRACT FUNDING fax/email |
Generated when an application is APPROVED: FUNDED or conditioned: funded. This letter is sent to the producer. |
DECISION FAX/EMAIL |
Generated when an application is APPROVED, conditioned, or rejected. This letter is sent to the consumer or producer, depending on whether the product is a direct or in-direct loan. |
PAID IN FULL LETTER |
Generated in nightly batch jobs when the account pays off. This letter is sent to the customer. |
PAYOFF QUOTE LETTER |
Generated when a payoff quote is created for an account. This letter is sent to the customer. |
WELCOME LETTER |
Generated when an application is APPROVED: FUNDED. This letter is sent to the consumer. STATEMENT PAST MATURITY Generated when an accounts are matured but unpaid. This letter is sent to the account holders as a reminder to make their payments. |
When the system generates letters, it searches the Letters screen for letter definitions that meet the following criteria:
- Definition is enabled.
- Definition is an exact match of the letter code being generated.
- Definition is a match of either the application/account value or ALL for all other criteria.
Exact matches for each field are given a higher weight than matches to ALL.
The returned rows are then given a descending rank based on the weighted values and the hierarchical position of these fields:
- Company
- Branch
- Product
- State
- Currency
On the ranked rows, the first row is returned as the best match.
To set up the Letters
- On the Oracle Financial Services Lending and Leasing home screen, click Setup > Setup > Administration > User > Products > Letters > Line.
- In the Letter Definition section, perform any of the Basic Operations mentioned in Navigation chapter.
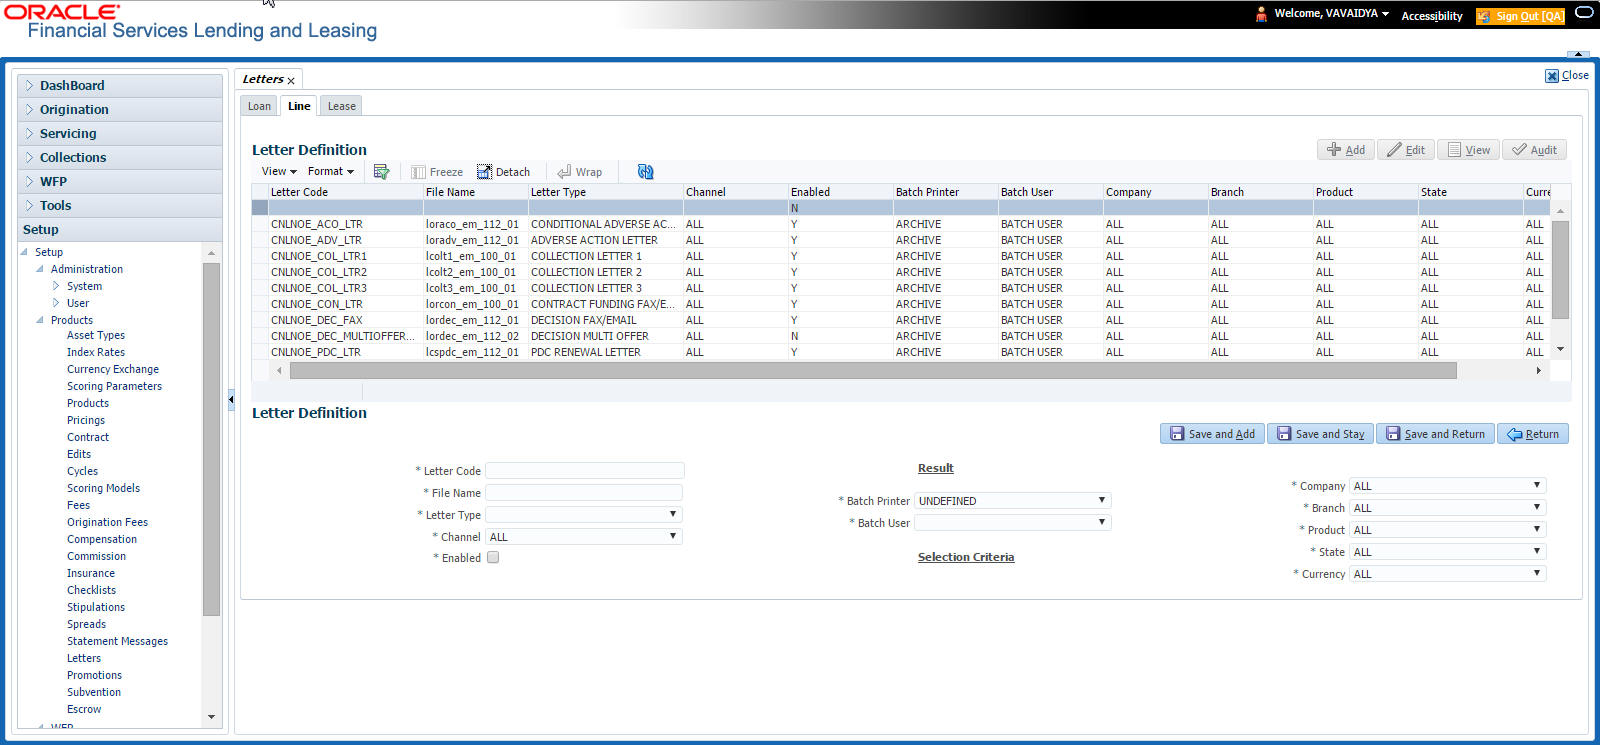
A brief description of the fields is given below:
Field: |
Do this: |
Letter Code |
Specify the code for the letter. |
File Name |
Specify the file name of the Oracle report used to generate the letter. The file should be named <File Name>.rep on your server. |
Letter Type |
Select the type of letter you want to generate from the drop-down list. |
Channel |
Select the application source (channel) for the letter from the drop-down list. This may be ALL or a specific channel. |
Enabled |
Check this box to enable this letter definition. |
Result section |
|
Batch Printer |
Select the batch printer being used to generate the letter from the drop-down list. |
Batch User |
Select the user who will submit this letter from the drop-down list. This will normally be set to BATCH. |
Selection Criteria section |
|
Company |
Select the portfolio company for which this letter will be used from the drop-down list. This may be ALL or a specific company. |
Branch |
Select the portfolio branch for which this letter will be used from the drop-down list. This may be ALL or a specific branch. This must be ALL if in the Company field you selected ALL). |
Product |
Select the product for which this letter will be used from the drop-down list. This may be ALL or a specific product. |
State |
Select the state for which this letter will be used from the drop-down list. This may be ALL or a specific state. |
Currency |
Select the currency for which this letter will be used from the drop-down list. This may be ALL or a specific currency. |
- Perform any of the Basic Actions mentioned in Navigation chapter.
4.17 Promotions
The Introductory screen of Promotions screen allows you to set up the promotions a financial institution can offer its customers. Promotions can be selected as part of the on the Application Entry and Applications windows.
You can define an introductory promotion based on the following attributes:
- Type
- Period Type
- Period
You can define multiple promotions for a product, then select the appropriate promotion at the time the application is processed. Promotions also serve as a selection criteria on the Pricing screen.
CAUTION: The system supports promotions selected when a product is funded.
Note
Promotions will not be supported for amortized and pre-compute loans
Same as Cash promotions
In the case of the same as cash promotion:
- If the outstanding amount at the end of the promotional period is within the tolerance amount, then the customer receives the full benefit of the promotion and the system will not charge any interest on the borrowers’ account.
- If the outstanding amount is higher than the authorized tolerance amount, then the customer loses the benefit of the promotion and the system computes and charges the borrower interest from the date the product was funded.
Interest & Payments
Interest still continues to accrue for a account that is funded using the SAME AS CASH promotion. However, the interest accrued during the promotion period is not charged or collected on the account until the end of the promotion period.
Any repayment made by the customer during the promotion period is applied towards the principal amount. The system then calculates the interest accrual using the reduced principal amount, if applicable.
If the product remains unpaid after the end of the promotion period and the principal balance is above any stated tolerance amount, then the system starts collecting interest earned and accrued during the promotion period.
Pay-off quote during promotion period
If the account is set-up using the SAME AS CASH promotion, then during the promotion period:
- On the Customer Service form’s Account Details screen, the system displays only the principal amount and any fees/expenses due. Interest amounts will not be included.
- The payoff quote generated through the Customer Service form’s Maintenance (3) screen displays only the principal amount and any fees/expenses due from the borrower(s). If all or any portion of the account is unpaid at the end of the promotion period and is over any set tolerance limit, then the PAYOFF amount displays the total amount (Principal + Interest + other charges, if any) using the current amounts.
Reduced Rate Introductory Promotions
Oracle Financial Services Lending and Leasing’s promotion method PROMOTIONAL RATE allows you to create and specify promotions where customers can be charged lower interest rates during a specific promotional period of time. You may define the length of the promotion in either terms or days. Also, you will be able to set the specific interest rate you want to attach to the promotion. During the promotional period, interest on an account is accrued at the promotional rate. When the promotional period expires, the system changes the interest rate of the product to the contractual interest rate to accrue interest. The promotion expires on the promotion end date defined by the length of the promotion. However, the system allows you to set a grace period for extending the automatic cancellation of the promotion due to delinquency, similar to the grace period associated with a payment date.
To set up the Introductory
- On the Oracle Financial Services Lending and Leasing home screen, click Setup > Setup > Administration > User > Products > Promotions > Line Introductory.
- In the Promotion Definitions section, perform any of the Basic Operations mentioned in Navigation chapter.
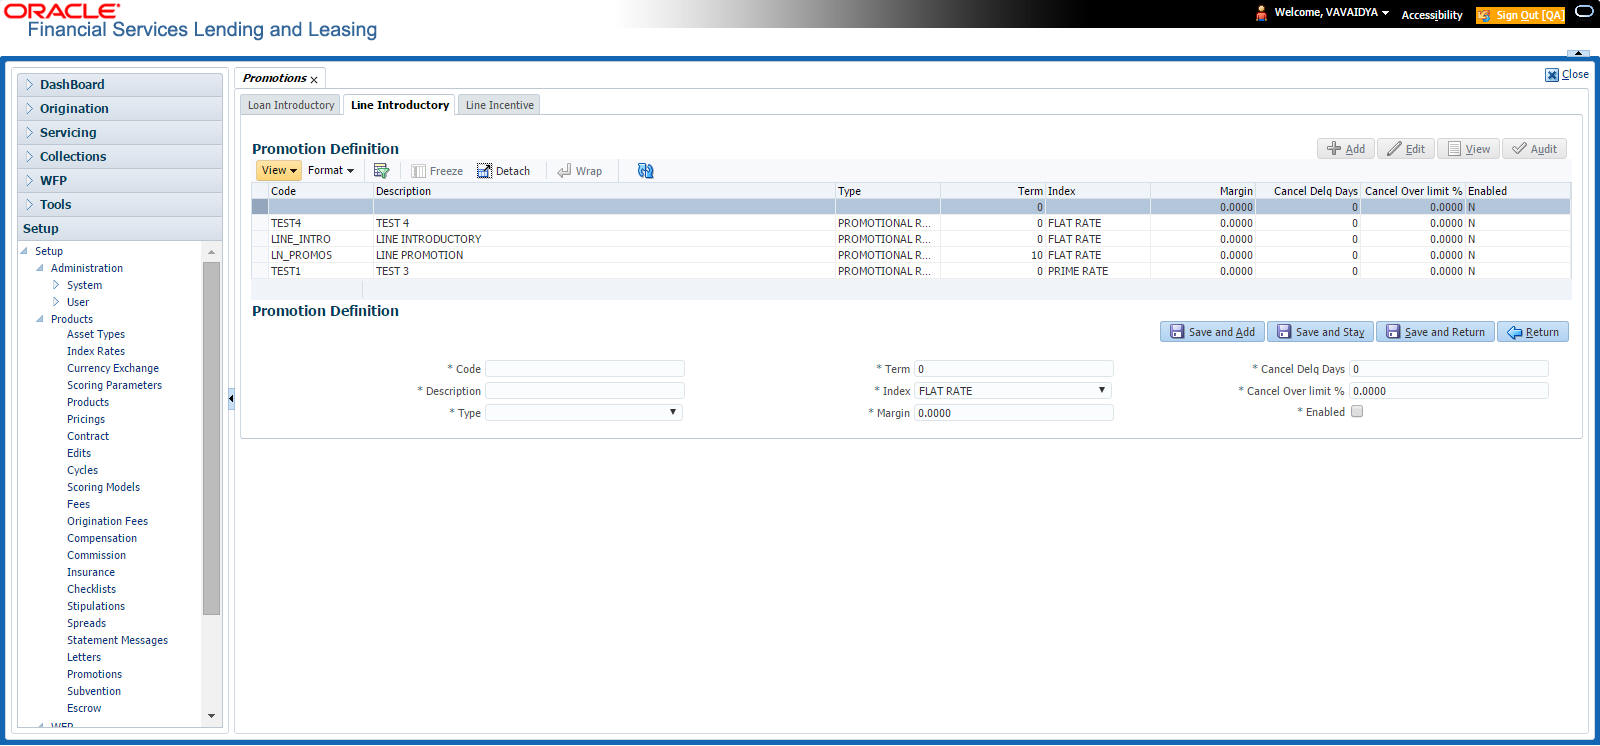
A brief description of the fields is given below:
Field |
Do this |
Code |
Specify the code identifying the promotion. |
Description |
Specify a description of the promotion being offered. |
Type |
Select the promotion type from the drop-down list. Oracle Financial Services Lending and Leasing supports the following promotion types for lines of credit: NO PAYMENT DUE ANY INTEREST DUE (No payments are required and no interest is accrued on the outstanding accrual balances for “x” terms). |
Term |
Select the promotion term from the drop-down list. |
Index |
Select the promotion index from the drop-down list. |
Margin |
Specify the promotion margin rate. |
Cancel Delq Days |
Specify the promotion cancellation delinquency days. |
Cancel Overlimit% |
Specify the promotion cancellation over limit percentage. |
Enabled |
Check this box to enable the promotion. |
- Perform any of the Basic Actions mentioned in Navigation chapter.
- On the Oracle Financial Services Lending and Leasing home screen, click Setup > Setup > Administration > User > Products > Promotions > Line Incentive.
- In the Promotion Definitions section, perform any of the Basic Operations mentioned in Navigation chapter.
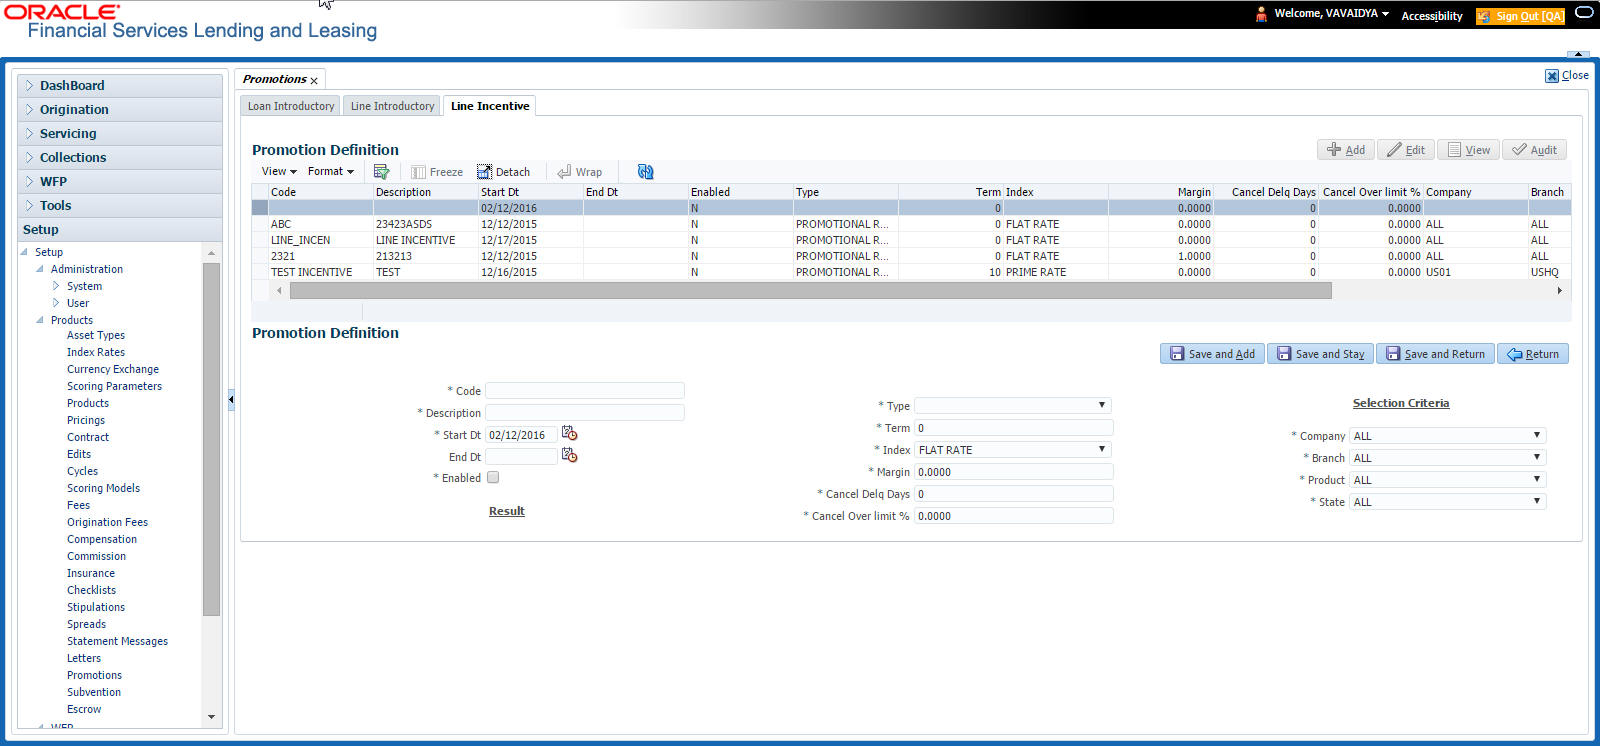
- A brief description of the fields is given below.
Field:
Do this:
Code
Specify the code identifying the promotion.
Description
Specify a description of the promotion being offered.
Start Date
Select the start date from the drop-down list.
End Date
Select the end date from the drop-down list.
Enabled
Check this box to enable the promotion.
Result section
Type
Select the promotion type from the drop-down list.
Term
Specify the promotion term .
Index
Select the promotion index from the drop-down list.
Margin
Specify the promotion margin rate.
Cancel Delq Days
Specify the promotion cancellation delinquency days.
Cancel Overlimit%
Specify the promotion cancellation over limit percentage.
Selection Criteria section
Company
Select the portfolio company from the drop-down list.
Branch
Select the portfolio branch from the drop-down list.
Product
Select the product from the drop-down list.
State
Select the state from the drop-down list.
- Perform any of the Basic Actions mentioned in Navigation chapter.