4. Customer Service
4.1 Introduction
After an application has cycled through the Line of credit origination process, it becomes an account. Account maintenance and collections tasks can be performed with Oracle Financial Services Lending and Leasing’s Customer Service screen.
The Customer Service screen enables you to view and manage all customer information in a centralized location to ensure data integrity and provide better service. Oracle Financial Services Lending and Leasing provides online real-time information about the applicant(s), contract, account balances, dues, transactions, call activities, and comments. Oracle Financial Services Lending and Leasing also supports back-dating of financial transactions till the account’s opening date.
Activating an Account
An account is automatically activated when you fund the contract using Funding main tab or convert from a legacy system. You cannot activate an account using the Customer Service screen.
Posting and Reversing Payments
A payment can be posted and reversed on the Payments screen. You cannot post and reverse the payment in Customer Service screen. (For more information, see the Payment Processing chapter)
Account Mask
After an application completes the Line of credit origination cycle and is funded or is ported into the system, it becomes an account and receives an account number. The system assigns account numbers using the following logic:
YYYYMMNNNNNNNX
where:
YYYYMM = contract date
NNNNNNN = serial number
X = check digit
The system sorts accounts using the NNNNNN portion only. That portion is referred to as the account ID.
4.1.1 Quick Search section
Conditions and Queues
During the Line of credit application process,applications had a status and sub status Accounts do not have sub statuses; instead, accounts use conditions. Conditions further define the status of an account; for example: delinquent, bankruptcy, scheduled for charge off, Do Not Charge Off. Conditions can be applied automatically by the system based on set up, and manually by the system users using Customer Service screen.
The system can assign accounts to specific users by way of queues. Queues are a work flow management tool that allow the users to work on accounts sequentially from a prioritized list, rather than having to manually search for and load them. Queues are created and sorted during nightly processing. Examples of customer service queues include due date change requests, delinquent accounts, deferment requests, and title and insurance follow-up.
Account conditions serve as default queues; that is, an account’s condition determines which queue the account is in.
In the following example, account has a condition of deliNquent, noted in the Conditions section and Status field. The account was loaded from delinquent queue, DELq (d).
A queue can be associated with only one condition. In the following example, the Delinquent queue is associated with the Delinquent condition. However, an account can have more than one condition, so an account can be in more than one queue. Multiple queues can be created for a single condition. Account attributes (such as number of days delinquent and product code) can be used for assigning accounts to a queue and sorting accounts within a queue.
You can quickly load an account from a queue using Next Account button in the Quick Search section.
4.2 Customer Service screen
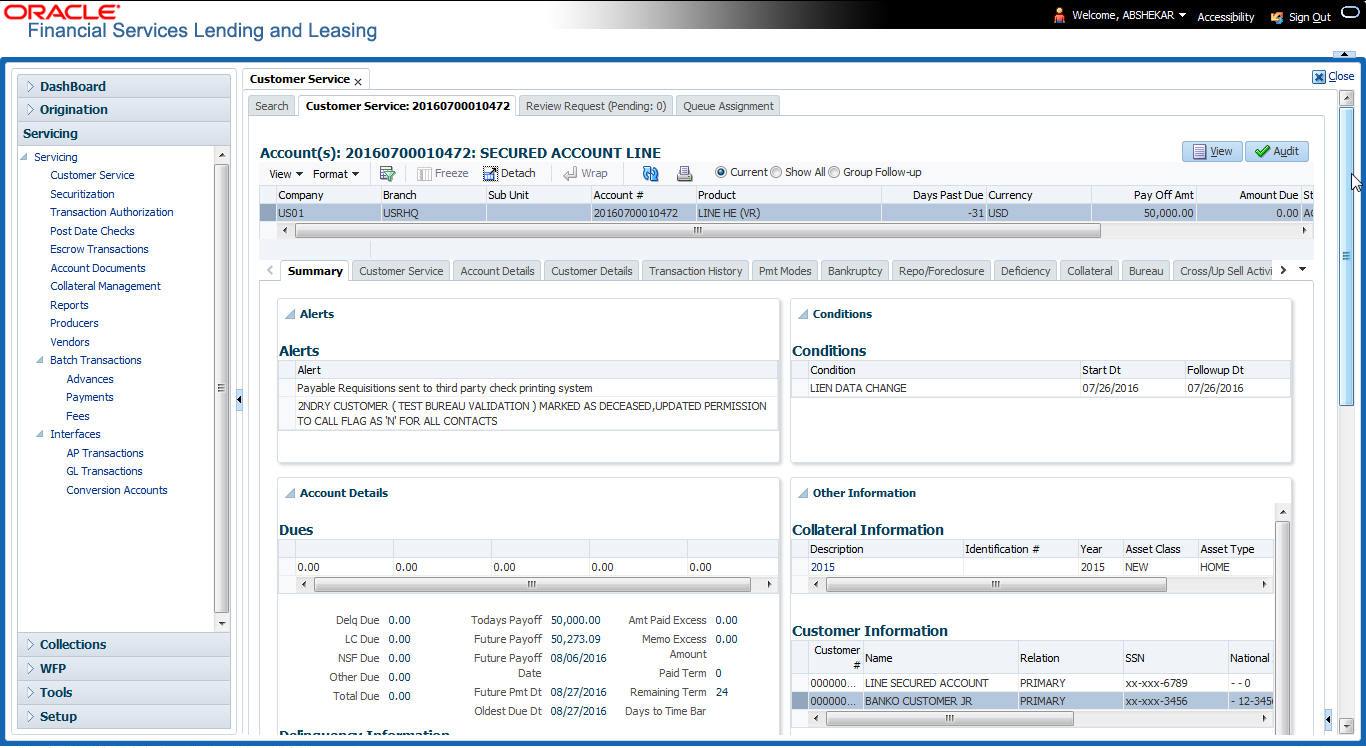
Most of the screens on Customer Service screen contain Account(s) and Customer(s) sections as a header. The Account(s) section provides a quick overview of an account by displaying its company, branch, account number, product, payoff amount and amount due, status, and oldest due date. The information on Customer Service screen always refers to the account selected in this section.
The Customer(s) section displays information about customer(s) attached to the account. The information on Customer Service screen always refers to the customer selected in this section.
To view account details in Account(s) and Customer(s) sections, open Customer Service screen and load the account you want to work with.
On Customer Service screen’s Account(s) section, view the following information: The system filters and displays information based on your selection:
Command Button: |
Action Performed: |
Current |
Displays the current search account only. It does not matter how that account was searched like using account search screen or selected a queue from drop-down and pressed ‘Next’ button or account number was directly pasted in Acc# text box and pressed Submit button.This is the default option. |
Show All |
Displays the related accounts based on current selected customer’s customer Id. To view the details of account number(s) other than current account, select the account in Account(s) section and click Submit. |
Group Follow-up |
Displays the set of accounts that share same account condition as the selected account and bear same Customer Id. Other than having same account condition and Customer Id, the queue currently selected should have the Group Follow-up Indicator enabled in queue setup and follow-up date should fall in range of organization level system parameter UCS_GROUP_FOLLOWUP_DAYS. |
In Account(s) section, click View to view the following information:
In this field: |
View this: |
Company |
The company of the account. |
Branch |
The branch of the account. |
Account # |
The account number. |
Product |
The product for the account. |
Days Past Due |
The total number of days elapsed past due date. |
Currency |
The currency for the account. |
Pay Off Amt |
The current payoff amount for the account. |
Amount Due |
The current delinquent amount due for the account. |
Status |
The account’s status. |
DLQ Reason |
The delinquency reason that gets auto updated by the system as one of the following when the account is marked delinquent. - 1st Payment Delinquency, when the first payment is delinquent. - NSF Delinquency, when the payment amount on due date results in NSF (non sufficient funds) in the account. - Matured Delinquency, when account reaches the ‘Maturity Date’ with some delinquency amount. Note: System automatically removes the delinquency reason on the account if the payment is received. However, if the same payment is reversed, the conditions are posted back. |
Oldest Due Dt |
The oldest due date. |
The system allows quick search of an account through Quick Search section in the right hand side of screen irrespective of the customer service screen on which you are working on. This is available in addition to the Quick Search section available in Results tab.
For more details on Quick Search refer ‘Search Functions’ chapter.
Comments can be added using Add Comment section in the right hand side of screen irrespective of screen you are working on. This is available in addition to the Comments sub tab available under Customer Service tab. This facilitates quick and easy reference.
For details on Comments refer Comments sub tab section in this chapter.
Call Activity functionality can be performed using Add Call Activity section in the right hand side of screen irrespective of the screen you are working on. This is available in addition to the Call Activities sub tab available under Customer Service tab. This facilitates quick and easy reference.
For details on Call Activity refer Call Activities sub tab section in this chapter.
4.3 Customer Service screen’s Summary tab
Open Customer Service screen and load the account you want to work with. By default the Customer Service screen opens the Summary tab.
Alerts section
Any comment posted as an alert, are displayed in the alert section of Summary tab.
Conditions section
You can view any conditions like Bankruptcy, Repossession, Foreclosure etc posted on an account. The condition is posted in the account with a start date which is the effective date and follow up date which indicates the next follow-up date for further process.
Dues section
Unpaid dues and the dates are displayed in a tabular form. Details of payment amount due, fee due, payoff are also displayed.
In this field: |
View this: |
Delq Due |
The total delinquent amount that is due so far in the account. |
LC Due |
The total amount of non-sufficient fee due in the account. |
NSF Due |
The non sufficient funds fee due. |
Other Due |
The total of any other dues pending in the account. |
Total Due |
The total of all dues including payment amount and all applicable fees. |
Today’s Payoff |
If the account is to be paid off as per the current date and the amount payable by the borrower. |
Future payoff |
The total Amount due on a future date. The borrower can know the total pay off amount for a future date, say 10 days from today. |
Future Payoff Date |
The date on which the future payoff is due. |
Future Pmt Dt |
The date till which the future payoff quote is valid. |
Oldest Due Dt |
The due date. |
Amt Paid Excess |
The excess amount paid. |
Memo Excess Amount |
The excess amount paid towards the membership fee. |
Paid Term |
The total count of paid dues. |
Remaining Term |
The total count of remaining outstanding dues to be paid. |
Days to Time Bar |
View the total number of days remaining to reach the time bar end date. |
Delinquency Information Section
View the following information in the Delinquency Information section:
In this field: |
View this: |
Late |
Total number of times the account was delinquent for less than 30 days since start date. |
30 |
Total number of times the account was delinquent for over 30 days since start date. |
60 |
Total number of times the account was delinquent for over 60 days since start date. |
90 |
Total number of times the account was delinquent for over 90 days since start date. |
120 |
Total number of times the account was delinquent for over 120 days since start date. |
150 |
Total number of times the account was delinquent for over 150 days since start date. |
180 |
Total number of times the account was delinquent for over 180 days since start date. |
Category |
The delinquency category. |
Days |
The number of days delinquent. A negative number in this fields denotes the number of days until a payment is due. |
Broken Promises (Life) |
Total number of broken promises since the account start date. |
Broken Promises (Year) |
Total number of broken promises since this year. |
Kept Promises (Life) |
Total number of fulfilled promises since the account start date excluding Broken and Cancelled Promises. |
Kept Promises (Year) |
Total number of fulfilled promises since this year excluding Broken and Cancelled Promises. |
NSF (Life) |
Total number of non sufficient funds since the account start date. |
NSF (Year) |
Total number of non sufficient funds since this year. |
Collector |
The default collector working on the account. |
Activities Section
View the following information in the Activities section:
In this field: |
View this: |
Active Dt |
The date account was made active. |
Last Activity Dt |
The date on which most recent activity was performed in the account. |
Due Day |
The due day for payment. |
Last Pmt Amt |
The last payment amount. |
Customer Grade |
The customer grade. |
App# |
The application number from which this account was created. |
Producer |
The producer through which the account was sourced. |
X-ref |
The cross reference number of third party origination system. |
Paid Off Dt |
The date on which account was paid off. Note: Filed has value only if account has Paid-off condition. |
Effective Dt |
The date account became effective. |
Current Pmt |
The current payment amount. |
Last Bill Amt |
The last bill amount. |
Last Pmt Amt |
The last payment amount. |
Chargeoff Dt |
The Date on which account was charged off. Note: This is applicable only if account has Charged-off condition. Else, no value displayed. |
Military Duty |
If selected, indicates that at the time of billing, the customer was in active military duty and qualifies for rates in accordance with Service members Civil Relief Act (SCRA) of 2003. |
Customer Score |
The customer score. |
Behaviour Score |
The behavior score. |
Due Date Change section
The Due Date Change section displays the remaining number of transactions available for the account in the Summary tab. You can view the following information under Due Date Change section.
In this Field: |
Do This: |
Last Txn Dt |
The last date on which the due date was changed. |
Rem. Txn. Limit (Life) |
Remaining number of due date changes allowed till account closure. |
Rem. Txn. Limit (Year) |
Remaining number of due date changes in the account for current calendar year. |
Extensions section
The Extensions section displays the remaining number of transactions available for the account in the Summary tab. You can view following extension details as per the conditions maintained in the contract.
In this Field: |
Do This: |
Rem. Txn. Limit (Year) |
Remaining number of extensions in the account for current calendar year. |
Rem. Txn. Limit (Life) |
Remaining number of extensions in the account till closure. |
Last Txn Dt |
The date when last extension was made. |
Exten. Gap Rem. (Months) |
The number of months remaining before you can post Extensions for an account. |
Contract Information
You can view the contract information recorded during the funding process. It’s a display only version of the same information found on the Funding screen’s > Contract screen.
In this Field: |
Do This: |
Contract Dt |
View the contract funded date. |
Term |
View the contract term. |
Rate |
View the interest rate. |
Maturity Dt |
View the contract maturity date. |
Credit Limit |
View the total credit limit issued. |
Collateral Information section
You can view the Collateral Information in this section:
In this field: |
View this: |
Description |
A brief description on the collateral. This is a hyper-link which when clicked opens Collateral Management screen with relevant collateral details. |
Identification # |
The identification number of the collateral. This is a hyper-link which when clicked takes you to the collateral management screen with the relevant asset details. |
Year |
The year of manufacture of the collateral. |
Asset Class |
The asset class of the collateral. |
Asset Type |
The type of collateral. |
Sub Type |
The sub type of the collateral. |
Customer Information section
On Customer Service screen’s Customer Information section, select the record you want to work with and view the following information:
In this field: |
View this: |
Customer # |
Customer identification number (unique customer identifier). |
Name |
Customer’s full name. |
Relation |
Customer’s relationship to the account. |
SSN |
Customer’s social security number. If the organizational parameter UIX_HIDE_RESTRICTED_DATA is set to Y, this appears as a masked number; for example, XXX-XX-1234. |
Birth Dt |
Customer’s date of birth. |
Gender |
Customer’s gender. |
Customer Details section
In this field: |
View this: |
Customer’s e-mail address. |
|
Language |
Language spoken by the customer. |
Marital Status |
Customer’s marital status. |
Disability |
Customer’s disability indicator If selected, this indicates that the customer is disabled. |
Skip |
Customer’s skip indicator. If selected, this indicates that the customer is a skip debtor. This is selected using the Maintenance screen. |
Stop Correspondence |
Stop correspondence indicator. If selected, Oracle Financial Services Lending and Leasing will not send correspondence to customer. This is selected using the Maintenance screen. |
Privacy Opt-Out |
Privacy opt-out indicator. If selected, indicates that customer does not want the FI to share his /her information with any other body, other than regulatory requirements. (optional). |
Active Military Duty |
Customer’s Active Military Duty indicator. If selected, this indicates that the customer is serving Military Duty. This is selected using the Maintenance screen. |
Time Zone |
Customer’s time zone. |
Address Information section
In this field: |
View this: |
Type |
Address type. |
Current |
If selected, indicates that this is the current address. |
Permission to Call |
If selected, indicates that you can contact the customer. |
Mailing |
If selected, indicates that this is the mailing address. |
Address |
Address details. |
Phone |
Phone number. |
Employment Information section
In this field: |
View this: |
Type |
Address type. |
Current |
If selected, indicates that this is the current address. |
Permission to Call |
If selected, indicates that you can contact the customer. |
Employer |
Employer Details |
Address |
Address details. |
Phone |
Phone number. |
Telecom Information Section
In this field: |
View this: |
Type |
The type of phone contact such as Home / Office / Car / Mobile phone. |
Permission to Call |
Permission as either Yes ‘Y’ or No ‘N’ to contact the customer over phone. |
Phone |
The customer’s phone number. |
Extn |
The customer’s phone extension. |
Time Zone |
The customer’s time zone. |
Best day to call |
Preferred day of the week to contact the customer, if specified. |
Best Time To Call |
Preferred time to contact the customer, if specified. |
Outbound Call History
Displays outbound call statistics with following references:
In this field: |
View this: |
Today |
The total number of outbound calls as of today. |
Last 7 days |
The total number of outbound calls in the past 7 days. |
Last 30 days |
The total number of outbound calls in the past 30 days. |
Work Order Details
Displays work order details as indicated below:
In this field: |
View this: |
Work Order # |
View the work order number. |
Case # |
View the case number if associated with the work order. |
Work Order Type |
View the type of work order. |
Vendor |
View the vendor to whom the work order is assigned. |
Status |
View the status of work order. |
4.4 Customer Service screen’s Customer Service tab
Open the Customer Service screen and load the account you want to work with. Click the Customer Service tab to view the sections under it.
4.4.1 Call Activities sub tab
Call activity section includes calls from customer, calls you make regarding the account or changes to the condition of the account. Entries in the Call Activities section are listed in reverse chronological order of follow-up date.
Each action and result has a code and description. The code for the call action and call result is what appears on the Call Activity sub screen. The Call activity action codes (Action field) and call activity results codes (Results field) are user-defined.
The Call Activities sub tab displays all the call activities defined by users in both “Customer Service > Call Activities tab” and in “Right Hand Splitter > Add Call Activity section”.
4.4.1.1 Recording a Call Activity
To record a call activity
- Open the Customer Service screen and load the account you want to work with.
- Click Customer Service sub tab and then click
Call Activities tab under it. Click Add. The system displays
the following screen.

- You can complete the following optional fields:
- Perform any of the Basic Operations mentioned in Navigation
chapter.
In this field:
Do this:
Dt
System defaults the current date.
Action
Select the action performed from the drop-down list.
Result
Select the result of the action from the drop-down list. Depending on the action selected, filtered results are displayed for selection.
Contact
Select who person you contacted from the drop-down list.
Reason
Select the reason for the communication from the drop-down list.
Promise Date
Select the promise date from the adjoining calendar.
Promise Amt
Specify the promise amount.
Condition
Select the condition or queue type from the drop-down list.
The list displays a combination of all the possible conditions depending on the action and result selected along with any open conditions applicable on the account. You can select ‘None’ if there are no specific conditions.
Appointment
Check this box to take an appointment.
If Appointment is checked, then system allows you to select date and appointment time as per customer request. If appointment flag is not checked, then you can only enter the date with date picker.
Followup Dt
Specify the next follow-up date. Based on this date, system automatically adds the account in queue for follow-up.
Time Zone
Select the time zone of the customer.
Group Followup
Check this box to enable group followup.
Comment
Specify additional information of the call activity, if any.
- Perform any of the Basic Actions mentioned in Navigation chapter.
- Click to Save and Add to add a new record. Click to Save and Return to return to the main screen. The system creates two entries on Customer Service screen for the call activity.
The codes for Action and Result appear as a record on the Customer Service screen, under Call Activities tab. The description for Action and Result appear as a system generated comment on the Customer Service screen, under Comments tab. If the account is delinquent, then the delinquency days is also appended in the system generated comment.
4.4.1.2 Making an Appointment
The Appointment box on Call Activities section enables you to schedule an account to appear in a particular queue at a future date and time. When you make an appointment, account will appear in the front of queue listed in the Conditions field at the time listed in the Follow Up Dt field.
In order to view the account, you must be working in that queue at follow up time. Refer the ‘Recording a Call Activity section’.
To make an appointment
- Open Customer Service screen and load the account you want to work with.
- Click Customer Service sub tab and then click Call Activities tab under it.
- Click Add and specify the field details on Call Activities section (Refer, Recording a call activity section).
- In Condition field, select the condition for queue you want the account to appear in.
- In Follow Up Dt field, select the date and time you want account to appear using the calendar. This can be either current day or a day in future.
- Select the Appn’mt box.
- Click Save And Add / Save And Return.
If account is not worked within the queue on day of the appointment, nightly jobs will cancel the appointment. If the account’s queue condition changes during nightly batch jobs, the outstanding appointments are cancelled.
4.4.1.3 Cancelling an Appointment
Using the Call Activities screen, you can cancel an appointment for an account. The account will still appear in the queue on follow up date, but no longer receive a priority.
To cancel an appointment
- Open Customer Service screen and load the account you want to work with.
- Click Customer Service sub tab and then click Call Activities tab under it.
Click Add. The system displays Call Activities screen.
If you need to change time for the appointment, create a new entry on
account’s Call Activities section with the same condition,
but enter a new follow up date. If you need to cancel the appointment,
create a new entry on account’s Call Activities section
with same condition, but don’t check the Appointment
check box.
(To create a new entry, refer Recording a Call Activity section.)
- Click Save.
4.4.1.4 Recording a Promise to Pay
If you record an action on Call Activities screen as a ‘promise to pay’, it appears as a record on the Account Details screen’s Promises section. The Promises section enables you to quickly view these actions without searching for them individually.
To record a promise to pay
- Open Customer Service screen and load the account you want to work with.
- Click Customer Service sub tab and then click Call Activities tab under it.
- Click Add. The system displays the Call Activities screen. In Action field, select the action which is already performed, such as DC - Dealer Called
- In the Result field, select a result involving a promise to pay, such as PP - PROMISE TO PAY.
- You can complete the following optional fields:
In this field:
Do this:
Contact
Select the contact type. (Who was the person you communicated with?).
Reason
Select the reason, as stated by the contacted person. (What is the reason for this contact?).
- In the Promise Dt field, record date when the person you spoke with promises to make payment.
- In the Promise Amt field, record amount of payment the person you spoke with promises to pay.
- In the Condition field, select the condition or queue type.
- In the Follow up Dt field, enter next follow-up date for the promise-to-pay or accept the default date.
- Click Save. The system automatically notes this information as an entry on the Promises and Comments sub screens.
Note
If payment amount is within the tolerance limit, promise is considered to be kept. If the payment amount is not within tolerance limit, promise is considered to be broken.
4.4.1.5 Cancelling a Promise to Pay
Oracle Financial Services Lending and Leasing enables you to cancel promises to pay using the Account Detail’s screen Call Activities section. You might do this when a customer informs you prior to the promise date that he or she cannot make the payment.
To cancel the existing promise to pay
- Open the Customer Service screen and load the account you want to work with.
- Click Customer Service sub tab and then click Call Activities tab under it.
- Click Add. The system displays the Call Activities screen.
- Select the call activity entry for the promise to pay you want to cancel.
Click the Cancel box. The promise is marked as cancelled and will not be considered when processing promises; in other words, it will not be counted as either satisfied or broken.
4.4.1.6 Posting Offline Call Activities
The system facilitates posting of offline call activities against an account.
To Post Offline Call Activities:
- The source file is provided in CSV format (pre-determined for fields & size). Each field in the file is separated by a comma (,) and each line is separated by return (New Line).
- A batch job Offline call activity posting, loads the provided flat file in the specified format and system will process it line by line.
- For each line, the system posts Call Action Code and the corresponding Call Result Code, for a given account number with SYSDATE.
- The system will perform respective call activities and sets the follow-up date as SYSDATE + Follow up Days (As provided in the feed file)
- During offline call activity, you can specify comments, if any, in the comments field. The system defaults comments received from offline call activity in the comments section sub tab under Customer Service screen.
- During offline call activity, you can also include the alert flag as ‘Y’ or ‘N’ for a comment as the last parameter (i.e. after comments and separated by a comma). Oracle Financial Services Lending and Leasing recognizes this comment as an alert and displays in Customer Service > Summary Tab, in Alerts section.
4.4.2 Maintenance sub tab
The Customer Service screen’s Maintenance screen acts as a single command stations that enables you to post a wide array of monetary and non monetary transactions for any given account. Transaction available is based on the account’s Line of credit produce and the user’s responsibility. This section explains how to complete the following tasks:
Monetary tasks
Line of Credit:
- Apply, adjust, or waive servicing expenses
- Adjust or waive late charges
- Adjust or waive non-sufficient funds
- Apply, adjust, or waive repossession expenses
- Apply, adjust, or waive bankruptcy expenses
- Apply or adjust phone pay fees
- Change an index/margin rate
- Apply, adjust, or cancel financed insurance
- Payoff an account
- Charge-off an account/Do Not Charge-Off an account.
- Close an account
- Indicate a borrower as on or off active military duty
- Post a credit limit
- Activate, adjust, cancel, or waive a credit insurance disability
- Activate, adjust, cancel, or waive a credit insurance life
- Adjust or waive an advance transaction fee
- Adjust or waive a membership fee
- Adjust or waive an over limit fee
- Adjust, charge-off, or waive the advance/principal balance
- Adjust the interest balance
- Stop interest accrual
Non-Monetary tasks
Line of credit:
- Update a customer’s name
- Maintain customer details
- Mark a customer as a skipped debtor
- Change a customer’s Privacy Opt-Out indicator
- Stop correspondence
- Modify financed insurance information
- Start or stop an ACH
- Reprint a statement (batch only)
- Add or stop servicing of accounts with post dated checks as a repayment method
- Adjust Dealer Compensation
The system enables you to post a monetary transaction immediately or submit it for nightly processing. The transaction is identified as either a ‘real-time’ or nightly batch transaction in Oracle Financial Services Lending and Leasing’s transaction setup codes. The system also enables you to cancel the future dated transactions or transactions those have been submitted for nightly processing. All activities in the account, including who performed it, date and time stamp, are captured in the audit trail.
4.4.2.1 Creating Monetary and Non monetary Transactions
All monetary and non monetary tasks listed in the appendix Transaction Parameters are available for use on Maintenance screen. Each task requires a Transaction value and a Parameter value.
To use the Maintenance screen to complete monetary transaction
- Open Customer Service screen and load the account you want to work with.
- Click Customer Service sub tab and then click
Maintenance tab under it.
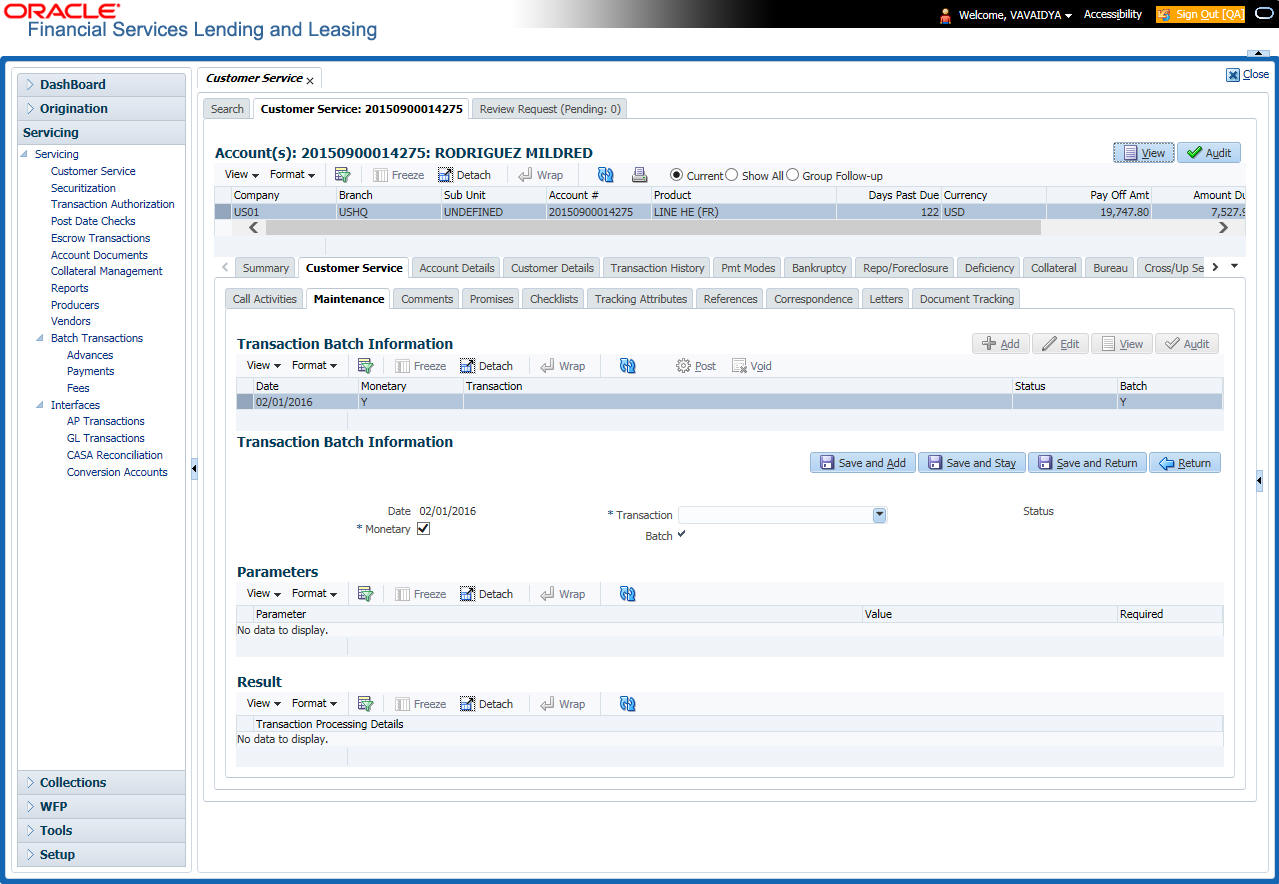
- On the Maintenance screen’s Action section, click AddIn the Transaction Batch Information Section section:
- Select the Monetary box to complete a monetary transaction.
-or-
- Clear the Monetary box to complete a non monetary transaction.
- In the Transaction field, select transaction for the task you want to complete. Transaction availability depends on the type of Line of credit account, whether the transaction is monetary or non monetary, and user responsibility.
Note that, during set up, all transactions are configured to be processed either in real time or as a batch transaction. Accordingly, the ‘Batch’ check box is selected only if the selected transaction is to be performed through batch execution.
- Click Load Parameters.
- Specify all the required parameter values and click Post.
The system displays result (success or failure) in the Results section.
You can cancel a transaction by selecting the record and clicking Void. The parameter ‘TPE_TXN_POST_DEFAULT_GLDATE’ is used to default the transaction date to GL date. If the ‘Default Transaction Date to GL Date’ is Yes, then GL date will be defaulted as transaction date. If the value is ‘No’, then the transaction date will not be defaulted and you can specify the transaction date manually.
When transaction date is not equal to or less than the system date, transaction is considered to be back dated. System Date is ‘OFSLL System Date’ which is the GL Date. When user posts the back dated transaction, system displays warning message as “Confirm to post the back dated transaction” with YES/NO. If user selects 'Yes', then transaction proceeds. If user selects 'No', then the transaction gets cancelled.
System displays back dated posting warning message only if the parameter ‘TPE_SHOW_BACKDATE_WARNING’ is set to ‘Y’
When an ‘ON MILITARY DUTY TRANSACTION’ is posted in an account:
- The system restricts users from bankruptcy /repossession/foreclosure conditions.
- System posts DO NOT CHARGE OFF condition on that account to exclude the account from Auto Charge Off process.
- The DO NOT CHARGE OFF condition is removed when 'OFF Military Duty' transaction is posted.
4.4.3 Comments sub tab
Oracle Financial Services Lending and Leasing enables you to record/delete comments on the Customer Service screen using Comments tab. These comments also appear under the Comments sub tab.
All the user added Comments in either Customer Service > Comments tab or in Right Hand Splitter > Add Comment section, are displayed in the Comments sub tab including system generated comments.
4.4.3.1 Recording an Additional Comment
To record an additional comment
- Open the Customer Service screen and load the account you want to work with.
- Click Customer Service sub tab and then click Comments tab under it.
- Click Add. The system displays the Comments
screen.
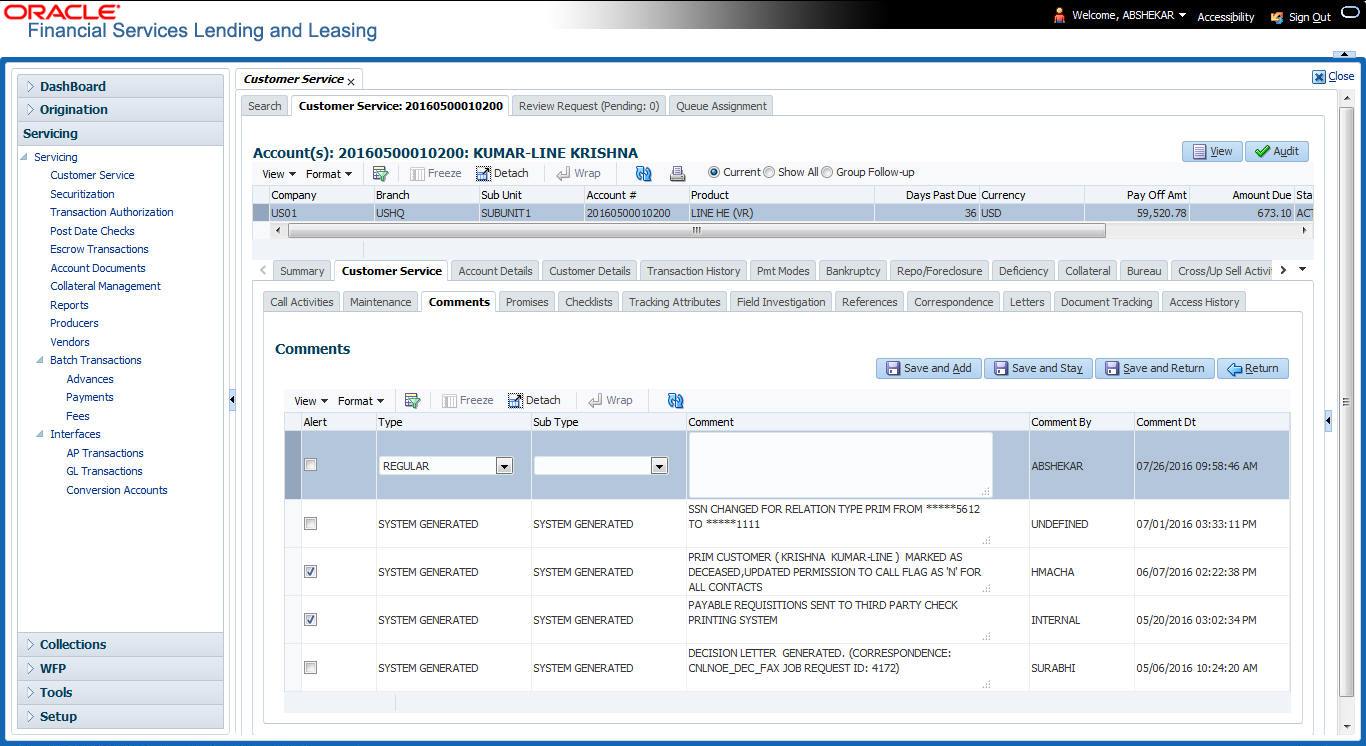
- If you want to tag this comment as important, select the Alert box. If selected, the comment appears on Customer Service screen’s Alerts section, after Save.
- In the Type field, select what type of comment you are adding.
- In the Sub Type field, select what sub type of comment you are adding.
- In the Comment field, specify your comment.
- Click Save and Add to add a new record. Click Save and Return to return to the main screen.
Comments can be viewed under the Comments tab View the following:
In this field: |
View this: |
Alert |
If selected, Oracle Financial Services Lending and Leasing to recognizes this comment as an alert and displays in Customer Service > Summary Tab, in Alerts section. |
Type |
The type of comment. |
SubType |
The sub type of comment. |
Comment |
The text message entered in the Add Comments section. |
Comment By |
The user ID of person who entered comment in the Add Comments section. |
Comment Dt |
The date on which comment was entered in the Add Comments section. |
4.4.3.2 Deleting Comment(s)
You can delete ‘REGULAR’ type comments displayed in the Comments sub tab.
To delete a comment
- Open the Customer Service screen and load the account you want to work with.
- Click Customer Service sub tab and then click Comments tab under it.
- Select the row which consists of the comment and click Delete from the actions.
- Click ‘Yes’ to confirm delete in the warning message displayed.
4.4.4 Promises sub tab
The system automatically updates promise to pay request information as an entry under the Promises sub tab based on value defined in parameter at setup level.
In this field: |
View this: |
Promise Amt |
The amount promised. |
Promise Dt |
The date by which customer promises to pay the said amount. |
Taken By |
The user who took promise. |
Taken Dt |
The date promise was taken. |
Collected Amt |
The amount collected against the promise. |
Broken ind |
If ‘Y’, indicates that this is a broken promise. |
Cancelled |
If ‘Y’, indicates that this is a cancelled promise |
If a call was recorded as a Promise to Pay on the Call Activities section, it will appear under the Promises sub tab. The Promises sub tab enables you to quickly view details about the call and subsequent actions and displays 25 most recent promises to pay.
A promise is considered to be broken in either of the following conditions:
- If system does not receive the promised amount ‘ON or Before’ the promised date.
- If a payment is received but the paid amount is not up to the tolerance limit, as defined in Setup > Contract screen.
System automatically updates the consolidated status of all promises in Customer Service > Summary tab, ‘Delinquency Information’ section. View the following information in the Promises sub tab.
Create Multiple Promises
In the Promises sub tab, you can capture more than one Promise at a go and track all promises, instead of adding multiple call activities to capture multiple promises.
To record multiple promises related to call activity, Click Create Multiple Promises. The system displays the ‘Promises’ section with the following fields:
In this field: |
View this: |
Action |
Select the type of action from the drop-down list. |
Result |
Select the required result of action from the drop-down list. The Result field drop-down list displays only “Promise to Pay” related results based on the action selected. |
Contact |
Select the type of person you contacted from the drop-down list. |
Reason |
Based on the account condition and the reason stated by the contact, select the appropriate reason from the drop-down list. |
Promise St Dt |
Select the date from which the first promise is made from the adjoining calendar icon. |
Frequency |
Select the frequency of payment from the drop-down list. |
Promise Amt |
Specify the amount promised by the contact. Ensure that you do not enter zero or a decimal value. |
No. of Promises |
Specify the total number of promises made by the contact. A minimum of one promise need to exist. |
Appointment |
Select the check box if a prior appointment is to be taken for future follow-up. |
Comment |
Specify additional details of the promise, if any. |
Click Create to record the promise details. Based on the number of promises, equivalent records are created in the section below with the following information:
In this field: |
View this: |
Promise Dt |
The first record indicates the promise start date and subsequent records will have dates incremented based on frequency and number of promises. |
Promise Amt |
View the amount promised. |
Reason |
Indicates the reason stated by the contact. |
Contact |
Indicates the contact selected. |
FollowUp Dt |
Indicates the followup date which is auto calculated by the system by adding 2-3 additional days from the promise date. |
Appointment |
Indicates if a prior appointment is required for future follow-up. |
Comment |
Specify additional details of the promise, if any. |
If required, You can further modify the details of each record.
Click Save and Return. The recorded promises are populated in Call Activities tab for tracking.
For more information on Call Activities, refer Customer Service > Call Activities sub tab section.
4.4.5 Checklists sub tab
In this field: |
View this: |
Promise Amt |
The amount promised. |
Promise Dt |
The date by which customer promises to pay the said amount. |
Taken By |
The user who took promise. |
Taken Dt |
The date promise was taken. |
Collected Amt |
The amount collected against the promise. |
Broken |
If selected, indicates that this is a broken promise. |
Cancelled |
If selected, indicates that this is a cancelled promise |
Oracle Financial Services Lending and Leasing enables you to use checklist to ensure that procedures are followed to complete various tasks. This instructional information appears under the Checklist sub tab.
4.4.5.1 Completing a Checklist for an Account
To complete a checklist for an account
- Open the Customer Service screen and load the account you want to work with.
- Click Customer Service tab, Click Checklist
sub tab.

- In the Check List Type field, select the type of checklist you want to complete and then click Load Checklist. The system loads checklist in the Checklist and Checklist Action sections.
- Under Action - Regular tab, Click Edit. In the Action field, select an action you want to complete.
- Under Action - Document tab, Click Edit. In Document tab, you can track documents pertaining to the checklist type and update the status.
- Note your work with the Yes/No/NA option buttons. You can also add comments to each action on the checklist in the Comment column.
- Click Save and Add to add a new record. Click Save and Return to return to the main screen.
4.4.6 Tracking Attributes sub tab
The Tracking Attributes screen enables you to link information to an account that is not tracked by default in the system, but is part of your company’s business practices; for example, the location of important documents, how customers receive pay checks, or the hint questions for remembering a PIN. Such attributes are defined during system setup.
To use the Customer Service screen’s Tracking Attributes screen
- Open the Customer Service screen and load the account you want to work with.
- Click the Customer Service tab, then click Tracking Attributes sub tab.
- Click Load Tracking. The system loads the
tracking parameters.

- Complete Tracking section by entering the requested parameter in the Value field.
- Save any changes you made to the account.
4.4.7 Field Investigation Sub Tab
The Field Investigation sub tab allows you to record the field investigation details for further processing. Field investigation primarily consists of verifying cusotmer’s contact points and the other details to be verified such as address, employment, asset etc through a specific verifying agency.
To record field investigation and create work-order
- Open the Customer Service screen and load the account you want to work with.
- Click the Customer Service tab, then click
Field Investigation sub tab.

- In Field Investigation section, perform any of the Basic Operations mentioned in Navigation chapter.
A brief description of the fields are given below:
Field |
Do this |
Customer |
Select the customer attached to the account from the adjoining drop-down list |
Verification Type |
Select the field verification type from the adjoining drop-down list. |
Verification Agency |
Select the verification agency from the adjoining drop-down list. |
Status |
Select the field verification status from the adjoining drop-down list. |
Spoke to |
Specify the name of the person contacted during field verification. |
Call Dt |
Select the date when the customer was contacted from the adjoining calendar. |
# of Attempts |
Specify the number of attempts made to contact the customer. |
Result |
Select the field verification result from the adjoining drop-down list |
- Perform any of the Basic Actions mentioned in Navigation chapter.
- In Verification Details section, perform any of the Basic Operations mentioned in Navigation chapter.
A brief description of the fields are given below:
Field |
Do this |
Remarks |
Specify remarks, if any regarding the field verification. |
Verification Match |
Check the box if the verification has matched. |
- Perform any of the Basic Actions mentioned in Navigation chapter.
4.4.8 References sub tab
The References sub tab enables you to view/add/edit references attached to the account during Line of credit origination cycle.
To use the Customer Service screen’s References screen
- Open the Customer Service screen and load the account you want to work with.
- Click the Customer Service tab, then click References sub tab.
- Click Add.
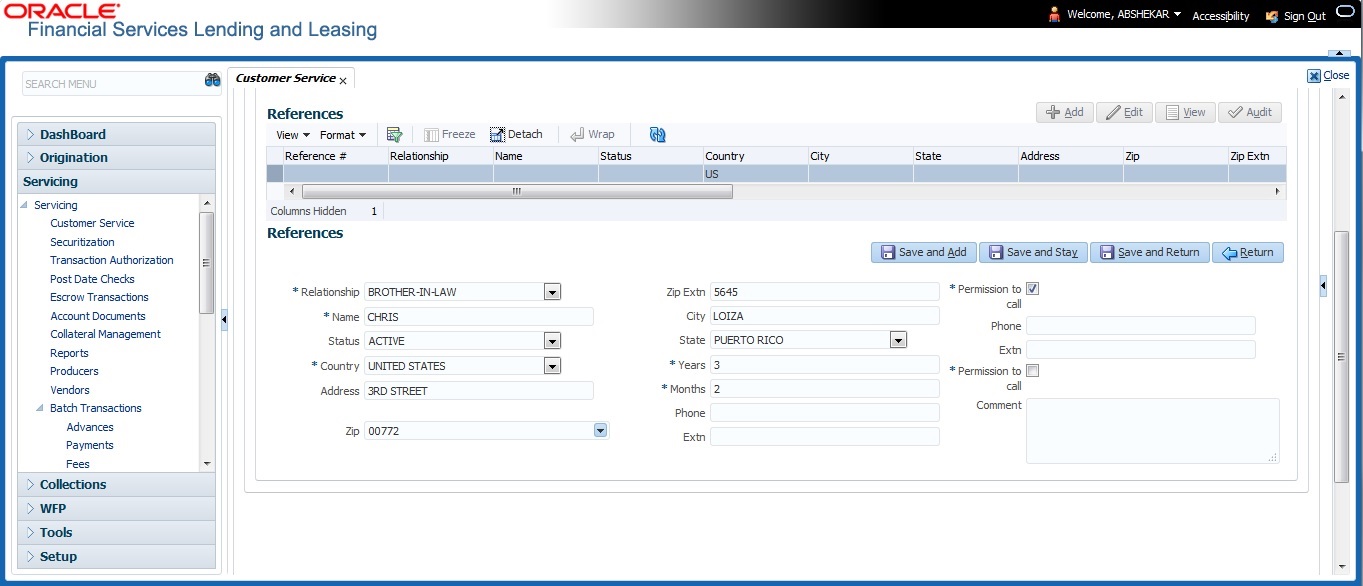
Specify the following details:
In this field: |
Specify this: |
Relationship |
Referee's relationship with borrower. |
Name |
Referee's name and details in the following fields. |
Status |
Select the status of the reference as either ‘Active’ or ‘Inactive’ from the drop-down list. |
Country |
The country. |
Address |
The address line. |
Zip |
The zip code. |
Zip Extn |
The zip code extension |
City |
The city. |
State |
The state. |
Years |
Number of years that the reference is known by the borrower. |
Months |
The number of months that the reference is known by the borrower. |
Phone |
The reference’s primary phone number. |
Extn |
The reference’s primary phone extension. |
Permission to call |
Check this box if customer has provided permission to contact through the specified phone number. When selected, system auto validates this option against the phone number specified. Atleast one phone number should have the permission to call for successful pre-qualification of the account. Else, an error message is displayed. |
Phone |
The reference’s secondary phone number. |
Extn |
The reference’s secondary phone extension. |
Permission to call |
Check this box if customer has provided permission to contact through the specified phone number. When selected, system auto validates this option against the phone number specified. Atleast one phone number should have the permission to call for successful pre-qualification of the account. Else, an error message is displayed. |
Comment |
The comments regarding the reference. |
- Click Save and Add to add a new record. Click Save and Return to return to the main screen.
Note
You can also post a non-monetary transaction to add or modify contact reference details. For more details, refer to Appendix - ‘Transaction Parameters’ chapter. For references updated through the Customer Service screen, system automatically appends a comment as 'Direct Update' while posting the respective transactions.
4.4.9 Correspondence sub tab
Ad-hoc correspondence enables you to include information from accounts in document templates you create yourself without manually transferring the data. Ad-hoc documents can be generated as either Microsoft Word or PDF files.
Ad-hoc correspondence can be viewed on the Correspondence screen when you have opened an account. The screen enables you to generate a new letter or view a previously generated letter.
To generate an ad hoc correspondence
- Open the Customer Service screen and load the account you want to work with.
- Click the Customer Service tab, then click
Correspondence sub tab.

- In the Correspondence section,
click Add. In the Correspondence section, use
Correspondence field to select type of correspondence you
want to generate. The system displays following information in the Correspondence
screen for selected type of correspondence:
In this field:
View this:
Id
The correspondence id.
Correspondence
The correspondence which is to be generated.
Date
The correspondence generation date.
- In the Correspondence section, click Save. The Documents section displays all types of documents available for the type of correspondence you selected.
- In the Documents section, click View.View
the following information for each document:
In this field:
View this:
Document Id
The document Id.
Document
The document description.
Recipient
The recipient description.
E-Form Source
The e-form source.
Source Type
The source type.
Generated
’Y’ indicates that Oracle Financial Services Lending and Leasing generated the document.
Selected
’Y’ indicates that this document is selected to be included in the correspondence.
- In the Documents section, select the correspondence you want to view.
- The Document Elements section displays elements of the system used to generate correspondence.
- Click All to view all elements in the correspondence.
- or -
- Click User Defined, to view user-defined elements
in the correspondence. In the Document Elements section,
view the following information:
In this field:
Do this:
Element Type
View the document element type.
Element
View the element description.
Content
Enter/view value of the element.
- In the Document Elements section, click User Defined and complete Content fields for Element fields you want to include in the correspondence.
- In the Document Elements section, click Save.
- In the Document Elements section, click View.
The system displays a PDF of the ad hoc correspondence.
4.4.9.1 Recipient Details Sub Tab
The recipient details sub tab facilitates you to send ad-hoc correspondence to Customers, Producers, and Others as an email.
To add recipient details
- Open the the Customer Service screen and load the account you want to work with.
- Click Correspondence > Recipient Details.
- Perform any of the Basic Operations mentioned in Navigation chapter.
A brief description of the fields is given below:
Field: |
Do this: |
Recipient |
Select the recipient from the drop-down list. The list displays the following options: - Applicant - Customer - Producer - Others |
Mode |
Select the mode of correspondence from the drop-down list. The list displays the following options: - Fax |
Type |
Based on the recipient selected, the following type of correspondence is listed for selection: When the recipient is selected as Customer / Producer, the Type is defaulted as ‘Email’ and associated email ID is selected for correspondence. You can also change the Type to ‘Adhoc’ and specify the required email ID. When the recipient is selected as ‘Others’ you can specify the email ID in Type field for correspondence. |
FAX/Email |
View the status of FAX/Email selected. |
Comments |
Specify additional information as comments. |
- In the Recipient Details section, click Save.
- Click Send to email the correspondence details to the specified recipients.
System validates the correspondence details and generates a PDF document through BI Publisher with the Correspondence details. The same is emailed to the specified recipient as an attachment and a system generated comment is updated in ‘Comments’ Tab. The correspondence consists of following header details::
Alert |
Type & Subtype |
Comment |
Comment By |
Comment Date |
N |
System Generated |
<Type> <Correspondence type> sent to <Recipient Type> through < Mode> to <'Email' id> |
Logged in user |
Current System date with time stamp |
4.4.10 Letters sub tab
The Oracle Financial Services Lending and Leasing Customer Service screen’s correspondence address matters regarding customer service and collections for accounts. They also enable financial organizations to manage bulk mailings. The Letters screen enables you to create and view the following types of correspondence:
- Welcome letter
- Paid in Full letter
- PayOff quote letter
- Rate change intimation letter
- PDC renewal letter
- Servicing:
- Pay Off quote letter
- PDC renewal letter
You can view format of all the above letter types by clicking ‘View Letter’ button. In case, the correspondence to a particular customer has been stopped using the Maintenance, ‘View Letter’ button will not be displayed and only Letters screen will be available.
To use the Letters screen
- Open the Customer Service screen and load the account you want to work with.
- Click the Customer Service tab, then click
Letters sub tab.
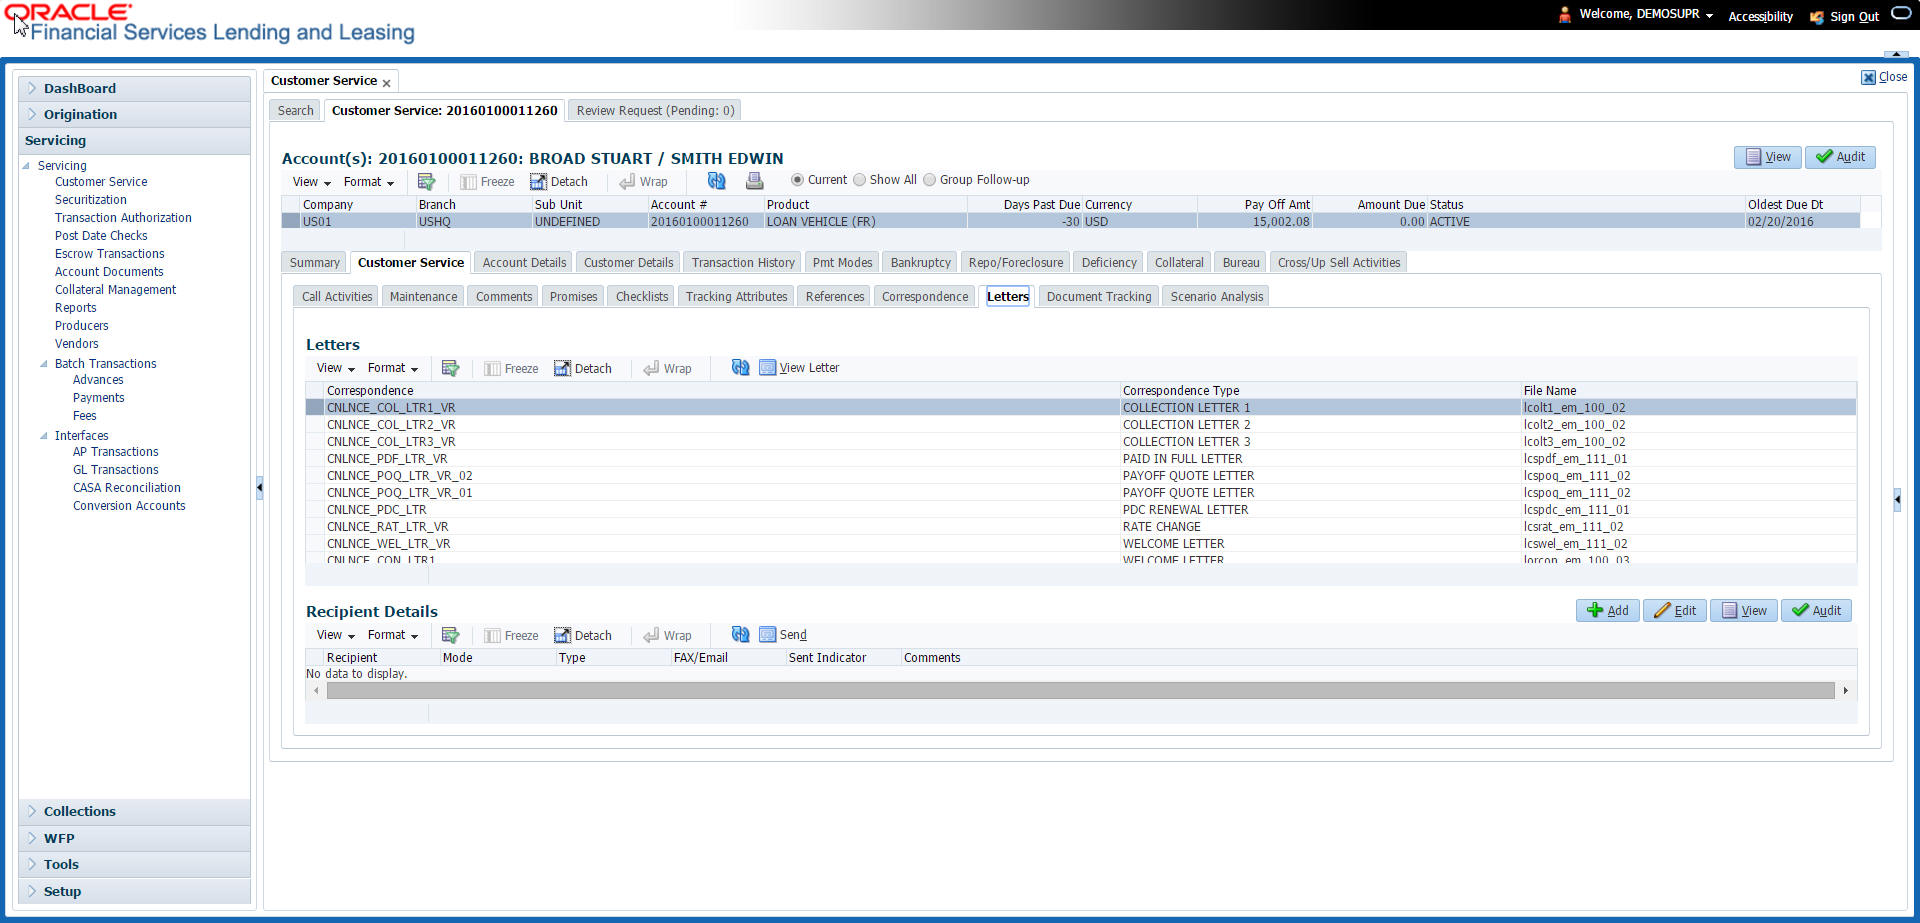
Recipient Details
In the Recipient Details section, you can maintain the recipient details to whom the letter should be sent. You can specify the following recipient details:
Field: |
Do this: |
Recipient |
Select the recipient from the drop-down list. The list displays the following options: - Applicant - Customer - Producer - Others |
Mode |
Select the mode of correspondence from the drop-down list. The list displays the following options: - Fax |
Type |
Based on the recipient selected, the following type of correspondence is listed for selection: When the recipient is selected as Customer / Producer, the Type is defaulted as ‘Email’ and associated email ID is selected for correspondence. You can also change the Type to ‘Adhoc’ and specify the required email ID. When the recipient is selected as ‘Others’ you can specify the email ID in Type field for correspondence. |
FAX/Email |
View the status of FAX/Email selected. |
Comments |
Specify additional information as comments. |
- In the Recipient Details section, click Save.
- Click Send to email the correspondence details to the specified recipients.
System validates the correspondence details and generates a PDF document through BI Publisher with the Correspondence details. The same is emailed to the specified recipient as an attachment and a system generated comment is updated in ‘Comments’ Tab. The correspondence consists of following header details:
Alert |
Type & Subtype |
Comment |
Comment By |
Comment Date |
N |
System Generated |
<Type> <Correspondence type> sent to <Recipient Type> through < Mode> to <'Email' id> |
Logged in user |
Current System date with time stamp |
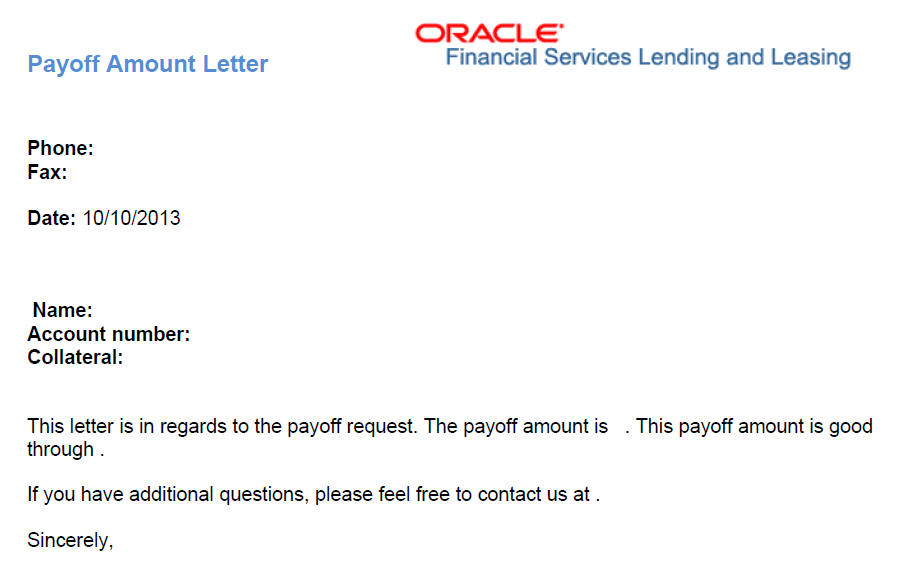
4.4.10.1 Servicing: Payoff Quote
The predefined Payoff Quote is sent if a payoff quote is requested for an account. Payoff quotes can be manually generated using Maintenance screen on the Customer Service screen with the monetary Payoff Quote transaction.
To generate a payoff quote letter
- Open the Customer Service screen and load the account you want to work with.
- Click the Customer Service tab, then click Letters sub tab.
- On the Letters section, select Payoff Quote Letter.
- Click View Letter to generate Payoff Quote
Letter.
4.4.10.2 Servicing: Rate Change Intimation Letter
For line of credits with interest rates based on index- it is standard practice to inform the borrower about upcoming interest rate changes due to a change in the rate index. Oracle Financial Services Lending and Leasing can print pre-rate change intimation letters both automatically and manually. The Rate Change Intimation letter informs borrowers that their rate index has changed. All borrowers with the changed index may receive a rate revision on the extn rate change, which is due after X days (X is a company parameter that can be set with pre-process days).
The Rate Change Intimation letter is available only for variable rate line of credits.
To generate the Rate Change Intimation letter
- Open the Customer Service screen and load the account you want to work with.
- Click the Customer Service tab, then click Letters sub tab.
- On the Letters section, select Rate Change Intimation Letter.
- Click View Letter to generate Rate Change
Intimation Letter .

4.4.11 Document Tracking sub tab
You can view the documents attached to a particular account by loading the account on Customer Service screen, then clicking the Document Tracking sub tab. You can also open the Document Tracking screen and select from a list of all accounts with documents attached on the Document Tracking screen.
To use the Document Tracking screen
- Open the Customer Service screen and load the account you want to work with.
- Click the Customer Service tab, then click
Document Tracking sub tab.

- In the Documents section, select
the document you want to view and view the following information:
In this field:
Do this:
Document Type
View the document type.
Comment
Specify comment.
- In the Account Document Details section, select the document you want to view and click Show in the Details column.
- In the Account Document Details section, click
View to view the following information:
In this field:
Do this:
Document Type
View the document type.
Document Sub Type
View the document sub type.
Version
View the version. Version numbers will be incremental by batch job, first version will start with 1.0.
Page #
View the page number. In multiple paged documents, choose 1 in the Page # field on Account Document Details section to view all the pages in the document.
Choose a specific page number to view only that page.
Document File Type
View the document file type.
Status
View the status of the document.
Tracker #
View the tracking number of the document.
Docket #
View the docket number of the document.
Location
View the location of the document.
Received Dt
View the received date of the document.
Effective Dt
View the effective date of the document.
Expiry Dt
View the expiration date of the document.
Comment
Specify comment.
- Click View Document. The system opens a File Download dialog box.
- Click Open to view the document in the browser screen
-or-
- Click Save to download the document to a location of your choice.
- If you want, add comments to the Comments field in the Documents and Account Document Details sections.
- Save your entry.
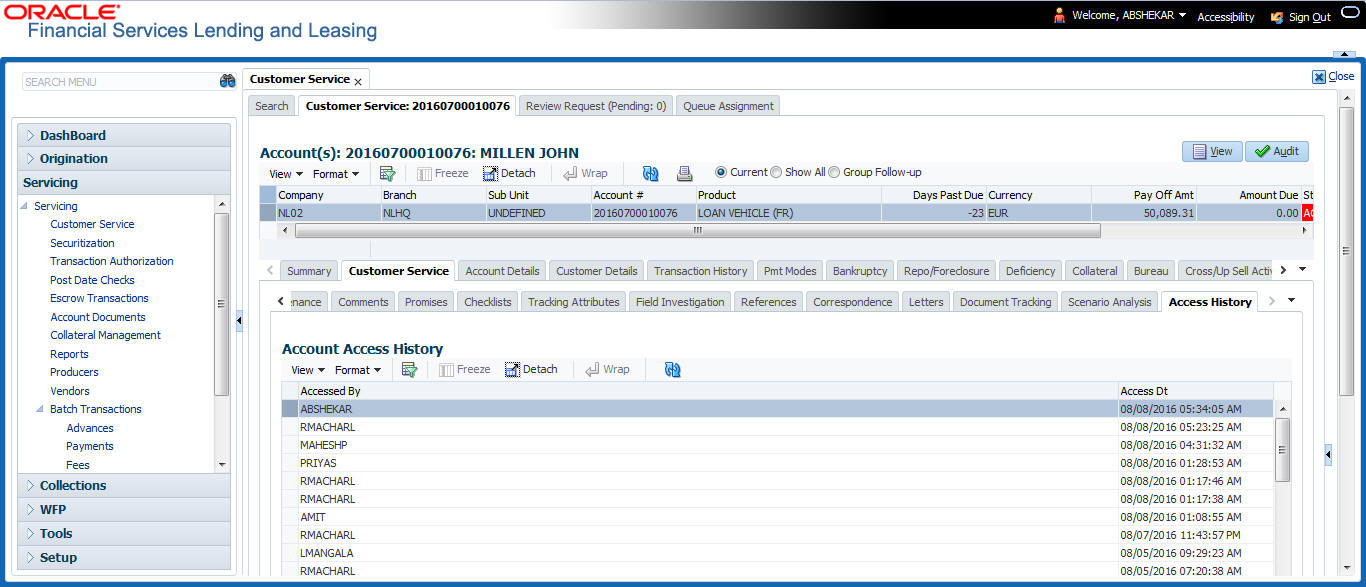
4.4.12 Access History
The Access History tab in Customer Service screen displays the list of users who have accessed a particular account in Oracle Financial Services Lending and Leasing application.
Irrespective of the action performed on the account or the way through which the account is accessed such as using search, queue/conditions, review requests and so on, system records every access and displays the user details in ‘Account Access History’ section.
Starting with the last user, the Account Access History section displays the list in descending order along with their logged-in User ID (Accessed By), date and time (Access Dt) of login in separate columns.
To view the account access history
- Open the Customer Service screen and load the account you want to work with.
- Click the Customer Service tab, then click
Access History sub tab.
You can click  (refresh) to fetch the
latest data.
(refresh) to fetch the
latest data.
4.5 Customer Service screen’s Account Details tab
Open the Customer Service screen and load the account you want to work with. Click the Account Details tab to view the sections under it.
4.5.1 Account Details sub tab
Oracle Financial Services Lending and Leasing enables you to view account details using Account Details sub tab.
In the Account Information section click View.

View the following information for Line of credit servicing product.
In this field: |
View this: |
Stop Accrual |
If selected, indicates that the accrual has been stopped for the account. |
Index Type |
The index type. |
Index Rate |
The current index rate. |
Margin Rat |
The current margin rate. |
Rate |
The current rate. |
Last Rate Change Dt |
The last Rate change date. |
Accural Start Dt |
The accural start date. |
Last Accural Dt |
The last accural date. |
Rate Start of the Year |
The start rate of the year. |
# of Rate changes (Year) |
The number of times rate changes are granted (year). |
# of Rate changes (Life) |
The number of times rate changes are granted (life). |
Extn and Due Dates |
|
# of Extensions (Year) |
The number of times extensions granted (year). |
# of Extensions (Life) |
The number of times extensions granted (life). |
# of Extension Term (Year) |
The number of terms extensions granted (year). |
# of Extension Term (Life) |
The number of terms extensions granted (life). |
# of Due Day Changes (Year |
The number of due day changes allowed in a year. |
# of Due Day Changes (Life) |
The number of due day changes allowed in a life of an account. |
Last Extn Dt |
The last extn date. |
Due Day Change Dt |
The due day change date. |
Credit Details |
|
Credit Limit |
Total credit limit. |
Hold (-) |
Held credit limit. |
Consumed (-) |
Consumed credit limit. |
Suspended(-) |
Suspended credit limit. |
Available Credit (=) |
Available credit limit. |
Over Limit Year |
Overlimit granted (year). |
Over Limit Life |
Over limit granted (life). |
Last Advance Dt |
The last advance date |
Last Advance Amt |
The last advance amount |
Cure Letter - This section displays the ‘Cure Letter’ details if it has been issued on the account on nonconforming to certain terms that are in violation of obligations and which are to be fixed within the time provided in cure letter. |
|
Start Date |
Displays the start date mentioned in Cure letter. |
Expiry Date |
Displays the date when the Cure notice expires. |
Others |
|
Stmt preference mode |
The account statement preference mode (Email or PHYSICAL) as defined in Origination > Contract screen is displayed here. |
Time Bar Details - System considers those accounts which are in ACTIVE or CHARGED OFF status and having dues, as time barred debts and displays the following time bar details: |
|
Start Date |
View the time bar start date which is the last payment date made on the account. The time bar years is calculated starting from this date. |
End Date |
View the time bar end date. System calculates this date from the start date till the total time bar years specified in Setup > Products > Contract screen. |
Days to Time Bar |
View the total number of days remaining to reach the time bar end date. |
4.5.2 Statements sub tab
The Statements screen contains three display only sections. The Statements section displays a list of all statements generated during life of the account. The Transaction section displays monetary transactions applied to the account from closing date of the previous statement through closing date of the current statement. The Messages section displays user-defined message that appears in the statement.
To view the Statements screen
- Open the Customer Service screen and load the account you want to work with.
- Click the Account Details tab, then click Statements
sub tab.
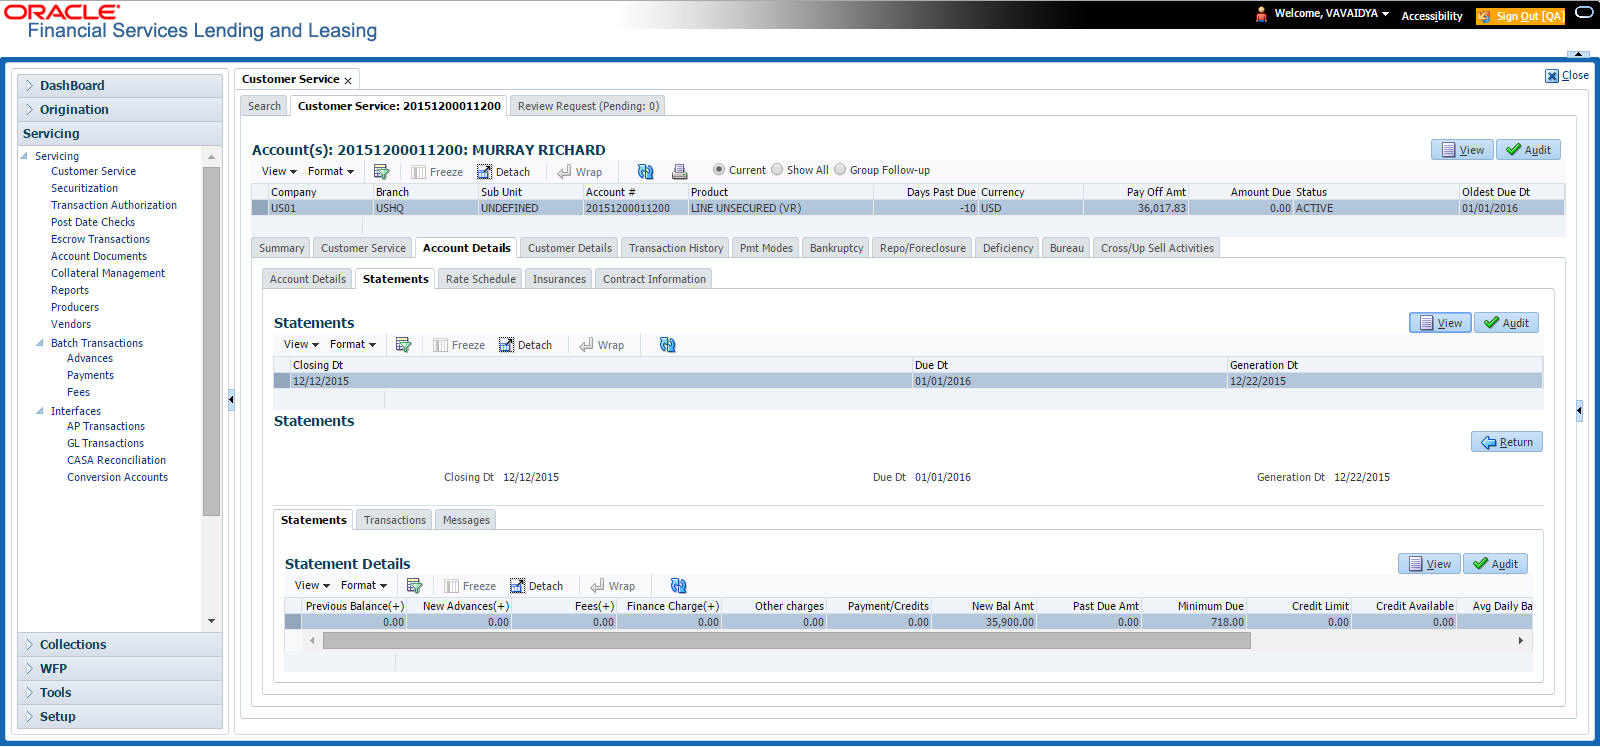
- In the Statements section, click View.
- View the following information:
In this field:
View:
Closing Dt
The statement closing date.
Due Dt
The statement due date.
Generation Dt
The statement generation date.
In the Statements Details section, select the statement you to view and click View.
- View the following:
In this field:
View:
Previous Balance(+)
The previous existing balance.
New Advances(+)
New advances allowed.
Fees(+)
Fees charged.
Finance Charge(+)
Applicable Financial charges.
Other charges
Applicable other charges.
Payment/Credits
Payments or credits issued.
New Bal Amt
New balance amount available.
Past Due Amt
Past due amount existing.
Minimum Due
Minimum due amount to be paid.
Credit Limit
Total credit limit issued.
Credit Available
Total available credit limit.
Avg Daily Balance
Average daily balance in account.
Daily Periodic Rate
Daily periodic expense rate.
Annual Rate
Annual rate on the account.
Days in Cycle
Total number of accounted days.
- Click Transactions sub tab and click View
- View the following information:
In this field:
View:
Txn Dt
The transaction effective date.
Transaction Type
The type of transaction.
Amount
The transaction amount.
Click Messages sub tab and click View.
- View the following information:
In this field:
View:
Sequence
The sequence number.
Message
The message.
4.5.3 Rate Schedule sub tab
The Rate Schedule section contains information about rate adjustments, such as the sequence and number of adjustments.
To view the Rate Schedule screen
- Open the Customer Service screen and load the account you want to work with.
- Click the Account Details tab, then click Rate Schedule
sub tab.

The Rate Schedule section only applies to variable rate loans.
- In Rate Schedule section, click View.
- View the following information:
In this field:
View this:
Seq
The sequence number for rate adjustment.
Adjustment Frequency Type
The rate adjustment frequency type.
Period
The rate adjustment period for the frequency.
# of Adjustments
The number of rate adjustments for the frequency.
4.5.4 Insurances sub tab
If insurance information was entered on Funding screen during Line of credit origination, you can view financed insurance information on the Customer Service screen’s Insurances screen. The Insurances screen displays the details of all financed insurances, including cancellation and refund information whenever applicable. It also displays the insurances that were financed after funding of Line of credit using the Customer Service screen’s Maintenance screen.
To view the Insurances screen
- Open the Customer Service screen and load the account you want to work with.
- Click the Account Details tab, then click Insurances
sub tab.

- On the Insurances screen, view
the following information in Insurance Information section:
In this field:
View:
Contractual
If selected, indicates that the insurance policy is required by contract.
Insurance Type
The insurance type.
Company
The insurance company.
Policy#
The insurance policy number.
Effective Dt
The insurance effective date.
Premium Amt
The insurance premium amount.
Term
The insurance term.
Status
The insurance status.
Click View and view the following information:
In this field: |
View: |
Policy Information section: |
|
Contractual |
If selected, indicates that the insurance policy is required by contract. |
Insurance Type |
The insurance type. |
Insurance Plan |
The insurance plan. |
Company |
The insurance company. |
Policy# |
The insurance policy number. |
Effective Dt |
The insurance effective date. |
Premium Amt |
The insurance premium amount. |
Commission Rule |
The rule of commission. |
Primary Beneficiary |
The primary beneficiary of the insurance. |
Secondary Beneficiary |
The secondary beneficiary of the insurance. |
Status |
The status. |
Sub Status |
The sub status. |
Insurance Mode |
The insurance mode. |
Phone |
The insurance company’s primary phone number. |
Phone 2 |
The insurance company’s alternate phone number. |
Itemization |
The contract itemization. |
Expiry Dt |
The insurance expiry date. |
Term |
The term of insurance. |
Commission Amt |
The insurance commission amount. |
Comments |
The comments regarding the insurance policy. |
Cancellation/Refund section: |
|
Policy Cancellation Dt |
The insurance cancellation date. |
Refund Allowed |
If selected, a refund is allowed. A selected box indicates that the insurance premium can be rebated to the customer in case of early payoff. |
Grace Days Cancellation Fee Allowed |
If selected, indicates that cancellation fees during grace period is allowed. |
Cancellation Fees |
View amount of the cancellation fee to be charged when the insurance is cancelled. |
Complete Refund |
If selected, a complete refund is allowed. |
Term Remaining |
The remaining term on the insurance at cancellation. |
Refund Calculation Method |
The refund calculation method. |
Grace Days |
View the number of grace days allowed for cancellation without charging a cancellation fee. |
Estimated Refund Amt |
The estimated insurance refund. |
Received Refund Amt |
The insurance refund received. |
Itemization |
The contract itemization. |
- In the Insurance Tracking section, click Create Tracking. The system loads insurance tracking parameters in the Insurance Tracking section.
- If you want to reduce the list of parameters, select a
sub attribute in the unlabelled Sub Attribute box next to Create Tracking
button.
If your system has been configured to use the Sub Attribute field, only attributes in a particular group appear in the parameter display. - Click Edit and complete the Parameter and Value fields.
- Click Save.
4.5.5 Condition Details sub tab
The Customer Service screen’s Condition Details tab displays the detailed log report of Account Vs Queue configuration changes i.e. every time an account has been changed from one queue/user/condition to another.
To view Condition Details
- Open the Customer Service screen and load the account you want to work with.
- Click Account Details tab, then click Condition
Details sub tab.
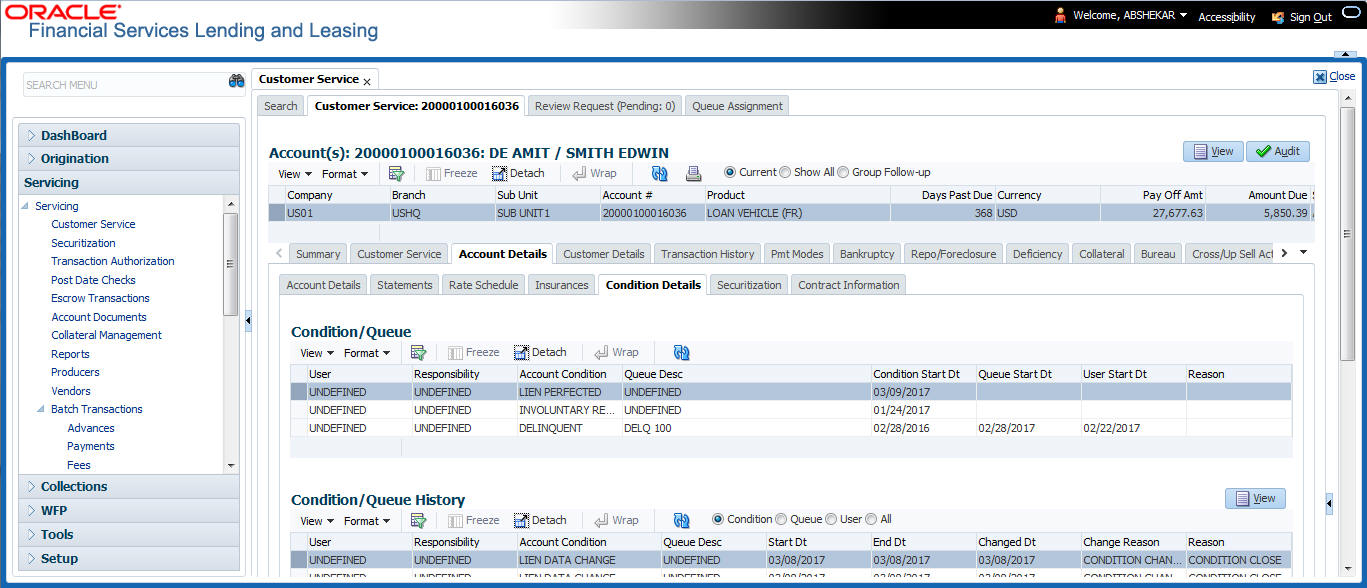
The Condition Details tab is further categorized into following sections:
- Condition/Queue
- Condition/Queue History
Condition/Queue
The Condition/Queue section displays the closed Conditions, Queues and User changes which were defined initially and later re-assigned to different Queues with Hard Assigned Users.
A current active Condition can be opened in any of the following cases:
- When a Call Activity is posted with Conditions on account
- When Conditions are posted by specific batch events
- When Conditions are posted by specific transactions (For example, Borrower on Military duty)
The Condition/Queue section displays the following information:
- User (Current Queue Assigned User If any)
- Responsibility (Current User Responsibility)
- Account Condition
- Queue Description
- Condition Start Dt
- Queue Start Dt
- User Start Dt
Condition/Queue History
The Condition/Queue section displays only the closed Conditions which were defined on the account and later was re-assigned to different Queues with Hard Assigned Users.
The Condition/Queue History section displays the following information:
- User (Old Queue Assigned User If any)
- Responsibility (Old User Responsibility)
- Account Condition
- Queue Description
- Start Date
- End Date
- Changed Date
- Change Reason
- Reason (specified in Queue Assignment tab)
In the Condition/Queue History section, select the required record and click ‘View’.
4.5.6 Contract Information sub tab
The Customer Service screen Contract sub tab enables you to view contract and truth-in-lending information recorded during the funding process. It’s a display only version of the same information found on the Funding screen’s Contract screen.
To view an account’s contract information
- Open the Customer Service screen and load the account you want to work with.
- Click Account Details tab, then click Contract
Information sub tab.

- Line of credit Use the following sub tabs to view more information about the contract, if available:
- Contract
- Repayment
- Itemization
- Trade-In
- Insurances
- ESC
- Compensation
- Subvention
- Proceeds
- Disbursements
- Fees
- ACH
- Coupon
- PDC
- References
- Real Estate
For more information on the sub tabs of the Contract tab, refer the section Contracts tab in Funding chapter of the Origination User Guide.
4.6 Customer Service screen’s Customer Details tab
Open the Customer Service screen and load the account you want to work with. Click the Customer Details tab to view the sections under it.
Customer Details screen displays the information gathered on application entry process regarding the customer and customer’s address, employment data, and phone numbers. Using this screen, you can update or add to a customer’s address, employment information, or phone listing. Whenever you add or edit the customer details, a system generated comment will be posted in the account to keep record of old and new details.
Note that the ‘Edit’ option on this screen has user level security defined and based on your responsibility, you can either edit a few or all of the fields. The difference is that, you may either have access to edit only non-PII (Personal Identifiable Information) fields or edit all possible fields as per the customer maintenance transaction.
The list of possible editable fields in both these scenarios is given below:
Edit non-PII fields |
All editable fields |
Marital Status |
Birth Date |
Language |
Marital Status |
Education |
Language |
Mother's Maiden Name |
Education |
Class Type |
Mother's Maiden |
Class Type |
|
Stop Correspondence |
|
Disability |
Stop Correspondence |
Skip |
Disability |
Privacy opt out |
Skip |
Existing CIF |
Privacy Optout |
|
Existing CIF |
|
Identification Details like |
|
Passport |
|
Issue Date |
|
Expiry Date |
|
Visa # |
|
Nationality |
|
National ID |
|
SSN |
|
License # |
|
License State |
To view or edit customer information
- Open the Customer Service screen and load the account you want to work with.
- Click Customer Details sub tab.

- In the Customer Information section,
click View the following information:
In this field:
View this:
Customer Information section
Customer #
Customer number.
Relation
Customer ‘s relation with the bank.
ECOA
The Equal Credit Opportunity Act code.
Name
Customer’s name.
Birth Dt
Customer’s date of birth.
Marital Status
Customer’s marital status.
Enabled
Status of the account.
Language
Customer’s language.
Education
Customer’s education.
Mother’s Maiden Name
Customer’s mother’s maiden name.
Class Type
Customer’s class type.
Email
Customer’s e-mail address.
Stop Correspondence
Customer’s stop correspondence indicator. If selected, this indicates that the system will not send the customer any correspondence, such as monthly statements. This is selected using the Maintenance screen.
Disability
Customer’s disability indicator.
Skip
Customer’s skip indicator. If selected, this indicates that the customer is a skip debtor. This is selected using the Maintenance screen.
Bankruptcy
Customer’s bankruptcy indicator.
Privacy Opt-Out
Privacy opt-out indicator. If selected, indicates that the applicant has elected to refrain from the non-public sharing of information.
Insurance Opt Out
Insurance Opt Out indicator. If selected, indicates that the applicant has elected to refrain from insurance related inquiries.
Marketing Opt Out
Marketing Opt Out indicator. If selected, indicates that the applicant has elected to refrain from marketing related inquiries.
Share Credit Opt Out
Share Credit Opt Out indicator. If selected, indicates that the applicant has elected to refrain from financial information and share credit related inquiries.
Existing CIF
If selected, indicates that the customer is an existing CIF.
Update Customer Info
If selected, indicates that the system was allowed to override the existing customer information with the latest address and communication details during account creation.
Identification Details section
Passport #
Customer’s passport number.
Issue Dt
Passport issue date.
Expiry Dt
Passport expiry date.
Visa #
Customer’s visa number.
Nationality
Customer’s nationality.
National ID
Customer’s national identification.
SSN
Customer’s social security number. If the organizational parameter UIX_HIDE_RESTRICTED_DATA is set to Y, this appears as a masked number; for example, XXX-XX-1234.
License #
Customer’s licence number.
License State
State where the licence was issued.
Military Service
Active Military Duty
Active military duty indicator. If selected, indicates that customer is on active military duty and may qualify for rates in accordance with the Service members Civil Relief Act of 2003 (SCRA).
Effective Dt
The effective date
Order Ref #
The order reference number.
Release Dt
The release date.
Customer Decease Date
The deceased date of the customer. You can also post a non monetary transaction to indicate if a customer is deceased. Refer to section Mark Customer as Deceased for more information.
When military duty transaction is posted on an account, the system does the following:
- Restricts the user from posting repossession/ foreclosure and bankruptcy activities on the account.
- Posts “DO NOT CHARGE OFF” condition on that account to exclude the account from Auto Charge Off process.
4.6.1 Customer sub tab
Click Customer to view the sections under it.
4.6.1.1 Address sub tab
Click Address sub tab to view address information for the customer in the following section:
In this field: |
View this: |
Type |
The address type. |
Current |
If selected, indicates that this is the customer’s current address. |
Confirmed |
If selected, indicates that the address if confirmed by the customer. |
Mailing |
If selected, indicates that this is the customer’s mailing address. |
Permission to Call |
Check this box if customer has provided permission to contact through the specified phone number. Atleast one phone number for every application should have the permission to call (flagged as 'Y') for the successful pre-qualification of the application. Else, an error message is displayed. |
Country |
The country. |
Postal Address Type |
The postal address type. |
Address # |
The address. |
Street Pre |
The street pre. |
Street Name |
The street name. |
Street Type |
The street type. |
Street Post |
The street post. |
Apt # |
The apartment number. |
Address 1 |
The customer’s address. |
Address 2 |
The customer’s address. |
Address 3 |
The customer’s address. |
Zip |
The zip code. |
Zip Extn |
The zip code extension. |
City |
The city. |
State |
The state code. |
Phone |
The phone number. |
Address |
The address. |
Census Tract/BNA Code |
The census tract/BNA code. |
MSA Code |
The metropolitan statistical area (MSA) code. |
Comment |
Comments regarding the address. |
4.6.1.2 Telecoms sub tab
- Click Telecom sub tab to View/edit the Telecom
information for the customer:
In this field:
Do this:
Type
Select the telecommunication type.
Phone
Specify the phone number.
Extn
Specify the phone extension.
Current
Select if this telecom number is current.
Permission to Call
Check this box if customer has provided permission to contact through the specified phone number.
Atleast one phone number per application should have the permission to call (flagged as 'Y') for the successful pre-qualification of the application. Else, an error message is displayed.
Time Zone
Select the applicant’s time zone.
Start Time
Specify the best time to call start time.
End Time
Specify the best time to end the call.
Period
Specify the time period.
Best day to call
Select the preferred day of the week to contact the customer from the drop-down list.
End Time
Specify the best time to end the call.
Period
Select the time period for the best time to call end time, am or pm, from the drop-down list.
4.6.1.3 Employment sub tab
- Click Employment sub tab, in Employment
Information section, click View to View/edit the employment information
for customer in the following section:
In this field:
View this:
Current
If selected, indicates that this is the customer’s current address.
Permission to Call
Check this box if customer has provided permission to contact through the specified phone number.
Atleast one phone number per application should have the permission to call (flagged as 'Y') for the successful pre-qualification of the application. Else, an error message is displayed.
Type
The occupation.
Employer
The employer’s name.
Occupation
The occupation.
Title
The title.
Department
The department of the employment.
Country
The country.
Address #
The address line.
Address Line 1
The employer’s address.
Address Line 2
The employer’s address.
Zip
The zip code.
Zip Extn
The zip code extension.
City
The city.
State
The state.
Phone
The work phone number.
Extn
The work phone number extension.
Comment
Comments regarding the employment.
4.6.1.4 Tracking Attributes sub tab
You can add tracking attribute information to an application at any time on the Customer Details screen’s Customer Tracking Attributes section
In the Tracking Attributes section, click Edit
When you click Create Tracking, the system loads the tracking parameters.
- If you want to reduce the list of parameters, select a sub-attribute in the Sub Attribute box.
- If your system has been configured to use the Sub Attribute field, only attributes in a particular group appear in the Parameter display.
- specify the requested parameter in the Value field and click Save.
Save any changes you made to the account.
4.6.2 Business sub tab
If this is a SME Line of credit, information gathered on the application entry process regarding the business and business’s address, partners and affiliates data, and phone numbers appears on the Customer Service screen’s Business screen. Using the Business screen, you can update or add to a business’s address, partners and affiliates information, or phone listing.
To view or edit business information
- Open the Customer Service screen and load the account you want to work with.
- On the Customer Service screen, click the Customer Details
tab and then click Business.
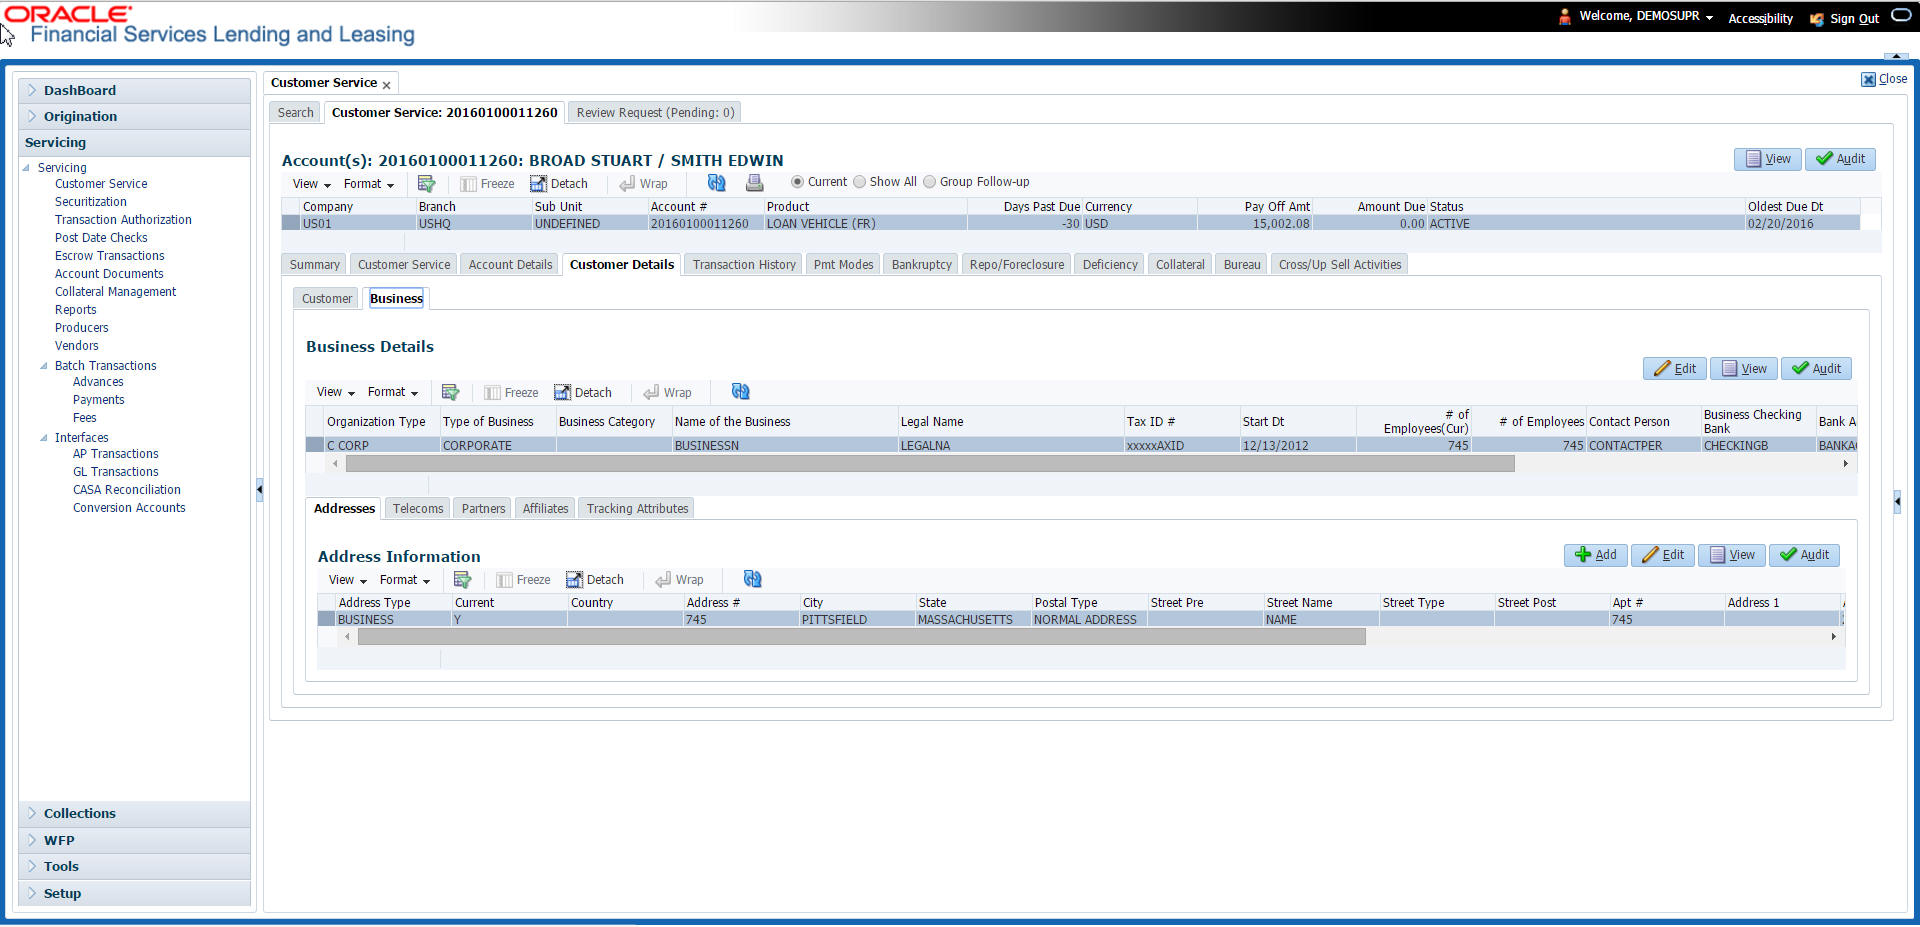
- In the Business Details section, click View
- On Business screen, load the business whose
information you want to view in the Business section using
First, Previous, Next, and Last
buttons.
In this field:
View this:
Organization Type
Organization type.
Type of Business
Type of the business.
Name of the Business
Name of the business.
Legal Name
Legal name of the business.
Tax Id #
Tax identification number.
Start Dt
Business start date.
# of Employees (Curr)
Current number of employees at the business.
# of Employees
Number of employees at the business after financing.
Contact Person
Contact person at the business.
Business Checking Bank
Bank name of the business’s checking account.
Bank Account #
Bank account number.
Avg Checking Balance
Average checking balance.
# of Locations
Number of locations of the business.
Management Since
Year the current management was established.
4.6.2.1 Addresses sub tab
Click Addresses sub tab and then click View. In the Address section, load the address information you want to view.
In this field: |
View this: |
Type |
Address type. |
Country |
Country code. |
Address # |
Address number. |
Postal Type |
Postal type. |
Pre |
Pre |
Street Name |
Name of street. |
Street Type |
Type of street. |
Post |
Post box number. |
Apt # |
Apartment number. |
Address 1 |
Address. |
Address Line 2 |
Address Line 2 |
Zip |
Zip code. |
Zip Extn |
Zip extension. |
City |
City. |
State |
State. |
Phone |
Phone number. |
Ownership |
Ownership type. |
Comment |
Additional comments. |
4.6.2.2 Telecom sub tab
Click Telecoms sub tab and then click View. In Telecom section, view the following information:
In this field: |
View this: |
Telecom Type |
Telecommunication type. |
Phone |
Phone number. |
Ext |
Phone extension. |
Current |
If selected, indicates that this is the current record. |
4.6.2.3 Partners sub tab
Click Partners sub tab and then click View. In the Partners section, load the business partner information you want to view or edit using First, Previous, Next, and Last buttons.
In this field: |
View this: |
First Name |
Partner’s first name. |
MI |
Partner’s middle name. |
Last Name |
Partner’s last name. |
Suffix |
Partner’s suffix. |
SSN |
Partner’s social security number. |
Birth Dt |
Partner’s birth date. |
Birth Place |
Partner’s birth place. |
Director Ind |
If selected, indicates that partner is the director of the business. |
Networth |
Partner’s net worth. |
Gross Income |
Partner’s gross income. |
Language |
Partner’s language. |
Nationality |
Partner’s nationality. |
Title |
Partner’s title. |
Ownership (%) |
Percentage of ownership held by the partner. |
Partner’s e-mail. |
|
Phone |
Partner’s phone. |
Extn |
Partner’s phone extension. |
4.6.2.4 Affiliates sub tab
Click Affiliates sub tab, in the Affiliates section, load the business affiliate information you want to view using First, Previous, Next, and Last buttons.
In this field: |
View this: |
Organization Type |
Affiliate’s organization type. |
Legal Name |
Affiliate’s legal name. |
Name of the Business |
Affiliate’s business name. |
Tax ID # |
Affiliate’s tax identification. |
Ownership (%) |
Affiliate’s percentage of ownership. |
# of Employees |
Affiliate’s number of employees. |
NAICS CODE |
Affiliate’s North American Industry Classification System code. |
4.7 Customer Service screen’s Transaction History tab
Open the Customer Service screen and load the account you want to work with. Click the Transaction History tab to view the sections under it.
![]()
4.7.1 Balances sub tab
Details of an account balance can be viewed on the Balances sub tab.
The Balance Group in Balances section consists of the following four action buttons:
- Current Balance
- Deficiency Balance
- Non-Performing Balance
- Terminate Balance
By default, the Current Balance option is selected. In case the status of an account is ‘Charged Off’, then the system defaults to ‘Deficiency Balance’ option.
Depending on which one you select, a different set of balance information appears. In all cases, the Balance screen can be viewed in the following two transaction period modes:
- ITD/CTD (Inception-to-date/Cycle-to-date)
- YTD (year-to-date)
To view account balance information
- Open the Customer Service screen and load the account you want to work with.
- Click Transaction History tab, then click Balances sub tab
- In the Balance Group section, select the balance you want to view.
Current Balance displays the current balances for accounts with an status of ACTIVE.
In this field: |
View: |
Balance Type |
The balance type. |
Opening Balance |
The opening balance amount. |
Posted |
The amount posted (in addition to the opening balance). |
Paid Balance |
The amount paid. |
Waived |
The amount waived. |
Charged Off |
The amount charged off. |
Adjusted (-) |
The amount adjusted (negative adjustments). |
Adjusted (+) |
The amount adjusted (positive adjustments). |
Balance |
The current (closing) balance. The total active balance of the account is displayed at the bottom. |
Deficiency Balance displays the current balances for accounts with an status of charged off. If you click Deficiency Balance, the following information appears:
In this field: |
View: |
Balance Type |
The balance type. |
Opening Deficiency |
The opening deficiency balance. |
Chg off Posted |
The additional charged off amounts posted. |
Recovery |
The amount of deficiency balance paid. |
Deficiency Balance |
The current (closing) deficiency balance. The total deficiency balance of the account is displayed at the bottom. |
Non-Performing Balance displays the current balance for accounts with status as non-performing. Non-Performing accounts fall between Charged Off accounts and Active accounts. These accounts are treated as active when dealing with the customer, but for accounting purposes are treated differently as they are expected to charge off in the future. Fee and interest balances are not expected to be collected in full and therefore are not recognized as income. If you click Non-Performing Balance, the following information appears:
In this field: |
View: |
Balance Type |
The balance type. |
Opening Non-Performing |
The opening non performing balance. |
Paid / Terminate |
The amount of non performing balance paid or terminated. |
Paid Excess |
The additional non performing amounts posted. |
Waived |
The amount waived. |
Adjusted (-) |
The amount adjusted (Negative adjustments). |
Adjusted (+) |
The amount adjusted (Positive adjustments). |
Balance |
The current (Closing) non performing balance. The total non-performing balance of the account is displayed at the bottom. |
Terminate Balance displays the current balance for accounts with a status of TERMINATE. Selecting Terminate Balance option displays the following account details.
In this field: |
View: |
Balance Type |
The balance type. |
Opening Balance |
The opening non performing balance. |
Paid / Terminate |
The amount of non performing balance paid or terminated. |
Waived |
The amount waived. |
Charge Off |
The additional charged off amounts. |
Adjusted (-) |
The amount adjusted (Negative adjustments). |
Adjusted (+) |
The amount adjusted (Positive adjustments). |
Terminate |
The balance amount to terminate. |
- In the Txn Period Balance section, select how you want to view the balance:
Select ITD/CTD to view transactions by Inception-to-date /Cycle-to-date:
-or-
Select YTD to view the transactions by year to date.
4.7.2 Transactions sub tab
The Transactions screen displays all transactions that have occurred over the life of account. Transactions can be sorted by when the transaction was created (Post Dt) or the effective date of transaction (Txn Dt). You can choose to view all transactions, export account transaction details to a file, or reverse certain transactions. This information comes from the payments and advances applied to the account, maintenance tasks, and nightly processes such as billing.
To view the transaction history of an account
- Open the Customer Service screen and load the account you want to work with.
- Click Transaction History tab, then click
Transactions sub tab.
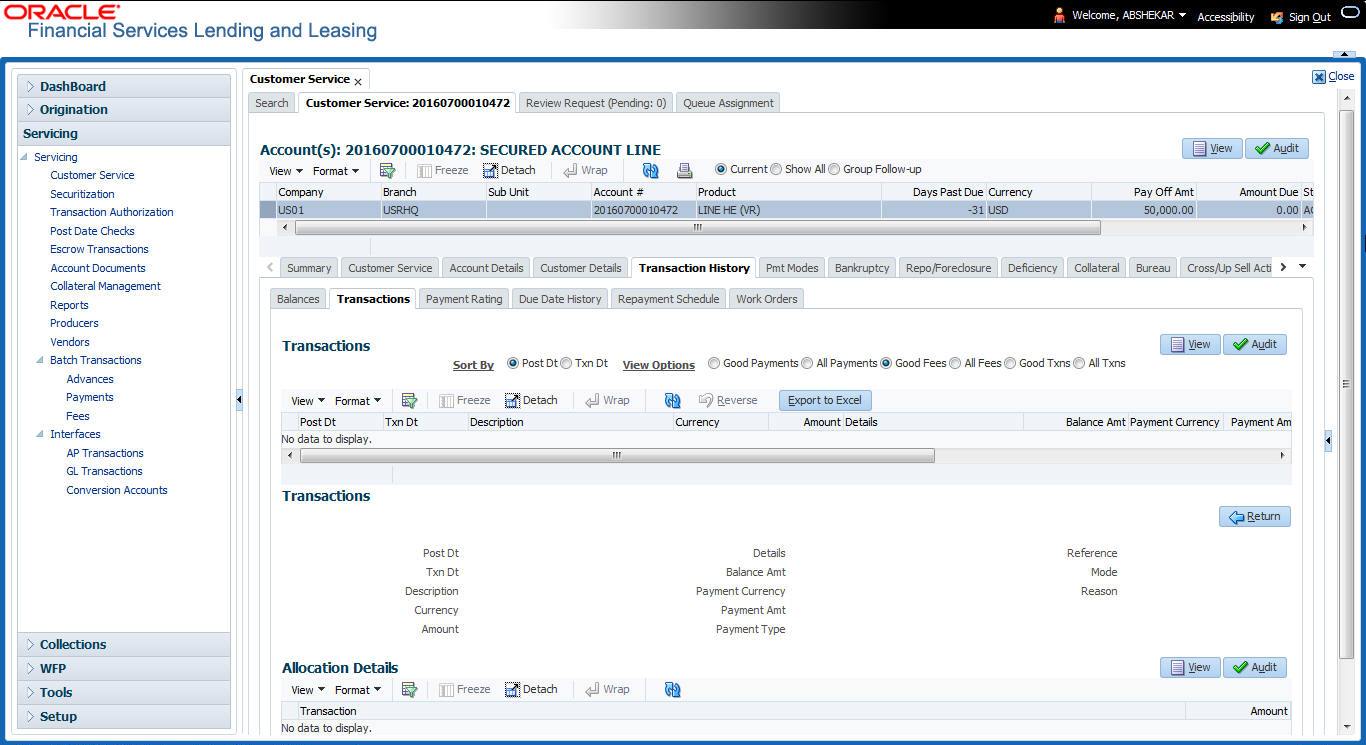
- In the View Options section, select
type of transactions in this account’s history you want to view
on the Transactions screen.
If you select this:
The system displays:
Good Payments
All valid payments that was neither voided nor reversed.
All Payments
All transaction involving payments.
Good Fees
All valid fees that was neither voided nor reversed.
All Fees
All transaction involving fees.
Good Txns
All transactions that was neither voided nor reversed.
All Txns
All transactions.
- In the Sort Option section, choose Post Dt to sort entries on in Transactions section in order of when the transaction was made effective.
-or-
- Select Txn Dt to sort the entries on in Transactions section in order of when the transaction was created.
- In View Option section, click View to
view the following information:
In this field:
View:
Transactions section
Post Dt
The transaction posting date.
Txn Dt
The transaction effective date.
Description
The transaction details.
Currency
The currency of the transaction.
Amount
The transaction amount.
Details
The transaction details.
Balance Amt
The balance amount. This is the principal balance, not the total balance amount.
Payment Currency
The payment currency.
Payment Amount
The payment amount.
Payment Type
The payment type.
Reference
The reference number associated with the transaction.
Mode
The mode of the transaction.
Reason
The reason for the transaction.
Allocation Details
Txn
The transaction allocation details.
Amt
The transaction allocation amount.
4.7.2.1 To Reverse (or Void) a Transaction
- Open the Customer Service screen and load the account you want to work with.
- On the Customer Service screen, click Transaction History tab and then click Transactions.
- In the Transactions section, select the transaction you want to reverse.
- Click Reverse. A confirmation dialog is displayed.
- Click ‘Yes’ to reverse the transaction. On confirmation, the reversal is posted for processing.
Some transactions cannot be reversed. If a transaction cannot be reversed, the Reverse button will be dimmed when transaction is selected. If the Reverse button is unavailable, the transaction anniversary cannot be reversed.
Access to the Reverse button can be restricted by user responsibility and account’s product type using the PAYMENT_REV transaction code (Super Group: ACCOUNT MONETARY TXN) on the Administration screen.
(For more information, see Txn Codes tab (Transaction Super Group screen) section of the Administration (System) Setup chapter in the Oracle Financial Services Lending and Leasing Setup Guide).
4.7.2.2 Voiding an Account
To void an account
Oracle Financial Services Lending and Leasing can be configured to void an account using the Reverse button on the Transaction screen.
- Open the Customer Service screen and load the account you want to work with.
- On the Customer Service screen, click Transaction History tab and then click Transactions.
- In the Transactions section, select Active entry in the Description field.
- Click Reverse.
On the Transactions screen, Oracle Financial Services Lending and Leasing creates an entry of Reverse Active and reverses all transactions. The system also changes status of the account to Closed: Void and changes status of the application to approved-void (or whatever the account’s last status was before funding).
To use this feature, active _rev transaction code must be enabled and set to manual on the Transaction Super Group screen for your user responsibility and account’s product type. (For more information, see the Txn Codes tab (Transaction Super Group screen) section of the Administration (System) Setup chapter in the Oracle Financial Services Lending and Leasing Setup Guide).
4.7.2.3 Export Account Transaction Details
In the Transactions sub tab, you can export the required account transactions and allocation details to a file.
To export account transaction details
- Open the Customer Service screen and load the account you want to work with.
- On the Customer Service screen, click Transaction History tab and then click Transactions.
- In the Transactions section, select the required transaction.
- Click Export to Excel. The details are exported to a .xls file with options to save or open.
4.7.3 Payment Rating sub tab
![]()
To view the transaction history of an account
- Open the Customer Service screen and load the account you want to work with.
- Click Transaction History tab, then click
Payment Rating sub tab.

The Payment Rating section displays month and year of payment and rating reported to credit bureaus through Metro 2 file for the past 24 months, including the following:
In this field: |
View this: |
Pmt Rating |
The payment rating. |
Rating Description |
The payment rating description. |
Acc Status |
The credit bureau account status. |
Status Description |
The credit bureau account status description. |
Month/Year Rating |
The month/year of payment rating. |
4.7.4 Due Date History sub tab
The Due Date History tab provides a delinquency history, by payment, by displaying a history of all due dates, along with when actual payment was made for that due date and the subsequent balance. If a payment was delinquent, Due Date History section displays the number of days the customer was delinquent against each due date.
Due Date History sub tab displays all the dues that have crossed the system date and also the history that is currently available in Transaction History > Due Date History sub tab.
- Open the Customer Service screen and load the account you want to work with.
- Click Transaction History tab, then click
Due Date History sub tab.

In Due Date History section, click View
View the following:
In this field: |
View this: |
Due Dt |
The due date. |
Due Amt |
The due amount. |
Last Pmt Dt |
The last payment date. |
Pmt Amt |
The payment amount. |
Balance Amt |
The balance amount. |
Days Past Due |
The days past due. |
Pmt Received |
If selected, indicates the payment was received. |
4.7.5 Repayment Schedule sub tab
The Repayment Schedule section contains information about schedule of repayment such as the date and payment amount.
- Open the Customer Service screen and load the account you want to work with.
- Click Transaction History tab, then click
Repayment Schedule sub tab.
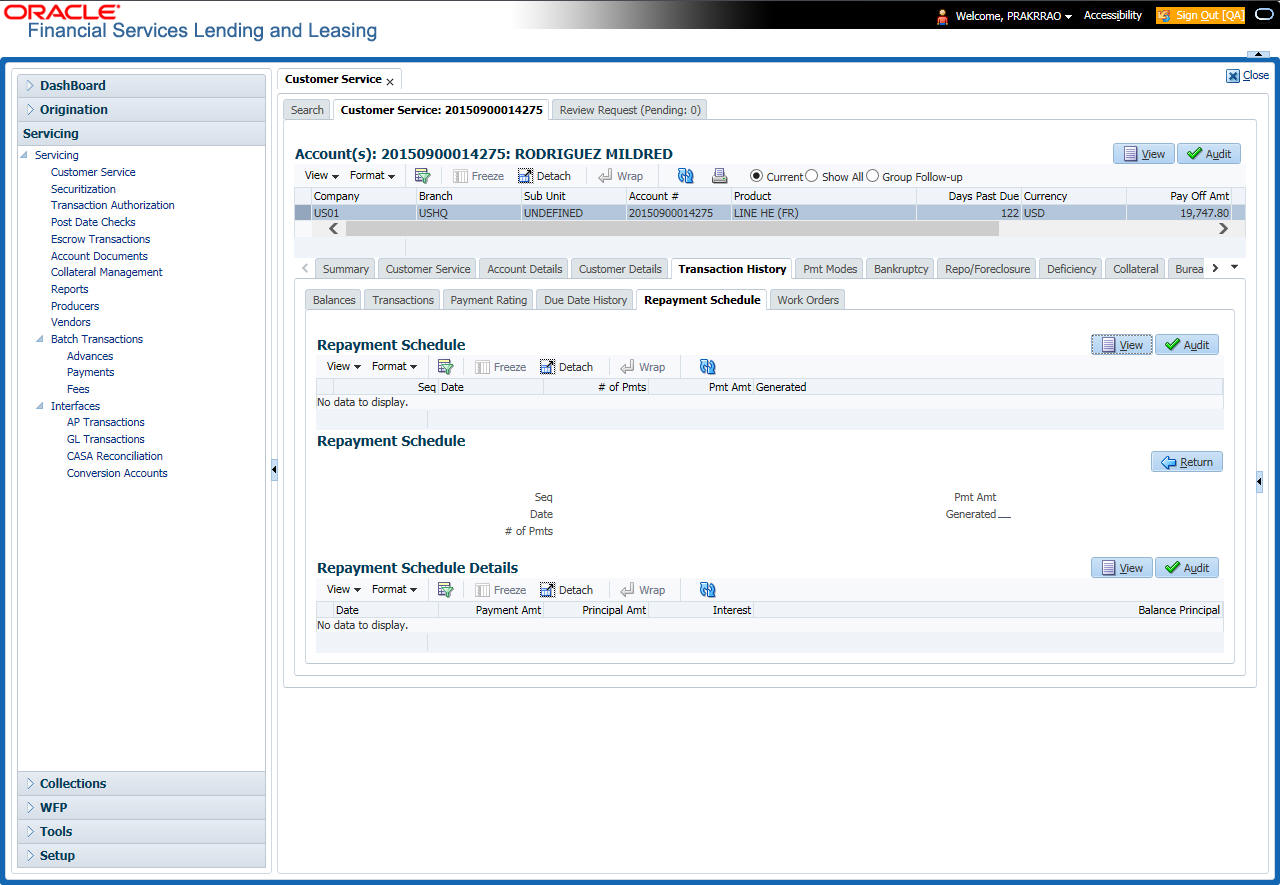
View the following information:
In this field: |
View this: |
Repayment Schedule section |
|
Seq |
The payment sequence number. |
Date |
The repayment date. |
# of Pmts |
The number of payments. |
Pmt Amt |
The payment amount. |
Generated |
If selected, indicates that the repayment schedule has been generated. |
Repayment Schedule Details section |
|
Date |
The repayment date. |
Payment Amt |
The payment amount. |
Principal Amt |
The amount paid to principal. |
Interest |
The amount paid to interest. |
Balance Principal |
The balance of the principal. |
4.7.6 Work Order sub tab
To expedite repossessions and foreclosures, the display only Vendor Work Order screen enables you to view all the work orders issued to different vendors for an account.
To view the vendor work order screen
- Open the Customer Service screen and load the account you want to work with.
- Click Transaction History tab, then click
Work Order sub tab.
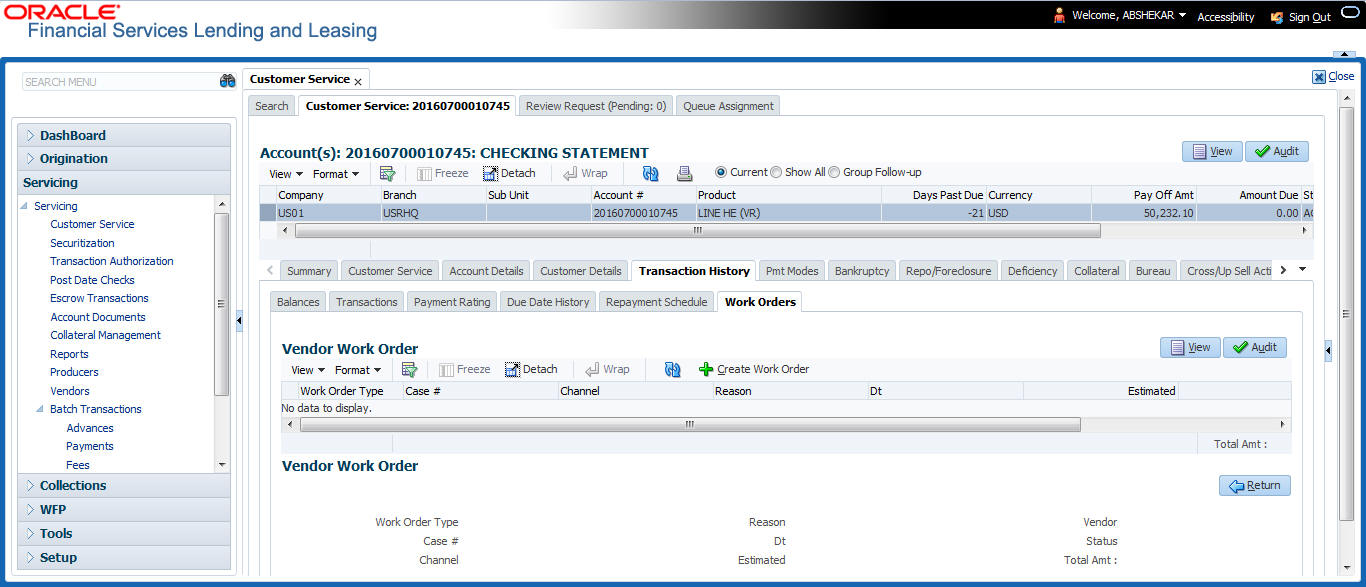
In the Vendor Work Order section, click View
View the following display only information:
In this field: |
View this: |
Work Order Type |
The assigned work order type. |
Dt |
The assignment date. |
Estimated |
The estimated dollar amount of work order. |
Vendor |
The vendor number and name. |
Status |
The assigned status. |
Total Amt |
The total estimated dollar amount of all work orders. |
You can create/view and maintain vendor work orders related to an account.
- To create and maintain vendor work orders, click Create Work Order. The system opens Vendor Management screen. You can perform tasks and record additional information, such as changing the work order’s status and adding comments in the Work Orders section.
If vendor screen is already opened in the main screen and user tries to create new work order or open an existing work order, system displays the warning message as “Vendor management screen is already open. Please close it and retry”.
- To view more detailed information about vendor work order, select the work order you want to view and click View Work Order. The View Work Order button appears faded if the responsibility does not allow access to the Vendor Work Order screen.
- Click Close on the Vendor Management screen to return to the Customer Service screen.
For more information about using the Vendor Management screen, please refer to the Vendor chapter in the User Guide.
4.8 Customer Service screen’s Pmt Modes tab
Open the Customer Service screen and load the account you want to work with. Click the Pmt Modes sub tab to view the sections under it.
4.8.1 ACH sub tab
If used, the ACH section displays information about automated clearing house and electronic fund transfers.
To view the ACH information screen
- Open the Customer Service screen and load the account you want to work with.
- Click Pmt Modes tab, then click ACH
sub tab.
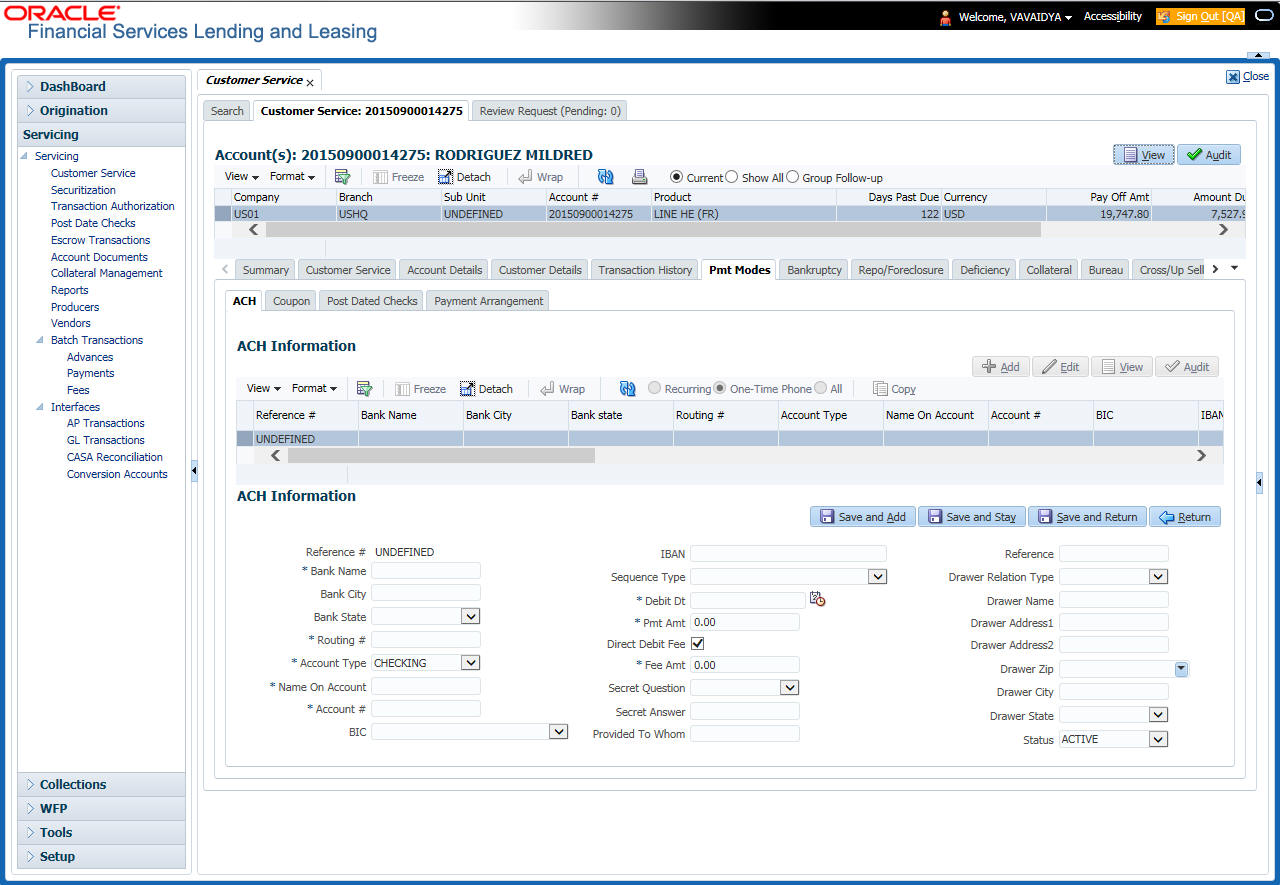
The system displays the ACH details depending on the following option selected:
- Recurring - Select ‘Recurring’ to display all the Recurring ACH details.
- One-Time Phone - Select this option to display one time ACH details.
- All - Select ‘All’ to display both recurring and one-time phone ACH details.
If you have selected ‘Recurring’ or ‘One-Time Phone’ option, you can further Add, Edit, or Copy the details and perform any of the Basic Operations mentioned in Navigation chapter. On save, the system will automatically post the transaction capturing the current transaction date along with a comment as 'Direct Record Update' for the particular ACH transactions.
If you have selected ‘Recurring’ option, the following fields are displayed:
In this field: |
View this: |
Reference # |
The unique reference number. |
Bank Name |
The bank name. |
Bank City |
Specify the city where the bank exist. |
Bank State |
Select the state where the bank exist form the drop-down list. |
Routing # |
The routing number. |
Account Type |
The type of account. |
Name On Account |
Specify the name of the account. |
Account # |
The account number. If the organizational parameter UIX_HIDE_RESTRICTED_DATA is set to Y, this appears as a masked number; for example, XXXXX1234. |
BIC |
Select the Business Identifier Code from the drop-down list. The list displays the BIC codes defined in the system. |
IBAN |
Specify the IBAN (International Bank Account Number). IBAN is used for identifying bank accounts across national borders with a minimal of risk of propagating transcription errors. Ensure that value entered satisfies the check-digit validation based on modulo 97. On save, system automatically validates the IBAN number length based on country code, characters, white spaces, and checksum. Validation is also done during posting non-monetary transaction (ACH Maintenance). You can maintain the IBAN length and other details required as per the country code in the user defined table (Setup > Administration > System > User Defined Tables). Note: IBAN for 'NL' country code (IBAN_FORMAT_NL) is defined by default with length of IBAN as 18. |
Sequence Type |
System displays the current Sequence Type of the selected account. Depending on the nature of direct debit, the sequence type can be one of the following: - First - First time direct debit - Recurrent - Subsequent repayments after first direct debit - Final - Final repayment - One-off - One time bullet contract repayment However, during the life cycle of the payment processing, the direct debit sequence type for an account can change. |
Pmt Day |
The payment day. |
Pmt Amt |
The Payment amount. |
Pmt Amt Excess |
The excess payment. |
Pmt Freq |
The payment frequency. |
Fee Amt |
The amount charged as fees. |
Direct Debit Fee |
If selected indicates that the fees is debited directly. |
Start Dt |
The date the system began using ACH payments for this account |
End Dt |
The ACH end date. |
Default |
If selected indicates that this ACH is the default ACH for the account. |
Status |
The status of the account. |
Note
This information can be edited using the Maintenance screen and the non monetary transaction ACH MAINTENANCE.
If you have selected ‘One-Time Phone’ or ‘All’ option, the following fields are displayed:
In this field: |
View this: |
Reference # |
The unique reference number. |
Bank Name |
The bank name. |
Bank City |
The bank city. |
Bank State |
List of available states. |
Routing # |
The routing number. |
Account Type |
The type of account. |
Name On Account |
The account name. |
Account # |
The account number. If the organizational parameter UIX_HIDE_RESTRICTED_DATA is set to Y, this appears as a masked number; for example, XXXXX1234. |
BIC |
Select the Business Identifier Code from the drop-down list. The list displays the BIC codes defined in the system. |
IBAN |
Specify the IBAN (International Bank Account Number). IBAN is used for identifying bank accounts across national borders with a minimal of risk of propagating transcription errors. Ensure that value entered satisfies the check-digit validation based on modulo 97. On save, system automatically validates the IBAN number length based on country code, characters, white spaces, and checksum. Validation is also done during posting non-monetary transaction (ACH Maintenance). You can maintain the IBAN length and other details required as per the country code in the user defined table (Setup > Administration > System > User Defined Tables). Note: IBAN for 'NL' country code (IBAN_FORMAT_NL) is defined by default with length of IBAN as 18. |
Sequence Type |
System displays the current Sequence Type of the selected account. - First - First time direct debit - Recurrent - Subsequent repayments after first direct debit - Final - Final repayment - One-off - One time bullet contract repayment However, during the life cycle of the payment processing, the direct debit sequence type for an account can change. |
Debit Dt |
The debit date. |
Pmt Amt |
The Payment amount. |
Direct Debit Fee |
If selected indicates that the fees is debited directly. |
Secret Question |
Select the secret question from the drop down list. |
Provided To Whom |
The person to whom the ACH is concerned. |
Reference |
Additional reference if any. |
Drawer Relation Type |
The withdrawer relation to ACH. |
Drawer Name |
The name of withdrawer. |
Drawer Address1 |
Address of withdrawer, |
Drawer Address2 |
Address of withdrawer, |
Drawer City |
City of withdrawer, |
Drawer State |
State of withdrawer, |
Drawer Zip |
Zip of withdrawer, |
Status |
The status of the account. |
Note
This information can be edited using the Maintenance screen and the non monetary transaction ACH MAINTENANCE.
Copying ACH Details
You can copy and maintain ACH details from Pmt Modes sub tab of Customer Service screen. Copy option is available only when you have selected the ACH option as either Recurring or One-Time Phone.
To copy the ACH details
- Select a record and click Copy.
- A confirmation message is displayed as ‘Do you want to Copy ACH Record?’. Click OK to copy and create a new record.
On confirmation, the system creates a new row with new reference number, Status as ‘Active’, Default as ‘N’, Start Dt as ‘System Dt + Pre note days’ and all the other details as maintained in the copied record. When a new record is created using the Copy function, the system will post a ‘New ACH Transaction’ capturing the current transaction date along with a comment as 'Direct Record Update'.
4.8.2 Coupon sub tab
The Coupon section displays information regarding coupons associated with the account.
To view the coupon screen
- Open the Customer Service screen and load the account you want to work with.
- Click Pmt Modes tab, then click Coupon
sub tab.

View the following:
In this field: |
View this: |
Order |
If the coupons are ordered for the selected account. |
Coupon Starting # |
The starting number of coupon ordered for the customer. |
Order Date |
The order date of the coupon. |
# of Coupons |
The total number of coupons ordered for the customer. |
Ordered By |
The person who ordered the coupons |
4.8.3 Post Dated Checks sub tab
The Post Date Check section enables you to view any post dated check information for the account, if PDC is a method of repayment.
To view the post dated checks details screen
- Open the Customer Service screen and load the account you want to work with.
- Click Pmt Modes tab, then click Post
Dated Checks sub tab.
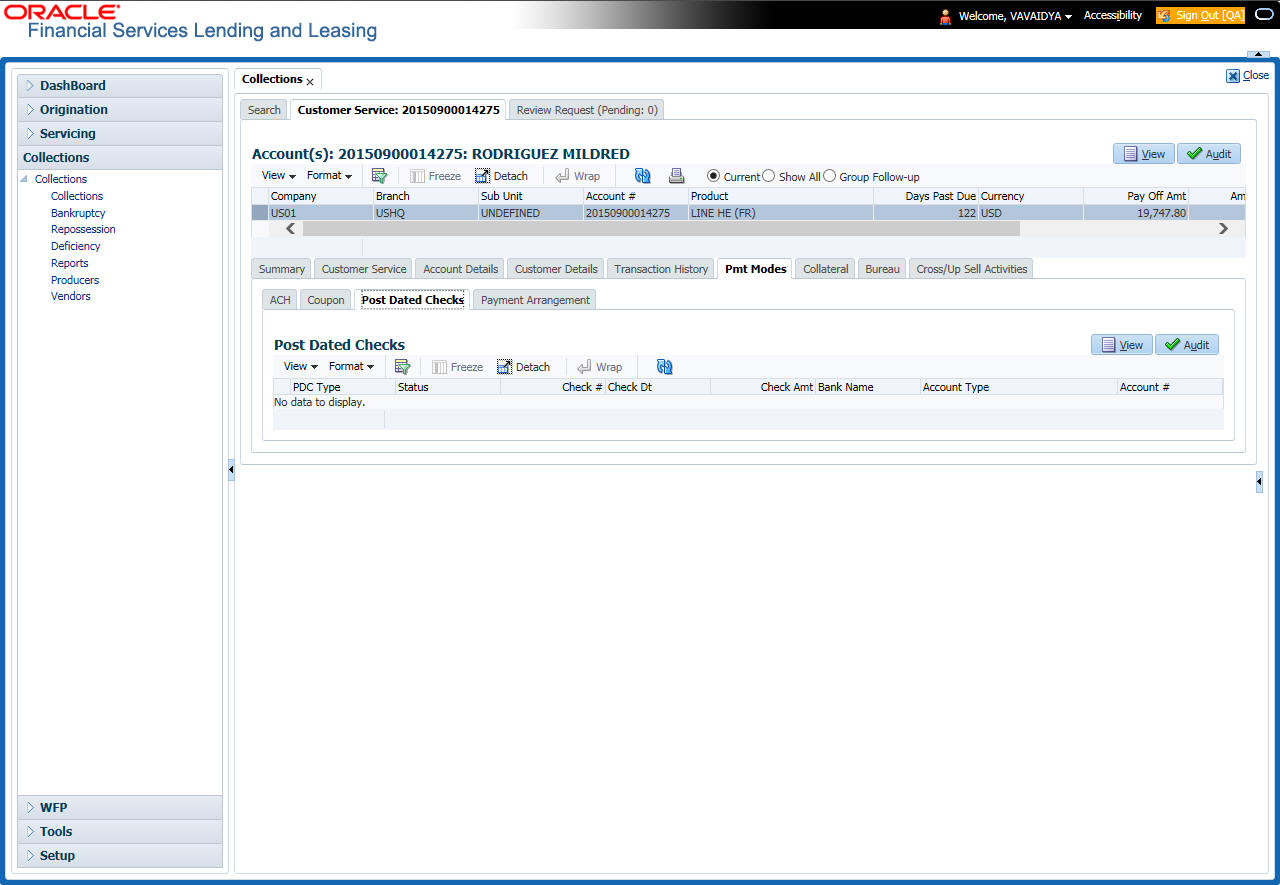
View the following:
In this field: |
View this: |
PDC Type |
The type of post dated check in use. |
Status |
The status of the post dated check. |
Check # |
The check number of the post dated check. |
Check Dt |
The check date of the post dated check. |
Check Amt |
The check amount of the post dated check. |
Bank Name |
The bank name of the post dated check. |
Account Type |
The account type of the post dated check. |
Account # |
The account number of the post dated check. |
Comments |
Additional information as comments, if any. |
4.8.4 Payment Arrangement sub tab
The Payment Arrangement section enables you to define and calculate the payment amount for the account with status Charge-off. An alert message will be displayed in the Customer Service screen when the user tries to view the payment arrangement for account other than charged off status.
To view the Payment Arrangement details screen
- Open the Customer Service screen and load the account you want to work with.
- Click Pmt Modes tab, then click Payment
Arrangement sub tab.
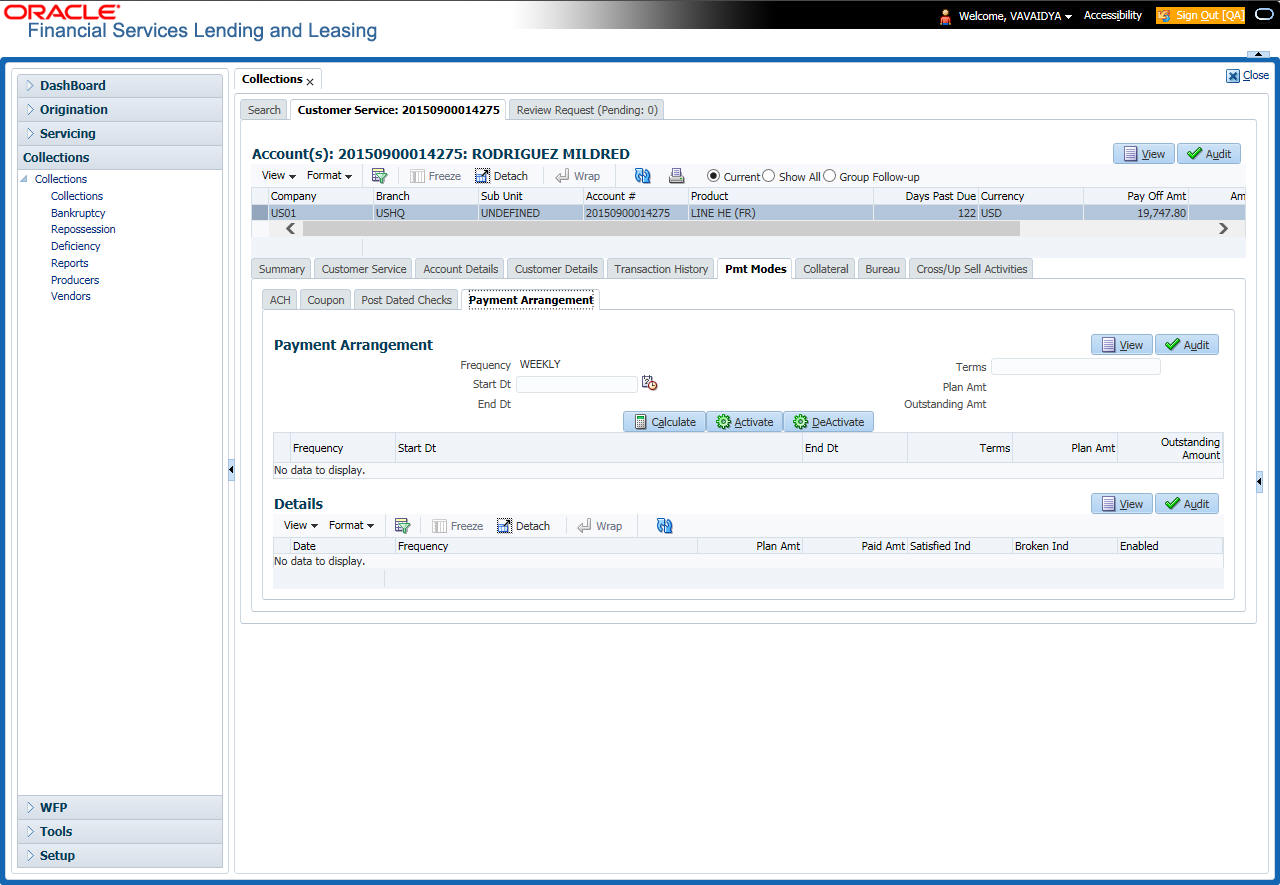
The Payment Arrangement section is enabled only when the Payment Arrangement Batch job is posted.
- In the Payment Arrangement section, click
View to view the following details:
In this field:
Do this:
Frequency
Displays the payment frequency.
Start Date
Enter the start date from when the customer pays.
Terms
Enter the number of payments. Note that if the term is specified as zero “0”, an error message is displayed.
End Date
View the end date of the payment.
Plan Amount
View the payment amount which the customer plans to pay.
Outstanding Amount
View the outstanding amount.
- In the Details section, click View
to view the following details:
In this field:
View this:
Date
View the start date of the payment plan.
Frequency
View the payment frequency.
Plan Amount
View the planned payment amount.
Paid Amount
View the paid amount.
Satisfied Ind
Indicates that the customer done the payment arrangements.
Broken Ind
Indicates that the customer did not make the payment arrangement.
Enabled Ind
Indicates that the arrangement is active
On Clicking Deactivate, the account will be deactivated.
To add a new payment rearrangement plan, previous plan has to be manually deactivated otherwise the system displays an error message. This condition applies to the payment arrangement previous plan even when the 'Broken Indicator' is selected.
Only one Payment arrangement plan can exist at a time. If a schedule broken by the customer make another payment arrangement, the first payment arrangement has to be deactivated and only then, the other payment can be added.
4.9 Customer Service screen’s Bankruptcy tab
The Bankruptcy screen enables you to record the details of a bankruptcy. This information usually is supplied from the customer or customer’s attorney. You can track each stage of the bankruptcy process based on its follow-up date and record information using the Details and Tracking sections.
As there are occasions when a borrower files bankruptcy more than once during tenure of the Line of credit, you can record information for multiple bankruptcies. The Add button enables you to create a new bankruptcy record with different start and end dates. You can also use the Bankruptcy screen to view previous bankruptcy record using Next and Previous buttons in Detail section. The Current box in Detail section indicates the current bankruptcy details.
When a Bankruptcy condition is opened on an account, the system defaults a detailed tracking record with ‘Current’ field enabled and ‘Follow up date’ defaulted to system date. The ‘Disposition’ is defaulted as ‘NEWLY RECEIVED’. The system only adds a new detail tracking record. No processing will be done with respect to detail tracking record when the bankruptcy condition is closed.
To enter bankruptcy details for an account
- Open the Customer Service screen and load the account you want to work with.
- Click Bankruptcy tab.
- In the Bankruptcy Details section, select the bankruptcy record you want to work with.
-or-
- Select Add to refresh the Bankruptcy screen
to create a new record.
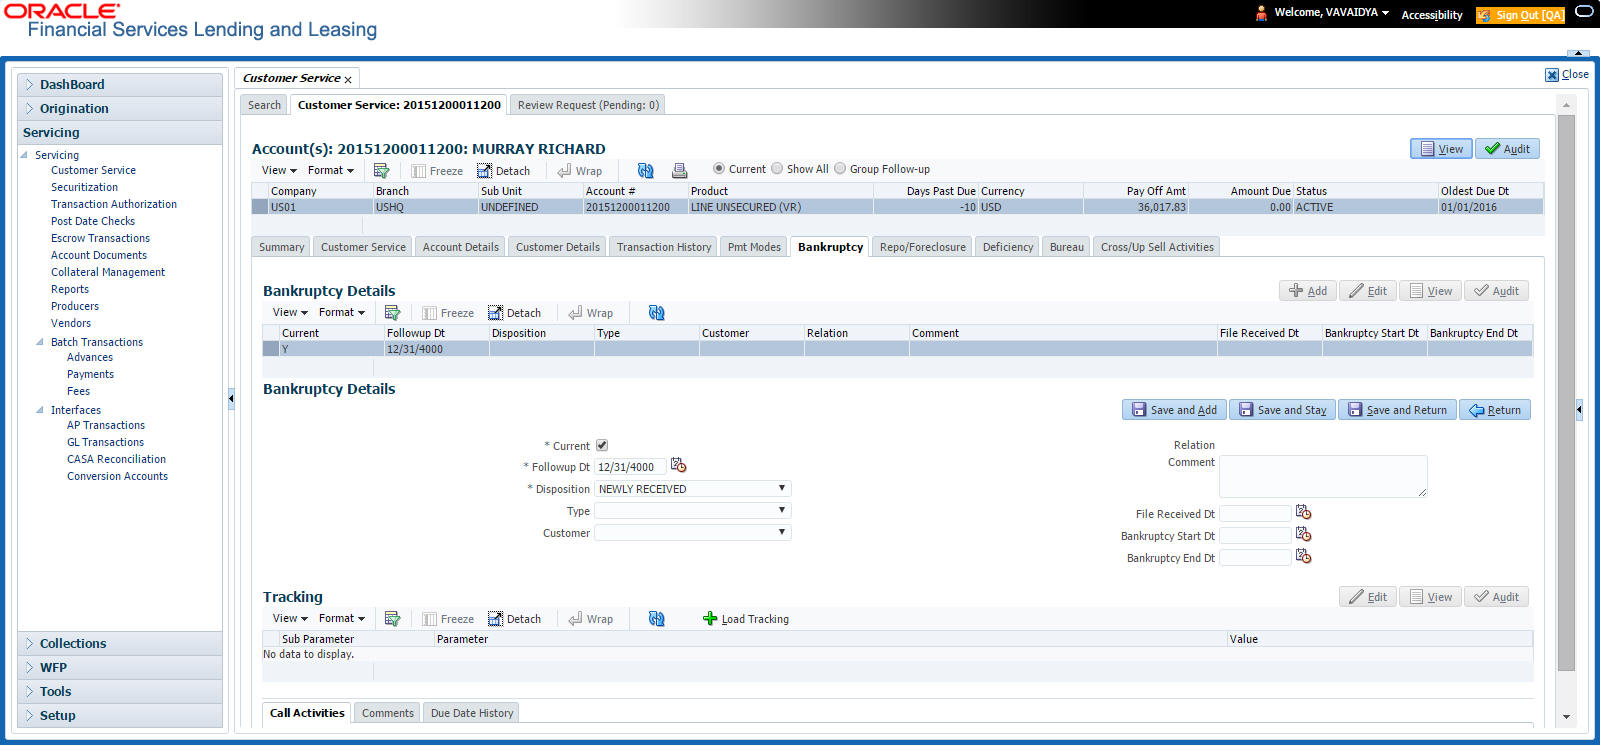
- In the Bankruptcy Details section, enter, view
or edit the following information:
Field:
Do this:
Current
Select to indicate this is the current bankruptcy record.
Follow up Dt
Enter the follow-up date for the bankruptcy.
Disposition
Select the bankruptcy disposition.
Type
Select the bankruptcy type.
Customer
Select the customer from the drop-down list
Relation
The system displays relation of the customer
Comment
Enter a comment.
File Received Dt
Select the file received date for the bankruptcy.
Bankruptcy Start Dt
Select the bankruptcy start date.
Bankruptcy End Dt
Select the bankruptcy end date.
- Click Save.
- In the Tracking section, click Load Tracking. The system loads the bankruptcy tracking parameters.
- If you want to reduce the list of parameters, select a sub attribute in the Sub Attribute field. If your system has been configured to use the Sub Attribute field, only attributes in a particular group appear in parameter display.
- Complete the Create Tracking section by entering information regarding bankruptcy in the Value field for each corresponding Parameter, click Save on the Bankruptcy screen.
4.9.1 Call Activities sub tab
Call activity section includes calls from customer, calls you make regarding the account or changes to the condition of the account. Entries in the Call Activities section are listed in reverse chronological order of follow-up date.
For details on how to Record a Call Activity, refer Call Activities sub tab section in “Customer Service screen’s Customer Service tab” section.
4.9.2 Comments sub tab
Oracle Financial Services Lending and Leasing enables you to record comments on the Customer Service screen using Comments tab. These comments also appear under the Comments sub tab.
For details on how to Record a Comment, refer Comments sub tab section in “Customer Service screen’s Customer Service tab” section.
4.9.3 Due Date History sub tab
The Due Date History tab section provides a delinquency history, by payment, by displaying a history of all due dates, along with when actual payment was made for that due date and the subsequent balance. If a payment was delinquent, Due Date History section displays the number of days the customer was delinquent against each due date.
For more details, refer Due Date History sub tab section in “Customer Service screen’s Transaction History tab” section.
4.10 Customer Service screen’s Repo/Foreclosure tab
The Repossession/Foreclosure screen enables you to record information regarding repossessions/foreclosure in a manner similar to how bankruptcies are recorded on the Bankruptcy screen. You can track each stage of repossession/foreclosure process based on the follow-up date and record information using the Details and Tracking section.
4.10.1 Repossession sub tab
On occasion, a lender performs multiple repossessions for the same Line of credit. The Create New Repossession button on the Repossession screen enables you to create a new repossession record for a different collateral and different start and end dates. You can also use the Repossession screen to view previous repossession information using the Next and Previous buttons in the Details section. The Current box in Details section indicates the current repossession record for each asset.
This tab will be available only when the collateral type associated with the Line of credit account is a Vehicle.
You can update the current record, but previous records cannot be modified.
When the REPO call activity is posted, system defaults the primary collateral details and current status will be checked.
When a Repossession condition is opened on an account, the system defaults a detailed tracking record with ‘Current’ field enabled and ‘Follow up date’ defaulted to system date. The ‘Disposition’ is defaulted as ‘NEWLY RECEIVED’. The system only adds a new detail tracking record. No processing will be done with respect to the detail tracking record when the repossession condition is closed.
To Specify repossession details for an account
- Open the Customer Service screen and load the account you want to work with.
- Click the Repo/Foreclosure sub tab, then click Repossession.
- In the Repossession Details section, select the repossession record you want to work with.
-or-
- Click Add to refresh the Repossession screen
to create a new record.
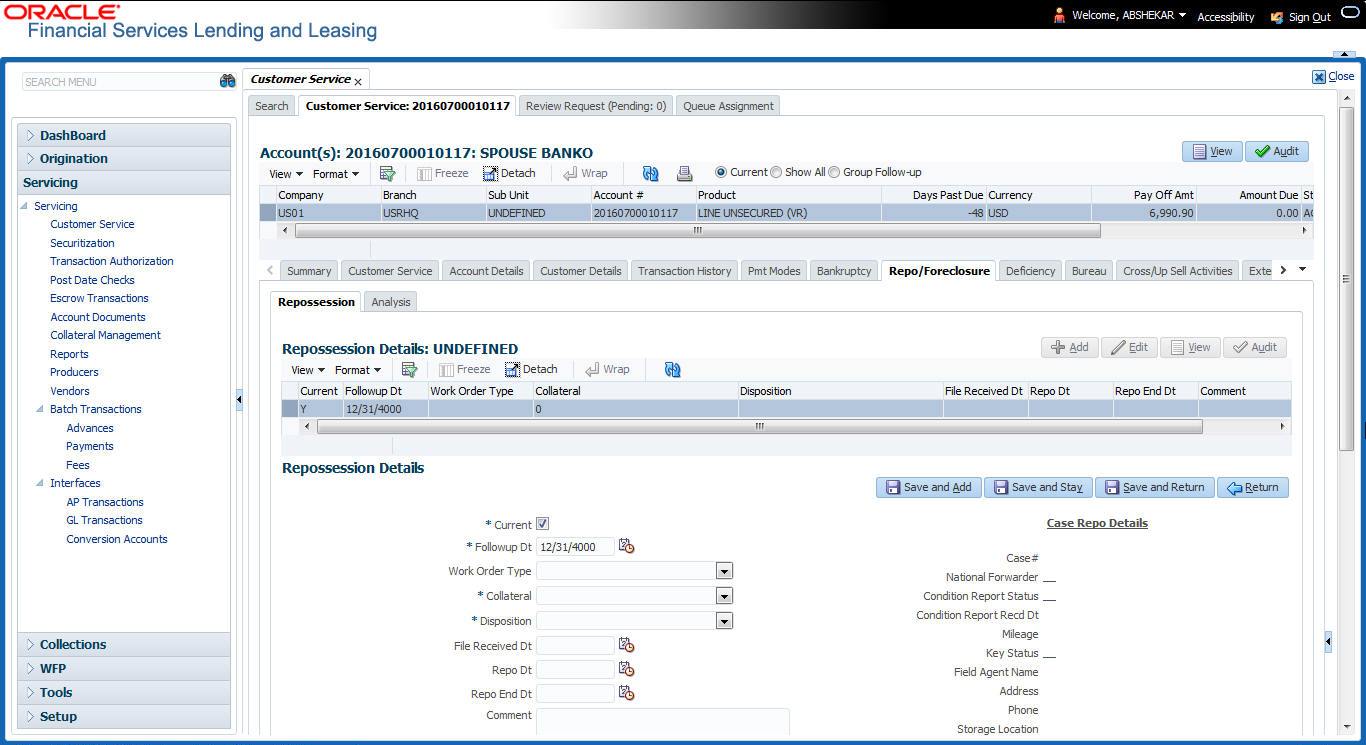
- In the Details section, add view
or edit the following information:
In this field:
Do this:
Current
Select to indicate this is the current repossession record.
Followup Dt
Specify the follow-up date for the repossession.
Work Order Type
Select the repossession type.
Collateral
Select the collateral involved in the repossession.
Disposition
Select the repossession disposition.
File Received Dt
Select the file received date for the repossession.
Repo Dt
Select the repossession start date.
Repo End Dt
Select the repossession end date.
Comment
Specify a comment.
Case Repo Details - This section displays the following details based on the case response received from the interfaced third party system.
Case#
Displays the case number of the repossession.
National Forwarder
If checked, indicates that National Forwarder carrier is equipped in the repossession.
Condition Report Status
If checked, indicates that the condition report exist.
Condition Report Recd Dt
Displays the date when condition report was received.
Mileage
Displays the mileage of the vehicle.
Key Status
Indicates if the vehicle key(s) is available.
Field Agent Name
Displays the name of the field agent involved in the repossession.
Address
Displays the address of the field agent.
Phone
Displays the contact number of the field agent.
Storage Location
Displays the location where the vehicle is currently stored.
Repo Location
Displays the repossession location.
Police Dept Name
Displays the name of police department involved in repossession.
- In the Tracking section, click Load Tracking. The system loads the repossession tracking parameters.
- If you want to reduce the list of parameters, select a
sub attribute in the Sub Attribute box.
If your system has been configured to use the Sub Attribute field, only attributes in a particular group appear in the parameter display. - Complete the Tracking section by entering information regarding repossession in the Value field for each corresponding Parameter, then click Save.
4.10.2 Foreclosure sub tab
The Foreclosure screen enables you to record information regarding foreclosure in a manner similar to how bankruptcies are recorded on the Bankruptcy screen. You can track each stage of the repossession process based on follow-up date and record information using Details and Tracking section.
A lender can perform multiple foreclosures for the same Line of credit. The Create New Foreclosure button on the Foreclosure screen enable you to create a new foreclosure record for a different collateral and different start and end dates. You can also use the Foreclosure screens to view the previous foreclosure information using Previous and Next buttons in Details section. The Current box in Details section indicates the current foreclosure record for each asset.
This tab will be available only when the Collateral type associated with the Line of credit account is home.
You can update the current record, but previous records cannot be modified.
To enter foreclosure details for an account
- Open the Customer Service screen and load the account you want to work with.
- Click the Repo/Foreclosure sub tab, then click Foreclosure.
- In the Foreclosure Details section, select the foreclosure record you want to work with.
-or-
- Click Add to refresh the Foreclosure screen
to create a new record.
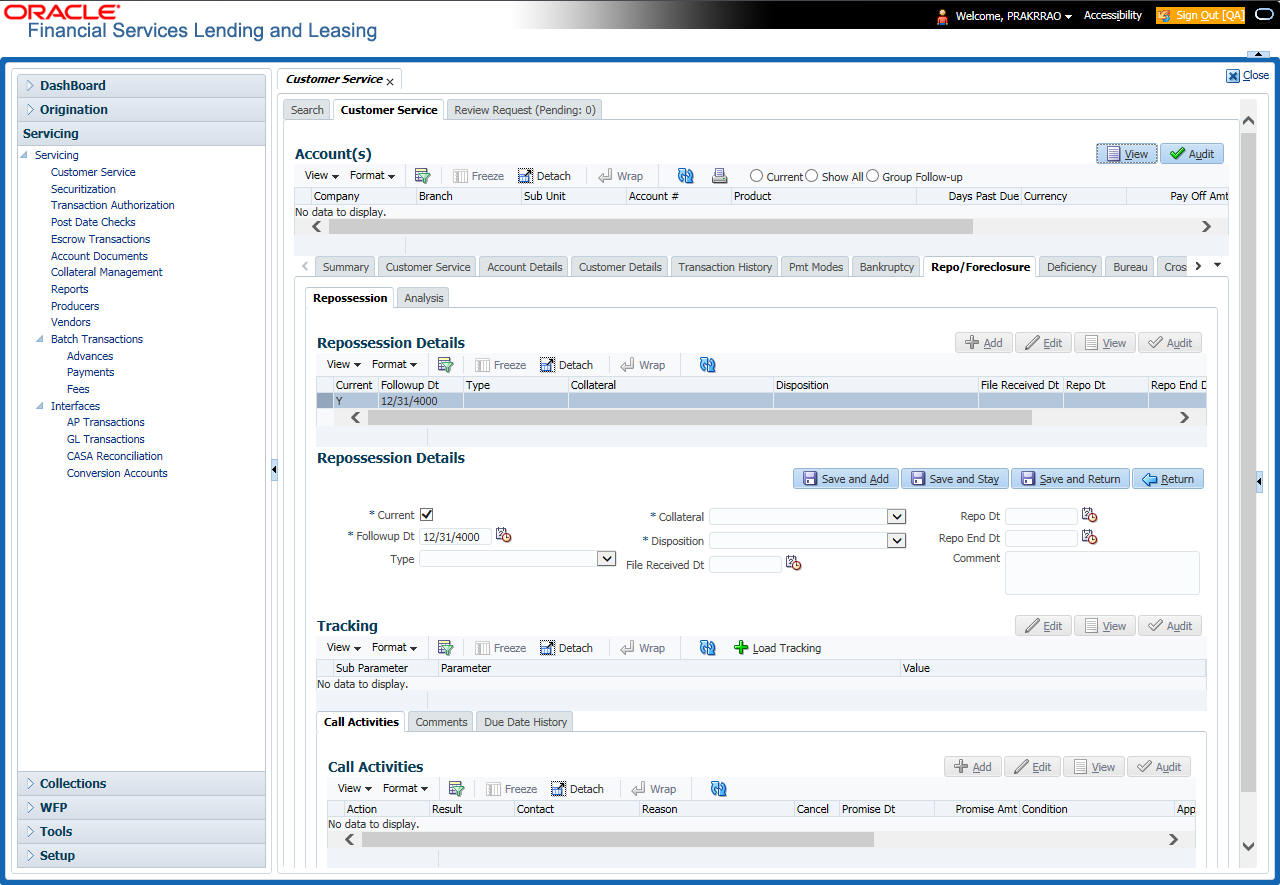
- In the Foreclosure Details section,
enter view or edit the following information:
In this field:
Do this:
Current box
Select to indicate this is the current repossession/foreclosure record.
Followup Dt
Select the follow-up date for the repossession/foreclosure.
Disposition
Select the foreclosure disposition.
Type
Select the foreclosure type.
Collateral
Select the foreclosure asset.
File Received Dt
Enter the file received date for the foreclosure.
Foreclosure Start Dt
Enter the foreclosure start date.
Foreclosure End Dt
Enter the foreclosure end date.
Comment
Enter a comment.
- In the Tracking section, click Load Tracking. The system loads the foreclosure tracking parameters.
- If you want to reduce the list of parameters, select a
sub attribute in the Sub Attribute box.
If your system has been configured to use the Sub Attribute field, only attributes in a particular group appear in the parameter display. - Complete the Tracking section by entering information regarding foreclosure in the Value field for each corresponding Parameter, then click Save.
4.10.3 Analysis sub tab
The Analysis screen enables you to create and analyze possible scenarios for re marketing and sale of the asset. This enables you to calculate the possible gain or loss in the sale of an asset. Expenses already incurred on the asset are displayed on Expenses sub screen. You can change the numbers if you expect more expenses by the time asset is sold. You can have up to three Repo/Foreclosure and three Sales analyzes on each Analysis screen.
To complete a repossession/foreclosure analysis or sales analysis for an account
- Open the Customer Service screen and load the account you want to work with.
- On the Customer Service screen, click Repo/Foreclosure tab and then click Analysis.
- In the Analysis section, select the analysis record you want to work with and click Load.
-or-
- Click Add to refresh the Foreclosure screen
to create a new record.
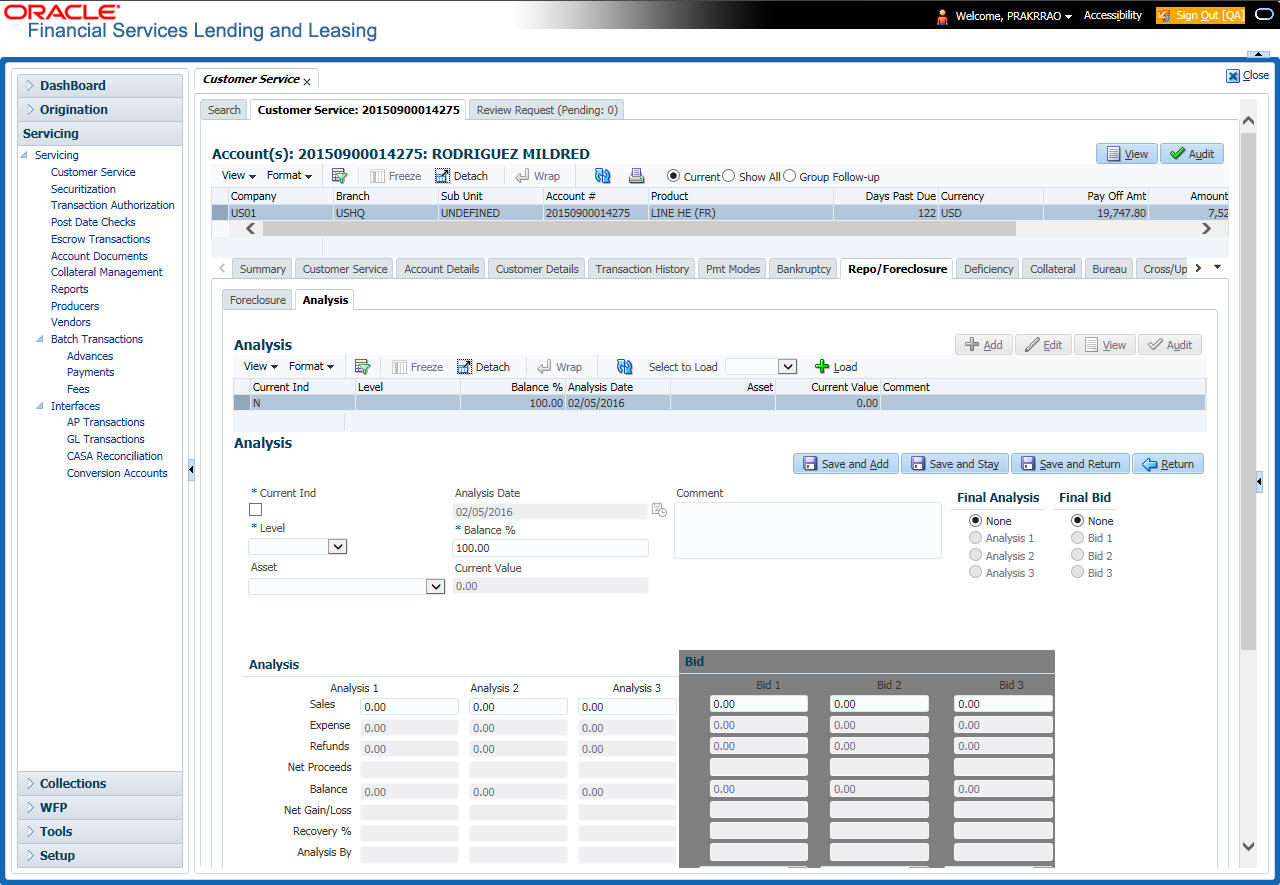
- In the Analysis section, select the Current box if you wish to indicate that this is current analysis worksheet.
- In the Analysis section, use the Level field to select analysis level you want to use, account or asset.
- Select Account if you want analysis to use value of the entire account.
- or -
- Select Asset if you want analysis to use the value of a particular asset.
- In the Analysis section, enter, view, or edit
the following information:
In this field:
Do this:
Current Ind
Current Indicator. Select the check box if analysis is current.
Level
Select the Analysis level from the drop down list.
Balance %
Specify balance allocation percentage.
Analysis Dt
View the analysis date.
Current Value
View the asset current total value.
Asset
If you want to perform an analysis for a particular asset, select the asset.
Comment
Specify comment associated with the analysis.
- Specify all the required information in Analysis or Bid section, depending on the type of incident you are analyzing.
- Complete the details in Expenses and Refunds sub screens, corresponding to analyze or bid number on the Analysis screen. The data here is loaded to the analysis and bid columns as ‘expenses’ and ‘refunds’.
- To complete the Expenses sub screen:
In this field:
Do this:
Expense Type
Select the expense type.
Manual
Indicates that the expense was entered manually.
Analysis1 Amt
Specify the expense amount for analysis1.
Analysis2 Amt
Specify the expense amount for analysis2.
Analysis3 Amt
Specify the expense amount for analysis3.
Bid1 Amt
Specify the expense amount for bid1.
Bid2 Amt
Specify the expense amount for bid2.
Bid3 Amt
Specify the expense amount for bid3.
- To complete the Refunds sub screen:
In this field:
Do this:
Refund Type
Select the refund type.
Manual
Indicates that the refund was entered manually.
Analysis1 Amt
Specify the refund amount for analysis1.
Analysis2 Amt
Specify the refund amount for analysis2.
Analysis3 Amt
Specify the refund amount for analysis3.
Bid1 Amt
Specify the refund amount for bid1.
Bid2 Amt
Specify the refund amount for bid2.
Bid3 Amt
Specify the refund amount for bid3.
- Select the Corresponding Analysis/Bid to Load details Maintained in the Expense and Refund sections.
- Repeat steps 4 to 8 with information regarding other repossession/foreclosure or sales analysis.
- In Status field, select status of the analysis: Approved or Rejected.
- When you have decided which analysis or which sale bid you want to approve, select your choice in either the Final Analysis or Final Bid section.
Note
You can approve only one analysis. Based on Analysis approved on ‘Save And Return’ Corresponding Radio button will be enabled in the Final section of Analysis details.
- Click Save.
4.10.4 Call Activities sub tab
Call activity section includes calls from customer, calls you make regarding the account or changes to the condition of the account. Entries in the Call Activities section are listed in reverse chronological order of follow-up date.
For details on how to Record a Call Activity, refer Call Activities sub tab section in “Customer Service screen’s Customer Service tab” section.
4.10.5 Comments sub tab
Oracle Financial Services Lending and Leasing enables you to record comments on the Customer Service screen using Comments tab. These comments also appear under the Comments sub tab.
For details on how to Record a Comment, refer Comments sub tab section in “Customer Service screen’s Customer Service tab” section.
4.10.6 Due Date History sub tab
The Due Date History tab section provides a delinquency history, by payment, by displaying a history of all due dates, along with when actual payment was made for that due date and the subsequent balance. If a payment was delinquent, Due Date History section displays the number of days the customer was delinquent against each due date.
For more details, refer Due Date History sub tab section in “Customer Service screen’s Transaction History tab” section.
4.11 Customer Service screen’s Deficiency tab
The Deficiency screen enables you to record information about deficiency accounts i.e. accounts that are no longer collectable. You can create and track specific details on status of the charged-off account for timely follow-up and analysis. You can also track each stage of the deficiency process based on its follow-up date and record information using the Details and Tracking sections.
The Add button enables you to create a new deficiency record with different start and end dates. You can also use the Deficiency Details screen to view deficiency information. The Current field in Deficiency Details section indicates the current bankruptcy details. To view the balance of a charged off account, click the Transaction History tab on Customer Service screen, then click Balances. On the Account Details screen’s Balance Group section, click Deficiency. For more information on Deficiency Balance, see Balances sub tab section in this chapter.
When a Deficiency condition is opened on an account, the system defaults a detailed tracking record with ‘Current’ field enabled and ‘Follow up date’ defaulted to system date. The ‘Disposition’ is defaulted as ‘NEWLY RECEIVED’. The system only adds a new detail tracking record. No processing will be done with respect to the detail tracking record when the deficiency condition is closed.
To enter deficiency details for an account
- Open the Customer Service screen and load the account you want to work with.
- Click Deficiency tab.
- In the Deficiency Detail section, select the deficiency record you want to work with
-or-
- Click Add to refresh the Deficiency screen
to create a new record.

- In the Deficiency Detail section, enter, view,
or edit the following information:
In this field:
Do this:
Current
Select to indicate this is the current deficiency record.
Followup Dt
Specify the follow-up date for the deficiency.
Disposition
Select the deficiency disposition.
Type
Select the deficiency type.
Comment
Specify a comment.
File Received Dt
Specify the file received date for the deficiency.
Charge Off Dt
Specify the deficiency start date.
Deficiency End Dt
Specify the deficiency end date.
- Click Save.
- In the Tracking section, click Load Tracking. The system loads deficiency tracking parameters that track actions taken to collect on the account.
- If you want to reduce the list of parameters, select a sub attribute in the Sub Attribute field. If your system has been configured to use the Sub Attribute field, only attributes in a particular group appear in the parameter display.
- Complete the Tracking section by entering information regarding deficiency in the Value field for each corresponding Parameter, then click Save.
4.11.1 Call Activities sub tab
Call activity section includes calls from customer, calls you make regarding the account or changes to the condition of the account. Entries in the Call Activities section are listed in reverse chronological order of follow-up date.
For details on how to Record a Call Activity, refer Call Activities sub tab section in “Customer Service screen’s Customer Service tab” section.
4.11.2 Comments sub tab
Oracle Financial Services Lending and Leasing enables you to record comments on the Customer Service screen using Comments tab. These comments also appear under the Comments sub tab.
For details on how to Record a Comment, refer Comments sub tab section in “Customer Service screen’s Customer Service tab” section.
4.11.3 Due Date History sub tab
The Due Date History tab section provides a delinquency history, by payment, by displaying a history of all due dates, along with when actual payment was made for that due date and the subsequent balance. If a payment was delinquent, Due Date History section displays the number of days the customer was delinquent against each due date.
For more details, refer Due Date History sub tab section in “Customer Service screen’s Transaction History tab” section.
4.12 Customer Service screen’s Collateral tab
The Collateral screen displays information regarding any assets associated with an account. Collateral can be a vehicle, home, or something else, such as household goods. The Collateral screen contains the Home and Seller sub tabs. To view the collateral details
- Open the Customer Service screen and load the account you want to work with.
- Click Collateral tab. System displays the
following screen:
If the account’s collateral is a vehicle, the Collateral screen opens at Vehicle tab:
- If account’s collateral is a home, the Collateral
screen opens at the Home tab:
- If
account’s collateral is neither a vehicle nor a home, the Collateral
screen opens at the Other Collateral:
Clicking on Asset # in the Vehicle sub tab takes you to Collateral Management screen opening respective collateral. You can modify the details on Collateral management screen by clicking on ‘Edit’ and saving the record.
The system displays a warning message if the Collateral Management screen is already open.
4.12.1 Valuation sub tab
With the Valuation sub screen, you can view the collateral or asset valuation for an account.
To view the collateral or asset valuation for an account
- Open the Customer Service screen and load the account you want to work with.
- Click Collateral tab and then Valuation.
- Click the Valuation sub tab to view the following
information:
In this field:
View this:
Value section
Current
Select if this is the current valuation.
Valuation Dt
The valuation date of the vehicle.
Source
The valuation source.
Edition
The valuation edition.
Supplement
The valuation supplement.
Wholesale section
Wholesale Base
The wholesale value.
Usage
The usage. This pertains to Line of credit and usually is entered as the current mileage.
Retail section
Retail Amt
Specify the retail base value.
Addons Amt (+)
The add-ons value.
Usage Value Amt (+)
The usage value; that is, the monetary effect that current mileage has on the value of vehicle.
Total Amt (=)
The total value.
Addons section
Addons/Attributes
Select the add-on/attribute.
Value
The value of the attribute.
Amount
The add-on amount.
Note
Assets can have exactly one current valuation.
4.12.2 Tracking sub tab
With the Tracking sub screen, you can view collateral or asset tracking details to an account, such as the location of title, liens, and insurance information.
To view the collateral or asset tracking for an account
- Open the Customer Service screen and load the account you want to work with.
- On the Customer Service screen, click Collateral tab.
- On the available screen (Vehicle, Home, or Other), click the Tracking sub tab.
- On the Tracking sub screen, enter, view, or edit the following
information:
In this field:
View this:
Tracking Items section
Select
If selected, indicates that this is the current record.
Tracking Item
The tracking type.
Disposition
The disposition.
Start Dt
The tracking start date.
End Dt
The tracking end date.
Followup Dt
The next follow-up date.
Comment
Comments if any.
Tracking Item Details section
Enabled
Select to track the information from start date in the Start Dt field.
Parameter
The parameter.
Value
The tracking parameter value.
4.12.3 Seller sub tab
The Collateral link’s Seller Details screen enables you to view seller details of the collateral of Line of credit. You cannot edit or modify details of the seller.
- In Seller Details section, click View.
- View the following:
In this field:
View this:
Seller Details
Seller Type
The seller type.
Seller Name
The seller name.
Nationality
The nationality of the seller.
National Id
The national Id of the seller.
Authorized Signatory
The authorized signatory of the seller.
- In Seller Address section click View.
- View the following:
Seller Address
Mailing
If selected, indicates that this address is the mailing address.
Current
If selected, indicates that this address is the current address.
Country
The seller’s country name.
Address #
The seller’s address.
City
The seller’s city name.
State
The seller’s state name.
4.13 Customer Service screen’s Bureau tab
The Customer Service screen Bureau screen enables you to view credit bureau reports associated with the account that were pulled during line of creditservicing for account. You can also use the Bureau screen to create and pull additional credit bureau reports and view the results as a text only file.
To view an existing credit bureau report
- Open the Customer Service screen and load the account you want to work with.
- On the Customer Service screen, click Bureau
tab.
- In the View Report section:
- Click Servicing to view credit reports generated with the Customer Service screen.
-or-
- Click Origination to view credit reports generated during Line of credit origination.
- In the Bureau Details section, select the report you want to view. The system displays report as a text file in the Text Report section.
To request a manual credit bureau report
- Open the Customer Service screen and load the account you want to work with.
- On the Customer Service screen, click Bureau tab.
- Click Add to open New Request section.
- Complete the following fields:
In this field:
Do this:
Customer
Select the available customer from the drop-down list.
Spouse
Select the applicant’s spouse from the drop-down list.
Bureau
Select the credit bureau from the drop-down list.
Report
Select the credit bureau report type from the drop-down list.
- In the New Request section, click Create Request. The system displays this information in the Bureau Details section and further information about customer in Customer Detail section.
Note
If you are requesting a report from Experian Credit Bureau for Premier Attribute Consumer report, you can do so without impacting the consumer FICO score. To facilitate the same, the ‘Soft Pull’ check box is to be selected in Bureau Details section. This option is available only when the system parameter ‘EXP_PA_SOFT_PULL_IND’ is enabled in the System Parameters screen and Bureau is selected as ‘EXP’ with Report as ‘PREMIER ATTRIBUTE’ in the Bureau Details section.
- If you want to receive a copy of a previously pulled credit bureau report, enter credit bureau reorder number in the Credit Bureau Reorder # field on the Bureau Details section.
- Click Save.
You can print the report by selecting the report and clicking on Print Report.
4.14 Customer Service screen’s Timeline tab
The Customer Service screen’s Timeline tab provides a graphical representation of specific events on an account over a period of time, The events mainly include Transactions (Monetary/Non Monetary), Payments and Call Activities that are posted on the account.
To view account timeline
- Open the Customer Service screen and load the account you want to work with.
- On the Customer Service screen, click Timeline
tab.
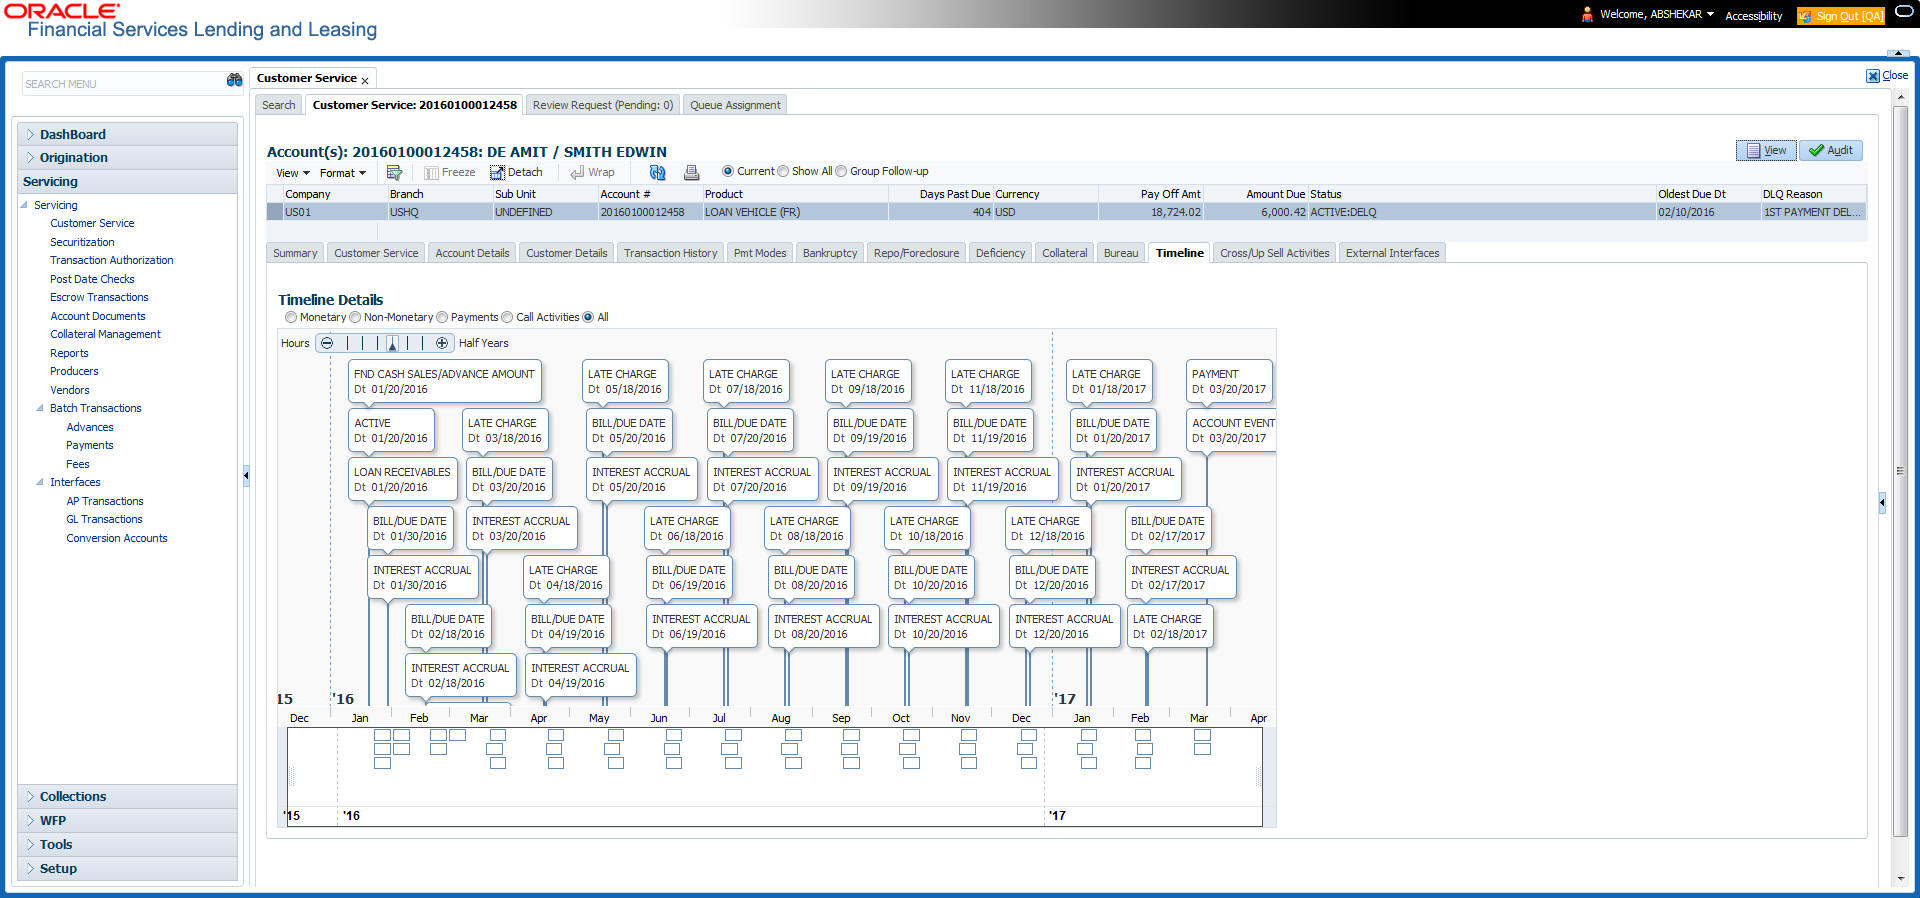
The Timeline Details section facilitates and displays the following options:
- The timeline ranges from 1 month before the account start date till 1 month after the current date.
- Each activity in timeline is arranged as per the transaction date on the account.
- The account activities are categorized as Monetary, Non-Monetary, Payments, and Call Activities. You can filter to view them by selecting the required option or select ‘ALL’ to display all the activities related to the account. By default, system displays ‘Monetary’ transactions.
- On selecting ‘Monetary’ and ‘Payments’ options, timeline displays only good monetary transactions and good payments. More details of these transactions can be viewed in Transaction History > Transactions tab by selecting ‘Good Txns’ and ‘Good Payments’ option.
- On selecting ‘Call Activities’ timeline displays all the call activities posted to the account.
- The Zoom bar
 has options to
view the timeline based on Hours, Days, Weeks, Months, Quarters and Half
Years.
has options to
view the timeline based on Hours, Days, Weeks, Months, Quarters and Half
Years.
- On hovering over the timeline, the arrows
 and
and  helps you to scroll
through the timeline.
helps you to scroll
through the timeline.
4.15 Customer Service screen’s Cross/Up Sell Activities tab
The Customer Service screen’s Cross/Up Sell Activities tab enables you to view and edit all the captured marketing trigger based events for respective customers linked primary accounts.
Oracle Financial Services Lending and Leasing Application has been integrated with a third party database marketing solutions provider to receive monitoring triggers related to marketing based call activities. Primarily the active customer details are shared through an input file and corresponding monitoring triggers data within the processed customer input file are uploaded back into designated location of OFSLL database through an automated interface.
The Customer Service screen’s Cross/Up Sell Activities tab displays the first 10 marketing trigger based call activities with the opportunity details and follow-up requirements. You can select View All check box to view all the ‘active’ and ‘closed’ call activities.
4.15.1 Edit Cross/Up Sell Activity
To edit a reported Cross/Up Sell Activity
- Open the Customer Service screen and load the account you want to work with.
- On the Customer Service screen, click Cross/Up Sell
Activities tab.
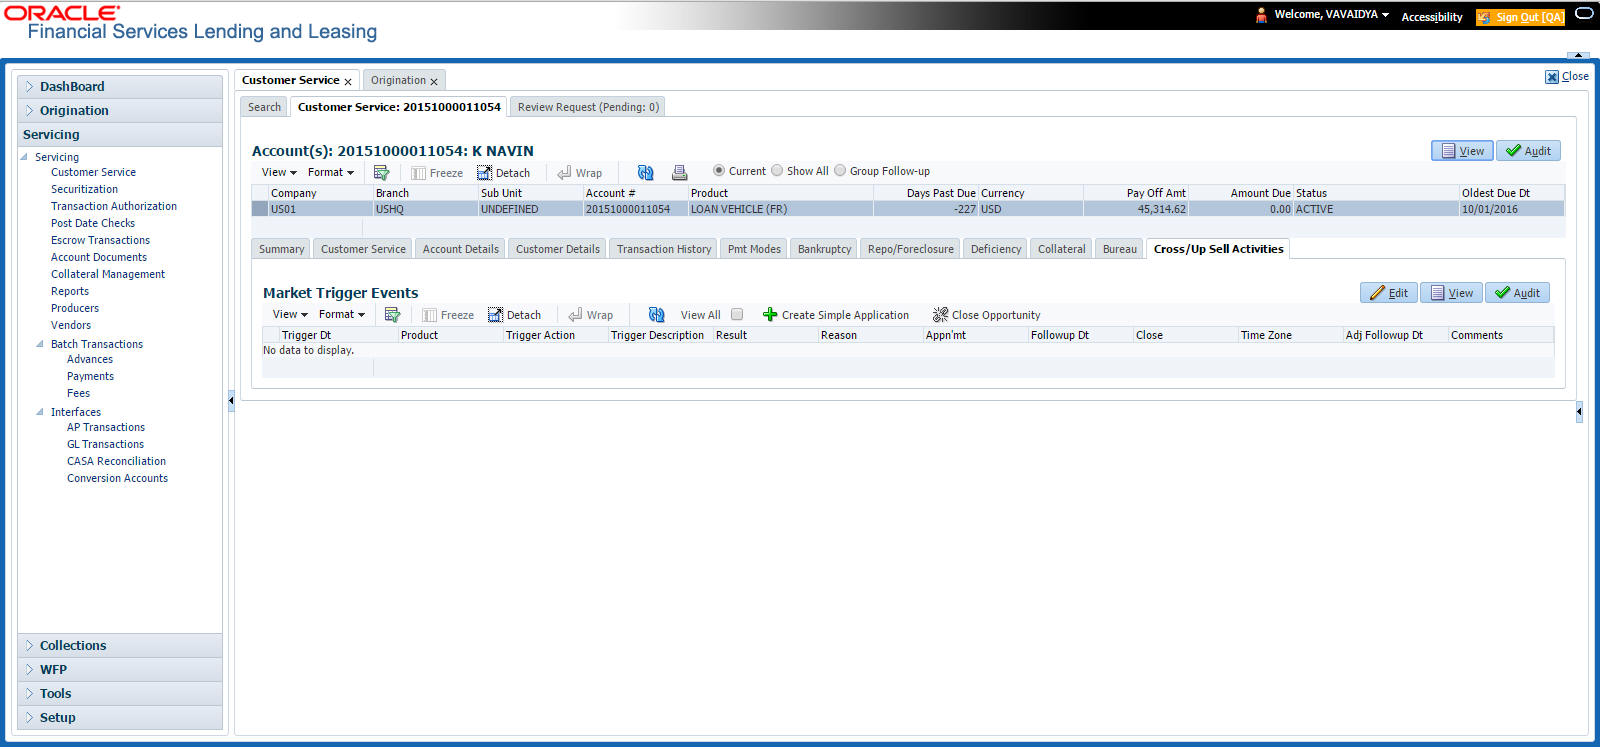
- Select the record which you want to update and click Edit.
- Complete the following fields:
In this field:
Do this:
Trigger Dt
View the date on which the activity has been recorded.
Product
Select the product from drop-down list.
Trigger Action
View the trigger action captured.
Trigger Description
View the description of the action.
Result
Select the result of the action from the drop-down list.
Reason
Select the desired reason for the result selected.
Appn'mnt
Select the check box to indicate if a prior appointment is required for next communication.
Followup Dt
Select the agreed follow-up date from the adjoining calendar icon.
Close
If there is no follow-up and the opportunity is closed, you can select this check box indicating the status of call activity as closed.
Time Zone
Select the time zone of the contact from the drop down list.
Comments
Specify additional information, if any.
- Click Save and Stay or any other save option as explained in Basic Actions section.
4.15.2 Create Simple Application
You can use the call activity data and directly initiate the Line of credit Origination process from Cross/Up Sell Activities tab.
To create simple application
- Open the Customer Service screen and load the account you want to work with.
- On the Customer Service screen, click Cross/Up Sell Activities tab.
- Select the required call activity record and click Create Simple Application.
The system opens Origination > Simple Application Entry screen with Application section capturing the details of call activity.
You can enter/edit the required details and continue creating credit application data into Oracle Financial Services Lending and Leasing Application.
For detailed information, refer to Simple Application Entry chapter in Line of credit Origination User Manual.
4.15.3 Close Opportunity
You can close an opportunity based on the response received from customer and if there are no follow-ups required. However, you can close an opportunity and de-link the same from an account only when all the records are closed.
To close an opportunity
- Open the Customer Service screen and load the account you want to work with.
- On the Customer Service screen, click Cross/Up Sell Activities tab.
- Ensure that all the records are marked as closed and click Close Opportunity.
4.16 Customer Service screen’s External Interfaces tab
The Customer Service screen’s External Interfaces tab displays the account specific information derived from external system.
Oracle Financial Services Lending and Leasing has been integrated with a third party system to explicitly fetch the account specific information through an input data file. A set of automated batch jobs which are scheduled at regular intervals pulls the data shared by external system and populates in the respective account in Customer Service > External Interfaces tab. For more information on available Batch Jobs, refer to Setup Guide > Administration > System > Batch Jobs section.

In the External Interfaces tab, each input data file either new or an update to existing information is displayed as individual record in the Interface section and the column definition details (as sorted in Setup > Data Files screen) are displayed in Interface Details section.
In this field: |
View this: |
Interface section |
|
ID |
Unique case identification number. |
Interface Name |
Name of the external interface. |
File Name |
Input data file name appended with New (IBN) or Existing (IBU) file identifier convention. |
Status |
Current status of the record (None, Accepted, or Rejected). |
Creation Dt |
Date when the record was created. |
Action Taken By |
User who has modified the record status. |
Action Dt |
Date when the action was performed on the record. |
Interface Details section |
|
Parameter |
Name of header used in input data file corresponding to the account information such as First Name, Last Name, Address and so on. |
Value |
Data fetched from external system for each header/parameter. |
Along with the account specific updates, the records may also contain bankruptcy details which needs you attention. You need to verify those details and confirm the authenticity by either accepting or rejecting the bankruptcy information. If Accepted, system posts the bankruptcy details on the corresponding customer accounts.
4.16.1 Accept or Reject Bankruptcy Details
In the External Interfaces tab you can Accept or Reject information of those records which are specific to bankruptcy update and marked with status as ‘None’.
- To accept the bankruptcy details, you need to create a new record with tracking attributes and then proceed with steps explained below.
- To reject a record, you can select the record and click ‘Reject’ in the external interface tab.
Post update, the status of record is marked as ‘Accepted’ or ‘Rejected’.
To Accept Bankruptcy Details
- Open the Customer Service screen and load the account you want to work with.
- On the Customer Service screen, click External Interfaces tab.
- In the Interface section, select the bankruptcy record with status ‘None’ for which action has to be performed.
- Verify the details displayed in Interface Details section.
- Once confirmed, navigate to Customer Service screen > Bankruptcy tab.
- Create a Bankruptcy record and load the tracking attributes as explained in ‘Customer Service screen’s Bankruptcy tab’ section.
- Click Accept in the action section and click ‘Yes’ in the confirmation dialog to accept changes.
On confirmation, system updates the bankruptcy details based on either ‘SSN’ for new bankrupt accounts or ‘Case Number’ for existing bankrupt accounts.
4.17 Review Request
The Review Requests page is primarily a work flow tool used to flag an account or an application for the attention of another Oracle Financial Services Lending and Leasing user and ask for feedback. It allows the system users to send and receive requests (including e-mail) commenting on a specific account or application.
In this chapter, you will learn how to compete the following tasks:
- Reviewing a request
- Sending a review request
- Responding to a review request
- E-mailing a Review Request
- Closing a review request
Note the following:
- You can complete the above tasks for an Account Review Request using Review Request page in the Servicing master tab.
- To complete the above mentioned tasks for an Application Review Request, use Review Request page available in the Origination master tab.
4.17.1 Review Requests Tab
The Review Requests page contains the following sections:
- Query Section
- Action Section
- Email Section
- Review request records
- Comments Sections
Query Section
The Query section enables you to filter records according to priority levels i.e.high, normal or low based on any of the following:
Query Options |
Descriptions |
Originator |
Displays the records of all the active review requests you created. |
Receiver |
Displays the records of all the active review requests you received. |
Both |
Displays all the review requests records you have created as well as received with the status other than ‘CLOSED’. |
View All |
Displays all the review requests records you sent and received, both active and closed. |
Action Section
The Action section enables you to send, respond or close the review request.
Action Options |
Descriptions |
Open Application/Account |
Opens the application details page to review the request. (if you open it from origination it’s application and if from servicing den account) |
Send Request |
Sends a review request to another Oracle Financial Services Lending and Leasing user. |
Send Response |
Sends a response to a review request from another Oracle Financial Services Lending and Leasing user. |
Close Request |
Changes the status of review request to CLOSED and removes its record from the Review Request page. The status can be viewed by selecting ‘View All’ in the ‘Query’ section.
|
Email Section:
The Email section enables you to send an email to either originator or receiver of the review request which cannot be responded or replied back from email recipient.
Email Options |
Descriptions |
Originator |
Sends an email of review request information to the person listed in the Originator column on Review Request page. |
Receiver |
Sends an email of review request to the person listed in the Receiver column on Review Request page. |
Comments Sections
The Comments section enables originator or receiver to specify additional information that needs to be sent with the request.
Comments From |
Descriptions |
Originator Comment |
Displays comments specified by the originator of review request at the time of creating a request. |
Receiver Comment |
Displays comments specified by the receiver of review request at the time of reviewing a request. |
4.17.1.1 Reviewing a Request
System displays the priority and the number of requests ready for review, if any, for your user id at My Pending Review Requests By Priority section in the Servicing Dash Board window.
To review requests
- On the Oracle Financial Services Lending and Leasing application
home page, click Servicing main tab and then click Servicing
drop-down link. Click Customer Service link.
The Customer Service window appears, opened at the Results tab. Under Customer Service screen, click Review Requests tab. - In the Query section, click Receiver.
In the Review Request record, the system displays all open review request you have received.
- In the Review Request record, select the record you want
to view and click View. The following screen is displayed.
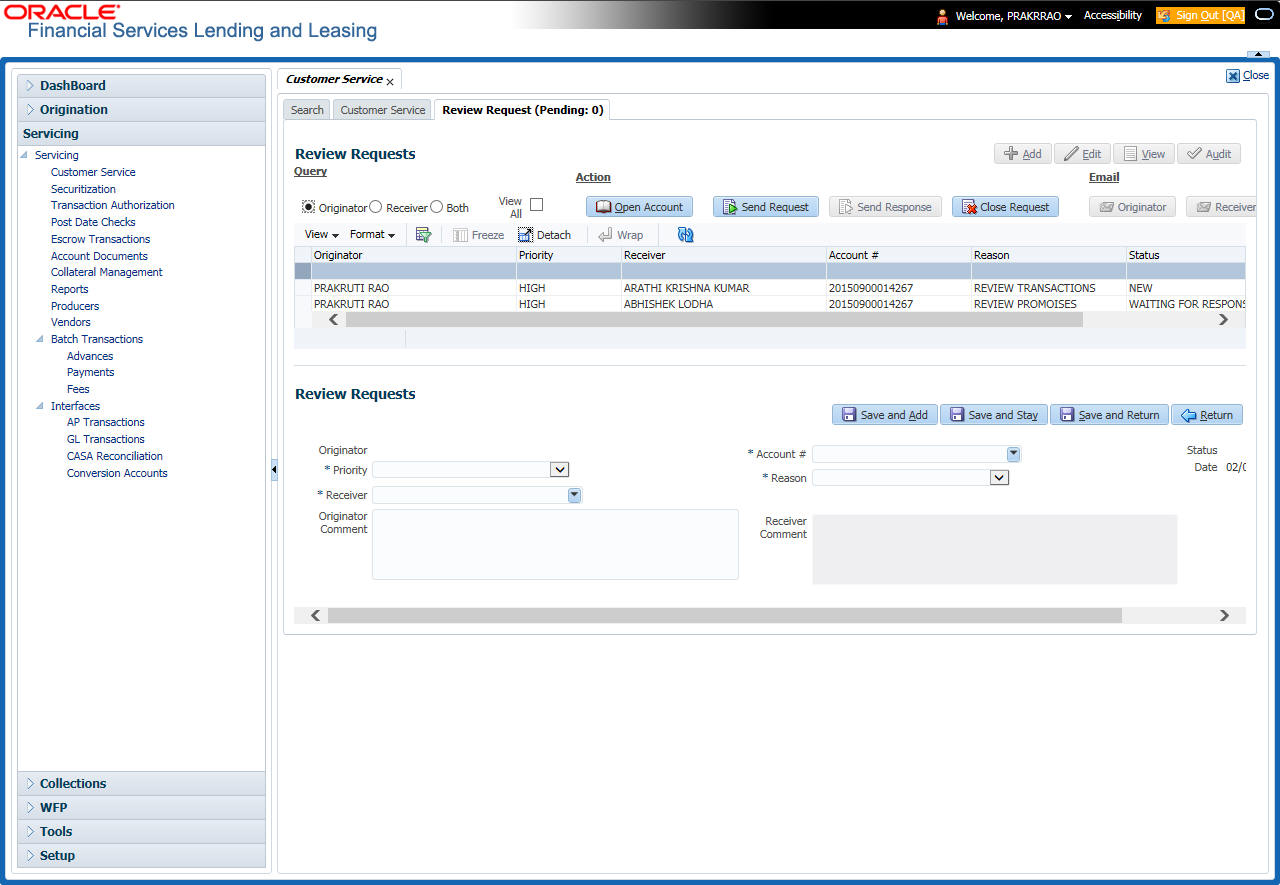
- For
the selected Review Request record, view the following information:
Fields
Descriptions
Originator
The user id of the request originator.
Priority
The request priority: HIGH, NORMAL, or LOW.
Receiver
The recipient of the request.
Account #
The account number which needs review.
Transaction
The transaction selected.
Reason
The review reason.
Status
The request status.
Date
The date and time when the request was created.
Originator Comment
The comment by the originator which creating a request.
Receiver Comment
The comment by the receiver after reviewing a request.
Note
If you click Open Account, system loads the account in review request and displays the Account Details page.
4.17.1.2 Sending a Review Request
The Send Request button enables you to send a review request to another the system user. However, the Send Request button is enabled only if you have specified the receiver while creating a review request and have saved it.
To send a review request
- On the Oracle Financial Services Lending and Leasing Application home page, click the Servicing main tab and then click Servicing drop-down link. Click Review Requests tab.
- In theReview Requests page in the Query section, select Originator.
- Click Add to create a new review request.
The following screen is displayed:
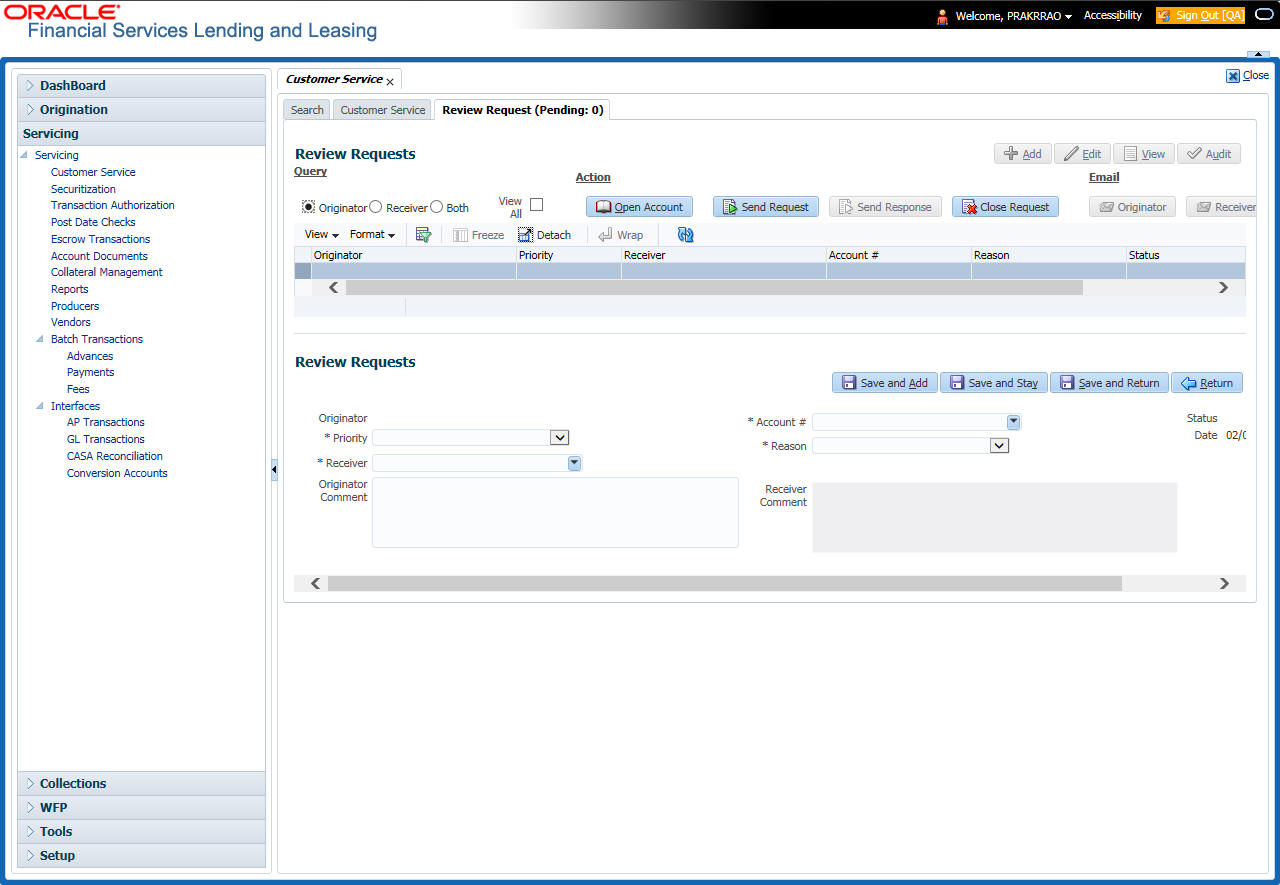
- In the Priority field, select the priority of review request: High, Normal, or Low which helps the recipient in responding to requests. It does not affect the order in which messages are sent or received.
- In Receiver field, select the person you want to receive the message.
- In Account # field, select the account involved with the review request. The default value NEW appears in the Status field.
- In Reason field, select the purpose for the review request.
- In Originator Comment field, specify any additional message you want to send along with the review request.
- Click Save And Add/Save And Return. The review
request is created and Send Request button is enabled in the Action section.

- In the Action section, click Send Request.
The system sends your request to the recipient’s, where it appears on My Pending Review Request window in Dash Board with status Sent to Originator.
4.17.1.3 Responding to a Review Request
When you receive a review request, the system notifies you by creating an entry in My of Pending Review Requests By Priority section in Dash Board with the number of unseen messages. In the following example, one review request is waiting on the Review Request page.

To respond to a review request
- On the Oracle Financial Services Lending and Leasing Application home page, click Servicing main tab and then click Servicing drop-down link. Click Customer Service link. If the Number of Pending Review Requests tab displays a number, click Review Requests tab. On the Review Request page Query section, select Receiver.
The system displays the unread review requests in Review Request record.
- In the Review Request record, select the record
you want to view and click View.
- Click Open Account.
The system loads the account on Customer Service screen and displays Account Details page.
- Perform requested task on review request on the account.
Click Review Request tab and selecting request, click Edit. Specify
your response in the Receiver Comment field. Click Save
And Return.

- In the Action section, click Send Request.
The system sends your response to the originator, where it appears on Review Request page with status Return to Originator.
The recipient can view sent response by clicking Receiver or View All in Query section. (The request has a status as RETURN TO ORIGINATOR.)
- In the Action section, click Close Request
It will remove the message from the Review Request section.
Back on the originator’s Review Request page, the message appears when Originator is selected in Query section. The request has a status as Return to Originator.
4.17.1.4 E-mailing a Review Request
While system updates My Pending Review Requests By Priority section in the DashBoard to notify you about the new requests, you can also e-mail a review request to both the originator and a receiver, as applicable. The system will use e-mail address recorded for both the originator and receive in User Definition section in User page.
To e-mail a review request
- On the Oracle Financial Services Lending and Leasing Application home page, click Servicing main tab and then click Servicing drop-down link.
- Click Customer Service link.
- On the Customer Service link, click Review Requests tab.
- Select the request you want to e-mail in the Review Request section.
- In Email section, click Originator to send the message to the person listed in Originator field.
-or-
- Click Receiver to send it to the person listed in the Receiver field.
The system emails the details of selected record to e-mail address recorded in user setup.
4.17.1.5 Closing a Review Request
You can close a review request you created at anytime, regardless of status. However, you can only close review requests that have your user id in the Originator field. When you close a review request, the system removes it from Review Request record.
To close a review request
- On the Oracle Financial Services Lending and Leasing Application home page, click Servicing main tab and then click Servicing drop-down link.
- Click Customer Service link.
- On the Customer Service link, click Review Requests tab.
- Select the request you want to close in the Review Request section.
- In the Action section, click Close Request.
The system assigns the request as Closed and removes it from your Review Request record. The closed accounts can be reviewed anytime by selecting View All in the Query section.
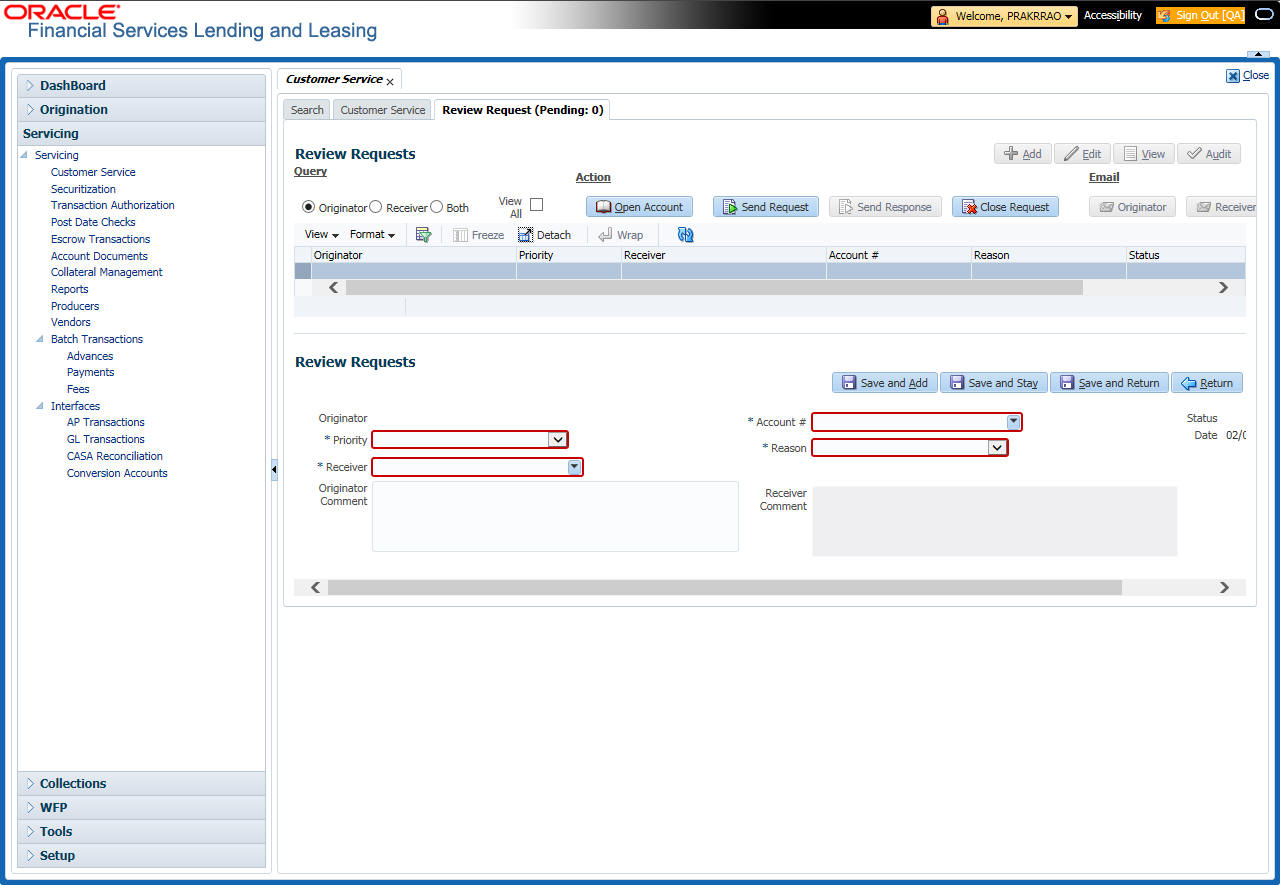
4.18 Queue Assignment
The Queue Assignment tab in Oracle Financial Services Lending and Leasing application allows you to search and view the hard assigned customer service queues maintained in the system. You can also view the queue assignment details and reassign users in a hard assigned queue.
Customer Service Queues are maintained in Administration’s setup screen (Setup > Administration > User > Queues > Customer Service). For more information on hard assigned queues, refer to section “Using the Hard Assigned feature” in setup guide.
Navigating to Queue Assignment
On the Oracle Financial Services Lending and Leasing home screen, click Servicing > Servicing > Customer Service > Queue Assignment.
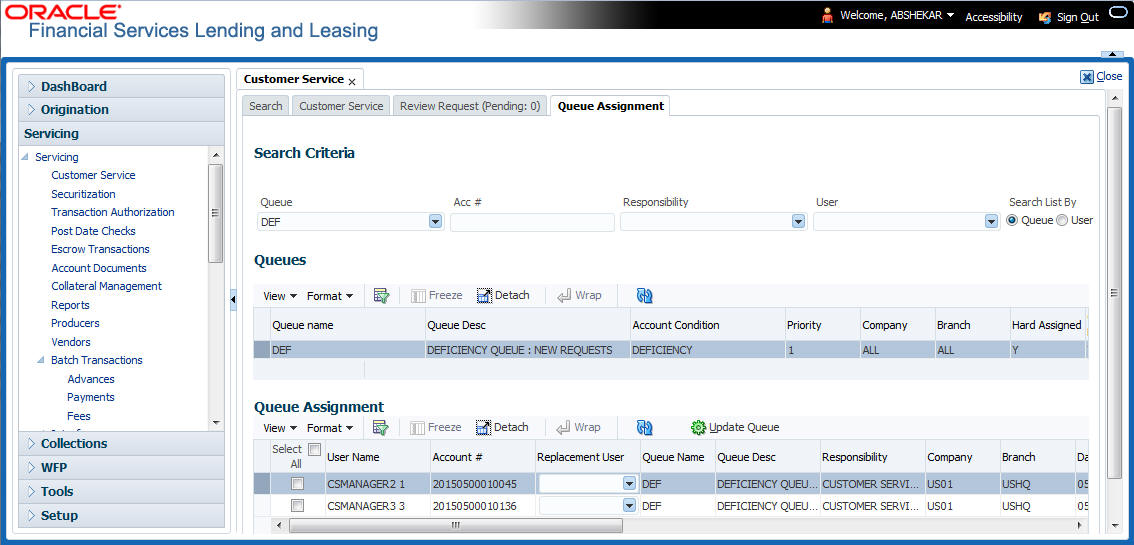
In this section, you will learn how to compete the following tasks:
- Using the Queue Search
- View Queues & Queue Assignment details
- Reassign Users in Queue
4.18.1 Using Queue Search
In the Search Criteria section, you can primarily use the ‘Search List By’ filter to search based on either ‘Queues’ or ‘Users’ maintained in the system. Depending on the option selected, you can further filter your search using the following list of parameters and query the database by providing one or more parameter values.
Field: |
Do this: |
Hard Assigned Queue |
Select the queue name from the drop-down list. The list displays both ‘Enabled’ and ‘Hard Assigned’ customer servicing queue definitions. |
Acc # |
Specify the account number to which the queue is assigned. |
Responsibility |
Select the user/queue responsibility from the drop-down list. The list displays various user responsibilities as defined in Setup > Administration > User > Queues > User Groups tab. |
User |
Select the ‘User’ from the drop-down list. The list displays all the hard assigned users maintained in the system. |
Note
You need to specify a minimum of one parameter for the search to retrieve queues from the database. Else system displays an error message.
Click Search. The search results for Queues and Users are displayed in the ‘Queues’ and ‘Queue Assignment’ sections respectively.
You can also click ‘Reset’ to clear the filters specified in Search Criteria .
Remove Account Filter
While searching for queues using Account number as the Search Criteria, the Queue Assignment section displays the filtered search results along with the ‘remove Filter’ option in the header.
Clicking on ‘remove Filter’ button will remove the account number filter and displays all the accounts belonging to the selected queue.
4.18.2 Queues & Queue Assignment details
While searching for queues in the Search Criteria section, the search results are displayed in the Queues & Queue Assignment section. Whereas, the search results for a User is displayed in Queue Assignment section.
The Queues section displays both ‘Enabled’ and ‘Hard Assigned’ customer servicing queues with the following details:
- Queue name
- Queue Desc
- Account Condition
- Priority
- Company
- Branch
- Hard Assigned
- Group Follow-up Ind
- Near Real-Time
- Dialer Extract
- Enabled
The Queue Assignment section consists of the following details:
- User Name
- Account #
- Replacement User
- Queue Name
- Queue Desc
- Responsibility
- Company
- Branch
- Date
- Title
- Products
- Status
- Delinquency Days
- Amount Due
- Outstanding Balance
- Producer
- Secured
- Reason
4.18.3 Reassign Users in Queue
In the Queue Assignment tab, you can reassign a different user for a queue either individually or in bulk and reassign the hard assigned queues. While doing so, you can state the reason for change which later gets appended and displayed in the account conditions history log (Customer Service > Account Details > Condition Details sub tab).
Replace User in Queue
- On the Oracle Financial Services Lending and Leasing home screen, click Servicing > Servicing > Customer Service > Queue Assignment.
- Search for the required Queue or User using the parameters in Search Criteria. The search results are displayed in the Queues & Queue Assignment section.
- In the Queue Assignment section, click on the ‘Replacement User’ drop-down list against the required user and select the new user from the list. You can also use the ‘Search’ option within the list to search for the required user.
- Specify the reason for change in the Reason column against the user selected.
- Click Update Queue.
Bulk Replace Queue Users
- On the Oracle Financial Services Lending and Leasing home screen, click Servicing > Servicing > Customer Service > Queue Assignment.
- Search for the required Queue or User using the parameters in Search Criteria. The search results are displayed in the Queues & Queue Assignment section.
- In the Queue Assignment section, click ‘Select All’ check box.
- Click on the ‘Replacement User’ drop-down list on the header and select the new user from the list. You can also use the ‘Search’ option within the list to search for the required user.
- Specify the reason for change in the Reason field on the header.
- Click Update Queue.
On successful user replacement, a system generated comment is posted on the account with the following details:
- Alert flag as ‘N’
- Type
- Sub Type
- Comment Format QUEUE USER CHANGED FROM XXX TO YYY BECAUSE OF <<REASON>> ON <<DATEFORMAT>>