User Management function enables bank administrator to onboard and manage users along with their login credentials for channel banking access. . This module facilitates channel banking access to the bank’s internal users (administrators) and external users (customers).
Internal Users:
External Users:
Pre-Requisites
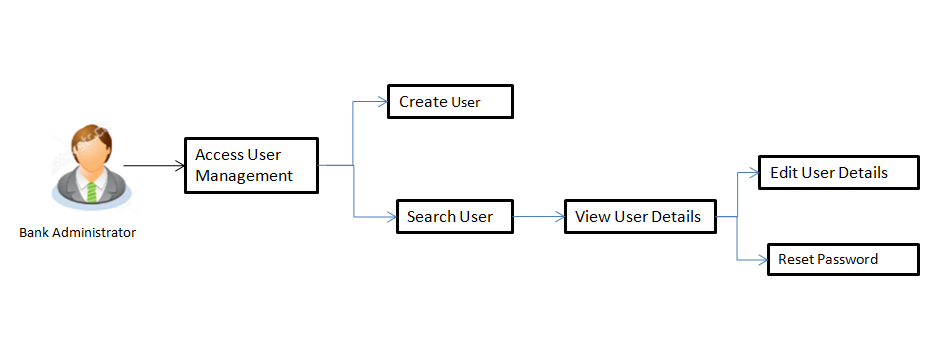
Workflow
Features Supported In Application
The User Management module allows the bank administrator to
![]() How to reach here:
How to reach here:
Dashboard > OnBoarding > User Management
OR
Dashboard > User Management (Quick Link)
Bank AdministratorAdministrator is a set of individuals that administer the applicant/Affiliate entity. For example, Accountants, Authorized Signatories for organizations, Power of Attorney for individuals. logs into the system and navigates to the User Management screen. This function allows the administrator to create internal and external users.
To create a new user:
|
Field Name |
Description |
|---|---|
|
User Type |
User type for which the new user is to be created. The user can be:
|
Create User – Map Party ID
If the user type to be created is selected as Retail or Corporate User, system displays a screen to enter the party information (party ID or party name) and search party. User can enter the party ID (if known) or the party name with a minimum of 5 characters. The matching results are shown on the screen.
In case of a party search by party ID, it is an exact match and PartyA party is any individual or business entity having a banking relationship with the bank. ID entered by the user gets validated from the host. After the host validation is successful, party name gets displays on the screen.
In case of a party search by name, system displays the matching party records. The records have parties listed with both Party ID and Party Name information. User can select the record by clicking on the Party ID from the list.
|
Field Name |
Description |
|---|---|
|
Search |
|
|
Party ID |
Party ID for which the party preference to be maintained/viewed. |
|
Party Name |
Party Name of a party for which the party preference to be maintained/viewed. |
|
Field Name |
Description |
|---|---|
|
Create |
|
|
User Type |
Type of user. The user can be:
|
|
Party ID |
Party ID for which the user is to be created is displayed. This field appears if you select Retail User/ Corporate User option from User Type list. |
|
Party Name |
Party Name of the party ID for which the user is to be created is displayed. This field appears if you select Retail User/ Corporate User option from User Type list. |
|
Organization |
Organization that the user belongs to. This field appears if you select Administrator option from User Type list. |
|
Manager |
Manager of the user. This field appears if you select Administrator option from User Type list. |
|
Employee Number |
Employee number of the user. This field appears if you select Administrator option from User Type list. |
|
Personal Information |
|
|
User Name |
Name of the user (login ID) which is to be created. |
|
Title |
Title of the user. If User type is Retail, value is fetched from the host and defaulted. For the user type corporate user and administrator are:
|
|
First Name |
First name of the user. If user type is Retail, value is fetched from the host and defaulted. |
|
Middle Name |
Middle name of the user. If user type is Retail, value is fetched from the host and defaulted. |
|
Last Name |
Last name/ surname of the user. If user type is Retail, value is fetched from the host and defaulted. |
|
Date of Birth |
Date of birth of the user. If user type is Retail, value is fetched from the host and defaulted. |
|
Contact Details |
|
|
Email ID |
Email id of the user. If user type is Retail, value is fetched from the host and defaulted. |
|
Contact Number (Mobile) |
Mobile number of the user. If user type is Retail, value is fetched from the host and defaulted. |
|
Contact Number (Land Line) |
Phone number (land line) number of the user. |
|
Address Line 1-3 |
Address of the user. If user type is Retail, value is fetched from the host and defaulted. |
|
Country |
Country of the user. If user type is Retail, value is fetched from the host and defaulted. |
|
City |
City in which the user resides. If user type is Retail, value is fetched from the host and defaulted. |
|
Zip Code |
The postal code of the city in which the user resided. If user type is Retail, value is fetched from the host and defaulted. |
|
Limits & Roles |
|
|
Limit |
To map transaction limit package to the user. |
|
Role |
Child roles like maker, checker etc maintained under respective user types are listed. Multiple child roles can be mapped to the user. |
|
Status |
The user's status. The option can be:
|
Using this option, bank administrators can search and view details of the existing users. Administrator selects the user type of the user to be searched.
Default search is available with User Name, whereas user can be searched by provided other details also.
To search user:
|
Field Name |
Description |
|---|---|
|
Create New User |
|
|
User Type |
Type for which the new user is to be created. The user can be:
|
|
User Name |
To search the user with the user name.
Partial search is allowed. |
|
More Search Options Below fields appears if you click the More Search Options link. |
|
|
First Name |
Allows to search based on first name or given name of the user. |
|
Last Name |
Allows to search based on last name/ surname of the user. |
|
|
Allows to search based on email id of the user. |
|
Mobile Number |
Allows to search based on mobile number of the user. |
|
Party ID |
Allows to search based on Party id. This field appears if you select Retail User/ Corporate User option from User Type list. |
To view the user details:
|
Field Name |
Description |
|---|---|
|
Search Results |
|
|
Full Name |
First name and last name of the user. |
|
User Name |
User Name of the user. |
|
Email / Mobile Number |
Email / Mobile Number of the user. |
|
Status |
Status of the user. Locked or Unlocked. |
User Management - View
|
Field Name |
Description |
|---|---|
|
View |
|
|
User Type |
Type of user. The user can be:
|
|
Party ID |
Party ID mapped to the user. |
|
Party Name |
Party Name of the party ID mapped to the user. This field appears if you select Retail User/ Corporate User option from User Type list. |
|
Organization |
Organization that the user belongs to. This field appears if you select Administrator option from User Type list. |
|
Manager |
Manager of the user. This field appears if you select Administrator option from User Type list. |
|
Employee Number |
Employee number of the user. This field appears if you select Administrator option from User Type list. |
|
Personal Information |
|
|
User Name |
Name of the user (login ID) of the user. |
|
Title |
Title of the user. The options are:
|
|
First Name |
First name of the user. |
|
Middle Name |
Middle name of the user. |
|
Last Name |
Last name/ surname of the user. |
|
Date of Birth |
Date of birth of the user. |
|
Contact Details |
|
|
Email ID |
Email id of the user. |
|
Contact Number (Mobile) |
Mobile number of the user. |
|
Contact Number (Land Line) |
Phone number (land line) number of the user. |
|
Address Line 1-3 |
Address of the user. |
|
Country |
Country of the user. |
|
City |
City in which the user resides. |
|
Zip Code |
The postal code of the city in which the user resided. |
|
Limits & Roles |
|
|
Limit |
To map transaction limit package to the user. This field appears if you select Retail User/ Corporate User option from User Type list. |
|
Roles |
Child roles mapped to the user. |
|
Status |
The user's status. The option can be:
|
This function enables the Administrator to edit the existing user details.
To edit or update a user details:
User Management - Edit User
|
Field Name |
Description |
|---|---|
|
Edit |
|
|
User Type |
Type of user. The user can be:
|
|
Party ID |
Party ID for which the user is to be created is displayed. This field appears if you select Retail User/ Corporate User option from User Type list. |
|
Party Name |
Party Name of the party ID for which the user is to be created is displayed. This field appears if you select Retail User/ Corporate User option from User Type list. |
|
Organization |
Organization that the user belongs to. This field appears if you select Administrator option from User Type list. |
|
Manager |
Manager of the user. This field appears if you select Administrator option from User Type list. |
|
Employee Number |
Employee number of the user. This field appears if you select Administrator option from User Type list. |
|
Personal Information |
|
|
User Name |
Name of the user (login ID) which is to be created. |
|
Title |
Title of the user. If User type is Retail, value is fetched from the host and non editable. Value can be edited only if the user type is Administrator or Corporate User, options are:
|
|
First Name |
First name of the user. This field is editable only for Administrator and Corporateuser type . |
|
Middle Name |
Middle name of the user. This field is editable only for Administrator and Corporateuser type . |
|
Last Name |
Last name/ surname of the user. This field is editable only for Administrator and Corporateuser type . |
|
Date of Birth |
Date of birth of the user. This field is editable only for Administrator and Corporateuser type . |
|
Contact Details |
|
|
Email ID |
Email id of the user. This field is editable only for Administrator and Corporateuser type . |
|
Contact Number (Mobile) |
Mobile number of the user. This field is editable only for Administrator and Corporateuser type . |
|
Contact Number (Land Line) |
Phone number (land line) number of the user. |
|
Address Line 1-3 |
Address of the user. This field is editable only for Administrator and Corporateuser type . |
|
Country |
Country of the user. This field is editable only for Administrator and Corporateuser type . |
|
City |
City in which the user resides. This field is editable only for Administrator and Corporateuser type . |
|
Zip Code |
The postal code of the city in which the user resided. This field is editable only for Administrator and Corporateuser type . |
|
Limits & Roles |
|
|
Limit |
To map transaction limit package to the user. This field is editable only for Retail and Corporateuser type . Field will not be displayed if user type is selected as Administrator. |
|
Role |
Child roles mapped to the user. Value can be edited for all types of user. |
|
Status |
The user's status. The option can be:
Value can be edited for all types of user. |
FAQs
![]() Who can create / update the user?
Who can create / update the user?
![]() Can I edit the party id mapped to the user?
Can I edit the party id mapped to the user?
![]() When does the system update a user status as ‘locked’?
When does the system update a user status as ‘locked’?
![]() Can I set the user name which is already used in the application?
Can I set the user name which is already used in the application?
![]() Can I edit personal and contact details of Retail user?
Can I edit personal and contact details of Retail user?
![]() Can one assign multiple child roles to a user?
Can one assign multiple child roles to a user?
![]() What are the different child roles available out of box?
What are the different child roles available out of box?
![]() If I update the child role associated to a user, what will happen to the in-flight transactions?
If I update the child role associated to a user, what will happen to the in-flight transactions?