| Agile Product Lifecycle Management Administrator Guide Release 9.3.6 E71145-01 |
|

 Previous |
 Next |
| Agile Product Lifecycle Management Administrator Guide Release 9.3.6 E71145-01 |
|
Previous |
Next |
From the Users node, you can give new users access to Agile PLM or modify the properties of existing users, including changing user group, role, and escalation approval settings.
The Users node lets you view and configure the following aspects of Agile PLM:
Add new users
Modify any user properties such as licenses, roles, sites, and passwords
Disable or delete users
The process of adding users involves establishing the properties that govern their access to Agile PLM applications. For example, their passwords allow them to log in, and their role assignments establish their access to Agile PLM objects from point of discovery forward. It is important to consider precisely what access and permissions your users require.
|
Important: Also available is the possibility of integrating aspects of your PLM system with Single Sign-On (SSO) capability. With SSO configured and deployed for your PLM system, a user that has signed in to the system once (for instance, through the corporate portal) is not prompted again by a "login" dialog. See Appendix A, "Configuring Single Sign-On". |
|
Note: A "supplier user" is a particular kind of user who is associated with a Supplier; supplier users, or "contact users" may not be created by the administrator but by certain Manager roles. You may assign the Organization Manager or Compliance Manager role to an Agile PLM user, and this person creates Suppliers and populates them with contact users who can respond to RFQs or RFIs through their (Restricted) role. For more information, see Agile PLM Product Cost Management User Guide and Agile PLM Product Governance & Compliance User Guide. |
Once you have assembled information about new users and assessed their access requirements, you can add them to the Agile PLM system.
Users created in an LDAP system must be imported to Agile PLM and synchronized in the Agile PLM database using the Refresh button. See "LDAP as a Node in Administrator."
Before creating a new Agile PLM user, make sure you answer the following questions:
What does this user need to be able to do in Agile PLM? What default roles are required for this user?
What should this user be prevented from doing in Agile PLM?
Will this user need to have separate Login and Approval passwords?
On which Agile PLM lists will the user's name appear?
Which Agile PLM searches should the user be able to use?
Is the user a Power User? A Power User can log in at any time and is not counted as a member of the concurrent user pool.
To create a new user in Java Client:
Under User Settings, double-click Users. The Users window appears.
Click the New button. The Create User dialog box opens.
Enter values for User ID, First Name, Last Name, and Email.
Type the Username and Password. Repeat the password in the Retype Login Password field.
Passwords are case-sensitive. For example, if you enter the password here in all capital letters, then the user must always enter the password in all capital letters when logging in to Agile PLM.
If the user requires a separate approval password, uncheck Use Login Password for Approval Password, then enter an approval password (the new user's approval password) in the Approval Password and Confirm Approval Password fields.
Decide whether to select the Change Password Upon Next Login check box, which forces the user to change the temporarily assigned password from the administrator to a new password the next time they log into Agile.
Click OK. The setup window for the new user appears.
Under Profile, click the Role(s) list and assign roles to the user. Remember, the user cannot do anything in Agile PLM until a role is assigned.
In the Profile section, enter other values as needed. These fields are not required and may be filled in later.
On the Preferences tab, enter values for the properties. You can accept the default values.
Click Save.
To create a new user in Web Client:
From the left navigation pane choose Tools and Settings > Address Book > Users.
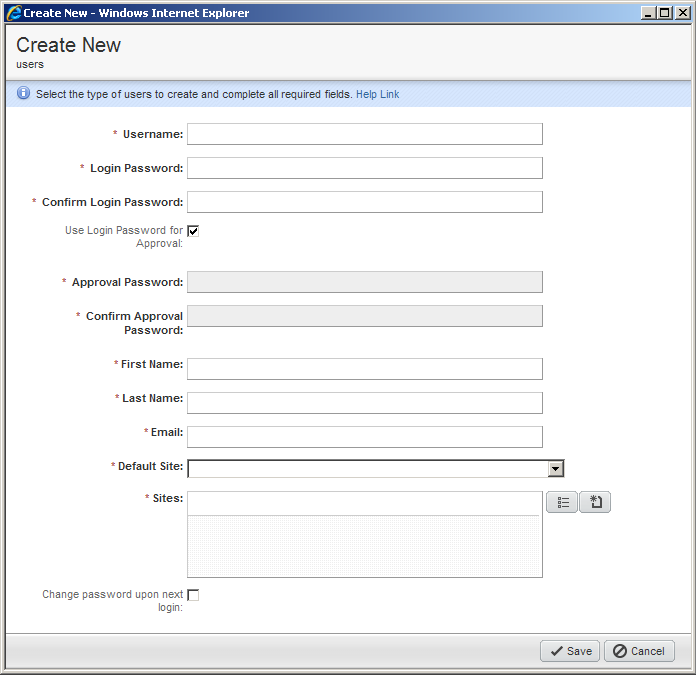
Click Add. The Create New User window opens.
Type the Username and Login Password. Repeat the password in the Confirm Login Password field.
|
Note: Passwords are case-sensitive. For example, if you enter the password here in all capital letters, then the user must always enter the password in all capital letters when logging in to Agile PLM. |
If the user requires a separate approval password, uncheck Use Login Password for Approval Password, then enter an Approval Password (the new user's approval password) and Confirm Approval Password.
Enter values for First Name, Last Name, and Email.
From the Sites field, click the Launch the Palette button to select the sites you want available for this user.
From the drop-down Default Site list, click the site you want as the default site for this user.
Decide whether to select the Change Password Upon Next Login check box, which forces the user to change the temporarily assigned password from the administrator to a new password the next time they log in to Agile.
Click Save. The General Info tab of the newly created user appears ready to edit.
To open the Role(s) list, click the Launch the Palette button. Assign roles to the user. Remember, the user cannot do anything in Agile PLM until a role is assigned.
In the Profile section, enter other values as needed. These fields are not required and may be filled in later. Click Save.
To confirm the addition and review the new user's properties, click Tools and Settings > Address Book > Users. Double-click the new user ID in the table of users. The new user's page appears.
|
Note: The "Username" property is now called "User ID." Both of these terms are seen in the Agile PLM clients and documentation, and they can be thought of as equivalent. |
For security reasons, Agile PLM usernames must be unique. You can create multiple users with the same name (first and last), provided that the username is unique.
If there is an active or inactive user with the same username as a deleted user and the deleted user is undeleted, you must change the username of the deleted user to make it unique. All history references from other objects to the undeleted user remain intact.
|
Important: To prevent frequent user inconvenience, it is important to periodically evaluate your license requirements with your Agile Account Executive, and upgrade as needed. |
|
Note: If you change a user's User ID (username) you must also reset the user's login password. If you change the User ID, and you do not reset the login password, the user will not be able to login to Agile PLM.
|
When you add new users, you assign passwords so that they can log in to Agile PLM for the first time. Users can then change their passwords themselves based on the settings in their Password property and the systemwide account policy. The Agile PLM administrator can also change a user password later if necessary.
Although the account policy established from the Account Policy node governs password expiration, length, and uniqueness, you can specify settings from LDAP.
For additional security, users can have different passwords for login and approval. For more information, see "Changing a User's Password."
For more information, see "Account Policy."
There are four "special users" in Agile PLM, which are used for internal purposes.
Table 13-1 Special PLM users and their purpose
| Special User | Purpose |
|---|---|
|
superadmin (internal user) |
used internally to gain access to all data |
|
agileuser (internal user) |
used internally to gain access to all data |
|
ifsuser (external user) |
needed for access by File Manager |
|
etluser (external user) |
needed for access by ETL tool |
The difficulty with these users is that these users are not exposed through the UI, that is, they exist in the PLM database table but are not visible in Java Client. However, anyone who knows the password can access agile data through SDK.
You can change the default passwords for the "IFS" user (file server), the "ETL" user (Datamart), and the "Agile" user.
|
Important: The "Super Admin" user password cannot be changed. |
To reset, for example, the "ifsuser" password:
Under User Settings, double-click Users. The Users window appears.
In the menu bar, click the Change Internal Password User drop-down list.
Click Change Password of "ifsuser". The Change Password of "ifsuser" dialog opens.
Fill with appropriate values for the Old Password, New Password, and Retype New Password fields. When you are finished, click OK.
When the password for ifsuser is reset, the following steps must be performed:
Run <AgileHome>\agileDomain\bin\encryptPwdUtil.cmd to encrypt the new password.
Paste the new password to agile.properties under <AgileHome>\agileDomain\config and server.conf under <AgileHome>\agileDomain\config and <AgileHome>\apache-tomcat-6.0.18\webapps\webdav\WEB-INF\classes.
If the ifsuser password is changed during installation, only this second step must be performed.
The File Manager must be restarted for the configuration change to take effect.
Administrator has an LDAP node under the Server Settings node folder in which to configure a Lightweight Directory Access Protocol. See "LDAP."
You can modify any of the fields for existing users from the Users node. The following is a general process for changing property settings.
For information about the filter bar at the top of the Users window, see "Filtering Data in Java Client."
To modify a user's fields in Java Client:
Under User Settings, double-click Users. The Users window appears.
Double-click the user's name in the list. That user's window appears.
Modify fields directly, make a selection from a list, or make changes in a dialog box.
Click the Save button.
To modify a user's fields in Web Client:
Open the User object, either from a search result or from the Users tab of Address Book.
Click Edit. The fields become editable. You can directly edit a field, make a selection from a list, or make changes in a dialog box. Modify the fields you want.
Click the Save button.
The next time the user logs in, he will see the results of changes you have made to his user properties. However, for some properties (for example, Time Zone and Receive Email Notification), you must log out and log back in to Web Client to see your changes to these properties.
|
Note: If you change a user's User ID (username) you must also reset the user's login password. If you change the User ID, and you do not reset the login password, the user will not be able to login to Agile PLM.
|
When you are adding new users, you assign passwords so that users can log in to Agile PLM for the first time. Users can then change their passwords within Agile PLM if necessary. The Agile PLM administrator can also change a user's password.
Administrators can assign temporary passwords and force users to change them the next time the user logs in to Agile. The Change Password Upon NextLogin check box during the user creation process is the first available place to apply this rule. In Web Client, the administrator can also apply this rule to an already created user object. From that user go to the Actions menu and click Change password upon next login, or go to Tools and Settings > Address Book > Users and then from the More menu click Change password upon next login.
In Java Client, the same user creation process provides the Change Password Upon NextLogin check box. To apply this rule in Java Client, the administrator can open an existing user, click the Reset Password button from the top menu, and in the Reset Password window select the Change Password Upon Next Login check box, The administrator can also go to the Users node, select multiple user objects, click the Change Internal Password User drop-down list and select the Change Password Upon Next Login option to be applied to all the selected users.
|
Note: If a user is an LDAP user, his password cannot be reset in the Agile PLM database, neither by the user himself nor by the Agile administrator. LDAP user passwords must be reset through LDAP. |
Each user can have both a login password and an approval password, although a single password can be used for both purposes.
|
Important: If the Signoff User Dual Identification Type preference is set to Login Password then the Login and Approval password may not be identical. |
You can specify whether to establish separate login and approval passwords, or to use a single password for both. The login password is required to establish access to Agile PLM. In addition, the system prompts users who approve objects, such as changes, for an approval password.
Using separate approval passwords provides additional security. If your company requires this type of security, or requires the assurance that only the correct person can approve an object (perhaps for audit purposes), set Use Login Password for Approval to No.
To change a user's login or approval password in Java Client:
Under User Settings, double-click Users. The Users window appears.
Double-click the user's name in the list. That user's window appears.
Click the Reset Password button to change the login password.
The Reset Password (or Reset Approval Password) dialog box appears. Select the Reset Login Password check box. Enter the new login or approval password, remembering that passwords are case-sensitive. If you enter the password here in all capital letters, then the user must always enter the password in all capital letters when logging in to Agile PLM.
Confirm the password by retyping it in the Retype New Password field.
Decide whether to select the Change Password Upon Next Login check box, which forces the user to change the temporarily assigned password from the administrator to a new password the next time they log in to Agile. Then click OK.
Click the OK button in the confirmation message that appears.
To change a user's login or approval password in Web Client:
Open the User object, either from a search result or from the Users tab of Address Book.
Click the Reset Passwords button to change the login password.
The Reset Passwords window appears. Enter the new login or approval password, remembering that passwords are case-sensitive. If you enter the password here in all capital letters, then the user must always enter the password in all capital letters when logging in to Agile PLM.
Confirm the password by retyping it. Click Save.
You can modify a user's role assignments from the Users node, the Roles node, or the user object.
From the Users node, you can change an individual user's role assignments by selecting a user and clicking the Assign Roles button.
From the Roles node, you can see and change the users assigned to a particular role from the Users tab of a particular role.
From the user object, you can see or change an individual user's role assignments by editing the roles under the Profile heading of the General Information page.
Preferences for users are found on the Preferences tab of any user object. There are three sub-categories of user preferences: system-related, format-related, and display-related. These "user preferences" should not be confused with Administrator > Server Settings > Preferences node of "systemwide preferences."
The tables below lists and describes the properties common to all users in the Agile PLM system. The General Info, Preferences, Escalations, and User Groups tabs are documented in the following sections:
Share, Subscription, Attachments, and History tabs are all automatically populated, and do not have fields or properties.
Table 13-2 General Info tab, Required Fields
| Property | Description (default is underlined) |
|---|---|
|
User ID (username) |
The user's Agile PLM login user identification, or username. It must be unique in the Agile PLM address book. The maximum is 128 characters. See "About Usernames." |
|
First Name and Last Name |
The user's public name. Neither of the user's Names fields has to be unique in the system, only the user's User ID must be unique. "About Usernames." |
|
|
The user's valid email address for change notification/routing. Example: danny.design@agile.com. Note: If there is not a valid email address in the Email field, the user will not receive any email notifications. |
Table 13-3 General Info tab, Optional User Information
| Property | Description (default is underlined) |
|---|---|
|
Status |
Active or Inactive. (This is the same thing as Enabled or Disabled, respectively.) |
|
Title |
The user's title, for example, Senior Engineer. |
|
Address fields |
There are four address fields that are used for informational purposes only: Address (street), Geography, City, and Postal/Zip Code. The Geography field is a series of drop-down lists. |
|
Phone number fields |
The user's Business Phone, Home Phone, and Mobile Phone numbers (for informational purposes only). |
|
Fax |
The user's fax number (for informational purposes only). |
|
Pager |
The user's pager number (for informational purposes only). |
|
Secondary Email |
The Secondary Email is optional, but when the field is filled in, the user receives notifications at both email addresses. |
Table 13-4 General Info tab, Profile fields, required fields
| Property | Description (default is underlined) |
|---|---|
|
Default Site and Site(s) |
Sites are used for distributed manufacturing, and indicate all of the company's locations where the user is involved; selecting from the drop-down list for this property populates the drop-down list for Default Site. Default Site is the user's main base of work. |
Table 13-5 General Info tab, Profile fields
| Property | Description (default is underlined) |
|---|---|
|
Role(s) |
The user's role assignments. This property determines a user's access to the objects in Agile PLM from the point of discovery forward. The default roles (automatically assigned when you create a user) are My User Profile and Read And Discover By Creator. For more information, see "Roles." Also see "Read and Discover Object I Created Role." |
|
Job Function(s) |
The user's assigned job functions. A user may be assigned multiple job functions. This property determines which job functions can be selected for the user in a functional team. A job function is a workplace job function, for example, Developer, Product Manager, or QA Lead. For more information, see "Administering Approval Matrix." |
|
Lists |
Note that these lists are particular to routable objects and their workflows, as specified below. They are not editable at the Lists node; names are added or removed from these lists based on this setting in a user's profile.
|
|
Searches |
Change Analyst Searches controls whether a user has the following in Java or Web Client:
Component Engineer Searches controls whether a user has a Component Engineer Searches folder in Java or Web Client. Quality Searches controls whether a user has the following in Java or Web Client:
Content Manager, Compliance, Price, Project, Supplier RFQ, Sourcing, Supplier RFQ, and Recycle Bin Searches. |
|
User Category |
Named, Concurrent, or Restricted. See "Licenses." |
|
Use Login Password for Approval |
Each user has a login password and approval password (used to approve changes). Set Use Login Password for Approval to Yes to use one password for both. Set it to No if you require an approval password. Use the Change Password button at the top of the setup window to define new (case-sensitive) passwords for the user. |
|
Allow Escalation Designation Approval |
If the user has identified one or more designated escalation persons (DEPs), then this setting determines when the DEPs can approve, reject, or acknowledge a routable object. Settings: After Escalation – The user's DEP can approve, reject, or acknowledge a routable object only after it has been escalated. A notification is sent to the DEP when the escalation period has elapsed.Always – The user's DEP can always approve, reject, or acknowledge a routable object. A notification is sent to the DEP immediately when the routable object enters a review-type or a released-type workflow status.For more information about designated escalation person status, see "Assigning Escalation Persons to User Groups." |
|
Home Organization |
The name of the company profile (organization name) for all users created from the Users node and the supplier name and supplier number for all users created from the Supplier Groups node. |
|
Ship-To address fields |
Home Ship-To is the primary location where the user is responsible for sourcing activities. Authorized Ship-To (called "Site" in earlier versions of PCM), used only by PCM, indicates all company locations where the user can initiate sourcing activity; selecting from the drop-down list for this property populates the drop-down list for Home Ship-To. |
|
Program Manager for Partners |
The partners for which this user is program manager (which is the change analyst for Package objects). See "Setting Up User Groups as Partners." |
|
Rate fields |
There are three Rates fields: Bill Rate, Labor Rate, and Overhead Rate. The drop-down lists in these fields show all currencies entered in the Currency Exchange Rates node. You can select a currency different from the user's Preferred Currency (see Preferences tab). Used by PPM. |
|
Comment |
The Agile PLM administrator may enter a comment regarding the user. This comment does appear to the user when he or she clicks Settings > User Profile. |
|
Project Type |
Types of projects the user can participate in. Available values depend on the Project Type List. |
|
Region |
Regions the user belongs to. Available values depend on the Region List. |
|
Division |
Divisions the user belongs to. Available values depend on the Division List. |
|
Product Line |
Product lines the user has access to. Available values depend on the Product Line List. |
|
Customer |
Customers the user is associated with. Available values depend on the Customer List. |
|
Launch Year |
Product launch years the user is associated with. Available values depend on the Launch Year List. |
|
Category 7, Category 8, Category 9, Category 10 |
Optional Product Portfolio Management Dashboard fields. |
|
Preferred Calendar |
Agile PPM preferred work calendar. Select a calendar from the list of available calendars. See Agile PLM Product Portfolio Management User Guide. |
Table 13-6 Preferences tab: System Preferences
| Property | Description (default is underlined) |
|---|---|
|
Preferred Client |
This field controls the type of link provided in system notifications to the user. Select Web Client or Java Client to determine which client is automatically opened to the object to which the notification's link points. Note that Agile's PCM, PG&C, and PPM solutions operate only in Web Client. Users who work primarily in those areas should have their Preferred Client set to Web Client. |
|
Preferred File Manager |
Select from the list of file servers. For best performance, select a file server that is a local server for the user. For example, for a user in the United States, select a server located in the United States. (For more information about file management servers, see "File Management in Agile PLM.") |
|
Receive Email Notification |
Controls whether the user can receive automatically generated email notifications from the system. Settings = Yes or No |
|
Download Structure Files |
This property controls the default setting for the Structured "Get" capability for Design objects in Agile PLM and permits a user to use the Get operation for structured design files. Note that this user preference will not appear if the GetFile privilege is not applied to the user. |
|
BOM Variant Configuration Preference |
Enabling this property presents the user with the ability to perform BOM Variant configurations within Agile PLM. For more information about BOM Variant Configuration, see the Agile PLM Product Collaboration User Guide. |
Table 13-7 Preferences tab, Format Preferences
| Property | Description (default is underlined) |
|---|---|
|
Language |
English is available with all Agile PLM licenses. Agile PLM includes Japanese, Traditional Chinese, Simplified Chinese, French, International Spanish, Italian, Russian, Korean, Portuguese or German, per your license. |
|
Workweek Settings |
This setting is for future use only, and is not referenced in any Agile PLM module. Note that this property is not applicable to any Agile PLM module including Product Portfolio Management and Microsoft Project schedules. |
|
Preferred Date Format |
The format in which dates are displayed to the user. Default is MM/dd/yyyy. |
|
Time Zone |
The time zone where the user is located. |
|
Preferred Time Format |
The format in which times are displayed to the user. The default is hh:mm:ss aaa (aaa = am or pm). |
|
Preferred Currency |
The currency in which prices/costs are displayed to the user. The default is U.S. Dollar. The drop-down list in this property shows all currencies entered from the Currency Exchange Rates node. |
|
Number Format |
The format in which numbers are displayed to the user when the Display Format property of the numeric attribute or money attribute is set to User's Preferred Number Format. The administrator or user selects a type of number format (for example, use commas for thousand separators and period for decimal separator; or use nothing for thousand and comma for decimal). An example of each format is displayed in the drop-down list. The available number formats are:
Note: If the Display Format property of the numeric attribute or money attribute is not set to User's Preferred Number Format, then the number is displayed in the format specified in the Display Format property of the numeric attribute or money attribute. See also "Numeric Attribute and Money Attribute Display Formats." |
Table 13-8 Preferences tab: Display Preferences
| Property | Description (default is underlined) |
|---|---|
|
Preferred Start Page |
Select between Home, Dashboard, Dashboard Financial, Dashboard My Activities, Dashboard Projects, and Dashboard Resources. |
|
Response Edit Mode |
Choose between Basic, Advanced Table Edit, and Advanced Wizard Edit. The Basic setting brings the user—generally a "supplier" who does not work at the "buyer" company—to a simplified Web Client user interface. The two Advanced settings bring the user to the familiar Web Client UI. For more information about these settings, see Agile PLM PCM Supplier Guide and Agile PLM PG&C Supplier Guide. |
|
Static Table Headers |
Set to Yes to carry table headers to additional pages. |
|
Encode Type |
Select from: Western European (ISO), Japanese (Shift JIS), Traditional Chinese (Big 5), Japanese (EUC), Simplified Chinese (GB2312), Unicode (UTF-8), Korean (MS949), and Russian (Cp1251). |
|
Thumbnails |
Off or On. Off is default. |
|
Table Display Mode |
Standard or With Thumbnails |
|
Search Display Mode |
Only Thumbnails, Standard, or Standard with Thumbnails |
|
Show Timesheet |
Set to Yes to display the Timesheet tab. Default setting is No. |
|
Include Inactive List Values |
When set to Yes, inactive lists values are populated and displayed for attributes and fields on objects for this user. |
Table 13-9 Escalations tab
| Property | Description (default is underlined) |
|---|---|
|
CriteriaandNotify Users |
Set Criteria and Notify Users, which is an individual user or user group (personal or global) to be notified when a workflow status exceeds its escalation time period without a signoff by the user. A user can have multiple designated escalation persons assigned to a variety of workflow-related criteria. For more information, see "Assigning Escalation Persons to User Groups." |
Table 13-10 User Groups / Functional Teams tab
| Property | Description (default is underlined) |
|---|---|
|
User Groups table Group Name and Status |
This table lists the user groups that the selected user is a member of. From here the administrator can add a user group membership for the user or remove the user from membership of a user group. A user can belong to multiple groups. These fields can be set in this tab or on the Users tab of the user group setup window. For more information, see "User Groups." Note that this does not display the Personal User Groups created by the user. |
|
Functional Teams table Name, Job Function(s), Status |
This table lists the functional teams that the selected user is a member of, and the user's assigned job functions in each functional team. A user can belong to multiple functional teams. The user profile property Job Function(s) determines which job functions can be selected for the user in a functional team. Adding or removing a member is performed in the functional team object. Click the functional team link in the Name column of the Functional Teams table to open the functional team object. For more information, see "Administering Approval Matrix." |